
FRONIUS IG 15 / 20 / 30 / 40 / 60 / 60 HV - Superior Solar€¦ · FRONIUS IG 15 / 20 / 30 / 40 /...
96
FRONIUS IG 15 / 20 / 30 / 40 / 60 / 60 HV 42,0410,0828 012005 GB Grid-connected inverters for photovoltaic systems Operating Instructions
Transcript of FRONIUS IG 15 / 20 / 30 / 40 / 60 / 60 HV - Superior Solar€¦ · FRONIUS IG 15 / 20 / 30 / 40 /...

FRONIUS IG
15 / 20 / 30 / 40 / 60 / 60 HV
42,0410,0828 012005
GB
Grid-connected inverters for
photovoltaic systems
Operating Instructions


ud_fr_st_et_00493 012004
Dear Reader
Thank you for choosing Fronius - and congratulations on your new, technically high-
grade Fronius product! This instruction manual will help you get to know your new
machine. Read the manual carefully and you will soon be familiar with all the many
great features of your new Fronius product. This really is the best way to get the most
out of all the advantages that your machine has to offer.
Please also take special note of the safety rules - and observe them! In this way, you
will help to ensure more safety at your product location. And of course, if you treat your
product carefully, this definitely helps to prolong its enduring quality and reliability - things
which are both essential prerequisites for getting outstanding results.
Introduction


ud_fr_se_sv_00923 012004I
Safety rules
Danger!
Warning!
Caution!
“Note!” indicates a situation which implies a risk of impaired welding results
and damage to the equipment.
Note!
This equipment has been manufactured in accordance with the state of the
art and general safety-engineering principles. Nevertheless, incorrect opera-
tion or misuse may still endanger
- the life and well-being of the operator or of third parties,
- the equipment and other tangible assets belonging to the owner/operator,
- working efficiently with the equipment.
All persons involved in any way with starting up, servicing and maintaining
the equipment must
- be suitably qualified
- have good knowledge of dealing with electrical installations and
- read this instruction manual thoroughly and follow the instructions to the
letter.
The instruction manual must be kept at the machine location at all times. In
addition to the instruction manual, it is important to comply with both the
generally applicable and local accident prevention and environmental protec-
tion regulations.
General Remarks
Important!
“Danger!” indicates an imminently hazardous situation which, if not avo-
ided, will result in death or serious injury. This signal word must be limited to
the most extreme situations. This signal word is not used for hazards
relating to property damage unless there is also a risk of personal injury
appropriate to this level.
“Warning!” indicates a potentially hazardous situation which, if not avoided,
could result in death or serious injury. This signal word is not used for
hazards relating to property damage unless there is also a risk of personal
injury appropriate to this level.
“Caution!” indicates a potentially hazardous situation which, if not avoided,
may result in minor or moderate injury. It may also be used to draw attention
to unsafe practices that may cause damage to property.
“Important!” indicates practical hints and other particularly useful informati-
on. It is not a signal word for a harmful or dangerous situation.
Whenever you see any of the symbols shown above, you must pay even
closer attention to the contents of the manual!
ud_fr_se_sv_00923 012004 II
The machine may only be used for jobs as defined by the “intended purpo-
se”.
Utilisation for any other purpose, or in any other manner, shall be deemed
"not in accordance with the intended purpose". The manufacturer shall not
be liable for any damage resulting from such improper use.
Utilisation in accordance with the “intended purpose” also comprises
- thorough reading of and compliance with all the instructions, safety
instructions and warnings given in this manual
- performing all stipulated inspection and servicing work
- installation in accordance with the instruction manual
Where appropriate, the following guidelines should also be applied:
- regulations of the power supply company for input to the grid
- information provided by the manufacturer of the solar modules
Utilisation for
Intended Purpose
Only
All the safety instructions and warning signs on the machine itself:
- must be kept in a legible condition
- must not be damaged
- must not be removed
- must not be covered, pasted or painted over
For information about where the safety instructions and warning signs are
located on the machine, please refer to the section of your machine’s in-
struction manual headed “General Remarks”.
Any malfunctions which might impair machine safety must be remedied
immediately - meaning before the equipment is next switched on.
Your safety is at stake!
General Remarks
(continued)
Operation or storage of the machine outside the stipulated range is deemed
“not in accordance with the intended use”. The manufacturer shall not be
liable for any damage resulting therefrom.
Please refer to the technical data in your instruction manual for accurate
information about the permissible ambient conditions.
Ambient
Conditions
Qualified Staff The servicing information provided in this instruction manual is only intended
for qualified staff. An electric shock can be fatal. Please do not carry out any
activities other than those referred to in the documentation. This also applies
even if you are suitably qualified.
All cables and other leads must be firmly attached, undamaged, properly
insulated and adequately dimensioned. Have loose connections, scorched,
damaged or under-dimensioned cables and wires repaired immediately by
an authorised specialist company.

ud_fr_se_sv_00923 012004III
Maintenance and repair may only be carried out by an authorised specialist
company.
There is no guarantee in the case of parts sourced from other suppliers that
these parts have been designed and manufactured to cope with the stresses
and safety requirements that will be placed on them. Use only original spare
parts (this also applies to standard parts).
Do not carry out any alterations, installations or modifications to the machine
without first getting the manufacturer’s permission.
Replace immediately any components that are not in perfect condition.
Qualified Staff
(continued)
Safety Precauti-
ons at the Machi-
ne Location
Ensure when installing machines with cooling-air vents that the cooling air can flow freely
through the air vents without obstruction. Only operate the machine with the degree of
protection specified on the rating plate.
Care must be taken during installation to ensure that there is no occurrence
of electromagnetic interference with electrical and electronic equipment.
EMC Precautions
Danger of damage to electronic components due to electrostatic discharge.
Take appropriate protective measures when replacing and installing the
components.
ESD Protective
Measures
Electrical Installa-
tions
Electrical installations may only be executed in accordance with the relevant
national and regional standards and specifications.
Only operate the machine if all its protective features are fully functional. If
any of the protective features are not fully functional, there is a danger to:
- the life and well-being of the operator or other persons
- the equipment and other tangible assets belonging to the owner/operator
- working efficiently with the equipment.
Have any safety features that are not fully functional repaired by an autho-
rised specialist company before switching the machine on again.
Never bypass or disable safety features.
Safety Precau-
tions in Normal
Operation

ud_fr_se_sv_00923 012004 IV
Equipment with the CE mark fulfils the basic requirements of the Guideline
Governing Low-Voltage and Electromagnetic Compatibility. (More detailed
information about this may be found in the Annex or in the section of your
documentation headed “Technical Data”.)
Safety markings
The user is responsible for backing up data relating to changes made to
factory settings. The manufacturer will not accept liability if personal settings
are deleted.
Data security
Copyright to this instruction manual remains the property of the
manufacturer.
The text and illustrations are all technically correct at the time of going to
print. The right to make modifications is reserved. The contents of the
instruction manual shall not provide the basis for any claims whatever on the
part of the purchaser. We should be most grateful for your comments if you
have any suggestions for improvement, or can point out to us any mistakes
which you may have found in the manual.
Copyright

1
Table of Contents
Safety of persons ................................................................................................................... 4Safety ............................................................................................................................ 4Housing unit .................................................................................................................. 4Galvanic insulation ........................................................................................................ 4Monitoring the electrical mains network ........................................................................ 4Photovoltaic generator .................................................................................................. 5Mains connection .......................................................................................................... 5DC plugs ....................................................................................................................... 5AC plugs ....................................................................................................................... 5
The Safety Concept ............................................................................................................... 6Standards and Regulations ........................................................................................... 6Conformity Declaration ................................................................................................. 6
General Introduction ............................................................................................................... 7
How a photovoltaic system works ..................................................................................... 7General information ...................................................................................................... 7Your roof is your power generator ................................................................................. 7Electricity is converted under the roof ........................................................................... 8
The FRONIUS IG Unit in the Photovoltaic System ........................................................... 9General information ...................................................................................................... 9Transforming DC into AC electricity .............................................................................. 9Fully automatic operation management ........................................................................ 9Voltage transformation and galvanic insulation ............................................................. 9Monitoring the mains network ..................................................................................... 10Display function and data communication .................................................................. 10Your advantage ............................................................................................................ 11
Product description .............................................................................................................. 12
The FRONIUS IG Unit ..................................................................................................... 12How it functions........................................................................................................... 12Startup phase .............................................................................................................. 12Overview for FRONIUS IG (for indoor housing) ......................................................... 14Overview for FRONIUS IG Outdoors .......................................................................... 15LED for operating status ............................................................................................. 16
Operating scheme ................................................................................................................ 18
The Display ..................................................................................................................... 18General information .................................................................................................... 18Functions of the keys .................................................................................................. 18Symbols ...................................................................................................................... 18
Navigating in the Display ................................................................................................. 19Display illumination ..................................................................................................... 19Menu level ................................................................................................................... 20Select display mode .................................................................................................... 20Scrolling between display functions ............................................................................ 21

2
Display Modes ................................................................................................................. 21Scheme of display modes ........................................................................................... 21Scheme of display readings ........................................................................................ 22Display mode „Now“ .................................................................................................... 23Display mode „Day / Year / Total“ ................................................................................ 26
The Setup Menu.............................................................................................................. 29List of menu items ....................................................................................................... 29Display mode „Setup“ ................................................................................................. 30Enter the setup menu ................................................................................................. 30Scroll among menu items ........................................................................................... 30Setting the menu items ............................................................................................... 31
Additional information........................................................................................................... 40Upgrading the system ................................................................................................. 40Forced ventilation........................................................................................................ 41
Installation manual ............................................................................................................. 43
Open the housing ................................................................................................................. 44FRONIUS IG (installation of the indoor housing) ........................................................ 44FRONIUS IG Outdoors ............................................................................................... 45
Installation ............................................................................................................................ 46Choosing the location general .................................................................................... 46Choosing the location - indoor housing ....................................................................... 46Choosing the location - outdoor housing..................................................................... 46Design without display: Set address ........................................................................... 47Fixing the wall mounting frame for indoor housing...................................................... 48Fixing the wall mounting frame for FRONIUS IG Outdoors ....................................... 49
Connection ........................................................................................................................... 52
Connection to the Solar Modules and to the Public Mains .............................................. 52Solar modules ............................................................................................................. 52Mains network monitoring ........................................................................................... 52Schemes with more than one inverter ........................................................................ 52Connection alternatives .............................................................................................. 531. Terminal block ......................................................................................................... 532. DC plug ................................................................................................................... 543. DC plug and AC connection .................................................................................... 554. FRONIUS IG Outdoors ........................................................................................... 57
Start up Operation ................................................................................................................ 58
Configuring your Inverter ................................................................................................. 58Factory pre-set configuration ...................................................................................... 58Your personal configuration ........................................................................................ 59
LocalNet ............................................................................................................................... 59System upgrading /slot-in board system ..................................................................... 59Data recorder .............................................................................................................. 60COM Card ................................................................................................................... 60Insert slot-in boards, FRONIUS IG (Installation for indoor housing) ........................... 60

3
Insert slot-in boards, FRONIUS IG (for external mounting) ........................................ 61Configuration............................................................................................................... 62Example ...................................................................................................................... 62
Status diagnosis and repair .................................................................................................. 63
Service-Codes Displayed ................................................................................................ 63Service display ............................................................................................................ 63General service codes ................................................................................................ 63Complete failure .......................................................................................................... 64FRONIUS IG with several power stage sets ............................................................... 64Class 1 ........................................................................................................................ 65Class 2 ........................................................................................................................ 66Class 3 ........................................................................................................................ 67Class 4 ........................................................................................................................ 68Class 5 ........................................................................................................................ 70Customer service ........................................................................................................ 71
Annex ................................................................................................................................... 72
Technical Data................................................................................................................. 72Fronius IG 15 / 20 / 30 ................................................................................................ 72Fronius IG 40 / 60 / 60 HV .......................................................................................... 73Our product complies with the following standards and regulations ........................... 74
Warranty and Liability ...................................................................................................... 75Warranty terms and liability ......................................................................................... 75Scope of warranty ....................................................................................................... 75Warranty period .......................................................................................................... 76Warranty evidence ...................................................................................................... 76
Disposal of obsolete equipment ...................................................................................... 76Recycling .................................................................................................................... 76
EC-Declaration of conformity ............................................................................................... 78

4
The design and function of the FRONIUS IG unit offer a maximum of safety,both during installation as well as in operation. A complete galvanic insulati-on between DC and AC side guarantees maximum safety.
The FRONIUS IG takes over the tasks of galvanic insulation and networkmonitoring. The passive and active measures for the protection of per-sons and equipment are understood by this.
Whenever conditions in the electric mains network are inconsistent withstandard conditions (for example mains switch-off, interruption), yourFRONIUS IG unit will immediately stop operating and interrupt the supplyof power into the mains.
Your FRONIUS IG unit can monitor the situation in the mains in severalways, by- monitoring voltage- monitoring cycle frequency- ENS (optional)
The ENS option is compulsory in only a few countries, and only for themthe FRONIUS IG unit is available with this option. In any case howeverwill the monitoring and safety systems integrated in the FRONIUS IG unitbe available as standard equipment.
Only qualified installers are authorized to open the connection area.
Opening the connection area is only permitted when it is not under voltage.
The separately insulation encased power stage shall only be openedwhen not under voltage and only by Fronius-trained service staff.
Safety of persons
Housing unit
Galvanic insu-
lation
Monitoring the
electrical
mains net-
work
Warning! Incorrect operation and work performed incorrectly cancause serious injury & damage! Only qualified staff are authorized toput your FRONIUS IG unit into operation and only within the scopeof the respective technical regulations. Do not start operation orcarry out maintenance works before you have read the chapter„Safety Conditions“!
Safety

5
The permanent ENS mains monitoring scheme is an additional link in itssafety chain. One of the signs by which ENS identifies abnormal situati-ons in the mains is a sudden increase of the impedance in the mainsnetwork.
Both the permanent mains monitoring by your FRONIUS IG unit directlyas well as ENS make sure that in case of a mains blackout (due to beingswitched off by the utility company or due to a defect in the transmissionline) it stops feeding power into the mains.
This scheme definitely prevents dangerous voltages at the AC lines andconstitutes an essential contribution towards avoiding hazards for themaintenance staff.
Before connecting the solar modules, you must check whether the voltageparameters laid down in the manufacturer’s data correspond with reality.
When checking the voltage reading, please take into account that solarmodules supply a higher no-load voltage when temperatures are low andinsolation remains unchanged.
At an outside temperature of -10 degrees centigrade the no-load voltageof the solar modules must in no case exceed 500 V - or 530 V for the IG60 HV. The data sheet of the solar module will tell you the temperaturefactors applicable for ascertaining the theoretical no-load voltage at -10degrees centigrade.
In case the solar modules exceed a no-load voltage of 500 V - or 530 Vfor the IG 60 HV - the FRONIUS IG unit will be completely damaged andall warranty rights will cease to exist.
Photovoltaic
generator
Only a licenced electricity installer is authorized to carry out the connec-tion works to the public mains network.
Mains connec-
tion
Monitoring the
electric mains
network
(continued)
Note! If DC plugs are provided, they must never be disconnectedfrom the sockets of the solar modules as long as the FRONIUS IGunit is feeding power into the mains. Before disconnecting the DCplug you must always disconnect in the fuse for the house distribu-tion.
DC plugs
Note! Disconnect AC plug connections only when the equipmentis not under voltage, after having disconnected the fuse for the in-house distribution panel.
AC plugs

6
The Safety Concept
Your FRONIUS IG unit complies with all applicable standards and regula-tions.
They comprise in particular:
- Guideline 89/336/EEC electromagnetic compatibility- Guideline 93/68/EEC CE-marking- European standards EN 50 081-1, EN 50 082-2, EN 61 000-3-2- „Guideline for parallel operation of self-owned photovoltaic generating
systems with the low voltage mains network of the utility supply compa-ny“, issued by the Association of German Electric Utility Supply Compa-nies (VDEW)
- „Technical Guidelines for parallel operation of self-owned photovoltaicgenerating systems with the low voltage mains network of the utilitysupply company“, issued by the Association of Electric Utility SupplyCompanies of Austria
- „Safety requirements for photovoltaic energy generation plants“(ÖNORM/ÖVE E2750), to the extent that these regulations are applica-ble for the inverter.
Standards and
Regulations
The respective conformity declarations you will find in the appendix tothese operating instructions.
Conformity
Declaration

7
The energy from worldwide insolation amounts to a total of about1,540,000,000,000,000,000 kWh/year (1,540 Peta kWh/year). This is15.000 times as much as the electricity consumption worldwide. Wecongratulate you on your decision to actively use world’s biggest energypool. By the way, it was a scientist in the field of of physics, Alexandre-Edmond Bequerel, who first discovered the photo-voltaic effect in 1839.The name photo-voltaic comes from the driving force behind this techno-logy, which is the ray of light. The ray of light consists of unimaginably tinyparticles, the photons.
General infor-
mation
How a photovoltaic system works
Let us simply start our explanation with a straight silicon solar cell. Re-membering our physics class in school, we know that there are four elec-trons in the outside electron shell of a silicon atom arranged around itsatomic nucleus, they are the so-called peripheral valency electrons. Thesunlight’s photons enter the solar cells and concentrate energy in thevalency electrons. The electron eventually separates from the silicon atomand leaves behind it an atom with a positive charge.
So that the free electrons will flow in one direction and thus generateelectricity, the poles on the front and back side of the cell must be diffe-rent from each other.
The silicon atoms of the front must be packed with a slight quantity ofphosphor atoms which contain an additional valency electron. On theback of the cell, atoms of boron having only three valency electrons areadded to the silicon atoms.
The result is an imbalance which makes the electrons flow, and this ishow electric power is generated.
Many such solar cells united together and packed behind glass form oneof your solar modules.
Your roof is
your power
generator
General Introduction
8
tota
l str
ing
te
nsio
n =
ten
sio
n m
od
ule
1,
2,
...
n
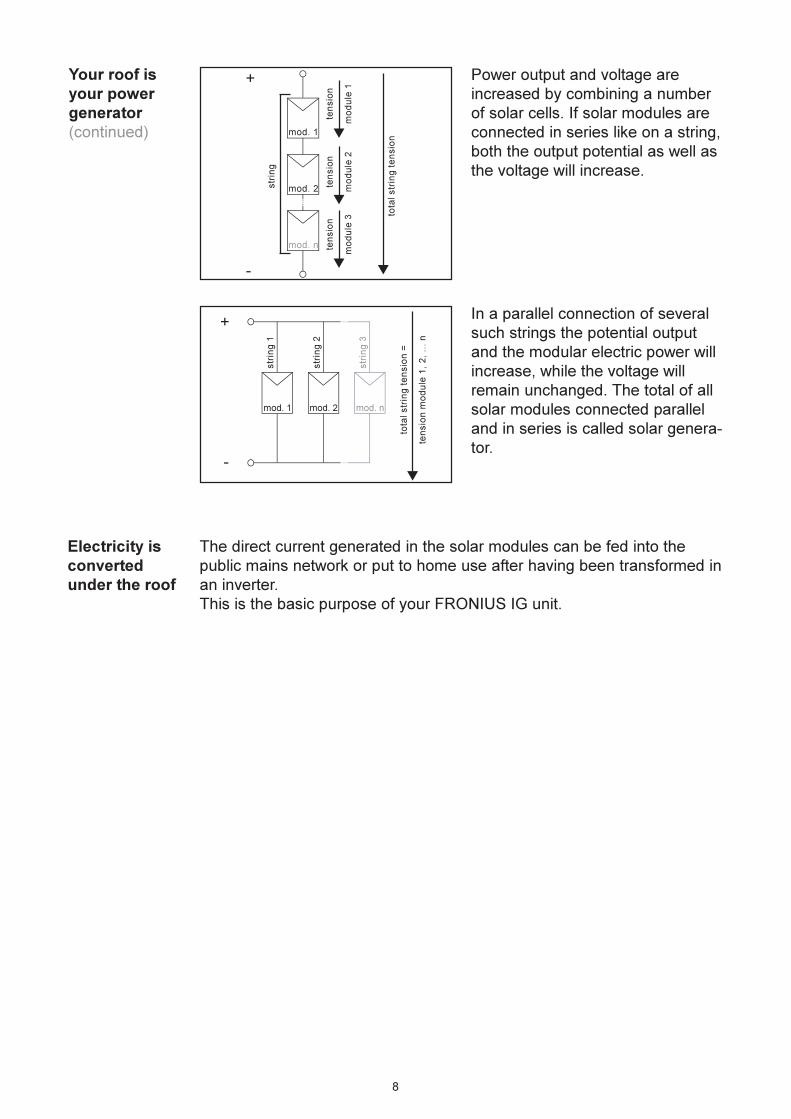
The direct current generated in the solar modules can be fed into thepublic mains network or put to home use after having been transformed inan inverter.This is the basic purpose of your FRONIUS IG unit.
Electricity is
converted
under the roof
In a parallel connection of severalsuch strings the potential outputand the modular electric power willincrease, while the voltage willremain unchanged. The total of allsolar modules connected paralleland in series is called solar genera-tor.
mod. 1 mod. 2 mod. n
str
ing
1
str
ing
2
str
ing
3
+
-
Your roof is
your power
generator
(continued)
ten
sio
n
mo
du
le 1
Power output and voltage areincreased by combining a numberof solar cells. If solar modules areconnected in series like on a string,both the output potential as well asthe voltage will increase.
mod. 1
mod. 2
mod. n
str
ing
+
-
tota
l str
ing
te
nsio
n
ten
sio
n
mo
du
le 2
ten
sio
n
mo
du
le 3

9
Your FRONIUS IG unit is the latest generation of solar inverters. It is thehighly complex link between solar modules and the public electricitymains network.
As such it is in charge of a number of highly qualified tasks.
General infor-
mation
The FRONIUS IG Unit in the Photovoltaic System
The FRONIUS IG unit transforms the direct current generated by the solarmodules into alternating current. This alternating current is fed into yourhome system or into the public mains synchronically with the voltagewhich is used there. The FRONIUS IG has been designed exclusively foruse in mains connected photovoltaic schemes. It cannot generate electricpower independent from the public mains network.
Transforming
DC into AC
electricity
The operation of the FRONIUS IG unit is fully automatic. Starting withsunrise, as soon as the solar modules generate enough power, the auto-matic control unit starts monitoring voltage and frequency. As soon asthere is a sufficient level of insolation, your solar inverter starts supplyingand feeding power. A few Watts of solar power output are sufficient toachieve this, depending on which version the unit is!
The operation of the FRONIUS IG unit ensures that at any time the maxi-mum possible power output is drawn from the solar modules.
This function is called MPPT (Maximum Power Point Tracking). It opera-tes with extremely high precision. As dusk starts there is no more suffi-cient energy available to feed power into the mains, the FRONIUS IG unitshuts the mains connection completely and stops operating. All settingsand data recorded are of course saved.
Fully automa-
tic operation
management
The FRONIUS IG has been designed for use with solar modules of a widerange of input voltages. This allows the use of the greatest variety oftypes of solar modules. Important notice: the parameters indicated formaximum DC voltage (total voltage of the solar cells connected) must atno time be exceeded!
By its design and operation, the FRONIUS IG offers a maximum of safetyduring installation as well as in operation.
Voltage trans-
formation and
galvanic insu-
lation

10
The complex technical systems of innovative solar inverters make it ne-cessary to design the display which is the interface with the user verycarefully. It is an unwavering design aiming at ease of operation andpermanent availability of the system’s data.
The FRONIUS IG unit is equipped with a basic recording function formonitoring minimum and maximum data on a daily and a cumulativebasis directly from the display. There is also an option to allow the readingof the following weather data on the display:- two different temperature readings (for example temperature at the
solar modules as well as the outside temperature in the shade)- insolation
In additition to the functions installed in the FRONIUS IG unit, a widechoice of elements offered for data communication allows for many possi-bilities of recording and visualising data. The respective componentsrequired to upgrade the system are easy to install using the FRONIUS IGDatCom operating instructions. The installation of system upgrades, suchas DatCom components, allows for possible remote system monitoring
Display func-
tion and data
communicati-
on
The FRONIUS IG unit is in charge of monitoring the mains network. Thisresponsibility comprises all measures necessary for the protection ofpersons and machines in case of a power blackout.
The FRONIUS IG unit is programmed to stop operation immediately andstop supplying power whenever conditions in the mains network deviatefrom standard (for example when power is switched off or in case of anyother kind of interruption).
There are several ways how the FRONIUS IG unit can identify a mains-cutoff, it can do so for example by monitoring:- voltage- frequency- resistance (only FRONIUS IG with ENS)
For this purpose it is important that the specific monitoring proceduresapplicable for the respective countries are carried out directly by the FRO-NIUS IG unit without the use of additional electronic monitoring devices.This will result in a substantial reduction of the installation work and cost.
Monitoring the
mains network
The FRONIUS IG is equipped with an HF-transformer (HF = high frequen-cy) which assures a galvanic insulation between the DC side and themains. In addition, the HF principle results in a drastic reduction of thetransformer’s size, which means that it requires less space and has consi-derably less weight. In spite of its full galvanic insulation, the FRONIUS IGunit achieves a high degree of efficiency, due to its innovative circuitschemes.
Voltage trans-
formation and
galvanic insu-
lation
(continued)

11
With each additional task, as described above and controlled directly bythe inverter, installation becomes easier and less costly because no addi-tional peripheral equipment will be required. Based on our experience andthe use of the most innovative technologies, the FRONIUS IG unit is ableto manage all these tasks simultaneously.
In addition, the FRONIUS IG unit complies with a whole number of requi-rements established for the safety of people and other household ap-pliances, as well for its own safety.
Some of these requirements are:- ability to monitor the mains network- the quality of the electricity supplied- detection of outside disturbance and interference (for example mobile
telephones).
Annexed you will find the respective certificates.
Your advan-
tage
Display func-
tion and data
communicati-
on
(continued)
via modem, text messages to mobile phones in the event of faults, datavisualisation and data comparison on the PC.

12
Product description
The FRONIUS IG Unit
The FRONIUS IG unit is designed for fully automatic operation. Basicallyno personal control is necessary for feeding the power it generates intothe mains network.
The FRONIUS IG unit starts operating automatically as soon as the solarmodules produce sufficient power output after sunrise. From this pointonwards, you will also receive system information from the FRONIUS AGgraphic display.
During its operation the FRONIUS IG unit maintains the voltage of thesolar modules at any time within the range of optimal power withdrawal.- the optimal voltage for any particular status of operation of the solar
modules is called MPP voltage (MPP = maximum power point)- exactly maintaining the MPP voltage guarantees an optimal level of the
efficiency factor of your solar modules at any time (MPP-tracking).
As soon as dusk begins there is no more sufficient energy available tofeed into the mains network, the FRONIUS IG unit fully shuts off themains connection.- during the night the FRONIUS IG unit does not draw any energy from
the public mains- the data and parameters set remain available- it is also possible to shut the unit off manually
How it func-
tions
After having switched on automatically, the FRONIUS IG unit goes throu-gh a self-test, and after that through a test of the public mains network.
This test takes between only few seconds up to several minutes, depen-ding on the regulations in your country. During startup the LED illuminati-on is yellow.
(1) Segment test
- all display elements light up for about one second
(2) TEST
- self test of important components of the FRONIUS IG unit- The FRONIUS IG unit goes through a master check list for a period
of only a few seconds- the display says „TEST“ and indicates the respective component
which is being tested (for example „LED“)
Startup phase

13
Startup phase
(continued)
(4) Startup test
- Before the FRONIUS IG unit starts supplying power into the mains,the conditions of the mains network are tested in detail in accor-dance with the regulations of your country.
- the screen displays „STARTUP
“
Depending on the regulations of each country, the startup test can takebetween just a few seconds up to several minutes. The time elapsed isindicated by a bar shrinking from top down.
(5) Synchronisation ENS (option)
- if the FRONIUS IG unit is equipped with the ENS option, everydetail of the ENS will be tested and synchronized
- the screen displays „SYNCENS
“
Depending on the operating status of the ENS, test and synchronizationmay take up to several seconds.
(6) Operation of feeding power supply into the mains network
- After termination of the tests, the FRONIUS IG unit starts feedingpower into the mains network.
- The LED lights up green, and the FRONIUS IG unit starts operating
Whenever two scale divisions stop flashing and disap-pear, 1/10 of the total duration of the test is over
(3) Synchronisation with mains
- The screen displays „SYN-C
AC“
- „WAITPS
“ is displayed: TheFRONIUS IG is waiting for allpower supplies in the networkto be on stand-by. This proce-dure takes place dependenton the DC-voltage.
- „SYNCAC
“ is displayed subse-quently.

14
(1) storage area for operation and installation manual
(2) ventilation grill
(3) LED for operation status
(4) display
(5) keyboard
(6) slot -in board area
(7) various versions of connection plate
(8) connection area - to be opened only by licensed electricity installers
(9) power stage, separately insulation encased - to be opened only byFronius trained service staff
Overview for
FRONIUS IG
(for indoor
housing)
(9)
(2)
(6)
(7) (5)(4)(3)
(8)
(1)

15
(1) tightening screws for housing
(2) cooling bonnets
(3) LED for operation status
(4) display outside (option)
(5) keyboard outside (option)
(6) covering for AC connection and slot-in board area
(7) connection rail Multicontact
(8) cover slide to protect the buttons and the display from the sun’s rays.
Note! We recommend that the cover slide is pushed in front of thedisplay in cases of direct sunshine.
Overview for
FRONIUS IG
Outdoors
(7)
(1)
(1)
(2)
(1) (6)
(3)
(4)
(5)
(2)
(8)

16
Depending on the operating status, the LED assumes different colours
(1) LED lights up green:
- a green light starts as soon as the FRONIUS IG unit has completedthe startup phase, it stays green as long as the operation of feedingpower into the network continues
- it indicates faultless operation of the photovoltaic equipment
(2) LED flashes green:
- as long as the photovoltaic equipment is operating without fault- and an additional message is displayed on the screen
Note! A message appears for example if there is an insulationfault, which however does not affect the function of the FRONIUSIG. However for safety reasons we recommend that the insulationfault is remedied as soon as possible.
The FRONIUS IG with display shows a status message. A message isdisplayed in the FRONIUS IG.access software for the FRONIUS IG wit-hout display.
If a message (e.g. „502“, Section „Status diagnosis and remedy) is shown,rectify the relevant status and acknowledge this by pressing the „Enter“button.
(3) LED lights up orange:
- The FRONUS IG unit will enter the automatic startup-phase, as soonas after sunrise the photovoltaic modules yield sufficient power output
LED for opera-
ting status
LED

17
(4) LED flashes orange:
- when a warning is being displayed on the screen- or the FRONIUS IG unit has been set to standby operation in the
setup menu = manual shutoff of power supply operation- after the next day sunrise, power supply operation will be resu-
med automatically- during the time while the orange LED keeps flashing, the power
supply operation can be resumed manually at any time (seechapter „Setup Menu“)
(5) LED lights up red:
- general status: the respective service code is displayed on thescreen
A list of all service codes, the corresponding status informations, theirstatus causes and repair measures can be found in the chapter „Sta-tus Diagnosis and Repair“ of the installation and service manual.
(6) LED remains dark:
- there is no connection to the solar modules- no power output from module due to darkness
LED for opera-
ting status
(continued)

18
Symbols
(5)(7)
(9)(11)(12)
(8)
(6)
(10)
(4)
(2)
(1) (3)
Operating scheme
The Display
Key (A) and (B):- for scrolling
key (C):- for switching to the menu level
(„Menu“) or exit from the setupmenu („Esc“) key „Enter“ (D):
- for confirming a choice
Functions of
the keys
(C) (D)(B)(A)
The FRONIUS IG unit is pre-configured to be ready for operation, therefo-re it is not necessary to make any adjustments in order to be able to get itto operate fully automatic and feed power into the mains.
The display is powered by the solar module and is therefore availablethroughout the day.
Important! The display of the FRONIUS IG is not a calibrated measuringdevice. A slight deviation by a few percent is inherent in the system.Therefore, a calibrated meter is required for accurate settlement of datawith the electricity supply company.
General infor-
mation
(1) symbols for keys (A) through (D)
(2) symbols for the display modes „Now“ through „Setup“

19
Symbols
(continued)
Press any key to activate the display lighting. If no key is pressed during30 seconds, the display lighting stops. At the same time the setup menuoffers a choice between permanently lit or permanently dark display.
Display illumi-
nation
Navigating in the Display
(3) area for data display ... for displaying the data value measured
(4) area for unit display ... for displaying the measuring unit applicable
(5) segment bar ... indicates at any time the power output fed into themains at a given time - independent from the display mode chosen.The screen displays % of the maximum possible power supply output of your solar inverter
(6) ... appears with data readings which are directly related to thepublic mains network
(7) ... appears with data readings which are directly related tothe solar modules
(8) ... appears with data readings which are related directly to theFRONIUS IG unit
(9) ... appears with data readings which are related to environmentconditions, like insolation and temperature (optional)
(10) ...appears with data readings which are transmitted by the con-sumption sensor (optional)
(11) Max ... the data reading indicates the maximum within the period ofobservation (depending on the display mode chosen)
(12) Min ... the data reading indicates the minimum within the period ofobservation (depending on the mode of display chosen)
Important! The Min. and Max. values do not correspond to the absoluteextreme values, as the measuring data value capture takes place at twosecond intervals

20
(D)
Select display
mode
- move into the menu level- select the desired display mode
(1) to (4) by pressing keys (A) or(B)
- enter the display mode selected:press key „Enter“ (D)
Note! for the menu item„Year“ a real time clock isrequired. The menu item„Year“ is only supportedwhen the option data recor-der is connected. Thissystem upgrade is equippedwith a real time clock.
(1) (2) (3) (4)
(A) (B) (D)
(A)
(B)
From the menu level you enter thedisplay mode or the setup menu.Move into the menu surface bypressing key (C)
Menu level
(C)
(C)- the screen displays „Menu“- the display is operating in the
menu level

21
Display Modes
Scheme of
display modesThe following display modes are available:
display mode „Now“ ...shows present data
display mode „Day“ ... shows data for supply into the mains for thecurrent day
display mode „Year“ ...shows data for supply into the mains in currentcalendar year - only in combination with data recorder option
display mode „Total“ ... shows data for supply into the mains since yourFRONIUS IG unit has been first operating
Scrolling
between dis-
play functions
(A) (B) (A) (B)
- select the desired display mode (see above)- scroll between the display functions available with keys (A) or (B)
(A) (B)

22
Mode „Now“ Mode „Day“ / „Year“ / „Total“
output supplied (W)
energy supplied (kWh / MWh)
voltage (V)
electricity supplied (A)
mains frequency (Hz)
* mains impedance (Ohm)
module voltage (V)
module power (A)
* module temperature (°C;alternatively also °F)
insulation resistance (MOhm)
yield (set applicable currency)
power output supplied (maxim.) (W)
* energy as read by consumptionmeter
(kWh / MWh)
CO2-reduction (kg / t)
mains voltage (maximum) (V)
* module temperature (maximum) (°C; alternat. also °F)
mains voltage (minimum) (V)
* module temperature (minimum) (°C; alternat. also °F)
* output reading of consumptionmeter
(W)
* ambient temperature (°C; alternnatively also in °F)
* insolation (W/m²)
* insolation (maximum) (W/m²)
* ambient temperature(maximum) (°C; alternat. also °F)
* ambient temperature( minimum) (°C; alternat. also °F)
* time(HH:MM)
Scheme of
display rea-
dings
The following scheme contains a brief list of the display readings available.
Display readings without footnote are shown when the setting „standard“is chosen (factory setting).
* optional - if the required option card is not available, the message„N.A.“ (nicht angeschlossen = not connected) is displayed.
module voltage (maximum) (V)
operating hours of FRONIUS IGunit
(HH:MM)

23
* mains impedance ... resi-stance of mains - parameter forsafe power supply to mains(Ohm; optional ENS)
The resistance of the local low voltage mains up to the next transformerstation is metered.
Whenever the local low voltage mains network is switched off for repairworks, the mains impedance will increase substantially, in this case theFRONIUS IG unit will interrupt power supply for safety reasons.
power supplied ...powersupplied to mains at the parti-cular moment (Ampere)
power supplied .. powersupplied to mains at this mo-ment (Watt)
- for the next item press key (B)- to scroll back press key (A)
mains frequency
(cycles)
mains voltage
(Volt)
(A) (B)
Display mode
„Now“
Displays present readings
- select display mode „Now“ (chapter „The Display“)- the first display function of the display mode „Now“ appears
* optional - in case the card for the required option is not available, themessage „N.A.“ is displayed

24
isolation resistance of photo-voltaic generator (MOhm)
* module temperature ... tem-perature at solar modules(degrees centigrade; can alsobe set for degrees Fahrenheit;temperature sensor No.1;sensor card optional)
module power ... power supp-lied by solar modules at themoment of data display (Am-pere)
The FRONIUS IG unit keeps the module voltage always within the rangeof the maximum possible power withdrawal from the solar modules. Thisresults in the optimum for the module electricity.
Isolation resistance is the resistance between the positive pole or theminus pole of the photovoltaic generator and the grounding potential.Whenever an isolation resistance higher than 500 kOhm is shown, thephotovoltaic generator is sufficiently insulated.
Warning! An isolation resistance < 500 kOhm can be caused by aninsufficiently insulated DC cable or by defective solar modules. Incase of an insufficient isolation resistance you must in any casecontact your Fronius service partner.
Important! Only an isolation resistance of less than 500 kOhm indicatesthat there is an error. Whenever a higher insulation reistance is shown it isnot to be interpreted as an error.
Whenever there is an isolation resistance of less than 10 MOhm, thedisplay differentiates between the negative potential and the earthing(minus sign „-“) and the positive potential and the earthing (plus sign „+“)
module voltage... voltage inthe solar modules at the mo-ment of data display
The voltage indicated during power supply into mains is equal to the so-called MPP voltage (MPP = maximum power point). The FRONIUS IGunit keeps the module voltage always within the maximum possible poweroutput withdrawal from the solar modules. This always guarantees anoptimum efficiency performance of your photovoltaic generator..
Display mode
„Now“
(continued)

25
* time of the day (data recorderis optional)
* power output drawn from
mains supply... present con-sumption (Watt; sensor cardoptional)
* ambient temperature (°C;°C;can also be set for °F in setupmenu; temperature sensorNr.2; sensor card optional)
Display mode
„Now“
(continued)
* insolation ... insolation poweroutput impact per square meter(Watt/m²; sensor card option)
Display example for positive poten-tial (sign „+“)Short circuit between DC+ line andearth
Display example for negative po-tential (sign „-“)Short circuit between DC- line andearth

26
Display mode
„Day / Year /
Total“ Display mode „Day“ ... shows readings for mains supply feed-in of currentday - only in combination with bus-master option
Important! For the FRONIUS IG unit, the day begins with the moment itswitches on. In case the DC supply line is disconnected, the followingparameters will be re-set after repeating the start-up:
- power supplied (kWH)- yield (currency can be selected)- CO
2-reduction (kg)
- maximum power supplied (Watt)- maximum mains voltage(Volt)- minimum mains voltage (Volt)- energy drawn from mains supply (kWh)- operating hours for FRONIUS IG unit
The information given above does not apply for the data recorder option.If the data recorder option is available the display values listed alwaysapply for the whole of the mains supply feed day.
Display mode „Year“ ...shows readings of power supply for the currentcalendar year (only in conjunction with data recorder)
Display mode „Total“ ...shows readings of power supply since original startof operation of the FRONIUS IG unit.
- select display mode „Day“ / „Year“ / „Total“ (chapter „The Display“)- the first display function of the display mode selected will appear
* optional - in case the required sensor card is not available, the mes-sage „N.A.“ is displayed.

27
CO2-reduction ... CO
2 emissi-
on saved during monitoredperiod (kg/t)
Maximum mains voltage ...highest reading of mains volta-ge (V) during observationperiod
Yield ... money earned duringperiod monitored (set currencyin setup menu)
Important! As was the case for the energy supplied, also here readingsmay differ from those of other instruments.
Chapter „Setup Menu“ tells how to set currency and rate applicable forinvoicing. The factory setting is 0,48 Euro/kWh.
Energy supplied ... energysupplied during period monito-red (kWh / MWh)
Due to different monitoring systems there can be deviations in compari-son with readings of other metering instruments. For invoicing of theenergy supplied only the readings of the calibrated meter supplied by theelectric utility company are relevant.
- press key (B) for next item- to scroll back press key (A)
Display mode
„Day / Year /
Total“
(continued)
Indication of CO2 emission (in kg/t) which would be released during gene-ration of same amount of electricity in a thermal power station. Set for0,53 kg/kWh in the factory (source of information: DGS - German Societyfor Solar Energy).
Maximum power input ..highest power input into mainduring observation period (W)
(A) (B)

28
* minimum temperature at
module...lowest temperaturereading at solar modules du-ring observation period (°C;can also be set for°F in setupmenu; temperature sensor No.1; applicable for sensor card)
Minimum mains voltage...
lowest reading of mains volta-ge (V) during observationperiod
* maximum temperature at
module... highest temperaturereading at solar modules du-ring observation period (°C;can also be set for°F in setupmenu; temperature sensor No.1; applicable for sensor card)
* Energy consumption meter
reading
energy consumed during ob-servation period (kWh / MWh;applicable for consumptionsensor)
Display mode
„Day / Year /
Total“
(continued)
* maximum ambient tempera-
ture ... highest temperaturereading during observationperiod (°C; can also be set for°F in setup menu; temperaturesensor No. 2; applicable forsensor card)
* minimum ambient tempera-
ture...lowest temperaturereading at solar modules du-ring observation period (°C;can also be set for °F in setupmenu;temperature sensor No2;applicable for sensor card)
Maximum module voltage...highest reading of modulevoltage (V) during observationperiod
Note! Fit the temperatureprobe on the rear side ofthe solar module.

29
operating hours ... duration ofoperation of FRONIUS IG unit(HH:MM)
* maximum insolation... high-est insolation during observati-on period (W/m²; sensor cardoptional)
Display mode
„Day / Year /
Total“
(continued)
Duration of operation is shown in hours and minutes upto 999 h and 59min (display: „999:59“). From then on only full hours are displayed.
Although the FRONIUS IG unit is not operating during the night, all datarequired for the sensor card option are monitored and saved around theclock.
The following brief scheme shows the menu items provided for readju-sting preset parameters of the FRONIUS IG unit
The Setup Menu
List of menu
items
Standby
Contrast
LightMode
currency
Enter
0 ... 7
AUTO ON
Cash
OFF
rate / kWh
01 ... 99(100. FRONIUS IG = 00)
IG-NR
DatComErrorOKCom
TimeTime
Version
Date
MainCtrl PS01 ENS
SIGCD_TEST
State_PSStatus display - power stage sets

30
Display mode
„Setup“
The setup menu allows easy readjustment of the preset parameters of theFRONIUS IG unit in order to adapt to your needs and requirements in thebest possible way.
(D)
Enter the
setup menu
- move to to the menu level (chap-ter „Navigating in the Display“)
- select mode „Setup (5)“ with keys(A) or (B)
- enter the mode „Setup“ (5) :press key „Enter“ (D)
(1) (2) (3) (4) (5)
(A) (B) (D)
(A)
(B)
- „Standby“, the first item on themenu, is displayed
Scroll among
menu items
(A) (B) (A) (B)
- select the desired display mode (see above)- scroll with keys (A) or (B) among the menu items available
(A) (B)

31
- „Standby“ ...activate/deactivatethe standby operation by pres-sing the „Enter“ key
(D)
The menu item „Standby“ allows manual activation of the standby operati-on of the FRONIUS IG unit.
During standby operation the electronic system of the power stage isswitched off. No power is fed into the mains. There is an orange flash onthe LED. The following message is flashed intermittently on the screen::
„STANDBY“ „ENTER“
- The orange flashing LED stops with dusk arriving.- After the subsequent sunrise, the power supply operation into the mains
is resumed automatically (after termination of the startup phase theLED is illuminated green)
- mains supply operation can be resumed at any time whenever the LEDis flashing orange (deactivate „standby“)
- LED with green light: activate „standby“ =manual shutoff of operationsupplying power into mains system:- press key „Enter“ (D)
- LED with orange flash: deactivate „standby“ = resuming operationsupplying power into mains system- press key „Enter“ (D)
Setting the
menu items

32
(D)
(A)
(B)
(C) (D)
(C) (D)
...
- „Menu Mode“ ... cannot beselected
- „Contrast“ ... set contrast onLCD display
- enter „Contrast“: press key „En-ter“ (D)
As contrast depends on tempera-ture, it may be necessary to adjustthe menu item „Contrast“ whenambient conditions change.
Settings for minimum possiblecontrast (0) upto maximum possib-le contrast (7):
- accept: press key „Enter (D)“
- maintain previous setting: presskey „Esc“ (C)
- select from settings „0“ to„7“ - press key (A) or (B):
(C) (D)
(C)

33
(D)
- „Light Mode“ ... pre-setting ofdisplay illumination
- to enter „Light Mode“: press key„Enter“ (D)
(A)
(B)
(C) (D)
(C) (D)
(C) (D)
- To switch between settingsAuto 1., On 2. and Off 3.
- press keys (A) or (B):
(A)
(B)
(C) (D)
- „Cash“ ... setting of currencyand rate for invoicing the energysupplied
- enter „Cash“ by pressing key„Enter“ (D)
(C) (D)
(D)
1
Important! These instructions are only applicable for the display back-ground illumination. It is not necessary to deactivate the display itselfbecause its energy consumption is less than one mW (1/1000 W).
2
1.The display illumination will stop30 seconds after the last time akey has been pressed
- accept: press key „Enter“ (D)- maintain previous setting: press
key „Esc“ (C)
2.The display will remain perma-nently illuminated for the durationof the operation of power supplyinto the mains
- accept: press key „Enter“ (D)- maintain previous setting: press
key „Esc“ (C)
3.The display illumination will bepermanently off:
- accept: press key „Enter“ (D)- maintain previous setting: press
key „Esc“ (C)

34
(B) (D)
2.Enter rate per kWh accordingcurrency selected (preset rate:0,48 EUR/kWh)
- first digit starts flashing- select a figure for the first digit by
pressing key (A) or (B)- confirm by pressing key „Enter“
(D)- next digit starts flashing- for subsequent digits, follow
same procedure as describedabove for first digit
(A)
(B)
1. Enter currency (factory pre-setfor EUR)
- first digit starts flashing- select a character for the first
digit by pressing key (A) or (B)- confirm by pressing key
„Enter“(D)- next digit starts flashing
1
- follow same procedure as descri-bed above for subsequent digits
- accept the currency selected bypressing key „Enter“ (D)
- to maintain previous setting,press key „Esc“ (C)
(A)
(B) (D)(A)
(C) (D)
- decimal point starts flashing- move the decimal point to the
position desired by pressing keys(A) or (B)
- accept the rate set by pressingkey „Enter“ (D)
- to maintain previous setting,press key „Esc“ (C)
(B) (D)(A)
(B)(A)
.........
...
2
Note! numbers between000,1 and 99,99 may beselected
(D)
(D)
(D)
(D)
(D)(C)
(C)
(C)
(C)

35
- „IG-NR“ ...Setting the number(=address) of the FRONIUS IGunit in a setup comprising morethan one photovoltaic inverterlinked with each other
- enter „IG-NR“ by pressing thekey „Enter“ (D)
(D)
(B)
enter address (01 ... 99)(factory setting: 01)
- first digit starts flashing- select a figure for the first digit by
pressing key (A) or (B)- confirm with key „Enter“ (D)- subsequent digit starts flashing
(A)
(B) (D)(A)
- for second digit follow procedureas described above for first digit
- accept the IG-No. selected: press key „Enter“ (D)- maintain previous setting: press key „Esc“ (C)
Note! Allocate an own address to each FRONIUS IG when con-necting several FRONIUS IG into a data communication networkusing data recorders.
It is important to give each FRONIUS IG an own address, so that the datarecorder can differentiate between the individual static inverters. If twoFRONIUS IG are in the system with the same address, they cannot com-municate with the data recorder. Set another address on the FRONIUS IGshowing the status-message 504.
Important! Version without display: You will find the relevant informationfor address setting in the operating manual chapter entitled „Installation“in the section „Version without Display: Set address“.
(D)
(D)(C)
(C) (D)

36
(C) (D)(D)
If a successful data link has beenset up then „OK
COM“ is displayed.
„Error“ is displayed if DatCom isnot installed or the data link isnot functioning correctly.
(B)(A) (B)(A)
Signal Card active- The Signal Card‘s acoustic signal sounds for confirmation.
Important! Check the signal lines if the signal fails to sound.
Signal Card not installed
(D) (C)
(C)
(B)
- Start the Signal Card test bypressing the „Enter“ key (D)
(D)
- Press key (B) to call up the Sig-nal Card test

37
Important! The menu item „Year“ isonly supported when the optiondata recorder is connected.
- „Time“ ... setting of date andtime
- enter „Time“ by pressing key„Enter“ (D)
1.Enter date (e.g.: 03.10.2003)
- first digit starts flashing- select a character for the first
digit by pressing key (A) or (B)- confirm by pressing key „Enter“
(D)- next digit starts flashing
- follow the same procedure asdescribed above for subsequentdigits
- accept the date selected bypressing key „Enter“ (D)
- to maintain previous setting,press key „Esc“ (C)
(C) (D)
(D)
(B)(A)
(B) (D)(A)
(D)(C)
(C)
(D)
(D)
2.Enter time (e.g.: 15:47)
- first digit starts flashing- select a figure for the first digit by
pressing key (A) or (B)- confirm by pressing key „Enter“
(D)- next digit starts flashing
- for subsequent digits, followsame procedure as describedabove for first digit
- accept the time set by pressingkey „Enter“ (D)
- to maintain previous setting,press key „Esc“ (C)
(B)(A)
(B) (D)(A)
(D)(C)
(C)
(D)

38
- The display for the first powerstage set (PS00) re-appears
- Change over to the second po-wer stage set by pressing key (B)
- In this case for example thesecond power stage set (PS01)is on „Run“
- „Run“ means intact delivery ofelectricity to the public mains
- Press „Enter“ key (D)
(B)
(D)
(B)
(D)
Alternately
- Display of the most recentlystored service code (e.g. „State----“)
Important! The most recentlystored service code and the display„State Load“ appear alternately.
- Escape: Press „Esc“ key (C)twice
(C)2x
(D)(D)
- „STATE_PS“ ... Status display ofpower stage sets
- Press „Enter“ key (D)
- In this case for example the firstpower stage set (PS00) is on„Standby“
- „Standby“ means no electricity isbeing fed into the public mains
- Press „Enter“ key (D)(D)(D)
Alternately
- Display of the most recentlystored service code (e.g. „State406“)
Important! The most recentlystored service code and the display„State Load“ appear alternately.
- Press „Esc“ key (C)(C)
(C)
Important! Status displays 306 (Power Low) and 307 (DC-Low) appearnaturally every morning and evening due to low solar irradiation. Thesestatus messages are not the result of a fault.

39
(D)
- „Version“ displays version num-ber and serial number of the IGcontrol unit and the power stage
- enter „Version“by pressing key„Enter“(D)
1. For displaying version number ofthe IG control unit : press key„Enter“ (D)- exit by pressing key „Esc“ (C)
- to switch into display of serialnumber for the IG control unit:press keys“ (A) or (B)“- exit with key „Esc (C)“
(A)
(B)
(C) (D)
- To switch between displaysMAIN
CTRL1., PS
01 2. and ENS
3. - press key (A) or (B)
displayversion number
displayserial number
(B)(A) (C)
3.To display type number of ENS:press key „Enter“ (D)- exit with key „Esc“ (C)
- to switch into display of versionnumber for ENS:press keys (A) or (B)- exit with key „Esc“ (C)
Note! in case the FRONIUSIG unit is not equipped withthe ENS option, type num-ber and version numbercannot be displayed.
- after the „Enter“ key (D) hasbeen pressed, the message„N.A.“ is displayed on the screen
- exit by pressing key „Esc (C)“
(C) (D)
displaytype number
displayversion number
(B)(A) (C)
2.To display version number ofpower stage, press key „Enter(D)“ - exit with key „Esc (C)“
- to switch into display of serialnumber of the power stage,press keys „(A) or (B)“ - exit withkey „Esc (C)“
(C) (D)
displayversion number
displayserial number
(B)(A) (C)
(A)
(B)
2

40
For an unlimited individual use of system upgradings, Fronius has de-veloped the LocalNet. LocalNet is a data network which allows linkingmore than one FRONIUS IG units with the system upgrade elements.
LocalNet is a bus system. One single cable is sufficient to allow communi-cation between one or several FRONIUS IG units with all system upgradeelements. This reduces the cable requirement to a minimum.
Upgrading the
system
For increased flexibility, all upgradings are also available in a version withexternal housing
Additional information
The FRONIUS IG unit is prepared for a whole series of system upgrades,such as:- for communicating between FRONIUS IG and outside system extensi-
ons, for example with other FRONIUS IG units- Data logger (for recording and managing data from your photovoltaic
system by PC) including datalogger and modem connection- Various large displays (FRONIUS IG Public Display)- Actuators / Relays / Alarm (FRONIUS IG Signal Card)- Sensors (Thermo sensors / Irradiance / Metering)
The system upgrades are offered in slot-in boards, similar to those onyour personal computer.

41
The FRONIUS IG unit is equipped with a temperature and rotation con-trolled air circulator which provides for the following features:- smaller heat sinks - more compact housing- components are better cooled - efficiency increases / longer life- least possible energy consumption / noise level, due to rotation control
and ball bearing support- should there not be sufficient heat discharge in spite of maximum rotati-
on of the ventilator (for example no adequate heat transfer away fromthe control panels) the power will be derated for auto-protection of theFRONIUS IG unit.- derating the power reduces the output of the FRONIUS IG unit for a
short period sufficient to ensure that the temperature will not exceedthe admissible parameter.
- your FRONIUS IG unit will remain ready for operation as long aspossible without any interruption.
- Even if the FRONIUS IG is frequently used at full load the fan canbe expected to last approx. 20 years.
Forced venti-
lation
Please take further details from the chapter „LocalNet“ of the installationand service manual.
Upgrading the
system
(continued)

42

43
Installation manual

44
Open the housing
Warning! Hazard due to supply voltage and DC-voltage from thesolar modules. Only licenced electricity installers are authorized toopen the connection area. Only Fronius-trained service staff areauthorized to open the separately insulation-enclosed power stageon condition that it is not under voltage.
Opening connection area
FRONIUS IG
(installation of
the indoor
housing)
- insert screwdriver into the borehole (1) at the bottom of the FRONIUS IG- unlock cover (2) of connection area by lifting the screwdriver carefully at
the end of its handle- pull cover (2) of connection area downwards and away
Important! To close the connection area put on cover (2) and push itforward until it reaches the locking position.
1.
2.
(1)
(2)
(2)

45
(3) connection section is open(4) power stage
Warning! Hazard due tosupply voltage and DC-volta-ge from the solar modules.Only Fronius-trained servicestaff are authorized to openthe separately insulation-enclosed power stage(3) (4)(5)
- loosen four screws (1)- remove cover (2)
- loosen securing screw (5) and remove wall mounting frame
FRONIUS IG
Outdoors
FRONIUS IG
(installation of
the indoor
housing)
(continued)
(2)(1)
(1)

46
The FRONIUS IG unit can only be installed inside buildings or on outsidelocations provided that they are protected from rain or snow.
- During certain operation phases the FRONIUS IG unit may develop aslight noise level, for this reason it should not be installed in the immedi-ate vicinity of living areas
- the FRONIUS IG unit is not to be set up in areas where there is heavydust development
- the FRONIUS IG unit is not to be set up in areas where there is heavyincidence of conducting dust particles (for example iron filings)
- the FRONIUS IG unit is to be installed at a height which keeps thedisplay slightly below the position of your eyes in order to secure bestpossible readability of the display.
- The distance between the top edge of the FRONIUS IG and the ceilingshould be approx. 30 cm.
Choosing the
location -
indoor hou-
sing
Choosing the
location -
outdoor hou-
sing
- The IP 45 protection system means that the FRONIUS IG can be ex-posed to moisture. However we recommend if possible that direct mois-ture is avoided.
- In spite of the IP 45 protection system the FRONIUS IG Outdoorsshould if possible not be exposed to the effects of the sun as there is nodisplay film worldwide that is resistant to UV-Rays over a period of time.However to achieve a long life the FRONIUS IG Outdoors has an exteri-or casing and a display with a cover slide.
Installation
Make the best possible use of your FRONUS IG unit by additionally ob-serving the following conditions:
- mains impedance should not be unnecessarily increased by a too nar-row AC conductor cable cross section between the FRONIUS IG unitand the in-house distribution panel. The AC conductor cable resistancebetween the FRONIUS IG unit and the house distribution panel mustnot exceed 0,5 Ohm.
- install it only on a solid vertical wall- The ambient temperature should not be under minus 20 degrees or
over 50 degrees centigrade.- No objects must be located within a distance of 15 cm around the air
vents on both sides of the FRONIUS IG unit- Keep a lateral distance of 20 cm between individual FRONIUS IG units.- The air flow direction within the inverter is from left to right (cold air
intake left, hot air exit right).- When installing the FRONIUS IG unit in a switch panel cabinet (or
similar closed sections) it is necessary to make sure that the hot airwhich develops will be discharged by forced ventilation.
Choosing the
location gene-
ral

47
The FRONIUS IG Outdoors is available with or without display. In the nodisplay version, a screwdriver is required for setting the address. In allother designs setting the address is described in the section „The SetupMenu“
Design wit-
hout display:
Set address
- Slacken screw (1) and remove- Insert a maximum 3 mm wide screwdriver into the threaded hole belon-
ging to the screw (1) that has been removed.- The display for the address is located behind the window (2).- Using the screwdriver push the buttons („+“) for both of the address
digits
Important! The „-“ keys cannot be reached using a screwdriver. To set alower figure, simply increase the number using the „+“ key so far until itpasses „9“ and starts at „0“ again.
- Tighten the screw (1)
- The protection of the display unit provided by the cover slide also incre-ases the life of the film. (The ideal situation is choosing a partially pro-tected fitting position for the FRONIUS IG Outdoors with exterior casinge.g. in the area of the solar module, or under a projecting roof).
- FRONIUS IG can be installed vertically as well as horizontally - accor-ding to chapter „Fixing the wall mounting for FRONIUS IG Outdoors“.
- For use in environments with heavy dust development: If necessaryremove the fan plates and clean the integrated fly screen
Choosing the
location -
outdoor hou-
sing
(continued)
(1)
(2)

48
Important! Dowels and screws arenot included as there are too manydifferent types on the market to suitdifferent wall surfaces.
- fix wall mounting frame (1) withsuitable screws (2) and dowels(3) on to a solid base.
- Open the connection area of theFRONIUS IG unit (chapter „Ope-ning the Housing“)
(4)
Caution! There is a danger of the machine toppling over. Hangthe FRONIUS IG unit into the wall mounting frame and secure itwith screw (4) in the connection area.
- install AC and DC cable as described in chapter „Connection“.- close connection area and mount cover by means of tightening screw.
The housing is designed for a cable channel of up to 50 mm height whichcan be located directly below the connection area, without- cables visible below the FRONIUS IG unit- impairing access to the connection area and the slot- in board area
Fixing the wall
mounting
frame for
indoor hou-
sing
(continued)
Fixing the wall
mounting
frame for
indoor hou-
sing
Hazard due to supply voltage and DC-voltage from the solar modu-les. Only licensed electricity installers are authorized to open theconnection area.
(2x)
(1x)
(1)
(2) (3)
(2) (3)
(4)
IG 3
0:
13
0 m
m
IG 6
0:
37
3 m
m

49
Fixing the wall
mounting
frame for
FRONIUS IG
Outdoors
Important! According to the illustration above the wall mounting framecan be mounted for horizontal position as well as for vertical position ofthe FRONIUS IG.
For draining seeped-in water:- Vertical mounting position: remove draining screw (1)- Horizontal mounting position: remove draining screw (2)
26 mm
Important! Should a cable channelbe located below the FRONIUS IGunit, the following must be obser-ved:- lower edge of FRONIUS IG unit
will be located exactly 26 mmbeneath the wall mounting frame
Fixing the wall
mounting
frame for
indoor hou-
sing
(continued)
vertical mountingposition
horizontal mounting position
(2)
(1)

50
Fixing the wall
mounting
frame for
FRONIUS IG
Outdoors
(continued)
The following illustration shows both parts (1) and (2) of the wall bracket.Both parts are included with the FRONIUS IG. The illustration shows howthe FRONIUS IG is hung in part (1).
Part (2) is fitted as follows:- Slacken the screws (3) on the bottom of the FRONIUS IG- Fit part (2) using the screws (3)
(2)
(1)
(3)

51
Note! Rawl plugs and screws are not included as every basesurface requires different ones.
- Fit part (1) of the wall mounting to a solid base surface using suitablescrews (3) and rawl plugs (4)
- Open on the FRONIUS IG connecting area (section „Open housing“)
Caution! There is a danger of the machine toppling over if theFRONIUS IG is not secured using part (2) of the wall bracket. Hangthe FRONIUS IG into part (1) of the wall bracket and secure usingpart (2) of the wall bracket.
- Fit part (2) of the wall bracket using suitable screws and rawl plugs.
- Fit AC and DC cables as described in the section „Connection“
26 mm
Important! Pay attention to thefollowing if a cable duct is fittedunderneath the FRONIUS IG:- The bottom edge of the FRONI-
US IG is exactly 26 mm underne-ath the top edge of part (2) of thewall bracket
(2x)(1)
(4) (5)
(4)
(5)
Fixing the wall
mounting
frame for
FRONIUS IG
Outdoors
(continued)
IG 3
0:
43
4 m
m
IG 6
0:
67
7 m
m
52
As your FRONIUS IG unit need be connected to only one phase of themains network, in can be installed in almost any part of the house.
Warning! In order to ensure the best possible functioning of themains monitoring system, it is important to make sure that there is aminimum of resistance in the feeding lines to the connection point.The AC conductor resistance between the FRONIUS IG unit and thehouse distribution panel must not exceed 0,5 Ohm.
Warning! Hazard due to supply voltage and DC-voltage from thesolar modules. Only licenced electricity installers are authorized toopen the connection area and only provided that it is not undervoltage.
Mains network
monitoring
For larger photovoltaic schemes it is possible to connect several FRONI-US IG units in parallel without any problems.
In order to secure a symmetric feed-in of the power supply, the FRONIUSIG units should be connected evenly to all 3 phases.If you have any doubt you should approach your specialized dealer whe-never there are technical problems.
Schemes with
more than one
inverter
Connection to the Solar Modules and to the Public
Mains
The following points are important for the most economic use of the FRO-NIUS IG unit when choosing suitable solar modules:
- the no-load voltage increases when temperature decreases with insola-tion remaining unchanged. Therefore the no-load voltage must notexceed 500 V - or 530 V for the IG 60 HV.
Whenever the no-load voltage of the solar modules exceeds 500 V - or530 V for the IG 60 HV - the FRONIUS IG unit will be destroyed, and allwarranty rights will become null and void.
- More exact data for dimensioning the solar modules for the locationchosen can be obtained using calculation schemes such as the FRONI-US configurator (available on www.fronius.com).
Solar modules
Connection

53
Depending on the options installed in your FRONIUS IG unit, you havethe following alternatives to connect the solar inverter at the DC solarmodules and to the public AC mains:
Note! Only cables up to a cross section of 4 mm² are permitted forthe AC-plug-type connector.
Only use cables with a cross-section of 4 sq.mm for the FRONIUS IG 60.
Important! We recommend AC protection as follows:- A special16 A fuse for each FRONIUS IG 15 and 30- A special 25 A fuse for each FRONIUS IG 40 and 60- Alternatively for FRONIUS IG 40 and 60: 32 A , type „C“ miniature
circuit-breaker
1. Terminal block (connection within the housing)2. DC plug (choice of up to 5 DC sockets, AC connection within the hou-
sing)3. DC plug and AC plug connection (choice of up to 5 DC plug pairs, AC
plug connection)4. FRONIUS IG Outdoors
The following chapters show the connection of the FRONIUS IG unitseparately for each one of the connection alternatives.
Connection
alternatives
- Fix the FRONIUS IG unit to the wall as shown in chapter „Installation“.
The housing is designed for a cable channel of up to 50 mm height whichcan be located directly below the connection area, without- cables visible below the FRONIUS IG unit- impairing access to the connection area and the slot- in board area
Permissible cross-sections for AC and DC connection cables:- cable without wire end ferrules: 6 mm² and 10 mm²- cable with wire end ferrules: 6 mm²
Note! Tighten the screws of the terminal strip with 1.8 Nm.
1. Terminal
block
- feed the 3 pole connection cableto the public mains through theconnector rail and strain reliefdevice and slide it into the termi-nal block
- connect the leads of the connec-tion cable as marked on terminal
connection rail for alternative with terminal rail
Strain relief for the
connection cables (DC)
strain relief for
connection cable (AC)

54
Note! When installing theDC plugs for connectionwith the solar modules,make sure that the poles ofthe solar modules correctlycorrespond with the sym-bols „+“ and „-“.
DC plug +
Connection rail with 5 pairs of plugs
Illustration also applicable for connection rail
with 1 - 5 pairs of plugs
DC sockets -Strain relief for
connection cablel
2. DC plug For easier installation and maintenance the solar modules are connectedvia a contact- voltage-proof plug connection with a choice between oneand five plug pairs
- fix the FRONIUS IG unit on the wall as shown in chapter „Installation“
- fix connection cable with strain relief device- close connection area, install cover
Example for DC plug: Multicontact socket
- open connection area - seechapter „Open the Housing“
- slide the 3 pole connection cablefor the public mains through theconnection plate and strain reliefinto the terminal block
- connect the leads of the connec-tion cable as marked on theterminalterminal rail for the leads
of connecting cable (AC)
DC plugs +
DC sockets -
PE N L1
terminal rail for the leads
of the (AC) connection
cable
- lead the connection cable for theDC supply through the connectorrail and strain relief device andslide it into the terminal block
- connect the leads of the connec-tion cable according to terminalmarkings
- fix the connection cables with thestrain relief device
- close connection area
termnal rail for the
leads of the (DC)
connection cable
+ -PE N L1
DC DCAC
1. Terminal
block
(continued)

55
- install the multicontact plugs at plus and minus poles of solar modulestrings
- connect the strings to the FRONIUS IG unit
Note! Never disconnect the DC plugs from the respective socketsduring power feed operation of the FRONIUS IG unit. Beforedisconnecting the strings always first disconnect the mains supplyor switch the FRONIUS IG to standby operation.
Not complying with this instruction may damage the connection plugs.
Should an electric arc develop during disconnecting, both plug and socketmust be replaced. Do not re-use defective DC plugs.
2. DC plug
(continued)
Connection earth
(yellow/green)
Co
nn
ect
ph
ase
(bro
wn
)
Co
nn
ect
ze
ro le
ad
(blu
e)
Install the AC plug as follows:- slide parts (2) and (3) on to the
mains cable as shown in theillustration below
- connect the mains cable leadswith the AC plug as shown inopposite illustration
To make installation and maintenance work easier, the solar modules andthe mains are connected with plugs. Depending on which version is used,up to five pairs of DC plugs are available for connecting the solar modu-les. Connection to the mains is effected by means of a touchproof ACplug which can be latched.
- Fix the FRONIUS IG unit on the wall as shown in chapter „Installation“
3. DC plug and
AC connec-
tion
Bare the mains cable as shown inthe illustration for the AC-plug-typeconnector
20 mm
5 mm

56
- assemble AC plug- connect AC plug to FRONIUS IG unit and latch
Note! Always shut off voltage before unplugging the AC connec-tion by disconnecting fuse in the house distribution cabinet.
3. DC plug and
AC connec-
tion
(continued)
- install DC connections on the plus and minus pole of the strings on thesolar modules
- plug the strings on to the FRONIUS IG unit
Note! Never disconnect the DC connections of the FRONIUS IGunit from the sockets when it is in operation of feeding powersupply. Before disconnecting the strings, always first disconnectfuse in the house distributor panel.
Failing to comply with this instruction may damage the plug connections.
Should an electric arc develop during unplugging, both plug and socketmust be replaced. Never re-use damaged DC connections.
Note! When installing DCconnections for solar modu-les make sure that the plusand minus poles correspondwith the respective symbols.
DC plugs +
Connector rail with 5 pairs of DC plugs
DC sockets -AC-plug
Illustration also applicable for connector rail
with 1 - 5 DC plug pairs
(1) (2) (3)
white: for main cable with
5 to 11 mm diameter
black: for main cable with
9,5 to 15 mm diameter

57
- fix the FRONIUS IG unit on the wall as shown in chapter „Installation“- loosen four tightening screws at the cover (2)- detach cover (2)- loosen strain relief device (3) at the cover (2)
- lead the 3 pole connection cable to the public mains through connectorrail (3) and strain relief device and slide it into the terminal block (4)
- connect the leads of the connection cable as marked on terminal block
- fix cover (2) with four tightening screws (1)- fix connection cable with strain relief device (3)
(4)
Stecker DC-
Buchsen DC++
- - - - -
+ + ++
PENL1
4. FRONIUS IG
Outdoors
(1) (1)
(2)(3)

58
4. FRONIUS IG
Outdoors
(continued)
Note! When installing DC connections for solar modules makesure that the plus and minus poles correspond with the respectivesymbols.
- install DC connections on the plus and minus pole of the strings on thesolar modules
- plug the strings on to the FRONIUS IG unit
Note! Never disconnect the DC plugs of the FRONIUS IG unitfrom the sockets when it is in operation of feeding power supply.Before disconnecting the strings, always first disconnect fuse inthe house distributor panel.
Failing to comply with this instruction may damage the plug connections.
Should an electric arc develop during unplugging, both plug and socketmust be replaced. Never re-use damaged DC plugs.
Start up Operation
Configuring your Inverter
Your FRONIUS IG unit has been pre-configured in the factory and isready for operation.
After connecting the FRONIUS IG unit to the solar modules (DC) and tothe public utility mains (AC), all you have to do is close the AC and DCisolating switch.
Factory pre-
set configura-
tion
LED

59
LocalNet
System upgra-
ding /slot-in
board system
Your FRONIUS IG is pre-set for quite a number of system upgrades:- data recorder (for recording and managing the data of your photovoltaic
system on your personal computer) including modem tie in, wie z.B.:- data recorder (for recording and managing photovoltaic system data on
your PC) including data recorder and modem connection- Various large displays (FRONIUS IG Public Display)- Actuators / Relays / Alarm (FRONIUS IG Signal Card)- Sensors (Thermosensors / Irradiance/ Metering)
The system upgrades are available in slot-in boards as you have them foryour personal computer. To increase flexibility, several system upgradescan be obtained also with external housing. Your FRONIUS IG unit is pre-set to accept slot-in boards within the housing.
Fronius has developed the LocalNet in order to provide unrestricted indivi-dual use of the system’s upgrade possibilities. For more flexibility thesystem upgrades are also available in a version with external housing.
Your personal
configuration
For your personal configuration please consult the chapter „OperatingScheme“, section „Setup Menu“ of your operating instructions.
For settings to connect more than one inverter at the LocalNet (such asnumbering of the bus partners connected/system upgrading) please con-sult the chapter LocalNet
- as soon as the photovoltaic modules produce sufficient power, the LEDlights up orange and the screen starts displaying the startup procedure
- the orange light of the LED indicates that the automatic startup proce-dure of the FRONIUS IG unit will begin shortly
- after the FRONIUS IG unit has started automatically, the LED light turnsgreen
- the LED light continues green as long as power supply is fed into themains, it confirms that the operation continues to function without fault.
In case the initial operation of your FRONIUS IG unit does not proceed asshown above and the FRONIUS IG unit does not start feeding powersupply into the mains network, you should consult the chapter „ErrorDiagnosis and Repair“

60
In order to tie in the FRONIUS IG unit with the LocalNet, the followingsystem upgrading is required (slot-in board)
- COM card ......................... for exchanging data between your FRONIUSIG unit and the LocalNet, including the re-spective upgradings
Note! Should the data recorder collect only data of one singlephotovoltaic converter, a COM card is nevertheless required. Inthis case the COM card is needed to couple the internal network ofyour FRONIUS IG with the LocalNet interface of the data recorder.
COM Card
Data recorder The data recorder is the core of the LocalNet. It coordinates data trans-mission and ensures quick and safe distribution also of larger data volu-mes.
For inserting the system upgrade slot-in boards proceed as follows:
Warning! Hazard due to supply voltage and DC-voltage from thesolar modules. Only licensed electricity installers are authorized toopen the connection area and only on condition that is not undervoltage.
Insert slot-in
boards, FRO-
NIUS IG (In-
stallation for
indoor hou-
sing)
insert ENS card only
in this slot
(1)
(2)
(3)(4)

61
Insert slot-in
boards, FRO-
NIUS IG (In-
stallation for
indoor hou-
sing)
(continued)
- open connection area - see chapter „Open the Housing“- slide display towards the left side (1) and remove it from the front (2)- loosen fastening screw and remove board slot cover
Note! In dealing with slot-in boards please observe the generalESD regulations.
- insert board (3) in any one of the slots- tighten board (3) with fastening screw (4)
For versions for countries where the ENS card is a standard requirement,the unit will not operate without this card. Legal regulations require asafety system which does not allow operation of the FRONIUS IG withoutinstallation of ENS.- power supply feeding operation can be resumed as soon as the ENS
card is placed back in the slot (slot on the left outside, see illustration)
Insert slot-in
boards, FRO-
NIUS IG (for
external
mounting)
- Release four screws (1)- Remove cover (2)- Release fastening screw (4) and
remove cover the relevant slot(se illustration in the section„Insert slot-in boards FRONIUSIG (for indoor housing)“.
Note! When dealing withslot-in boards, please obser-ve general ESD regulations.
- Insert board (3) in any of the slots- Attach the board (3) with faste-
ning screw (4)
(2) (1)
(1)
Note! Please see the versions and notes for the ENS card (in thechapter „Insert slot-in card (for indoor housing)“.

62
- Equipping a FRONIUS IG with a datalogger card(Illustration: FRONIUS IG 2)
- Equipping all FRONIUS IGs with a COM Card
The data recorder has two RS-232 interfaces for the connection withpersonal computer and modem.
CO
M C
ard
(5)
OUTIN
Da
ta r
eco
rde
r
PC
(5)
(6)(6)(6)
CO
M C
ard
CO
M C
ard
(5) Blind plug
(6) Data cable
Sensor Box in
external Housing
IN OUTIN OUT
PC
IN OUT
EN
S
EN
S
EN
S
RS
-23
2
Example Example: Recording and archiving inverter and sensor data by means of adatalogger card and sensor box.
The cards communicate within the FRONIUS IG unit via its internal net-work. External communication (LocalNet) is effected via the COM cards.Each COM card has two RS-485 interfaces for entry and exit. Connectionis effected with RJ45 plugs.
The first FRONIUS IG unit with COM card can be located at a distance ofup to 1000 m from the last FRONIUS IG unit with COM card.
LocalNet automatically identifies different system upgrades (data recor-der, sensor card, ...)
To differentiate between several identical system upgradings, the respec-tive units must have an individual number.
To define each FRONIUS IG clearly in the LocalNet, an individual numbermust also be allocated to each FRONIUS IG.
For the respective procedure, please consult the chapter „Setup Menu“ inyour operating instructions.
Configuration

63
Status diagnosis and repair
Service-Codes Displayed
Your FRONIUS IG unit is equipped with a self diagnostic system whichautomatically identifies a large number of possible defects by itself anddisplays them on the screen. It is thus possible to quickly ascertain de-fects in the FRONIUS IG unit, in the photovoltaic system as well as instal-lation and operation errors.
Whenever the self diagnostic system has identified a particular defect, therespective service code is displayed on the screen.
Note! Display of a service code for a short time may be a result ofthe control procedure of your FRONIUS IG unit. If subsequently itcontinues to operate normally, there has not been a case of anerror.
Service dis-
play
As soon as the no-load voltage exceeds 150 V, the FRONIUS IG unitstarts synchronizing the network (display shows „SYNC
AC“).
General ser-
vice codes
As long as the no load voltage of the solar modules is not sufficient, thescreen displays the information „DC
LOW“.
Note! Basically the order of sequence for placing the cards doesnot matter.Important however is:- One FRONIUS IG can have only one COM card- One network can contain only one data recorder.
More information on the various system upgrade possbilities you will find inthe respective service manuals or in the internet under www.fronius.com.
Example
(continued)

64
Should the display remain dark for a longer period of time after sunriseyou must check the no-load voltage of the solar modules.
Should the no-load voltage of the modules (at the connecting points of theFRONIUS IG UNIT) not reach 160 V, it is possibly the case of a defect inthe remaining part of the photovoltaic system.
If the no-load voltage of the solar modules (at the connection points of theFRONIUS IG unit) amounts to more than 160 V, there may be a basicdefect in the FRONIUS IG unit. In this case you must consult a Froniustrained service technician.
Complete
failure
After a short time of waiting the FRONIUS IG resumes network synchroni-zation (message: „SYNC
AC“).
As long as the power output at the solar modules is insufficient, the dis-play shows the message „POWER
LOW“.
General ser-
vice codes
(continued)
Display in normal operation
(D)
Fault in one of the two power stagesets:- Display of a service code (e.g.
„State 515“)Alternately
(D)
Important! The display of theservice code alternates with „En-ter“.
- Press „Enter“ key twice(D)2x
FRONIUS IG
with several
power stage
sets
A special status diagnostic is run if an error occurs in a FRONIUS IG withseveral power stage sets. The examples shown below illustrate the trou-ble-shooting process.
Important! It is also possible to call up status messages even if there isno actual error in existence. This form of status polling may be found inthe set-up menu.
1

65
Service codes of service class 1 appear mostly only temporarily, theircause lies in the public mains network.
The first reaction of your FRONIUS IG unit is to disconnect from themains. Subsequently the mains network will be checked for the durationof the observation period stipulated. If after the end of this period nofurther defect is identified, your FRONIUS IG unit resumes operating andfeeding power into the mains network.
The following schedule lists a number of service codes with their respecti-ve designation, description, and repair measures.
Class 1
(D)
- The status display of the powerstage sets „State_ PS“ appears
- Press the „Enter“ key
1
Important! Please see the Section entitled „The Set-Up Menu“,„STATE_PS“ for how to proceed.
FRONIUS IG
with several
power stage
sets
(continued)
FRONIUS IG resumes fee-
ding power into the mains
network as soon as the
mains network conditions
have returned to the per-
missible range following
detailed checking procedu-
res.
108 Islanding detected Contact your installation
specialist if the service
code fails to disappear.
As soon as the mains volta-
ge, after detailed check pro-
cedure has returned to ad-
missible range, FRONIUS
IG resumes feeding power
into the mains network
101 Mains voltage not wi-
thin admissible range
Check mains voltage
If the service code does
not disappear you should
contact your installation
specialist
As soon as mains frequen-
cy after detailed check pro-
cedure has returned to ad-
missible range, FRONIUS
IG resumes feeding power
into the mains network
104 Mains frequency not wi-
thin admissible range
Check mains frequency
If the service code does
not disappear you should
contact your installation
specialist
As soon as the mains net-
work conditions after detai-
led check procedure have
returned to admissible ran-
ge, FRONIUS IG resumes
feeding power into the mains
network
107 AC mains network not
available
Check mains connec-
tions and fuses
If the service code does
not disappear you should
contact your installation
specialist
Code Designation Description Repair

66
As soon as the mains volta-
ge, after detailed check, has
returned to the admissible
range, your FRONIUS IG
resumes feeding power into
the mains network
201 Excessive mains volta-
ge
Service class 2 codes can only arise in connection with the ENS option.
Class 2 service codes are also related to the parameters of the mainsnetwork. Some of the checking procedures therefore overlap with those ofservice class 1. Your FRONIUS IG unwill react in the same way as in thecase of service codes in service class 1.
Code Designation Description
Class 2
Check mains voltage
If the service code does
not disappear, you
should contact your
installation specialist
Repair
As soon as the mains volta-
ge, after a detailed check,
has returned to the admis-
sible range, your FRONIUS
IG resumes feeding power
into the mains network
202 Insufficient mains
voltage
Check mains voltage
If the service code does
not disappear, you
should contact your
installation specialist
As soon as the mains fre-
quency, after a detailed
check, has returned to the
admissible range, your
FRONIUS IG resumes fee-
ding power into the mains
network
203 Excessive mains
frequency
Check mains frequency
If the service code does
not disappear, you
should contact your
installation specialist
As soon as the mains fre-
quency, after a detailed
check, has returned to the
admissible range, your
FRONIUS IG resumes fee-
ding power into the mains
network
204 Insufficient mains fre-
quency
Check mains frequency
If the service code does
not disappear, you
should contact your
installation specialist
As soon as the mains impe-
dance after a detai led
check, has returned to the
admissible range, your
FRONIUS IG resumes fee-
ding power into the mains
network
205 Imbalance of mains
network impedance
Imbalance reaction can
be only short termed
As soon as the mains impe-
dance after detailed che-
cking, has returned to the
admissible range, your
FRONIUS IG resumes fee-
ding power into the mains
network
206 Absolute reading of
mains impedance too
high
Check in-house line ca-
ble cross section
ENS recognises a faulty207 Problems with the
mains relay
Check ENS-Jumper
If Service-Code is dis-
played permanently, you
should contact a Froni-
us trained service tech-
nician
mains relay
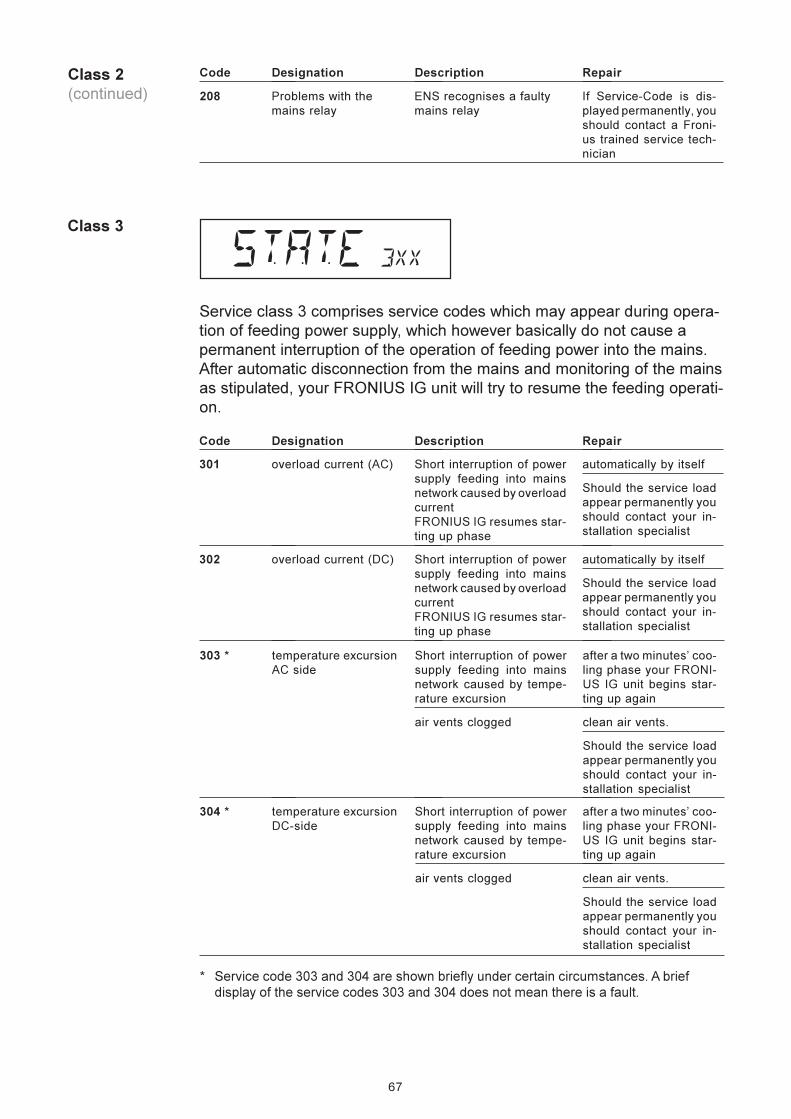
67
Short interruption of power
supply feeding into mains
network caused by overload
current
FRONIUS IG resumes star-
ting up phase
301 overload current (AC)
Service class 3 comprises service codes which may appear during opera-tion of feeding power supply, which however basically do not cause apermanent interruption of the operation of feeding power into the mains.After automatic disconnection from the mains and monitoring of the mainsas stipulated, your FRONIUS IG unit will try to resume the feeding operati-on.
Code Designation Description
Class 3
automatically by itself
Should the service load
appear permanently you
should contact your in-
stallation specialist
Repair
Short interruption of power
supply feeding into mains
network caused by overload
current
FRONIUS IG resumes star-
ting up phase
302 overload current (DC) automatically by itself
Should the service load
appear permanently you
should contact your in-
stallation specialist
Short interruption of power
supply feeding into mains
network caused by tempe-
rature excursion
air vents clogged
303 * temperature excursion
AC side
after a two minutes’ coo-
ling phase your FRONI-
US IG unit begins star-
ting up again
clean air vents.
Should the service load
appear permanently you
should contact your in-
stallation specialist
Short interruption of power
supply feeding into mains
network caused by tempe-
rature excursion
304 * temperature excursion
DC-side
after a two minutes’ coo-
ling phase your FRONI-
US IG unit begins star-
ting up again
clean air vents.
Should the service load
appear permanently you
should contact your in-
stallation specialist
air vents clogged
* Service code 303 and 304 are shown briefly under certain circumstances. A brief
display of the service codes 303 and 304 does not mean there is a fault.
ENS recognises a faulty
mains relay
208 Problems with the
mains relay
If Service-Code is dis-
played permanently, you
should contact a Froni-
us trained service tech-
nician
Code Designation Description RepairClass 2
(continued)

68
If it is possible, your FRONI-
US IG unit will resume the
power feeding operation af-
ter successfully completing
another attempt to connect
401 no internal communi-
cation with power sta-
ge
Class 4 service codes require in some cases the intervention of a trainedFronius service technician.
Code Designation Description
Class 4
If an error code is dis-
played permanently, you
should contact a Froni-
us trained service tech-
nician
Repair
If it is possible, your FRONI-
US IG unit will resume the
power feeding operation af-
ter successfully completing
another attempt to connect
402 no internal communi-
cation with ENS
If Service-Code is dis-
played permanently, you
should contact a Froni-
us trained service tech-
nician
If it is possible, your FRONI-
US IG unit will resume the
power feeding operation af-
ter successfully completing
another attempt to connect
403 EEPROM faulty If Service-Code is dis-
played permanently, you
should contact a Froni-
us trained service tech-
nician
If it is possible, your FRONI-
US IG unit will resume the
power feeding operation af-
ter successfully completing
another attempt to connect
404 No communication
possible between the
control unit and ENS
FRONIUS IG has no net-
work connection. Check
if the mains supply isola-
tor is switched on
If Service-Code is dis-
played permanently, you
should contact a Froni-
us trained service tech-
nician
If it is possible, your FRONI-
US IG unit will resume the
power feeding operation af-
ter successfully completing
another attempt to connect
405 Incorrect or faulty ENS-
card
If Service-Code is dis-
played permanently, you
should contact a Froni-
us trained service tech-
nician
FRONIUS IG disconnects
from the mains supply for
safety reasons
406 AC temperature sensor
faulty
If Service-Code is dis-
played permanently, you
should contact a Froni-
us trained service tech-
nician
FRONIUS IG disconnects
from the mains supply for
safety reasons
407 DC temperature sensor
faulty
If Service-Code is dis-
played permanently, you
should contact a Froni-
us trained service tech-
nician
FRONIUS IG disconnects
from the mains supply for
safety reasons
408 Direct current input If Service-Code is dis-
played permanently, you
should contact a Froni-
us trained service tech-
nician
FRONIUS IG does not
switch itself onto the mains
supply.
409 No +15V supply avai-
lable for the control
electronics
If Service-Code is dis-
played permanently, you
should contact a Froni-
us trained service tech-
nician

69
Fixing voltage lower than the
current MPP-voltage
412 The setting voltage has
been selected instead
of the MPP-voltage
operation and the set-
ting voltage is set to
too low a value.
If Service-Code is dis-
played permanently, you
should contact a Froni-
us trained service tech-
nician
2-pole plug inserted in the
wrong socket.
410 Service plug was not
inserted in its original
position
If Service-Code is dis-
played permanently, you
should contact a Froni-
us trained service tech-
nician
The FRONIUS IG briefly dis-
connects from the mains
supply due to changed net-
work requirements.
413 Control problems If Service-Code is dis-
played permanently, you
should contact a Froni-
us trained service tech-
nician
Class 4
(continued)
Memory component trigge-
red
414 EEPROM faulty If Service-Code is dis-
played permanently, you
should contact a Froni-
us trained service tech-
nician
Defect in the ENS micro-
controller, lead to ENS
faulty
415 No ENS enabling
signal
If Service-Code is dis-
played permanently,
contact a Fronius-trai-
ned service technician
Code Designation Description Repair
Orange LED lights up, then
the FRONIUS IG attempts a
new start
416 Communication with
IG-Ctrl not possible
If Service-Code is dis-
played permanently,
contact a Fronius-trained
service technician
434 Earth-fault current in solar
modules
Earth fault detected Check DC-side wiring
and fuse on FRONIUS
IG
The FRONIUS IG blocking,
red LED displays critical er-
rors
417 Two power supplies
have the same Print
Number
If Service-Code is dis-
played permanently,
contact a Fronius-trained
service technician
The FRONIUS IG blocking,
red LED displays critical er-
rors
419 Two or more power
supplies recognised
with the identical soft-
ware serial number.
If Service-Code is dis-
played permanently,
contact a Fronius-trained
service technician
The FRONIUS IG blocking,
red LED displays critical er-
rors
421 Print Number set incor-
rectly
If Service-Code is dis-
played permanently,
contact a Fronius-trained
service technician
Orange LED lights up, then
the FRONIUS IG attempts a
new start
425 No communication
possible with the po-
wer supply.
If Service-Code is dis-
played permanently,
contact a Fronius-trained
service technician

70
FRONIUS IG adress issued
twice
The LocalNet components
required are in the FRONI-
US IG unit: still, communi-
cation is possible
504 communication not
possible in LocalNet
change FRONIUS IG
address (chapter: “Setup
Menu“)
Status message goes
out after the FRONIUS
IG address is altered.
Data from the Setup menu
is lost
505 EEPROM faulty Automatic rectification
Data from the „Total“ menu
is lost
506 EEPROM faulty Automatic rectification
Data from the menu „Day“ /
„Year“ is lost
507 EEPROM faulty Automatic rectification
Address for data communi-
cation is no longer saved
508 FRONIUS IG address
is faulty
Set address again
e.g. solar module covered
in snow
509 24h no feed e.g. remove snow from
solar module
SMS settings were restored
to standard
510 EEPROM faulty If necessary, reconfigu-
re SMS
Sensor card settings were
restored to standard
511 EEPROM faulty If necessary, reconfigu-
re metering channels
If Service-Code is dis-
played permanently,
contact a Fronius-trained
service technician
Too many power supplies
recognised in the system
512 Too many power sup-
plies in the system
In spite of insufficient power
generation the temperature
in the unit is too high
501 defective ventilator
air vents blocked
Class 5 service codes generally do not impair the operation of feedingpower into the mains network. They will be displayed so long until theservice code displayed is cancelled by pressing a key (the FRONIUS IGunit, however, continues working normally in the background).- press any key- error message disappears
Code Designation Description
Class 5
contact your installation
specialists
clean air vents
Repair
In case of automatic moni-
toring of isolation by the
FRONIUS IG unit, an isola-
tion error against earthing
has been recorded
502 insufficient isolation
value reading
check isolation of your
photovoltaic system
service code reappears:
contact your installation
specialist

71
Class 5
(continued) Warning message from one
of the power stage sets,
second power stage set
working normally
514 No communication with
one of the power stage
sets
Contact Fronius-trained
service technician if ser-
vice code is displayed
permanently
Temperature sensor DC/AC
or DC/DC faulty, Service
jumper located on „service“
plug-in station or „+15 V
secondary“ not connected
515 Faulty plug-in connec-
tions
Check plug-in connec-
tions
It is not possible to activate
all power stage sets
516 Status message pre-
sent for one of the po-
wer stage sets
Carry out analysis. Sec-
tion entitled „The Set-Up
Menu“, „State_PS“ for
further details. Contact
Fronius-trained service
technician if service code
is displayed permanent-
ly
Important! contact your Fronius dealer or Fronius trained service partnerif an error not mentioned in the schedule appears frequently or perma-nently.
Customer
service
Code Designation Description Repair
Transformer not connected/
not plugged in
Bridge short-circuit
Detection of intermediate
circuit voltage damaged
517 Change of master has
taken place
Check possible errors
referred to in „Descripti-
on“. If service code is
displayed permanently:
contact Fronius-trained
service technician.

72
Technical Data
Annex
Input data IG 15 IG 20 IG 30
Recommended PV power 1300-2000 Wp 1800-2700 Wp 2500-3600 Wp
MPP-voltage range 150 - 400 V
Max. input voltage
(at 1000 W/m² / - 10°C in no-load operation) 500 V
Max. input current 10,75 A 14,34 A 19 A
Output data IG 15 IG 20 IG 30
Nominal output power (Pnom
) 1,3 kW 1,8 kW 2,5 kW
Max. output power 1,5 kW 2,05 kW 2,65 kW
Nominal mains voltage 230 V, +10 / -15 % *
Nominal output current 5,7 A 7,8 A 10,9 A
Nominal frequency 50 +/-0,2 Hz *
Total harmonic distortion < 3%
Power factor 1
General data IG 15 IG 20 IG 30
Maximum efficiency 94,2 % 94,5 % 94,5 %
Euro-efficiency 91,4 % 92,3 % 92,7 %
Consumption during night 0,15 W *
Consumption during operation 7 W
Cooling controlled forced ventilation
Protection type IP 21 / IP 45
Size l x w x h 366 x 344 x 220 mm / 500 x 435 x 225 mm
Weight 9 kg / 12 kg
Admissible ambient temperature
(at 95% rel. humidity) -20 ... 50 °C **
Protection devices IG 15 IG 20 IG 30
DC-isolation monitoring warning at RISO
< 500 kOHM
DC-excess voltage protection integrated
DC reverse polarity protection integrated
Reaction at DC-overload shift of operating point
*) Values given are standard. Your FRONIUS IG unit has been specifically adjusted in
accordance with the regulations of your country.
**) The AC-output reduces (power-derating) when the ambient temperature is increased,
from approx. 35 °C (dependent on the solar module voltage).
Fronius IG 15 /
20 / 30
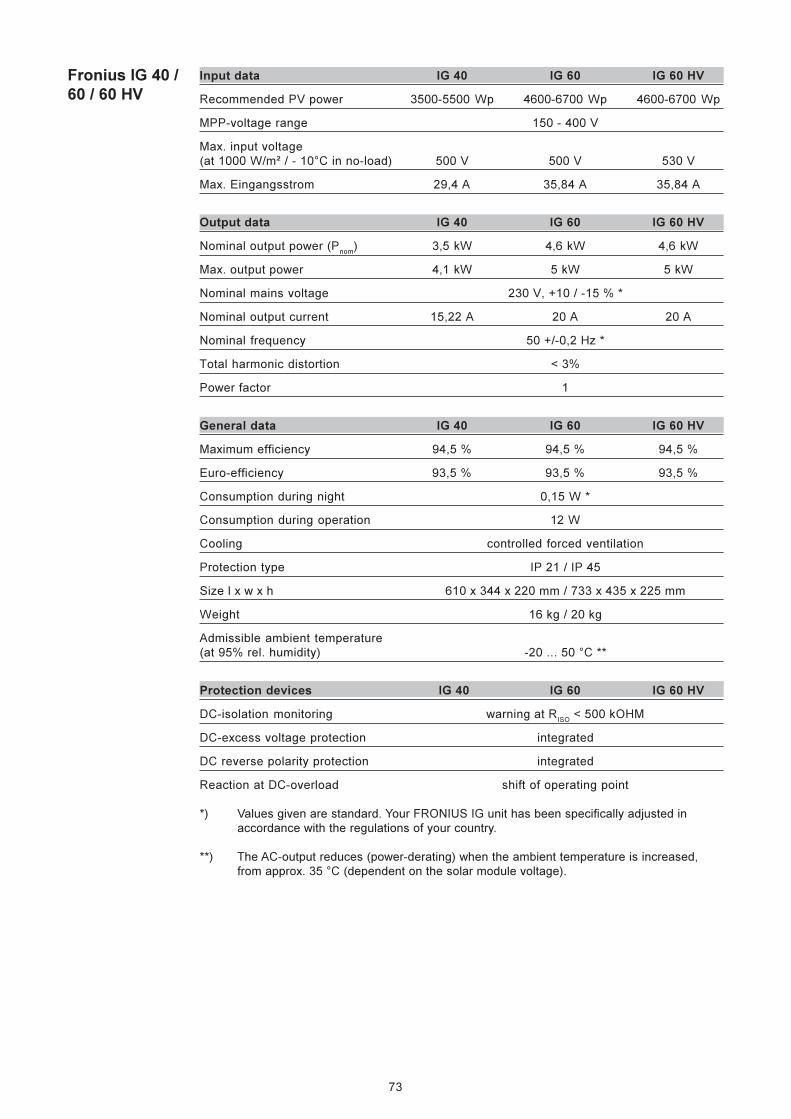
73
Input data IG 40 IG 60 IG 60 HV
Recommended PV power 3500-5500 Wp 4600-6700 Wp 4600-6700 Wp
MPP-voltage range 150 - 400 V
Max. input voltage
(at 1000 W/m² / - 10°C in no-load) 500 V 500 V 530 V
Max. Eingangsstrom 29,4 A 35,84 A 35,84 A
Output data IG 40 IG 60 IG 60 HV
Nominal output power (Pnom
) 3,5 kW 4,6 kW 4,6 kW
Max. output power 4,1 kW 5 kW 5 kW
Nominal mains voltage 230 V, +10 / -15 % *
Nominal output current 15,22 A 20 A 20 A
Nominal frequency 50 +/-0,2 Hz *
Total harmonic distortion < 3%
Power factor 1
General data IG 40 IG 60 IG 60 HV
Maximum efficiency 94,5 % 94,5 % 94,5 %
Euro-efficiency 93,5 % 93,5 % 93,5 %
Consumption during night 0,15 W *
Consumption during operation 12 W
Cooling controlled forced ventilation
Protection type IP 21 / IP 45
Size l x w x h 610 x 344 x 220 mm / 733 x 435 x 225 mm
Weight 16 kg / 20 kg
Admissible ambient temperature
(at 95% rel. humidity) -20 ... 50 °C **
Protection devices IG 40 IG 60 IG 60 HV
DC-isolation monitoring warning at RISO
< 500 kOHM
DC-excess voltage protection integrated
DC reverse polarity protection integrated
Reaction at DC-overload shift of operating point
*) Values given are standard. Your FRONIUS IG unit has been specifically adjusted in
accordance with the regulations of your country.
**) The AC-output reduces (power-derating) when the ambient temperature is increased,
from approx. 35 °C (dependent on the solar module voltage).
Fronius IG 40 /
60 / 60 HV

74
The FRONIUS IG unit complies with the „Regulation for supply and paralleloperation of low voltage network power generation systems for owner’s ownuse“ (Richtlinie für Anschluß und Parallelbetrieb von Eigenerzeugungsanla-gen am Niederspannungsnetz) of VDEW, the German Association of Pro-ducers of Electric Energy (Verband der Elektrizitätswirtschaft).
In addition, all prerequisites of the applicable standards as well as regula-tions within the scope of the applicable EU (European Union)regulationare complied with, so that all equipment bears the CE label.
In countries with applicable regulations the FRONIUS IG unit is equippedwith a circuit element to prevent isolated operation, as officially acceptedby the German professional association „Berufsgenossenschaft für Fein-mechanik und Elektrotechnik“ (professional association for precisionmechanics and electricity technology) in accordance with the Germanstandard DIN VDE 0126. This so-called ENS device is based on theprinciple of impedance monitoring (for of product reliability confirmationdocument see annex).
In the particular country versions both with as well as without ENS the mo-nitoring and safety systems integrated in the FRONIUS IG as part of itsstandard equipment make sure that in case of a mains dropout (causedeither by shutoff effected by the utility supplier or by power transmission linefailure) the power supply feeding will be immediately interrupted.
In particular, the following standards and regulations are being complied with:
- EN 61000-3-2 (harmonic oscillations), EN 61000-6-2, EN 61000-6-3- EN 50081-1 (EMV-interference emissions)- EN 50082-2 (EMV-interference immunity)- EN 50178 (electric safety)- E DIN VDE 0126 (ENS:country versions with standard ENS card)- Regulation 89/336/EEC electromagnetic compatibility- Regulation 93/68/EECCE marking- „Regulation for photovoltaic generation plants in parallel operation with
the low voltage mains network of the utility electricity companies“, issu-ed by VDEW, the Association of German Electric Utility Supply Compa-nies (Vereinigung Deutscher Elektrizitätswerke).
- „Technical regulations for photovoltaic plants in parallel operation withthe low voltage mains network of the electric utility companies“, issuedby the Association of Electric Utility Companies of Austria (Verband derE-Werke Österreichs)
- Safety requirements for photovoltaic energy generation plants (Austrianstandard ÖNORM/ÖVE E2750), as far as these regulations are applica-ble for the inverter.
This is the guarantee for an unproblematic and unbureaucratic authoriza-tion of operation by the distribution network operator and the electric utilitysupply company (for confirmity declaration documents see annex)
Our product
complies with
the following
standards and
regulations

75
Scope of war-
ranty
The warranty covers only the FRONIUS IG unit and the options containedin the product delivered (system upgrades). The other components of thephotovoltaic plant are not covered by the warranty.
Also excluded from the warranty are such damages to the FRONIUS IGunit which are caused by the other components of the photovoltaic plant.
Extensions to the warranty concern only the FRONIUS IG, not systemupgrades in the form of slot-in boards.
The warranty of the general terms of business is applicable for theFRONIUS IG unit. For the duration of this period Fronius guarantees theproper function of your solar inverter. Should there be any defect forwhich Fronius is responsible, Fronius undertakes within the warrantyperiod to carry out the factory repair free of charge. If the machine shutsdown no loss of yield can be ascertained for the network power supplythat has been lost.If you need to claim under the warranty, please contact your Froniusdealer.
Warranty claims are excluded as a result of :- use of your solar inverter and its accessory equipment for other than
the intended purpose- improper installation or installation not carried out in compliance with
the applicable standards, especially if effected by electricity fitters whoare not duly licensed
- operating malpractices- operation of the FRONIUS IG unit when protective equipment is defective- unauthorized modifications of the FRONIUS IG unit and its accessory
equipment- foreign object damage and Acts of God (force majeure)
Warranty claims will be repaired either by Fronius directly or by Froniustrained service partners of their local service organization. For returntransport the equipment or components must be packed in the originalpacking or packing equivalent to it.
These services will be charged to the dealer or his fitter, as well as thefitting of the repaired machine.
Warranty
terms and
liability
Warranty and Liability

76
Should your inverter be replaced at some future date, Fronius will acceptthe obsolete equipment back and provide for its proper recycling.
Disposal of obsolete equipment
Recycling
Warranty
evidence
Purchase date of the invoice, date of taking over the equipment / date ofcommissioning and report of the energy utility supply company
Warranty
period
60 months from date of installation
Exception: Options contained in the product delivered (system upgrades).Warranty for this components is 24 months from installation date on.
A prolongation of the warranty is possible up to 10 years from date ofproduction.

77
EU-KONFORMITÄTSERKLÄRUNG 2002
EC-DECLARATION OF CONFORMITY 2002
DECLARATION DE CONFORMITÉ DE LA CE, 2002
Die Firma Manufacturer La compagnie
FRONIUS INTERNATIONAL GMBHGünter Fronius Straße 1, A-4600 Wels-Thalheim
erklärt in alleiniger Verantwortung,
daß folgendes Produkt:
IG 15Solar-Wechselrichter
auf das sich diese Erklärung bezieht,
mit folgenden Richtlinien bzw.
Normen übereinstimmt:
Richtlinie 73/23/ EWGElektrische BetriebsmittelNiederspannungsrichtlinie
Richtlinie 89/336/ EWGElektromag. Verträglichkeit
Richtlinie 93/68/EWGCE Kennzeichnung
Europäische NormenEN 50 178EN 50 081-1EN 50 082-2EN 61 000-3-2+A14
Die oben genannte Firma hält
Dokumentationen als Nachweis der
Erfüllung der Sicherheitsziele und die
wesentlichen Schutzanforderungen
zur Einsicht bereit.
2002
Hereby certifies on it´s sole
responsibility that the following
product:
IG 15Photovoltaic-inverter
which is explicitly referred to by this
Declaration meet the following
directives and standard(s):
Directive 73/23/ EECElectrical ApparatusLow Voltage Directive
Directive 89/336/ EECElectromag. compatibility
Directive 93/68/EECCE marking
European StandardEN 50 178EN 50 081-1EN 50 082-2EN 61 000-3-2+A14
Documentation evidencing
conformity with the requirements of
the Directives is kept available for
inspection at the above
Manufacture´s.
se déclare seule responsable du fait
que le produit suivant:
IG 15Onduleur solaire
qui est l’objet de la présente
déclaration correspondent aux
suivantes directives et normes:
Directive 73/23/ CEEOutillages électriquesDirective de basse tension
Directive 89/336/ CEEÉlectromag. compatibilité
Directive 93/68/ CEEIdentification CE
Norme européenneEN 50 178EN 50 081-1EN 50 082-2EN 61 000-3-2+A14
En tant que preuve de la satisfaction
des demandes de sécurité la
documentation peut être consultée
chez la compagnie susmentionnée.
Wels-Thalheim, 22.05.2002

78
EU-KONFORMITÄTSERKLÄRUNG 2001
EC-DECLARATION OF CONFORMITY 2001
DECLARATION DE CONFORMITÉ DE LA CE, 2001
Die Firma Manufacturer La compagnie
FRONIUS SCHWEISSMASCHINEN PRODUKTION GMBH & CO KGGünter Fronius Straße 1, A-4600 Wels-Thalheim
erklärt in alleiniger Verantwortung,
daß folgendes Produkt:
IG 20Solar-Wechselrichter
auf das sich diese Erklärung bezieht,
mit folgenden Richtlinien bzw.
Normen übereinstimmt:
Richtlinie 73/23/ EWGElektrische BetriebsmittelNiederspannungsrichtlinie
Richtlinie 89/336/ EWGElektromag. Verträglichkeit
Richtlinie 93/68/EWGCE Kennzeichnung
Europäische NormenEN 50 178EN 50 081-1EN 50 082-2EN 61 000-3-2+A14
Die oben genannte Firma hält
Dokumentationen als Nachweis der
Erfüllung der Sicherheitsziele und die
wesentlichen Schutzanforderungen
zur Einsicht bereit.
2001
Hereby certifies on it´s sole
responsibility that the following
product:
IG 20Photovoltaic-inverter
which is explicitly referred to by this
Declaration meet the following
directives and standard(s):
Directive 73/23/ EECElectrical ApparatusLow Voltage Directive
Directive 89/336/ EECElectromag. compatibility
Directive 93/68/EECCE marking
European StandardEN 50 178EN 50 081-1EN 50 082-2EN 61 000-3-2+A14
Documentation evidencing
conformity with the requirements of
the Directives is kept available for
inspection at the above
Manufacture´s.
se déclare seule responsable du fait
que le produit suivant:
IG 20Onduleur solaire
qui est l’objet de la présente
déclaration correspondent aux
suivantes directives et normes:
Directive 73/23/ CEEOutillages électriquesDirective de basse tension
Directive 89/336/ CEEÉlectromag. compatibilité
Directive 93/68/ CEEIdentification CE
Norme européenneEN 50 178EN 50 081-1EN 50 082-2EN 61 000-3-2+A14
En tant que preuve de la satisfaction
des demandes de sécurité la
documentation peut être consultée
chez la compagnie susmentionnée.
Wels-Thalheim, 08.11.2001

79
EU-KONFORMITÄTSERKLÄRUNG 2001
EC-DECLARATION OF CONFORMITY 2001
DECLARATION DE CONFORMITÉ DE LA CE, 2001
Die Firma Manufacturer La compagnie
FRONIUS SCHWEISSMASCHINEN PRODUKTION GMBH & CO KGGünter Fronius Straße 15, A-4600 Wels-Thalheim
erklärt in alleiniger Verantwortung,
daß folgendes Produkt:
IG 30Solar-Wechselrichter
auf das sich diese Erklärung bezieht,
mit folgenden Richtlinien bzw.
Normen übereinstimmt:
Richtlinie 73/23/ EWGElektrische BetriebsmittelNiederspannungsrichtlinie
Richtlinie 89/336/ EWGElektromag. Verträglichkeit
Richtlinie 93/68/EWGCE Kennzeichnung
Europäische NormenEN 50 178EN 50 081-1EN 50 082-2EN 61 000-3-2+A14
Die oben genannte Firma hält
Dokumentationen als Nachweis der
Erfüllung der Sicherheitsziele und die
wesentlichen Schutzanforderungen
zur Einsicht bereit.
2001
Hereby certifies on it´s sole
responsibility that the following
product:
IG 30Photovoltaic-inverter
which is explicitly referred to by this
Declaration meet the following
directives and standard(s):
Directive 73/23/ EECElectrical ApparatusLow Voltage Directive
Directive 89/336/ EECElectromag. compatibility
Directive 93/68/EECCE marking
European StandardEN 50 178EN 50 081-1EN 50 082-2EN 61 000-3-2+A14
Documentation evidencing
conformity with the requirements of
the Directives is kept available for
inspection at the above
Manufacture´s.
se déclare seule responsable du fait
que le produit suivant:
IG 30Onduleur solaire
qui est l’objet de la présente
déclaration correspondent aux
suivantes directives et normes:
Directive 73/23/ CEEOutillages électriquesDirective de basse tension
Directive 89/336/ CEEÉlectromag. compatibilité
Directive 93/68/ CEEIdentification CE
Norme européenneEN 50 178EN 50 081-1EN 50 082-2EN 61 000-3-2+A14
En tant que preuve de la satisfaction
des demandes de sécurité la
documentation peut être consultée
chez la compagnie susmentionnée.
Wels-Thalheim, 08.11.2001

80
EU-KONFORMITÄTSERKLÄRUNG 2003
EC-DECLARATION OF CONFORMITY 2003
DECLARATION DE CONFORMITÉ DE LA CE, 2003
Die Firma Manufacturer La compagnie
FRONIUS INTERNATIONAL GMBHGünter Fronius Straße 1, A-4600 Wels-Thalheim
erklärt in alleiniger Verantwortung,
daß folgendes Produkt:
IG 40Solar-Wechselrichter
auf das sich diese Erklärung bezieht,
mit folgenden Richtlinien bzw.
Normen übereinstimmt:
Richtlinie 73/23/ EWGElektrische BetriebsmittelNiederspannungsrichtlinie
Richtlinie 89/336/ EWGElektromag. Verträglichkeit
Richtlinie 93/68/EWGCE Kennzeichnung
Europäische NormenEN 50 178EN 61 000-3-2EN 61 000-6-2EN 61 000-6-3
Die oben genannte Firma hält
Dokumentationen als Nachweis der
Erfüllung der Sicherheitsziele und die
wesentlichen Schutzanforderungen
zur Einsicht bereit.
2003
Hereby certifies on it´s sole
responsibility that the following
product:
IG 40Photovoltaic-inverter
which is explicitly referred to by this
Declaration meet the following
directives and standard(s):
Directive 73/23/ EECElectrical ApparatusLow Voltage Directive
Directive 89/336/ EECElectromag. compatibility
Directive 93/68/EECCE marking
European StandardEN 50 178EN 61 000-3-2EN 61 000-6-2EN 61 000-6-3
Documentation evidencing
conformity with the requirements of
the Directives is kept available for
inspection at the above
Manufacture´s.
se déclare seule responsable du fait
que le produit suivant:
IG 40Onduleur solaire
qui est l’objet de la présente
déclaration correspondent aux
suivantes directives et normes:
Directive 73/23/ CEEOutillages électriquesDirective de basse tension
Directive 89/336/ CEEÉlectromag. compatibilité
Directive 93/68/ CEEIdentification CE
Norme européenneEN 50 178EN 61 000-3-2EN 61 000-6-2EN 61 000-6-3
En tant que preuve de la satisfaction
des demandes de sécurité la
documentation peut être consultée
chez la compagnie susmentionnée.
Wels-Thalheim, 2003-09-25
ppa. Mag.Ing. H.Hackl

81
EU-KONFORMITÄTSERKLÄRUNG 2003
EC-DECLARATION OF CONFORMITY 2003
DECLARATION DE CONFORMITÉ DE LA CE, 2003
Die Firma Manufacturer La compagnie
FRONIUS INTERNATIONAL GMBHGünter Fronius Straße 1, A-4600 Wels-Thalheim
erklärt in alleiniger Verantwortung,
daß folgendes Produkt:
IG 60Solar-Wechselrichter
auf das sich diese Erklärung bezieht,
mit folgenden Richtlinien bzw.
Normen übereinstimmt:
Richtlinie 73/23/ EWGElektrische BetriebsmittelNiederspannungsrichtlinie
Richtlinie 89/336/ EWGElektromag. Verträglichkeit
Richtlinie 93/68/EWGCE Kennzeichnung
Europäische NormenEN 50 178EN 61 000-3-2EN 61 000-6-2EN 61 000-6-3
Die oben genannte Firma hält
Dokumentationen als Nachweis der
Erfüllung der Sicherheitsziele und die
wesentlichen Schutzanforderungen
zur Einsicht bereit.
2003
Hereby certifies on it´s sole
responsibility that the following
product:
IG 60Photovoltaic-inverter
which is explicitly referred to by this
Declaration meet the following
directives and standard(s):
Directive 73/23/ EECElectrical ApparatusLow Voltage Directive
Directive 89/336/ EECElectromag. compatibility
Directive 93/68/EECCE marking
European StandardEN 50 178EN 61 000-3-2EN 61 000-6-2EN 61 000-6-3
Documentation evidencing
conformity with the requirements of
the Directives is kept available for
inspection at the above
Manufacture´s.
se déclare seule responsable du fait
que le produit suivant:
IG 60Onduleur solaire
qui est l’objet de la présente
déclaration correspondent aux
suivantes directives et normes:
Directive 73/23/ CEEOutillages électriquesDirective de basse tension
Directive 89/336/ CEEÉlectromag. compatibilité
Directive 93/68/ CEEIdentification CE
Norme européenneEN 50 178EN 61 000-3-2EN 61 000-6-2EN 61 000-6-3
En tant que preuve de la satisfaction
des demandes de sécurité la
documentation peut être consultée
chez la compagnie susmentionnée.
Wels-Thalheim, 2003-09-25
ppa. Mag.Ing. H.Hackl

82
EU-KONFORMITÄTSERKLÄRUNG 2005
EC-DECLARATION OF CONFORMITY 2005
DECLARATION DE CONFORMITÉ DE LA CE, 2005
Die Firma Manufacturer La compagnie
FRONIUS INTERNATIONAL GMBHGünter Fronius Straße 1, A-4600 Wels-Thalheim
erklärt in alleiniger Verantwortung,
daß folgendes Produkt:
IG 60 HVSolar-Wechselrichter
auf das sich diese Erklärung bezieht,
mit folgenden Richtlinien bzw.
Normen übereinstimmt:
Richtlinie 73/23/EWGElektrische BetriebsmittelNiederspannungsrichtlinie
Richtlinie 89/336/EWGElektromag. Verträglichkeit
Richtlinie 93/68/EWGCE Kennzeichnung
Europäische NormenEN 50 178EN 61 000-6-2EN 61 000-6-3EN 61 000-3-2
Die oben genannte Firma hält
Dokumentationen als Nachweis der
Erfüllung der Sicherheitsziele und die
wesentlichen Schutzanforderungen
zur Einsicht bereit.
2005
Hereby certifies on it´s sole
responsibility that the following
product:
IG 60 HVPhotovoltaic-inverter
which is explicitly referred to by this
Declaration meet the following
directives and standard(s):
Directive 73/23/EECElectrical ApparatusLow Voltage Directive
Directive 89/336/EECElectromag. compatibility
Directive 93/68/EECCE marking
European StandardEN 50 178EN 61 000-6-2EN 61 000-6-3EN 61 000-3-2
Documentation evidencing
conformity with the requirements of
the Directives is kept available for
inspection at the above
Manufacture´s.
se déclare seule responsable du fait
que le produit suivant:
IG 60 HVOnduleur solaire
qui est l’objet de la présente
déclaration correspondent aux
suivantes directives et normes:
Directive 73/23/CEEOutillages électriquesDirective de basse tension
Directive 89/336/CEEÉlectromag. compatibilité
Directive 93/68/CEEIdentification CE
Norme européenneEN 50 178EN 61 000-6-2EN 61 000-6-3EN 61 000-3-2
En tant que preuve de la satisfaction
des demandes de sécurité la
documentation peut être consultée
chez la compagnie susmentionnée.
Wels-Thalheim, 2005-02-15
ppa. Mag.Ing. H.Hackl

83

84

85

86

87

ud_fr_se_so_00913 012004
Fronius International GmbH
4600 Wels-Thalheim, Günter-Fronius-Straße 1, Austria
E-Mail: [email protected]
http://www.fronius.com
USAA
Fronius Worldwide - www.fronius.com/addresses
Fronius USA LLC Solar Electronic Division
5266 Hollister Ave., #117, Santa Barbara, California 93111
E-Mail: [email protected]
http://www.fronius.com
Under http://www.fronius.com/addresses you will find all addresses of our sales branches and partner firms!


