
FrogTime Manager Training Manual - Human Resources
40
1 FrogTime Manager Training Manual TimeClock Plus Student & Biweekly Temporary Employees Manager Training Package
Transcript of FrogTime Manager Training Manual - Human Resources

1
FrogTime Manager
Training Manual
TimeClock Plus
Student & Biweekly
Temporary Employees
Manager Training Package

2
TimeClock Plus
Manager Training Package
3
Table of Contents
TimeClock Plus
Manager Training Package Goal: To accurately and efficiently manage employees’ time
Section I- Manage Time ..................................................................................................... 4
Pre-Payroll Processing Checklist............................................................................... 5
Reviewing Time ........................................................................................................... 6
Viewing Employee Time ........................................................................................ 6
Managing Time ........................................................................................................... 7
Adding Employee Time .......................................................................................... 7 Deleting Employee Time ........................................................................................ 9
Managing Exceptions................................................................................................ 10
Frog Time Approver Managing Missed Punches .................................................. 12
Entering in a Blank Missed Punch ........................................................................ 12
Approving an Entered Missed Punch ................................................................... 13
Approving Exceptions/Approving Hours ............................................................... 15
Section II- Manage Tools ................................................................................................. 16
Reports ....................................................................................................................... 17
Running a Report .................................................................................................. 17 Saving a Report ..................................................................................................... 19
Automating a Report ............................................................................................. 20
Employee Status ........................................................................................................ 24
Employee Status Tabs ........................................................................................... 24
Audit Log ................................................................................................................... 25
Hours Audit Log ................................................................................................... 25 Incomplete Clock Operation Audit Log ............................................................... 27
Section III- Employee Clock Operations ....................................................................... 28
WebClock Log On..................................................................................................... 29
Clock Operations ...................................................................................................... 30
Delegate Setup ........................................................................................................... 36
Troubleshooting TimeClock ............................................................................................. 38
Payroll Tips................................................................................................................. 39
Manager Training Package
4
TimeClock Plus
Section I- Manage Time
Manager Training Package

5
Pre-Payroll Processing Checklist
TimeClock Plus
Managers and Timekeepers will need to review and approve employee hours and outstanding exceptions before payroll processing can begin.
All employee time records must be approved EVERY Monday at 10:00 AM.
Reviewing pay period time segments for errors
□ Reviewing Time Segments
Managing Time/Making Corrections to Employee Time Segments
□ Adding segments
□ Editing segments
□ Deleting segments~ (email [email protected])
Managing Exceptions
□ Manager Approval
□ Missed Punches
□ Overtime
□ Conflicting Shifts
Managing Missed Punches
□ Edit and Verify Missed Punches
Approving Exceptions/Approve Hours
□ Manager Approval
□ Missed Punches
□ Overtime
□ Conflicting Shifts
Manager Training Package

6
The purpose of reviewing time is to identify any errors in employees’ worked hours during the period.
Reviewing Time
TimeClock Plus
Viewing Employee Time 1. Browse to Hours > Group Hours 2. Set your Date Range to the “This Period” and click Update. 3. You can set your default date selection to your pay period by clicking on the
Options button.
4. Review employee time for any errors or missed punches 5. Make corrections to employee time segments (See ‘Manage Time’, pg. 4)
Manager Training Package

7
The purpose of managing time is to correct any errors in employees’ worked hours
during the period.
Managing Time
TimeClock Plus
Adding Employee Time 1. Browse to Hours > Individual Hours. 2. Select the Employee to add time. 3. Click on the + Add button. 4. Enter the date and time next to Time in and Time out. You can use the calendar
to select a date and the clock icon to enter a time, or manually enter the date and time.
5. To enter in a Timesheet click on the + Add .Check Time sheet entry. This will enable the Hours field and allow you to enter in a segment length. The Date and Time In can be entered and you can select the proper Job Code from the drop down.
6. If you are clocking an employee in, check Individual is clocked in and click Save, this will allow the employees to clock out at the end of their shifts.
7. To specify the job code worked for this shift click the Job Code drop-down. 8. If the segment was the result of a missed punch, you can indicate this by
selecting Missed in punch and/or Missed out punch.
NOTE: Job code~ activity the employee is doing in your department
Manager Training Package

8
TimeClock Plus
Editing Employee Time
1. Browse to Hours > Individual Hours. 2. Select the Employee to edit time. 3. Click on the segment to highlight it, then click Manage, then Edit to access the
Edit Segment window. You can also double-click on the segment. 4. The Time In and Time Out fields can be edited. 5. If the employee is currently clocked in, enable Individual is clocked in. 6. If you want to make the segment a time sheet entry, check Time sheet entry.
This will enable the Hours field and allow you to enter in a segment length. The Date and Time in will remain as the anchor point of the shift.
7. To change the job code worked for this shift, click the Job Code drop-down. 8. Click Save
Manager Training Package

9
TimeClock Plus
Deleting Employee Time
This option is not available for FrogTime Managers at this time
Email TCU payroll for deletes - [email protected]
Manager Training Package

10
TimeClock Plus
Managing Exceptions: 1. To approve your employees’ exceptions go to Hours > Group Hours. 2. Click the Exception Filter button and check each exception you want to manage
and click Filter.
The Exception Filter allows you to filter segments based on the exceptions flagged on your Employees’ shifts. For example, if you are required to approve all missed punches before processing payroll, you can filter all the segments worked that week to see just those segments that have unapproved missed punches so you can focus on editing/approving only missed punches.
3. Next, set the date range to Current Pay Period and click Update. This will load
all employees’ segments that have unapproved exceptions specific to the exceptions checked in the Exception Filter.
Manager Training Package
Exceptions are used to track any inconsistencies in worked segments, such as
tardiness, missed punches, or segments awaiting approval.
Managing Exceptions

11
TimeClock Plus
Three ways to determine which segments still have exceptions that require approval by looking at the exceptions column.
If a segment is blank then all exceptions that require approval have been approved
If a segment is has a blue dot, then all exceptions that require approval have been approved
If a segment has a red dot, then there is an exception that still requires approval.
Exceptions can be displayed by hovering over a blue or red dot next to each segment. Those that require approval will be listed under the ‘Requires Approval’ section.
Anything listed under ‘Exceptions’ is informational only and does not require approval, but notifies you that a particular exception did occur during your employees’ shift.
Manager Training Package

12
TimeClock Plus
Frog Time Approver Managing Missed Punches:
Entering in a Blank Missed Punch
Record a blank time in/out and flag as a missed punch: These options create a blank time for the missed punch and allow the employee to perform the clock operation. The time of the missed punch must be entered before the week can be closed.
If the option to record a blank time in/out and flag as a missed punch is selected, then a User (Manager) will need to enter the missed punch time on behalf of the employee.
When you browse to either Individual Hours or Group Hours, you’ll see segments like the ones below:
To enter a missed punch time in place of the << Missed >> segment:
1. Right-click on the segment with the << Missed >> punch and select Edit. 2. Next to the segment that is missing, enter in the time that the missed punch
occurred. 3. Click Save.
Upon saving the corrected segment, the missed punch will be automatically marked as Approved.
PAYROLL TIP: Approve time daily
Missed punches occur when an employee fails to performs a clock operation, either for
clocking in or out for a shift or break.
Manager Training Package

13
TimeClock Plus
Correcting an Entered Missed Punch
If the missed punch time that has been entered (either by the Frog Time Approver or the employee), as pictured below, is inaccurate, you can correct it using the following steps:
1. Right-click on the segment with the inaccurate punch and select Edit. 2. Next to the segment that needs to be changed, enter the time that the missed
punch occurred. 3. Click Save.
Upon saving the corrected segment, the missed punch will be automatically marked as Approved.
Approving an Entered Missed Punch
* Record the scheduled time in/out (if available) and flag as a missed punch: If the employee is working on a schedule, this option records the time they were supposed to clock in or out, and allows the employee to perform his/her clock operation.
*Disclaimer: Phase #1 training for basic and advance scheduler is NOT available
Allow the employee to enter the time in/out and flag it as a missed punch: This option allows the employee to enter the time that they were supposed to clock in or out and flags it as a missed punch.
Manager Training Package

14
TimeClock Plus
When you browse to Individual Hours or Group Hours, you will see segments like the ones below.
If the missed punch time that has been entered (either by the Frog Time approver or employee) is correct, approve the segment as follows:
1. Highlight the segment by checking the box to the far left. 2. Click on Manage Exceptions and set Missed Punches to Approve. 3. Click Apply.
PAYROLL TIP: In the “note” section give a reason why there was a missed punch or an edit
Manager Training Package

15
TimeClock Plus
Approving Exceptions 1. Browse to Hours > Group Hours. 2. Set your Date Range to “This Period” and click Update. 3. Click the Resolve Period button and select the radial under the Approve column
next to the exception you want to approve and click Apply.
Note: Resolve Period will approve or unapprove ALL exceptions, not just the ones visible on the current page you are viewing.
Manager Training Package
All exceptions that require approval need be approved for payroll to be processed. Manager approval is a separate process from approving missed punches and all other exceptions.
Approving Exceptions/Approving Hours

16
TimeClock Plus
Section II- Manage Tools
Manager Training Package
17
TimeClock Plus
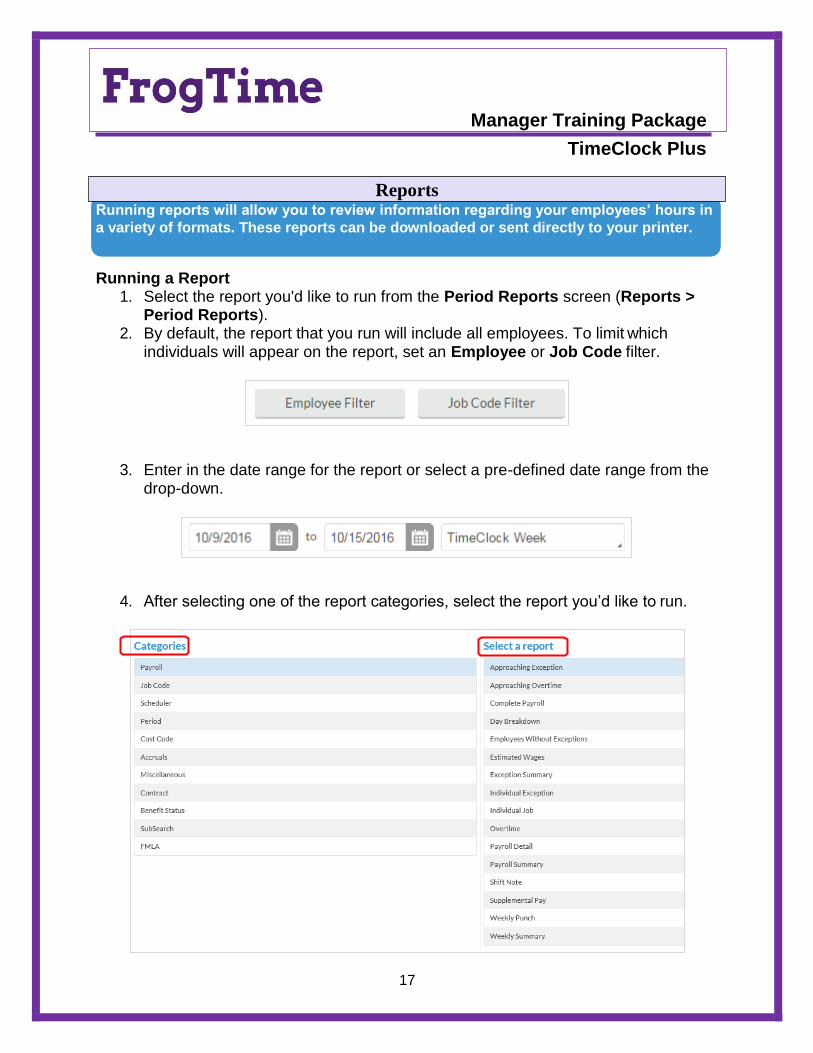
Running a Report 1. Select the report you'd like to run from the Period Reports screen (Reports >
Period Reports). 2. By default, the report that you run will include all employees. To limit which
individuals will appear on the report, set an Employee or Job Code filter.
3. Enter in the date range for the report or select a pre-defined date range from the drop-down.
4. After selecting one of the report categories, select the report you’d like to run.
Manager Training Package
Running reports will allow you to review information regarding your employees’ hours in
a variety of formats. These reports can be downloaded or sent directly to your printer.
Reports
18
TimeClock Plus
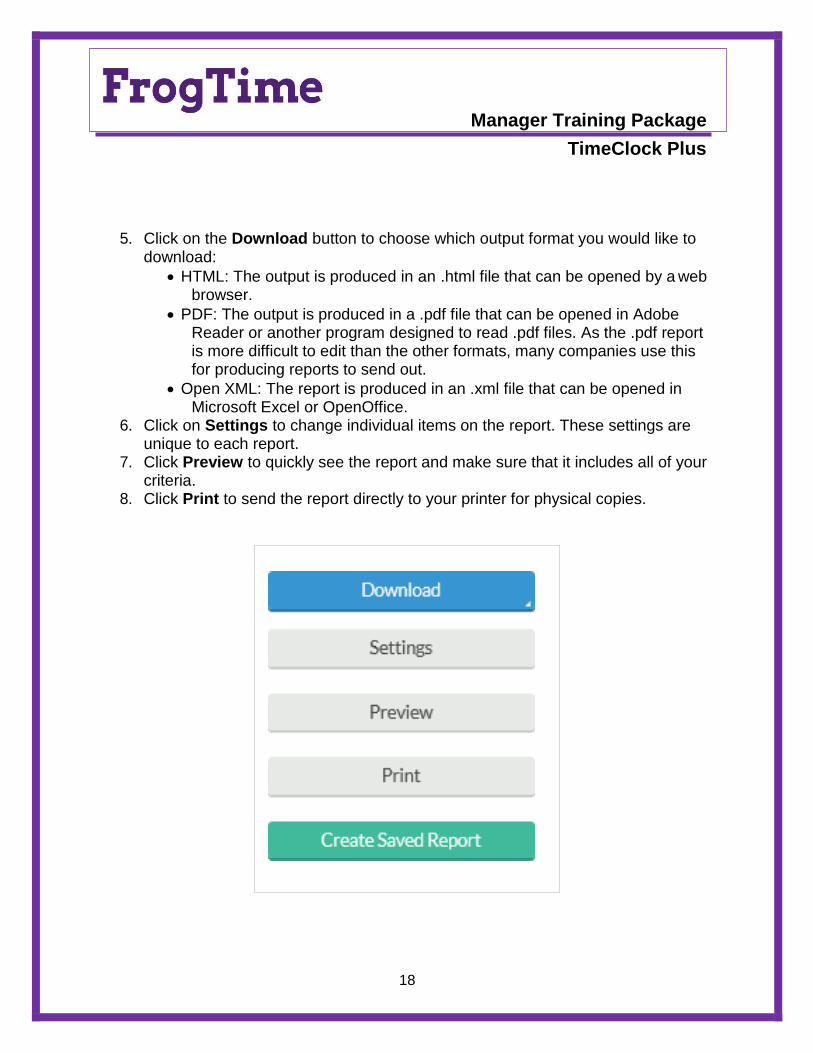
5. Click on the Download button to choose which output format you would like to download:
HTML: The output is produced in an .html file that can be opened by a web browser.
PDF: The output is produced in a .pdf file that can be opened in Adobe Reader or another program designed to read .pdf files. As the .pdf report is more difficult to edit than the other formats, many companies use this for producing reports to send out.
Open XML: The report is produced in an .xml file that can be opened in Microsoft Excel or OpenOffice.
6. Click on Settings to change individual items on the report. These settings are unique to each report.
7. Click Preview to quickly see the report and make sure that it includes all of your criteria.
8. Click Print to send the report directly to your printer for physical copies.
Manager Training Package

19
Saving a Report
TimeClock Plus
1. In the Period Reports window, select the report for which the saved report will be created.
2. Click the Create Saved Report button.
3. Double-click the ‘Category’ drop-down to choose an existing report category, or create a new category by typing it into the box. This represents the section that the report will be filed under when viewing your saved reports.
4. To choose specific employees to include in the report, place a check next to Save employee filter, and click Employee Filter.
5. To choose specific job codes to include in the report, place a check next to Save job code filter, and click Job Code Filter.
6. To adjust any report-specific settings, click on the Settings button at the bottom of the window.
7. Select Save
Manager Training Package
Creating a Saved Report will allow you to save any filters or settings to a report’s defaults, allowing you to run the report without having to set up configurations each time.

20
TimeClock Plus
Automating a Report
1. From the Saved Report window, click the Add button under Report Automation.
2. Use the ‘Description’ field to enter a name for the report automation. 3. Select a User to run automation. This is the user whose information will be
used to send out any e-mails that are sent with the automation. This user must have an e-mail defined under their User Profile (Configuration > User Profiles).
4. Beneath that, select the period of time that you want to include in the report 5. Click Next
Manager Training Package
Once you’ve created a Saved Report, you can also automate that report. This will allow TimeClock Plus to run a report on your behalf, without the need to log into the software,
and have that report e-mailed to yourself or any desired recipients.

21
TimeClock Plus
6. On the Output Options screen, select the Report Format in which the report will be run.
7. Click Next. 8. In the Message Recipients window, enter the e-mail address of each individual
who will be receiving this report and click Add.
Manager Training Package

22
TimeClock Plus
9. Click Next. 10. On the Email Content tab, enter what you would like to appear in the body of the
email with the report when it is sent out.
11. Click Next. 12. On the Task Scheduling tab, you’ll get to choose when this report gets sent out.
By default, this report will be configured to send out daily at the time you created it. To edit that setting, click the Edit icon.
Manager Training Package

23
TimeClock Plus
Next to Execute, select the frequency with which this report will be sent.
13. Select the date you want this report to begin sending and an expiration date (if necessary).
14. Enter the time of day to send the report.
15. Click Save on the Schedule Task Rule window. 16. Click Finish in the Report Automation window. 17. Click Save on the Saved Report screen.
Manager Training Package

24
TimeClock Plus
Employee Status Tabs
Browse to Tools> Employee Status:
The All tab allows the user to view every employee they have access to, their status, and (if clocked in) their job code, time in, and location.
The Clocked In tab only shows the clocked-in employees, as well as the job code that employees clocked in to, the time they clocked in, and the location of the clock operation.
The Auto Out tab only shows employees that are clocked into an auto-out job code, the job code that employees is clocked into, the time they clocked in, and the location of the clock operation.
The Not In tab only shows employees that are not currently clocked in.
The Last Punch tab shows employees, their status, their last clock in, and their last clock out.
The Hours tab shows employees, their hire date, the amount of hours worked today, the amount of hours worked this week, the employees’ status, and the last time that employee clocked out.
Manager Training Package
The Employee Status screen allows managers to monitor employees in real time. From this screen, you can see which employees are clocked in, what job code they are working
in, and how long the employee has been clocked in.
Employee Status

25
TimeClock Plus
Hours Audit Log
1. Browse to Tools > Other Tools > Audit Log. 2. Next to Select Feature, select Hours Audit Log. 3. By default, this feature will load all of the changes that have been made to the
present day. To only view certain changes, use one of the following filters:
Employee Filter to select which employees will appear.
Job Code Filter to select which job code hours will appear.
User Filter to see changes made by a particular user.
Advanced Filter to see particular types of clock operations or changes made using a specific software tool.
4. To view changes made to hours during a particular timeframe, change the date range boxes.
5. Once necessary changes have been made, click Update to view audits based on the specified criteria.
Manager Training Package
The Audit Log allows you to examine changes that have been made to employees’ hours, and profiles as well as situations where employees have not completed a clock
operation.
Audit Log

26
TimeClock Plus
6. Click the icon next to the date to see the details of any changes made to the employees’ hours including what changes were made, when they were made, and who made them.
Manager Training Package
27
TimeClock Plus
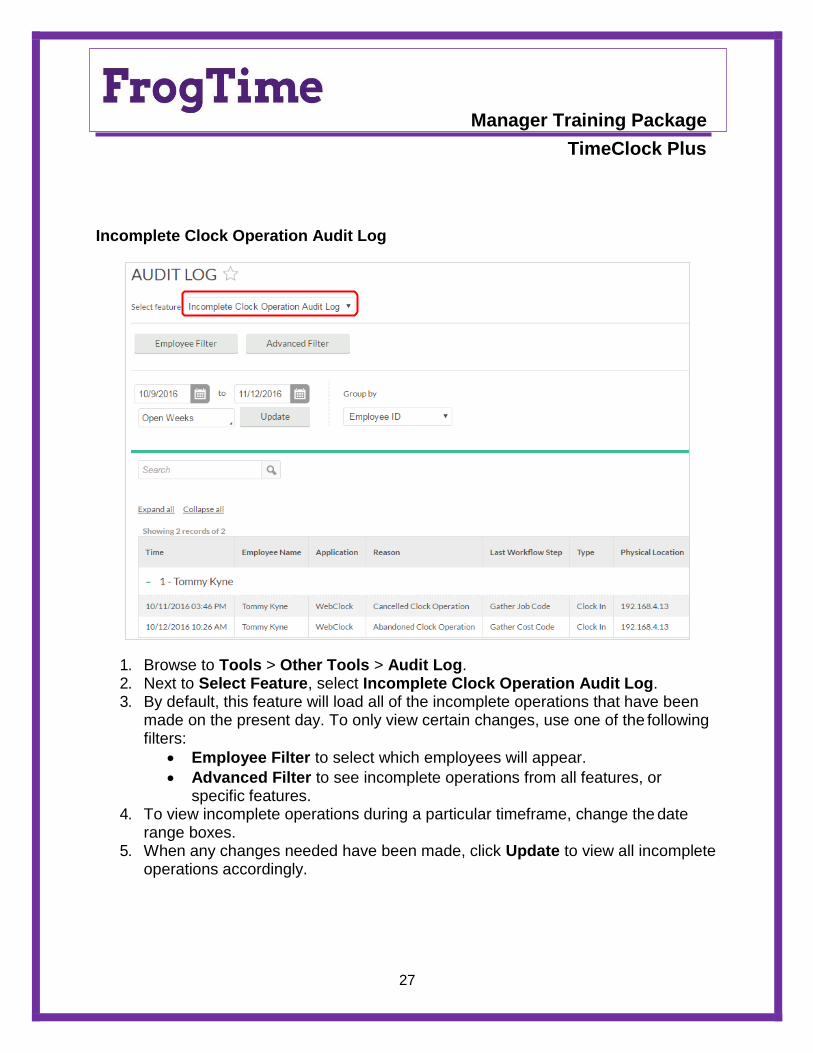
Incomplete Clock Operation Audit Log
1. Browse to Tools > Other Tools > Audit Log. 2. Next to Select Feature, select Incomplete Clock Operation Audit Log. 3. By default, this feature will load all of the incomplete operations that have been
made on the present day. To only view certain changes, use one of the following filters:
Employee Filter to select which employees will appear.
Advanced Filter to see incomplete operations from all features, or specific features.
4. To view incomplete operations during a particular timeframe, change the date range boxes.
5. When any changes needed have been made, click Update to view all incomplete operations accordingly.
Manager Training Package

28
TimeClock Plus
Section III- Employee Clock Operations
Manager Training Package

29
TimeClock Plus
WebClock
To sign into WebClock dashboard
Manager Training Package
30
TimeClock Plus
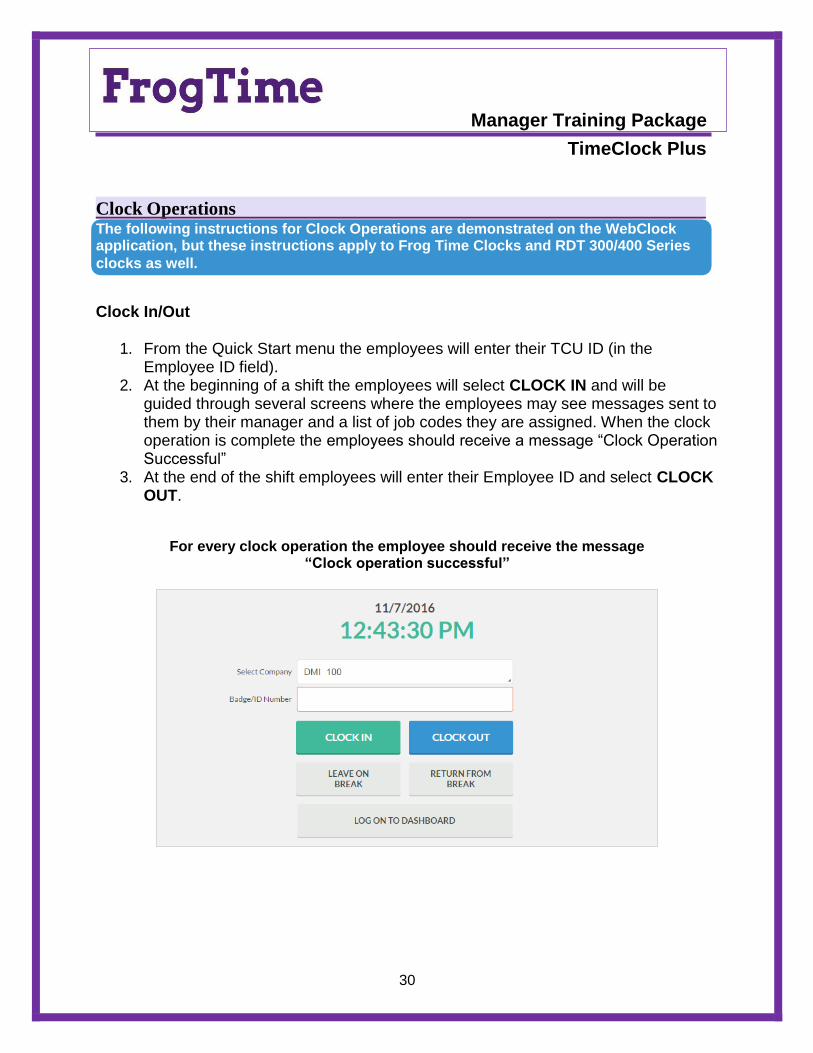
Clock Operations
Clock In/Out
1. From the Quick Start menu the employees will enter their TCU ID (in the Employee ID field).
2. At the beginning of a shift the employees will select CLOCK IN and will be guided through several screens where the employees may see messages sent to them by their manager and a list of job codes they are assigned. When the clock operation is complete the employees should receive a message “Clock Operation Successful”
3. At the end of the shift employees will enter their Employee ID and select CLOCK OUT.
For every clock operation the employee should receive the message “Clock operation successful”
The following instructions for Clock Operations are demonstrated on the WebClock application, but these instructions apply to Frog Time Clocks and RDT 300/400 Series
clocks as well.
Manager Training Package

31
TimeClock Plus
Missed Punches
Occasionally employees will forget to clock in or out which will generate a missed punch during their next clock operation. The Missed Punches tool not only tracks missed clock operations, but also allows employees to continue with subsequent clock operations while doing so.
If an employee has missed a punch in or out, upon performing the next clock operation, a screen will be displayed requesting confirmation that a missed punch has occurred.
To verify this is correct, the employee will click Continue
If the employee clicks Cancel, the entire clock operation will be canceled, a missed punch will not be created, and the employee will not be able to clock in/out
2. The next screen will verify that the missed punch was a missed out or missed in then specify the date and time of the last clock operation.
To verify this is correct, the employee will click Continue
If the employee clicks Cancel, the entire clock operation will be canceled, a missed punch will not be created, and the employee will not be able to clock in/out
Manager Training Package

32
TimeClock Plus
3. The next screen will prompt the employee to enter the date and time in or date and time out for the clock operation that he/she missed.
To verify, the employee will click Continue
If the employee clicks Cancel, the entire clock operation will be canceled, a missed punch will not be created, and the employee will not be able to clock in/out
Manager Training Package

33
TimeClock Plus
4. The next screen will provide a summary of the missed punch date in and time in or date out and time out.
To verify, the employee will click Continue
If the employee clicks Cancel, the entire clock operation will be canceled, a missed punch will not be created, and the employee will not be able to clock in/out
Manager Training Package
34
TimeClock Plus
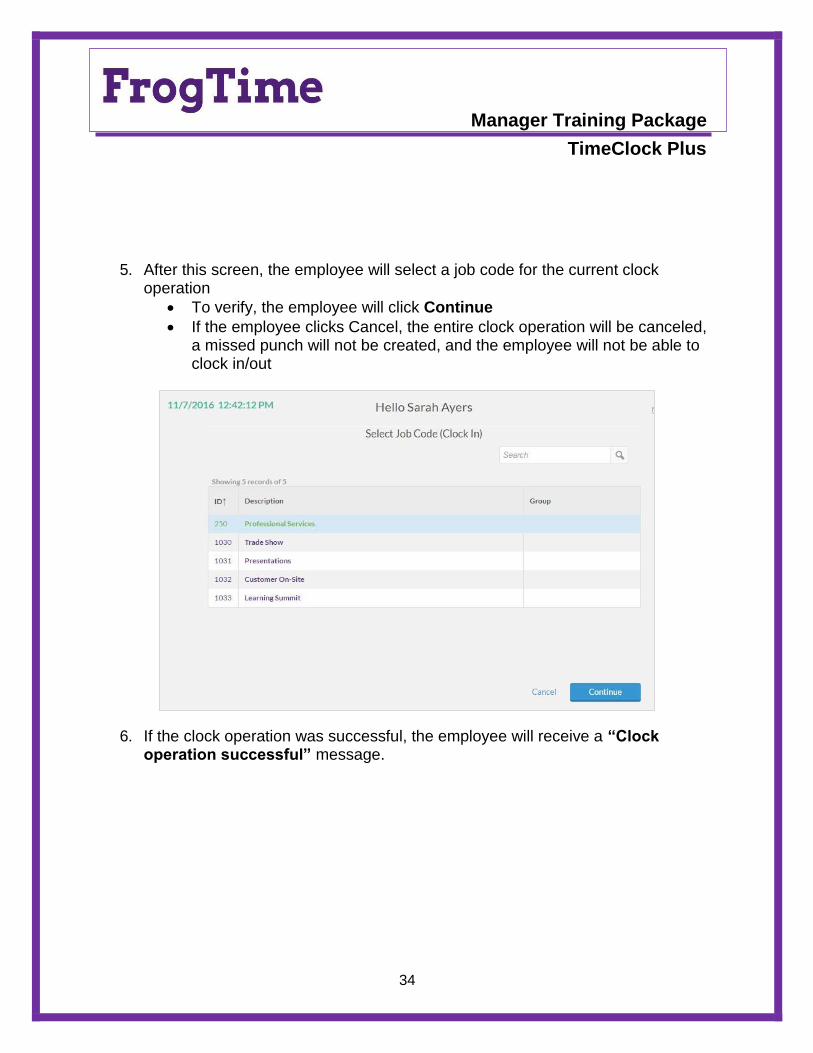
5. After this screen, the employee will select a job code for the current clock operation
To verify, the employee will click Continue
If the employee clicks Cancel, the entire clock operation will be canceled, a missed punch will not be created, and the employee will not be able to clock in/out
6. If the clock operation was successful, the employee will receive a “Clock operation successful” message.
Manager Training Package

35
TimeClock Plus
View/Approve Hours 1. From the Quick Start menu, the employee will enter his/her Employee ID number
in the Employee ID field and click LOG ON TO DASHBOARD. 2. From the Dashboard, click VIEW, then Hours. 3. Under VIEW HOURS, the employee can see all shifts they have worked for the
current week and use the navigation arrows in the top left to view previous weeks.
4. Employees can check the box under the column to approve their hours. This is their electronic signature verifying their hours are correct.
Manager Training Package

36
TimeClock Plus
Purpose: Department Managers can identify delegate(s), who in the absence of a direct supervisor of an employee can approve the time and leave of employees. This includes both my.tcu.edu leave approval, and FrogTime time approval.
Delegate Setup Page A department manager automatically granted access to the delegate setup page. This page can be access through my.tcu.edu, Department/Budget Manager Tile, and Delegate Setup Tile.
Click the Search button to view the departments you have access to manage. Then select the department.
Identifying the Delegate
The budget manager can identify the delegate by first clicking the Add Delegate link – this creates a new page in the setup page. Enter the employee’s id number, or click on the magnify glass to search and then select the appropriate person. The employees included for the delegate include all exempt & nonexempt employees in the department & the roll up department.
An active delegate gains access to the setup page only when the department manager has identified them as a delegate
Manager Training Package
Set up a Delegate

37
TimeClock Plus
Tasks that can be delegated are:
Leave Approval
Time Sheet Delegate (FrogTime)
Time Clock Scheduler Access
A delegate can also setup email notification for leave approval. Enter the effective date for the delegation. Select the task to be delegated by clicking the check mark box. Also, click the option “Is delegate Active.” This is used to terminate access, which is discussed later in this document. Click the save button.
Terminating Delegate Access
Delegate access can be removed entirely, or for selected systems. To do this, click the “Add Effective Date” link for the identified delegate. This creates a new effective dated page. Enter the date you want the access removed. To terminate all access – unclick “Is Delegate Active.” To terminate only certain system access, unclick only the system you want to remove access. Click the save button. To stop email notifications, unclick that option. Click the save button.
Manager Training Package

38
TimeClock Plus
Manager Training Package

39
Payroll Tips!
TimeClock Plus
It is a must to hire all student employees thru the EPAF system
before they begin working in the department.
Do not wait until the last Friday of the pay period end date to
hire students.
If the student has worked hours in the current pay period, and
the department needs to terminate the job, the termination
effective date MUST be the start of the following pay period.
Any EPAF action during the current pay period could prevent
hours being paid.
Please run the Department Manager’s Active Student Report
often. This is the list of current student employees.
Phase One FrogTime - collection only (replacing student and temp employees paper pay sheets
with clock swiping)
Phase Two FrogTime – basic scheduling following completion of phase one.
Phase Three FrogTime- TBD
As always, your support and patience are greatly appreciated.
Your FrogTime Payroll Team
Manager Training Package
FrogTime Timeline

40
TimeClock Plus
Manager Training Package


