Frequently Asked Questions / Product Summary Imperial… · Imperial/MAMA Center -...
39
Imperial/MAMA Center - ([email protected] ) Frequently Asked Questions / Product Summary Imperial/MAMA Center ([email protected] ) 1
Transcript of Frequently Asked Questions / Product Summary Imperial… · Imperial/MAMA Center -...

Imperial/MAMA Center - ([email protected])
Frequently Asked Questions / Product Summary Imperial/MAMA Center
1
proose
Rectangle
proose
Rectangle

Table of Contents FAQ’s……………………………………………………………………………………...2 How To: Transfer the programming into a new panel……………………………………………..19 Connect with a network cable without the use of a router or switch…………………….20 Create access doors and program access users…………………………………………..23 1

Imperial/MAMA Center - ([email protected])
CCoommmmuunniiccaattiioonn PPoorrttss What is the difference between RS485 and Multibus communication? RS485 is an asynchronized communication meaning that the packets are sent in a continuous stream without the use of a clock signal. Multibus is synchronized communication, it refers to time periods meaning that the information is sent along with a periodic signal. Why don’t we use one single bus to communicate with all modules (Security, Home Automation, and Access Control)? The advantage of having a separate RS485 bus for Access is that the ACM24D access control modules are completely independent from the rest of the system. The Multibus and RS485 both communicate through 4-wires that include Green and Yellow. What do the Green and Yellow wire represent? Multibus Green: data Yellow: clock signal at 1KHZ RS485 The data is a differential voltage signal so green and yellow are used to transmit the data. What is the maximum distance at which we can wire a module from the main V32 controller on the Multibus? Is it the same for an ACM24D access control module on the RS485 bus? Multibus: 900m (3000ft) – with 18AWG 300m (1000ft) – with 22AWG RS485: Same as the Multibus.
The V32 has a built-in TCP/IP communication port that is specified to communicate at speeds of 10/100Mbps. What does the 10/100Mbps represented? The 10/100Mbps means that the V32 is compatible with a local area network speed of 10 Mbps or 100Mbps. 2
proose
Rectangle

Imperial/MAMA Center - ([email protected])
What could affect the transfer rate between BabyWare and the V32 assuming that you are connecting through a local network? Traffic on the network from other devices can slow down the transfer rate between BabyWare and the V32. Is a crossover network cable required in order to connect directly to the V32 if you do not have a router/LAN, or will a straight through cable be OK? With newer laptop and PC’s you can use both. Older PC’s usually require the use of a crossover cable. Please refer to section “BabyWare Direct Connect” on page 22. The V32 dialer is a 2 opto coupler dialer circuit that is primarily used to dial out to a central station for reporting purposes. What exactly is so reliable about the 2 opto coupler dialer design? The opto coupler is a phototransistor. The opto coupler is used because it physically isolates the output from the input of the circuit. High voltages on one side cannot damage the low voltage circuits on the other side. In other words it protects the V32 from the potential danger of the telephone line. Does BabyWare and the V32 have the ability to communicate through the dialer on standard telephone line? No. BabyWare connection is only possible using the network port. Does the USB 2.0 port serve a purpose for the V32? At this moment the USB 2.0 port can only be used for emergency firmware upgrade of the V32. 3
proose
Rectangle

Imperial/MAMA Center - ([email protected])
VV3322 –– MMaaiinn CCoonnttrroolllleerr SSyysstteemm FFeeaattuurreess What is the 32MB internal memory used for? The 32MB internal memory is used to maintain the communication speed between the V32 and BABYWARE and also for the system events storage. What is the V32 events capacity? The events buffer’s size is 20.000 total. 2000 Security events, 8000 Access events and 10000 Home Automation events. For how long will the panel keep the time and date in case of a total power loss (AC and battery)? A powerful capacitor keeps the panel’s time and date available for 10 days. Can the V32 input transformer be shared with other modules? It is possible to share the transformer however the use of a dedicated transformer is recommended for increased protection. Why is there a BELL button on the V32 and in what condition would that be of use to the owner of the system? To test the siren, or to manually deactivate it if necessary. In what occasion would a ‘Scan Module’ of the V32 need to be started? It is always recommended to perform a Scan Module after adding or removing a module. A scan module can also be started in a situation where a module shows OFFLINE How many BabyWare PC connections are permitted on one V32 controller? 8 simultaneous local/remote BabyWare PC connections. Can the same user login be connected on the V32 from two different PCs? No, the connected user logins need to be different. 4
proose
Rectangle

Imperial/MAMA Center - ([email protected])
HHoommee AAuuttoommaattiioonn Are there any recommendations regarding the installation of MAMA modules? Yes. Power the MAMA modules with an external power source (e.g. PS100 or PS27D) and NOT the Multibus to avoid flickering of the output in case of a loss of bus power. Flickering might cause damage to electrical appliances connected to the outputs. Recommendation for dimmer modules only: To avoid flickering in a 3-phase installation, all dimmer modules in the same electrical box should be connected to the same phase. Separate electrical boxes should be used for other phases. Also, wires running together to the loads should be connected to dimmer modules on the same phase. What is the purpose of the ‘Global Button’ on some of the switches (MVCA2 and MCB1H/V)?
Global buttons can control alternate device/s or macro/s. The Global button allows dimmer dials to control two devices (or groups of devices). For example if a dimmer dial’s primary function is to control the kitchen window shutters, by pressing the Global button, the dial could switch to its secondary function which could be to control all window shutters in the house. Global function could even be programmed with a completely unrelated function e.g. control the kitchen light. Is there a limit to how many switches can control the same output? Up to 510 switches can control one single output. This amount is only limited because of the total amount of modules that can be connected. My dimmer module is not dimming anymore, it is just turning the light ON or OFF. Verify the setting of the DIP switch on the dimmer module. For phase control dimming the DIP switch 1 and 2 need to set to OFF. 5
proose
Rectangle

Imperial/MAMA Center - ([email protected])
AAcccceessss CCoonnttrrooll What readers are compatible with the ACM24D access control modules?
4 wire reader R915 4 wire reader R910 version 2.1 and up. 26-bit Wiegand readers can also be used in conjunction with the Wiegand-RS485
Convertor module RW485D. (*Requires ACM24D V1.02 or higher) What is meant by ‘Fail Safe Operation’ with Access Control in the Imperial? The ACM24D access control modules provide fail-safe operation should the panel go offline by managing its access control functions internally and by accumulating up to 1,000 local access events. What type of wiring connection is recommended for the RS485 bus, daisy-chain or star configuration? The Imperial RS485 bus can be wired in daisy-chain or star configuration. Does the Imperial RS485 bus need termination or not? Termination is needed for high baud rates and long cable runs only. The RS485 bus with the Imperial does not require termination. Termination complicates system design and rarely solves problems when used in the kilobit data range. 6
proose
Rectangle

Imperial/MAMA Center - ([email protected])
What makes the Imperial Access Control so fast? The Access Control is almost instant because the access control modules (not the V32) manage all the access control functions internally, which gives it the ability to perform on Stand-Alone. What is the advantage of having a separate RS485 bus for Access Control? In addition of being completely independent from the rest of the system, the RS485 bus provides fast bus module programming, data transfer, firmware upgrade, system event buffering and communication management between the Imperial main controller and the access control modules. How long will the ACM24D access control modules remain in stand-alone mode after they have lost communication with the V32 controller? The ACM24D access control modules will remain in stand-alone mode until the V32 restores it’s communication with the ACM24D modules. How far can you connect an ACM24D access control module from the V32? 900m (3000ft) – with 18AWG 300m (1000ft) – with 22AWG What is the maximum distance between the ACM24D access control module and the readers? 900m (3000ft) – with 18AWG 300m (1000ft) – with 22AWG My readers are not turning ON. Make sure that the 4-wire connection in the reader is not reversed. When using a RW485D module then assure that the reader OUT connections are good. 7
proose
Rectangle

Imperial/MAMA Center - ([email protected])
SSeeccuurriittyy What is a ‘Virtual Zone’? A zone that can be used for automation events; a virtual zone is not linked to a partition and works independently from the Security part. Up to 384 virtual zones are programmable. How many user codes are capable of performing arm/disarm actions? The first 250 Security users. How many access cards are capable of performing arm/disarm actions? 250 cards, assigned to the first 250 Security users. Why does the ZX32D have a built-in power supply, but the ZX8/16D do not? The ZX32D has a built-in power supply to give the option of providing power to the 32 input devices. The ZX8D and ZX16D have fewer zones so the chances of needing power are less. Can I assign more than 8 partitions to a keypad? Only the Grafica allows you to view more than 8 partitions. AAcccceessssoorriieess How many HUB4D can we connect on the same run? Maximum 3 HUB4D’s can be connected on the same run BUT the total length of the run can not exceed more than 9000 feet with 18AWG cable. 8
proose
Rectangle

Imperial/MAMA Center - ([email protected])
BBaabbyyWWaarree
General What are the system requirements for BabyWare? - Microsoft® Windows® 7/Vista/XP/2000 - 512MB of RAM (1GB Recommended) - Intel® Pentium® 4, 1.4GHz processor or faster - 150 MB of available hard-disk space for installation (additional 150 MB recommended for multi-accounts and events) - 1280 X 1024 video display with 32-bit color adapter BabyWare is not working on my Windows 7 64 bit computer Make sure you the UAC (User Account Control) is disabled and that you have administrator rights. What is the difference between an Operator and a User in BABYWARE? The ‘Operator’ is a login for the BABYWARE software. The ‘User’ is a login for the V32 account in the BABYWARE software. What is the BABYWARE events capacity? Maximum 50.000 events displayed (but BABYWARE can accumulate unlimited events, but not displayed over this amount). Can BABYWARE be run by a regular User on a Windows computer? No. In order to run BABYWARE, the User must be logged on as an Administrator User in Windows on that specific computer. 9
proose
Rectangle

Imperial/MAMA Center - ([email protected])
What kind of labels are there in BabyWare?
There are several places where text can be added to identify: - The group of outputs being controlled by the module (1,4) - The controlled output of the module (2) - The area/room location of the module (3,5) - The physical location of the device (6 - EX: Light fixture)
What is the purpose of the “Email Logfile to Paradox Support” option under the Help menu? When selecting this option BabyWare will email the logfile to Paradox. This logfile will help Paradox to analyze a potential issue with the account. Is the ‘First Name’ and ‘Last Name’ information (user programming) saved in the database of BabyWare only or is it actually downloaded to the V32 controller also? First Name’ and ‘Last Name’ information is kept only in the database of BabyWare so another installation of BabyWare will not see this information. I need to replace my panel, how can I restore all the programming from my old panel to the new one? Please refer to the section “Replacing a panel” on page 21. 10
proose
Rectangle

Imperial/MAMA Center - ([email protected])
Mama Modules General MAMA trouble-shooting procedure Step 1 Check if every output in the MAMA module programming is set to the correct “Type” value
Step 2 In the switch programming make sure you are activating the correct output.
Step 3 Make sure that the output is being powered.
DIM1D and DIM4D modules. Press and hold the “up-arrow” dimming button. If the dim intensity LED display is not lighting up then this means that there is no power going to the module.
HV8D and LV8D modules: Measure the voltage on the output. Step 4 Last resort is to reset and reprogram the module and switch programming. 11
proose
Rectangle

Imperial/MAMA Center - ([email protected])
What is the meaning of “Manual Duration” and “Reactivation Delay” in the “Relay Controller Properties”? 1. Manual duration: the time interval that the output stays activated after manually pressing the corresponding output button on the module or on its icon in BABYWARE. 2. Reactivation delay: the time interval before the output activates. Once this is set then the time delay will always be applicable, even when controlled by a switch. This option can be used to protect the load on the output. What does ‘Restore status’ for a MAMA module mean? 3. Restore Status: Upon a power loss, the MAMA outputs status is saved and when the power is restored the output will be put back to the same position. This feature will be linked to the Manual and/or Macro activation and a priority level will be established. When I press on one of the HV8D onboard button then the output does not remain ON. I have to hold the button in order for the output to stay ON. The HV8D module is in shutter mode. In the Relay Controller Properties, change the output Type. My output does not stay ON when I turn it ON with the on-board control button. Make sure there is no value entered in the “Manual Duration” field in the MAMA module programming.
12
proose
Rectangle

Imperial/MAMA Center - ([email protected])
The on-board control button starts to flash when I push it. Make sure there is no value entered in the “Reactivation Delay” field under the “Relay Controller Properties”.
The dimming intensity LED display is OFF and I’m not able to change the dimming level with the on-board dimming buttons. If the dim intensity LED display is not lighting up then this means that there is no power going to the module. My output does not stay ON when I turn it ON with the switch. Make sure there is no value entered in the “Duration” field under “Select Outputs”.
13
proose
Rectangle

Imperial/MAMA Center - ([email protected])
My lights are turning OFF by themselves and sometimes they don’t turn ON at all. Make sure the output “Type” is set as “Light” and not “Shutter”.
I press the button to turn OFF all my lights, instead all my lights turn ON. In order to turn OFF all my lights I need to press the button again. The function to turn ON and OFF all lights needs to be programmed on two buttons, not one single button. If you program it on one single button then the priority is always given to turning ON all lights first.
14
proose
Rectangle

Imperial/MAMA Center - ([email protected])
Access Control What is the meaning of the ‘Stay Locked delay’ option? The time interval where the door will stay locked after an access granted. Once the Stay Locked delay has elapsed the door will unlock. What is ‘Unlock Delay on Fire Alarm’? The time interval after which the door unlocks following a fire alarm. What does ‘Re-open on REX’ mean? The door unlocks upon REX, regardless if the zone is open. What is ‘Lockout mode’? Lockout mode blocks the reader from reading any cards/codes after a programmable number of invalid cards/codes for a programmable time period. What is the “SAS” option under the Advanced Options in the Door programming? SAS (door trap/man trap) prevents one door from giving access granted before another door is closed. Typical applications include: Military security access control, detention facilities, courtrooms, financial center access control, laboratories, clean rooms, airlocks, showers, money counting rooms, restricted dark rooms, computer rooms and more. What is the purpose of the Hardware options ‘Energy saving on relay activation’ and ‘Energy saving on relay standby’? Energy saving on relay activation: The lock activation voltage is decreased to a selectable value (=Activation voltage) Energy saving on relay standby: The lock standby voltage is decreased to a selectable value (=Standby voltage) What is the purpose of Hardware setting called “Activation time before Standby (Sec)”? The number of seconds of the activation voltage (before the Standby voltage kicks in). How do we create doors and program access cards? Please refer to the section “QuickStart ACM24D” on page 34. 15
proose
Rectangle

Imperial/MAMA Center - ([email protected])
Security What is the “Registration Account” in the “IP Com Channels”/“Reporting Paths” under the V32 programming? The value of the “Registration Account” is the registration number of the account in the IPR512. Is there a way to monitor the openings and closing of all the zones through the event list? Yes, under “Events” select “Log all zones (Opening / Closing)”. I’ve noticed that the keypad (K07C) does not contain all the changed names for partitions and zones. It has some carried across but many of the new ones I have created are labeled as "Zone 140" "Area 14" and so on. Do I have to power the V32 on and off to get this to happen? No need to reboot the V32. You need to start the function called “Broadcast Label to Modules”. Connect to your panel with BabyWare and right click on the IMPERIAL panel, then select “Broadcast Label to Modules”. After a couple of minutes you will see that the labels will be available in the keypad. 16
proose
Rectangle

Imperial/MAMA Center - ([email protected])
Macros Can I activate a PGM on the V32 for a particular partition when it is armed / disarmed? The programming of the onboard PGM’s with BabyWare is not available yet, for now they are for local use only. The Imperial MAMA Macro programming is being re-designed and improved. Once those improvements are ready then the onboard PGM programming will be evaluated to be re-introduced. What we suggest you to do for now is use the MAMA automation module LV8D that has eight programmable low voltage outputs.
When programming Macros – how many Macros are able to use the same MAMA module? Maximum 16 Macros are able to use the same MAMA module. Is there a limit to how many outputs can be used in the same Macro? No, all 512 outputs can be used in the same Macro. What is the meaning of “Pre-delay” and “Duration” in the macro programming of an output? Pre-delay: the time interval before the output’s activation. Duration: the time interval the output stays activated. What is the representation of the different colors of the outputs numbers?
Grey: Normal Green: ON by macro (automatic) RED: ON by switch or button on module (manual) 17
proose
Rectangle

Imperial/MAMA Center - ([email protected])
Licensing If I replace a licensed V32 with a new one that is not licensed, will all the modules that are connected to it continue to work as it did with the original panel? Yes, but a 30-day countdown will start. At the end of the 30-day period, BabyWare will not let you connect to the panel anymore. What is the purpose of registering the V32? Registering your V32 controller allows you to: • Activate a V32 license • Receive notification of available upgrades • Receive technical support from your distributor and/or Paradox 18
proose
Rectangle
proose
Rectangle

How to recover the programming from BabyWare to a replacement panel The simplest way to transfer all the information from your BW account to a new panel is by connecting with that account to the new panel. Steps needed prior to connecting:
1. Search for the new panel on the network because it will have a different IP address then the one that was installed originally.
2. Change the System Login and System Password (default is admin admin).
3. While connecting, a Serial # Mismatch window will pop up.
4. Select Action “This is a replacement panel. Write all the PC programming to panel”. The System Login and System Password of the original Panel are required in order to connect and transfer all the programming from the account to the new panel.
Note: If you have a backup of your original account then you can restore it and connect with the restored account following the same procedure explained above. 19

BabyWare Direct Connect with network cable
1. Turn OFF Windows Firewall
2. Turn OFF the Wireless Network communication
3. Connect network cable directly from the PC to the V32
4. Open BabyWare and locate the V32:
1) Select “Connection Option” 2) Click on the “hour glass” to view local devices 3) Click on OK
20
proose
Rectangle

If you can’t see the V32 panel then try changing the IP setting of your PC/laptop:
1. Under Control panel go to Network and Sharing Center
2. Select “View status” next to “Local Area Connection”]
3. Select “Properties”
4. Double Click on “Internet Protocol Version 4 (TCP/IPv4)
5. Select “Use the following IP address” and enter an IP address and Subnet mask: Example for first time connection: IP address: 169.254.1.100 Subnet mask: 255.255.0.0
6. Open BabyWare and locate the V32 again 7. Connect to the V32
21
proose
Rectangle

If BabyWare can not keep a connection active for longer then 2 minutes then try changing the IP setting of the V32 panel:
1. With BabyWare, change the panel's IP address to static: DHCP=NO and IP address: 169.254.1.1 for example
2. Now reboot the panel for the new IP settings to take effect 3. Open BabyWare and locate the V32 again 4. Connect to the V32
22
proose
Rectangle

QQuuiicckk SSttaarrtt
AAcccceessss CCoonnttrrooll IInnssttaallllaattiioonn//PPrrooggrraammmmiinngg
23
proose
Rectangle
proose
Rectangle

AAcccceessss CCoonnttrrooll IInnssttaallllaattiioonn//PPrrooggrraammmmiinngg WWiizzaarrdd STEP #1: RS485 Access Bus Connections Connect to V32 RS485 Access bus. Ensure that it is powered by an external power supply (PS27D). This will not be necessary with an upcoming V32 hardware version, which will supply the power (see www.paradox.com for availability).
24
proose
Rectangle
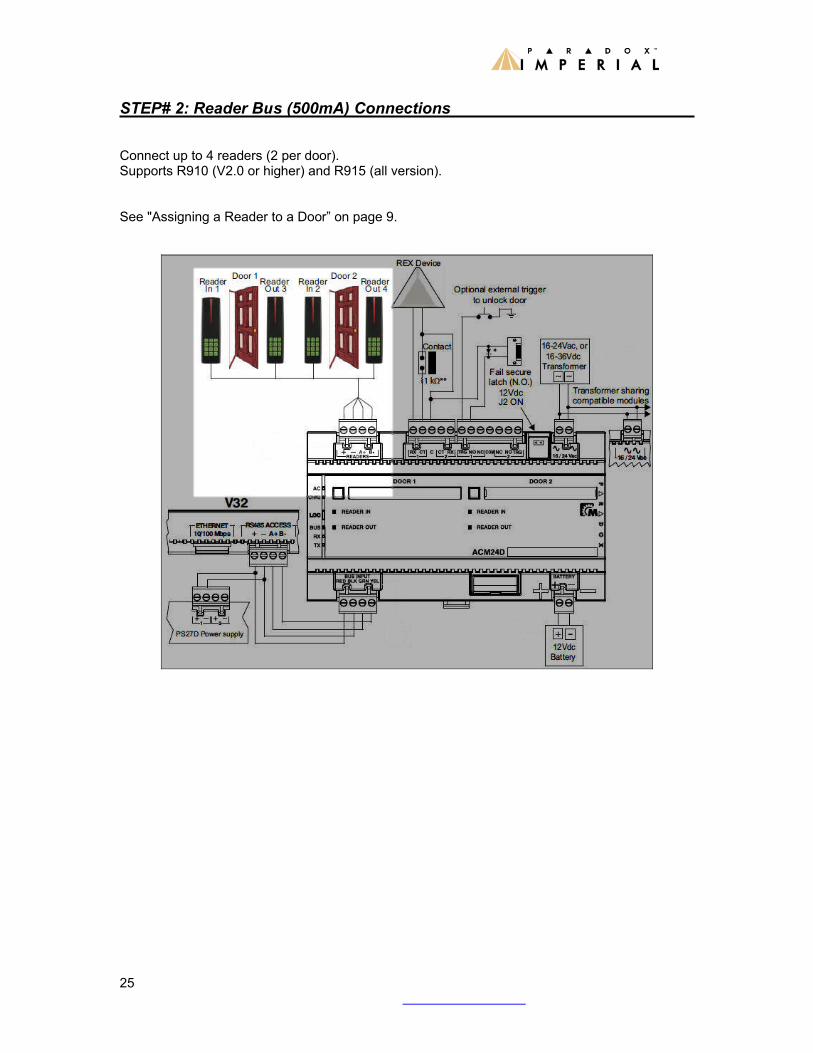
STEP# 2: Reader Bus (500mA) Connections Connect up to 4 readers (2 per door). Supports R910 (V2.0 or higher) and R915 (all version). See "Assigning a Reader to a Door” on page 9.
25
proose
Rectangle

STEP# 3: AC/DC Input with Transformer Sharing Modules with this feature can share a central transformer (16-24Vac, or 16-36Vdc) throughout the system. Ensure that the total power output of the transformer is respected. There is no specific polarity. Battery Input Connect a 12Vdc (4Ah or 7Ah) rechargeable gel cell battery. Apply AC power before connecting the battery. If battery wires are extended, use an external fuse to protect against a short.
26
proose
Rectangle

STEP# 4: Door (Latch) Power Selection Jumper J2 ON = Internal power (12Vdc) with Energy Saving feature J2 OFF = External Power Also see STEP 5:
27
proose
Rectangle

STEP# 5: Connecting Door accessories to the ACM24D The ACM24D is equipped with several inputs such as REX, Contact & Trigger. You also need to connect the electric latch or maglock system using the N.O or N.C. and “C” connector only when using ACM24D power to supply these units. Otherwise when using the Fail Secure Feature simply take out J2 Jumper and use external power source in conjunction with the “COM” connector instead of the “C” connector
28
proose
Rectangle

STEP #6: Programming an Access Door To Program the ACM24D “right click” on the appropriate ACM24D and select “Properties”.
29
proose
Rectangle

STEP #7: Labeling the ACM24D First fill out the Label and Location Portion, then you can select the option for that ACM24D.
The hardware options for door1 will apply to door2 automatically. 30
proose
Rectangle

STEP #8: Assigning a Reader to a Door Click on the tab “Readers” and expand the “Door1” and select witch readers to be assign to what door number/or in/out (the ACM24D can support 4 readers and 2 doors). Select the reader by clicking on the “ …” icon next to the serial# row. Click “OK”.
Note that the serial number will apply itself in the proper field and that you will be showed to what reader and door number it is all ready assign if this is already the case.
31
proose
Rectangle

STEP 9: (Optional) Configuring the LED intensity and Piezzo frequency You have the option of configuring the LED display Brightness of both the access granted and Reader status LED feedback as well as changing the piezzo frequency. Note that this option as to be configured for each individual readers.
32
proose
Rectangle

STEP 10: Door programming To create a door, select the “Doors” view option, right click on the “Doors” display bar and select “Add Door”
Once you succeeded creating a door, you will be able to right click on it and select properties for further programming.
33
proose
Rectangle

STEP #11: General options and Labeling In this window you need to label your door itself and label its location. Once the door labeled you can select what ACM24D shall control it as well as what door output from that ACM24D to assign it to base on the programming done on the ACM24D earlier. You will find here features like “ Door Unlock Time, Extended Unlock Time, Door left Open Supervision, Restrict Arming/Disarming, and Area Selection, Unlock Delay On Fire Alarm, Door Unlock Schedule “ and much more.
Note that there is no need to select any partitions in order to open a door using pin or card. (only when dealing with security ) 34
proose
Rectangle

STEP 12: Advanced Door Configuration In this Advanced Section you will be able to configure the various delays options Such as :
• Door Forced Alarm • Door left open Alarm • Card/Co de lockout • Unlock delay on fire Alarm • Locko ut timer • Door Forced Supervision • Readers Feedback type • SAS mode activation • Lockout Enabling mode
35
proose
Rectangle

STEP 13: Creating Access Users To start creating Users Click on the Users TAB. In this section, you can create both Security and Access type users.
1. To identify a user type simply look at the user numbers.. Security are from 1 to 250 and Access will be from 251 up to 4000.
2. These numbers will tell you how many are programmed in each type and how many left to program in the system. 250 for security & Access + 3750 for access only for a total of 4000 users.
3. This code will arm disarm depending on the Security profile for each user and will only unlock doors for user with access profile only.
4. Extended delay enable (this feature can be use for special delivery people or handicap people for example).
5. Card Number input field. “See How to enroll a card on page 15” 6. Remote Control Serial number input field. 7. Security Rights Selection. Here you can configure up to 256 Security Rights profiles. 8. Access Rights Selection. Here you can configure up to 64 Access Rights profiles
36
proose
Rectangle
proose
Rectangle

Enrolling/Programming an access card into the system
STEP #1 Programming an access card To program a card simply put the numbers printed on the card itself. If the numbers are erase not present on the card you can enroll it by pressing the “ …”
STEP #2 Enrolling an access card If a card needs to be enrolled simply select the scanning door feature and the door you would like to use during the enrollment or select from previously enrolled cards.
37
proose
Rectangle

Tips To help you programming your ACM24D and Doors, having organized plan will help you programming your doors in BabyWare. Such Plan should contain the following information’s.
• ACM24D serial number and relevant label. • Reader serial number and relevant label. • A detailed floor plan of the building.
38
proose
Rectangle