FPLFEV200 - Adorama · miniaturized modular “SpeedMonoLight” system with interchangeable flash...
24
eVOLV 200 200ws TTL Modular Flash with integrated R2 radio Receiver FPLFEV200
Transcript of FPLFEV200 - Adorama · miniaturized modular “SpeedMonoLight” system with interchangeable flash...

eVOLV 200 200ws TTL Modular Flash with integrated R2 radio Receiver
FPLFEV200

2
FLASHPOINT eVOLV 200 Flash Instruction Manual
Intro
Before using this product
Please read this user manual carefully in order to ensure your safety and the proper operation of this
product. Keep for future reference.
Thank You for Choosing Flashpoint!
The new eVOLV200 is not just a mighty 200 watt second fully cordless TTL strobe, but an amazing
miniaturized modular “SpeedMonoLight” system with interchangeable flash heads. You can snap
in the best of traditional speedlite style Fresnel heads at GN170 (ft) or chose to use to the barebulb
parabolic reflector head at GN 196 (ft) with super even spread, just by plugging it in. The incredible
amount of power and control in these compact and lightweight flashes, make this design a first
choice of professional photographers with an eye for flexible multiple light set up.
The eVOLV200 has a max recycle time of under 2 seconds and enough energy to cover at least 500
full power shots. That gives more flexibility and instant solutions for multiple off camera lighting
while maintaining all of the investment in light modifiers in the Streaklight and ZoomLion models.
The battery recharge is a snap, too, using the external power charger to keep the action going
without tying up the flash to re-energize. Add the pro LED modeling light feature and the picture is
complete.
The eVOLV200 is the next evolution of the Flashpoint R2 radio system, totally compatible with the
Canon, Nikon and Sony systems, for remote power control and shooting. With a focus on portable
lighting, the R2 Family frees your camera to go out and shoot at will - whether you are a wedding or
event photographer, environmental portraiture shooter, freelance commercial illustrator,
photojournalist, a backpack adventurer, or fast action sports snapper.
3
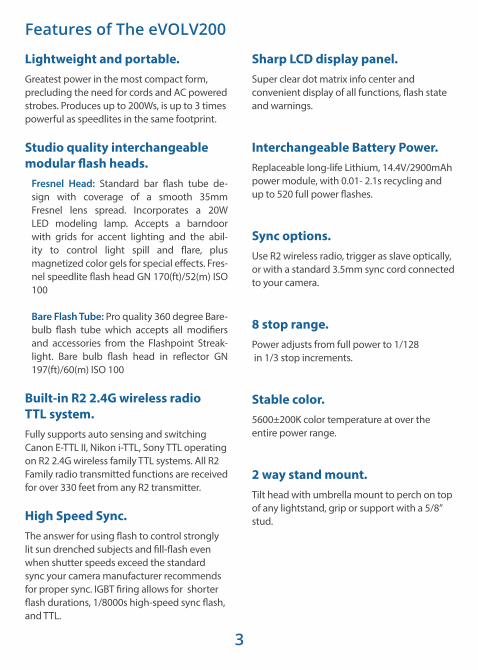
Features of The eVOLV200
Lightweight and portable. Greatest power in the most compact form, precluding the need for cords and AC powered strobes. Produces up to 200Ws, is up to 3 times powerful as speedlites in the same footprint.
Studio quality interchangeable modular flash heads.
Fresnel Head: Standard bar flash tube de-sign with coverage of a smooth 35mm Fresnel lens spread. Incorporates a 20W LED modeling lamp. Accepts a barndoor with grids for accent lighting and the abil-ity to control light spill and flare, plus magnetized color gels for special effects. Fres-nel speedlite flash head GN 170(ft)/52(m) ISO 100
Bare Flash Tube: Pro quality 360 degree Bare-bulb flash tube which accepts all modifiers and accessories from the Flashpoint Streak-light. Bare bulb flash head in reflector GN 197(ft)/60(m) ISO 100
Built-in R2 2.4G wireless radio TTL system.Fully supports auto sensing and switching Canon E-TTL II, Nikon i-TTL, Sony TTL operating on R2 2.4G wireless family TTL systems. All R2 Family radio transmitted functions are received for over 330 feet from any R2 transmitter.
High Speed Sync. The answer for using flash to control strongly lit sun drenched subjects and fill-flash even when shutter speeds exceed the standard sync your camera manufacturer recommends for proper sync. IGBT firing allows for shorter flash durations, 1/8000s high-speed sync flash, and TTL.
Sharp LCD display panel. Super clear dot matrix info center and convenient display of all functions, flash state and warnings.
Interchangeable Battery Power. Replaceable long-life Lithium, 14.4V/2900mAh power module, with 0.01- 2.1s recycling and up to 520 full power flashes.
Sync options. Use R2 wireless radio, trigger as slave optically, or with a standard 3.5mm sync cord connected to your camera.
8 stop range. Power adjusts from full power to 1/128 in 1/3 stop increments.
Stable color. 5600±200K color temperature at over the entire power range.
2 way stand mount. Tilt head with umbrella mount to perch on top of any lightstand, grip or support with a 5/8” stud.

4
For Your Safety
• Always keep this product dry. Do not use in rain or in damp conditions.
• This product contains high-voltage electronic parts. Touching the high-voltage circuit inside it may result in electric shock. Do not disassemble. Should repairs become necessary, this product must be sent to an authorized maintenance center.
• Stop using this product if it breaks open due to extrusion, falling or strong hit. Otherwise, electric shock may occur if you touch the electronic parts inside it.
• Do not use the flash unit in the presence of flammable gases, chemicals and other similar materials. In certain circumstances, these materials may be sensitive to the strong light emitting from this flash unit and fire or electromagnetic interference that may result.
• Do not leave or store the flash unit if the ambient temperature reads over 120°F/50°C (e.g. in sun drenched automobile). Otherwise the electronic parts may be damaged.
• Do not use any power supply other than the included one to charge the battery.
• Do not insert metal parts into any lighting equipment.
• Do not touch the electrical contacts on the strobe or battery or contact them with any conductive materials.
• Do not fire the flash directly into the eyes (especially those of babies) within short distances. Other-wise, visual impairment may occur. When taking pictures of babies, keep the flash unit at least 3.3 feet (1 meter) away from them. Using bounce flash to reduce light intensity is also recommended.
• This strobe has an over-heat protection circuit, rapid continuous firing will cause the strobe to slow operation and trigger a “cool down” period. After this period, the strobe will resume normal opera-tion. You may also reboot the strobe by cycling the power off and then on.
• The strobe has a locking mechanism to ensure secure operation. To avoid damage, slide the release before removing any reflectors or accessories.
• In case of abnormal function, sparks, excessive heat, flames or smoke, immediately power off the unit and disconnect the battery if safely possible. Have it checked by an authorized technician.

5
Contents
Intro ..................................................................................................................................................... 2For your safety ................................................................................................................................. 4Name of Parts .................................................................................................................................. 6 Control Panel.................................................................................................................................... 7LCD Panel........................................................................................................................................... 7 eVOLV200 kit contents ................................................................................................................. 8Separately Sold Accessories....................................................................................................... 8Attaching Flash Heads ................................................................................................................. 9Battery ..............................................................................................................................................10Power Management ...................................................................................................................11Modeling Lamp ............................................................................................................................11Flash Modes ....................................................................................................................................11Flash Mode— TTL Autoflash ...................................................................................................11FEC (Flash Exposure Compensation) ...................................................................................12Flash Mode—M: Manual Flash ...............................................................................................12Slave Settings.................................................................................................................................12Flash Mode—Multi/Stroboscopic Flash .............................................................................13High-Speed Sync ..........................................................................................................................14Wireless Flash Shooting: R2 Radio (2.4G) Transmission ................................................15Ratio Lighting Examples ...........................................................................................................16Optical Wireless Control Function .........................................................................................16Sync Triggering .............................................................................................................................16C.Fn: Setting Custom Functions .............................................................................................17MASK Custom Function 5 .........................................................................................................18Troubleshooting ...........................................................................................................................18Temperature Protection Function .........................................................................................19Technical Data ...............................................................................................................................20Firmware Upgrade .......................................................................................................................20Maintenance ..................................................................................................................................22Warranty and Customer Service ............................................................................................23
Conventions used in this ManualThis manual is based on the assumption that both the camera and camera flash’s power switches are powered on. Reference page numbers are indicated by “Page ?/?”.The following alert symbols are used in this manual:
The Caution symbol indicates a warning to prevent shooting problem.
The Note symbol gives supplemental information.

6
Figure A
1. Barebulb Flash Head2. Fresnel “Speedlite” Flash Head3. Head Mounting System4. Support Mounting Socket (¼”x20 thread)5. Power Switch
6. R2 Wireless Radio and Optic Light Sensor7. LCD Control Panel8. Battery Compartment9. Battery Release Button10. Wireless Control Port/USB Port
and 3.5mm Sync Cord Jack11. Head Release Button
Figure B
13. Barebulb Head Accessory Lock Knob14. Mounting Socket (¼”x20 thread)
12. Lithium Battery
Name of Parts
Figure D
Figure C

7
(A) R2 Radio Status Radio Operation Pg 15 Manual Operation Pg 12
(B) Channel Status Pg 15(C) MODE: TTL/Manual/Multi Flash Pg 11-13(D) High Speed Sync Pg 14(E) Battery Level Pg 10(F) TTL (FEC) Exposure Compensation / Manual Power Setting Pg 12(G) Flash Duration / Multiflash Frequency /
Sleep Pg 13(H) Overheat Warning Pg 19
(I) Modeling Lamp Pg 11(J) Sleep Status Pg 11(K) Optic Slave Pg 16(L) Audio Signal Pg 17(M) Timer Pg 17(N) Mask Status Pg 18(O) Flash Duration Symbol Pg 12(P) Custom Function Pg 17(Q) Group Pg 15-16
Control Panel:
LCD Panel
Figure E
Figure F
15. LCD Panel16. <GR/CH>Group/Channel Button
(long press for 2 seconds)17. Flash Ready Indicator, < / C.Fn>
Test Button/ C.Fn Button (long press for 2 seconds)
18. Select Dial
19. <SET> Set Button20. < / H> Modeling Lamp Button/
High Speed Sync Button (long press for 2 seconds)
21. < MODE / > Mode Selection Button/ Wireless Selection Button (long press for 2 seconds)
8
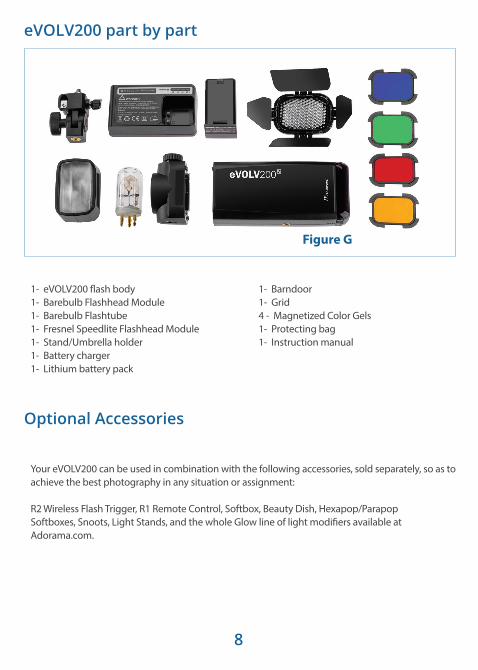
Your eVOLV200 can be used in combination with the following accessories, sold separately, so as to achieve the best photography in any situation or assignment:
R2 Wireless Flash Trigger, R1 Remote Control, Softbox, Beauty Dish, Hexapop/Parapop Softboxes, Snoots, Light Stands, and the whole Glow line of light modifiers available at Adorama.com.
1- eVOLV200 flash body1- Barebulb Flashhead Module1- Barebulb Flashtube1- Fresnel Speedlite Flashhead Module1- Stand/Umbrella holder1- Battery charger1- Lithium battery pack
1- Barndoor1- Grid4 - Magnetized Color Gels1- Protecting bag1- Instruction manual
eVOLV200 part by part
Optional Accessories
Figure G

9
1. Start with a removing an attached flash head by the sliding catch lock to the left (fig B / 11) and pulling gently on the head to slip it off the mounting plate of the eVOLV200 body.
2. Remove the reflector or other accessories from the flash head b efore mounting it on the eVOLV200 body.
3. The modular Barebulb flash head locks into the eVOLV200 body by lining up the pins on the head to the sockets of the eVOLV200 (fig H & I) and sliding the head down, engaging the head to the body. The lock automatically closes.
4. Take the Barebulb flashtube and align the pins of the tube carefully with the tube socket by matching the 3 pins on the base of the flash tube with the 3 sockets in the Tube Socket (fig J & K). Push the flash tube in until it is securely seated into the socket.
5. You have the option to attach a reflector or any Streaklight light modifier on to the Barebulb head socket surrounding the flashtube socket. The knob on the side of the module (fig J) locks and unlocks the add-on accessory with a twist right or left.
Speedlite and Bare Bulb Modular Flash Heads
Figure H Figure JFigure I Figure K
Attaching the Bare Bulb Flash Head
Attaching the Fresnel Speedlite Flash Head
1. Start with a removing an attached flash head by the sliding catch lock to the left (fig B / 11) and pulling gently on the head to slip it off the mounting plate of the eVOLV200 body.
2. The modular Fresnel Speedlite flash head locks into the eVOLV200 body by lining up the pins on the head to the sockets of the eVOLV (fig H & I) and sliding the head down, engaging the head to the body. The lock automatically closes.

10
Lithium Battery
Features
Warnings and Advice
Battery Level Indicator
1. The Flashpoint eVOLV200 uses a high capac-ity Li-ion polymer battery which has long runtime. The available full power discharges are approximately 500 times.
2. Safety first. The internal circuits are designed to prevent overcharge, over discharge, current overrun, and short circuit.
3. It takes only 4 hours to fully charge the battery by using the included standard battery charger.
1. Do not short circuit. 2. Do not expose to rain or immerse into
water. This battery is not water proof.3. Keep out of reach of children.4. No over 24 hours’ continuous charging.5. Store in dry, cool, ventilated places.6. Do not expose the battery to high tempera-
tures or into fire.
7. Dead batteries should be disposed according to local regulations.
8. If the battery has not been charged for a long time due to product idleness, please charge it to refresh the energy reserve.
9. If the battery had not been used for over 3 months, please recharge fully.
Make sure the battery pack is securely locked in the chamber of the flash. (fig D) Check the battery level indication on the LCD panel to see the remaining battery level (fig F/E).
Battery Level Indication on the LCD Panel
Meaning
3 bars Full battery
2 bars Medium battery
1 bar Low battery
Blank symbolLow battery, re-charge immediately.
Blinking symbol
The battery level depleting quickly and will immediately auto shutdown the flash in 1 minute. Please recharge the battery as soon as possible (within 10 days) to preserve the life of the battery.

11
Modeling Lamp
TTL Mode
Power Management Flash Modes
A short press the modeling lamp button (fig E/20) will turn the 20W LED modeling lamp on or off. An icon appears on the LCD panel to confirm the status.
The LED Modeling light is only featured on the Fresnel speedlite style flash head. The model-ing lamp will automatic turn off after 1 hour.
The ON/OFF Power Switch (fig L) controls the state of the flash unit. Turn off the power pack if the flash unit will not be used for an extend-ed period. The automatic hibernation feature puts the power supply to sleep when there is no operation for 30 minutes. You can alter the designated time in Custom Function (C.Fn-F3) 3 to 30, 60, or 90 minutes, before the flash will automatically hibernate. You can chose to disable the sleep mode entirely to facilitate use remotely off camera.
This flash has three flash modes: TTL (Auto), Manual (M), and Multi (Stroboscopic). Press the <MODE> Mode Selection Button and three flash modes will display on the LCD panel one by one in sequence each time the button is pressed.
Press <MODE > Selection Button to enter TTL mode. The LCD panel will display “TTL”. In TTL mode, the camera and the flash will work together “through-the-lens” to calculate the correct exposure for the subject and the back-ground. In this mode, multiple TTL functions are available: FEC, HSS, second curtain sync, modeling flash, which can be controlled with the camera’s menu screen.The TTL connection is accomplished with R2 Wireless Radio technology and the eVOLV200 will sense the Canon, Nikon or Sony camera automatically upon receiving a transmission from any R2 Family transmitter or flash. It will even switch automatically between several different camera manufacturers, which are on the same channel/group, on demand.
Figure L

12
FEC: Flash Exposure Compensa-
M: Manual Flash
Flash Duration Display
Flash Output Range
With FEC function, the eVOLV200 can adjust the auto exposure bias from -3 to +3 in 1/3rd stops. It is useful in situations where minor adjusting of the TTL system is needed based on the environment.
Press <MODE > Selection Button to enter Manual mode. The LCD panel will display “M”. The flash output is adjustable from 1/1 (full power) to 1/128th power in 1/3rd stop increments. To obtain a correct flash exposure, use a hand-held flash meter to determine the required flash output.
The following table makes it easier to see how the stop changes in terms of f/stop when you increase or decrease the flash output. For example, when you decrease the flash output to 1/2, 1/2-0.3, or 1/2-0.7, and then increase the flash output to more than 1/2, 1/2+0.3, 1/2+0.7, and 1/1 will be displayed.
Figures displayed when reducing flash output level --->
<--- Figures displayed when increasing flash output level
1. Press the <SET> Function Button and flash exposure compensation amount will be high-lighted on the LCD panel.
2. Set the flash exposure compensation amount.• Turn the Select Dial to set the amount.• “0.3”means 1/3 stop, “0.7”means 2/3 stop.• To cancel the flash exposure compensation, set
the amount to “+0”.3. Press < SET > button again to confirm the
setting.
In M manual flash mode, press the < C.Fn > button for 2 seconds to enter the menu. Select the C.FN-F2 and choose the S1 function, so that this flash can function as an optically triggered S1 secondary slave flash with the built-in optic sensor. With this function, the flash will fire in synch when the main flash fires, the same ‘real-time’ response that is realized by R2 radio triggers. This creates multiple lighting effects without the use of radio systems.
Long press on the <C.Fn> button for 2 seconds to enter the menu. C.FN-F2 to choose S2 function, so that this flash can also function as an optically triggered S2 secondary slave flash with the built-in optic sensor while in M manual flash mode. This is useful when strobes have pre-flash function. With this function, the optical sensor on the eVOLV200 will ignore a single “preflash” from the main (master) flash and will only fire in response to the second, actual flash from the main unit.
Flash duration refers to the length of time that from flash’s firing to reach the half peak at maximum. The half peak at maximum is usually expressed as t=0.5. In order to provide the photographer with more concrete data, this product adopts t=0.1. The difference between t=0.5 and t=0.1 is shown in the following picture.
1. Press <MODE > button so that < M > is displayed. 2. Turn the Select Dial to choose a desired flash
output amount.
Setting FEC:
S1 Optical Slave Setting
S2 Optical Slave Setting
• S1 and S2 optic triggering is only available in M manual flash mode.
1/11/1-0.3 1/1+0.7
1/21/2-0.3 1/2-0.7
1/4...
1/2+0.7 1/2+0.3 1/4+0.7 1/4+0.3 ...

13
Multi: Stroboscopic Flash
1. Long press the C.Fn button for 2 seconds to enter C.FN function.
2. Adjust the Select Dial to F6, the t0.1 icon will be displayed on the LCD panel.
3. Press <SET> button to enter the adjustment condition.
4. Turn the Select Dial to choose the ON/OFF.
During stroboscopic flash, the shutter remains open until the firing stops. Use the formula below to calculate the shutter speed and set it with the camera.
For example, if the number of flashes is 10 and the firing frequency is 5 Hz, the shutter speed should be at least 2 seconds.
To avoid overheating and deteriorating the flash head, do not use stroboscopic flash more than 10 times in succession. After 10 times, allow the camera flash to rest for at least 15 minutes. If you try to use the strobo-scopic flash more than 10 times in succession, the firing might stop automatically to protect the flash head. If this happens, allow at least 15 minutes of rest for the camera flash.
• Stroboscopic flash is most effective with a carefully lit or highly reflective subject against a dark background.
• Using a tripod and a remote control is recommended.
• A flash output of 1/1 and 1/2 cannot be set for stroboscopic flash.
• Stroboscopic flash can be used with the“ bulb”setting on the shutter speed dial of your camera.
• If the number of flashes is displayed as “--”, the firing will continue until the shutter closes or the battery is exhausted. The number of flashes will be limited as shown by the following table.
Number of Flashes / Flash Frequency =
Shutter Speed
1. Press < MODE > button so that < MULTI > is displayed.
2. Turn the Select Dial to choose a desired flash output.
3. Set the flash frequency and flash times.
• Press < SET > button to select the flash frequen-cy. Turn the Select Dial to set the number.
• Press < SET > button to select the flash times. Turn the Select Dial to set the number.
• After finish the setting, press <SET> button and all the settings will be displayed.
With stroboscopic flash, a rapid series of flashes is fired. It can be used to dramatically capture a multiple images of a moving subject in a single photograph.
You can set the firing frequency (number of flashes per sec. expressed as Hz), the number of flashes, and the flash output.
Display Flash Duration Operation: Calculating the Shutter Speed
• The flash duration will only be displayed on the LCD panel in M mode.

14
High Speed Sync (FP flash) enables the flash to synchronize with virtually all camera shutter speeds. This is convenient when you want to use aperture priority for fill-flash portraits, outdoor brightly lit subjects or to overpower the sun as the main source of
• With high-speed sync, the faster the shutter speed, the shorter the effective flash range. • Multi flash mode cannot be set in high-speed sync mode.
1. Long Press Function Button < SYNC > for 2 seconds so that < H > is displayed.
2. Please use the R2 Family of flashes or transmitters to trigger in perfect sync with a Canon,
High-Speed Sync
Maximum Stroboscopic
H
1 2 3 4 5 6-7 8-9
1/4 7 6 5 4 4 3 3
1/8 14 14 12 10 8 6 5
1/16 30 30 30 20 20 20 10
1/32 60 60 60 50 50 40 30
1/64 90 90 90 80 80 70 60
10 11 12-14 15-19 20-50 60-199
1/4 2 2 2 2 2 2
1/8 4 4 4 4 4 4
1/16 8 8 8 8 8 8
1/32 20 20 20 20 20 20
1/64 50 40 40 35 30 20
Hz
Hz
Flash Output
Flash Output

15
R2 Wireless Flash Op-
The eVOLV200 adopts the R2 2.4G wireless radio system, which has absolute compat-ibility with other R2 Family flashes and transmitters. As a slave unit, the eVOLV 200 senses and switches automatically to be compatible with Canon, Nikon, and Sony R2 TTL according to the master unit employed.
Nikon cameras (use R2T-N), Canon cameras (use R2T-C) and Sony cameras (use R2T-S) can use one or more eVOLV 200-TTL flashes simultaneously.
The EVOLV200 can only be set as slave unit (R2 receiver or Optical S1/S2). Long press the wireless selection button (figE/21) for 2 seconds to switch the radio transmission func-
B. Setting the Communication ChannelIn order to prevent signal interference from other wireless flash systems nearby, you can change the channel IDs. The channel IDs of the master unit and the slave unit(s) must be set to the same value. 1. Long press the < GR/CH > Button for
2 seconds, so that the icon will be displayed on the LCD panel.
2. Turn the Select Dial to choose a channel ID value from 1 to 32.
3. Press the < SET > button to confirm.
Setting the Communication Group
Wireless Mode Flash Mode
OFF M / Multi
Radio Transmission TTL / M / Multi
A. R2 Wireless SettingsLong press < > button for 2 seconds to switch wire-less function ON/ OFF.
Turn the wireless function on, the < > icon will be displayed on the LCD panel. When using the R1 remote control or

16
Positioning and Operation Range Optical Wireless Flash
R1 Wireless Remote Control Function
You can assign the slave units into two or three groups
and perform TTL autoflash while changing the flash
ratio (factor). In addition, you can set and shoot with
a different flash modes for each firing group, for up
to 5 groups.
See the Manual Mode section on page 12 for Optical Slave instructions.
The flash unit is built in with a Wireless Control Port so that you can wirelessly adjust the power level of the flash and the flash triggering.
To control the flash wirelessly, you need a R1 remote control set both on-camera and on the eVOLV200. Insert the receiver end into the Wireless Control Port on the flash (fig B/6) and insert the R1 transmitter onto the camera hot shoe. Settings made on the hotshoe-mounted transmitter will be wirelessly communicated to the flash with the R1 receiver.
The Sync Cord Jack is a Φ3.5mm plug. Insert the trigger
cord plug into the socket and the flash will be fired
synchronously with the camera shutter.
R2 Wireless Multiple Flash
Sync Triggering
TTL Auto flash with one slave unit
• For full instructions on the use of R1 series remote control, see its user manual.
• Before shooting, perform a test flash and test exposure for ratios.
• The transmission distance might be shorter depending on the conditions such as positioning of slave units, the surrounding environment and weather conditions.
• When frequent interruption or
TTL Auto with Two Slave
TTL Auto with Three Slave Groups
• Flash Mode: TTL, M, Multi• Sync Mode: First-curtain sync, sec-
ond-curtain sync and High-speed sync
• Control the power level• Modeling Lamp: turn on or off• Audio Signal: turn on or off
When using the eVOLV200 and any R2 family flash trigger together, the R2 transmitter unit can control the flash function such as:

17
C.Fn: Setting Custom FunctionsCustom Function Display Number
FunctionsSetting Display
Setting & Descriptions
Limitations
F1 BeeperON ON
NOOFF OFF
F2S1/S2 mode selection
OFF OFF
M modeS1 S1 Mode
S2 S2 Mode
F3 Auto hibernate
OFF OFF
NO30 min
Auto hibernate with-out any operation
60 min
90 min
F4 Delay flash OFF, Can be triggered as second curtain
M/Multi mode
F5 Mask
OFF OFF M mode
N1ON: Trigger 2 times for 1 cycles, 1st flash of trigger.
M mode
N2ON: Trigger 2 times for 1 cycles, 2nd flash of trigger.
1. Long press < C.Fn > button for 2 seconds to enter the C.Fn menu. 2. Select the Custom Function.• Turn the Selection Dial to select the Custom Function. An
icon appears on the lower portion of the LCD screen to represent the Custom Function selected.
3. Change the setting. • Press < SET > button and the Setting No. blinks. • Turn the Select Dial to set the desired feature. Press < SET > button will confirm the settings.

18
The MASK Custom Function 5, adds the power of creating photographic digital masks that can be used in layers within photo editing software, to mask subjects, isolating them from backgrounds without the use of special computer based post production techniques. A great time saver.
You need to establish the link from the transmitting R2 Rapid or XPLOR 600 Custom Function corresponding to the MASK feature. The concept is simple, while one set of flashes fire for the main subject, the other set flashes immediately after in sequence to make 2 different exposures. The execution is precise when you follow the linking process on each flash, assigning the N1 or N2 designation as needed. There are two settings for the Custom Function on the eVOLV200. N1: Mask function is on: when the camera fires 2 shots rapidly, the units linked will trigger on Troubleshoot-If there is a problem, refer to this Troubleshooting Guide.
The flash exposure is underexposed or overexposed. • There was a highly reflective object (e.g. glass window) in the picture.> Use FE lock (FEL).
• You used high-speed sync.> With high-speed sync, the effective flash range will be shorter. Make sure the subject is within the effective flash range displayed.
• You used Manual Flash mode.> Set the flash mode to TTL or modify the flash output using a flash meter for accurate
The system provides real-time protection to secure the device and your safety. The following is a list of prompts for your reference:
Other LCD Error Messages
Prompts on LCD Pan-el
Meaning
E1
A failure occurred on the recycling system that prevents the flash from firing.Please restart the flash unit. If the problem still exists, please send this product to our maintenance center.
E2The system is excessively hot. Please allow a rest time of 10 minutes.
E3The voltage on two outlets of the flash tube is too high. Please send this product to our maintenance center.

19
Temperature Protection Func-• To avoid overheating and deteriorating the flash heads, do not fire more than 100 con-
tinuous flashes in fast succession at 1/1 full power. After 100 continuous flashes, allow a rest time of at least 10 minutes.
• If you fire more than 100 continuous flashes and then fire more flashes in short inter-vals, the inner over-temperature protection function may be activated and alter the recycling time to over 10 seconds to protect the circuitry. If this occurs, allow a rest time of about 10 minutes, and the flash unit will then return to normal operation.
Power Output LevelNumber of Flashes
Speedlite Flash Head Bare bulb Flash Head
1/1 40 60
1/2 (+0.3,+0.7) 50 80
1/4 (+0.3,+0.7) 60 100
1/8 (+0.3,+0.7) 100 150
1/16 (+0.3,+0.7) 200 200
1/32 (+0.3,+0.7) 300 300
Power Output LevelNumber of Flashes
Speedlite Flash Head Bare bulb Flash Head
1/1 40 50
1/2 (+0.3,+0.7) 50 60
1/4 (+0.3,+0.7) 60 75
1/8 (+0.3,+0.7) 75 100
1/16 (+0.3,+0.7)1/32 (+0.3,+0.7)
80 150
Number of flashes that will activate over-temperature pro-
Number of flashes that will activate over-temperature protection
20
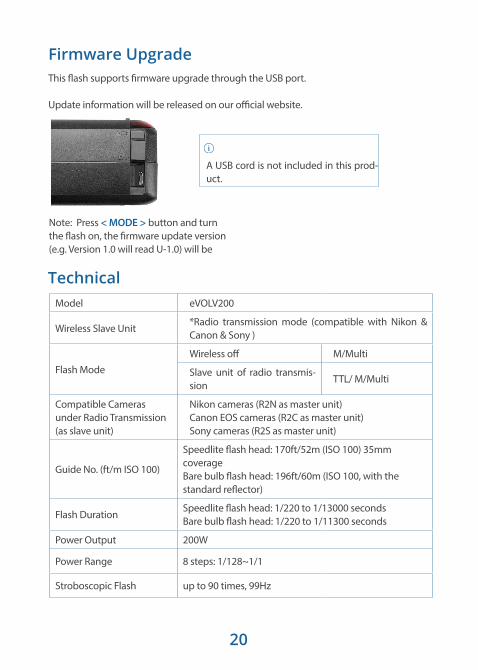
Technical Model eVOLV200
Wireless Slave Unit*Radio transmission mode (compatible with Nikon & Canon & Sony )
Flash ModeWireless off M/Multi
Slave unit of radio transmis-sion
TTL/ M/Multi
Compatible Cameras under Radio Transmission (as slave unit)
Nikon cameras (R2N as master unit)Canon EOS cameras (R2C as master unit)Sony cameras (R2S as master unit)
Guide No. (ft/m ISO 100)
Speedlite flash head: 170ft/52m (ISO 100) 35mm coverageBare bulb flash head: 196ft/60m (ISO 100, with the standard reflector)
Flash DurationSpeedlite flash head: 1/220 to 1/13000 secondsBare bulb flash head: 1/220 to 1/11300 seconds
Power Output 200W
Power Range 8 steps: 1/128~1/1
Stroboscopic Flash up to 90 times, 99Hz
Firmware UpgradeThis flash supports firmware upgrade through the USB port. Update information will be released on our official website.
Note: Press < MODE > button and turn the flash on, the firmware update version (e.g. Version 1.0 will read U-1.0) will be
A USB cord is not included in this prod-uct.

21
Technical Data (Contin-
Delay Flash 0.01~30 seconds
Mask √
Beeper √
Modeling Lamp (LED) √
Optic Slave Flash S1/S2
Flash Duration Indication √
Wireless Flash
Wireless Flash R2 2.4G radio and optical reception
Wireless flash function Slave, Off
Controllable slave groups 5 (A, B, C, D, and E)
R2 Radio reception range (approx.)
330ft/100m
Channels 32 (1~32)
Power Supply Lithium battery pack (14.4V/2900mAh)
Full Power Flashes 520
Recycle Time Approx. 0.01-2.1s
Battery Indicator √
Power IndicationPower hibernate automatically after approx. 30 minutes of idle operation.
Sync Triggering Mode 3.5mm sync line, Wireless control port
Color Temperature 5600±200k
Dimension 168x75x50mm (flash head not included)

22
Maintenance
• Shut down the device immediately once abnormal operation be detected.
• Avoid sudden impacts.
• The product should be clean and be dust-free.
• It is normal for the flash tube to be warm when in use. Avoid continuous flashes if unnecessary.
• Maintenance of the flash must be performed by our authorized maintenance depart-ment which can provide original accessories and expert service.
• This product, except consumables (e.g. flash tube), is supported with a one-year war-ranty.
• Unauthorized service will void the warranty.
• If the product has problems such as electronic failure or was exposed to moisture, cease
Question about our product line? Need Product
We are proud of our products and celebrate our customers. We are with you, from product selection to everyday use. Be secure with your purchase and reach us as you
need.
Email us: [email protected] Call: 212-647-9300
Address: Adorama Brands, 42 West 18th Street, New York, NY 10011
You can always contact us at [email protected] for personal technical support.
Our web site contains a wide range of Support and FAQ pages with valuable technical assistance.
Flashpoint is a registered trademark of ADORAMA CAMERA.

ONE YEAR FLASHPOINT LIMITED WAR-
Flashpoint warrants to the original purchaser that your Flashpoint eVOLV200 shall be free from defects in material and workmanship for the period of one (1) year from the date of purchase (or delivery as may be required in cer-tain jurisdictions), or thirty (30) days after replacement, whichever comes later.
Flashpoint’s entire liability and your exclusive remedy for any breach of warranty shall be, at Flashpoint’s option, to repair or replace the hardware, provided that the hardware is returned to the point of purchase or such other place as Flashpoint may direct with a copy of the sales receipt or dated itemized receipt. Flashpoint may, at its option, replace your product, offer to provide a functionally equivalent product, or repair any product with new, refurbished or used parts as long as such parts are in compliance with the product’s technical specifications. Any replacement hardware product will be warranted for the remainder of the original warranty period or thirty (30) days, whichever is longer, or for any additional period of time that may be applicable in your jurisdiction. If the product has been discontinued, the warranty provider reserves the right to replace it with a model of equivalent quality and function. This warranty does not cover problems or damage resulting from accident, abuse, mis-application, or any unauthorized repair, modification or disassembly, improper operation or maintenance, normal wear and tear, or usage not in accordance with product instruc-tions or connection to improper voltage supply, use of consumables, such as replacement batteries, not supplied by Flashpoint, except where such restriction is prohibited by applicable law.
Except where prohibited by applicable law, this warranty is nontransferable and is limited to the original purchaser and the country in which the product was purchased. This warranty gives you specific legal rights, and you may also have other rights, including a longer warranty duration that may vary under local laws.
To start a warranty claim contact the Flashpoint Customer Service Department to obtain a return merchandise authorization (“RMA”) number, and return the defective product to Flashpoint, along with the RMA number and proof of purchase.
23