Foundry™ - Anvil Brewing V4 10_24_19.pdf · Anvil Brewing Foundry - V4 Anvil Brewing Equipment 20...
11
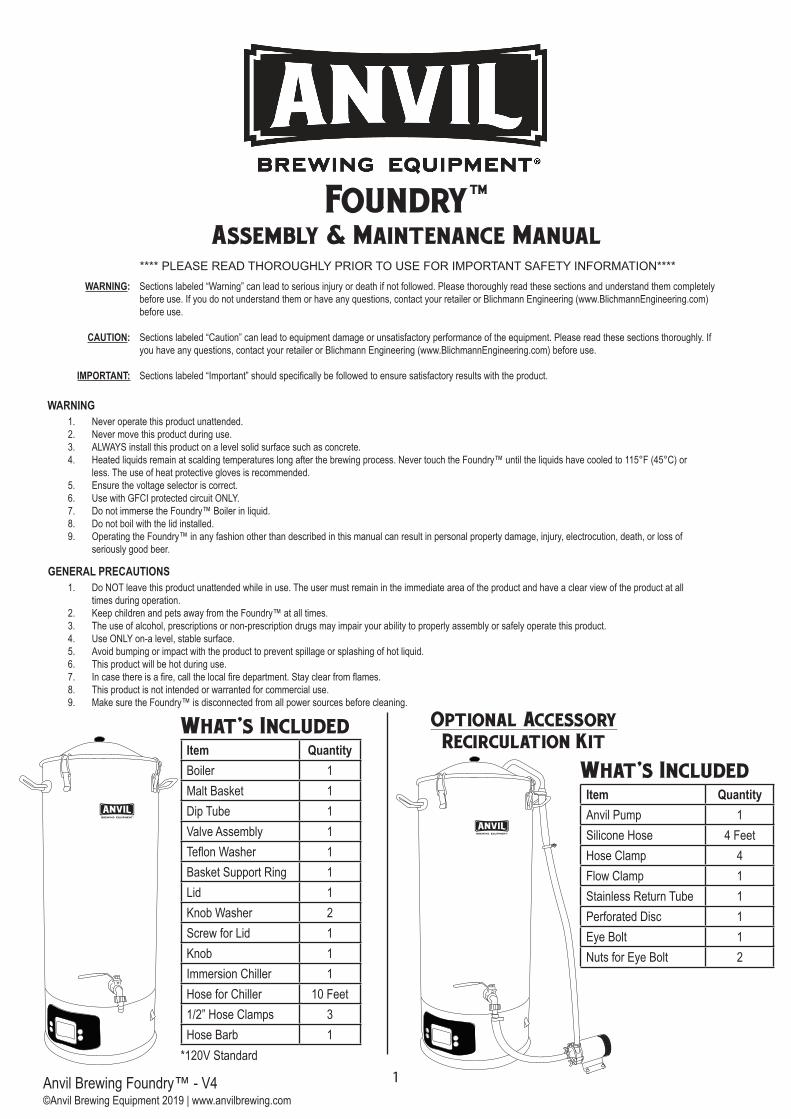
1 Anvil Brewing Foundry™ - V4 ©Anvil Brewing Equipment 2019 | www.anvilbrewing.com Foundry™ Assembly & Maintenance Manual **** PLEASE READ THOROUGHLY PRIOR TO USE FOR IMPORTANT SAFETY INFORMATION**** What’s Included Item Quantity Boiler 1 Malt Basket 1 Dip Tube 1 Valve Assembly 1 Teflon Washer 1 Basket Support Ring 1 Lid 1 Knob Washer 2 Screw for Lid 1 Knob 1 Immersion Chiller 1 Hose for Chiller 10 Feet 1/2” Hose Clamps 3 Hose Barb 1 Optional Accessory Item Quantity Anvil Pump 1 Silicone Hose 4 Feet Hose Clamp 4 Flow Clamp 1 Stainless Return Tube 1 Perforated Disc 1 Eye Bolt 1 Nuts for Eye Bolt 2 Recirculation Kit What’s Included *120V Standard Sections labeled “Warning” can lead to serious injury or death if not followed. Please thoroughly read these sections and understand them completely before use. If you do not understand them or have any questions, contact your retailer or Blichmann Engineering (www.BlichmannEngineering.com) before use. Sections labeled “Caution” can lead to equipment damage or unsatisfactory performance of the equipment. Please read these sections thoroughly. If you have any questions, contact your retailer or Blichmann Engineering (www.BlichmannEngineering.com) before use. Sections labeled “Important” should specifically be followed to ensure satisfactory results with the product. WARNING: CAUTION: IMPORTANT: 1. Do NOT leave this product unattended while in use. The user must remain in the immediate area of the product and have a clear view of the product at all times during operation. 2. Keep children and pets away from the Foundry™ at all times. 3. The use of alcohol, prescriptions or non-prescription drugs may impair your ability to properly assembly or safely operate this product. 4. Use ONLY on-a level, stable surface. 5. Avoid bumping or impact with the product to prevent spillage or splashing of hot liquid. 6. This product will be hot during use. 7. In case there is a fire, call the local fire department. Stay clear from flames. 8. This product is not intended or warranted for commercial use. 9. Make sure the Foundry™ is disconnected from all power sources before cleaning. 1. Never operate this product unattended. 2. Never move this product during use. 3. ALWAYS install this product on a level solid surface such as concrete. 4. Heated liquids remain at scalding temperatures long after the brewing process. Never touch the Foundry™ until the liquids have cooled to 115°F (45°C) or less. The use of heat protective gloves is recommended. 5. Ensure the voltage selector is correct. 6. Use with GFCI protected circuit ONLY. 7. Do not immerse the Foundry™ Boiler in liquid. 8. Do not boil with the lid installed. 9. Operating the Foundry™ in any fashion other than described in this manual can result in personal property damage, injury, electrocution, death, or loss of seriously good beer. WARNING GENERAL PRECAUTIONS
Transcript of Foundry™ - Anvil Brewing V4 10_24_19.pdf · Anvil Brewing Foundry - V4 Anvil Brewing Equipment 20...
1Anvil Brewing Foundry™ - V4©Anvil Brewing Equipment 2019 | www.anvilbrewing.com
Foundry™Assembly & Maintenance Manual
**** PLEASE READ THOROUGHLY PRIOR TO USE FOR IMPORTANT SAFETY INFORMATION****
What’s IncludedItem QuantityBoiler 1Malt Basket 1Dip Tube 1Valve Assembly 1Teflon Washer 1Basket Support Ring 1Lid 1Knob Washer 2Screw for Lid 1Knob 1Immersion Chiller 1Hose for Chiller 10 Feet1/2” Hose Clamps 3Hose Barb 1
Optional Accessory
Item QuantityAnvil Pump 1Silicone Hose 4 FeetHose Clamp 4Flow Clamp 1Stainless Return Tube 1Perforated Disc 1Eye Bolt 1Nuts for Eye Bolt 2
Recirculation KitWhat’s Included
*120V Standard
Sections labeled “Warning” can lead to serious injury or death if not followed. Please thoroughly read these sections and understand them completely before use. If you do not understand them or have any questions, contact your retailer or Blichmann Engineering (www.BlichmannEngineering.com) before use.
Sections labeled “Caution” can lead to equipment damage or unsatisfactory performance of the equipment. Please read these sections thoroughly. If you have any questions, contact your retailer or Blichmann Engineering (www.BlichmannEngineering.com) before use.
Sections labeled “Important” should specifically be followed to ensure satisfactory results with the product.
WARNING:
CAUTION:
IMPORTANT:
1. Do NOT leave this product unattended while in use. The user must remain in the immediate area of the product and have a clear view of the product at all times during operation.
2. Keep children and pets away from the Foundry™ at all times.3. The use of alcohol, prescriptions or non-prescription drugs may impair your ability to properly assembly or safely operate this product.4. Use ONLY on-a level, stable surface.5. Avoid bumping or impact with the product to prevent spillage or splashing of hot liquid.6. This product will be hot during use.7. In case there is a fire, call the local fire department. Stay clear from flames.8. This product is not intended or warranted for commercial use.9. Make sure the Foundry™ is disconnected from all power sources before cleaning.
1. Never operate this product unattended.2. Never move this product during use.3. ALWAYS install this product on a level solid surface such as concrete.4. Heated liquids remain at scalding temperatures long after the brewing process. Never touch the Foundry™ until the liquids have cooled to 115°F (45°C) or
less. The use of heat protective gloves is recommended.5. Ensure the voltage selector is correct.6. Use with GFCI protected circuit ONLY.7. Do not immerse the Foundry™ Boiler in liquid.8. Do not boil with the lid installed.9. Operating the Foundry™ in any fashion other than described in this manual can result in personal property damage, injury, electrocution, death, or loss of
seriously good beer.
WARNING
GENERAL PRECAUTIONS

Anvil Brewing Foundry™ - V4©Anvil Brewing Equipment 2019 | www.anvilbrewing.com
2
Assembly
Place the knob washer on the top and bottom of the lid in the center. Put the screw through the bottom of the lid into the knob. Do not over tighten.
Attach the valve through the hole in the Foundry™. Place all parts in order as shown. When assembled correctly, the valve and dip tube can be rotated to leave behind trub in the bottom of the kettle. Tighten the valve firmly but not so tight that the valve doesn’t rotate by hand.
Use the rotating valve at the end of your boil to transfer clearer wort.
Tip: Install the dip tube facing the same direction as the closed valve handle so you know the position
Place the basket support ring into the top of the Foundry™. The basket support ring will fit firmly into the top. If the ring does not fit firmly, stretch out the ring until it fits snugly. This will prevent the ring from popping out accidentally.
Warning: Be careful not to dislodge the support ring while lifting the basket.
Foundry™ Kettle Wall
Outside Foundry™ Inside Foundry™
TeflonWasherBarb
Nut
ValveBarb Dip TubeValve Nut
Lid Assembly
Valve and Rotating Dip Tube Assembly
Basket Support Ring Assembly
Knob
Knob Washer
Screw
Lid
O-ring
Assemble the valve handle to the valve with the valve nut and lock washer as shown below. Do not overtighten the nut.
Barb O-ring
O-ring (inside dip tube)
Immersion ChillerPlace the immersion chiller into your boiling wort 5 to 10 minutes before the end of your boil to sanitize. Place the drain hose down the drain. Once you’re ready to chill, send cold water through the coil with the garden hose connection until it reaches fermentation temperature. Stir the wort with a sanitized spoon while cooling to increase cooling speed.Warning: Water coming out the drain hose will be hot.
InletOutlet
Cold WaterSupply
Drain

3Anvil Brewing Foundry™ - V4©Anvil Brewing Equipment 2019 | www.anvilbrewing.com
The Foundry™ comes standard set for 120V operation, but has a dual voltage feature. The Foundry™, in its 240V configuration, will decrease heating times by about half and generate an excellent boil intensity. To use the Foundry™ at 240V, first follow the instructions in the 240V Wiring Guide. When the Foundry™ has a 240V plug installed, flip the switch, shown below, from 120V to 240V.
240V Wiring GuideEnsure the switch is set to the proper voltage before use. If you are uncertain about the voltage and capacity of your power source, contact a licensed and qualified electrician familiar with National Electric Code standards before proceeding.
Warning: Operating the product with 240V power with the voltage selector switch set at 120V may cause permanent damage to the product.
Warning: Ensure the Foundry™ is unplugged from any power source before wiring.
To operate the Foundry™ on 240V, cut off the 120V plug and strip the sleeve from the wires about one inch away from the end. Strip each wire ½” away from the ends. Your plug may require different lengths. Tighten the terminal screws per the instructions included with the plug.
Do not use ungrounded plugs for this application. Minimum capacity plug: 15 amps 240V.One of the following plug types can be used for plugging the Foundry™ into a 240V outlet.1. NEMA 6-15P2. NEMA 6-20P3. Any other UL listed plug that is rated for at least 15A @240V
Power Source Overview
Tip: With the correct adapter and GFCI protection, dryer and stove connections maybe used for your 240V power supply.
BreakerVoltage Selector
Switch
Anvil Brewing Foundry™ - V4©Anvil Brewing Equipment 2019 | www.anvilbrewing.com
4
Operation
The Foundry™ is capable of creating wort in two different ways. The first method is called “no-sparge.” Sparging is the process of adding water to the mash basket after the mash is finished. No-Sparge simply omits that step and the wort is drained out of the mash basket after mashing without adding additional water. No-Sparge is the easiest method. The second method utilizes “sparging” which means rinsing the grain with hot water after mashing to extract more sugars. The Sparge method requires a second vessel in which to heat water and requires pouring of the hot water over the grain. The Sparge method is more efficient and allows for higher gravity beers. Both methods make quality wort. The methods are explained in greater detail below.
Mash Methods with the Foundry™
No-Sparge MethodTo determine how much water you need for your brew day, you will first need to add the weight of all the grain in your recipe. Include flaked grains as well. But do not include malt extract syrup or powder. Extracts or other sugars are added after mashing. Use the tables below for batch size and voltage you will be using. The 120V operation will “boil off” (turn water into steam) about ½ gallon of water per hour at 100% power and the 240V will boil off about 1 full gallon per hour at 100% power. These volumes are accounted for in the charts. Select the volume of brewing water you will need for your batch based on the total weight of the grain. Also, note the Strike Water Temperature. “Strike Water” is the amount of water that is initially added to the Foundry™ boiler and mixed with the grain. Fill the Foundry™ to the required level, lower in the empty malt basket, and set the temperature at the recommended Strike Water Temperature.
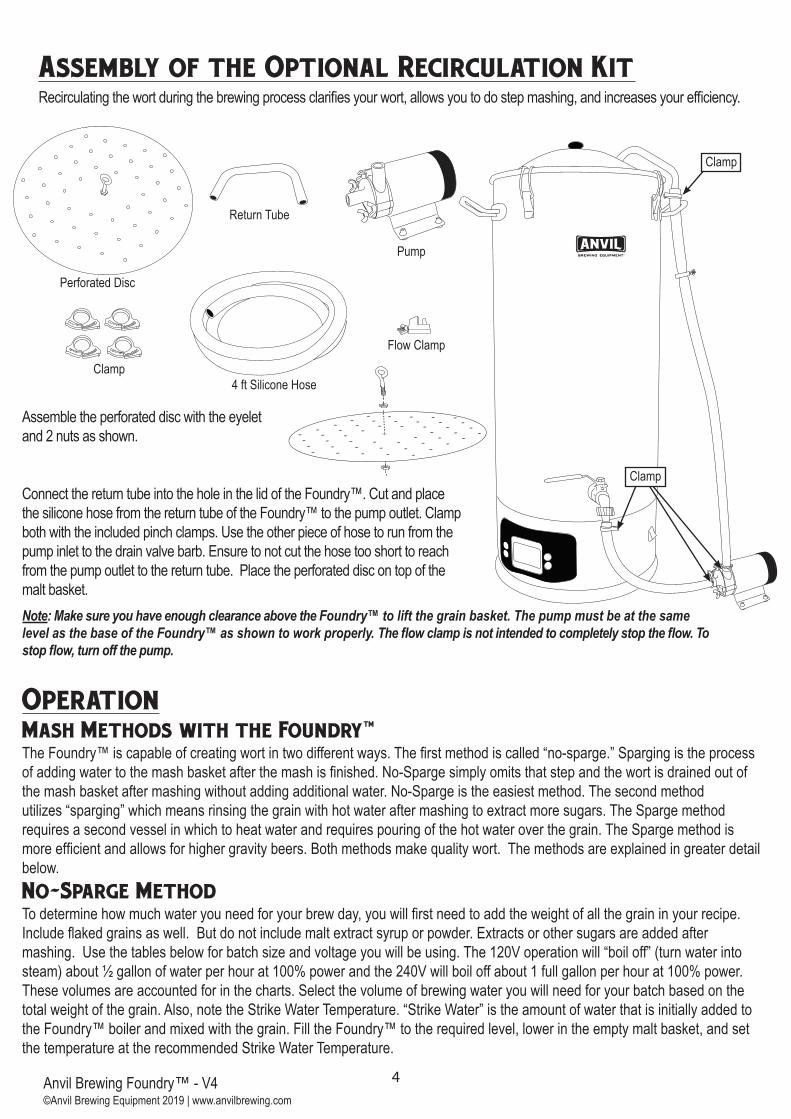
Assembly of the Optional Recirculation Kit
Connect the return tube into the hole in the lid of the Foundry™. Cut and place the silicone hose from the return tube of the Foundry™ to the pump outlet. Clamp both with the included pinch clamps. Use the other piece of hose to run from the pump inlet to the drain valve barb. Ensure to not cut the hose too short to reach from the pump outlet to the return tube. Place the perforated disc on top of the malt basket.
Clamp4 ft Silicone Hose
Return Tube
Perforated Disc
Pump
Flow Clamp
Recirculating the wort during the brewing process clarifies your wort, allows you to do step mashing, and increases your efficiency.
Assemble the perforated disc with the eyelet and 2 nuts as shown.
Note: Make sure you have enough clearance above the Foundry™ to lift the grain basket. The pump must be at the same level as the base of the Foundry™ as shown to work properly. The flow clamp is not intended to completely stop the flow. To stop flow, turn off the pump.
Clamp
Clamp
5Anvil Brewing Foundry™ - V4©Anvil Brewing Equipment 2019 | www.anvilbrewing.com
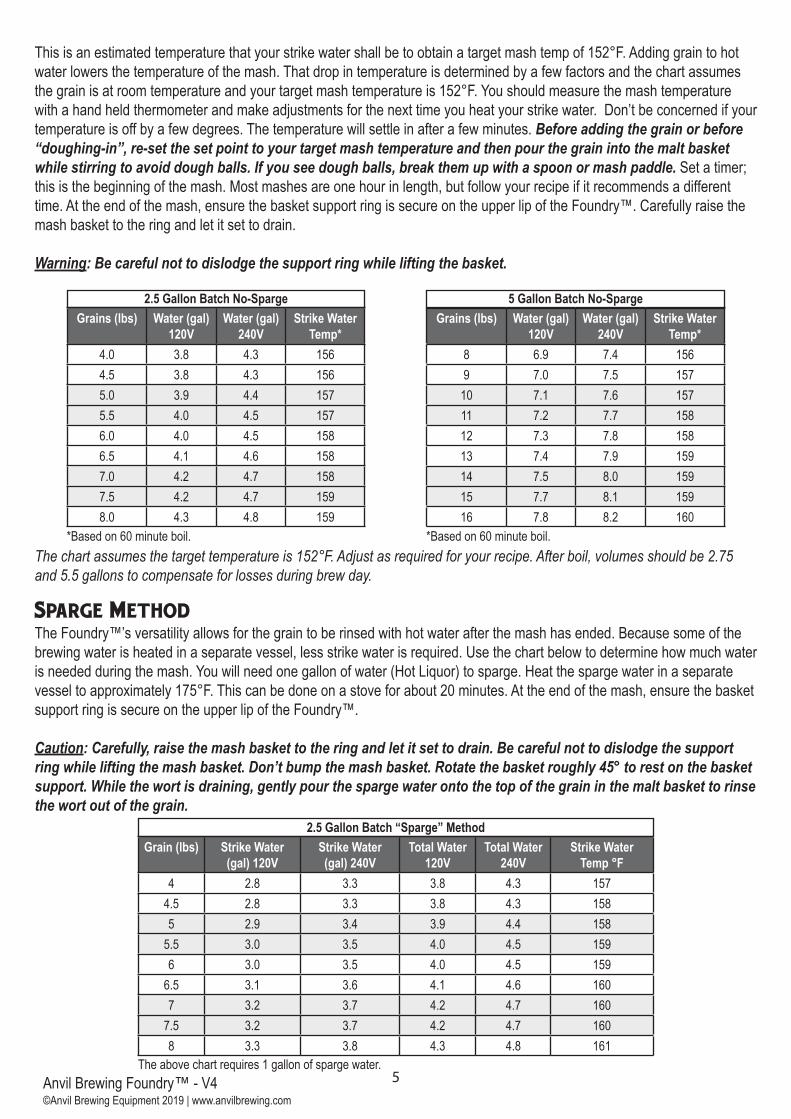
Grains (lbs) Water (gal) 120V
Water (gal) 240V
Strike Water Temp*
4.0 3.8 4.3 1564.5 3.8 4.3 1565.0 3.9 4.4 1575.5 4.0 4.5 1576.0 4.0 4.5 1586.5 4.1 4.6 1587.0 4.2 4.7 1587.5 4.2 4.7 1598.0 4.3 4.8 159
2.5 Gallon Batch No-SpargeGrains (lbs) Water (gal)
120VWater (gal)
240VStrike Water
Temp*8 6.9 7.4 1569 7.0 7.5 157
10 7.1 7.6 15711 7.2 7.7 15812 7.3 7.8 15813 7.4 7.9 15914 7.5 8.0 15915 7.7 8.1 15916 7.8 8.2 160
5 Gallon Batch No-Sparge
The chart assumes the target temperature is 152°F. Adjust as required for your recipe. After boil, volumes should be 2.75 and 5.5 gallons to compensate for losses during brew day.
*Based on 60 minute boil. *Based on 60 minute boil.
This is an estimated temperature that your strike water shall be to obtain a target mash temp of 152°F. Adding grain to hot water lowers the temperature of the mash. That drop in temperature is determined by a few factors and the chart assumes the grain is at room temperature and your target mash temperature is 152°F. You should measure the mash temperature with a hand held thermometer and make adjustments for the next time you heat your strike water. Don’t be concerned if your temperature is off by a few degrees. The temperature will settle in after a few minutes. Before adding the grain or before “doughing-in”, re-set the set point to your target mash temperature and then pour the grain into the malt basket while stirring to avoid dough balls. If you see dough balls, break them up with a spoon or mash paddle. Set a timer; this is the beginning of the mash. Most mashes are one hour in length, but follow your recipe if it recommends a different time. At the end of the mash, ensure the basket support ring is secure on the upper lip of the Foundry™. Carefully raise the mash basket to the ring and let it set to drain.
Warning: Be careful not to dislodge the support ring while lifting the basket.
Sparge MethodThe Foundry™’s versatility allows for the grain to be rinsed with hot water after the mash has ended. Because some of the brewing water is heated in a separate vessel, less strike water is required. Use the chart below to determine how much water is needed during the mash. You will need one gallon of water (Hot Liquor) to sparge. Heat the sparge water in a separate vessel to approximately 175°F. This can be done on a stove for about 20 minutes. At the end of the mash, ensure the basket support ring is secure on the upper lip of the Foundry™.
Caution: Carefully, raise the mash basket to the ring and let it set to drain. Be careful not to dislodge the support ring while lifting the mash basket. Don’t bump the mash basket. Rotate the basket roughly 45° to rest on the basket support. While the wort is draining, gently pour the sparge water onto the top of the grain in the malt basket to rinse the wort out of the grain.
Grain (lbs) Strike Water (gal) 120V
Strike Water (gal) 240V
Total Water 120V
Total Water 240V
Strike Water Temp °F
4 2.8 3.3 3.8 4.3 1574.5 2.8 3.3 3.8 4.3 1585 2.9 3.4 3.9 4.4 158
5.5 3.0 3.5 4.0 4.5 1596 3.0 3.5 4.0 4.5 159
6.5 3.1 3.6 4.1 4.6 1607 3.2 3.7 4.2 4.7 160
7.5 3.2 3.7 4.2 4.7 1608 3.3 3.8 4.3 4.8 161
2.5 Gallon Batch “Sparge” Method
The above chart requires 1 gallon of sparge water.

Anvil Brewing Foundry™ - V4©Anvil Brewing Equipment 2019 | www.anvilbrewing.com
6
Grain (lbs) Strike Water (gal) 120v
Strike Water (gal) 240v
Total Water 120v
Total Water 240v
Strike Water Temp °F
8 5.5 6.0 6.5 7.0 1579 5.7 6.2 6.7 7.2 158
10 5.8 6.3 6.8 7.3 15911 5.9 6.4 5.9 7.4 15912 6.1 6.6 7.1 7.6 15913 6.2 6.7 7.2 7.7 16014 6.3 6.8 7.3 7.8 16015 6.5 7.0 7.5 8.0 16116 6.6 7.1 7.6 8.1 161
5 Gallon Batch “Sparge” Method
The above chart requires 1 gallon of sparge water
Water chemistry varies depending on the location of the source and what was done to treat the water. The most predictable way to control the quality of the water, particularly if you are unsure of your local water chemistry, is to start with pure water (distilled, deionized, or reverse osmosis) and add your own minerals to the water. This ensures that the mash is at the correct pH so that the grains are more efficiently converted to sugars, and the proper pH avoids extracting astringent flavors from the husks. For more information on brewing water, and for troubleshooting your water chemistry issues, see John Palmer’s book: How to Brew.
To get started, you will need some raw ingredients: These can be found at your local homebrew supply store. 1. Gypsum (Calcium Sulfate, CaSO4) 2. Calcium Chloride (CaCl) 3. Baking Soda (Available in the baking isle at a grocery store.)
Next, use the chart on the next page to select the proper water treatment. Important: Multiply the unit of measure by how many gallons you will be mixing at a time. Stir well to ensure the ingredients completely dissolve. There may be some cloudi-ness initially; this is acceptable. We recommend the Anvil Precision Scale for making these measurements.
Water Chemistry
Special care needs to be taken when purchasing ingredient kits or when milling grain. When ordering an all-grain ingredient kit, be sure to purchase a normal medium grind and avoid of “BIAB” or “brew in a bag” grind ratings if those options are available. Brew in a bag mill rating usually means that the grain is nearly pulverized to a powder. With a fine crush, the mash will stick, a condition in which wort will not flow out of the basket. A normal/medium grind will filter and flow more efficiently through the mash basket. If your recipe calls for grain that does not have a husk, like wheat, rye, and oats, about ½ pound of rice hulls per 10 pounds of total grain should be added to the grain before doughing in. The rice hulls will allow the mash to flow with ease and avoid sticking.
Tip: If you experience a stuck mash consider using a coarser grind or adding rice hulls.
Milling the Grain
The full volume of water required for brewing should be treated with water salts if using distilled or de-ionized water (see Water Chemistry for more information). Otherwise, carbon-filtered city water (carbon filtering removes chlorine), well water, or un-chlorinated spring water would be acceptable. If your water source is known to have very hard water, you are not able to use a carbon filter, or your water is treated with a water softener, it is advisable to follow the water chemistry techniques outlined in the Water Chemistry section. See also John Palmer’s book: How To Brew for more details on brewing water chemistry.
Water for Brewing
The chart assumes the target temperature is 152°F. Adjust as required for your recipe. After boil, volumes should be 2.75 and 5.5 gallons to compensate for losses during brew day.

7Anvil Brewing Foundry™ - V4©Anvil Brewing Equipment 2019 | www.anvilbrewing.com
tsp/gal g/gal tsp/gal g/gal tsp/gal g/galPale Hoppy 1/4 1 1/8 0.5 0 0Pale Malty 1/8 0.5 1/4 1 0 0
Amber Hoppy 1/4 1 1/8 0.5 1/16 0.5Amber Malty 1/8 0.5 1/4 1 1/16 0.5Dark Hoppy 1/4 1 1/8 0.5 3/16 1Dark Malty 1/8 0.5 1/4 1 3/16 1
Gypsum (CaSO4) Calcium Chloride (CaCl) Baking Soda (NaHC03)
Beer
Sty
le
Recirculating the wort during the mash can clarify the wort and homogenize the mash temperature through the mash basket, increasing mash efficiency. With the optional Anvil Recirculation Kit, this becomes very easy. Follow the assembly instructions shown on page 4. Before turning on the pump, always wait 10 minutes after doughing-in for the grain to completely absorb water and for trapped air to escape; this helps to prevent a stuck mash. Open the drain valve completely to prime the pump. Then, turn on the pump and close off the pinch valve to reduce the flow of the pump.
Caution: Do not attempt to pump wort at full speed or a stuck mash condition may occur.
Recirculation During The Mash
It is very important to “rake the mash” every 15 minutes during the mash while recirculating. This is accomplished by stirring just the top 1/3 of the grain bed inside the malt basket. It is especially important to use rice hulls in the mash (1/2 pound per 10 pounds of grain) if the grain bill includes wheat, rye, oats, or other husk-less grain.
Important: If the wort level raises to the top of the mash basket, the flow rate is too high or the mash bed is compacting. To fix this turn off the flow, rake the entire mash to break up compacted grain and reset the flow rate to a slower setting. Allow 10 minutes for the mash to settle before restarting recirculation.
ACT = Actual Temperature SET = Set TemperaturePWR = Set % Power Used
+
_
F/C
%PWR
ACTSETPWR
After startup, the Foundry™’s default temperature is set to 39°F, and the power is set to 0%. Press the F/C button to change from Fahrenheit and Celsius. To set the temperature, press the + “plus” or – “minus” button. The temperature will begin flashing. Press and hold the + or – button to quickly advance the values. Next, press the percent power button “%PWR”. The Power percentage number will begin flashing. Press and hold the + or – button to reach the desired percent power button. To heat water at the fastest rate, use 100% power. To boil off 1 gallon of water per hour in 240V or ½ gallon per hour at 120V, keep the power set to 100%. You can slow down the heat rate or boil off rate as desired with the percent of power function. When the temperature is set to 212 °F or 100°C, the display will switch to BOIL.
Warning: Always remove the lid before bringing the wort to boil. Boiling wort can cause severe burns and damage to equipment. Do not set the unit to boil with the lid installed.
Operating the Temperature Controller
153˚F154˚F75%
To set the delay timer for the Foundry™, first fill the unit with water to the desired level. Set the temperature and power of the Foundry™. Press and hold the %PWR for 3 seconds and 1h will appear. Release the buttons and use the + to increase the time delay by 1 hour increments. Once you have the desired delay time, press the %PWR or give the Foundry™ 3 seconds for the time to locked in.
Important: Do not set the Delay Timer with grain in the Foundry™. Only use the delay timer for heating water. To cancel the delay, cycle the power (turn off and on).
Tip: To quickly go from 0% to 100%, simply press the minus “-” button. Similarly, to go from 39°F (4°C) to 212°F (100°C) , simply press the - button.

Anvil Brewing Foundry™ - V4©Anvil Brewing Equipment 2019 | www.anvilbrewing.com
8
Verify the voltage switch is set correctly and the unit is plugged into a GFCI protected outlet.Prepare water and slowly lower the empty malt basket.Heat the water to the recommended strike water temperature.Set the controller to the desired mash temperature. Gently stir in the grain with a mash paddle, breaking up any dough balls.If you’re using the optional recirculation kit, wait 10 mins before turning the pump on to let the grain settle, then gently rake (stir) the top ½ of the malt basket every 15 minutes.After mash process is complete, install the malt basket support ring and carefully lift the basket to the resting ring and set heat to boil (SET = 212°F). Be careful not to dislodge the support ring while lifting the mash basket. Rotate the basket roughly 45° to rest on the basket support, letting it drain. During draining, don’t bump the mash basket. Gently add “Sparge Water” (hot liquor) to the malt basket (if using sparging method).Remove the basket from the Foundry™ when drips from the basket significantly decrease and the grain looks like all the wort has drained.Boil for 60 minutes, or as directed in the recipe. Add hops and/or other ingredients as required. Sanitize the cooling coil by submerging it into the boiling wort for the last 10-15 minutes of the boil. Turn the Foundry™ off and run cold tap water through the coil until wort has reached the pitching temperature. Stirring with a sanitized spoon will speed the cooling process significantly.Remove the cooling coil, stir the wort to cause a whirlpool with a sanitized spoon, and leave the lid on. Wait 15 minutes for the hops and trub to settle to the bottom.Sanitize the pump and hoses (if equipped) and transfer into a sanitized fermentor using the rotating racking arm to leave behind hops and trub. Oxygenate the wort and pitch the yeast.
1.2.3.4.5.
6.
7.8.
9.
10.
11.
12.
13.
Clean the Foundry™ with mild unscented detergents, Powdered Brewery Wash (PBW), or percarbonate-based cleaners. For stubborn areas, we highly recommend Bar Keepers Friend to keep your product clean. Bleach should NOT be used to clean or sanitize stainless steel. For keeping your equipment clean and looking new, we strongly recommend cleaning immediately after brewing as soils and residue will be much easier to remove before it dries. Never toss components in a bucket of cleaning agents “to clean tomorrow” as these chemicals may damage the product if you exceed the recommended contact time.
Important: Keep the inside bottom of the Foundry™ thoroughly clean and bright with Bar Keepers Friend.
Cleaning and Maintenance
Brewing Steps, a quick reference
Tip: If anything touches the wort after the boil you must use sanitizer.

9Anvil Brewing Foundry™ - V4©Anvil Brewing Equipment 2019 | www.anvilbrewing.com
Recommended Accessories
Small Scale for Measuring Hops and Salts Mash Paddle and Stir SpoonLarge Scale for Measuring Grain
Stainless Bucket Fermentor
Distillation ReadyThe Foundry™ integrates seamlessly with the Turbo 500 Still unit. For installation, remove the knob and knob washers on the lid. Follow all operation instructions in the Turbo 500 Still manual. Zero to 100% power and temperature control makes the Foundry™ ideal for distillation. Install the stopper (BE-000689-00) in the lid hole when in use, which is included if you purchased the distillation kit through ANVIL Brewing Equipment.
Measuring Hops and Salts
5.5 Gallon Hot Liquor Tank
O2 Wand with Regulator
Handles up to 65 lbs with 0.02 lb accuracy Handles up to 4.4 lbs with 0.005 oz (0.1g) accuracy
Recirculation Kit4 Gallon and 7.5 Gallon

Anvil Brewing Foundry™ - V4©Anvil Brewing Equipment 2019 | www.anvilbrewing.com
10
TroubleshootingIf the wort is flowing at the recommended flow rate but is flowing over the sides of the basket instead of through it, you may have a stuck mash caused by compacting the grain. This is caused by recirculating too fast, too fine of a grain crush, or a high percentage of wheat, oats or similar grains in the grain bill. If this occurs, turn off the pump, and stir the entire mash. Add 1/4 to 1/2 pound of rice hulls if available and stir in well. Let the mash sit for 10 minutes before re-starting circulation.
If the Foundry™ does not turn on when powered up, see Power Source Overview for more information.
If the unit is accidentally ran without water the dry run switch will cut the power to the heaters. An error code “E3” will appear to reset:
1. Turn off the unit and disconnect from power.2. Allow the unit to cool.3. Flip over the Foundry™ and depress the pin to reset.
1.
2.
3.

11Anvil Brewing Foundry™ - V4©Anvil Brewing Equipment 2019 | www.anvilbrewing.com
Anvil Brewing Equipment Product WarrantyA. Limited Warranty 1. ANVIL Brewing Equipment warrants to the original purchaser that this product will be free from manufacturing defects in material workmanship for a period of one (1) year from the date of purchase by the customer. Proof of purchase is required. ANVIL Brewing Equipment’s obligation to repair or replace defective materials or workmanship is the sole obligation of ANVIL Brewing Equipment under this limited warranty. 2. This product is for home use only. The limited warranty covers only those defects that arise as a result of normal use of the product and does not cover any other problems, including, but not limited to, those that arise as a result of: a. Improper maintenance or modification; b. Damage due to incorrect voltage or improper wiring by customer; c. Operation outside of the product’s specifications; d. Carelessness or neglect to operate the product in accordance with instructions provided with the product; e. Damaging the tamper label on the product; f. Damage by over-tightening the fasteners; g. Failure to follow cleaning and / or maintenance procedures; or h. Exceeding published operational temperatures. 3. ANVIL Brewing Equipment reserves the right to request delivery of the defective component for inspection before processing the warranty claim. If ANVIL Brewing Equipment receives, during the applicable warranty period, notice of a defect in any component that is covered by the warranty, ANVIL Brewing Equipment shall either repair or replace the defective component with a new or rebuilt component at ANVIL Brewing Equipment’s option. 4. ANVIL Brewing Equipment must be notified within seven (7) days of the delivery date of any shipping damage. Customer is responsible for shipping damage outside of this time period. Approval for return must be provided by ANVIL Brewing Equipment prior to any return. Customer is responsible for keeping all original packaging material for warranty returns. ANVIL Brewing Equipment is not responsible for damage from improperly packaged warranty returns, and these repair costs will be the sole responsibility of the customer. Shipping costs for warrantee returns are covered only for the contiguous United States. 5. ANVIL Brewing Equipment’s limited warranty is valid in any country where the product is distributed. ________________________________________B. Limitations of Warranty 1. Any implied warranty that is found to arise by way of state or federal law, including any implied warranty of merchantability or any implied warranty of fitness, is limited in duration to the terms of this limited warranty and is limited in scope of coverage to this warranty. ANVIL Brewing Equipment disclaims any express or implied warranty, including any implied warranty of fitness for a particular purpose or merchantability, on items excluded from coverage as set forth in this limited warranty. 2. ANVIL Brewing Equipment makes no warranty of any nature beyond that contained in this limited warranty. No one has authority to enlarge, amend, or modify this limited warranty, and 3. ANVIL Brewing Equipment does not authorize anyone to create any other obligation for it regarding this product. 4. ANVIL Brewing Equipment is not responsible for any representation, promise, or warranty made by any independent dealer or other person beyond what is expressly stated in this limited warranty. Any selling or servicing dealer is not ANVIL Brewing Equipment’s agent, but an independent entity.________________________________________C. Limitations of Liability 1. The remedies provided in this warranty are the customer’s sole and exclusive remedies. 2. Except for the obligations specifically set forth in this warranty, in no event shall ANVIL Brewing Equipment be liable for direct, indirect, special, incidental, or consequential damages, whether based on contract, tort, or any other legal theory and whether or not advised of the possibility of such damages. 3. This warranty does not cover, and in no event shall ANVIL Brewing Equipment be liable for, travel, lodging, or any other expense incurred due to manufacturing defects in material and work manship, or any other reason. 4. Any performance of repairs after the warranty coverage period has expired or performance of repairs regarding anything excluded from coverage after this limited warranty 5. Shall be considered good-will repairs and they will not alter the terms of this limited warranty, or extend any warranty coverage period. 6. Venue for any legal proceedings relating to or arising out of this warranty shall be in Tippecanoe County, Indiana, United States, which courts will have exclusive jurisdiction. ________________________________________D. Local Law 1. This warranty gives the customer specific legal rights. The customer may also have other rights that vary from state to state in the United States or other countries. 2. To the extent that this warranty is inconsistent with local law, it shall be deemed modified, only to the extent necessary to be consistent with such local law.


![[Anvil Christopher] Anvil, Christopher - Interstel(BookFi)](https://static.fdocuments.in/doc/165x107/577c7f1a1a28abe054a33ed5/anvil-christopher-anvil-christopher-interstelbookfi.jpg)