FOUNDATION STAGE PROFILE 2017 - Staffordshire · EYFS Data Collection 2017 – Using SIMS...
18
FOUNDATION STAGE PROFILE 2017 Using SIMS Assessment Termly EYFS Resources
Transcript of FOUNDATION STAGE PROFILE 2017 - Staffordshire · EYFS Data Collection 2017 – Using SIMS...

FOUNDATION STAGE
PROFILE 2017
Using SIMS Assessment
Termly EYFS Resources


EYFS Data Collection 2017 – Using SIMS Assessment Termly EYFS Resources MIS Team | May 2017 | Version 1.0
Page 2 of 16
Foundation Stage Profile 2017 SIMS Assessment
Returning your FSP Results to the LA
For Those Schools That Have Used the EY TT Resources in SIMS to Record Assessments
Contents
Stage 1 Checking the Wizard is Available .................................................................................... 3
Stage 2 Checking That the Data Has Been Recorded in the EYFS Marksheets. ......................... 4
Stage 3 Creating a User-Defined Group ....................................................................................... 5
Stage 4 Using the EYFS Profile Wizard ....................................................................................... 8
Stage 5 Checking and Calculating the Assessment Data ............................................................. 9
Stage 6 Printing the Reports ....................................................................................................... 10
Stage 7 Creating the Export File to Send to the LA .................................................................... 12
Stage 8 Returning Foundation Stage Profile via Entrust Secure File Transfer ........................... 15
PLEASE NOTE: You will need to ensure that you have at least SIMS version 7.174 before the wizard will be available.
IMPORTANT The Foundation Stage Profile return should be submitted to the LA by:-
Tuesday 20th June 2017
Copyright © 2017 Entrust/Link2ICT. All rights reserved. Any unauthorised reproduction, distribution or use will constitute an
infringement of copyright.
EYFS Data Collection 2017 – Using SIMS Assessment Termly EYFS Resources MIS Team | May 2017 | Version 1.0
Page 3 of 16
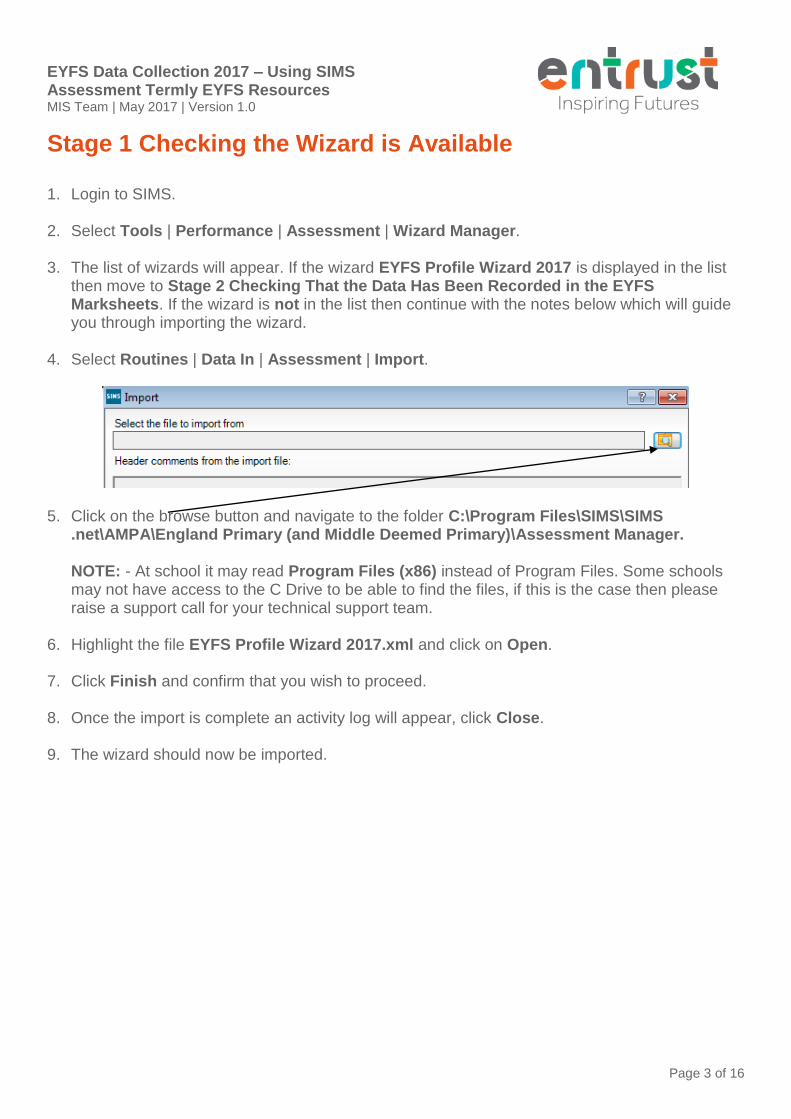
Stage 1 Checking the Wizard is Available 1. Login to SIMS.
2. Select Tools | Performance | Assessment | Wizard Manager.
3. The list of wizards will appear. If the wizard EYFS Profile Wizard 2017 is displayed in the list
then move to Stage 2 Checking That the Data Has Been Recorded in the EYFS Marksheets. If the wizard is not in the list then continue with the notes below which will guide you through importing the wizard.
4. Select Routines | Data In | Assessment | Import.
5. Click on the browse button and navigate to the folder C:\Program Files\SIMS\SIMS
.net\AMPA\England Primary (and Middle Deemed Primary)\Assessment Manager. NOTE: - At school it may read Program Files (x86) instead of Program Files. Some schools may not have access to the C Drive to be able to find the files, if this is the case then please raise a support call for your technical support team.
6. Highlight the file EYFS Profile Wizard 2017.xml and click on Open.
7. Click Finish and confirm that you wish to proceed.
8. Once the import is complete an activity log will appear, click Close.
9. The wizard should now be imported.

EYFS Data Collection 2017 – Using SIMS Assessment Termly EYFS Resources MIS Team | May 2017 | Version 1.0
Page 4 of 16
Stage 2 Checking That the Data Has Been Recorded in the EYFS Marksheets. These notes are to be used by schools who have been entering data into the EY TT resources within SIMS. Before schools can create and submit the return the class teacher must have entered the Summer Term 2 data. To check that it has been entered, follow the steps below. 1. From within SIMS choose Focus | Assessment | Marksheet Entry. 2. In ‘Template Name’ type EY TT and click Search.
3. Scroll through the list of marksheets until you find one entitled EY TT Data Entry Reception
YR HT or EY TT Data Entry Reception YR, highlight either and click on Open.
4. The marksheet displays the 17 areas and you will notice that next to each of the Summer Term 2 columns there is a grey column displaying 1’s, 2’s and 3’s. This column is automatically populated once the Summer Term 2 data has been entered.
IMPORTANT – Ensure that the data has calculated correctly.
5. If the Summer Term 2 column is not complete then you will need to speak to the teacher and ask them to complete the appropriate assessments.
6. Close the marksheet once you have completed
checking.

EYFS Data Collection 2017 – Using SIMS Assessment Termly EYFS Resources MIS Team | May 2017 | Version 1.0
Page 5 of 16
Stage 3 Creating a User-Defined Group IMPORTANT - Note about students to include If a child transfers schools before the summer half term holiday, the new setting must report the child’s EYFS profile data to the LA. If a child transfers schools during the second half of the summer term the previous school is responsible for reporting to the LA. 1. Select Focus | Groups | Assessment Defined Groups within SIMS. 2. Once the group browser appears click ‘New’ and a blank record will appear.
3. Insert a suitable description Foundation Stage Profile 2017 and short name for the group e.g.
FSP 2017.
4. From the drop down list set the Active State to ‘Active’.
5. Move down the screen to the ‘Membership’ area.
6. Click on against Effective Date Range and choose Whole Year.
7. Click OK.

EYFS Data Collection 2017 – Using SIMS Assessment Termly EYFS Resources MIS Team | May 2017 | Version 1.0
Page 6 of 16
8. Click on the ‘Action’ button and choose ‘Add Member’.
9. The Select Members screen will appear.
10. From the Group Type choose National Curriculum Year Group.
11. Click on Group browser and choose Curriculum Year R, click OK, then click on Search.
12. You may need to change the effective date if you need to include a student who is no longer on roll at the school.
13. Highlight the students you wish to include in the group.
To highlight blocks of students hold down the ‘Shift’ key on the keyboard and click on the first student then the last. This will highlight in blue all those students in between.
To highlight individual students hold down the ‘Ctrl’ key on the keyboard and click the individuals you want to select.

EYFS Data Collection 2017 – Using SIMS Assessment Termly EYFS Resources MIS Team | May 2017 | Version 1.0
Page 7 of 16
14. Once the students have been highlighted click on ‘OK’.
15. Once the students have been added click the ‘Save’ at the top of the screen and close the screen.

EYFS Data Collection 2017 – Using SIMS Assessment Termly EYFS Resources MIS Team | May 2017 | Version 1.0
Page 8 of 16
Stage 4 Using the EYFS Profile Wizard 1. Select Tools | Performance | Assessment | Wizard Manager from within SIMS.
2. Highlight the EYFS Profile Wizard 2017 so that it has a thin blue line around it and click
‘Next’.
3. Click on the Group
Browser button and click on the + by Assessment User Defined. Highlight Foundation Stage Profile 2017 and click on ‘Apply’.
4. Click Next to display the marksheet.

EYFS Data Collection 2017 – Using SIMS Assessment Termly EYFS Resources MIS Team | May 2017 | Version 1.0
Page 9 of 16
Stage 5 Checking and Calculating the Assessment Data
1. Highlight the EYFS Profile 2017 Marksheet and click the Edit Marksheet button . 2. The marksheet will appear on screen. 3. It displays a number of columns; the first 17 columns should be complete with data as the
class teacher will already have entered the information into the half termly or termly trackers that they have been using throughout the year.
4. Set the Result Date to 01/05/2017.
5. Click Calculate at the top of the screen and the data will copy across to the last 17 columns on
the marksheet, these columns are the ones that will be returned to the LA and DfE.
6. Once complete click Save at the top of the marksheet and then close it.

EYFS Data Collection 2017 – Using SIMS Assessment Termly EYFS Resources MIS Team | May 2017 | Version 1.0
Page 10 of 16
Stage 6 Printing the Reports 1. Clicking on Next will take you to the screen in the wizard which enables the printing of the FSP
report which can be sent to parents.
2. NOTE – To return to the wizard, if it has been closed, select Tools | Performance | Assessment | Wizard Manager. Highlight the EYFS Profile Wizard 2017 and click Next, Next and Next.
In the 2017 wizard there are 3 reports which are available to print.
An example of the report produced from the FSP Wizard. This is optional as you may have already used some other method to produce your reports to parents. The EYFS Profile Pupil Report 2017 displays each of the 17 areas with the score along with a column showing the meaning of the score, Emerging, Expected or Exceeding.

EYFS Data Collection 2017 – Using SIMS Assessment Termly EYFS Resources MIS Team | May 2017 | Version 1.0
Page 11 of 16
Printing the EYFS Profile Pupil Report 2017 1. Ensure that the EYFS Profile Pupil Report 2017 is highlighted. 2. In order to view the report for an individual student, deselect all pupils and then tick the
student(s) of your choice before clicking the Preview button. Enable macros if requested. 3. Close Word and choose No to save any changes.
4. To print all reports click on Select All so that all the students in the chosen group are selected
and then click on the Print button.
5. Reports can be uploaded to the Linked Documents area of the student record by clicking the
upload button .
The EYFS Profile School Report 2017 displays the percentage of students at each outcome for your EYFS cohort 2017. The report is the same for each student, so you may want to print one and photocopy it for all of the students.
The EYFS Profile National Report 2017 displays the percentage of students at each outcome, based on the national 2016 data. The report is the same for each student.
Will preview reports for students selected. Will print reports for students selected.
Will export reports to Individual Word Documents for students selected.
Will export reports to the Document Management Server for students selected. Reports will be attached to the individual student record under linked documents.

EYFS Data Collection 2017 – Using SIMS Assessment Termly EYFS Resources MIS Team | May 2017 | Version 1.0
Page 12 of 16
Stage 7 Creating the Export File to Send to the LA
The Foundation Stage Profile assessments will be sent to the LA via the Entrust Secure File Transfer. The first stage in submitting the assessments requires creating an export file from Assessment. The deadline for the return to the LA is Tuesday 20th June 2017. 1. If you have closed the wizard then select Tools | Performance | Assessment | Wizard
Manager, choose the EYFS Profile Wizard 2017 and click Next, Next, Next and finally Next again. (If you were already in the wizard on the reports section, then just click Next).
2. You should now see the screen below.
3. In the ‘Results for export’ section click on Deselect All and then click on the column heading entitled Result Set.

EYFS Data Collection 2017 – Using SIMS Assessment Termly EYFS Resources MIS Team | May 2017 | Version 1.0
Page 13 of 16
4. You will need to place a tick against the following 17 aspects with the Result Set of Early Years Foundation Stage.
Aspect Name Result Set
EY: Being imaginative Early Years Foundation Stage
EY: Exploring & using media & material Early Years Foundation Stage
EY: Health and self care Early Years Foundation Stage
EY: Listening and attention Early Years Foundation Stage
EY: Making relationships Early Years Foundation Stage
EY: Managing feelings and behaviour Early Years Foundation Stage
EY: Moving and handling Early Years Foundation Stage
EY: Numbers Early Years Foundation Stage
EY: People and communities Early Years Foundation Stage
EY: Reading Early Years Foundation Stage
EY: Self-confidence and self-awareness Early Years Foundation Stage
EY: Shape, space and measures Early Years Foundation Stage
EY: Speaking Early Years Foundation Stage
EY: Technology Early Years Foundation Stage
EY: The world Early Years Foundation Stage
EY: Understanding Early Years Foundation Stage
EY: Writing Early Years Foundation Stage
5. Ensure that the correct students are showing in the bottom section of the window and that all
the students have a tick against them.
6. Click on the Export button top right of the screen .
7. Navigate to F:\Sims\EntrustSFT.
EYFS Data Collection 2017 – Using SIMS Assessment Termly EYFS Resources MIS Team | May 2017 | Version 1.0
Page 14 of 16
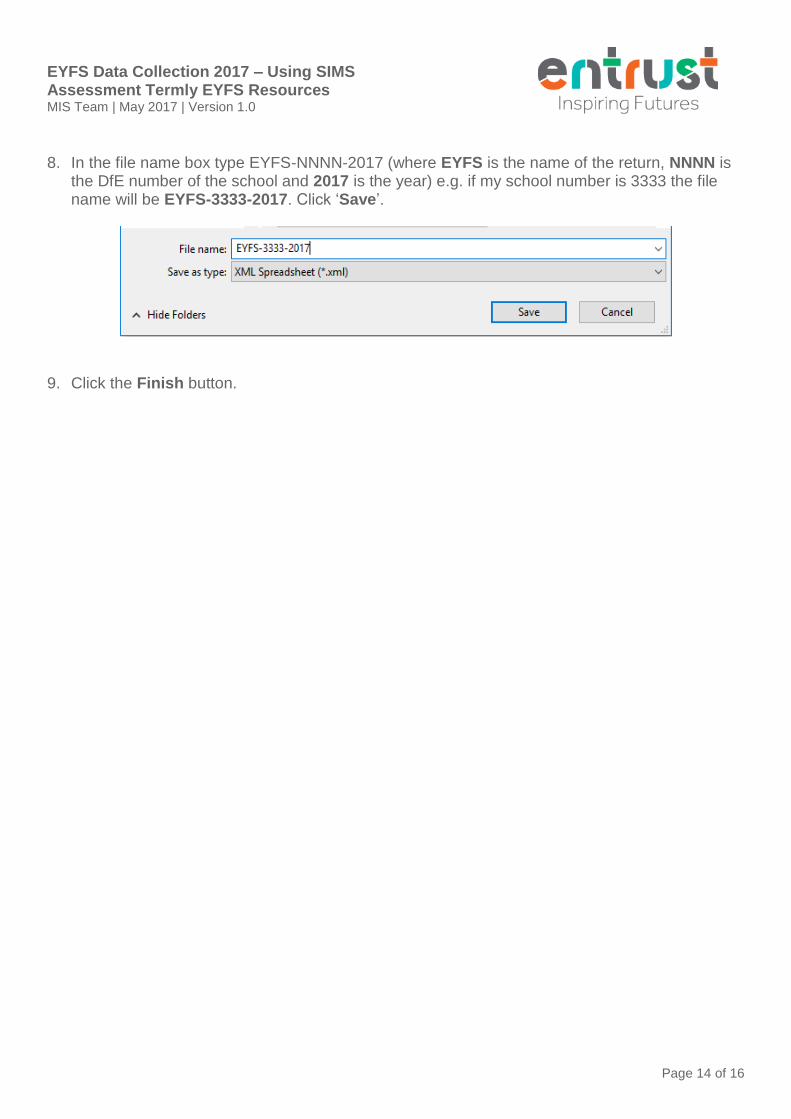
8. In the file name box type EYFS-NNNN-2017 (where EYFS is the name of the return, NNNN is the DfE number of the school and 2017 is the year) e.g. if my school number is 3333 the file name will be EYFS-3333-2017. Click ‘Save’.
9. Click the Finish button.

EYFS Data Collection 2017 – Using SIMS Assessment Termly EYFS Resources MIS Team | May 2017 | Version 1.0
Page 15 of 16
Stage 8 Returning Foundation Stage Profile via Entrust Secure File Transfer
IMPORTANT
The deadline for the submission of the file is Tuesday 20th June 2017. 1. To access the Entrust Secure File Transfer website, open Internet Explorer and in the
address box type in https://securetransfer.entrust-lt.co.uk and press Enter.
2. Enter your Username and Password. All schools will have been issued with this prior to the
data collection.
3. Click Login.
4. Click on . 5. Click on the Browse button to choose the FSP file.
6. Navigate to F:\Sims\EntrustSFT.
7. Highlight the EYFS-NNNN-2017 (where EYFS is the name of the return, NNNN is the DfE number of the school and 2017 is the year), click Open.
EYFS Data Collection 2017 – Using SIMS Assessment Termly EYFS Resources MIS Team | May 2017 | Version 1.0
Page 16 of 16
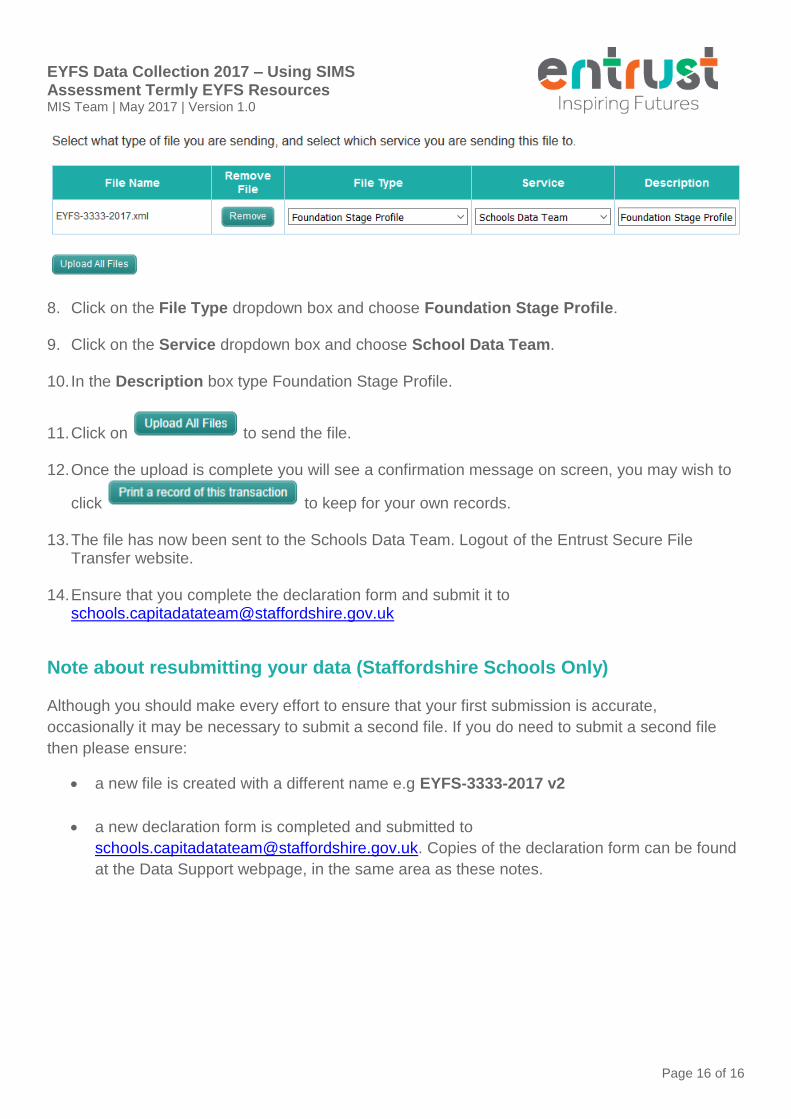
8. Click on the File Type dropdown box and choose Foundation Stage Profile. 9. Click on the Service dropdown box and choose School Data Team. 10. In the Description box type Foundation Stage Profile.
11. Click on to send the file. 12. Once the upload is complete you will see a confirmation message on screen, you may wish to
click to keep for your own records.
13. The file has now been sent to the Schools Data Team. Logout of the Entrust Secure File Transfer website.
14. Ensure that you complete the declaration form and submit it to
Note about resubmitting your data (Staffordshire Schools Only) Although you should make every effort to ensure that your first submission is accurate,
occasionally it may be necessary to submit a second file. If you do need to submit a second file
then please ensure:
• a new file is created with a different name e.g EYFS-3333-2017 v2
• a new declaration form is completed and submitted to
[email protected]. Copies of the declaration form can be found
at the Data Support webpage, in the same area as these notes.
MIS Advisory Team
Entrust Learning Technologies
Riverway Centre
Riverway
Stafford
ST16 3TH
Tel: 0300 111 8030
e-mail: [email protected]
https://secure2.sla-online.co.uk/pages/mPageView.aspx