Forte Mobile Application| Forte Mobile Application: User Guide v3.1.2 Forte Payment Systems...
22
Forte Mobile Application Updated 5.25.2017 User Guide v3.1.2
Transcript of Forte Mobile Application| Forte Mobile Application: User Guide v3.1.2 Forte Payment Systems...
Forte Mobile Application
Updated 5.25.2017
User Guide v3.1.2
© 2019 CSG Systems International, Inc. and/or its affiliates Confidential 2 | Page
| Forte Mobile Application: User Guide v3.1.2
Revision History
Version Date Changes3.1.1 4/6/2016 New Format. Added Merchant Settings Admin Password.3.1.2 5/25/2017 Added Troublshooting section.
© 2019 CSG Systems International, Inc. and/or its affiliates (“CSG”)
All rights reserved. The information contained in this document is subject to change without notice. CSG makes no warranty of any kind with regard to this material, including but not limited to the documentation, function, and performance of these programs and their suitability for any purpose. CSG shall not be liable for any errors contained herein for incidental or consequential damages in connection with the furnishing, performance, or use of this material.
This document contains proprietary information, including trade secrets, which is protected by copyright. All rights are reserved. No part of this document may be reproduced or translated into another document in any language without prior consent of CSG Systems International, Inc., 500 W. Bethany Dr., Suite 200, Allen, TX 75013.
© 2019 CSG Systems International, Inc. and/or its affiliates Confidential 3 | Page
Forte Mobile Application: User Guide v3.1.2 |
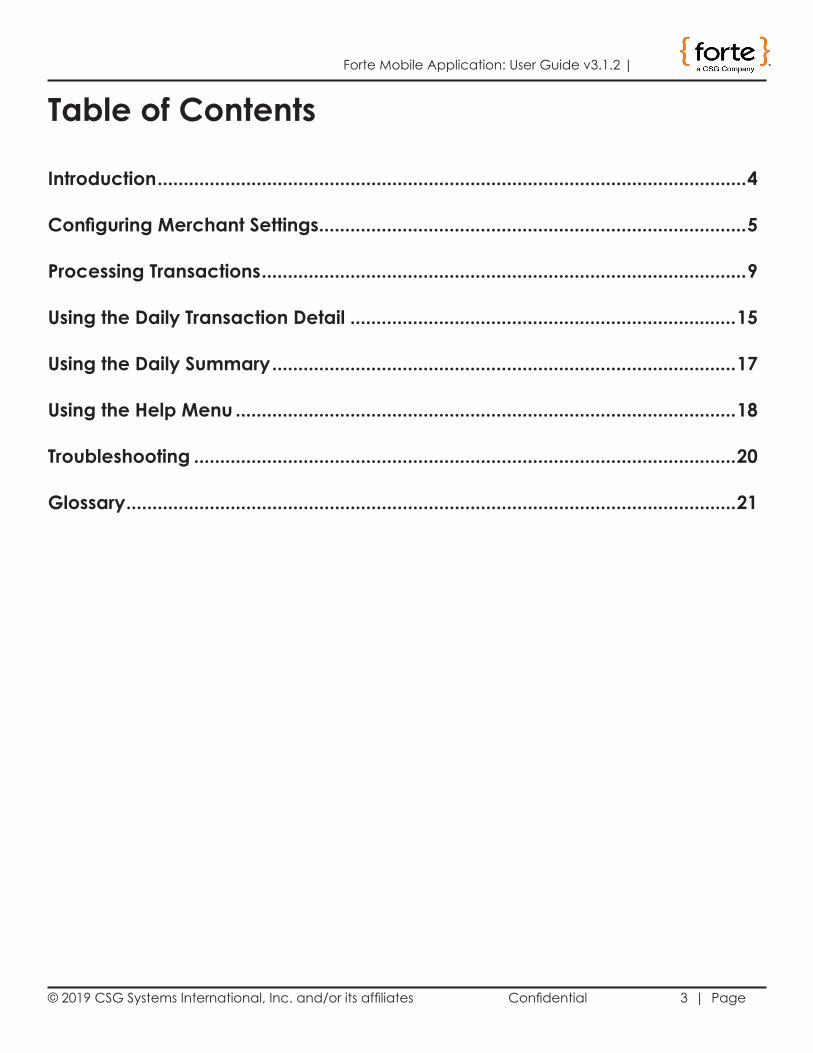
Table of Contents
Introduction .................................................................................................................4
Configuring Merchant Settings ..................................................................................5
Processing Transactions .............................................................................................9
Using the Daily Transaction Detail ..........................................................................15
Using the Daily Summary .........................................................................................17
Using the Help Menu ................................................................................................18
Troubleshooting ........................................................................................................20
Glossary .....................................................................................................................21
© 2019 CSG Systems International, Inc. and/or its affiliates Confidential 4 | Page
| Forte Mobile Application: User Guide v3.1.2
Forte Payment Systems processes credit card, debit card, and echeck transac-tions. The Forte Mobile App enables merchants to process transactions in real time and provide instant approve or decline responses with the convenience of a cell phone.
Overview
PurposeThis guide provides detailed instructions for• configuring the Merchant Settings in your Forte Mobile App,• processing transactions using the Forte Mobile App, and• obtaining summary and detail data about transactions processed through the
Forte Mobile App.
For Help. . . Call. . . At. . .With the Forte Mobile App
Forte Customer Service 800-337-3060 option 1
With the MagTek® iDynamo or uDynamo
Forte Sales 866-290-5400Forte Customer Service 800-337-3060 option 1
Assistance
• MagTek® iDynamo device for iOS products.• MagTek® uDynamo device for Android products.Required Equipment
Use the Forte Mobile App with the following list of supported devices and operating systems: https://www.magtek.com/content/documentationfiles/d99800115.pdf.
A device must have SMS capabilities to work with the Forte Mobile App’s receipt functionality. WiFi-only devices do not have these capabilities.
Supported Hardware and Operating System
Introduction
© 2019 CSG Systems International, Inc. and/or its affiliates Confidential 5 | Page
Forte Mobile Application: User Guide v3.1.2 |
Configuring Merchant Settings
Setting Up
Before you can begin processing transactions using the Forte Mobile App, you must• Obtain your Merchant ID (MID) and password from Forte. This information can
be found in the Welcome Letter the primary contact received from Forte when the merchant account was set up or by calling Forte Customer Service.
• Download the App from iTunes (for Apple devices) or the Google Play Store (for Android devices).
• Enable Location Settings. When you first open the Forte Mobile App, a dialog displays asking you to enable Location Services. Click OK.
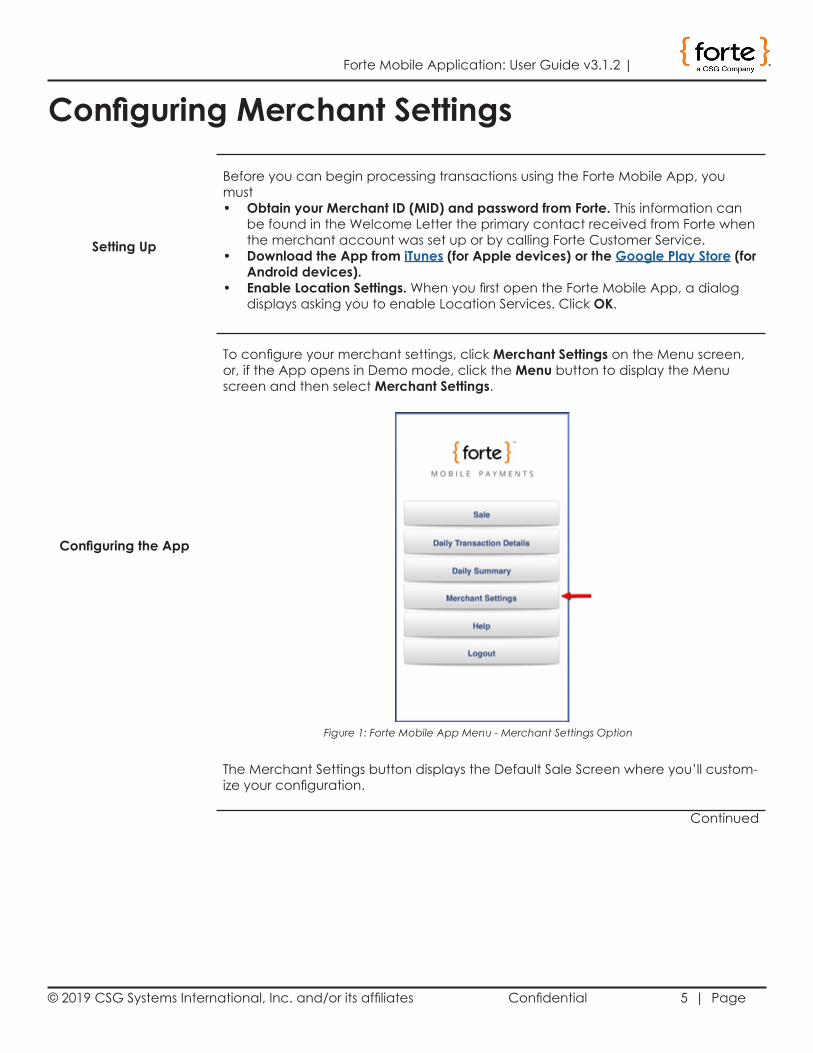
To configure your merchant settings, click Merchant Settings on the Menu screen, or, if the App opens in Demo mode, click the Menu button to display the Menu screen and then select Merchant Settings.
The Merchant Settings button displays the Default Sale Screen where you’ll custom-ize your configuration.
Configuring the App
Figure 1: Forte Mobile App Menu - Merchant Settings Option
Continued
© 2019 CSG Systems International, Inc. and/or its affiliates Confidential 6 | Page
| Forte Mobile Application: User Guide v3.1.2
Configuring Merchant Settings (Cont’d)
Configuring the App
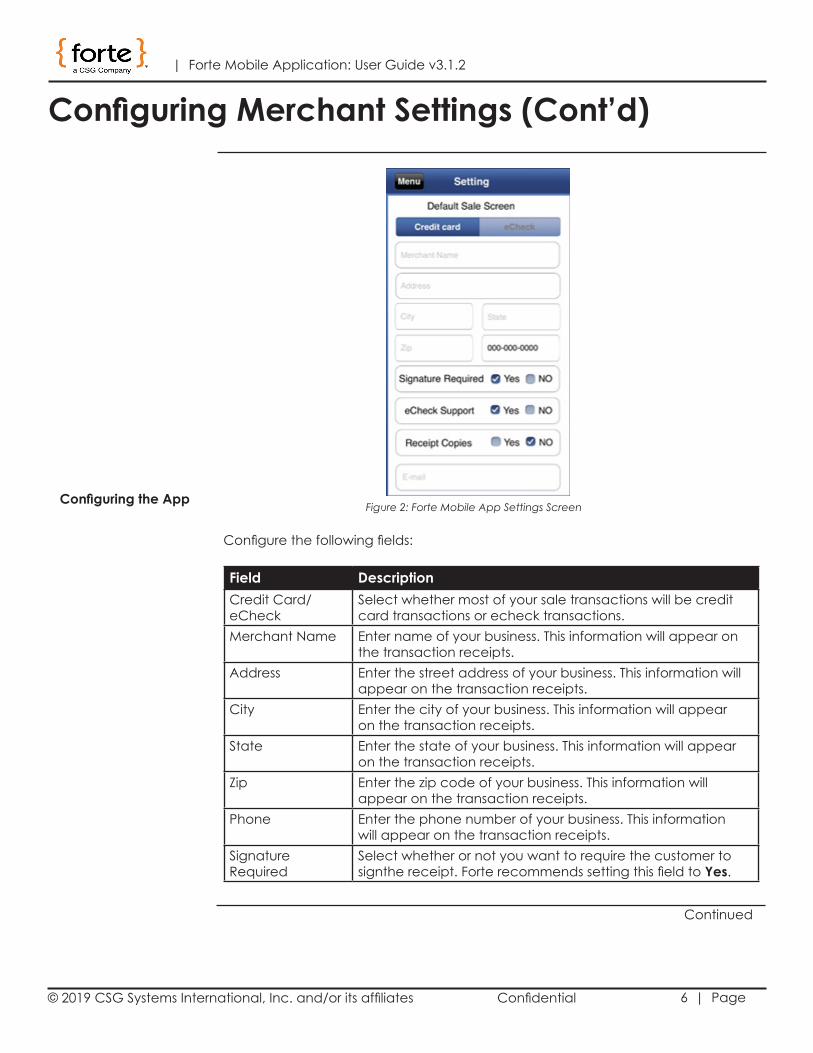
Configure the following fields:
Field DescriptionCredit Card/eCheck
Select whether most of your sale transactions will be creditcard transactions or echeck transactions.
Merchant Name Enter name of your business. This information will appear onthe transaction receipts.
Address Enter the street address of your business. This information willappear on the transaction receipts.
City Enter the city of your business. This information will appearon the transaction receipts.
State Enter the state of your business. This information will appearon the transaction receipts.
Zip Enter the zip code of your business. This information willappear on the transaction receipts.
Phone Enter the phone number of your business. This informationwill appear on the transaction receipts.
Signature Required
Select whether or not you want to require the customer to signthe receipt. Forte recommends setting this field to Yes.
Figure 2: Forte Mobile App Settings Screen
Continued
© 2019 CSG Systems International, Inc. and/or its affiliates Confidential 7 | Page
Forte Mobile Application: User Guide v3.1.2 |
Configuring Merchant Settings (Cont’d)
Configuring the App
Field DescriptioneCheck Support Click Yes if you want to accept echecks and your Forte
account has been set up to accept echeck transactions;otherwise, click No. If you wish to accept echecks, but youraccount has not been set up for echecks, contact your ForteSales Representative.
Receipt Copies Click Yes to receive a copy of every receipt and then add your email address to the Email field. Forte recommends set-tingthis field to Yes. Selecting Yes for this field ensures that theapplication automatically brings up a receipt for everyapproved transaction with the provided email address. Youstill must click Send. If you selected a Signature Required,then the signature will also be attached to the receipt.
Occasionally, a cardholder may contact his/her bank re-garding a charge that appeared on his/her statement because he/she does not recognize or recall the charge. In such cases, the bank may request a copy of the sales re-ceipt. To satisfy the issuer association requirements for pro-viding receipt copies, Forte recommends that the Signature Required and Receipt Required fields are both set to Yes. If the bank requests a receipt copy, Forte’s Risk Department will contact you for a copy of a sales receipt and you will be able to provide them with a receipt. You may be subject to a chargeback if you are not able to provide a receipt when requested.
Email The email address where you will be receiving receipt copies.Disable Voids Select whether or not you want to disable the ability to void
a transaction.Enter UserDefined FieldName(s)
Select how many user-defined fields you want to capture, ifany. Examples of user-defined fields include CustomerNumber or Policy Number. This information, when enteredduring the sale process, will be available on reports andexports from Forte to help in reconciliation.
Name 1 If you want user-defined fields, enter the name of the field asyou want it to appear on the Sale screen.Name 2
Credit/eCheckConv Fee
Select whether you want convenience fees added to yourcredit card and/or echeck transactions. Convenience fees must be set up on your Forte account prior to assessing them.Convenience fees must be clearly disclosed to the customer in advance.
Continued
© 2019 CSG Systems International, Inc. and/or its affiliates Confidential 8 | Page
| Forte Mobile Application: User Guide v3.1.2
Configuring Merchant Settings (Cont’d)
Configuring the App
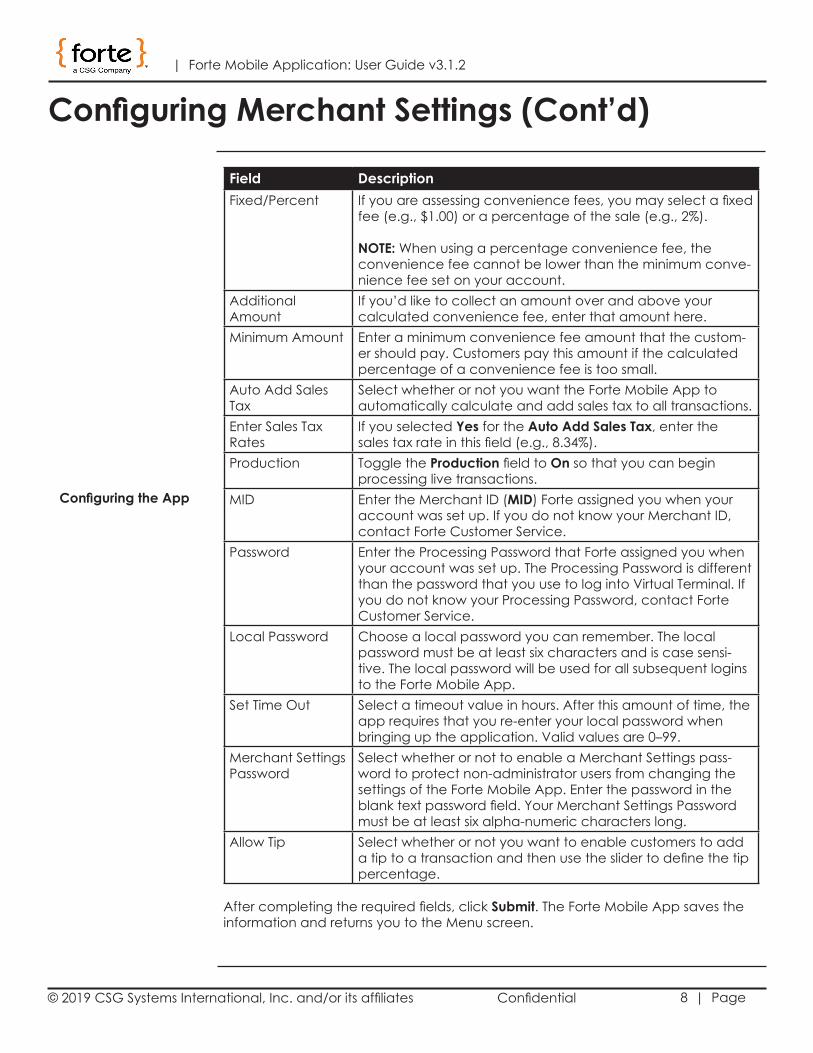
Field DescriptionFixed/Percent If you are assessing convenience fees, you may select a fixed
fee (e.g., $1.00) or a percentage of the sale (e.g., 2%). NOTE: When using a percentage convenience fee, the convenience fee cannot be lower than the minimum conve-nience fee set on your account.
AdditionalAmount
If you’d like to collect an amount over and above yourcalculated convenience fee, enter that amount here.
Minimum Amount Enter a minimum convenience fee amount that the custom-er should pay. Customers pay this amount if the calculatedpercentage of a convenience fee is too small.
Auto Add SalesTax
Select whether or not you want the Forte Mobile App toautomatically calculate and add sales tax to all transactions.
Enter Sales TaxRates
If you selected Yes for the Auto Add Sales Tax, enter thesales tax rate in this field (e.g., 8.34%).
Production Toggle the Production field to On so that you can beginprocessing live transactions.
MID Enter the Merchant ID (MID) Forte assigned you when youraccount was set up. If you do not know your Merchant ID,contact Forte Customer Service.
Password Enter the Processing Password that Forte assigned you whenyour account was set up. The Processing Password is differentthan the password that you use to log into Virtual Terminal. Ifyou do not know your Processing Password, contact ForteCustomer Service.
Local Password Choose a local password you can remember. The localpassword must be at least six characters and is case sensi-tive. The local password will be used for all subsequent logins to the Forte Mobile App.
Set Time Out Select a timeout value in hours. After this amount of time, theapp requires that you re-enter your local password whenbringing up the application. Valid values are 0–99.
Merchant SettingsPassword
Select whether or not to enable a Merchant Settings pass-word to protect non-administrator users from changing the settings of the Forte Mobile App. Enter the password in the blank text password field. Your Merchant Settings Password must be at least six alpha-numeric characters long.
Allow Tip Select whether or not you want to enable customers to add a tip to a transaction and then use the slider to define the tippercentage.
After completing the required fields, click Submit. The Forte Mobile App saves theinformation and returns you to the Menu screen.
© 2019 CSG Systems International, Inc. and/or its affiliates Confidential 9 | Page
Forte Mobile Application: User Guide v3.1.2 |
Processing Transactions
Performing a Credit Card Sale
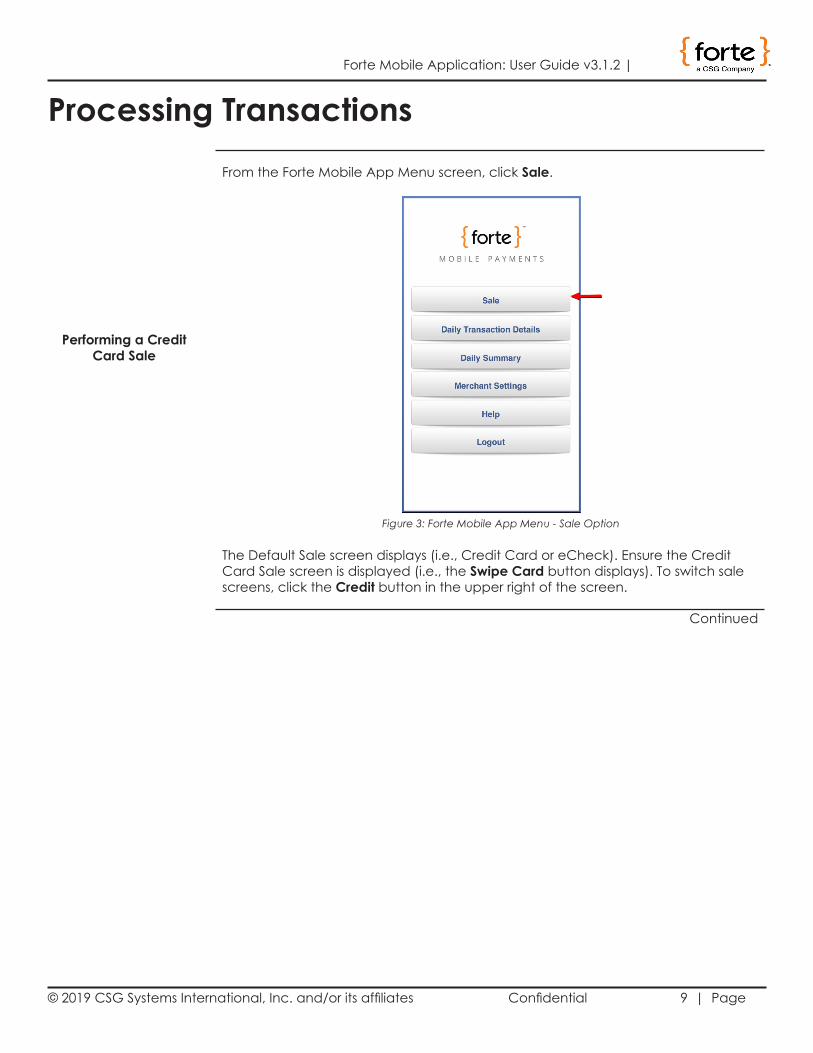
From the Forte Mobile App Menu screen, click Sale.
The Default Sale screen displays (i.e., Credit Card or eCheck). Ensure the Credit Card Sale screen is displayed (i.e., the Swipe Card button displays). To switch sale screens, click the Credit button in the upper right of the screen.
Figure 3: Forte Mobile App Menu - Sale Option
Continued
© 2019 CSG Systems International, Inc. and/or its affiliates Confidential 10 | Page
| Forte Mobile Application: User Guide v3.1.2
Processing Transactions (Cont’d)
Performing a Credit Card Sale
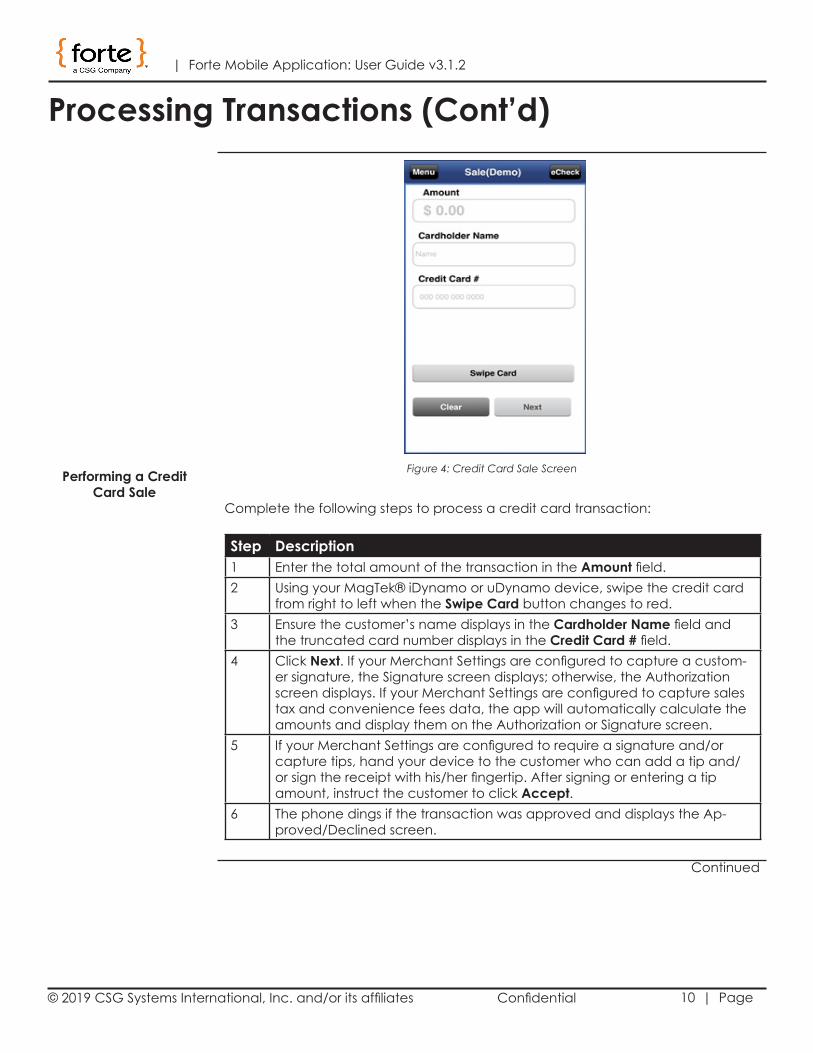
Complete the following steps to process a credit card transaction:
Step Description1 Enter the total amount of the transaction in the Amount field.2 Using your MagTek® iDynamo or uDynamo device, swipe the credit card
from right to left when the Swipe Card button changes to red.3 Ensure the customer’s name displays in the Cardholder Name field and
the truncated card number displays in the Credit Card # field.4 Click Next. If your Merchant Settings are configured to capture a custom-
er signature, the Signature screen displays; otherwise, the Authorization screen displays. If your Merchant Settings are configured to capture sales tax and convenience fees data, the app will automatically calculate the amounts and display them on the Authorization or Signature screen.
5 If your Merchant Settings are configured to require a signature and/or capture tips, hand your device to the customer who can add a tip and/or sign the receipt with his/her fingertip. After signing or entering a tip amount, instruct the customer to click Accept.
6 The phone dings if the transaction was approved and displays the Ap-proved/Declined screen.
Figure 4: Credit Card Sale Screen
Continued
© 2019 CSG Systems International, Inc. and/or its affiliates Confidential 11 | Page
Forte Mobile Application: User Guide v3.1.2 |
Processing Transactions (Cont’d)
Performing a Credit Card Sale
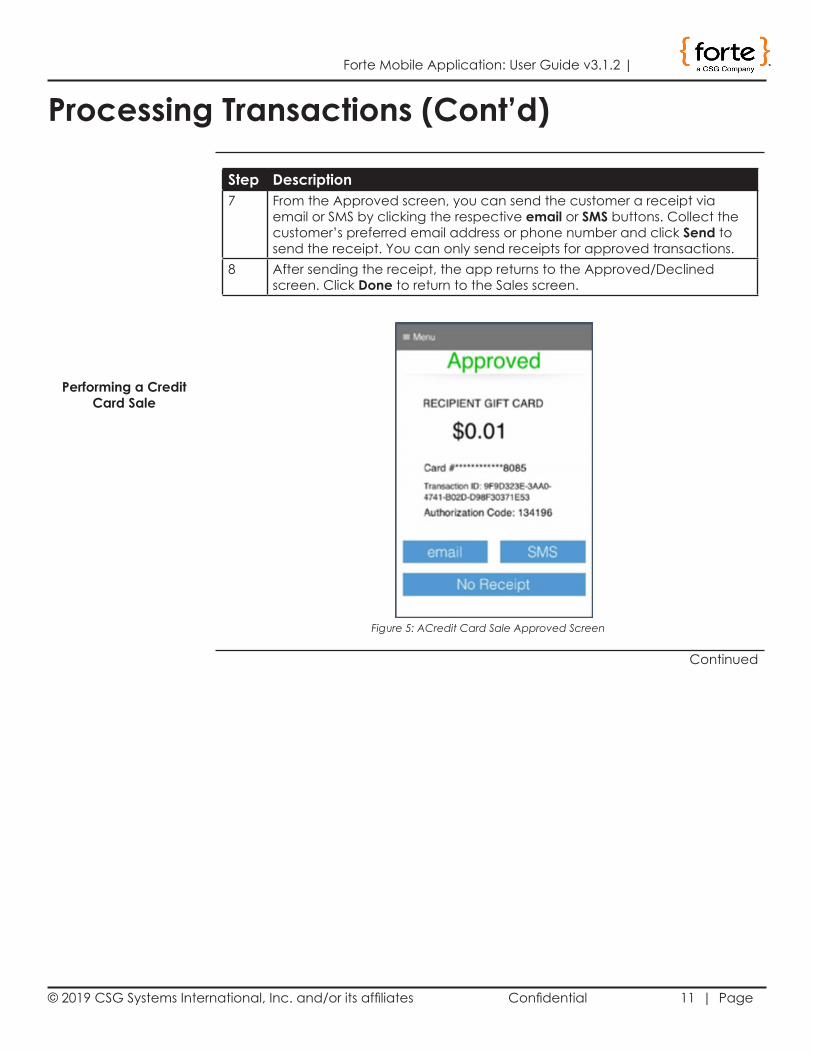
Step Description7 From the Approved screen, you can send the customer a receipt via
email or SMS by clicking the respective email or SMS buttons. Collect the customer’s preferred email address or phone number and click Send to send the receipt. You can only send receipts for approved transactions.
8 After sending the receipt, the app returns to the Approved/Declined screen. Click Done to return to the Sales screen.
Figure 5: ACredit Card Sale Approved Screen
Continued
© 2019 CSG Systems International, Inc. and/or its affiliates Confidential 12 | Page
| Forte Mobile Application: User Guide v3.1.2
Processing Transactions (Cont’d)
Performing an eCheck Sale
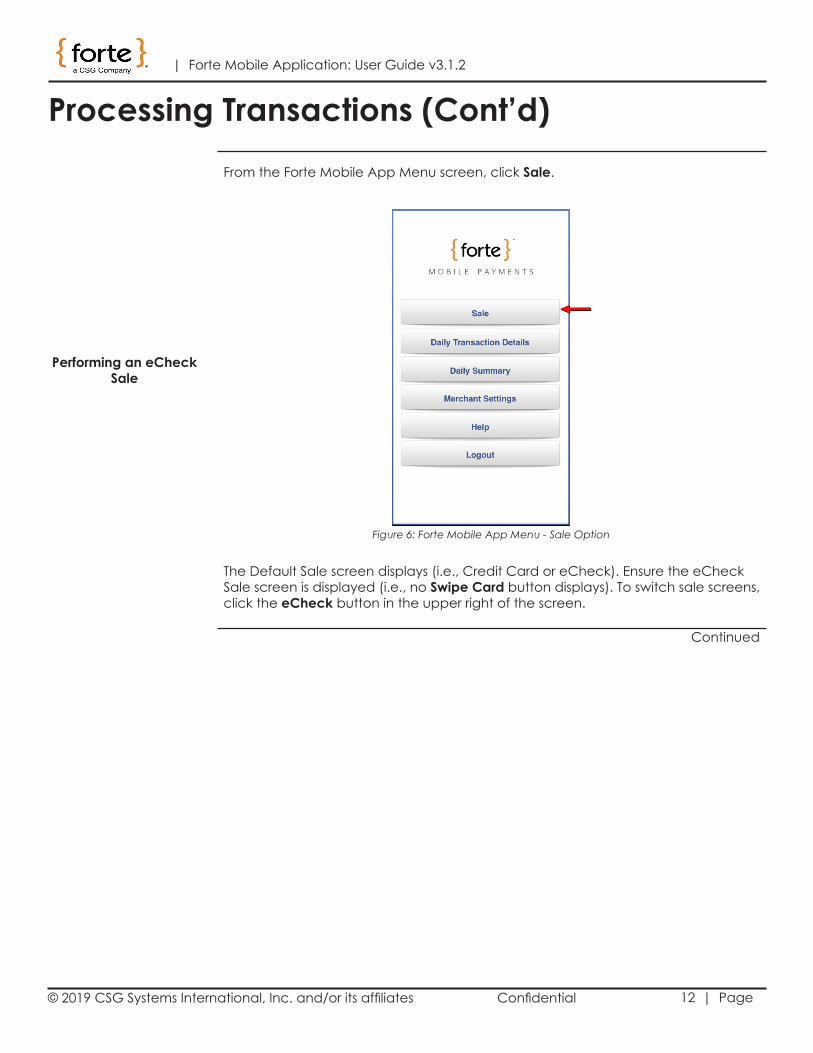
From the Forte Mobile App Menu screen, click Sale.
The Default Sale screen displays (i.e., Credit Card or eCheck). Ensure the eCheck Sale screen is displayed (i.e., no Swipe Card button displays). To switch sale screens, click the eCheck button in the upper right of the screen.
Figure 6: Forte Mobile App Menu - Sale Option
Continued
© 2019 CSG Systems International, Inc. and/or its affiliates Confidential 13 | Page
Forte Mobile Application: User Guide v3.1.2 |
Processing Transactions (Cont’d)
Performing an eCheck Sale
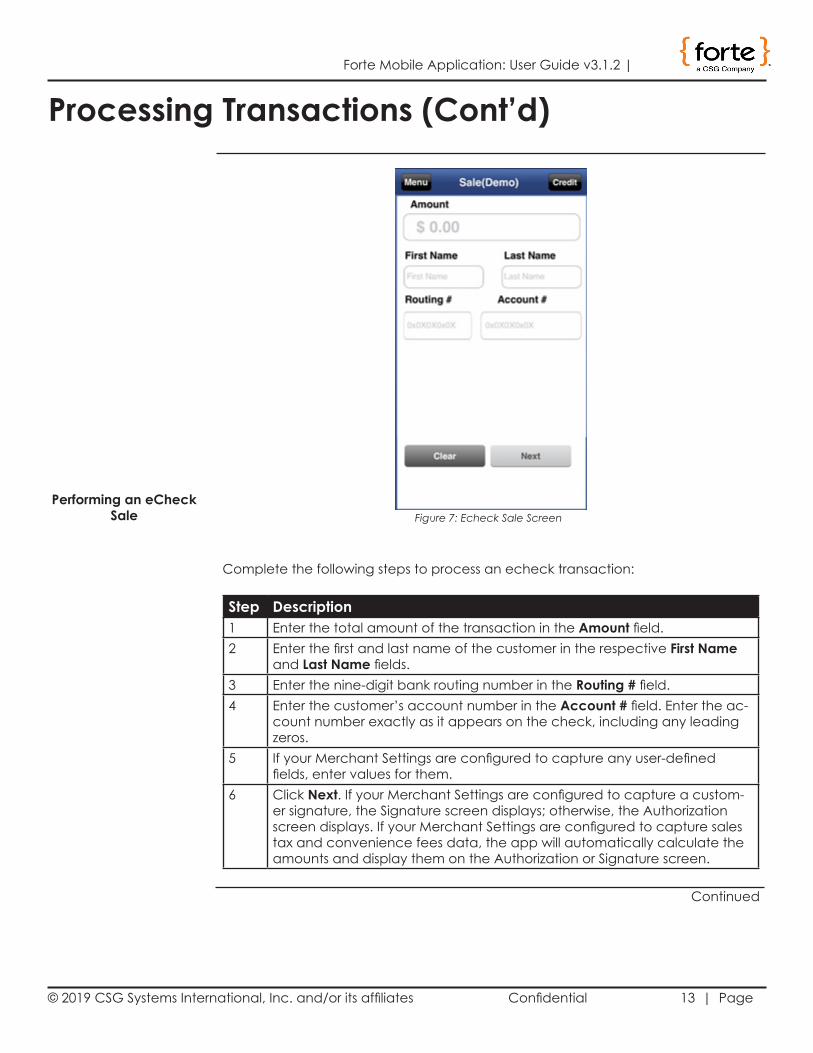
Complete the following steps to process an echeck transaction:
Step Description1 Enter the total amount of the transaction in the Amount field.2 Enter the first and last name of the customer in the respective First Name
and Last Name fields.3 Enter the nine-digit bank routing number in the Routing # field.4 Enter the customer’s account number in the Account # field. Enter the ac-
count number exactly as it appears on the check, including any leading zeros.
5 If your Merchant Settings are configured to capture any user-defined fields, enter values for them.
6 Click Next. If your Merchant Settings are configured to capture a custom-er signature, the Signature screen displays; otherwise, the Authorization screen displays. If your Merchant Settings are configured to capture sales tax and convenience fees data, the app will automatically calculate the amounts and display them on the Authorization or Signature screen.
Figure 7: Echeck Sale Screen
Continued
© 2019 CSG Systems International, Inc. and/or its affiliates Confidential 14 | Page
| Forte Mobile Application: User Guide v3.1.2
Processing Transactions (Cont’d)
Performing an eCheck Sale
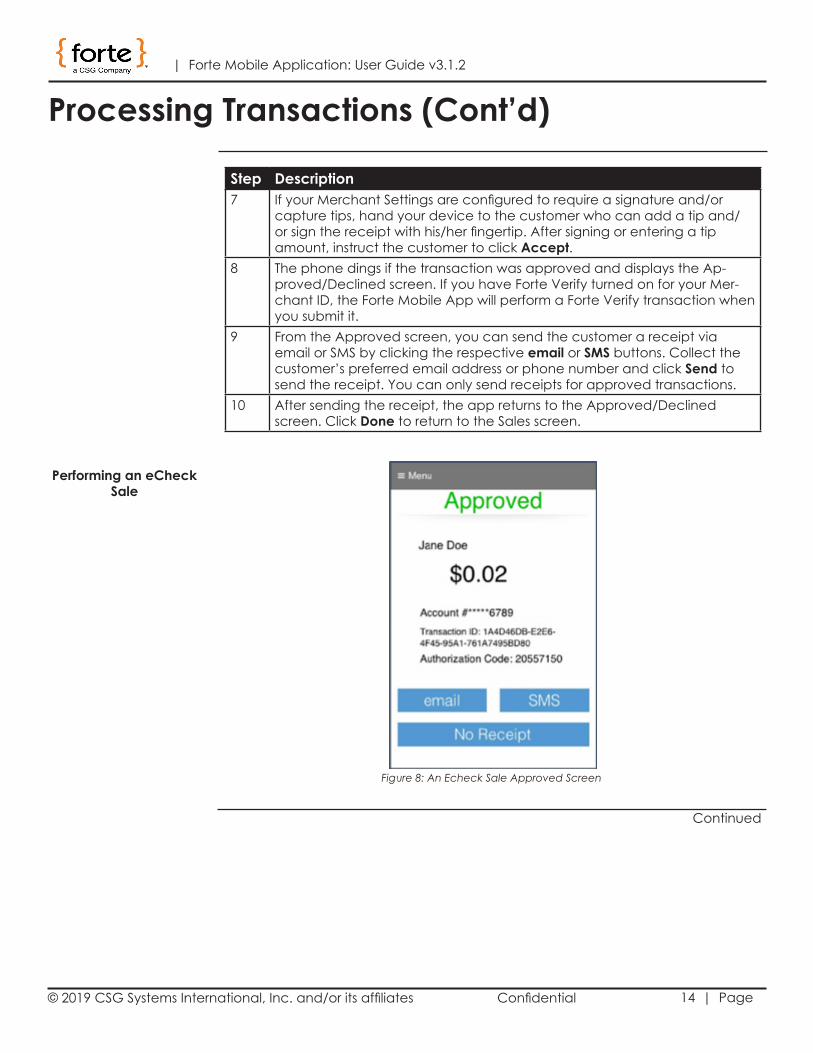
Step Description7 If your Merchant Settings are configured to require a signature and/or
capture tips, hand your device to the customer who can add a tip and/or sign the receipt with his/her fingertip. After signing or entering a tip amount, instruct the customer to click Accept.
8 The phone dings if the transaction was approved and displays the Ap-proved/Declined screen. If you have Forte Verify turned on for your Mer-chant ID, the Forte Mobile App will perform a Forte Verify transaction when you submit it.
9 From the Approved screen, you can send the customer a receipt via email or SMS by clicking the respective email or SMS buttons. Collect the customer’s preferred email address or phone number and click Send to send the receipt. You can only send receipts for approved transactions.
10 After sending the receipt, the app returns to the Approved/Declined screen. Click Done to return to the Sales screen.
Figure 8: An Echeck Sale Approved Screen
Continued
© 2019 CSG Systems International, Inc. and/or its affiliates Confidential 15 | Page
Forte Mobile Application: User Guide v3.1.2 |
Using the Daily Transaction Detail
Overview
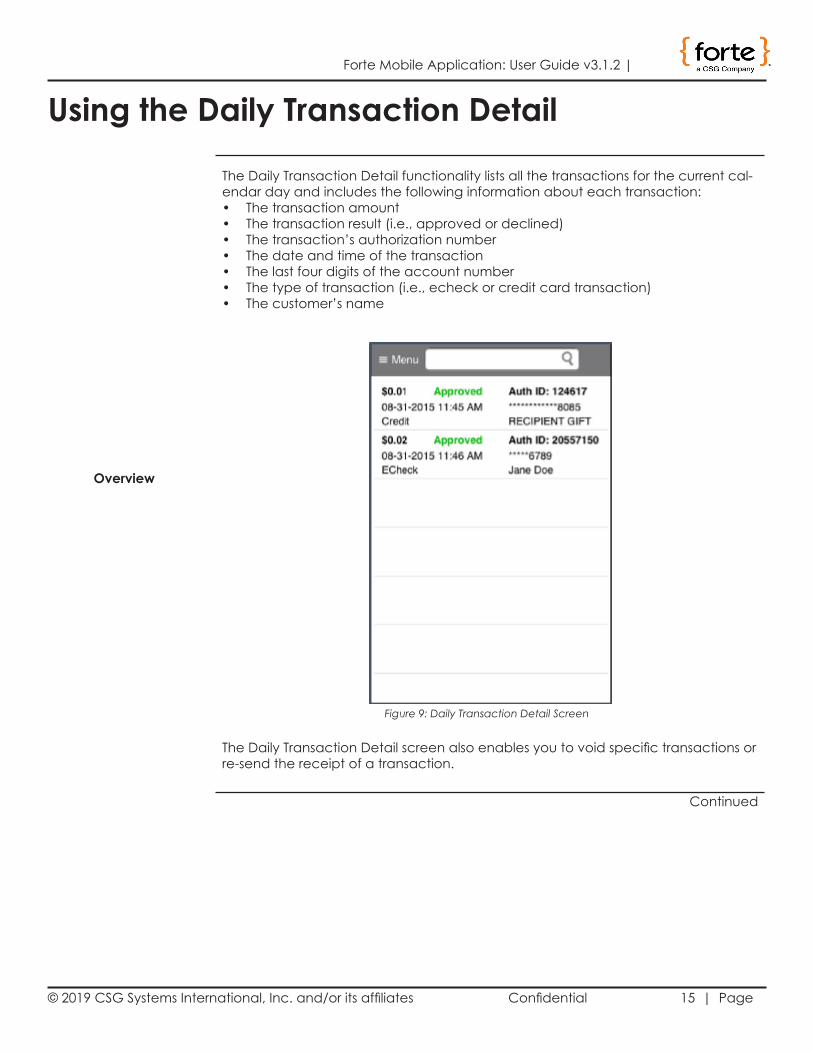
The Daily Transaction Detail functionality lists all the transactions for the current cal-endar day and includes the following information about each transaction:• The transaction amount• The transaction result (i.e., approved or declined)• The transaction’s authorization number• The date and time of the transaction• The last four digits of the account number• The type of transaction (i.e., echeck or credit card transaction)• The customer’s name
The Daily Transaction Detail screen also enables you to void specific transactions or re-send the receipt of a transaction.
Figure 9: Daily Transaction Detail Screen
Continued
© 2019 CSG Systems International, Inc. and/or its affiliates Confidential 16 | Page
| Forte Mobile Application: User Guide v3.1.2
Using the Daily Transaction Detail (Cont’d)
Voiding a Transaction
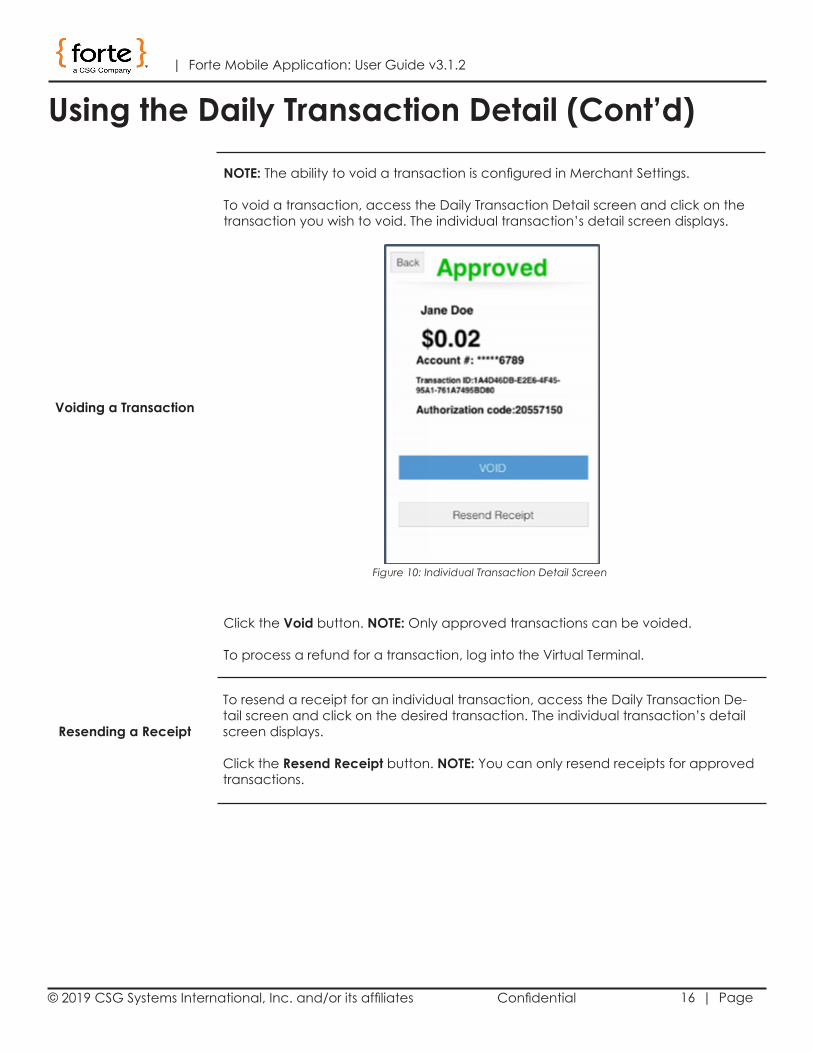
NOTE: The ability to void a transaction is configured in Merchant Settings.
To void a transaction, access the Daily Transaction Detail screen and click on the transaction you wish to void. The individual transaction’s detail screen displays.
Click the Void button. NOTE: Only approved transactions can be voided.
To process a refund for a transaction, log into the Virtual Terminal.
Figure 10: Individual Transaction Detail Screen
Resending a Receipt
To resend a receipt for an individual transaction, access the Daily Transaction De-tail screen and click on the desired transaction. The individual transaction’s detail screen displays.
Click the Resend Receipt button. NOTE: You can only resend receipts for approved transactions.
© 2019 CSG Systems International, Inc. and/or its affiliates Confidential 17 | Page
Forte Mobile Application: User Guide v3.1.2 |
Using the Daily Summary
Overview
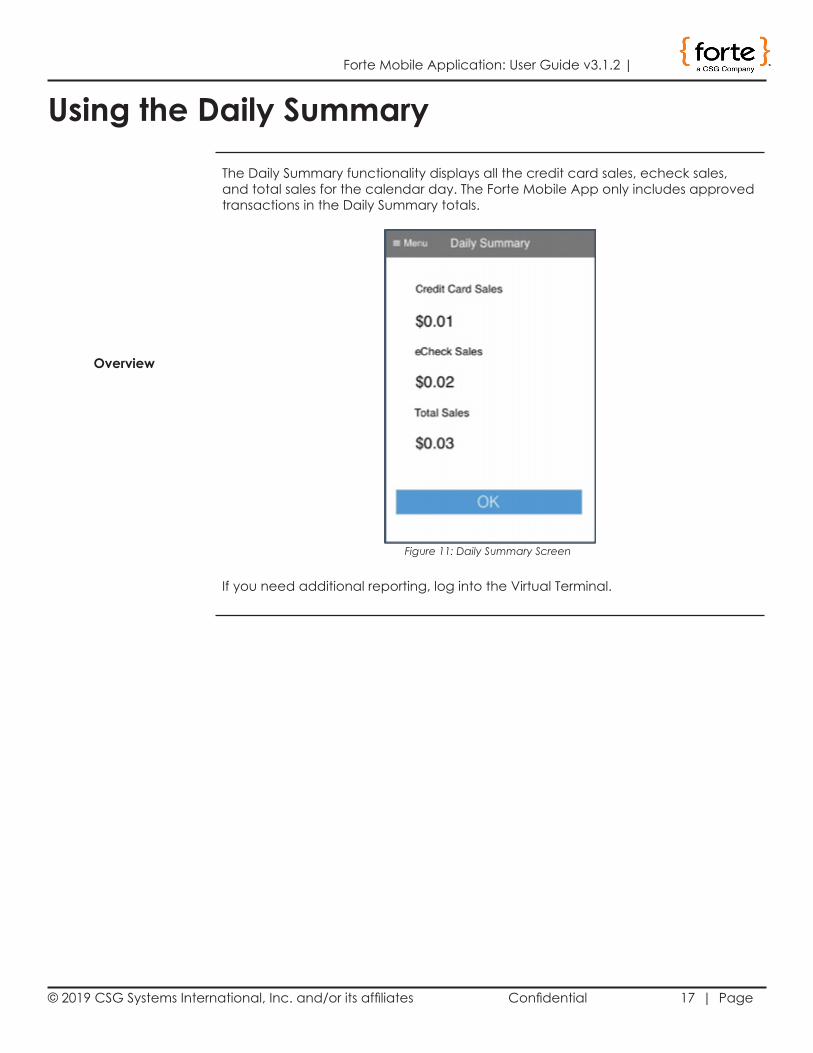
The Daily Summary functionality displays all the credit card sales, echeck sales, and total sales for the calendar day. The Forte Mobile App only includes approved transactions in the Daily Summary totals.
If you need additional reporting, log into the Virtual Terminal.
Figure 11: Daily Summary Screen
© 2019 CSG Systems International, Inc. and/or its affiliates Confidential 18 | Page
| Forte Mobile Application: User Guide v3.1.2
Using the Help Menu
Overview
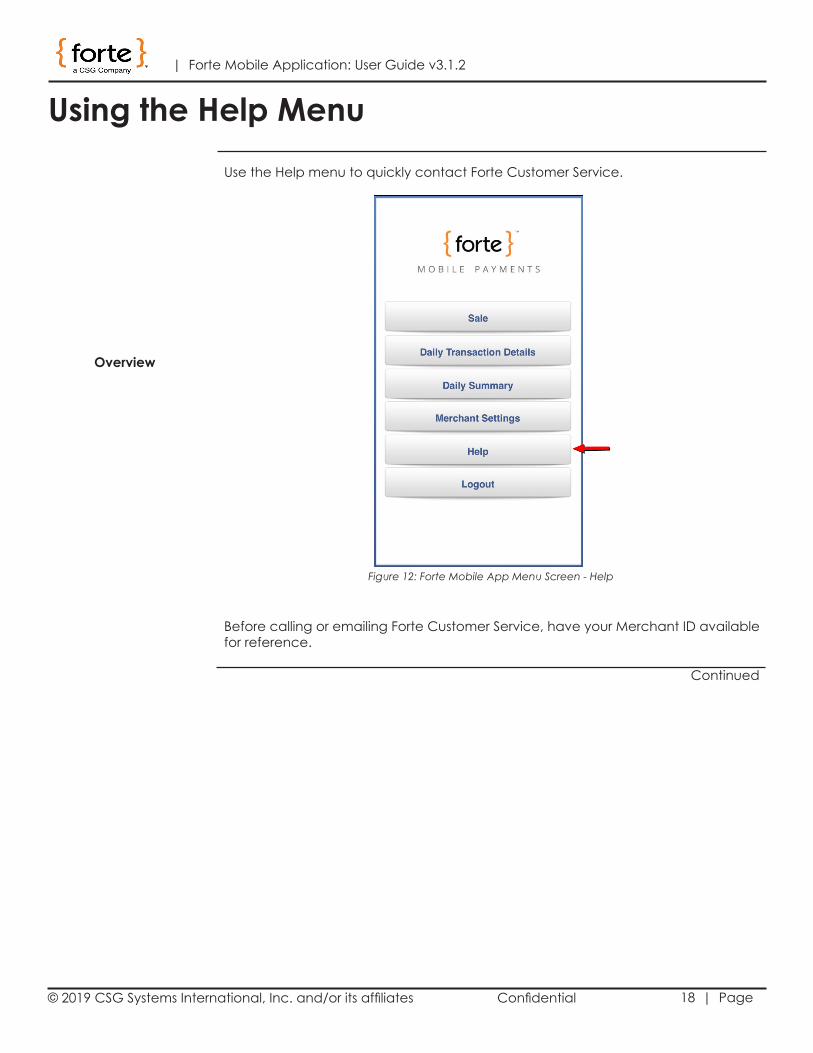
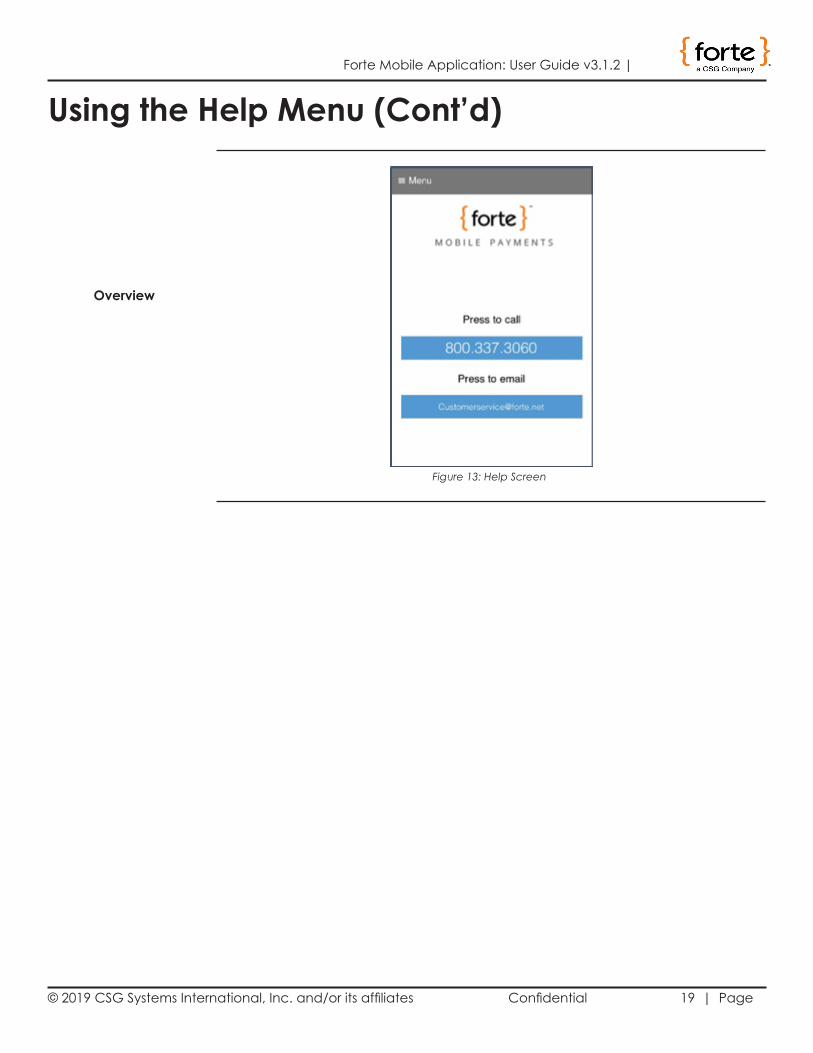
Use the Help menu to quickly contact Forte Customer Service.
Before calling or emailing Forte Customer Service, have your Merchant ID available for reference.
Figure 12: Forte Mobile App Menu Screen - Help
Continued
© 2019 CSG Systems International, Inc. and/or its affiliates Confidential 19 | Page
Forte Mobile Application: User Guide v3.1.2 |
Using the Help Menu (Cont’d)
Overview
Figure 13: Help Screen
© 2019 CSG Systems International, Inc. and/or its affiliates Confidential 20 | Page
| Forte Mobile Application: User Guide v3.1.2
Troubleshooting
The Swipe Card Button Doesn’t Change to Red
If the Swipe Card button does not change to red for a credit card swipe, check the following:• Is the reader out of battery? If so, using the cable that came with your device
to plug the reader into a power source for charging.
• Is the reader plugged into your mobile device all the way? If not, remove any protective cases from the device and attempt to plug in the reader again. NOTE: You might also use an extender cable to connect the card reader to your mobile device.
The Swipe Card Button Changes to Red but is not Reading the Card
If the Swipe Card button changes to red for a credit card swipe, but the reader doesn’t seem to be reading the card, try one of the following solutions:• Swipe the card faster or slower
• Swipe the card in a different direction
• If the card is invalid, ask the customer for a different credit card
• Try a new card reader. Readers can be damaged if exposed to dusty or humid environments.
© 2019 CSG Systems International, Inc. and/or its affiliates Confidential 21 | Page
Forte Mobile Application: User Guide v3.1.2 |
Glossary
ApprovalAn approval is a transaction approved by the credit provider or the check writer’s bank. Approvals are granted after an authorization has been requested by a mer-chant.
Authorization
Only used for credit card transactions, an authorization is a request from a mer-chant to charge a cardholder. If approved, the authorization will decrease the customer’s available credit, but will not actually capture any funds. An autho-rization is the first step in the delayed settlement process. This occurs when the merchant obtains an approval, but it is not settled within a specific period of time, causing the authorization to expire. The credit provider determines the delay peri-od.
Authorization Code Numeric or alphanumeric code issued by the credit provider and used to refer-ence the authorization.
Decline A transaction which is not approved by the credit provider/issuer. No authorization is issued.
Echeck An electronic version or representation of a paper check.
Merchant ID (MID)
This is the identification number for your organization, used by Forte to identify you in all communications. It is critical that anyone contacting Forte for assistance know this ID number.
Partial Refund
A partial refund is a transaction that electronically reverses part of a payment from a customer. A partial refund would generally be performed if the customer returns some, but not all, of the goods that they purchased.
Refund
A refund is a transaction that electronically reverses a payment from a customer. A refund would generally be performed if the customer returns the goods that were purchased.
Routing and Transit
The routing and transit number is located on the bottom of the check and identifies the bank that the check is drawn upon. U.S. routing and transits are nine digit num-bers that begin with 01-39.
Continued
© 2019 CSG Systems International, Inc. and/or its affiliates Confidential 22 | Page
| Forte Mobile Application: User Guide v3.1.2
Glossary (Cont’d)
Settlement
In this process, authorized transactions are sent to the processor for payment to the merchant. This process finalizes the transaction and allows funds due to the mer-chant to be “captured” and routed to the merchant’s bank for deposit. In other words, the merchant cannot be paid until the transaction is settled. It can take several days for funds to reach settlement. Credit card settlement may be within one day, while settlement for checks may take up to 90 days.
SSL
SSL is an acronym for Secure Sockets Layer, a communications protocol used to transmit private documents or information via the Internet. SSL encrypts data using a private key that is transferred over the SSL connection. Websites that require an SSL connection have an address that begins with https:// rather than http://.
Void To void a transaction is to cancel one that has been authorized, but not yet settled. Settled transactions may not be voided. Instead, they must be reversed.