Ford Module Programming (FMP) Purchase and …my.cardone.com/English/Club/flash2/docs/Section C...
36
Ford Module Programming (FMP) Purchase and Installation Guide Section C1 Page 1 of 8 Subject: Doc. # C1 CREATE A NEW ACCOUNT NOTE : For first time users of FMP, you must create an account prior to purchasing any services from this web-site. Process subject to change without notice. • Log onto www.motorcraftservice.com . • Click on “Membership Accounts” in the grey column on the left-hand side of the screen. • Click on “Start a New Account”. • Fill in required information to create an account and click on “Create Account” at the bottom of this page. Orig. Date: 12/12/99 Rev. Date: 6/11/10 Rev. Level: 001
Transcript of Ford Module Programming (FMP) Purchase and …my.cardone.com/English/Club/flash2/docs/Section C...

Ford Module Programming (FMP) Purchase and Installation Guide
Section C1 Page 1 of 8 Subject: Doc. # C1
CREATE A NEW ACCOUNT NOTE: For first time users of FMP, you must create an account prior to purchasing any services from this web-site. Process subject to change without notice. • Log onto www.motorcraftservice.com.
• Click on “Membership Accounts” in the grey column on the left-hand side of the screen.
• Click on “Start a New Account”.
• Fill in required information to create an account and click on “Create Account” at the
bottom of this page.
Orig. Date: 12/12/99 Rev. Date: 6/11/10 Rev. Level: 001

Ford Module Programming (FMP) Purchase and Installation Guide
Section C1 Page 2 of 8 Subject: Doc. # C1
PURCHASE SUBSCRIPTION
Before purchasing log out of the website
• Click on “Purchase Subscriptions” in the grey column on the left-hand side of the
screen.
• Click on “Reprogramming and Initialization” in the grey column on the left-hand side of
the screen or in the body of the display.
• Select the “Term” and “# of Terms”, and click on “Add to Cart”.
Orig. Date: 12/12/99 Rev. Date: 6/11/10 Rev. Level: 001
Ford Module Programming (FMP) Purchase and Installation Guide
Section C1 Page 3 of 8 Subject: Doc. # C1
• The Shopping Cart window will be displayed. Select “Ok” to continue.
• Click on the “Checkout” button.
• Review information and click on “Checkout”.
Orig. Date: 12/12/99 Rev. Date: 6/11/10 Rev. Level: 001

Ford Module Programming (FMP) Purchase and Installation Guide
Section C1 Page 4 of 8 Subject: Doc. # C1
• Read the “Disclaimers and Terms of Use” and click on “Cancel” or “I Agree”. Selecting “Cancel” will end the subscription process.
• If you are not already a “Member”, select “Start a New Account” and fill out the
appropriate information. If you are already a member, fill in your “User Name” and “Password” and click on “Enter”. We will use the scenario of an existing Member.
• Fill in the appropriate information for payment and click on “Submit Order”.
• Confirmation.
Orig. Date: 12/12/99 Rev. Date: 6/11/10 Rev. Level: 001

Ford Module Programming (FMP) Purchase and Installation Guide
Section C1 Page 5 of 8 Subject: Doc. # C1
INSTALLATION
NOTE: Process subject to change without notice.
• Log into your Membership account and click on “Reprogramming and Initialization”.
• Click on “software application”.
Orig. Date: 12/12/99 Rev. Date: 6/11/10 Rev. Level: 001
Ford Module Programming (FMP) Purchase and Installation Guide
Section C1 Page 6 of 8 Subject: Doc. # C1
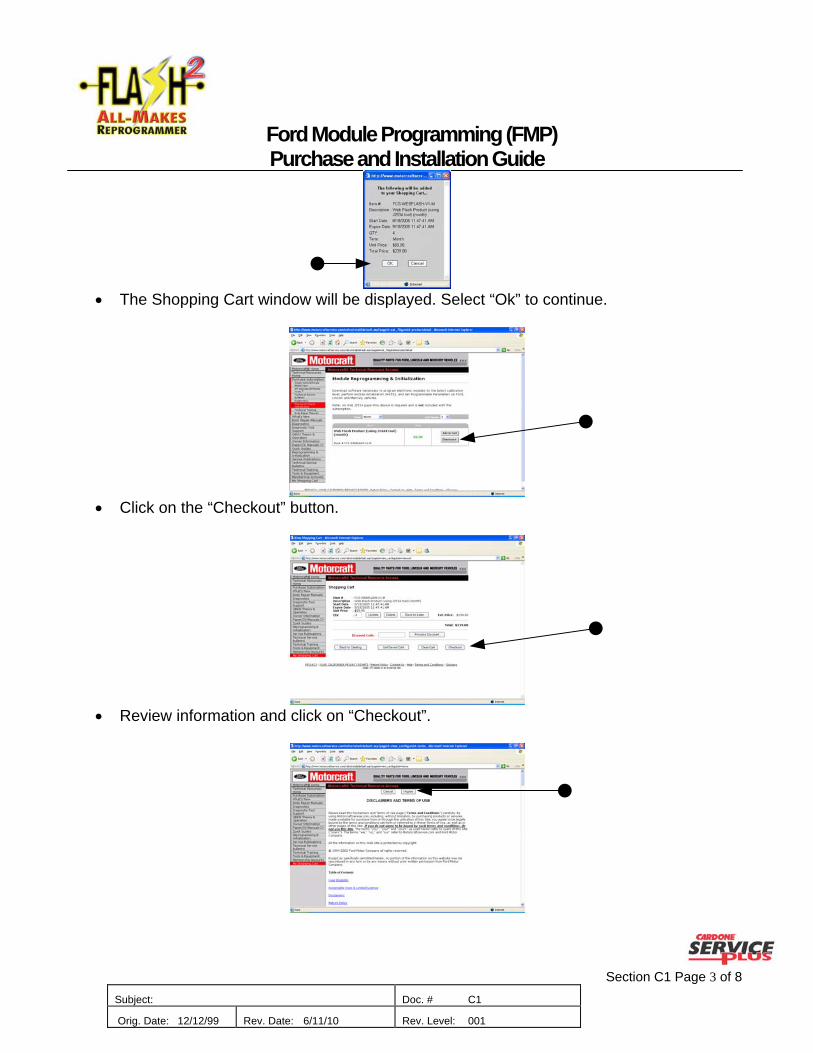
• Scroll to bottom of next screen and click on “Ford Module Programming”. NOTE: it is
recommended that the “Ford Module Programming User’s Guide”, also located here, be read in its entirety.
• Click on “Save”.
• It is recommended to save the Application to the Desktop for easy retrieval.
Orig. Date: 12/12/99 Rev. Date: 6/11/10 Rev. Level: 001

Ford Module Programming (FMP) Purchase and Installation Guide
Section C1 Page 7 of 8 Subject: Doc. # C1
• After installation is complete, locate the “FMPxx” icon on your desktop and double-click
on it.
• Select “Run”.
• Go through the installation process by responding accordingly to the messages. Please
make special note of the following screen during the installation process:
Orig. Date: 12/12/99 Rev. Date: 6/11/10 Rev. Level: 001
Ford Module Programming (FMP) Purchase and Installation Guide
Section C1 Page 8 of 8 Subject: Doc. # C1
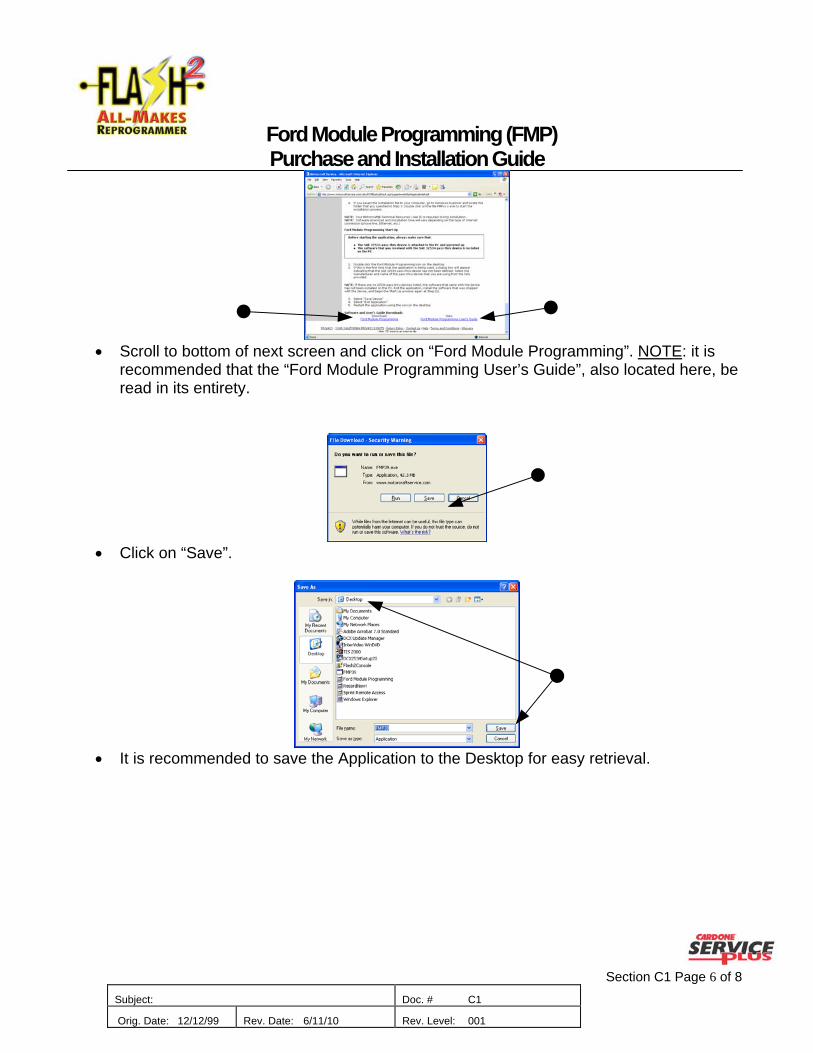
• You must type in your UserName exactly how you subscribed. The user ID is your
username that you created in the registration process , the FMP application will not recognize your subscription unless you have the correct user ID .
• Installation Complete.Follow the restart prompts
Orig. Date: 12/12/99 Rev. Date: 6/11/10 Rev. Level: 001

Ford FMP On/Off-Car Reprogramming Guide
Section C2 Page 1 of 14 Subject: Doc. # C2
NOTE: It is high recommended that the Ford Module Programming User’s Guide, available from the Motorcraft Service website, be downloaded and read before loading the FMP software and attempting a Ford flash. This guide is and shows the common steps in reprogramming. Application-specific variations may not be represented. Simply follow the applicable screen prompts and proceed as indicated. This process is subject to change w/o notice.
• Click on the Ford icon in the Reprogramming/Analyze section.
• Click on “FLASH2 Reprogramming”.
• Click either “On-Car” or “Off-Car”.
Orig. Date: 12/12/99 Rev. Date: 7/27/10 Rev. Level: 002

Ford FMP On/Off-Car Reprogramming Guide
Section C2 Page 2 of 14 Subject: Doc. # C2
• Read “Warning” information and click on “Next”.
• On-Car only: It is strongly recommended that a “Battery Test” be conducted. Read
the notes and click on “Battery Test”.
• On-Car only: Battery test is within acceptable parameters. Click “Next”.
• On-Car: make sure the vehicle’s Ignition Switch is in the “On” position and click “OK”. • Off-Car: make sure the FLASH2 tool’s Ignition Switch is in the “On” position and click “Ok”.
Orig. Date: 12/12/99 Rev. Date: 7/27/10 Rev. Level: 002

Ford FMP On/Off-Car Reprogramming Guide
Section C2 Page 3 of 14 Subject: Doc. # C2
• IMPORTANT! Please read carefully and follow the directions. Click on the “Launch” button, please see the next diagram for instructions.
2
1
43
• Select “Cardone Industries, In. (04.04) and then “FLASH2 All-Makes Reprogrammer”. Click “Save Device” and then “Exit Application”.
• Click on “Next” and you’ll launch into the Ford Module Programming (FMP)
Application.
• If there are updates to the FMP program you will be prompted with the option to install these updates.
Orig. Date: 12/12/99 Rev. Date: 7/27/10 Rev. Level: 002

Ford FMP On/Off-Car Reprogramming Guide
Section C2 Page 4 of 14 Subject: Doc. # C2
• Click on “Continue”.
• Click on “Start New Session”.
• Click on the “Tick icon”.
• Establish an Internet connection and select Confirm.
• Read the important Warning information. Click the “Tick icon” to continue.
Orig. Date: 12/12/99 Rev. Date: 7/27/10 Rev. Level: 002

Ford FMP On/Off-Car Reprogramming Guide
Section C2 Page 5 of 14 Subject: Doc. # C2
• Establishing communication with the PCM.
• Confirmation of the Vehicle Specification. Click YES if the PCM being flashed is the original PCM and the Vehicle Specification listed is correct. Click No if the PCM being flashed is a replacement unit. You will then be prompted to enter the OE number, calibration number or the tear tag number. The Vehicle Specification description will appear again. Now, if the vehicle date is correct, click YES and continue.
• These fields are OPTIONAL. For more information regarding this feature, please see the Ford Module Programming User’s Guide. Click on the “Tick icon”.
Orig. Date: 12/12/99 Rev. Date: 7/27/10 Rev. Level: 002

Ford FMP On/Off-Car Reprogramming Guide
Section C2 Page 6 of 14 Subject: Doc. # C2
• Click on the “Toolbox Tab”.
• Click on “Module Programming” and then the “Tick icon”.
• Programmable Module Installation: will allow programming over the current
calibration file, even if the PCM already has the latest. • Module Reprogramming: will not allow programming over the current calibration file,
if the latest already resides on the PCM. • Programmable Parameters: (not shown, but would be listed if applicable) change
configurable parameters such as customer preference items (ex: horn chirp, lighting delays, etc.) or vehicle modifications (ex: tire size or axle ratio).
• Select the appropriate option and then the “Tick icon”. See the “Ford Module Programming Users Guide” for the other options.
Orig. Date: 12/12/99 Rev. Date: 7/27/10 Rev. Level: 002

Ford FMP On/Off-Car Reprogramming Guide
Section C2 Page 7 of 14 Subject: Doc. # C2
• Read this “Notice” and click on the “Tick icon”.
• On-Car: make sure the vehicle’s Ignition Switch is in the “Off” position and click the “Tick
icon”. • Off-Car: make sure the FLASH2 tool’s Ignition Switch is in the “Off” position and click the
“Tick icon”.
• Click on the “Tick icon”.
Orig. Date: 12/12/99 Rev. Date: 7/27/10 Rev. Level: 002
Ford FMP On/Off-Car Reprogramming Guide
Section C2 Page 8 of 14 Subject: Doc. # C2
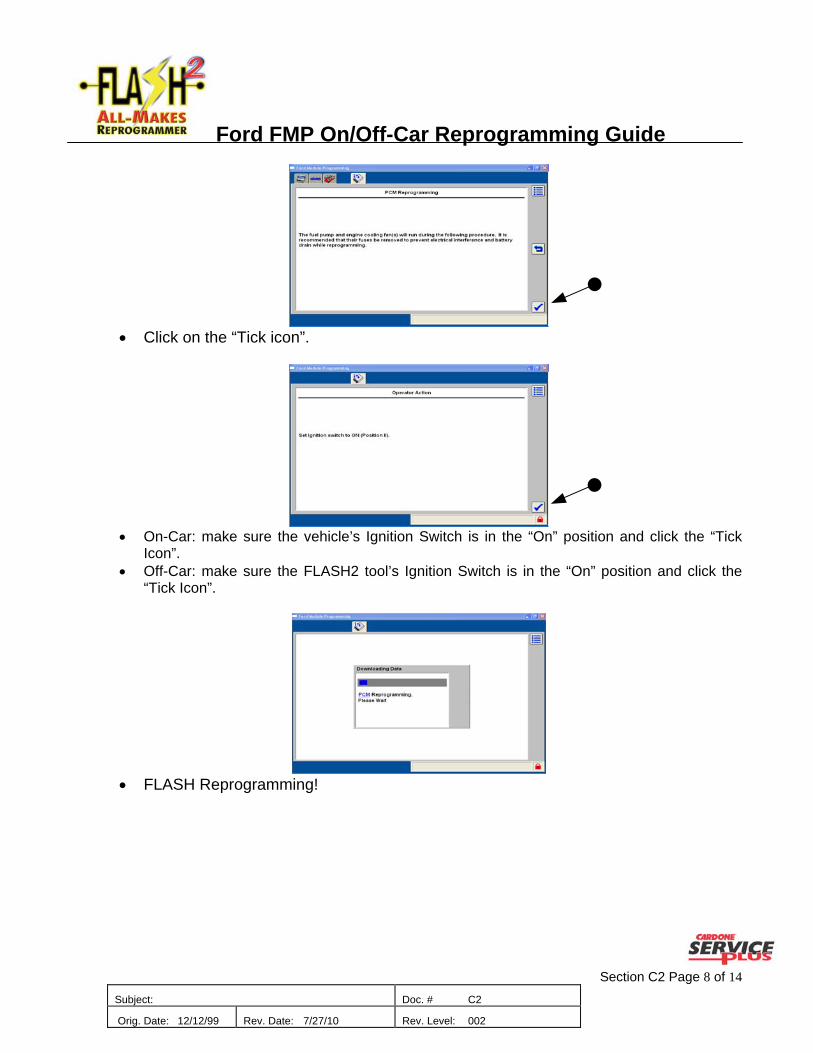
• Click on the “Tick icon”.
• On-Car: make sure the vehicle’s Ignition Switch is in the “On” position and click the “Tick
Icon”. • Off-Car: make sure the FLASH2 tool’s Ignition Switch is in the “On” position and click the
“Tick Icon”.
• FLASH Reprogramming!
Orig. Date: 12/12/99 Rev. Date: 7/27/10 Rev. Level: 002

Ford FMP On/Off-Car Reprogramming Guide
Section C2 Page 9 of 14 Subject: Doc. # C2
• On-Car: make sure the vehicle’s Ignition Switch is in the “Off” position and click the “Tick
Icon”. • Off-Car: make sure the FLASH2 tool’s Ignition Switch is in the “Off” position and click the
“Tick Icon”.
• On-Car: make sure the vehicle’s Ignition Switch is in the “On” position and click the “Tick
Icon”. • Off-Car: make sure the FLASH2 tool’s Ignition Switch is in the “On” position and click the
“Tick Icon”.
• On-Car: make sure the vehicle’s Ignition Switch is in the “Off” position and click the “Tick
Icon”. • Off-Car: make sure the FLASH2 tool’s Ignition Switch is in the “Off” position and click the
“Tick Icon”.
Orig. Date: 12/12/99 Rev. Date: 7/27/10 Rev. Level: 002

Ford FMP On/Off-Car Reprogramming Guide
Section C2 Page 10 of 14 Subject: Doc. # C2
• Click on the “Tick icon”.
• Click on the “Tick icon”.
• Read carefully and take the appropriate action necessary. Click on the “Tick icon”.
• Click on the “Tick icon”.
Orig. Date: 12/12/99 Rev. Date: 7/27/10 Rev. Level: 002

Ford FMP On/Off-Car Reprogramming Guide
Section C2 Page 11 of 14 Subject: Doc. # C2
• On-Car: make sure the vehicle’s Ignition Switch is in the “Off” position and click the “Tick
Icon”. • Off-Car: make sure the FLASH2 tool’s Ignition Switch is in the “Off” position and click the
“Tick Icon”.
• On-Car: make sure the vehicle’s Ignition Switch is in the “On” position and click the “Tick
Icon”. • Off-Car: make sure the FLASH2 tool’s Ignition Switch is in the “On” position and click the
“Tick Icon”.
• Wait…
Orig. Date: 12/12/99 Rev. Date: 7/27/10 Rev. Level: 002
Ford FMP On/Off-Car Reprogramming Guide
Section C2 Page 12 of 14 Subject: Doc. # C2
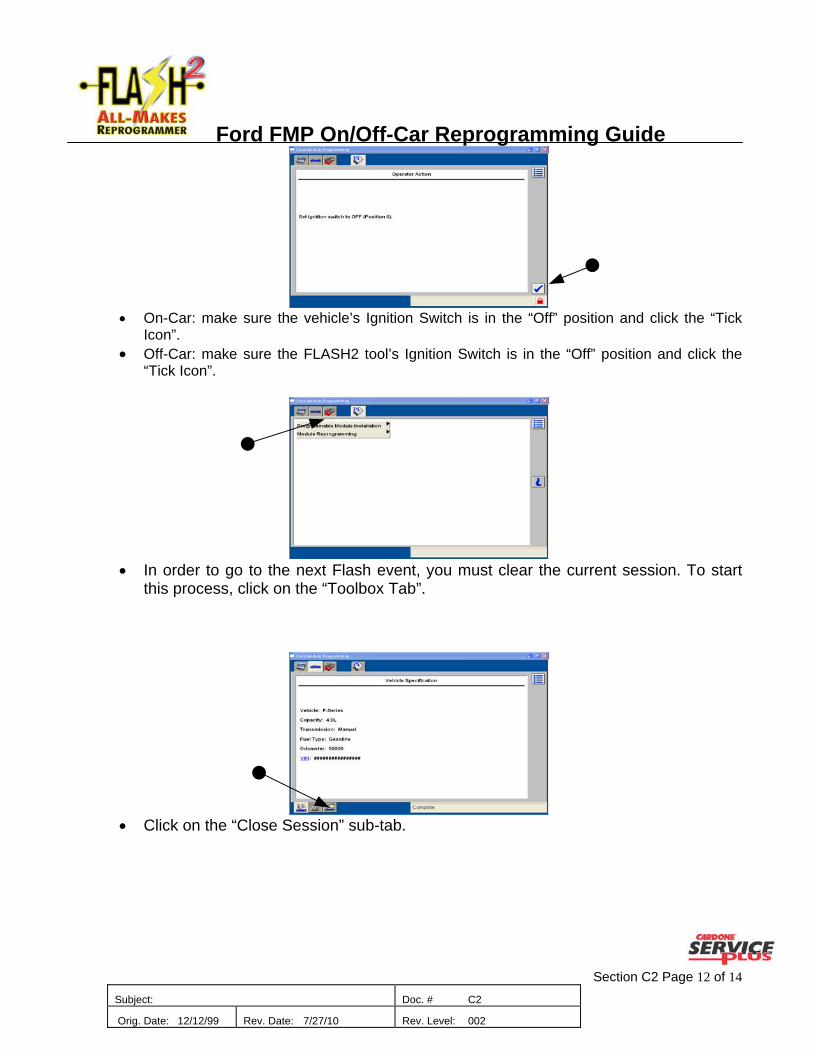
• On-Car: make sure the vehicle’s Ignition Switch is in the “Off” position and click the “Tick
Icon”. • Off-Car: make sure the FLASH2 tool’s Ignition Switch is in the “Off” position and click the
“Tick Icon”.
• In order to go to the next Flash event, you must clear the current session. To start
this process, click on the “Toolbox Tab”.
• Click on the “Close Session” sub-tab.
Orig. Date: 12/12/99 Rev. Date: 7/27/10 Rev. Level: 002

Ford FMP On/Off-Car Reprogramming Guide
Section C2 Page 13 of 14 Subject: Doc. # C2
• Click on Delete Session and then the Check mark
• Click on the red “X” in the upper right-hand corner of the window.
• You may click on “Get Status” and the information for the reprogramming event will appear. You may also Print this information. Click “Finish” when done.
Orig. Date: 12/12/99 Rev. Date: 7/27/10 Rev. Level: 002

Ford FMP On/Off-Car Reprogramming Guide
Section C2 Page 14 of 14 Subject: Doc. # C2
BLANK PAGE
Orig. Date: 12/12/99 Rev. Date: 7/27/10 Rev. Level: 002

Ford “PATS” Reprogramming Guide
Section C3 Page 1 of 4 Subject: Ford PATS Reprogramming Doc. # C3
NOTE: • This guide shows the common steps in Passive Anti-Theft System (PATS)
programming. Variations to this procedure are application-specific. Follow the screen prompts and requests to proceed. It is high recommended that the Ford Module Programming User’s Guide and the Passive Anti-Theft System (SecuriLock) reference chart (sample shown below) be referenced for specific vehicle requirements. The PATS chart will identify which vehicles need PATS, the procedure type, and the number of keys process. Go to www.motorcraftservice.com and log on to gain access to these documents and procedures.
• This process is necessary when performing “PATS” programming replacing or
installing a different PCM or PATS Module.
• Click on the “PATS Functions” and then the “Tick” icon.
Orig. Date: 12/12/99 Rev. Date: 7/27/10 Rev. Level: 002

Ford “PATS” Reprogramming Guide
Section C3 Page 2 of 4 Subject: Ford PATS Reprogramming Doc. # C3
• Read and click on the “Tick” icon.
• Read and click on “Yes” button.
• Click on the Tick Icon
Orig. Date: 12/12/99 Rev. Date: 7/27/10 Rev. Level: 002

Ford “PATS” Reprogramming Guide
Section C3 Page 3 of 4 Subject: Ford PATS Reprogramming Doc. # C3
Orig. Date: 12/12/99 Rev. Date: 7/27/10 Rev. Level: 002
• Click on the Check Mark
• Select the appropriate option based on vehicle specific procedure and then Click
the Check mark.

Ford “PATS” Reprogramming Guide
Section C3 Page 4 of 4 Subject: Ford PATS Reprogramming Doc. # C3
Orig. Date: 12/12/99 Rev. Date: 7/27/10 Rev. Level: 002
• Read Warning for this documentation, select “Yes”
• Click on “Tick” icon.
• Select Module that has been replaced and follow the information displayed on the right
side of the screen. Click on the “Tick” icon when done. The next screen will show the Vehicle Specification information. You may exit FMP by clicking on the tab at the bottom with the picture of the vehicle & folder.

Ford Blank Path PCM Reprogramming Guide
Section C4 Page 1 of 4 Subject: Doc. # C4
NOTE: This guide shows the common steps in “Blank Path” PCM Reprogramming. Variations to this procedure may be application-specific and may not be represented. Simply follow the applicable screen requests and proceed as indicated. Another resource to refer to is the Ford Module Programming User’s Guide available on the Ford website.
• After attempting to ‘Establishing communication with the PCM”, FMP produces this
message. If further attempts are unsuccessful, select “No”.
• Switch the Ignition Switch to “Off” and click on the “Tick” icon.
Orig. Date: 12/12/99 Rev. Date: 7/27/10 Rev. Level: 002

Ford Blank Path PCM Reprogramming Guide
Section C4 Page 2 of 4 Subject: Doc. # C4
• Switch the Ignition Switch to “On” and click on the “Tick” icon.
• Click on the “Tick” icon.
• Select “None of the above”. Click on the “Tick” icon.
Orig. Date: 12/12/99 Rev. Date: 7/27/10 Rev. Level: 002

Ford Blank Path PCM Reprogramming Guide
Section C4 Page 3 of 4 Subject: Doc. # C4
• Click on the “Tick” icon.
• Highlight the box next to the selection and enter ONLY ONE of the available options.
The “Tear Tag” option is considered best. Click on the “Tick” icon.
• If the “Vehicle Specification” is correct, click on “Yes”. If “No” is selected, the process
will begin again until the correct vehicle is selected.
Orig. Date: 12/12/99 Rev. Date: 7/27/10 Rev. Level: 002
Ford Blank Path PCM Reprogramming Guide
Section C4 Page 4 of 4 Subject: Doc. # C4
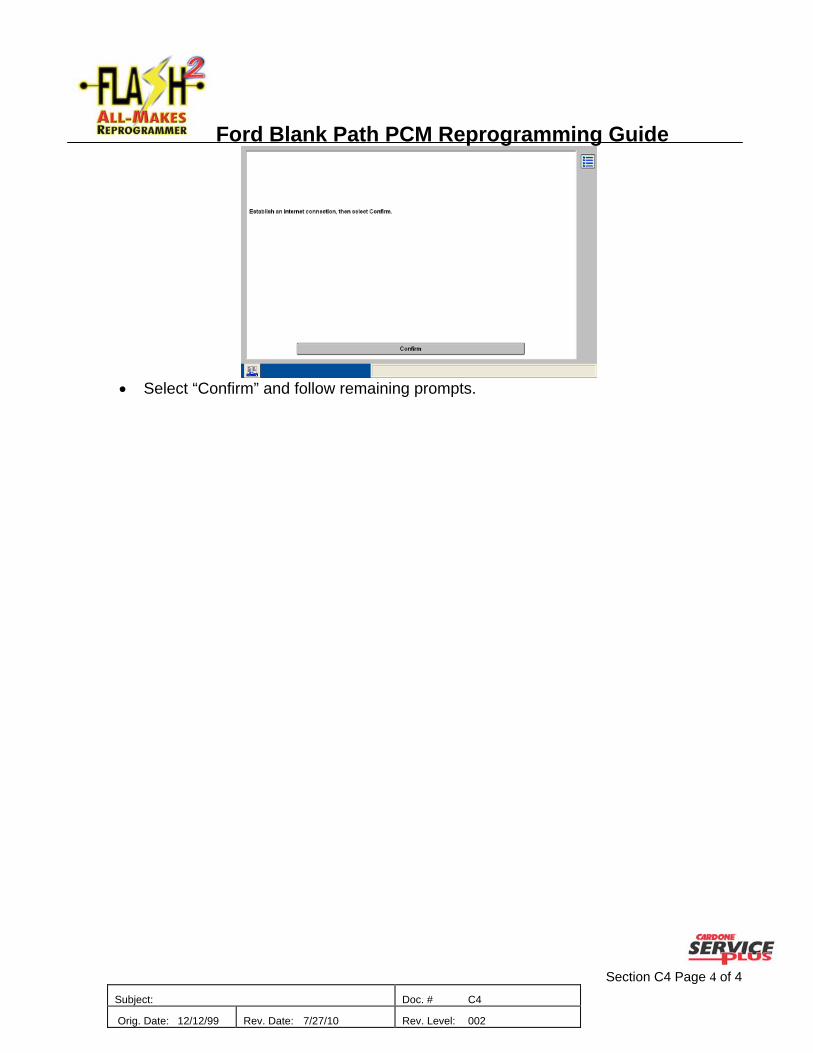
• Select “Confirm” and follow remaining prompts.
Orig. Date: 12/12/99 Rev. Date: 7/27/10 Rev. Level: 002

Ford “F” PCM Reprogramming Guide
Section C5 Page 1 of 6 Subject: Doc. # C5
NOTE: This guide shows the common steps in CARDONE “F” suffix SKU reprogramming. The process starts at a point within the normal FMP reprogramming process. Variations to this procedure are possible due to application-specific requirements. Simply follow the applicable screen requests and proceed as indicated. To see and understand the screens before or after the steps described below, please refer to Section C2 of the Flash2 User Manual Rev 2 or higher.
When you get to the “Vehicle Specification” screen, always click on “No”.
Verify VIN, select Yes or No and make corrections as needed.
Select CONNECTED
Orig. Date: 12/12/99 Rev. Date: 7/29/10 Rev. Level: 2

Ford “F” PCM Reprogramming Guide
Section C5 Page 2 of 6 Subject: Doc. # C5
Click on check mark
Click the check mark
Turn ignition OFF and click the check mark
Orig. Date: 12/12/99 Rev. Date: 7/29/10 Rev. Level: 2

Ford “F” PCM Reprogramming Guide
Section C5 Page 3 of 6 Subject: Doc. # C5
Click the check mark
Turn ignition ON and click the check mark
Click on the check mark
Orig. Date: 12/12/99 Rev. Date: 7/29/10 Rev. Level: 2
Ford “F” PCM Reprogramming Guide
Section C5 Page 4 of 6 Subject: Doc. # C5
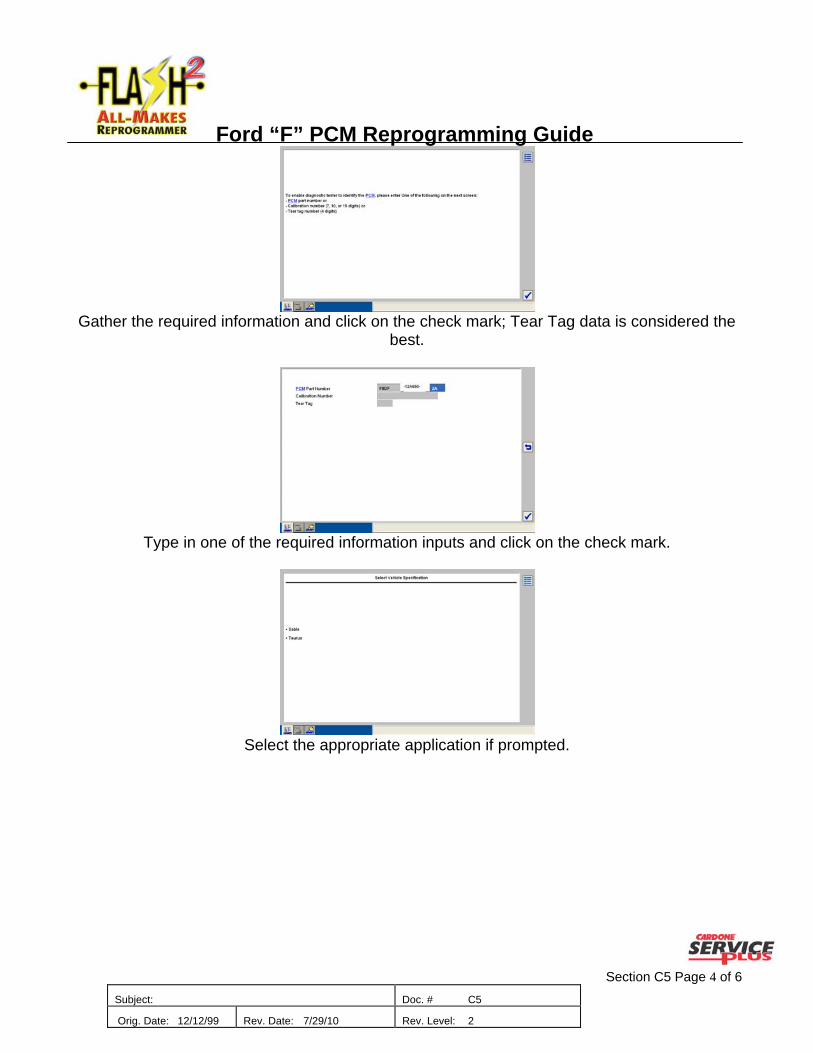
Gather the required information and click on the check mark; Tear Tag data is considered the
best.
Type in one of the required information inputs and click on the check mark.
Select the appropriate application if prompted.
Orig. Date: 12/12/99 Rev. Date: 7/29/10 Rev. Level: 2

Ford “F” PCM Reprogramming Guide
Section C5 Page 5 of 6 Subject: Doc. # C5
Vehicle Specification has been corrected to the proper vehicle. Click on “Yes” to accept
change.
Select “Confirm” and proceed through rest of programming operation.
Orig. Date: 12/12/99 Rev. Date: 7/29/10 Rev. Level: 2

Ford “F” PCM Reprogramming Guide
Section C5 Page 6 of 6 Subject: Doc. # C5
THIS PAGE LEFT INTENTIALLY BLANK
Orig. Date: 12/12/99 Rev. Date: 7/29/10 Rev. Level: 2