For use with the McAfee SecurityCenter · For use with the McAfee SecurityCenter. ... ePolicy...
181
Product Guide McAfee Endpoint Security 10.0.0 Software For use with the McAfee SecurityCenter
Transcript of For use with the McAfee SecurityCenter · For use with the McAfee SecurityCenter. ... ePolicy...
Product Guide
McAfee Endpoint Security 10.0.0SoftwareFor use with the McAfee SecurityCenter

COPYRIGHTCopyright © 2014 McAfee, Inc. Do not copy without permission.
TRADEMARK ATTRIBUTIONSMcAfee, the McAfee logo, McAfee Active Protection, McAfee DeepSAFE, ePolicy Orchestrator, McAfee ePO, McAfee EMM, Foundscore, Foundstone, PolicyLab, McAfee QuickClean, Safe Eyes, McAfee SECURE, SecureOS, McAfee Shredder, SiteAdvisor, McAfee Stinger, McAfee Total Protection, TrustedSource,VirusScan, WaveSecure are trademarks or registered trademarks of McAfee, Inc. or its subsidiaries in the United States and other countries. Othernames and brands may be claimed as the property of others.
Product and feature names and descriptions are subject to change without notice. Please visit mcafee.com for the most current products and features.
LICENSE INFORMATION
License AgreementNOTICE TO ALL USERS: CAREFULLY READ THE APPROPRIATE LEGAL AGREEMENT CORRESPONDING TO THE LICENSE YOU PURCHASED, WHICH SETSFORTH THE GENERAL TERMS AND CONDITIONS FOR THE USE OF THE LICENSED SOFTWARE. IF YOU DO NOT KNOW WHICH TYPE OF LICENSE YOUHAVE ACQUIRED, PLEASE CONSULT THE SALES AND OTHER RELATED LICENSE GRANT OR PURCHASE ORDER DOCUMENTS THAT ACCOMPANY YOURSOFTWARE PACKAGING OR THAT YOU HAVE RECEIVED SEPARATELY AS PART OF THE PURCHASE (AS A BOOKLET, A FILE ON THE PRODUCT CD, OR AFILE AVAILABLE ON THE WEBSITE FROM WHICH YOU DOWNLOADED THE SOFTWARE PACKAGE). IF YOU DO NOT AGREE TO ALL OF THE TERMS SETFORTH IN THE AGREEMENT, DO NOT INSTALL THE SOFTWARE. IF APPLICABLE, YOU MAY RETURN THE PRODUCT TO MCAFEE OR THE PLACE OFPURCHASE FOR A FULL REFUND.
2 McAfee Endpoint Security 10.0.0 Software Product Guide

Contents
Preface 7About this guide . . . . . . . . . . . . . . . . . . . . . . . . . . . . . . . . . . 7
Audience . . . . . . . . . . . . . . . . . . . . . . . . . . . . . . . . . . 7Conventions . . . . . . . . . . . . . . . . . . . . . . . . . . . . . . . . . 7What's in this guide . . . . . . . . . . . . . . . . . . . . . . . . . . . . . . 8
Find product documentation . . . . . . . . . . . . . . . . . . . . . . . . . . . . . . 9
1 Introducing Endpoint Security and the SecurityCenter 11Core product strengths . . . . . . . . . . . . . . . . . . . . . . . . . . . . . . . 12Protection methodologies . . . . . . . . . . . . . . . . . . . . . . . . . . . . . . 12How the product works with the SecurityCenter . . . . . . . . . . . . . . . . . . . . . 14The role of the client software . . . . . . . . . . . . . . . . . . . . . . . . . . . . 15How the client software stays up to date . . . . . . . . . . . . . . . . . . . . . . . . 15
Overview of automatic update methods . . . . . . . . . . . . . . . . . . . . . . 16Simple updates through direct connections . . . . . . . . . . . . . . . . . . . . 17Updates using Rumor technology . . . . . . . . . . . . . . . . . . . . . . . . 17Updates through relay servers . . . . . . . . . . . . . . . . . . . . . . . . . 17
Management with the SecurityCenter . . . . . . . . . . . . . . . . . . . . . . . . . 18Creating user groups . . . . . . . . . . . . . . . . . . . . . . . . . . . . . 19Creating customized policies . . . . . . . . . . . . . . . . . . . . . . . . . . 20Viewing status emails and reports . . . . . . . . . . . . . . . . . . . . . . . . 23
Management with the ePolicy Orchestrator console . . . . . . . . . . . . . . . . . . . . 23New features and enhancements . . . . . . . . . . . . . . . . . . . . . . . . . . . 24Where to go from here . . . . . . . . . . . . . . . . . . . . . . . . . . . . . . . 28
2 Using the client software 29Interacting with the client software . . . . . . . . . . . . . . . . . . . . . . . . . . 29
About the McAfee system tray icon . . . . . . . . . . . . . . . . . . . . . . . 29About notification messages . . . . . . . . . . . . . . . . . . . . . . . . . . 30About the client console . . . . . . . . . . . . . . . . . . . . . . . . . . . . 30
Get started with the client software . . . . . . . . . . . . . . . . . . . . . . . . . . 32Open the client console . . . . . . . . . . . . . . . . . . . . . . . . . . . . 32Get help . . . . . . . . . . . . . . . . . . . . . . . . . . . . . . . . . . 32Get information about protection . . . . . . . . . . . . . . . . . . . . . . . . 32
Update protection manually from the client . . . . . . . . . . . . . . . . . . . . . . . 33Configure policy settings for shared client protection features . . . . . . . . . . . . . . . . 33
Protect McAfee resources . . . . . . . . . . . . . . . . . . . . . . . . . . . 34Configure settings for client interface security . . . . . . . . . . . . . . . . . . . 34Enable Access Protection . . . . . . . . . . . . . . . . . . . . . . . . . . . . 35
Manage features from the client interface . . . . . . . . . . . . . . . . . . . . . . . . 36Log on as administrator . . . . . . . . . . . . . . . . . . . . . . . . . . . . 36Unlock the client interface . . . . . . . . . . . . . . . . . . . . . . . . . . . 36Disable and enable features . . . . . . . . . . . . . . . . . . . . . . . . . . 37Uninstall the client software . . . . . . . . . . . . . . . . . . . . . . . . . . 37
McAfee Endpoint Security 10.0.0 Software Product Guide 3

3 Using the SecurityCenter 39Managing protection with the SecurityCenter . . . . . . . . . . . . . . . . . . . . . . 40
Log on to the SecurityCenter . . . . . . . . . . . . . . . . . . . . . . . . . . 41Access data on SecurityCenter pages . . . . . . . . . . . . . . . . . . . . . . . 42
Quick account evaluation with the Dashboard page . . . . . . . . . . . . . . . . . . . . 44View a summary of protection status . . . . . . . . . . . . . . . . . . . . . . . 44Manage protection with widgets . . . . . . . . . . . . . . . . . . . . . . . . 45
Management of client computers . . . . . . . . . . . . . . . . . . . . . . . . . . . 46Manage computers from the Computers page . . . . . . . . . . . . . . . . . . . 47Manage a computer from the Computer Details page . . . . . . . . . . . . . . . . 49Remove duplicate and inactive computers . . . . . . . . . . . . . . . . . . . . 50Identify product and component versions on computers . . . . . . . . . . . . . . . 51Upgrade the client software . . . . . . . . . . . . . . . . . . . . . . . . . . 52
Management of computer groups . . . . . . . . . . . . . . . . . . . . . . . . . . . 53Create and manage groups . . . . . . . . . . . . . . . . . . . . . . . . . . . 54
Management of group administrators . . . . . . . . . . . . . . . . . . . . . . . . . . 55Create and manage group administrators . . . . . . . . . . . . . . . . . . . . . 57
Management of security policies . . . . . . . . . . . . . . . . . . . . . . . . . . . . 58McAfee Default policy . . . . . . . . . . . . . . . . . . . . . . . . . . . . . 59Create and manage policies . . . . . . . . . . . . . . . . . . . . . . . . . . 59
Generation of security reports . . . . . . . . . . . . . . . . . . . . . . . . . . . . 60Schedule reports . . . . . . . . . . . . . . . . . . . . . . . . . . . . . . . 62Add your logo to reports . . . . . . . . . . . . . . . . . . . . . . . . . . . . 62
Management of your licenses and subscriptions . . . . . . . . . . . . . . . . . . . . . 63View and update subscription information . . . . . . . . . . . . . . . . . . . . . 63Buy and renew subscriptions and licenses . . . . . . . . . . . . . . . . . . . . . 64Locate, create, or activate keys for your account . . . . . . . . . . . . . . . . . . 66Upgrade the client software . . . . . . . . . . . . . . . . . . . . . . . . . . 67
Management of your account . . . . . . . . . . . . . . . . . . . . . . . . . . . . . 67Configure your account profile . . . . . . . . . . . . . . . . . . . . . . . . . 67Sign up for email notifications . . . . . . . . . . . . . . . . . . . . . . . . . 68Merge accounts . . . . . . . . . . . . . . . . . . . . . . . . . . . . . . . 68
Management in the McAfee ePO environment . . . . . . . . . . . . . . . . . . . . . . 69Overview of SaaS management from the ePolicy Orchestrator console . . . . . . . . . 70The ePolicy Orchestrator Servers widget . . . . . . . . . . . . . . . . . . . . . 70Access extension features from the SecurityCenter . . . . . . . . . . . . . . . . . 70Configuration of a synchronization administrator account . . . . . . . . . . . . . . 71Find more information . . . . . . . . . . . . . . . . . . . . . . . . . . . . 72
Account management utilities . . . . . . . . . . . . . . . . . . . . . . . . . . . . 73Assistance for using the product . . . . . . . . . . . . . . . . . . . . . . . . . . . 74
4 Using the threat prevention service 75Overview of the threat prevention service . . . . . . . . . . . . . . . . . . . . . . . . 75
Component interaction . . . . . . . . . . . . . . . . . . . . . . . . . . . . 76Using threat prevention features to protect your system . . . . . . . . . . . . . . . 77What to do first . . . . . . . . . . . . . . . . . . . . . . . . . . . . . . . 78
Scanning for threats on client computers . . . . . . . . . . . . . . . . . . . . . . . . 79Types of scans . . . . . . . . . . . . . . . . . . . . . . . . . . . . . . . . 79Configuring common scanning options . . . . . . . . . . . . . . . . . . . . . . 82Scanning files on access . . . . . . . . . . . . . . . . . . . . . . . . . . . . 84Scanning files on demand . . . . . . . . . . . . . . . . . . . . . . . . . . . 88
Managing threat prevention . . . . . . . . . . . . . . . . . . . . . . . . . . . . . 93Keeping your protection up to date . . . . . . . . . . . . . . . . . . . . . . . 93Schedule client security updates . . . . . . . . . . . . . . . . . . . . . . . . 93
Managing detections . . . . . . . . . . . . . . . . . . . . . . . . . . . . . . . . 94How the client software handles detections . . . . . . . . . . . . . . . . . . . . 94
Contents
4 McAfee Endpoint Security 10.0.0 Software Product Guide

View threats detected on the account . . . . . . . . . . . . . . . . . . . . . . 95View unrecognized programs detected on the account . . . . . . . . . . . . . . . . 96View user-approved programs and exclusions . . . . . . . . . . . . . . . . . . . 97View historical information about detections . . . . . . . . . . . . . . . . . . . 98
Reports for threat prevention . . . . . . . . . . . . . . . . . . . . . . . . . . . . . 98Best practices (threat prevention) . . . . . . . . . . . . . . . . . . . . . . . . . . . 98
5 Using firewall protection 101Administrator or user configuration of firewall protection . . . . . . . . . . . . . . . . . 101Using Firewall Mode to allow or block unknown applications . . . . . . . . . . . . . . . . 102
Use learn mode to discover Internet applications . . . . . . . . . . . . . . . . . 102Using Connection Type to allow or block incoming communications . . . . . . . . . . . . . 103Configure policy options . . . . . . . . . . . . . . . . . . . . . . . . . . . . . . 104
Select general firewall settings . . . . . . . . . . . . . . . . . . . . . . . . . 104Configure options for Internet applications . . . . . . . . . . . . . . . . . . . . 105Track blocked communications . . . . . . . . . . . . . . . . . . . . . . . . . 106
Install and enable firewall at the policy level . . . . . . . . . . . . . . . . . . . . . . 106Install firewall during policy updates . . . . . . . . . . . . . . . . . . . . . . 107Enable and disable firewall . . . . . . . . . . . . . . . . . . . . . . . . . . 107
About custom connections . . . . . . . . . . . . . . . . . . . . . . . . . . . . . 107The role of IP addresses and domains . . . . . . . . . . . . . . . . . . . . . . 108The role of system service ports . . . . . . . . . . . . . . . . . . . . . . . . 108
Configure custom connections . . . . . . . . . . . . . . . . . . . . . . . . . . . . 110Configure system services and port assignments . . . . . . . . . . . . . . . . . 110Configure IP addresses and domains . . . . . . . . . . . . . . . . . . . . . . 111
Manage detections . . . . . . . . . . . . . . . . . . . . . . . . . . . . . . . . . 112View unrecognized programs detected on the account . . . . . . . . . . . . . . . 113View user-approved programs and exclusions . . . . . . . . . . . . . . . . . . . 113View blocked communications . . . . . . . . . . . . . . . . . . . . . . . . . 114
Reports for firewall protection . . . . . . . . . . . . . . . . . . . . . . . . . . . . 115Best practices (firewall protection) . . . . . . . . . . . . . . . . . . . . . . . . . . 115
6 Using the web control service and web filtering 117Web control features . . . . . . . . . . . . . . . . . . . . . . . . . . . . . . . . 117
Web control button identifies threats while browsing . . . . . . . . . . . . . . . . 118Safety icons show threats while searching . . . . . . . . . . . . . . . . . . . . 118Site reports describe threat details . . . . . . . . . . . . . . . . . . . . . . . 119How safety ratings are compiled . . . . . . . . . . . . . . . . . . . . . . . . 119Secure Search features . . . . . . . . . . . . . . . . . . . . . . . . . . . . 120
Access web control features . . . . . . . . . . . . . . . . . . . . . . . . . . . . . 120Access features while browsing . . . . . . . . . . . . . . . . . . . . . . . . 121View site report while searching . . . . . . . . . . . . . . . . . . . . . . . . 121Troubleshoot communication problems . . . . . . . . . . . . . . . . . . . . . 122
Web filtering features . . . . . . . . . . . . . . . . . . . . . . . . . . . . . . . 122How web filtering works . . . . . . . . . . . . . . . . . . . . . . . . . . . 122Using safety ratings to control access . . . . . . . . . . . . . . . . . . . . . . 123Using content categories to control access . . . . . . . . . . . . . . . . . . . . 124Using URLs or domains to control access . . . . . . . . . . . . . . . . . . . . 125Using Web Control mode to observe browsing activity . . . . . . . . . . . . . . . 127
Setting up a strategy for browsing security . . . . . . . . . . . . . . . . . . . . . . . 127Guidelines for creating a strategy . . . . . . . . . . . . . . . . . . . . . . . . 127Selecting the right policy options and features . . . . . . . . . . . . . . . . . . 128Information that web control sends to McAfee . . . . . . . . . . . . . . . . . . 129
Configure web control and web filtering features . . . . . . . . . . . . . . . . . . . . 129Install web control during policy updates . . . . . . . . . . . . . . . . . . . . . 130Enable and disable web control via policy . . . . . . . . . . . . . . . . . . . . 130
Contents
McAfee Endpoint Security 10.0.0 Software Product Guide 5

Observe browsing activity or enforce access control (learn mode) . . . . . . . . . . . 131Block or warn access based on safety ratings . . . . . . . . . . . . . . . . . . . 131Block or allow sites based on URLs . . . . . . . . . . . . . . . . . . . . . . . 132Block or warn site access based on content . . . . . . . . . . . . . . . . . . . . 132Configure Secure Search . . . . . . . . . . . . . . . . . . . . . . . . . . . 133Customize user notifications for blocked content . . . . . . . . . . . . . . . . . 134Enable and disable email annotations . . . . . . . . . . . . . . . . . . . . . . 134
View browsing activity on client computers . . . . . . . . . . . . . . . . . . . . . . 135Web Filtering report . . . . . . . . . . . . . . . . . . . . . . . . . . . . . . . . 136Best practices (web control) . . . . . . . . . . . . . . . . . . . . . . . . . . . . . 136
7 Using the SaaS email protection service 139Core SaaS email protection features . . . . . . . . . . . . . . . . . . . . . . . . . 139Additional SaaS email protection services . . . . . . . . . . . . . . . . . . . . . . . 140The SaaS email protection widget and portal . . . . . . . . . . . . . . . . . . . . . . 142Account activation and setup . . . . . . . . . . . . . . . . . . . . . . . . . . . . 143
Activate and set up your account . . . . . . . . . . . . . . . . . . . . . . . . 144Access the SaaS email and web protection portal . . . . . . . . . . . . . . . . . 145Configure policy settings for the SaaS email protection service . . . . . . . . . . . . 145Check quarantined messages . . . . . . . . . . . . . . . . . . . . . . . . . 146Read encrypted messages . . . . . . . . . . . . . . . . . . . . . . . . . . 146
Reports and statistics for SaaS email protection . . . . . . . . . . . . . . . . . . . . . 147View email activity for the week . . . . . . . . . . . . . . . . . . . . . . . . 147View reports . . . . . . . . . . . . . . . . . . . . . . . . . . . . . . . . 147
Find more information . . . . . . . . . . . . . . . . . . . . . . . . . . . . . . . 147
8 Using the Saas web protection service 149SaaS web protection features . . . . . . . . . . . . . . . . . . . . . . . . . . . . 149Multiple layers of protection against web-based threats . . . . . . . . . . . . . . . . . 150The SaaS web protection widget and portal . . . . . . . . . . . . . . . . . . . . . . . 150Account activation and setup . . . . . . . . . . . . . . . . . . . . . . . . . . . . 151
Activate and set up your account . . . . . . . . . . . . . . . . . . . . . . . 152Access the SaaS email and web protection portal . . . . . . . . . . . . . . . . . 152Configure policy settings for SaaS web protection . . . . . . . . . . . . . . . . . 153
Reports for SaaS web protection . . . . . . . . . . . . . . . . . . . . . . . . . . . 153View reports . . . . . . . . . . . . . . . . . . . . . . . . . . . . . . . . 153
Find more information . . . . . . . . . . . . . . . . . . . . . . . . . . . . . . . 153
9 Troubleshooting and reference 155Frequently asked questions . . . . . . . . . . . . . . . . . . . . . . . . . . . . . 155McAfee Default policy settings . . . . . . . . . . . . . . . . . . . . . . . . . . . . 158Troubleshoot client software problems . . . . . . . . . . . . . . . . . . . . . . . . . 163
Test virus protection . . . . . . . . . . . . . . . . . . . . . . . . . . . . . 163View the Event Log from the client computer . . . . . . . . . . . . . . . . . . . 163
Index 165
Contents
6 McAfee Endpoint Security 10.0.0 Software Product Guide

Preface
This guide provides the information you need to configure, use, and maintain your McAfee product.
Contents About this guide Find product documentation
About this guideThis information describes the guide's target audience, the typographical conventions and icons usedin this guide, and how the guide is organized.
AudienceMcAfee documentation is carefully researched and written for the target audience.
The information in this guide is intended primarily for:
• Administrators — People who implement and enforce the company's security program.
ConventionsThis guide uses these typographical conventions and icons.
Book title, term,emphasis
Title of a book, chapter, or topic; a new term; emphasis.
Bold Text that is strongly emphasized.
User input, code,message
Commands and other text that the user types; a code sample; a displayedmessage.
Interface text Words from the product interface like options, menus, buttons, and dialogboxes.
Hypertext blue A link to a topic or to an external website.
Note: Additional information, like an alternate method of accessing anoption.
Tip: Suggestions and recommendations.
Important/Caution: Valuable advice to protect your computer system,software installation, network, business, or data.
Warning: Critical advice to prevent bodily harm when using a hardwareproduct.
McAfee Endpoint Security 10.0.0 Software Product Guide 7

What's in this guide This guide is organized to help you find the information you need.
Chapter Description
Introducing EndpointSecurity and theSecurityCenter
General information about product components, new features, and howthe product works.
Using the client software General information on configuring and using product features on clientcomputers.
Using the SecurityCenter General information on viewing and managing client computers with theMcAfee® SecurityCenter online management console.
Using protection service • Information on configuring and using the features for each protectionservice in McAfee® Endpoint Security.
• Information on managing these and additional bundled protectionservices with the SecurityCenter.
• When applicable, instructions on accessing additional documentation.
Your subscription might not include all the protection servicesdescribed in this document.
Troubleshooting andreference
Frequently asked questions and details about the product.
Other product documents
Context-sensitive online Help is available on any page of the SecurityCenter by clicking the help link( ? ) in the upper-right corner.
These product documents are also available:
Document How to access
Installation guide From the SecurityCenter, click the link on the Help & Support tab.
Release notes From the SecurityCenter, click the link on the Help & Support tab.
Release notes are available for the most recent release of the clientsoftware and the most recent upgrade of product and SecurityCenterfeatures.
Push installation onlineHelp
During a push installation, click the help link in any dialog box.
Client installation onlineHelp
During a standard installation on a client computer, click the help link inany dialog box.
Client online Help From the client console on a client computer, select Action Menu | ViewHelp.
SaaS extension quick startguideSaaS extensiontroubleshooting guide
From the SecurityCenter, click the link on the ePO Servers tab of theUtilities page. These short guides provide information on installing andusing the McAfee® Security-as-a-Service (McAfee SaaS) extension forMcAfee® ePolicy Orchestrator® (McAfee ePO™) .
PrefaceAbout this guide
8 McAfee Endpoint Security 10.0.0 Software Product Guide

Find product documentationAfter a product is released, information about the product is entered into the McAfee online KnowledgeCenter.
Task1 Go to the McAfee ServicePortal at http://support.mcafee.com and click Knowledge Center.
2 Enter a product name, select a version, then click Search to display a list of documents.
PrefaceFind product documentation
McAfee Endpoint Security 10.0.0 Software Product Guide 9

PrefaceFind product documentation
10 McAfee Endpoint Security 10.0.0 Software Product Guide

1 Introducing Endpoint Security and theSecurityCenter
The McAfee®
SecurityCenter provides a custom administrative website for monitoring security in smalland medium business (SMB) networks. You can use the SecurityCenter to manage the features inMcAfee subscription protection services, such as McAfee
®
Endpoint Security.
Endpoint Security provides a "hands-off" solution to safeguard the computers on your networkautomatically by keeping itself up-to-date and checking for threats contained in files and programs, incommunications from inside and outside the network, and on websites.
When you purchase an SMB subscription to Endpoint Security or a supported McAfee®
Security-as-a-Service (McAfee SaaS) protection service, a SecurityCenter account is created for you,and you become the account administrator (referred to as the site administrator). When you install theprotection services on computers, the computers are added to your account and referred to as clientcomputers or managed systems. A weekly email alerts you to any problems detected for computers onyour account. These features allow you to focus on other tasks, confident that you'll be notified if yourattention is required.
In some organizations, another person, such as a purchasing department representative, purchases thesubscription and then designates you to be the site administrator.
For a more "hands-on" approach, use the SecurityCenter to view and manage computers anddetections on your account. Your service provider sends you a unique URL and logon credentials foryour account, which you can use to access the SecurityCenter. This is a pre-configured website thatprovides a simple-to-use management console for monitoring the protection status of computers onyour account. Use the SecurityCenter to view reports on detections and activities and to configuresecurity settings that address the specific needs of your account.
This section provides an overview of using the SecurityCenter to manage computers protected byEndpoint Security and McAfee SaaS services.
Contents Core product strengths Protection methodologies How the product works with the SecurityCenter The role of the client software How the client software stays up to date Management with the SecurityCenter Management with the ePolicy Orchestrator console New features and enhancements Where to go from here
1
McAfee Endpoint Security 10.0.0 Software Product Guide 11
Core product strengthsEndpoint Security safeguards your computers with a robust set of core features.
• Continuous protection — From the time a client computer is turned on until it is turned off, theproduct silently monitors all file input and output, downloads, program executions, inbound andoutbound communications, and other system-related activities.
• Instant discovery for virus threats — When Endpoint Security detects a virus threat, itattempts to clean the item containing the threat before further damage can occur. If an itemcannot be cleaned, an encrypted copy of it is placed in a quarantine folder and the original item isdeleted.
• Customized threat response for program detections — You can configure the response todetections: take immediate action to clean, quarantine, or block the detection; prompt users for aresponse; or only log the detection for administrative reports.
• Preemptive safety notifications for web-based threats — Threats reported on websites arecommunicated to users through color-coded icons and safety reports, enabling them to minimizeexposure to dangerous websites. You can also block access to or display a warning message tousers about sites based on their site safety rating or content.
• Automatic updates — Endpoint Security checks for product updates at regular intervalsthroughout the day, comparing security components against the latest releases. When a computerneeds a newer version, the client software retrieves it automatically.
• Early Warning system and quick response — Endpoint Security uses the latest informationabout threats and outbreaks as soon as they are discovered by McAfee Labs, a research division ofMcAfee. Unrecognized detections are sent to McAfee for analysis and information on recommendedactions.
Protection methodologies You can use the SecurityCenter to manage both client-based and cloud-based protection services.
Client-based protection services
Software for each client-based service is installed on client computers. It checks for threats,downloads updates that add protection against the latest types of threats, and sends statusinformation to the SecurityCenter. Endpoint Security includes three client-based protection services.
Protectionservice orfeature
Description
Threat prevention Checks for viruses, spyware, unwanted programs, and other threats by scanningitems — automatically when users access them or on demand at any time.
Firewall Monitors communication between the computer and resources on the networkand the Internet. Intercepts suspicious communications.
Web control Displays safety ratings and reports for websites during online browsing andsearching. Blocks access to websites based on safety rating or content.Users can view website safety ratings and safety reports as they browse orsearch with Microsoft Internet Explorer, Mozilla Firefox, or Google Chrome.
Web filtering Works within the web control service to expand the policy and reporting optionsavailable and enable greater control over access to websites.
1 Introducing Endpoint Security and the SecurityCenterCore product strengths
12 McAfee Endpoint Security 10.0.0 Software Product Guide

Cloud-based protection services
Cloud-based McAfee SaaS protection services reside on dedicated McAfee servers outside yournetwork. They route incoming and outgoing content through the dedicated servers for analysis, reportdata to SaaS protection portals and the SecurityCenter, and provide tools for analyzing risks anddetecting threats.
Protectionservice
Description
SaaS emailprotection
Routes inbound and outbound messages through McAfee servers to scan them forthreats. Blocks or quarantines detections of directory harvest attacks, spam,phishing scams, viruses, and other email-borne threats in messages andattachments. Enables web-based email access during outages. Also includescontinuity features. Can be enhanced with these additional services:• McAfee® SaaS Email Archiving — Stores email messages in a centralized, secure
location.
• SaaS Email Intelligent Routing — Routes filtered email to distributed emailsystems.
• McAfee® SaaS Email Encryption — Encrypts the content of outgoing messages,then requires account credentials to retrieve them.
SaaS webprotection
Routes web traffic through McAfee servers for analysis. Web-based threats andinappropriate content are intercepted before being sent to client computers on youraccount. Policy options allow you to define inappropriate content and specify thethreats to block.
Introducing Endpoint Security and the SecurityCenterProtection methodologies 1
McAfee Endpoint Security 10.0.0 Software Product Guide 13

How the product works with the SecurityCenterEndpoint Security delivers comprehensive security as a service for all the computers on your account.
It automatically checks for threats, intercepts them, takes the appropriate action to keep your dataand your network safe, and tracks detections and security status for reports. You can check youraccount's protection status in weekly status emails that your service provider sends to you or bylogging on to the SecurityCenter management website. You can also subscribe to McAfee SaaSprotection services and manage them through the SecurityCenter.
1 McAfee or another service provider sets up the server-side components "in the cloud" and sendsthe installation URL and logon information to the administrator, who then sends the URL to userswith instructions for installing the client software on local systems.
2 The client software downloads the latest content (threat information) files from an update server. Italso checks for policy assignments from the SecurityCenter.
3 The client software uploads security information about each managed system to the SecurityCenterfor use in status emails and administrative reports.
4 (Optional) If the account includes McAfee SaaS protection services, they run on separate serversand report security information to a SaaS protection portal for use in status emails andadministrative reports. The administrator can view the reports using the SecurityCenter.
5 The administrator checks a weekly status email sent by McAfee or another service provider. Itcontains information reported to the SecurityCenter by the client software.
1 Introducing Endpoint Security and the SecurityCenterHow the product works with the SecurityCenter
14 McAfee Endpoint Security 10.0.0 Software Product Guide

6 (Optional) The administrator uses a web browser to log on to the SecurityCenter and viewdetection reports or configure policies and assign them to managed systems.
7 (Optional) The administrator downloads and installs the McAfee Security-as-a-Service extension,then views basic SecurityCenter detection and status data in the McAfee
®
ePolicy Orchestrator®
(McAfee ePO™
) security management console. (Not available for McAfee®
ePolicy Orchestrator®
Cloud(McAfee ePO
™
Cloud) accounts.)
The role of the client softwareThe client software protects computers with regular updates, continuous monitoring, and detailedreporting.
1 It silently monitors all file input and output, downloads, program executions, inbound and outboundcommunications, visits to websites, and other system‑related activities on client computers, then:
• Deletes or quarantines detected viruses.
• Removes potentially unwanted programs, such as spyware or adware.
• Blocks or warns of suspicious activity, depending on product settings.
• Indicates unsafe websites with a color‑coded button or icon in the browser window or searchresults page. These indicators provide access to safety reports that detail site-specific threats.
• Blocks or warns of unsafe websites, depending on product settings.
2 It regularly connects to a relay server or directly to a site on the Internet to check for:
• Updates to content files used to detect threats. Content files contain information to protectagainst threats such as malware and exploits, and these files are updated as new threats arediscovered.
• Upgrades to software components.
If new versions are available, the client software downloads them.
To simplify terminology, this document refers to both updates and upgrades as updates.
3 It logs security information for each client computer, including protection status and details aboutdetections. If policy settings assigned to their computer allows them, users can view thisinformation in the client console on their computer.
4 It regularly communicates with the SecurityCenter to:
• Send logged security information.
• Receive new policy assignments.
How the client software stays up to dateRegular updates of Endpoint Security make sure that client computers are always protected from thelatest threats.
Shortly after a client computer first connects to the network, and at regular intervals throughout theday, the client software checks for updates from McAfee. As an administrator, you can specify whencomputers check for updates by configuring a policy option.
Introducing Endpoint Security and the SecurityCenterThe role of the client software 1
McAfee Endpoint Security 10.0.0 Software Product Guide 15

You can also specify whether users are able to check for updates manually through the client consoleon their local system.
Updates usually occur automatically in the background. The McAfee system tray icon indicateswhen an update is in progress. Don't disconnect from the network or turn off the computer until theupdate is complete.
Overview of automatic update methodsUpdates to client software can occur in three ways. You can implement one method or a combinationof methods, which enables you to control the impact updates have on network resources.
1 For simple updates, each client computer has a direct connection to the Internet and checks fornew updates.
2 Rumor technology enables all computers in a workgroup to share downloaded updates, whichcontrols Internet traffic and minimizes expensive downloads.
3 Internet Independent Updating (IIU) enables any computer on the network to get information fromthe update site, even if that computer does not have an Internet connection, by communicatingwith the update site through a network computer that is configured as a relay server.
1 Introducing Endpoint Security and the SecurityCenterHow the client software stays up to date
16 McAfee Endpoint Security 10.0.0 Software Product Guide

Simple updates through direct connectionsEach client computer that has a direct Internet connection can check for updates and download themfrom the update site on the Internet. This is the simplest method of retrieving updates.
Before downloading updates, the client software checks whether the computer's protection servicesare up to date (whether they have checked for updates in the last three days). If they are up to date,it waits for an idle period before downloading updates. If they are not up to date, it downloadsupdates immediately.
Updates using Rumor technologyWhen one computer shares updates with other computers on the local area network (LAN), ratherthan requiring each computer to retrieve updates from the update website individually, the Internettraffic load on the network is reduced. This process of sharing updates is called Rumor.
1 Each client computer checks the version of the most recent catalog file on the Internet site. Thiscatalog file contains information for every component in the client software, and is stored in adigitally signed, compressed .cab file format.
• If the version is the same as the catalog file on the client computer, the process stops here.
• If the version is different from the catalog file on the client computer, the client computerattempts to retrieve the latest catalog file from its peers. It queries if other computers on theLAN have already downloaded the new catalog file.
2 The client computer retrieves the required catalog file (directly from the Internet site or from oneof its peers) and uses it to determine if new components are available.
3 If new components are available, the client computer attempts to retrieve them from its peers. Itqueries whether computers on the LAN have already downloaded the new components.
• If so, the client computer retrieves the update from a peer. (Digital signatures are checked toverify that the computer is valid.)
• If not, the client computer retrieves the update directly from the update site.
4 On the client computer, the catalog file is extracted and new components are installed.
Updates through relay serversInternet Independent Updating (IIU) enables computers to update the client software when they arenot connected to the Internet.
At least one computer on the subnet must have an Internet connection to be able to communicatewith the update site. That computer is configured to act as a relay server, and computers without anInternet connection use this computer to connect with the Internet and retrieve updates directly fromthe McAfee update site.
1 When a computer without Internet access fails to connect directly to the update site, it requests aresponse from a relay server on the LAN and uses that computer to communicate with the updatesite.
2 The computer without an Internet connection downloads updates directly from the update sitethrough the relay server.
You can specify which computers function as relay servers when you install the client software or at alater time. See the installation guide for more information.
Introducing Endpoint Security and the SecurityCenterHow the client software stays up to date 1
McAfee Endpoint Security 10.0.0 Software Product Guide 17

Management with the SecurityCenterYour subscription to McAfee protection services includes access to the SecurityCenter, a preconfigured,web-based management console for your account. You can use tools on the SecurityCenter to monitorthe status of client computers on your account, view reports on detections and activities, andconfigure security settings that address the specific needs of your account.
Your service provider sends you the unique URL and credentials for logging on to the SecurityCenterwhen you purchase your subscription. You can use the SecurityCenter to manage the protectionservices included with Endpoint Security and additional McAfee SaaS bundles.
The Dashboard page is the "home page" of the SecurityCenter. It shows summary information for youraccount at-a-glance.
• Alerts and action items — Indicate whether any action is required to address security issues, andlinks you to instructions for resolving them.
• Product coverage and activity summaries — Modular reports (known as widgets) illustrate thecurrent status of your account. These include reports on protection coverage (such as computerswhere protection is installed and enabled) and activity (such as the number of detections, emails,and website visits). The type, size, and placement of widgets can be customized.
• Subscription tracking — Widgets are available to show subscription and licensing information foryour account. Click a button to install protection, create a trial subscription, renew or purchase asubscription, or buy additional licenses.
• Links to related portals — Some widgets contain a link to a portal used for managingcloud-based protection, such as SaaS email protection and SaaS web protection.
1 Introducing Endpoint Security and the SecurityCenterManagement with the SecurityCenter
18 McAfee Endpoint Security 10.0.0 Software Product Guide

The SecurityCenter offers three powerful tools for protecting and monitoring your computers:
• User groups — Create groups for computers that have one or more common characteristics. Thisenables you to view and manage them as a single entity when needed.
• Customized policies — Select settings for protection features, save them in a policy, and assignthe policy to computers or groups of computers. This enables you to configure settings targetedspecifically for each computer's environment and risk factors.
• Reports — View administrative reports on activities and detections for the groups and computersin your account.
From the SecurityCenter, you can also access additional information and management tools.
• Installation wizard and links to remote installation methods.
• Detailed identification, status, activity, and detection data for the groups and computers on youraccount.
• Account configuration data, reference information, subscription status, and tools for managing youraccounts and subscriptions.
• Tools for reporting in the McAfee ePO environment.
• Links to helpful utilities and support tools.
• Links to product documentation, technical support, and customer service.
Creating user groupsA group consists of one or more computers that share a particular feature. They are used to help youmanage computers more easily. Each computer running the client software belongs to a group.
You can place a computer in a group in these ways.
• Specify a group during installation.
• Move a computer into a group on the Computers page of the SecurityCenter.
By default, computers are placed in the Default Group.
To create a new group, use the Computers page of the SecurityCenter.
How to use groups
Groups let you manage computers collectively rather than individually. If there aren't many computerson your account, you probably don't need to create groups. You should create groups only if they helpyou manage your computers more easily.
In large accounts, groups are an essential tool for managing computers. You can view all thecomputers in a group, view detections and reports for the group, and assign security settings (calledpolicies) to a group as a single entity. You can base groups on geographic location, department,computer type, user tasks, or anything meaningful to your organization.
For example, you might place all laptops used by traveling sales representatives into a single groupcalled Sales Team. You can then view details about this group of computers separately from othercomputers in your account. You can easily check detections for these computers or customize theirsecurity settings to protect them from the risks specific to users of public networks.
The following example shows how an administrator might configure policies for client computers inthree different groups. You should configure policies for your users to meet your own company’sneeds.
Introducing Endpoint Security and the SecurityCenterManagement with the SecurityCenter 1
McAfee Endpoint Security 10.0.0 Software Product Guide 19

Policy setting
On-Demand Scan • Weekly
• Enable full scans onlywhen computer is inidle state
• Daily
• Enable full scans onlywhen computer is inidle state
• Do not scan whencomputer is on batterypower
• Do not scan whencomputer is inpresentation mode
• Daily
• Enable full scans onlywhen computer is inidle state
Enable buffer overflowprotection
Enabled Enabled Enabled
Scan within archivesduring on-access scans
No Enabled Enabled
Check for updatesevery
12 hours 4 hours 4 hours
Threat Prevention Mode Prompt Protect Prompt
Approved Programs None None Nmap remote admintool
Firewall Mode Protect Protect Report
Use SmartRecommendations(Firewall)
• Enabled
• Medium Risk
• Enabled
• Unverified
• Enabled
• High Risk
Connection Type Trusted network Untrusted network Trusted network
Access to Sites, Accessto Downloads (WebFiltering)
• Red — Block
• Yellow — Warn
• Unrated — Warn
• Red — Block
• Yellow — Block
• Unrated — Warn
• Red — Warn
• Yellow — Allow
• Unrated — Allow
Web Control Mode Report Prompt Report
Secure Search Enabled Enabled Disabled
Creating customized policiesA policy is a collection of security settings that define how the product features operate. A policy isassigned to each computer when it is added to your account.
Policies allow you to assign different levels and types of protection to different users. Although policiesare assigned to computers, it is common practice to assign the same policy to all the computers in agroup.
1 Introducing Endpoint Security and the SecurityCenterManagement with the SecurityCenter
20 McAfee Endpoint Security 10.0.0 Software Product Guide

The McAfee Default policy is preconfigured in the SecurityCenter. You cannot modify it, but you cancreate other policies on the Policies page of the SecurityCenter.
You can assign a policy to a computer in two ways.
• Specify a policy during installation.
• Assign a different policy on the Computers page of the SecurityCenter.
If you do not specify a different policy during installation, the default policy for your account isassigned. This is the McAfee Default policy, unless you have selected a different default policy. McAfeepreconfigures features with default settings that protect systems in medium-risk environments. Thesesettings ensure that the system can access important websites and applications until you have achance to revise the settings.
How to use policies
If there aren't many computers on your account, you probably don't need to create multiple policies.You should create policies only if they help you manage your computers more easily.
If computers on your account are used in different circumstances or for different purposes, creatingdifferent policies for them lets you change the way some settings are configured for them.
For example, you can assign a Sales policy to your mobile Sales Team group, with security settingsthat protect against threats in unsecured networks such as airports and hotels.
Introducing Endpoint Security and the SecurityCenterManagement with the SecurityCenter 1
McAfee Endpoint Security 10.0.0 Software Product Guide 21
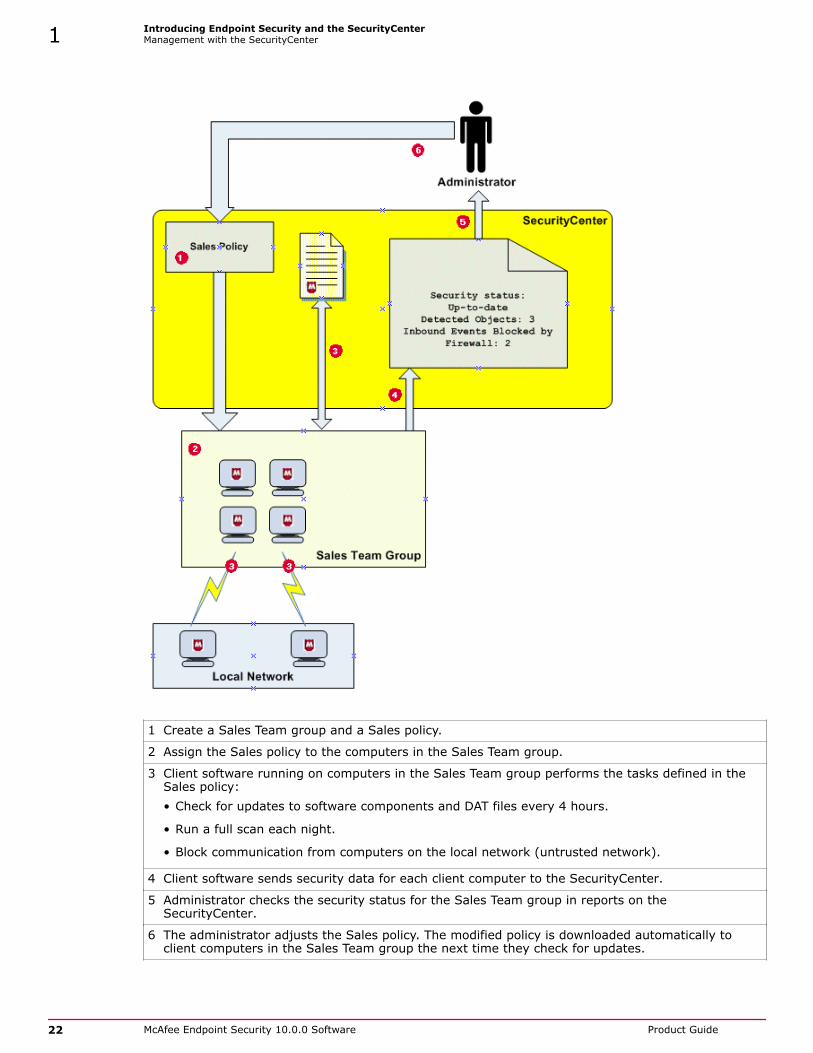
1 Create a Sales Team group and a Sales policy.
2 Assign the Sales policy to the computers in the Sales Team group.
3 Client software running on computers in the Sales Team group performs the tasks defined in theSales policy:• Check for updates to software components and DAT files every 4 hours.
• Run a full scan each night.
• Block communication from computers on the local network (untrusted network).
4 Client software sends security data for each client computer to the SecurityCenter.
5 Administrator checks the security status for the Sales Team group in reports on theSecurityCenter.
6 The administrator adjusts the Sales policy. The modified policy is downloaded automatically toclient computers in the Sales Team group the next time they check for updates.
1 Introducing Endpoint Security and the SecurityCenterManagement with the SecurityCenter
22 McAfee Endpoint Security 10.0.0 Software Product Guide

Viewing status emails and reportsWhenever client computers check for updates, they upload information about their security status tothe SecurityCenter.
This information includes the number and type of detections, the functional status of the clientsoftware, and any applications or communications that were approved by users or blocked. Themethod used to upload information is the same method used to retrieve updates: through a directconnection, Rumor technology, or a relay server.
You can view this information in several ways:
• Check the weekly status email sent by your service provider (unless you or your service providerhas disabled this feature). Status emails contain a summary of the protection status for computerson your account.
• Check the widgets on the Dashboard page of the SecurityCenter. Widgets provide summaryinformation for each protection service and for your subscriptions and licenses.
• View reports available on the Reports page of the SecurityCenter. Reports show the types ofdetections and activities occurring for computers on your account. Use them to evaluate thecurrent policy options for your account and adjust them as needed. (In some cases, you areredirected to a protection portal where the report data is stored.)
• Schedule SecurityCenter reports to run at regular intervals and be delivered to you or otherspecified persons as an email attachment.
• View summary information on the Security-as-a-Service dashboard on the ePolicy Orchestrator console.(Available if you have installed the McAfee® Security-as-a-Service extension for the McAfee ePolicyOrchestrator software.)
Management with the ePolicy Orchestrator consoleIf you use the McAfee ePO software to manage network resources and security, you can use theePolicy Orchestrator console to monitor the status of computers that are protected by yoursubscription McAfee protection services and managed with the SecurityCenter.
To enable this functionality, you need to install the McAfee Security-as-a-Service extension on theePolicy Orchestrator server. The extension establishes a connection between the ePolicy Orchestratorserver and the SecurityCenter and pulls security information from the SecurityCenter. You can viewthis information, which includes client computer status and detection details, in monitors and reportson the ePolicy Orchestrator console.
The Security-as-a-Service extension is not supported for McAfee ePO Cloud accounts.
Introducing Endpoint Security and the SecurityCenterManagement with the ePolicy Orchestrator console 1
McAfee Endpoint Security 10.0.0 Software Product Guide 23

New features and enhancementsThis release of the product includes these new features and enhancements.
Table 1-1 General product and client features
Feature orenhancement
Description
New client software • Endpoint Security Client — Was McAfee® SaaS Endpoint Protection.
• Client protection services now share some common functions, such asscanning, which improves product performance.
New names forprotection services
• Threat prevention — Was virus and spyware protection.
• Web control — Was browser protection.
Support for newoperating systemsand browsers
• Operating systems:
• Windows 8 (not including Windows RT edition)
• Windows 8.1 Update 1
• Web browsers:
• Microsoft Internet Explorer, versions 7.0, 8.0, 9.0, 10.0, and 11.0
• Mozilla Firefox, versions 3.0 through 28
• Google Chrome, versions 4.0 through 34
New client consolewith multi-modeclient user interface
• Full access — Enables access to all features.
• Standard access — Displays protection status and allows access to most featuresexcept settings. This mode is the default setting.From Standard access interface mode, you can log on as administrator to accessall features, including all settings.
• Locked — Requires a password to access the client.Once you unlock the client interface, you can access all features.
New shared productfeatures
• Access Protection — Restricts unauthorized access to client computersthrough access points that threats attempt to exploit.
• Self Protection — Protects McAfee system resources from malicious attemptsto disable or modify them.
• McAfee® Global Threat Intelligence™ (McAfee GTI) service — The protectionservices check the McAfee cloud-based, real-time threat intelligence servicefor the latest information about threats and recommended responses.
• Threat prevention checks for detailed information on malware andpotentially unwanted programs, including how to handle them.
• Firewall checks for information about the safety of a communication'ssource or destination, then block those that are rated at or above theselected risk level. (These ratings correspond to a reputation valueassigned by the service.)
• Web control accesses site safety ratings and reports on the McAfee GTIserver.
1 Introducing Endpoint Security and the SecurityCenterNew features and enhancements
24 McAfee Endpoint Security 10.0.0 Software Product Guide

Table 1-1 General product and client features (continued)
Feature orenhancement
Description
Changes to clientpolicy options onthe SecurityCenter
These options are no longer available for the Client Settings policy:• Display support notifications on client computers — Not supported.
• Update client computers where users are not logged on — The client software updateseven if users are not logged on.
• Hide the splash screen — Not supported.
Enhancements tolistings and reportson theSecurityCenter
• An icon in the column headings indicates how data in a listing is sorted.
• Computer Details page — Lets you filter by default browser.
• Computer Profiles report — Lets you filter by default browser; includes theversion for the default browser in the listing.
• Scheduled Reports page — Shows when each scheduled report was last run,whether it was successful, and when it is scheduled to run next.
• Web Filtering report — Shows the IP address for each client computer and thedate and time for last browsing activity.
Changes to utilities These utilities are no longer available from the SecurityCenter:
• ProtectionPilot Migration Tool
• Standalone installation utility
Products no longeravailable
These protection services are no longer available with your SecurityCenteraccount:• Email server protection — Email protection is available at the server level by
using McAfee® Security for Email Servers. For more information, visit http://www.mcafee.com/in/products/security-for-email-servers.aspx.
• SaaS vulnerability scanning, PCI certification, and TrustMark module —Vulnerability scanning services are available from our partner PathDefenderat www.mcafeesecure.com.
• McAfee® Cloud Single Sign On — This is no longer an option for purchase inthe SecurityCenter.
Table 1-2 Threat prevention features
Feature orenhancement
Description
New on-demand scantype and options
• Set up a Full Scan or Quick Scan to run once or on a regular basis.
• Specify that scans run only when specific conditions are met (for example,not in presentation or battery-powered mode), and whether users canpause or cancel scheduled scans.
Zero-impact scanning Zero-impact on-demand scans run only when the computer is idle. The threatprevention service pauses the scan when it detects disk or user activity, suchas use of the keyboard or mouse. The scan resumes automatically when thesystem is idle for three minutes.
Introducing Endpoint Security and the SecurityCenterNew features and enhancements 1
McAfee Endpoint Security 10.0.0 Software Product Guide 25
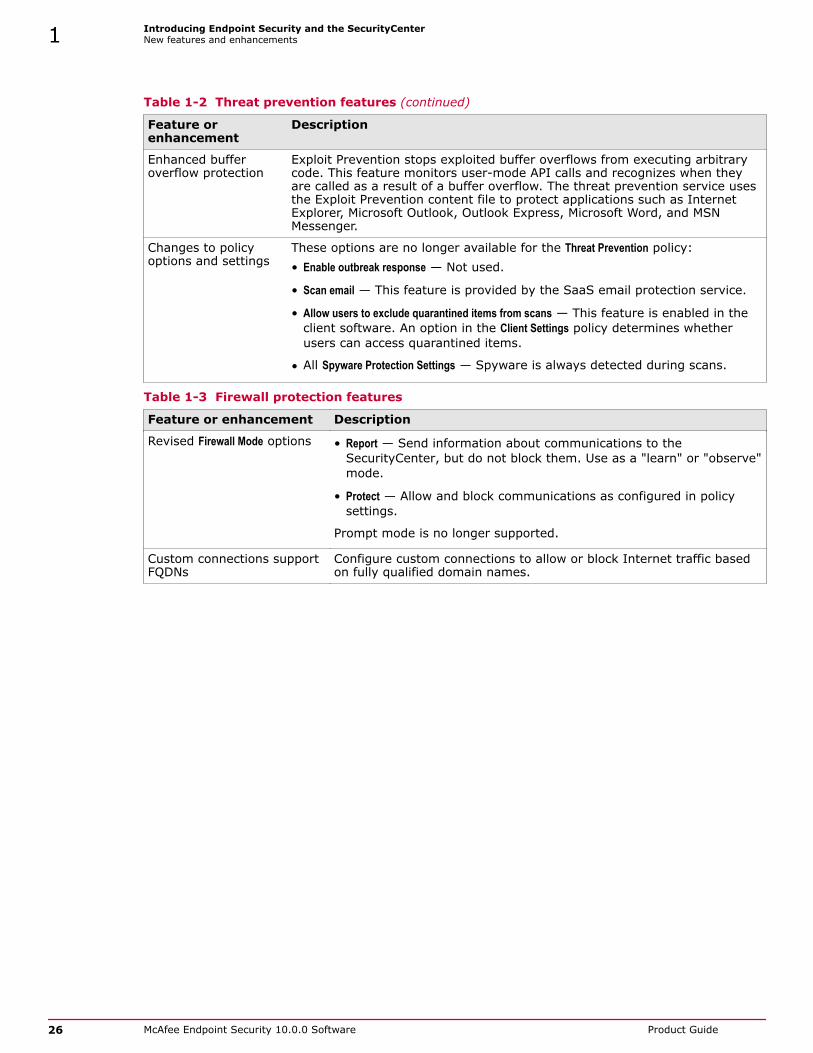
Table 1-2 Threat prevention features (continued)
Feature orenhancement
Description
Enhanced bufferoverflow protection
Exploit Prevention stops exploited buffer overflows from executing arbitrarycode. This feature monitors user-mode API calls and recognizes when theyare called as a result of a buffer overflow. The threat prevention service usesthe Exploit Prevention content file to protect applications such as InternetExplorer, Microsoft Outlook, Outlook Express, Microsoft Word, and MSNMessenger.
Changes to policyoptions and settings
These options are no longer available for the Threat Prevention policy:• Enable outbreak response — Not used.
• Scan email — This feature is provided by the SaaS email protection service.
• Allow users to exclude quarantined items from scans — This feature is enabled in theclient software. An option in the Client Settings policy determines whetherusers can access quarantined items.
• All Spyware Protection Settings — Spyware is always detected during scans.
Table 1-3 Firewall protection features
Feature or enhancement Description
Revised Firewall Mode options • Report — Send information about communications to theSecurityCenter, but do not block them. Use as a "learn" or "observe"mode.
• Protect — Allow and block communications as configured in policysettings.
Prompt mode is no longer supported.
Custom connections supportFQDNs
Configure custom connections to allow or block Internet traffic basedon fully qualified domain names.
1 Introducing Endpoint Security and the SecurityCenterNew features and enhancements
26 McAfee Endpoint Security 10.0.0 Software Product Guide

Table 1-4 Web control features
Feature orenhancement
Description
Web control includesthe web filteringmodule
Configure policy settings to control access to websites based on content.
Secure Search Select a default search engine and block risky sites in search results listingsfor computers running the web control service.
Secure Search is supported for Microsoft Internet Explorer.
New policy options These options are added to the General Settings tab of the Web Control & WebFiltering policy:• Web Control Mode
• Report — Send information about browsing activities to theSecurityCenter, but do not block them. Use as a "learn" or "observe"mode.
• Prompt — Allow, block, or warn users about websites and site resourcesas configured in policy settings.
• Email Annotations Configuration• Enable annotations in Outlook — Annotate URLs in email management tools,
such as Microsoft Outlook or Outlook Express.
• Enable annotations in webmail clients — Annotate URLs in browser-based emailclients, such as Gmail, Outlook.com, AOL, and Yahoo.
Table 1-5 Features for managing accounts, subscriptions, licenses, and renewals
Feature orenhancement
Description
New, tabbed My Licensespage
Centrally manage subscriptions and licenses:• Buy More / Renew — Check the status of your current subscriptions and view
your subscription history, which now includes the grant number for youraccount.
• Keys — Look up your company key and account enrollment key, createan account enrollment key, and activate a license key.
Revised tabs for MyAccount page
• My Profile & Logo — Update profile information for your account and uploada logo to appear on reports.
• Group Administrators — Set up subadministrators to perform manage groupswithin your account.
• Merge Account — Merge two accounts into a single account, so you canmanage them all in one McAfee® SecurityCenter account.
• Notification — Select the notifications you would like to receive for youraccount.
Features for identifyingand renewing expired orexpiring productsubscriptions andlicenses
• Customers are redirected automatically to the redesigned Product Renewalpage, where they can contact the vendor from whom they purchased theproduct. The can also select a different vendor during the renewalprocess.
• No status or report information is available for accounts that have beenfully expired for at least 60 days. Only account subscription informationis available.
Introducing Endpoint Security and the SecurityCenterNew features and enhancements 1
McAfee Endpoint Security 10.0.0 Software Product Guide 27
Enhancements for partner features
General improvements are added to the features that partners use to create and manage accounts.
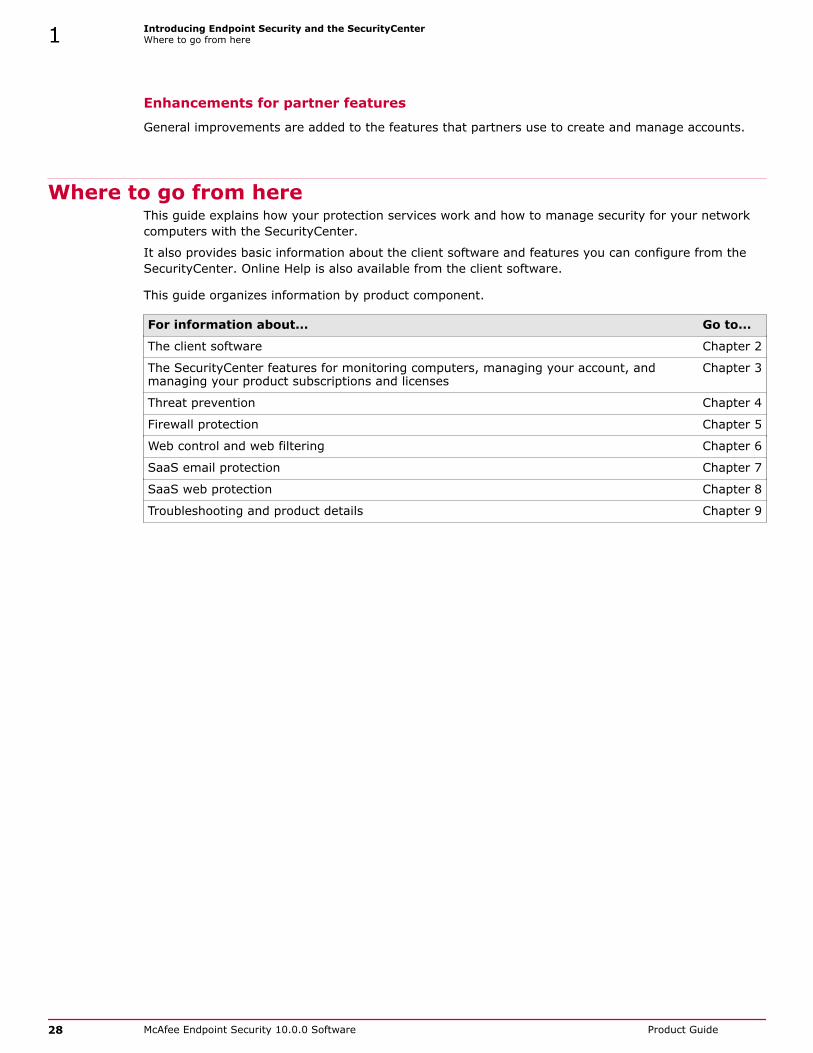
Where to go from hereThis guide explains how your protection services work and how to manage security for your networkcomputers with the SecurityCenter.
It also provides basic information about the client software and features you can configure from theSecurityCenter. Online Help is also available from the client software.
This guide organizes information by product component.
For information about... Go to...
The client software Chapter 2
The SecurityCenter features for monitoring computers, managing your account, andmanaging your product subscriptions and licenses
Chapter 3
Threat prevention Chapter 4
Firewall protection Chapter 5
Web control and web filtering Chapter 6
SaaS email protection Chapter 7
SaaS web protection Chapter 8
Troubleshooting and product details Chapter 9
1 Introducing Endpoint Security and the SecurityCenterWhere to go from here
28 McAfee Endpoint Security 10.0.0 Software Product Guide

2 Using the client software
Software called McAfee®
Endpoint Security Client (the client software) is installed on each computeryou want to protect with Endpoint Security.
When installation is complete, the computer is added to your SecurityCenter account automatically.The software then runs in the background to download updates to the computer, protect the computerfrom threats, and send detection data to the SecurityCenter for use in administrative reports.
Typically, users have little interaction with the client software unless they want to manually scan forthreats. User tasks are documented in the client online Help.
As an administrator, you can use the SecurityCenter website to configure settings and monitordetections for the client computers on your account. Occasionally, you might work directly on a clientcomputer by using the tasks described in this section.
Contents Interacting with the client software Get started with the client software Update protection manually from the client Configure policy settings for shared client protection features Manage features from the client interface
Interacting with the client softwareEndpoint Security provides visual components for interacting with the client software.
• McAfee icon in the Windows system tray — Enables users to open the client console.
• Notification messages — Alert users to firewall intrusion detections and prompts them for input.
• The client console — Displays the current protection status and provides access to features.
You can configure an option in a policy you assign to a client computer to specify which componentsappear.
About the McAfee system tray iconThe McAfee icon in the Windows system tray provides access to the client console.
Use the system tray icon to:
• Check the security status — Right-click the icon and select View Security Status to display the McAfeeSecurity Status page.
• Open client console — Right-click the icon and select McAfee Endpoint Security.
2
McAfee Endpoint Security 10.0.0 Software Product Guide 29

How the icon indicates the status of Endpoint Security
The appearance of the icon changes to indicate the status of Endpoint Security. Hold the cursor overthe icon to display a message describing the status.
Icon Indicates...
Endpoint Security is protecting the system and no issues exist.
Endpoint Security detects an issue with system security, such as a protection service ortechnology is disabled.• Firewall is disabled.
• Threat Prevention — Buffer overflow protection (Exploit Prevention), on-access scanning, orscript scanning is disabled.
Endpoint Security reports issues when product components have been disabled manually, notas a result of a policy settings configured by an administrator.
When an issue is detected, the McAfee Security Status page indicates which protection service ortechnology is disabled.
About notification messagesEndpoint Security uses two types of messages to notify users about issues with protection or torequest input. Some messages might not appear, depending on how you configure the product.
• Alerts pop up from the McAfee icon for five seconds, then disappear.
Alerts notify users of firewall intrusion events. They don't require any action from users.
Endpoint Security displays alerts only when firewall intrusion alerts are enabled. To enable them in apolicy, select Show alerts when inbound events are blocked on the General Settings tab of the Firewall policy pagein the SecurityCenter.
• Prompts open a page at the bottom of the screen and stay visible until the user selects an option.
When a scheduled on-demand scan is about to start, Endpoint Security might prompt users todefer the scan.
About the client consoleThe client console enables users to check the protection status and access features on clientcomputers.
Endpoint Security displays the client console only when the client interface mode is set to Standard accessor Full access. If it is set to Locked, enter the administrator password to open the client console.
• Options on the Action menu provide access to features.
2 Using the client softwareInteracting with the client software
30 McAfee Endpoint Security 10.0.0 Software Product Guide

Settings Configures feature settings.This menu option is available if any of the following are true:
• The Client console access is set to Full access.
• The user is logged on as administrator.
• The administrator has enabled the user to configure firewall settings on theclient computer.
Load Extra.DAT Enables the user to install a downloaded Extra.DAT file.
This might be required by customer support to troubleshoot problems.
Help Displays Help.
Support Links Displays a page with links to helpful pages, such as the McAfee ServicePortal andKnowledge Center.
AdministratorLogon
Logs on as the site administrator. (Requires administrator credentials.)The default password is your company key. You can view or change the passwordon the Client Settings policy page of the SecurityCenter.
This option is available if the Client console access is set to Full access. If the Clientconsole access is not Full access and the user is logged on as the administrator, thismenu option is Administrator Logoff.
About Displays information about Endpoint Security.
Exit Exits the Endpoint Security Client.
• Buttons on the top right of the page provide quick access to frequent tasks.
Checks for malware with a Full Scan or Quick Scan of the client computer.
This button is available only if the threat prevention service is installed.
Updates content files and software components on the computer.
This button is enabled by default, but can be disabled by the administrator.
• Buttons on the left side of the page provide information about protection.
Status Returns to the main Status page.
Event Log Displays the log of all protection and threat events on this computer.
Quarantine Opens the Quarantine Manager.
This button is available only if the threat prevention service is installed.
• The Threat Summary gives information about threats that Endpoint Security detected on thecomputer in the last 30 days.
Using the client softwareInteracting with the client software 2
McAfee Endpoint Security 10.0.0 Software Product Guide 31

Get started with the client softwareUse the client in Standard access mode to perform most functions, including system scans and managingquarantined items.
Tasks
• Open the client console on page 32Open the client console to display the status of the protection features installed on thecomputer.
• Get help on page 32The two methods for getting help while working in the client console are the Help menu andthe ? icon.
• Get information about protection on page 32You can get information about the type of protection on the client computer, includingmanagement type, protection modules, features, status, version numbers, and licensing.
Open the client consoleOpen the client console to display the status of the protection features installed on the computer.
Before you beginIf the interface mode is set to Locked, enter the administrator password to open the clientconsole.
Task
1 Use one of these methods to display the client console:
• Right-click the system tray icon, then select McAfee Endpoint Security.
• Select Start | Programs | McAfee | McAfee Endpoint Security.
2 If prompted, enter the administrator password on the Administrator Logon page, then click Log On.
Get helpThe two methods for getting help while working in the client console are the Help menu and the ? icon.
Task
1 Open the client console.
2 Depending on the page you're on:
• Status, Event Log, and Quarantine pages: from the Action menu , select Help.
• Settings, Update, and Scan System pages: click ? in the interface.
Get information about protectionYou can get information about the type of protection on the client computer, including managementtype, protection modules, features, status, version numbers, and licensing.
Task
1 Open the client console.
2 From the Action menu , select About.
2 Using the client softwareGet started with the client software
32 McAfee Endpoint Security 10.0.0 Software Product Guide
3 Click the name of a module or feature on the left to jump to information about that item.
4 Click the browser Close button to close the About page.
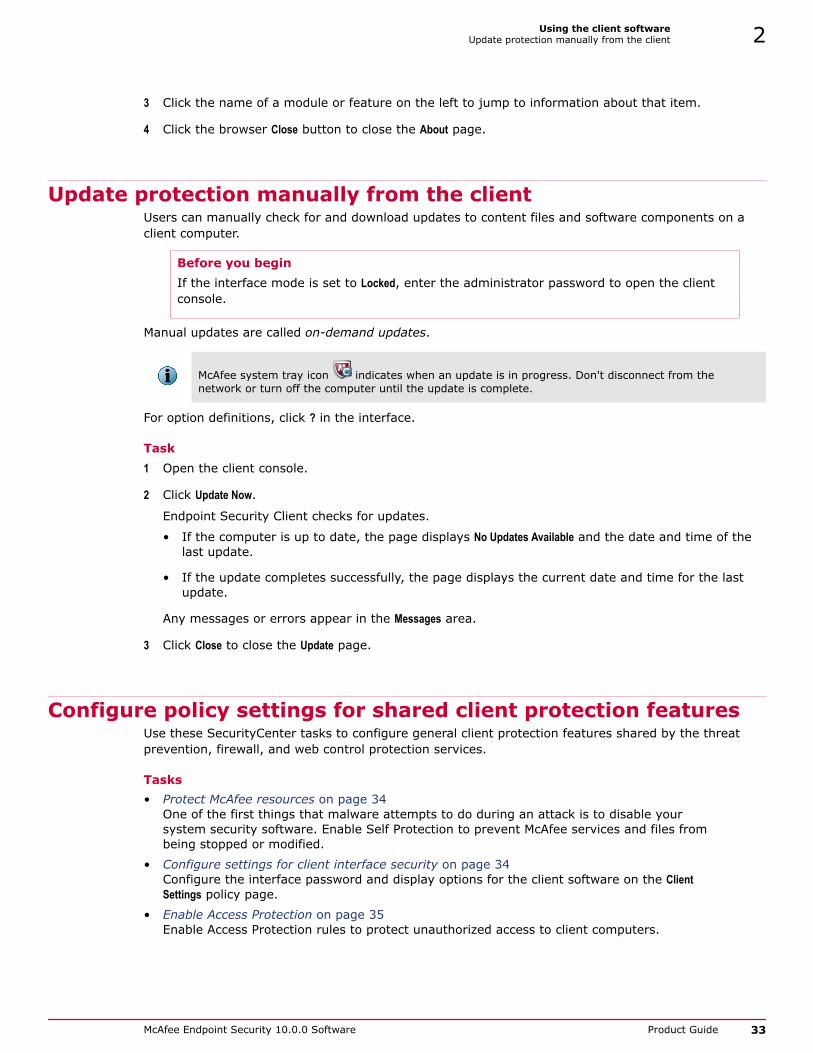
Update protection manually from the clientUsers can manually check for and download updates to content files and software components on aclient computer.
Before you beginIf the interface mode is set to Locked, enter the administrator password to open the clientconsole.
Manual updates are called on-demand updates.
McAfee system tray icon indicates when an update is in progress. Don't disconnect from thenetwork or turn off the computer until the update is complete.
For option definitions, click ? in the interface.
Task1 Open the client console.
2 Click Update Now.
Endpoint Security Client checks for updates.
• If the computer is up to date, the page displays No Updates Available and the date and time of thelast update.
• If the update completes successfully, the page displays the current date and time for the lastupdate.
Any messages or errors appear in the Messages area.
3 Click Close to close the Update page.
Configure policy settings for shared client protection featuresUse these SecurityCenter tasks to configure general client protection features shared by the threatprevention, firewall, and web control protection services.
Tasks• Protect McAfee resources on page 34
One of the first things that malware attempts to do during an attack is to disable yoursystem security software. Enable Self Protection to prevent McAfee services and files frombeing stopped or modified.
• Configure settings for client interface security on page 34Configure the interface password and display options for the client software on the ClientSettings policy page.
• Enable Access Protection on page 35Enable Access Protection rules to protect unauthorized access to client computers.
Using the client softwareUpdate protection manually from the client 2
McAfee Endpoint Security 10.0.0 Software Product Guide 33

Protect McAfee resourcesOne of the first things that malware attempts to do during an attack is to disable your system securitysoftware. Enable Self Protection to prevent McAfee services and files from being stopped or modified.
Users, administrators, developers, or security professionals should never need to disable McAfeeprotection on their systems.
TaskFor option definitions, click ? in the interface.
1 In the SecurityCenter, click the Policies tab, then click Add Policy (or click Edit to modify an existingpolicy).
2 Click Client Settings.
3 Under Self Protection Settings, select the checkbox for Enable self protection.
4 Click Save.
(For a new policy, click Next, select additional options for the policy, then click Save.)
Configure settings for client interface securityConfigure the interface password and display options for the client software on the Client Settings policypage.
Modify these settings with caution because they can allow users to change their security configuration,which can leave systems unprotected from malware attacks.
TaskFor option definitions, click ? in the interface.
1 In the SecurityCenter, click the Policies tab, then click Add Policy (or click Edit to modify an existingpolicy).
2 Click Client Settings.
3 Under Client Configuration, select an option for Client console access.• Full access — Allows access to all features.
• Standard access — Displays protection status and allows access to most features except settings,such as run updates and scans. (Default setting)
From Standard access interface mode, you can log on as administrator to access all features,including all settings.
Standard access mode requires a password to view and modify policy settings on the Client Settingspage.
• Locked — Users see only the tray icon. Requires a password to access the client software.
4 If you select Standard access or Locked, specify and confirm an administrator password foraccessing all features of the client interface.
This password is also required to uninstall the client software. The default administrator passwordis your company key.
5 Click Save.
(For a new policy, click Next, select additional options for the policy, then click Save.)
2 Using the client softwareConfigure policy settings for shared client protection features
34 McAfee Endpoint Security 10.0.0 Software Product Guide

Effects of setting an administrator passwordWhen you set the interface mode to Standard access or Locked, you must also set an administratorpassword.
In Locked mode, the administrator password is required to open the client console and gain access toall features.
In Standard access mode, setting an administrator password for the client software affects the followingusers:
Non-administrators(users without administratorrights)
Non-administrators can:
• View some configuration parameters.
• Run scans.
• Check for updates (if enabled).
• View the Quarantine.
• View the Event Log.
• Access the Settings page to view or modify firewall protection servicesettings (if enabled).
Non-administrators can't:
• Change any configuration parameters.
• Uninstall the client software.
• View, create, delete, or modify settings.One exception is the ability to view or modify firewall protectionservice settings (if enabled).
Administrators(users with administratorrights)
Administrators must type the password to access the protected areas,modify settings, or uninstall the client software.
Enable Access ProtectionEnable Access Protection rules to protect unauthorized access to client computers.
Access Protection stops potential threats by managing actions based on rules configured by McAfee toprotect the access points that threats attempt to exploit.
On-access scanning must be enabled.
TaskFor option definitions, click ? in the interface.
1 In the SecurityCenter, click the Policies tab, then click Add Policy (or click Edit to modify an existingpolicy).
2 Click Client Settings.
3 Under Access Protection Settings, select the checkbox for Enable access protection.
4 Click Save.
(For a new policy, click Next, select additional options for the policy, then click Save.)
See also Configure on-access scanning options on page 87
Using the client softwareConfigure policy settings for shared client protection features 2
McAfee Endpoint Security 10.0.0 Software Product Guide 35

Manage features from the client interfaceAs administrator, you can manage some features of Endpoint Security from the Endpoint SecurityClient.
Policy changes from the SecurityCenter might overwrite changes from the Settings page.
See the client online Help for more information about performing tasks with the client software.
Tasks• Log on as administrator on page 36
If the interface mode for Endpoint Security Client is set to Standard access, you can log on asadministrator to access all settings.
• Unlock the client interface on page 36If the interface for Endpoint Security Client is locked, unlock the interface with theadministrator password to access all settings.
• Disable and enable features on page 37As an administrator, you can disable and enable Endpoint Security features from theEndpoint Security Client.
• Uninstall the client software on page 37Use this task at a client computer to remove the client software. You might do this fortesting or before re-installing the client software.
Log on as administratorIf the interface mode for Endpoint Security Client is set to Standard access, you can log on asadministrator to access all settings.
TaskFor option definitions, click ? in the interface.
1 Open the Endpoint Security Client.
2 From the Action menu , select Administrator Logon.
3 In the Password field, enter the administrator password, then click Log On.
By default, the password is the company key for your account. To view or change the password, goto the Client Settings policy page in the SecurityCenter.
You can now access all features of the Endpoint Security Client.
To log off, select Action | Administrator Logoff.
Unlock the client interfaceIf the interface for Endpoint Security Client is locked, unlock the interface with the administratorpassword to access all settings.
Before you beginThe interface mode for the client must be set to Locked.
For help, from the Action menu , select Help.
2 Using the client softwareManage features from the client interface
36 McAfee Endpoint Security 10.0.0 Software Product Guide

Task1 Open the Endpoint Security Client.
2 On the Administrator Log On page, enter the administrator password in the Password field, then click LogOn.
By default, the password is the company key for your account. To view or change the password, goto the Client Settings policy page in the SecurityCenter.
Endpoint Security Client opens and you can now access all features of the client.
To log off and close the client, from the Action menu , select Administrator Logoff.
Disable and enable featuresAs an administrator, you can disable and enable Endpoint Security features from the Endpoint SecurityClient.
Before you beginSet the interface mode for the Endpoint Security Client to Full access or log on asadministrator.
The Status page shows the enabled status of the protection service or feature, which might not reflectthe actual status of the feature. You can see the status of each feature in the Settings page. For example,if the Enable script scanning setting isn't successfully applied, the ScriptScan status might be (Status:Disabled).
For help, from the Action menu , select Help.
Task1 Open the Endpoint Security Client.
2 Do one of the following:
• Click the protection service (such as Threat Prevention or Firewall) or feature name on the main Statuspage.
• from the Action menu, select Settings, then click the service or feature name on the Settings page.
3 Select or deselect the Enable service or feature option.
Enabling any of the threat prevention features enables the threat prevention service.
Uninstall the client softwareUse this task at a client computer to remove the client software. You might do this for testing orbefore re-installing the client software.
Before you beginAn administrator password might be required to uninstall the product.
This task uses the Windows feature for uninstalling software, which does not always remove all theassociated components, such as registry keys. A McAfee utility is available that cleans up thesecomponents, and you can also use it to uninstall the software. This Cleanup utility requires administrativecredentials for the SecurityCenter, and is available on the Optimization tab of the Utilities page.
Using the client softwareManage features from the client interface 2
McAfee Endpoint Security 10.0.0 Software Product Guide 37

If you uninstall the client software, the computer is no longer protected. We recommend that youre-install as soon as possible.
Task1 Open the Windows Control Panel, then go to the Uninstall Programs screen.
2 In the list of programs, select the protection services to uninstall, then click Uninstall.• McAfee Endpoint Security Firewall
• McAfee Endpoint Security Threat Prevention
• McAfee Endpoint Security Web Control
On computers running the Windows firewall, the setting for the Windows firewall is automaticallyrestored to the setting that was in effect before the client software was installed. If the Windowsfirewall was enabled then, it is re-enabled automatically now.
3 If prompted, enter a password for each module.
By default, the password is the company key for your account. To view or change the password, goto the Client Settings policy page in the SecurityCenter.
2 Using the client softwareManage features from the client interface
38 McAfee Endpoint Security 10.0.0 Software Product Guide

3 Using the SecurityCenter
Use the SecurityCenter web-based management console to centrally manage all the client computersand protection information for your account.
After installing the software on client computers, you receive regular emails that summarize thesecurity status of all client computers on your account, and notify you of actions required to addressvulnerabilities. Status emails contain a link to the SecurityCenter, where you can view detailed reportsand instructions for resolving problems.
McAfee Endpoint Security is designed to protect your computers automatically with little or nohands-on management. In small organizations, status emails might be all that is needed to assure youthat your computers are safe. If you manage a large account or want more proactive, hands-oninvolvement, you can take advantage of the management console available on the SecurityCenter.
Contents Managing protection with the SecurityCenter Quick account evaluation with the Dashboard page Management of client computers Management of computer groups Management of group administrators Management of security policies Generation of security reports Management of your licenses and subscriptions Management of your account Management in the McAfee ePO environment Account management utilities Assistance for using the product
3
McAfee Endpoint Security 10.0.0 Software Product Guide 39

Managing protection with the SecurityCenterFrom the SecurityCenter, you can monitor the protection status of computers on your account, assesstheir security needs, and configure feature settings in policies.
Administrative features are divided among these pages:
Table 3-1 SecurityCenter pages
From thepage...
You can...
Dashboard View and manage the status of protection services and subscriptions.• Install protection services.
• View and resolve action items.
• Configure the information that appears on the pages.
• View interactive reports on subscription status, protection coverage, and activitysummaries.
• Purchase, add, and renew protection services.
• Create a trial subscription.
• Activate and configure McAfee SaaS protection services.
Computers Centrally manage all client computers.• Search for computers.
• Install protection services.
• Create and manage groups.
• Display computer details.
• View detections for computers.
• View user-approved applications.
• Send email to computers.
• Delete computers from your reports and block them from receiving updates.
• Check for active licenses on computers in your account.
• View and delete computers where the client software has been uninstalled.
• Move computers into a new group.
• Assign policies to computers.
Reports Access the security data uploaded by client computers.• View detections. • View browser and operating system
versions.
• View potentially unwanted programdetections.
• View your detection history.
• View unrecognized Internetapplications.
• View web browsing and web filteringactivity.
• View blocked inbound events. • View email protection reports.
• View duplicate computers. • Schedule reports and view scheduledreports.
3 Using the SecurityCenterManaging protection with the SecurityCenter
40 McAfee Endpoint Security 10.0.0 Software Product Guide

Table 3-1 SecurityCenter pages (continued)
From thepage...
You can...
Policies Set up policies to manage your site.• Create and manage policies.
• Select a default policy.
• Display details for managed computers.
My Licenses Manage products and licenses for your accounts.• View your current and past
subscriptions.• View your company key and account
enrollment key.
• Purchase, add, and renew protectionservices.
• Activate your license key.
• Create a trial subscription.
My Account Manage data for your accounts.• Change your SecurityCenter password.
• Set up your account profile.
• Sign up for email notifications.
• Create, edit, and delete group administrator accounts.
• Add your logo to reports.
• Merge another account with your account.
Utilities Find helpful tools.• Access installation and troubleshooting utilities.
• Schedule a product upgrade.
• Register one or more ePolicy Orchestrator servers and view their status. (Used tosynchronize and display McAfee SaaS information in an ePolicy Orchestratorenvironment.)
Help & Support Get assistance for using the product.• View product documents.
• Access support tools.
• Submit on online support ticket for McAfee Technical Support.
• Contact McAfee Corporate Customer Service.
Feedback Submit information about your experience with the product.
Log on to the SecurityCenterUse this task to log on to the SecurityCenter console and access administrative features.
Before you beginWhen you purchased your subscription to protection services, your service provider sentemails containing the information required to log on to the SecurityCenter. Make sure thisinformation is available if you need it.
Using the SecurityCenterManaging protection with the SecurityCenter 3
McAfee Endpoint Security 10.0.0 Software Product Guide 41

Task1 Paste or type the URL into your browser.
A welcome email from McAfee contains the unique URL for your account.
2 Type your logon credentials.
• Email Address — The email address that you used to sign up for Endpoint Security.
If you're unsure of the email address, click the Forgot Email Address option to display a page withinformation about contacting McAfee Corporate Customer Service.
• Password — The password for your account.
If this is the first time you have logged on, a logon credentials email from McAfee contains a linkto the Create Password page, where you can create your new password.
If you've forgotten your password, click the Forgot Password option. You'll receive an email with alink to the Create Password page.
3 Click Log On.
Access data on SecurityCenter pagesEach page or tab on the SecurityCenter console includes features for displaying the exact data youneed and using it efficiently.
TaskFor option definitions, click ? in the interface.
1 Log on to the SecurityCenter, then click a tab to view a page.
For example, click the Computers tab to display a listing of the computers in your account.
2 Do any of the following:
The actions available change according to the page you are viewing and the information currentlydisplayed.
3 Using the SecurityCenterManaging protection with the SecurityCenter
42 McAfee Endpoint Security 10.0.0 Software Product Guide

When you want to... Do this...
Send the current page asan email attachment orscheduled report
Click the email icon (located along the upper-right margin of thepage) to open the Scheduled Reports page, which contains a blank emailmessage to fill out and delivery options. You can configure themessage to be sent immediately or at regular intervals, then clickSave. (You must have a local email application installed to use thisfeature.)
Print the current page Click the print icon (located along the upper-right margin of the page)to open the page in a separate browser window, then select Send toPrinter to open the Windows Print dialog box.
Save the current page asa file
Click the save icon (located along the upper-right margin of thepage), then select the file format:• Microsoft Excel
• Microsoft Word
• Adobe PDF
• Comma-separated text
Display context-sensitiveHelp
Click the help ( ? ) icon (located along the upper-right margin of thepage) to display Help for the current page, with links to relatedtopics.
Navigate in multiple-pagelistings
Click the number of entries to display, or select a page number fromthe Go to page drop-down list.
Select computers tomanage
Select the checkbox for individual computers, or select the checkboxin the heading to select all computers.
Check your action itemsand alerts
Problems that require your attention appear in red. The method forresolving them varies depending on the page.• In an action item, click the button at the end of the text to display
instructions for resolving the problem.
• In a computer listing, click the name of the computer to displaydetails about it, then click the action item.
Display details about acomputer
Click a computer name in a listing.
Send email to a computer Click an email address in the listing to open a blank, preaddressedmessage. (You must have a local email application installed to usethis feature.)
Filter information on apage
At the top of a page, select the information to display (such as groupname, period of time, or type of information).
For greater flexibility in managing large accounts, select whether todisplay groups or individual computers.
Sort information in listings Click a column heading to sort by that column.Click it again to switch the order in which it is displayed (ascendingorder or descending order).
Using the SecurityCenterManaging protection with the SecurityCenter 3
McAfee Endpoint Security 10.0.0 Software Product Guide 43

Quick account evaluation with the Dashboard pageThe Dashboard page is your “home” page on the SecurityCenter console, where you can check theprotection status for your account at a glance.
It provides a graphical overview of your coverage, with instant access to summary information aboutthe computers and subscriptions in your account. Access the Dashboard page at any time by clicking theDashboard tab.
From the Dashboard page, you can do any of the following:
• Install additional protection.
• View and resolve action items.
• View protection coverage and activity for all computers or specific groups with interactive reports(known as widgets) containing clickable charts and links.
• Check and update your subscriptions and licenses.
• Create trial subscriptions.
• Select, resize, and reposition the widgets that appear on the page.
• Access associated management portals by clicking a link (available only when your accountincludes McAfee SaaS protection services).
View a summary of protection statusUse this task to view details about your account and protection coverage, resolve action items, andupdate protection.
3 Using the SecurityCenterQuick account evaluation with the Dashboard page
44 McAfee Endpoint Security 10.0.0 Software Product Guide

TaskFor option definitions, click ? in the interface.
1 Click the Dashboard tab.
2 Select the group for which you want to display information. (Optional)
3 Do any of the following:
To... Do this...
View instructions toresolve an action item
Click the button at the end of the text.Action items are security issues that need your immediate attention.
Install additionalprotection
Click Install Protection to open a wizard that guides you through the stepsfor installing protection on new or existing computers.
Add clickable charts andgraphs (widgets) to thepage
Click Add Widget, select a chart or graph, then click Add to Dashboard.
Redisplay the defaultpage configuration
Click Restore Defaults.
View details aboutprotection coverage
In a widget, click a color in the pie chart that shows the status of clientcomputers in your account.• Red — Out-of-date or unprotected systems.
• Green — Up-to-date or protected systems.
• Gray — Computers where protection is not installed.
Update protection In the Subscription Summary widget, click Buy, Buy More, or Renew, then followthe instructions on the Product Purchase or Product Renewal page.
Create trialsubscriptions
Click the Try link in one of these widgets:• Evaluate McAfee SaaS Solutions
• Subscription Summary
Customize theappearance of the page
• To remove a widget, click its close box (in the upper-right corner).
• To reposition a widget, click its title bar and drag it to a new location.
• To resize a widget, click its border and drag to a new size.
• To email the information in the widget, click the email icon (in theupper-right corner). You can also schedule it to be sent as an emailattachment at regular intervals.
Manage protection with widgets Use this task to view, manage, and access information in widgets.
Widgets are small, interactive reports that appear on the Dashboard page of the SecurityCenter. Theyprovide summary and overview information about your account's protection status, activity, andsubscriptions. Some widgets provide links to associated portals or subscription-related tasks.
Some widgets appear by default when you purchase a subscription to a service. Widgets for newsubscriptions appear at the top of the Dashboard page.
You can add new widgets, remove widgets, and customize the way widgets appear.
Using the SecurityCenterQuick account evaluation with the Dashboard page 3
McAfee Endpoint Security 10.0.0 Software Product Guide 45

TaskFor option definitions, click ? in the interface.
1 Click the Dashboard tab.
2 Do any of the following:
To... Do this...
View details aboutprotection coverage
In a widget, click a color in the pie chart that shows the status ofclient computers in your account.
• Red — Out-of-date or unprotected systems.
• Green — Up-to-date or protected systems.
• Gray — Computers where protection is not installed.
View details about activity In a widget, click links that display more information about reportedactivity, such as the computer names or the number of detections.
Buy or renewsubscriptions and licenses
Click links in the Subscription Summary widget.
Create trial subscriptions Click the Try link in one of these widgets:• Evaluate McAfee SaaS Solutions
• Subscription Summary
Open a protection portalin a separate browserwindow
Click the Click here to configure link in a widget for a SaaS protectionservice, such as SaaS email protection. (Available only when yoursubscription includes these protection services.)
Remove a widget Click its close box (in the upper-right corner).
Reposition a widget Click its title bar and drag it to a new location.
Resize a widget Click its border and drag to a new size. (Two sizes are available.)
Email the information inthe widget
Click the email icon (in the upper-right corner), then select deliveryoptions to send it now or schedule it to be sent at regular intervals.(You must have a local email application installed to use this feature.)
Add widgets to the page Click Add Widget, locate the widget you want to display in the gallery,then click Add to Dashboard.
The new widget appears at the bottom of the Dashboard page.
Management of client computersThe Computers page provides a centralized location for working with all the computers in your account.
You can instantly view each computer’s group and email address, when it last connected to thenetwork, whether its detection definition (DAT) file is current, the number of detections, and thenumber of Internet applications approved by its user. You can easily see which computers need yourattention, display additional information, and perform necessary management tasks.
3 Using the SecurityCenterManagement of client computers
46 McAfee Endpoint Security 10.0.0 Software Product Guide
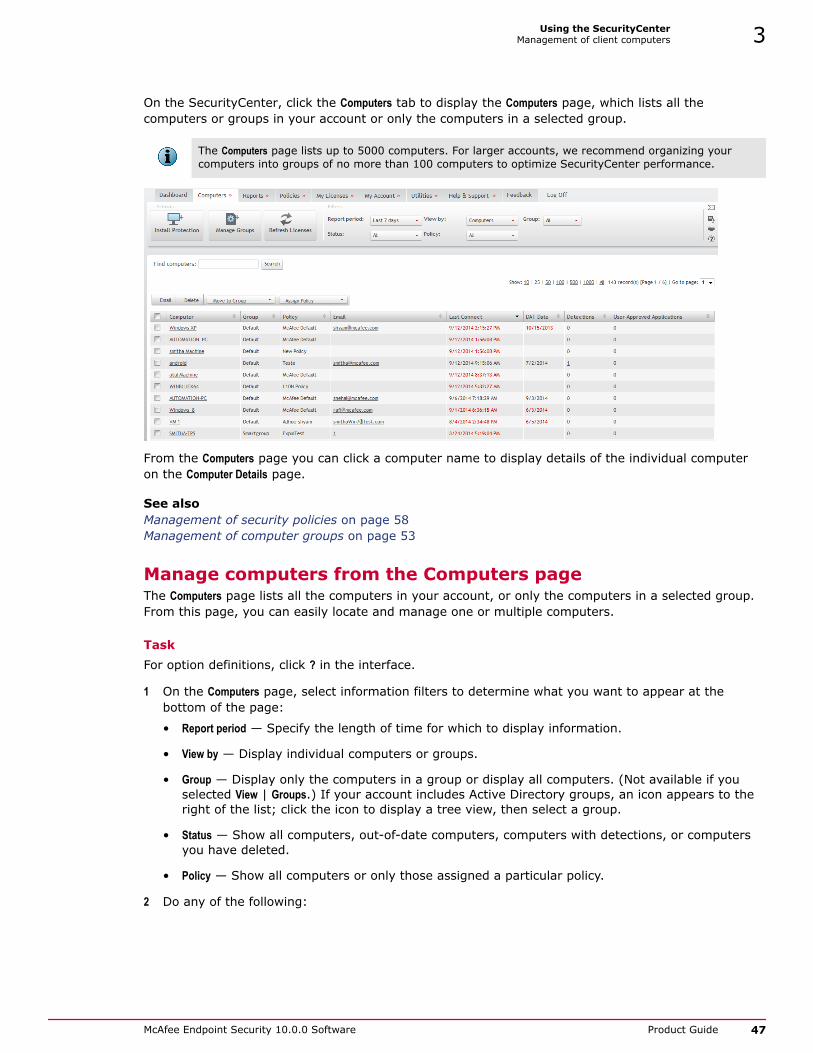
On the SecurityCenter, click the Computers tab to display the Computers page, which lists all thecomputers or groups in your account or only the computers in a selected group.
The Computers page lists up to 5000 computers. For larger accounts, we recommend organizing yourcomputers into groups of no more than 100 computers to optimize SecurityCenter performance.
From the Computers page you can click a computer name to display details of the individual computeron the Computer Details page.
See also Management of security policies on page 58Management of computer groups on page 53
Manage computers from the Computers pageThe Computers page lists all the computers in your account, or only the computers in a selected group.From this page, you can easily locate and manage one or multiple computers.
TaskFor option definitions, click ? in the interface.
1 On the Computers page, select information filters to determine what you want to appear at thebottom of the page:
• Report period — Specify the length of time for which to display information.
• View by — Display individual computers or groups.
• Group — Display only the computers in a group or display all computers. (Not available if youselected View | Groups.) If your account includes Active Directory groups, an icon appears to theright of the list; click the icon to display a tree view, then select a group.
• Status — Show all computers, out-of-date computers, computers with detections, or computersyou have deleted.
• Policy — Show all computers or only those assigned a particular policy.
2 Do any of the following:
Using the SecurityCenterManagement of client computers 3
McAfee Endpoint Security 10.0.0 Software Product Guide 47

To... Do this...
Find one or morecomputers
Type the full or partial name of a computer in the Find Computers boxand click Search.
The computer search feature does not recognize wildcard characters,so type letters or numbers only. Site administrators can search theentire account; group administrators can search only the groups theirsite administrator has assigned to them.
Add one or morecomputers to youraccount
Click Install Protection to open the installation wizard, which guides youthrough the steps for installing protection on new or existingcomputers.
View or edit details for acomputer
Click a computer name to display the Computer Details page for thatcomputer.
View detections for acomputer
Click a quantity under Detections to open the Detections List, then click adetection name to view detailed information from the McAfee LabsThreat Library.
Move computers into agroup
Select the checkbox for one or more computers in the list, then selectan existing group from the Move to Group list.
Assign a policy tocomputers
Select the checkbox for one or more computers in the list, then selectan existing policy from the Assign Policy list.
Send email to users abouttheir computer's problemsor tasks they need toperform
Click an email address for a computer. Alternatively, select thecheckbox for multiple computers in the list, then click the Email button.A blank preaddressed email message appears. (You must have a localemail application installed to use this feature.)
Add user-approvedapplications to one ormore policies
1 Click a quantity under User-Approved Applications.
2 In the User-Approved Applications List, click Allow, select the policies toadd the approved applications to, then click Save.
The User-Approved Applications List shows detected programs that usershave approved to run on the computer. To prevent users fromapproving applications, configure policy options for Protect mode.
Verify active licenses forcomputers in the listing(remove selectedcomputers from thelisting, then add back onlythose with active licenses)
1 Click Refresh Licenses.
2 On the Refresh Licenses page, select the checkbox for one or morecomputers in the list, then click Refresh Licenses.The computers are removed from reports and the Computers page. Ifthe computers check for updates, they reappear.
Delete obsolete orunauthorized computers
Select the checkbox for one or more computers in the list, then clickDelete.
Deleting a computer does not remove the client software. It doesblock the computer from receiving updates.
3 Using the SecurityCenterManagement of client computers
48 McAfee Endpoint Security 10.0.0 Software Product Guide

To... Do this...
Restore deletedcomputers
1 For the Status filter, select Deleted.
2 Select the checkbox for one or more computers in the list, then clickUnDelete.
The computers are added to the account and allowed to receiveupdates.
Delete computers wherethe client software hasbeen uninstalled
1 Click the Computers tab, then select All Uninstalled Computers from thedrop-down menu.
2 On the Uninstalled Computers page, select the Report period if needed. Thelisting shows all the computers from which the client software wasuninstalled during the selected period.
3 Select the checkbox for one or more computers in the list, then clickDelete.
Manage a computer from the Computer Details pageThe Computer Details page displays detailed information about a single computer, including its servicecomponents, its detections, and the date and status for its last update and scan.
From this page, you can manage some of the product features for the computer.
For option definitions, click ? in the interface.
Task1 From a computer listing, such as the Computers page, click a computer name.
2 On the Computer Details page, do any of the following:
To... Do this...
Update the email address In the System email address box, type a new email address, then clickSave.
Move the computer to anew group
In the Group list, select a group, then click Save.
Assign a new policy In the Assign Policy list, select a new policy, then click Save.
Install protection on anunprotected computer
Select the Click here to install link to open the installation wizard.
Display instructions forresolving an action item
Under Action Items, click the action item.
Display details aboutdetections
In the Detections section, click a quantity under Detections orUser-Approved Applications to display a detailed listing.
Add user-approvedapplications to one or morepolicies
1 In the Detections section, click a quantity under User-ApprovedApplications.
2 In the User-Approved Applications List, click Allow, select the policies toadd the approved applications to, then click Save.
The User-Approved Applications List shows detected programs that usershave approved to run on the computer. To prevent users fromapproving applications, configure policy options for Protect mode.
Using the SecurityCenterManagement of client computers 3
McAfee Endpoint Security 10.0.0 Software Product Guide 49

To... Do this...
View attempted visits toblocked websites
In the Detections section, click a quantity under Blocked Sites to open apage that lists details about each attempted visit.
View quarantined items thatthe user has excluded fromscans
In the Quarantined Items Excluded by Users section, view the name andlocation of each item, the last action performed on the item(whether the item was added to or removed from the list ofexclusions), and the date and time of the last action.
This section appears only when there are user-excluded items forthe computer.
Remove duplicate and inactive computers Use this task to find computers that need to be deleted from your account.
Typically, you might want to delete these types of computers from your account:
• Duplicate listings usually result when the client software has been installed more than once on asingle computer or when users install it on their new computers without uninstalling it from theirprevious computers.
• Inactive computers usually remain in your account because the client software is not uninstalled ona computer no longer in use.
• Uninstalled computers remain in your account for tracking purposes. You can see which computersare no longer running the client software, and either re-install the client software or delete thecomputers from your account.
Including duplicate and inactive computers in your reports causes the number of installations for youraccount to be reported incorrectly. Removing these computers makes all the licenses you havepurchased available for other computers to use.
Uninstalled computers do not affect the number of licenses available, but we recommend that youremove them from your account if you do not plan to re-install the client software.
TaskFor option definitions, click ? in the interface.
• Do any of the following:
3 Using the SecurityCenterManagement of client computers
50 McAfee Endpoint Security 10.0.0 Software Product Guide

When you wantto...
Do this...
Verify activecomputers, deleteinactivecomputers
1 Click the Computers tab, then click Refresh Licenses.
2 Select the checkbox for one or more computers in the list, then click RefreshLicenses. The selected computers are removed from the listing on theComputers tab and from reports.
If any of these computers are active, they reappear in listings and reports thefirst time they check for updates. Inactive computers do not reappear.
Delete computerswhere the clientsoftware has beenuninstalled
1 Click the Computers tab, then select All Uninstalled Computers from the drop-downmenu.
2 On the Uninstalled Computers page, select the Report period if needed. The listingshows all the computers from which the client software was uninstalledduring the selected period.
3 Select the checkbox for one or more computers in the list, then click Delete.
Delete duplicatecomputers
Do either of the following:1 Click the Reports tab, then click Duplicate Computers.
2 In the Duplicate Computers report, select the checkbox for each duplicatecomputer listed, then click Delete.
or
1 Click the Computers tab.
2 Select the checkbox for one or more computers in the list, then click Delete.
Deleting a computer does not remove the client software.
Restore deletedcomputers
1 Click the Computers tab.
2 For the Status filter, select Deleted.
3 Select the checkbox for one or more computers in the list, then click UnDelete.
Identify product and component versions on computersUse this report to locate computers that are due for maintenance, such as installing Microsoft orMcAfee software patches. You can also check whether a computer is configured as a relay server, viewinformation about the group it belongs to, and view the version of client software components andcontent (DAT) files currently in use.
Using the SecurityCenterManagement of client computers 3
McAfee Endpoint Security 10.0.0 Software Product Guide 51

TaskFor option definitions, click ? in the interface.
1 On the Reports tab, click Computer Profiles.
2 In the Computer Profiles report, do any of the following:
When you want to... Do this...
Identify computers running an operatingsystem that needs an update or patchinstalled
Filter the listing to display only computers running thespecific operating system.
Identify computers running a browserthat needs to be updated
Filter the listing to display only computers running thespecific browser.
Identify computers running a version ofthe firewall engine or core web controlapplication that needs to be updated
Click the column heading for Firewall Version or Web ControlVersion to sort the listing according to the versionrunning on computers.
Identify computers where firewallprotection is disabled
Click the column heading for Firewall Protection to sort thelisting according to whether firewall protection isenabled or disabled.
Send email notifying users about issuesor maintenance specific to theiroperating system or browser
Select the checkbox for each applicable computer, thenclick Email to open a blank message to fill in and send.(You must have a local email application installed to usethis feature.)
Locate group information for computers Check the name and number of the group for eachcomputer. (The group number is the group ID requiredwhen using the silent installation method (VSSETUP) toinstall client software.)
See which computers are configured asrelay servers
Check the Relay Server column.
Check details about the files running oncomputers
Check the version of the DAT file and the clientcomputer software (agent build number).
Upgrade the client software When a new version of the client software becomes available, you can schedule an upgrade forselected computers. This lets you test the new version before deploying it to all computers.
An action item on the Dashboard page of the SecurityCenter notifies you when a new version of thesoftware is available.
You can't schedule upgrades for client computers that are configured as relay servers. Relay servers areupdated during the first scheduled upgrade for client computers that are not configured as relayservers.
TaskFor option definitions, click ? in the interface.
1 On the Utilities page, click the Software Upgrade tab.
2 Do any of the following:
3 Using the SecurityCenterManagement of client computers
52 McAfee Endpoint Security 10.0.0 Software Product Guide

To do this... Do this...
Schedule an upgrade 1 Select the computers you want to upgrade.
2 Click the calendar icon that appears above the computer listing, thenselect a month and a day.
3 Click Schedule My Upgrade.
Modify a scheduledupgrade
1 Select the computers.
2 Click Clear Date.
3 Click the calendar icon that appears above the computer listing, thenselect a month and a day.
4 Click Schedule My Upgrade.
Cancel an upgrade 1 Select the computers.
2 Click Clear Date.
Management of computer groupsA group consists of one or more computers that share a particular feature.
You can create groups that are based on geographic location, department, computer type, the tasksperformed by the users, or anything meaningful to your organization.
By default, every computer in your account is placed into a group called Default Group. You can createother groups in the SecurityCenter, then move computers into them.
Why use groups?
Groups help you manage large numbers of computers or computers that use different security settings(defined in policies). They allow you to manage computers collectively rather than individually.
Groups are particularly helpful in larger organizations or companies that are widely distributedgeographically. Placing similar computers into a single group enables you to view and manage securityissues for the group separately from the other computers in your account.
For example, you might place all laptops used by traveling sales representatives into a single groupcalled Sales Team. Then you can configure special security settings for those computers to providegreater protection against threats in unsecured networks such as airports and hotels. You can alsotrack the number of detections on those computers through more frequent reports and adjust thesecurity settings as needed.
Tips for large accounts
To more efficiently monitor large accounts and optimize SecurityCenter performance, we recommendthat you organize your computers into groups of no more than 100 computers. This enables you touse the View filter to display reports and computer status by group, then drill down to see theindividual computers within a group as needed.
How can I manage groups?
The Manage Groups page displays the groups in your organization. Access the page by clicking the ManageGroups button on the Computers page. If you have not created any groups or policies, only the DefaultGroup is displayed.
Using the SecurityCenterManagement of computer groups 3
McAfee Endpoint Security 10.0.0 Software Product Guide 53

The Default Group
Until you create additional groups, all computers are assigned to the Default Group when the EndpointSecurity Client is installed. If you delete a group that contains computers, they are moved into theDefault Group. You cannot change the name of the Default Group.
After you create additional groups, you can assign computers to them during the installation processor move computers into them at a later time.
See also Management of group administrators on page 55Management of security policies on page 58Management of client computers on page 46
Create and manage groupsUse this task to set up and configure groups of computers in the SecurityCenter.
TaskFor option definitions, click ? in the interface.
1 On the Computers page, click Manage Groups.
2 On the Manage Groups page, click an icon for flat view or tree view.
This changes the format in which groups are listed. (Available only if you have imported ActiveDirectory groups.)
3 Do any of the following:
To... Do this...
Create a group 1 Click Add Group.
2 Type a name for the group.
3 Select the computers to add to the group.
4 Click Save.
View computers ina group
Under Computers, click the number that appears.This number indicates how many computers are in the group. Clicking itopens the Computers page and displays a listing of all the computers in thegroup.
Rename a group Under Action, select Rename, specify a new name for the existing group, thenclick Save.
You cannot rename the Default Group or Active Directory groups.
Delete a group Under Action, select Delete, then click OK. If you delete a group that containscomputers, they will be moved into the Default Group.
You cannot delete the Default Group or Active Directory groups.
3 Using the SecurityCenterManagement of computer groups
54 McAfee Endpoint Security 10.0.0 Software Product Guide

Management of group administratorsGroup administrators oversee and manage the groups that you, the site administrator, assign to them.
When creating group administrators, you specify which groups they manage and their access level.When you are ready, the SecurityCenter automatically creates an email that you can send to themthat includes information about logging on to the group administrator account, performing groupadministrator tasks, and accessing documentation. It also includes a link they can use to create apassword for their group administrator account.
Why use group administrators?
Create group administrators to distribute security management in large organizations.
Using the SecurityCenterManagement of group administrators 3
McAfee Endpoint Security 10.0.0 Software Product Guide 55

Group administrators have fewer access rights than the site administrator. While the site administratorcan access all security information for all client computers in the account, group administrators canaccess information only for client computers in the groups they are assigned to.
1 The site administrator communicates directly with the SecurityCenter to create policies, checkreports, and maintain the SecurityCenter account.
2 The site administrator creates and manages group administrators.
3 Group administrators communicate directly with the SecurityCenter to access security data for thegroups they are assigned to.
3 Using the SecurityCenterManagement of group administrators
56 McAfee Endpoint Security 10.0.0 Software Product Guide

4 Group administrators manage the client computers in their assigned groups. The managementtasks they can perform and the information they can access on the SecurityCenter depend on theaccess level assigned to them.
5 The site administrator can manage all client computers in all groups.
What can group administrators do?
The access level you assign to group administrators determines which tasks they can perform for theirgroups. Select from two access levels:
• Read Only
• Read and Modify Reports
Basic tasks for both access levels Additional tasks for Read and Modify Reports
• Access the SecurityCenter website.
No subscription information is visible.Only the assigned groups are visible.
• Manage from client computers:
• Manage quarantined files.
• Disable on-access scanning.
• View the status of a scheduled scan inprogress.
• View computers from the SecurityCenter.
• Check data in reports.
• Install protection services on client computers(includes access to the company key).
• View and manage computers from theSecurityCenter.
• View policies.
• Rename groups.
• Modify the information in listings and reports:
• Send email to computers.
• Delete computers from your reports.
• Move computers in and out of groups.
• Send email to users.
• Schedule and send reports to users in email.
See also Management of computer groups on page 53
Create and manage group administratorsUse this task to manage group administrators on the My Account page. Here you can view, edit, create,or delete group administrators.
Up to six group administrators can be listed. If you have created more than six group administratoraccounts, click View all group administrators to display a complete listing.
TaskFor option definitions, click ? in the interface.
1 On the My Account page, click the Group Administrators tab.
2 Do any of the following:
Using the SecurityCenterManagement of group administrators 3
McAfee Endpoint Security 10.0.0 Software Product Guide 57

To... Do this...
Add a groupadministrator
1 In the Group Administrators section, select Add.
2 On the Manage Group Administrators page, select Create New.
3 Type the group administrator’s name, email address, and password.
4 Select an access level.
5 For each group you want the administrator to manage, select thegroup in the listing on the left, then click Add Group.
6 Click Save.
Modify information for agroup administrator
1 Under Actions, select Edit for the group administrator you want toupdate.
2 On the Add Group Administrators page, modify information, then click Save.
Delete a groupadministrator
Under Actions, select Delete for the group administrator you want todelete, then click OK.
Scheduled reports created by the group administrator are also deleted.
Email instructions to agroup administrator forcreating or resetting apassword, logging on toan account, andperforming groupadministrator tasks
1 Under Actions, select Send Password Email for the group administrator youwant to send email to.Your local email application opens a preaddressed message explaininghow to create or reset a password, log on to the SecurityCenter,assign groups, and access information about their responsibilities.
2 Send the email.
You must have a local email application installed to use this feature.
Management of security policiesA policy is a collection of security settings that define how the product features operate. A policy isassigned to each computer when it is added to your account.
Why use policies?
Policies enable you to customize security settings for your entire organization or for differentcomputers in your organization. You can assign a unique policy to each computer, assign a singlepolicy to every computer in a group, or allow all computers to share a single policy.
For example, you might place all laptops used by traveling sales representatives into a single groupcalled Sales Team. For each computer in the group, you can assign a policy with high security settingsthat will provide greater protection against threats in unsecured networks such as airports and hotels.Whenever you want to adjust those setting, simply change the policy. Your changes will be applied toall the computers in the Sales Team group automatically. There is no need to update each computer’ssetting individually.
How can I manage policies?
The Policies page displays all your policies. Use this page to create, copy, modify, and delete policies foryour account. If you have not created any policies, only the McAfee Default policy is displayed.
3 Using the SecurityCenterManagement of security policies
58 McAfee Endpoint Security 10.0.0 Software Product Guide

See also Management of computer groups on page 53Management of client computers on page 46
McAfee Default policyUntil you create additional policies, all computers are assigned the McAfee Default policy.
The McAfee Default policy is configured with settings recommended by McAfee to protect manyenvironments and ensure that all computers can access important websites and applications until youhave a chance to create a customized policy. See the Troubleshooting and reference chapter for acomplete list of these settings.
You cannot rename or modify the McAfee Default policy. When you add computers to your account, theMcAfee Default policy is assigned to them. When you delete a policy that is assigned to one or moregroups, the McAfee Default policy is assigned to those groups automatically.
The first time you create a new policy, the McAfee Default policy settings appear as a guideline. Thisenables you to configure only the settings you want to change without having to configure them all.
After you create one or more new policies, you can select a different default policy for your account. Inthe future, new policies will be prepopulated with these default settings, and the new default policy isassigned to new computers (if no other policy is selected) and groups whose policy is deleted.
See also McAfee Default policy settings on page 158
Create and manage policiesUse this task to create and modify policies from the Policies page. You can also select a new defaultpolicy for your account.
Configure policies for McAfee SaaS protection services on portals. To open a portal, click the Policies tab,then select the service you want to configure from the drop-down menu.
For option definitions, click ? in the interface.
Task1 Click the Policies tab.
2 On the Policies page, do any of the following:
Using the SecurityCenterManagement of security policies 3
McAfee Endpoint Security 10.0.0 Software Product Guide 59
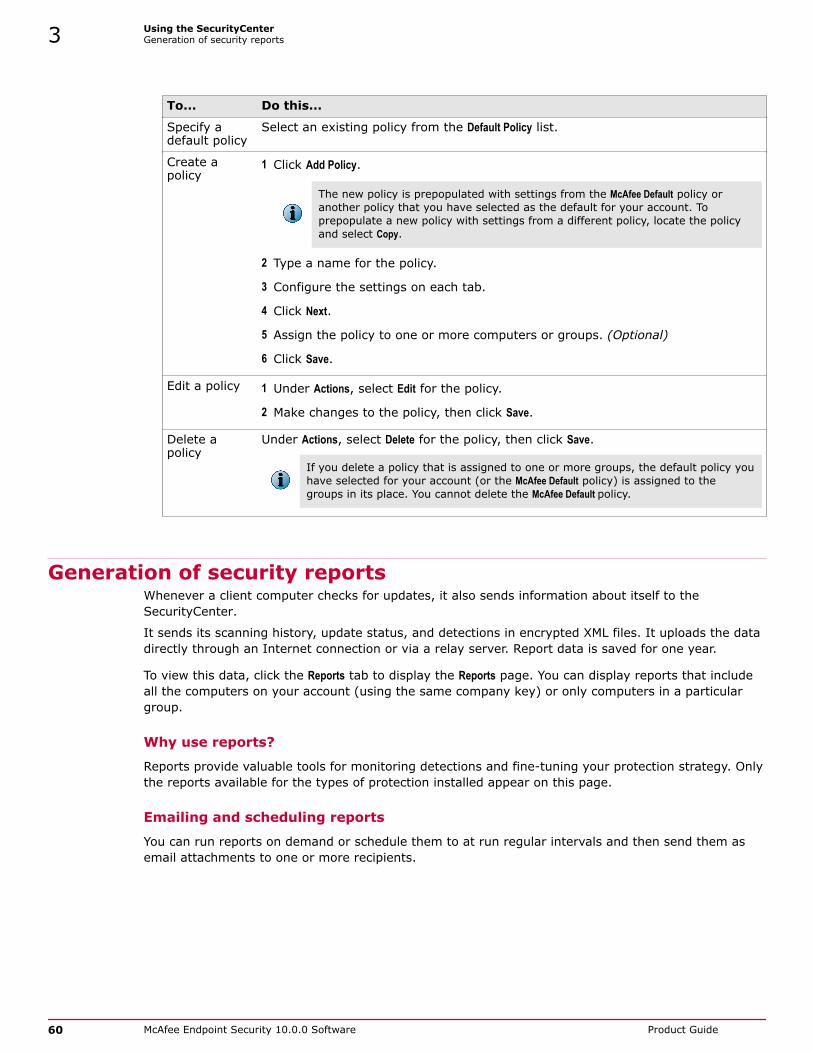
To... Do this...
Specify adefault policy
Select an existing policy from the Default Policy list.
Create apolicy
1 Click Add Policy.
The new policy is prepopulated with settings from the McAfee Default policy oranother policy that you have selected as the default for your account. Toprepopulate a new policy with settings from a different policy, locate the policyand select Copy.
2 Type a name for the policy.
3 Configure the settings on each tab.
4 Click Next.
5 Assign the policy to one or more computers or groups. (Optional)
6 Click Save.
Edit a policy 1 Under Actions, select Edit for the policy.
2 Make changes to the policy, then click Save.
Delete apolicy
Under Actions, select Delete for the policy, then click Save.
If you delete a policy that is assigned to one or more groups, the default policy youhave selected for your account (or the McAfee Default policy) is assigned to thegroups in its place. You cannot delete the McAfee Default policy.
Generation of security reportsWhenever a client computer checks for updates, it also sends information about itself to theSecurityCenter.
It sends its scanning history, update status, and detections in encrypted XML files. It uploads the datadirectly through an Internet connection or via a relay server. Report data is saved for one year.
To view this data, click the Reports tab to display the Reports page. You can display reports that includeall the computers on your account (using the same company key) or only computers in a particulargroup.
Why use reports?
Reports provide valuable tools for monitoring detections and fine-tuning your protection strategy. Onlythe reports available for the types of protection installed appear on this page.
Emailing and scheduling reports
You can run reports on demand or schedule them to at run regular intervals and then send them asemail attachments to one or more recipients.
3 Using the SecurityCenterGeneration of security reports
60 McAfee Endpoint Security 10.0.0 Software Product Guide

Types of reports
Reports contain information sent by the protection services and other software installed on clientcomputers.
For more information about specific reports, go to the report in the SecurityCenter, then click ? in theinterface to display online Help. If your subscription includes McAfee SaaS protection services, reportsare available on the associated portal.
Use thisreport...
To view...
Detections The types of potentially malicious code or unwanted programs that have been foundon your network.Use this report to manage detections of viruses and potentially unwanted programs.
Computer Profiles For each client computer, the version of the Microsoft Windows operating systemand Microsoft Internet Explorer web browser running, which group it belongs to,whether it is configured as a relay server, and other details.Use this report to locate computers where you need to install software patches for aspecific browser or operating system, check the version of the client software,identify relay servers, and identify the group number for use in silent installation.
DuplicateComputers
Computers that appear more than once in administrative reports.Use this report to track down obsolete computers and those where EndpointSecurity Client has been incorrectly re-installed and tracked as multiple installations.
UnrecognizedPrograms
Programs that the threat prevention or firewall protection service detected on yournetwork.Use this report to manage your potentially unwanted program detections andInternet applications blocked by the firewall protection service. You can addapproved programs and allowed Internet applications to policies directly from thereport.
Inbound EventsBlocked by Firewall
Computers where inbound or outbound communications were blocked by the firewallprotection service.Use this report to manage blocked communications.
For blocked events to be reported, the Report blocked events option must be enabled inthe Firewall policy. Blocked events are logged for all computers that are assigned apolicy where this option is enabled.
Detection History A graphical summary of the number of detections and the number of computerswhere detections occurred on your network over the past year.Use this report to evaluate the effectiveness of your security strategy.
Web Filtering A summary of browsing activity monitored by the web control service. Shows thetypes of sites that client computers attempted to access by content rating andcategory. Includes successful, warned, and blocked access attempts. (Available onlywhen web filtering policy options are enabled.)Use this report to evaluate the types of sites being accessed by which computersand the effectiveness of the content rules defined in policies.
Using the SecurityCenterGeneration of security reports 3
McAfee Endpoint Security 10.0.0 Software Product Guide 61

Use thisreport...
To view...
SaaS EmailProtection
Data about email activity and detections for your account, accessed on the SaaSemail and web protection portal. (Available only for subscriptions that include theSaaS email protection service.)Use these reports to monitor email activity and detections.
SaaS WebProtection
Data about web traffic and content for your account, accessed on the SaaS emailand web protection portal. (Available only for subscriptions that include the SaaSweb protection service.)Use this report to evaluate the types of sites being accessed by which computersand the effectiveness of the content rules defined in policies.
Schedule reportsUse this task to send information from the SecurityCenter as an email attachment at regular intervals.You can send this information in scheduled reports:
• Reports
• Summary information displayed on the Dashboard page
• Information displayed on the Computers or Computer Details page
• Information displayed in widgets on the Dashboard page
For option definitions, click ? in the interface.
Task1 Display the page or widget that shows the information you want to send.
2 Click the email icon in the upper-right corner.
A blank email message appears.
3 Select delivery options.
• Immediately — Send the information once, as soon as you click Save.
• Weekly on — Send the information each week, on the selected day.
• Monthly on — Send the information each month, on the selected day.
4 Type one or more email addresses to receive the report.
Separate multiple addressees with commas.
5 Type a subject and a message for the email.
6 Click Save.
7 To view a listing of all the reports currently scheduled and their current status, go to the Reportspage, then click the Scheduled Reports tab.
Add your logo to reportsUse this task to customize reports by adding or revising a logo.You can upload a logo that appears in the upper-right corner of the SecurityCenter website andreports.
Logo files can be .gif, .jpeg, .jpg, or .png format. Logo dimensions must be 175 x 65 pixels with a filesize under 500 KB. Other dimensions will result in a stretched or shrunken logo.
3 Using the SecurityCenterGeneration of security reports
62 McAfee Endpoint Security 10.0.0 Software Product Guide

TaskFor option definitions, click ? in the interface.
1 On the My Account page, click the My Profile & Logo tab.
The My Logo section displays the current logo, or a placeholder if you have not uploaded a logo.
2 Click Edit.
3 On the Manage Logo page, do any of the following:
To... Do this...
Add orreplace alogo
1 Click Upload New Logo.
2 On the Upload Your Logo page, type the name of the file you want to upload orbrowse to locate the file.
3 In the Verification Code box, type the characters displayed in the black box.Alphabetic characters are not case-sensitive.
4 Click Upload Logo.If your logo file is not the correct size, the SecurityCenter resizes it to fit theallotted area and displays a preview of how it will appear on reports.
• Click Approve to accept the resized logo.
• Click Delete and Resubmit to select a different file.
5 Click Close Window.
Delete a logo Click Delete Logo.
4 Click Done.
Management of your licenses and subscriptionsAccess tasks for managing your licenses and subscriptions for Endpoint Security and bundled McAfeeSaaS products on the My Licenses page of the SecurityCenter.
• Buy More/Renew tab — View details about your current and past subscriptions, buy or renew asubscription, buy more licenses, enter credit card information, enable automatic subscriptionrenewals, and request a trial subscription.
• Keys tab — View the company key, enrollment key, and license key for your account.
View and update subscription informationUse this task to view current and cancelled subscriptions, update subscription and paymentinformation, and sign up for automatic renewals.
It is important to check the status of your subscriptions to ensure that protection remains active andyou have the right number of licenses to protect new computers as your organization grows.
Subscription summary information also appears in the Subscription Summary widget on the Dashboard page.
For option definitions, click ? in the interface.
Using the SecurityCenterManagement of your licenses and subscriptions 3
McAfee Endpoint Security 10.0.0 Software Product Guide 63

Task1 On the My Licenses page, click the Buy More/Renew tab.
The Subscription Summary section lists details about each subscription, including the number of licensesand their expiration date.
2 Do any of the following.
To... Do this...
Purchase or extend coverage In the Subscription Summary section, check the number oflicenses available and their expiration dates. If needed,click Buy, Buy More, or Renew.
View details of each subscription Click View subscription history.
Update contact information for asubscription
1 Click View subscription history.
2 Locate the subscription (by grant number), then underAction click Edit Contact Info.
3 On the Edit Subscription Information page, type newinformation for any of the following:
• Email address
• Company name
• First name or Last name
4 Click Submit.
Update credit card information for asubscriptionSign up for automatic subscriptionrenewal
The link for these options appearsonly if you have purchased yoursubscription with a credit card fromour Small and Medium Businessonline store (http://shopmcafee.com/).
1 Click View subscription history.
2 Locate the subscription (by grant number), then underAction click Edit Payment Info.
3 Do any of the following:
• Add, delete, or change information for a credit card.
• Enable or disable automatic renewal for yoursubscription(s).
4 Click Submit.
Display a list of subscriptions that areno longer current
Select View cancelled subscriptions.
Buy and renew subscriptions and licensesSubscriptions entitle you to one or more protection services, and the number of licenses determineshow many computers are protected. Use this task to buy, add, or renew subscriptions and licenses.
Customers can renew existing subscriptions and licenses, or buy new ones at any time.
Beginning 30 days before their last order expires, customers who log on to the SecurityCenter areredirected to the Product Renewal page, which displays a reminder and options to renew theirsubscriptions.
For option definitions, click ? in the interface.
3 Using the SecurityCenterManagement of your licenses and subscriptions
64 McAfee Endpoint Security 10.0.0 Software Product Guide

Task1 If you are not automatically redirected to the Product Renewal page, do one of the following:
• On the Dashboard page, go to the Subscription Summary widget.
• On the My Licenses page, click the Buy More/Renew tab to display the Subscription Summary.
• On the Product Renewal page, click Renew to display the Subscription Summary.
The Subscription Summary page lists details about each subscription, including the number of licensesand their expiration date.
2 Select a Buy, Buy More, or Renew link, as needed.
To try a new protection service free-of-charge for 30 days, request a trial subscription by clicking Try.Before it expires, you will have an opportunity to purchase the full subscription and continue using itwith no interruption.
3 Follow the instructions on the page that appears.
Tips for buying and renewing subscriptions and licensesFollow these guidelines and take advantage of these product features to simplify product purchases.
Tips for buying and renewing
To ensure that additional or renewed services remain on the same account with your existing services,follow these guidelines:
• Submit your order through the same SecurityCenter account you use to maintain your originalsubscriptions.
• Submit your order with the same email address you use to log on to the SecurityCenter.
By keeping all your subscriptions on the same account, all your client computers report to the sameSecurityCenter website, and your service provider sends all correspondence and notifications to oneemail address.
If you do purchase subscriptions on multiple accounts, you can merge them into a single account.
Guard against lapses in protection
To prevent lapses in protection, configure your notification preferences to receive an email wheneverthe expiration date for a subscription approaches.
Expired and expiring subscriptions
If your subscriptions will expire soon, these features help you renew your subscriptions without alapse in protection.
• Beginning 30 days before your last order expires, when you log on to the SecurityCenter you areredirected to the Product Renewal page, which displays a reminder and options to renew yoursubscriptions.
• The Buy More option shows the details of the vendor from whom you purchased your currentsubscriptions and licenses. You will have an opportunity to select a different vendor during therenewal process.
Using the SecurityCenterManagement of your licenses and subscriptions 3
McAfee Endpoint Security 10.0.0 Software Product Guide 65

If all your subscriptions are fully expired, these features help you renew your subscriptions and restoreprotection.
• Your weekly status email notifies you that your subscriptions have expired and provides a link torenew them by logging on to the SecurityCenter.
• After logging on to your SecurityCenter account, you are redirected to the Product Renewal page,which provides a link to renew your expired subscriptions. The vendor from whom you purchasedyour previous subscriptions determines the link that appears on the page, but you will have anopportunity to select a different source during the renewal process. For example, if you purchasedfrom a reseller, you are linked directly to that reseller initially, but you will have the opportunity toselect a new reseller.
• If your account has been fully expired for at least 60 days, the SecurityCenter displays onlyinformation about subscriptions and licenses. Status and report information is not available inweekly status emails or on the SecurityCenter.
Locate, create, or activate keys for your accountUse this task to reference important keys for your account.
• Company key — Required for URL-based or silent installation of client software.
• Account enrollment key — Required to activate pre-installed versions of client software andplace them under your account. If no valid enrollment key exists, create a new one.
• License key — Required to activate CD-based versions of the client software. Locate the licensekey on the CD label, then activate it here.
TaskFor option definitions, click ? in the interface.
1 On the My Licenses page, click the Keys tab.
2 Do any of the following:
To... Do this...
Access your companykey
Locate the company key for your account in the Company Key section.
Install protection on newcomputers
1 Click standard URL installation to open the installation wizard.
2 Click VSSETUP to download the silent installation utility.
See the installation guide for more information.
Access your accountenrollment key
Locate the enrollment key for your account in the Account Enrollment Keysection.
Create a new accountenrollment key
Click Create a new key.Account enrollment keys are valid for seven days.
Activate your license key(CD-based products)
Locate the license key on the CD label.1 Click Activate your license key.
2 Enter the license key, country of purchase, and vendor or resellerfrom whom you purchased the product, then click Next.
See the online Help for more information.
3 Using the SecurityCenterManagement of your licenses and subscriptions
66 McAfee Endpoint Security 10.0.0 Software Product Guide

Upgrade the client software When a new version of the client software becomes available, you can schedule an upgrade forselected computers. This lets you test the new version before deploying it to all computers.
An action item on the Dashboard page of the SecurityCenter notifies you when a new version of thesoftware is available.
You can't schedule upgrades for client computers that are configured as relay servers. Relay servers areupdated during the first scheduled upgrade for client computers that are not configured as relayservers.
TaskFor option definitions, click ? in the interface.
1 On the Utilities page, click the Software Upgrade tab.
2 Do any of the following:
To do this... Do this...
Schedule an upgrade 1 Select the computers you want to upgrade.
2 Click the calendar icon that appears above the computer listing, thenselect a month and a day.
3 Click Schedule My Upgrade.
Modify a scheduledupgrade
1 Select the computers.
2 Click Clear Date.
3 Click the calendar icon that appears above the computer listing, thenselect a month and a day.
4 Click Schedule My Upgrade.
Cancel an upgrade 1 Select the computers.
2 Click Clear Date.
Management of your account Access tasks for managing your Endpoint Security account on the My Account page of theSecurityCenter.
• My Profile & Logo tab — Update the contact information for your account and add a customized logo toappear in reports.
• Group Administrators tab — Create and manage administrators for groups in your account.
• Notification tab — Subscribe to status emails and email notifications.
• Merge Account tab — Merge another account into your account.
Configure your account profileUse this task to update information in your customer profile when it changes.
Your profile contains the information your service provider needs to contact you about your account.Initially, information supplied during your product purchase is placed into your profile. It is importantto keep this information up-to-date to prevent a disruption in your protection.
Using the SecurityCenterManagement of your account 3
McAfee Endpoint Security 10.0.0 Software Product Guide 67
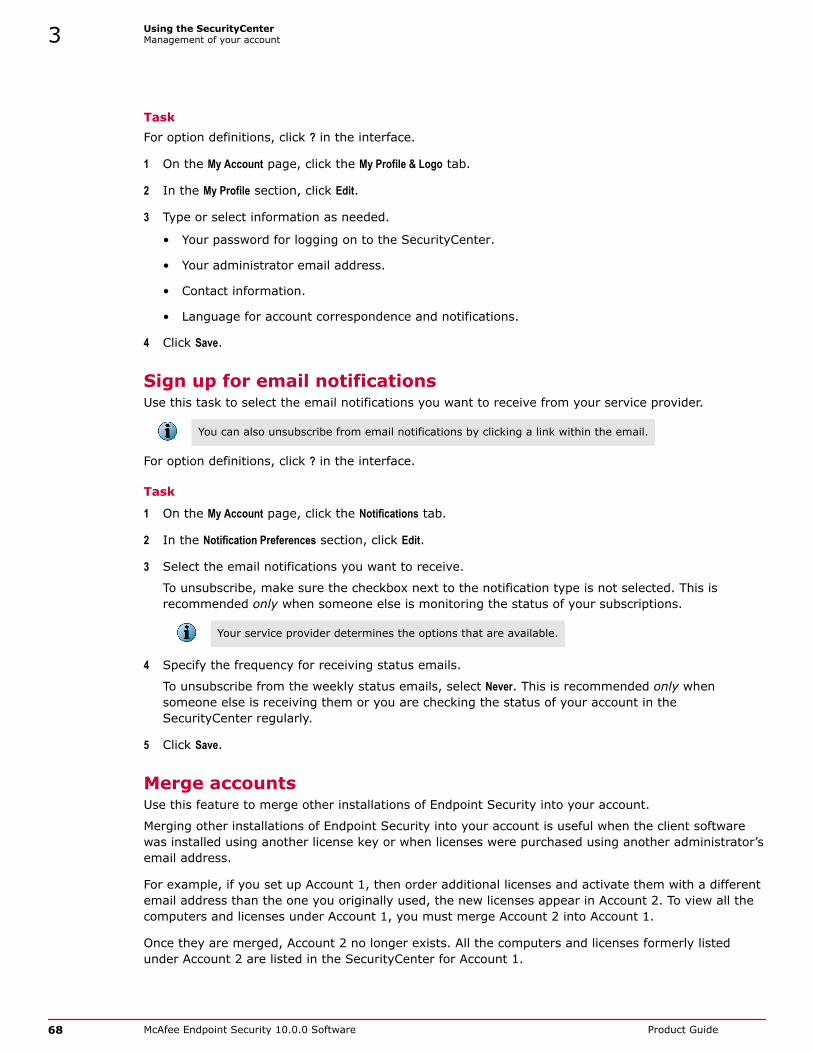
TaskFor option definitions, click ? in the interface.
1 On the My Account page, click the My Profile & Logo tab.
2 In the My Profile section, click Edit.
3 Type or select information as needed.
• Your password for logging on to the SecurityCenter.
• Your administrator email address.
• Contact information.
• Language for account correspondence and notifications.
4 Click Save.
Sign up for email notificationsUse this task to select the email notifications you want to receive from your service provider.
You can also unsubscribe from email notifications by clicking a link within the email.
For option definitions, click ? in the interface.
Task
1 On the My Account page, click the Notifications tab.
2 In the Notification Preferences section, click Edit.
3 Select the email notifications you want to receive.
To unsubscribe, make sure the checkbox next to the notification type is not selected. This isrecommended only when someone else is monitoring the status of your subscriptions.
Your service provider determines the options that are available.
4 Specify the frequency for receiving status emails.
To unsubscribe from the weekly status emails, select Never. This is recommended only whensomeone else is receiving them or you are checking the status of your account in theSecurityCenter regularly.
5 Click Save.
Merge accountsUse this feature to merge other installations of Endpoint Security into your account.
Merging other installations of Endpoint Security into your account is useful when the client softwarewas installed using another license key or when licenses were purchased using another administrator’semail address.
For example, if you set up Account 1, then order additional licenses and activate them with a differentemail address than the one you originally used, the new licenses appear in Account 2. To view all thecomputers and licenses under Account 1, you must merge Account 2 into Account 1.
Once they are merged, Account 2 no longer exists. All the computers and licenses formerly listedunder Account 2 are listed in the SecurityCenter for Account 1.
3 Using the SecurityCenterManagement of your account
68 McAfee Endpoint Security 10.0.0 Software Product Guide

For option definitions, click ? in the interface.
Task1 On the My Account page, click the Merge Account tab.
2 In the Manage Accounts section, select Merge another account.
3 On the Step 1 page, enter the email address and password activated for the account you want tomerge into your main account, then click Next.
4 On the Step 2 page, view details for the account you have selected. Verify that the licenses andcomputers listed for the account are the ones you want to merge, then click Next.
5 On the Step 3 page, click Merge Account.
Management in the McAfee ePO environment Customers who use the McAfee ePO software to manage network resources and security can now usethe McAfee Security-as-a-Service product extension to monitor the status of computers that areprotected by subscriptions to Endpoint Security and McAfee SaaS services and managed with theSecurityCenter.
The Security-as-a-Service extension establishes a communication link between the ePolicyOrchestrator management server and one or more SecurityCenter accounts. It then pulls data fromthe SecurityCenter database and synchronizes it with the ePolicy Orchestrator database. You can usethe monitoring and reporting features provided by the extension to view basic protection informationfrom the SecurityCenter in the ePolicy Orchestrator console.
The Security-as-a-Service extension is not supported for McAfee ePO Cloud accounts.
Setting up the extension McAfee ePO environment
To use the Security-as-a-Service extension, perform these tasks from the ePolicy Orchestrator consolein an existing McAfee ePO environment:
• Install the Security-as-a-Service extension.
• Register your SecurityCenter account with the McAfee ePO software as a SaaS server.
• Configure and run a server task to pull SaaS data from the registered SecurityCenter account andsynchronize it with other information in the ePolicy Orchestrator database. You can then view thedata in dashboard monitors on the ePolicy Orchestrator console.
Extension features in the SecurityCenter
Use the ePO Servers tab on the Utilities page to access features related to the Security-as-a-Serviceextension.
When a SecurityCenter account is registered or unregistered with a server running McAfee ePOsoftware, a notification appears on the Dashboard page of the SecurityCenter. Also, information isupdated on the ePO Servers tab and in the ePolicy Orchestrator Servers widget.
Using the SecurityCenterManagement in the McAfee ePO environment 3
McAfee Endpoint Security 10.0.0 Software Product Guide 69

Overview of SaaS management from the ePolicy Orchestratorconsole Use a two-prong approach to monitor and manage McAfee subscription protection services from theePolicy Orchestrator console.
1 View synchronized McAfee protection data.
Use monitoring features in the ePolicy Orchestrator console to check security data and identifyissues with client computers protected by McAfee services.
2 Address issues in the SecurityCenter.
Visit the SecurityCenter console to install client software on managed systems, configure policies,and take other steps to fix problems. The default Security-as-a-Service dashboard provides easyaccess through a monitor.
The ePolicy Orchestrator Servers widgetWhen you register your SecurityCenter account with one or more ePolicy Orchestrator servers, theePolicy Orchestrator (McAfee ePO) Servers widget is displayed on the Dashboard page of the SecurityCenter. Thewidget lists the ePolicy Orchestrator servers where you have registered your account and the last timethey connected to the SecurityCenter to synchronize data.
The widget also contains a link to the ePO Servers tab on the Utilities page, where you can view moreinformation about each server.
Access extension features from the SecurityCenter On the Utilities page, use the ePO Servers tab to access features that support the Security-as-a-Serviceextension.
Most features of the extension are accessed from the ePolicy Orchestrator console. However, the ePOServers tab lets you perform a few basic tasks from the SecurityCenter.
TaskFor option definitions, click ? in the interface.
1 On the Utilities page, click the ePO Servers tab.
2 Do any of the following:
3 Using the SecurityCenterManagement in the McAfee ePO environment
70 McAfee Endpoint Security 10.0.0 Software Product Guide

If you want to... Do this...
Download the extension'sinstallation file
1 Click the link for downloading the file.
2 In the File Download dialog box, save the Security-as-a-Service.zipfile to a local folder, then click OK.
Open the ePolicy Orchestrator console to install and configure theextension.
Create or edit informationfor a synchronizationadministrator account
These links appear only when a synchronization administratoraccount is required.• Create — Enter the email address and password for a new account.
• Edit — Update the email address or password for an existingaccount.
Check the status of serverswhere you registered yourSecurityCenter account
• In the ePolicy Orchestrator Servers list, locate the server, then check thelast time it synchronized.
Delete a server where youregistered yourSecurityCenter account
• In the ePolicy Orchestrator Servers list, locate the server, then clickDelete.
Get more information aboutusing ePolicy Orchestratorfeatures
• Click the link for downloading a document in PDF format:
• Quick Start Guide — Instructions for installing the extension andconfiguring basic features.
• Troubleshooting Solutions — Instructions for resolving problemsencountered while setting up and using the extension.
Configuration of a synchronization administrator account Tasks that include communication between the SecurityCenter server and other servers require logoncredentials for an administrative SecurityCenter account.
If you don't already have an administrative SecurityCenter account, you need to create asynchronization administrator account before performing these tasks. This account provides thecredentials necessary to access the SecurityCenter for only these tasks. (Credentials for anadministrative account are typically provided by McAfee or the provider from whom you purchasedMcAfee protection services.)
Use a synchronization administrator account to:
• Register a SecurityCenter account with the McAfee ePO software.
• Run or schedule data synchronization between the SecurityCenter server and an ePolicyOrchestrator server.
Only one synchronization administrator account can be created for a SecurityCenter account.
If a synchronization administrator account is required, links for creating and editing the account appearin the SecurityCenter, on the ePO Servers tab of the Utilities page.
Using the SecurityCenterManagement in the McAfee ePO environment 3
McAfee Endpoint Security 10.0.0 Software Product Guide 71

Create or update a synchronization administrator accountIf you do not have an administrative SecurityCenter account, you need to create a synchronizationadministrator account before you can perform tasks that require the SecurityCenter server tocommunicate with other servers.
Only one synchronization administrator account can be created for a SecurityCenter account.
If you have an administrative SecurityCenter account, the links described in this task do not appear.They are displayed only when a synchronization administrator account is required.
TaskFor option definitions, click ? in the interface.
1 From the SecurityCenter console, click the Utilities tab, then click the ePO Servers tab.
A message is displayed if you need to create an administrator account before performing a task,along with a Create link. If an administrator account already exists, an email address for the accountand an Edit link appear.
2 Click the appropriate link.
• Create — Enter the email address and password for a new account.
• Edit — Update the email address or password for an existing account.
3 Click Save.
Find more information Access additional documentation to get more information about using the software.
Task• Do any of the following.
3 Using the SecurityCenterManagement in the McAfee ePO environment
72 McAfee Endpoint Security 10.0.0 Software Product Guide

Product How to access documentation
ePolicy Orchestratorsoftware
From the ePolicy Orchestrator console:• View the online Help: Click the ? icon in the upper-right corner of any
page.
• Download the user guide or release notes:
1 Click Menu | Software | Software Manager | Extensions.
2 In the Product Categories pane, click Management Solutions.
3 In the right pane under Software, click McAfee ePolicy Orchestrator.
4 In the lower-right pane, locate the document in the Component column,then click Download in the Actions column.
5 In the File Download dialog box, save the document file to a local folder,then click OK.
Security-as-a-Serviceextension
From the ePolicy Orchestrator console:• View the online Help: Click the ? icon in the upper-right corner of any
page containing content specific to the extension.
• Download the user guide or release notes:
1 Click Menu | Software | Software Manager | Extensions.
2 In the Product Categories pane, click Management Solutions.
3 In the right pane under Software, click McAfee SaaS <version number>.
4 In the lower-right pane, locate the document in the Component column,then click Download in the Actions column.
5 In the File Download dialog box, save the document file to a local folder,then click OK.
Account management utilities You can access tools for managing your account on the Utilities page of the SecurityCenter.
Tools and tasks are organized by purpose on different tabs:
Use thistab...
To do this...
Installation • Create a URL for basic installation, then email it to users.
• Download the silent installation utility.
• View welcome kits containing instructions for configuring protection services.
See the installation guide, available from the Help & Support tab, for instructions on usinginstallation utilities.
Optimization • Download a cleanup utility for removing leftover files after uninstalling productsoftware.
Using the SecurityCenterAccount management utilities 3
McAfee Endpoint Security 10.0.0 Software Product Guide 73

Use thistab...
To do this...
Software Upgrade Schedule an upgrade to install a new version of client software on selected clientcomputers.You can schedule upgrades only when a new version of the software is available.
ePO Servers • Download the Security-as-a-Service extension file for installation in an ePolicyOrchestrator environment.
• Register your servers.
• View, delete, or check status, for the ePolicy Orchestrator servers you haveregistered with the SecurityCenter.
• View documentation for installing, setting up, and troubleshooting theSecurity-as-a-Service extension.
• Create or modify a synchronization administrator account (if needed).
Assistance for using the product You can use links on the Help & Support page to access documentation, tools, and support for usingEndpoint Security and the SecurityCenter.
In addition, context-sensitive online Help is available on any page of the SecurityCenter by clicking thehelp link (?) in the upper-right corner.
On the SecurityCenter, click the Help & Support tab to display the Help & Support page.
Types of assistance
When you want to... Do this...
View online documents Click a link for an installation guide, product guide, or set of releasenotes.
Access informationresources for the product
In the Support Tools section, click links to open a variety of referencematerials and sources of information:• Virtual technical support
• McAfee KnowledgeBase
• McAfee ServicePortal
• McAfee Community forum for McAfee business customers
Get assistance forsubscriptions, licenses, orrenewals
Click a link for phone support to display a list of phone numbers forMcAfee Customer Support.
Submit feedback Click a feedback link to open a page where you can submitproduct-related comments and requests to McAfee.
3 Using the SecurityCenterAssistance for using the product
74 McAfee Endpoint Security 10.0.0 Software Product Guide

4 Using the threat prevention service
The threat prevention service detects threats, then acts to protect your environment based on settingsthat you configured.
It scans files and programs each time they are accessed on client computers. It also checks removablemedia, downloads, and network files. Administrators can schedule scans to occur at regular intervalsand customize scan settings. They can also specify whether users can run scans on their computers orpause scheduled scans.
Contents Overview of the threat prevention service Scanning for threats on client computers Managing threat prevention Managing detections Reports for threat prevention Best practices (threat prevention)
Overview of the threat prevention serviceOnce installed, the threat prevention service immediately begins protecting your system from threats.
This software offers easy-to-use, scalable protection, and fast performance to protect yourenvironment from the following:
• Viruses, worms, and trojan horses
• Access point violations
• Buffer overflow exploits
• Potentially unwanted code and programs
Security content updates are delivered automatically to target specific vulnerabilities and blockemerging threats from executing.
The threat prevention service detects threats based on security content files, then acts, based onsettings that you configured.
As an administrator, you can use the McAfee SecurityCenter to configure and assign policies, then uselistings, reports, and status emails to track activity and detections.
4
McAfee Endpoint Security 10.0.0 Software Product Guide 75

Component interactionAs an administrator, you must be familiar with the components of the threat prevention service andhow they interact. The following figure shows these components for a basic environment.
Client system
Threat prevention software, the Endpoint Security Client, and the McAfee Agent are installed on theclient system.
• Content files (including AMCore content, also called detection definition (DAT) files or malwaresignatures, and buffer overflow Exploit Prevention content) — Works with the scanning engine toidentify and handle threats.
• Scan engine — Scans the files, folders, and disks on the client computer and compares the resultsto the known virus information in the content files.
Content files and the engine are updated as needed by downloading from McAfee or from adesignated relay server on your network.
• McAfee GTI (heuristic network check for suspicious files) — Looks for suspicious programs andDLLs running on client systems that the threat preventions service protects. When a detectionoccurs, the software sends a DNS request containing a fingerprint of the suspicious file to a centraldatabase server hosted by McAfee Labs.
• McAfee Agent — Provides secure communication between protection service software and theMcAfee SecurityCenter. The agent also provides local services such as updating, logging, reportingevents and properties, task scheduling, communication, and policy storage.
4 Using the threat prevention serviceOverview of the threat prevention service
76 McAfee Endpoint Security 10.0.0 Software Product Guide

McAfee
McAfee, home to McAfee Labs and McAfee support, provides the following services:
• Content updates — Copied from a McAfee central database server to the client computerswhenever computers check for updates. Content update files provide protection against specificvulnerabilities and block emerging threats (including buffer-overflow attacks) from executing.
• Engine updates — Stored on a McAfee central database server, the threat prevention servicedownloads engine updates as needed, keeping the engine up to date.
• McAfee Labs (threat library) — Stores detailed information on malware and potentially unwantedprograms, including how to handle them. The McAfee GTI feature sends the fingerprint of eachsuspicious file to McAfee Labs for analysis and response.
McAfee SecurityCenter
Manages and enforces threat prevention policies from a central location and provides listings andreports to track activity and detections.
Using threat prevention features to protect your systemProtecting your client systems from viruses, worms, and trojans requires defining threat preventionand detection, responding to threats, and ongoing analyzing and tuning.
Prevention — Avoiding threats
Configure these features to stop intrusions before they gain access to your environment:
• User Interface Security — Control access to the client software using Client Settings policy settings.
• Access Protection — Restrict access to specified ports, files, shares, registry keys, and registryvalues to prevent unwanted changes to client systems.
• Exploit Prevention (Buffer Overflow Protection) — Prevent malicious programs or threatsfrom overrunning the buffer boundary and overwriting adjacent memory, possibly executingarbitrary code on client systems.
• Options — Enable optional scans, such as process scans during updates, schedule regular fullscans, and configure scanning options, including:
• Scans of archived files and files on mapped network drives
• Detection names to exclude from scans
• Submission of unrecognized detections to McAfee Labs for evaluation
• Maximum scan times
• Product Updates — Schedule frequent updates for client computers to check for and downloadupdated engine and content files automatically from the McAfee download website.
Detection — Finding threats
Use these features to detect threats when they occur:
• On-Access Scan — Scan for threats as files are read from, or written to, disk.
• On-Demand Scan — Run a Quick Scan or Full Scan on the Endpoint Security Client or from theSecurityCenter. Run a Right-Click Scan on files and folders on the client.
• Scheduled On-Demand Scan — Schedule a Quick Scan or Full Scan to run on client computers at regularintervals when computers meet specified criteria.
Using the threat prevention serviceOverview of the threat prevention service 4
McAfee Endpoint Security 10.0.0 Software Product Guide 77

Response — Handling threats
Use alerts in the SecurityCenter and other notification features to determine the best way to handledetections.
• Actions — Configure actions to take when detections occur.
• Alerts — Specify how the threat prevention service notifies you and users when detections occur.
Tuning — Monitoring, analyzing, and fine-tuning your protection
Monitor and analyze your configuration to improve system and network performance, and enhancevirus protection, if needed. Use the following tools and features:
• Status emails and SecurityCenter reports — Monitor scanning activity and detections.
• Scheduled scans — Modify scheduled scan settings and scan times to improve performance byrunning them during nonpeak times.
• Scan policies — Analyze reports and modify policies to increase performance or virus protection, ifnecessary. For example, you can improve performance by configuring exclusions and disablingprocess scanning during updates.
What to do firstOnce installed, the threat prevention service uses the content files packaged with the product toprovide general security for your environment. McAfee recommends that client computers downloadthe latest content files as soon as the product is installed. If needed, customize policy settings to meetyour requirements.
By default, threat prevention checks for updates soon after a computer connects to the network forthe first time after installation. If threat prevention detects user activity on the computer, it waits untilthe computer is idle to download updates.
The McAfee Default policy is preconfigured with settings that protect systems in medium-riskenvironments. These settings ensure that client computers can access important websites andapplications until you have a chance to revise the settings. To customize threat prevention for yourenvironment, take these actions after installation:
Task1 Set client user interface security — Specify the access options and password to prevent users
from accessing specific components or the entire Endpoint Security Client interface.
Configure these options on the Client Settings policy page.
2 Confirm engine and content files — Verify that client systems have the latest engine andcontent files installed.
Check this information on the Computer Details page and the Computer Profiles report in theSecurityCenter.
3 Set the Threat Prevention mode — Specify whether to allow, block, or prompt for a response tounrecognized programs.
Configure this option on the General Settings tab of the Threat Prevention policy page.
4 Confirm protection against buffer overflow exploits — Verify that Buffer overflow protection isenabled.
Configure this setting on the Advanced Settings tab of the Threat Prevention policy page.
4 Using the threat prevention serviceOverview of the threat prevention service
78 McAfee Endpoint Security 10.0.0 Software Product Guide

5 Specify scan settings — Specify options that apply to on-access scans, on-demand scans, orboth, including:
• Scans of archived files and files on mapped network drives
• Detection names to exclude from scans
• Submission of unrecognized detections to McAfee Labs for evaluation
• Maximum scan times
Configure these options on the Advanced Settings tab of the Threat Prevention policy page.
6 Schedule regular on-demand scans — Schedule full scans and quick scans; select features thatminimize disruption to user activity by not scanning when computers are:
• In use
• In presentation mode
• On battery power
Configure these settings on the General Settings tab of the Threat Prevention policy page.
7 Schedule product updates — Schedule frequent, regular updates to make sure that clientcomputers have the most current content files, engine, and product upgrades.
Configure updates on the Client Settings policy page.
See also Configure settings for client interface security on page 34Identify product and component versions on computers on page 51Using Threat Prevention mode to allow or block programs on page 82Preventing buffer overflow exploits on page 83Enabling script scanning on page 84Enabling McAfee GTI on page 84Configure on-access scanning options on page 87Schedule and configure on-demand scans on page 90Schedule client security updates on page 93Best practices (threat prevention) on page 98
Scanning for threats on client computersScanning files for threats when the user accesses them provides protection against intrusions whenthey occur. Periodically scanning areas of your system most susceptible to infection ensures completeprotection.
Types of scansThe threat prevention service scans files automatically when they are accessed for viruses, spyware,and other malware. Administrators and users can run other types of scans via policy and on demand.
The basic types of scans are:
• Automatic (on-access) scans
• Manual on-demand scans — Run from the client console or Windows Explorer
• Scheduled full and quick on-demand scans — Scheduled in policy settings
• Process scans during updates — Enabled in policy setting
Using the threat prevention serviceScanning for threats on client computers 4
McAfee Endpoint Security 10.0.0 Software Product Guide 79

The behavior of the scanning features on client computers is defined in the policies configured in theSecurityCenter. Policy settings determine:
• The types of files, programs, and other items detected
• Whether users can manage their scans and detections
• How frequently and when computers check for updates
• When scheduled scans occur
On-access (automatic) scansOn-access scans are those that occur on client computers whenever users access files (for example,open a file or run a program).
The threat prevention service scans for all types of viruses and spyware during on-access scans.
The Threat Prevention policy options let you configure these on-access scanning features:
• The types of files scanned and whether files on network drives are scanned.
• Whether files in archives (compressed files, such as .zip files) are scanned.
• Whether unrecognized detections are sent to McAfee Labs for investigation.
• Whether to enable on-access scanning (if it is disabled) whenever computers check for updates.
• Files and folders excluded from scans.
• Approved programs that should not be detected as threats.
• Maximum scan time.
The default settings for on-access scanning are:
• Block buffer overflow exploits. (Enabled for all scans)
• Block harmful code scripts embedded in web pages that would cause unauthorized programs to runon client computers. (Enabled for all scans)
• Scan all types of local files when opened, and again when closed (if they were modified). Do notscan files on network drives.
• Do not scan files in archives.
• Scan programs for spyware identifiers, to detect if a spyware program attempts to run or aprogram attempts to install spyware.
• Send unrecognized detections to McAfee Labs.
• Enable on-access scanning when computers check for updates.
• Cancel an on-access scan that lasts longer than 45 seconds.
See also Configure on-access scanning options on page 87
On-demand scansOn-demand scans are those that occur whenever administrators or users request them. Users canrequest on-demand scans to occur immediately, and administrators can schedule them to occur atregular intervals.
There are two types of on-demand scans.
4 Using the threat prevention serviceScanning for threats on client computers
80 McAfee Endpoint Security 10.0.0 Software Product Guide

Manual Users run manual scans on managed computers (if policy settings allow).
•Run a predefined on-demand scan at any time by clicking andselecting a scan type:Quick Scan runs a quick check of the areas of the system most susceptible to infection.
Full Scan performs a thorough check of all areas of the system. (Recommended if yoususpect the computer is infected.)
• Scan an individual file or folder at any time from Windows Explorer by right-clickingthe file or folder and selecting Scan for threats from the pop-up menu.
Scheduled The administrator configures and schedules on-demand scans to run on computers.
When a scheduled on-demand scan is about to start, Endpoint Security displays a scanprompt at the bottom of the screen. Users can start the scan immediately or defer thescan, if policy settings allow.
Configure and schedule on-demand scans on the General Settings tab of the Threat Preventionpolicy page.
On-demand scans use many of the same policy options as on-access scans. In addition, the ThreatPrevention policy options let you configure these on-demand scanning features:
• Whether files in archives (compressed files, such as .zip files) are scanned.
• Whether scans should run when a computer is on battery power, is in presentation mode, or onlywhen idle.
• Whether users can pause, resume, and cancel scans.
• How much CPU time to allow for scans. (Full Scan only)
• A schedule for performing an on-demand scan at regular intervals.
The default settings for on-demand scans are:
• Block buffer overflow exploits. (Enabled for all scans)
• Block harmful code scripts embedded in web pages that would cause unauthorized programs to runon client computers. (Enabled for all scans)
• Scan all local files, including those in archives.
• Scan all critical registry keys.
• Scan all processes running in memory.
• Send unrecognized detections to McAfee Labs for evaluation.
• Wait until the computer is idle to run scheduled scans.
• Do not check for battery power or presentation mode.
• Do not allow users to pause, resume, or cancel scans.
Using the threat prevention serviceScanning for threats on client computers 4
McAfee Endpoint Security 10.0.0 Software Product Guide 81

• No scans are scheduled.
• Use a low amount of CPU time for scans.
This system utilization feature "throttles" the processor resources used for scans. Whenset to Low, scans might take longer to complete, but they can usually run during periodsof high activity without impeding other processes. When set to High, scans should be runduring periods of reduced computer and network activity.
In addition, during an on-demand scan of the My Computer folder, the drive where Windows isinstalled, or the Windows folder:
• Scan all registry keys.
See also Schedule and configure on-demand scans on page 90
Process scansProcess scanning is a feature within the threat prevention service that checks for threats in processesrunning on client computers when they check for updates.
These scans occur at the end of scheduled and manual updates, when computers have finisheduploading their status information and downloading DAT files.
You can configure whether process scans occur by configuring a policy option on the Advanced Settingstab of the Threat Prevention policy page.
By default, process scans are disabled. Enabling them can increase the time required for updates tocomplete. If the time required for updates is not an issue, we recommend that you enable this optionfor greater protection.
Configuring common scanning optionsUse the SecurityCenter to specify Threat Prevention policy settings that apply to both on-access andon-demand scans.
See also Best practices (threat prevention) on page 98
Using Threat Prevention mode to allow or block programsThreat prevention monitors programs that attempt to install or run on client computers. When itdetects an unrecognized program, it either allows or blocks it. The response is based on the ThreatPrevention mode selected in the policy assigned to the client computer.
In thismode...
Spyware protection does this...
Protect Checks the list of allowed and blocked programs created by the administrator forcomputers using the policy. If the program is not on the list, threat prevention blocksthe potentially unwanted program. This setting is the default.
Prompt Checks the list of approved and blocked programs created by the administrator forcomputers using the policy. Checks the list of programs the user has approved. If theprogram is not on either list, threat prevention displays a prompt with informationabout the detection and allows the user to select a response.
Report Checks the list of approved and blocked programs created by the administrator forcomputers using the policy. If the program is not on the list, it sends information aboutthe potentially unwanted program to the SecurityCenter and takes no additional action.
4 Using the threat prevention serviceScanning for threats on client computers
82 McAfee Endpoint Security 10.0.0 Software Product Guide

For all modes, detections are reported to the SecurityCenter, where you can view information aboutthem in reports.
To prevent pop-up prompts from appearing on client computers when potentially unwanted programsare detected, and for highest security, we recommend using Protect mode.
Configure the Threat Prevention mode on the General Settings tab of the Threat Prevention policy page.
How policy options are implemented in the Threat Prevention modes
Mode Threat prevention behavior
Report • Users are not prompted about detections.
• Detections are reported to the SecurityCenter.
• Administrator can select approved programs, which are not reported as detections.
• Can be used as a "learn" mode to discover which programs to approve and block.
Prompt • Users are prompted about detections.
• Detections are reported to the SecurityCenter.
• Administrator can select approved programs. These programs are not reported asdetections, and users are not prompted for a response to them.
• Users can approve additional programs in response to prompts. These are reported to theSecurityCenter.
Protect • Users are not prompted about detections.
• Users are notified about deleted or quarantined programs.
• Detections are reported to the SecurityCenter.
• Administrator can select approved programs, which are not reported as detections.
See also How the client software handles detections on page 94
Preventing buffer overflow exploitsExploit Prevention stops exploited buffer overflows from executing arbitrary code. This featuremonitors user-mode API calls and recognizes when they are called as a result of a buffer overflow.
Attackers use buffer overflow exploits to run executable code by overflowing the fixed-size memorybuffer reserved for an input process. This code allows the attacker to take over the target computer orcompromise its data.
When a detection occurs, information is recorded in the activity log, displayed on the client system,and sent to the SecurityCenter, if configured.
The threat prevention service uses the Exploit Prevention content file to protect applications such asInternet Explorer, Microsoft Outlook, Outlook Express, Microsoft Word, and MSN Messenger. McAfeeupdates this file daily with information about the latest threats.
Select Enable buffer overflow protection on the Advanced Settings tab of the Threat Prevention policy page.
On-access scanning must be enabled.
Using the threat prevention serviceScanning for threats on client computers 4
McAfee Endpoint Security 10.0.0 Software Product Guide 83

Enabling script scanningThe script scanner operates as a proxy component to the native Windows Script Host, intercepting andscanning scripts before they execute.
For example:
• If the script is clean, the script scanner passes the script to the native Windows Script Host.
• If the script contains a potential threat, the script doesn't execute.
If script scanning is disabled when Internet Explorer is launched, and then is enabled, it doesn't detectmalicious scripts in that instance of Internet Explorer.
You must restart Internet Explorer after enabling ScriptScan for it to detect maliciousscripts.
Select Enable script scanning on the Advanced Settings tab of the Threat Prevention policy page.
Enabling McAfee GTIIf you enable McAfee GTI for the threat prevention service, the on-access and on-demand scanneruses heuristics to check for suspicious files. The McAfee GTI server also stores site ratings and reportsfor the web control service. If you configure web control to scan downloaded files, the scanner usesheuristics to check for suspicious files.
The scanner submits fingerprints of samples, or hashes, to a central database server hosted byMcAfee Labs to determine if they are malware. By submitting hashes, detection might be madeavailable sooner than the next content file update, when McAfee Labs publishes the update.
You can configure the sensitivity level that McAfee GTI uses when it determines if a detected sample ismalware. The higher the sensitivity level, the higher the number of malware detections. However,allowing more detections can result in more false positive results.
Select Enable McAfee Global Threat Intelligence file reputation service on the Advanced Settings tab of the Threat Preventionpolicy page, then select a sensitivity level.
Scanning files on accessThe on-access scanner examines files on the computer as the user access them, providing continuous,real-time detection of threats.
The Access Protection and Exploit Prevention features also use the on-access scanner to detect andprevent access violations and buffer overflow exploits, respectively.
See also Scanning files on demand on page 88
How on-access scanning worksThe on-access scanner integrates with the system at the lowest levels and scans files where they firstenter the system.
The on-access scanner reports detections to the SecurityCenter.
4 Using the threat prevention serviceScanning for threats on client computers
84 McAfee Endpoint Security 10.0.0 Software Product Guide

When an attempt is made to open or close a file, the scanner intercepts the operation, then:
1 The scanner determines if the item must be scanned, using this criteria:
• The file extension matches the configuration.
• The file hasn't been cached, excluded, or previously scanned.
If you enable McAfee GTI, the scanner uses heuristics to check for suspicious files.
2 If the file meets the scanning criteria, the scanner compares it to the signatures in the currentlyloaded AMCore content file.
• If the file is clean, the result is cached and the read or write operation is granted.
• If the file contains a threat, the operation is denied and the scanner takes the configured action.
For example, if the action is to clean the file, the scanner:
1 Uses information in the currently loaded AMCore content file to clean the file.
2 Records the results in the activity log.
3 Notifies the user that it detected a threat in the file, and prompts for the action to take(clean or delete the file).
Windows 8 — If the scanner detects a threat in the path of an installed Windows Store app,the scanner marks it as tampered. Windows 8 adds the tampered flag to the tile for the app.When you attempt to run it, Windows notifies you of the problem and directs you to theWindows Store to re-install.
Using the threat prevention serviceScanning for threats on client computers 4
McAfee Endpoint Security 10.0.0 Software Product Guide 85

3 If the file doesn't meet the scanning requirements, the scanner caches the file and grants theoperation.
The on-access scan detection list is cleared when the Endpoint Security service restarts or the systemreboots.
The on-access scanner uses trust logic to optimize scanning. Trust logic improves your security andboosts performance by avoiding unnecessary scans. For example, McAfee analyzes and considerssome programs to be trustworthy. If McAfee verifies that these programs haven't been tampered with,the scanner might perform reduced or optimized scanning.
Scanning scripts
The threat prevention service script scanner operates as a proxy component to the native WindowsScript Host, intercepting and scanning scripts before they execute.
4 Using the threat prevention serviceScanning for threats on client computers
86 McAfee Endpoint Security 10.0.0 Software Product Guide

For example:
• If the script is clean, the script scanner passes the script to the native Windows Script Host.
• If the script contains a potential threat, the script doesn't execute.
If script scanning is disabled when Internet Explorer is launched, and then is enabled, it doesn'tdetect malicious scripts in that instance of Internet Explorer.
You must restart Internet Explorer after enabling script scanning for it to detect maliciousscripts.
Deselect this option to enable the client computer to use both the exclusions specifiedhere and the exclusions that are specified locally on the client.
You can specify websites to exclude from inspection if they use scripts.
On Windows Server 2008 systems, URL exclusions for script scanning don't work with Windows InternetExplorer unless you enable third-party browser extensions and restart the system. See theKnowledgeBase article KB69526.
Configure on-access scanning optionsThese settings configure on-access scans, including the types of files scanned and maximum timeallowed.
TaskFor option definitions, click ? in the interface.
1 In the SecurityCenter, click the Policies tab, then click Add Policy (or click Edit to modify an existingpolicy).
2 Click Threat Prevention.
3 On the Advanced Settings tab, under Threat Prevention Settings, select the checkbox for each option youwant to enable.
Select this option... To do this...
Scan all file types during on-access scans Inspect all types of files, instead of only default types,when they are downloaded, opened, or run. (Defaultfile types are defined in the AMCore content files.)
Scan within archives during on-access scans(e.g., .zip, .rar, .tat, .tgz )
Look for threats in compressed archive files when thefiles are accessed.
Scan mapped network drives during on-accessscans
Look for threats in files located on mapped networkdrives when the files are accessed.
Enable on-access scanning (if disabled) the nexttime client computers check for an update
If on-access scanning has been disabled on a clientcomputer, re-enable it the next time that computerchecks for updates.
Maximum scanning time (in seconds) for on-accessscans
Cancel an on-access scan that lasts longer than thespecified number of seconds.
Using the threat prevention serviceScanning for threats on client computers 4
McAfee Endpoint Security 10.0.0 Software Product Guide 87

4 For the highest level of security, select these options for all on-access and on-demand scans.
• Enable buffer overflow protection
• Enable script scanning
If script scanning is disabled when Internet Explorer is launched, and then is enabled, it doesn'tdetect malicious scripts in that instance of Internet Explorer.
You must restart Internet Explorer after enabling script scanning for it to detectmalicious scripts.
5 Click Save.
(For a new policy, click Next, select additional options for the policy, then click Save.
See also On-access (automatic) scans on page 80Best practices (threat prevention) on page 98
Scanning files on demandThe on-demand scanner examines the computer for potential threats, at convenient times, or atregular intervals. Use on-demand scans to supplement the continuous protection of the on-accessscanner.
The threat prevention service includes these types of on-demand scans:
• Quick Scan and Full Scan — Initiate these scans from the Endpoint Security Client on the clientcomputer.
• Right-Click Scan — Right-click the file or folder and select Scan for threats from the pop-up menu onthe client computer.
• Scheduled On-Demand Scan — Configure and schedule Quick Scan and Full Scan on-demand scansfrom the SecurityCenter by using the General Settings tab of the Threat Prevention policy page.
If configured, the web control service sends file download requests to the on-demand scanner forscanning before downloading.
See also Scanning files on access on page 84
How on-demand scanning worksThe on-demand scanner searches files, folders, memory, and registry, looking for any malware thatcould have infected the computer.
The on-demand scanner reports detections to the SecurityCenter.
You decide when and how often the on-demand scans occur. You can scan systems manually, at ascheduled time, or at startup.
1 The on-demand scanner uses the following criteria to determine if the item must be scanned:
• The file extension matches the configuration.
• The file hasn't been cached, excluded, or previously scanned (if the scanner uses the scancache).
If you enable McAfee GTI, the scanner uses heuristics to check for suspicious files.
4 Using the threat prevention serviceScanning for threats on client computers
88 McAfee Endpoint Security 10.0.0 Software Product Guide

2 If the file meets the scanning criteria, the scanner compares the information in the item to theknown malware signatures in the currently loaded AMCore content files.
• If the file is clean, the result is cached, and the scanner checks the next item.
• If the file contains a threat, the scanner takes the configured action.
For example, if the action is to clean the file, the scanner:
1 Uses information in the currently loaded AMCore content file to clean the file.
2 Records the results in the activity log.
3 Notifies the user that it detected a threat in the file, and includes the item name and theaction taken.
Windows 8 — If the scanner detects a threat in the path of an installed Windows Store app,the scanner marks it as tampered. Windows 8 adds the tampered flag to the tile for the app.When you attempt to run it, Windows notifies you of the problem and directs you to theWindows Store to reinstall.
3 If the item doesn't meet the scanning requirements, the scanner doesn't check it. Instead, thescanner continues until all data is scanned.
Using the threat prevention serviceScanning for threats on client computers 4
McAfee Endpoint Security 10.0.0 Software Product Guide 89

The on-demand scan detection list is cleared when the next on-demand scan starts.
Reducing the impact of scans on usersTo minimize the impact that on-demand scans have on a system, specify performance options whenconfiguring these scans.
Scan only when the system is idle
The easiest way to make sure that the scan has no impact on users is to run the on-demand scan onlywhen the computer is idle.
When this option is selected, the threat prevention service pauses the scan when it detects disk oruser activity, such as access using the keyboard or mouse. Threat prevention resumes the scan whenthe user hasn't accessed the system for three minutes.
Select Scan only when the system is idle on the General Settings tab of the Threat Prevention policy page.
Pause scans automatically
To improve performance, you can pause on-demand scans when the system is running on batterypower. You can also pause the scan when an application, such as a browser, media player, orpresentation, is running in full-screen mode. The scan resumes immediately when the system isconnected to power or is no longer in full-screen mode.
Select these options on the General Settings tab of the Threat Prevention policy page:
• Do not scan when the system is on battery power
• Do not scan when the system is in presentation mode
Allow users to defer scans
You can allow users to defer scheduled scans until a more convenient time.
Select Allow users to pause, resume, or cancel scans on the General Settings tab of the Threat Prevention policy page.
Configure system utilization
System utilization specifies the amount of CPU time that the scanner receives during an on-demandFull Scan.
The on-demand scanner uses the Windows Set Priority setting for the scan process and thread priority.The system utilization (throttling) setting enables the operating system to specify the amount of CPUtime that the on-demand scanner receives during the scan process.
Setting the system utilization for the scan to Low provides improved performance for other runningapplications. The low setting is useful for systems with end-user activity. Conversely, by setting thesystem utilization to High, the scan completes faster. The high setting is useful for systems that havelarge volumes and little end-user activity.
Specify a value for Maximum percentage of CPU time allocated for scheduled scans under Scheduled Full Scan Settings onthe General Settings tab of the Threat Prevention policy page. For systems with end-user activity, set systemutilization to Low.
Schedule and configure on-demand scansThese settings configure on-demand scanning.
4 Using the threat prevention serviceScanning for threats on client computers
90 McAfee Endpoint Security 10.0.0 Software Product Guide

TaskFor option definitions, click ? in the interface.
1 In the SecurityCenter, click the Policies tab, then click Add Policy (or click Edit to modify an existingpolicy).
2 Click Threat Prevention.
3 Select options as needed.
To... Do this...
Schedule a FullScan or Quick Scan
1 Click the General Settings tab.
2 Under Scheduled Full Scan Settings or Scheduled Quick Scan Settings, select On, thenselect scheduling options.
3 Select options for reducing user impact.
4 Configure a system utilization option. (Full Scan only)
Configureadvancedscanning optionsfor all on-demandscans
1 Click the Advanced Settings tab.
2 Select the checkbox for each option you want to enable.
• Scan within archives during on-demand scans
• Scan mapped network drives during scheduled scans
3 For the highest level of security, select these options for all on-access andon-demand scans.
• Enable buffer overflow protection
• Enable script scanning
If script scanning is disabled when Internet Explorer is launched, and thenis enabled, it doesn't detect malicious scripts in that instance of InternetExplorer.
You must restart Internet Explorer after enabling script scanningfor it to detect malicious scripts.
4 Click Save.
(For a new policy, click Next, select additional options for the policy, then click Save.)
See also On-demand scans on page 80Best practices (threat prevention) on page 98
Exclude files and folders from scans in a policyUse this SecurityCenter task to define and manage in a policy the items that should not be scanned bythreat prevention. You can add files, folders, or file extensions to the list of exclusions or remove themfrom the list.For option definitions, click ? in the interface.
Task
1 On the Policies page, click Add Policy (or click Edit to modify an existing policy).
2 Click Threat Prevention, then click the Excluded Files and Folders tab.
Using the threat prevention serviceScanning for threats on client computers 4
McAfee Endpoint Security 10.0.0 Software Product Guide 91

3 Select the type of exclusion you want to create.
4 Specify the value (browse for a file or folder, or type a file extension).
You can use wildcard characters when specifying file names, folder names, or file extensions.
5 Click Add Exclusion.
The new exclusion appears in a list.
6 To remove an entry from the list of exclusions, click Remove.
7 Click Save.
(For a new policy, click Next, select additional options for the policy, then click Save.)
Approve and block programs in a policyUse this SecurityCenter task to add approved programs to a policy or remove approved programs froma policy. Approved programs are not detected as potentially unwanted programs.
You can also use the Unrecognized Programs report to view a complete listing of all programs detected onclient computers and add them to policies.
For option definitions, click ? in the interface.
Task1 On the Policies page, click Add Policy (or click Edit to modify an existing policy).
2 Click Threat Prevention, then click the Approved Programs tab.
3 Locate the program you want to approve in the listing of all programs detected on clientcomputers, then select an option.
Select this... To do this...
Approve Approve the selected program.
Approve All Approve all the programs listed.
Block Block the selected program.
Block All Block all the programs listed.
4 Click Save.
(For a new policy, click Next, select additional options for the policy, then click Save.)
See also View user-approved programs and exclusions on page 97View unrecognized programs detected on the account on page 96
4 Using the threat prevention serviceScanning for threats on client computers
92 McAfee Endpoint Security 10.0.0 Software Product Guide

Managing threat preventionManage the threat prevention service by responding to threat detections, managing quarantineditems, and periodically analyzing your protection.
Keeping your protection up to dateThe threat prevention service depends on the engine and information in the content files to identifyand take action on threats. Every day, McAfee Labs releases new content files to address new threats.
To update protection on a client computer, click in the Endpoint Security Client.
To update systems from the SecurityCenter, configure frequent, regular updates on the Client Settingspolicy page.
How content files workWhen searching files for threats, the scan engine compares the contents of the scanned files to knownthreat information stored in the AMCore content files. Exploit Prevention uses its own content files toprotect against buffer overflow exploits.
AMCore content
McAfee Labs finds and adds known threat information (signatures) to the content files. With thesignatures, AMCore content files include information on cleaning and counteracting damage that thedetected virus can cause.
If the signature of a virus isn't in any of the installed content files, the scan engine can't detect andclean that virus.
New threats appear regularly. McAfee Labs releases engine updates and new content files thatincorporate the results of ongoing threat research almost every day at about 6:00 PM (GMT). To makesure that Threat Prevention uses the latest content files and engine, retrieve these files from McAfeeand update your systems daily.
Endpoint Security stores the currently loaded content file and the previous two versions on clientcomputers. If required, you can revert to a previous version.
Exploit Prevention content
The Exploit Prevention content includes:
• Memory protection signatures — Generic Buffer Overflow Protection (GBOP) and Kevlar.
• Application Protection List — Processes that Exploit Prevention protects.
McAfee releases new Exploit Prevention content files once a month. To make sure that the threatprevention service uses the latest content files, retrieve these files from McAfee and update yoursystems regularly.
Schedule client security updatesSchedule frequent updates to occur at regular intervals. At the specified interval, client computersusing the policy connect to the McAfee update server to check for updated content files and productcomponents.
Using the threat prevention serviceManaging threat prevention 4
McAfee Endpoint Security 10.0.0 Software Product Guide 93

TaskFor option definitions, click ? in the interface.
1 In the SecurityCenter, click the Policies tab, then click Add Policy (or click Edit to modify an existingpolicy).
2 Click Client Settings.
3 Under Update Settings, select a setting from the drop-down list for Check for updates every.
To update daily during a specific time period, select Day between, then specify the first and last hourin the time period during which client will check for updates. Also, specify how often out-of-datecomputers check for updates.
4 Click Save.
(For a new policy, click Next, select additional options for the policy, then click Save.)
Managing detectionsThe threat prevention service is designed to detect and resolve specific types of threats automaticallyand silently. In addition, administrators can assign a security policy to each computer that determineshow certain detections are handled and whether users can manage detections.
How the client software handles detections The threat prevention service monitors content and activity on client computers to detect a variety ofthreats. These are grouped into two general categories: viruses and spyware.
Virus detections
When the threat prevention service detect a threats in a file or program, it attempts to clean theinfected item.
• If it can clean the item, the software does not display an alert.
• If it can't clean the item, the software displays an alert, deletes the detected item, and places acopy of the item in the quarantine folder.
Items are placed into the quarantine folder in a format that is no longer a threat to the clientcomputer. After 30 days, quarantined items are deleted. You do not need to take any action.
• Any registry keys associated with a detection are cleaned. Their status is reported as Detectedinitially, then as Cleaned.
Spyware detections
The threat prevention service monitors programs that attempt to install or run on client computers.When it detects an unrecognized or potentially unwanted program with spyware characteristics, itsresponse depends on the policy assigned to the computer. Three responses are possible:
• Delete the detected program automatically.
• Prompt for instructions by displaying a notification whenever a potentially unwanted program isdetected.
• Leave the program intact, but include information about the detection in administrative reports.
4 Using the threat prevention serviceManaging detections
94 McAfee Endpoint Security 10.0.0 Software Product Guide

On-access scan detection list
All detections are listed in the on-access scan detection list, where users can view and manage them(if policy options allow them to). To view the list from the Endpoint Security Client, click View Detectionsfrom the On-Access Scan page.
The on-access scan detection list is cleared when the Endpoint Security service restarts or the systemreboots.
See also Using Threat Prevention mode to allow or block programs on page 82
Use learn mode to discover programsReport mode can be used as a “learn mode” to help you determine which programs to approve.
In Report mode, spyware protection tracks but does not block potentially unwanted programs. You canreview detected programs in the Unrecognized Programs report and approve those that are appropriate foryour policy. When you no longer see unapproved programs you want to approve in the report, changethe policy setting for spyware protection mode to Prompt or Protect.
View threats detected on the accountUse this SecurityCenter task to view the Detections report.
The Detections report lists these types of threats detected on all the client computers on your account:
• virus and malware threats
• potentially unwanted programs
• buffer overflow processes
For option definitions, click ? in the interface.
Task1 Click the Reports tab, then click Detections.
2 In the Detections report, view detailed information about detections and the computers wheredetections occurred by using one of these methods.
Using the threat prevention serviceManaging detections 4
McAfee Endpoint Security 10.0.0 Software Product Guide 95

When you wantto...
Do this...
Display computersor detections
Click the triangle icon next to a name.
• Under a computer name, show which detections were found.
• Under a detection name, show the computers where it was found.
Click a group name to display computers in that group.
View details aboutdetections
If detections are listed for a computer, click a quantity to display details.
• Click a quantity for Detected Objects to display a list of detected threats andtheir status.
• From the Detections List, click the name of a detection to display detailedinformation from the McAfee Labs Threat Library.
View details about acomputer where adetection occurred
Click a computer name to display the Computer Details page, which displaysinformation about:
• the computer
• protection services installed
• hardware and software status
• detections on the computer
• detected items that the user has excluded from scans
See also View historical information about detections on page 98Manage a computer from the Computer Details page on page 49
View unrecognized programs detected on the accountUse this SecurityCenter task to view the Unrecognized Programs report, which lists potentially unwantedprograms detected on all the client computers on your account.For option definitions, click ? in the interface.
Task1 Click the Reports tab, then click Unrecognized Programs.
2 In the Unrecognized Programs report, view detailed information about unrecognized programs and thecomputers where they were detected by using one of these methods.
When you want to... Do this...
Display computers ordetections
Click the triangle icon next to a name.
• Under a computer name, show which programs were detected.
• Under a program name, show the computers where it was detected.
Click a group name to display computers in that group.
View details aboutdetections
Click the name of a potentially unwanted program to display detailedinformation from the McAfee Labs Threat Library.
4 Using the threat prevention serviceManaging detections
96 McAfee Endpoint Security 10.0.0 Software Product Guide
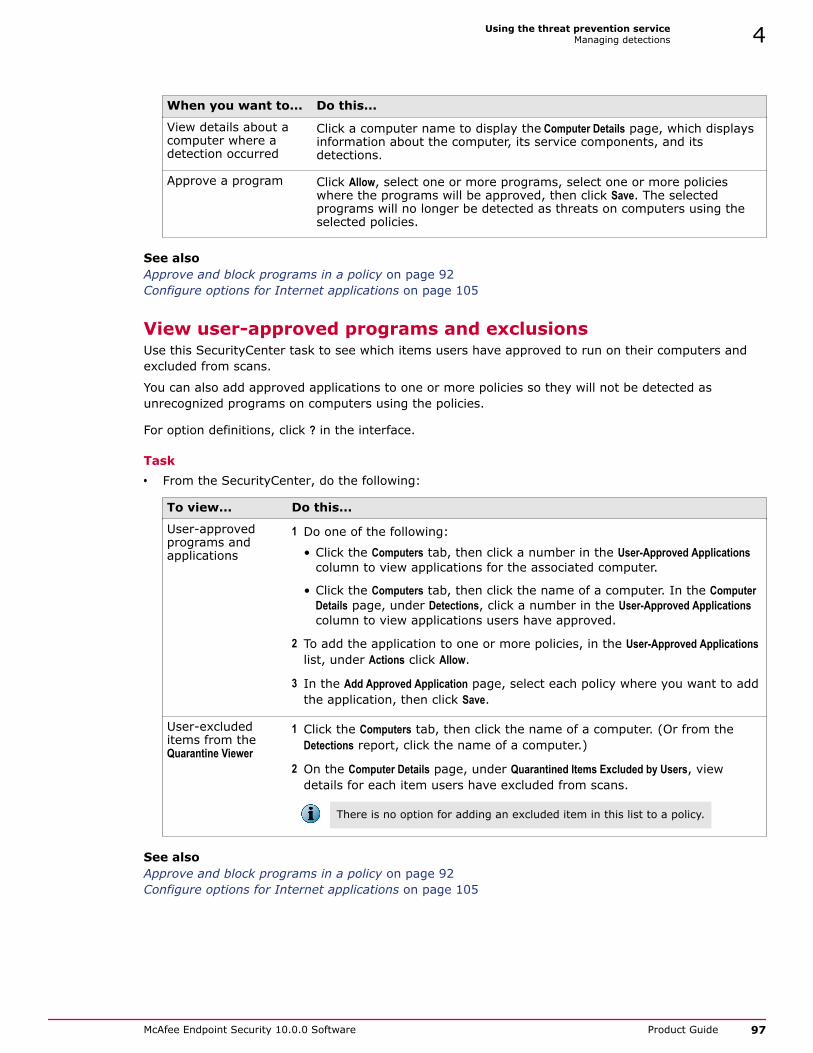
When you want to... Do this...
View details about acomputer where adetection occurred
Click a computer name to display the Computer Details page, which displaysinformation about the computer, its service components, and itsdetections.
Approve a program Click Allow, select one or more programs, select one or more policieswhere the programs will be approved, then click Save. The selectedprograms will no longer be detected as threats on computers using theselected policies.
See also Approve and block programs in a policy on page 92Configure options for Internet applications on page 105
View user-approved programs and exclusionsUse this SecurityCenter task to see which items users have approved to run on their computers andexcluded from scans.
You can also add approved applications to one or more policies so they will not be detected asunrecognized programs on computers using the policies.
For option definitions, click ? in the interface.
Task• From the SecurityCenter, do the following:
To view... Do this...
User-approvedprograms andapplications
1 Do one of the following:
• Click the Computers tab, then click a number in the User-Approved Applicationscolumn to view applications for the associated computer.
• Click the Computers tab, then click the name of a computer. In the ComputerDetails page, under Detections, click a number in the User-Approved Applicationscolumn to view applications users have approved.
2 To add the application to one or more policies, in the User-Approved Applicationslist, under Actions click Allow.
3 In the Add Approved Application page, select each policy where you want to addthe application, then click Save.
User-excludeditems from theQuarantine Viewer
1 Click the Computers tab, then click the name of a computer. (Or from theDetections report, click the name of a computer.)
2 On the Computer Details page, under Quarantined Items Excluded by Users, viewdetails for each item users have excluded from scans.
There is no option for adding an excluded item in this list to a policy.
See also Approve and block programs in a policy on page 92Configure options for Internet applications on page 105
Using the threat prevention serviceManaging detections 4
McAfee Endpoint Security 10.0.0 Software Product Guide 97

View historical information about detections Use this SecurityCenter task to view the Detection History report.
The Detection History report shows summary information for the detections on your account over the pastyear. Data can be displayed by month or by quarter.
This information can help you determine if your protection features are configured properly, andwhether strategies you have implemented, such as user education or policy adjustments, have beeneffective.
For option definitions, click ? in the interface.
Task1 Click the Reports tab, then click Detections.
2 In the Detection History report, view a chart of summary information about threats detected over thepast year by selecting the appropriate options.
When you want to... Do this...
Display information for the last year in monthlyincrements.
In the Display by list, select Monthly.
Display information for the last year in quarterlyincrements.
In the Display by list, select Quarterly.
Display detections for all the computers on youraccount.
In the Groups list, select All.
Display detections for a single group. In the Groups list, select the group for whichyou want to display data.
See also View threats detected on the account on page 95
Reports for threat preventionView information about threat prevention detections in administrative reports available from the Reportspage of the SecurityCenter. Reports provide details about the specific threats detected and the historyof detections over the past year.
• Detections report — Lists the malware threats, potentially unwanted programs, and buffer overflowprocesses that threat prevention detected on client computers.
• Unrecognized Programs report — Lists programs detected on client computers that are not recognizedby threat prevention and firewall protection. Allows you to approve programs from within thereport.
• Detection History report — Graphs detections on client computers over the past year.
Best practices (threat prevention)To develop an effective strategy for guarding against malware threats, we recommend that youproactively track the types of threats being detected on your network and where they are occurring.
1 Check your status emails or the SecurityCenter website for an overview of your account’s status.
• Ensure that computers in your account are up-to-date.
• Ensure that protection is installed on all computers.
4 Using the threat prevention serviceReports for threat prevention
98 McAfee Endpoint Security 10.0.0 Software Product Guide

2 Check the Detections report regularly to see what is being detected.
3 Check the Unrecognized Programs report frequently to monitor the programs that users are approvingon client computers. If you know some of the programs are safe and do not want them to bedetected as potentially unwanted, add them to policies as approved programs.
4 To centralize management and more easily monitor the types of programs allowed on clientcomputers, define client security settings in a policy.
5 To prevent users from inadvertently approving risky items, set Threat Prevention Mode to Protect toautomatically clean or block potentially unwanted programs. (This is the default setting.)
6 If particular types of detections are occurring frequently or certain computers appear vulnerable,update the policy to resolve these issues.
• Schedule scans or add exclusions.
• Enable advanced scanning options.
7 Enable the buffer overflow protection and script scanning features. These options appear on theAdvanced Settings tab of the Threat Prevention policy page.
8 Enable the McAfee GTI feature to boost performance by avoiding unnecessary scans.
9 Schedule scans to run at nonpeak hours, and configure on-demand scanning options to reduce theimpact of scans on users.
10 Use "learn" mode (by setting your Threat Prevention Mode to Report) to identify which programs to addto the Approved Programs list. This ensures that no required programs are deleted before you have theopportunity to authorize their use. Then change the Threat Prevention Mode to Protect.
11 Unless minimizing the time required for updates is an important issue for your site, enable theoption to scan processes running on computers during updates.
12 Enable the Enable on‑access scanning (if disabled) the next time client computers check for an update option if clientcomputer users have the ability to disable on-access scanning.
13 View the Detection History report periodically to discover trends specific to your network, and verifyyour strategy’s success in reducing detections.
See also Configure on-access scanning options on page 87Schedule and configure on-demand scans on page 90Configuring common scanning options on page 82
Using the threat prevention serviceBest practices (threat prevention) 4
McAfee Endpoint Security 10.0.0 Software Product Guide 99

4 Using the threat prevention serviceBest practices (threat prevention)
100 McAfee Endpoint Security 10.0.0 Software Product Guide
5 Using firewall protection
Firewall protection protects system resources and applications from external and internal attacks bychecking for suspicious activity in communications sent between client computers and networkresources or the Internet.
Firewall protection acts as a filter between a client computer and the network or the Internet. It scansall incoming and outgoing traffic at the packet level. As it reviews each arriving or departing packet, itchecks settings for policy options that define whether it to allow or block communications that meetspecific criteria. Firewall protection responds according to the policy, blocking or allowingcommunications through the firewall.
Contents Administrator or user configuration of firewall protection Using Firewall Mode to allow or block unknown applications Using Connection Type to allow or block incoming communications Configure policy options Install and enable firewall at the policy level About custom connections Configure custom connections Manage detections Reports for firewall protection Best practices (firewall protection)
Administrator or user configuration of firewall protection As an administrator, you can configure settings for firewall protection or allow users to configure them.
Configuring the settings enables you to control which applications and communications are allowed onyour network. It provides the means for you to ensure the highest level of security. The McAfee Defaultpolicy is configured to let the user configure the settings.
We recommend that administrators configure settings for firewall protection. If you allow users toconfigure the settings, it is important to educate them about threats and strategies for avoiding risk.
5
McAfee Endpoint Security 10.0.0 Software Product Guide 101

You can fine-tune policy settings to define what constitutes suspicious activity and how firewallprotection responds to:
• IP addresses, domains, and communication ports that attempt to communicate with your computer.You can specify whether to allow or block communications from other IP addresses on yournetwork or outside your network, or you can identify specific IP addresses, domains, and ports toallow or block.
• Applications that attempt to access the Internet. You can use the McAfee recommendations for safeInternet applications, or you can identify specific applications to allow or block. You can also selectfirewall protection's response to detections of unrecognized applications.
When you configures the settings, it is important that the applications and communications that areimportant to your users are allowed before deploying the policy. This ensures that no importantcommunications are blocked.
Using Firewall Mode to allow or block unknown applicationsThe Firewall Mode determines whether firewall protection allows or blocks attempts by unrecognizedapplications to access the Internet.
Firewall protection monitors communications with Internet applications, which connect to the Internetand communicate with client computers. When it detects an Internet application running on acomputer, it either allows the application to connect to the Internet or blocks the connection,depending on the Firewall Mode selected in the policy assigned to the client computer.
In thismode...
Firewall protection does this...
Protect • Blocks the suspicious activity and notifies the user.
• Reports the detection to the SecurityCenter.
This setting is the default.
Report • Reports the detection to the SecurityCenter.
• Does not notify the user about detections.
This can be used as a "learn" mode to discover which applications to allow andblock.
See also Configure options for Internet applications on page 105
Use learn mode to discover Internet applicationsReport mode can be used as a “learn mode” to help you determine which applications to allow.
In Report mode, firewall protection tracks but does not block unrecognized Internet applications. Youcan review detected applications in the Unrecognized Programs report and approve those that areappropriate for your policy. When you no longer see applications you want to allow in the report,change the policy setting to Protect mode.
5 Using firewall protectionUsing Firewall Mode to allow or block unknown applications
102 McAfee Endpoint Security 10.0.0 Software Product Guide
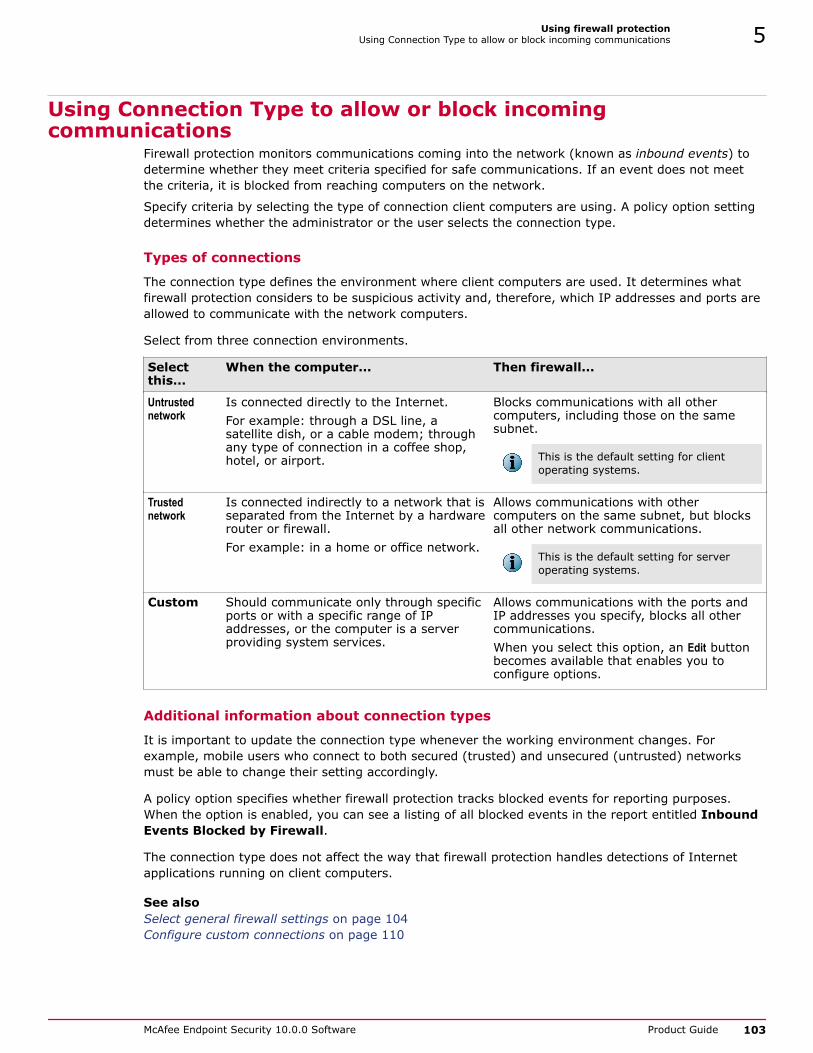
Using Connection Type to allow or block incomingcommunications
Firewall protection monitors communications coming into the network (known as inbound events) todetermine whether they meet criteria specified for safe communications. If an event does not meetthe criteria, it is blocked from reaching computers on the network.
Specify criteria by selecting the type of connection client computers are using. A policy option settingdetermines whether the administrator or the user selects the connection type.
Types of connections
The connection type defines the environment where client computers are used. It determines whatfirewall protection considers to be suspicious activity and, therefore, which IP addresses and ports areallowed to communicate with the network computers.
Select from three connection environments.
Selectthis...
When the computer... Then firewall...
Untrustednetwork
Is connected directly to the Internet.For example: through a DSL line, asatellite dish, or a cable modem; throughany type of connection in a coffee shop,hotel, or airport.
Blocks communications with all othercomputers, including those on the samesubnet.
This is the default setting for clientoperating systems.
Trustednetwork
Is connected indirectly to a network that isseparated from the Internet by a hardwarerouter or firewall.For example: in a home or office network.
Allows communications with othercomputers on the same subnet, but blocksall other network communications.
This is the default setting for serveroperating systems.
Custom Should communicate only through specificports or with a specific range of IPaddresses, or the computer is a serverproviding system services.
Allows communications with the ports andIP addresses you specify, blocks all othercommunications.When you select this option, an Edit buttonbecomes available that enables you toconfigure options.
Additional information about connection types
It is important to update the connection type whenever the working environment changes. Forexample, mobile users who connect to both secured (trusted) and unsecured (untrusted) networksmust be able to change their setting accordingly.
A policy option specifies whether firewall protection tracks blocked events for reporting purposes.When the option is enabled, you can see a listing of all blocked events in the report entitled InboundEvents Blocked by Firewall.
The connection type does not affect the way that firewall protection handles detections of Internetapplications running on client computers.
See also Select general firewall settings on page 104Configure custom connections on page 110
Using firewall protectionUsing Connection Type to allow or block incoming communications 5
McAfee Endpoint Security 10.0.0 Software Product Guide 103

Configure policy optionsUse these tasks to select policy options for firewall behavior on client computers.
Tasks• Select general firewall settings on page 104
Use this SecurityCenter task to configure the general settings for firewall protection.
• Configure options for Internet applications on page 105SecurityCenterUse this SecurityCenter task to configure the way firewall protectionresponds to detections of Internet applications.
• Track blocked communications on page 106Use this SecurityCenter task to track communication attempts (known as events) betweenclient computers and network resources that firewall protection blocks.
Select general firewall settingsUse this SecurityCenter task to configure the general settings for firewall protection.
• Who configures the firewall
• Connection type
To ensure the highest level of security, we recommend that administrators configure firewall settings. Ifyou allow users to configure the settings, it is important to educate them about threats and strategiesfor avoiding risk.
For option definitions, click ? in the interface.
Task1 On the Policies page, click Add Policy (or click Edit to modify an existing policy).
2 Select Firewall, then click the General Settings tab.
3 Under Firewall Configuration, select Administrator configures firewall or User configures firewall.
If you select the administrator option, additional policy options are displayed for you to configure.
4 Under Connection Type, select an option.
5 If you selected Custom settings, click Edit to configure related options.
These are described in another section of this document.
6 Click Save.
(For a new policy, click Next, select additional options for the policy, then click Save.)
See also Configure custom connections on page 110Using Connection Type to allow or block incoming communications on page 103
5 Using firewall protectionConfigure policy options
104 McAfee Endpoint Security 10.0.0 Software Product Guide

Configure options for Internet applicationsSecurityCenterUse this SecurityCenter task to configure the way firewall protection responds todetections of Internet applications.
These policy option settings determine:
• Whether firewall protection checks the McAfee GTI system for information about the safety of thecommunication's source or destination and level of risk.
• Whether firewall protection blocks an unrecognized application or simply reports it to theSecurityCenter.
• Specific applications to allow or block.
For option definitions, click ? in the interface.
Task1 On the Policies page, click Add Policy (or click Edit to modify an existing policy).
2 Select Firewall, then click the General Settings tab.
3 Under Firewall Configuration, select Administrator configures firewall.
4 Under Firewall Configuration, select or deselect the Use Smart Recommendations from McAfee Global ThreatIntelligence (McAfee GTI) to block outgoing traffic option.
When this option is selected, firewall protection checks the McAfee GTI system for informationabout the safety of an unrecognized communication's source or destination and level of risk.
5 Under Firewall Mode, select an option.
To help identify applications required for your users to conduct business, you can use Report modeas a "learn" mode, then view unrecognized programs in a report. However, McAfee recommendsthis feature then be set to Protect.
6 To manually select applications to allow or block, follow these steps.
a Click the Allowed Internet Applications tab. This tab lists all the Internet applications detected on thecomputers in your account.
To... Do this...
Find applications quickly Type the full or partial name of an application in the Findapplications box, then click Search.
This feature does not recognize wildcard characters, so typeletters and numbers only.
View or hide the names ofcomputers where applicationswere detected
Click the arrow to the left of the application name.
Using firewall protectionConfigure policy options 5
McAfee Endpoint Security 10.0.0 Software Product Guide 105
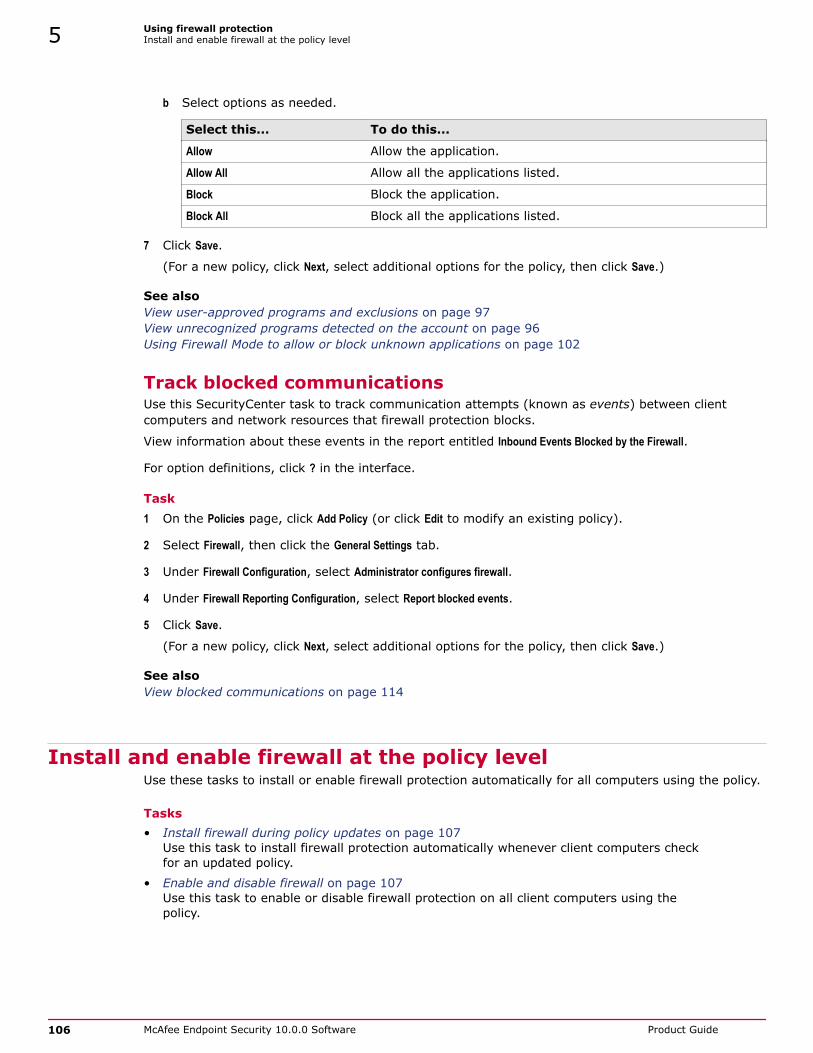
b Select options as needed.
Select this... To do this...
Allow Allow the application.
Allow All Allow all the applications listed.
Block Block the application.
Block All Block all the applications listed.
7 Click Save.
(For a new policy, click Next, select additional options for the policy, then click Save.)
See also View user-approved programs and exclusions on page 97View unrecognized programs detected on the account on page 96Using Firewall Mode to allow or block unknown applications on page 102
Track blocked communicationsUse this SecurityCenter task to track communication attempts (known as events) between clientcomputers and network resources that firewall protection blocks.
View information about these events in the report entitled Inbound Events Blocked by the Firewall.
For option definitions, click ? in the interface.
Task1 On the Policies page, click Add Policy (or click Edit to modify an existing policy).
2 Select Firewall, then click the General Settings tab.
3 Under Firewall Configuration, select Administrator configures firewall.
4 Under Firewall Reporting Configuration, select Report blocked events.
5 Click Save.
(For a new policy, click Next, select additional options for the policy, then click Save.)
See also View blocked communications on page 114
Install and enable firewall at the policy levelUse these tasks to install or enable firewall protection automatically for all computers using the policy.
Tasks• Install firewall during policy updates on page 107
Use this task to install firewall protection automatically whenever client computers checkfor an updated policy.
• Enable and disable firewall on page 107Use this task to enable or disable firewall protection on all client computers using thepolicy.
5 Using firewall protectionInstall and enable firewall at the policy level
106 McAfee Endpoint Security 10.0.0 Software Product Guide

Install firewall during policy updatesUse this task to install firewall protection automatically whenever client computers check for anupdated policy.You might want to use this feature for adding the firewall module on computers where the clientsoftware for other product modules is already installed. By default, this option is disabled.
Enabling this feature can result in unattended installations on computers where no one is available toauthorize communications that are consequently blocked by firewall protection. If this feature is used toinstall firewall protection on a server, it is important to configure essential system services first, toprevent disruptions.
For option definitions, click ? in the interface.
Task1 On the Policies page, click Add Policy (or click Edit to modify an existing policy).
2 Select Firewall, then click the General Settings tab.
3 Under Firewall Configuration, select Administrator configures firewall.
4 Under Firewall Configuration, select Automatically install firewall protection on all computers using this policy.
5 Click Save.
(For a new policy, click Next, select additional options for the policy, then click Save.)
Enable and disable firewallUse this task to enable or disable firewall protection on all client computers using the policy.For option definitions, click ? in the interface.
Task1 On the Policies page, click Add Policy (or click Edit to modify an existing policy).
2 Select Firewall, then click the General Settings tab.
3 Under Firewall Status, select On or Off.
4 Click Save.
(For a new policy, click Next, select additional options for the policy, then click Save.)
About custom connectionsTrusted and untrusted connection types let you specify whether to allow or block communicationsoriginating within a network.Configure a custom connection type when you want to be more specific about where communicationsoriginate. When you set up a custom connection, you can designate:
• Open and blocked ports, through which a computer can and cannot receive communications. This isrequired to set up a computer as a server that provides system services. The server will acceptcommunications through any open port from any computer. Conversely, it will not acceptcommunications through any blocked port.
• IP addresses from which a computer can receive communications. This allows you to limitcommunications to specific IP addresses and fully qualified domain names.
Configure settings for custom connections on the General tab of the Firewall policy page.
Using firewall protectionAbout custom connections 5
McAfee Endpoint Security 10.0.0 Software Product Guide 107

Once configured, custom connection settings are saved until you reconfigure them. If you temporarilyselect a Trusted network or Untrusted network connection type, the custom settings will still be there thenext time you want to configure a custom connection.
See also Configure custom connections on page 110
The role of IP addresses and domainsAn IP address is used to identify any device that originates or receives a request or a message overnetworks and the Internet (which comprises a very large group of networks). A domain name is theunique name of a website or other Internet resource, which resolves to an IP address.
Each IP address uses a unique set of hexadecimal characters to identify a network, a subnetwork (ifapplicable), and a device within the network.
An IP address enables:
• The request or message to be delivered to the correct destination.
• The receiving device to know where the request or message originated and where to send aresponse if one is required.
Firewall protection allows you to configure a custom connection to accept only communications thatoriginate from designated IP addresses. You can specify IP addresses that conform to either of thesestandards:
• IPv4 (Internet Protocol Version 4) — The most common Internet addressing scheme. Supports32-bit IP addresses consisting of four groups of four numbers between 0 and 255.
• IPv6 (Internet Protocol Version 6) — Supports 128-bit IP addresses consisting of eight groups offour hexadecimal characters.
Firewall protection also allows you to allow or block connections to the IP addresses that resolve toone or more fully qualified domain names. The information in each domain name is organizedhierarchically and follows established conventions that enable web browsers to locate it on theInternet. A fully qualified domain name (FQDN) contains all the information required to resolve to theassociated IP address.
See also Configure IP addresses and domains on page 111
The role of system service portsSystem services communicate through ports, which are logical network connections.
Common Windows system services are typically associated with particular service ports, and yourcomputer’s operating system or other system applications might attempt to open them. Because theseports represent a potential source of intrusions into a client computer, you must open them before thecomputer can communicate through them.
5 Using firewall protectionAbout custom connections
108 McAfee Endpoint Security 10.0.0 Software Product Guide

Certain applications, including web servers and file-sharing server programs, must accept unsolicitedconnections from other computers through designated system service ports. When configuring acustom connection, you can:
• Allow applications to act as servers on the local network or the Internet.
• Add or edit a port for a system service.
• Disable or remove a port for a system service.
Select a port for system services only if you are certain it must be open. You will rarely need to open aport. We recommend that you disable unused system services.
Examples of system services that typically require ports to be opened are:
• Email server — You do not need to open a mail server port to receive email. You need to open aport only if the computer running the firewall protection service acts as an email server.
• Web server — You do not need to open a web server port to run a web browser. You need to opena port only if the computer running the firewall protection service acts as a web server.
An opened service port that does not have an application running on it poses no security threat.However, we recommend that you close unused ports.
See also Configure system services and port assignments on page 110
Standard assignments for system service portsThese commonly used standard service ports are listed by default, where you can open or close them:
• File and Print Sharing
• Remote Desktop
• Remote Assistance
You can add other service ports as needed. Standard service ports for typical system services are:
System Service Port(s)
File Transfer Protocol (FTP) 20-21
Mail Server (IMAP) 143
Mail Server (POP3) 110
Mail Server (SMTP) 25
Microsoft Directory Server (MSFT DS) 445
Microsoft SQL Server (MSFT SQL) 1433
Network Time Protocol Port 123
Remote Assistance / Terminal Server (RDP) 3389 (same as Remote Assistance and Remote Desktop)
Remote Procedure Calls (RPC) 135
Secure Web Server (HTTPS) 443
Universal Plug and Play (UPNP) 5000
Web Server (HTTP) 80
Windows File Sharing (NETBIOS) 137-139 (same as File and Print Sharing)
See also Configure system services and port assignments on page 110
Using firewall protectionAbout custom connections 5
McAfee Endpoint Security 10.0.0 Software Product Guide 109

Configure custom connectionsUse these tasks to configure system service ports and IP addresses for custom connections.
Tasks
• Configure system services and port assignments on page 110Use this SecurityCenter task to configure system service port assignments for a customconnection.
• Configure IP addresses and domains on page 111Use this SecurityCenter task to allow or block a range of IP addresses or a domain in acustom connection.
See also Select general firewall settings on page 104Using Connection Type to allow or block incoming communications on page 103About custom connections on page 107
Configure system services and port assignmentsUse this SecurityCenter task to configure system service port assignments for a custom connection.
Before you beginThe Administrator configures firewall option must be selected
This task allows you to add, remove, or modify a service by specifying its name and the ports throughwhich it communicates with client computers using the policy.
Opening a system service port on a client computer allows it to act as a server on the local network orInternet. Closing a port blocks all communications through the ports with client computers using thepolicy.
For option definitions, click ? in the interface.
Task
1 On the Policies page, click Add Policy (or click Edit to modify an existing policy).
2 Select Firewall, then click the General Settings tab.
3 Under Firewall Configuration, select Administrator configures firewall if it is not already selected.
4 Under Connection Type, select Custom settings, then click edit.
5 On the Firewall Custom Settings panel, under Allowed Incoming Connections, configure a service by using oneof these methods.
To do this... Perform these steps...
Allow an existingservice by openingits ports
1 Select the checkbox for a service listed in the table.
2 Click OK.
Computers using this policy will accept communications through the portsassigned to the service.
Add a new serviceand open its ports
1 Click Add Connection.
2 In the Add or Edit Incoming Connection panel, type a name for the service, typethe ports through which the service will communicate with computersusing this policy, then click OK.
5 Using firewall protectionConfigure custom connections
110 McAfee Endpoint Security 10.0.0 Software Product Guide

To do this... Perform these steps...
Modify an existingservice
1 For a service listed in the table, click edit.
2 In the Add or Edit Incoming Connection panel, modify the name for the serviceand/or the ports through which the service will communicate withcomputers using this policy, then click OK.
Block an existingservice and close itsports
1 For a service listed in the table, click Block.
2 Click OK.
The service is removed from the list, and computers using this policy willnot accept communications through the ports assigned to the blockedservice.
6 Click Save.
(For a new policy, click Next, select additional options for the policy, then click Save.)
See also The role of system service ports on page 108Standard assignments for system service ports on page 109
Configure IP addresses and domainsUse this SecurityCenter task to allow or block a range of IP addresses or a domain in a customconnection.
Client computers using this policy will accept communications originating only from the IP addressesyou add.
Specify IP addresses and system service ports through which to communicate by using separate tasks.
For option definitions, click ? in the interface.
Task1 On the Policies page, click Add Policy (or click Edit to modify an existing policy).
2 Select Firewall, then click the General Settings tab.
3 Under Firewall Configuration, select Administrator configures firewall if it is not already selected.
4 Under Connection Type, select Custom settings, then click edit.
5 On the Firewall Custom Settings panel, under Allowed Incoming Addresses, configure a range of IP addressesfor computers using this policy by using one of these methods.
To do this... Perform these steps...
Accept communications fromany IP address
1 Select Any computer.
2 Click OK.
Accept communications fromIP addresses on the subnetwhere the computers arelocated
1 Select My network (the subnet only).
2 Click OK.
Using firewall protectionConfigure custom connections 5
McAfee Endpoint Security 10.0.0 Software Product Guide 111

To do this... Perform these steps...
Accept communications fromthe specified addresses
1 Select Specific address range.
2 Type a beginning and ending IP address range in either IPv4 orIPv6 format.
3 Click Allow. The IP address range is displayed in a the list ofallowed addresses.
4 Click OK.
Computers using this policy will accept communicationsoriginating from all IP addresses in the list you approved.
Block an existing range of IPaddresses
1 For the IP address range, click Block. The IP address range isremoved from the list of allowed addresses.
2 Click OK.
Computers using this policy will not accept communicationsoriginating from the IP addresses you removed from the list.
When using a computer in multiple locations, you might want to specify more than one range of IPaddresses. For example, you might want one IP address range for office use and another for homeuse. To specify multiple address ranges, repeat step 4, enter another address range, then click Addagain.
6 On the Firewall Custom Settings panel, for Fully qualified domain name, type a domain name, then click Allow.
Computers using this policy will accept communications originating from all domains in the list youapproved.
To do this... Perform these steps...
Accept communicationsfrom a domain
1 For Fully qualified domain name, type a domain name.
2 Click Allow. The domain is displayed in a the list of allowed domains.
3 Click OK.
Computers using this policy will accept communications originatingfrom the domain.
Block communicationsfrom a domain
1 For the domain, click Remove. The domain is removed from the list ofallowed domains.
2 Click OK.
Computers using this policy will not accept communications originatingfrom the domains you removed from the list.
7 Click Save.
(For a new policy, click Next, select additional options for the policy, then click Save.)
See also The role of IP addresses and domains on page 108
Manage detectionsUse these tasks to view and manage suspicious activity and unrecognized applications detected byfirewall protection.
5 Using firewall protectionManage detections
112 McAfee Endpoint Security 10.0.0 Software Product Guide

Tasks
• View unrecognized programs detected on the account on page 96Use this SecurityCenter task to view the Unrecognized Programs report, which lists potentiallyunwanted programs detected on all the client computers on your account.
• View user-approved programs and exclusions on page 97Use this SecurityCenter task to see which items users have approved to run on theircomputers and excluded from scans.
• View blocked communications on page 114Use this SecurityCenter task to view a list of communications that firewall protectionprevented from reaching client computers.
View unrecognized programs detected on the accountUse this SecurityCenter task to view the Unrecognized Programs report, which lists potentially unwantedprograms detected on all the client computers on your account.For option definitions, click ? in the interface.
Task
1 Click the Reports tab, then click Unrecognized Programs.
2 In the Unrecognized Programs report, view detailed information about unrecognized programs and thecomputers where they were detected by using one of these methods.
When you want to... Do this...
Display computers ordetections
Click the triangle icon next to a name.
• Under a computer name, show which programs were detected.
• Under a program name, show the computers where it was detected.
Click a group name to display computers in that group.
View details aboutdetections
Click the name of a potentially unwanted program to display detailedinformation from the McAfee Labs Threat Library.
View details about acomputer where adetection occurred
Click a computer name to display the Computer Details page, which displaysinformation about the computer, its service components, and itsdetections.
Approve a program Click Allow, select one or more programs, select one or more policieswhere the programs will be approved, then click Save. The selectedprograms will no longer be detected as threats on computers using theselected policies.
See also Approve and block programs in a policy on page 92Configure options for Internet applications on page 105
View user-approved programs and exclusionsUse this SecurityCenter task to see which items users have approved to run on their computers andexcluded from scans.
You can also add approved applications to one or more policies so they will not be detected asunrecognized programs on computers using the policies.
For option definitions, click ? in the interface.
Using firewall protectionManage detections 5
McAfee Endpoint Security 10.0.0 Software Product Guide 113

Task• From the SecurityCenter, do the following:
To view... Do this...
User-approvedprograms andapplications
1 Do one of the following:
• Click the Computers tab, then click a number in the User-Approved Applicationscolumn to view applications for the associated computer.
• Click the Computers tab, then click the name of a computer. In the ComputerDetails page, under Detections, click a number in the User-Approved Applicationscolumn to view applications users have approved.
2 To add the application to one or more policies, in the User-Approved Applicationslist, under Actions click Allow.
3 In the Add Approved Application page, select each policy where you want to addthe application, then click Save.
User-excludeditems from theQuarantine Viewer
1 Click the Computers tab, then click the name of a computer. (Or from theDetections report, click the name of a computer.)
2 On the Computer Details page, under Quarantined Items Excluded by Users, viewdetails for each item users have excluded from scans.
There is no option for adding an excluded item in this list to a policy.
See also Approve and block programs in a policy on page 92Configure options for Internet applications on page 105
View blocked communicationsUse this SecurityCenter task to view a list of communications that firewall protection prevented fromreaching client computers.
Before you beginThe Report blocked events option must be enabled on the General Settings tab of the Firewall policypage.
For the purposes of this report, each attempt to communicate is called an event.
For option definitions, click ? in the interface.
Task1 Click the Reports tab, then click Inbound Events Blocked by Firewall.
2 In the report, view detailed information about detections and the computers where detectionsoccurred by using one of these methods.
5 Using firewall protectionManage detections
114 McAfee Endpoint Security 10.0.0 Software Product Guide

When you wantto...
Do this...
Display computers ordetections
Click the triangle icon next to a name.
• Under a computer name, show which detections were found.
• Under a detection name, show the computers where it was found.
Click a group name to display computers in that group.
View details aboutevents
Click a quantity under Events to display the Inbound Event List, which showsthe name of the event, the number of occurrences, and the date on whichit was detected.
View details about acomputer
Click a computer name to display the Computer Details page, which displaysinformation about the computer, its service components, and itsdetections.
See also Track blocked communications on page 106
Reports for firewall protectionYou can view information about firewall detections in administrative reports available from theSecurityCenter on the Reports page. Reports provide details about the specific threats detected over thepast year.
• Unrecognized Programs — Lists programs detected on client computers that are not recognized bythreat prevention and firewall. Allows you to approve Internet applications from within the report.
• Inbound Events Blocked by Firewall — Lists the incoming communication attempts that firewall preventedclient computers from receiving, where they originated, and to which computer they were sent.
See also View user-approved programs and exclusions on page 97View unrecognized programs detected on the account on page 96View blocked communications on page 114
Best practices (firewall protection)To effectively manage your strategy for guarding against suspicious activity, we recommend that youproactively track the types of threats being detected and where they are occurring.
1 Check your status emails or the SecurityCenter website for an overview of your account’s status.Ensure that protection is installed on all computers.
2 To centralize management and more easily monitor the types of applications and communicationsallowed on client computers, configure client settings for firewall protection in a policy.
3 Use the McAfee recommendations for safe Internet applications. When the Use Smart Recommendationsoption is selected, firewall protection checks the McAfee GTI system for information about thesafety of an unrecognized communication's source or destination and level of risk.
4 Check the Unrecognized Programs report frequently to monitor the Internet applications that users areallowing on client computers. If you know some of the applications are safe and do not want themto be detected as threats, add them to policies.
Using firewall protectionReports for firewall protection 5
McAfee Endpoint Security 10.0.0 Software Product Guide 115

5 If you want to monitor the inbound communications that firewall protection has blocked, select theReport blocked events policy option, then check the Inbound Events Blocked by Firewall report regularly.
6 Use “learn” mode to identify which Internet applications to allow. This ensures that no applicationsrequired for your business are blocked before you have the opportunity to authorize their use. (Touse learn mode, change the firewall mode to Report, then change it back to Protect when you aredone.)
7 If particular types of suspicious activity are occurring frequently or certain computers appearvulnerable, update the policy to resolve these issues.
• Ensure that the firewall protection service is enabled.
• Carefully specify the environment where client computers are used. For users with mobilecomputers, ensure that they know how to select the correct connection type each time theirenvironment changes and that their policy allows them to do so.
• Before installing the firewall protection service on a server, ensure that the server’s systemservices and Internet applications are configured correctly. If there is a possibility that thefirewall protection service might be installed when no user is present to monitor the installation,disable the policy setting for Automatically install Firewall on all computers using this policy.
• When running the firewall protection service on a server, ensure that system service ports areconfigured correctly to prevent disruption of system services. Ensure that no unnecessary portsare open.
• For maximum protection, set Firewall Mode to Protect to automatically block suspicious activity. Thisis the default setting.
8 If your account includes computers that are operated in multiple environments, such as in theoffice and in unsecured public networks, update the policy appropriately.
• Configure policy options that allow users to select their connection type to match theirenvironment. Be sure they know when and how to select the appropriate connection type.
• If you configure custom connections that include IP addresses, specify ranges of IP addressesappropriate for all their working environments.
5 Using firewall protectionBest practices (firewall protection)
116 McAfee Endpoint Security 10.0.0 Software Product Guide

6 Using the web control service and webfiltering
The web control service monitors web searching and browsing activity on client computers to protectagainst threats on web pages and in file downloads.
Client software adds features that display in the browser window on client computers to notify usersabout threats.
The web filtering module, which is a component of the web control service, provides features forcontrolling access to websites. Policy options allow administrators to control access to sites based ontheir safety rating, the type of content they contain, and their URL or domain name.
Contents Web control features Access web control features Web filtering features Setting up a strategy for browsing security Configure web control and web filtering features View browsing activity on client computers Web Filtering report Best practices (web control)
Web control featuresA McAfee team analyzes each website and assigns a color-coded site safety rating based on testresults. The color indicates the level of safety for the site.
The web control service uses the test results to notify users about web-based threats they mightencounter.
• On search results pages, an icon appears next to each site listed. The color of the icon indicatesthe safety rating for the site. Users can access more information with the icons.
• In the browser window, a button appears in the upper-right corner. The color of the buttonindicates the safety rating for the site. Users can access more information with the button.
The button also notifies users when communication problems occur and provides quick access totests that help identify common issues.
• In site safety reports, details show how the safety rating was calculated based on types ofthreats detected, test results, and other data.
You can also enable the Secure Search feature, which inserts an additional level of protection fromweb-based threats during Internet searches on client computers and blocks risky websites from searchresults.
6
McAfee Endpoint Security 10.0.0 Software Product Guide 117

Web control supports 32-bit and 64-bit versions of Microsoft Internet Explorer, Mozilla Firefox, andGoogle Chrome browsers. There is a slight difference in the way some product features operate in thedifferent browsers.
Firefox doesn't allow you to check file downloads or to hide the web control button with the View |Toolbars command.
Chrome doesn't support file download enforcement or the Show Balloon option.
The web filtering module is a component of the web control service that enables administrators tomonitor and regulate browser activity on network computers. As an administrator, you can configurepolicy settings to allow or block websites and website resources based on site safety ratings, content,or URLs.
Web control button identifies threats while browsingWhen users browse to a website, a color-coded button appears in theupper-right corner of the browser. The color of the button corresponds to the safety rating for the site.
The Chrome browser window displays a small button in the address bar.
Green This site is tested daily and certified safe by McAfee SECURE™.
Green This site is safe.
Yellow This site might have some issues.
Red This site might have some serious issues.
Gray No rating is available for this site.
Orange A communication error occurred with the McAfee GTI server thatcontains rating information.
Blue No information is available to rate this site. The reason might bethat the site is internal or in a private IP address range.
Black This site is a phishing site or is blocked by a policy setting.
Phishing is an attempt to acquire sensitive information such asuser names, passwords, and credit card details. Phishing sitesmasquerade as trustworthy entities in electroniccommunication.
White A policy setting allows this site.
Silver A policy setting disabled web control.
Safety icons show threats while searching When users type keywords into a search engine such as Google, Yahoo, Bing, or Ask, safety iconsappear next to sites in the search results page. The color of the button corresponds to the site's safetyrating.
Tests revealed no significant problems.
Tests revealed some issues users should know about. For example, the site tried to change thetesters’ browser defaults, displayed pop-ups, or sent them a significant amount of non-spamemail.
6 Using the web control service and web filteringWeb control features
118 McAfee Endpoint Security 10.0.0 Software Product Guide

Tests revealed some serious issues that users should consider carefully before accessing this site.For example, the site sent testers spam email or bundled adware with a download.
This site is blocked by a policy option.
This site is unrated.
Site reports describe threat detailsUsers can view a website's safety report for details about specific threats discovered by testing.
Site reports are delivered from the McAfee GTI ratings server and provide the following information:
This item Indicates...
Overview The overall rating for the website. We determine this rating by looking at a widevariety of information. First, we evaluate a website's email and download practicesusing our proprietary data collection and analysis techniques. Next, we examine thewebsite itself to see if it engages in annoying practices such as excessive pop-ups orrequests to change your home page. Then we perform an analysis of its onlineaffiliations to see if the site associates with other suspicious sites. Finally, wecombine our own review of suspicious sites with feedback from our ThreatIntelligence services and alert you to sites that are deemed suspicious.
OnlineAffiliations
How aggressively the site tries to get you to go to other sites that we've flagged witha red rating. It is a very common practice on the Internet for suspicious sites to havemany close associations with other suspicious sites. The primary purpose of these'feeder' sites is to get you to visit the suspicious site. A site can receive a red ratingif, for example, it links too aggressively to other red sites. In effect, a site canbecome 'red by association' due to the nature of its relationship to red-flaggeddomains.
Web SpamTests
The overall rating for a website's email practices, based on the test results. We ratesites based on both how much email we receive after entering an address on thesite, and how spammy the email we receive looks. If either of these measures ishigher than what we consider acceptable, we'll rate the site as yellow. If bothmeasures are high, or one of them looks particularly egregious, we'll rate the sitered.
DownloadTests
The overall rating for the impact a site's downloadable software had on our testingcomputer, based on the test results. Red ratings are given to sites that havevirus-infected downloads or that add unrelated software that many people wouldconsider adware or spyware. The rating also takes note of the network servers aprogram contacts during its operation, as well as any modifications to browsersettings or a computer's registry files.
How safety ratings are compiledA McAfee team develops safety ratings by testing criteria for each site and evaluating the results todetect common threats.
Automated tests compile safety ratings for a website by:
• Downloading files to check for viruses and potentially unwanted programs bundled with thedownload.
• Entering contact information into sign-up forms and checking for resulting spam or a high volumeof non-spam email sent by the site or its affiliates.
• Checking for excessive pop-up windows.
• Checking for attempts by the site to exploit browser vulnerabilities.
• Checking for deceptive or fraudulent practices employed by a site.
Using the web control service and web filteringWeb control features 6
McAfee Endpoint Security 10.0.0 Software Product Guide 119

The team compiles test results into a safety report that can also include:
• Feedback submitted by site owners, which might include descriptions of safety precautions used bythe site or responses to user feedback about the site.
• Feedback submitted by site users, which might include reports of phishing scams or bad shoppingexperiences.
• More analysis by McAfee experts.
The McAfee GTI server stores site ratings and reports.
Secure Search featuresSecure Search inserts an additional level of protection from web-based threats during Internetsearches on client computers.
Secure Search features support Internet Explorer.
Configure these Secure Search options to protect users during searches:
• Search engine — Default search engine for use during Internet searches on client computers.
• Block links to risky sites — Automatically filter and block the malicious websites in search results basedon their site safety rating.
These options appear on the General Settings tab of the Web Control & Web Filtering policy page.
After configuring Secure Search options, it is important to notify users to accept the new searchprovider default and use Internet Explorer to perform Internet searches.
See also Configure Secure Search on page 133
Access web control featuresAccess web control features from the browser.
Tasks• Access features while browsing on page 121
Access web control features from the button on the browser. The button works differentlydepending on the browser.
• View site report while searching on page 121Use the safety icon on a search results page to view more information about the site.
• Troubleshoot communication problems on page 122Use this task from a client computer to determine why web control is not communicatingwith the McAfee GTI server that provides safety ratings information.
6 Using the web control service and web filteringAccess web control features
120 McAfee Endpoint Security 10.0.0 Software Product Guide

Access features while browsingAccess web control features from the button on the browser. The button works differently dependingon the browser.
Internet Explorer and Firefox
• Hold the cursor over this button to display a balloon with a summary of the safety report for thesite.
• Click the button to display the detailed safety report.
• Click the button next to the icon to display a menu of features.
Chrome — Click the button to display a menu of features.
In Chrome, you can't display balloons with the menu button. Balloons are available only from searchresults pages.
Task1 From the menu, select options.
Option To do... Notes
View Site Report View the safety report for the current site.
You can also click Read site report in the siteballoon.
Available only when web control isenabled.
Show Balloon Display the balloon for the current site. Available only when web control isenabled, and for browsers otherthan Chrome.
2 If the communication error button appears, show the balloon for thesite, and click Troubleshoot.
The connection status page indicates the possible cause of the communication error.
See also View site report while searching on page 121
View site report while searchingUse the safety icon on a search results page to view more information about the site.
Task1 Place the cursor over the safety icon. Balloon text displays a high-level summary of the safety
report for the site.
2 Click Read site report (in the balloon) to open a detailed site safety report in another browser window.
See also Access features while browsing on page 121
Using the web control service and web filteringAccess web control features 6
McAfee Endpoint Security 10.0.0 Software Product Guide 121

Troubleshoot communication problemsUse this task from a client computer to determine why web control is not communicating with theMcAfee GTI server that provides safety ratings information.
An orange button in the upper right corner of the browser indicatescommunication problems with the McAfee GTI server.
Communication troubleshooting isn't available in Chrome. To perform these tests, use Internet Exploreror Firefox.
Task1 In Internet Explorer or Firefox, hold the cursor over the orange button to display the balloon.
2 Click Troubleshoot to run tests and display the results.
A connection status page displays the reason for the communication error and possible resolutionsafter these tests are completed.
Test Checks for... A failed test means...
Internet Access Does the browser haveInternet access?
Your computer can't access the Internet. Thisfailure might mean that your network connection isdown or the proxy settings are configuredincorrectly. Contact your administrator.
McAfee GTI ServerAvailability
Is the McAfee GTIserver down?
The McAfee GTI servers are down.
3 Check the results when they are displayed and follow any instructions to resolve the problem.
4 Retest the connection by clicking Repeat Tests.
The Repeat Tests button enables you to see if the error persists or is corrected while the page is open.
Web filtering featuresThe web filtering component of web control provides expanded policy options for enabling anddisabling web control and for controlling the content users can access.
The additional policy options enable you to:
• Control user access to websites and file downloads based on their safety rating (for example, blockaccess to red sites and display a warning before opening yellow sites).
• Control user access to websites based on the type of content they contain, the function they enableusers to perform, or the risks they present.
• Create a list of sites that are always authorized or prohibited, based on their URL or domain.
How web filtering worksThe web filtering module adds the capability to control access to websites based on site safety ratings,content, or URL. Policy options for configuring access appear on the Web Control & Web Filtering policy page.
On this tab... Specify access to websites based on ...
General The site safety rating (red, yellow, or unrated).
Content Rules The type of content (such as social networking, stock trading, online shopping,blogs).
Exceptions The URL or domain.
6 Using the web control service and web filteringWeb filtering features
122 McAfee Endpoint Security 10.0.0 Software Product Guide

Overview of block/allow process
When a user attempts to visit a website, the web filtering module follows this process to determinewhether to block or allow access.
1 It checks the Exceptions list to see if the site's URL is authorized or prohibited.
If the site is authorized, it is allowed. If the site is prohibited, the client software blocks the contentand displays a notification that the site is blocked.
2 If the site is not on the Exceptions list, the client software checks the content categories that appearon the site and compares them to the settings in the Content Rules tab.
• If the site contains content with a Risk Group of Security, it is blocked by the default policy settings.
The client software blocks the content and displays a notification that the site is blocked.
• If the site includes content for which you have configured an action, the client software takesthe appropriate action.
Example: If the site contains Streaming Media content and you have allowed that content, the clientsoftware allows users to access the site. If you have blocked or warned that content, the clientsoftware displays a notification.
• If the site includes more than one type of content for which you have configured actions, theclient software responds to the content that presents the greatest threat.
Example: If a site contains both Online Shopping content (which you have allowed) and GamblingRelated content (which you have blocked), the client software blocks the site and displays anotification.
3 If no action is configured for the content on the site, the client software checks the site safetyratings for the site and any site resources (such as downloadable files) and compares them to thesettings in the General tab for Access to Sites and Downloads.• The client software blocks, warns, and allows access to the site or downloadable files based on
the actions configured on the tab.
By default, the client software blocks red sites (or downloadable files), warns yellow sites, andallows green sites.
Using safety ratings to control access The web filtering module adds policy options that allow, warn, or block each yellow, red, or unratedsite or downloadable file.
These options appear on the General tab of the Web Control & Web Filtering policy option page in theSecurityCenter.
When you block a site, users are redirected to a notification explaining that the site is blocked. Apolicy option allows you to customize the notification that is displayed.
When you configure a warning action for a site, users are redirected to a notification explaining thatthere might be threats on the site. They can then decide whether to cancel or continue theirnavigation to the site.
To ensure users can access specific sites that are important to your business, no matter how they arerated, add them to the Exceptions list as an authorized site. For authorized sites, the browser protectionservice ignores the safety rating.
Using the web control service and web filteringWeb filtering features 6
McAfee Endpoint Security 10.0.0 Software Product Guide 123

Using content categories to control access The web filtering module enables web control to categorize the type of content that appears on a site.You can use policy options to allow, warn, or block access to sites based on the category of contentthey contain.
The web filtering module uses more than 100 pre-defined content categories that are stored on theMcAfee GTI server. These categories are listed on the Content Rules tab of the Web Control & Web Filteringpolicy option page in the SecurityCenter.
For each category of content, the Content Rules tab displays:
• Type of content (for example, shopping or gambling).
• Function it enables users to perform (for example, purchasing or entertainment).
• Risks it might present to your business (for example, a risk to security or productivity).
This allows you to configure policy settings based on content alone, or the functions that users canperform by accessing the content, or the risks that the content might present to your business.
• You can block, warn, or allow all sites that contain specific types of content.
• You can block, warn, or allow all sites that enable specific types of functions or present specifictypes of risks or functions.
Risk Groups
Each category is placed in a Risk Group that identifies the primary risk from accessing this content. Riskgroups can help identify changes that need to be made with web-filtering policies and can be used inreporting. The Content Rules tab lists these risk groups.
• Bandwidth – Web pages that feature content that consumes a large amount of bandwidth (such asstreaming media or large files), which might affect the business-related flow of data on thenetwork.
• Communications – Web pages that allow direct communication with others through the web browser.
• Information – Web pages that allow users to find information that might not be pertinent to theirbusiness or education.
• Liability – Allowing users to view web pages in this category might be criminal or lead to lawsuits byother employees.
• Productivity – Non-business sites that users visit for entertainment, social, or religious reasons.
• Propriety – Sites in this category are for mature users only.
• Security – Web pages that are a source of malware, which can damage computer software, getaround network policies, or leak sensitive data.
Examples
You can use the filters at the top of the Content Rules tab to assist you in locating all the contentcategories for which you might want to configure actions. Then select whether to Allow, Warn, or Blockeach category that meets your criteria.
• Select a Functional Group of Risk/Fraud/Crime and a Risk Group of Security to display all the categories ofcontent that might pose a threat to user security due to fraud or criminal intent.
All sites containing content with a Risk Group of Security are blocked by default. This includes phishingpages, malicious downloads, malware, and spam.
6 Using the web control service and web filteringWeb filtering features
124 McAfee Endpoint Security 10.0.0 Software Product Guide

• Select a Functional Group of All and a Risk Group of Productivity to display all the categories of content thatmight impact users' productivity adversely, such as online shopping or gaming.
• Select a Functional Group of Lifestyle and a Risk Group of Propriety to configure settings for socialnetworking and dating sites.
• Select a Functional Group of Information/Communication and a Risk Group of All to display categories ofcontent used for collaborating and exchanging information. Because some sites are geared forprofessional use and some for personal use, you can allow or block each content categoryindividually. This provides the flexibility to enforce a company's or department's security standardsfor content such as Instant Messaging, Forum/Bulletin Boards, or Blogs/Wiki content, which have importantbusiness uses in some companies and not others.
Using URLs or domains to control access Web filtering allows you to set up an Exceptions list containing the URLs for sites that users can orcannot access.
• Authorized sites that users are always allowed to access, regardless of their safety rating or type ofcontent — Add authorized sites to ensure access to sites that are important to your business. Theweb control button in the upper-right corner of the browser window appears white for authorizedsites.
Exercise caution when adding authorized sites to policies.
You can also specify actions for resources, such as file downloads, within authorized sites. Forexample, if your users aren't vulnerable to potential threats on a yellow site, add the site as anauthorized site. If the site contains a red download file, allow access to the site, but block access tothose resources. This strategy makes sure that sites important to your business are accessible,while protecting your users from potential threats on those sites.
• Prohibited sites that users are never allowed to access — Add prohibited sites to block access tosites that are not related to job performance or do not conform to company security standards. Theweb control button in the upper-right corner of the browser window appears black for prohibitedsites.
How site patterns workThe Exceptions list uses site patterns to specify a range of sites that are authorized or prohibited. Thisenables you to authorize or prohibit a particular domain or a range of similar sites without enteringeach URL separately.
When a client computer attempts to navigate to a site, the web control service checks whether theURL matches any site patterns configured in the Exceptions list. It uses specific criteria to determine amatch.
Using the web control service and web filteringWeb filtering features 6
McAfee Endpoint Security 10.0.0 Software Product Guide 125

A site pattern consists of a URL or partial URL, which the web control service interprets as two distinctsections: domain and path.
Site pattern: www.mcafee.com/us/enterprise
http://www.mcafee.com
This is the domain. The domain consists of two parts:• Protocol. In this case: http://
• Internet domain. In this case: www.mcafee.com
Domain information is matched from the end. A matching URL’s domainmust end with the site pattern’s domain. The protocol can vary.
These domains match:
• http:// ftp.mcafee.com
• https://mcafee.com
• http://www.info.mcafee.com
These domains do not match:
• http:// www.mcafee.downloads.com
• http://mcafee.net
• http://www.mcafeeasap.com
• http://us.mcafee.com
/us/enterprise This is the path. The path includes everything that follows the / after thedomain.Path information is matched from the beginning. A matching URL’s pathmust begin with the site pattern’s path.
These paths match:
• /us/enterpriseproducts
• /us/enterprise/products/security
These paths do not match:
• /emea/enterprise
• /info/us/enterprise
Site patterns must be at last six characters in length, and they do not accept wildcard characters. Theweb control service does not check for matches in the middle or end of URLs.
Use the “.” character at the beginning of a site pattern to match a specific domain. For convenience,the “.” character disregards the protocol and introductory characters.
Example: .mcafee.com
Matches Does not match
• http://www.info.mcafee.com
• http://mcafee.com
• http://ftp.mcafee.com
• http://www.mcafeeasap.com
• http://salesmcafee.com
• http://ftp.mcafee.net
6 Using the web control service and web filteringWeb filtering features
126 McAfee Endpoint Security 10.0.0 Software Product Guide

Using Web Control mode to observe browsing activityWeb control monitors attempts made by client computers to access websites and downloads.Depending on the setting for Web Control Mode, it responds with actions configured by policy settings orsimply reports the attempts without taking any other action.
In Report mode, web control tracks but does not block access to websites and resources, such asdownloadable files. You can review user browsing activity on your network (in widgets and reports) tobe sure that any policy options you have configured to allow or block access will not prevent usersfrom accessing any web content required for your business. This enables you to evaluate browsingactivity on your network and decide how to configure security settings. When you are ready to enforcethe policy options you have configured, change the Web Control Mode to Prompt.
In Prompt mode, web control enforces the responses you have configured to block, allow, or warn usersabout websites and downloads. It also reports visits and downloads to the SecurityCenter.
Depending on the settings configured for the policy, Prompt mode blocks or displays a warning messageprompt when users attempt to access a website or resource that meets specified criteria. In this regard,it functions as both a Prompt mode and a Protect mode.
See also Observe browsing activity or enforce access control (learn mode) on page 131
Setting up a strategy for browsing securityThe web control service includes a default policy with settings recommended by McAfee to protectmanaged systems from most web-based threats. Customize these settings to address your businessneeds.
Guidelines for creating a strategyFollow these guidelines to design and implement a browsing security strategy that fully protects yourmanaged systems against web-based threats.
1 Configure a policy with Report mode enabled, then install web control on client computers.
Before installing the client software, enable Report mode in a policy assigned to client computers.This mode prevents web control from acting (such as blocking and warning) based on the policysettings. Instead, web control tracks browsing behavior data that you can retrieve in reports.
2 Evaluate browsing traffic and usage patterns (widgets and reports).
In the SecurityCenter, view the web control and web filtering widgets on the Dashboard page andreports (such as the Web Filtering report) to learn about network browsing patterns. For example,what types of sites are users visiting and what tasks are they performing at these sites? What timeof day is browsing traffic heaviest?
3 Create policies.
Configure policy options based on the browsing behavior revealed in the reports. Block or warn anysites or downloads that present threats, and allow sites that are important to your users.
4 Test and evaluate policy settings in Report mode.
With Report mode still enabled, track the number of users who access sites that the configuredpolicy settings might affect. View reports, then view and evaluate the tracked data. Are the settingscomprehensive enough? Did the settings result in any unintended consequences? Adjust thesettings as needed, then enable Prompt mode to activate them.
5 Ensure compliance, productivity, and security with frequent monitoring.
Using the web control service and web filteringSetting up a strategy for browsing security 6
McAfee Endpoint Security 10.0.0 Software Product Guide 127
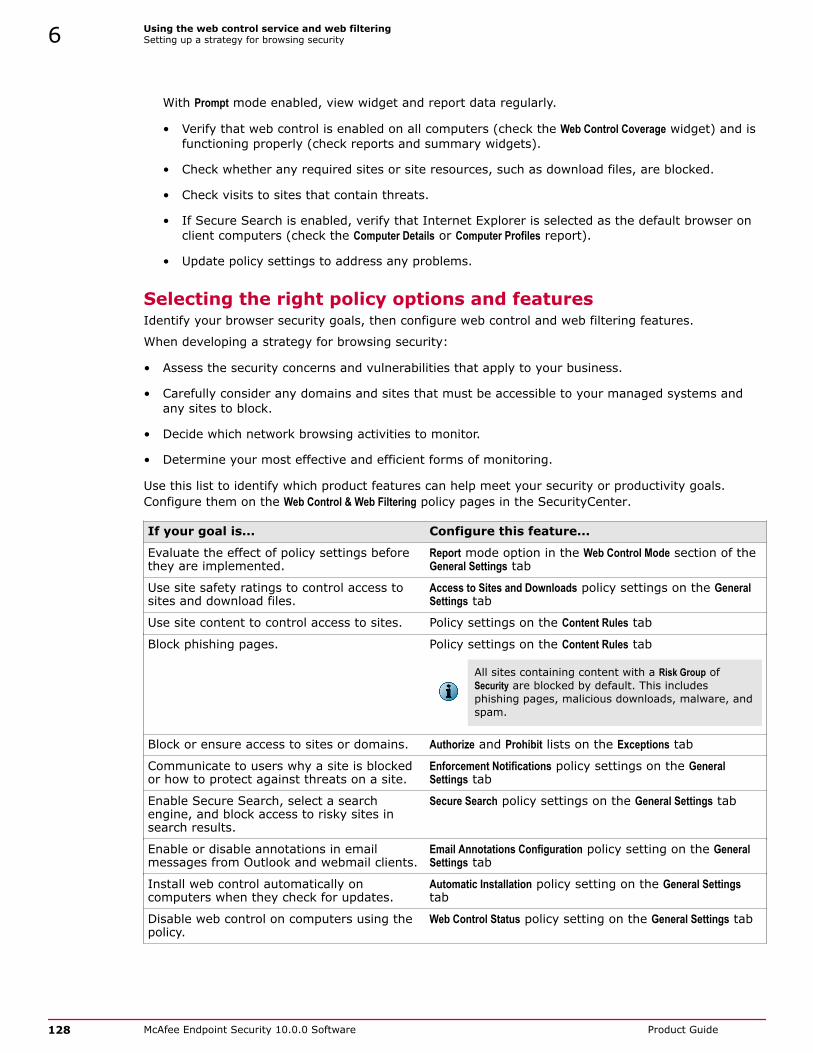
With Prompt mode enabled, view widget and report data regularly.
• Verify that web control is enabled on all computers (check the Web Control Coverage widget) and isfunctioning properly (check reports and summary widgets).
• Check whether any required sites or site resources, such as download files, are blocked.
• Check visits to sites that contain threats.
• If Secure Search is enabled, verify that Internet Explorer is selected as the default browser onclient computers (check the Computer Details or Computer Profiles report).
• Update policy settings to address any problems.
Selecting the right policy options and featuresIdentify your browser security goals, then configure web control and web filtering features.
When developing a strategy for browsing security:
• Assess the security concerns and vulnerabilities that apply to your business.
• Carefully consider any domains and sites that must be accessible to your managed systems andany sites to block.
• Decide which network browsing activities to monitor.
• Determine your most effective and efficient forms of monitoring.
Use this list to identify which product features can help meet your security or productivity goals.Configure them on the Web Control & Web Filtering policy pages in the SecurityCenter.
If your goal is... Configure this feature...
Evaluate the effect of policy settings beforethey are implemented.
Report mode option in the Web Control Mode section of theGeneral Settings tab
Use site safety ratings to control access tosites and download files.
Access to Sites and Downloads policy settings on the GeneralSettings tab
Use site content to control access to sites. Policy settings on the Content Rules tab
Block phishing pages. Policy settings on the Content Rules tab
All sites containing content with a Risk Group ofSecurity are blocked by default. This includesphishing pages, malicious downloads, malware, andspam.
Block or ensure access to sites or domains. Authorize and Prohibit lists on the Exceptions tab
Communicate to users why a site is blockedor how to protect against threats on a site.
Enforcement Notifications policy settings on the GeneralSettings tab
Enable Secure Search, select a searchengine, and block access to risky sites insearch results.
Secure Search policy settings on the General Settings tab
Enable or disable annotations in emailmessages from Outlook and webmail clients.
Email Annotations Configuration policy setting on the GeneralSettings tab
Install web control automatically oncomputers when they check for updates.
Automatic Installation policy setting on the General Settingstab
Disable web control on computers using thepolicy.
Web Control Status policy setting on the General Settings tab
6 Using the web control service and web filteringSetting up a strategy for browsing security
128 McAfee Endpoint Security 10.0.0 Software Product Guide

If your goal is... Configure this feature...
Monitor the effect of current policy settings. • Web Control and Web Filtering widgets on the Dashboardpage
• Web Filtering reports on the Reports page
Obtain detailed reports based on sitecontent.
Web Filtering reports on the Reports page
Information that web control sends to McAfeeThe client software sends the following information to the SecurityCenter for use in the Web Filteringreport.
• Type of event initiated by the client computer (site visit or download).
• Unique ID assigned by Endpoint Security to the client computer.
• Time of event.
• Domain for event.
• URL for event.
• Safety rating for the event’s site, stored on the McAfee GTI server.
• Whether the event’s site or site resource is added to the Exceptions list as an authorized orprohibited site.
• Reason for action (allow, warn, or block) taken by web control.
Web control sends the following information to the McAfee GTI server:
• Version of the web control client software running on the client computer.
• Version of the operating system running on the client computer.
• Language and country locale selected for the operating system and browser running on the clientcomputer.
• Host name and part of the URL for each website the client computer requests to access.
• MD5 algorithm for each application the client computer requests to download.
When a client computer visits a website, web control tracks the site’s domain specifier. The domainspecifier is the smallest amount of information required for web control to uniquely identify the sitebeing rated for security. The focus of web control is protecting your client computers; no attempt ismade to track personal Internet usage.
Web control does not send information about your company’s intranet site to the McAfee GTI serverwhere site safety ratings information is stored.
See also Web Filtering report on page 136View browsing activity on client computers on page 135
Configure web control and web filtering featuresUse these tasks to configure how web protection features work on client computers and monitor theireffectiveness.
Using the web control service and web filteringConfigure web control and web filtering features 6
McAfee Endpoint Security 10.0.0 Software Product Guide 129

Tasks• Install web control during policy updates on page 130
Use this task to install the client software for web control automatically whenever clientcomputers check for an updated policy.
• Enable and disable web control via policy on page 130Use this task to enable and disable web control on all client computers using the policy.
• Observe browsing activity or enforce access control (learn mode) on page 131Configure Web Control Mode to only report network browsing activity or to enforce securitysettings for website access.
• Block or warn access based on safety ratings on page 131Use this task to block users from accessing websites and file downloads based solely ontheir site safety rating.
• Block or allow sites based on URLs on page 132Use this task to create and manage an Exceptions list of websites that are always allowed orblocked based on the URL.
• Block or warn site access based on content on page 132Use this task to block users from accessing sites and file downloads that contain particulartypes of content.
• Configure Secure Search on page 133Configure Secure Search to automatically block risky sites from appearing in search results.
• Customize user notifications for blocked content on page 134Use this task to create a notification that displays when users attempt to access sites thatare blocked.
• Enable and disable email annotations on page 134Use this task to specify whether annotations are visible in email messages.
Install web control during policy updatesUse this task to install the client software for web control automatically whenever client computerscheck for an updated policy.
You might want to use this feature for adding web control on computers where the client software forother product modules is already installed. By default, this option is enabled.
TaskFor option definitions, click ? in the interface.
1 On the Policies page, click Add Policy (or click Edit to modify an existing policy).
2 Select Web Control, then click the General Settings tab.
3 Under Automatic Installation, select Automatically install web control on all computers using this policy.
4 Click Save.
(For a new policy, click Next, select additional options for the policy, then click Save.)
Enable and disable web control via policyUse this task to enable and disable web control on all client computers using the policy.
6 Using the web control service and web filteringConfigure web control and web filtering features
130 McAfee Endpoint Security 10.0.0 Software Product Guide

TaskFor option definitions, click ? in the interface.
1 On the Policies page, click Add Policy (or click Edit to modify an existing policy).
2 Select Web Control & Web Filtering, then click the General Settings tab.
3 Under Web Control Status, select or deselect the option Disable web control on all computers using this policy.
This feature takes effect on client computers the next time they update their policy.
4 Click Save.
(For a new policy, click Next, select additional options for the policy, then click Save.)
Observe browsing activity or enforce access control (learnmode)Configure Web Control Mode to only report network browsing activity or to enforce security settings forwebsite access.
Depending on the setting for Web Control Mode, when users attempt to access websites or downloads,web control responds with actions (allow, block, or warn) configured by policy settings or simplyreports the attempts without taking any other action.
TaskFor option definitions, click ? in the interface.
1 On the Policies page, click Add Policy (or click Edit to modify an existing policy).
2 Select Web Control & Web Filtering, then click the General Settings tab.
3 Under Web Control Mode, select a mode.
• Prompt — Block, allow, or warn users about websites or file downloads based on policy settings.
• Report — Track user browsing activity and send it to the SecurityCenter for use in reports. Do notblock or warn users about access. This enables you to evaluate browsing activity on yournetwork and decide how to configure security settings.
4 Click Save.
(For a new policy, click Next, select additional options for the policy, then click Save.)
See also Using Web Control mode to observe browsing activity on page 127
Block or warn access based on safety ratings Use this task to block users from accessing websites and file downloads based solely on their sitesafety rating.
Before you beginWeb Control Mode must be set to Prompt.
When users attempt to visit a website, if that website does not appear on the Exceptions list, and if thecontent is not blocked, then the client software checks whether the site is restricted based on itsrating.
For option definitions, click ? in the interface.
Using the web control service and web filteringConfigure web control and web filtering features 6
McAfee Endpoint Security 10.0.0 Software Product Guide 131

Task
1 On the Policies page, click Add Policy (or click Edit to modify an existing policy).
2 Select Web Control & Web Filtering, then click the General Settings tab.
3 Under Access to Sites and Downloads, select a separate level of access for red, yellow, and unrated sites.
• Block — Block access to all sites or file downloads with the specified rating.
• Warn — Display a warning when users attempt to access a site or file download with the specifiedrating.
• Allow — Allow access to all sites or file downloads with the specified rating.
4 Click Save.
(For a new policy, click Next, select additional options for the policy, then click Save.)
Block or allow sites based on URLs Use this task to create and manage an Exceptions list of websites that are always allowed or blockedbased on the URL.
When users attempt to visit a website, the client software checks first to see whether the site appearsin the Exceptions list and responds accordingly.
By authorizing a site, web control ignores the safety rating for that site. Users can access authorizedsites even if threats have been reported on these sites and they have a safety rating of red. Users canalso access unsafe downloads and phishing pages on authorized sites. It is important to exercisecaution when adding authorized sites to an Exceptions list.
For option definitions, click ? in the interface.
Task
1 On the Policies page, click Add Policy (or click Edit to modify an existing policy).
2 Select Web Control & Web Filtering, then click the Exceptions tab.
3 Click Add to Exceptions List.
4 Type a URL or site pattern into the text box, then click an action to associate with the site.
• Authorize — Add the site to the Exceptions list as an authorized site, which users are always allowedto access.
• Prohibit — Add the site to the Exceptions list as a prohibited site, which users are not allowed toaccess.
• Cancel — Close the text box without adding the site to the list.
5 Repeat step 4 for each site you want to add to the list.
6 Click Save.
(For a new policy, click Next, select additional options for the policy, then click Save.)
Block or warn site access based on contentUse this task to block users from accessing sites and file downloads that contain particular types ofcontent.
When users attempt to visit a website, if that website does not appear on the Exceptions list, then theclient software checks whether the site is restricted based on content.
6 Using the web control service and web filteringConfigure web control and web filtering features
132 McAfee Endpoint Security 10.0.0 Software Product Guide

For option definitions, click ? in the interface.
Task1 On the Policies page, click Add Policy (or click Edit to modify an existing policy).
2 Select Web Control & Web Filtering, then click the Content Rules tab.
3 Select one or more filtering options to customize the content categories listed. (Optional)
• Functional Group — Display content categories that are used to perform similar functions.
• Risk Group — Display content categories that present similar risks to users.
All sites containing content with a Risk Group of Security are blocked by default. This includesphishing pages, malicious downloads, malware, and spam.
• Action — Display the content categories for which you have configured an allow, block, or warnaction.
4 In the list, select the content categories for which you want to select an action.
5 Click Allow, Block, or Warn.
This action will be applied when users attempt to access websites, pages, or downloads thatcontain the selected categories of content.
6 Click Save.
(For a new policy, click Next, select additional options for the policy, then click Save.)
Configure Secure SearchConfigure Secure Search to automatically block risky sites from appearing in search results.
Secure Search automatically filters the malicious websites in the search results based on their sitesafety rating.
To use this feature, enable Secure Search and select a search engine. The next time the user opensInternet Explorer, web control displays a pop-up prompting the user to change to Secure Search withthe specified search engine.
Web control uses Yahoo as the default search engine and supports Secure Search features on InternetExplorer.
TaskFor option definitions, click ? in the interface.
1 On the Policies page, click Add Policy (or click Edit to modify an existing policy).
2 Select Web Control & Web Filtering, then click the General Settings tab.
Using the web control service and web filteringConfigure web control and web filtering features 6
McAfee Endpoint Security 10.0.0 Software Product Guide 133

3 Under Secure Search, configure options.
• Enable McAfee Secure Search feature — Select this option to enable Secure Search on client computers.
• Search engine — Select a search provider to use for Secure Search.
• Block links to risky sites (Recommended) — Select this option to gray out links to risky sites in securesearch results on client computers.
If you change the default search engine, restart the browser after enforcing the policy on the clientsystem.
4 Click Save.
(For a new policy, click Next, select additional options for the policy, then click Save.)
See also Secure Search features on page 120Safety icons show threats while searching on page 118
Customize user notifications for blocked content Use this task to create a notification that displays when users attempt to access sites that are blocked.
The notification appears when users attempt to access a site you have blocked by ratings, by content,or by adding it to the Exceptions list as a prohibited site. Instead of navigating to the site, users areredirected to a page displaying the customized notification. You might use the notification to explainwhy the site is blocked.
The notification appears on client computers in the language configured for the client software, if youhave created the notification in that language.
For option definitions, click ? in the interface.
Task1 On the Policies page, click Add Policy (or click Edit to modify an existing policy).
2 Select Browser Protection & Web Filtering, then click the General Settings tab.
3 Under Enforcement Notifications, select a language for the notification.
By default, the language you have logged on in appears. If that language is not available fornotifications, English is displayed.
4 Type a notification of up to 200 characters.
5 Repeat steps 3 and 4 for each language for which you want to configure a notification.
6 Click Save.
(For a new policy, click Next, select additional options for the policy, then click Save.)
Enable and disable email annotationsUse this task to specify whether annotations are visible in email messages.
When this feature is enabled, users can make annotations directly in email messages and viewannotations that others have made.
You might want to disable this feature if it causes performance issues on your network.
6 Using the web control service and web filteringConfigure web control and web filtering features
134 McAfee Endpoint Security 10.0.0 Software Product Guide

TaskFor option definitions, click ? in the interface.
1 On the Policies page, click Add Policy (or click Edit to modify an existing policy).
2 Select Web Control & Web Filtering, then click the General Settings tab.
3 Under Email Annotations Configuration, select the options you want to enable.
• Enable annotations in Outlook — Annotate URLs in email management tools, such as Microsoft Outlookor Outlook Express.
• Enable annotations in webmail clients — Annotate URLs in browser-based email clients, such as Gmail,Outlook.com, AOL, and Yahoo.
4 Click Save.
(For a new policy, click Next, select additional options for the policy, then click Save.)
View browsing activity on client computers Use this task to view the Web Filtering report, which lists visits to websites by client computers andattempts to access websites for which you have configured policy options to control access.For option definitions, click ? in the interface.
Task1 Click the Reports tab, then click Web Filtering.
2 In the Web Filtering report, view the number and type of sites visited by client computers on thenetwork.
3 Do any of the following.
When you wantto...
Do this...
Display the sites in adomain
Click the triangle icon next to the domain name to display the sites usersattempted to access in the domain.
View details aboutan access attempt
Click a quantity to display the Event Details page:• When View | Computers is selected, click a quantity in an action column
(such as Blocked).
• When View | Domains is selected, click a quantity under Access Count.
The Event Details page shows the name of the computer that attempted toaccess the site, the URL for the site, the type of access attempted, and thedate and time of the attempted access.
View details about acomputer
Click a computer name to display the Computer Details page, which displaysinformation about the computer, its service components, and its detections.
See also Web Filtering report on page 136Information that web control sends to McAfee on page 129
Using the web control service and web filteringView browsing activity on client computers 6
McAfee Endpoint Security 10.0.0 Software Product Guide 135

Web Filtering reportUse the Web Filtering report, available from the SecurityCenter, to track Internet usage and browsingactivity on your network.
This report lists visits to websites and attempts to access websites for which you have configuredpolicy options to control access. Use this report to view detailed information about the specific sites,their safety ratings and content categories, the computers that attempted to access them, and theaction taken by the browser protection service.
Phishing pages and sites prohibited by policy, which have a black safety rating on client computers,appear in the report as red sites.
Visits to safe (green) sites, internal (blue) sites, and sites authorized by policy (white) do not appearin the report.
See also View browsing activity on client computers on page 135Information that web control sends to McAfee on page 129
Best practices (web control)To develop an effective strategy for guarding against web-based threats, we recommend that youproactively track browsing activity on your network and configure policy options appropriate for yourusers.
1 Check your status emails or the SecurityCenter website for an overview of your account’s status.Ensure that the client software for the web control service is installed and enabled on allcomputers.
2 To centralize management and more easily monitor web protection, configure policy options toblock content that is dangerous or violates company standards and warn users about suspiciouscontent.
3 Use "learn" or "observe" mode to evaluate network browsing activity before you begin blockingaccess to websites and downloads. This lets you check that users can access all the websitesrequired for your business. Set the Web Control Mode to Report for "learn" or "observe" mode, then setit to Prompt when you want to enforce policy settings to allow and block websites.
4 Check the Web Filtering report regularly to see what sites users are visiting, their safety ratings, andtheir content categories.
5 Using the Web Filtering report:
• Determine whether users are visiting sites that should be added to an Exceptions list. Authorizesites that are important to productivity to ensure that users can always access them. Prohibitsites that do not comply with company policy or contribute to job performance goals to ensureusers cannot access them.
• Note the number of visits to red, yellow, and unrated sites. If appropriate, configure policyoptions to block sites or site resources that have particular safety ratings.
• Note the content categories for sites being visited. If appropriate, configure policy options toblock sites containing particular types of content.
• Note which computers are visiting which sites. If appropriate, configure different policies forcomputers that should and should not be able to access particular sites or content.
6 Using the web control service and web filteringWeb Filtering report
136 McAfee Endpoint Security 10.0.0 Software Product Guide
6 Customize a notification to display on client computers that attempt to access a site you haveblocked.
7 To ensure that all computers are protected against web-based threats, configure policy options toinstall and enable web control via policy.
8 Configure Secure Search features for client computers and block access to risky sites in searchresults lists. Then let users know that they need to accept McAfee Secure Search as their default searchprovider for Internet Explorer and use Internet Explorer for Internet searches.
9 Configure policy settings that specify web control actions (block, warn, or allow) for the websitesthat are not known to the McAfee GTI server (zero-day protection).
Using the web control service and web filteringBest practices (web control) 6
McAfee Endpoint Security 10.0.0 Software Product Guide 137

6 Using the web control service and web filteringBest practices (web control)
138 McAfee Endpoint Security 10.0.0 Software Product Guide

7 Using the SaaS email protection service
The SaaS email protection service supplements the email scans performed on client computers by thevirus and spyware protection service. Your company’s email is redirected through the McAfeemulti-layered spam detection system and scanned before entering the network, with less than aone-second delay in transit.
The SaaS email protection service resides outside the network; it requires no system resources, andthere's no hardware or software to install. Use the SecurityCenter and the SaaS email and webprotection portal to manage web protection features.
Contents Core SaaS email protection features Additional SaaS email protection services The SaaS email protection widget and portal Account activation and setup Reports and statistics for SaaS email protection Find more information
Core SaaS email protection featuresUse the core features of the SaaS email protection service to safeguard your email communication andensure uninterrupted access to messages.
The SaaS email protection service routes all inbound email through McAfee servers to scan for threats.It checks for spam, phishing scams, viruses, directory harvest attacks, and other email-borne threatsin messages and attachments before they enter your network, then blocks them. The SaaS emailprotection service allows you to specify whether to deny or quarantine messages detected as spam.
The SaaS email protection service provides:
Protection from email-borne threats — The flood of email threats is stopped before entering thenetwork.
Real-time, around-the-clock email security — Email is processed all day, every day in real timethrough a highly secure system architecture that operates with no detectable latency.
Simplified management — Centralized, web-based policy management through the SaaS email andweb protection portal allows you to configure comprehensive policies for threats and content filtering(for inappropriate words and phrases). You can also check email statistics and activity, and viewreports and check quarantined messages.
Customizable scanning criteria — Policy options allow you to configure which threats and types ofcontent should be blocked. You can allow different types of content for different users and groups ofusers on your account.
7
McAfee Endpoint Security 10.0.0 Software Product Guide 139

Continuous access to email — Web-based email access allows uninterrupted use and managementof email during planned or unplanned outages.
• Retains all inbound and outbound email sent or received during the outage.
• Synchronizes an accurate record of all outage-period message activity with your email servers.
As of April, 2012, continuity features are included in new or renewed subscriptions to the SaaS emailprotection service.
A robust set of core features — All accounts for the SaaS email protection service include:
• More than 20 separate filters
• Advanced spam blocking
• Virus and worm scanning
• Content and attachment filtering
• Fraud protection
• Protection from email server attacks
• Outbound email filtering
• Accurate and effective quarantine with customizable reporting
• Comprehensive email threat reporting
• Secure message delivery over Enforced Transport Layer Security (TLS)
You can customize the way these features work by configuring policy settings on the SaaS email andweb protection portal. A link is provided on the Help page of the SecurityCenter to detailed informationabout configuring features for the SaaS email protection service.
Additional SaaS email protection servicesPurchase additional services to supplement the core features set of the SaaS email protection service.
Instructions for setting up these services are provided when you activate your account. They areavailable at any time in a welcome kit on the Utilities page of the SecurityCenter. A separate welcomekit is available for each additional service you purchase except encryption.
You can also customize the way these features work by configuring policy settings on the SaaS emailand web protection portal. A link is provided on the Help page of the SecurityCenter to guides thatcontain detailed instructions for configuring features for the SaaS email protection service.
Archiving
Stores all internal, inbound, and outbound email messages in a centralized, secure location.
• Stores messages and message metadata in read-only format to protect them in their original state.
• Verifies that stored message copies are identical to the original.
• Protects messages on your email server from deletion until accurate copies are made and verified.
• Adds a unique numeric identifier to each message to comply with SEC requirements prohibitingtampering or deletion of messages.
7 Using the SaaS email protection serviceAdditional SaaS email protection services
140 McAfee Endpoint Security 10.0.0 Software Product Guide

• Provides tools for locating information in messages, attachments, and metadata with simple orcomplex search criteria, including user, date range, message content, or attachment content.
• Transports messages to storage securely via TLS or SSL and stores them using 256-bit encryption.
Intelligent Routing
Routes filtered email to your organization's distributed email systems.
• Accepts email for a single domain and routes it to different email servers and environments (forexample, different geographic locations or business units), which can use different policy settings.
• Creates email address uniformity for corporate branding purposes.
• Facilitates the addition of new local domains to the existing public domain as your companyexpands its workforce or locations.
• Reduces the need to purchase, administer, and maintain internal email routing equipment.
• Leverages disaster recovery when one email sites goes down, without interrupting email service forother sites that are still up and running.
Encryption
Encrypts the content of outbound messages.
• Ensures the security of email message content through encryption and by requiring accountcredentials for recipients.
• Allows you to define which messages to encrypt (for example, all messages that contain a specifiedkeyword) and for which users or recipients.
• Provides recipients with two methods for retrieving the content in encrypted messages sent tothem:
• Remotely, by using a link that appears in a delivery notification.
• Locally, by downloading a Secure Reader application to client computers.
• Allows recipients to customize the way encrypted email is delivered.
Using the SaaS email protection serviceAdditional SaaS email protection services 7
McAfee Endpoint Security 10.0.0 Software Product Guide 141

The SaaS email protection widget and portalThe SaaS email protection widget and portal allow you to view activity and configure features for yourSaaS email protection service account.
When you purchase a subscription for the SaaS email protection service, a SaaS email protectionwidget is displayed on the Dashboard page of the SecurityCenter. The widget contains a link to activatethe service. After activation, the link's text changes (Click here to configure); use it to access the SaaSemail and web protection portal.
The portal provides tools for configuring administrative features and policy options, checking emailstatistics and activity, and viewing reports. The portal supports these browsers running on theadministrative computer:
• Internet Explorer 8.x on Windows XP, Windows Vista, and Windows 7
• Internet Explorer 7.x on Windows XP and Windows Vista
7 Using the SaaS email protection serviceThe SaaS email protection widget and portal
142 McAfee Endpoint Security 10.0.0 Software Product Guide

• Firefox 3.5.x on Windows XP, Windows Vista, and Windows 7
• Internet Explorer 6.x on Windows XP
See also Access the SaaS email and web protection portal on page 145
Account activation and setupTo begin using the SaaS email protection service, you must activate your account, then perform somebasic configuration tasks.These tasks are required to use the SaaS email protection service.
1 Activate your account.
If you have already activated an account for the SaaS web protection service, you do not need toactivate the SaaS email protection service.
2 Redirect your MX records and configure the core features you have purchased.
3 Configure any additional SaaS email services you have purchased.
Before you can activate your account, your company needs to have its own mail domain, such asyourdomain.com, with a static IP address and a dedicated email server, either in-house or hosted byan ISP.
When your account is ready to activate, an action item appears on the Dashboard page of theSecurityCenter website. Click the button associated with the action item to display activationinstructions. A SaaS email protection widget also appears on the Dashboard page with a link to activateyour account.
When activation is complete, reporting information appears in the widget along with a link to the SaaSemail and web protection portal. You can view additional instructions for configuring your account inone or more welcome kits available on the Utilities page, and you can configure policy options on theportal.
Using the SaaS email protection serviceAccount activation and setup 7
McAfee Endpoint Security 10.0.0 Software Product Guide 143

After activation, use these tasks at any time to view and customize the features of the SaaS emailprotection service:
1 Access the SaaS email and web protection portal.
2 Customize policy options.
3 Check quarantined messages and adjust settings if needed.
4 Read encrypted messages and configure delivery options.
Activate and set up your accountUse this SecurityCenter task to activate your account for the SaaS email protection service, thenredirect your MX records and set up the features.
When your account is ready to activate, an action item appears on the Dashboard page of theSecurityCenter.
If you have purchased additional SaaS email services, you should configure them after you activateand configure the core features.
If you have already activated an account for the SaaS web protection service, you do not need toactivate the SaaS email protection service.
TaskFor option definitions, click ? in the interface.
1 On the Dashboard page of the SecurityCenter, click the button for the action item Your SaaS emailprotection needs to be activated.
(If you need to activate the SaaS web protection service too, the action item includes it.)
2 Type the required information.
• Primary domain name — The name of the domain you want to protect (for example,yourdomain.com). If you want to protect multiple domains, type only the primary domain here.You will be able to set up additional domains later on the SaaS email and web protection portal.
Customers adding the optional intelligent routing service are required to designate one domainas the organization's public domain. All other domains should be designated as primary domains.
• Technical contact email address — The email address where you want McAfee to send technical andsupport emails for your account.
3 Click Continue.
7 Using the SaaS email protection serviceAccount activation and setup
144 McAfee Endpoint Security 10.0.0 Software Product Guide

4 Follow the steps for redirecting your domain's mail exchange (MX) records and configuring corefeatures.
5 If you have purchased additional SaaS email services, open the welcome kit for each service andfollow the instructions provided.
Links to the welcome kits for the services you have purchased are provided at the top of the page.The instructions are provided in PDF format.
(The SaaS email encryption service does not have a welcome kit. Documentation is available on theSaaS email and web protection portal by clicking the link Guides for SaaS Email Protection on the Help &Support page of the SecurityCenter.)
Welcome kits for additional services also contain instructions for setting up the core features of theSaaS email protection service. If you have purchased core protection and one additional service, youcan configure both by following the instructions in the optional welcome kit. If you have purchasedmore than one additional service, you need to open multiple welcome kits, then follow any steps youhave not already completed.
Access the SaaS email and web protection portalUse this task to access the SaaS email and web protection portal directly from the SecurityCenter. Noseparate login credentials are required.
The portal provides tools for configuring administrative features and policy options, checking emailstatistics and activity, and viewing reports.
TaskFor option definitions, click ? in the interface.
• From the SecurityCenter, perform one of these actions.
• Click the Dashboard tab, then select Click here to configure in a SaaS email protection widget.
• Click the Policies tab, then select Configure SaaS Email Protection Policy from the drop-down menu.
• Click the Reports tab, then select SaaS Email Protection.
The SaaS email and web protection portal opens in a separate browser window.
See also The SaaS email protection widget and portal on page 142
Configure policy settings for the SaaS email protection serviceUse this task to create a policy or modify policy settings for the SaaS email protection service on theSaaS email and web protection portal.
If you do not customize policy settings, the SaaS email protection service uses default settings forinbound and outbound message filtering and additional services.
TaskFor option definitions, click ? in the interface.
1 From the SecurityCenter, click the Policies tab, then select Configure SaaS Email Protection Policy from thedrop-down menu.
2 On the SaaS email and web protection portal, click the Email Protection tab, then click the Policies tab.
Using the SaaS email protection serviceAccount activation and setup 7
McAfee Endpoint Security 10.0.0 Software Product Guide 145

3 Select the policy and settings you want to configure.
• Click New to create a policy.
• Select a policy from the list, then click Edit to modify an existing policy.
4 Click Save.
Check quarantined messagesUse this task to view quarantined email detections and ensure they are being filtered appropriately.
TaskFor option definitions, click ? in the interface.
1 From the SecurityCenter, open the SaaS email and web protection portal.
• Click the Dashboard tab, then select Click here to configure in a SaaS email protection widget.
• Click the Policies tab, then select Configure SaaS Email Protection Policy from the drop-down menu.
2 On the SaaS email and web protection portal, click the Email Protection tab, then click the Policies tab.
3 Select options required to display all quarantined messages.
• Threat — Select All Threats.
• Day — Select All Days.
• Direction — Select Inbound, or select Inbound and Outbound if you also use outbound email filtering.
4 Click Search.
5 For each message, check the type of threat, the sender, the recipient, and the subject.
6 To view detailed information about a message, hold the cursor over the information displayed inthe From column.
7 If messages are being quarantined incorrectly, add email addresses to a policy's Allow List or Deny Listas needed.
Read encrypted messages Use this task to read the content of email messages that have been encrypted by the SaaS emailprotection service.
Before you beginAccount login credentials are required to access encrypted messages.
When an encrypted message has been sent to a user, the user receives a notification with a link to themessage.
Task
• Use one of these methods.
• Click the link in the notification that an encrypted message has been delivered.
• If the subscription to SaaS email encryption has not been activated, the link allows you toactivate it, then access the message.
• If the subscription has been activated, the link allows you to access the message in thePick-up portal.
7 Using the SaaS email protection serviceAccount activation and setup
146 McAfee Endpoint Security 10.0.0 Software Product Guide

• Download the Secure Reader application on the user's client computer, then access the messagelocally. The Secure Reader application is available from the Pick-up portal.
Users can configure how encrypted messages are delivered to them after installing the SecureReader application.
Reports and statistics for SaaS email protectionView account information tracked by the SaaS email protection service in charts and administrativereports.
• Weekly statistics for email usage and detections, available in the widgets on the Dashboard page ofthe SecurityCenter.
• Data on email traffic, performance, and detections, available in reports on the portal.
View email activity for the weekUse this task to view statistics on email activity and detections for the last seven days.
TaskFor option definitions, click ? in the interface.
1 From the SecurityCenter, click the Dashboard tab.
2 In one of the SaaS email activity widgets, check your email statistics.
3 Select the widget's Click here to configure link to open the SaaS email and web protection portal, whereyou can view additional information about the number and types of threats detected.
View reportsUse this task to view reports created for your SaaS email protection service account.
TaskFor option definitions, click ? in the interface.
1 From the SecurityCenter, click the Reports tab, then click SaaS Email Protection.
2 On the SaaS email and web protection portal, click the Email Protection tab, then click the Reports tab.
3 Select the information to appear in the report.
• Select a domain, type of report, and time period to display the corresponding report data.
• Click Performance Reports to display a page where you can schedule a recurring weekly or monthlyreport of performance data to be distributed via email.
Find more informationUse this task to access detailed instructions for using the features on the SaaS email and webprotection portal.
Using the SaaS email protection serviceReports and statistics for SaaS email protection 7
McAfee Endpoint Security 10.0.0 Software Product Guide 147

TaskFor option definitions, click ? in the interface.
• Select one of these options:
• On the SecurityCenter, click the Help & Support tab, click Guides for SaaS Email Protection, then selectthe appropriate guide.
• On the SaaS email and web protection portal, click Help to display context-sensitive informationabout the current page.
7 Using the SaaS email protection serviceFind more information
148 McAfee Endpoint Security 10.0.0 Software Product Guide

8 Using the Saas web protection service
The SaaS web protection service redirects all web traffic through McAfee servers for analysis.Web-based threats and inappropriate content are intercepted before being sent to client computers onyour account. Policy options allow you to define inappropriate content and specify the threats to block.
The SaaS web protection service resides outside the network; it requires no system resources, andthere’s no hardware or software to install. Use the SecurityCenter and the SaaS email and webprotection portal to manage web protection features.
Contents SaaS web protection features Multiple layers of protection against web-based threats The SaaS web protection widget and portal Account activation and setup Reports for SaaS web protection Find more information
SaaS web protection features SaaS web protection protects client computers from web-based threats encountered while browsingand searching the web. All websites are checked before being delivered to the web browsers on yournetwork. The type of threats and content blocked by the SaaS web protection service depends on thepolicy options configured for your account.
The SaaS web protection service includes these features:
Real-time scanning — Web content is scanned each time it is accessed; any new threats andupdated content are assessed before being blocked or delivered to your network.
Up-to-date scanning criteria — Scanning criteria are updated regularly so that you are alwaysprotected against the most current threats.
Simplified management — Centralized, web-based policy management through the SaaS email andweb protection portal allows you to configure comprehensive policies for threats and content filtering(for inappropriate words and phrases). You can also view reports about web traffic, statistics, andactivity for your account.
Customizable scanning criteria — Policy options allow you to configure which threats and types ofcontent should be blocked. You can allow different types of content for different users and groups ofusers on your account.
Support for a variety of web browsers — See the SaaS web protection documentation for acurrent list of browsers that are supported on client and administrative computers.
8
McAfee Endpoint Security 10.0.0 Software Product Guide 149

Multiple layers of protection against web-based threats Multiple protection services work together to provide computers on your account with completeprotection from web-based threats while browsing and searching.
Here's what happens when a client computer requests access to a website.
1 The web control service analyzes the request and decides whether to allow the request. Policyoptions that you have configured for your account determine whether the request is allowed orblocked.
For example, if the site has a red McAfee site safety rating and you have configured policy optionsto block all red sites, the request is blocked. If you have configured policy options to warn usersagainst possible threats, a warning message is displayed. If the user requests a site that meets thecriteria specified in your policies, the request is sent "to the clouds."
2 On McAfee servers, the SaaS web protection service analyzes the content and scans it for malware.If the content is safe and meets the criteria specified in your policies, the request is sent back tothe network.
For example, if you have configured policy options to block particular types of content, sites thatcontain that content are blocked. If the site has developed a threat since it was tested andassigned a McAfee site safety rating, the SaaS web protection service blocks the request based onits analysis of the site's current content.
3 Once the request returns to the network, the threat prevention service scans the website contentaccording to the policy options you have configured.
For example, it can scan scripts running on the site or scan a file download. If no threats are found,the request is sent to the client computer's browser.
Each protection service provides an additional barrier between your computers and threats on theweb.
See also Configure policy settings for SaaS web protection on page 153
The SaaS web protection widget and portalWhen you purchase a subscription for SaaS web protection, a SaaS web protection widget is displayedon the Dashboard page of the SecurityCenter. The widget contains a link to activate the service. Afteractivation, the link's text changes (Click here to configure); use it to access the SaaS email and webprotection portal.
Summary data is not available in this widget; you need to click the link to view all reports for SaaSweb protection.
The portal provides tools for configuring administrative features and policy options, checking webtraffic statistics and activity, and viewing reports.
8 Using the Saas web protection serviceMultiple layers of protection against web-based threats
150 McAfee Endpoint Security 10.0.0 Software Product Guide

See also Access the SaaS email and web protection portal on page 152
Account activation and setupTo begin using the SaaS web protection service, you must activate your account, then perform somebasic configuration tasks.
These tasks are required to use the SaaS web protection service.
1 Activate your account.
If you have already activated an account for the SaaS email protection service, you do not need toactivate the SaaS web protection service.
2 Redirect your web traffic.
3 Configure SaaS web protection features.
When your account is ready to activate, an action item appears on the Dashboard page of theSecurityCenter website. Click the button associated with the action item to display activationinstructions. A SaaS web protection widget also appears on the Dashboard page with a link to activateyour account.
When activation is complete, the widget contains a link to the SaaS email and web protection portal.You can view additional instructions for configuring your account in a welcome kit available on theUtilities page, and you can configure policy options on the portal.
After activation, use these tasks at any time to view and customize the features of the SaaS webprotection service:
1 Access the SaaS email and web protection portal.
2 Customize policy options.
Using the Saas web protection serviceAccount activation and setup 8
McAfee Endpoint Security 10.0.0 Software Product Guide 151

Activate and set up your account Use this SecurityCenter task to activate your account for the SaaS web protection service, thenredirect your web traffic and set up the features.
When your account is ready to activate, an action item appears on the Dashboard page of theSecurityCenter.
If you have already activated an account for the SaaS email protection service, you do not need toactivate the SaaS web protection service.
TaskFor option definitions, click ? in the interface.
1 On the Dashboard page of the SecurityCenter, click the button for the action item Your SaaS webprotection needs to be activated.
(If you need to activate the SaaS email protection service too, the action item includes it.)
2 Type the required information.
• Primary domain name — The name of the domain you want to protect (for example,yourdomain.com). If you want to protect multiple domains, type only the primary domain here.You will be able to set up additional domains later on the SaaS email and web protection portal.
If you do not have a domain, select the checkbox for I do not have a domain, then leave this fieldblank. McAfee will create the necessary settings for you to use the SaaS web protection service,and they will be invisible to you.
• Technical contact email address — The email address where you want McAfee to send technical andsupport emails for your account.
3 Click Continue.
4 Follow the steps in the activation instructions for configuring features and policy options.
Access the SaaS email and web protection portal Use this task to access the SaaS email and web protection portal directly from the SecurityCenter. Noseparate login credentials are required.
The portal provides tools for configuring administrative features and policy options, checking webactivity, and viewing reports.
TaskFor option definitions, click ? in the interface.
• From the SecurityCenter, perform one of these actions.
• Click the Dashboard tab, then select Click here to configure in the SaaS web protection widget.
• Click the Policies tab, then click Configure SaaS Web Protection Policy from the drop-down menu.
• Click the Reports tab, then click SaaS Web Protection.
The SaaS email and web protection portal opens in a separate browser window.
See also The SaaS web protection widget and portal on page 150
8 Using the Saas web protection serviceAccount activation and setup
152 McAfee Endpoint Security 10.0.0 Software Product Guide

Configure policy settings for SaaS web protection Use this task to create a policy or modify policy settings for the SaaS web protection service on theSaaS email and web protection portal.
TaskFor option definitions, click ? in the interface.
1 From the SecurityCenter, click the Policies tab, then select Configure SaaS Web Protection Policy from thedrop-down menu.
2 On the SaaS email and web protection portal, click the Web Protection tab, then click the Policies tab.
3 Select the policy and settings you want to configure.
• Click New to create a policy.
• Select a policy from the list, then click Edit to modify an existing policy.
4 Click Save.
See also Multiple layers of protection against web-based threats on page 150
Reports for SaaS web protection View account information tracked by the SaaS web protection service in charts and administrativereports.
From the SaaS email and web protection portal you can view the following:
• Data on web traffic, threat filtering, and allowed and blocked content.
• Specific volume and traffic trends.
• Types and numbers of threats detected.
View reports Use this task to view reports created for your SaaS web protection service account.
TaskFor option definitions, click ? in the interface.
1 From the SecurityCenter, click the Reports tab, then click SaaS Web Protection.
2 On the SaaS email and web protection portal, click the Web Protection tab, then click the Reports tab.
3 Select the information to appear in the report.
• Select a domain, type of report, and time period to display the corresponding report data.
• Click Performance Reports to display a page where you can schedule a recurring weekly or monthlyreport of performance data to be distributed via email.
Find more information Use this task to access detailed instructions for using the features on the SaaS email and webprotection portal.
Using the Saas web protection serviceReports for SaaS web protection 8
McAfee Endpoint Security 10.0.0 Software Product Guide 153

TaskFor option definitions, click ? in the interface.
• Select one of these options:
• On the SecurityCenter, click the Help & Support tab, click Guides for SaaS Web Protection, then select theappropriate guide.
• On the SaaS email and web protection portal, click Help to display context-sensitive informationabout the current page.
8 Using the Saas web protection serviceFind more information
154 McAfee Endpoint Security 10.0.0 Software Product Guide
9 Troubleshooting and reference
For help using and maintaining the product, refer to frequently asked questions or specific referenceinformation.
Contents Frequently asked questions McAfee Default policy settings Troubleshoot client software problems
Frequently asked questions Here are answers to frequently asked questions.
The most current information on product-related questions is documented in the McAfee Support onlineKnowledgeBase. For a quick-reference listing of popular KB articles, see KB75932.
Questions about adding, renewing, and moving licenses
Can I move a license from one computer to another?
Yes. You can uninstall the client software from one computer and install it on a new computerwithout affecting the total number of licenses you are using. The old computer is automaticallysubtracted from your total license count on the product accounting system, and the new oneadded, so that your license number remains constant. To do this:
1 Uninstall the software from the old computer.
2 From the SecurityCenter, click the Computers tab.
3 For Groups, select All, then select the old computer in the listing and click Delete.
4 Install the software on the new computer.
The new computer appears in your reports after it uploads its status to the SecurityCenter. Thisusually takes about 20 minutes after installation.
My computer crashed and I had to re-install the operating system and start over. Will thisaffect my license number?
No. The old computer is automatically subtracted from your total license count on the productaccounting system, and the new one is added when you re-install the client software. Yourlicense number remains constant.
The new computer appears in your reports after it uploads its status to the SecurityCenter. Thisusually takes about 20 minutes after installation.
9
McAfee Endpoint Security 10.0.0 Software Product Guide 155

Questions about reporting
Why don't some of my computers show up on my reports?
If your company added more licenses, or upgraded from a trial to a full subscription, somecomputers might not appear in your reports.
If you upgraded or purchased additional protection using a new email address, you received anew company key and URL for a new account instead of adding licenses to your existingaccount. (The company key appears after the characters CK= in the URL. It also appears on theKeys tab of the of the My Licenses page on the SecurityCenter.) Because you have two companykeys, reports appear in two places. Make sure all your trial users re-install with the installationURL associated with the new key. If you do need to merge multiple accounts, then use the MergeAccount tab of the My Account page.
Why do my cloned systems all report as the same computer?
The client software generates a unique system identifier when it is installed. If a drive is imagedafter the software was installed, all the cloned systems have the same system identifier. To avoidthis problem, the client software must be installed after the new systems are restarted. You cando this automatically by using the silent installation method, described in the installation guide.
I just installed the product and don’t have much information on my SecurityCenter website.Can I view sample reports?
Yes. Sample reports are available at:
http://www.mcafeeasap.com/MarketingContent/Products/SampleReports.aspx
Sample reports are useful for new administrators who do not have many users or muchdetection data and, therefore, cannot view some advanced reporting features.
Sample reports are available in all product languages. Select the language from the Global Sitespull-down list in the upper right corner of the page.
Questions about the threat prevention and firewall protection services
How can I prevent pop-up prompts from appearing when unrecognized programs aredetected?
Threat prevention prompts users for a response to a detection when set to Prompt mode. Toprevent pop-up windows, select Protect or Report mode. For highest protection, select Protect modeto automatically delete unrecognized programs.
Why would I want to specify excluded files and folders or approved programs?
Specifying excluded files and folders from scanning can be useful if you know a particular type offile is not vulnerable to attack, or a particular folder is safe. If you use a program to conductyour business, adding it to a list of approved programs keeps it from being detected asunrecognized and deleted. If you are unsure, it is best not to specify exclusions.
Can I add approved programs and allowed Internet applications to the McAfee Default policy?
No. However, you can create a new policy and add them. When you click Add Policy on the Policiespage of the SecurityCenter, the new policy is prepopulated with the McAfee Default policy settings(unless you have specified a different policy as your default). Specify a name for the new policy,save it, and then add approved programs as needed. You can also designate the new policy asyour default policy.
9 Troubleshooting and referenceFrequently asked questions
156 McAfee Endpoint Security 10.0.0 Software Product Guide

Questions about McAfee GTI
What is McAfee GTI?
McAfee GTI is a global Internet reputation intelligence system that determines what is good andbad behavior on the Internet. McAfee GTI uses real-time analysis of worldwide behavioral andsending patterns for email, web activity, malware, and system-to-system behavior. Using dataobtained from the analysis, McAfee GTI dynamically calculates reputation scores that representthe level of risk to your network when you visit a webpage. The result is a database ofreputation scores for IP addresses, domains, specific messages, URLs, and images.
What do you mean by "reputation"?
For each IP address on the Internet, McAfee GTI calculates a reputation value. McAfee GTI basesthe value on sending or hosting behavior and various environmental data collected fromcustomers and partners about the state of Internet threat landscape. The reputation isexpressed in four classes, based on our analysis:
• Do not block (minimal risk) — This is a legitimate source or destination of content/traffic.
• Unverified — This appears to be a legitimate source or destination of content/traffic. However,this site also displays certain properties suggesting that further inspection is necessary.
• Medium Risk — This source/destination shows behavior that we believe is suspicious andcontent/traffic to or from it requires special scrutiny.
• High Risk — This source/destination is known to or likely to send/host potentially maliciouscontent/traffic. We believe that it presents a serious risk.
Does McAfee GTI introduce latency? How much?
When McAfee GTI is contacted to do a reputation lookup, some latency is inevitable. McAfee hasdone everything it can to minimize this latency. McAfee GTI:
• Checks reputations only when the options are selected.
• Uses an intelligent caching architecture. In normal network usage patterns, the cacheresolves most wanted connections without a live reputation query.
If the firewall can't reach the McAfee GTI servers, does traffic stop?
If the firewall can't reach any of the McAfee GTI servers, it automatically assigns all applicableconnections a default allowed reputation. The firewall then continues analyzing other Firewallpolicy settings.
Questions about the web control service and web filtering
How can users circumvent Web Control policy settings and hide their browsing behavior?
These methods allow users to hide browsing activity:
• Creating an application that browses the web.
• Creating a frame page to load websites within a frame.
• Disabling the client software in Chrome from Extensions or Add-ons in the Tools menu.
To protect against these situations, frequently view reports and widgets that track browsingbehavior and usage. These alert you when managed systems show no browsing data or lessbrowsing data than expected. You can then take immediate steps to ensure compliance.
Troubleshooting and referenceFrequently asked questions 9
McAfee Endpoint Security 10.0.0 Software Product Guide 157

Does web control work for Internet Explorer, Firefox, and Chrome on the same computer?
Yes. The web control service protects all three browsers running on the same computer. (If allbrowsers are present on a computer when the browser protection service is installed, protectionfor all browsers is installed automatically.)
If Microsoft Internet Explorer is the only browser installed on a client computer when webcontrol is installed, does web control need to be re-installed after installing Mozilla Firefoxor Google Chrome?
No. The web control client software detects Firefox or Chrome when it is installed andimmediately begins to protect searching and browsing activities in that browser, while continuingto provide protection for Internet Explorer.
How does the web control service define a website visit? Does it track individual websitepages viewed?
When a client computer visits a website, web control tracks the site’s domain specifier. Thedomain specifier is the smallest amount of information required to uniquely identify the sitebeing rated for security. For example, if a client computer visited 10 different pages on thewww.mcafee.com website over the course of a single browser session, only a single visit wouldbe logged to the .mcafee.com domain.
That is the information required to locate a safety rating. A single browser session times outafter 30 minutes, and a new session is then tracked.
Questions about the SaaS email protection service
After installing the SaaS email protection service, why am I not receiving email or seeingany charts on the SaaS email and web protection portal?
Check to ensure you have updated your MX records to route email messages through McAfeeservers. Instructions are provided in your welcome kit.
Why are messages with inappropriate content not being blocked?
If you are using the default policies, you must enable content filtering before these messageswill be blocked.
McAfee Default policy settingsThe McAfee Default policy is configured with settings recommended by McAfee to protect manyenvironments and ensure that all computers can access important websites and applications until youhave a chance to create a customized policy.
You can't change these settings, but you can save a copy of this policy with a different name, revisethe settings as needed, then assign it to client computers.
Client Settings
Client Settings tab
9 Troubleshooting and referenceMcAfee Default policy settings
158 McAfee Endpoint Security 10.0.0 Software Product Guide

Category Option Default setting
Update Settings Check for updatesevery
12 hours: Client computers check for updated content (detectiondefinition DAT) files and product components every 12 hours.
Client InterfaceConfiguration
Client InterfaceMode
• Standard access: Allow users to view protection status and accesssome features, such as run updates and scans. (Requires theadministrator password to access the full set of features oruninstall the client software.)
• Set Administrator Password: The company key for your account.
• Password for client uninstall: The company key for your account.
Self ProtectionSettings
Enable selfprotection
Enabled: Block unauthorized attempts to disable or modify McAfeeproduct resources.
Access ProtectionSettings
Enable accessprotection
Enabled: Restrict unauthorized access to client computers byenabling Access Protection rules.
On-access scanning must be enabled.
Threat Prevention
No excluded files and folders or approved programs are configured.
With the default advanced settings for the threat prevention service, it is possible for an on-demandscan to detect threats in archived files that are not detected during an on-access scan. This is becauseon-access scans do not look at compressed archives by default. If this is a concern for yourorganization, you should create a new policy where this option is enabled.
General Settings Tab
Option Default setting
Scheduled Full Scan Settings Off: No Full Scan is scheduled.On-access scans still occur every time users run, open, or downloadfiles.
Scheduled Quick Scan Settings Off: No Quick Scan is scheduled.On-access scans still occur every time users run, open, or downloadfiles.
Maximum percentage of CPU timeallocated for on-demand andscheduled scans
Low: Allow a Full Scan to use a low percentage of CPU time. As aresult, it might take longer to complete.
Threat Prevention Mode Protect: Block unrecognized programs from opening or running.
Advanced Settings Tab
Troubleshooting and referenceMcAfee Default policy settings 9
McAfee Endpoint Security 10.0.0 Software Product Guide 159

Option Default setting
Enable buffer overflow protection Enabled: Detect code starting to run from data in reserved memoryand prevent that code from running. The threat prevention serviceprotects against buffer overflow in more than 30 most commonlyused Windows-based programs. McAfee updates this list regularly inthe Exploit Prevention content file.
On-access scanning must be enabled.
Buffer overflow protection, also known as ExploitPrevention, does not stop data from being written. Do notrely on the exploited application remaining stable afterbeing compromised, even if buffer overflow protection stopsthe corrupted code from running.
Enable script scanning Enabled: Detect harmful code embedded in web pages that wouldcause unauthorized programs to run on client computers.
If script scanning is disabled when Internet Explorer is launched,and then is enabled, it doesn't detect malicious scripts in thatinstance of Internet Explorer.
You must restart Internet Explorer after enabling scriptscanning for it to detect malicious scripts.
Scan all file types during on-accessscans
Enabled: Look for threats in all types of files, instead of only defaulttypes, when they are downloaded, opened, or run. (Default filetypes are defined in the content files.)
Scan within archives during on-accessscans (e.g., .zip, .rar, .tat, .tgz)
Disabled: Do not look for threats in compressed archive files when thefiles are accessed.
Scan within archives during on-demandscans (e.g., .zip, .rar, .tat, .tgz)
Enabled: Look for threats in compressed archive files when files arescanned manually and during scheduled scans.
Enable McAfee Global ThreatIntelligence file reputation service
Enabled: Send information about unrecognized threat detections toMcAfee Labs for analysis. The Sensitivity level is set to High.
Scan mapped network drives duringon-access scans
Disabled: Do not look for threats in files on mapped network driveswhen they are accessed.
Scan mapped network drives duringscheduled scans assigned to thecomputer
Disabled: Do not look for threats in files on mapped network drivesduring scheduled scans.
Enable on-access scanning (if disabled)the next time client computers check foran update
Enabled: If on-access scanning is disabled on a client computer, it isre-enabled when the computer checks for updates.
Scan processes during detectiondefinition (DAT) file updates
Disabled: Do not scan the processes that are running on the clientcomputer when content files are downloading.
This reduces the time required for updates to complete. If the timerequired for updates is not an issue, we recommend that youenable this option for greater protection.
Maximum scanning time (in seconds)for on-access scans
45: Cancel an on-access scan that lasts longer than 45 seconds.
Excluded Files and Folders Tab
No exclusions are configured.
Approved Programs Tab
9 Troubleshooting and referenceMcAfee Default policy settings
160 McAfee Endpoint Security 10.0.0 Software Product Guide

No approved programs are configured.
Firewall
General Settings Tab
Table 9-1 Option definitions
Category Option Default setting
Firewall Configuration configures firewall User configures firewall: Users can change the firewallsettings on their computer.
When Administrator configures firewall is selected, additional options appear in this category.
Firewall Configuration Automatically install firewallprotection on all computersusing this policy
Off: Do not check whether the firewall protection serviceis installed on computers checking for updates.
Use Smart Recommendationsfrom McAfee Global ThreatIntelligence (McAfee GTI) toblock outgoing traffic withMedium Risk and above
On: Allow common Internet applications that areclassified as Medium Risk by McAfee GTI to access theInternet.
Show alerts when inboundevents are blocked
Off: Do not display a notification on client computerswhen firewall protection blocks incomingcommunications.
Firewall Status On: Enable the firewall protection service on clientcomputers.
Firewall Mode Report: Report but do not block unrecognized programs.
Connection Type • For servers — Trusted network: Systems are connected toa network that is separated from the Internet by ahardware router or firewall. For example: in a homeor office network. Firewall protection allowscommunications with other computers on the samesubnet, but blocks all other network communications.
• For workstations — Untrusted network: Computers mightbe connected directly to the Internet. For example:through a DSL line, a satellite dish, or a cablemodem; through any type of connection in a coffeeshop, hotel, or airport. Firewall protection blockscommunications with all other computers, includingthose on the same subnet.
Firewall ReportingConfiguration
Report blocked events Enabled: Send information about blockedcommunications to the SecurityCenter for use inreports.
Allowed Internet Applications Tab
No allowed applications are configured.
Web Control & Web Filtering
General Settings Tab
Troubleshooting and referenceMcAfee Default policy settings 9
McAfee Endpoint Security 10.0.0 Software Product Guide 161

Table 9-2 Option definitions
Category Option Default setting
Automatic Installation Automatically install the webcontrol service on allcomputers using this policy
Disabled: Do not check whether web control is installedon computers checking for updates.
Email AnnotationsConfiguration
Enable annotations in Outlook Enabled: Annotate URLs in email management tools,such as Microsoft Outlook or Outlook Express.
Enable annotations in webmailclients
Enabled: Annotate URLs in browser-based email clients,such as Gmail, Outlook.com, AOL, and Yahoo.
Access to Sites andDownloads
Overall site and downloadaccess
Control access to websites, pages, and downloadablefiles according to their safety ratings:• Yellow: Warn
• Red: Block
• Unrated: Allow
EnforcementNotifications
Language The default language for your account.
Notification Display this notification when users attempt to accessblocked content: An unacceptable security risk is posed by thissite.
Secure Search Enable McAfee Secure Searchfeature
Enabled: Enable Secure Search.
Search engine Yahoo! Use yahoo.com as the search engine for SecureSearch.
Secure Search features support Internet Explorer.
Block links to risky sites Enabled: Block (gray out) links to high-risk sites thatappear in the search results page for computersrunning Secure Search.
Web Control Status Disable web control on allcomputers using this policy
Disabled: Do not disable web control on computers usingthis policy.
Web Control Mode Prompt: Warn or block access to sites with yellow or redsite safety warnings, according to the policy settingsconfigured on this page for Access to Sites and Downloads.
Content Rules Tab
All Content Category items with a Risk Group of Security are blocked.
Exceptions Tab
No exceptions are configured.
See also McAfee Default policy on page 59
9 Troubleshooting and referenceMcAfee Default policy settings
162 McAfee Endpoint Security 10.0.0 Software Product Guide

Troubleshoot client software problemsUse these tasks to investigate problems with the client software.
Tasks
• Test virus protection on page 163Use this task to test the virus-detection feature of the threat prevention service bydownloading the EICAR Standard AntiVirus Test File at the client computer.
• View the Event Log from the client computer on page 163The activity and debug logs store a record of events that occur on the McAfee-protectedsystem. Endpoint Security logs threat data, including threat origin and duration beforedetection, in natural language, and provides easy access to this information in the EventLog.
Test virus protectionUse this task to test the virus-detection feature of the threat prevention service by downloading theEICAR Standard AntiVirus Test File at the client computer.Although it is designed to be detected as a virus, the EICAR test file is not a virus.
Task
1 Download the EICAR file from the following location:
http://www.eicar.org/download/eicar.com
If installed properly, the threat prevention service interrupts the download and displays a threatdetection dialog box.
2 Click OK.
If installed incorrectly, the threat prevention service does not detect the virus or interrupt thedownload process. In this case, use Windows Explorer to delete the EICAR test file from the clientcomputer, then re-install Endpoint Security Client and test the new installation.
View the Event Log from the client computerThe activity and debug logs store a record of events that occur on the McAfee-protected system.Endpoint Security logs threat data, including threat origin and duration before detection, in naturallanguage, and provides easy access to this information in the Event Log.
Use this task to view the Event Log from the Endpoint Security Client. You can also view this data inreports on the SecurityCenter.
For help, from the Action menu , select Help.
Task
1 Open the Endpoint Security Client.
2 Click Event Log on the left side of the page.
The page shows any events that Endpoint Security has logged on the system in the last 30 days.
If the Endpoint Security Client can't reach the Event Manager, it displays a communication errormessage. In this case, reboot the system to view the Event Log.
3 Select an event from the top pane to display the details in the bottom pane.
To change the relative sizes of the panes, click and drag the sash widget between the panes.
Troubleshooting and referenceTroubleshoot client software problems 9
McAfee Endpoint Security 10.0.0 Software Product Guide 163

4 On the Event Log page, sort, search, filter, or reload events.
The options that appear depend on how the scan is configured.
Sort events by date,features, action taken, andseverity
Click the table column heading.
Search the event log Enter the search text in the Search field and press Enter, or clickSearch.The search is case-insensitive and searches all fields of the eventlog for the search text. The event list shows all elements withmatching text.
To cancel the search and display all events, click x in the Searchfield.
Filter events by severity ormodule
From the filter drop-down list, select an option.To remove the filter and display all events, select Show all eventsfrom the drop-down list.
Refresh the Event Log displaywith any new events
Click .
Open the folder thatcontains the log files
Click View Logs Folder.
5 Navigate the Event Log.
Display the previous page of events Click Previous page.
Display the next page of events Click Next page.
Display a specific page in the log Enter a page number and press Enter or click Go.
By default, the Event Log displays 20 events per page. To display more events per page, select anoption from the Events per page drop-down list.
9 Troubleshooting and referenceTroubleshoot client software problems
164 McAfee Endpoint Security 10.0.0 Software Product Guide

Index
Aabout this guide 7access
client software 29
levels, for group administrators 55
protection, configuring 35
SecurityCenter 41
to websites, when to allow (web control) 122
Access Protectionconfiguring 35
on-access scans and 84
overview 35
account enrollment key, locating or creating 66
account, Endpoint Securitydefined 11
email notifications, configuring 68
keys 66
merging 68
payment information 63
profile information, updating 67
subscriptions and licenses, buying and renewing 64, 65
subscriptions and licenses, viewing 63
accountsSaaS web protection, See web protectionsynchronization administrator, about 71
synchronization administrator, creating 72
accounts, SaaS email protection, See email protection Action menu
accessing Help 32
description 30
activationlicense key, CD-based products 66
SaaS email protection 144
SaaS web protection 152
addallowed Internet applications (firewall) 105
approved programs (threat prevention) 92
domains for custom connections (firewall) 111
excluded files and folders (threat prevention) 91
group administrators (SecurityCenter) 57
groups of client computers (SecurityCenter) 54
IP addresses for custom connections (firewall) 111
licenses and subscriptions (SecurityCenter) 64, 65
logo for reports (SecurityCenter) 62
add (continued)policies (SecurityCenter) 59
system service ports for custom connections (firewall) 110
widgets on Dashboard page (SecurityCenter) 45
administrative website, See SecurityCenter website administrator password (client software)
configuring 34
default 30
logging on as administrator 36
unlocking client interface 36
administrator password (SecurityCenter)default 41
logging on as administrator 41
lost 41
administratorschanging SecurityCenter password 67
configuring account information 67
data synchronization, about 71
data synchronization, creating account 72
enabling and disabling client features 37
group administrators, configuring account information for57
group administrators, overview 55
logging on to client software 36
logging on to SecurityCenter 41
password (client interface) 30, 34, 36
password (SecurityCenter) 41
setting client interface mode 34
site administrator, defined 11
unlocking client interface 36
updating client protection 93
alerts, client software 30
allowdomains for custom connections (firewall) 111
IP addresses for custom connections (firewall) 111
system service ports for custom connections (firewall) 110
unrecognized programs (threat prevention) 82
websites and downloads (web control) 127, 131
allowed Internet, See allowed Internet applications allowed Internet applications (firewall protection)
viewing and managing 47
allowed Internet applications (firewall)configuring 105
discovering in learn mode 102
McAfee Endpoint Security 10.0.0 Software Product Guide 165

allowed Internet applications (firewall) (continued)McAfee recommendations for 105
viewing and managing 49
viewing, user-approved 97, 113
AMCore content files, See content files annotations in email 134
applicationsallowed Internet, See allowed Internet applications
approved programs (threat prevention)adding to policies 92
discovering in learn mode 95
viewing and managing 47, 49, 92, 97, 113
archiving, SaaS email protection, See email protection authorized sites (web control)
configuring 132
overview 125
safety ratings and 125
site patterns 125
web control button 118
automatic renewal of subscriptions 63
Bballoons, safety (web control)
accessing from search icons 121
accessing from web control button 118
Chrome 118
best practicesfirewall 115
threat prevention 77, 78, 98
web control 127, 128, 136
web filtering 136
blockclient computer updates (SecurityCenter) 47, 50
domains for custom connections (firewall) 111
Internet applications (firewall) 105
Internet Explorer (firewall) 155
IP addresses for custom connections (firewall) 111
programs (threat prevention) 92
risky sites from search results (web control) 133
system service ports for custom connections (firewall) 110
unknown Internet applications (firewall) 102
unrecognized programs (threat prevention) 82
website access (SaaS web protection) 150
website access, by content (web control) 124, 132
website access, by ratings (web control) 123, 131
website access, by URL (web control) 132
website access, when to block (web control) 122
websites and downloads (web control) 127, 131
websites, customizing notifications for (web control) 134
browsersdefault, reporting 127
displaying web control features 121
non-Microsoft 117, 155
supported for SaaS web protection 149
supported for web control 117
browsers (continued)troubleshooting communication problems 122
viewing client computers and 51
web control client software and 155
browsing activity on network, viewing 135, 153
browsing of websites (SaaS web protection)protection for 150
reports for 153
browsing of websites (web control)protection for 118, 121
site safety ratings 119
tracking in report 135
browsing security strategyguidelines for developing 127
selecting options and features 128
buffer overflow protectionconfiguring 83
Detections report and 95
Exploit Prevention 83
buy, subscriptions and licenses 64, 65
CCAB files 17
cancelled subscriptions, viewing 63
catalog files 17
Chromedisplaying safety balloons 121
displaying site reports 121
displaying the web control menu 121
troubleshooting communication problems 122
web control menu 118
web control, support 117
Cleanup utility 37, 73
client computersComputer Profiles report 51
displaying profile of 51
Duplicate Computers report 50
duplicate computers, managing 47, 50
group ID 51
groups, assigning 49
groups, managing 54
groups, overview 19, 53
inactive computers, managing 50
licenses, verifying 50
managing in SecurityCenter 46, 47, 49
multiple environments, firewall and 103, 111
policies and, overview 58
policies, assigning 47, 49
policies, managing 59
scan types, overview 79
scheduling updates 93
searching for 47
selecting on SecurityCenter pages 42
uninstalled computers 47, 50
updating content files 93
Index
166 McAfee Endpoint Security 10.0.0 Software Product Guide

client computers (continued)upgrading software 52, 67
client interface mode, settings 34
client softwareAccess Protection 35
access to 29
Action menu 30
client interface mode 34
communication problems (web control) 122
configuring display of client features 34
console 30
default password 30
detection list, clearing 84, 88
enabling and disabling features 37
Event Log 163
EXTRA.DAT files 30
Full access 34
Help, displaying 30, 32
icon 29
Locked mode 34
logging on as administrator 36
notification messages 30
opening 29
opening client interface 32
operation, illustrated 14
overview 15, 30
scheduling automatic updates for 93
scheduling upgrades 52, 67
self protection 34
Settings menu 30
Standard access 34
testing installation of 163
uninstalling 37
unlocking client interface 36
update methods, illustrated 16
updates, Internet Independent Updating 17
updates, overview 15
updates, relay servers and 17
updates, Rumor technology 17
updating manually 33
updating protection, overview 93
upgrading 52, 67
uploading detection data 15, 23
view product information 32
viewing the Event Log 163
client-based protection, defined 12
cloned systems, troubleshooting 155
close, system service ports for custom connections 110
cloud-based protection, defined 12
color coding (web control)icons 118
menu 118
communication problems (web control) 118, 122
company key, locating 66
Computer Details pagemanaging computers and 49
using 49
Computers pagemanaging computers and 47
overview 46
using 47
configuration (client software)Access Protection 35
administrator password 34, 36
alerts, firewall events 30
client interface mode 34
display of client features 29, 34
self protection 34
configuration (firewall)alerts in client software 30
allowed Internet applications 105
connection type 103
domains for custom connections 111
Firewall Mode 105
IP addresses for custom connections 111
McAfee GTI 105
overview 101
Smart Recommendations for Internet applications 105
system service ports for custom connections 110
tracking blocked events 106
configuration (SaaS email protection)encrypted email delivery 146
MX records 144
policies 145
quarantine settings 146
configuration (SaaS web protection)domains 153
policies 153
configuration (Security-as-a-Service extension)overview 69
synchronization administrator account 71, 72
configuration (SecurityCenter)account correspondence and notifications 68
account data for site administrator 67
administrator profile information 67
group administrators 57
groups of client computers 54
logo for reports 62
password for administrator 67
policies 59
scheduled reports 62
status emails 68
configuration (threat prevention)approved programs 92
buffer overflow protection 83
excluded files and folders 91
Exploit Prevention 83
McAfee GTI 84
on-access scans 87
Index
McAfee Endpoint Security 10.0.0 Software Product Guide 167

configuration (threat prevention) (continued)on-demand scans 90
reducing user impact 90
script scanning 84
system utilization 90
updates 93
users pause or cancel scans 90
zero-impact scanning 90
configuration (web control)authorized sites 132
blocking or allowing website access, by URL 125, 132
blocking or warning website access, by content 124, 132
blocking or warning website access, by ratings 123, 131
customized notifications for blocked sites 134
email annotations 134
enabling and disabling at policy level 130
Exceptions list 132
guidelines for configuring options 127
installation via policy 130
learn mode 131
overview 128
prohibited sites 132
Secure Search 133
selecting options and features 128
selecting the right policy options 127
Web Control mode 131
connection typeconfiguring 104
custom, overview 107
default settings 103
overview 103
consoleclient software 30
SecurityCenter 40
contact informationadministrator account, configuring 67
customer service 74
group administrators, configuring 57
content categories for websitesSaaS web protection 149
web control 124
content filesAMCore 93
automatic updates 93
Exploit Prevention 93
on-access scans and 84, 87
on-demand scans and 88
overview 15, 93
scheduling updates 93
updating 93
continuity, See email protection conventions and icons used in this guide 7CPU time, for scans, See system utilization create
account enrollment key (SecurityCenter) 66
create (continued)browsing security strategy (web control) 127
group administrators (SecurityCenter) 57
groups of client computers (SecurityCenter) 54
policies (SecurityCenter) 59
synchronization administrator account 71, 72
credentials, default administratorclient interface 30
SecurityCenter 41
credit card information for subscriptions 63
custom connectionsconfiguring domains for 111
configuring IP addresses for 111
configuring port assignments for 110
domains and 108
IP addresses and 108
overview 107
standard assignments for system service ports 109
system service ports and 108
customer service, contacting 74
customization (SecurityCenter)listings and reports 42
widgets 45
DDashboard page
overview 44
tasks accessible from 44
using 44
widgets, using 45
DAT files, See content files data synchronization (Security-as-a-Service extension)
synchronization administrator, about 71
synchronization administrator, creating 70, 72
view status 70
defaultbrowser, reporting 127
group, overview 53
policy settings, initial 158
policy, changing 59
Default Group, overview 53
default passwordadministrator, client interface 30, 34
administrator, SecurityCenter 41
client interface, unlocking 30, 34
client software, uninstalling 30, 34
deleteapproved programs (threat prevention) 92
client computers (SecurityCenter) 47
domains for custom connections (firewall) 111
duplicate computers (SecurityCenter) 50
excluded files and folders (threat prevention) 91
group administrators (SecurityCenter) 57
groups of client computers (SecurityCenter) 54
Index
168 McAfee Endpoint Security 10.0.0 Software Product Guide

delete (continued)IP addresses for custom connections (firewall) 111
logo for reports (SecurityCenter) 62
policies (SecurityCenter) 59
registered servers (Security-as-a-Service extension) 70
uninstalled computers 47, 50
widgets on Dashboard page (SecurityCenter) 45
delivery of encrypted email messages 146
details, viewdetections (threat prevention) 95
potentially unwanted programs (threat prevention) 96, 113
unrecognized Internet applications (firewall) 96, 113
detection history for deleted computers 50
Detection History report 98
detection listclearing, on-access scans 84
clearing, on-demand scans 88
detections (firewall)blocked events 106
inbound communications, managing 106
inbound communications, overview 103
Inbound Events Blocked by Firewall report 114
Internet applications, managing 105
Internet applications, overview 102
recommendations for managing 115
viewing report 96, 113
detections (SaaS email protection)quarantined messages 146
reports, viewing 147
statistics, viewing 147
detections (SaaS web protection)reports, viewing 153
detections (threat prevention)Detections report 95
overview 94
pop-up prompts 82
potentially unwanted programs, managing 82
quarantined items, managing 49
recommendations for managing 98
response by software 94
viewing historical summary 98
viewing report 95, 96, 113
Detections report 95
disableAccess Protection 35
client features, from client interface 37
email annotations 134
Exploit Prevention 83
firewall, via policy 107
McAfee GTI (threat prevention) 84
script scanning 83, 84
system service ports for custom connections 110
web control, by policy 130
Windows firewall 155
displayclient interface 29, 34
widgets on Dashboard page 45
documentationaudience for this guide 7client Help, viewing 30, 32
ePolicy Orchestrator 72
online Help 8product and user guides 8product-specific, finding 9, 72
SaaS email protection, viewing 147
SaaS web protection, viewing 153
Security-as-a-Service extension 72
SecurityCenter links 74
typographical conventions and icons 7viewing 8
domainsconfiguration (SaaS email protection) 144
configuration (SaaS web protection) 152
configuring for custom connections (firewall) 111
custom connections and (firewall) 108
DNS blocking (firewall) 108
overview (firewall) 108
downloadsEXTRA.DAT files 30
Security-as-a-Service extension file 70
tools and utilities 73
duplicate computersdeleting from reports 47, 50
historical data 47
managing 47
report 50
Eedit
account profile 67
domains for custom connections 111
IP addresses for custom connections 111
MX records 144
notification preferences 68
password for administrator 67
payment information 63
policy settings 59
subscription information 63
synchronization administrator account 71, 72
system service ports for custom connections 110
EICAR test virus 163
email addressesadministrator, updating 67
client computers, updating 49
group administrators, updating 57
purchasing subscriptions and 64, 65
renewing subscriptions and 64, 65
email annotations 134
Index
McAfee Endpoint Security 10.0.0 Software Product Guide 169

email protectionactivating 144
activity, viewing 147
archiving, overview 140
continuity, overview 139
detections, viewing 147
documentation, viewing on portal 147
domains, configuring 144
encrypted email, managing 146
encryption, overview 140
features, core, overview 139
features, enhanced, overview 140
getting started 143
intelligent routing, overview 140
MX records, configuring 144
overview 139
policies, configuring 145
portal, accessing 145
portal, illustrated 142
quarantined email, managing 146
reports, viewing 147
setting up 144
status, viewing 147
troubleshooting 147, 155
welcome kits 73, 144
widget, illustrated 142
email scans (SaaS email protection) 139
emailsfrom service provider, subscribing and unsubscribing 68
scheduling reports 62
sending reports 62
sending SecurityCenter pages 42
sending to client computer users 42
sending to group administrators 57
enableAccess Protection 35
buffer overflow protection 83
client features, from client interface 37
email annotations 134
Exploit Prevention 83
firewall, via policy 107
McAfee GTI (threat prevention) 84
script scanning 84
system service ports for custom connections 110
web control, by policy 130
encrypted email messages, reading 146
Endpoint Security Client, See client software ePO Servers tab 70
ePolicy Orchestratormanagement of SecurityCenter data, overview 69, 70
ePolicy Orchestrator extension, See Security-as-a-Serviceextension
Event Log (client software) 163
events (firewall)overview 103
events (firewall) (continued)tracking for reports 106
viewing 114
events (web control)information for reports 129
Exceptions list (web control)configuring 132
overview 125
site patterns and 125
exclusionsdefault settings (firewall) 158
default settings (threat prevention) 158
managing from the Computer Details page (threatprevention) 49
managing with policies (firewall) 105
managing with policies (threat prevention) 91, 92
viewing (threat prevention) 97, 113
expiration notificationssigning up for 68
Exploit Preventionconfiguring 83
content file updates 93
on-access scans and 84
overview 83
EXTRA.DAT files, downloads 30
Ffeatures, new 24
filterlistings in SecurityCenter 42
Firefoxdisplaying web control features 121
support for SaaS web protection 149
troubleshooting communication problems 122
web control menu 118
web control, support 117
firewallallowed Internet applications, configuring 105
best practices 115
configuring, overview 101
connection type, configuring 104
connection types, overview 103
custom connection type, overview 107
domain and DNS blocking, overview 108
domains, configuring 111
enabling and disabling via policy 107
events, blocked, tracking 106
events, overview 103
Firewall Mode, configuring 105
Inbound Events Blocked by Firewall report 114
installing on servers 107
installing via policy 107
IP addresses, configuring 111
IP addresses, overview 108
learn mode 102
Index
170 McAfee Endpoint Security 10.0.0 Software Product Guide
firewall (continued)McAfee GTI 24, 105
Prompt mode 102
Protect mode 102
protecting client computers in multiple environments 103,111
protection mode, configuring 105
protection mode, overview 102
Report mode 102
reports, overview 115
response to detections 102, 105
response to events, overview 103
Smart Recommendations for Internet applications 105
system service ports, configuring 110
system service ports, overview 108
tracking blocked events 106
troubleshooting 155
user/administrator settings and 102
Windows 7 37, 155
Windows 8 37, 155
Windows Vista 37, 155
Firewall Modeconfiguring 105
overview 102
Full access mode, configuration 34
fully qualified domain name, defined 108
GGoogle Chrome, See Chrome group administrators
access levels 55
managing, tasks 57
overview 55
passwords, creating or resetting 57
sending email to 57
group ID, locating 51
groupsadministrators, managing 57
administrators, overview 55
assigning computers 49
configuring 54
default 53
illustrated 19
managing 54
overview 19, 53
HHelp
client, displaying 30, 32
SaaS email protection, viewing 147
SaaS web protection, viewing 153
viewing 8, 72, 74
Help & Support page 74
historical data on detections 98
Iicons, McAfee
security status and 29
updates and 15, 33
icons, site safety (web control) 118
inactive computersdeleting from reports 47, 50
installationfirewall, via policy 107
Security-as-a-Service extension 70
testing 163
utilities for, downloading 73
web control, via policy 130
intelligent routing, See email protection Internet and intranet usage, tracking 129
Internet applications, See allowed Internet applications Internet Explorer
blocking 155
displaying web control features 121
script scans 84
Secure Search 133
support for SaaS web protection 149
troubleshooting 155
troubleshooting communication problems 122
web control menu 118
web control, support 117
Internet Independent Updating (IIU)overview 17
Internet traffic load, reducing 17
intranet sites and web control 118, 136
IP addressesconfiguring for custom connections 111
custom connections and 108
IPV4 format 108
IPV6 format 108
overview 108
Kkeys
account enrollment, locating or creating 66
company, locating 66
Llanguage selection
for account correspondence 67
for blocked website notifications 134
learn modefirewall 102
threat prevention 95
web control 127, 131
license key, activating 66
licensesmoving 155
purchasing and renewing 64, 65
Index
McAfee Endpoint Security 10.0.0 Software Product Guide 171

licenses (continued)support for 74
verifying active licenses 50
viewing 63
Local Area Network (LAN), reducing Internet traffic 17
Locked mode, configuration 34
log onto client software 36
to SecurityCenter, from administrative computer 41
logos, adding or removing from reports 62
Mmanagement
client computers (SecurityCenter) 50, 51
client computers, all (SecurityCenter) 47
client computers, individual (SecurityCenter) 49
client computers, overview (SecurityCenter) 46
detections (threat prevention) 98
encrypted messages (SaaS email protection) 146
ePolicy Orchestrator and SecurityCenter data 69
group administrators (SecurityCenter) 57
groups, overview (SecurityCenter) 53
groups, tasks (SecurityCenter) 54
Internet applications (firewall protection) 47
Internet applications (firewall) 49, 105
policies, overview (SecurityCenter) 58
policies, tasks (SecurityCenter) 59
potentially unwanted programs (threat prevention) 47, 49
quarantined detections (threat prevention) 49
quarantined messages (SaaS email protection) 146
suspicious activity (firewall) 115
manual scans (threat prevention) 80
manual updates 33
McAfee Default policydefined 59
settings 158
McAfee GTIconfiguring (firewall) 105
configuring (threat prevention) 84
firewall and 24
how it works 155
illustrated 76
information sent by web control 129
McAfee Labs and 84
on-access scans (threat prevention) 84
on-demand scans (threat prevention) 88
reputation ratings 155
safety ratings for websites (web control) 119
sensitivity level (threat prevention) 84
service unavailable 122, 155
site safety reports (web control) 119
threat prevention and 24
troubleshooting communication problems (web control) 122
web control and 24
McAfee LabsAMCore content file updates 93
defined 12
Exploit Prevention content file updates 93
McAfee GTI and 84
McAfee SecurityCenter, See SecurityCenter website McAfee ServicePortal, accessing 9memory, scanning 80
menu, web controloverview 118
using 121
menus, clientAction 30
Help, about 30
Settings 30
merge accounts 68
Microsoft Internet Explorer, See Internet Explorer modes
client interface 34
Firewall, configuring 105
Firewall, overview 102
Full access (client interface) 34
learn (firewall) 102
learn (threat prevention) 95
learn (web control) 127, 131
Locked (client interface) 34
Prompt (threat prevention) 82
Prompt (web control) 127, 131
Protect (firewall) 102
Protect (threat prevention) 82
Protect (web control) 127, 131
Report (firewall) 102
Report (threat prevention) 82
Report (web control) 127, 131
Standard access (client interface) 34
Threat Prevention 82
Web Control 127, 131
modificationdomains for custom connections (firewall) 111
IP addresses for custom connections (firewall) 111
system service ports for custom connections (firewall) 110
Mozilla Firefox, See Firefox MX records, updating for SaaS email protection 144
My Account page 67
My Licenses page 63
Nnew features 24
notificationsclient, types 30
for blocked sites, customizing (web control) 134
language for, selecting 67
receipt of encrypted email message 146
signing up for 68
unsubscribing 68
Index
172 McAfee Endpoint Security 10.0.0 Software Product Guide

Oobserve mode, See learn mode on-access scans (threat prevention)
Access Protection and 84
compressed files and, default settings 158
configuring 87
default settings 80
enabling, via policy 87
Exploit Prevention and 84
how scans work, overview 84
illustrated 84
policy options, overview 80
script scanning 84
on-demand scans (threat prevention)compressed files and, default settings 158
configuring 90
default settings 80
Full Scan 80
how scans work, overview 88
illustrated 88
policy options overview 80
policy options, overview 80
Quick Scan 80
reducing user impact 90
scanning files and folders in Windows 88
scheduled, policy options overview 80
scheduling 90
system utilization 90
types of scans 88
users pause or cancel scans 90
zero-impact scanning 90
on-demand updates, See manual updates online Help, viewing 8, 72, 74
open, system service ports for custom connections 110
operating systemsre-installing 155
viewing client computers and 51
Ppasswords
administrator (client software) 30, 34, 36
administrator (SecurityCenter) 41, 67
groups administrators 57
payment information for subscriptions 63
phishing pages (web control)authorized sites and 132
blocking phishing pages 132
reporting visits to 136
site safety reports and 119
web control button and 118
Web Filtering report 136
policies (client settings)Access Protection 35
administrator password 34, 36
policies (client settings) (continued)client interface mode 34
display of client features 29, 34
self protection 34
policies (firewall)Administrator configures firewall 104
alerts in client software 30
allowed Internet applications, configuring 105
allowed Internet applications, overview 102
connection type, configuring 104
connection type, overview 103
custom connection, overview 107
domains, configuring 111
Firewall Configuration option 107
Firewall Mode, configuring 105
firewall mode, overview 102
Firewall Mode, overview 102
installing firewall via policy 107
IP addresses, configuring 111
McAfee GTI 105
Smart Recommendations for Internet applications 105
system service ports, configuring 110
tracking blocked events 106
User configures firewall 104
user/administrator settings and 102
policies (general)assigning to computers 47, 49
configuring 59
default settings and assignments 158
default settings, changing 59
illustrated 20
managing 59
McAfee Default, defined 59
McAfee Default, settings 158
overview 20, 58
policies (SaaS email protection)configuring 145
quarantine settings 146
policies (SaaS web protection), configuration 153
policies (threat prevention)approved programs 82, 92
buffer overflow protection 83
CPU time allocated for scans 80
excluded files and folders 91
Exploit Prevention 83
McAfee GTI 84
on-access scan options 87
on-demand scan options 90
script scanning 84
system utilization 80, 90
Threat Prevention mode 82
zero-impact scanning 90
policies (web control)authorized sites, configuring 132
authorized sites, overview 125
Index
McAfee Endpoint Security 10.0.0 Software Product Guide 173

policies (web control) (continued)blocking risky sites from results 133
configuring Secure Search 133
configuring website access, by content 124, 132
configuring website access, by ratings 123, 131
configuring website access, by URL 125, 132
customizing notifications for blocked sites 134
email annotations, enabling 134
enabling and disabling at policy level 130
installing web control, via policy 130
learn mode 127, 131
prohibited sites, configuring 132
prohibited sites, overview 125
selecting options and features 128
site patterns 125
Web Control mode 127, 131
web filtering, overview 122
Policies pagemanaging policies and 59
overview 58
using 59
policy installationfirewall 107
web control 130
pop-up promptsbrowsers and safety ratings (web control) 119
client, overview 30
preventing (threat prevention 155
preventing (threat prevention) 82
preventing (web control) 127
Secure Search (web control) 133
when they appear (threat prevention) 82
when they appear (web control) 127
portal (SaaS email and web protection)accessing 145, 152
documentation, viewing 147, 153
illustrated 142, 150
ports, See system service ports potentially unwanted programs, See unrecognized programs preferences, notification 68
privacy concerns, web control 129, 155
process scans, during updates (threat prevention) 82, 98, 158
Product Renewal page 64, 65
profileaccount, configuring 67
client computers, viewing 51
programsallowing and blocking (firewall) 96, 102, 105, 113
excluding from scans (threat prevention) 91
viewing unrecognized 96, 113
prohibited sites (web control)configuring 132
overview 125
reporting visits to 136
safety ratings and 125
prohibited sites (web control) (continued)site patterns 125
web control button 118
Web Filtering report 136
Prompt modethreat prevention 82
web control 127, 131
prompts, See pop-up prompts Protect mode
firewall 102
threat prevention 82
web control 127, 131
purchase, subscriptions and licenses 64, 65
Qquarantined detections
managing (threat prevention) 49
viewing user-excluded detections (threat prevention) 49,97, 113
quarantined emailSaaS email protection 146
Rratings, site safety, See safety ratings re-installation
operating systems 155
Read & Modify Reports access level, group administrators 55
Read Only access level, group administrators 55
read, encrypted email messages 146
recommended practicesclient computers in multiple environments 103, 111
firewall 115
Internet applications, using McAfee recommendations 105
threat prevention 77, 98
web control 136
web filtering 136
refresh licenses feature 50
registered ePolicy Orchestrator serversmanaging from ePO Servers tab 70
overview 69
registration, See activation registry keys
scanning during on-demand scans 80
relay serversoverview 17
upgrading software 52, 67
viewing in reports 60
removalallowed Internet applications (firewall) 105
approved programs (threat prevention) 92
domains for custom connections (firewall) 111
duplicate computers (SecurityCenter) 50
excluded files and folders (threat prevention) 91
group administrators (SecurityCenter) 57
Index
174 McAfee Endpoint Security 10.0.0 Software Product Guide
removal (continued)groups of client computers (SecurityCenter) 54
IP addresses for custom connections (firewall) 111
logo for reports (SecurityCenter) 62
policies (SecurityCenter) 59
system service ports for custom connections (firewall) 110
widgets on Dashboard page (SecurityCenter) 45
renewalssubscriptions and licenses 63–65
support for 74
Report modefirewall 102
threat prevention 82
web control 127, 131
reports (firewall)Inbound Events Blocked by Firewall 114
overview 115
Unrecognized Programs 96, 113
reports (general)Computer Profiles 51
customizing data in 42
deleting duplicate computers in 50
Duplicate Computers 50
emailing 62
filtering or sorting data in 42
logo, adding or removing 62
overview 23
overview of types 60
samples of 155
scheduling 62
troubleshooting 155
reports (SaaS email protection), viewing 147
reports (SaaS web protection), viewing 153
reports (threat prevention)Detection History 98
Detections 95
overview 98
Unrecognized Programs 96, 113
reports (web control)information sent to McAfee GTI 129
information sent to SecurityCenter 129
site safety, content details 119
site safety, McAfee GTI 119
site safety, overview 117
site safety, viewing 119, 121
using 127
Web Filtering 135, 136
Reports page 60
right-click scan 88
risk groups, defined (web filtering) 124
routing, intelligent, See email protection Rumor technology 17
SSaaS email protection, See email protection
SaaS protection, defined 12
SaaS web protection, See web protection safety balloons and icons
Chrome 118
how to use while browsing 118, 121
how to use while searching 121
safety ratings for websitesauthorized sites and 125
colors defined 118
configuring website access and 123
how website ratings are derived 119
McAfee GTI 119
search icons and 118
web control button and 118
safety reports, See reports (web control) scans (threat prevention)
Access Protection and 84
automatic 80
compressed files and 158
CPU time allocated 80
default settings for 158
excluding files and folders 91
Exploit Prevention and 84
Full Scan 80
manual, default policy 80
manual, overview 80
McAfee GTI 84
on-access, configuring 87
on-access, default settings 80
on-access, how scans work 84
on-access, policy options overview 80
on-demand, configuring 90
on-demand, default settings 80
on-demand, how scans work 88
on-demand, policy options overview 80
on-demand, reducing user impact 90
on-demand, scheduling 90
on-demand, system utilization 90
on-demand, types of scans 88
on-demand, users pause or cancel scans 90
on-demand, zero-impact scanning 90
process scans during updates 82, 98, 158
Quick Scan 80
right-click scan 88
scanning files and folders in Windows 88
scheduled, policy options overview 80
script scanning 84
types, overview 79
scans, files and folders in Windows 88
scans, SaaS email protection 139
scheduleon-demand scans, configuring (threat prevention) 90
on-demand scans, overview (threat prevention) 80
reports (SecurityCenter) 62
updates (client software) 93
Index
McAfee Endpoint Security 10.0.0 Software Product Guide 175

schedule (continued)upgrades (client software) 52, 67
script scansenabling (threat prevention) 84
on Internet Explorer 84
overview 84
ScriptScan, See script scans search engines and web control 120
searching of websites (SaaS web protection)protection for 150
reports for 153
searching of websites (web control)blocking risky sites from results 120, 133
protection for 118, 121
Secure Search 120, 133
site safety ratings 119
tracking in report 135
Secure Searchconfiguring 133
overview 120
security settings, See policies security strategy, recommended
firewall 115
threat prevention 77, 98
web control 136
web filtering 136
security strategy, web control 127, 128
Security-as-a-Service extensionaccessing features in SecurityCenter 70
deleting or viewing registered servers 70
downloading documentation 70, 72
downloading extension file 70
overview 69
setting up 69
synchronization administrator account, about 71
synchronization administrator account, creating 72
SecurityCenter websiteaction items 42
Computers page, overview 46
Dashboard page, overview 44
Dashboard page, using 44
defined 11
emailing pages 42
ePO Servers tab 70
filtering data in 42
Help & Support page 74
logging on, from administrative computer 41
My Account page 67
My Licenses page 63
operation, illustrated 14
overview 18
page controls, overview 42
Policies page, overview 58
Policies page, using 59
printing pages 42
SecurityCenter website (continued)Reports page, overview 60
saving pages 42
selecting computers in listings 42
sorting data in 42
tabs, overview 40
Utilities page 73
widgets, using 45
self protectionconfiguration 34
overview 34
send emailto client computer users 42
to group administrators 57
with attached report 62
with attached SecurityCenter data 42
serversinstalling firewall on 107
registered (Security-as-a-Service extension), Seeregistered ePolicy Orchestrator servers
service ports, See system service ports ServicePortal, finding product documentation 9site patterns, web control 125
site reports, See reports (web control) Smart Recommendations 105
Software Manager, downloading documentation 72
sortlistings in SecurityCenter 42
Standard access mode, configuration 34
status (client software)icon and 29
status emailssigning up for 68
unsubscribing 68
subscriptionspurchasing and renewing 63–65
support for 74
trial, starting 45, 64, 65
updating payment information 63
verifying active licenses 50
viewing 63
support, contacting 74
synchronization (ePolicy Orchestrator)administrator account, about 71
administrator account, creating or modifying 72
overview 69
view status 70, 73
system service portsconfiguring 110
custom connections and 108
overview 108
standard assignments for 109
system services, See system service ports system tray icon, McAfee, See icons, McAfee
Index
176 McAfee Endpoint Security 10.0.0 Software Product Guide

system utilization (threat prevention)default setting 80
defined 90
Ttechnical support, finding product information 9test
communication problems (web control) 122
virus protection (threat prevention) 163
threat preventionAccess Protection, configuration 35
AMCore content files 93
best practices 77, 98
buffer overflow protection 83
components 76
content files, defined 93
Detection History report 98
detection list, clearing 84, 88
Detections report 95
excluded files and folders 91
Exploit Prevention 83
Exploit Prevention content files 93
features, overview 77
Full Scan 80
illustrated 76
learn mode 95
McAfee GTI, configuring 84
McAfee GTI, overview 24
McAfee GTI, sensitivity level 84
on-access scans, configuring 87
on-access scans, default settings 80
on-access scans, defined 84
on-access scans, overview 84
on-access scans, policy options overview 80
on-demand scans, configuring 90
on-demand scans, overview 88
on-demand scans, policy options overview 80
on-demand scans, reducing user impact 90
on-demand scans, scheduling 90
on-demand scans, system utilization 90
on-demand scans, types 88
overview 75, 76
process scans, during updates 82, 98, 158
Prompt mode 82
Protect mode 82
Quick Scan 80
Report mode 82
reports, overview 98
right-click scans 88
SaaS web protection and 150
scanning files and folders in Windows 88
scheduled scans, policy options overview 80
scheduling scans 90
scheduling updates 93
threat prevention (continued)script scanning 84
Secure Search 120
self protection 34
testing virus protection 163
Threat Prevention mode, overview 82
updates, scheduling 93
what to do first 78
zero-impact scanning 90
throttling, See system utilization trial subscriptions, starting 45, 64, 65
troubleshootingemail annotations 134
troubleshooting (client software)testing virus protection 163
view Event Log 163
troubleshooting (firewall)firewall, Windows 155
Internet Explorer 155
troubleshooting (general)cloned systems 155
licenses, adding, moving, and renewing 155
reports 155
troubleshooting (threat prevention)pop-up prompts 155
testing virus protection 163
troubleshooting (web control)communication problems 122
gray site safety icon 155
users circumventing policy settings 155
Trusted network connection type 103
types of protection, overview 12
Uundelete
client computers (SecurityCenter) 47
duplicate computers (SecurityCenter) 50
uninstall utility 37, 73
uninstallationclient software 37
password 30
utilities, downloading 73
uninstalled computers, viewing and deleting 47, 50
unknown Internet applications, See unrecognized programs(firewall)
unrecognized programs (firewall)allowing and blocking 96, 102, 113
how detections are handled 102
Inbound Events Blocked by Firewall report 106
managing detections 105
Unrecognized Programs report 96, 113
viewing 96, 113
unrecognized programs (threat prevention)allowing and blocking 82
Detections report and 95
Index
McAfee Endpoint Security 10.0.0 Software Product Guide 177

unrecognized programs (threat prevention) (continued)how detections are handled 82
Unrecognized Programs report 96, 113
viewing 96, 113
Unrecognized Programs reportlearn mode and 95, 102
viewing 96, 113
unsubscribe from emails 68
Untrusted network connection type 103
updateaccount data for site administrator 67
MX records 144
updatesblocking and unblocking 47, 50
configuring 93
content files, overview 93
Internet Independent Updating 17
methods, illustrated 16
on-demand (manual) 33
overview 15
overview, illustrated 14
process scans and 82, 98, 158
relay servers and 17
Rumor technology 17
scheduling 93
uploading detection data 15, 23
upgradesclient software 52, 67, 73
Windows operating system 155
user-approved programs, See approved programs utilities
accessing 73
Cleanup utility 37
uninstall utility 37
Vview (client software)
About box 32
client interface 30, 32, 34, 36
Event Log 163
Help 32
product information 32
security status 29
view (firewall)blocked events 106
detections, Internet applications 105
inbound events on network 114
unrecognized programs detected on network computers 96,113
user-approved applications 97, 113
view (SaaS email protection)activity 147
encrypted messages 146
portal 145
reports 147
view (SaaS email protection) (continued)status 147
view (SaaS web protection)portal 152
reports 153
view (Security-as-a-Service extension)registered servers 70
view (SecurityCenter)blocked website visits 49
cancelled subscriptions 63
client computer profiles 51
client computers, individual 49
client computers, list 46, 47
computers in a group 54
documentation 74
duplicate computers 50
group administrators 57
groups, all 53
Help, online 74
policies 59
policies, all 58
protection status 44
subscription information 63
user-approved applications 47, 49, 97, 113
user-excluded quarantined items 49, 97, 113
view (threat prevention)detection history on network computers 98
detections on network computers 95
quarantined items excluded by users 49, 97, 113
unrecognized programs detected on network computers 96,113
user-approved programs 49, 97, 113
user-excluded quarantined items 49, 97, 113
view (web control)browsing activity 135
safety balloons 118, 121
site reports 119, 121
troubleshooting wizard 122
web control menu 121
Web Filtering report 135
website visits 135
Wwarn
website access, by content 124, 132
website access, by ratings 123, 131
web controlauthorized sites, configuring 132
authorized sites, overview 125
best practices 127, 128, 136
blocking or allowing website access, by URL 125, 132
blocking or warning website access, by content 124, 132
blocking or warning website access, by ratings 123, 131
browsing protection 118
browsing websites 118
Index
178 McAfee Endpoint Security 10.0.0 Software Product Guide

web control (continued)circumventing policy settings 155
color-coded icons 118
color-coded menu 118
communication problems 118
configuring Secure Search 133
configuring website access, by content 124, 132
configuring website access, by ratings 123, 131
configuring website access, by URL 125, 132
Content Rules tab 124
creating browsing security strategy 127
customizing notifications for blocked sites 134
email annotations, enabling 134
enabling and disabling at policy level 130
Exceptions list, configuring 132
Exceptions list, overview 125
gray site safety icon 155
guidelines for configuring options 127
information sent to McAfee GTI 129
installing, via policy 130
intranet sites and private IP addresses 118
learn mode 127, 131
McAfee GTI 24, 119, 155
menu, overview 118
notifications for blocked sites 134
observe mode 127, 131
overview 117
prohibited sites, configuring 132
prohibited sites, overview 125
Prompt mode 127, 131
Report mode 127, 131
risk groups, defined 124
SaaS web protection and 150
safe search icons 118
safety ratings, ignored for authorized sites 125
searching websites 118
selecting options and features 128
site patterns 125
site reports, overview 119
support for multiple browsers 155
tracking Internet usage 129, 135
troubleshooting communication problems 122
version 51
viewing browsing activity 135
viewing safety balloons and icons 121
viewing site reports 119, 121
viewing web control menu 121
viewing website visits 135
web control menu 118
Web Control mode, configuring 131
Web Control mode, overview 127
Web Filtering report 136
web filtering, access control and 122
web filtering, overview 122
website visits, defined 155
web filtering (web control)authorized sites, configuring 132
authorized sites, overview 125
best practices 136
blocking or allowing website access, by URL 125, 132
blocking or warning website access, by content 124, 132
blocking or warning website access, by ratings 123, 131
configuring website access, by content 124, 132
configuring website access, by ratings 123, 131
configuring website access, by URL 125, 132
Content Rules tab 124, 132
customizing notifications for blocked sites 134
enabling and disabling at policy level 130
Exceptions list, configuring 132
Exceptions list, overview 125
how it controls access 122
overview 122
prohibited sites, configuring 132
prohibited sites, overview 125
risk groups, defined 124
site patterns 125
tracking Internet usage 135
viewing browsing activity 135
Web Filtering report 136
Web Filtering report 136
web protection (SaaS web protection)activating 152
documentation, viewing on portal 153
domains, configuring 152
features 149
getting started 151
policies, configuring 153
portal, accessing 152
portal, illustrated 150
reports 153
setting up 152
threat prevention and 150
troubleshooting 153
web control and 150
widget, illustrated 150
website access (SaaS web protection) 150
website access (web control)authorizing and prohibiting sites 132
blocking or allowing, by URL 125, 132
blocking or warning, by content 124, 132
blocking or warning, by ratings 123, 131
customizing notifications for blocked sites 134
learn mode 127, 131
observe mode 127, 131
viewing report of 135
websitesaccess regulation (SaaS web protection) 149
access regulation (web control) 122
authorized and prohibited sites (web control) 125, 132
blocking risky sites from search results 120
Index
McAfee Endpoint Security 10.0.0 Software Product Guide 179

websites (continued)browsing protection (web control) 118
search protection (web control) 118, 120
testing for safety (web control) 119
viewing reports (SaaS web protection) 153
viewing site reports (web control) 119, 121
viewing visits (SaaS web protection) 153
viewing visits (web control) 135
websites, blockingfrom search results 120, 133
welcome kitsSaaS email protection 73, 144
SaaS web protection 73, 151
what's in this guide 8widgets
adding to Dashboard page 44
overview 45
widgets (continued)using 45
wildcard characters 47, 91, 105, 125
Windows 7firewall 37, 155
Windows 8detections, Windows Store apps 84, 88
firewall 37, 155
Windows firewallfirewall protection service and 155
log 155
Windows Vistafirewall 37, 155
Zzero-day protection 136
zero-impact scanning options 90
Index
180 McAfee Endpoint Security 10.0.0 Software Product Guide

0-00