For the Realm - Z-Man Games each remaining card one space toward the front. Then, place the top card...
8
For the Realm Marc André TM In Majesty: For the Realm, you are competing for the crown by establishing the wealthiest realm. To do so, you must enlist the help of your citizens, who bring special skills with them. But you must act with prudence, for your opponents will always be working to snatch the most valuable citizens before you can, and some of your rivals may even be planning to march against your borders... INTRODUCTION This rulebook is divided into several sections: Pages 2 and 3: The SETUP and BASICS sections explain how to start playing the game. Pages 4 and 5: The structure of YOUR TURN is explained. Page 6: Each location’s SPECIAL ABILITIES are explained in detail. Page 7: How to perform FINAL SCORING once the game is over. Page 8: A brief SUMMARY , as well as playing with SIDE B AND BEYOND . The SUMMARY RULESHEET contains thorough explanations for each location’s abilities. ABOUT THESE RULES
Transcript of For the Realm - Z-Man Games each remaining card one space toward the front. Then, place the top card...

1
For the Realm
Marc André
Marc A
ndré
Marc André
Marc André
For the Realm
For the Realm
For the Realm
Marc André
For the Realm
2–4
2–4
2–47+
7+
7+20–30 Min.
20–30 Min.
20–30 Min.
7+
20–30 Min.
2–4
TMTM
TM
TM
TM
TMTM
TM
TM
In Majesty: For the Realm, you are competing for the crown by establishing the wealthiest realm. To do so, you must enlist the help of your citizens, who bring special skills with them. But you must act with prudence, for your opponents will always be working to snatch the most valuable citizens before you can, and some of your rivals may even be planning to march against your borders...
INTRODUCTION
This rulebook is divided into several sections:
Pages 2 and 3: The SETUP and BASICS sections explain how to start playing the game.
Pages 4 and 5: The structure of YOUR TURN is explained.
Page 6: Each location’s SPECIAL ABILITIES are explained in detail.
Page 7: How to perform FINAL SCORING once the game is over.
Page 8: A brief SUMMARY , as well as playing with SIDE B AND BEYOND .
The SUMMARY RULESHEET contains thorough explanations for each location’s abilities.
ABOUT THESE RULES

2
SETUP
Arrange your location cards in front of you with side A faceup, in ascending order from left to right. Leave some space below each location to place your character cards.
1B
1A+1B
2A+2B
3
3
42A
2A
Location cards have a number and a letter in the bottom-left corner. There are eight locations, each of which has both a side A and a side B.
Each player takes one of each location card.
1A
Shuffle the tier 2 cards (with red backs) and place them facedown in a pile in the center of the table.
Then, shuffle the tier 1 cards (with green backs). Using the chart on the right, set aside the number of tier 1 cards listed. Place the set-aside cards on top of the tier 2 cards to create the deck. Return the unused tier 1 cards to the box.
Finally, create the character display by placing the top 6 cards of the deck faceup in a row next to the deck.
4
Tier 1 Tier 2

3
SETUPIn Majesty: For the Realm, you control your own realm, which consists of the eight different location cards in front of you. Nearby, you and your rivals compete for the loyalty of the people, who will aid you.
The goal of the game is to enlist these subjects and to use their skills to bring wealth to your realm. At the end of the game, the player with the most points wins.
GAMEPLAYThe player who has the worker card with the knight is the first player.
On your turn, you must take one character from the display and place it at its matching location in your realm. Doing so activates that location, which can result in you gaining points or meeples, attacking other players, or even causing other players to gain points. Then, play proceeds clockwise to the player on your left, who also takes one character from the display, places it in his or her realm, and activates its location.
When you gain points, take the appropriate value of chips from the supply. When you lose points, return the appropriate value of chips to the supply. At any time during the game, you can exchange your chips with those of equivalent value from the supply.
Play continues as described above until each player has exactly 12 character cards in their realm. At that point, players perform final scoring and compare points. The player with the most points win.
Shuffle a number of worker cards equal to the number of players (ensuring that the card with the knight is among them) and deal one to each player. Place this card faceup above your location cards. Then, each player places 5 meeples on his or her worker card.
The player who has the worker card with the knight is the first player.
Your workers are represented by meeples. Place the remaining meeples as a supply within easy reach of all players.
2B
Your wealth is tracked by chips:
10 1-point chips (copper coin)
25 2-point chips (silver coin)
25 10-point chips (gold coin)
6 50-point chips (precious gem)
4 100-point chips (1 each: dagger, goblet, ring, and circlet)
Place these chips as a supply within easy reach of all players.
3
1A+1B
BASICS
Shuffle the tier 2 cards (with red backs) and place them facedown in a pile in the center of the table.
Then, shuffle the tier 1 cards (with green backs). Using the chart on the right, set aside the number of tier 1 cards listed. Place the set-aside cards on top of the tier 2 cards to create the deck. Return the unused tier 1 cards to the box.
Finally, create the character display by placing the top 6 cards of the deck faceup in a row next to the deck.
4
In a 2-player game, set aside 6 tier 1 cards.
3 In a 3-player game, set aside 14 tier 1 cards.
In a 4-player game, set aside 26 tier 1 cards.4
2
2A

4
Taking a CardAt the start of your turn, choose one character card to take from the display. The character card farthest from the deck is in the front space of the display, and the character card nearest to the deck is in the back space. The character card in the front space is always free to take. To take a card in any other space, place one of your meeples on each card, starting with the front space, leading up to your chosen card.
You cannot choose a character card if you do not have enough meeples to place one on each card leading up to it.
Gaining MeeplesYou can gain meeples by either taking a card with meeples on it from the display or resolving a location’s ability (which is explained on the next page). When you gain meeples, place them in empty spaces on your worker card. If you still have more meeples to place, but there are no more empty spaces available, keep them next to your worker card until the end of the turn.
Placing CharactersAfter you take a character card from the display, place it at its matching location. Each character card has an icon in the top-right corner. This icon shows where the character is placed and is used by location abilities to reference character cards. When you place your character at its location, activate that location and resolve its abilities.
There is no limit to how many characters can be at a location.
Split Character CardsSome character cards show two characters, one split on each half of the card. When you take a split card, choose which character to use by placing it with the top character at its matching location.
YOUR TURN
On a later turn, you take the Miller, which has 2 meeples on it.
BackFront
You can place this split card at either the Brewery as a Brewer or the Cottage as a Witch.
Your worker card has only one empty space. You place one meeple on your worker card, and one next to your worker card.
You want to choose the Knight, but you have only two meeples. Instead, you choose to take the Noble. You place one meeple on the Witch, one on the Miller, and take the Noble from the display.
The meeples remain on cards in the display until they are taken.

5
These are the different characters and locations, and this is how they are arranged:
Resolving AbilitiesAfter you place a character at its location, resolve that location’s abilities from top to bottom. Abilities typically provide points and/or meeples based on which characters are currently in your realm. Some locations have special abilities written on a signpost, which are explained on the next page. The summary rulesheet explains each location’s abilities in detail.
End of TurnAfter you have resolved the location’s abilities, your turn ends. If there are any meeples next to your worker card, return them to the supply and gain 1 point for each meeple you return.
Then, close the gap in the display. To do this, slide each remaining card one space toward the front space. Then, draw the top character card and place it faceup in the back space. Remember to keep meeples on their cards.
Play then proceeds clockwise to the player on your left.
Miller Brewer Witch Guard Knight Innkeeper Noble
On your next turn, you take another Miller. You gain 2 points for each
Miller, for a total of 4 points.
Then, you take a Witch. You gain 2 points for each Miller, Brewer, and Witch in your realm. Since you have
two Millers and one Witch, you gain 6 points.You take a Miller and place it at your Mill. You gain 2 points.
Slide each remaining card one space toward the front.
Then, place the top card of the character deck faceup in the back space.
At the end of your turn, you still have a meeple next to your worker card. You return it to the supply, and gain 1 point.
6
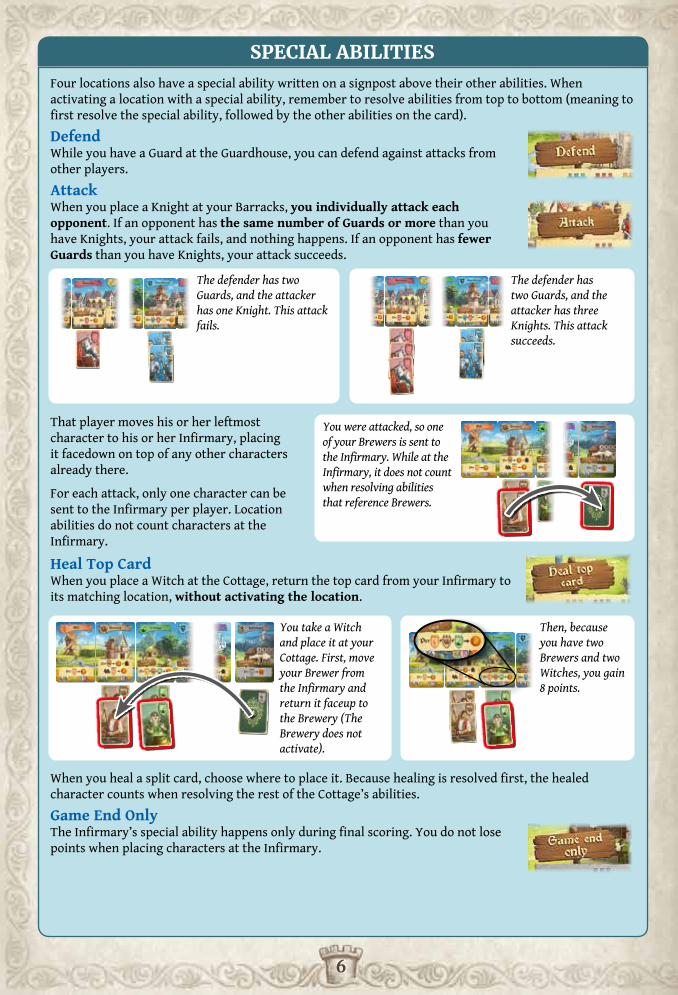
Four locations also have a special ability written on a signpost above their other abilities. When activating a location with a special ability, remember to resolve abilities from top to bottom (meaning to first resolve the special ability, followed by the other abilities on the card).
DefendWhile you have a Guard at the Guardhouse, you can defend against attacks from other players.
AttackWhen you place a Knight at your Barracks, you individually attack each opponent. If an opponent has the same number of Guards or more than you have Knights, your attack fails, and nothing happens. If an opponent has fewer Guards than you have Knights, your attack succeeds.
That player moves his or her leftmost character to his or her Infirmary, placing it facedown on top of any other characters already there.
For each attack, only one character can be sent to the Infirmary per player. Location abilities do not count characters at the Infirmary.
Heal Top CardWhen you place a Witch at the Cottage, return the top card from your Infirmary to its matching location, without activating the location.
When you heal a split card, choose where to place it. Because healing is resolved first, the healed character counts when resolving the rest of the Cottage’s abilities.
Game End OnlyThe Infirmary’s special ability happens only during final scoring. You do not lose points when placing characters at the Infirmary.
You were attacked, so one of your Brewers is sent to the Infirmary. While at the Infirmary, it does not count when resolving abilities that reference Brewers.
The defender has two Guards, and the attacker has one Knight. This attack fails.
The defender has two Guards, and the attacker has three Knights. This attack succeeds.
SPECIAL ABILITIES
You take a Witch and place it at your Cottage. First, move your Brewer from the Infirmary and return it faceup to the Brewery (The Brewery does not activate).
Then, because you have two Brewers and two Witches, you gain 8 points.

7
When all players have exactly 12 characters in their realm, the game ends, and final scoring begins. Each player follows these steps:
1. InfirmaryFor each character in your Infirmary, you lose 1 point. Then return those cards to the box; they are no longer part of your realm.
2. VarietyCount the number of your locations that have at least one character. You gain points equal to that number multiplied by itself.
Each location card has the full set of icons in the bottom-right as a reminder of this step.
3. MajorityOn the bottom-right of each location card is a coin showing that location’s value.
Each player counts the number of Millers at his or her Mill. Whoever has the most Millers among all players gains points equal to the Mill’s value. Repeat this process for each location with a location value. In case of a tie, each tied player gains points equal to that location’s value.
Claim the CrownAll players compare points, and the player with the most points wins. In case of a tie, the tied players share victory.
You have 12 characters, this time spread out over six locations. You gain (6 x 6 =) 36 points.
You have 12 total characters, but they are only at four different locations. You gain (4 x 4 =) 16 points.
FINAL SCORING
The Mill’s value is 10. You have the most Millers, so you gain 10 points.
For the two characters in your Infirmary, you lose 2 points.

8
Side B After you have played a few times with the location cards on side A, you are ready to try side B. To do this, flip over your location cards so that side B is faceup during setup. On side B, the locations become more risky, but also more rewarding, and you must make your decisions with greater care. Just like when playing with side A, make sure that all players have all of their cards with side B faceup.
Mixing Sides A and B You can also experiment with some unofficial combinations, by having some cards showing side A and some showing side B. When playing this way, all players’ realms must be identical.
Customizing the Character Deck For even more variance, you can try combining the character cards together. To do this, during step 4 of setup, shuffle the tier 1 cards with the tier 2 cards to create the character deck. Do not set aside any tier 1 cards.
AcknowledgmentsFrom the DesignerFirst designed in 2014, Majesty: For the Realm has been through a long creative process, and I want to thank everyone who helped me along the way. Special thanks go out to Sébastien Pauchon for his good advice about removing the original game board, Gaetan Beaujannot for his tireless support all the way to the end, and the Hans im Glück team, for their top-quality work and their confidence in my game.
From Hans im Glück Deepest thanks to Gaetan Beaujannot (from Forgenext) and Marc André for trusting us with their amazing game. It was such a pleasure to work with them, and we can’t wait to do it again! We would also like to thank our diligent playtesters, promoters, proofreaders, and partners, who all worked with us on this project. Thank you, and without your feedback (conscious or otherwise), this game never would have made it where it is now.
Special thanks goes to Anne Heidsieck and Andreas Resch for the illustrations and design process, and the Z-Man Games team for the English localization.
SIDE B AND BEYOND
1. Take one character from the display and place it at its matching location in your realm.2. Resolve that location’s abilities, including any special abilities on signposts.3. Play proceeds clockwise around the table.4. Players repeat steps 1, 2, and 3 until all players have exactly 12 character cards in their realm.5.Perform final scoring. The player with the most points wins!
SUMMARY
© 2017 Hans im Glück Verlags-GmbH. © 2017 Z-Man Games. Z-Man Games and the Z-Man logo are TMs of Z-Man Games. Fantasy Flight Supply is a TM of Fantasy Flight Games. Z-Man Games and Fantasy Flight Games are divisions of Asmodee North America, Inc. 1995 W County Road B2 Roseville, MN 55113, USA. (651)-639-1905. Actual components may vary from those shown. Made in China.
CreditsGame Design: Marc André
Game Development: Hans im Glück Team
Technical Editing: James Meier
Cover & Interior Art: Anne Heidsieck
Image Layout & 3D Rendering: Andreas Resch
Publisher: Steven Kimball
Playtesters: Gregor Abraham, Bernd Argesheimer, Silke Bansemer, Johanna & Rita Dorra, Laurin & Luca Dorra, Michael Fronia, Tom Hilgert, Dennis Hofeld, Dirk Rösch, Torsten & Tina Schlender, Karl-Heinz Schmiel, Thorsten Wagner, and especially Dieter Hornung.
Z-Man Games1995 W County Road B2Roseville, MN 55113 USA(651)[email protected]
TM


![[T2R RS] Rules WORLD EN V2 - Days of Wonderwith a new card from either deck (his choice). So during the game, the six faceup cards could be all Train cards, all Ship cards, three of](https://static.fdocuments.in/doc/165x107/5e443c557e831173c47b2de1/t2r-rs-rules-world-en-v2-days-of-wonder-with-a-new-card-from-either-deck-his.jpg)