FOR TECHNICAL ASSISTANCE 1.800.743 - Acorn … ENGINEERING COMPANY P.O. BOX 3527 ... TUB SPOUT...
16
INSTALLATION, OPERATION AND MAINTENANCE INSTRUCTIONS SV16 TEMPERATURE/PRESSURE BALANCING MIXING VALVE NOTES TO THE INSTALLER: 1. Please leave this documentation with the owner of the fixture when finished. 2. Please read this entire booklet before beginning the installation. 3. Check your installation for compliance with plumbing and other applicable codes. LIMITED WARRANTY UNITED STATES AND CANADA Acorn Controls warrants that its products are free from defects in material or workmanship under normal use and service for a period of one year from date of shipment. Acorn's liability under this warranty shall be discharged solely by replacement of repair of defective material, provided Acorn is notified in writing within one year from date of shipment, F.O.B. Industry, California. This warranty does not cover installation or labor charges and does not apply to materials, which have been damaged by other causes such as mishandling or improper care or abnormal use. The repair or replacement of the defective materials shall constitute the sole remedy of the Buyer and the sole remedy of Acorn under this warranty. Acorn shall not be liable under any circumstances for incidental, consequential or direct charges caused by defects in materials, or any delay in the repair or replacement thereof. This warranty is in lieu of all other warranties expressed or implied. Product maintenance instructions are issued with each unit and disregard or non-compliance with these instructions will constitute an abnormal use condition and void the warranty. FOR TECHNICAL ASSISTANCE 1.800.743.8259 [email protected] Date: 09/01/16 Manual #7802-116-000 Model SV16 Patent Pending WWW.ACORNENG.COM ACORN ENGINEERING COMPANY P.O. BOX 3527 CITY OF INDUSTRY, CA 91744 UNITED STATES OF AMERICA Acorn Controls Division of Acorn Engineering Company®, A member of Morris Group International™ Model SV16-LVR Patented Tri-Lever Handle Federal Public Law 111-380 (No Lead)
Transcript of FOR TECHNICAL ASSISTANCE 1.800.743 - Acorn … ENGINEERING COMPANY P.O. BOX 3527 ... TUB SPOUT...

INSTALLATION, OPERATION AND MAINTENANCE INSTRUCTIONS
SV16 TEMPERATURE/PRESSURE BALANCING MIXING VALVE
NOTES TO THE INSTALLER:
1. Please leave this documentation with the owner of the fixture when finished.
2. Please read this entire booklet before beginning the installation.
3. Check your installation for compliance with plumbing and other applicable codes.
LIMITED WARRANTY
UNITED STATES AND CANADA
Acorn Controls warrants that its products are free from defects in material or workmanship under normal use and service for a period of one year from date of shipment. Acorn's liability under this warranty shall be discharged solely by replacement of repair of defective material, provided Acorn is notified in writing within one year from date of shipment, F.O.B. Industry, California.
This warranty does not cover installation or labor charges and does not apply to materials, which have been damaged by other causes such as mishandling or improper care or abnormal use. The repair or replacement of the defective materials shall constitute the sole remedy of the Buyer and the sole remedy of Acorn under this warranty. Acorn shall not be liable under any circumstances for incidental, consequential or direct charges caused by defects in materials, or any delay in the repair or replacement thereof. This warranty is in lieu of all other warranties expressed or implied. Product maintenance instructions are issued with each unit and disregard or non-compliance with these instructions will constitute an abnormal use condition and void the warranty.
FOR TECHNICAL ASSISTANCE
1.800.743.8259
Date: 09/01/16Manual #7802-116-000
Model SV16Patent Pending
WWW.ACORNENG.COM
ACORN ENGINEERING COMPANYP.O. BOX 3527CITY OF INDUSTRY, CA 91744
UNITED STATES OF AMERICA
Acorn Controls Division of Acorn Engineering Company®, A member of Morris Group International™
Model SV16-LVR
Patented Tri-LeverHandle
FederalPublic Law111-380 (No Lead)

Page 2 of 9
Thoroughly read all installation instructions and product safety information before beginning the installation of this product.
FAILURE TO READ AND FOLLOW PROPER INSTALLATION AND MAINTENANCE INSTRUCTIONS MAY RESULT IN PRODUCT FAILURE WHICH CAN CAUSE PROPERTY DAMAGE, PERSONAL INJURY AND/OR DEATH.
Acorn Controls is not responsible for damages resulting from improper installation and/or maintenance. Installation of this valve shall be in accordance with Uniform Plumbing Code.
TO ENSURE ACCURATE AND RELIABLE OPERATION OF THIS PRODUCT, IT IS ESSENTIAL TO:
ŸProperly design the system to minimize pressure and temperature variations.
ŸImplement an annual maintenance program to ensure proper operation and temperature setting of valve(s).
ŸThis valve is factory preset however, it can be adjusted. It is the responsibility of the installer and or facility maintenance personal to make sure valve outlet temperature does not exceed 115°F (46°C) after installation, maintenance or repair.
(Not provided by Acorn)
1. Wall anchors, screws, nuts and washers asrequired.
2. Teflon tape for sealing water connections.
3. Allen wrenches for lever handle and bonnet set screws.
4. Copper pipe adapters as required.
5. Snap-ring pliers with pins less than 0.03”
ŸFlush supply lines of all foreign material such as pipe dope, chips or solder prior to connecting to mixing valve.
ŸTo ensure proper installation, review the manual thoroughly to verify rough-ins before beginning any work.
ŸInstallation and field adjustment are the responsibility of the installer.
ŸMaximum water pressure is 125 psi (8.62 bars). Maximum inlet hot water temperature is 180°F (82°C). Temperature adjustment range is 85-115°F (29-46°C). Valve assembly must be drained prior to being subjected to freezing temperatures. Valve includes integral check- stops.
PRESSUREDROP
10(69)
1.9(7.1)
15(103)
2.3(8.7)
20(138)
2.7(10)
30(207)
3.3(12.4)
45(310)
4(15.1)
60(414)
4.6(17.5)
5(34)
1.3(5)
FLOW RATEGPM (LPM)
PSID (KPA)CV
0.6
WARNING:! SUPPLIES REQUIRED:
Acorn Controls Division of Acorn Engineering Company®, A member of Morris Group International™
SV16 Installation & Operation Manual
! IMPORTANT
Manual #7802-116-000 Date: 09/01/16

Page 3 of 9
NOTE;ALL DIMENSIONS ARE IN INCHES (MM).
*Please refer to ASSE 1016-2011 for other test conditionswhich may or may not equal installed conditions.
Patent Pending
ROUGH-IN DIMENSIONS:
SPECIFICATIONS:
Acorn Controls Division of Acorn Engineering Company®, A member of Morris Group International™
Manual #7802-116-000
Excessive overheating of valve during soldering may damage the cartridge and checkstops. Do not heat valve any higher than needed to flow solder. If a higher temperature method is being used all internal components must be removed. See figures 8 for cartridge removal and 9 and10 for temperature limit setting.
! IMPORTANT
134" (44)
MIN.
212" (64)
MAX.
72"
(1829)
A.F.F.24"
(610)
REF.
1/2" NPT PLUG
Ø412"
(114)
ROUGH-IN
518"
(130)
338"
(86)
COMBINATION1/2" NPT AND
1/2" SWEATCONNECTIONS
1/2" NPTFEMALECONNECTION
1/2" NPTFEMALE
CONNECTION
20"
(508)
A.F.F.
24"
(610)
REF.
72"
(1829)
A.F.F.
134" (44)
MIN.
212" (64)
MAX.
1/2" NPTCONNECTION
OPTIONALTUB SPOUT
FIGURE 2
FIGURE 1
ROUGH-INGUIDE
ROUGH-INGUIDE
SV16 Installation & Operation Manual
Connections: ................... Combination 1/2" NPT and 1/2” sweat Inlet-Connections
Riser Connection: ...................................... 1/2" NPT
Flow Rate: ........... 4 gpm (15 lpm) @ 45 psi (310 kpa) Differential
Hot Water Supply Temp.: ........ 110°-180°F (43°-82°C)
Cold Water Supply Temp.: ......... 35°-80°F (1.7°-27°C)
Approach Temperature*: .........................
Maximum Operating Pressure: ........ 125 psi (862 kpa)
Temperature Ranges*: .................
Minimum Flow: ............................................
5°F (2.8°C) Above Set Point
85°-115°F (29-46°C)
1.25 gpm (4.7 lpm)
Date: 09/01/16

Page 4 of 9
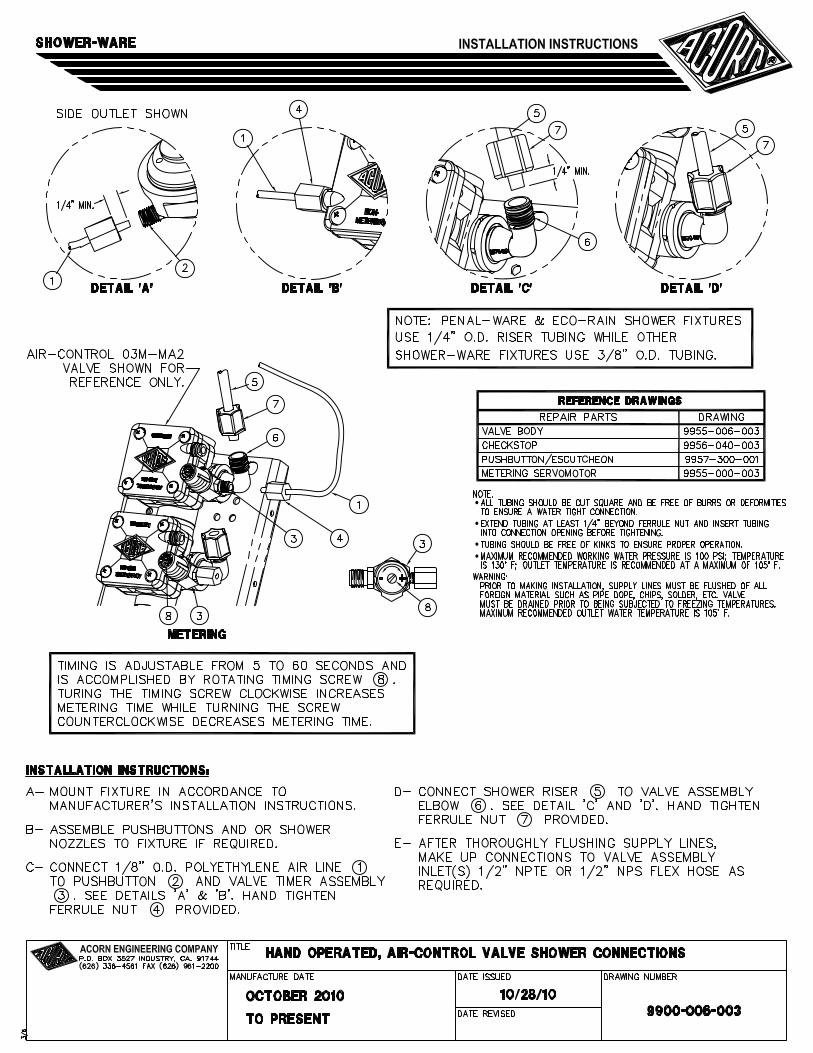
1. With installation guide 1 on the valve, positionshower valve 2 so that center of inlet ports are 2” ± 3/8” (51mm ± 9.5mm) from finished wallensuring the outlet port marked “T” is facingdown.
NOTE:
rough-in guide will insure propersize opening in finished wall for valve, access tocheckstops and for repairs
2. Make up connections to the appropriate inletports, marked “H” and “C”. Inlet connectionsare combination 1/2” NPT and 1/2” sweat.
3. Valve is set-up for standard inlets. If reversedinlets are required for back-to-back installation see “Back-To-Back Installation” page 5.
4. For shower only installation, see Figure 1on page 3. Pipe directly from top outlet port toshowerhead and leave plug in bottom port.Outlet port connection is 1/2” NPT female.
5. For tub and shower installation, see Figure2 on page 3. Remove plug and pipe directlyfrom bottom outlet port to diverter tub spoutand top outlet port to showerhead. Outlet portsconnections are 1/2” NPT female. Valve isdesigned to be used without the use of a twinell.
6. Remove rough-in guide 1.
7. Prior to installing valve trim, check for properoperation of valve, on/off, flow and hightemperature limit. If temperature is notsatisfactory refer to TEMPERATUREADJUSTMENT page 6 step 4.
8. Prior to installing valve trim, attach escutcheon gasket 4 to the back of escutcheon 5 and gaskets 3 and 4 to the back of escutcheon 6 by removingadhesive protection film and attaching as shownin Figure 4 and 5. NOTE: Insure that outer gasket 4 gap istowards bottom of escutcheon 5.
9A. SV16 Valve Trim Installation: Figure 6a. Remove adhesive protective film from foam gasket 7 and wrap around valve body as shown.
b. Place escutcheon with gaskets 5 over valve and against finished wall and secure with screws 8.
c. Push handle 9 onto valve stem and secure with screw 10 using provided Allen Wrench 11.
NOTE: If handle 10 does not sit properly inescutcheon, remove stem insert 12 and rotateso it sits on upper or lower ledge. Detail “A”.
After the valve has been piped and before starting finished wall, the
.
INSTALLATION:
Acorn Controls Division of Acorn Engineering Company®, A member of Morris Group International™
Manual #7802-116-000
SV16 Installation & Operation Manual
Date: 09/01/16
FINISHEDWALL
1
4 3
6
FIGURE 5
FIGURE 6
5
8
9
10
FINISHEDWALL
SV16 7
2
SV16-LVR
SV16
4
5
FIGURE 4
FIGURE 3
12
9
DETAIL "A"
FRONT OFINSTALLATION
GUIDE
11

Page 5 of 9
1. For 2” x 6” wall construction, position showervalve so that center of inlet ports are 2-1/8” ±1/2” (50mm ± 13mm) from finished wall,ensuring the outlet port marked “T” is facingdown.
2. For 2” x 4” wall construction position, showervalve so that center of inlet ports are 1-3/8” ±1/4” (50mm ± 6mm) from finished wall,ensuring the outlet port marked “T” is facingdown.
3. Make up connections to the appropriate inletports, marked “H” and “C” on one valve andreverse on the other, cold supply to “H” and hotsupply to “C”. Inlet connections are combination 1/2” NPT and 1/2” sweat. Refer to page 6 for cartridge removal and reversal.
4. To continue installations follow steps 4-9A onpage 4 or 9B on page 5.
To avoid confusion, Hot and Cold inlets need to be re-identified for future maintenance.
! IMPORTANT
Excessive overheating of valve during soldering may damage the cartridge and checkstops. Do not heat valve any higher than needed to flow solder. If a higher temperature method is being used all internal components must be removed. See figures 8 for cartridge removal and 10 for temperature limit setting.
! IMPORTANT
BACK-TO-BACK INSTALLATION:
Acorn Controls Division of Acorn Engineering Company®, A member of Morris Group International™
VALVE TRIM INSTALLATION CONTINUES:
9B. SV16-LVR Valve Trim Installation:Figure 7.a. Slide valve sleeve 13 over valve body.b. Place escutcheon with gaskets 6 over
valve sleeve 13 and against finished walland secure with screws 8.
c. Push handle 14 onto valve stem andsecure with set screw 15.
BACK-TO-BACK DETAIL
HOT
COLD
VIEW FROM REVERSED SIDE
2" X 6" BACK-TO-BACKINSTALLATION
134" (44)
MIN.
212" (64)
MAX.
FINISHEDWALL
134" (44)
MIN.
212" (64)
MAX.
Manual #7802-116-000
FIGURE 7
FINISHEDWALL
14
8
6 13
15
SV16 Installation & Operation Manual
Date: 09/01/16

Page 6 of 9
1. Bonnet Removal: Figure 8.
a. Close Checkstops 16.
b. Using snap-ring pliers with pins less than 0.03”, by others, remove snap-ring 17.
c. Remove both temperature limit washers 18.
d. Loosen 1/16” hex set screw 19.
e. Unscrew bonnet 20.
f. Remove external valve stem 21
g. Pull cartridge 22 out.
2. Cartridge Reversal and Reassembly:
a. Inspect valve cartridge 22 ensuring that 'D' shaped grooves have cartridge screen O-rings 23 in them and that stainless steel screens 24 are seated. See Figure 8.
b. Insert cartridge 22 into valve body. Ensure the 'H' (see detail) on the side of cartridge housing is on the cold water supply side of valve casting.
This is so when the cartridge is installed, it seats in the valve casting and cartridge will not rotate. See Figures 9 and 10.
c. With valve stem O-ring 25 assembled onto valve stem 21, slide valve stem 21 onto cartridge stem while holding in place. See Figure 11.
d. Inspect valve bonnet set screw 19 and ensure it is in the backed out position. Slide bonnet O-ring 26 over threaded area on bonnet 20 and seat in groove. See Figure 11. NOTE: For optional Lever Handle, slide O-ring 26 into groove on the top of bonnet 20.
e. Thread valve bonnet 20 into valve casting turning clockwise. Apply pressure on top of stem while screwing valve bonnet 20 into place. This will keep cartridge from slipping out of slot while bonnet is threaded into place. Tighten valve bonnet 20 onto valve body firmly (180 In-Lbs). Tighten set screw 19 with 1/16” Allen wrench firmly (75 In Oz). This will prevent valve bonnet 20 from coming loose during use. See Figure 11.
Take note of the rib on the bottom of cartridge 22 (between the screens) and the slot in the bottom of valve body are aligned.
CARTRIDGE REMOVAL:
Acorn Controls Division of Acorn Engineering Company®, A member of Morris Group International™
Manual #7802-116-000
SV16 Installation & Operation Manual
FIGURE 8
22
FIGURE 11
VIEW FROM REVERSED SIDE
HOT
COLD
17
18
19
21
16
22
20
22
FIGURE 10
24
23
25
21
20
19
FIGURE 9
26
25
SLOT
RIB
Date: 09/01/16

Page 7 of 9Acorn Controls Division of Acorn Engineering Company®, A member of Morris Group International™
Manual #7802-116-000
SV16 Installation & Operation Manual
OFF POSITION SETTING:
1. Turn on hot and cold water supply. Open both checkstop assemblies by turning check adjustment screw 16 counterclockwise until screw tops out. Check for leaks around bonnet and stop assemblies at this time.
2. Using handle, rotate valve stem 21 clockwise two full turns. Continue to slowly turn handle clockwise until water flow stops. Then continue to rotate handle clockwise an additional 90 Deg. (1/4 turn) then stop. Turn back counterclockwise slowly until the water flow completely stops.
3. With the flow of water now shut off, place the first temperature stop washer 18 on the valve stem 21 keyed on the counterclockwise side as close to the bonnet stop as possible. See Figure 12.
4. Once temperature stop washer 18 is installed, slightly valve by turning stem with handle counter-
clockwise and then back clockwise until first temperature stop washer 18 hits stop on valve bonnet. At this time, ensure that water is shut off completely to showerhead.
5. If not, rotate stop one tooth either way and repeat step until the water flow is shut off and the temperature
stop washer 18 is against the valve bonnet stop.
HIGH LIMIT TEMPERATURE SETTING:
1. Rotate external stem 21 with handle counter- clockwise measuring water temperature with a thermometer until the high limit temperature is reached. (Recommend 105° to 110 °F)
2. Place the second temperature stop washer 18 on the valve stem 21 keyed on the clockwise side as close to the valve bonnet stop as possible. Rotate counter-clockwise until it is fully against bonnet stop (full hot). See Figure 13.
3. At full hot, use thermometer to verify required high limit temperature is reached.
4. With valve in the “ON” position and water running install the retaining ring 17 with snap ring pliers. Confirm snap ring is inserted properly on groove of stem. (When water is running, the external stem 21 is pushed outward increasing the exposure of the snap ring groove.) See Figure 14.
open
4
18
21
18
21
21
17
FIGURE 12
FIGURE 13
FIGURE 14
BONNETSTOP
BONNETSTOP
16
Date: 09/01/16

Page 8 of 9Acorn Controls Division of Acorn Engineering Company®, A member of Morris Group International™
Manual #7802-116-000
TROUBLESHOOTING:
CAUSE SOLUTIONPROBLEM
1. SET POINT DIFFICULT TO SET ORCANNOT BE REACHED
SUPPLY TEMPS NOT WITHINSPECIFIED LIMITS
HOT AND COLD SUPPLIES ARE REVERSED
CHECK DIFFERENTIAL TEMPERATUREBETWEEN SUPPLIES AND OUTLET
REINSTALL VALVE WITH SUPPLIESCONNECTED TO MARKED INLETS
2. DOES NOT MAINTAIN OUTLETTEMPERATURE OR CHANGES
FLUCTUATION IN SUPPLY PRESSURES
FILTERS BLOCKED WITH DEBRIS
CHECK DIFFERENTIAL TEMPERATUREBETWEEN SUPPLIES AND OUTLET
CLEAN FILTERSOVER TIME
3. DISCHARGE TEMPERATURE TOOHOT OR TOO COLD
VALVE NOT ADJUSTED PROPERLY READJUST VALVE TEMPERATURE PERINSTALLATION INSTRUCTIONS
4. NO FLOW FROM VALVE HOT OR COLD SUPPLY FAILUREOR SHUTOFFS CLOSED
OPEN SHUTOFFS OR RESTORE HOT AND COLD SUPPLIES
CHECK FILTERS BLOCKED WITHDEBRIS
CLEAN FILTERS
HOTWATERSUPPLY
COLDWATERSUPPLY
HOTWATERSUPPLY
COLDWATERSUPPLY
SV16 SHOWERVALVE
SHOWERHEAD
TUB SPOUT
SV16 SHOWERVALVE
DIVERTERVALVE
SHOWERHEAD HANDHELD SUPPLYCONNECTION
HANDHELDSHOWER
TYPICAL PIPING w/ TUB SPOUT
TYPICAL PIPING w/ HANDHELD SHOWER
SV16 Installation & Operation Manual
Date: 09/01/16

Page 9 of 9
NOTE:Individual parts not available for purchase, sold in repair kits only. Parts called out for reference only.
REPAIR PARTS:
Acorn Controls Division of Acorn Engineering Company®, A member of Morris Group International™
Manual #7802-116-000
SV16 Installation & Operation Manual
O-RINGS SHOULD BE LUBRICATED WITH AN NSF APPROVED LUBRICANT. CARE SHOULD BE EXERCISED WHILE INSERTING COMPONENTS INTO VALVE BODY DURING REASSEMBLY.
! IMPORTANT
Date: 09/01/16
ITEM DESCRIPTION
CUP POINT SET SCREW7
LEVER HANDLE8
VALVE SLEEVE9
OVAL HEAD SCREWS (x2)10
ESCUTCHEON, LEVER HANDLE11
16
LIGATURE RESISTANT ESCUTHCHEON
17
ITEM DESCRIPTION
18
RETAINING RING (x2 )
19
VALVE STEM O-RING
20
CARTRIDGE
25
STAINLESS STEEL SCREENS (x2)
26
CARTRIDGE SCREEN O-RINGS (x2)
27
CHECK CAP (x2)
28
TEMPERATURE STOP RINGS (x2)
STEM INSERT
29
KIT NUMBER DESCRIPTION
TRIM REPLACEMENT, LEVER HANDLE7800-503-001
TRIM REPLACEMENT, LIGATURE RESISTANT7800-186-001
CARTRIDGE & BONNET REPLACEMENT7800-502-001
CARTRIDGE REPLACEMENT7800-175-001
ITEM KIT NUMBER DESCRIPTIONITEM
1
2
4
5
ITEM DESCRIPTION
TRIM PLATE CENTER GASKET12
ESCUTCHEON GASKET13
LIGATURE RESISTANT HANDLE SCREW
14
SET SCREW
21
VALVE BONNET
22
23
CHECK CAP O-RING (x2)
CHECK ADJUST SCREW (x2)
30
CHECK ADJUST SCREW O-RING (x2)
31
BONNET O-RING
32
LIGATURE RESISTANT HANDLE
15
24
VALVE STEM
COMPLETE REBUILD KIT7800-500-001 CHECK-STOP REBUILD KIT7800-504-0013 6
VALVE BODYSHOWN FORREFERENCE
3
2021
2324
25
26
27
28
2930
3132
3334
3536
37
19
13
12
11
10
9
8
7
15
16
17
10
18
13
3132
3334
3536
37
CHECK SPRING (x2)
33
CHECK PLUNGER (x2)
CHECK SEAL (x2)
34
35
36
4
5
6
1
2
6
22
37
EXTERNAL BONNET O-RING
SLEEVE GASKET (SV16 ONLY)
38
5/32" CENTER REJECT ALLEN WRENCH
14
21
EXTRA RETAINING RINGPROVIDED. USE ONLY ONEDURING REASSEMBLY.