for Iridium Satellite Phones - Extreme (9575) - 9555 CommStation_Iridium... · Operating and...
42
Operating and Installation Manual Sattrans Wi-Fi CommStation for Iridium Satellite Phones - Extreme (9575) - 9555 SATTRANS USA & Americas: +1 877 688 4635 Europe: +48 17 71 58 100 Asia & Africa: +971 44 356 105 Russia: +7 495 981 0477 Ukraine: +380 44 490 3900 [email protected] www.sattrans.com © 2015 SATTRANS. All Rights Reserved. Sattrans, the Sattrans logo are owned and registered by SATTRANS and its affiliates. All other registered names, trademarks are the property of their respective owners. SATTRANS assumes no responsibility for any errors that may appear in this manual. Information contained herein is subject to change without notice.
Transcript of for Iridium Satellite Phones - Extreme (9575) - 9555 CommStation_Iridium... · Operating and...
Operating and Installation ManualSattrans Wi-Fi CommStationfor Iridium Satellite Phones - Extreme (9575) - 9555
SATTRANSUSA & Americas: +1 877 688 4635Europe: +48 17 71 58 100Asia & Africa: +971 44 356 105Russia: +7 495 981 0477Ukraine: +380 44 490 [email protected]
© 2015 SATTRANS. All Rights Reserved. Sattrans, the Sattrans logo are owned and registered by SATTRANS
and its affiliates. All other registered names, trademarks are the property of their respective owners. SATTRANS
assumes no responsibility for any errors that may appear in this manual. Information contained herein is subject
to change without notice.

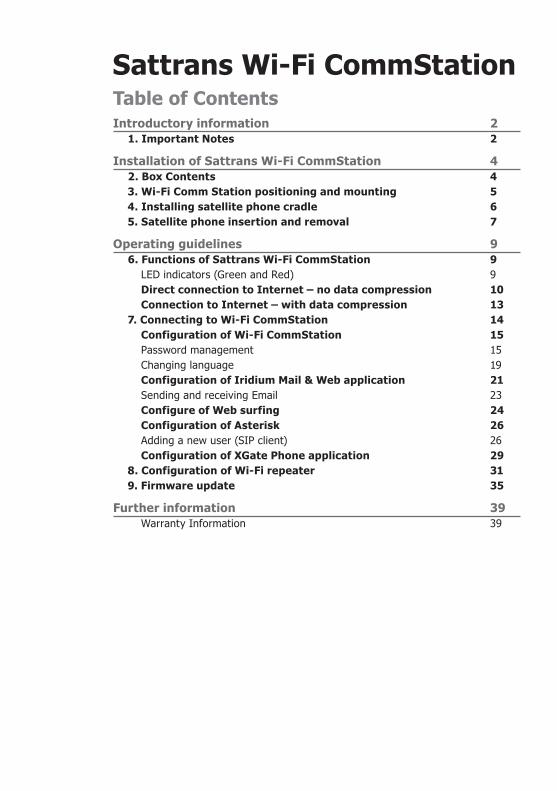
Sattrans Wi-Fi CommStationTable of ContentsIntroductory information 2
1. Important Notes 2
Installation of Sattrans Wi-Fi CommStation 4 2. Box Contents 4 3. Wi-Fi Comm Station positioning and mounting 5 4. Installing satellite phone cradle 6 5. Satellite phone insertion and removal 7
Operating guidelines 9 6. Functions of Sattrans Wi-Fi CommStation 9
LED indicators (Green and Red) 9Direct connection to Internet – no data compression 10Connection to Internet – with data compression 13
7. Connecting to Wi-Fi CommStation 14Configuration of Wi-Fi CommStation 15Password management 15Changing language 19Configuration of Iridium Mail & Web application 21Sending and receiving Email 23Configure of Web surfing 24Configuration of Asterisk 26Adding a new user (SIP client) 26Configuration of XGate Phone application 29
8. Configuration of Wi-Fi repeater 31 9. Firmware update 35
Further information 39Warranty Information 39
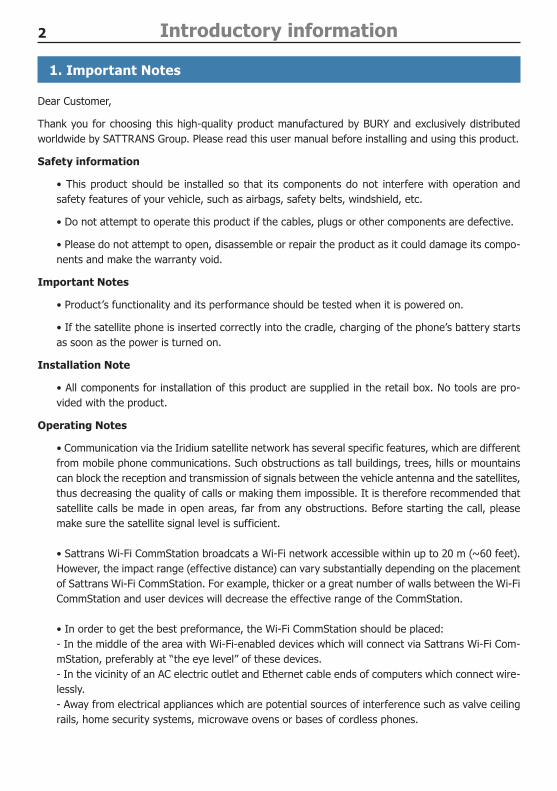
2 Introductory information
1. Important Notes
Dear Customer,
Thank you for choosing this high-quality product manufactured by BURY and exclusively distributed worldwide by SATTRANS Group. Please read this user manual before installing and using this product.
Safety information
• This product should be installed so that its components do not interfere with operation and safety features of your vehicle, such as airbags, safety belts, windshield, etc.
• Do not attempt to operate this product if the cables, plugs or other components are defective.
• Please do not attempt to open, disassemble or repair the product as it could damage its compo-nents and make the warranty void.
Important Notes
• Product’s functionality and its performance should be tested when it is powered on.
• If the satellite phone is inserted correctly into the cradle, charging of the phone’s battery starts as soon as the power is turned on.
Installation Note
• All components for installation of this product are supplied in the retail box. No tools are pro-vided with the product.
Operating Notes
• Communication via the Iridium satellite network has several specific features, which are different from mobile phone communications. Such obstructions as tall buildings, trees, hills or mountains can block the reception and transmission of signals between the vehicle antenna and the satellites, thus decreasing the quality of calls or making them impossible. It is therefore recommended that satellite calls be made in open areas, far from any obstructions. Before starting the call, please make sure the satellite signal level is sufficient.
• Sattrans Wi-Fi CommStation broadcats a Wi-Fi network accessible within up to 20 m (~60 feet). However, the impact range (effective distance) can vary substantially depending on the placement of Sattrans Wi-Fi CommStation. For example, thicker or a great number of walls between the Wi-Fi CommStation and user devices will decrease the effective range of the CommStation.
• In order to get the best preformance, the Wi-Fi CommStation should be placed: - In the middle of the area with Wi-Fi-enabled devices which will connect via Sattrans Wi-Fi Com-mStation, preferably at “the eye level” of these devices. - In the vicinity of an AC electric outlet and Ethernet cable ends of computers which connect wire-lessly.- Away from electrical appliances which are potential sources of interference such as valve ceiling rails, home security systems, microwave ovens or bases of cordless phones.
3
- Away from big metal surfaces such as doors made of solid metal or big concentration of aluminium rivets. The strength of signal is also influenced by big surfaces of other materials, e.g. glass, insulated walls, aquariums, mirrors, bricks or concrete.
Important: Failure to obey these recommendations may cause substantial deterioration of the Wi- X
Fi signal and and decreased quality of communication or complete lack of possibility of connecting to the Internet.
Warranty & Liability Notes
• This product is covered by a 2-year worldwide warranty from date of purchase with proof of purchase submitted.
• SATTRANS shall not be liable for any damages resulted from misuse, abuse, neglect, accident, repair, alteration or maintenance by any person or party other than our own service facility or the modification of this product in any way.
• Obligations of SATTRANS and its affiliates shall be limited to repair or replacement with the same or similar unit, at our option. When returning the product for repair, please pack it carefully and include an explanatory note.
We hope you will be satisfied with the use of your Sattrans Wi-Fi CommStation and wish you a pleasant ride.
4 Installation of Sattrans Wi-Fi CommStation
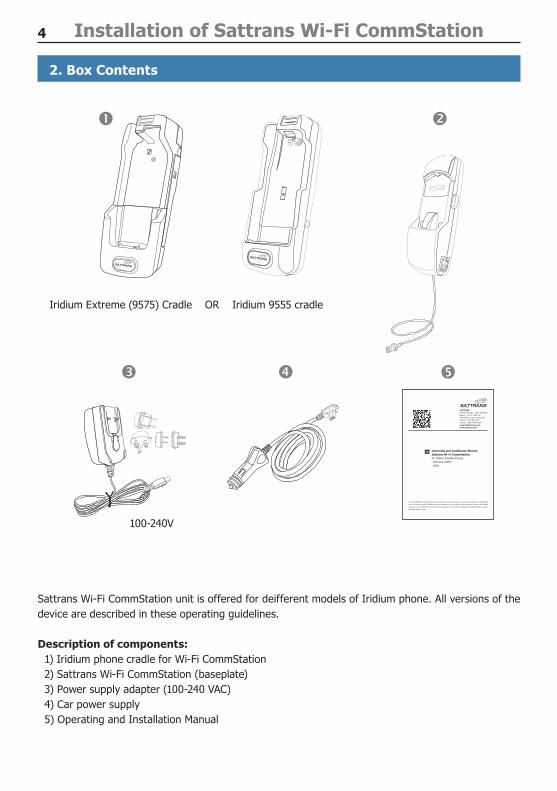
2. Box Contents
Iridium Extreme (9575) Cradle OR Iridium 9555 cradle
100-240V
Sattrans Wi-Fi CommStation unit is offered for deifferent models of Iridium phone. All versions of the device are described in these operating guidelines.
Description of components: 1) Iridium phone cradle for Wi-Fi CommStation 2) Sattrans Wi-Fi CommStation (baseplate) 3) Power supply adapter (100-240 VAC) 4) Car power supply 5) Operating and Installation Manual
Operating and Installation ManualSattrans Wi-Fi CommStationfor Iridium Satellite Phones - Extreme (9575) - 9555
SATTRANSUSA & Americas: +1 877 688 4635Europe: +48 17 71 58 100Asia & Africa: +971 44 356 105Russia: +7 495 981 0477Ukraine: +380 44 490 [email protected]
© 2015 SATTRANS. All Rights Reserved. Sattrans, the Sattrans logo are owned and registered by SATTRANS
and its affiliates. All other registered names, trademarks are the property of their respective owners. SATTRANS
assumes no responsibility for any errors that may appear in this manual. Information contained herein is subject
to change without notice.
5
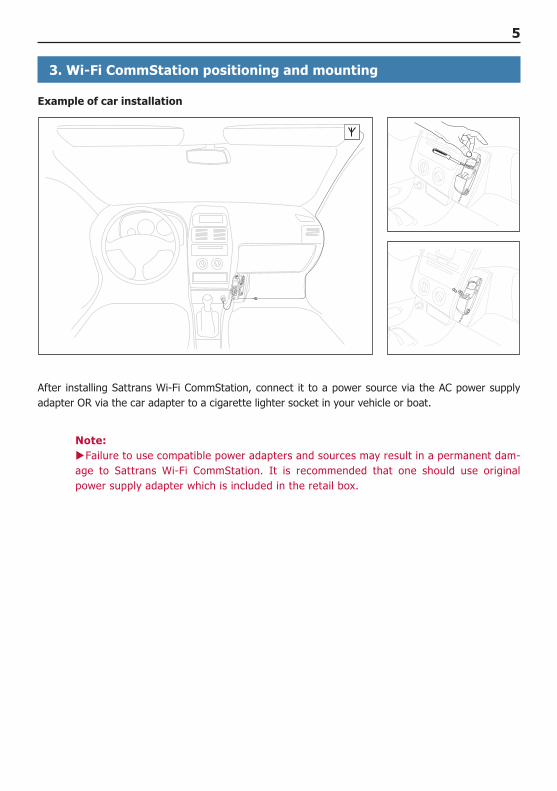
3. Wi-Fi CommStation positioning and mounting
Example of car installation
After installing Sattrans Wi-Fi CommStation, connect it to a power source via the AC power supply adapter OR via the car adapter to a cigarette lighter socket in your vehicle or boat.
Note: Failure to use compatible power adapters and sources may result in a permanent dam- X
age to Sattrans Wi-Fi CommStation. It is recommended that one should use original power supply adapter which is included in the retail box.
6 Installation of Sattrans Wi-Fi CommStation
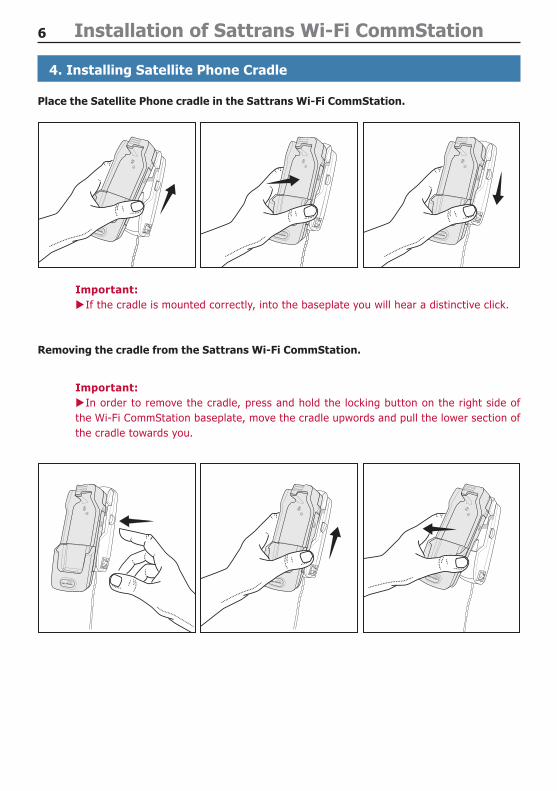
4. Installing Satellite Phone Cradle
Place the Satellite Phone cradle in the Sattrans Wi-Fi CommStation.
Important: If the cradle is mounted correctly, into the baseplate you will hear a distinctive click. X
Removing the cradle from the Sattrans Wi-Fi CommStation.
Important: In order to remove the cradle, press and hold the locking button on the right side of X
the Wi-Fi CommStation baseplate, move the cradle upwords and pull the lower section of the cradle towards you.

7
5. Satellite phone insertion and removal
Inserting satellite phone into cradle.
Important: Please remove the antenna cover (9555 phone) or the bottom connector cover (Extreme X
phone) before inserting the phone into the cradle.
Place the satellite phone in the cradle starting from the bottom connector.
Push the top part of the satellite phone until you hear the phone click into the cradle. The correct position-ing of the satellite phone in the cradle is signalled by a perceptible ‘clicking’ sound.
antenna cover
connector cover
8 Installation of Sattrans Wi-Fi CommStation
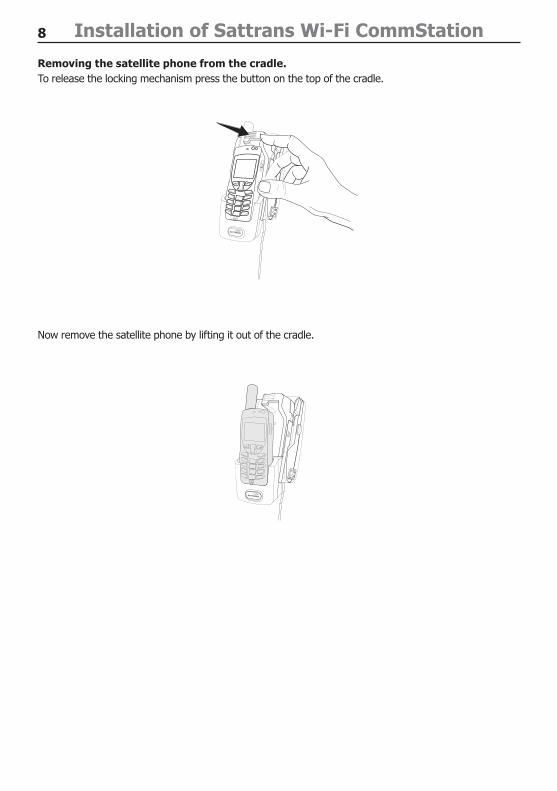
Removing the satellite phone from the cradle.To release the locking mechanism press the button on the top of the cradle.
Now remove the satellite phone by lifting it out of the cradle.

9Operating guidelines
6. Functions of Sattrans Wi-Fi CommStation device
1 - LAN port (RJ-45) enables connection of a router or a computer by means of Ethernet cable in order to configure Sattrans Wi-Fi CommStation.
2 - Power supply socker (mini-USB)
3 - Two LED indicators
4 - Reset button
SATTRANS Wi-Fi CommStation for Iridium provides the following main features:Router • with AP (Access Point)PBX• (Private Branch Exchange) - private branch exchange offers all functions which are necessary for the users in small offices for conducting daily voice communication and data exchange: - VoIP gateway (Voice over Internet Protocol) allowing to receive/make voice calls inside and outside the network (via satellite phone) between sip client and Iridium network. - sms functionality (sms message from sip client to Iridium networks and redirect sms from net-work to sip client.
Receiving/sending email• Web browsing •
LED Indicators
LED 1 - for VoIP and WAN status:
Blinking RED WAN_CONNECTING: the device will try to connect to internet via the satellite phone. The process may take a while, depending on t he satellite signal quality
Solid RED WAN_CONNECTED: the device is connected to internet via Iridium satellite phone
Solid GREEN VoIP_GATEWAY_READY: the device works as VoIP gateway for Iridium network, PBX ready
Blinking GREEN VoIP_GATEWAY_ACTIVE: internal or external call is ongoing
LED 2 - for Wi-Fi status:
Solid RED Wi-Fi AP not ready, device powered
Solid / Blinking GREEN Wi-Fi data transfer
10 Operating guidelines
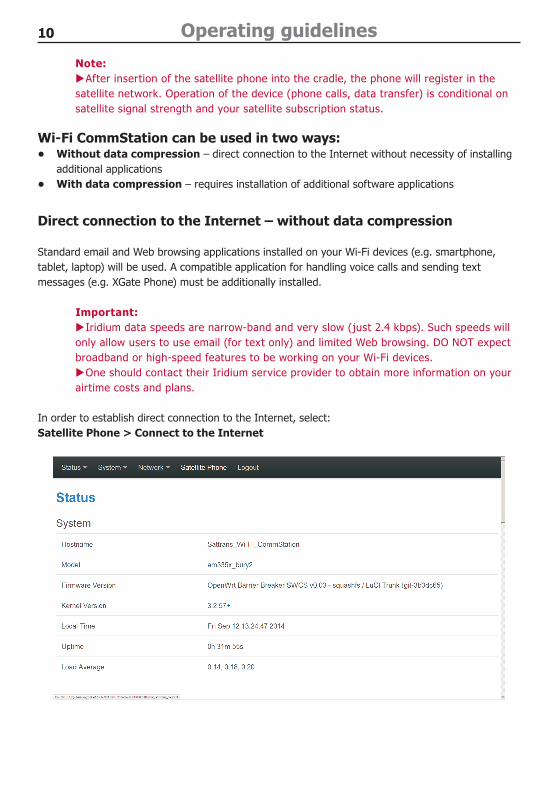
Note: After insertion of the satellite phone into the cradle, the phone will register in the X
satellite network. Operation of the device (phone calls, data transfer) is conditional on satellite signal strength and your satellite subscription status.
Wi-Fi CommStation can be used in two ways: Without data compression• – direct connection to the Internet without necessity of installing
additional applications With data compression• – requires installation of additional software applications
Direct connection to the Internet – without data compression
Standard email and Web browsing applications installed on your Wi-Fi devices (e.g. smartphone, tablet, laptop) will be used. A compatible application for handling voice calls and sending text messages (e.g. XGate Phone) must be additionally installed.
Important: Iridium data speeds are narrow-band and very slow (just 2.4 kbps). Such speeds will X
only allow users to use email (for text only) and limited Web browsing. DO NOT expect broadband or high-speed features to be working on your Wi-Fi devices.
One should contact their Iridium service provider to obtain more information on your Xairtime costs and plans.
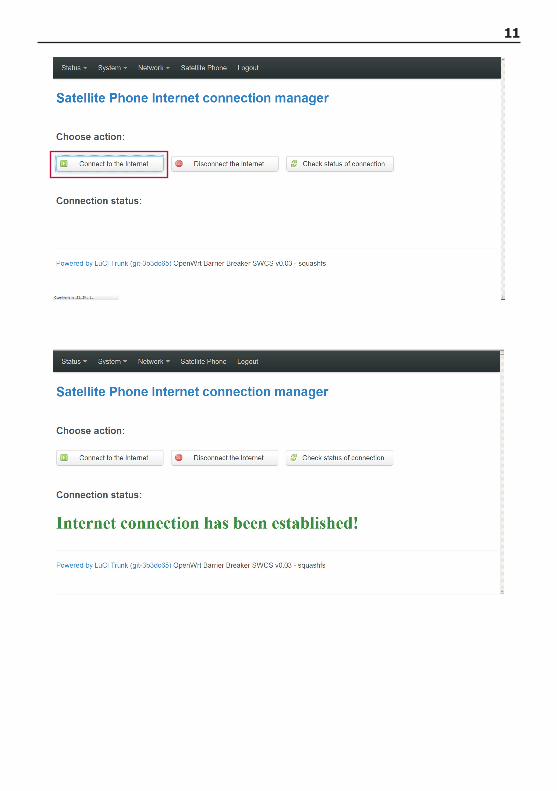
In order to establish direct connection to the Internet, select: Satellite Phone > Connect to the Internet
11
12 Operating guidelines
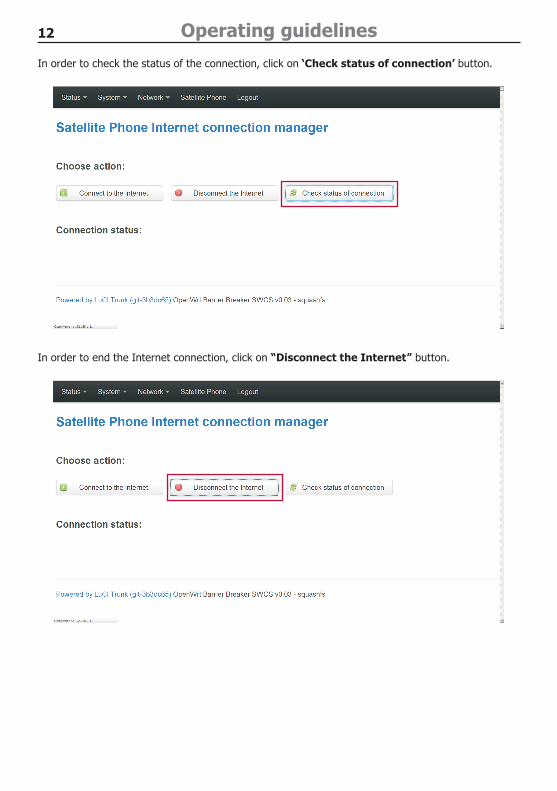
In order to check the status of the connection, click on ‘Check status of connection’ button.
In order to end the Internet connection, click on “Disconnect the Internet” button.
13
Connection to the Internet with data compression
Third-party data optimization and compression software can help you improve performance of the slow Iridium data connection and use your airtime more efficiently. You will need to install additional applications on your Wi-Fi devices to optimize sending/receiving email or Web browsing.
For PC or Mac:Iridium Mail & Web (free): www.iridium.com/Iridium-AxcessPoint-Mail-and-Web.aspxXGate for SATTRANS (premium, full featured): www.sattrans.com/XGate
For Android devices: Find and install ‘Iridium Mail & Web’ (free) or ‘XGate Email & Web’ (full featured) app in your device’s Google Play Store.
For iOS devices (iPhone, iPad): Find and install ‘Iridium Mail & Web’ (free) or ‘XGate Email & Web’ (full featured) app in your device’s App Store.
Software Activation:
Iridium Mail & Web software should be activated (at no cost) at: www.iridium.com/MailAndWeb. Use the supplied login and password to use the software and apps on all compatible Wi-Fi devices.
XGate for SATTRANS software can be activated at www.sattrans.com/XGate. Use the MAC-address of your Wi-Fi CommStation for a free 30-day trial of the full-featured XGate Email & Web software.
Important: Your Iridium satellite subscription should include data capability. Check with your X
Iridium service provider.Free Iridium Mail & Web software will only work with Iridium satellite phones. XXGate for Sattrans will work with any satellite or cellular phone system, such as Irid- X
ium, Inmarsat, Thuraya and cellular networks around the world.After your free 30-day trial, you can purchase extension of your subscription at X
www.sattrans.com/XGate
14 Operating guidelines
7. Connecting to Sattrans Wi-Fi CommStation
The following conditions must be met to ensure that the connection is successful.- Wi-Fi radio must be switched on in your Wi-Fi devices (e.g. smartphone, tablet, laptop). - Sattrans Wi-Fi CommStation must be powered on.
Note:The range of the Wi-Fi signal can be limited. X
Establishing Wi-Fi connectionStep 1. Search for available Wi-Fi networks from your Wi-Fi device (refer to the operating instructions of your specific device).Step 2. Select “Sattrans Wi-Fi CommStation” from the list of available networks and enter “sattrans” for password. Step 3. Select the “Connect”.
Disconnecting from Wi-Fi networkYou can disconnect from Sattrans Wi-Fi CommStation using one of the following methods.1. By disconnecting your Wi-Fi device from Sattrans Wi-Fi CommStation.2. By switching off Wi-Fi radio in your Wi-Fi device.3. By powering off the Sattrans Wi-Fi CommStation.
Automatic connectionThe connection to Sattrans Wi-Fi CommStation will re-established under the following conditions:1. Wi-Fi radio is switched on in your Wi-Fi device(s). 2. Sattrans Wi-Fi CommStation is powered on. 3. Wi-Fi network password is saved in your Wi-Fi enabled device(s).
Note:You can connect up to 10 different Wi-Fi devices to Sattrans Wi-Fi CommStation at the X
same time.
15
Configuration of Sattrans Wi-Fi CommStation
1. Enter http://192.168.1.1 in the Web browser (e.g. Mozilla Firefox) of a connected Wi-Fe device.2. Enter default credentials: Username: admin Password: admin
Note:To ensure safe operations, we recommend that username and password be changed X
immediately after your first login.
Various configuration options are available in the configuration portal, such as update of software, statistics, information about Sattrans Wi-Fi CommStation connection. Note: Settings modification by the incompetent staff can cause limitation of functioning and even make it impossible to use the Wi-Fi CommStation product.
Saving changes to the settingsChanges to the settings will be applied only after taking the following steps.- Save changes by clicking on the “Save & Apply” button.- Reboot of Sattrans Wi-Fi CommStation by selecting System -> Reboot -> Perform reboot.
Password managementPassword can be changed in the Wi-Fi CommStation admin portal from connected Wi-Fi device(s). Any password changes will be applied after saving settings and rebooting the Wi-Fi CommStation (“Saving changes to the settings” – see above).
Changing the passwordIn the “Configuration” menu item, enter a new password. The password must contain 8-17 charac-ters without diacritics or special characters (e.g. +, -, /, etc.).
16 Operating guidelines
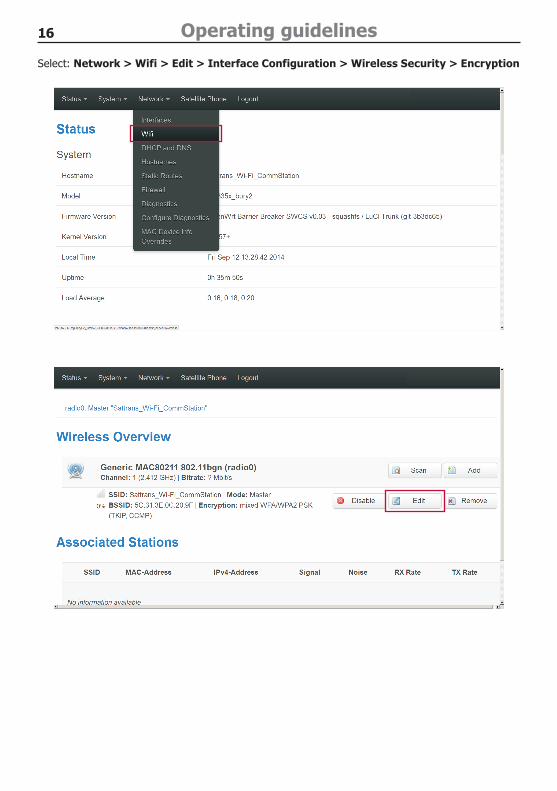
Select: Network > Wifi > Edit > Interface Configuration > Wireless Security > Encryption
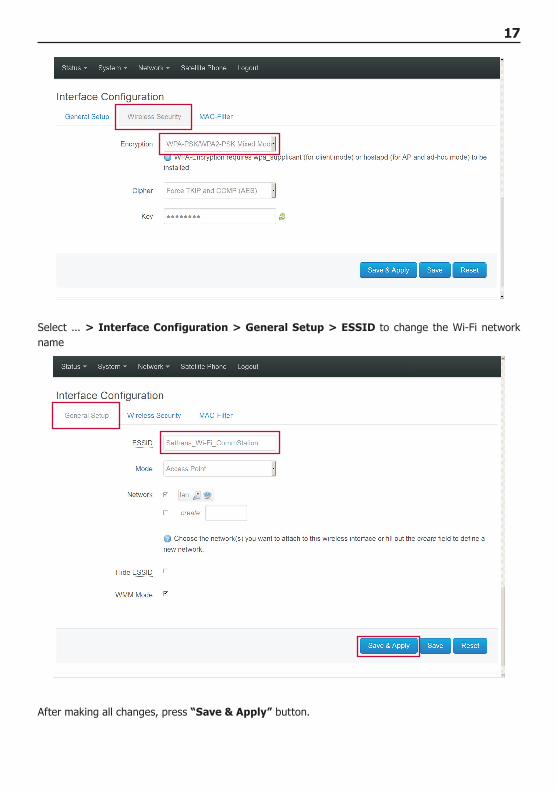
17
Select ... > Interface Configuration > General Setup > ESSID to change the Wi-Fi network name
After making all changes, press “Save & Apply” button.
18 Operating guidelines
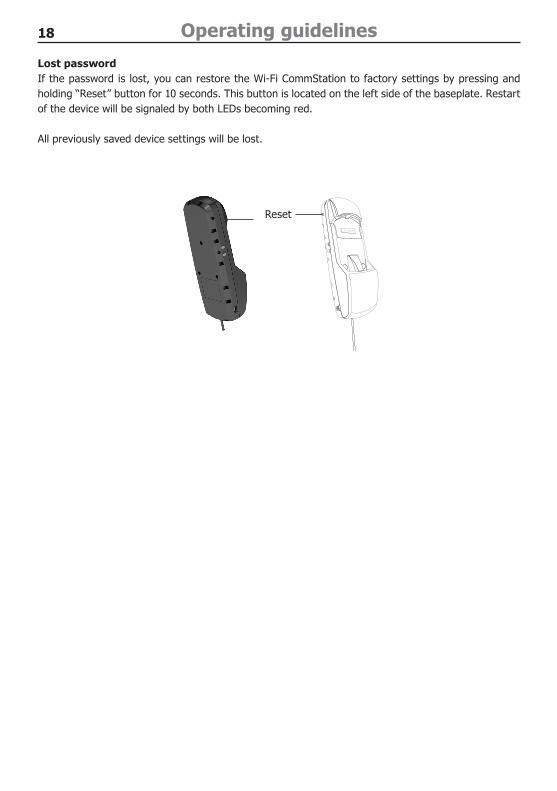
Lost passwordIf the password is lost, you can restore the Wi-Fi CommStation to factory settings by pressing and holding “Reset” button for 10 seconds. This button is located on the left side of the baseplate. Restart of the device will be signaled by both LEDs becoming red.
All previously saved device settings will be lost.
Reset
19
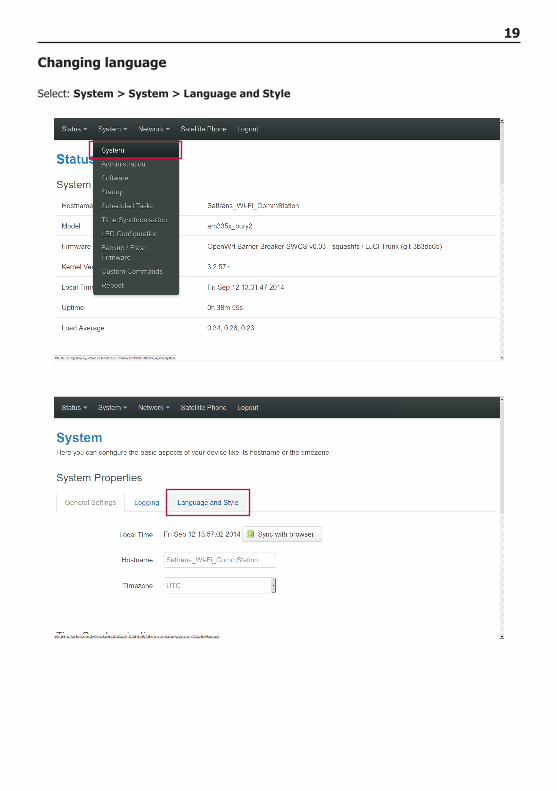
Changing language
Select: System > System > Language and Style
20 Operating guidelines
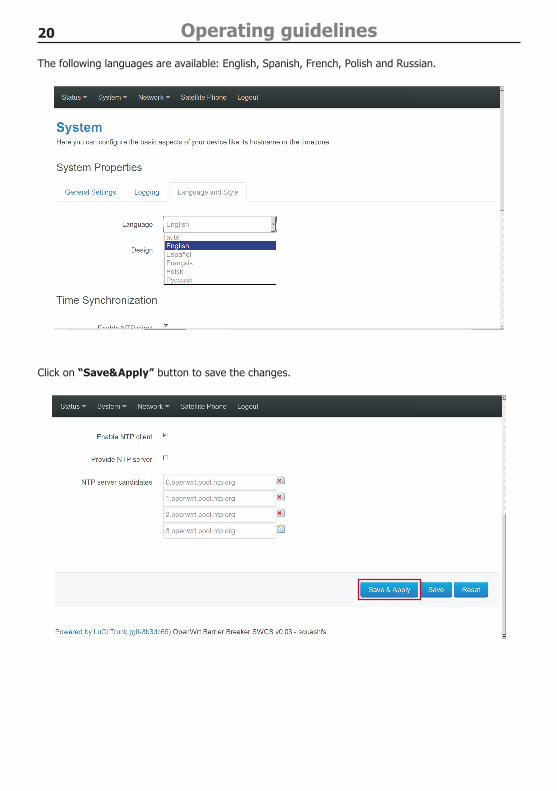
The following languages are available: English, Spanish, French, Polish and Russian.
Click on “Save&Apply” button to save the changes.
21
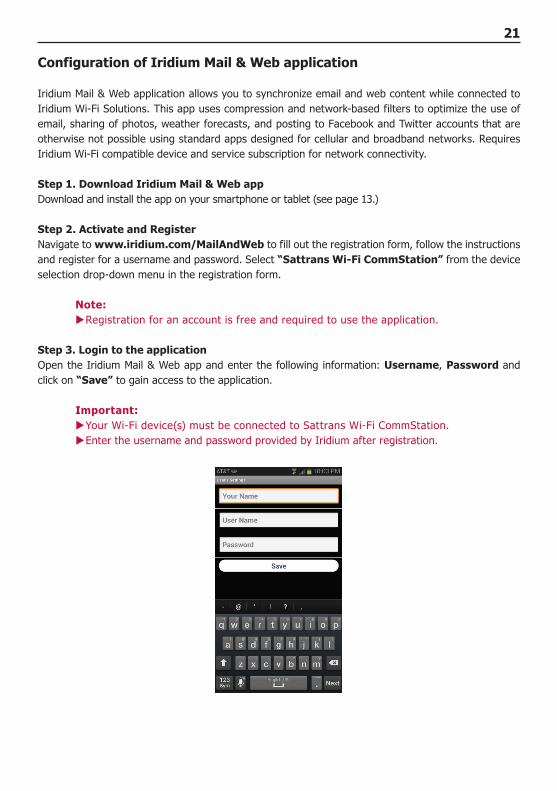
Configuration of Iridium Mail & Web application
Iridium Mail & Web application allows you to synchronize email and web content while connected to Iridium Wi-Fi Solutions. This app uses compression and network-based filters to optimize the use of email, sharing of photos, weather forecasts, and posting to Facebook and Twitter accounts that are otherwise not possible using standard apps designed for cellular and broadband networks. Requires Iridium Wi-Fi compatible device and service subscription for network connectivity.
Step 1. Download Iridium Mail & Web appDownload and install the app on your smartphone or tablet (see page 13.)
Step 2. Activate and RegisterNavigate to www.iridium.com/MailAndWeb to fill out the registration form, follow the instructions and register for a username and password. Select “Sattrans Wi-Fi CommStation” from the device selection drop-down menu in the registration form.
Note: Registration for an account is free and required to use the application. X
Step 3. Login to the applicationOpen the Iridium Mail & Web app and enter the following information: Username, Password and click on “Save” to gain access to the application.
Important:Your Wi-Fi device(s) must be connected to Sattrans Wi-Fi CommStation. XEnter the username and password provided by Iridium after registration. X
22 Operating guidelines
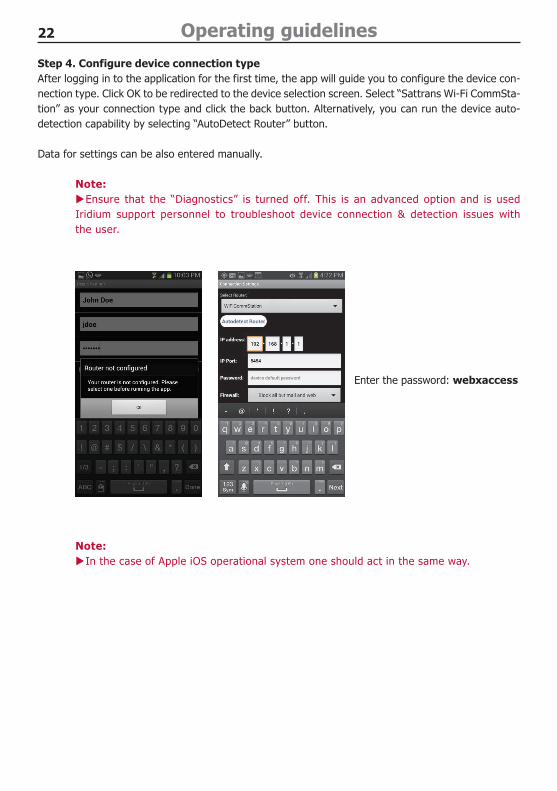
Step 4. Configure device connection typeAfter logging in to the application for the first time, the app will guide you to configure the device con-nection type. Click OK to be redirected to the device selection screen. Select “Sattrans Wi-Fi CommSta-tion” as your connection type and click the back button. Alternatively, you can run the device auto-detection capability by selecting “AutoDetect Router” button.
Data for settings can be also entered manually.
Note: Ensure that the “Diagnostics” is turned off. This is an advanced option and is used X
Iridium support personnel to troubleshoot device connection & detection issues with the user.
Note: In the case of Apple iOS operational system one should act in the same way. X
Enter the password: webxaccess
23
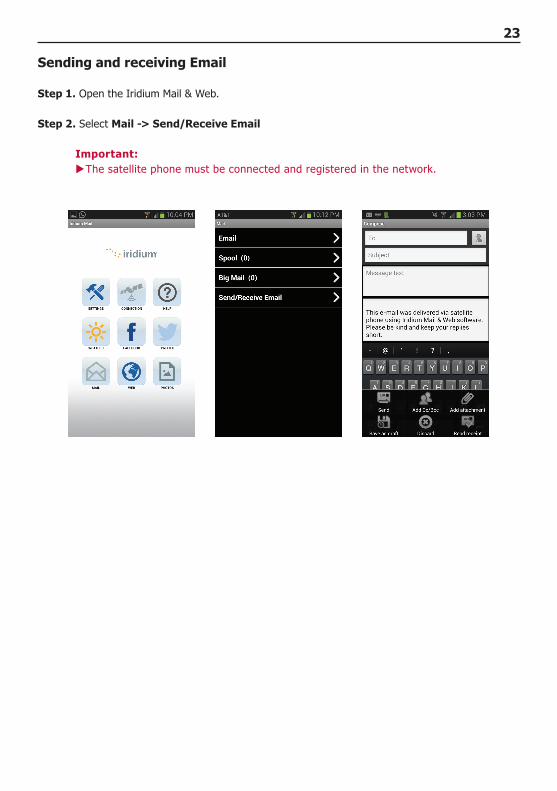
Sending and receiving Email
Step 1. Open the Iridium Mail & Web.
Step 2. Select Mail -> Send/Receive Email
Important:The satellite phone must be connected and registered in the network. X
24 Operating guidelines
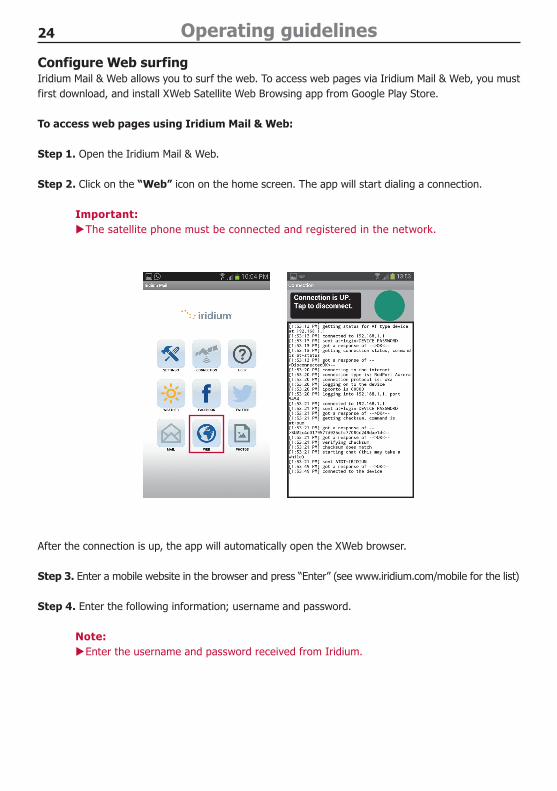
Configure Web surfingIridium Mail & Web allows you to surf the web. To access web pages via Iridium Mail & Web, you must first download, and install XWeb Satellite Web Browsing app from Google Play Store.
To access web pages using Iridium Mail & Web:
Step 1. Open the Iridium Mail & Web.
Step 2. Click on the “Web” icon on the home screen. The app will start dialing a connection.
Important:The satellite phone must be connected and registered in the network. X
After the connection is up, the app will automatically open the XWeb browser.
Step 3. Enter a mobile website in the browser and press “Enter” (see www.iridium.com/mobile for the list)
Step 4. Enter the following information; username and password.
Note:Enter the username and password received from Iridium. X
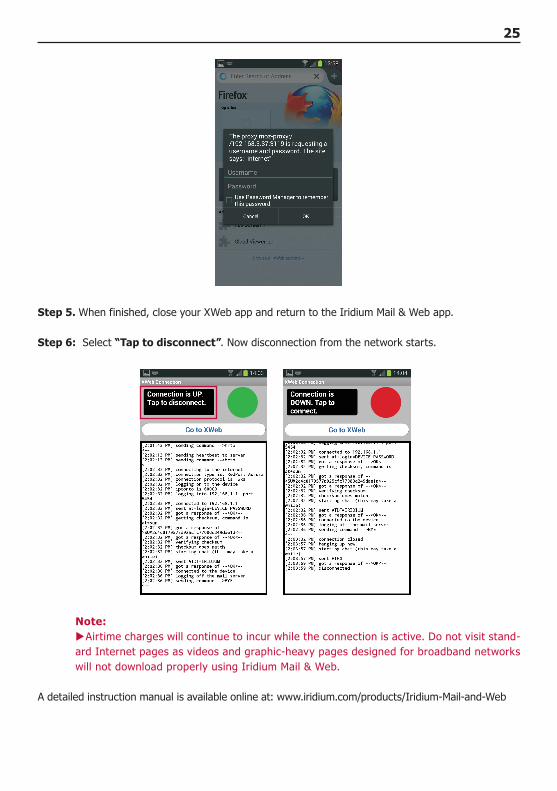
25
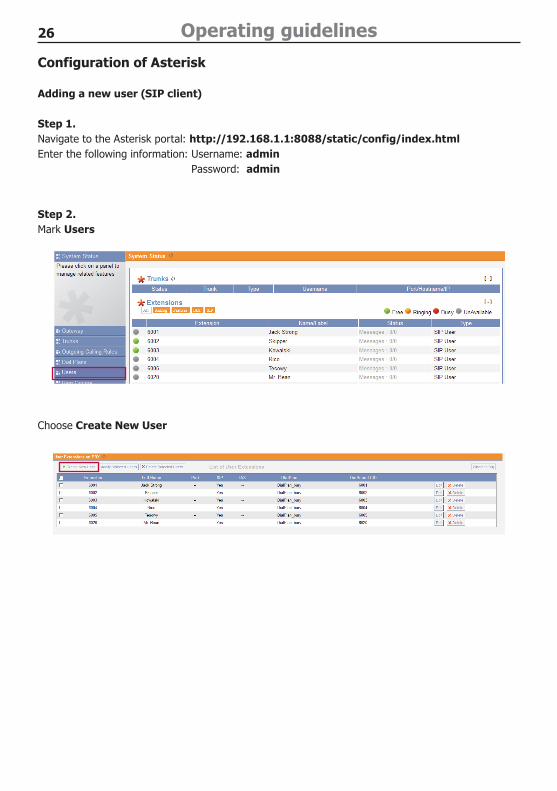
Step 5. When finished, close your XWeb app and return to the Iridium Mail & Web app.
Step 6: Select “Tap to disconnect”. Now disconnection from the network starts.
Note: Airtime charges will continue to incur while the connection is active. Do not visit stand- X
ard Internet pages as videos and graphic-heavy pages designed for broadband networks will not download properly using Iridium Mail & Web.
A detailed instruction manual is available online at: www.iridium.com/products/Iridium-Mail-and-Web
26 Operating guidelines
Configuration of Asterisk
Adding a new user (SIP client)
Step 1. Navigate to the Asterisk portal: http://192.168.1.1:8088/static/config/index.htmlEnter the following information: Username: admin Password: admin
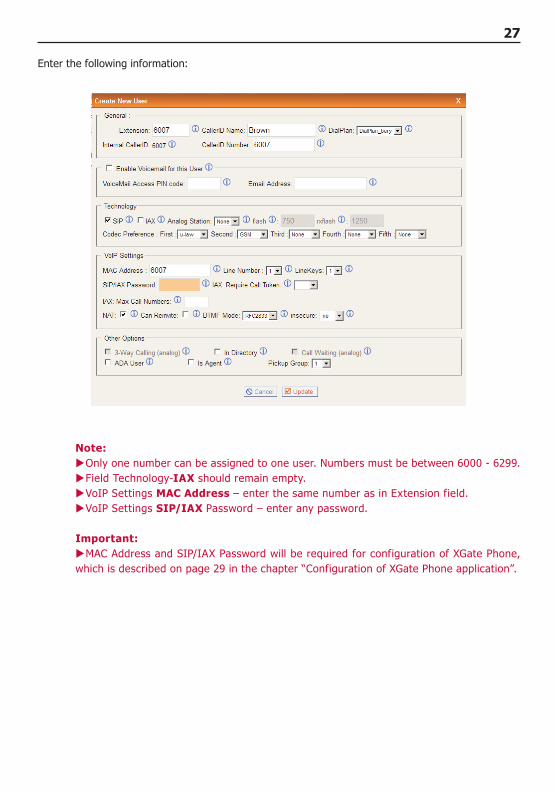
Step 2. Mark Users
Choose Create New User
27
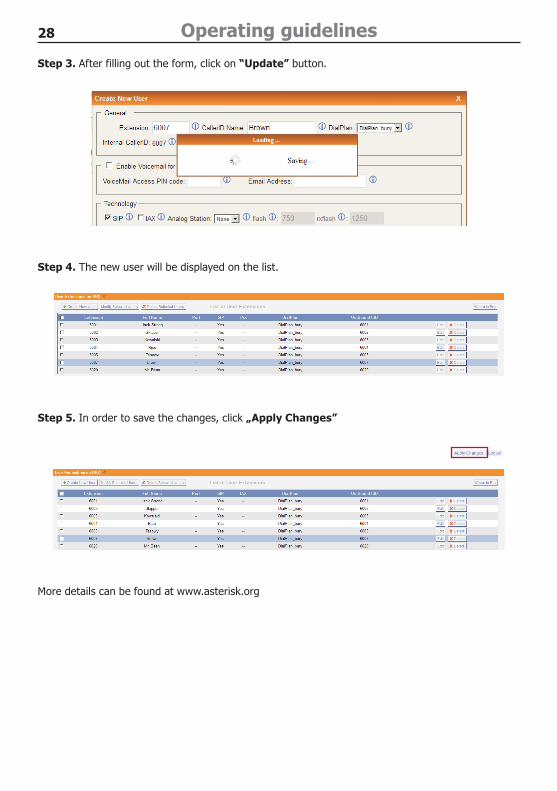
Enter the following information:
Note: Only one number can be assigned to one user. Numbers must be between 6000 - 6299. XField Technology- X IAX should remain empty. VoIP Settings X MAC Address – enter the same number as in Extension field. VoIP Settings X SIP/IAX Password – enter any password.
Important: MAC Address and SIP/IAX Password will be required for configuration of XGate Phone, X
which is described on page 29 in the chapter “Configuration of XGate Phone application”.
28 Operating guidelines
Step 3. After filling out the form, click on “Update” button.
Step 4. The new user will be displayed on the list.
Step 5. In order to save the changes, click „Apply Changes”
More details can be found at www.asterisk.org
29
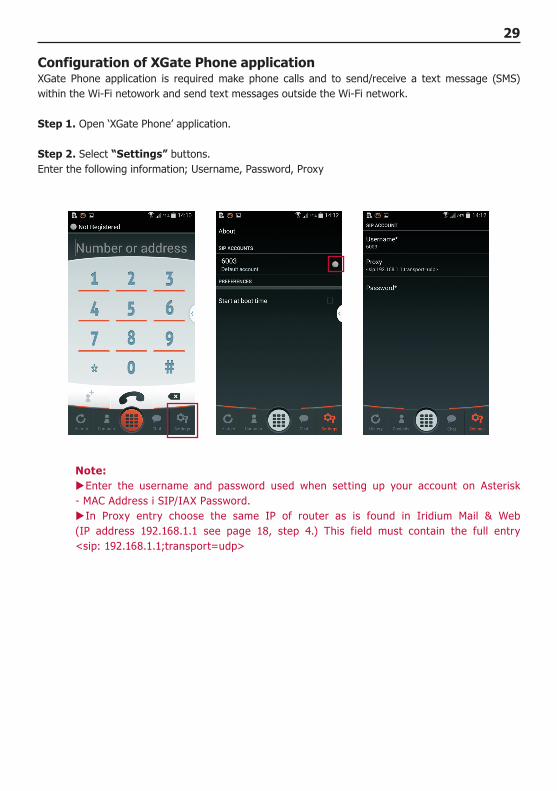
Configuration of XGate Phone application XGate Phone application is required make phone calls and to send/receive a text message (SMS) within the Wi-Fi netowork and send text messages outside the Wi-Fi network.
Step 1. Open ‘XGate Phone’ application.
Step 2. Select “Settings” buttons. Enter the following information; Username, Password, Proxy
Note: Enter the username and password used when setting up your account on Asterisk X
- MAC Address i SIP/IAX Password. In Proxy entry choose the same IP of router as is found in Iridium Mail & Web X
(IP address 192.168.1.1 see page 18, step 4.) This field must contain the full entry <sip: 192.168.1.1;transport=udp>
30 Operating guidelines
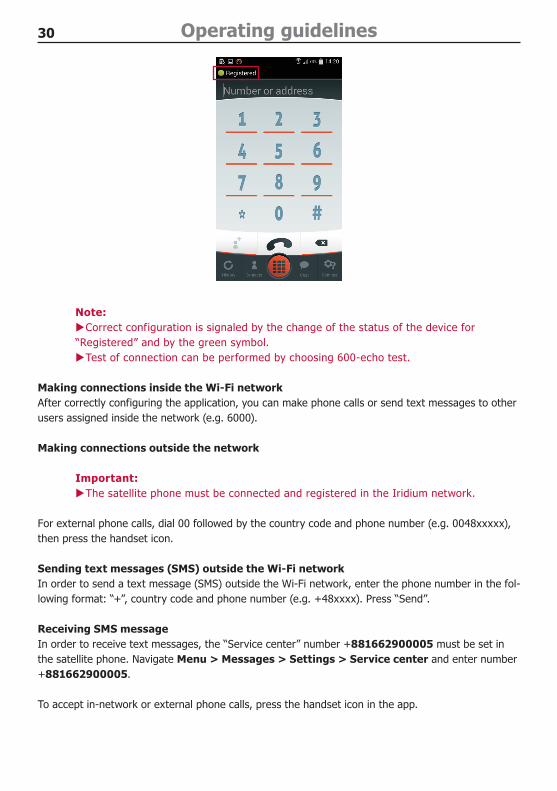
Note: Correct configuration is signaled by the change of the status of the device for X
“Registered” and by the green symbol. Test of connection can be performed by choosing 600-echo test. X
Making connections inside the Wi-Fi network After correctly configuring the application, you can make phone calls or send text messages to other users assigned inside the network (e.g. 6000).
Making connections outside the network
Important:The satellite phone must be connected and registered in the Iridium network. X
For external phone calls, dial 00 followed by the country code and phone number (e.g. 0048xxxxx), then press the handset icon.
Sending text messages (SMS) outside the Wi-Fi network In order to send a text message (SMS) outside the Wi-Fi network, enter the phone number in the fol-lowing format: “+”, country code and phone number (e.g. +48xxxx). Press “Send”.
Receiving SMS message In order to receive text messages, the “Service center” number +881662900005 must be set in the satellite phone. Navigate Menu > Messages > Settings > Service center and enter number +881662900005.
To accept in-network or external phone calls, press the handset icon in the app.
31
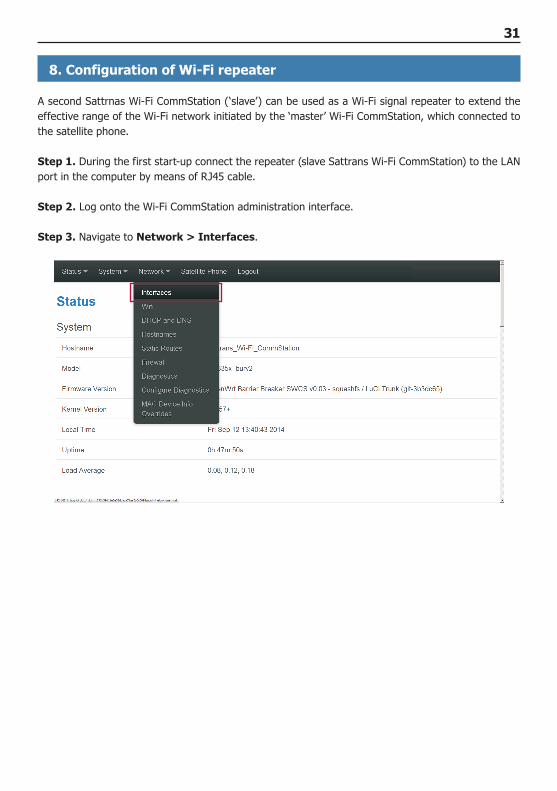
8. Configuration of Wi-Fi repeater
A second Sattrnas Wi-Fi CommStation (‘slave’) can be used as a Wi-Fi signal repeater to extend the effective range of the Wi-Fi network initiated by the ‘master’ Wi-Fi CommStation, which connected to the satellite phone.
Step 1. During the first start-up connect the repeater (slave Sattrans Wi-Fi CommStation) to the LAN port in the computer by means of RJ45 cable.
Step 2. Log onto the Wi-Fi CommStation administration interface.
Step 3. Navigate to Network > Interfaces.
32 Operating guidelines
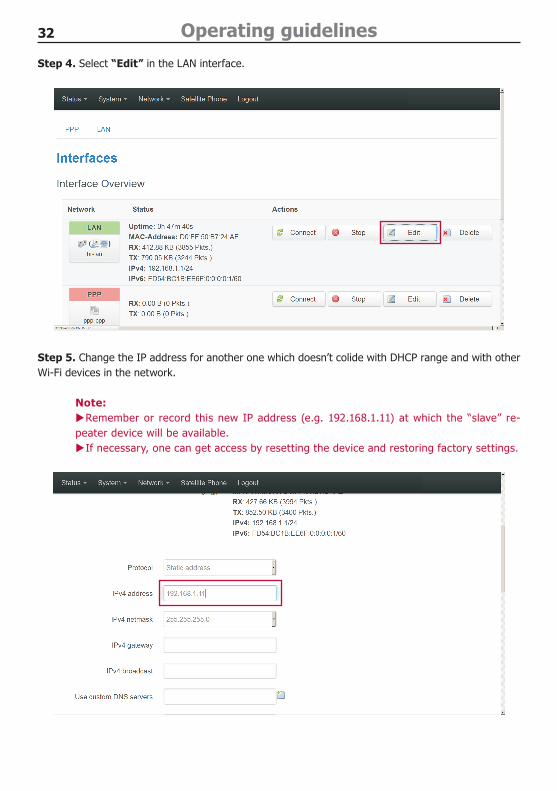
Step 4. Select “Edit” in the LAN interface.
Step 5. Change the IP address for another one which doesn’t colide with DHCP range and with other Wi-Fi devices in the network.
Note:Remember or record this new IP address (e.g. 192.168.1.11) at which the “slave” re- X
peater device will be available.If necessary, one can get access by resetting the device and restoring factory settings. X

33
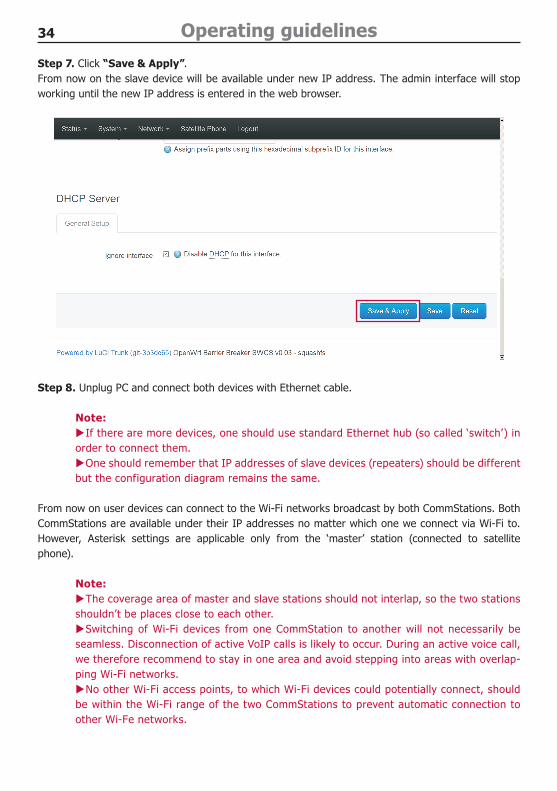
Step 6. Select “Ignore interface” in section DHCP server.
34 Operating guidelines
Step 7. Click “Save & Apply”. From now on the slave device will be available under new IP address. The admin interface will stop working until the new IP address is entered in the web browser.
Step 8. Unplug PC and connect both devices with Ethernet cable.
Note:If there are more devices, one should use standard Ethernet hub (so called ‘switch’) in X
order to connect them. One should remember that IP addresses of slave devices (repeaters) should be different X
but the configuration diagram remains the same.
From now on user devices can connect to the Wi-Fi networks broadcast by both CommStations. Both CommStations are available under their IP addresses no matter which one we connect via Wi-Fi to. However, Asterisk settings are applicable only from the ‘master’ station (connected to satellite phone).
Note:The coverage area of master and slave stations should not interlap, so the two stations X
shouldn’t be places close to each other.Switching of Wi-Fi devices from one CommStation to another will not necessarily be X
seamless. Disconnection of active VoIP calls is likely to occur. During an active voice call, we therefore recommend to stay in one area and avoid stepping into areas with overlap-ping Wi-Fi networks.
No other Wi-Fi access points, to which Wi-Fi devices could potentially connect, should Xbe within the Wi-Fi range of the two CommStations to prevent automatic connection to other Wi-Fe networks.
35
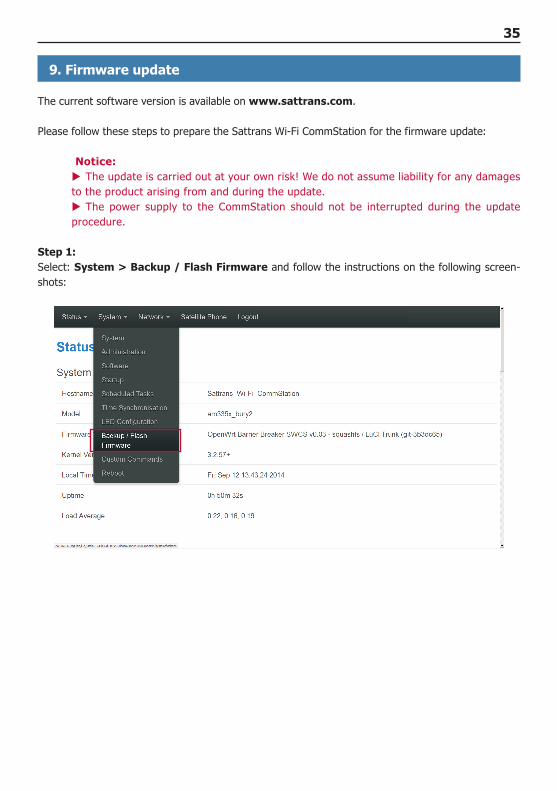
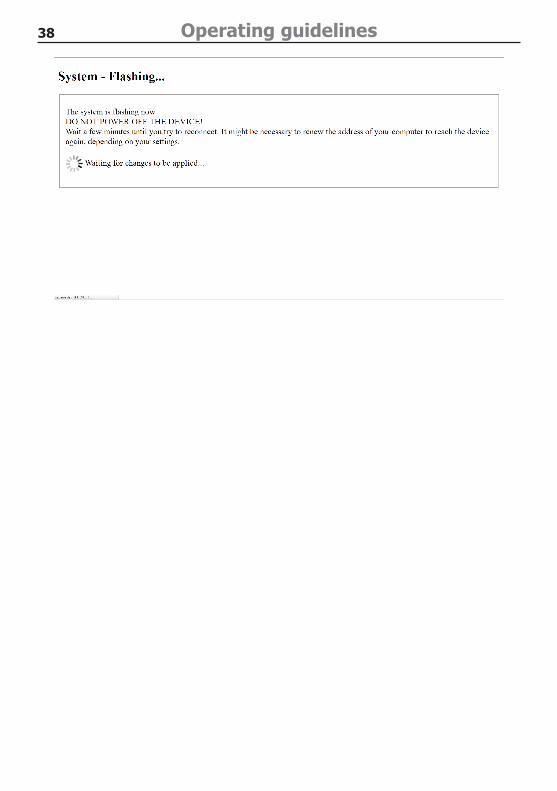
9. Firmware update
The current software version is available on www.sattrans.com.
Please follow these steps to prepare the Sattrans Wi-Fi CommStation for the firmware update:
Notice:The update is carried out at your own risk! We do not assume liability for any damages X
to the product arising from and during the update. The power supply to the CommStation should not be interrupted during the update X
procedure.
Step 1:Select: System > Backup / Flash Firmware and follow the instructions on the following screen-shots:
36 Operating guidelines
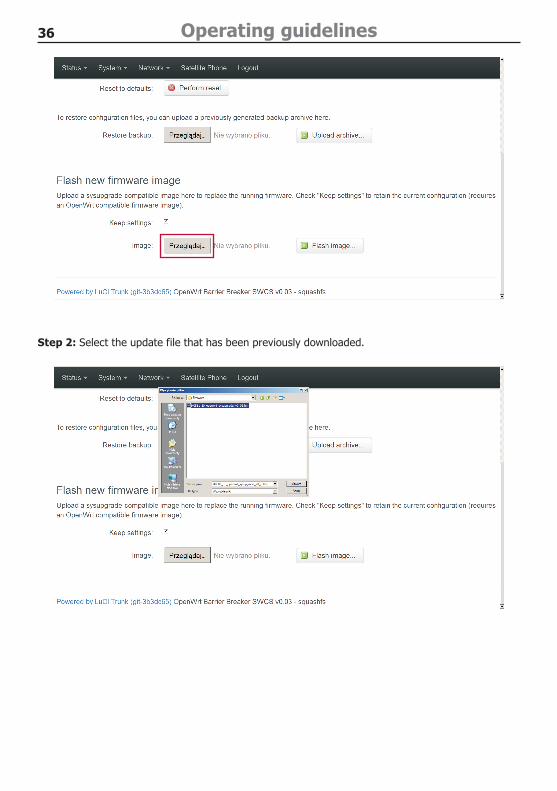
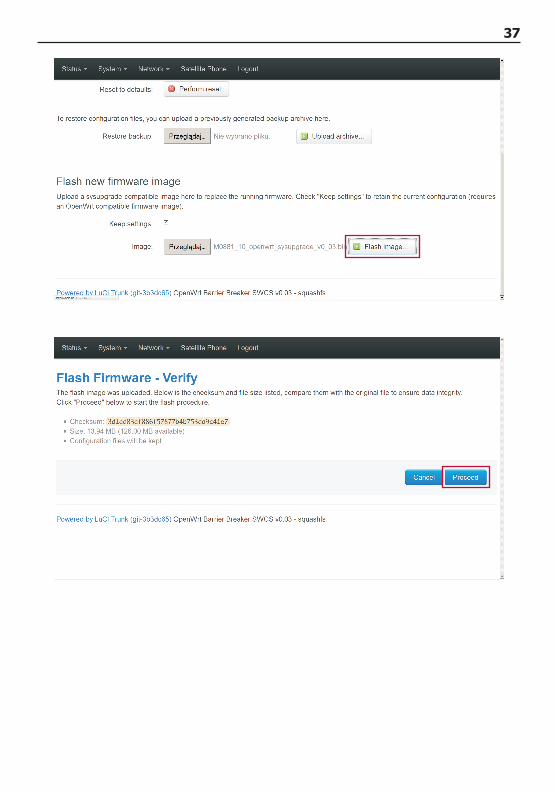
Step 2: Select the update file that has been previously downloaded.
37
38 Operating guidelines
39Further Information
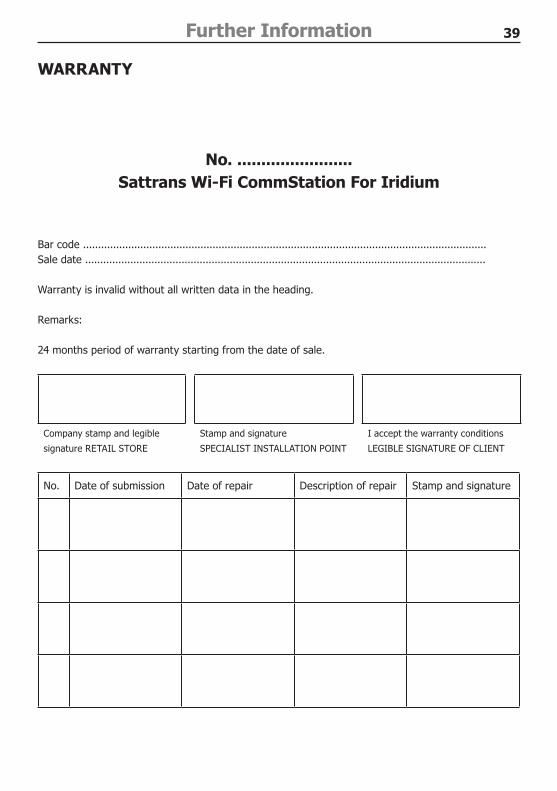
WARRANTY
No. ........................Sattrans Wi-Fi CommStation For Iridium
Bar code ......................................................................................................................................Sale date .....................................................................................................................................
Warranty is invalid without all written data in the heading.
Remarks:
24 months period of warranty starting from the date of sale.
Company stamp and legible
signature RETAIL STORE
Stamp and signature
SPECIALIST INSTALLATION POINT
I accept the warranty conditions
LEGIBLE SIGNATURE OF CLIENT
No. Date of submission Date of repair Description of repair Stamp and signature

40
25.1686.0-01-210115


![· SHIM SACD Dire Straits rLove Over Gold] (Private Investigations) ' Clear Cygnus SACD ' , IRIDIUM , IRIDIUM , IRIDIUM 11.5 AWG , , PFA 3455R IRIDIUM Clear Cygnus , 5 Trigon Exxpert](https://static.fdocuments.in/doc/165x107/60d04de1d6909b691a4f38e7/shim-sacd-dire-straits-rlove-over-gold-private-investigations-clear-cygnus.jpg)