For iPad, iPad mini and iPhone - centrumdruku.com.pl · “Made for iPhone,” and “Made for...
18
V1.6 U s e r G u i d e “Made for iPhone,” and “Made for iPad” mean that an electronic accessory has been designed to connect specifically to iPhone, or iPad, respectively, and has been certified by the developer to meet Apple performance standards. Apple is not responsible for the operation of this device or its compliance with safety and regulatory standards. Please note that the use of this accessory with iPhone, or iPad may affect wireless performance. All trademarks are the property of their respective owners and all rights are acknowledged. For iPad, iPad mini and iPhone Docking Scanner L i g h t n i n g C o n n e c t o r S u p p o r t e d Works with Scanner App iScan Pro
Transcript of For iPad, iPad mini and iPhone - centrumdruku.com.pl · “Made for iPhone,” and “Made for...

V1.6
User Guide
“Made for iPhone,” and “Made for iPad” mean that an electronic accessory has been designed to connect specifically to iPhone, or iPad, respectively, and has been certified by the developer to meet Apple performance standards. Apple is not responsible for the operation of this device or its compliance with safety and regulatory standards. Please note that the use of this accessory with iPhone, or iPad may affect wireless performance.All trademarks are the property of their respective owners and all rights are acknowledged.
For iPad, iPad mini and iPhone
Docking Scanner
Ligh
tnin
g
Connector Supported
Works with
Scanner AppiScan Pro
2
Safety and Precautions
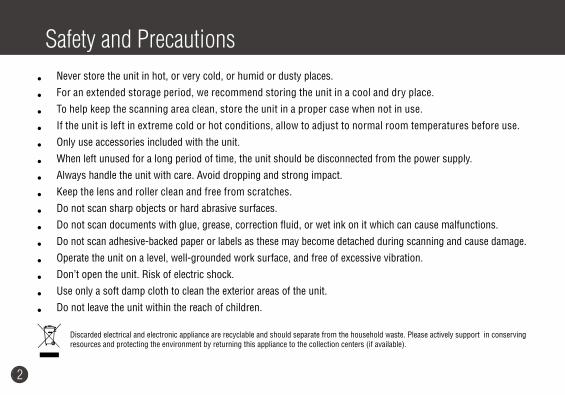
Discarded electrical and electronic appliance are recyclable and should separate from the household waste. Please actively support in conserving resources and protecting the environment by returning this appliance to the collection centers (if available).
• Never store the unit in hot, or very cold, or humid or dusty places.
• For an extended storage period, we recommend storing the unit in a cool and dry place.
• To help keep the scanning area clean, store the unit in a proper case when not in use.
• If the unit is left in extreme cold or hot conditions, allow to adjust to normal room temperatures before use.
• Only use accessories included with the unit.
• When left unused for a long period of time, the unit should be disconnected from the power supply.
• Always handle the unit with care. Avoid dropping and strong impact.
• Keep the lens and roller clean and free from scratches.
• Do not scan sharp objects or hard abrasive surfaces.
• Do not scan documents with glue, grease, correction fluid, or wet ink on it which can cause malfunctions.
• Do not scan adhesive-backed paper or labels as these may become detached during scanning and cause damage.
• Operate the unit on a level, well-grounded work surface, and free of excessive vibration.
• Don’t open the unit. Risk of electric shock.
• Use only a soft damp cloth to clean the exterior areas of the unit.
• Do not leave the unit within the reach of children.
3
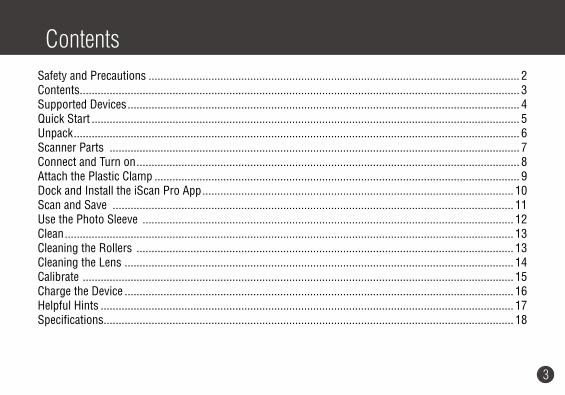
Safety and Precautions ............................................................................................................................ 2Contents ................................................................................................................................................... 3Supported Devices ................................................................................................................................... 4Quick Start ............................................................................................................................................... 5Unpack ..................................................................................................................................................... 6Scanner Parts ......................................................................................................................................... 7Connect and Turn on ................................................................................................................................ 8Attach the Plastic Clamp .......................................................................................................................... 9Dock and Install the iScan Pro App ........................................................................................................ 10Scan and Save ...................................................................................................................................... 11Use the Photo Sleeve ............................................................................................................................ 12Clean ...................................................................................................................................................... 13Cleaning the Rollers .............................................................................................................................. 13Cleaning the Lens .................................................................................................................................. 14Calibrate ................................................................................................................................................ 15Charge the Device .................................................................................................................................. 16Helpful Hints .......................................................................................................................................... 17Specifications ......................................................................................................................................... 18
Contents
4
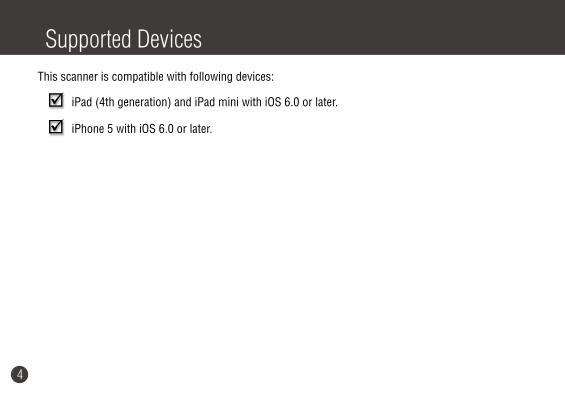
Supported DevicesThis scanner is compatible with following devices:
iPad (4th generation) and iPad mini with iOS 6.0 or later.
iPhone 5 with iOS 6.0 or later.
5
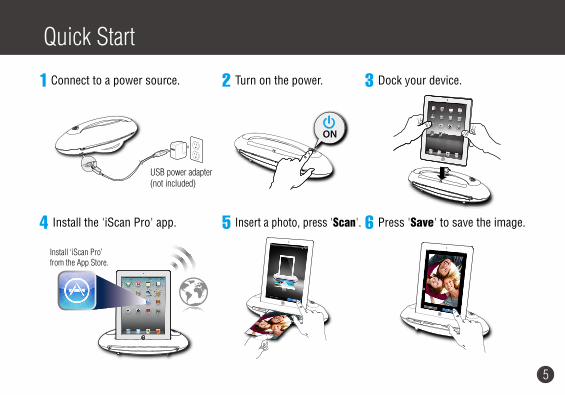
Quick Start
1 Connect to a power source. 2 Turn on the power. 3 Dock your device.
ON
4 Install the 'iScan Pro' app. 5 Insert a photo, press 'Scan'. 6 Press 'Save' to save the image.
Install ‘iScan Pro’ from the App Store.
Please insert a photo/document.
USB power adapter(not included)
6
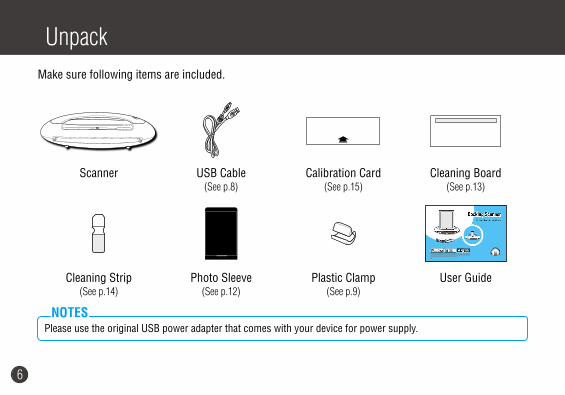
UnpackMake sure following items are included.
Scanner USB Cable (See p.8)
Calibration Card(See p.15)
Cleaning Board(See p.13)
Cleaning Strip(See p.14)
Photo Sleeve(See p.12)
Plastic Clamp(See p.9)
User Guide
Please use the original USB power adapter that comes with your device for power supply.NOTES
7
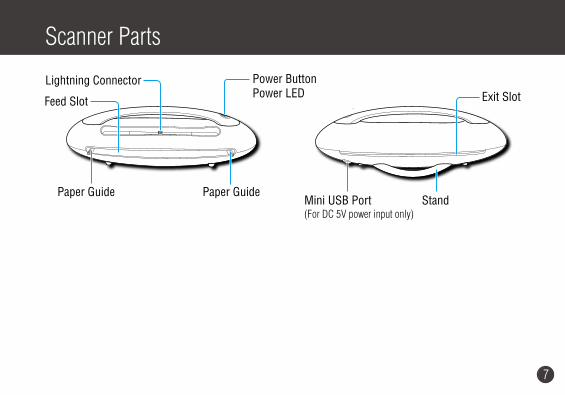
Scanner Parts
Lightning Connector
Feed Slot Exit Slot
StandMini USB Port(For DC 5V power input only)
Paper Guide
Power ButtonPower LED
Paper Guide
8
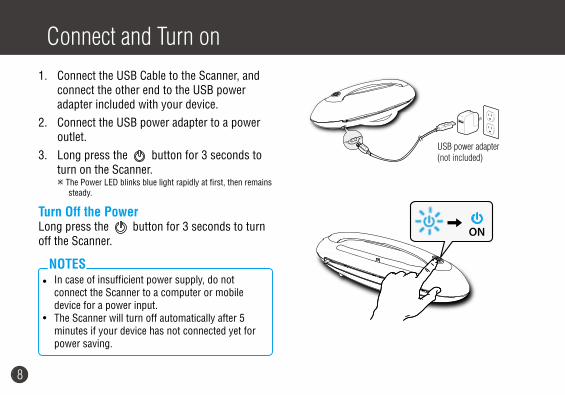
Connect and Turn on1. Connect the USB Cable to the Scanner, and
connect the other end to the USB power adapter included with your device.
2. Connect the USB power adapter to a power outlet.
3. Long press the button for 3 seconds to turn on the Scanner. The Power LED blinks blue light rapidly at first, then remains
steady.
Turn Off the PowerLong press the button for 3 seconds to turn off the Scanner.
ON
USB power adapter(not included)
• In case of insufficient power supply, do not connect the Scanner to a computer or mobile device for a power input.
• The Scanner will turn off automatically after 5 minutes if your device has not connected yet for power saving.
NOTES
9
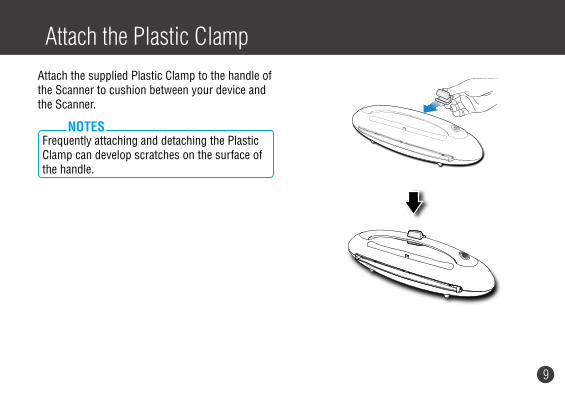
Attach the Plastic ClampAttach the supplied Plastic Clamp to the handle of the Scanner to cushion between your device and the Scanner.
Frequently attaching and detaching the Plastic Clamp can develop scratches on the surface of the handle.
NOTES
10
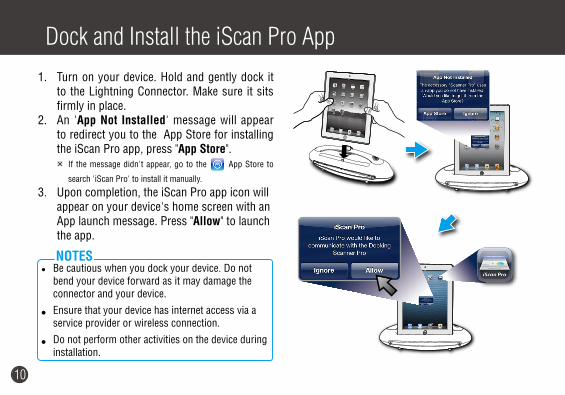
Dock and Install the iScan Pro App1. Turn on your device. Hold and gently dock it
to the Lightning Connector. Make sure it sits firmly in place.
2. An 'App Not Installed' message will appear to redirect you to the App Store for installing the iScan Pro app, press "App Store". If the message didn't appear, go to the App Store to
search 'iScan Pro' to install it manually.
3. Upon completion, the iScan Pro app icon will appear on your device's home screen with an App launch message. Press "Allow" to launch the app.
• Be cautious when you dock your device. Do not bend your device forward as it may damage the connector and your device.
• Ensure that your device has internet access via a service provider or wireless connection.
• Do not perform other activities on the device during installation.
NOTES
11
Please insert a photo/document.
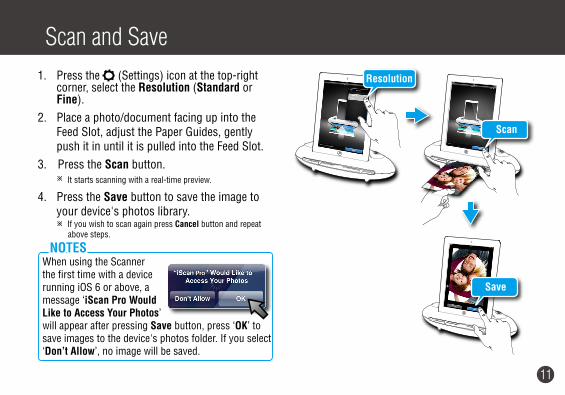
Scan and Save 1. Press the (Settings) icon at the top-right
corner, select the Resolution (Standard or Fine).
2. Place a photo/document facing up into the Feed Slot, adjust the Paper Guides, gently push it in until it is pulled into the Feed Slot.
3. Press the Scan button. It starts scanning with a real-time preview.
4. Press the Save button to save the image to your device's photos library. If you wish to scan again press Cancel button and repeat
above steps.
When using the Scanner the first time with a device running iOS 6 or above, a message ‘iScan Pro Would Like to Access Your Photos’ will appear after pressing Save button, press ‘OK’ to save images to the device's photos folder. If you select ‘Don’t Allow’, no image will be saved.
NOTES
Scan
Save
Please insert a photo/document.
Resolution
12
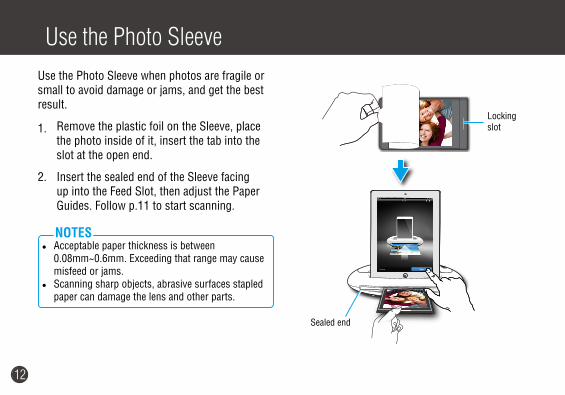
Use the Photo Sleeve when photos are fragile or small to avoid damage or jams, and get the best result.
1. Remove the plastic foil on the Sleeve, place the photo inside of it, insert the tab into the slot at the open end.
2. Insert the sealed end of the Sleeve facing up into the Feed Slot, then adjust the Paper Guides. Follow p.11 to start scanning.
Use the Photo Sleeve
Sealed end
• Acceptable paper thickness is between 0.08mm~0.6mm. Exceeding that range may cause misfeed or jams.
• Scanning sharp objects, abrasive surfaces stapled paper can damage the lens and other parts.
NOTES
Locking slot

13
Dirt and residues can build up inside the Scanner and affect image quality. Clean Scanner’s rollers and lens periodically to get the best result.
Clean
• Make sure the Cleaning Board and Cleaning Strip are clean and free of dust before use.
• Use a soft cloth dampened with alcohol to remove dirt and stains from the Cleaning Board if necessary.
• Using small drops of alcohol on the cotton side of Cleaning Strip can help clean lens easily.
NOTES
Cleaning the Rollers1. Open iScan Pro. Press the (Settings)
icon at the top-right corner, select the Clean setting.
2. Hold the foam strip of Cleaning Board facing down, gently insert it into the Feed Slot.
3. Press the Clean button to begin the process. The Cleaning Board will be pulled into the Scanner. Wait
until the Board is ejected with a 'Cleaning Done' message, then press the OK button.
Mechanical sounds produced during the cleaning process are normal.
Clean
Clean
14
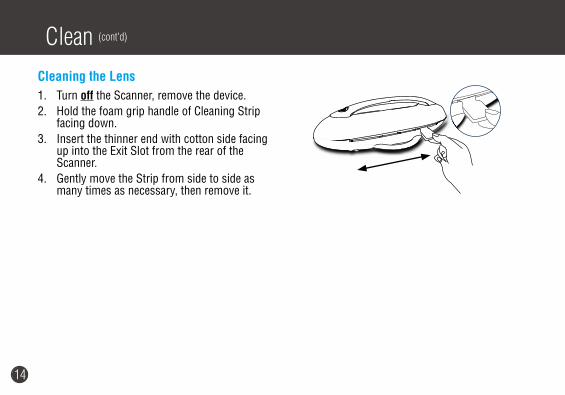
Clean (cont'd)
Cleaning the Lens1. Turn off the Scanner, remove the device. 2. Hold the foam grip handle of Cleaning Strip
facing down.3. Insert the thinner end with cotton side facing
up into the Exit Slot from the rear of the Scanner.
4. Gently move the Strip from side to side as many times as necessary, then remove it.
15
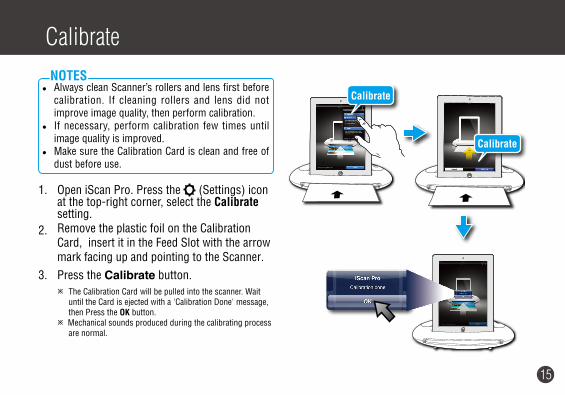
Calibrate
• Always clean Scanner’s rollers and lens first before calibration. If cleaning rollers and lens did not improve image quality, then perform calibration.
• If necessary, perform calibration few times until image quality is improved.
• Make sure the Calibration Card is clean and free of dust before use.
NOTES
1. Open iScan Pro. Press the (Settings) icon at the top-right corner, select the Calibrate setting.
2. Remove the plastic foil on the Calibration Card, insert it in the Feed Slot with the arrow mark facing up and pointing to the Scanner.
3. Press the Calibrate button. The Calibration Card will be pulled into the scanner. Wait
until the Card is ejected with a 'Calibration Done' message, then Press the OK button.
Mechanical sounds produced during the calibrating process are normal.
Calibrate
Calibrate

16
Charge the DeviceYour mobile device will start charging when it is docked to the Scanner that is turned on. Your device's screen will indicate its charging status.
USB power adapter (not included) ON
ON
• Your device will not charge when the Scanner is in operation.
• If your device is not charging, remove your device and reconnect it to start charging again.
• To ensure scanning operation, charge your device if the battery has less than 20% capacity remaining.
NOTES
17
Helpful HintsScanner does not turn on.• Check if the USB cable is connected properly, and the Scanner is turned on.• The Scanner turns off automatically in 5 minutes when your mobile device has not connected to it yet. iScan Pro does not launch when the device is docked.• Make sure the iScan Pro app is installed and the device is docked correctly. • Check if the device is off or locked. Refer its own manual to unlock. Cannot charge my device.• Your device will not be charged when the Scanner is in operation.The scan result is poor.• Clean the Scanner’s rollers and lens first. If image quality does not improve, please perform calibration. • Do not use the Photo Sleeve if the photo is laminated.Cannot feed the paper.• Remove the photo/document from the feed slot and insert it again until it is pulled in by the rollers.• Check if the paper thickness is exceeded the limit. • Do not scan more than one page at a time; otherwise the extra pages may not feed properly.Cannot scan and/or save.• Charge your device if the battery has less than 20% power. • Close other running apps on the device to release memory. On the Apple device, a message ‘iScan Pro Would Like to Access Your Photos’ appears after pressing SAVE button • This is a privacy settings requested by your device. Press ‘OK’ button in order to save images to your device. If you
select ‘Don’t Allow’, no image will be saved, and you will get an error message for the the next scan. Follow on-screen instructions to solve the problem: select Settings > Privacy > Photos > iScan Pro > "ON".
The scanner behaves abnormally.• Do not connect/disconnect your device when the Power LED is flashing.
18
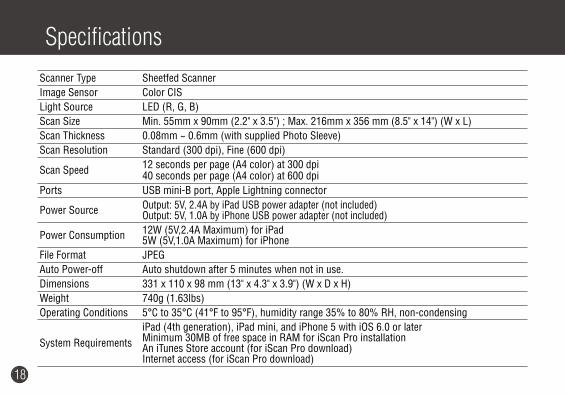
SpecificationsScanner Type Sheetfed ScannerImage Sensor Color CISLight Source LED (R, G, B)Scan Size Min. 55mm x 90mm (2.2" x 3.5") ; Max. 216mm x 356 mm (8.5" x 14") (W x L) Scan Thickness 0.08mm ~ 0.6mm (with supplied Photo Sleeve)Scan Resolution Standard (300 dpi), Fine (600 dpi)
Scan Speed 12 seconds per page (A4 color) at 300 dpi40 seconds per page (A4 color) at 600 dpi
Ports USB mini-B port, Apple Lightning connector
Power Source Output: 5V, 2.4A by iPad USB power adapter (not included)Output: 5V, 1.0A by iPhone USB power adapter (not included)
Power Consumption 12W (5V,2.4A Maximum) for iPad5W (5V,1.0A Maximum) for iPhone
File Format JPEGAuto Power-off Auto shutdown after 5 minutes when not in use.Dimensions 331 x 110 x 98 mm (13" x 4.3" x 3.9") (W x D x H)Weight 740g (1.63lbs)Operating Conditions 5°C to 35°C (41°F to 95°F), humidity range 35% to 80% RH, non-condensing
System RequirementsiPad (4th generation), iPad mini, and iPhone 5 with iOS 6.0 or laterMinimum 30MB of free space in RAM for iScan Pro installation An iTunes Store account (for iScan Pro download)Internet access (for iScan Pro download)