For help with the Classic, Classic Lite or Classic-SL ... help with the Classic, Classic Lite or...
44
ATTENTION: Please Read this cover letter BEFORE installing the Classic-SL For help with the Classic, Classic Lite or Classic-SL please see our how to videos and extended documentation. Please visit this website: www.midnitesolar.com/classic Before calling tech support, we recommend visiting this website for some of the most common issues. DANGER OF DEATH TO YOUR CLASSIC Warning with Tigo modules Solar Mode must not be used or the Classic will not survive. MidNite does not recommend the use of Tigo Module Optimizers with the Classic. If Tigo modules must be installed Legacy P&O MUST be used. When the Classic is used with Wind or Hydro a Clipper type device will most likely be needed to protect against over voltage. A battery based diversion load WILL NOT keep the Classic safe from over voltage. High input voltage is recorded and over voltage is not covered under warranty. Never hook a Pump or other load to the Input side of the Classic. If a Load must be hooked to the input side of the classic the load and Classic need to have blocking diodes on them.
Transcript of For help with the Classic, Classic Lite or Classic-SL ... help with the Classic, Classic Lite or...

ATTENTION: Please Read this cover letter
BEFORE installing the Classic-SL
For help with the Classic, Classic Lite or Classic-SL please see our how to videos and extended documentation. Please visit this website: www.midnitesolar.com/classic Before calling tech support, we recommend visiting this
website for some of the most common issues.
DANGER OF DEATH TO YOUR CLASSIC
Warning with Tigo modules Solar Mode must not be used or the Classic will not survive.
MidNite does not recommend the use of Tigo Module Optimizers with the Classic. If
Tigo modules must be installed Legacy P&O MUST be used.
When the Classic is used with Wind or Hydro a Clipper type device will most likely be
needed to protect against over voltage. A battery based diversion load WILL NOT keep
the Classic safe from over voltage. High input voltage is recorded and over voltage is not
covered under warranty.
Never hook a Pump or other load to the Input side of the Classic. If a Load must be
hooked to the input side of the classic the load and Classic need to have blocking diodes
on them.
Classic SL owner’s manual REVB 2056
2 | P a g e x x - x x x - x x R E V : A
Never Parallel 2 Classics onto one PV array. If 2 Classic’s have to be paralleled for wind
or hydro (NOT SOLAR) there must be blocking diodes on each Classic.
For Larger systems with Large inverters and or multiple inverters (like the Radian or
XW+ for example) it is important to use appropriate sized cables and bus bars or
damage to the inverters or charge controllers can occur. Take a single XW+ E-Panel for
example it has a positive bus bar for Charge controller battery side connections. This
bus bar is sufficient for 2 charge controllers so if you needed 3 or more then you need to
look at the best way to handle the amperage. Or a Dual Radian for example is actually 4
separate inverters. Proper size cables become very important as well as large enough
battery banks. Most manufacturers of Battery based inverters recommend 100AH of
battery per KW of solar modules. (Please consult the inverter manufacture for
assistance with cable sizing etc)

Classic SL owner’s manual REVB 2056
3 | P a g e x x - x x x - x x R E V : A
This Manual covers models Classic 150-SL, 200-SL & 250-
SL
Classic SL owner’s manual REVB 2056
4 | P a g e x x - x x x - x x R E V : A
The MidNite Solar Classic charge controller conforms to UL 1741, Safety for Inverters, Converters, Controllers
and Interconnection System Equipment for Use With Distributed Energy Resources, Second Edition, May 7,
1999 with revisions through January 28, 2010 and
CAN/CSA C22.2 No. 107.1: 2001/09/01 Ed: 3 (R2006)
MidNite Solar Inc. reserves the right to revise this document and to periodically make changes to the content hereof
without obligation or organization of such revisions or changes unless required to do so by prior arrangement.
Disclaimer
Unless specifically agreed to in writing, MidNite Solar Inc.
(a) Makes no warranty as to the accuracy, sufficiency or suitability of any technical or other information provided in
its manuals or other documentation.
(b) Assumes no responsibility or liability for loss or damage whether direct, indirect, consequential or incidental,
which might arise out of use of such information. The use of any such information will be entirely at the user's risk.
Contact Information
Telephone: 360.403.7207
Fax: 360.691.6862
Email: [email protected]
Web: www.midnitesolar.com
Contents Scope ............................................................................................................................................................................. 5
Introduction ................................................................................................................................................................. 5
Classic SL Power Graphs & Sizing the Solar Array................................................................................................ 8
Unpacking the Classic SL ......................................................................................................................................... 10
Removing and installing the front cover on the Classic SL ................................................................................... 10
Mounting the Classic SL ........................................................................................................................................... 11
Wiring the Classic SL ............................................................................................................................................... 13
DC Terminal Connector .......................................................................................................................................... 17
Maximum and Minimum Wire Size ....................................................................................................................... 17
Over Current Protection and Wire Size Requirements ........................................................................................ 17
Current Rating ......................................................................................................................................................... 18
Over Current Protection .......................................................................................................................................... 18
Long Distance Wire Runs ....................................................................................................................................... 18
Classic SL owner’s manual REVB 2056
5 | P a g e x x - x x x - x x R E V : A
Battery Temperature Compensation ....................................................................................................................... 19
Battery Temperature Sensor Installation ............................................................................................................... 19
Chassis Grounding .................................................................................................................................................... 21
DC System Grounding ............................................................................................................................................ 21
Positive Ground systems .............................................................................................. Error! Bookmark not defined.
DC GFP (Ground Fault Protection) ........................................................................................................................ 22
Disabling GFP ......................................................................................................................................................... 23
Commissioning the Classic SL (Quick Start) ......................................................................................................... 23
Equalization ............................................................................................................................................................... 23
Battery Charge Stages and Meanings ..................................................................................................................... 23
Resting ................................................................................................................................................................ 24
Mode is OFF ....................................................................................................................................................... 24
Adjusting Absorb, Equalize and Float Voltages ..................................................................................................... 24
Current Limit........................................................................................................................................................... 25
Calibrating Battery and PV Voltage ....................................................................................................................... 25
Configuring DC Input Source ................................................................................................................................. 25
Setting the Date and Time ....................................................................................................................................... 26
Uploading New Firmware to the Classic ................................................................................................................. 27
Troubleshooting ........................................................................................................... Error! Bookmark not defined.
Electrical Specifications ............................................................................................................................................ 36
Specifications Mechanical ........................................................................................................................................ 37
Classic Breaker sizing ............................................................................................................................................. 38
Scope
This Manual provides safety guidelines and installation information for the Classic SL charge controller. It does not
provide brand specific information about photovoltaic panels, batteries etc. Contact the manufacturer of other
components in the system for relevant technical data.
Introduction
The MidNite Classic SL charge controller was designed as a SOLAR only charge controller. The Classic 150-SL,
200-SL and 250-SL are designed to work with 12, 24, 36, 48, 60 and 72 volt battery banks.
The Classic SL can be installed stand alone or as a multi-unit networked installation.
Standard features of the Classic SL charge controller include:
*3 input operating voltage ranges 150, 200 and 250 VDC
*Graphical display
*Previous 380 days of operational data logged
Classic SL owner’s manual REVB 2056
6 | P a g e x x - x x x - x x R E V : A
This Manual covers Classic 150-SL, Classic 200-SL and the Classic 250-SL. It covers the installation, wiring and
use of the Classic charge controller.
WARNING Warnings signs identify conditions or practices that could result in personal injury or loss of
life.
CAUTION Cautions identify conditions or practices that could result in damage to the unit or other
equipment.
MIDNITE SOLAR CHARGE CONTROLLER INSTALLATION GUIDELINES AND SAFETY
INSTRUCTIONS
This product is intended to be installed as part of a permanently grounded electrical system as shown in the system
configuration sections. The following important restrictions apply unless superseded by local or national codes:
•To use the Classic’s built in DC GFP the System's DC Negative conductor must not be bonded to earth ground. The
Classic does this with its internal Ground Fault Protection circuitry. The battery negative and ground are not
bonded together directly but are connected together by the Classic’s internal GFP device. All negative conductor
connections must be kept separate from the grounding conductor connections. The equipment ground terminal
inside the Classic must be connected to Earth Ground for the internal DC-GFP to work.
• With the exception of certain telecom applications, the Charge Controller should never be positive grounded.
• The Charge Controller equipment ground is marked with this symbol: • If damaged or malfunctioning, the Charge Controller should only be disassembled and repaired by a qualified
service center. Please contact your renewable energy dealer/installer for assistance. Incorrect reassembly risks
malfunction, electric shock or fire.
• The Charge Controller is designed for indoor installation or installation inside a weatherproof enclosure. It must
not be exposed to rain and should be installed out of direct sunlight.
For routine, user-approved maintenance:
• Turn off all circuit breakers, including those to the solar modules, batteries and related electrical connections
before performing any maintenance.
Standards and Requirements
All installations must comply with national and local electrical codes; professional installation is recommended. The
NEC in the USA requires a DC ground fault interrupter for all residential PV installations. The GFP (Ground Fault
Protection) device is built into the Classic.

Classic SL owner’s manual REVB 2056
7 | P a g e x x - x x x - x x R E V : A
DC and Battery-Related Installation Requirements:
All DC cables must meet local and national codes.
Shut off all DC breakers before connecting any wiring.
Torque all the Charge Controller’s wire lugs and ground terminals to the specs found on page 21. Copper wiring must be rated at 75° C or higher.
Keep cables close together (e.g., using a tie-wrap) as much as possible to reduce inductance.
Ensure both cables pass through the same knockout and conduit to allow the inductive currents to cancel.
DC battery over-current protection must be used as part of the installation on the input and output.
Breakers between the battery and the Classic must meet UL489 standards.
Breakers between the DC source and the Classic must meet UL1077 or UL489 standards.
Design the battery enclosure to prevent accumulation of hydrogen gas at the top of the enclosure. Vent the battery
compartment from the highest point to the outside. A sloped lid can also be used to direct the flow of hydrogen to
the vent opening. Sealed (AGM, Gel etc) batteries do not normally require ventilation. Consult your battery
manufacturer for details.
WARNING: PERSONAL PRECAUTIONS DURING INSTALLATION
WARNING BATTERIES PRESENT RISK OF
ELECTRICAL SHOCK, BURN FROM HIGH SHORT CIRCUIT CURRENT, FIRE OR
EXPLOSION FROM VENTED GASES. FOLLOW PROPER PRECAUTIONS.
Someone should be within range of your voice to come to your aid if needed.
Keep plenty of fresh water and soap nearby in case battery acid contacts skin, clothing, or eyes.
Wear complete eye protection. Avoid touching eyes while working near batteries. Wash your hands with
soap and warm water when done.
If battery acid contacts skin or clothing, wash immediately with soap and water. If acid enters an eye, flood
the eye with running cool water at once for at least 15 minutes and get medical attention immediately
following.
Baking soda neutralizes lead acid battery electrolyte. Keep a supply on hand in the area of the batteries.
NEVER smoke or allow a spark or flame in vicinity of a battery or generator.
Be cautious to reduce the risk of dropping a metal tool onto batteries. It could short the batteries or other
electrical parts that can result in fire or explosion.
Never wear metal items such as rings, bracelets, necklaces, and watches when working with a battery or
other electrical circuits. A battery can produce a short circuit current high enough to weld a ring or the like
to metal, causing severe burns.

Classic SL owner’s manual REVB 2056
8 | P a g e x x - x x x - x x R E V : A
Classic SL Power Graphs & Sizing the Solar Array
Table 1
Table 2
Table 3
Classic SL owner’s manual REVB 2056
9 | P a g e x x - x x x - x x R E V : A
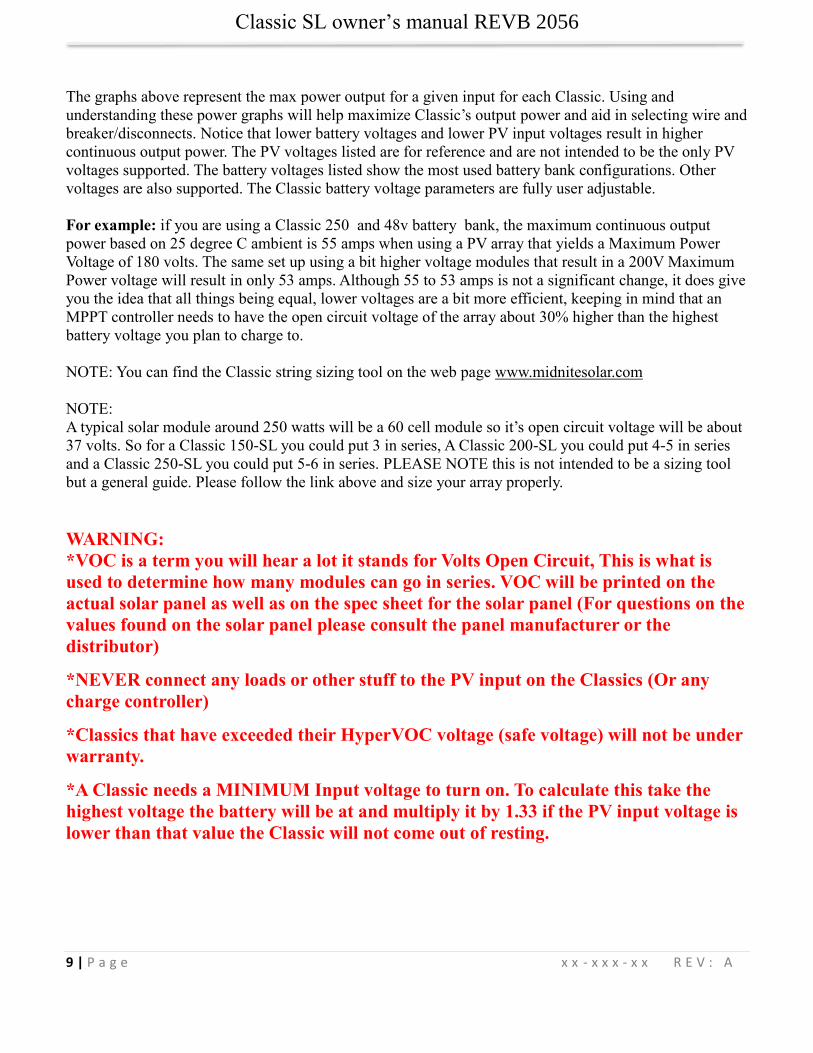
The graphs above represent the max power output for a given input for each Classic. Using and
understanding these power graphs will help maximize Classic’s output power and aid in selecting wire and
breaker/disconnects. Notice that lower battery voltages and lower PV input voltages result in higher
continuous output power. The PV voltages listed are for reference and are not intended to be the only PV
voltages supported. The battery voltages listed show the most used battery bank configurations. Other
voltages are also supported. The Classic battery voltage parameters are fully user adjustable.
For example: if you are using a Classic 250 and 48v battery bank, the maximum continuous output
power based on 25 degree C ambient is 55 amps when using a PV array that yields a Maximum Power
Voltage of 180 volts. The same set up using a bit higher voltage modules that result in a 200V Maximum
Power voltage will result in only 53 amps. Although 55 to 53 amps is not a significant change, it does give
you the idea that all things being equal, lower voltages are a bit more efficient, keeping in mind that an
MPPT controller needs to have the open circuit voltage of the array about 30% higher than the highest
battery voltage you plan to charge to.
NOTE: You can find the Classic string sizing tool on the web page www.midnitesolar.com
NOTE:
A typical solar module around 250 watts will be a 60 cell module so it’s open circuit voltage will be about
37 volts. So for a Classic 150-SL you could put 3 in series, A Classic 200-SL you could put 4-5 in series
and a Classic 250-SL you could put 5-6 in series. PLEASE NOTE this is not intended to be a sizing tool
but a general guide. Please follow the link above and size your array properly.
WARNING:
*VOC is a term you will hear a lot it stands for Volts Open Circuit, This is what is
used to determine how many modules can go in series. VOC will be printed on the
actual solar panel as well as on the spec sheet for the solar panel (For questions on the
values found on the solar panel please consult the panel manufacturer or the
distributor)
*NEVER connect any loads or other stuff to the PV input on the Classics (Or any
charge controller)
*Classics that have exceeded their HyperVOC voltage (safe voltage) will not be under
warranty.
*A Classic needs a MINIMUM Input voltage to turn on. To calculate this take the
highest voltage the battery will be at and multiply it by 1.33 if the PV input voltage is
lower than that value the Classic will not come out of resting.

Classic SL owner’s manual REVB 2056
10 | P a g e x x - x x x - x x R E V : A
Unpacking the Classic SL
When you receive your Classic you will want to unpack it and make sure everything is there and in good shape.
Refer to Figure 1 Included in the Classic package should be:
*Classic charge controller
*Knock out covers 3 screened
*Parts bag with stickers, Terminal block cover and silicone grease
*User’s manual printed
Email [email protected] for more information or if anything is missing or damaged.
Figure 1
Removing and installing the front cover on the Classic SL
Removing the front art deco cover is required to gain access to the wiring compartment.
Be aware if this is not the first removal of this cover there is a cable connecting the cover to the
electronics. Do not pull hard or fast as damage could occur.
Classic SL owner’s manual REVB 2056
11 | P a g e x x - x x x - x x R E V : A
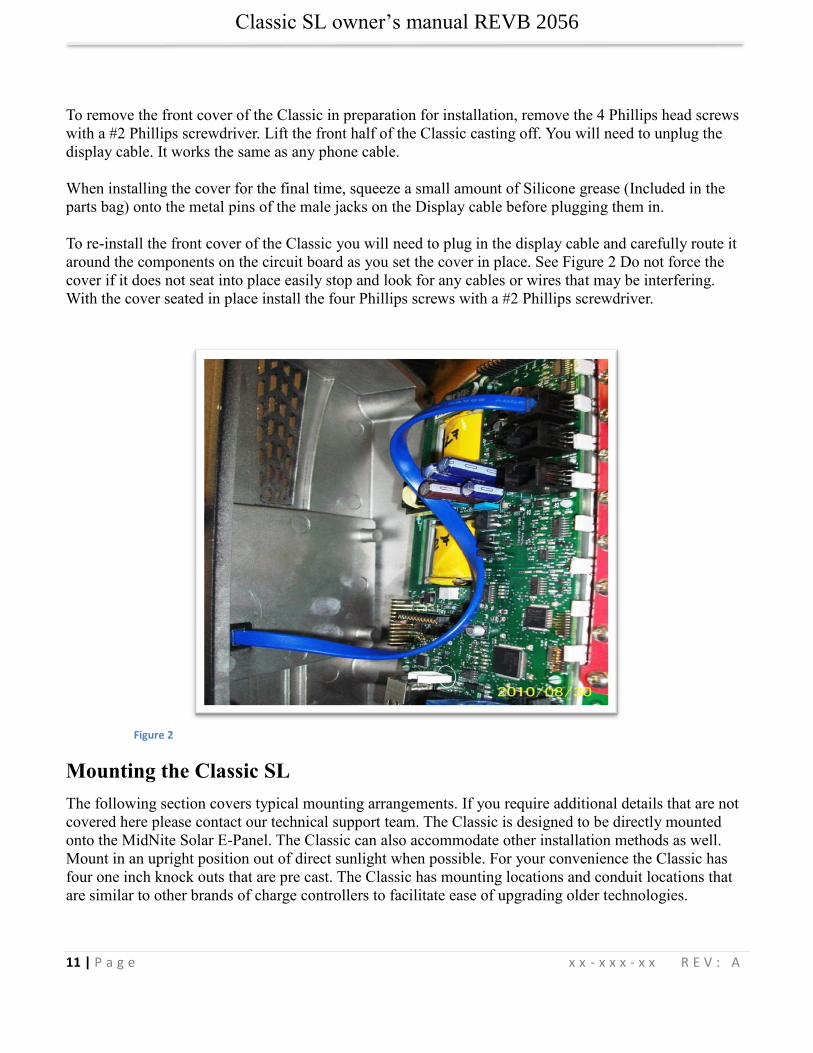
To remove the front cover of the Classic in preparation for installation, remove the 4 Phillips head screws
with a #2 Phillips screwdriver. Lift the front half of the Classic casting off. You will need to unplug the
display cable. It works the same as any phone cable.
When installing the cover for the final time, squeeze a small amount of Silicone grease (Included in the
parts bag) onto the metal pins of the male jacks on the Display cable before plugging them in.
To re-install the front cover of the Classic you will need to plug in the display cable and carefully route it
around the components on the circuit board as you set the cover in place. See Figure 2 Do not force the
cover if it does not seat into place easily stop and look for any cables or wires that may be interfering.
With the cover seated in place install the four Phillips screws with a #2 Phillips screwdriver.
Figure 2
Mounting the Classic SL
The following section covers typical mounting arrangements. If you require additional details that are not
covered here please contact our technical support team. The Classic is designed to be directly mounted
onto the MidNite Solar E-Panel. The Classic can also accommodate other installation methods as well.
Mount in an upright position out of direct sunlight when possible. For your convenience the Classic has
four one inch knock outs that are pre cast. The Classic has mounting locations and conduit locations that
are similar to other brands of charge controllers to facilitate ease of upgrading older technologies.

Classic SL owner’s manual REVB 2056
12 | P a g e x x - x x x - x x R E V : A
Mounting the Classic directly to the E Panel:
*Remove the front cover of the Classic.
*Install the mounting bracket on the E Panel and start the upper mounting screw into the bracket, leaving
it about half way out so you can hang the Classic on this screw.
*Install the 1 inch close nipple into the E Panel as shown in the E-Panel directions. The 1” close nipple, 3
locknuts and 2 plastic bushings are included with each E-Panel. One locknut acts as a spacer.
*Carefully hang the Classic on the screw in the bracket and slide it over the close nipple (see figure 4).
*Install the lock nut and bushing on the close nipple and tighten the screw in the mounting bracket.
*Don't install the front cover until you complete the wiring of the Classic.
Figure 3
Classic Mounted to side of E-Panel Nipple, locknuts and bushings that come with
every E-Panel
Figure 4 Figure 5
Classic mounted to the side of a MidNite Solar E-Panel
Figure 3 A Charge controller bracket mounted to the E-Panel. The bracket comes with every E-Panel
Classic SL owner’s manual REVB 2056
13 | P a g e x x - x x x - x x R E V : A
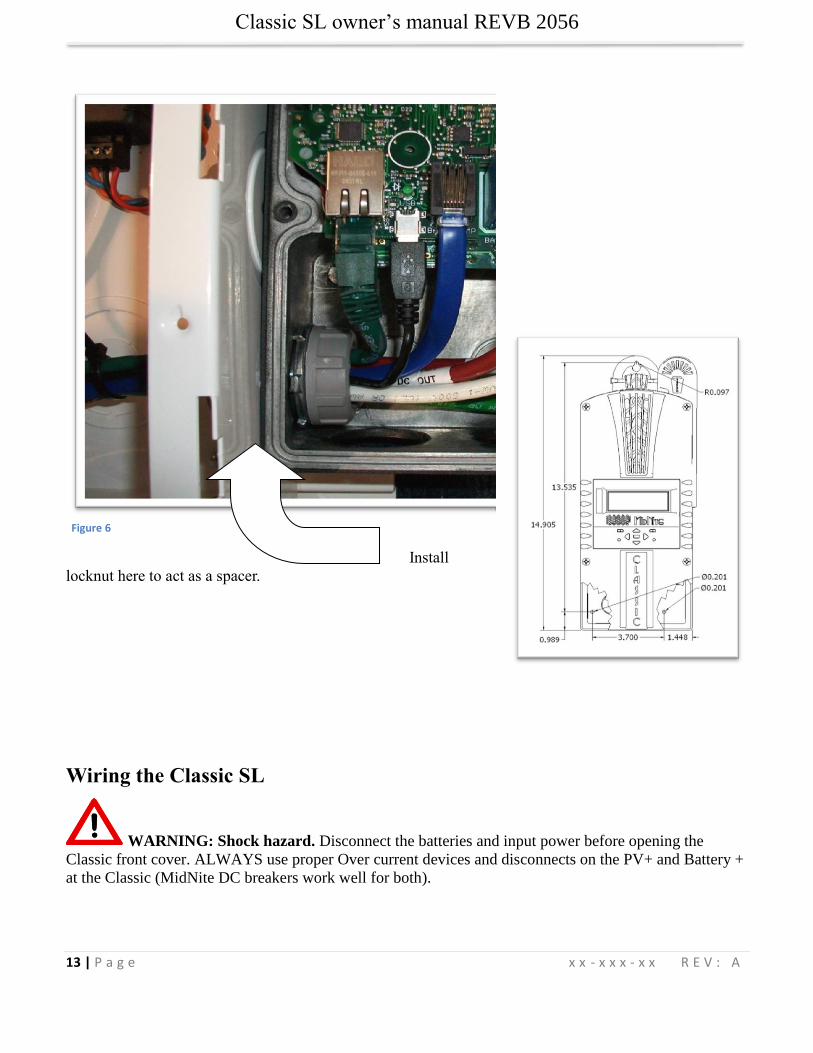
Figure 6
Install
locknut here to act as a spacer.
Wiring the Classic SL
WARNING: Shock hazard. Disconnect the batteries and input power before opening the
Classic front cover. ALWAYS use proper Over current devices and disconnects on the PV+ and Battery +
at the Classic (MidNite DC breakers work well for both).
Classic SL owner’s manual REVB 2056
14 | P a g e x x - x x x - x x R E V : A
The Classic SL should be wired by a qualified professional and needs to meet all applicable
electrical codes. Always make sure all source and battery circuits are de energized and wait 5 minutes
before working on the wiring in the Classic. The Classic has 2 common neutral (negative) terminals.
Therefore, only one neutral conductor is required to run from the E-Panel and terminate on either (or both)
common neutral terminal. This negative conductor shoule be sized to match the battery + cable. The
Positive DC source wire goes to the PV+ Turbine+ screw. The Positive Battery DC wire goes to battery +
terminal. Torque the terminal screws to the specs below.
To connect the wiring to the Classic:
Ensure the DC source and Battery are disconnected
Connect a grounding conductor between the Classic and system ground
Ensure the breaker between the battery and Classic meets UL489 standards.
Ensure the breaker between the DC source and Classic meets UL1077 standards.
Connect the DC source and Battery wire to the Classic
Connect any communications cables or auxiliary input/output wires
Torque terminal connector screws to the following specs
The Torque specs on the DC terminal connector (big blue terminal connector) are:
Up to #10 AWG torque to 25-35 inch pounds.
#8 AWG torque to 30-40 inch pounds.
#6 AWG or above. Torque to 40-50 inch pounds.
HyperVOC ™ HyperVOC is a unique feature the Classic has built in. HyperVOC refers to when the DC Input Voltage
raises above the maximum operating voltage (150V, 200V, 250V, depending on the Classic model).
HyperVOC gives you the flexibility to go up to the maximum operating voltage PLUS the nominal battery
voltage. For example, the Classic 150 has an input voltage rating of 150 operating volts, if the Classic 150
is connected to a 48 volt battery bank, the HyperVOC voltage limit will be: 150V + 48V a total of 198
Volts that the Classic can withstand without damage. When the Classic input voltage rises above 150 volts
it will switch off (stop outputting power). As long as the Classic is in HyperVOC mode, the
microprocessor and all other functions like AUX will continue running. When the input voltage comes
back down below 150v (or the rated operating voltage of the Classic, depending on model) the Classic
will wake up and start charging again automatically. This could happen in a really cold morning with a
system that has a Voltage Open Circuit (VOC) close to the maximum operating input voltage.
Note 1. A HyperVOC message will be displayed on the bottom right side of the Status screen.
Note 2. Max nominal battery voltage to be added is 48v

Classic SL owner’s manual REVB 2056
15 | P a g e x x - x x x - x x R E V : A
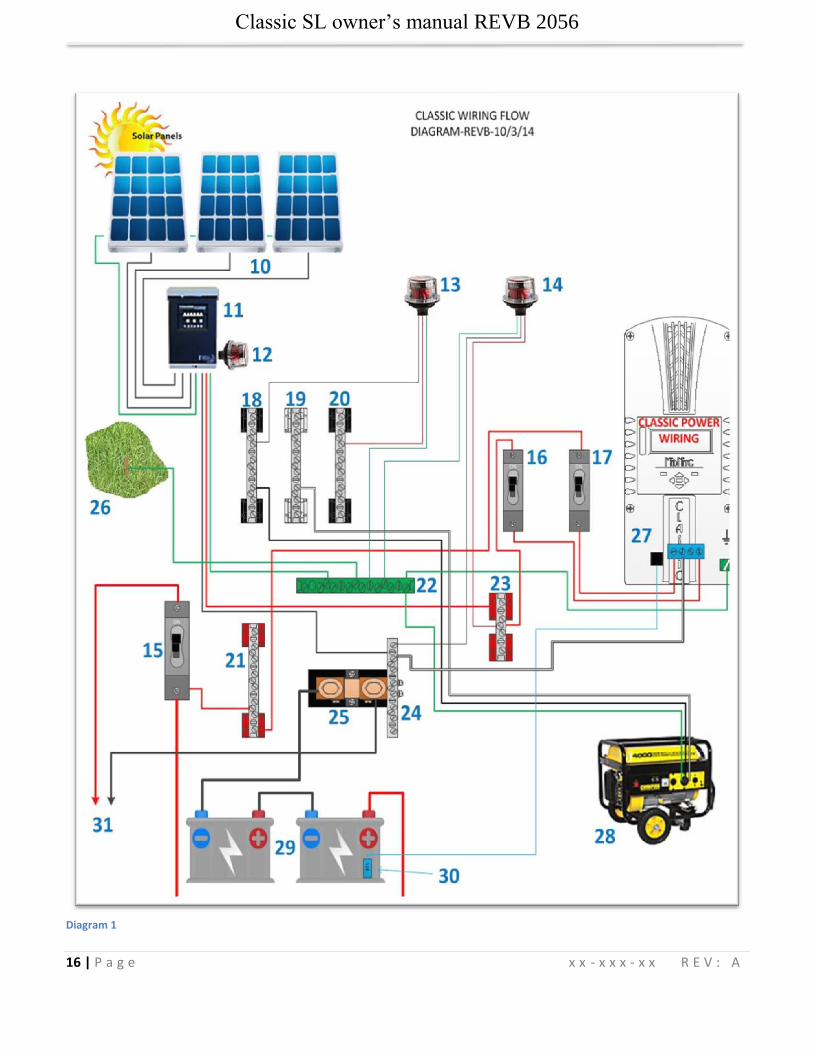
Diagram 1 Explanations
10 = Solar Modules (PV)
11 = DC Combiner (Like our MNPV6 or MNPV12 for example)
12 = MNSPD300-DC (Surge protection)
13 = MNSPD300-AC (Surge protection)
14 = MNSPD300-DC (Surge protection)
15 = DC breaker for the Inverter (Also serves as a disconnect for the Inverter)
16 = DC breaker for the PV into the Classic (Also serves as a disconnect for the Classic)
17 = DC breaker for the Battery into the Classic (Also serves as a disconnect for the Classic)
18 = AC L1 Input Bus Bar. (This is where the generator L1 input gets wired)
19 = AC Neutral Bus Bar. (This is where ALL AC Neutrals get wired)
20 = AC L1 Output Bus Bar. (This is where the L1 Output to the Load center for the building would connect)
21 = Battery Positive Bus Bar. (This is where we would wire the Battery positive side of the Classic, as well as
where we would wire up DC loads. Do NOT wire the battery cable to this bus bar).
22 = Earth Ground Bus Bar. (This is the common Earth Ground bus bar where all the grounds get wired back to and
it needs to be connected to the building’s ground rod system )
23 = PV Positive Bus Bar. (This is where the Solar Panels positive lead connects.)
24 = Battery negative Bus Bar. This is where the solar panel negative lead would go as well as the Classics
negative lead and any negatives from the loads. Do NOT connect the battery negative cable to this bus bar
25 = DC Shunt. (The Shunt measures the amperage in or out of the battery. You connect the battery to one side and
everything else to the other side.)
26 = Earth Ground system of the building
27 = Classic Charge controller.
28 = AC Generator
29 = Batteries. (The Voltage must match the voltage of the inverter. Typically 2-3 strings of batteries would be
considered the max.)
30 = Optional Battery temperature sensor. (This is used to compensate for the temperature of the battery. If a battery
is cold it has to be charged to a slightly higher voltage and when it is hot it will be charged to a slightly lower
voltage.)
31 = DC Cables to Inverter
Classic SL owner’s manual REVB 2056
16 | P a g e x x - x x x - x x R E V : A
Diagram 1

Classic SL owner’s manual REVB 2056
17 | P a g e x x - x x x - x x R E V : A
DC Terminal Connector
Figure 7
The Classic's DC terminal connector is located on the circuit board as shown in figure 17. The connector
will take up to a #4 AWG. #4 AWG THHN when installed in the Classic and MidNite E-Panel is rated for
over 100 amps and is therefore suitable for the highest power available from the Classic 150-SL. After
installing the wires for the last time snap in the blue cover that is included in the parts bag.
Maximum and Minimum Wire Size
The Classic’s Blue DC terminal connector will accept wire from #14-#4 AWG
The Classic’s Aux 1 and 2 terminal connector will accept wire up to #18 AWG
WARNING: Extra fine Stranded wire is actually larger in diameter than standard stranded wire
like THHN therefore #4 extra fine strand (Welding cable) will not fit in the terminal block.
Over Current Protection and Wire Size Requirements
The over current devices, wiring, and installation methods used must conform to all electrical codes
applicable to the location of installation. Wiring needs to be protected with proper strain relief clamps and
or conduit. See page 49 for a breaker and wire size chart.
Classic SL owner’s manual REVB 2056
18 | P a g e x x - x x x - x x R E V : A
The USB cable, BTS cable and auxiliary input/output cables should run in a different conduit to preserve
their signal. When installing the Classic in a MidNite E-Panel, it is acceptable to run all wiring through the
same knockout hole. It is legal to run signal and power wires together as long as all wiring is listed for the
highest voltage to be encountered. (Follow all local code)
Current Rating
The Classic limits the output current based on the model you have.
The Classic current ratings are:
Classic 150-SL - 96 amps maximum
Classic 200-SL - 79 amps maximum
Classic 250-SL - 62 amps maximum
Over Current Protection
The Classic must have over current protection to protect wiring from over current events. A means of
disconnect must be installed on the DC in and DC out of the Classic. Consult your local codes to
determine over current ratings. The breaker between the battery bank and the Classic must conform to
UL489. The breaker between the DC source and the Classic must conform to UL1077 or UL489. The
NEC requires 1.56 times short circuit current for PV over current protection. This is reduced to 1.25 times
when using a breaker rated for continuous duty. All MidNite Solar breakers are hydraulic/magnetic and
are rated for continuous duty (100% rating). No de-rating is required for the output breaker when using
MidNite Solar breakers.
PV in particular will be capable of producing more current than its name plate rating in extreme situations
so the safe minimum wire size should be selected for the PV array maximum short circuit current. Please
consult PV manufacturer for specifications. The US National Electrical Code requires 1.56 times the PV
short circuit current for wire size on the PV input. Output wire size follows the NEC guidelines. Typical
wire size for output is 6AWG for the Classic 250-SL and 4AWG for the Classic 200-SL and 150-SL but
check all de-ratings for your wire type and installation method.
Long Distance Wire Runs
The Classic offers some unique opportunities if you are faced with longer than normal wire runs between
the DC source and the Classic. The Classic comes in 3 input voltage ranges letting you design a DC
source at a higher voltage if it is beneficial. For example let’s say you have a 300 ft run from a PV array to
the Classic. You could wire for an open circuit voltage close to 250vdc accounting for the coldest
temperature you will encounter. This will allow you to run a smaller gauge wire than with a lower voltage
charge controller. The efficiency of a high voltage Classic is less than the lower voltage versions, so you
need to weigh the benefit. If this sounds too complicated use this rule of thumb in selecting the proper
Classic. PV runs up to 100 feet, use the Classic 150, runs up to 180 feet, use the Classic 200, or above 180
feet use the Classic 250.
If the wire size between the DC source and the Classic is larger than the Classic's DC terminal connector
you can use a splicer block or similar connector to reduce down to #4 AWG close to the Classic. The
MidNite E-Panels are supplied with a PV input bus bar that accepts up to 2/0 wire
Classic SL owner’s manual REVB 2056
19 | P a g e x x - x x x - x x R E V : A
Battery Temperature Compensation
A remote battery temperature sensor (BTS) can be purchased separately. This sensor raises or lowers
charge voltage based on temperature. Connect BTS to the BATT TEMP jack. (Refer to Battery
Temperature Sensor Installation 20) The Battery temperature menu appears as T-Comp in the BATTERY
MENU. In this menu you can change the voltage compensation as needed. If the BTS is disconnected or
shorted the Classic will automatically default to 25C on the Battery temperature.
Battery Temperature Sensor Installation
CAUTION - To reduce risk of injury, charge only deep-cycle lead acid, lead antimony, lead calcium,
gel cell or absorbed glass mat type rechargeable batteries. Other types of batteries may burst, causing
personal injury and damage. Never charge a frozen battery.
WARNING: RISK OF INJURY. To reduce the risk of injury, charge only properly rated (such as 6
V 12 V and 24 V ) lead-acid (GEL, AGM, Flooded, or Nickel Cadmium) rechargeable batteries. Other
battery types may burst, causing personal injury and damage.
WARNING: Explosion hazard during equalization, the battery generates explosive gases. Follow all
the battery safety precautions listed in this guide. Ventilate the area around the battery using ventilators
with brushless motors thoroughly and ensure that there are no sources of flame or sparks in the vicinity.
An optional Battery temperature sensor is available which plugs into the jack beside the DC Terminal
connector labeled “Batt Temp”. Route the cable through the E-panel into the battery box. Pick a battery in
the middle of the bank and about half way up the side of the battery thoroughly clean a spot off on the
case. Then remove the protective tape from the sensor and adhere the temperature sensor to the battery.
Some manufacturers use a double wall case on the battery. For mounting a temp sensor to a double wall
battery case please refer to the battery manufacturer's recommended procedure.

Classic SL owner’s manual REVB 2056
20 | P a g e x x - x x x - x x R E V : A
Figure 8
Insert BTS to the jack labeled BATTERY TEMP on the control board.
Figure 9

Classic SL owner’s manual REVB 2056
21 | P a g e x x - x x x - x x R E V : A
Chassis Grounding
In all installations the Classic chassis should be connected to ground. For systems with a battery breaker
sized 60 amps and smaller, 10 AWG (6 mm2) copper is generally sufficient. For systems with a battery
breaker sized 100 amps and smaller, 8 AWG (10 mm2) copper is required. For grounding conductor
requirements on your specific installation please consult your local electrical code. The chassis
grounding terminal is in the upper right corner of the electrical connection compartment.
Figure 10
DC System Grounding
The Classic charge controller is designed to work with Negative Ground, Positive Ground or Ungrounded
power systems. In grounded systems, dc negative may be connected to ground either externally or by
using the Classic’s internal grounding jumper, shown on figure 15 on Page 21. The internal grounding
jumper should only be installed when the Classic’s GFP is enabled.
In Positive ground or Ungrounded systems the GFP jumper must be removed. See Figure 15 Also note that
with Positive ground there will be items still referenced to battery negative that can complete a short
circuit of the battery bank. These items include, but are not limited to, the USB Cable and RS232 serial
data lines.
Classic SL owner’s manual REVB 2056
22 | P a g e x x - x x x - x x R E V : A
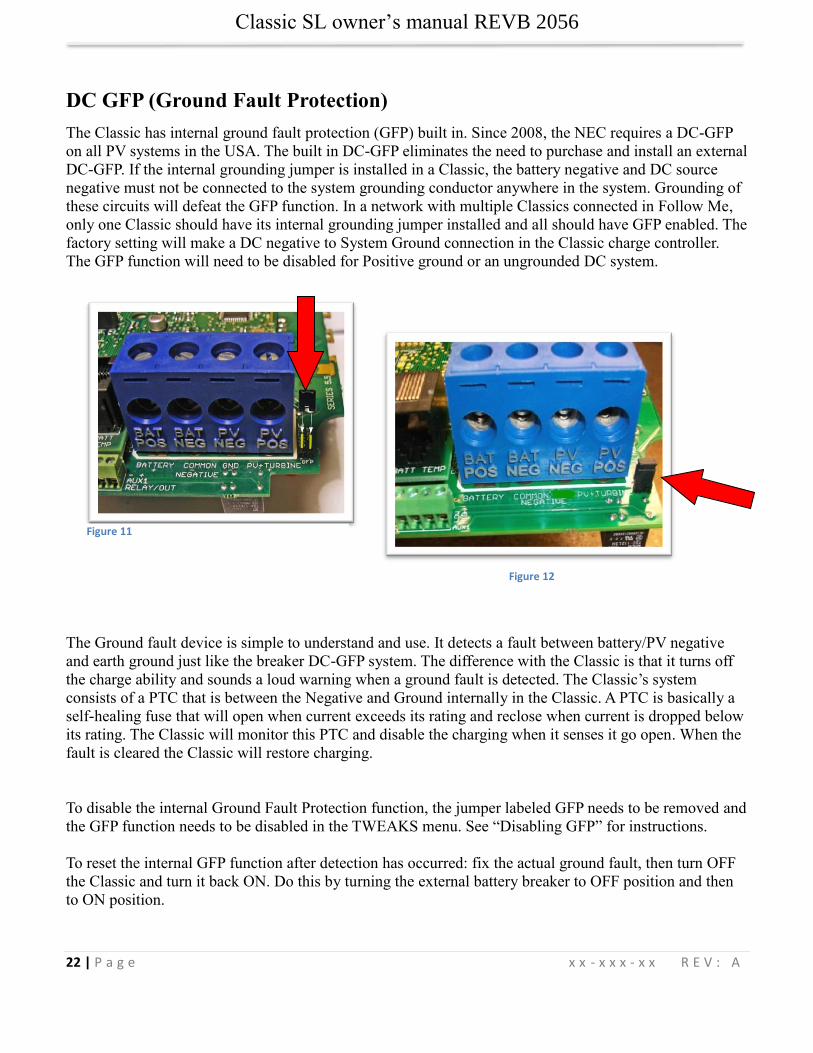
DC GFP (Ground Fault Protection)
The Classic has internal ground fault protection (GFP) built in. Since 2008, the NEC requires a DC-GFP
on all PV systems in the USA. The built in DC-GFP eliminates the need to purchase and install an external
DC-GFP. If the internal grounding jumper is installed in a Classic, the battery negative and DC source
negative must not be connected to the system grounding conductor anywhere in the system. Grounding of
these circuits will defeat the GFP function. In a network with multiple Classics connected in Follow Me,
only one Classic should have its internal grounding jumper installed and all should have GFP enabled. The
factory setting will make a DC negative to System Ground connection in the Classic charge controller.
The GFP function will need to be disabled for Positive ground or an ungrounded DC system.
Figure 12
The Ground fault device is simple to understand and use. It detects a fault between battery/PV negative
and earth ground just like the breaker DC-GFP system. The difference with the Classic is that it turns off
the charge ability and sounds a loud warning when a ground fault is detected. The Classic’s system
consists of a PTC that is between the Negative and Ground internally in the Classic. A PTC is basically a
self-healing fuse that will open when current exceeds its rating and reclose when current is dropped below
its rating. The Classic will monitor this PTC and disable the charging when it senses it go open. When the
fault is cleared the Classic will restore charging.
To disable the internal Ground Fault Protection function, the jumper labeled GFP needs to be removed and
the GFP function needs to be disabled in the TWEAKS menu. See “Disabling GFP” for instructions.
To reset the internal GFP function after detection has occurred: fix the actual ground fault, then turn OFF
the Classic and turn it back ON. Do this by turning the external battery breaker to OFF position and then
to ON position.
Figure 11

Classic SL owner’s manual REVB 2056
23 | P a g e x x - x x x - x x R E V : A
Disabling GFP
The GFP feature should only be disabled to operate the Classic in an ungrounded power system or in
systems where GFP is not required.
Press Main Menu
Scroll to the right or left until TWEAKS is highlighted and press ENTER
In TWEAKS press the right soft key to get to the MORE menu
In MORE scroll until GFP is highlighted
Use the up and down arrow keys to toggle between on and off
Press ENTER to save
Commissioning the Classic SL (Quick Start)
The Classic will enter into the Quick Set screens upon initial power up. If the Classic does not enter into
the quick set or you want to restore to Factory Default follow these steps to initiate a Quick Set.
With the power off to the Classic Hold the left and right arrow buttons down.
Turn the power on to the Classic and continue to hold the arrow buttons until the setup screen is
displayed.
Answer the questions on the next few screens to complete the Quick Set.
Equalization
To do a manual Equalization charge, go into the Charge menu and highlight “EQ” and press “Enter”. Now
“EQ Stopped” will be highlighted. Scroll up to select “Eq Started”. Press the “Status” button to return to
the home screen. To stop a manual EQ in progress simply reverse the steps above. A manual EQ when
started will last for that day.
Battery Charge Stages and Meanings
Bulk MPPT
This stage of the Classic means that the Classic will be putting out as much current as it can to raise the
battery voltage to the absorb voltage set point. This is also known as Constant Current Mode.
Absorb
This stage means that the Classic will maintain the Absorb set point voltage until the batteries are charged.
This stage is terminated at the end of the Absorb time or the End Amps set point, whichever is reached
first. At this stage the Classic is not putting out maximum current, as that would increase the battery
voltage over the Absorb set point. This is also referred to as Constant Voltage Mode.
The absorb time is proportional to the bulk time (i.e. the time bulk takes to reach the absorb voltage). The
battery is considered “full” at the end of the absorb charge cycle.
Classic SL owner’s manual REVB 2056
24 | P a g e x x - x x x - x x R E V : A
Float
A Float cycle follows after the Absorb cycle is completed; Float is displayed on the screen. Battery
voltage is held at the float voltage set point.
Equalize
The Equalization function can be manually initiated or can be set up to Auto Equalize. The intent of an
Equalization charge is to bring all battery cells to an equal voltage by a controller deliberate overcharge.
The goal is to return each battery cell to its optimum condition through a series of voltage controlled
chemical reactions inside the batteries.
Resting
“Resting” will show on the display when the Classic is not charging the batteries, this is typically due to
low light. If the Classic is resting and should not be, make sure Aux2 is not set to a logic input that is
forcing it into resting.
Mode is OFF
The Classic has a software “ON” and “OFF” feature. This software “Switch” basically turns the relay off,
effectively disconnecting the input source so the Classic will not charge the battery. If you see “Mode is
Off” in the bottom right corner of the display then the Mode may have been turned off. To turn the mode
back “ON” push the Main Menu button several times until “Charge” is highlighted. Scroll to the right
until “Mode” is highlighted and press “Enter”. On this screen “OFF” should be highlighted use the up or
down arrow to change it to “ON” and press “Enter”. Press the Status button once to return to the main
status screen.
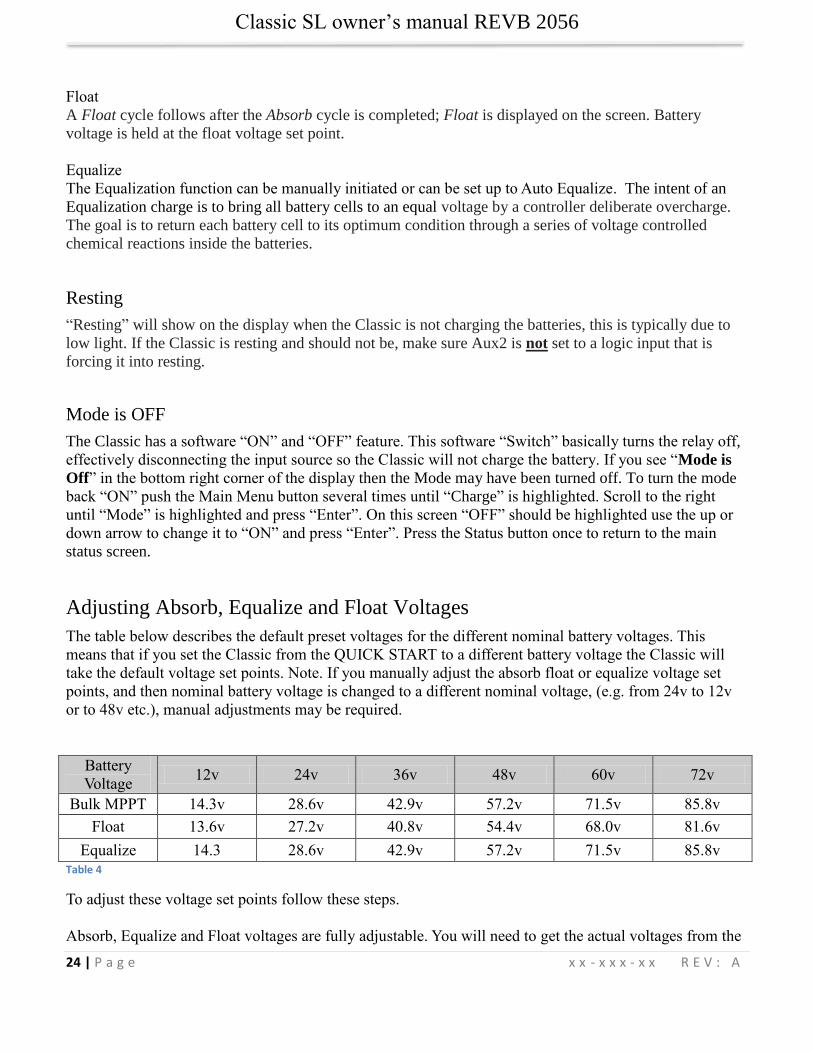
Adjusting Absorb, Equalize and Float Voltages
The table below describes the default preset voltages for the different nominal battery voltages. This
means that if you set the Classic from the QUICK START to a different battery voltage the Classic will
take the default voltage set points. Note. If you manually adjust the absorb float or equalize voltage set
points, and then nominal battery voltage is changed to a different nominal voltage, (e.g. from 24v to 12v
or to 48v etc.), manual adjustments may be required.
Battery
Voltage 12v 24v 36v 48v 60v 72v
Bulk MPPT 14.3v 28.6v 42.9v 57.2v 71.5v 85.8v
Float 13.6v 27.2v 40.8v 54.4v 68.0v 81.6v
Equalize 14.3 28.6v 42.9v 57.2v 71.5v 85.8v Table 4
To adjust these voltage set points follow these steps.
Absorb, Equalize and Float voltages are fully adjustable. You will need to get the actual voltages from the
Classic SL owner’s manual REVB 2056
25 | P a g e x x - x x x - x x R E V : A
battery manufacturer. To adjust these voltages follow the steps below.
Press Main Menu to enter the Main Menu
Scroll right or left until Charge is highlighted and push the Enter button
Highlight Volts and press the Enter button
Use left and right arrow keys to highlight the set point voltage to adjust
Use up and down arrow keys to lower or raise the voltage
Press the Enter button to save the new voltages.
Current Limit The Classic has a current limit component which interacts with the temperature of the charge controller.
If the Classic is exposed to extremely hot ambient conditions the output current will be reduced
automatically to keep the charge controller safe. If the orange LED comes on the MNGP, it means that the
Classic is in current limit mode. If you believe the Classic is not hot and the orange LED is on, most likely
the current limit set point is too low. To check this, follow steps below.
Press Main Menu
Highlight the CHARGE menu and press the Enter Button
Scroll to LIMITS and press the Enter Button
Press the right arrow key to highlight the “Out Amps” column
Use the up and down arrow keys to change the current limit then press the Enter Button to save
this data
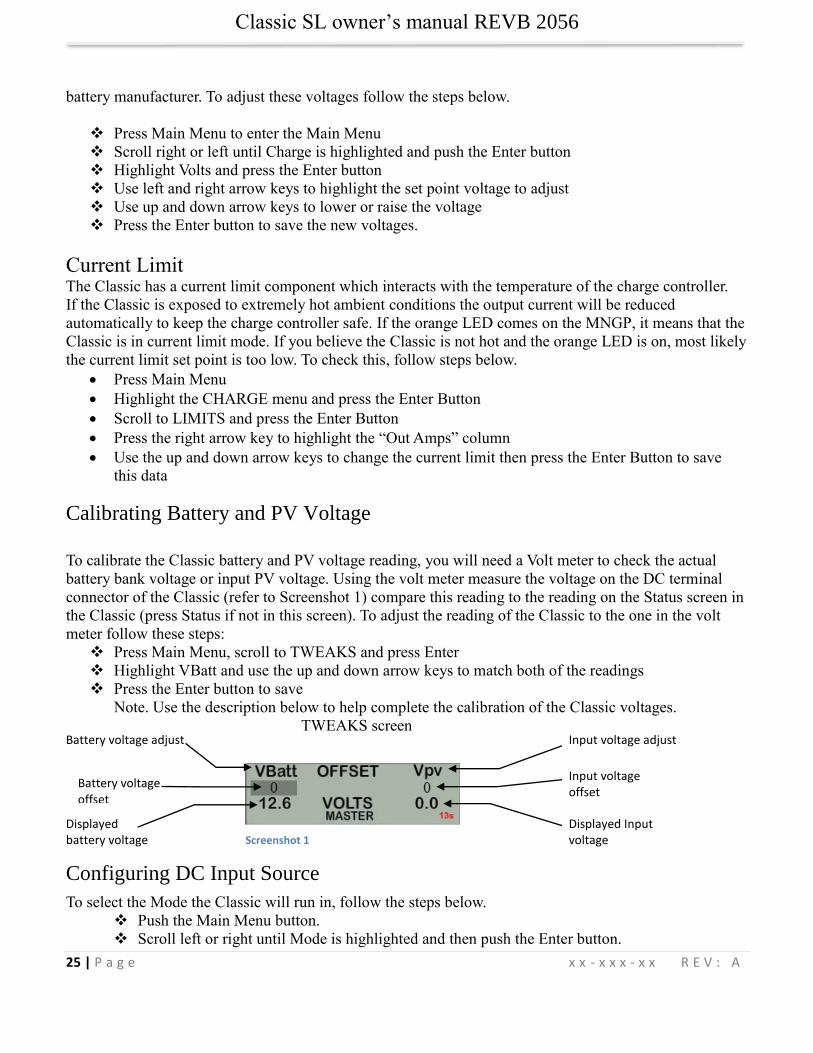
Calibrating Battery and PV Voltage
To calibrate the Classic battery and PV voltage reading, you will need a Volt meter to check the actual
battery bank voltage or input PV voltage. Using the volt meter measure the voltage on the DC terminal
connector of the Classic (refer to Screenshot 1) compare this reading to the reading on the Status screen in
the Classic (press Status if not in this screen). To adjust the reading of the Classic to the one in the volt
meter follow these steps:
Press Main Menu, scroll to TWEAKS and press Enter
Highlight VBatt and use the up and down arrow keys to match both of the readings
Press the Enter button to save
Note. Use the description below to help complete the calibration of the Classic voltages.
TWEAKS screen
Configuring DC Input Source
To select the Mode the Classic will run in, follow the steps below.
Push the Main Menu button.
Scroll left or right until Mode is highlighted and then push the Enter button.
Battery voltage adjust
Battery voltage offset
Displayed battery voltage
Input voltage adjust
Input voltage offset
Displayed Input voltage Screenshot 1
Classic SL owner’s manual REVB 2056
26 | P a g e x x - x x x - x x R E V : A
Scroll to the right and highlight the current Mode than use the up and down arrows to set the
mode you want.
Take note of the Right soft key most modes have some set points that can be adjusted.
Press the Main Menu button until you get back to the Mode Menu
Set the ON/OFF to ON and press Enter
The following Modes will appear in this order in the MODE Menu.
Solar This is the default mode for PV systems and has a very fast sweep (typically1/2 second or less) that will
re-sweep at user adjustable sweep intervals, unless the Classic finds that it needs to do a sweep on its own
because of changing conditions. The timed sweep interval is user adjustable and is in units of
minutes. SOLAR mode is typically best for PV systems, especially if there is partial shading at times
during the day. SOLAR mode is best suited for shaded or un-shaded PV arrays that are at least one
nominal voltage above the battery voltage. For severe partial shading or PV arrays with nominal voltage
equal to battery voltage, you may also want to try Legacy P&O (Perturb and Observe) MPPT mode.
Legacy P&O Legacy P&O (Perturb and Observe) mode is a slow tracking mode similar to the Micro Hydro mode but
with the difference that it is slightly faster and will shut off if the power source goes off.
It has two settings that are user adjustable. Sweep Interval is the time between mini-sweeps, in minutes,
and sweeps around the present (i.e. the last found) MPP Voltage. The range of this sweep is determined by
the Sweep Depth user adjustment and is expressed as a percentage of Watts that the sweep started
from. For example, if in Legacy P&O mode, the Classic was outputting 500 Watts and the Sweep Depth
percentage was set for 10% (50 Watts), the sweep will bring the input voltage DOWN until the output
power drops down to 450 Watts, then will sweep UP in voltage until the power drops again down to 450
Watts and then go back to the newly found MPP Voltage, waiting for the next sweep.
Note: Mode must be manually turned ON after changing the mode. To turn the mode ON highlight the
OFF under ON/OFF and switch it to ON. Press enter to save this change.
Setting the Date and Time
To set the date and time manually on the Classic follow the steps below.
Push the Main Menu button repeatedly until Charge is highlighted.
Scroll left or right to highlight “MISC” and push the Enter button
Scroll to “Time” and push Enter
Now scroll left or right to highlight the data you want to manually change. Use the up and down buttons to
change the data. When you have all the data changed push the Enter button to save the changes.
The Classic includes a battery (CR1216) in the MNGP portion to keep the time running even when the
power is disconnected. To replace the battery refer to the Installation Manual

Classic SL owner’s manual REVB 2056
27 | P a g e x x - x x x - x x R E V : A
Uploading New Firmware to the Classic
The Classic has the ability to have its firmware updated with a standard USB cable and a Windows based
PC. The USB cable is Standard to Mini B. Please see www.midnitesolar.com and click on the Software tab
for the firmware and instructions. Due to the various different Windows configurations we will not go into
detail in the Classic Manual. The Firmware upgrade is fail safe so if the wrong code is installed the Classic
simply says “Wrong code” prompting you to load the correct code. Also if the upload is interrupted for
whatever reason simply start over.
WARNING ! The Classic's USB port is NOT isolated from battery negative. This is typically only an issue on
positive ground systems or systems with a tripped ground fault protection device. Care must be taken that a
computer connected to the Classic's USB port is either isolated from ground and the Classic's negative or
that the computer's USB negative is common with the Classic's negative and ground.
WARNING ! You cannot turn a Classic 150 into a Classic 200 for example using new software the internal
components are also different.

Classic SL owner’s manual REVB 2056
28 | P a g e x x - x x x - x x R E V : A
Troubleshooting / FAQs
How do I do a software
Factory Restore on my
Classic or Classic SL?
*Note this only works on the Classics with Displays not a Classic Lite with the
MNLP (LED Panel)
*Warning this will erase ALL settings.
*Turn the PV breaker and Battery breaker off (What you don’t have a breaker?
Get one asap) and make sure the display has gone dark
*Hold the left and right arrow and turn on JUST the battery breaker, Continue
to hold the arrow buttons until you see the Quick Start pop up
*Follow the on screen prompts to set up your controller.
WARNING: You must get the battery charging voltages from the battery
manufacturer and it is VERY important you do this and do not just leave it as
default settings as it is likely this will undercharge and slowly destroy your
batteries
WARNING: The Clock is a 24 hr clock. Setting it off by 12hrs will cause it to
reset to a new day at Noon.
How do I do a
HARDWARE factory
restore?
*Warning this will erase ALL settings.
*Turn the PV breaker and Battery breaker off (What you don’t have a breaker?
Get one asap) and make sure the display has gone dark
Do a hardware factory restore. There are 4 sets of jumpers directly above the
blue terminal block. For the purpose of this we will call the left most jumper
JP1 and the right most JP4 (actually labeled "Boot")
Step 1- Turn the PV and Battery power off to the Classic and remove
the front cover
Step 2- Locate the 2 jumpers JP1 and BOOT (JP4). Take the actual
jumpers and keep them in your hand
Step 3- Turn the Battery power on to the classic
Step 4- within 1 minute place jumper JP4 on its two pins and then place
jumper JP1 on its two pins. at this point the 3 leds on the top of the
circuit board should flash back and forth for about 60 seconds.
Step 5- After the flashing stops power down the classic and remove JP1
and JP4 and stow them back on a single pin like they were.
Step 6- Put the front cover on and power up the Classic Lite. If you
have the MNLP set to Custom you will need to go to the local app and
reset the battery voltage and setpoints etc.
What is a “VMM”? *It has become industry slang for our factory restore “Vulcan Mind Meld”
from the 2 fingers needed to push the arrows
Classic SL owner’s manual REVB 2056
29 | P a g e x x - x x x - x x R E V : A
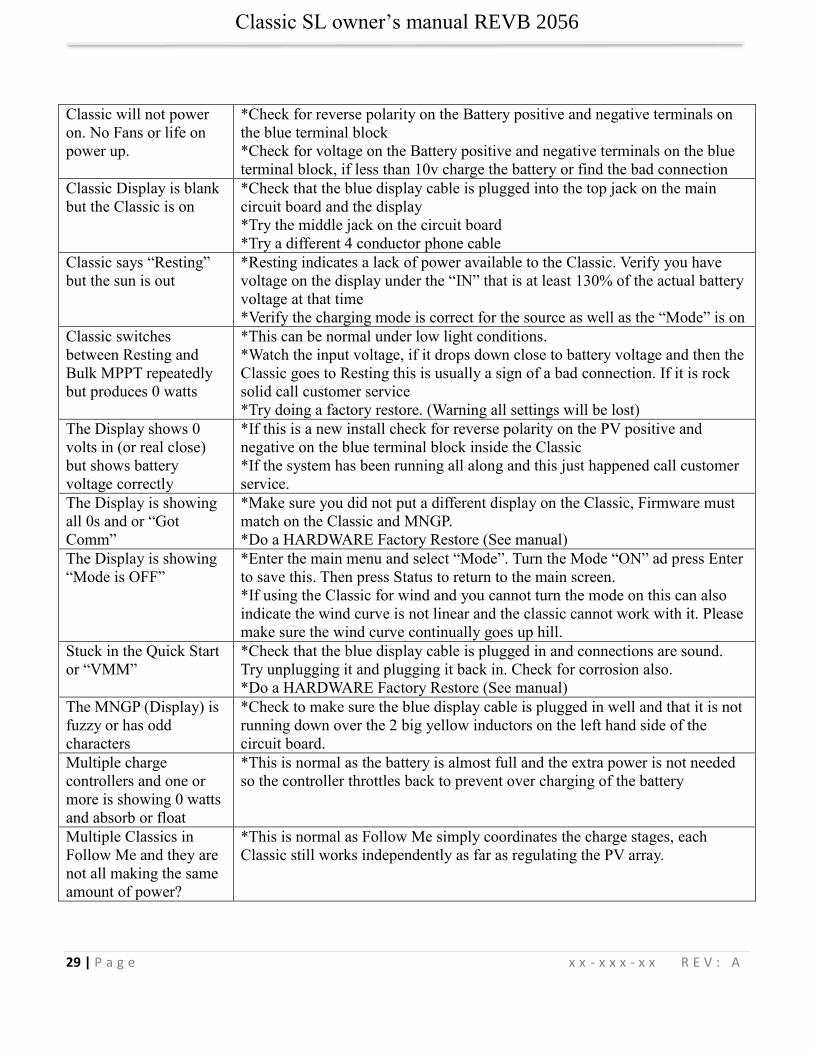
Classic will not power
on. No Fans or life on
power up.
*Check for reverse polarity on the Battery positive and negative terminals on
the blue terminal block
*Check for voltage on the Battery positive and negative terminals on the blue
terminal block, if less than 10v charge the battery or find the bad connection
Classic Display is blank
but the Classic is on
*Check that the blue display cable is plugged into the top jack on the main
circuit board and the display
*Try the middle jack on the circuit board
*Try a different 4 conductor phone cable
Classic says “Resting”
but the sun is out
*Resting indicates a lack of power available to the Classic. Verify you have
voltage on the display under the “IN” that is at least 130% of the actual battery
voltage at that time
*Verify the charging mode is correct for the source as well as the “Mode” is on
Classic switches
between Resting and
Bulk MPPT repeatedly
but produces 0 watts
*This can be normal under low light conditions.
*Watch the input voltage, if it drops down close to battery voltage and then the
Classic goes to Resting this is usually a sign of a bad connection. If it is rock
solid call customer service
*Try doing a factory restore. (Warning all settings will be lost)
The Display shows 0
volts in (or real close)
but shows battery
voltage correctly
*If this is a new install check for reverse polarity on the PV positive and
negative on the blue terminal block inside the Classic
*If the system has been running all along and this just happened call customer
service.
The Display is showing
all 0s and or “Got
Comm”
*Make sure you did not put a different display on the Classic, Firmware must
match on the Classic and MNGP.
*Do a HARDWARE Factory Restore (See manual)
The Display is showing
“Mode is OFF”
*Enter the main menu and select “Mode”. Turn the Mode “ON” ad press Enter
to save this. Then press Status to return to the main screen.
*If using the Classic for wind and you cannot turn the mode on this can also
indicate the wind curve is not linear and the classic cannot work with it. Please
make sure the wind curve continually goes up hill.
Stuck in the Quick Start
or “VMM”
*Check that the blue display cable is plugged in and connections are sound.
Try unplugging it and plugging it back in. Check for corrosion also.
*Do a HARDWARE Factory Restore (See manual)
The MNGP (Display) is
fuzzy or has odd
characters
*Check to make sure the blue display cable is plugged in well and that it is not
running down over the 2 big yellow inductors on the left hand side of the
circuit board.
Multiple charge
controllers and one or
more is showing 0 watts
and absorb or float
*This is normal as the battery is almost full and the extra power is not needed
so the controller throttles back to prevent over charging of the battery
Multiple Classics in
Follow Me and they are
not all making the same
amount of power?
*This is normal as Follow Me simply coordinates the charge stages, each
Classic still works independently as far as regulating the PV array.

Classic SL owner’s manual REVB 2056
30 | P a g e x x - x x x - x x R E V : A
How do I verify Follow
Me is working properly?
*You should first go to the Main menu and then into the “Temps” menu and
verify all controllers are seeing the Battery Temp from the one with the BTS
plugged in.
*You should also see a blue LED flashing inside the top vent. There are two
types of blink, A short blink that is about one tenth of a second means it is
getting good information. A long blink that is about half a second indicates it
did not get any info. If the blinks are ALL long then you probably have a bad
cable and all cables should be checked immediately
The Fans seem way to
loud
*If it is the internal fans make sure no wires or anything have come in contact
with them inside the wiring compartment
*If it is the external fan you may want to remove the front half of the “Turbo”
plastic housing and make sure the fan is still adhered into the back plastic
housing. If the fan has come loose a dab of silicone on each side should solve
the noise issue. Please make sure not to get any silicone on the fan blades
Updating the firmware
and the Classic went
well but the MNGP will
not update
*Make sure the MNGP (Display) is actually plugged in using the blue display
cable in the top jack of the main circuit board
*Verify you have an MNGP and not an MNLP. The MNLP is an LED panel
that comes with the Classic Lite and does not need to be updated
*When the black box pops up telling you to power the Classic up, Count to 4
before turning the breaker on
*If you do not have a breaker or disconnect and you are trying to connect a
wire to a terminal block or a battery the connection will likely be to dirty for
the boot loader. Install the proper breakers
Classic goes to absorb at
too low of a voltage
*Verify this is not normal operation do to the battery being warmer than the
neutral point. You can verify the battery temperature by going into the main
menu and selecting the “Temps” menu. The Classic like all other chargers will
adjust the actual charge voltage based on the temperature of the battery. It uses
2 variables you program in for this. 1-Temperature neutral point (Typically 25
degrees C) and this is found in the WBjr set up menus. 2-Milli volts per degree
C per cell (typically -5Mv). So verify both of these are set per the battery
manufacturers specs.
So for an example if Absorb was set for 58.8 volts and the battery is at 35
degrees C and the temp comp is set for -5mv we have a 10 degree C
difference:
10 x 24 = 240 x 5 = 1200Mv or 1.2v so the Classic would actually charge to
57.6v
Classic goes to absorb at
too high of a voltage
*Verify this is not normal operation do to the battery being cooler than the
Neutral point. You can verify the battery temperature by going into the main
menu and selecting the “Temps” menu. The Classic like all other chargers will
adjust the actual charge voltage based on the temperature of the battery.
See above calculation’s the same works for cold batteries as well you just end
up with a negative number so a battery that is 15 degrees C would look like:
-10x24 = -240x5 = -1200Mv or -1.2v so the Classic would actually charge to
60v

Classic SL owner’s manual REVB 2056
31 | P a g e x x - x x x - x x R E V : A
Classic goes to Float to
early
*Make sure End Amps is not set to high causing the Classic to go to Float (End
Amps is in the Charge menu and the way it works is if the charge current falls
below the End Amps setting AND the Classic is in Absorb the Classic will go
to Float. Setting End Amps to 0 will disable it. End Amps setting is a value the
battery manufacturer supplies
*Make sure you have the Absorb time is set properly
Follow Me with my
Classic Lite is not
working
*Classic Lites older than serial # CL05435 did not work with Follow Me
please call customer service for a new MNLP
*Verify you are seeing the short blips of the blue LED internally as talked
about above. If not please check all your cables.
My Classic says “OCP is
OFF” on the display
*This can happen on older Classics that have had the firmware updated. This
will have no effect on the operation of the classic but to make the message go
away do a factory restore to fix this. (Warning all settings will be lost)
My Classic says “OCP”
now and then on the
display
*This can be normal if the battery bank is small or the inverter cables are too
small. If this shows up just once in a great while that would be ok but if it is
happening pretty regularly you may want to look at the size of the battery
cables, Age of the battery bank or the size of the battery. Call customer service
for assistance
My Classic has an
orange LED on the
display lit up and or says
“Amp Limit”
*This indicates the Classic is current limiting. Either because it has reached the
current limit you have set in the Charge menu under limits or because it is to
hot and it is backing its current down to prevent overheating. Go into the Main
menu and the Charge category, Look in the Limits sub menu and verify the
amp limits for In and Out are set to what you desire.
My Classic says “Hyper
VOC’ on the display
*This is indicating that the input voltage has exceeded the operational voltage
of the Classic. If this is happening now and then on rare occasions when it is
really cold then this is normal. If this is happening all the time this indicates
the PV array was wired for too high a voltage, Please consult your installer for
assistance with that
My Classic says
“Battery over V” on the
display
*This is an indication the Classic thinks the battery voltage is to high and has
stopped charging.
*This can happen with multiple controllers that are not networked together if
one of the classics goes to float it can show this and will go away as soon as
the other controller goes to float.
*If this is a new install the wrong nominal voltage may be selected and a
factory restore will be needed.
*if this is a running system then you may have another charging source that
has malfunctioned and over charging the battery bank
My Classic says “GRND
FLT” on the display and
is making a loud
beeping
*Generally this would be caused by the PV or Battery positive shorting to
ground somewhere in the system. The first thing to do is verify it is a real fault
by carefully measuring between Battery Negative and Earth ground. If you see
any voltage here than the system has a fault. Call your installer for help finding
and rectifying the fault. The Classic will automatically stop showing the fault
when the issue is fixed
Classic SL owner’s manual REVB 2056
32 | P a g e x x - x x x - x x R E V : A
My Classic says “Set
date and time” on the
display
*Verify you are not setting the date and time with the local app without time
sync off in the tweaks menu
*If not using the local app to set the time then verify that time sync is ON in
the tweaks menu.
*Verify the “Remove” paper was removed out of the coin battery in the
display.
*Check coin battery for voltage, if under 2.5v replace the battery
*Check the coin battery for glue residue from the remove tag
*With coin battery removed press in on the 2 tabs to bend them in a little
tighter and add more spring pressure to the battery.
I have a WBjr and the
SOC% is not showing
on the main status
screen
*Verify the WBjr is set up properly by looking at the WBjr status screen and
verifying the values it is showing look proper
*The SOC% will not show up until the Classic with the WBjr goes to float
once so it can calibrate.
*If there are multiple Classics in Follow me we need to make sure the one with
the WBjr is the first one to go to float. We recommend setting the Classics that
do not have WBjrs for about 15 minutes longer on the absorb time this will
ensure the Classic with the WBjr goes to float first.
*If you are using End Amps make sure you use the Classic with the WBjr to do
the sensing of End Amps.
I don’t see a WBjr status
screen or I don’t see all
the settings shown in the
manual?
*If the WBjr status menu is not present or does not match the manual then you
most likely have older firmware. We recommend updating the firmware and
doing a factory restore. (Warning all settings will be lost) The firmware can be
found on our website under the “software” tab. Or at the URL below.
http://www.midnitesolar.com/firmware.php?firmwareProduct_ID=1
My State of Charge
seems inaccurate?
*Verify the neutral temperature for the temp comp is set per the battery
manufacturers specs (typically 25C)
*Verify the Amp Hours of the battery bank is set properly (Note batteries in a
string do not add in amp hours, so if you have a single string of 8 golf cart
batteries each having 220AH then you have 220AH of capacity)
*Verify the efficiency of the battery is set properly according to the battery
manufacturer’s specs (typically 94%)
Classic says “Arc Fault”
on the display and is
making a loud beeping
noise
* This is generally indicating you have a bad connection somewhere causing
arcs, This can be anywhere in the system so generally finding it is easier if you
can turn things off and see what causes the Fault to clear.
*This also can be caused by loads etc and be a nuisance trip. Please see the
manual for help with that
My Classic Lite has
ALL of its LEDs
blinking slowly
*This is indicating the LED panel “MNLP” is not talking to the Classic, Try
making sure the blue cable is plugged in well.
*Try plugging the Blue cable into the middle jack
*If both of the above fail do a HARDWARE factory restore (See manual)
Classic SL owner’s manual REVB 2056
33 | P a g e x x - x x x - x x R E V : A
My Classic Lite has the
left hand 3 LEDs
blinking on the LED
panel
*This indicates wrong code, If you recently updated code you may have
updated with the wrong model code. Look at the inductor stickers they will
have the model of classic on them also so you can verify and re update with
that model code
When I make changes to
my Classic Lite with the
Local App they do not
appear to stay
*This is generally caused by failing to put the MNLP (LED panel) into Custom
mode. To put this into custom mode set S1 Switches 1 and 2 to ON or UP this
will allow the LED panel to read the classic but not make ANY changes to its
programming so you can program the Lite with the Local App
My Time gets out of
whack on the Local App
when the Classic Lite is
powered down and back
up
*Unfortunately on the Lite there is no battery to back up the real time clock
like there is on the regular Classics, You will need to use the Local App to reset
the time after a power cycle, The Local App will turn yellow if the time is not
in sync with the PC you are viewing it on. And the Local app has a time sync
button on the Basic Configuration tab
I am having trouble
getting my Classic Lite
on the network
*We recommend setting the dip switches for normal operation and DHCP.
Connect to it with the Local App and verify it has connected to the network.
Now at this point we can go switch the S1 switch 1 and 2 to ON or UP to set
the MNLP to custom. Do this with the Classic Lite powered on. Now you can
change the network settings on the Local App if you want.
(Note setting switches to custom first and then powering the Classic Lite can
cause issues trying to connect as it assumes you are already connected, We
anticipate setting to Custom AFTER connecting to the network)
My Classic or Classic
lite keeps going back to
address 10 after I
readdress it to something
else
*There was a bug in older firmware that would cause this. We recommend
updating the firmware and doing a factory restore. (Warning all settings will be
lost) The firmware can be found on our website under the “software” tab. Or at
the URL below.
http://www.midnitesolar.com/firmware.php?firmwareProduct_ID=1
I am having issues
connecting my Classic
or Classic Lite directly
to my PC without a
Router
*We advise against this as it is more complicated than most people feel
comfortable with. We recommend a cheap router for this as it makes it much
easier. The way to think about this is the Computer and Classic have NO
address until the Router addresses them so if we must go direct we have to
address both of them.
*To do a direct connection we recommend a cross over Ethernet cable. Then
you need to set the Classic to a static IP say 192.168.1.5 then you need to go
into the IPV4 properties on the PC and set it for a static IP also of say
192.168.1.2
Note the important part here is that the first 3 sets of numbers match
192.168.1.xxx for example and that the LAST sets of numbers do NOT match
as this is the unique identifier of where each item is. You will not need to
worry about Gateways or DNS IPs for this connection. For more help with this
see our video on direct connection to Classic or consult your network guru

Classic SL owner’s manual REVB 2056
34 | P a g e x x - x x x - x x R E V : A
I cannot find an
uninstaller for the
Midnite firmware
updater?
*Go to the C directory and find the folder labeled midnitesolar and open it. In
here you will find an uninstaller, simply double left click it to run it. After it is
complete you can delete the midnitesolar folder to completely remove any files
left behind
What is the
PASSWORD for the
Classic?
*All Classics use 142 for the password
I hear a singing sound
coming from my
Classic, Sort of a high
pitched whine that varies
*This is the inductors “Singing” when the Input voltage is really low. This is
normal and is no cause for concern, however if it bothers you then you can
disable it by going to the main menu and entering into tweaks. Look for
LoMax and set it to off and press enter.
Note: If the PV array is real low voltage and its max power point is close to the
battery voltage disabling LoMax will cause a slight loss in power as the Classic
will not be able to track all the way to the battery voltage looking for the
MPPT voltage
I have a classic that
came with a grey
“Magnum” Battery temp
sensor can I replace it
with a Midnite blue one?
*No the Magnum sensor was a different resistance value so those classics
where modified to use those sensors. Call customer service if you need help
with a new sensor
How can I verify that all
my fans work on My
Classic?
*If you unplug the battery temp sensor and use a flat bladed screw driver to
short out all 6 pins inside the jack (Carefully so as not to bend the pins) the
fans should all start spinning
How do I find the
“Wizard”?
*You won’t, we removed the wizard as it asked a lot of questions that did
nothing and was confusing, We replaced it with the Quick Start that comes up
when you first power the classic or do a factor restore
My fans run all the time
no matter what the
Classic is doing
*Check to make sure you did not pinch the Fan wire at the top in the casting
I remotely mounted my
MNGP (display) and
now it won’t power on
or it blinks but won’t
power up
*Check that you made the cable exactly the same as the blue one. Note that Pin
one on one end becomes Pin 6 at the other end (Mirror image)
*Try a heavier cable, We have found that off the shelf phone cables are good
for about 25ft max before the voltage drop is to great. We have found that
cable like Cat3 or Cat5E can go about 100ft no problem.
How many amps can my
Classic handle on the
input side? OR Can I put
too much PV on my
Classic?
*The Classic regulates very well so within reason there is no limit on the input
amps or PV wattage. We recommend you not exceed 150% of the capacity.
The Classic, just like a grid tie inverter, can be over driven on the pv side it
simply produces the max amount it is rated for.
My Classic is not
making the same amount
of wattage as I have for
Solar Panels?
*First it should be noted a solar panel is rated in a lab so in the real world we
typically see about 80% of what it is labeled (So a 100 watt panel becomes an
80 watt panel)
*Does the Classic say Absorb, Float or EQ? If so that means the battery is
nearly full and the Classic is throttling back to prevent over charging the
battery.
Classic SL owner’s manual REVB 2056
35 | P a g e x x - x x x - x x R E V : A
My Label is gone or I
mixed up my covers
how do I know what
model Classic I have?
*You can remove the cover and look at the stickers on the big yellow inductors
on the left side of the circuit board
*You can press the status button several times and the Classic will say
“Connected to Classic xxx” on one of them, this is your model #
I can’t read my serial #
sticker how can I find
my serial #
*Press the status button several times and a screen will come up saying
“Connected to a Classic xxx” in the bottom right corner is the serial number, it
will start with a CL.
How do I know what
Nominal voltage my
Classic is programmed
for?
*Press the status button several times and a screen will come up saying
“Connected to a Classic xxx” to the right of this it will say the battery voltage
it is programmed to (Example 48v)
I have Aux1
programmed properly
but I cannot get 12v out
of it when I should?
*Most likely the Jumpers on the bottom left corner of the circuit board are set
for a dry relay not for a 12v signal. See the Aux portion of the manual for help
with that.
I was in the middle of a
firmware update and the
update got interrupted
what do I do?
*No problem simply start over with the update, The Classic has a boot loader
that will always look for new firmware on boot up so you can not damage the
Classic.
Can I use wind and
Solar on a single
Classic?
*No they both require drastically different tracking algorithms so you will need
two Classics
Can I have more than
one Classic on a single
battery?
*Yes as long as they have separate Solar Arrays
Do I have to shut off my
Classic if I have a
different charger
charging?
*No the Classic will work just fine in conjunction with ANY other charger on
the same battery
Table 5
Classic SL owner’s manual REVB 2056
36 | P a g e x x - x x x - x x R E V : A
Electrical Specifications
Model Classic150-SL Classic200-SL Classic250-SL
Operating Volts in 150VDC 200VDC 250VDC
Max Hyper VOC 150+battery 200+battery 250+battery
*Battery Charge Volts 12-93 volts 12-93 volts 12-93 volts
**Absolute Current
Output at 25°C
96a at 12v battery
94a at 24v battery
83a at 48v battery
74a at 12v battery
70a at 24v battery
65a at 48v battery
60a at 12v battery
62a at 24v battery
55a at 48v battery
De-rate current
at 40°C+ 80 amperes 66 amperes 52 amperes
Environment -40c to 40c
Dimensions of Classic 14.87”X 5.95”X 4.00” 378mm X 151mm X 102mm
Dimensions of Box 19.00”X 8.50”X 5.70” 483mm X 216mm xX145mm
Shipping Weight 11.5 lb 4.9 kg
NOTE: Current output ratings were measured with 75% of the PV array’s VOC (Open Circuit Voltage)
*NOTE: Calculated by adding battery voltage to the maximum input operating voltage (48V battery max)
* **NOTE: Measurement Accuracies: +- 0.12v, offset calibration adjustment maybe necessary
Table 6
Classic SL owner’s manual REVB 2056
37 | P a g e x x - x x x - x x R E V : A
Specifications Mechanical
Figure 13

Classic SL owner’s manual REVB 2056
38 | P a g e x x - x x x - x x R E V : A
Classic Breaker sizing
Table 7

Classic SL owner’s manual REVB 2056
39 | P a g e x x - x x x - x x R E V : A

Classic SL owner’s manual REVB 2056
40 | P a g e x x - x x x - x x R E V : A
Classic SL owner’s manual REVB 2056
41 | P a g e x x - x x x - x x R E V : A

Classic SL owner’s manual REVB 2056
42 | P a g e x x - x x x - x x R E V : A
Table 8
Classic SL owner’s manual REVB 2056
43 | P a g e x x - x x x - x x R E V : A
Glossary of Terms
Absorb – Constant voltage charge stage to fill the batteries. The controller is regulating so maximum power will not be seen at
this time. The Absorb timer is also counting down to the switch to Float.
Aux – Auxiliary relays. The Classic has 2 relays: Aux 1 can be configured as a 12 volt signal or a dry relay, Aux 2 can be used
as a PWM signal output. Refer to page Error! Bookmark not defined. for more Aux info.
BLK – Bulk MPPT Mode. By using the up arrow in Tweaks under BLK you can force the Classic into Bulk mode.
Bulk MPPT - Maximum current charge stage, the Classic is trying to bring the batteries to the Absorb voltage set point. We are
basically putting all available power into the batteries.
Comm – This menu allows adjustment of things like Mod Bus port, USB Mode and MNGP address.
DvrtCnt – When enabled, allows the charge stage timers to continue to run when the diversion modes are holding the battery
voltage just below the actual set point.
Equalize - Constant voltage charge stage to equalize the batteries. The controller is regulating so maximum power will not be
seen at this time. The Equalize timer is also counting down to the switch to Float.
EQ MPPT - Maximum current charge stage. The Classic is trying to bring the batteries to the Equalize voltage set point. We
are basically putting all available power into the batteries.
Float – Constant voltage charge stage with a lower voltage than the Absorb charge point. The controller is regulating so
maximum power will not be seen at this time.
Float MPPT – Maximum current charge stage. The Classic is trying to bring the batteries to the Float voltage set point. We are
basically putting all available power into the batteries.
FLT – Float mode. By using the up arrow in Tweaks under FLT you can force the Classic into Float mode.
GF – Ground Fault, See page 22 for more info on ground fault protection.
Got Comm – Indicates a lack of communication between the display and the Classic. Consult Troubleshooting for information
page Error! Bookmark not defined..
Insomnia – This, when enabled, will keep the Classic from going to Resting. This is intended for hydro mode only where you
may need time to open water valves and do not want to wait for the Classic to wake up.
LED-MODE – This selection lets you pick the function of the 6 visible LEDs on a standard Classic.
LMX – LoMax. This enables the Classic to track the input voltage all the way down to Battery voltage. When disabled the
Classic will stop tracking the input around 5 volts above the battery voltage. When the input voltage is within a couple volts of
the battery voltage the inductors can “Sing” this is usually not very loud and will do no harm.
MNGP – Midnite Graphical interface Panel. This is the graphical display included with the standard Classic controller.

Classic SL owner’s manual REVB 2056
44 | P a g e x x - x x x - x x R E V : A
Mode – This menu lets you turn the charging ability of the controller On / Off as well as lets you select the DC input source.
See page 23 for info on the Mode menu.
Mod Bus – a standard protocol used for communications. We have published our protocol to allow users to interface with the
Classic. See www.midnitesolar.com for our Mod Bus protocol.
Pwr Save – Allows you to adjust the time the Backlight stays on.
Resting – The Classic is not charging the battery due to low light. For certain reasons Resting will appear. Please see page 24.
T-Comp – Temperature compensation using a temperature sensor to measure the ambient temperature of the battery bank and
will adjust the voltage set points up or down accordingly to ensure a full battery. There are 3 parameters to set Minimum and
Maximum adjusted voltage as well as volts per degree C per Cell. Typically this is -5 mV but please consult your battery
manufacturer. See page 19 for Temperature compensation info.
Tweaks – This menu has all the advanced adjustments for the Classic. For example: Voltage off set adjustments etc.
VBatt – Battery voltage, measured at the battery terminals of the Classic.
VOC – Open Circuit Voltage, unloaded voltage measurement.
Vpv – Input voltage, measured at the input terminals of the Classic.