FMO Lead Management User Guide - unitedhealthrx.com · Howk to wor your UnitedHealthcare Medicare...
29
bConnected FMO User Guide for Lead Management
Transcript of FMO Lead Management User Guide - unitedhealthrx.com · Howk to wor your UnitedHealthcare Medicare...

bConnected FMO User Guide for Lead Management

UHG Confidential Page 1
Table of Contents bConnected Terminology ....................................................................................................................................... 2 Logon to bConnected.............................................................................................................................................. 7 Change Password in bConnected ........................................................................................................................... 7 What do you see when you first log into bConnected? ......................................................................................... 9 How to work your UnitedHealthcare Medicare Leads in bConnected................................................................. 10 New Leads List................................................................................................................................................... 10 Callbacks Queue................................................................................................................................................ 11 Search for a Contact in Your Book of Business ................................................................................................. 13 Contact Search .............................................................................................................................................. 13
Meetings & Appointments Tab......................................................................................................................... 14 Community Meetings Queue........................................................................................................................ 14 Appointments Queue.................................................................................................................................... 14
Calendar Tab ......................................................................................................................................................... 15 List Builder Tab...................................................................................................................................................... 15 Unresolved Activities Message ............................................................................................................................. 16 Managing Your Leads Using bConnected ............................................................................................................. 16 Opportunity Status ............................................................................................................................................... 16 Guidelines for Working a New Lead Throughout the Sales Process .................................................................... 17 New Lead – Appointment Request....................................................................................................................... 18 New Lead – Lead Reassigned................................................................................................................................ 19 New Lead – Inquiry (Fulfillment Requested) ........................................................................................................ 20 New Lead – Community Meeting ......................................................................................................................... 21 Closing a Lead at the End of the Sales Process..................................................................................................... 22 Closed/Won ...................................................................................................................................................... 22 Closed/Lost…..................................................................................................................................................... 23 Closed – Ineligible ............................................................................................................................................. 23 Closed – Duplicate ............................................................................................................................................ 23
Working From The Callbacks Queue..................................................................................................................... 24 Schedule or Reschedule a Callback Activity.......................................................................................................... 25 A Day in the Life of a UHG FMO Agent ................................................................................................................. 26

bConnected Terminology Welcome to bConnected! bConnected is a web‐based Lead Management system that will empower you manage your UnitedHealthcare Medicare sales leads efficiently and successfully. As you get familiar with the bConnected Lead Management tool, you will get to know some common terms associated with the system. Below you will find a guide to the most common terms and phrases used within bConnected. In the left column, the term is shown in bold with a brief definition; to the right you will see an image that illustrates the term(s) that are defined. (The remainder of this user guide follows this layout – description on the left, related illustrations on the right.)
New Leads Queue The section of the agent dashboard where your new leads are displayed. These leads have been recently assigned to you by a UHG MADE or a manager.
Callbacks Queue The section of the dashboard where all of your scheduled callback activities are listed.
Meetings List and Appointments List From the agent dashboard, go to the Meetings & Appointments tab. This screen shows you your scheduled Community Meetings and In‐Home Appointments.
UHG Confidential Page 2

Contact Record (aka Contact) Where basic caller information is stored, including Permission to Call.
Opportunity Record (aka Opportunity) Where sales activities and information is located. The Opportunity Recowhere applicant’s geographical informcan be found. This is althe place where all activities are schedulefor the app
rd is
ation so
d licant.
Primary Contact The Primary Contact is a person acting as a point of contact on behalf of an applicant. Example: Jane (primary contact) is the Authorized Representative for her mother (applicant). Primary Contact information is always located on the left side of the Opportunity Contact
UHG Confidential Page 3

Info page.
Applicant The applicant is the actual consumer to whom you are selling the product to. In the example above, the mother is the applicant. Applicant contact information is always located on the right side of the Opportunity Contact Info page.
In Progress Opportunity An Opportunity is In Progress while you are going through the sales process. An Opportunity remains In Progress until it has been closed by the agent.
Future Activity All Opportunities that are In Progress must have a future activity scheduled. An agent may not exit from a record unless a future activity is scheduled. The most common type of future activity is a callback.
UHG Confidential Page 4

Schedule Callback Button/Window Use the Schedule Callback button to schedule or reschedule a callback activity for a consumer. The Schedule Callback window is where you enter call data – date, time, and reason.
Available Plans List The available plans are listed on the Plan Compare/Enroll tab within the Opportunity Record.
iEnroll/eEnroll This term refers to electronic enrollment. Whenever possible, it is recommended that all agents use electronic applications. The electronic application can be accessed from within the Opportunity Record when you choose to enroll an applicant.
UHG Confidential Page 5

Disposition & Resolution There are two pick‐list menus located at the bottom of the Contact Record and Opportunity Record.
Disposition (left) – select the type of interaction you have completed
Resolution (right) – select the result of the interaction
The dispostion and resolution menus allow an agent to record the interaction they are having with the lead. This is required every time you access a Contact or Opportunity record.
UHG Confidential Page 6

Logon to bConnected Let’s get started! To begin using bConnected, open your internet browser and navigate to the web address provided in the instructions below. You should save this URL in your bookmarks/favorites for easy access in the future.
1. Open an internet browser window.
2. Copy and paste the following bConnected URL into the Address bar.
http://uhcmedicare.bconnected.com - Enter this URL directly into the address bar; do not search for bConnected using a search engine (i.e. Yahoo, Bing, or Google)
3. Press the Enter key on your keyboard.
4. The bConnected Welcome Screen is displayed, as shown to the right. To logon to bConnected, click on the Click Here to Log In hyperlink.
5. The bConnected login screen is displayed.
6. Enter your user name and
password into the User Name and Password fields.
7. Click the login button. Note: Your username will be provided by the bConnected System Administrator.
Change Password in bConnected 1. In the upper right‐hand
navigation bar, click on the Your Account menu. Click on the Change Password option.
UHG Confidential Page 7

2. The Change Password window is displayed. To change your password, enter your current password into the Old Password field.
3. Enter a new password into the New Password field.
4. To confirm your password, in the Confirm Password field, enter the new password again.
5. Click the Change button.
6. The bConnected Software prompt indicating your password was successfully changed.
Note: If you have trouble logging in, contact the Producers Helpdesk ([email protected]) or the MADE in your region.
UHG Confidential Page 8

What do you see when you first log into bConnected? Now that you have logged into the system, you can begin receiving new UnitedHealthcare Medicare leads. In this section of the guide, we’ve illustrated what you’ll see when you log into the system and how you will use each of these features.
1. Menu bar. This is where you can see your demographic data, change your password, see useful links, and
get the latest copies of our user’s guide & tipsheets. 2. View Contact History will show you which leads you viewed in the system on any given day. 3. Search for leads in your book of business. You can only search for leads that you own. 4. These are our system announcements. We post release information, system errors, and other helpful
information. 5. The New Leads list is where you will see the new leads that are given to you by your MADE or local sales
manager. 6. The Callback Queue is where you will “work” your leads to show that you do not have any overdue tasks. 7. The Meetings & Appointments tab will show you your upcoming home visits and community meetings.
This is where you can see your community meeting rosters—people who RSVP to your meetings if you have public meetings with United Healthcare Medicare.
8. The calendar tab is another view of your meetings, appointments, and callbacks, together in one list. 9. List Builder is where you can build reports to view your book of business. This tool is very helpful for self‐
managing your performance, but it can be overwhelming, so we are limiting our training on this piece.
UHG Confidential Page 9

How to work your UnitedHealthcare Medicare Leads in bConnected Now that you’ve gotten an introduction to bConnected, let’s discuss how to work your UnitedHealthcare Medicare leads using the system. New leads are displayed in the New Leads list so that you can quickly and easily see them. Use the information in this section to learn what you need to do when you receive new leads.
New Leads List
Remember to check your New Leads list every day. Leads should be acknowledged and followed up on as soon as possible so that you can build a great relationship with the consumers. You have 2 business days to acknowledge the leads being given to you. If you do not acknowledge them, they are in jeopardy of being given to another agent.
1. Left‐click once on this checkbox to mark the lead for acknowledgement. This lets us know that you are aware that we gave you the lead and you are going to work it. Each new lead shows you why you got the lead, the products, permission to call, and the consumer’s name. Note that the date is red in this example. This means that the lead was not ackowledged within the 2 business day timeframe. If it is green, you are within the timeframe to acknowledge the lead.
2. After you mark the checkbox(es) for the leads you are agreeing to work, click the Acknowledged Checked button to acknowledge the lead(s).
3. If you changed your mind on accepting the leads and want to clear the checkboxes, click the Reset Checked button.
That is all you need to do to acknowledge your new leads in the New Leads list.
UHG Confidential Page 10

Callbacks Queue
Every new lead has a scheduled callback associated to it. The Callbacks Queue is where you will work your leads. By working the callbacks from this list, you will demonstrate that you are keeping up with the tasks associated to your leads. This list shows that you have future tasks assigned with each of your leads and that you are dedicated to the sale. The Callbacks Queue is designed to set you up for success and to help you effectively manage your leads. Each call is listed with a due date that is color‐coded, the consumer’s name, phone number, PTC, how the lead was generated, and the activity type that the callback is scheduled for. Below you can learn about each of these components in detail.
1. The color of the due date shows if the callback (activity) is overdue, current, or due in the future a. Red = Overdue, you should double‐click (click twice) on the lead to open the opportunity and
call the consumer b. Green = Due today c. Black = Future callback
2. Remember to look at the permission to call (PTC). The callback queue will show you the permission to call. It needs to be Yes in order for you to call the prospect.
3. Source of the Lead tells you how United Healthcare Medicare obtained the lead. FS Lead is a self‐generated lead. Inbound call means they called us.
4. You can filter the callback list by the options listed. 5. The Activity Type provides insight to why the callback is scheduled and the next step with the lead—
was the lead reassigned to you by your MADE; did we sent the consumer a fulfillment item and they need to be called upon to verify receipt/see if they have questions; or did this consumer ask to attend a community meeting (CM RSVP) or have an in‐home appointment (Appointment Request).
To show that you’ve completed a callback activity, double‐click the line item for the person you called. You will need to dispostion the call by selecting Outbound Call in the lower left with the appropriate disposition. This process is described in detail in the Working From the Callbacks Queue section of this guide. NOTE: When you open a callback from the Callback queue, you will be taken to the Contact Record. The system will automatically load the associated Opportunity where the callback activity is scheduled. You need to open that opportunity to say you have made the outbound call. See image below.
UHG Confidential Page 11
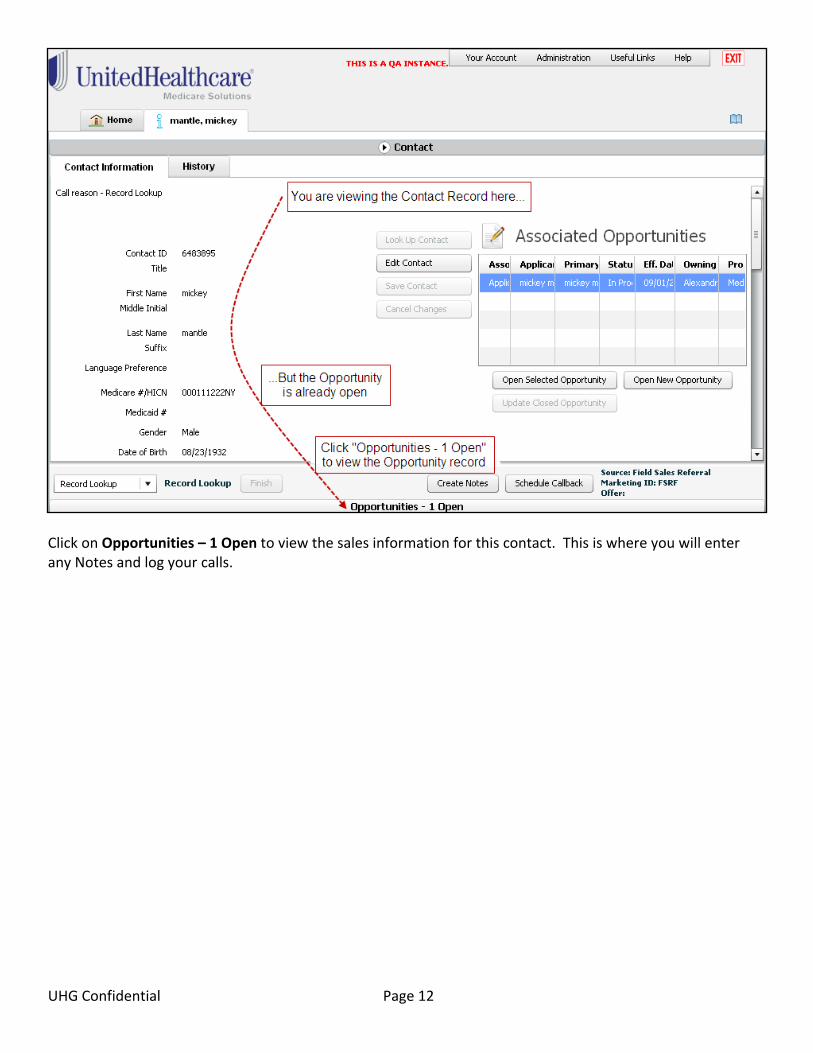
Click on Opportunities – 1 Open to view the sales information for this contact. This is where you will enter any Notes and log your calls.
UHG Confidential Page 12

Search for a Contact in Your Book of Business
Now that you’re familiar with the primary parts of the system that you will use, let’s explore the other features. You can search the system for any of the leads that you own using the search fields located on the left side of the agent dashboard. You can search for a lead by the consumer’s name, Medicare#/HICN, DOB, State, County, or zip code or the unique contact ID associated to the consumer.
UHG Confidential Page 13
Contact Search
To search for a contact by Agent Book of Business Search Criteria Tips:
Contact ID
First Name (minimum three characters)
Last Name (minimum three characters)
Medicare # / HICN
State
ZIP Code Note: Not all sections of the dashboard pertains to all FMO user roles.

Meetings & Appointments Tab
The Meetings & Appointments tab shows lists of your Community Meetings and Appointments. The Community Meetings list can be viewed by date or a range of dates and the Appointments list can be filtered using the options in the “Filter by” drop‐down menu. Both lists can be printed.
Community Meetings Queue
View community meetings associated with an agent schedule.
Meeting Venue
Date and time of the meeting
Number of attendees
Meeting Status and owner
Print the Community Meetings list by clicking the Print button located to the upper‐right of the list
View the meeting roster by double‐clicking on the meeting in the list
Note: Not all sections of the dashboard pertains to all FMO user roles.
Click the Calendar icon to select a date or a range of dates The default view is today
To view a range of dates, click the calendar icon, on the calendar displayed left‐click to select a beginning date, press and hold the Shift key on your keyboard, then left‐click to select the end date. Click OK.
The selected date range is shown as illustrated in the image below
Appointments Queue
View in‐home appointments associated with an agent schedule.
Date and time of the appointment
Date the appointment lead was Assigned On
Agent who owns the appointment
First name & last name of the consumer
Filter the list using the “Filter by” options or Print the Appointments list using the Print button (located to the upper‐right of the list)
Note: Not all sections of the dashboard pertains to all FMO user roles.
UHG Confidential Page 14

Calendar Tab The Calendar tab provides a list of all bConnected activities associated with an agent’s schedule – callbacks, appointments, and meetings. The calendar is not interactive, activities can be viewed here but you cannot interact with the leads from this tab.
The Calendar tab provides a “comprehensive look” at all Activities by type, date or range of dates.
Activities cannot be worked from within the Calendar.
Similar to the Community Meetings list discussed in the previous section, you may view a single date or range of dates. Click the Calendar icon to change the view.
Note: Not all sections of the dashboard pertains to all FMO user roles.
List Builder Tab The List Builder tab provides access to the List Builder tool. List Builder is a means of monitoring your performance as you have used bConnected. You can access reports saved by the administrator or a manager or set filters to create your own report (i.e. Closed/Won leads).
Ability to utilize canned reports, which may be defined by the administrator and or manager, defines ad‐hoc reports, and chooses specific fields when list results are returned.
Ability to report on community meeting details
Note: Not all sections of the dashboard pertains to all FMO user roles.
UHG Confidential Page 15

Unresolved Activities Message All Contact and Opportunity records must be properly resolved when you are finished viewing the record. This is done by selecting the appropriate Disposition and Resolution (defined in bConnected Terminology) then clicking the Finish button. If this is not done, then the next time you log into bConnected, you will see a grid showing the lead(s) you were last working with when you exited the system. This protects you in the event that you unintentionally exit the system while working. You must revisit the lead(s) listed here and properly resolve each record before you can continue.
If the agent logs out of bConnected before completely dispositioning a record, the unresolved activities screen will appear upon the agent’s next login.
The contact record must be accessed and dispositioned before proceeding to the Agent Dashboard.
Managing Your Leads Using bConnected You now know how to acknowledge the new leads that you receive from UnitedHealthcare and how to follow up on each lead using the Callbacks Queue. The next section provides the steps you will take to work your leads through the sales process. Also in this section are guidelines you should follow to ensure success with your UnitedHealthcare Medicare leads.
When you have worked a lead through the sales process the Opportunity will end up in a closed state. Every Opportunity must be closed by the end of a selling season, whether it has been won, lost, or closed due to ineligibility. You can use the chart below as a reference to the closed statuses.
Opportunity Status New leads are In Progress until the sales process has been completed. As the sales process is completed, a sales opportunity may result in any of the following resolutions:
o Closed/Won – Ensure HICN and Requested Effective Date are accurate; proceed with enrollment o Closed/Lost, Closed‐Ineligible or Closed‐Duplicate
- Closed/Won The applicant is enrolled, this status is automatically set by the system upon enrollment activity
- Closed/Lost – Benefits/Network/Cost/PTC=No The sales lead was lost due to cost, benefits, network, or because you are unable to contact the consumer
by any means – including a lack of Permission to Call (PTC=No) - Closed – Ineligible When a prospect is not qualified and cannot enroll for reasons such as age, geographic location, ESRD, or
lack of Medicare A or B. - Closed – Duplicate The opportunity is closed because the applicant has an existing opportunity
UHG Confidential Page 16

Guidelines for Working a New Lead Throughout the Sales Process Here you’ll find a scenario‐based guide on what to do with a new lead, from the point of receipt throughout the sales process. Depending on the type of activity that is associated with a lead, you will take different steps in the system to acheive a positive consumer experience and successful sale. All new leads have an In Progress Opportunity; begin with the In Progress Opportunity and complete the activities with the consumer. Then, update the Opportunity Record and select the correct disposition and resoslution to close the lead.
Here are some basic guidelines and rules to keep in mind while you manage your UnitedHealthcare Medicare leads in bConnected:
Rules for Lead Management All new leads on the agent’s dashboard
are considered In Progress. New leads must be acknowledged within 2 business days of receipt.
As shown in the image to the right, it is required for all agents to have a scheduled future activity for all In Progress leads. (This is also mentioned in bConnected Terminology)
Agents are to keep all In Progress opportunities updated throughout the sales process.
New marketing‐generated leads for each sales period (AEP, OEP, SEP) are to be sold or closed within the selling period.
All sales must be entered in bConnected. Agents are expected to use electronic enrollment unless paper application is the only option.
Sales Managers will reassign (sweep) leads to another field agent or channel, or will adjust routing rules if the following guidelines are not followed.
GUIDELINES FOR SUCCESSFULLY MANAGING IN PROGRESS LEADS
1. Acknowledgement of new leads as soon as possible, remember that this must occur within 2 business days
Same‐day appointment requests must be called within 3 hours of notification If this is not possible, agent should notify sales manager immediately
so that the lead can be reassigned appropriately
Follow‐up and complete all open Activities based on the due date and activity type Request for Appointment – call schedule specific date and time
(system sets callback 2 business days from request) Community Meeting RSVP – confirm attendance (system sets callback
2 business days from request) BRC – confirm receipt of information and move to next step of selling
process (system sets callback 2 business days from request) Inquiry Leads (fulfillment requests and generic opportunities) –confirm
receipt of information and move to next step of selling process (system sets callback 7 business days from request)
Always make sure PTC=YES before making any calls (it can change daily) 2. Every In Progress opportunity must have a future activity scheduled.
Keep up with scheduled callbacks, complete them before they become overdue
Where appropriate, reschedule a callback or schedule a new one 3. If a meeting or in‐home appointment exist on an opportunity and the event has been completed, the opportunity record should be updated to reflect this
A Community Meeting and In‐home Appointment cannot exist simultaneously on an Opportunity Record, one activity must be completed or cancelled before a new one may be scheduled
UHG Confidential Page 17

New Lead – Appointment Request When a new lead is received and the activity associated to that consumer is an Appointment Request, the agent must call the consumer to confirm the appointment and set a date and time for the in‐home visit. Here are the steps to follow when you receive an Appointment Request new lead.
1. A new lead is displayed in the New Leads queue, the Activity Type is “Appointment Requested”
Acknowledge the new lead (see New Leads list)
2. Complete the scheduled activity from the Callbacks queue
Double‐click the callback to open the Contact and Opportunity record (see Callbacks Queue and Working from the Callbacks Queue)
3. Once the record has loaded (see Note within the Callbacks Queue section), view the Opportunity record and go to the Appointments tab
Update the appointment request to reflect the scheduled date and time as agreed upon with the consumer.
4. The Date and Time are populated in the Appointment Requests grid and the Status is now Appointment Confirmed
5. Disposition the lead as “Outbound Call” and select the appropriate Resolution (see bConnected terminology for more information on Disposition/Resolution)
– Left‐click on the appointment to select it
– Click the “Reschedule Appointment” button; in the pop up window displayed select a date and time, then click Commit
UHG Confidential Page 18

New Lead – Lead Reassigned When a new lead is received by an agent as a result of a manual reassignment completed by a manager, the agent must reach out to the consumer to initiate the relationship and proceed to the next step in the sales process. Here are the steps to follow when you receive a new lead where the Activity Type is Lead Reassigned.
1. A new lead is displayed in the New Leads queue, the Activity Type is Lead Reassigned
Acknowledge the new lead (see New Leads list)
2. Complete the scheduled activity from the Callbacks queue
Double‐click the callback to open the Contact and Opportunity records (see Callbacks Queue and Working from the Callbacks Queue)
You are making contact with the consumer to introduce yourself and engage them in the sales process
– Read the Notes associated to the Opportunity to obtain useful information about this consumer’s needs
– Proceed through the sales process; arrange an Appointment, Community Meeting, or a future callback with the consumer
UHG Confidential Page 19

New Lead – Inquiry (Fulfillment Requested) 1. A new lead is displayed in the New Leads queue, the Activity Type is “Inquiry”
Acknowledge the new lead (see New Leads list)
2. Complete the scheduled activity from the Callbacks queue
Double‐click the callback to open the Contact and Opportunity record (see Callbacks Queue and Working from the Callbacks Queue)
You are making contact with the consumer to introduce yourself and engage he/she in the sales process
– Read the Notes associated to the Opportunity to obtain useful information about this consumer’s needs
– View the Fulfillments tab within the Opportunity to review the fulfillment order that was placed
3. Proceed through the sales process; arrange an Appointment, Community Meeting, or a future callback with the consumer
UHG Confidential Page 20

New Lead – Community Meeting 1. A new lead is displayed in the New Leads queue, the Activity Type is “CM RSVP”
Acknowledge the new lead (see New Leads list)
2. Complete the scheduled activity from the Callbacks queue
Double‐click the callback to open the Contact and Opportunity record (see Callbacks Queue and Working from the Callbacks Queue)
3. Once the record has loaded (see Note within the Callbacks Queue section), view the Opportunity record and go to the Meetings tab
View the Meeting Info for the event that the consumer is registered for
4. Complete the outbound call; you are contacting the consumer to introduce yourself and begin the sales process by verifying that the consumer will attend the meeting
5. Disposition the lead as “Outbound Call” and select the appropriate Resolution (see bConnected terminology for more information on Disposition/Resolution)
UHG Confidential Page 21

Closing a Lead at the End of the Sales Process After you have completed all steps in the sales process with the consumer, the Opportunity is eventually closed. All sales must be entered in bConnected thus closing the Opportunity as Closed/Won. In the event when a consumer does not enroll, the opportunity is closed for the appropriate reason – the sale was lost, the consumer was ineligible, or after exhausting all means of communication, the consumer was not responsive. Please use the chart below as a guide when closing opportunities.
Closed/Won An Opportunity is Closed/Won when the applicant has been enrolled. This status is not a pick‐list option in the Resolution menu, rather it is automatically set by the system upon enrollment actions being taken, please see the steps below: 1. When an applicant is ready to enroll,
the enrollment should be completed in bConnected
2. Go to the Plan Compare/Enroll tab within the Opportunity Record to view the available plans and select a plan for enrollment a. Note the plan icon by each available
plan b. Where the PDF icon is available, in
the Plan Overview column, you can click to view more info on this plan
3. Click the Enroll button for the plan in which you are enrolling the applicant a. The Enrollment Method popup
window is displayed – complete the selections then click Continue i. If you elect to launch the
electronic application now, the iEnroll application will be opened in a new browser window; complete the application
ii. If you choose a paper application or chose to submit the application through iEnroll offline, then you will be directed back to the Plan Compare/Enroll tab within the Opportunity Record
‐Disposition the Opportunity to exit from the record ‐The Opportunity Status will be automatically updated to show Closed/Won
UHG Confidential Page 22

Closed/Lost… An Opportunity is Closed/Lost when the sales lead is lost due to a specific reason as defined by the applicant or due to circumstance; an opportunity is Closed/Lost due to cost, benefits, network, or lack of PTC. When an eligible applicant’s opportunity cannot be worked to an enrollment because of any of the reasons listed above, the applicable Resolution should be selected as shown to the right ‐
All associated activities for that Opportunity will be cancelled
Associated callbacks will drop off of the Callbacks Queue
The Closed – Lost… resolutions are available for these types of dispositions – Outbound Call, Inbound Call, or Face to Face Visit.
Closed – Ineligible An Opportunity should be Closed – Ineligible when a prospect is not qualified and cannot enroll for reasons such as age, geographic location, ESRD, or lack of Medicare A or B. The Closed – Ineligble resolution is available for any type of disposition selected, for example Outbound Call, Inbound Call, Face to Face Visit, or Record Lookup.
Closed – Duplicate An Opportunity is Closed as a duplicate when another opportunity for that applicant already exists. An example is if there are duplicate Contact Records for a prospect and opportunities are present on all Contact Records, the Opportunities on the duplicate(s) Contact Records should be resolved as Closed‐Duplicate. This Resolution is available when a Record Lookup is performed as shown to the right –
UHG Confidential Page 23

Working From The Callbacks Queue Callbacks have a designated activity type associated to the reason for the callback. After new leads have been acknowledged, work from the activities in the callbacks queue. Callback activities should be worked according to the following priority:
1. Appointment Requested 2. CM (Community Meeting) RSVP 3. Lead Reassigned 4. Callback Scheduled
Each callback activity is assigned a due date. The due dates are in the left‐most column of the queue and are color‐coded.
Red = Overdue Green = Due today Black = Due in the future
Work each activity from the queue when completing the outbound call to the consumer; all callbacks must be resolved in this way. Once a callback has been worked to completion, it will no longer appear in the queue. All calls should be completed before they become overdue.
To complete a callback activity: 1. Double‐click the callback that you are working from the queue a. This will open the lead record b. Notice the Call Reason that
populates in the upper‐left corner of the Contact Record
2. After completing the outbound call to the consumer, disposition the record by setting the accurate disposition and resolution, then click Finish a. Select the Resolution that is
appropriate for the result of the outbound call
b. The Contact Record must also be dispositioned; set the appropriate disposition/resolution on the Contact Record as applicable to the selections made on the Opportunity Record
UHG Confidential Page 24

Schedule or Reschedule a Callback Activity To schedule a callback:
Click the Schedule Callback button at the bottom right of the Opportunity record.
Enter the date and time of the call, as well as the Reason for the callback
To reschedule a callback:
Click the Existing Calls dropdown menu and select the call you wish to change and change as necessary
Click Commit
UHG Confidential Page 25
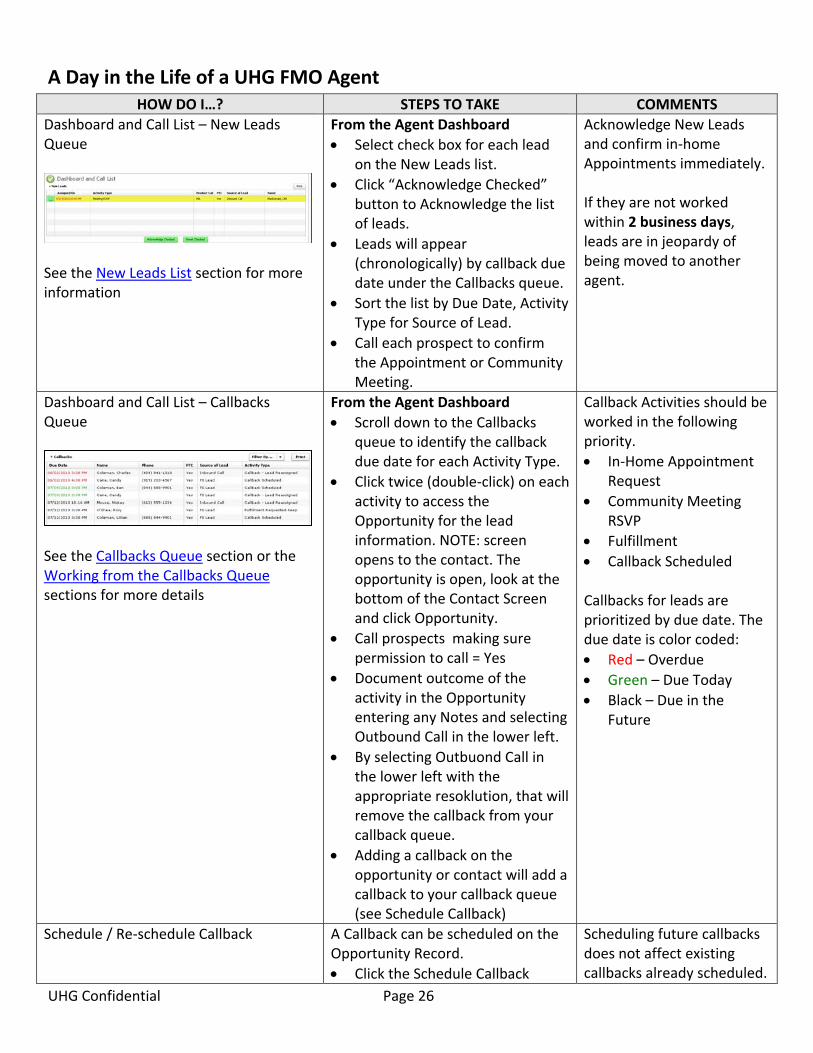
A Day in the Life of a UHG FMO Agent HOW DO I…? STEPS TO TAKE COMMENTS
Dashboard and Call List – New Leads Queue
See the New Leads List section for more information
From the Agent Dashboard
Select check box for each lead on the New Leads list.
ity
Click “Acknowledge Checked” button to Acknowledge the list of leads.
Leads will appear (chronologically) by callback due date under the Callbacks queue.
Sort the list by Due Date, Activity Type for Source of Lead.
Call each prospect to confirm the Appointment or CommunMeeting.
Acknowledge New Leads and confirm in‐home Appointments immediately. If they are not worked within 2 business days, leads are in jeopardy of being moved to another agent.
Dashboard and Call List – Callbacks Queue
See the Callbacks Queue section or the Working from the Callbacks Queue sections for more details
From the Agent Dashboard
Scroll down to the Callbacks queue to identify the callback due date for each Activity Type.
Click twice (double‐click) on each activity to access the Opportunity for the lead information. NOTE: screen opens to the contact. The opportunity is open, look at thbottom of the Contact Screenand click Oppo
e
rtunity.
ur queue.
Future
Call prospects making sure permission to call = Yes
Document outcome of the activity in the Opportunity entering any Notes and selecting Outbound Call in the lower left.
By selecting Outbuond Call in the lower left with the appropriate resoklution, that will remove the callback from yocallback
Adding a callback on the opportunity or contact will add a callback to your callback queue (see Schedule Callback)
Callback Activities should be worked in the following priority.
In‐Home Appointment Request
Community Meeting RSVP
Fulfillment
Callback Scheduled Callbacks for leads are prioritized by due date. The due date is color coded:
Red – Overdue
Green – Due Today
Black – Due in the
Schedule / Re‐schedule Callback
A Callback can be scheduled on the Opportunity Record.
Click the Schedule Callback
Scheduling future callbacks does not affect existing callbacks already scheduled.
UHG Confidential Page 26

See Schedule or Reschedule a Callback Activity for more information
button at the bottom right of the Opportunity record.
Enter the date and time of the call, as well as the Reason for the callback
If re‐scheduling an existing callback, click the Existing Calls dropdown menu and select the call you wish to change and change as necessary
Click Commit
Note: If there are other callbacks already scheduled for this opportunity, when you open the callback window, they will appear at the top in the drop down.
Review Community Meeting Roster See the Community Meetings Queue section for more information on the Meeting Roster
Select Meetings & Appointments Tab
Double‐click on the community meeting event
This will open the roster so you can view.
Print Roster
If the RSVP count does not match the number of people on the list, it could be due to someone brining a guest.
Online Electronic Enrollment via bConnected See the Guidelines for Managing Your Leads…section for more information
From the Agent Dashboard
Search for or double‐click on the Callback Queue to access the Opportunity information.
Select Needs Assessment tab to ensure the consumer is qualified.
Select Plan Comparison tab.
Select Enroll button fo
r the
ool. For example, Online
cooresponding plan.
Proceed with an electronic enrollment using the eEnroll Online teEnroll.
Refer to these instructions when updating an Opportunity and processing an electronic application in bConnected at the same time.
Close/Won a Lead
f the Also see, Closing a Lead at the End o
UHG Confidential Page 27
Sales Process for more information
the
lified ng the required
r the
y
ample, Paper or Offline iEnroll.
uctions
as been
s for a
e
all this on
From the Agent Dashboard
Search for or double‐click on theCallback Queue to access Opportunity information.
Select Needs Assessment tab to ensure the consumer is quaby answeriquestions.
Select Plan Comparison tab.
Select Enroll button fo
cooresponding plan.
Proceed in bConnected bdocumenting the type of enrollment taken. For ex
Refer to these instrwhen updating an Opportunity after anelectronic or paper application hcompleted. Required fieldClosed/Won:
Requested EffectivDate
Medicare ID/HICN
Date of Birth If you do not havethe Applicant, you will need

UHG Confidential Page 28
o Tab. Applicant it
to enter it on the opportuntiy under the Contact Infis on the right side. Click EdApplicant.
Within an Opportunity Record
In the lower right‐han
Create a Note on an Opportunity
d corner of
button.
Save button.
tered and at any point while
Notes can not be edited or deleted from history.
an Opportunity record, click Create Notes
Type in a note and click the
View from the History Tab
Notes can be eneditedthe record is open.
Disposition a Record Also see, Closing a Lead at the End of the Sales Process and bConnected Terminology for more information
f
ailable
l,
the the
resolutions change based upon selected Disposition.
n. Also, r to the
Help menu for the Disposition Guide.
Within an Opportunity Record
In the lower left‐hand corner oan Opportunity record, click aDisposition from the avdropdown list of options. Forexample, Inbound CalOutbound Call, Face‐to‐Face Visit, Record Lookup.
In the next dropdown list toright, click a Resolution fromavailable dropdown list of options. Notice how the
Please contact your MADE for more informatioin bConnected refe