
FLP 3000-X GB.cdr:CorelDRAW - ProjectorCentral Projector User's Manual FLP 3000-X SAGEM SA - Siège...
20
LCD Projector User's Manual FLP 3000-X SAGEM SA - Siège social : Le ponant de Paris - 27, rue Leblanc – 75512 PARIS CEDEX 15 - FRANCE Société anonyme à directoire et conseil de surveillance au capital de • 33 300 000 – 562 082 909 R.C.S. PARIS
Transcript of FLP 3000-X GB.cdr:CorelDRAW - ProjectorCentral Projector User's Manual FLP 3000-X SAGEM SA - Siège...

LCD Projector
User's Manual
FLP 3000-X
SAGEM SA - Siège social : Le ponant de Paris - 27, rue Leblanc – 75512 PARIS CEDEX 15 - FRANCESociété anonyme à directoire et conseil de surveillance au capital de • 33 300 000 – 562 082 909 R.C.S. PARIS

© 2002 . All rights reserved
Reproduction is any manner whatsoever without the written permission of SAGEM SA is strictly forbidden.Informations in this document is subject to change without notice.
Trademarks used in this user-guide: SAGEM and the SAGEM logo are trademarks of SAGEM SA ; Apple,Macintosh and PowerBook logo are trademarks of ; Microsoft, Windows logo aretrademarks of ; DLP (Digital Light Processing), Texas Instruments logo are trademarksof .
Others trademarks and trade names may be used in this document to refer to either the entities claiming themarks and names or their products.SAGEM SA disclaims any proprietary interest in trademarks and trade names other than its own.
SAGEM SA
Apple Computer, Inc.Microsoft Corporation
Texas Instruments Corporation
Important Safety Notice...............................................................01
Accessories.................................................................................02
Parts of the Projector...................................................................03
Installation...................................................................................04
Connections................................................................................05
Basic Operation...........................................................................08
Using the Remote Control...........................................................11
Menu Operation (OSD)...............................................................12
Troubleshooting (Indicators).......................................................15
Cleaning and Replacing the Air Filter..........................................15
Replacing the Lamp Unit.............................................................16
Specifications..............................................................................17
Contents

Please use the carrying case to carry this unit and make surethe lens is protected with lens cap.Do not subject this unit to strong mechanical shock.
Only use the appropriate batteries, according themanufacturer specifications (see "Specifications" section inpage 17). The provided batteries are notre chargeable.Bringback the defective or empty batteries to your localwaste disposal in accordance with the current regulations.Do not throw of used batteries in the dustbin.
WARNING
IMPORTANT SAFEGUARDS
INSTALLATION
Do not place the unit in direct sunlight, near heaters orheat radiating applications.Do not expose this unit to dust, smoke or steam whichmay harm internal components.Handle the unit carefully. Dropping or jarring maydamage internal components.Do not place heavy objects or liquids on the top of theunit. Spilled liquids may cause damage.Do not
The ceiling must be strong enough to support the unit andthe installation must be in accordance with any local build-ing codes. The unit must be installed by qualified servicepersonnel.
INSTALLATION ON THE CEILING
push objects of any kind through openings of thisprojector as they may touch dangerous voltage points orshort-out parts that could result in a fire or electric shock.Do not use this projector near water or in contact with water.Do not use the unit while the temperature is high or variesgreatly. The unit must be used at environment temperaturebetween 5 C (41 F) and 35 C (95 F).
POWER SUPPLY
This unit is designed to operate on a power supply of100~240VAC, 50 - 60 Hz.Be sure that your power supply fits the above requirementbefore attempting to use the unit.
Before disconnecting the power cable, make sure youhave followed the shut-off procedure.Disconnect the power cable from the power outlet afterusing the unit.
If you are not sure of the type of power, please consultyour appliance dealer or local power company.
CLEANING
Make sure to unplug the power cable before cleaning.Do not use water, liquid aerosol cleaners, strong detergentsor solvents such as alcohol. Please use damp cloth and wipeon the cabinet gently.Use a blower or lens paper to clean the lens. Be careful notto scratch or mar the lens.Use a vacuum cleaner to clean periodically theventilation slots and speaker grills or change the air filter(see p15). Accumulated dust on the ventilation slots maycause the unit over-heated and lead to malfunction.
CARRYING AROUND
LAMP REPLACEMENT
Under normal usage, the life time of lamp is about 1500hours. The output luminance will drop as lamp lifediminishes. User can check the lamp life status in theMENU of projector.Change the lamp cartridge when the brightness is no moreacceptable (see p16 for instruction).
CAUTION
Do not put your hand or any object near the ventilation slots because the air is hot.
Do not look into the lens while the unit is operating. Strong light may cause harm to your eyes.
Do not block ventilation openings to prevent inside components from overheating.
WARNING
Handle the power cable carefully and avoid excessive bending. A damaged cable may cause electric shock or fire.
Do not expose this unit to rain or moisture to prevent fire or shock.
Do not open the cabinet to avoid electrical shock. Refer all servicing to qualified service personnel.
1
IMPORTANT SAFETY NOTICE
PRECAUTIONS
Please read this manual carefully before using the projector and keep this manual handy for future reference.

Video cable(1.8m / 6.0ft)
+
COX-02
R
FREEZE
VOLUME ZOOM
L
AUTOMUTE
LASER
ENTER
POWER
ESC
SOURCE MENU
U
D
L R
2
AAA battery x 2
ACCESSORIES
Remote control and batteries
User's manual
VGA cable(1.8 m / 6.0ft)
AC power cable(1.8m / 6.0ft)
S-Video cable(1.8m / 6.0ft)
DVI cable(1.8m / 6.0ft)
Component YCbCr/YPbPr cable(1.8m / 6.0ft)
<Not supplied as standard accessories>
LCD Projector
User's Manual
FLP 3000-X
Audio cable(1.8m / 6.0ft)
USB mouse cable(1.8m / 6.0ft)

Lens
Lens Cover
Exhaust Vents
Adjuster LegMain Power Switch
Power Input Socket (AC IN)
Handle
Remote Sensor( Front )
Speaker
Focus Ring
Zoom Ring
Adjuster Legs
Air Filter
Lamp Cover
Video
S-Video
Audio
Y
Cb/Pb
Cr/Pr
DVI-D
RGB out
Rs232 USB
RGB in 2
RGB in 1
Remote Sensor( Rear )
Cooling Fans and Ventilation Slot
* Connector Panel
Power
Source
Keystone
Auto
Menu
Esc
Volume
Lamp Temp
Enter
* Control Panel and Indicators
Front, Side, and Top
Bottom Rear
3
PARTS OF THE PROJECTOR

4
INSTALLATION
<NOTE!> Please read the important safety notice(p1) carefully before installation.
Please place the unit on a solid plat level surface.
Positioning
Projection distance and image size
The distance from projector lens to the screen willdetermine the size of the projected image. Themaximum image size is about 282 ~ 366 inchesdiagonally at a distance of 15 meter.
Please refer to the table below for the image sizeprojected.
* "Wide" and "Tele" means the maximum and minimumimage size diagonally at the same distance by adjustinglens to zoom.
* Please do not place any object near the ventilation
slots of the projector within 30cm distance.
* Please prevent any scraps or lint suck into ventilation
slots or use the projector in the dusty environment.
* Please do not operate the projector while the ambient
temperature or the humidity is too high.
* Please use the projector at plate level and use the
adjuster legs to adjust the height. Do not operate
the projector upside down or at an inclined level.
This may damage the projector.
Ventilation
* The ceiling mount is an optional accessory.
Please contact qualified service personnel or agent
for further information or service.
* The projector can be installed on the ceiling for
education, conference and home entertainment
applications.
Ceiling installation
1
2
3
4
5
6
7
8
9
10
11
12
13
14
15
24
48
72
97
121
146
170
195
219
244
268
293
317
341
366
18
37
56
74
93
112
131
150
169
187
206
225
244
263
282
Projection Distance Image Size (Diagonal)
(M) Tele (inch)Wide (inch)
Video
S-Video
Audio
Y
Cb/Pb
Cr/Pr
DVI-D
RGB out
Rs232 USB
RGB in 2
RGB in 1
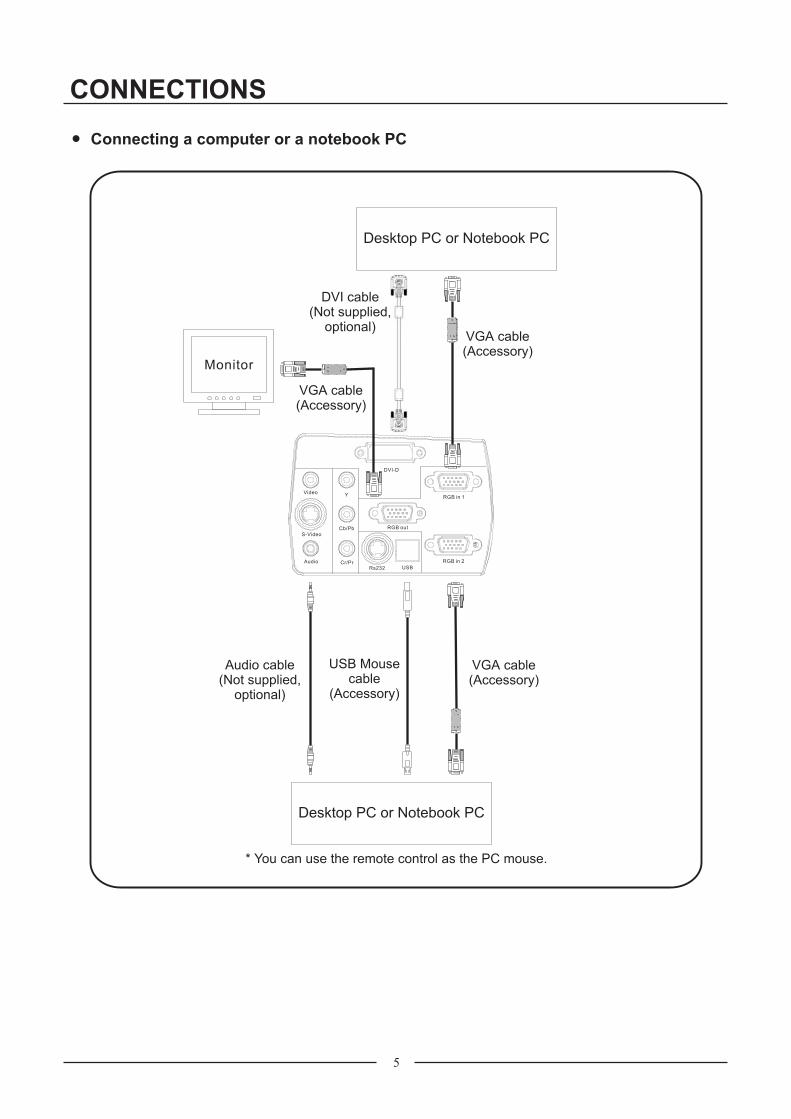
Monitor
5
USB Mousecable
(Accessory)
Audio cable(Not supplied,
optional)
DVI cable(Not supplied,
optional)
CONNECTIONS
Connecting a computer or a notebook PC
* You can use the remote control as the PC mouse.
Desktop PC or Notebook PC
Desktop PC or Notebook PC
VGA cable(Accessory)
VGA cable(Accessory)
VGA cable(Accessory)

6
Connecting video equipments
* Connecting a VCR/VCD/DVD player, digital camcorder by using a composite video cable
Composite video images
Composite video cable(Accessory)
Audio cable(Accessory)
VCR/VCD/DVD playerDigital camcorder
L RAudio
VIDEOVideo
S-Video
Audio
Y
Cb/Pb
Cr/Pr
DVI-D
RGB out
Rs232 USB
RGB in 2
RGB in 1
* Connecting a VCD/DVD player, digital camcorder by using a S-Video cable
S-Video images
S-Video cable(Not supplied, optional)
VCD/DVD playerDigital camcorder
Audio cable(Accessory)
S-VIDEOL RAudio
Video
S-Video
Audio
Y
Cb/Pb
Cr/Pr
DVI-D
RGB out
Rs232 USB
RGB in 2
RGB in 1

7
* Connecting a DVD player by using a component video cable (YCbCr/YPbPr)
Component images: YCbCr/YPbPr
Component YCbCr/YPbPr cable(Not supplied, optional)
DVD player
Audio cable(Accessory)
Y Cb/Pb Cr/PrL RAudio
Video
S-Video
Audio
Y
Cb/Pb
Cr/Pr
DVI-D
RGB out
Rs232 USB
RGB in 2
RGB in 1

R
FREEZE
VOLUME ZOOM
L
AUTOMUTE
LASER
ENTER
POWER
ESC
SOURCE MENU
U
D
L R
Video
S-Video
Audio
Y
Cb/Pb
Cr/Pr
DVI-D
RGB out
Rs232 USB
RGB in 2
RGB in 1
Power
Source
Keystone
Auto
Menu
Esc
Volume
Lamp Temp
Enter
VGA1
VGA2
YPbPr
DVI
VIDEO
S-VIDEO
YCbCr
--SOURCE SELECT--
1 4
6
2
5 ON
I
0
3
Power On
8
BASIC OPERATION
1. Remove the lens cover.
2. Connect a computer or video equipment to the projector.
3. Connect the power cord, and turn on the MAIN POWER switch.
4. Press the POWER button.
5. Turn on the connected input source.
6. Press the SOURCE button to select the input signal.
The three indicators will flash once together, and the POWER indicator will light RED.
The POWER indicator will flash GREEN for a while, and then light steadily.
Input Source
RGB-in 1, 2 (VGA 1, 2)
Video (Composite video images)
S-Video (S-Video images)
YCbCr (Component images)
YPbPr (Component images)
Video Equipment
Computer
VCR/VCD/DVD PlayerDigital Camcorder
DVD PlayerSet-top-box
: Select
or Enter : Confirm
POWER
SOURCE
POWER indicator
9
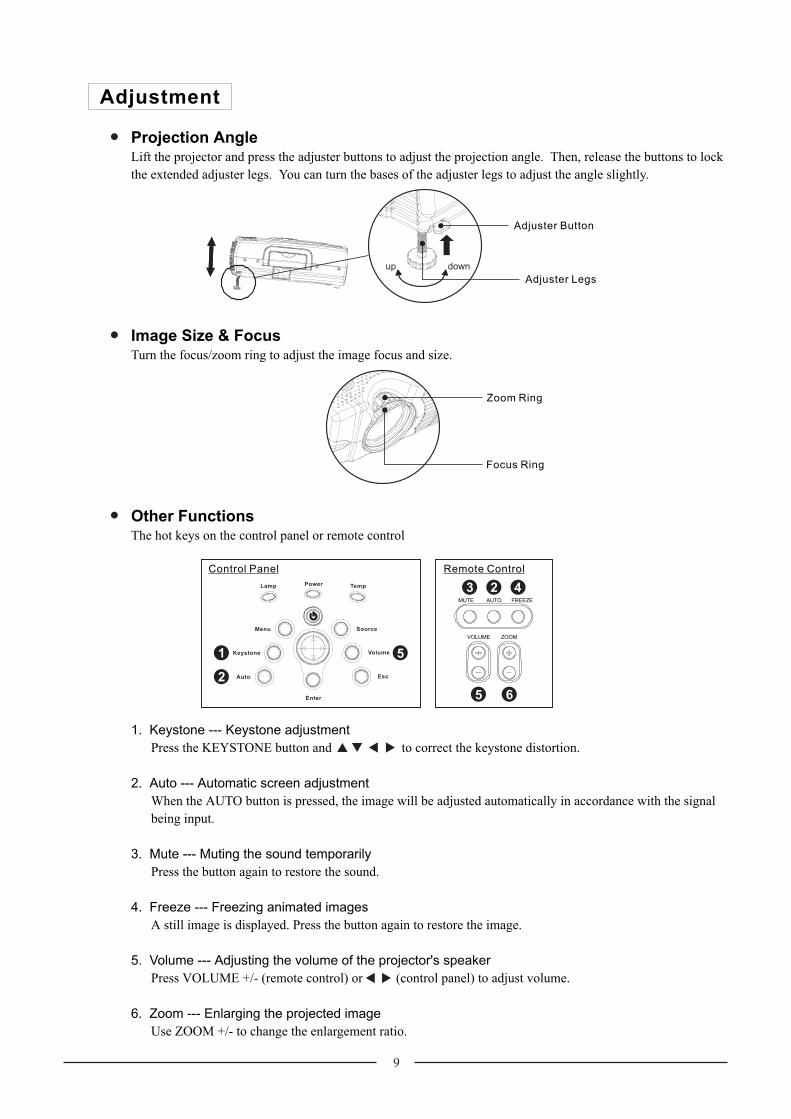
Adjustment
Projection Angle
Image Size & Focus
Other Functions
Lift the projector and press the adjuster buttons to adjust the projection angle. Then, release the buttons to lock
the extended adjuster legs. You can turn the bases of the adjuster legs to adjust the angle slightly.
Turn the focus/zoom ring to adjust the image focus and size.
The hot keys on the control panel or remote control
Press the KEYSTONE button and to correct the keystone distortion.
When the AUTO button is pressed, the image will be adjusted automatically in accordance with the signal
being input.
Press the button again to restore the sound.
A still image is displayed. Press the button again to restore the image.
Press VOLUME +/- (remote control) or (control panel) to adjust volume.
Use ZOOM +/- to change the enlargement ratio.
1. Keystone --- Keystone adjustment
2. Auto --- Automatic screen adjustment
3. Mute --- Muting the sound temporarily
4. Freeze --- Freezing animated images
5. Volume --- Adjusting the volume of the projector's speaker
6. Zoom --- Enlarging the projected image
Zoom Ring
Adjuster Button
Adjuster Legs
Focus Ring
1
2
5
Power
Source
Keystone
Auto
Menu
Esc
Volume
Lamp Temp
Enter
4
6
2
5
3FREEZE
VOLUME ZOOM
AUTOMUTE
Control Panel Remote Control
up down

10
1. Press the POWER button twice to turn off the power.
2. Wait until the POWER indicator lights RED steadily (until the cooling fan stops).
3. Turn off the MAIN POWER switch.
To prevent mis-operation, a confirmation message appears when POWER is pressed once.
The power turns off when you press the button once more.
The lamp will turn off and the cooling fan will keep running.
The POWER indicator will flash GREEN for 60 sec.
Be careful not to cut power to the projector while the cooling fan is still running.
Power Off
WARNING
If the projector is turned off abnormally and restart immediately, the POWER indicator will flash
GREEN for 60 sec (for cool-down). When the POWER indicator lights RED steadily, press the POWER
button to restart the unit.
INSERTING BATTERIES BEFORE OPERATION
- : the same as "Left button" of PC mouse.
- : the same as "Right button" of PC mouse.
- : moving the mouse "up", "down", "left"and "right"
L
R
POWER
SOURCE MENU LASER
ESC ENTER
RL
U
D
RL
FREEZE
VOLUME ZOOM
AUTOMUTE
R
FREEZE
VOLUME ZOOM
L
AUTOMUTE
LASER
ENTER
POWER
ESC
SOURCE MENU
U
D
L R
11
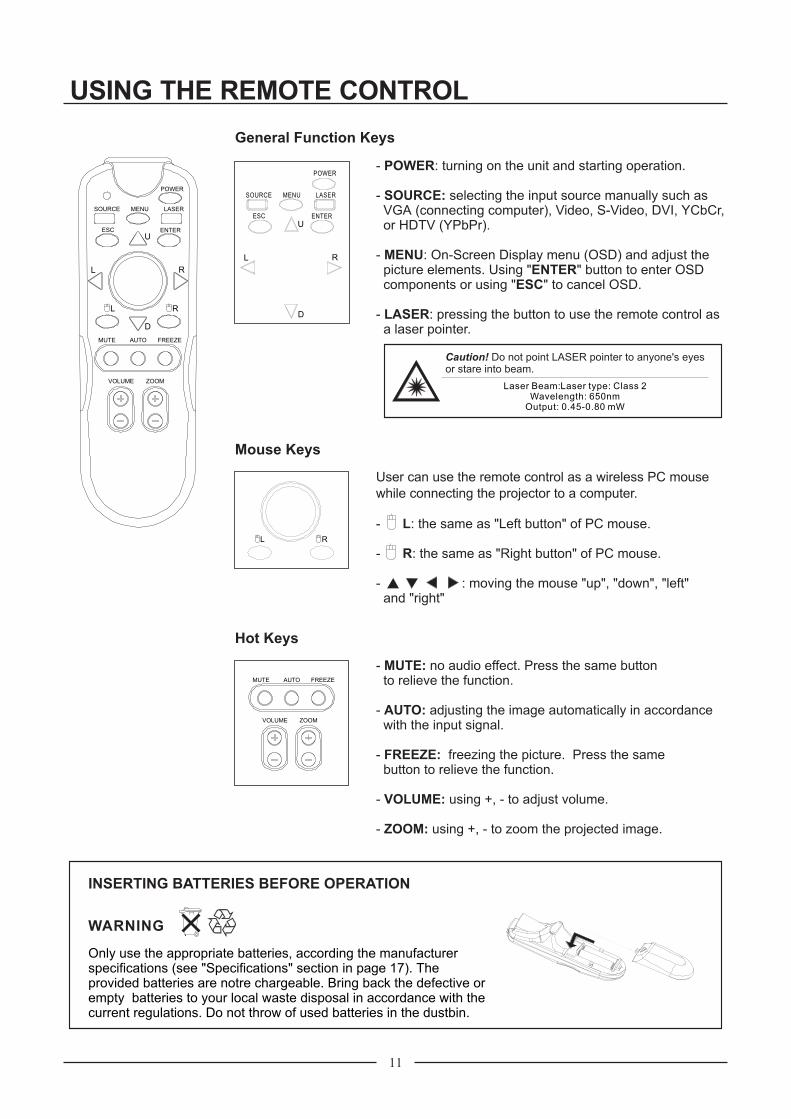
USING THE REMOTE CONTROL
General Function Keys
- : turning on the unit and starting operation.
- selecting the input source manually such asVGA (connecting computer), Video, S-Video, DVI, YCbCr,or HDTV (YPbPr).
- : On-Screen Display menu (OSD) and adjust thepicture elements. Using " " button to enter OSDcomponents or using " " to cancel OSD.
- : pressing the button to use the remote control asa laser pointer.
POWER
SOURCE:
MENUENTER
ESC
LASER
Caution! Do not point LASER pointer to anyone's eyesor stare into beam.
Laser Beam:Laser type: Class 2Wavelength: 650nm
Output: 0.45-0.80 mW
Mouse Keys
User can use the remote control as a wireless PC mouse
while connecting the projector to a computer.
Hot Keys
- no audio effect. Press the same buttonto relieve the function.
- adjusting the image automatically in accordancewith the input signal.
- freezing the picture. Press the samebutton to relieve the function.
- using +, - to adjust volume.
- using +, - to zoom the projected image.
MUTE:
AUTO:
FREEZE:
VOLUME:
ZOOM:
WARNING
Only use the appropriate batteries, according the manufacturerspecifications (see "Specifications" section in page 17). Theprovided batteries are notre chargeable. Bring back the defective orempty batteries to your local waste disposal in accordance with thecurrent regulations. Do not throw of used batteries in the dustbin.

12
1. Press the MENU button to display the On-screen Menu.
2. Use to select a main menu item, and then press
to enter the selected sub-menu.
3. Use to select a sub-menu item, and then press
to enter an individual adjustment screen or the next menu
level.
4. Use to adjust the setting, and to select an item.
5. Press MENU to return to the previous screen.
Press or ENTER to accept the setting.
Press to return to the previous menu level.
6. To close the menu, press ESC.
You can use the ON-SCREEN MENU to make various adjustments and settings.
MENU OPERATION (OSD)
List of Functions
IMAGE
Sub-menu
BRIGHTNESS
CONTRAST
SHARPNESS
POSITION
SATURATION
TINT
PHASE
Function
Adjust the image brightness.
Adjust the difference between light and shade in the image.
Adjust the image sharpness.
Move the image display position vertically and horizontally.
Adjust the color intensity for the image.
Adjust the image tint.
Adjust clock phase if any banding noise.
COLOR
63
61
50
H. 0 V. 0
69
50
Back Select Next/Execute
YCbCr
BRIGHTNESS
CONTRAST
SHARPNESS
POSITION
SATURATION
TINT
IMAGE
Main Menu
Input Source Main Menu Item
Sub-Menu
13
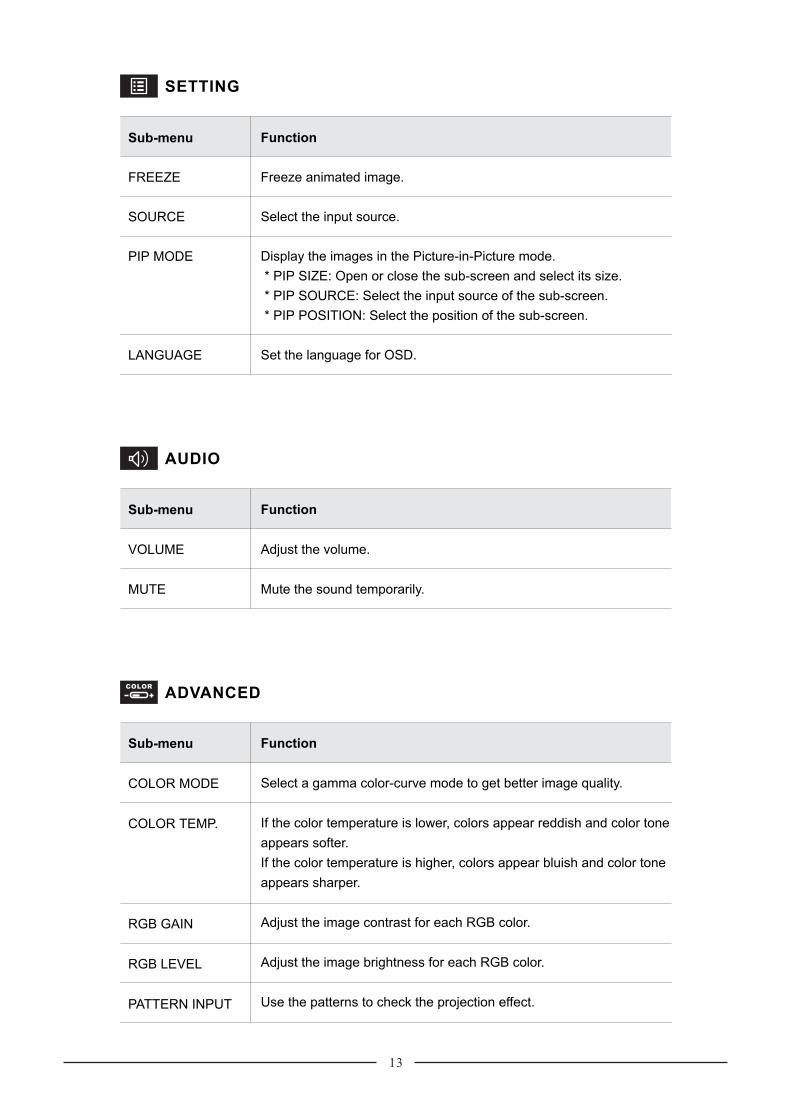
SETTING
Sub-menu
FREEZE
SOURCE
PIP MODE
LANGUAGE
Function
Freeze animated image.
Select the input source.
Display the images in the Picture-in-Picture mode.
* PIP SIZE: Open or close the sub-screen and select its size.
* PIP SOURCE: Select the input source of the sub-screen.
* PIP POSITION: Select the position of the sub-screen.
Set the language for OSD.
AUDIO
Sub-menu
VOLUME
MUTE
Function
Adjust the volume.
Mute the sound temporarily.
COLOR
ADVANCED
Sub-menu
COLOR MODE
COLOR TEMP.
RGB GAIN
RGB LEVEL
PATTERN INPUT
Function
Select a gamma color-curve mode to get better image quality.
If the color temperature is lower, colors appear reddish and color tone
appears softer.
If the color temperature is higher, colors appear bluish and color tone
appears sharper.
Adjust the image contrast for each RGB color.
Adjust the image brightness for each RGB color.
Use the patterns to check the projection effect.

14
INSTALLATION
Sub-menu
IMAGE ASPECT
KEYSTONE
ORIENTATION
USER'S LOGO
LOGO CAPTURE
SHOW LOGO
Function
Set the aspect ratio for projected images.
Correct the vertical or horizontal keystone distortion.
Make the projected images reverse vertically or horizontally
according to the installation mode of the projector.
Enable or disable the user's logo function.
* LOGO BACKGROUND: Change the fill color behind the logo.
* LOGO SCALING: Adjust the scale of the logo screen.
* LOGO POSITION: Adjust the position of the logo within its area.
* LOGO DELETE: Delete the capture logo.
* START LOGO CAPTURE: Start the logo capture process.
Show the logo chosen by user.
MANAGEMENT
Sub-menu
OSD SETTING
LAMP COUNTER
INFORMATION
SLEEPING
BACKGROUND
RESET LAMP
RESET ALL
Function
* POSITION: Adjust the position of OSD.
* TIMEOUT: Set the staying time of OSD.
* MODE: Select the background of OSD to be opaque or translucent.
Display the cumulative lamp operating time.
Display the input resolution and scanning frequency.
Set the background color when no video signal is being input.
Reset all items to their default settings.
Set the time to power off automatically.
Reset the cumulative lamp operating time.
Filter Cover
15
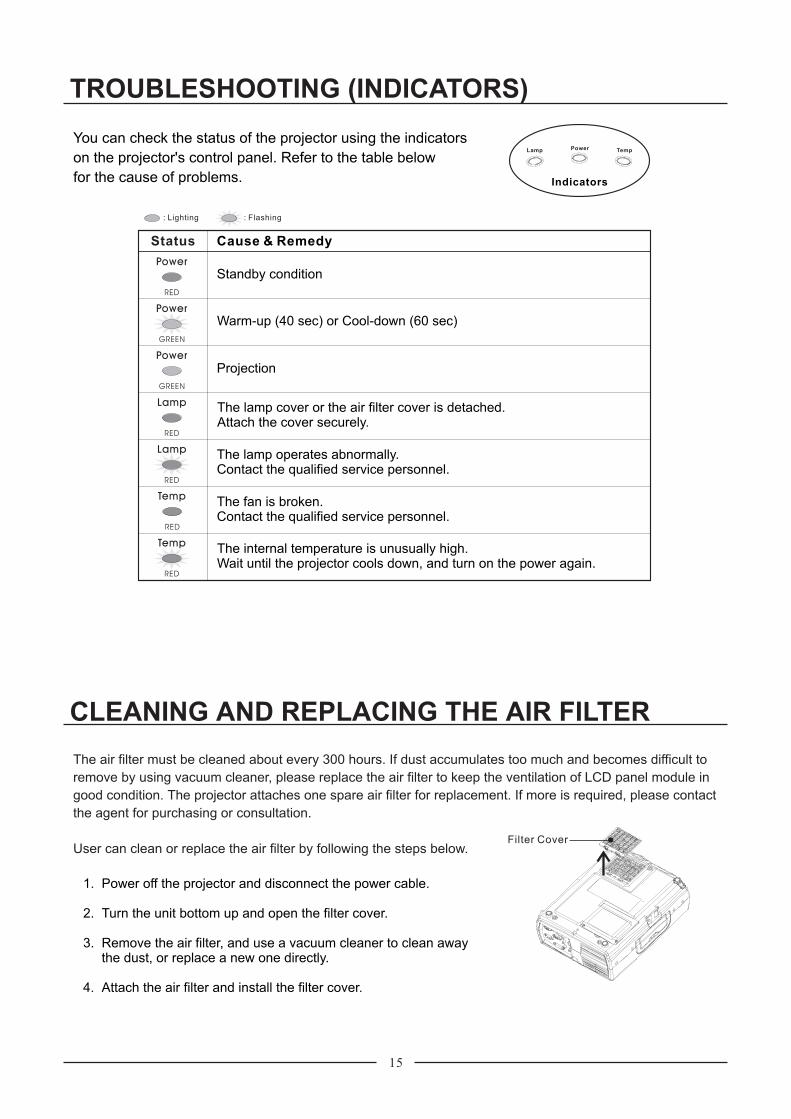
TROUBLESHOOTING (INDICATORS)
You can check the status of the projector using the indicators
on the projector's control panel. Refer to the table below
for the cause of problems.
PowerLamp Temp
Indicators
Standby condition
Warm-up (40 sec) or Cool-down (60 sec)
Projection
The lamp cover or the air filter cover is detached.Attach the cover securely.
The lamp operates abnormally.Contact the qualified service personnel.
The fan is broken.Contact the qualified service personnel.
The internal temperature is unusually high.Wait until the projector cools down, and turn on the power again.
Status Cause & Remedy
: Flashing: Lighting
CLEANING AND REPLACING THE AIR FILTER
The air filter must be cleaned about every 300 hours. If dust accumulates too much and becomes difficult to
remove by using vacuum cleaner, please replace the air filter to keep the ventilation of LCD panel module in
good condition. The projector attaches one spare air filter for replacement. If more is required, please contact
the agent for purchasing or consultation.
User can clean or replace the air filter by following the steps below.
1. Power off the projector and disconnect the power cable.
2. Turn the unit bottom up and open the filter cover.
3. Remove the air filter, and use a vacuum cleaner to clean awaythe dust, or replace a new one directly.
4. Attach the air filter and install the filter cover.
Loosen screws
Loosen screws
16
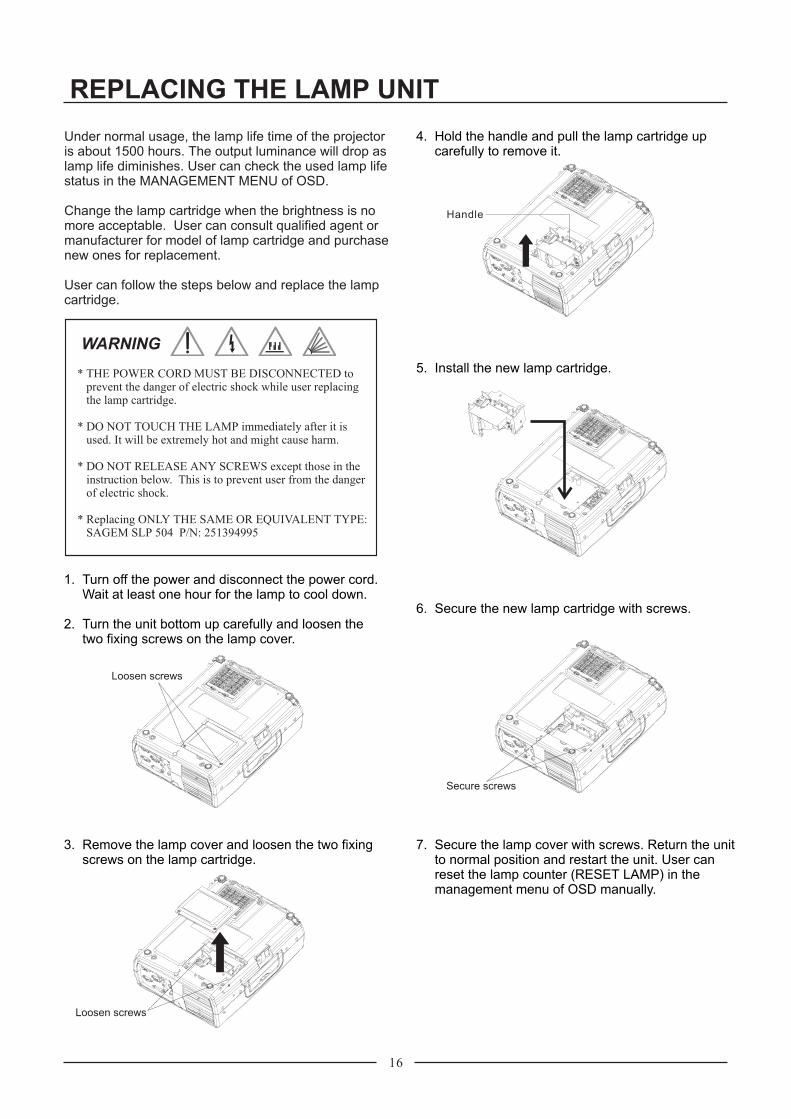
Under normal usage, the lamp life time of the projectoris about 1500 hours. The output luminance will drop aslamp life diminishes. User can check the used lamp lifestatus in the MANAGEMENT MENU of OSD.
Change the lamp cartridge when the brightness is nomore acceptable. User can consult qualified agent ormanufacturer for model of lamp cartridge and purchasenew ones for replacement.
User can follow the steps below and replace the lampcartridge.
WARNING
* THE POWER CORD MUST BE DISCONNECTED toprevent the danger of electric shock while user replacingthe lamp cartridge.
* DO NOT TOUCH THE LAMP immediately after it isused. It will be extremely hot and might cause harm.
* DO NOT RELEASE ANY SCREWS except those in theinstruction below. This is to prevent user from the dangerof electric shock.
* Replacing ONLY THE SAME OR EQUIVALENT TYPE:SAGEM SLP 504 P/N: 251394995
REPLACING THE LAMP UNIT
1. Turn off the power and disconnect the power cord.Wait at least one hour for the lamp to cool down.
2. Turn the unit bottom up carefully and loosen thetwo fixing screws on the lamp cover.
3. Remove the lamp cover and loosen the two fixingscrews on the lamp cartridge.
Handle
4. Hold the handle and pull the lamp cartridge upcarefully to remove it.
5. Install the new lamp cartridge.
Secure screws
6. Secure the new lamp cartridge with screws.
7. Secure the lamp cover with screws. Return the unitto normal position and restart the unit. User canreset the lamp counter (RESET LAMP) in themanagement menu of OSD manually.
17
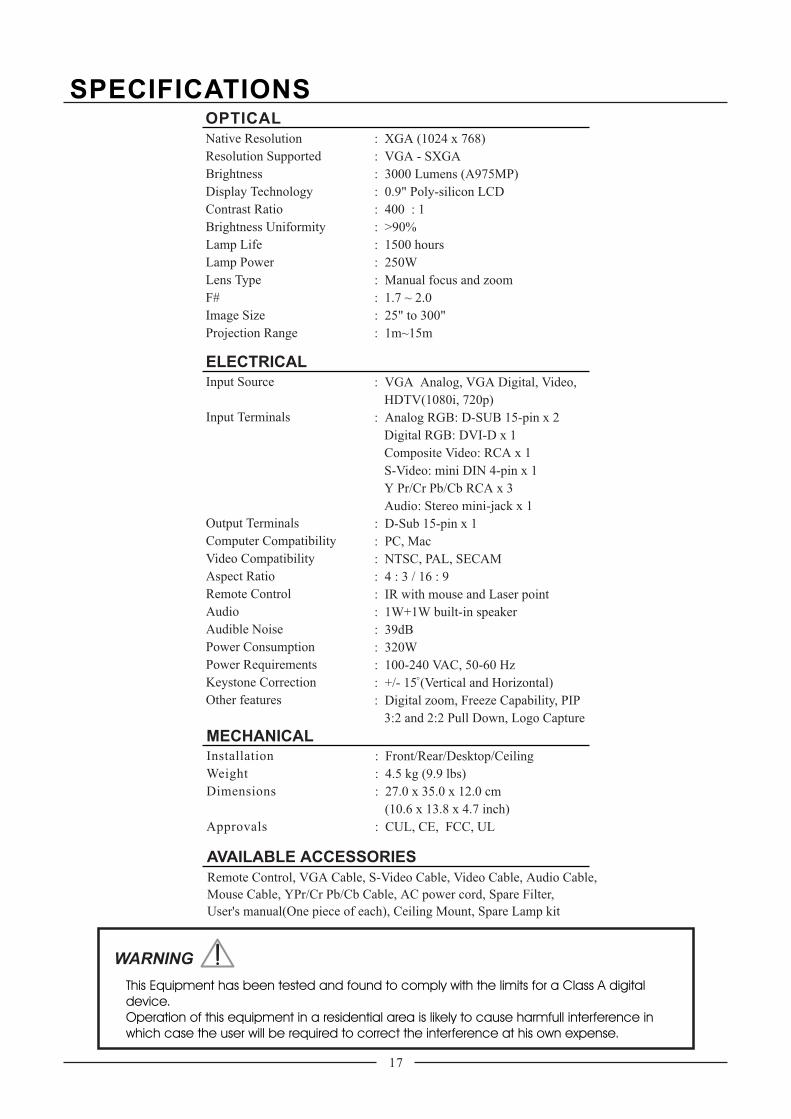
SPECIFICATIONSOPTICAL
Native Resolution
Resolution Supported
Brightness
Display Technology
Contrast Ratio
Brightness Uniformity
Lamp Life
Lamp Power
Lens Type
F#
Image Size
Projection Range
: XGA (1024 x 768)
: VGA - SXGA
: 3000 Lumens (A975MP)
: 0.9" Poly-silicon LCD
: 400 : 1
: >90%
: 1500 hours
: 250W
: Manual focus and zoom
: 1.7 ~ 2.0
: 25" to 300"
: 1m~15m
Input Source
Input Terminals
Output Terminals
Computer Compatibility
Video Compatibility
Aspect Ratio
Remote Control
Audio
Audible Noise
Power Consumption
Power Requirements
Keystone Correction
Other features
ELECTRICAL
: VGA Analog, VGA Digital, Video,
HDTV(1080i, 720p)
: Analog RGB: D-SUB 15-pin x 2
Digital RGB: DVI-D x 1
Composite Video: RCA x 1
S-Video: mini DIN 4-pin x 1
Y Pr/Cr Pb/Cb RCA x 3
: D-Sub 15-pin x 1
: PC, Mac
: NTSC, PAL, SECAM
: 4 : 3 / 16 : 9
: IR with mouse and Laser point
: 1W+1W built-in speaker
: 39dB
: 320W
: 100-240 VAC, 50-60 Hz
: +/- 15 (Vertical and Horizontal)
: Digital zoom, Freeze Capability, PIP
3:2 and 2:2 Pull Down, Logo Capture
Audio: Stereo mini-jack x 1
MECHANICALInstallation
Weight
Dimensions
Approvals
:
: 4
: 27.0 x 35.0 x 12.0 cm
(10
: C
Front/Rear/Desktop/Ceiling
.5 kg (9.9 lbs)
.6 x 13.8 x 4.7 inch)
UL, CE, FCC, UL
AVAILABLE ACCESSORIES
Remote Control, VGA Cable, S-Video Cable, Video Cable, Audio Cable,
Mouse Cable, YPr/Cr Pb/Cb Cable, AC power cord, Spare Filter,
User's manual(One piece of each), Ceiling Mount, Spare Lamp kit
WARNING
This Equipment has been tested and found to comply with the limits for a Class A digital
device.
Operation of this equipment in a residential area is likely to cause harmfull interference in
which case the user will be required to correct the interference at his own expense.


