
Florida Department of TRANSPORTATION · Florida Department of TRANSPORTATION ... Materials and...
34
Florida Department of TRANSPORTATION Materials Certification Review (MC Review) Project Administrator (PA) Manual January 4, 2017
Transcript of Florida Department of TRANSPORTATION · Florida Department of TRANSPORTATION ... Materials and...

Florida Department of
TRANSPORTATION
Materials Certification Review (MC Review) Project Administrator (PA)
Manual
January 4, 2017

Page 2 of 34
Contents
Introduction ............................................................................................................................... 3 Chapter 1 – Initiating an MC Review by the MC Reviewer ....................................................... 4 Chapter 2 – Searching for an MC Review ................................................................................ 5 Chapter 3 – Managing Findings ................................................................................................ 7
A. Findings List on an MC Review ....................................................................................... 7
B. Findings Statuses ............................................................................................................ 8
C. Excluding a Finding ......................................................................................................... 8
D. Manual Findings .............................................................................................................. 8
E. Excluding a Finding ......................................................................................................... 9
F. Submitting a Finding for PA Response ..........................................................................10
G. Responding to a Finding in Submitted Status ................................................................10
H. Returning the Finding for Additional Clarification ...........................................................11
I. Setting a Finding as MC Resolved .................................................................................13
J. Relating a Finding to other Findings ...............................................................................13
K. Findings Icons ................................................................................................................14
L. Promoting a Finding to MAR ..........................................................................................14
M. Undoing a MAR Promotion .........................................................................................15
Chapter 4 – Processing an Issue through MAR .......................................................................16 A. Making an Initial Recommendation from the Finding Details .........................................16
B. Making a Recommendation of EAR, No EAR or No EAR - Delineation ......................18
C. Processing the EAR or Delineation ................................................................................18
D. Making an Initial Recommendation from the Findings List ..........................................19
E. Attaching the EAR and other documents to the Finding .................................................20
F. Making the Final Recommendation from the Finding Details .........................................21
G. Making a Final Recommendation from the Findings List ................................................22
H. Entering the Final Pay Information .................................................................................23
I. Entering the MAR Location Information .........................................................................26
Chapter 5 – Processing a MAR Issue for Straightedge Deficiencies .......................................31 A. How MAC designates Straightedge Deficiencies ...........................................................31
B. Making an Initial Recommendation by Resident Engineer .............................................32
C. Making an Initial Recommendation by District Materials Bituminous Engineer (DBE), DCE
and DOC ...............................................................................................................................34
D. Straightedge Deficiency Location Information .............................................................34
Page 3 of 34
Introduction
What are the Project Administrator’s (PA’s) responsibilities for Materials Certification Review (MC Review)? The PA is the person in responsible charge for the materials acceptance on a contract. The State Construction Office has defined the person who will be given the role of PA in MAC as the Project Administrator, the Contract Specialist, or the Lead Inspector. In some cases, the Asphalt Plant Technician or Resident Asphalt Specialist can be given the PA role in MAC. For Sample Life Cycle (SLC), the PA must finalize project samples and create comparison packages if needed. There are separate instructions for SLC functions. Part of the SLC process may be that findings were generated from the sample data. These instructions describe how to process those findings for the PA role and other functions related to the Materials Certification Review (MC Review). It also describes functions related to processing the findings through the Materials Acceptance Resolution (MAR) process. Separate instructions are also available for the other users with functions in this process, such as the MC Review Program Maintenance User who will be referred to in this document as the MC Reviewer.
What is a finding? A finding is a potential issue with the material method of acceptance. A finding may or may not result in an Exception to the Project Materials Certification Letter (PMCL). Findings can be generated by the system or they can be added manually by PAs or MC Reviewers. What is an issue? An issue is a finding that needs further action. It is any finding that is not Excluded or MC Resolved. It may result in an Exception. All issues must be promoted to the Materials Acceptance Resolution (MAR) process. Not all issue promoted to MAR will have an Exception created. What is an Exception? An Exception is a materials issue that meets the definition of a PMCL Exception per Materials Manual 5.4. All Exceptions must be promoted to MAR in order to have the ability to create the Exception on the PMCL What is MAR? Materials Acceptance Resolution (MAR) is the process for documenting material method of acceptance issues. Method of acceptance includes more than just failing material. It includes any material that does not meet the requirements needed to determine if the material is acceptable including frequency, qualified personnel, qualified labs and if the material meets the minimum specification requirements. Any material not meeting the requirements will have to be processed through MAR. Not all MAR issues require recommendations and resolutions by the District Materials and Research Engineer (DMRE), District Construction Engineer (DCE) or Director, Office of Construction (DOC).
Page 4 of 34
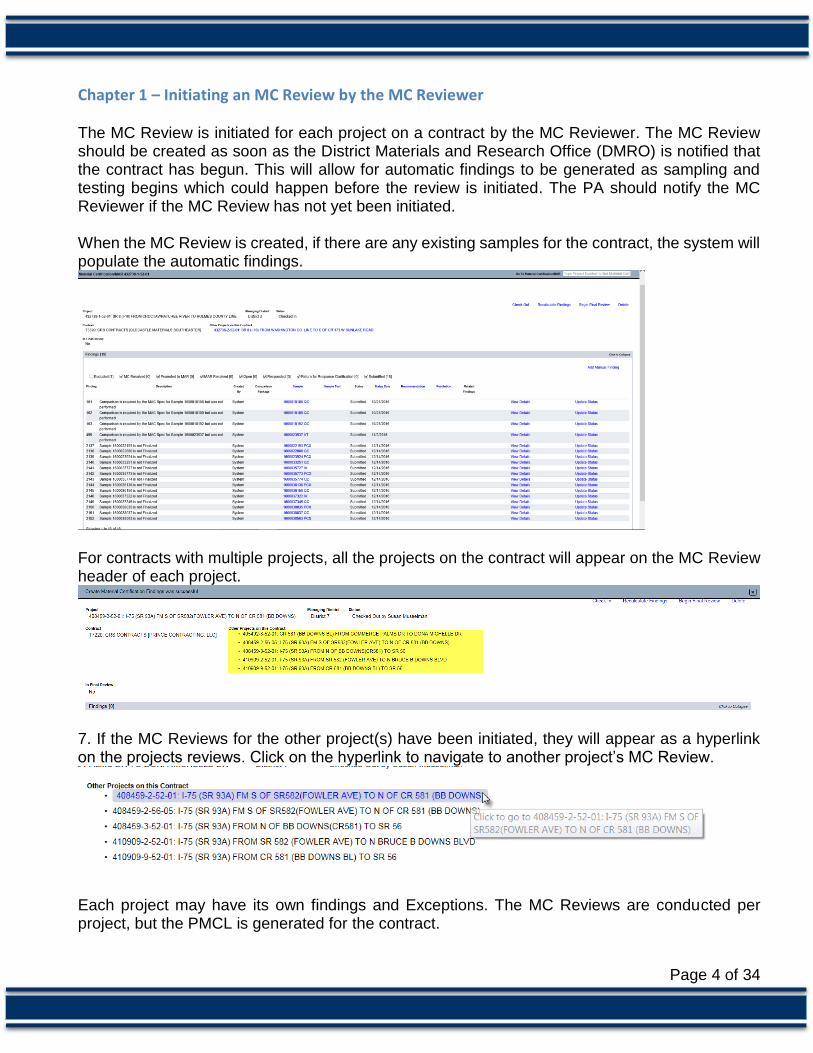
Chapter 1 – Initiating an MC Review by the MC Reviewer The MC Review is initiated for each project on a contract by the MC Reviewer. The MC Review should be created as soon as the District Materials and Research Office (DMRO) is notified that the contract has begun. This will allow for automatic findings to be generated as sampling and testing begins which could happen before the review is initiated. The PA should notify the MC Reviewer if the MC Review has not yet been initiated. When the MC Review is created, if there are any existing samples for the contract, the system will populate the automatic findings.
For contracts with multiple projects, all the projects on the contract will appear on the MC Review header of each project.
7. If the MC Reviews for the other project(s) have been initiated, they will appear as a hyperlink on the projects reviews. Click on the hyperlink to navigate to another project’s MC Review.
Each project may have its own findings and Exceptions. The MC Reviews are conducted per project, but the PMCL is generated for the contract.

Page 5 of 34
Chapter 2 – Searching for an MC Review NOTE: PAs may also have company roles. If you have company roles and system roles, you will see the Select Company Role dialog box when you log into MAC. If you only have system roles, you will not see a Select Company Role dialog box.
1. Select the “No Company (I’ll use my System Roles) option.
2. Select the Materials Certifications/MAR menu option. 3. Select the Materials Certifications/MAR option on the submenu.
4. Select the Search option.
Use the filter options to narrow the search down. 5. Enter the managing district. 6. If you know the contract id, enter it to narrow the search down to one entry. 7. Select the search option to generate the search.

Page 6 of 34
The search results will appear at the bottom of the search sub-screen.
8. Click anywhere on the row to navigate to the specific MC Review. You will be navigated to the MC Review for that entry.
When an MC Review is initiated, it is checked out the MC Reviewer who created it. During this status, no other MC Reviewer can make modifications to the review. Check in and check out does not apply to the PA. The PA does not need to check out an MC Review in order to work on the findings.

Page 7 of 34
Chapter 3 – Managing Findings Some findings are generated by the system based on criteria such as a failing test, a required test not being performed, an unqualified technician, etc. Samples can have multiple findings. Similar findings can be related to each other.
A. Findings List on an MC Review When the MC Review is created or when it is checked out, the system will populate or recalculate the automatic findings. The PA cannot recalculate the findings. If findings do not appear on the findings list, check the excluded findings to ensure the MC Reviewer has not already excluded the finding.
a. Select the Excluded option on the Findings status selection to review excluded findings. b. If the findings do not appear, ask the MC Reviewer to perform the Recalculate Findings option.
1. To see the specific information for a finding, select the View Details option. A new window will appear with information and additional tabs for that issue.

Page 8 of 34
B. Findings Statuses Findings statuses are as follows: 1. Excluded – The MC Reviewer has determined that the finding is not an issue. It does not have to be responded to by the PA. 2. MC Resolved – The MC Reviewer has determined without the PA’s response or is satisfied with the PA’s response and determined the finding is not an issue. 3. Promoted to MAR – the finding has a response from the PA and the MC Reviewer and PA agree that the finding should be processed as a Materials Acceptance Resolution (MAR) issue. 4. Open – The finding has been added to the findings list but the MC Reviewer has not yet excluded it or submitted it to the PA for response. 5. Responded – The PA has submitted a response to the MC Reviewer. 6. Returned for Response Clarification – the MC Reviewer has returned a responded finding to the PA for additional response. 7. Submitted – the MC Reviewer has submitted the finding to the PA for a response. NOTE: The findings statuses can be used as filters to shorten the list that is displayed. Deselecting an option does not remove the findings. It just takes them off the view.
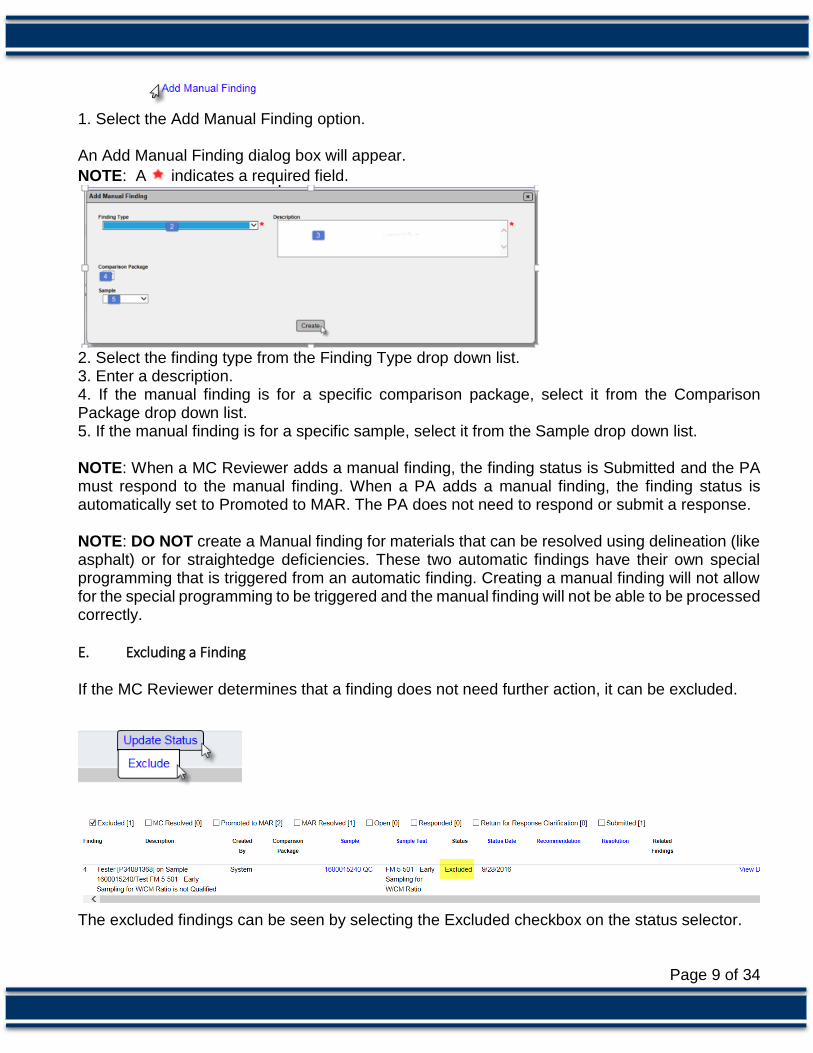
C. Excluding a Finding If the MC Reviewer determines that a finding does not need further action, it can be excluded.
The excluded findings can be seen by selecting the Excluded checkbox on the status selector.
D. Manual Findings Because not all issues that are possible exceptions can be detected by the system, there is a way to add a manual finding. These can be created by MC Reviewers PAs. To create a manual finding:
Page 9 of 34
1. Select the Add Manual Finding option. An Add Manual Finding dialog box will appear.
NOTE: A indicates a required field.
2. Select the finding type from the Finding Type drop down list. 3. Enter a description. 4. If the manual finding is for a specific comparison package, select it from the Comparison Package drop down list. 5. If the manual finding is for a specific sample, select it from the Sample drop down list. NOTE: When a MC Reviewer adds a manual finding, the finding status is Submitted and the PA must respond to the manual finding. When a PA adds a manual finding, the finding status is automatically set to Promoted to MAR. The PA does not need to respond or submit a response. NOTE: DO NOT create a Manual finding for materials that can be resolved using delineation (like asphalt) or for straightedge deficiencies. These two automatic findings have their own special programming that is triggered from an automatic finding. Creating a manual finding will not allow for the special programming to be triggered and the manual finding will not be able to be processed correctly.
E. Excluding a Finding If the MC Reviewer determines that a finding does not need further action, it can be excluded.
The excluded findings can be seen by selecting the Excluded checkbox on the status selector.
Page 10 of 34
F. Submitting a Finding for PA Response If the MC Reviewer is not sure if a finding should be excluded, he can submit the finding to the PA for a response. The PA’s response should provide more detail about the finding to assist the MC Reviewer and PA determine if the finding warrants more action, like promoting it to MAR.
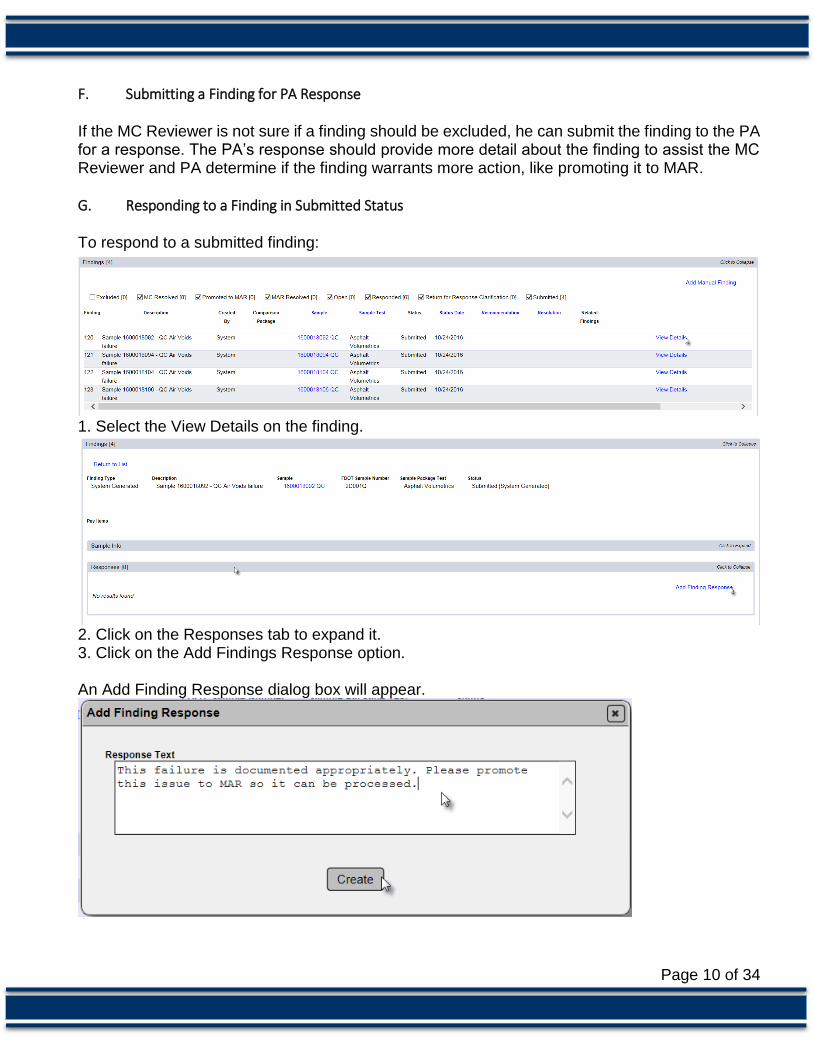
G. Responding to a Finding in Submitted Status To respond to a submitted finding:
1. Select the View Details on the finding.
2. Click on the Responses tab to expand it. 3. Click on the Add Findings Response option. An Add Finding Response dialog box will appear.

Page 11 of 34
4. Enter the description of the finding in the Response Text field. The information should include any additional details for the MC Reviewer to assist with determining if the finding is a potential exception. The needed information will depend on the finding itself. 5. Select the Create option.
6. Once you have response entered, select the Submit Responses option. The response status will be changed to Responded.
H. Returning the Finding for Additional Clarification If the PA’s response is incomplete or unclear, the MC Reviewer may return the finding to the PA to get additional information. The finding will be placed in the status Return for Response.
1. Select the View Details option to see the finding details.

Page 12 of 34
The MC Reviewer’s comment can be seen under the status heading. You may need to contact the MC Reviewer to coordinate the needed information in the response.
2. Click on the Responses tab to expand it. 3. Click on the Add Findings Response option. An Add Findings Response dialog box will appear.
4. Enter the description of the finding in the Response Text field. Since the finding has been returned for additional information, you may need to include new details or more descriptive information. 5. Select the Create option.

Page 13 of 34
6. Click on the Submit Responses option. The issue status will be changed to Responded.
I. Setting a Finding as MC Resolved If after the MC Reviewer and the PA determine that the finding needs no further action, the finding can be designated with the status of MC Resolved. Similar to excluded findings, MC Resolved findings cannot be promoted to MAR and cannot have an Exception created from the finding. MC Resolved means that after further review and comment by the PA and MC Reviewer, the finding does not warrant additional action.
J. Relating a Finding to other Findings Often times, findings will be similar in nature and will be resolved with the same disposition. The MC Reviewer can connect findings together by relating them to each other. The finding details will be updated to show the related findings.
Page 14 of 34
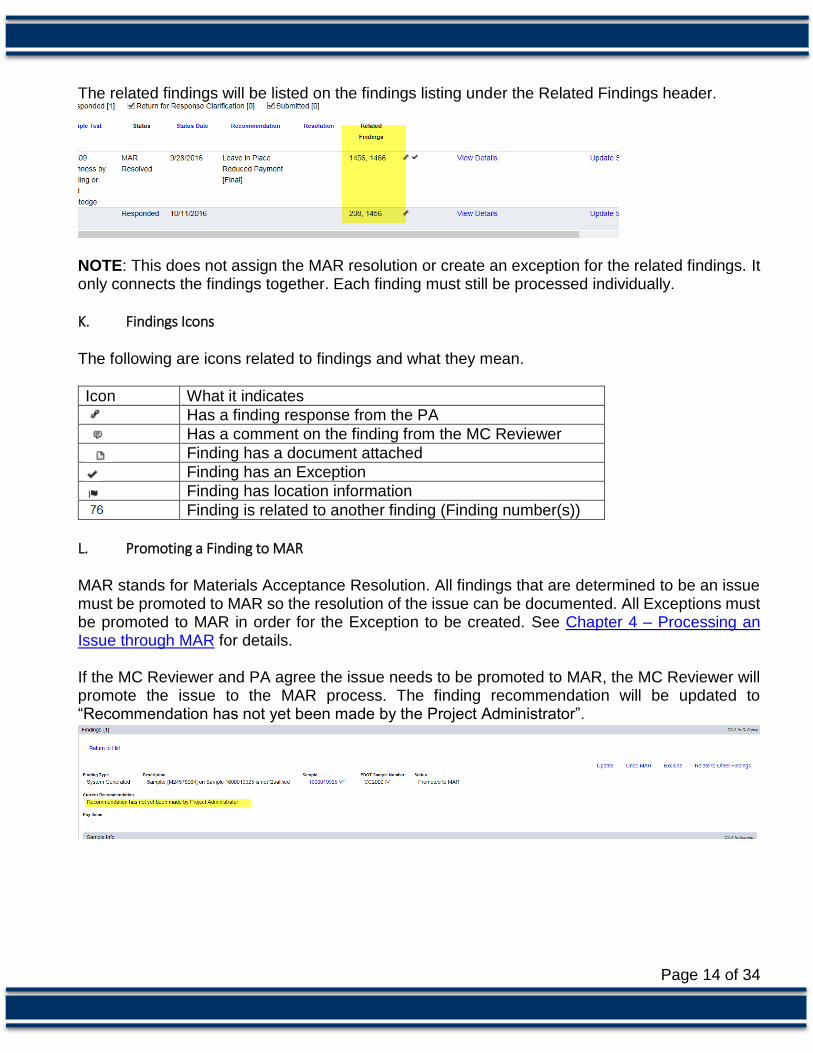
The related findings will be listed on the findings listing under the Related Findings header.
NOTE: This does not assign the MAR resolution or create an exception for the related findings. It only connects the findings together. Each finding must still be processed individually.
K. Findings Icons The following are icons related to findings and what they mean.
Icon What it indicates
Has a finding response from the PA
Has a comment on the finding from the MC Reviewer
Finding has a document attached
Finding has an Exception
Finding has location information
Finding is related to another finding (Finding number(s))
L. Promoting a Finding to MAR MAR stands for Materials Acceptance Resolution. All findings that are determined to be an issue must be promoted to MAR so the resolution of the issue can be documented. All Exceptions must be promoted to MAR in order for the Exception to be created. See Chapter 4 – Processing an Issue through MAR for details. If the MC Reviewer and PA agree the issue needs to be promoted to MAR, the MC Reviewer will promote the issue to the MAR process. The finding recommendation will be updated to “Recommendation has not yet been made by the Project Administrator”.

Page 15 of 34
M. Undoing a MAR Promotion If an item is inadverently sent to MAR, or if one of the users in the MAR process selects the incorrect recommendation or resolution, the MC Reviewer can undo the process. The finding status will be taken all the way back to the Submitted status. The PA will need to resubmit the responses. All users will need to reperform the steps up to the action that required the MAR promotion to be undone.

Page 16 of 34
Chapter 4 – Processing an Issue through MAR The PA is responsible for coordinating the steps of the MAR issue through to final resolution. MAC does not currently notify the specific users that need to make a recommendation or resolution. The PA should let the users know if the issue needs further action from the user. These instructions will describe the process for issues that may require an EAR or delineation. The follow the requirements of Construction Project Administration Manual (CPAM) Section 5.8. Straightedge deficiencies have a different MAR process with different users. They are processed according to CPAM Section 11.5. Chapter 5 – Processing a MAR Issue for Straightedge Deficiencies describes the process for straightedge deficiencies.
A. Making an Initial Recommendation from the Finding Details When an issue is promoted to MAR, the first step is for the PA to enter an initial recommendation. There are two ways to get to the functions. This section describes how to make the initial recommendation from the findings details. By doing this, the PA has the option to review the information, comments and documents associated to the finding. Section D. Making an Initial Recommendation from the Findings List describes how to make the finding recommendation from the findings list. Because additional steps are usually needed, this is the preferred method.
1. On a finding with the status of Promoted to MAR, select the View Details option.
2. On the findings details, click on the Recommendations tab to expand it. 3. Click on the Set Recommendations option.

Page 17 of 34
A Set Recommendation dialog box will appear.
4. From the Recommendation drop down, select the appropriate recommendation. a. Asphalt Follow up Sample Passed – if the follow up sample as described in Materials Manual Section 3.1. b. Complete Removal and Replacement – the material that the finding represents has been removed and replaced before the Contractor requested an EAR to leave in place. If the Contractor voluntarily removes and replaces immediately, this option should be selected. c. EAR – the material meets the definition of defective material and the Contractor has requested the material be left in place and an EAR performed. The PA’s recommendation is to allow the Contractor to perform an EAR. d. Materials Rejected for Use – The material has been tested before placement, like a stockpile, and the material was not placed. e. No EAR – the material meets the definition of defective material and the Contractor has requested the material be left in place and an EAR performed. The PA recommends that the Contractor not be allowed to perform and EAR or the EAR is not needed. f. No EAR – Delineation – The material allows for delineation as an option to the EAR and the delineation option is being used instead of an EAR.
NOTE: This option does not appear for all findings. The material must allow for the use of delineation on the MAC Spec. If the PA created a manual finding, this option will not appear. For this reason, DO NOT create a manual finding for materials that allow the use of delineation as a resolution.
f. Pay Reduction Per Specification – a pay reduction has been applied per specifications that addressed the material resolution; for example, a structural concrete compressive strength failure 500 psi or less than the minimum required strength. g. Reworked and Remixed – the material represented by the finding has been reworked and remixed and there are samples that represent the material that do not have any findings.

Page 18 of 34
NOTE: When the PA selects a, b, d, f, or g, the PA’s recommendation becomes the final resolution and there are no other actions needed by other users such as the District Materials and Research Engineer (DMRE) or District Construction Engineer (DCE). The PA should enter the final payment information H. Entering the Final Pay Information and the location information I. Entering the MAR Location Information. 5. Select the Save option to save the initial recommendation.
B. Making a Recommendation of EAR, No EAR or No EAR - Delineation If the PA selects c, e, or f (EAR, No EAR or No EAR – Delineation), he should coordinate with the other users in the process to ensure the MAR issue recommendations and resolutions are designated. 1. If the PA selects EAR or No EAR, the PA should notify the DMRE that the finding is awaiting
DMRE initial recommendation. 2. Once the DMRE makes an initial recommendation, the DCE needs to make an initial
recommendation. The PA should not notify the DCE that the finding is awaiting DCE initial recommendation.
3. If the DMRE and DCE do not concur, in some cases, the Director, Office of Construction (DOC), may need to make an initial recommendation. The finding will indicate if the DOC’s initial recommendation is needed.
The PA should notify the DOC that the finding is awaiting the DOC’s initial recommendation.
C. Processing the EAR or Delineation Once the initial recommendation of EAR, No EAR or No EAR – Delineation is selected, the process goes outside of MAC. The PA should return to MAC when the final resolution is ready to be documented. Outside of MAC: 1. If the Recommendation is EAR: a. The Contractor submits the scope of the EAR to the PA.

Page 19 of 34
b. The PA submits the EAR scope to the DMRE for his review. NOTE: The scope can be attached as a document in MAC, but it does not have to be. See E. Attaching the EAR and other documents to the Finding for attaching documents to the finding.
c. The DMRE reviews the scope and makes recommendations to the scope. d. The DMRE returns the scope with recommendations to the PA. e. The PA returns the updated scope to the Contractor. f. The Contractor performs the EAR. g. The Contractor submits the EAR to the PA. h. The PA comes back into MAC to continue the process. i. The PA attaches the EAR to the finding (E. Attaching the EAR and other documents to the Finding). 2. If the Recommendation is No EAR – Delineation: a. The Contractor performs the delineation. b. The Contractor submits the delineation summary to the PA. c. The PA comes back into MAC to continue the process. d. The PA attaches the any delineation documentation to the finding (E. Attaching the EAR and other documents to the Finding). 3. If the Recommendation is No EAR: a. The PA goes directly to making the final recommendation (F. Making the Final Recommendation from the Finding Details or G. Making a Final Recommendation from the Findings List)
D. Making an Initial Recommendation from the Findings List The PA can make a recommendation for a finding directly from the findings list. By selecting the initial recommendation from the finding listing, the PA has does not have the option to review the information, comments and documents associated to the finding. From the findings list:
1. Select the Set Recommendations option next to the finding that is promoted to MAR.

Page 20 of 34
A Set Recommendation dialog box will appear.
From here, the steps are the same as described in A. Making an Initial Recommendation from the Finding Details. If the PA selects c, e, or f, additional steps are required as described above.
E. Attaching the EAR and other documents to the Finding If an EAR or delineation is used, the PA must attach the EAR or delineation documentation to the finding. This process can be used for any document that needs to be attached to the finding.
1. Click on the documents tab to expand it. 2. Select the Upload Document option. An Upload Document dialog box will appear.
3. Click on the Select File option.
Page 21 of 34
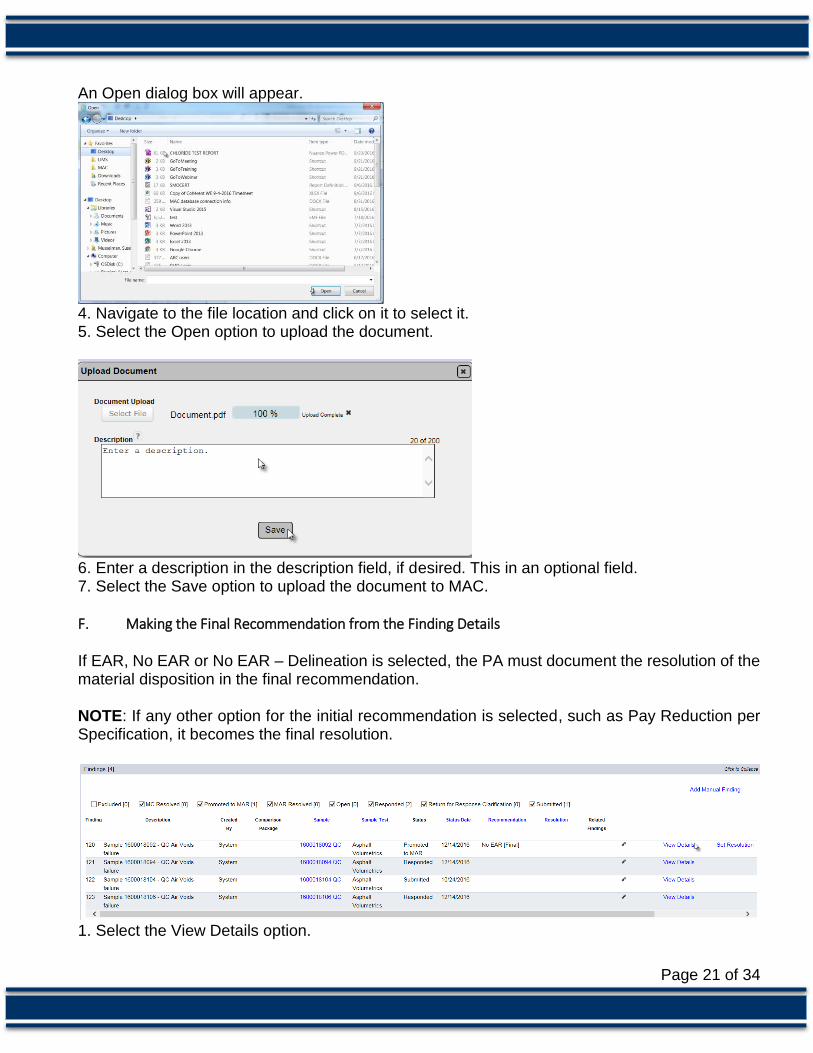
An Open dialog box will appear.
4. Navigate to the file location and click on it to select it. 5. Select the Open option to upload the document.
6. Enter a description in the description field, if desired. This in an optional field. 7. Select the Save option to upload the document to MAC.
F. Making the Final Recommendation from the Finding Details If EAR, No EAR or No EAR – Delineation is selected, the PA must document the resolution of the material disposition in the final recommendation. NOTE: If any other option for the initial recommendation is selected, such as Pay Reduction per Specification, it becomes the final resolution.
1. Select the View Details option.

Page 22 of 34
2. On the finding detail, click on the Resolutions tab to expand it. 3. Click on the Set Resolution option. A Set Resolution dialog box will appear.
4. Select the appropriate resolution from the drop down list. a. Complete Removal of Material – The Department’s decision is to direct the Contractor to remove the material. b. Leave in Place – The Department’s decision is to allow the Contractor to leave the material in place. c. Partial Removal of Material - The Department’s decision is to allow the Contractor to leave the some of the material in place but some of the material must be removed. 5. Make any comments, if desired. 6. Select the Save option to save the PA’s recommendation for final resolution.
G. Making a Final Recommendation from the Findings List The PA can set his final resolution directly on the findings list. This option does not allow the PA to enter the Final Pay information, the Location information or review any of the finding details before selecting the final recommendation.

Page 23 of 34
1. Select the Set Resolution option on the appropriate finding row. A Set Resolution dialog box will appear.
2. Select the appropriate resolution from the drop down list. a. Complete Removal of Material – The Department’s decision is to direct the Contractor to remove the material. b. Leave in Place – The Department’s decision is to allow the Contractor to leave the material in place. c. Partial Removal of Material - The Department’s decision is to allow the Contractor to leave the some of the material in place but some must be removed. 3. Make any comments, if desired. 4. Select the Save option to save the PA’s recommendation for final resolution.
H. Entering the Final Pay Information The PA is the appropriate person to enter the final pay information. The information entered for final pay is not used in the MC Review process. The fields are available in MAC to document any payment issues from the final resolution; for example, reduced payment per Specification or left in place at reduced or no pay. NOTE: The final pay information will appear in the dialog box for the DMRE, DCE and DOC. These users are not expected to enter the information. It is expected that the PA will record the final pay information. There are two times when the final payment can be entered:

Page 24 of 34
1. When setting the initial recommendation:
a. Select the Final Pay Type from the drop down list:
i. Dollars – if you want to record the final dollar amount paid, select Dollars. ii. Percentage – if you want to record the final percentage paid, select Percentage. If you selected Dollars, a new field for Final Pay Dollars will appear.
iii. Enter the final dollars paid. For example, if the final payment amount is ten thousand dollars, select Dollars from the Final Pay Type drop down list, then enter 10,000 in the Final Pay Dollars field. If you selected Percentage, a new field for Final Pay Percentage will appear.
iv. Enter the final percentage paid. For example, if the final payment amount is 50%, select Percentage from the Final Pay Type drop down list, then enter 50 in the Final Pay Percentage field. b. After entering either the Final Pay Dollars or Final Pay Percentage, select the Save option. NOTE: This information is not used for the purposes of the MC Review and is not needed by Materials personnel. The fields are available to Construction personnel for the purposes of documenting information that may be needed for contract administration related to the material acceptance issue.
Page 25 of 34
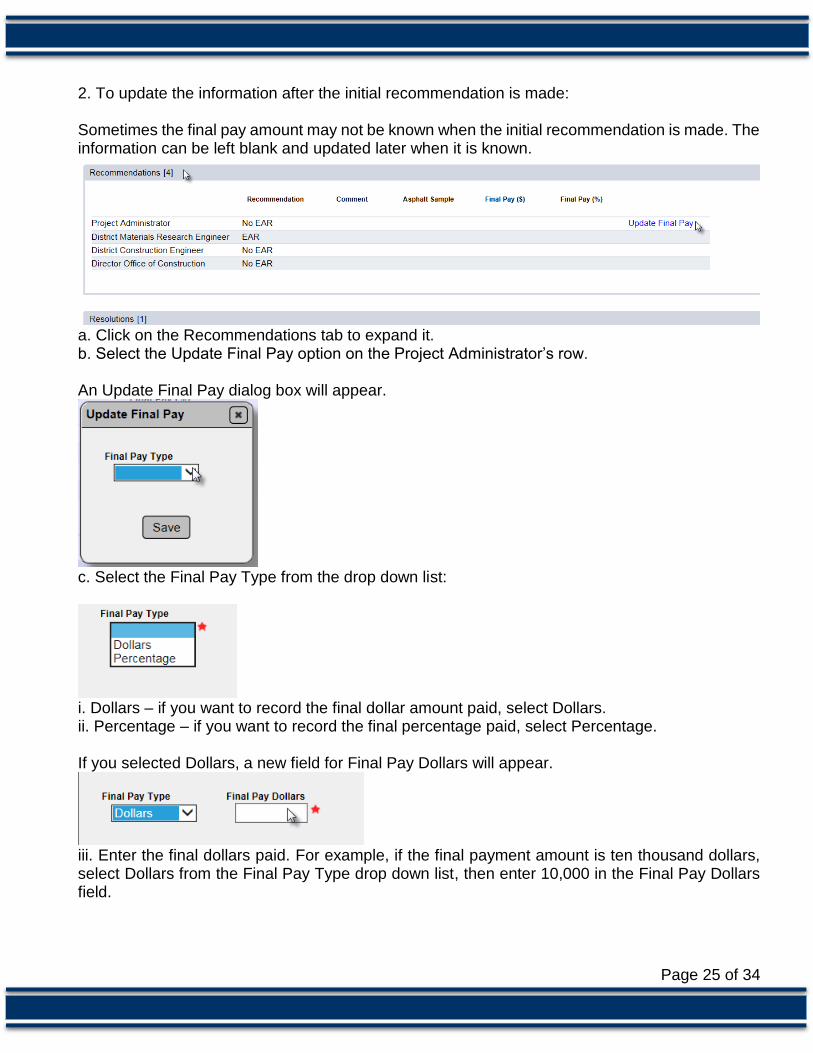
2. To update the information after the initial recommendation is made: Sometimes the final pay amount may not be known when the initial recommendation is made. The information can be left blank and updated later when it is known.
a. Click on the Recommendations tab to expand it. b. Select the Update Final Pay option on the Project Administrator’s row. An Update Final Pay dialog box will appear.
c. Select the Final Pay Type from the drop down list:
i. Dollars – if you want to record the final dollar amount paid, select Dollars. ii. Percentage – if you want to record the final percentage paid, select Percentage. If you selected Dollars, a new field for Final Pay Dollars will appear.
iii. Enter the final dollars paid. For example, if the final payment amount is ten thousand dollars, select Dollars from the Final Pay Type drop down list, then enter 10,000 in the Final Pay Dollars field.

Page 26 of 34
If you selected Percentage, a new field for Final Pay Percentage will appear.
iv. Enter the final percentage paid. For example, if the final payment amount is 50%, select Percentage from the Final Pay Type drop down list, then enter 50 in the Final Pay Percentage field. d. After entering either the Final Pay Dollars or Final Pay Percentage, select the Save option. NOTE: This information is not used for the purposes of the MC Review and is not needed by Materials personnel. The fields are available to Construction personnel for the purposes of documenting information that may be needed for contract administration related to the material acceptance issue.
I. Entering the MAR Location Information As part of the PA’s responsibilities for processing the MAR issue, he must include the location information on the location tab. The information may not be available until after the final recommendation is complete and the material is removed or partially removed. It must be completed before the finding can be designated as an Exception. This information is used by MAC to enter the location information of the exception on PMCL. Because of this, the MC Reviewer may notify the PA if additional entries are needed or if there are issues with the current location entries.
1. Click on the Locations tab to expand it. 2. Click on the Add Locations of Representative Material option.

Page 27 of 34
An Add Location of Representative Material dialog box will appear. Enter the information for the entire area that it represented by the finding.
3. Select all the RCI Lanes the material was placed on. 4. Select the beginning station for the material placement. 5. Select the ending station for the material placement. 6. Enter the beginning Latitude entry for the material placement to 6 decimal places; for example, 21.123456. 7. Enter the beginning Longitude entry for the material placement to 6 decimal places; for example, -81.123456. 8. Enter the ending Latitude entry for the material placement to 6 decimal places; for example, 21.987654. 9. Enter the ending Longitude entry for the material placement to 6 decimal places; for example, -81.987654. 10. Enter the offset distance. 11. Enter the offset direction. 12. Enter the surveyed reference line. NOTE: Offset Distance, Offset Direction and Reference Line are the only optional fields on the dialog box.
13. Select the Placement Designation. This is the same information as the final resolution. It is selected again here to drive additional programming for the location information. Make sure your selection matches the final resolution. 14. Enter the material quantity. For example if the material quantity represented is 2,000 tons, enter 2000 in the material quantity field. 15. Enter the unit of measure for the material quantity. For example if the material quantity represented is 2,000 tons, enter Ton(s) in the unit of measure field. 16. Select the Save option.

Page 28 of 34
NOTE: If the Placement Designation selected is Left in Place or Removed, this one overall entry is sufficient. If the Placement Designation selected is Partial Removal and Replacement, subentries must now be made for each area removed and each area left in place. There may need to be more than two entries, one for all the material removed and one for all the material replaced. The overall area must be broken down by each area that was removed and each that was left in place. 1+00 2+00 3+00 4+00 5+00
[L1] Area 1 Area 2 Area 3
[L2] Area 4 Area 5 Area 6
[L3] Area 7 Area 8 Area 9 Area 10
Overall Locations = L1, L2, L3 1+00 – 5+00 Orange areas were removed Green areas were left in place In MAC this would be represented by 11 entries – one for the overall area for L1, L2, and L3 from 1+00 to 5+00 and 10 more for each sub area removed or left in place. To enter a sub area after the Placement Designation is Partial Removal and Replacement:
1. Select the Add Location of Representative Material option.
2. Select all the RCI Lanes for the first sub area. 3. Select the beginning station for the first sub area. 4. Select the ending station for the first sub area. 5. Enter the beginning Latitude entry for the first sub area to 6 decimal places; for example, 21.123456. 6. Enter the beginning Longitude entry for the first sub area to 6 decimal places; for example, -81.123456.

Page 29 of 34
7. Enter the ending Latitude entry for the first sub area to 6 decimal places; for example, 21.987654. 8. Enter the ending Longitude entry for the first sub area to 6 decimal places; for example, -81.987654. 9. Enter the offset distance for the first sub area. 10. Enter the offset direction for the first sub area. 11. Enter the surveyed reference line for the first sub area. NOTE: Offset Distance, Offset Direction and Reference Line are the only optional fields on the dialog box.
12. Select the Placement Designation. Select either Left in Place or Removed. From our example above, the first sub area was Removed. 13. Enter the material quantity for the first sub area. For example if the material quantity represented is 200 tons, enter 200 in the material quantity field. 14. Enter the unit of measure for the material quantity. For example if the material quantity represented is 200 tons, enter Ton(s) in the unit of measure field. 15. Select the Save option. The Locations tab will be update to include both the original overall area and the new sub area information. Fields will appear for the Total Affected Quantity and the Accumulated Quantity. The Accumulated Quantity should add up to the Total Affected Quantity when all the sub areas are entered.
16. Repeat steps 1-15 for each sub area.

Page 30 of 34
When the entries are complete, if the areas do not match, the PA should correct the entries so that the sub areas indicated show fully how the overall area was designated. This information will be used as the Location Information on the PMCL and cannot be updated anywhere but here if the data is incorrect. The MC Reviewer may ask the PA for corrections or additional information if the sub areas do not fully represent the overall area of if the sub areas fall outside the overall area.

Page 31 of 34
Chapter 5 – Processing a MAR Issue for Straightedge Deficiencies
A. How MAC designates Straightedge Deficiencies Straightedge Deficiencies are processed according to CPAM 11.5. Because of this, they have a different flow in MAR and a different set of users. This chapter describes the process for MAR findings for straightedge deficiencies. For information on entering straightedge samples and test results (which trigger the MAR finding) see the Rolling Straightedge Sample Life Cycle information.
NOTE: When the QC data entry selects Has Deficiency Readings on the FM 5-509 test definition, it triggers an automatic finding that follows the CPAM 11.5 process. DO NOT create a manual finding for straightedge deficiencies. A manual finding does not get the special programming that is generated from this selection and it will not be able to be processed in accordance with CPAM 11.5.
NOTE: When the QC data entry select the Has Deficiency Readings option, the Test Disposition will appear as Pass*. This is because there are no limits set on the test definition on the MAC Spec. So it technically it does pass the targets and limits programming. However, the special programming that detects this selection as an automatic finding indicates it as a failure. If you click on the test disposition, a dialog box will appear describing the test as failing.
Page 32 of 34
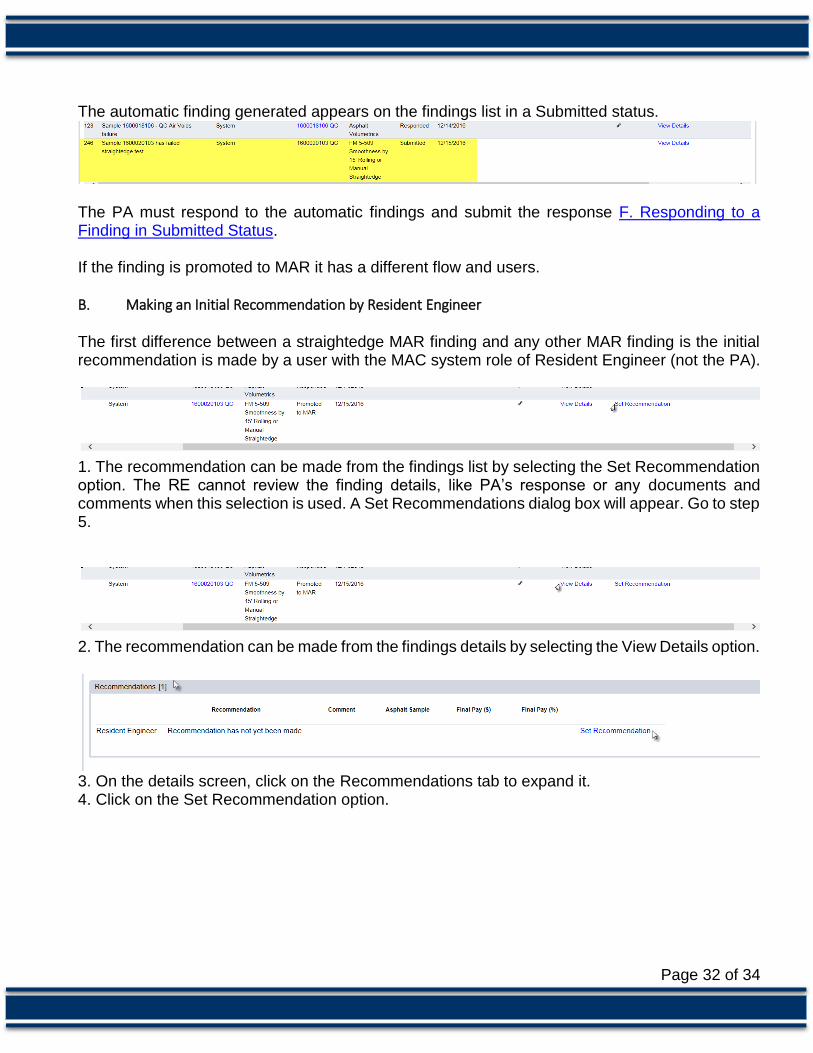
The automatic finding generated appears on the findings list in a Submitted status.
The PA must respond to the automatic findings and submit the response F. Responding to a Finding in Submitted Status. If the finding is promoted to MAR it has a different flow and users.
B. Making an Initial Recommendation by Resident Engineer The first difference between a straightedge MAR finding and any other MAR finding is the initial recommendation is made by a user with the MAC system role of Resident Engineer (not the PA).
1. The recommendation can be made from the findings list by selecting the Set Recommendation option. The RE cannot review the finding details, like PA’s response or any documents and comments when this selection is used. A Set Recommendations dialog box will appear. Go to step 5.
2. The recommendation can be made from the findings details by selecting the View Details option.
3. On the details screen, click on the Recommendations tab to expand it. 4. Click on the Set Recommendation option.

Page 33 of 34
A Set Recommendation dialog box will appear.
5. Select the Recommendation from the Recommendation drop down list. NOTE: Currently there is no way for the RE to set more than one overall recommendation. Select the one option that most represents the straightedge deficiencies. Future enhancements to the MC Review process will address this. If Leave in Place Full Payment or Leave in Place Reduced Payment is selected, the Director, Office of Construction will be required to make the final recommendation. NOTE: The current programming does not account for when the deficiencies are left in place at full pay and waived per Specifications Section 330. Future enhancements will address this. a. Leave in Place Full Payment – if the deficiencies were left in place at full payment. b. Leave in Place No Payment – if the deficiencies were left in place at no payment. c. Leave in Place Reduced Payment - – if the deficiencies were left in place and payment was reduced. d. Remove and Replace – if the deficiencies were removed and replaced. 6. Enter comments, if desired. 7. Select the Final Pay Type from the drop down list:
a. Dollars – if you want to record the final dollar amount paid, select Dollars. b. Percentage – if you want to record the final percentage paid, select Percentage. If you selected Dollars, a new field for Final Pay Dollars will appear.
c. Enter the final dollars paid.
Page 34 of 34
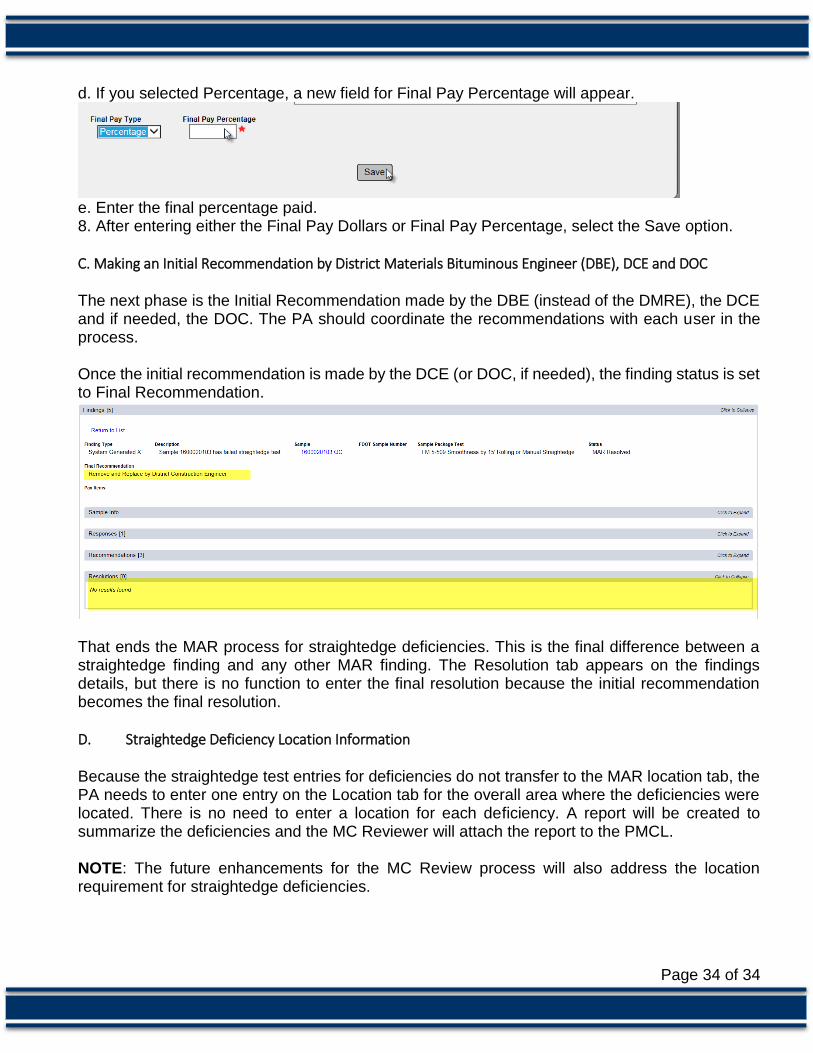
d. If you selected Percentage, a new field for Final Pay Percentage will appear.
e. Enter the final percentage paid. 8. After entering either the Final Pay Dollars or Final Pay Percentage, select the Save option.
C. Making an Initial Recommendation by District Materials Bituminous Engineer (DBE), DCE and DOC The next phase is the Initial Recommendation made by the DBE (instead of the DMRE), the DCE and if needed, the DOC. The PA should coordinate the recommendations with each user in the process. Once the initial recommendation is made by the DCE (or DOC, if needed), the finding status is set to Final Recommendation.
That ends the MAR process for straightedge deficiencies. This is the final difference between a straightedge finding and any other MAR finding. The Resolution tab appears on the findings details, but there is no function to enter the final resolution because the initial recommendation becomes the final resolution.
D. Straightedge Deficiency Location Information Because the straightedge test entries for deficiencies do not transfer to the MAR location tab, the PA needs to enter one entry on the Location tab for the overall area where the deficiencies were located. There is no need to enter a location for each deficiency. A report will be created to summarize the deficiencies and the MC Reviewer will attach the report to the PMCL. NOTE: The future enhancements for the MC Review process will also address the location requirement for straightedge deficiencies.