FLIGHT DESIGN STARTER LOFT DOVE BREEDING BOXES PIGEON TALK LOFT TIPS Flight
45
CONTENTS: FLIGHT DESIGN STARTER LOFT DOVE BREEDING BOXES PIGEON TALK LOFT TIPS Flight Design FORWARD: BASH THIS BOOK! I guess you could call this a compiler’s note, because I am not an author. These articles have been gathered from sources around the interwebs and written by people who actually know what they are doing. This is plagerism in it’s purest form, copy/paste of the finest Ctrl A + Ctrl C. If you read this book and have something to add, complain, or mention, please email me. Just don’t try contacting me like I’m some kind of expert. This is Philodice, a member at www.Pigeontalk.com . "This was one of the first flights I built. The following plans are for a flight very similar to this one. There are a few differences correcting some mistakes and making the flight safer to you and the birds." "The biggest difference is in the door or doors. The flight above had a large door on the end I could stand and walk through and a small door to feed through. This allowed for birds to fly past me when entering which could result in their loss. I always recommend the addition and use of a Man-Trap on all outdoor flights. This way birds cannot be lost! In attempting escape, birds tend fly upward. If a Man-Trap is not possible, then it is very important to keep the doors small and as low as possible."
Transcript of FLIGHT DESIGN STARTER LOFT DOVE BREEDING BOXES PIGEON TALK LOFT TIPS Flight

CONTENTS:
FLIGHT DESIGN
STARTER LOFT
DOVE BREEDING BOXES
PIGEON TALK LOFT TIPS
Flight Design
FORWARD: BASH THIS BOOK!
I guess you could call this a compiler’s note, because I am not an author. These articles
have been gathered from sources around the interwebs and written by people who
actually know what they are doing. This is plagerism in it’s purest form, copy/paste of
the finest Ctrl A + Ctrl C. If you read this book and have something to add, complain, or
mention, please email me. Just don’t try contacting me like I’m some kind of expert.
This is Philodice, a member at www.Pigeontalk.com.
"This was one of the first flights I built. The following plans are for a flight very similar
to this one. There are a few differences correcting some mistakes and making the flight
safer to you and the birds."
"The biggest difference is in the door or doors. The flight above had a large door on the
end I could stand and walk through and a small door to feed through. This allowed for
birds to fly past me when entering which could result in their loss. I always recommend
the addition and use of a Man-Trap on all outdoor flights. This way birds cannot be lost!
In attempting escape, birds tend fly upward. If a Man-Trap is not possible, then it is very
important to keep the doors small and as low as possible."
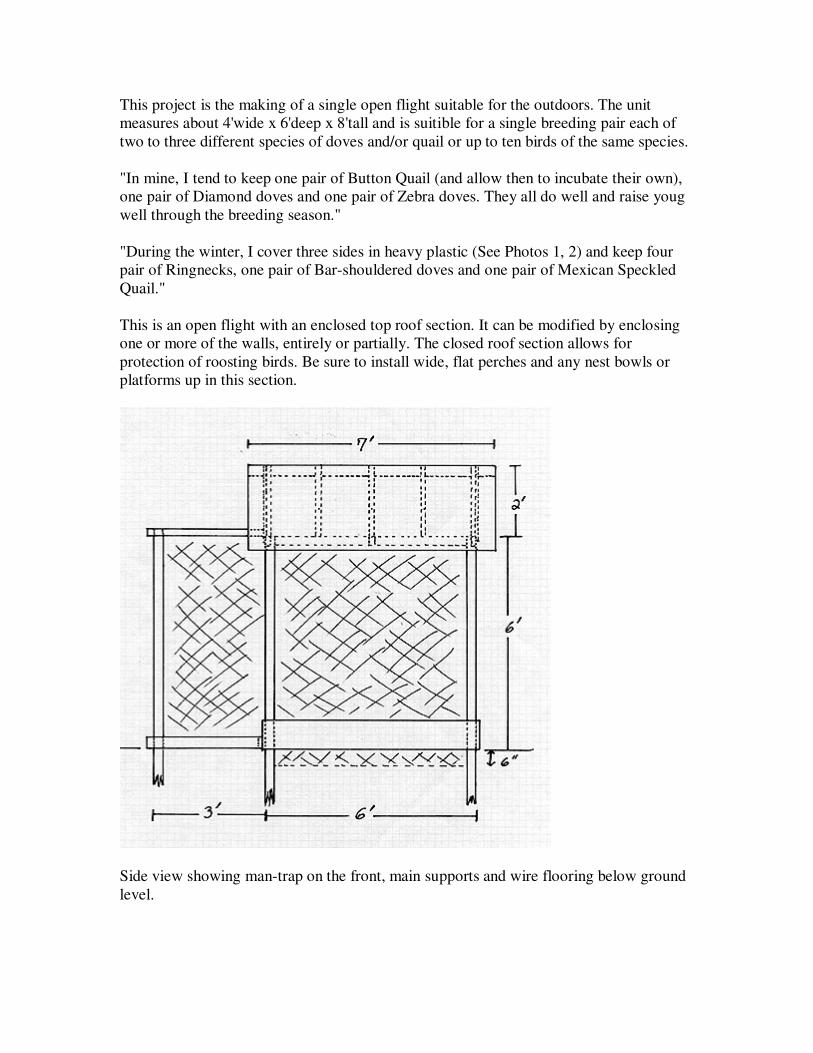
This project is the making of a single open flight suitable for the outdoors. The unit
measures about 4'wide x 6'deep x 8'tall and is suitible for a single breeding pair each of
two to three different species of doves and/or quail or up to ten birds of the same species.
"In mine, I tend to keep one pair of Button Quail (and allow then to incubate their own),
one pair of Diamond doves and one pair of Zebra doves. They all do well and raise youg
well through the breeding season."
"During the winter, I cover three sides in heavy plastic (See Photos 1, 2) and keep four
pair of Ringnecks, one pair of Bar-shouldered doves and one pair of Mexican Speckled
Quail."
This is an open flight with an enclosed top roof section. It can be modified by enclosing
one or more of the walls, entirely or partially. The closed roof section allows for
protection of roosting birds. Be sure to install wide, flat perches and any nest bowls or
platforms up in this section.
Side view showing man-trap on the front, main supports and wire flooring below ground
level.
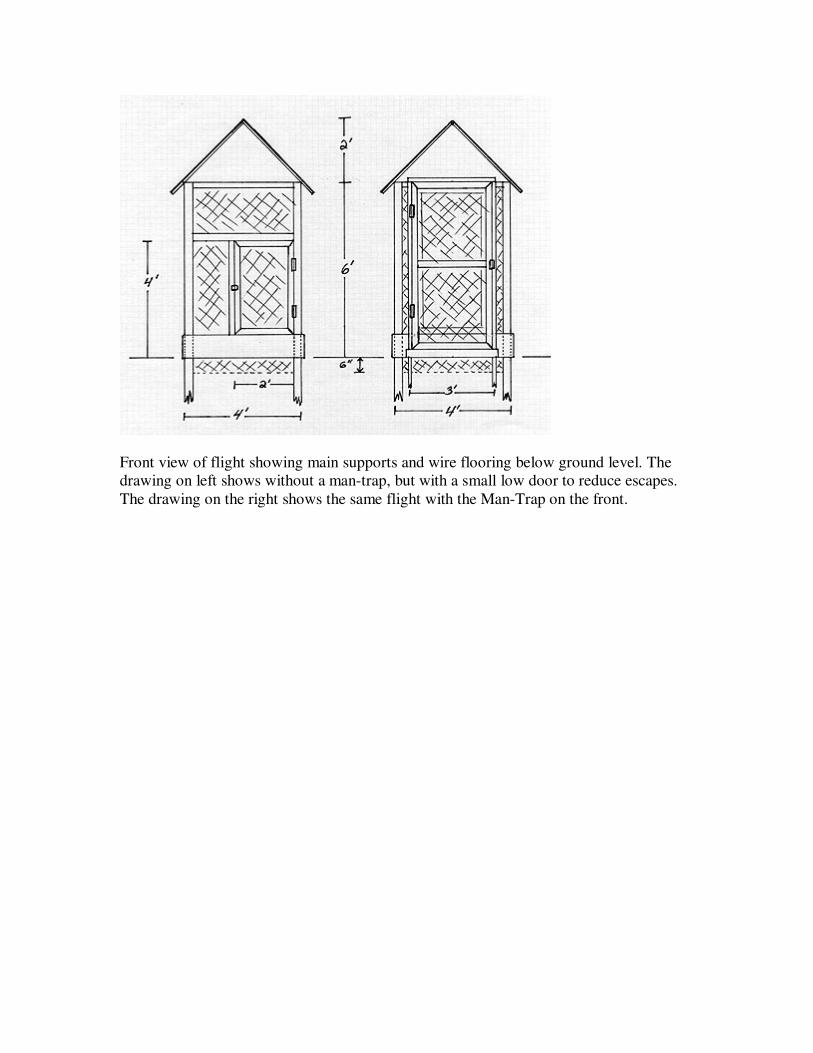
Front view of flight showing main supports and wire flooring below ground level. The
drawing on left shows without a man-trap, but with a small low door to reduce escapes.
The drawing on the right shows the same flight with the Man-Trap on the front.
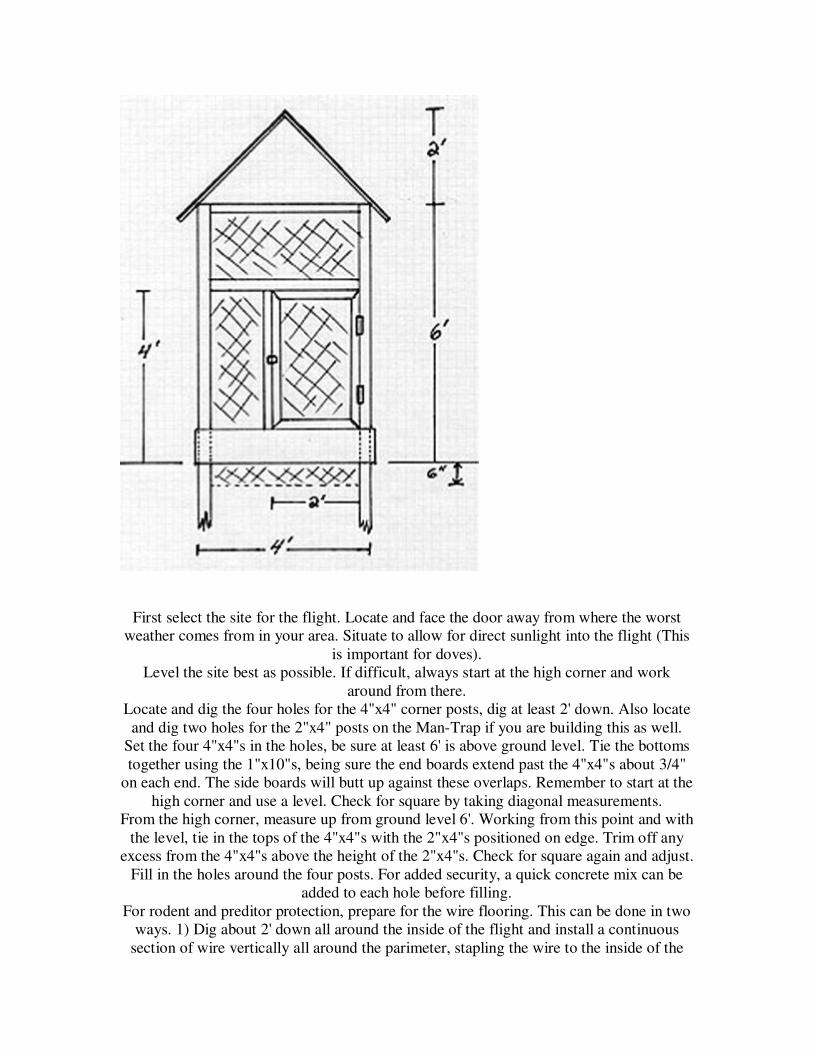
First select the site for the flight. Locate and face the door away from where the worst
weather comes from in your area. Situate to allow for direct sunlight into the flight (This
is important for doves).
Level the site best as possible. If difficult, always start at the high corner and work
around from there.
Locate and dig the four holes for the 4"x4" corner posts, dig at least 2' down. Also locate
and dig two holes for the 2"x4" posts on the Man-Trap if you are building this as well.
Set the four 4"x4"s in the holes, be sure at least 6' is above ground level. Tie the bottoms
together using the 1"x10"s, being sure the end boards extend past the 4"x4"s about 3/4"
on each end. The side boards will butt up against these overlaps. Remember to start at the
high corner and use a level. Check for square by taking diagonal measurements.
From the high corner, measure up from ground level 6'. Working from this point and with
the level, tie in the tops of the 4"x4"s with the 2"x4"s positioned on edge. Trim off any
excess from the 4"x4"s above the height of the 2"x4"s. Check for square again and adjust.
Fill in the holes around the four posts. For added security, a quick concrete mix can be
added to each hole before filling.
For rodent and preditor protection, prepare for the wire flooring. This can be done in two
ways. 1) Dig about 2' down all around the inside of the flight and install a continuous
section of wire vertically all around the parimeter, stapling the wire to the inside of the
flight base. 2) Dig down about 6" or so from the entire flight bottom. Save the dirt off to
the side. Cut wire sections to fill the entire flight bottom comming up and overlapping the
insides of the 1"x10"s. Attach the sections of wire with J-clips or thread them together
with galvanized or stainless wire and staple the entire unit inside the flight. Backfill the
flight with the dirt removed or any other surface material you wish to use.
"I prefer the second method on this size flight. If putting a number of these flights side by
side, I would use the first method."
Tie the center of the two upper 2"x4"s together with a 2"x4" cross member on edge.
The Roof
Calculate and cut the angles for your ten rafter pieces from 2"x4"s. (If you are using
heavy plywood for the roof, 3/4" or more, three rafters may be sufficient.) With help, put
up the 2"x6" ridge beam and the rafters at both ends of the flight. Attach the center rafters
as well. Fill in with the others if using them. Cut and install roofing plywood or other
roofing material you have selected. If plywood, cover with tar paper, install drip edges
and apply shingles. Be sure no screws or nails come through the plywood or roofing
material and can harm the birds.
Measure, cut and install the two triangular end caps to finish enclosing the roof section.
Cut the wire sections for the two sides and the back of the flight. Combine sections with
J-clips or by threading with stainless wire. Install the wire sections to the flight. This can
be done from the inside or outside of the flight depending on how you wish the finished
project to look. Just be sure there are no sharp wires for the birds to injure themselves.
"I chose to install the wire from the inside and then cover the edges with thin strips of
finishing wood."
Without a Man-Trap
(I do not recommend this method!)
If a Man-Trap is not to be used, it is important to keep the door as small and low as
possible. I would install horizontal and verticle 2"x4"s to make an opening for a door
about 2'wide x 4'tall. Build the door and install so it swings outward. I would also
consider an even smaller door to feed and water through to even further reduce chances
of birds escaping.
With a Man-Trap
(It is Always best to use a Man-Trap)
If building a 3'x3'x6' Man-Trap, cut and attach two verticle 2"x4"s to the open end of the
flight, 3'apart. Place a long 2"x4" into each of the holes dug 3' apart and 3' from the flight.
Be sure they extend at least 6' above ground level. Tie the four verticles together above
and below with 2"x4"s checking for level and square. The finished frame should be a
3'x3' square 6'tall. Trim any excess 2"x4" from the two outer verticles. Backfill the holes
firmly with dirt.
Select the end or side of the Man-Trap for your door, build the Man-Trap door and hang
so it swings outward. Be sure to use cross or angle members for a stronger door frame.
Also be sure there is a latch or hook to lock the Man-Trap from the inside once you are in
it.
"You do not want someone opening it from the outside while it is doing its job and
holding a valuable bird."
Cover the Man-Trap (walls & top) and door with wire.
Even with the Man-Trap, I still recommend that the door to the flight be low as possible
and small. Determine the doors size and install a horizontal and verticle 2"x4"s to make
the desired opening. Make the flight door. If there is enough room to open it into the
Man-Trap with you inside the Trap, hang it to swing so. If not, it must swing into the
flight.
"Remember you will probably have feed buckest, water or a shipping box of birds with
you when in the Trap. Design its size to accomodate this."
Cover the door end of the flight and door with wire using the same methods as the rest of
the flight.
To make your flight last the longest, paint or preserve any wood surfaces. This is often
easier before the wire is installed, so plan accordingly! Be sure any products used are
non-toxic for birds and allow pleanty of time to dry.
Tools List
At least an 8' flat surface, Saw Horses, Circular Saw, Extension Cord,
Electric Drill with Bits and Screw Bits, Hammer, Screw Drivers, Tape
Measure, Pencils, Wire Nippers, J-clips Pliers, Straight Edge or T-Square
and Level.
Materials List
This list will vary depending on variations you have selected.
Plywood: Two sheets for roofing, One sheet for triangular end caps of roof section.
4"x4"s: (Pressure Treated) Four at 8' long.
2"x6": One at 8' long.
2"x4"s: Five at 6' long. (add Two if extra Roof Rafters are to be installed), Seven at 4'
long.
[If the Man-Trap is to be built: Add Two (Pressure Treated) at 8' long and
Seven (To Include Two Pressure Treated) at 6' long.]
1"x10"s: (Pressure Treated) Four at 6' long.
Wire: Welded Wire at 1/4"x1/4", enough to cover the following:
One section at 6'x8' (wire bottom), or a 2-1/2'x20' (wire ground barrier).
Two walls at 6'x6' and Two walls at 6'x4'
[If the Man-Trap is to be built: Add for Three walls at 6'x3' and One top at
4'x4'.]
Roofing Materials: To cover a section about 6'x8'.
Other Materials:
Nails, Screws and Heavy Staples, Wood Glue, J-clips or Stainless Wire, Hindges for Two
or Three doors, Locks or Latches for Three doors plus an extra Latch for inside the Man-
Trap.
Flat Perches from 1"x2"s, Nests and/or Nesting Platforms.
Quick Concrete Mix, Alternative Flight Substrate.
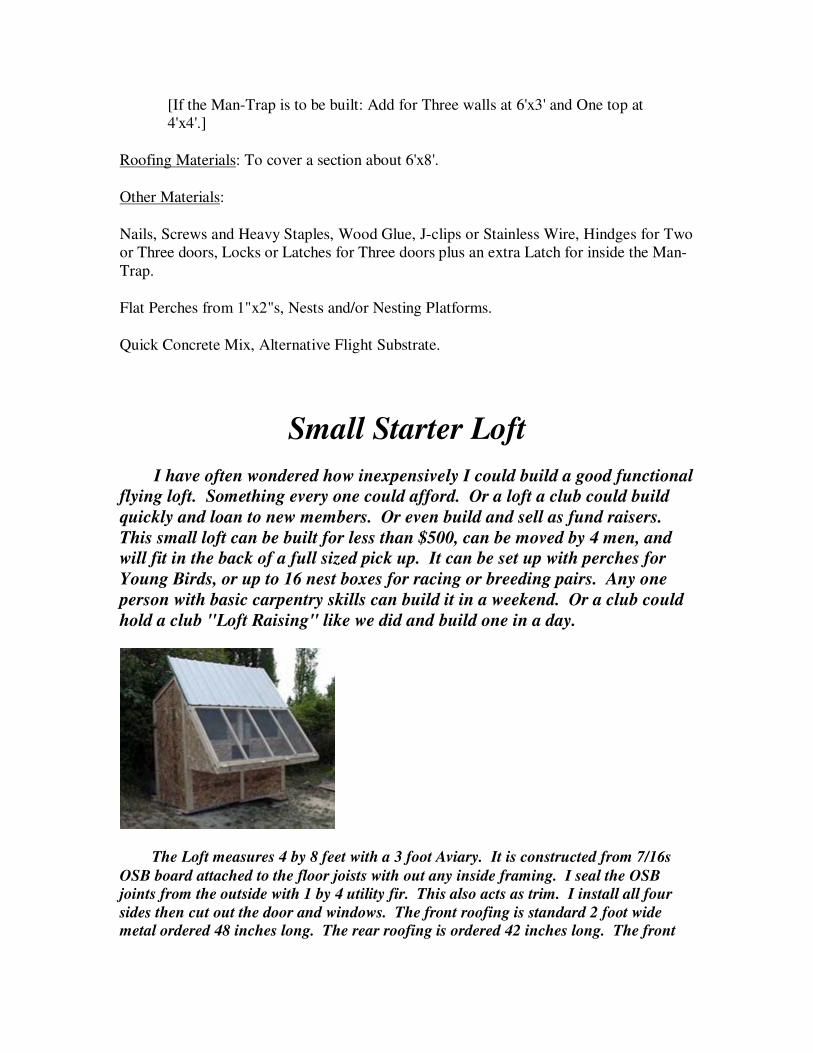
Small Starter Loft
I have often wondered how inexpensively I could build a good functional flying loft. Something every one could afford. Or a loft a club could build quickly and loan to new members. Or even build and sell as fund raisers. This small loft can be built for less than $500, can be moved by 4 men, and will fit in the back of a full sized pick up. It can be set up with perches for Young Birds, or up to 16 nest boxes for racing or breeding pairs. Any one person with basic carpentry skills can build it in a weekend. Or a club could hold a club "Loft Raising" like we did and build one in a day.
The Loft measures 4 by 8 feet with a 3 foot Aviary. It is constructed from 7/16s
OSB board attached to the floor joists with out any inside framing. I seal the OSB joints from the outside with 1 by 4 utility fir. This also acts as trim. I install all four sides then cut out the door and windows. The front roofing is standard 2 foot wide metal ordered 48 inches long. The rear roofing is ordered 42 inches long. The front
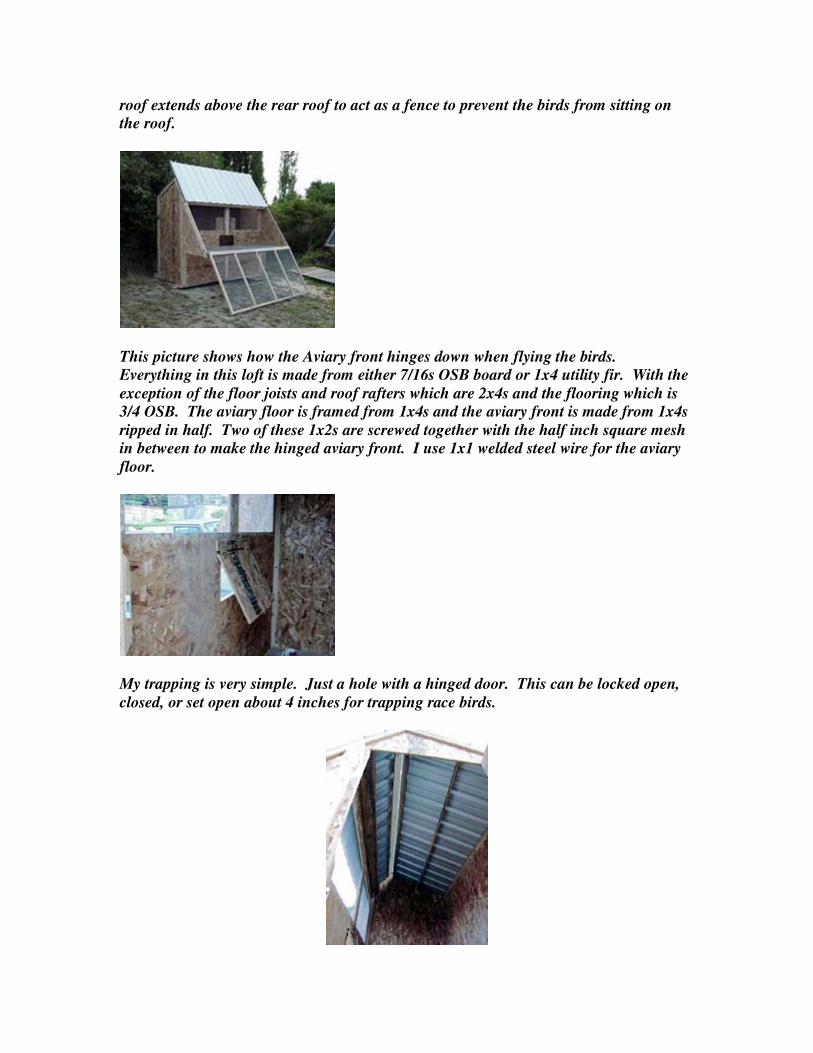
roof extends above the rear roof to act as a fence to prevent the birds from sitting on the roof.
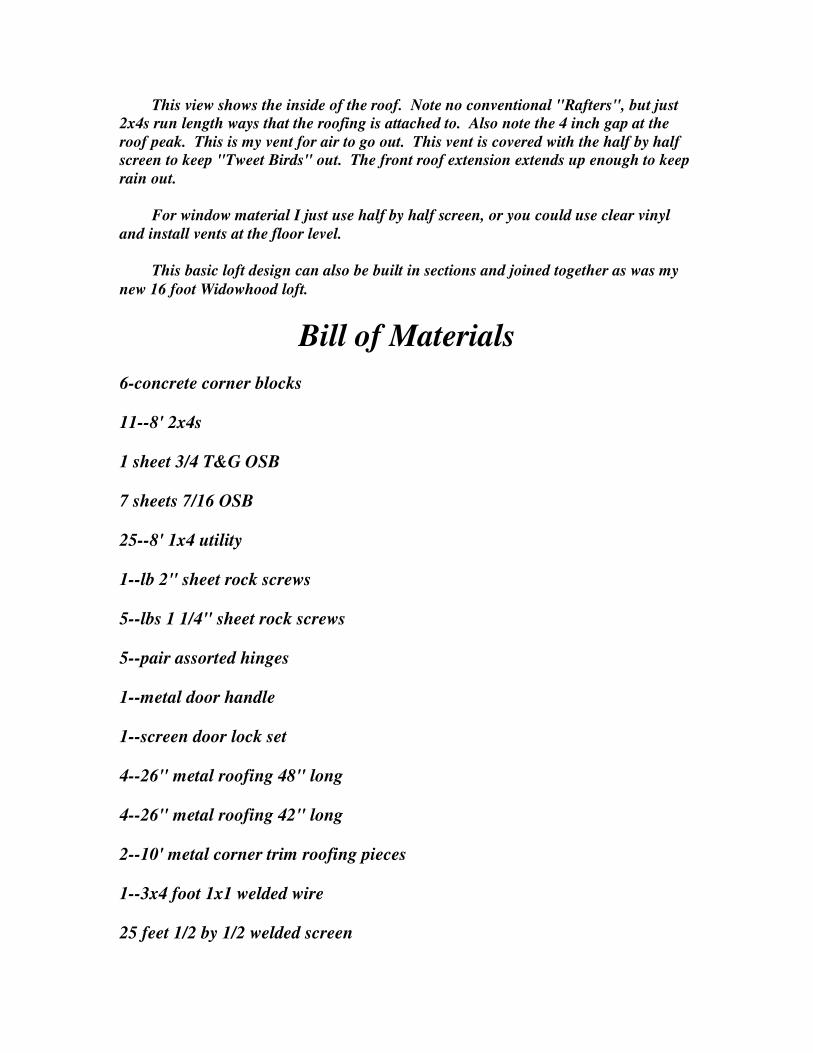
This picture shows how the Aviary front hinges down when flying the birds. Everything in this loft is made from either 7/16s OSB board or 1x4 utility fir. With the exception of the floor joists and roof rafters which are 2x4s and the flooring which is 3/4 OSB. The aviary floor is framed from 1x4s and the aviary front is made from 1x4s ripped in half. Two of these 1x2s are screwed together with the half inch square mesh in between to make the hinged aviary front. I use 1x1 welded steel wire for the aviary floor.
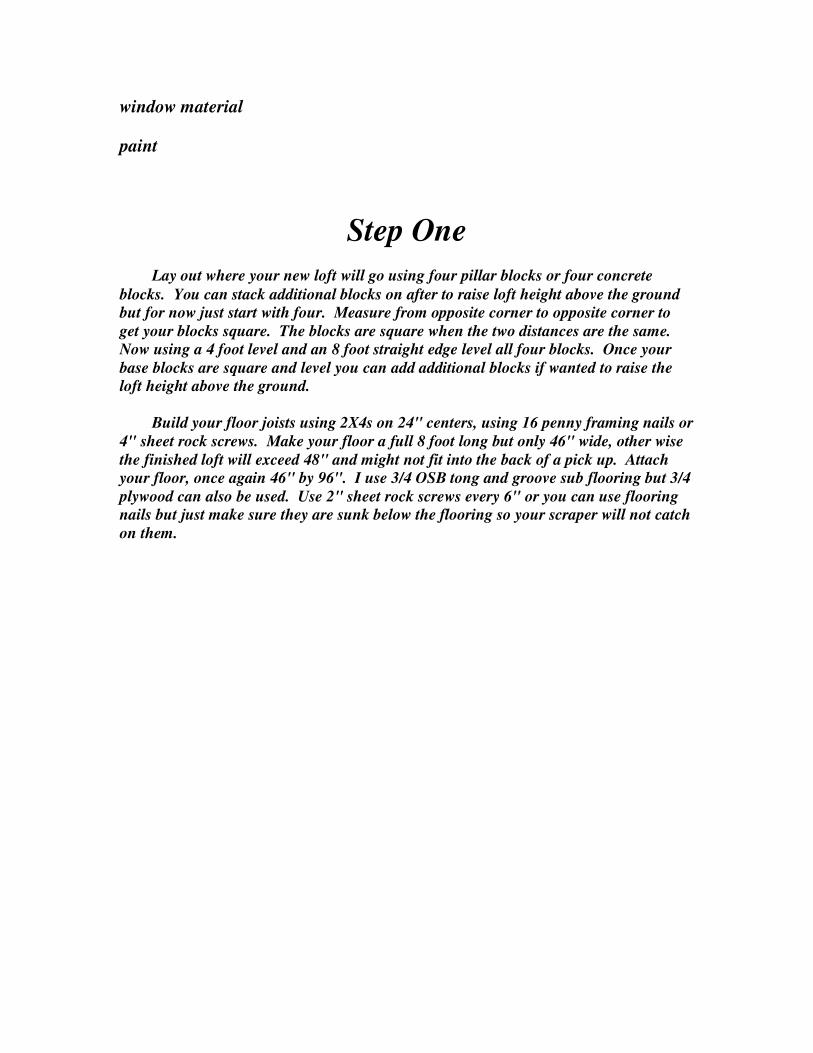
My trapping is very simple. Just a hole with a hinged door. This can be locked open, closed, or set open about 4 inches for trapping race birds.
This view shows the inside of the roof. Note no conventional "Rafters", but just 2x4s run length ways that the roofing is attached to. Also note the 4 inch gap at the roof peak. This is my vent for air to go out. This vent is covered with the half by half screen to keep "Tweet Birds" out. The front roof extension extends up enough to keep rain out.
For window material I just use half by half screen, or you could use clear vinyl and install vents at the floor level.
This basic loft design can also be built in sections and joined together as was my
new 16 foot Widowhood loft.
Bill of Materials
6-concrete corner blocks
11--8' 2x4s
1 sheet 3/4 T&G OSB
7 sheets 7/16 OSB
25--8' 1x4 utility
1--lb 2" sheet rock screws
5--lbs 1 1/4" sheet rock screws
5--pair assorted hinges
1--metal door handle
1--screen door lock set
4--26" metal roofing 48" long
4--26" metal roofing 42" long
2--10' metal corner trim roofing pieces
1--3x4 foot 1x1 welded wire
25 feet 1/2 by 1/2 welded screen
window material
paint
Step One
Lay out where your new loft will go using four pillar blocks or four concrete
blocks. You can stack additional blocks on after to raise loft height above the ground but for now just start with four. Measure from opposite corner to opposite corner to get your blocks square. The blocks are square when the two distances are the same. Now using a 4 foot level and an 8 foot straight edge level all four blocks. Once your base blocks are square and level you can add additional blocks if wanted to raise the loft height above the ground.
Build your floor joists using 2X4s on 24" centers, using 16 penny framing nails or 4" sheet rock screws. Make your floor a full 8 foot long but only 46" wide, other wise the finished loft will exceed 48" and might not fit into the back of a pick up. Attach your floor, once again 46" by 96". I use 3/4 OSB tong and groove sub flooring but 3/4 plywood can also be used. Use 2" sheet rock screws every 6" or you can use flooring nails but just make sure they are sunk below the flooring so your scraper will not catch on them.

IMPORTANT
Use the Concrete pier blocks with the metal anchors so you can bolt the loft
to the concrete blocks.
Also, I would recommend using 6 blocks instead of 4.
There has been two lofts that I know of blown over in hurricanes or tornados.
Step Two
As per the drawing below lay two sheets of 7/16th OSB on the ground and lay out
the ends of the loft for cutting. The two triangle pieces from the top of the sides can be discarded as they are scrap. You need to cut two end pieces and two aviary side pieces. The two aviary side pieces can be cut from one sheet of OSB so you will need a total of three pieces of 7/16th OSB for this step. Next take two more pieces of 7/16th OSB and
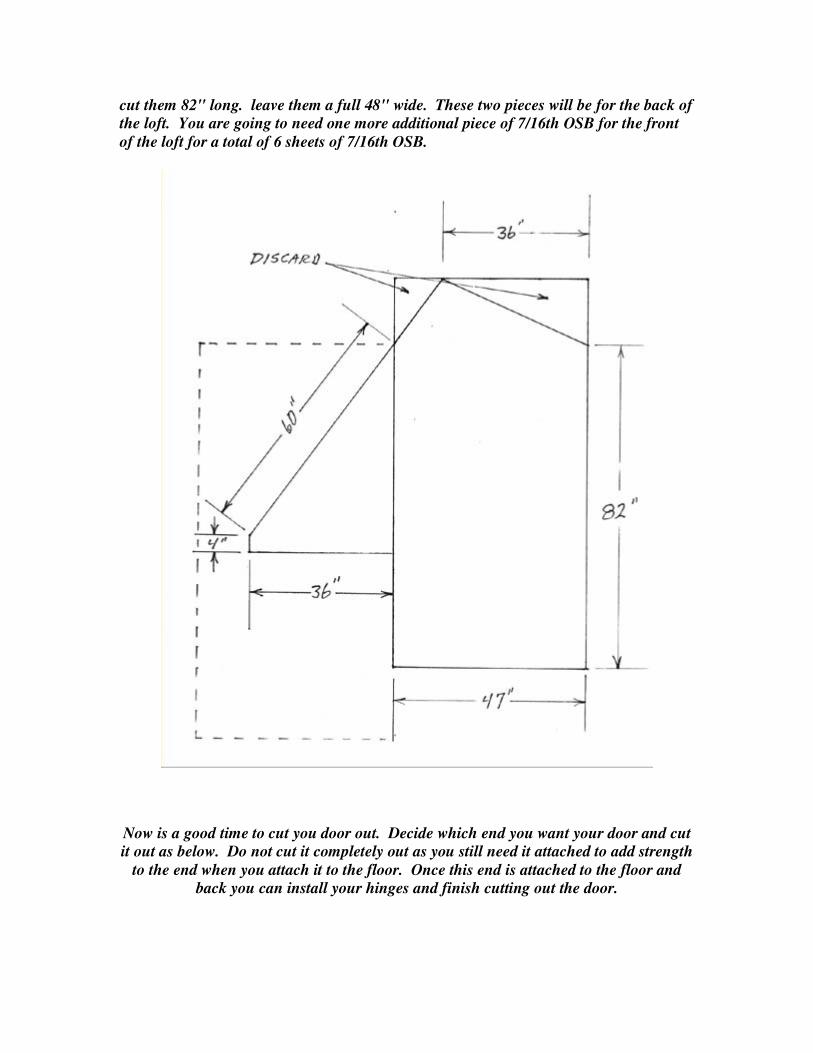
cut them 82" long. leave them a full 48" wide. These two pieces will be for the back of the loft. You are going to need one more additional piece of 7/16th OSB for the front of the loft for a total of 6 sheets of 7/16th OSB.
Now is a good time to cut you door out. Decide which end you want your door and cut it out as below. Do not cut it completely out as you still need it attached to add strength
to the end when you attach it to the floor. Once this end is attached to the floor and back you can install your hinges and finish cutting out the door.
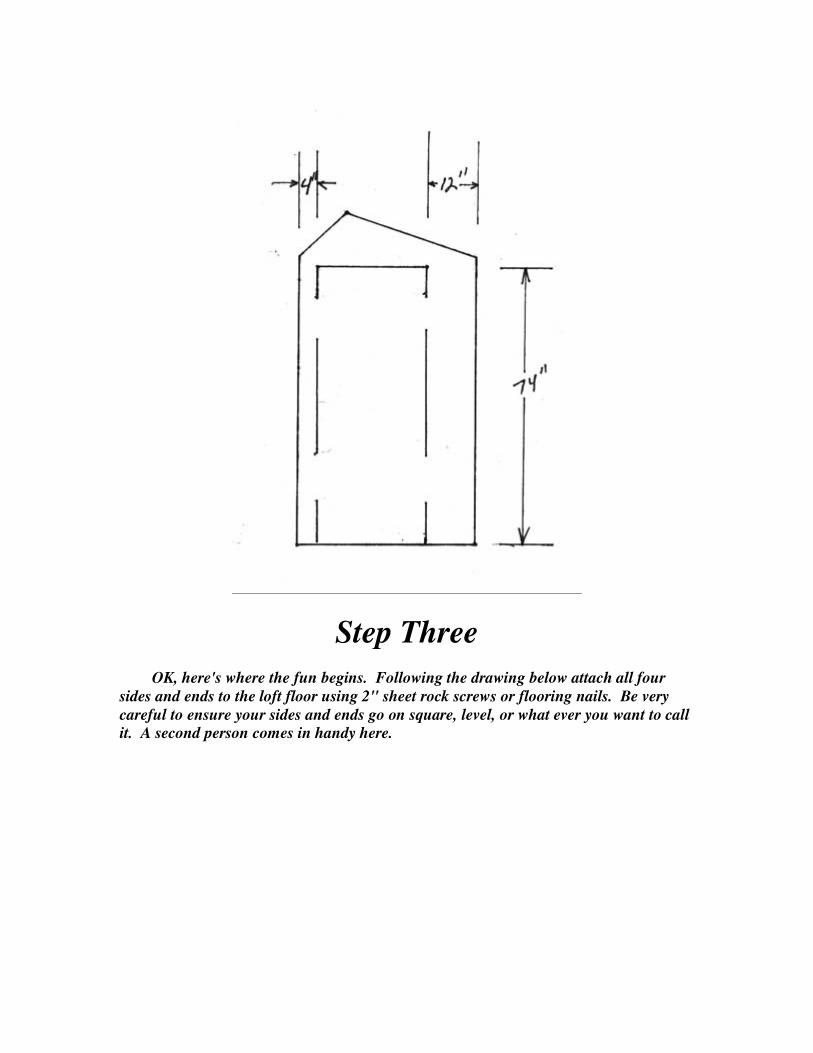
Step Three
OK, here's where the fun begins. Following the drawing below attach all four sides and ends to the loft floor using 2" sheet rock screws or flooring nails. Be very careful to ensure your sides and ends go on square, level, or what ever you want to call it. A second person comes in handy here.
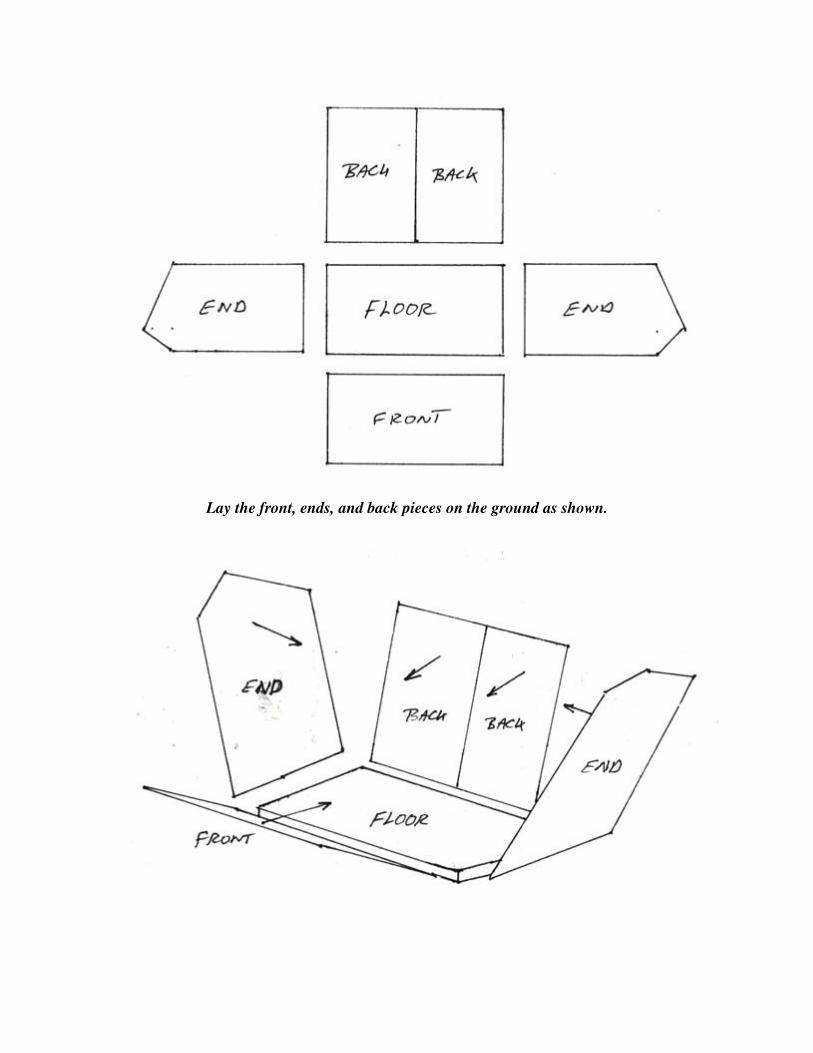
Lay the front, ends, and back pieces on the ground as shown.
I like to start with the two back pieces first, then the two ends, and then the front. The best thing to do is to hold off on the front for a while until you finish off the back corners and cut your door. Also, DO NOT screw or nail the bottom of the door
permanently. You can put a few screws in to help hold the end but these screws will need to come out later.
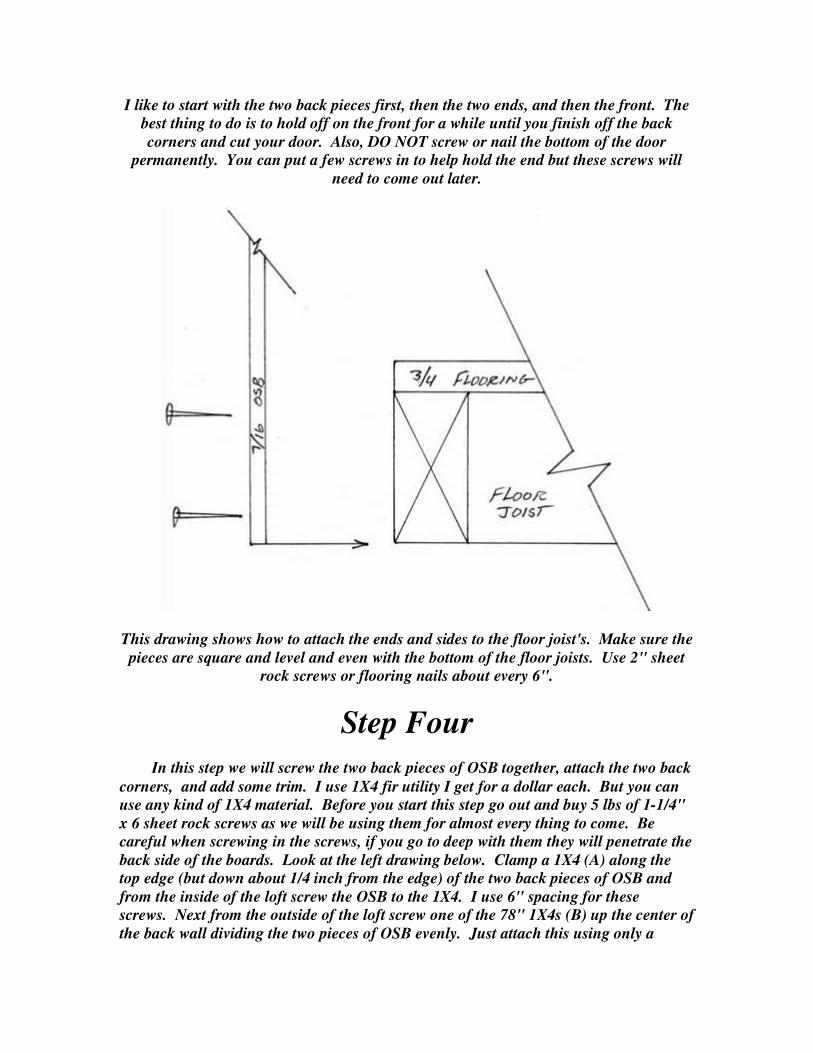
This drawing shows how to attach the ends and sides to the floor joist's. Make sure the pieces are square and level and even with the bottom of the floor joists. Use 2" sheet
rock screws or flooring nails about every 6".
Step Four
In this step we will screw the two back pieces of OSB together, attach the two back
corners, and add some trim. I use 1X4 fir utility I get for a dollar each. But you can use any kind of 1X4 material. Before you start this step go out and buy 5 lbs of 1-1/4" x 6 sheet rock screws as we will be using them for almost every thing to come. Be careful when screwing in the screws, if you go to deep with them they will penetrate the back side of the boards. Look at the left drawing below. Clamp a 1X4 (A) along the top edge (but down about 1/4 inch from the edge) of the two back pieces of OSB and from the inside of the loft screw the OSB to the 1X4. I use 6" spacing for these screws. Next from the outside of the loft screw one of the 78" 1X4s (B) up the center of the back wall dividing the two pieces of OSB evenly. Just attach this using only a
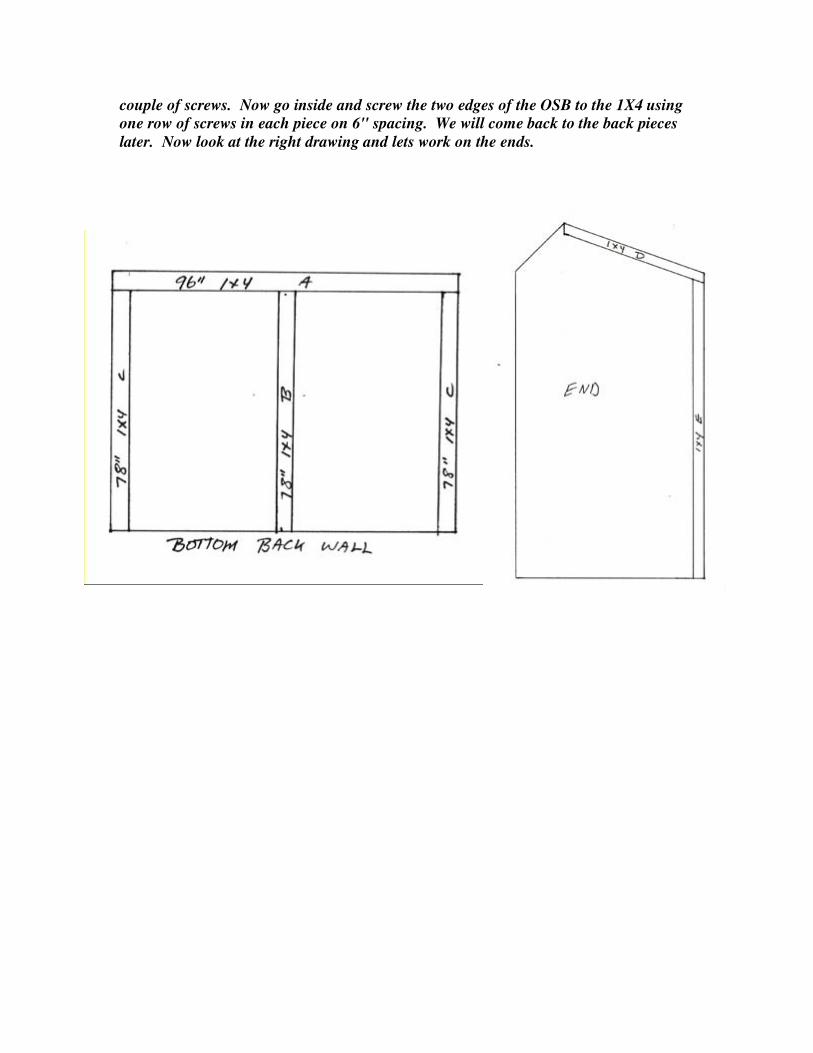
couple of screws. Now go inside and screw the two edges of the OSB to the 1X4 using one row of screws in each piece on 6" spacing. We will come back to the back pieces later. Now look at the right drawing and lets work on the ends.
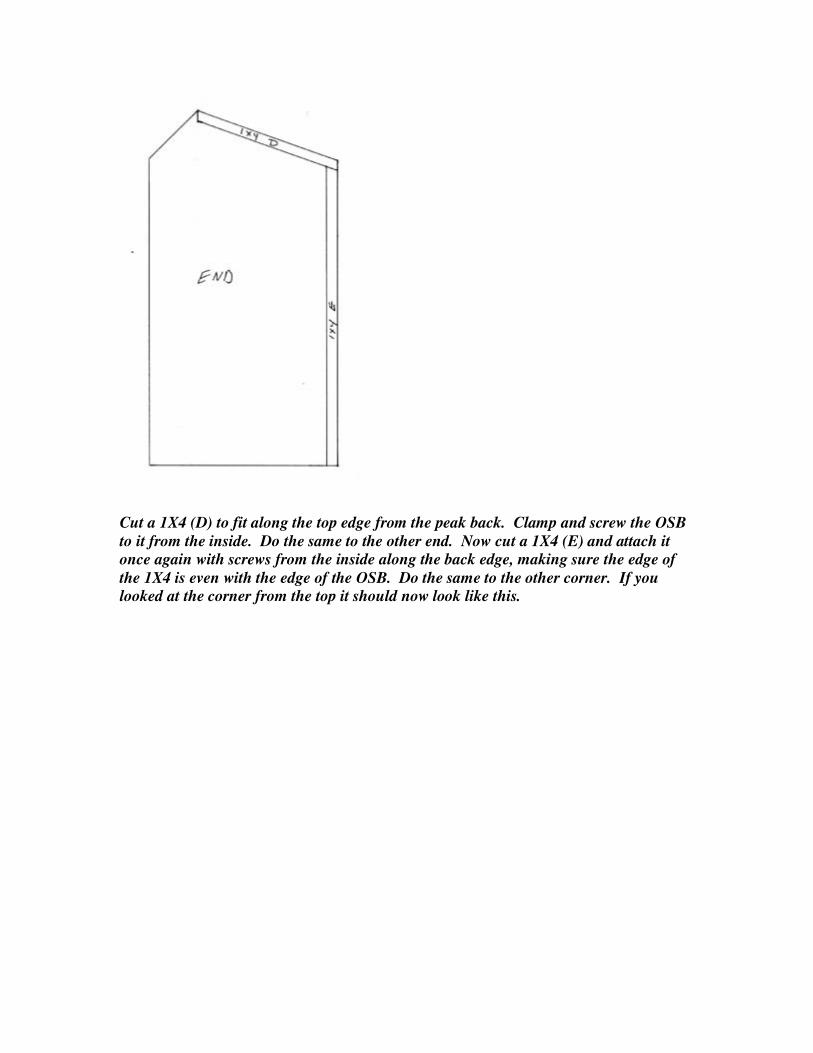
Cut a 1X4 (D) to fit along the top edge from the peak back. Clamp and screw the OSB to it from the inside. Do the same to the other end. Now cut a 1X4 (E) and attach it once again with screws from the inside along the back edge, making sure the edge of the 1X4 is even with the edge of the OSB. Do the same to the other corner. If you looked at the corner from the top it should now look like this.
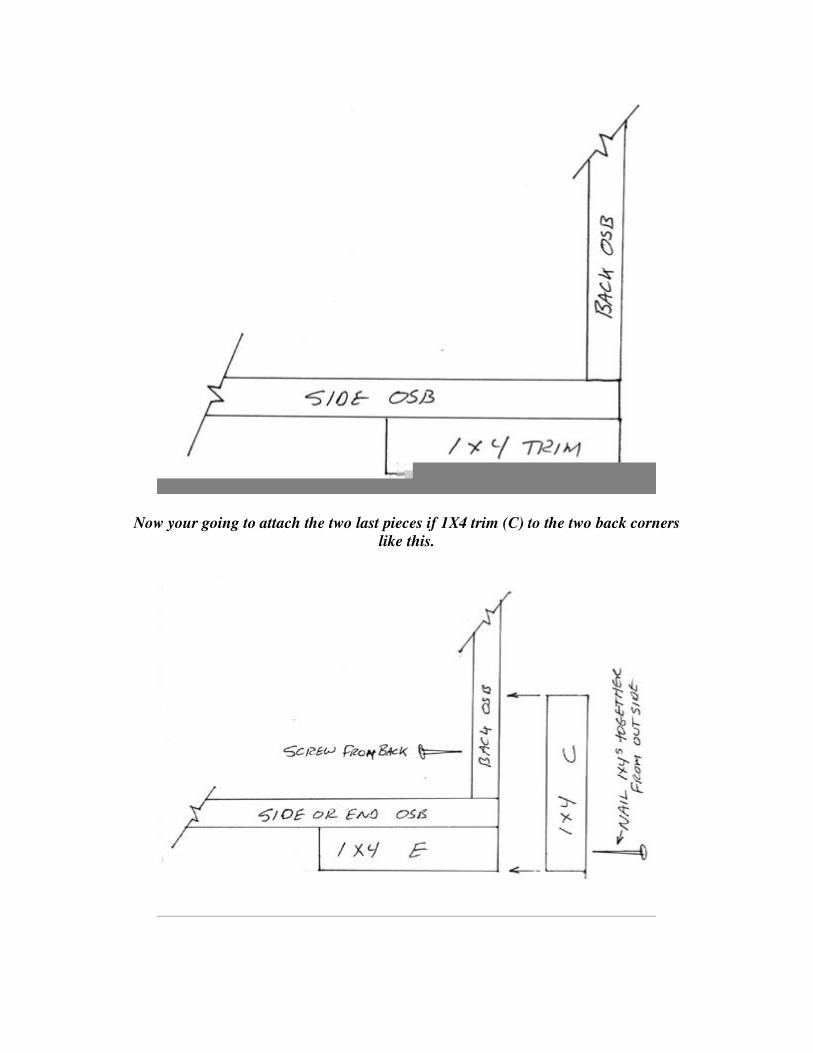
Now your going to attach the two last pieces if 1X4 trim (C) to the two back corners like this.
Use your screws from the inside and some 2" finishing nails from the out side going through piece C into piece E. Do the same to the other side. You now have your two
back corners done. They should be nice and solid and hopefully straight.
Step Five
Well by now we're all proficient carpenters, Right? The next steps will become a
little more tricky. I hope I can explain them well enough to follow.
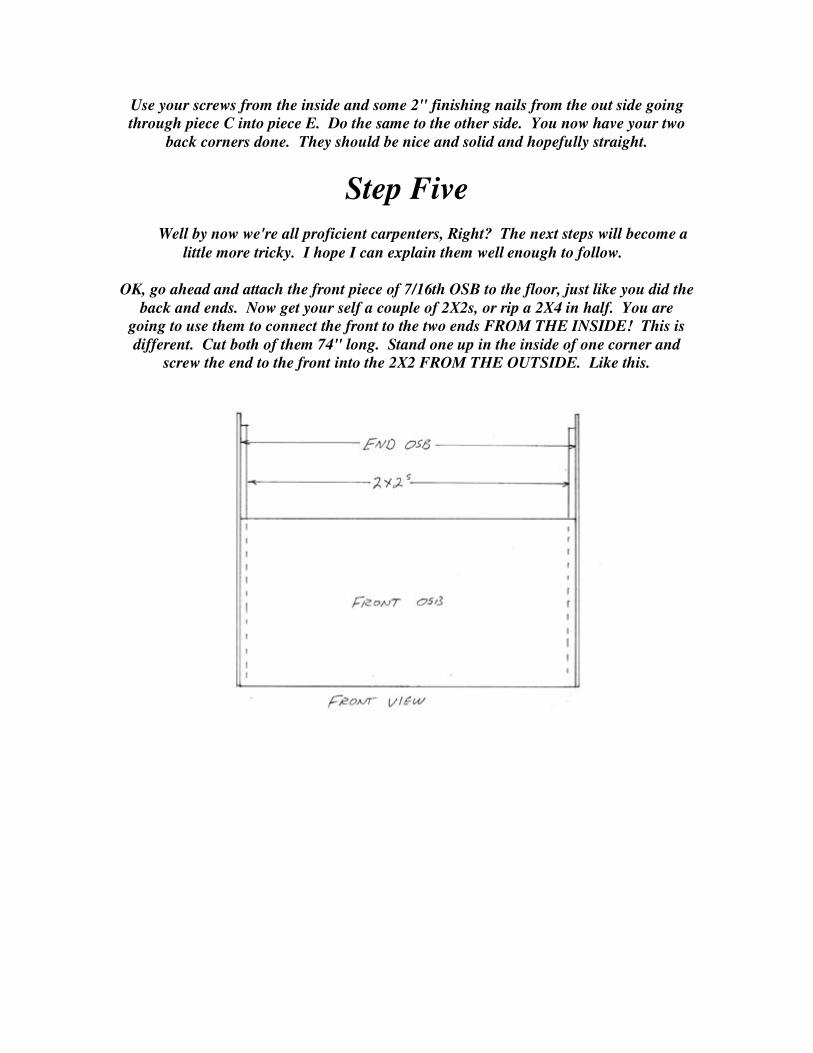
OK, go ahead and attach the front piece of 7/16th OSB to the floor, just like you did the back and ends. Now get your self a couple of 2X2s, or rip a 2X4 in half. You are
going to use them to connect the front to the two ends FROM THE INSIDE! This is different. Cut both of them 74" long. Stand one up in the inside of one corner and
screw the end to the front into the 2X2 FROM THE OUTSIDE. Like this.
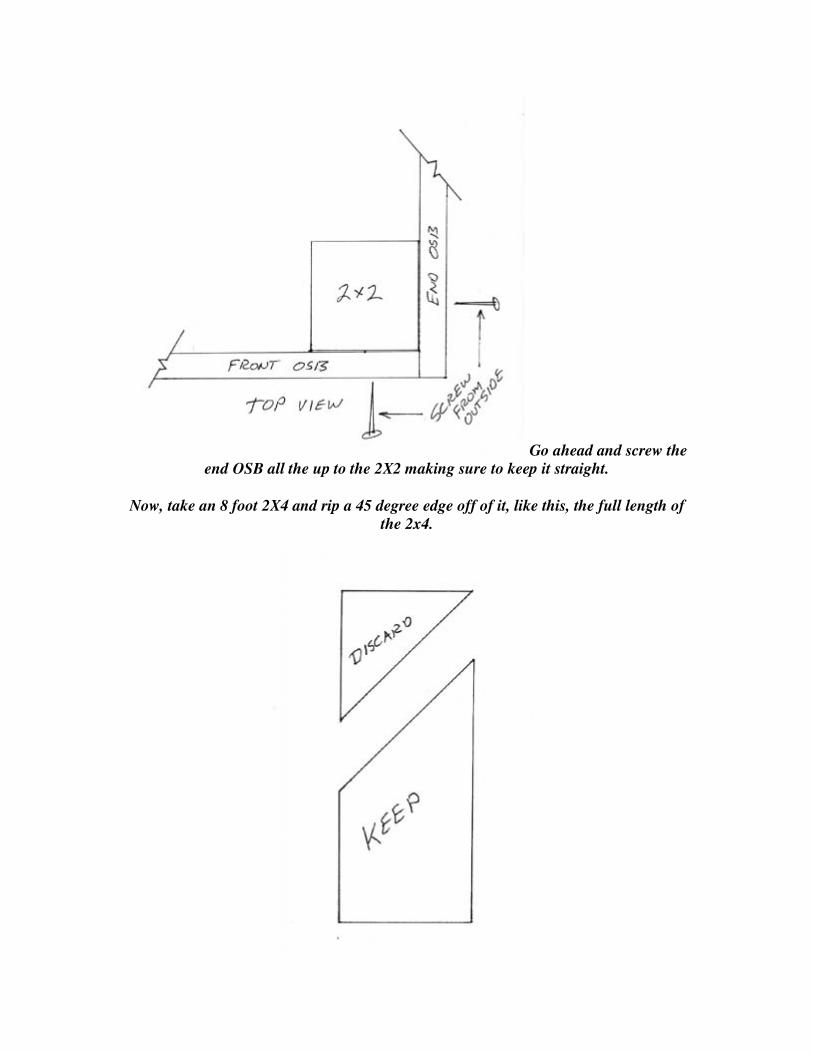
Go ahead and screw the end OSB all the up to the 2X2 making sure to keep it straight.
Now, take an 8 foot 2X4 and rip a 45 degree edge off of it, like this, the full length of the 2x4.
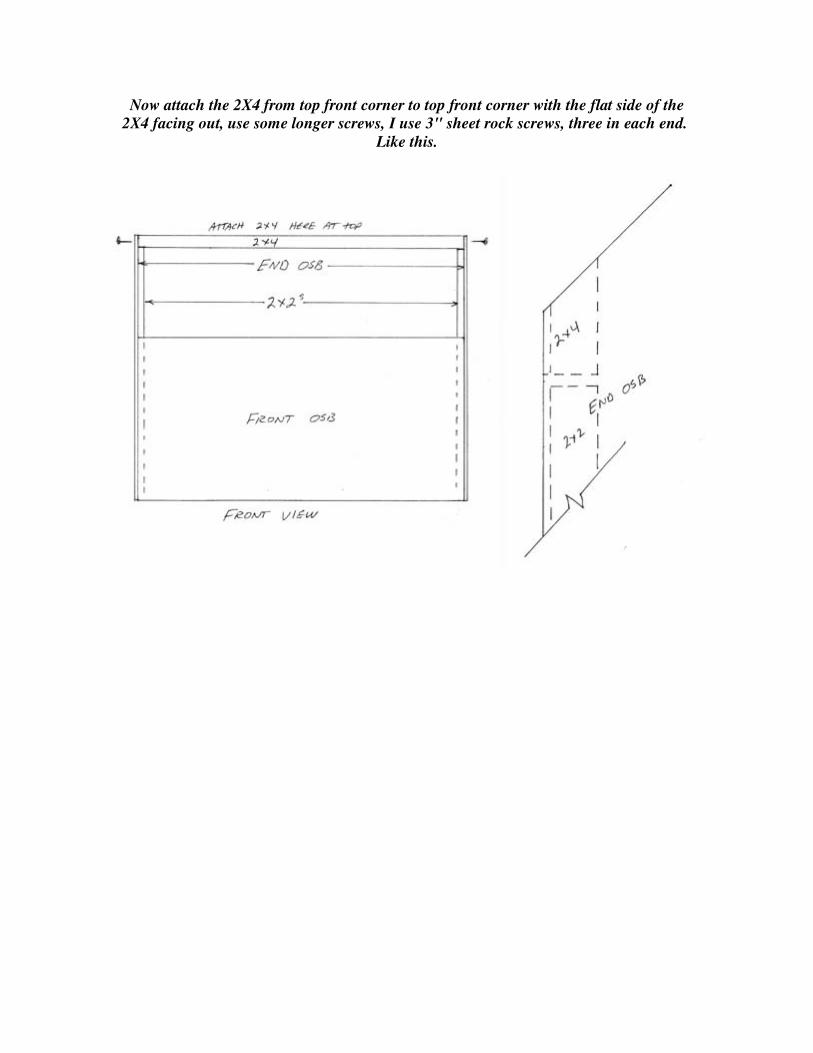
Now attach the 2X4 from top front corner to top front corner with the flat side of the 2X4 facing out, use some longer screws, I use 3" sheet rock screws, three in each end.
Like this.
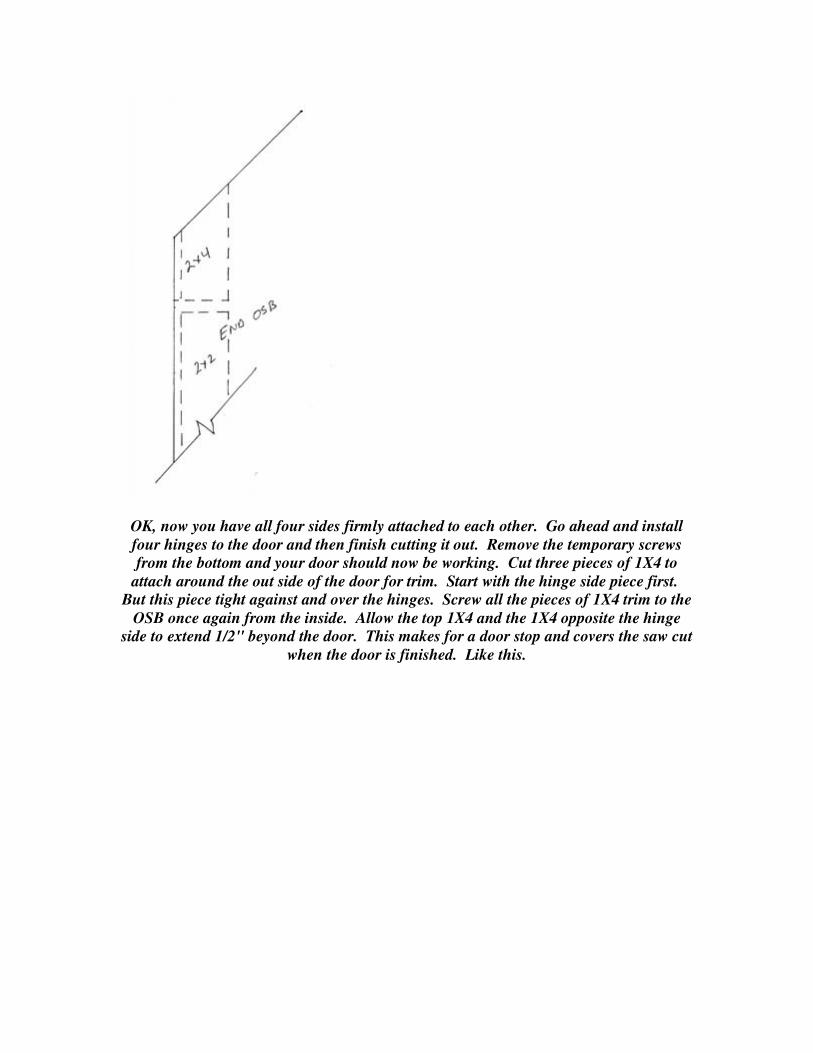
OK, now you have all four sides firmly attached to each other. Go ahead and install four hinges to the door and then finish cutting it out. Remove the temporary screws from the bottom and your door should now be working. Cut three pieces of 1X4 to
attach around the out side of the door for trim. Start with the hinge side piece first. But this piece tight against and over the hinges. Screw all the pieces of 1X4 trim to the
OSB once again from the inside. Allow the top 1X4 and the 1X4 opposite the hinge side to extend 1/2" beyond the door. This makes for a door stop and covers the saw cut
when the door is finished. Like this.
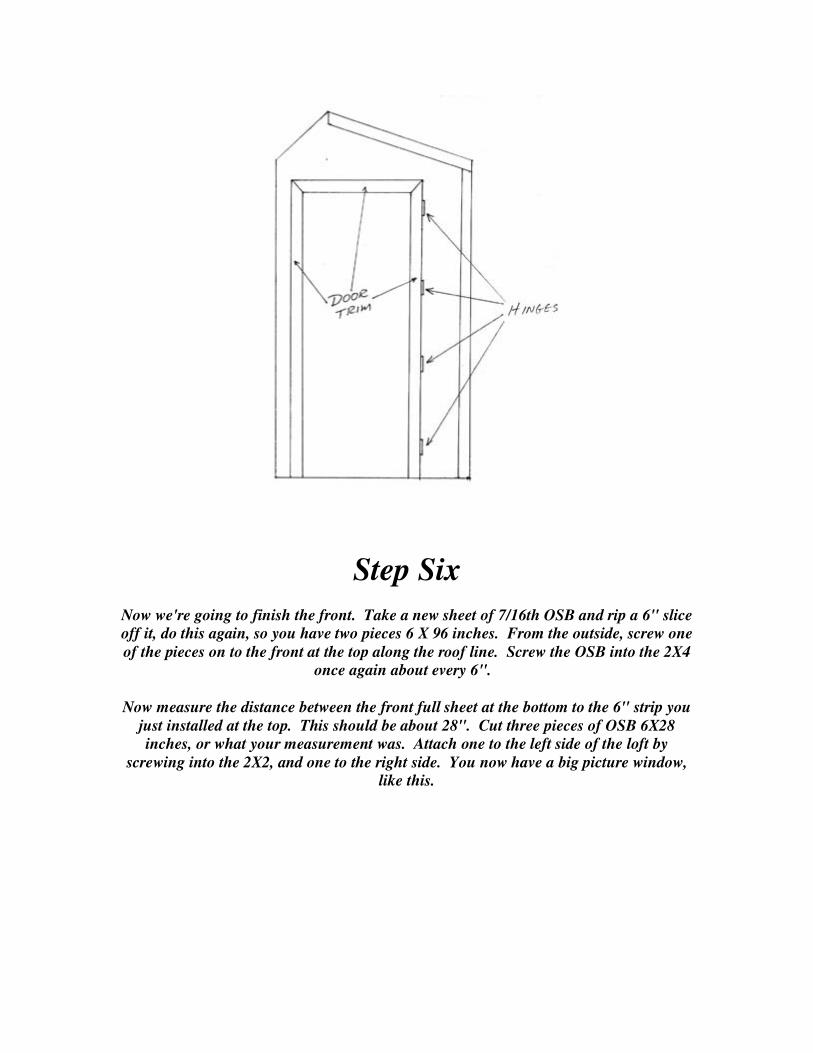
Step Six
Now we're going to finish the front. Take a new sheet of 7/16th OSB and rip a 6" slice off it, do this again, so you have two pieces 6 X 96 inches. From the outside, screw one of the pieces on to the front at the top along the roof line. Screw the OSB into the 2X4
once again about every 6".
Now measure the distance between the front full sheet at the bottom to the 6" strip you just installed at the top. This should be about 28". Cut three pieces of OSB 6X28 inches, or what your measurement was. Attach one to the left side of the loft by
screwing into the 2X2, and one to the right side. You now have a big picture window, like this.
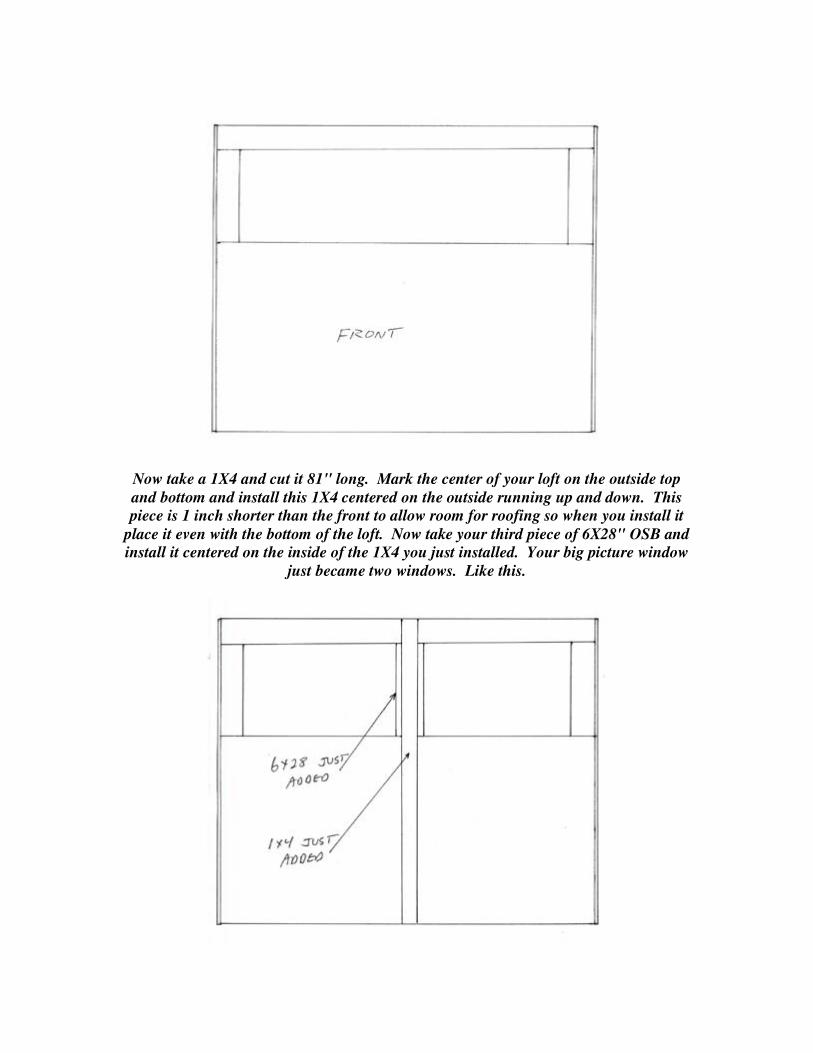
Now take a 1X4 and cut it 81" long. Mark the center of your loft on the outside top and bottom and install this 1X4 centered on the outside running up and down. This piece is 1 inch shorter than the front to allow room for roofing so when you install it
place it even with the bottom of the loft. Now take your third piece of 6X28" OSB and install it centered on the inside of the 1X4 you just installed. Your big picture window
just became two windows. Like this.
For Window material you can use screen like 1/2 by 1/2 which we will be using for the Aviary. Or I like soft heavy duty vinyl, like what is used for storm windows. This
flexible material will not hurt your birds if they fly into it like glass would. Or for a widowhood loft you can use translucent roofing that allows light to come in but the
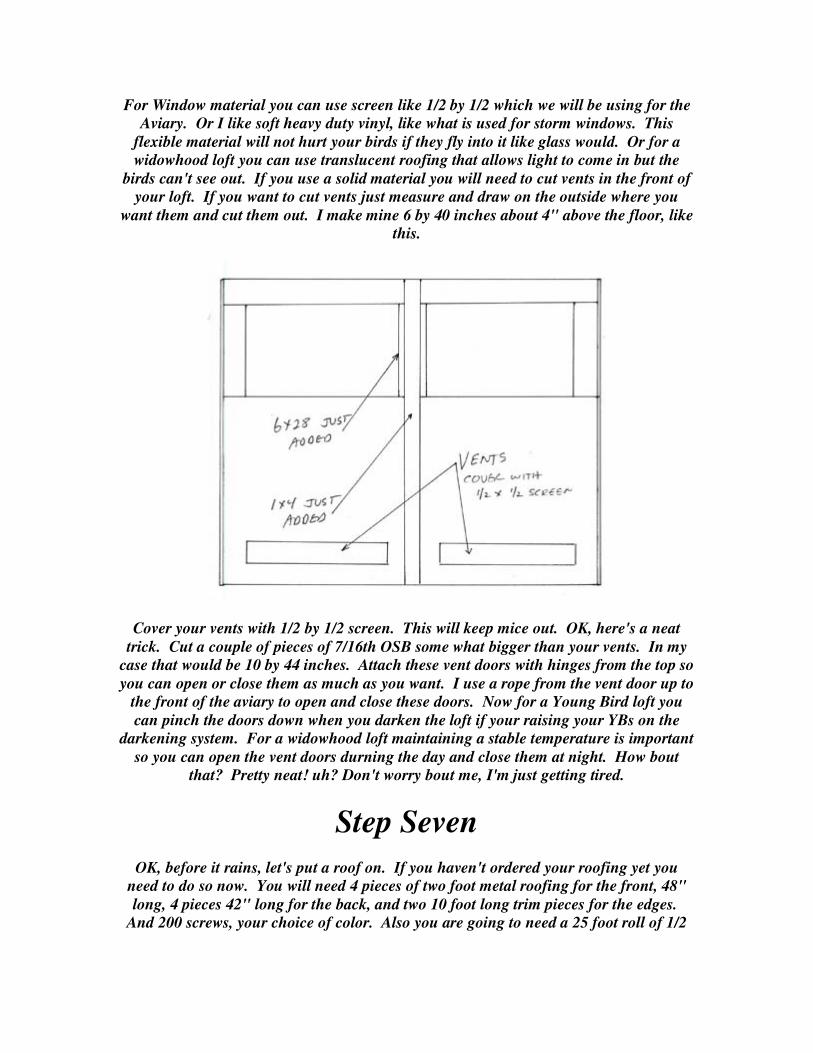
birds can't see out. If you use a solid material you will need to cut vents in the front of your loft. If you want to cut vents just measure and draw on the outside where you
want them and cut them out. I make mine 6 by 40 inches about 4" above the floor, like this.
Cover your vents with 1/2 by 1/2 screen. This will keep mice out. OK, here's a neat trick. Cut a couple of pieces of 7/16th OSB some what bigger than your vents. In my
case that would be 10 by 44 inches. Attach these vent doors with hinges from the top so you can open or close them as much as you want. I use a rope from the vent door up to
the front of the aviary to open and close these doors. Now for a Young Bird loft you can pinch the doors down when you darken the loft if your raising your YBs on the
darkening system. For a widowhood loft maintaining a stable temperature is important so you can open the vent doors durning the day and close them at night. How bout
that? Pretty neat! uh? Don't worry bout me, I'm just getting tired.
Step Seven
OK, before it rains, let's put a roof on. If you haven't ordered your roofing yet you need to do so now. You will need 4 pieces of two foot metal roofing for the front, 48" long, 4 pieces 42" long for the back, and two 10 foot long trim pieces for the edges.
And 200 screws, your choice of color. Also you are going to need a 25 foot roll of 1/2

by 1/2 galvanized wire screen for your Aviary front, vents, and roof vent so if you haven't got that yet go ahead and get it now also. OK, let's do it!
Take an 8 foot 2X4 and rip the corner off at a 45 like you did before. Install this 2x4 at the front peak of the roof, like this.
Now take another 2X4 and install it 4" down from the one you just installed, this will leave your 4" gape for the roof vent. Like this.
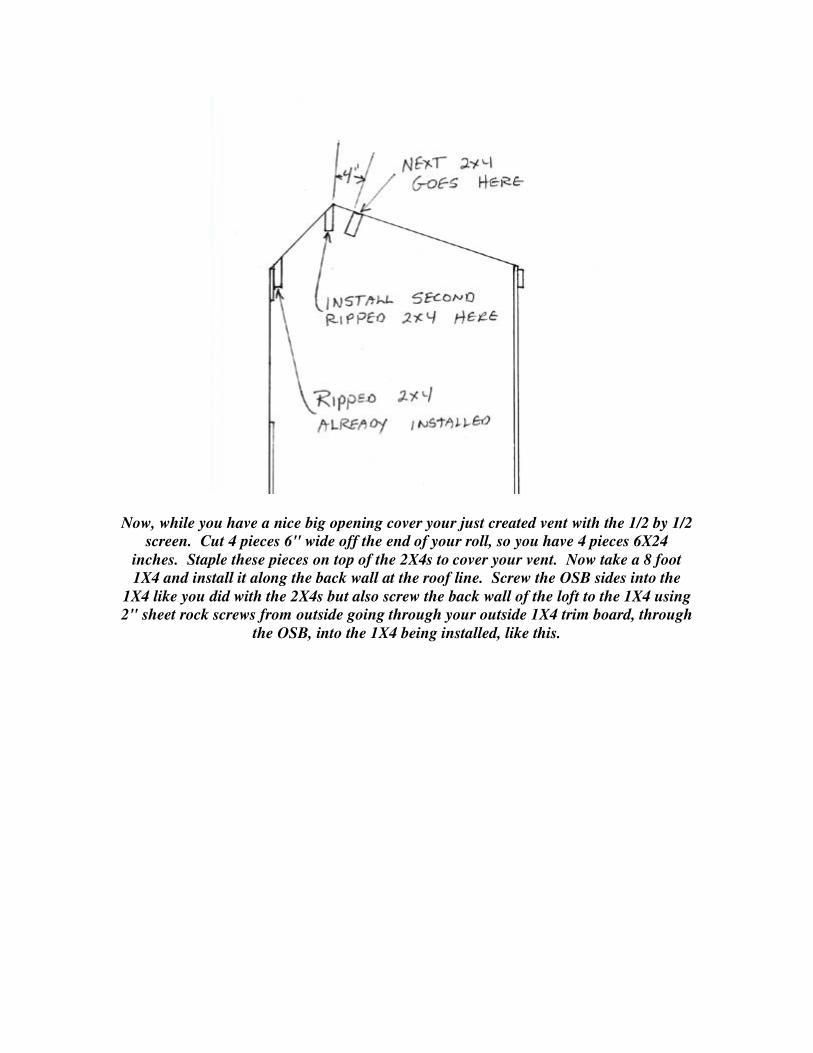
Now, while you have a nice big opening cover your just created vent with the 1/2 by 1/2 screen. Cut 4 pieces 6" wide off the end of your roll, so you have 4 pieces 6X24
inches. Staple these pieces on top of the 2X4s to cover your vent. Now take a 8 foot 1X4 and install it along the back wall at the roof line. Screw the OSB sides into the
1X4 like you did with the 2X4s but also screw the back wall of the loft to the 1X4 using 2" sheet rock screws from outside going through your outside 1X4 trim board, through
the OSB, into the 1X4 being installed, like this.
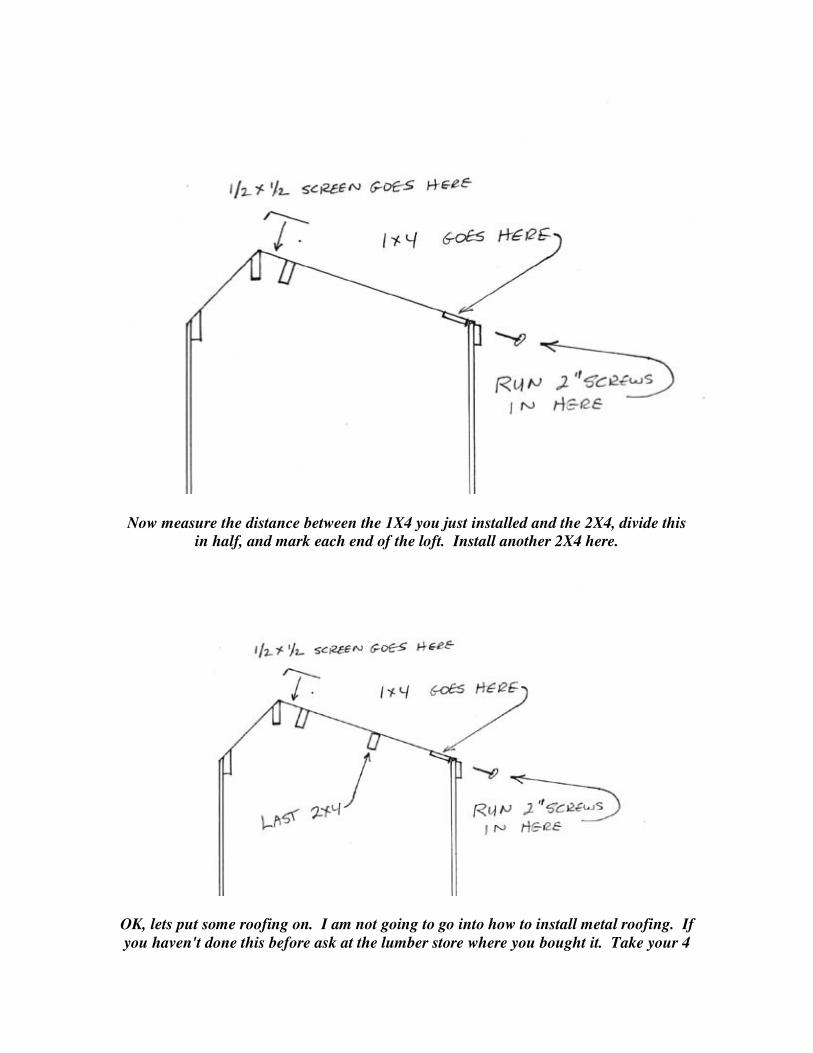
Now measure the distance between the 1X4 you just installed and the 2X4, divide this in half, and mark each end of the loft. Install another 2X4 here.
OK, lets put some roofing on. I am not going to go into how to install metal roofing. If you haven't done this before ask at the lumber store where you bought it. Take your 4
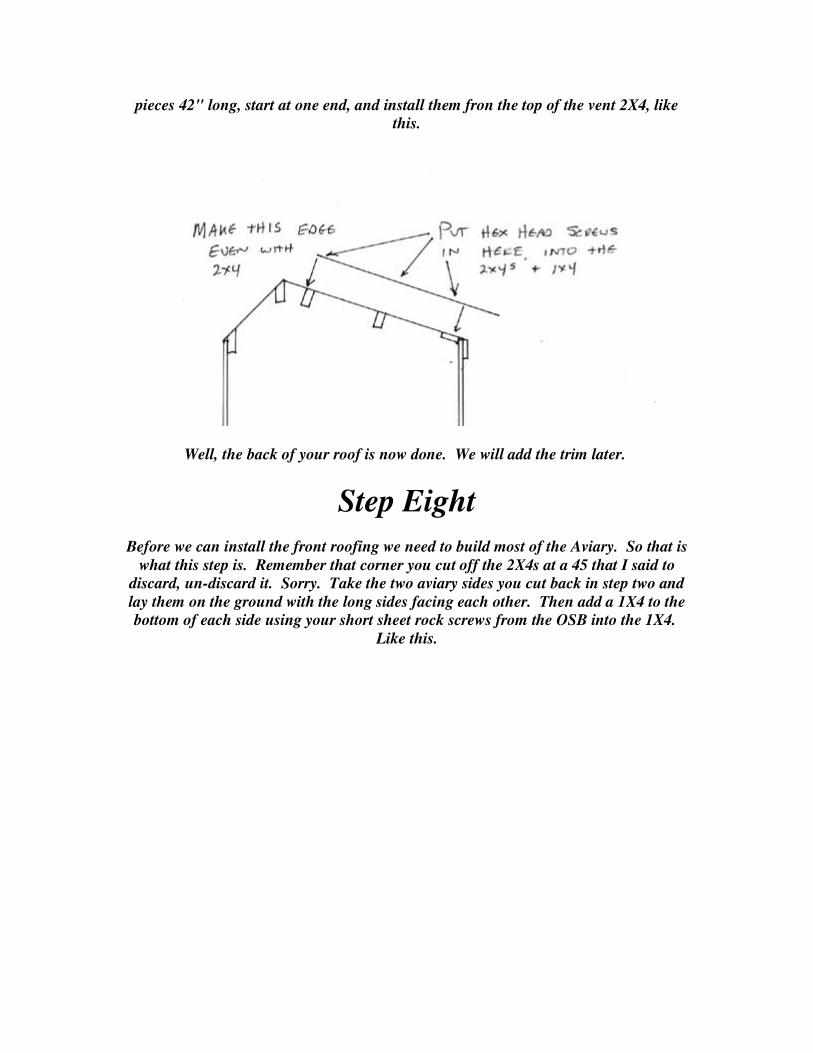
pieces 42" long, start at one end, and install them fron the top of the vent 2X4, like this.
Well, the back of your roof is now done. We will add the trim later.
Step Eight
Before we can install the front roofing we need to build most of the Aviary. So that is what this step is. Remember that corner you cut off the 2X4s at a 45 that I said to
discard, un-discard it. Sorry. Take the two aviary sides you cut back in step two and lay them on the ground with the long sides facing each other. Then add a 1X4 to the bottom of each side using your short sheet rock screws from the OSB into the 1X4.
Like this.
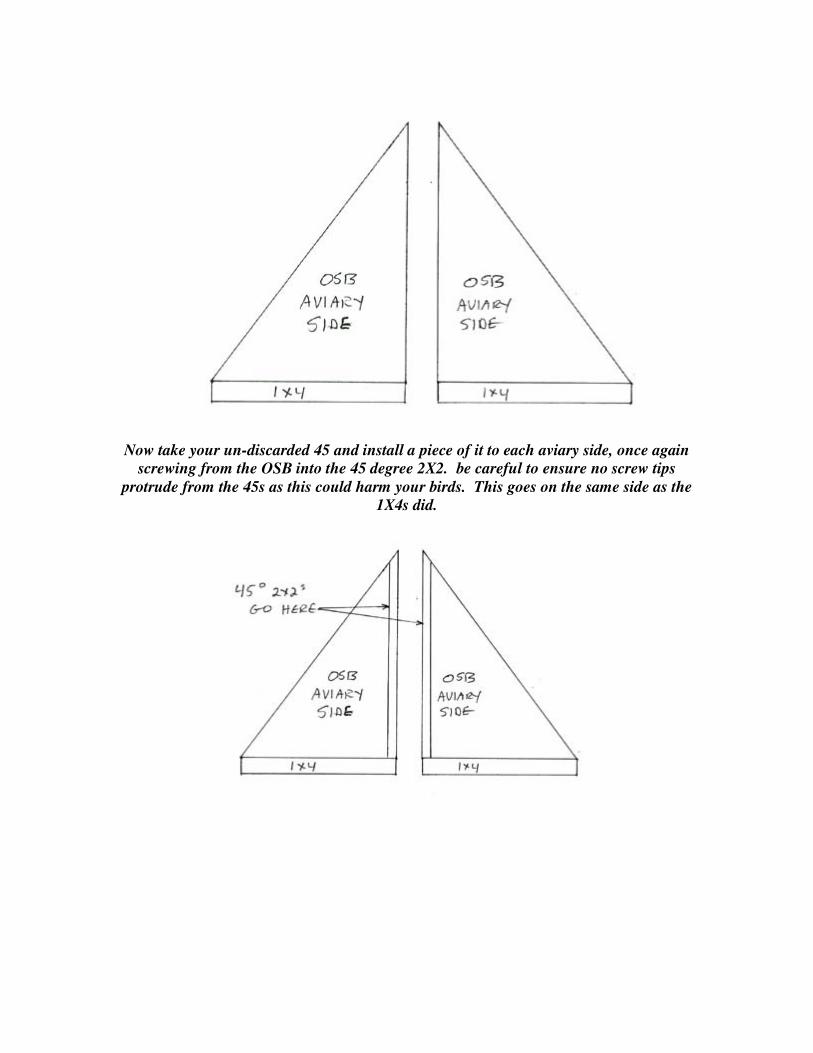
Now take your un-discarded 45 and install a piece of it to each aviary side, once again screwing from the OSB into the 45 degree 2X2. be careful to ensure no screw tips
protrude from the 45s as this could harm your birds. This goes on the same side as the 1X4s did.
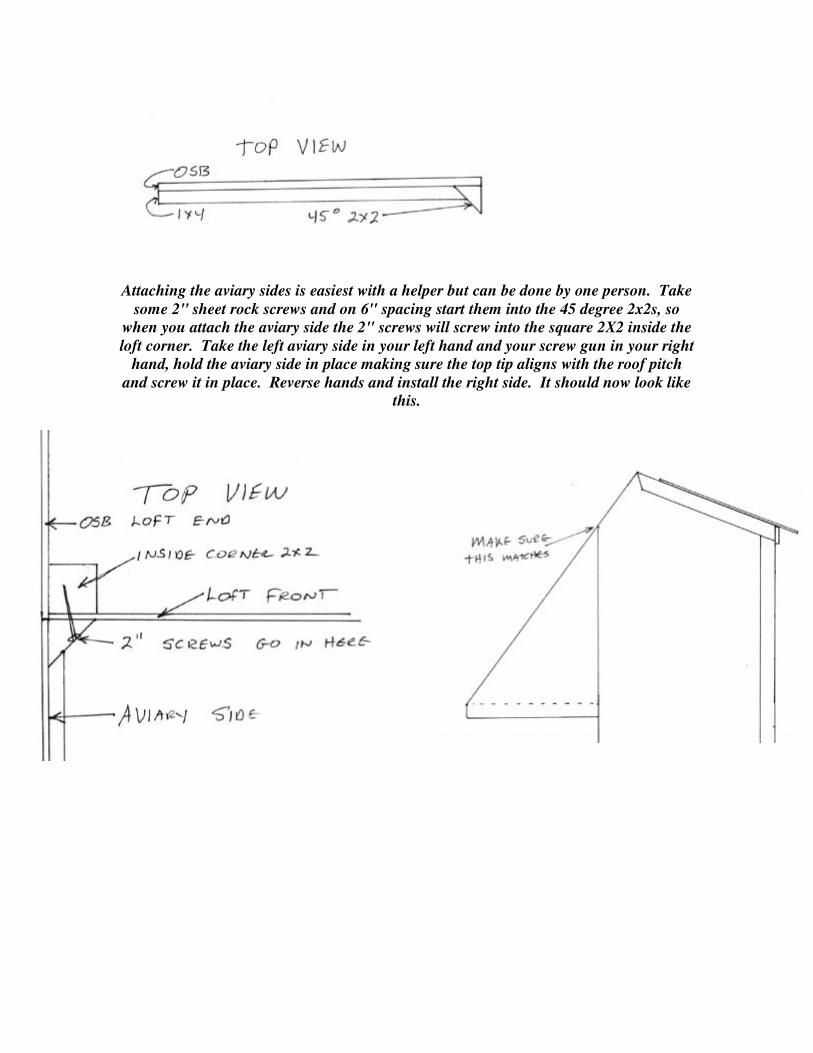
Attaching the aviary sides is easiest with a helper but can be done by one person. Take some 2" sheet rock screws and on 6" spacing start them into the 45 degree 2x2s, so
when you attach the aviary side the 2" screws will screw into the square 2X2 inside the loft corner. Take the left aviary side in your left hand and your screw gun in your right
hand, hold the aviary side in place making sure the top tip aligns with the roof pitch and screw it in place. Reverse hands and install the right side. It should now look like
this.
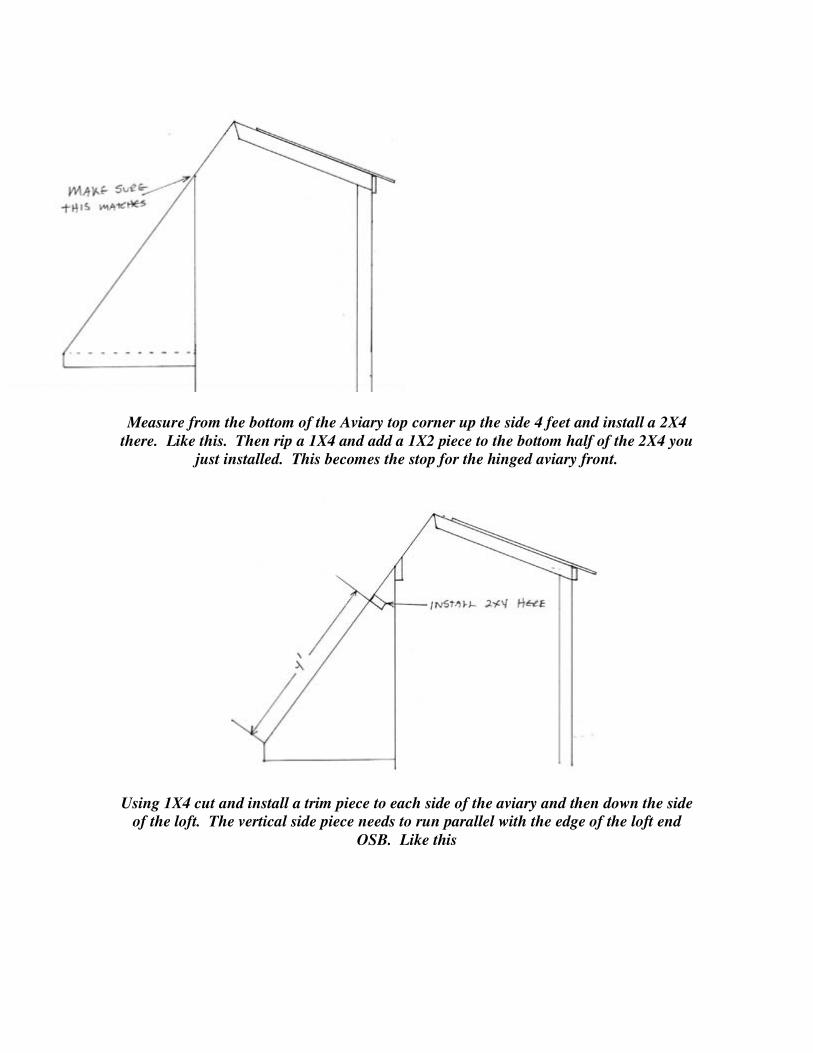
Measure from the bottom of the Aviary top corner up the side 4 feet and install a 2X4 there. Like this. Then rip a 1X4 and add a 1X2 piece to the bottom half of the 2X4 you
just installed. This becomes the stop for the hinged aviary front.
Using 1X4 cut and install a trim piece to each side of the aviary and then down the side of the loft. The vertical side piece needs to run parallel with the edge of the loft end
OSB. Like this
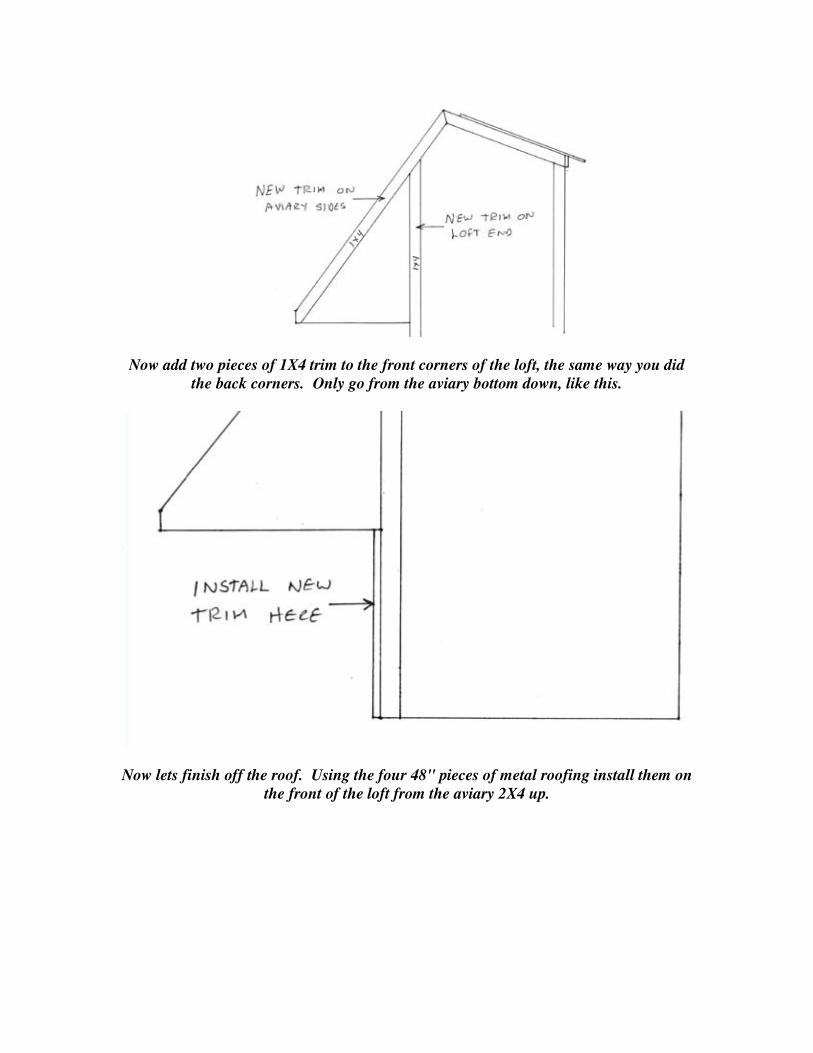
Now add two pieces of 1X4 trim to the front corners of the loft, the same way you did the back corners. Only go from the aviary bottom down, like this.
Now lets finish off the roof. Using the four 48" pieces of metal roofing install them on the front of the loft from the aviary 2X4 up.
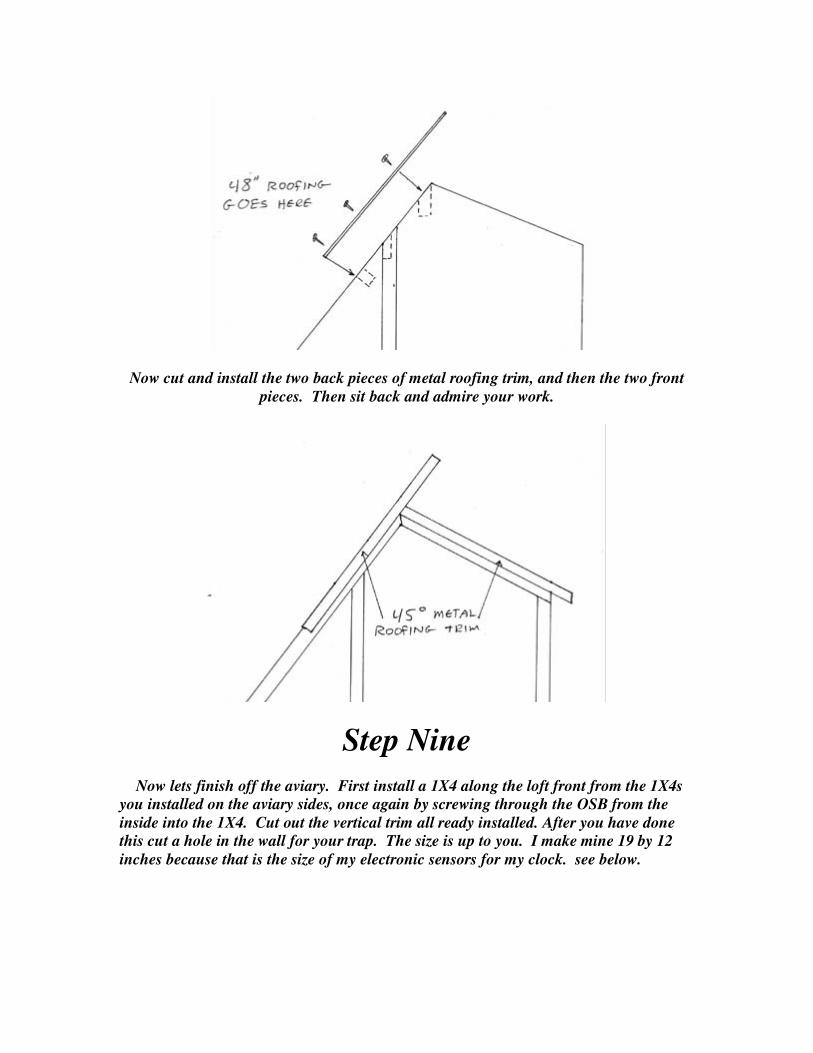
Now cut and install the two back pieces of metal roofing trim, and then the two front pieces. Then sit back and admire your work.
Step Nine
Now lets finish off the aviary. First install a 1X4 along the loft front from the 1X4s you installed on the aviary sides, once again by screwing through the OSB from the inside into the 1X4. Cut out the vertical trim all ready installed. After you have done this cut a hole in the wall for your trap. The size is up to you. I make mine 19 by 12 inches because that is the size of my electronic sensors for my clock. see below.
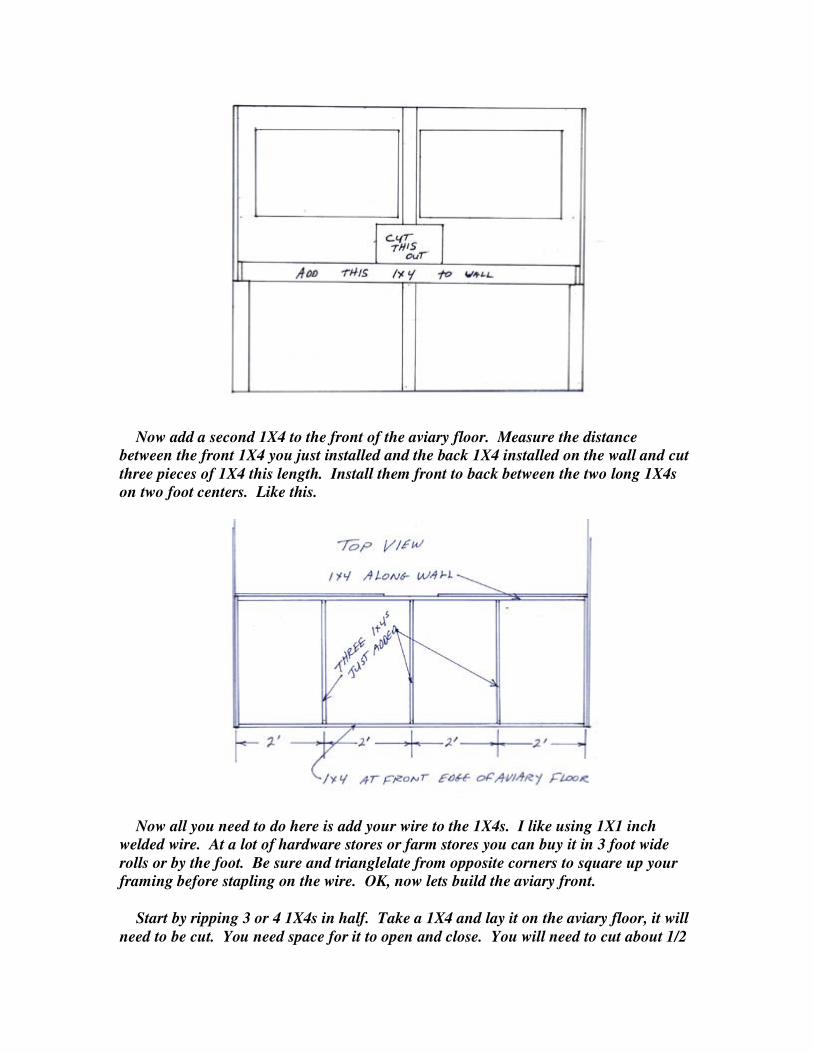
Now add a second 1X4 to the front of the aviary floor. Measure the distance between the front 1X4 you just installed and the back 1X4 installed on the wall and cut three pieces of 1X4 this length. Install them front to back between the two long 1X4s on two foot centers. Like this.
Now all you need to do here is add your wire to the 1X4s. I like using 1X1 inch welded wire. At a lot of hardware stores or farm stores you can buy it in 3 foot wide rolls or by the foot. Be sure and trianglelate from opposite corners to square up your framing before stapling on the wire. OK, now lets build the aviary front.
Start by ripping 3 or 4 1X4s in half. Take a 1X4 and lay it on the aviary floor, it will need to be cut. You need space for it to open and close. You will need to cut about 1/2
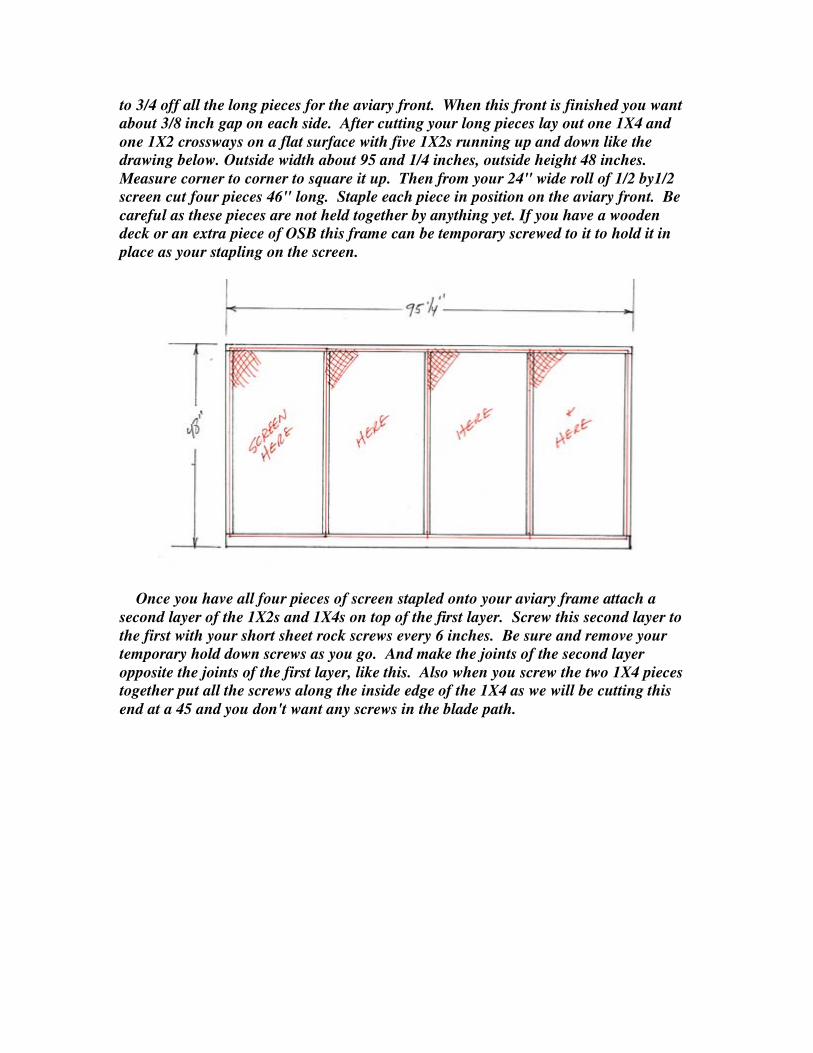
to 3/4 off all the long pieces for the aviary front. When this front is finished you want about 3/8 inch gap on each side. After cutting your long pieces lay out one 1X4 and one 1X2 crossways on a flat surface with five 1X2s running up and down like the drawing below. Outside width about 95 and 1/4 inches, outside height 48 inches. Measure corner to corner to square it up. Then from your 24" wide roll of 1/2 by1/2 screen cut four pieces 46" long. Staple each piece in position on the aviary front. Be careful as these pieces are not held together by anything yet. If you have a wooden deck or an extra piece of OSB this frame can be temporary screwed to it to hold it in place as your stapling on the screen.
Once you have all four pieces of screen stapled onto your aviary frame attach a second layer of the 1X2s and 1X4s on top of the first layer. Screw this second layer to the first with your short sheet rock screws every 6 inches. Be sure and remove your temporary hold down screws as you go. And make the joints of the second layer opposite the joints of the first layer, like this. Also when you screw the two 1X4 pieces together put all the screws along the inside edge of the 1X4 as we will be cutting this end at a 45 and you don't want any screws in the blade path.
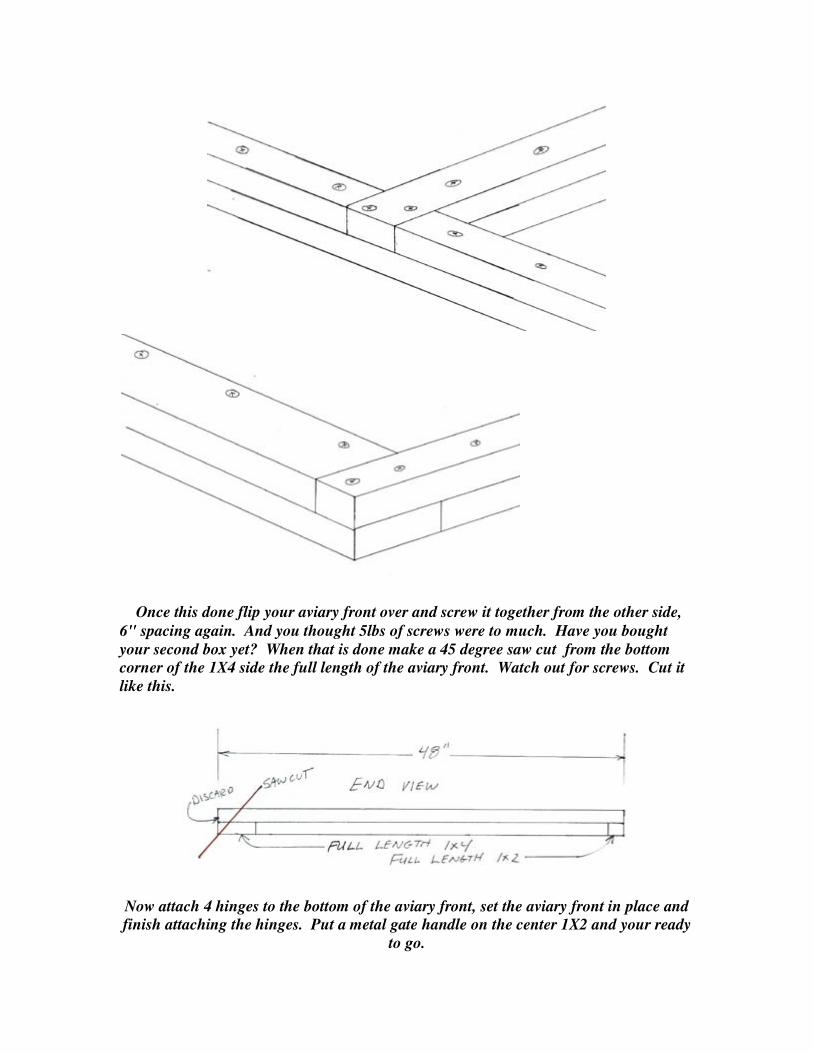
Once this done flip your aviary front over and screw it together from the other side,
6" spacing again. And you thought 5lbs of screws were to much. Have you bought your second box yet? When that is done make a 45 degree saw cut from the bottom corner of the 1X4 side the full length of the aviary front. Watch out for screws. Cut it like this.
Now attach 4 hinges to the bottom of the aviary front, set the aviary front in place and finish attaching the hinges. Put a metal gate handle on the center 1X2 and your ready
to go.
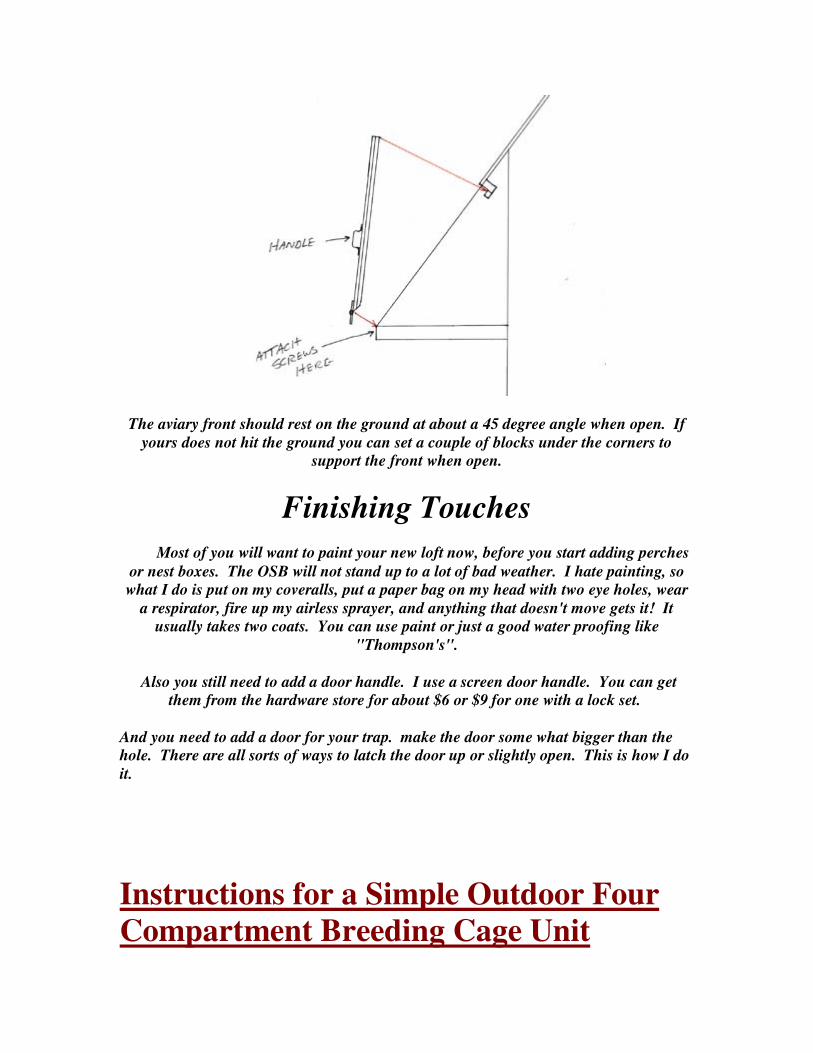
The aviary front should rest on the ground at about a 45 degree angle when open. If yours does not hit the ground you can set a couple of blocks under the corners to
support the front when open.
Finishing Touches
Most of you will want to paint your new loft now, before you start adding perches
or nest boxes. The OSB will not stand up to a lot of bad weather. I hate painting, so what I do is put on my coveralls, put a paper bag on my head with two eye holes, wear
a respirator, fire up my airless sprayer, and anything that doesn't move gets it! It usually takes two coats. You can use paint or just a good water proofing like
"Thompson's".
Also you still need to add a door handle. I use a screen door handle. You can get them from the hardware store for about $6 or $9 for one with a lock set.
And you need to add a door for your trap. make the door some what bigger than the hole. There are all sorts of ways to latch the door up or slightly open. This is how I do it.
Instructions for a Simple Outdoor Four
Compartment Breeding Cage Unit
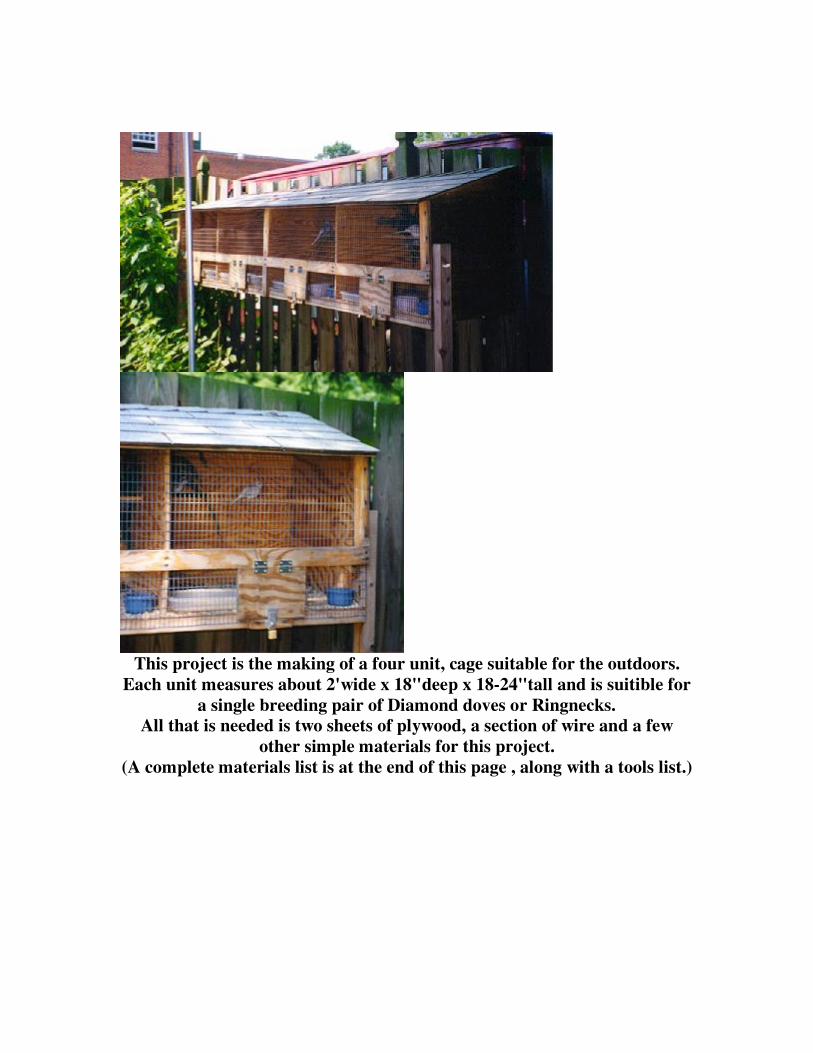
This project is the making of a four unit, cage suitable for the outdoors.
Each unit measures about 2'wide x 18"deep x 18-24"tall and is suitible for
a single breeding pair of Diamond doves or Ringnecks.
All that is needed is two sheets of plywood, a section of wire and a few
other simple materials for this project.
(A complete materials list is at the end of this page , along with a tools list.)
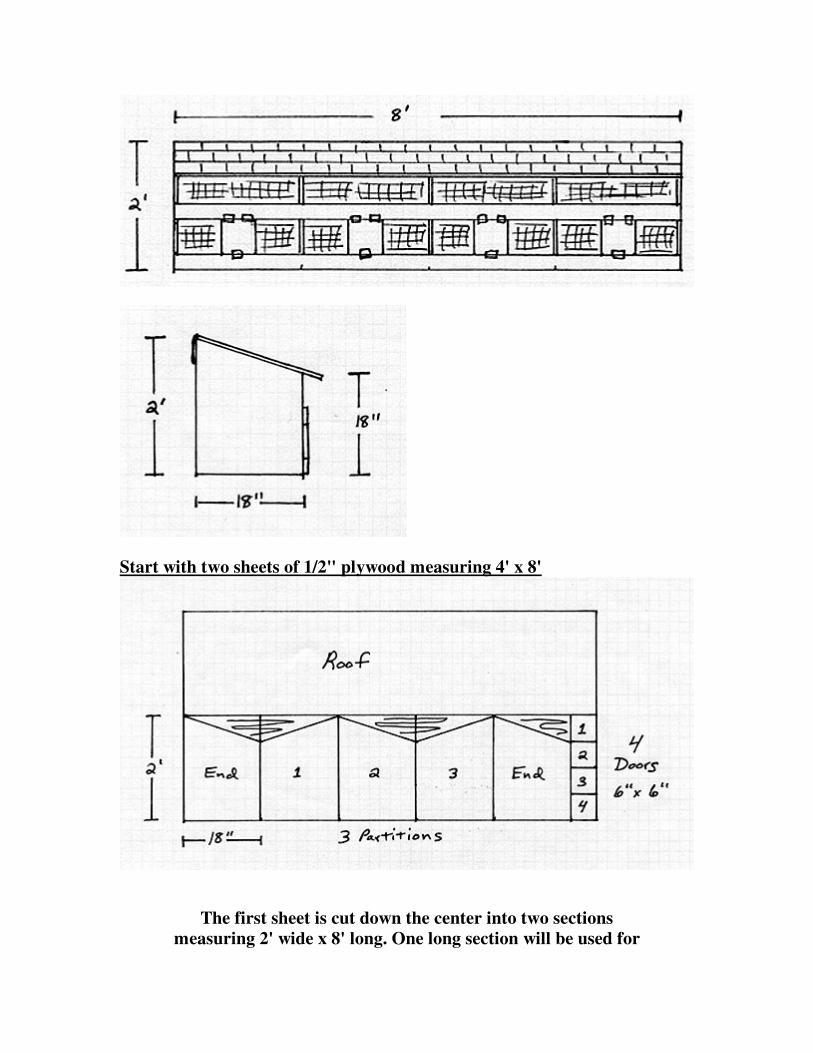
Start with two sheets of 1/2" plywood measuring 4' x 8'
The first sheet is cut down the center into two sections
measuring 2' wide x 8' long. One long section will be used for
the roof, the other is to be divided. The two end pieces and
three partitions are to be marked off. Each piece is 18" wide
and 24" tall on one side and 16" tall along the other side,
creating an angle for the slant roof. The four doors measuring
6" x 6" can be cut from the remainder.
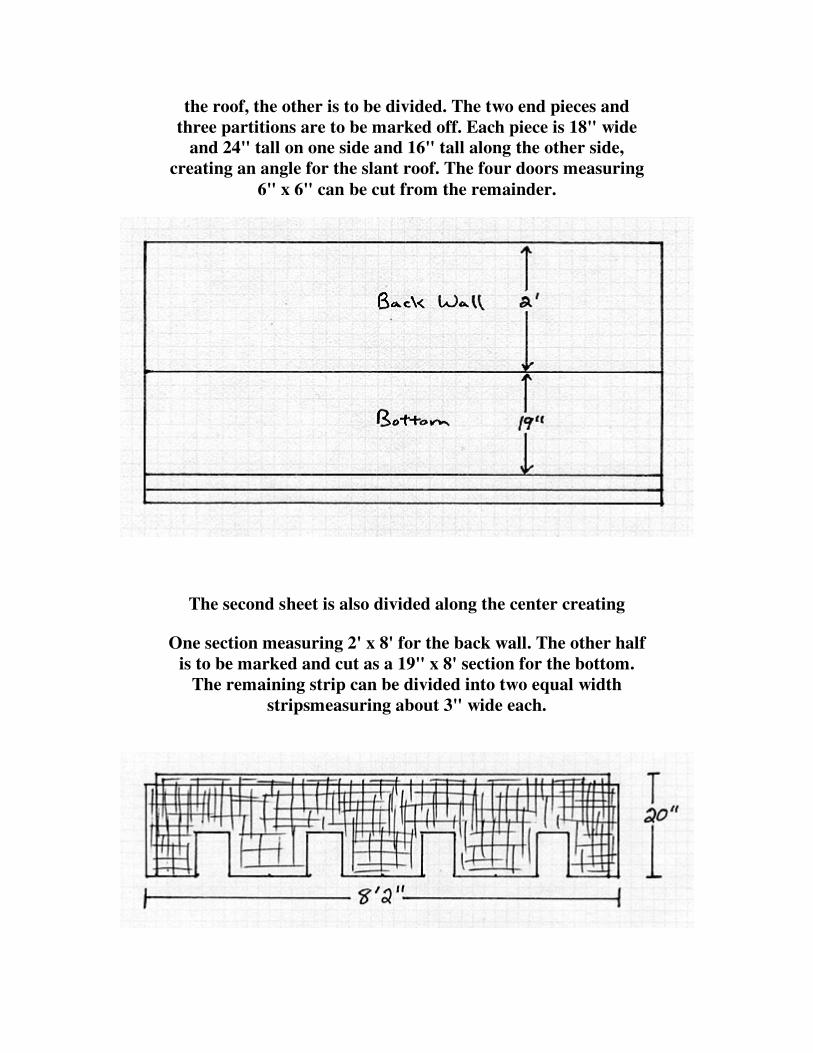
The second sheet is also divided along the center creating
One section measuring 2' x 8' for the back wall. The other half
is to be marked and cut as a 19" x 8' section for the bottom.
The remaining strip can be divided into two equal width
stripsmeasuring about 3" wide each.
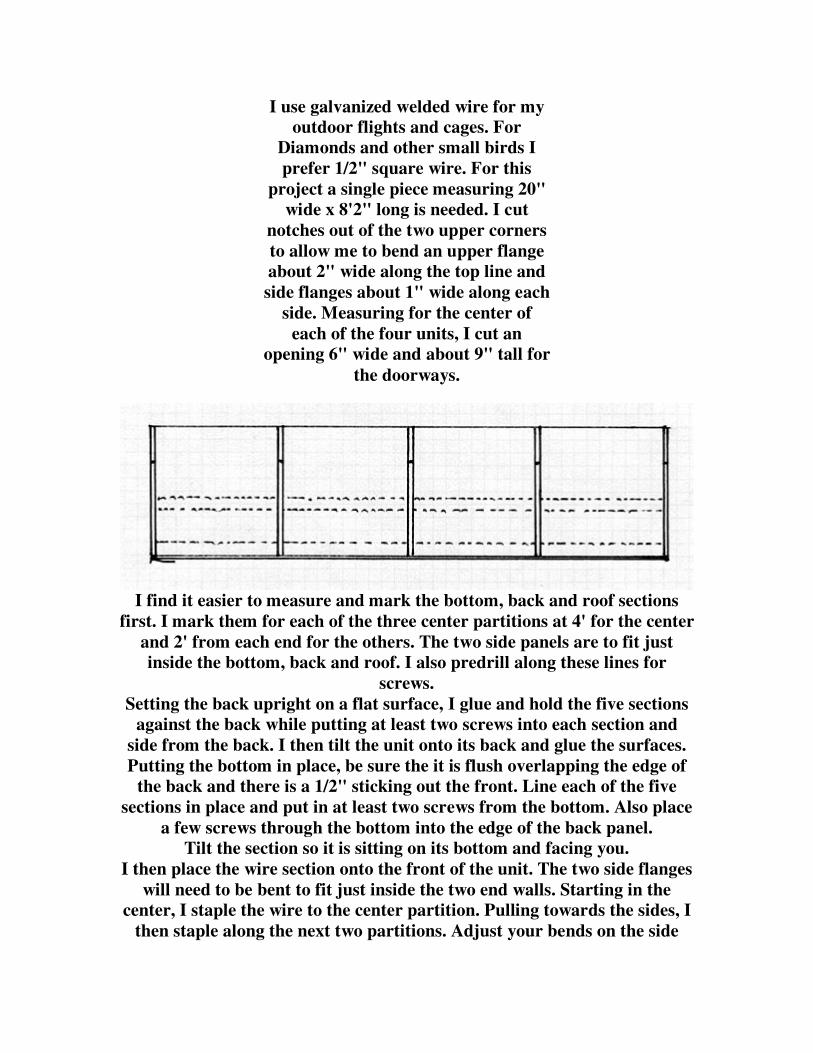
I use galvanized welded wire for my
outdoor flights and cages. For
Diamonds and other small birds I
prefer 1/2" square wire. For this
project a single piece measuring 20"
wide x 8'2" long is needed. I cut
notches out of the two upper corners
to allow me to bend an upper flange
about 2" wide along the top line and
side flanges about 1" wide along each
side. Measuring for the center of
each of the four units, I cut an
opening 6" wide and about 9" tall for
the doorways.
I find it easier to measure and mark the bottom, back and roof sections
first. I mark them for each of the three center partitions at 4' for the center
and 2' from each end for the others. The two side panels are to fit just
inside the bottom, back and roof. I also predrill along these lines for
screws.
Setting the back upright on a flat surface, I glue and hold the five sections
against the back while putting at least two screws into each section and
side from the back. I then tilt the unit onto its back and glue the surfaces.
Putting the bottom in place, be sure the it is flush overlapping the edge of
the back and there is a 1/2" sticking out the front. Line each of the five
sections in place and put in at least two screws from the bottom. Also place
a few screws through the bottom into the edge of the back panel.
Tilt the section so it is sitting on its bottom and facing you.
I then place the wire section onto the front of the unit. The two side flanges
will need to be bent to fit just inside the two end walls. Starting in the
center, I staple the wire to the center partition. Pulling towards the sides, I
then staple along the next two partitions. Adjust your bends on the side
flanges if needed and staple the flanges along the insides of the end
partitions.
Taking the two long thin strips, I mark and predrill them for the ends and
each of the three partitions. Place one of the strips onto the overlap of the
bottom sticking out the front of the unit and screw it into place overtop of
the wire.
Measure up from the top edge of this lower strip, just over 6" and mark.
This will be the lower edge of the other thin strip allowing enough room
for the doors to swing down into place. Screw it into place over the wire as
before. The wire section can now be stapled to these strips from inside the
units. I also prefer to cut sections of plastic wire edging to cover the wire
along both sides of each door opening. This protects both birds and hands.
The hinge or hinges can now be screwed to each door as well as any
locking hardware. Place each door over the openings and be sure they will
swing freely. I hinge mine at the top so they swing downward. Screw the
doors and any locking hardware into place.
I now cut small sections out of the upper flange of wire where the flange
meets each of the three partitions. This allows the roof to contact all of the
surface of the partitions. I bend each flange so it is sticking up beyond
where the roof will be so that the roof will push down onto the flange with
pressure. Another option is to bend the flange outward and staple it along
the underside of the roof overhang.
I now cut my 1" x 1" perches to fit each unit. I predrill them at angles,
then glue and screw them into place. I am sure the height allows for
enough head room while mating for the birds to be kept in the units. I use
flat perches for my outdoor units as birds may be in them during winter
and flat perches will decrease injuries from freezing toes.
I also now screw the metal kitchen strainers, that I use for nests, into place.
You may want to provide a shelf or a removable nest system.
If the insides are to be painted, which I recommend, do that now.
If hanging the unit along a wall or fence, it is easier to do this before the
roof is on so you can screw from the inside of the units.
Once the interior is as you wish, mark and predrill the roof of the unit.
There are options here as well. If the unit is going along a wall or fence,
you will want the roof flush with the back. If you are placing legs on the
unit or it is free standing, you can overlap the roof front and back. The
sides will be flush. Glue and screw the roof into place. The roof can be
covered with shingles or any other roofing material you may have around.
Paint the entire outside with a good exterior paint.
The finished unit is rather heavy. You will need help to hang or put into its
final place.
Tools List
At least an 8' flat surface, Circular Saw, Extension Cord, Electric Drill
with Bits and Screw Bits, Tape Measure, Pencils, Wire Nippers, Straight
Edge or T-Square and Level.
Materials List
Two sheets of 1/2" exterior grade plywood, 4' x 8'.
Section of galvanized welded wire, 1/2" square, measuring at least 8-1/2' x
2'.
One section of 1" x 1" at least 8' long.
One box of galvanized or coated wood screws 1-1/2" long.
Four large hinges or eight smaller ones with mounting screws.
Four locking mechanisms with mounting screws.
Wood Glue
Plastic Wire Edging, at least 4'.
Four metal kitchen strainers the proper size for nests (or other nesting
options).
Exterior Grade Paint
Roofing Materials
PIGEON TALK LOFT TIPS:
IMO, the ONLY type of wire that should be used is the 1/4" X 1/4" hardware cloth.
Anything bigger and critters can get in. Slightly larger can be used for the bottom of the
aviary, or the poop won't fall through.
Nest Boxes: Should be large enough to raise two rounds of squeaker. Ideal size is 32"
long, 16" high. Obviously, if there's room to make them bigger, that's even better, but I
wouldn't go any smaller.
Perches: There should be two perches per bird. Never have the same number of perches
as birds.
Floors: That really depends on where you live and your climate. Some people can get
away with the wire floors, but I don't recommend it in colder climates. I actually don't
recommend them at all, but that's just a personal opinion, so I guess you should leave that
out.
Here is the formula for figuring out how many birds you can put in a loft.
Width X Depth X Height / 15 = Number of birds.
Example for 8 X 10 loft.
8' high X 10' deep X 6' tall / 15 = 32 birds

Some people use this formula.
8 X 10 / 2 = 40 birds.
The harware cloth has to be a thick gage too, as well as 1/4 inch.
TREES GRAY weighs in on the wire:
”Different areas have different kinds of predators, 1/2 inch is too large for down here in
Florida.”


![Alibre Design Tutorial: Loft, Extrude, & Revolve Cutaircraft-computational.com/alibre/assistance/loft-tube-1_complete.pdf · Alibre Design Tutorial: Loft ... Loft-Tube-1 [Complete]](https://static.fdocuments.in/doc/165x107/5a8f57bc7f8b9a4a268da782/alibre-design-tutorial-loft-extrude-revolve-cutaircraft-design-tutorial-loft.jpg)