Flash Video Encoder User Guide - University of British ... · PDF fileFlash® Video Encoder...
36
FLASH ® VIDEO ENCODER USER GUIDE
Transcript of Flash Video Encoder User Guide - University of British ... · PDF fileFlash® Video Encoder...

FLASH® VIDEO ENCODER USER GUIDE

© 2007 Adobe Systems Incorporated. All rights reserved.
Flash® Video Encoder User Guide
If this guide is distributed with software that includes an end user agreement, this guide, as well as the software described in it, is furnished under license and may be used or copied only in accordance with the terms of such license. Except as permitted by any such license, no part of this guide may be reproduced, stored in a retrieval system, or transmitted, in any form or by any means, electronic, mechanical, recording, or otherwise, without the prior written permission of Adobe Systems Incorporated. Please note that the content in this guide is protected under copyright law even if it is not distributed with software that includes an end user license agreement.
The content of this guide is furnished for informational use only, is subject to change without notice, and should not be construed as a commitment by Adobe Systems Incorporated. Adobe Systems Incorporated assumes no responsibility or liability for any errors or inaccuracies that may appear in the informational content contained in this guide.
Please remember that existing artwork or images that you may want to include in your project may be protected under copyright law. The unauthorized incorporation of such material into your new work could be a violation of the rights of the copyright owner. Please be sure to obtain any permission required from the copyright owner.
Any references to company names in sample templates are for demonstration purposes only and are not intended to refer to any actual organization.
Adobe, the Adobe logo, Adobe Studio, ActionScript, After Effects, Dreamweaver, Flash, Flash Player, Flash Video, and Soundbooth are either registered trademarks or trademarks of Adobe Systems Incorporated in the United States and/or other countries.
Apple is a trademark of AppleInc., registered in the United States and other countries. All other trademarks are the property of their respective owners.
This product includes software developed by the Apache Software Foundation (http://www.apache.org/). MPEG Layer-3 audio compression technology licensed by Fraunhofer IIS and Thomson Multimedia (http://www.iis.fhg.de/amm/). You cannot use the MP3 compressed audio within the Software for real time or live broadcasts. If you require an MP3 decoder for real time or live broadcasts, you are responsible for obtaining this MP3 technology license. Portions of this product contain code licensed from Nellymoser (www.nellymoser.com). Flash CS3 video is powered by On2 TrueMotion video technology. © 1992-2005 On2 Technologies, Inc. All Rights Reserved. http://www.on2.com. This product includes software developed by the OpenSymphony Group (http://www.opensymphony.com/)
Sorenson Spark™ video compression and decompression technology licensed from Sorenson Media, Inc.
Adobe Systems Incorporated, 345 Park Avenue, San Jose, California 95110, USA.
Notice to U.S. Government End Users. The Software and Documentation are “Commercial Items,” as that term is defined at 48 C.F.R. §2.101, consisting of “Commercial Computer Software” and “Commercial Computer Software Documentation,” as such terms are used in 48 C.F.R. §12.212 or 48 C.F.R. §227.7202, as applicable. Consistent with 48 C.F.R. §12.212 or 48 C.F.R. §§227.7202-1 through 227.7202-4, as applicable, the Commercial Computer Software and Commercial Computer Software Documentation are being licensed to U.S. Government end users (a) only as Commercial Items and (b) with only those rights as are granted to all other end users pursuant to the terms and conditions herein. Unpublished-rights reserved under the copyright laws of the United States. Adobe Systems Incorporated, 345 Park Avenue, San Jose, CA 95110-2704, USA. For U.S. Government End Users, Adobe agrees to comply with all applicable equal opportunity laws including, if appropriate, the provisions of Executive Order 11246, as amended, Section 402 of the Vietnam Era Veterans Readjustment Assistance Act of 1974 (38 USC 4212), and Section 503 of the Rehabilitation Act of 1973, as amended, and the regulations at 41 CFR Parts 60-1 through 60-60, 60-250, and 60-741. The affirmative action clause and regulations contained in the preceding sentence shall be incorporated by reference.

3
Contents
Using Flash Video Encoder . . . . . . . . . . . . . . . . . . . . . . . . . . . . . . . . 5
About Flash Video and Flash Video Encoder . . . . . . . . . . . . . . . . . . . . . . 5About Flash Video Exporter (QuickTime Export plug-in) . . . . . . . . . . . . 6Supported video compression codecs for Flash Video . . . . . . . . . . . . . . . . . . . . . . . . . . . . . . . . . . . . . . . . . . . . . . . . . . . . 7
Comparing the On2 VP6 and Sorenson Spark video codecs . . . . . . 7Understanding video standards and terminology . . . . . . . . . . . . . . . . . . . 8
Frame rates . . . . . . . . . . . . . . . . . . . . . . . . . . . . . . . . . . . . . . . . . . . . . . . . . . 8Data rates . . . . . . . . . . . . . . . . . . . . . . . . . . . . . . . . . . . . . . . . . . . . . . . . . . .9Keyframes . . . . . . . . . . . . . . . . . . . . . . . . . . . . . . . . . . . . . . . . . . . . . . . . . . 10Aspect ratios (frame size) . . . . . . . . . . . . . . . . . . . . . . . . . . . . . . . . . . . . .11Interlaced versus noninterlaced video. . . . . . . . . . . . . . . . . . . . . . . . . . 13
Encoding audio-only files . . . . . . . . . . . . . . . . . . . . . . . . . . . . . . . . . . . . . . . 14About cue points. . . . . . . . . . . . . . . . . . . . . . . . . . . . . . . . . . . . . . . . . . . . . . . 14
Adobe Soundbooth and the cue point XML file . . . . . . . . . . . . . . . . . 15About the cue point XML file. . . . . . . . . . . . . . . . . . . . . . . . . . . . . . . . . . 15
Encoding video with Flash Video Encoder . . . . . . . . . . . . . . . . . . . . . . . . 17Saving the encoding queue . . . . . . . . . . . . . . . . . . . . . . . . . . . . . . . . . . . 19Removing files from the encoding queue . . . . . . . . . . . . . . . . . . . . . . . 19Skipping a file . . . . . . . . . . . . . . . . . . . . . . . . . . . . . . . . . . . . . . . . . . . . . . 20Stopping the encoding of the current file . . . . . . . . . . . . . . . . . . . . . . 20
Customizing video encoding settings . . . . . . . . . . . . . . . . . . . . . . . . . . . . 21Specifying video encoding settings. . . . . . . . . . . . . . . . . . . . . . . . . . . 22Specifying audio encoding settings. . . . . . . . . . . . . . . . . . . . . . . . . . . 24Defining and embedding cue points . . . . . . . . . . . . . . . . . . . . . . . . . . 25Cropping, trimming, and resizing video. . . . . . . . . . . . . . . . . . . . . . . . 28
Setting Flash Video Encoder preferences . . . . . . . . . . . . . . . . . . . . . . . 30Viewing the Flash Video Encoder log file . . . . . . . . . . . . . . . . . . . . . . . . . 31Troubleshooting video encoding errors. . . . . . . . . . . . . . . . . . . . . . . . . . 32
Index . . . . . . . . . . . . . . . . . . . . . . . . . . . . . . . . . . . . . . . . . . . . . . . . . .33

4 Contents

5
Using Flash Video Encoder
Adobe® Flash® Video Encoder is a stand-alone video encoding application that lets you encode video in Adobe Flash Video (FLV) format. The FLV format lets you easily incorporate video into a web page or Flash document in a format that almost anyone can view using Adobe Flash® Player. The ubiquity of Flash Player ensures that most visitors to your website can view Flash Video without downloading additional plug-ins, so you can reach the largest possible Internet viewing audience with low development, testing, and support costs.
About Flash Video and Flash Video EncoderFlash Video offers technological and creative benefits that let you create rich, immersive experiences that combine video presentations with data, graphics, sound, and interactive control.
Flash Video provides full creative control and integrates easily into your website. You can use video skins (graphic themes) to customize video presentations, incorporate your organization’s branding, and design unique controls that let visitors to your website interact with video content.
Flash treats Flash Video simply as a media type, so you can layer, script, and control video like any other object in a Flash SWF file. Flash Video is an integral part of the viewing experience, not a separate pop-up window that plays video externally and interrupts the experience.
Flash Video Encoder lets you encode video files in either the On2 VP6 or Sorenson™ Spark™ video codecs. A codec is an algorithm that controls how video files are compressed during import and decompressed during playback. You can use Flash Video Encoder on a computer that does not have Adobe® Flash® CS3 Professional or other Adobe Creative Suite® 3 software installed. This configuration lets you continue working with Flash, Adobe Dreamweaver® CS3, or another application while encoding, because video encoding is a processor-intensive activity that often prevents you from simultaneously working in other applications.

6 Using Flash Video Encoder
Using Flash Video Encoder on a dedicated computer for video encoding lets you batch-process multiple video clips; in environments where video is a significant form of content, batch processing produces an expedited workflow. You can add, reorder, and change the encoding settings of files in the batch processing queue while Flash Video Encoder is encoding video files.
About Flash Video Exporter (QuickTime Export plug-in)If you have Adobe Flash CS3 Professional and QuickTime 6.1.1 or later installed on your computer, you can use the Adobe Flash Video Exporter (QuickTime Export plug-in) to export FLV files from supported video-editing applications. You can then import these FLV files directly into Flash to use in your Flash documents. The QuickTime Export plug-in is installed by the Flash Video Encoder installer.
The following video-editing applications are supported by the QuickTime Export plug-in:
■ Adobe After Effects® CS2 and later versions (Microsoft® Windows® and Apple® Macintosh®)
■ Apple Final Cut Pro (Macintosh)■ Apple QuickTime Pro (Windows and Macintosh)■ Avid Xpress DV (Windows and Macintosh)
Exporting FLV files from either Flash Video Encoder or video-editing applications using the QuickTime Export plug-in significantly streamlines the workflow in using FLV files in your Flash documents. With the QuickTime Export plug-in, you can select encoding options for video and audio content as you export, including frame rate, bit rate, quality, and other options. You can import FLV files directly into Flash without needing to re-encode the video after you import them.
NO
TE
Avid Xpress DV does not support the encoding of an alpha channel when you use it to export to the FLV video format.

Supported video compression codecs for Flash Video 7
Supported video compression codecs for Flash VideoBy default, Flash Video Encoder encodes video using the On2 VP6 codec for use with Flash Player 8 and later, and the Sorenson Spark codec for use with Flash Player 7. To understand how Flash achieves high-quality video with low bandwidth requirements, you should understand video compression.
There are two types of compression that can be applied to digital media: spatial and temporal. Spatial compression is applied to a single frame of data, independent of any surrounding frames. Spatial compression can be lossless (in which no data is discarded from the image) or lossy (in which data is selectively discarded). A spatially compressed frame is often called an intraframe.
Temporal compression identifies the differences between frames and stores only those differences, so that frames are described based on their difference from the preceding frame. Unchanged areas are simply repeated from the previous frame(s). A temporally compressed frame is often called an interframe.
Both the On2 VP6 and Sorenson Spark are interframe codecs. Although many other codecs use intraframe compression (for example, JPEG is an intraframe codec), the efficient interframe compression of the On2 VP6 and Sorenson Spark codecs, among other features, distinguishes them from other compression technologies because these codecs require a much lower data rate (also known as the bit rate) to produce high-quality video.
It’s important to note that interframe codecs also use intraframes. Intraframes are used as the reference frames (keyframes) for the interframes. Both the On2 VP6 and Sorenson Spark codecs always begin with a keyframe. Each keyframe becomes the main reference frame for the following interframes. Whenever the next frame is significantly different from the previous frame, the codec compresses a new keyframe.
Comparing the On2 VP6 and Sorenson Spark video codecsThe On2 VP6 codec is the default video codec to use when encoding FLV content for use with Flash Player 8 or later. Using the On2 VP6 codec provides the following advantages when compared to the Sorenson Spark codec:
■ Encodes higher quality video at the same data rate ■ Supports the use of an alpha channel to create composite video

8 Using Flash Video Encoder
In order to support better quality video at the same data rate, the On2 VP6 codec is noticeably slower to encode and requires more processor power on the client computer to decode and play back the video data. For this reason, you should consider the lowest common denominator of computer that your audience will use when they access your Flash video content.
If you anticipate a large user base that is using older computers, it may be advisable to consider encoding your FLV files using the Sorenson Spark codec.
Understanding video standards and terminologyThe following section introduces digital video concepts and terminology you should know when working with video content. If you are new to digital video or want to learn more about digital video and encoding high-quality video content, this section can help you understand the trade-offs related to encoding video for different applications and Internet viewing environments.
Frame ratesVideo is a sequence of images that appear on the screen in rapid succession, giving the illusion of motion. The number of frames that appear every second is known as the frame rate, and it is measured in frames per second (fps). The higher the frame rate, the more frames per second are used to display the sequence of images, resulting in smoother motion. The trade-off for higher quality, however, is that higher frame rates require a larger amount of data to display the video, which uses more bandwidth.
When working with digitally compressed video in a format such as Flash Video, the higher the frame rate, the larger the file size. To reduce the file size, you must lower either the frame rate or the data rate (for more information, see “Data rates” on page 9). If you lower the data rate and leave the frame rate unchanged, the image quality is reduced. If you lower the frame rate and leave the data rate unchanged, the video motion may look less smooth than desired.

Understanding video standards and terminology 9
Because video looks much better at native frame rates (the frame rate at which the video was originally filmed), Adobe recommends leaving the frame rate high if your delivery channels and playback platforms allow it. For full-motion NTSC (the standard defined by the National Television System Committee in the U.S.), use 29.97 fps; for PAL (Phase Alternating Line, the dominant television standard in Europe), use 25 fps. If you lower the frame rate (which can significantly reduce the video data that must be encoded), Flash Video Encoder drops frames at a linear rate to achieve the new fps rate. However, if you need to reduce the frame rate, the best results come from dividing evenly. For example, if your source has a frame rate of 24 fps, then reduce the frame rate to 12 fps, 8 fps, 6 fps, 4 fps, 3 fps, or 2 fps. If the source frame rate is 30 fps, in most cases you can adjust the frame rate to 15 fps, 10 fps, 6 fps, and so on.
If your video clip is encoded with a higher data rate, a lower frame rate can improve playback on lower-end computers. For example, if you are compressing a talking-head video clip with little motion, cutting the frame rate in half might save only 20% of the data rate. However, if you are compressing high-motion video, reducing the frame rate has a much greater effect on the data rate.
Data ratesThe data rate affects the quality of a video clip and the audience that can download the file given their bandwidth constraints.
When you deliver video using the Internet, you should produce files using lower data rates. Users with fast Internet connections can view the files with little or no delay, but dial-up users must wait for files to download. If you anticipate an audience of dial-up users, you should make short video clips to keep the download times within acceptable limits.
Flash Video Encoder lets you specify data rate settings for encoding video at a low, medium, or high quality. If the available settings in the Quality pop-up menu do not produce the desired results with your particular source footage, select Custom, and enter a higher data rate in the Maximum Data Rate text box.
NO
TE
If a video clip is longer than 10 minutes, the audio will drift noticeably out of sync if you do not adhere to the 29.97 fps rate or an accurate even division for lower frame rates (such as 14.98 fps, which is half of 29.97).
10 Using Flash Video Encoder
KeyframesKeyframes are complete video frames (or images) that are inserted at consistent intervals in a video clip. The frames between the keyframes contain information on movement and scene changes that occurs between keyframes. For example, if a video depicts a person walking past a doorway, the keyframes contain the complete image of the person and the door in the background, and the interval frames contain information describing the person’s movement as they walk in front of the door.
By default, Flash Video Encoder automatically determines the keyframe interval to use based on the video clip’s frame rate. The keyframe interval value tells the encoder how often to re-evaluate the video image and record a full frame, or keyframe, into an FLV file. In Flash Video Encoder, this setting is the keyframe interval value, which represents the number of frames between keyframes. Flash Video Encoder approximates frames that reside between keyframes by estimating the full value of all pixels on the screen by comparing multiple frames and eliminating redundant information.
The keyframe interval value can be any number up to 100. When you select Automatic as an interval setting, Flash Video Encoder places a keyframe every two seconds of playback time. For example, if the video you’re encoding has a frame rate of 30 fps, a keyframe will be inserted every 60 frames. In general, the default keyframe interval value provides a reasonable level of control when seeking within a video clip. If you need to select a custom keyframe placement value, be aware that the smaller the keyframe interval, the larger the file size.
If your footage has a lot of scene changes or rapidly moving motion or animation, then the overall image quality may benefit from a lower keyframe interval. In general, a higher keyframe interval produces better image quality because data is not wasted describing the areas of an image that remain unchanged from frame to frame.
An important dependency of the keyframe interval is that it affects the ability of Flash Player to seek (fast-forward or rewind) through an FLV file. Flash Player can only advance from keyframe to keyframe, so if you want to skip to different places and pause the frames, you must use a lower keyframe interval value. If you want to advance to every frame in an FLV file, use a keyframe interval value of 1. When you reduce the keyframe interval value, you must raise the data rate for the Flash video to maintain comparable image quality.

Understanding video standards and terminology 11
Aspect ratios (frame size)As with the frame rate, the aspect ratio (or frame size) for your document is important for producing high-quality video. At a specific data rate (connection speed), increasing the frame size results in decreased video quality. When you select the frame size for your document, consider the frame rate, the aspect ratio of the source video clip, and your personal preferences to create a successful video presentation. Standard video display resolutions on the Internet include 640 x 480, 512 x 384, 320 x 240, and 160 x 120 pixels.
The most common aspect ratio is 4:3 (standard television). Increasingly, 16:9 and 2:1 (wide screen) aspect ratios are becoming more commonplace as well. Typically, you should encode the video using the same aspect ratio at which it was originally captured. Altering a video clip’s aspect ratio may result in a distorted video image. An exception to this practice is when encoding digital video (DV) formats, whose aspect ratio is slightly different than the 4:3 aspect ratio because DV uses rectangular pixels. When encoding video content captured with a digital video camera, you must manually specify the frame size of the DV format you are using to preserve the video’s aspect ratio. For more information see, “Encoding video with non-square pixels” on page 12.
The following list of standard frame sizes can be used as a guideline. You can experiment to find the best setting for your project.
Frame sizes for 4:3 aspect ratio video:
■ Modem (56k): 160 x 120■ DSL: 320 x 240■ Cable: 512 x 384■ Cable/corporate LAN: 640 x 480
Frame sizes for 16:9 aspect ratio video:
■ Modem (56k): 192 x 108■ DSL: 384 x 216■ Cable: 448 x 252■ Cable/corporate LAN: 704 x 396

12 Using Flash Video Encoder
Encoding video with non-square pixelsMost static computer graphics use square pixels, which have a width-to-height ratio of 1:1. When working with digital video, pixels often have a different width-to height ratio and are referred to as rectangular pixels. The reason for this behavior is to allow analog video (e.g. broadcast television) and digital video (e.g. DVD video) to coexist. When encoding video formats with non-square pixels (also known as anamorphic video), you need to resample the video image to the correct Display Aspect Ratio (DAR).
For example, standard NTSC digital video (DV), has a frame size of 720 x 480 pixels, and it’s usually displayed at an aspect ratio of 4:3. This means that each pixel is rectangular, with a pixel aspect ratio (PAR) of 10:11 (a tall, narrow pixel). Both MPEG 1 and 2 video are also produced in various sizes (720 x 480 or 480 x 480 are common) even though they are typically displayed with either a 4:3 or 16:9 (wide screen) aspect ratio.
To calculate the image frame size to use when encoding video using non-square pixels, you must first decide which dimension—width or height—is the preferred master dimension, and then compute the other dimension as follows:
If height is the master dimension, calculate the width using the following formula:
For example, if your video uses an aspect ratio of 4:3 the equation would appear as:
If width is the master dimension, calculate the height using the following formula:
For example, if your video uses an aspect ratio of 4:3 the equation would appear as:
As an example, if you are encoding a video whose frame size is 720 x 480 pixels, and you want to encode it with a 4:3 aspect ratio, you must determine the width at which to encode the video frame in pixels:
The result is a video image height of 640 pixels.
Thus, you need to encode the 720 x 480 image to 640 x 480, a standard 4:3 aspect ratio.
width height aspect ratio widthaspect ratio height--------------------------------------------×=
width height 34---×=
height width aspect ratio heightaspect ratio width--------------------------------------------×=
height width 43---×=
640 480 43---×=

Understanding video standards and terminology 13
To correct the image size when encoding using Flash Video Encoder, deselect the Maintain Aspect Ratio option on the Crop and Resize tab of the Flash Video Encoding Settings dialog box, and enter the corrected dimensions at which to encode the video. For more information, see “Customizing video encoding settings” on page 21.
Interlaced versus noninterlaced videoIf your source video is interlaced, you can use Flash Video Encoder to either maintain the interlacing, or deinterlace it during encoding to create noninterlaced video.
Most broadcast video is interlaced, though emerging high-definition television standards have interlaced and noninterlaced variants. Interlaced video consists of two fields that make up each video frame. Each field contains half the number of horizontal lines in the frame; the upper field (or Field 1) contains all of the odd-numbered lines, and the lower field (or Field 2) contains all of the even-numbered lines. An interlaced video monitor (such as a television) displays each frame by first drawing all of the lines in one field and then drawing all of the lines in the other field. Field order specifies which field is drawn first. In NTSC video, new fields are drawn to the screen approximately 60 times per second, which corresponds to a frame rate of approximately 30 frames per second.
Noninterlaced video frames are not separated into fields. A progressive-scan monitor displays a noninterlaced video frame by drawing all of the horizontal lines, from top to bottom, in one pass. Because of this, both fields that make up a video frame are shown simultaneously. Thus, a computer monitor displays video at 30 fps, and most video displayed on computer monitors is noninterlaced.
Typically you will always want to deinterlace video content used in Flash. Both the Sorenson Spark and On2 VP6 codecs used to encode Flash video can cause unwanted artifacts when encoding interlaced video.
There are instances when you may want to avoid deinterlacing: for example, if the source video doesn't contain too many interlacing artifacts (typically caused by horizontal pans or motion). When you deinterlace, you discard half of the video’s vertical resolution.
You may also want to avoid deinterlacing if you’re reducing the size of the video substantially—to 240 x 180 pixels or less—because the pixel averaging that occurs when resizing video to a smaller size can cause interlacing artifacts that appear as a motion blur.
14 Using Flash Video Encoder
Encoding audio-only filesThe same considerations exist for audio production as for video production. To achieve good audio compression, you must begin an audio file that is free of distortion and audible artifacts introduced from the source recording. If you are encoding material from a CD, try to record the file using direct digital transfer rather than your sound card’s analog input. The sound card introduces an unnecessary digital-to-analog and analog-to-digital conversion that can create noise in your transferred audio. Direct digital transfer tools are available for both Windows and Macintosh platforms. If you must record from an analog source, use the highest quality sound card available.
About cue pointsCue points cause the video playback to start other actions within the presentation and let you synchronize the video with animation, text, graphics, and other interactive content. For example, you can create a Flash presentation that has video playing in one area of the screen while text and graphics appear in another area.
Each cue point consists of a name, the time at which it occurs in the video, type of cue point, and optional parameters. You specify cue point times using the format hour:minute:second:millisecond. When the encoded FLV file is played back within a Flash SWF file, and the FLV plays or seeks to the elapsed time specified by the cue point, the action you’ve specified is triggered.
Flash Video Encoder lets you embed cue points in video clips using the Flash Video Encoding Settings dialog box. You can assign each cue point an event type and parameter that can be used with ActionScript™ or the Flash FLVPlayback component to programmatically cause the video playback to start other actions in the presentation.
You can save and load cue points, letting you more easily apply cue points created for one video clip to another. The cue point data is saved in XML format, letting you share it across platforms and applying it to any video that supports the FLV cue point format.

About cue points 15
Adobe Soundbooth and the cue point XML fileAdobe Soundbooth™, a sound editing application, can import and export the cue point XML file. An advantage to creating the cue point XML file in Soundbooth, is that its Video panel lets you play back video footage while editing sound. This lets you insert cue point markers using both the video and audio components of the file. When you are ready to encode the video using Flash Video Encoder, you can import the cue point file from Soundbooth and use the cue points to encode the FLV file. To learn more about using Soundbooth to create cue points, and importing the cue points XML file into Flash Video Encoder, see the information on working with Flash and video in Using Soundbooth.
About the cue point XML fileThe cue point XML file lets you save your cue point data, and apply it to other video clips. An example of the file is shown below:<?xml version="1.0" encoding="UTF-8"?><FLVCoreCuePoints>
<CuePoint><Time>2000</Time><Type>navigation</Type><Name>CuePoint1</Name>
<Parameters><Parameter>
<Name>CuePoint1</Name><Value>Introduction</Value>
</Parameter><Parameter>
<Name>Cast</Name><Value>ActorNames</Value>
</Parameter></Parameters></CuePoint>
The cue point XML file’s DTD (Document Type Definition) is shown below (A DTD defines the valid document structure of the XML file, with a list of supported elements and their meaning within the XML file itself ):<!DOCTYPE FLVCoreCuePoints [ <!ELEMENT FLVCoreCuePoints (CuePoint+)> <!-- FLVCoreCuePoints is the root element in the XML file and must
contain at least one CuePoint element -->
CA
UT
ION
I f you modify the cue point XML fi le and insert invalid values or otherwise
malformed XML syntax, Flash Video Encoder wil l not be able to load the f i le.

16 Using Flash Video Encoder
<!ELEMENT CuePoint (Time, Type, Name, Parameters?)> <!-- CuePoint contains the data for a particular cue point, and must
contain one each of Time, Type, and Name elements, and may contain one Parameters
element --> <!ELEMENT Time (#CDATA)> <!-- Time contains the cue point time as an integer in milliseconds --> <!ELEMENT Type (#CDATA)> <!-- Type contains the cue point type as a case-sensitive string, either
"event" or "navigation" --> <!ELEMENT Name (#CDATA)> <!-- Name contains the cue point name as a text string; it also can
contain a parameter name when appearing inside a Parameter element --> <!ELEMENT Parameters (Parameter+)> <!-- Parameters contains the cue point's parameters. It must contain at
least one Parameter element --> <!ELEMENT Parameter (Name, Value)> <!-- Parameter contains the data for one of a cue point's parameters. It
must contain one each of Name and Value elements --> <!ELEMENT Value (#CDATA)> <!-- Value contains the value-part of the name-value pair for a cue
point parameter -->]>
In addition to the restrictions enforced by the cue point XML file’s DTD, the following characteristics apply to the XML format:
■ All comments regarding the data inside the tags in the DTD will be enforced on read; non-compliant XML will result in an error.
■ Cue points must appear in ascending time order within the XML file, and there can be only one cue point assigned at a given time.
■ The XML format is written as UTF-8. Other encoding types are supported if they are properly declared via an XML declaration with encoding (e.g. <?xml version="1.0" encoding="UTF-16"?> or a BOM marker in the file.
■ The only types allowed are “event” and “navigation,” both of which must be written using lowercase letters.
■ Time must be specified in milliseconds as an integer. This means that you cannot use decimal points when specifying time (for example, 12.123 will cause the XML file to fail).

Encoding video with Flash Video Encoder 17
Cue point files that do not successfully load generate a cue point error log (CuePoints_Errors.log) that you can use to troubleshoot potential errors in the XML file. The log file is stored in the following location:
■ Windows: C:\Documents and Settings\user\Application Data\Adobe\Flash Video Encoder\CuePoints_Errors.log
■ Macintosh: Macintosh HD/Users/user/Library/Application Support/Adobe/Flash Video Encoder/CuePoints_Errors.log
For more information, see “Defining and embedding cue points” on page 25.
Encoding video with Flash Video EncoderBy default, Flash Video Encoder encodes source videos using the On2 VP6 codec, which is compatible with Flash Player 8 and later. The Flash Video Encoder uses the Sorenson Spark codec to encode video for Flash Player 7.
When configuring encoding settings, you can select individual files and specify different settings based on the type of video format and quality required for each file, or you can select multiple files and specify the same settings for all of them.
To encode video with the Flash Video Encoder:
1. Start Flash Video Encoder by selecting Start > All Programs > Adobe Flash Video Encoder (Windows), or open the folder that contains the Adobe Flash Video Encoder application, and double click the application icon (Macintosh).
2. In the Flash Video Encoder, add source video clips to the list of files to encode. You can drag a file into the list, or click the Add button and select a file on your computer.
3. Click Settings (Edit > Encoding Settings) to display the Flash Video Encoding Settings dialog box.
Flash provides several pre-configured encoding profiles that you can use to encode your video. In the Encoding panel, you can select an encoding profile to determine the level of compression to be applied to the video clip.
TIP You can select multiple video files and drag them into the list of files to encode.

18 Using Flash Video Encoder
The encoding profiles are based on the Flash Player version for which you intend to publish content and the data rate at which you want your video content to be encoded. If you choose an encoding profile using Flash Player 8, the On2 VP6 video codec is used to encode the video. If you choose an encoding profile using Flash Player 7, the Sorenson Spark video codec is used to encode the video.For information on advanced video encoding settings, see “Specifying video encoding settings” on page 22.
4. Verify that the encoding profile you’ve selected is appropriate for your intended application. The text box below the Flash Video Encoding Profile pop-up menu displays the Flash Player version, video codec, video bit rate, and audio encoding information for the selected encoding profile.
5. Enter a filename for the encoded FLV file. If you don’t specify a filename, Flash Video Encoder uses the filename of the source video clip. When naming a file, do not enter the .flv extension; Flash Video Encoder does this automatically.
You can specify a destination folder in which to save the encoded FLV file relative to the folder containing the source video clip. When specifying a destination folder:■ The destination folder you specify must already exist. If you specify a folder that does
not exist, an error message informs you that the file cannot be encoded because the folder cannot be found.
■ When specifying a folder, you must separate the folder name and the filename using either a forward slash (/) or backward slash (\) (Windows), or a forward slash (/) (Macintosh).
6. Do one of the following:
■ Click Settings to further adjust the encoding settings, embed cue points, or to modify the video clip’s size or playback length using the crop and trim controls.
■ Click OK to close the Flash Video Encoding Settings dialog box.7. Click Start Queue to begin encoding your files.
Flash Video Encoder starts encoding the first file in the video encoding list. While a file is being encoded, the Status column of the video encoding list provides information on the status of each video:Encoding indicates that the file is currently being encoded. Flash Video Encoder encodes only one file at a time.
TIP You can specify a folder in which to save encoded files using the Flash Video
Encoder Preferences. For more information, see “Setting Flash Video Encoder preferences” on page 30.

Encoding video with Flash Video Encoder 19
Waiting indicates that the file is in the encoding queue but has not been encoded. You can remove a file from the queue that has not been encoded or that is not being encoded. For more information, see “Removing files from the encoding queue” on page 19.Skip indicates that the file will be skipped during the encoding process. You can choose to skip files or change their status to Waiting. For more information, see “Skipping a file” on page 20.The Encoding Complete icon indicates that the specified file has been successfully encoded.The Error icon indicates that Flash Video Encoder encountered an error when attempting to encode the specified file, or that the user canceled the encoding process while the file was being encoded. Errors are recorded to a log file.If you exit and restart Flash Video Encoder, or if you stop and restart the queue, a dialog box appears that lets you select the file to encode.
8. The FLV encoded files are saved to the same folder as the source video files with a .flv file extension to identify them. If you encode the same file more than once, an incremental number is appended to the filename for each additional encoding.
Saving the encoding queue
You can manually save the current encoding queue—including all encoding settings. If you do not choose to save the encoding queue, it is saved automatically when you exit Flash Video Encoder.
To save the encoding queue:
■ Select File > Save Queue.
Removing files from the encoding queueYou can remove any video from the encoding queue before it is encoded.
To remove a video from the encoding queue:
1. Select the video (or videos) that you want to remove from the source file list.
2. Click Remove.
A dialog box prompts you to confirm that you want the selected files removed from the encoding queue.

20 Using Flash Video Encoder
Skipping a fileYou can specify that Flash Video Encoder not encode a file in the current encoding queue.
To skip a file:
1. Select the file or files that you want to skip in the encoding queue. To select multiple files in the encoding queue, Control-click (Windows) or Command-click (Macintosh).
2. Select Edit > Skip Selection.
To reset a skipped file for encoding:
1. Select the file or files in the encoding queue that you want to reset to the Waiting to Encode state. To select multiple files in the encoding queue, Control-click (Windows) or Command-click (Macintosh).
2. Select Edit > Reset Status.
The selected file or files will be reset to the Waiting to Encode state. You can reset the status of files while Flash Video Encoder is encoding.
Stopping the encoding of the current fileYou can stop the encoding process for any file that is currently being encoded. If you want to specify that Flash Video Encoder not encode a file that is waiting to be encoded, you can either remove that file from the encoding queue, or specify that the file be skipped. For more information, see “Removing files from the encoding queue” on page 19.
To stop encoding a file:
■ Select File > Stop Current File.A dialog box prompts you to confirm that you want to stop the current file from encoding. Click OK to stop the encoding process. An error message that states “The operation was interrupted by the user” is written to the log file. For more information, see “Viewing the Flash Video Encoder log file” on page 31.
Customizing video encoding settings 21
Customizing video encoding settingsThe Flash Video Encoding Settings option of Flash Video Encoder let you create custom video encoding settings.
Before creating custom video encoding settings, be sure you understand the different video encoding options. For information about video encoding options, see “Understanding video standards and terminology” on page 8.
To specify custom video encoding settings:
1. Select the file or files whose encoding settings you want to modify.
To select multiple files in the encoding list, Control-click (Windows) or Command-click (Macintosh), or select Edit > Select All to select all files in the encoding queue.
2. Click Settings (Edit > Encoding Settings).
The Flash Video Encoding Settings dialog box appears. This dialog box lets you perform the following actions:■ Specify alternate encoding settings to deliver video for different bandwidths and
applications.■ Create cue points to trigger events.■ Crop and resize the video clip to alter its dimensions.■ Trim the length of the video to change its beginning and ending frames.
To learn about the options available in the Flash Video Encoding Settings dialog box, see the following sections:
■ “Specifying video encoding settings” on page 22■ “Specifying audio encoding settings” on page 24■ “Defining and embedding cue points” on page 25■ “Cropping, trimming, and resizing video” on page 28

22 Using Flash Video Encoder
Specifying video encoding settingsThe video encoding settings let you select the quality of your FLV files. The Video tab lets you specify the encoding options for video files. The following sections describe the encoding options.
Flash Video Encoder showing video encoding settings
To specify custom video encoding settings:
1. Select the file or files whose encoding settings you want to modify.
To select multiple files in the encoding list, Control-click (Windows) or Command-click (Macintosh), or select Edit > Select All to select all files in the encoding queue.
2. Click Settings (Edit > Encoding Settings).
The Flash Video Encoding Settings dialog box appears.3. Click the Video tab to display the video encoding settings.
The Encode Video option is selected by default.4. Select a video codec with which to encode your content from the Video Codec pop-up
menu.
If you are authoring for Flash Player 7, select Sorenson Spark codec; if you are authoring for Flash Player 8, select On2 VP6 codec.
Customizing video encoding settings 23
5. (Optional) Select the Encode alpha channel option to encode an alpha channel.
Alpha channels let you encode video such that the background is removed and saved as a transparency. This lets you overlay (or composite) the video on top of other Flash content, while the subject of the video remains in the foreground. For example, a common use of alpha channels is to record a video clip of a presenter using a blue screen as a backdrop. The video can then be encoded with an alpha channel, and the presenter can be placed in front of another image as the backdrop to the video
6. (Optional) Select the Deinterlace option to deinterlace the video.
If your source video is interlaced, you can use Flash Video Encoder to either maintain the interlacing, or deinterlace it during encoding to create noninterlaced video. Flash Video Encoder deinterlaces by discarding one field and interpolating a new field based on the lines of the remaining field. For more information, see “Interlaced versus noninterlaced video” on page 13.
7. Select a frame rate. Flash Video Encoder uses the same frame rate as the source video by default. If you need to alter the frame rate, be sure you understand how modifying the frame rate affects the video quality. For more information, see “Understanding video standards and terminology” on page 8.
8. Select the key frame placement for the video. Keyframes are video frames that contain complete data. For example, if you specify a keyframe interval of 30, Flash Video Encoder encodes a complete frame every 30 frames in the video clip. For frames between keyframe intervals, Flash stores only the data that changes from the preceding frame.
By default, Flash Video encoder places a keyframe every 2 seconds of playback time. For example, if the video you’re encoding has a frame rate of 30 fps, a keyframe will be inserted every 60 frames. In general, the default keyframe value provides a reasonable level of control when seeking within a video clip. If you need to select a custom keyframe placement value, be aware that the smaller the keyframe interval, the larger the file size.
CA
UT
ION
If you are modifying the encoding settings for a video clip that will be embedded within a SWF file, the video frame rate must match that of the SWF file. For more information, see the information on embedding video in a SWF file in Using Flash.

24 Using Flash Video Encoder
9. Specify the quality setting for the video from the Quality pop-up menu. The quality setting determines the data rate of the encoded video. The higher the data rate, the better the quality of the encoded video clip.
■ Select a preset Quality setting (Low, Medium, or High) to automatically select a Data Rate value. When you select Low, Medium, and High from this menu, the Maximum Data Rate text box value is updated to reflect the specified value.
■ Select Custom and enter a value, in Kilobits/Sec, in the Maximum Data Rate text box.
10. When you finish specifying advanced encoding settings, you may select either the Cue Point or the Crop and Trim tab to further modify the video’s encoding settings, or click OK to return to the main Flash Video Encoding dialog box.
If you are ready to encode your video clips, or need to add additional source video clips to encode, see “Encoding video with Flash Video Encoder” on page 17.
To learn about the other options available in the Flash Video Encoding Settings dialog box, see the following sections:■ “Specifying audio encoding settings” on page 24■ “Defining and embedding cue points” on page 25■ “Cropping, trimming, and resizing video” on page 28
Specifying audio encoding settingsThe Audio tab lets you select the bit rate for mp3 audio encoding.
NO
TE
If you find that the preset quality settings do not work with your source footage, try specifying a custom maximum data rate. For more information on data rate, and how it affects video quality, see “Data rates” on page 9.
NO
TE
When you encode the video, the original source video clip is not changed. You can always re-encode a video clip and specify new settings if your initial attempt does not produce the results you want.
NO
TE
You can select an encoding profile from the Flash Video Encoding Profile pop-up menu, which sets a corresponding profile for the audio-only encoding format

Customizing video encoding settings 25
To specify custom audio encoding settings:
1. Select the file or files whose encoding settings you want to modify.
To select multiple files in the encoding list, Control-click (Windows) or Command-click (Macintosh), or select Edit > Select All to select all files in the encoding queue.
2. Click Settings (Edit > Encoding Settings).
The Flash Video Encoding Settings dialog box appears.3. Click the Audio tab to display the audio encoding settings.
4. The Encode Audio option is selected by default.
By default, the audio codec is mp3. 5. Select a data rate from the Data Rate pop-up menu.
Better quality audio tracks, such as music and significant background noise, require a higher data rate. Simple dialogue, such as a video of a talking-head with relatively little motion, can be compressed to a much higher degree. Higher bit rate settings (encoded at 80 kbps or larger) are encoded in stereo, while lower bit rate settings (encoded at 64 kbps or smaller) are encoded in mono.
Defining and embedding cue pointsCue points cause the video playback to start other actions within the presentation. For example, you can create a Flash presentation that has video playing in one area of the screen while text and graphics appear in another area. A cue point placed in the video starts an update to the text and graphic, while they remain relevant to the content of the video.
Each cue point consists of a name and the time at which it occurs. You specify cue point times using the format hour:minute:second:millisecond.
To create a cue point:
1. From the encoding queue, select a video in which you want to embed cue points.
To select a video in the encoding list, click the video name in the video encoding queue.2. Click Settings.
The Flash Video Encoding Settings dialog box is displayed.
NO
TE
In addition to embedding cue points within the encoded FLV video clip, you can create cue points using the FLVPlayback component. Using this component, you can create a cue point that is not embedded in the video clip itself, providing greater flexibility in triggering events. For more information, see the information on the FLVPlayback component in the ActionScript 2.0 Components Language Reference or the ActionScript 3.0 Components Language Reference.

26 Using Flash Video Encoder
3. If you haven’t specified encoding settings for the video clip, do so now. To learn more, see “Encoding video with Flash Video Encoder” on page 17.
4. Click the Cue Points tab to display the cue point controls.
Cue Points tab
5. Use the playhead to locate a specific point in the video where you want to embed a cue point. For greater precision, you can use the Left and Right Arrow keys to move the playhead in millisecond increments. To do this, select the playhead, and then use the arrow keys to further adjust its position.
To locate a specific time, drag the playhead to the point in the video where you want to embed a cue point. The video preview window lets you visually identify points in the video at which to insert a cue point. You can also use the elapsed time counter (located beneath the video preview window) to locate specific points in time at which to embed cue points.
6. When the playhead is positioned at a place in the video where you want to embed a cue point, click the (+) button on the left side of the Cue Points tab.
Flash Video Encoder embeds a cue point at the time indicated by the counter beneath the video preview window, and populates the cue point list with a placeholder for the name of the new cue point and the elapsed time at which the cue point is located (this is the time during playback when the event will be triggered), and displays a pop-up menu that lets you select the type of cue point to embed.

Customizing video encoding settings 27
A cue point marker is displayed on the slider control at the point where the cue point was embedded. You can use the cue point marker to further adjust the placement of the cue point. For greater precision, you can use the Left and Right Arrow keys to move the cue point marker in millisecond increments. To do this, select the cue point marker, and then use the arrow keys to further adjust its position.
7. Specify the type of cue point you want to embed. You can embed either a navigation or event cue point.
■ Event cue points are used to trigger ActionScript methods when the cue point is reached, and let you synchronize the video playback to other events within the Flash presentation.
■ Navigation cue points are used for navigation and seeking, and to trigger ActionScript methods when the cue point is reached. Embedding a navigation cue point inserts a keyframe at that point in the video clip to enable viewers to seek to that place in the video.
8. Enter parameters for the selected cue point.
Parameters are a set of key-value pairs that you can add to the cue point. The parameters are passed to the cue point event handler as members of the single parameter object.To learn more about using cue points, and the parameter values they can use, see the following:■ Information on working with video in Using Flash■ FLVPlayback information in the ActionScript 2.0 Components Language Reference or
the ActionScript 3.0 Components Language Reference9. (Optional) Save the cue points you’ve created so that you can apply them to other video
clips. Click the Save Cue Points button (the disk icon) on the cue points tab, and save the file to a location on your computer.
To remove a cue point:
1. Select the cue point in the cue point list.
2. Click the Delete Cue Point button (-), or press the Delete key.
NO
TE
Only one cue point can be embedded at a specified time code within the video clip.
NO
TE
Adding additional keyframes can lower the overall quality of a video clip. For this reason, navigation cue points should only be used when users will need to seek to a particular place within the video. For more information on keyframes, and their effect on video playback, see “Keyframes” on page 10.

28 Using Flash Video Encoder
The cue point is deleted from the cue point list.
To load previously saved cue point data
1. Click the Load Cue Points button (the folder icon) on the cue points tab.
2. Select the cue point file you want to import, and click OK.
The cue point file loads, and populates the cue point list with the cue points specified in the file.
To learn more about using cue points, and the cue points XML file, see “About cue points” on page 14.
Cropping, trimming, and resizing videoFlash Video Encoder provides the following editing options that let you crop and trim video clips before encoding them:
Cropping lets you alter the dimensions of a video clip. You can eliminate areas of the video to emphasize a particular focal point within the frame, such as highlighting a character by removing ancillary imagery or removing unwanted backdrops.
Trimming lets you edit the beginning and ending points (the in and out points) of a video. For example, you can adjust the trim of a video clip to begin play back 30 seconds into the full clip, removing unwanted frames.
Resizing lets you modify the width and height of the video frame. You can specify a frame size in pixels or as a percentage of the original image size.
1. Select a video in which you want to embed cue points.
To select a video in the encoding list, click the video name in the video encoding queue.2. Click Settings.
The Flash Video Encoding Settings dialog box appears.3. If you haven’t yet specified encoding setting for the video clip, do so now. To learn more,
see “Encoding video with Flash Video Encoder” on page 17.
NO
TE
When you load cue points from a file, any cue points you may have created in the cue points list are replaced by the cue points in the file.
Customizing video encoding settings 29
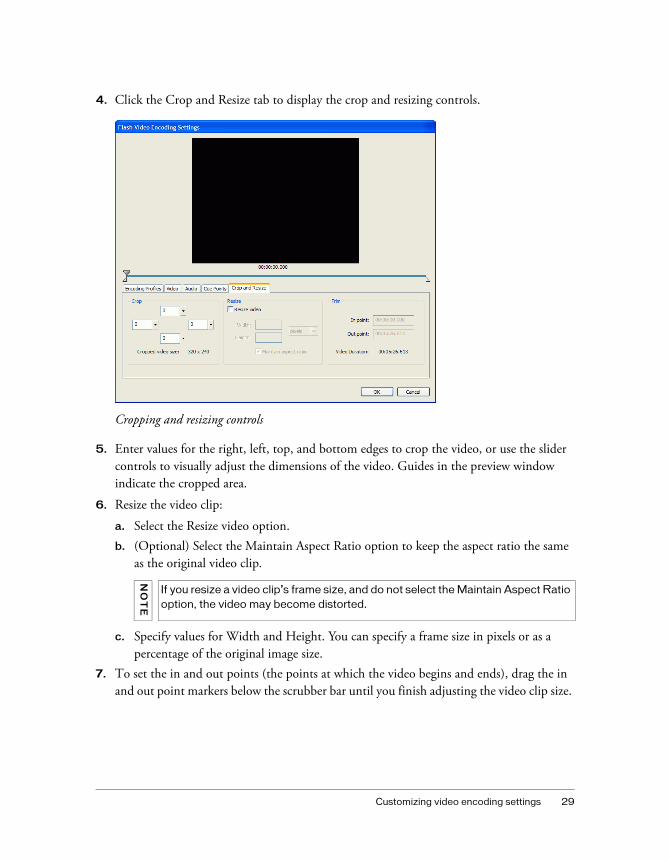
4. Click the Crop and Resize tab to display the crop and resizing controls.
Cropping and resizing controls
5. Enter values for the right, left, top, and bottom edges to crop the video, or use the slider controls to visually adjust the dimensions of the video. Guides in the preview window indicate the cropped area.
6. Resize the video clip:
a. Select the Resize video option. b. (Optional) Select the Maintain Aspect Ratio option to keep the aspect ratio the same
as the original video clip.
c. Specify values for Width and Height. You can specify a frame size in pixels or as a percentage of the original image size.
7. To set the in and out points (the points at which the video begins and ends), drag the in and out point markers below the scrubber bar until you finish adjusting the video clip size.
NO
TE
If you resize a video clip’s frame size, and do not select the Maintain Aspect Ratio option, the video may become distorted.

30 Using Flash Video Encoder
The video preview window lets you visually identify beginning and ending frames where you can trim the video clip. You can also use the elapsed time counter (located in the Trim section of the dialog box) to locate specific points in time where you can trim the video clip.
8. Preview the video by dragging the playhead over the scrubber bar to ensure that it plays appropriately.
9. When you finish cropping and trimming the video, you may select either the Cue Point or the Encoding tab to further modify the video’s encoding settings, or click OK to return to the main Flash Video Encoding dialog box.
If you are ready to encode your video clips, or need to add additional source video clips to encode, see “Encoding video with Flash Video Encoder” on page 17.To learn about the other options available in the Flash Video Encoding Settings dialog box, see the following sections:■ “Specifying video encoding settings” on page 22■ “Defining and embedding cue points” on page 25
Setting Flash Video Encoder preferencesFlash Video Encoder provides the following preference settings that you can specify:
Flash lets you set preferences for general application operations, editing operations, and clipboard operations.
To set preferences:
1. Select Edit > Preferences (Windows) or Flash > Preferences (Macintosh).
Preferences dialog box
NO
TE
When you encode the video, the original source video clip is not changed. You can always re-encode a video clip and specify new settings if your initial attempt does not produce the results you want.

Viewing the Flash Video Encoder log file 31
2. Select from the respective options described in the procedures that follow.
■ By default, Flash Video Encoder prompts you with a warning if you attempt to stop encoding a queue, or remove a file during the encoding process. To disable the warning, deselect Warn On Stop Queue Or Remove File.
■ By default, Flash Video Encoder increments each file you encode with the same name by appending a number to the filename. For example, if you encode a video clip and create the output file video.flv, and then decide to re-encode the same file without deleting video.flv, Flash Video Encoder will name the next file video1.flv. To disable filename incrementing, deselect the Increment Output Filename If File With Same Name Exists option.
■ To remove files from the encoding queue once they’ve been encoded, select the Remove Completed Files From The Queue On Exit option. This removes any encoded files from the encoding queue when you exit (close) Flash Video Encoder.
■ By default, Flash Video Encoder places encoded FLV files in the same folder as the source video clip, prepending a .flv extension to differentiate the newly encoded video clip from its source video. To select a different destination folder in which to place FLV encoded video clips, select the Place Output Files In option. The Browse for a Folder dialog box will be displayed. Select an existing folder on your local computer, or create a new folder in which to output encoded video files.
Viewing the Flash Video Encoder log fileFlash Video Encoder provides a log file that lets you view the status of files that you have encoded. The log file opens automatically if any errors are encountered when encoding a video clip, or if you manually stop the encoding queue.
The log file is a plain text file that contains a record of all files encoded, whether successfully completed or not. The encoding status of each file you encode is appended to the end of the file (placing the newest entry at the end of the file). The log file adds entries until you manually clear them by opening the file in a text editor, selecting all of the entries, deleting them, and saving the empty file using the default filename (log.text).
CA
UT
ION
If you choose to disable filename incrementing, Flash Video Encoder writes over any existing files in the destination folder with the same name. To prevent this, name your video clips in such a way that they don’t inadvertently overwrite one another.
32 Using Flash Video Encoder
The log file is stored in the following location:
■ Windows: C:\Documents and Settings\user\Application Data\Adobe\Flash Video Encoder\log.txt
■ Macintosh: Macintosh HD/Users/user/Library/Application Support/Adobe/Flash Video Encoder/log.txt
To view the log file:
■ Select File > Show Log.The log file is displayed using the operating system’s default text editing application.
Troubleshooting video encoding errorsFlash Video Encoder provides an error window that you can use to troubleshoot errors encountered when encoding video clips.
To view the error messages:
■ Select File > Show Errors.You can leave the Errors dialog box open when encoding video clips. The Errors dialog box clears all entries when you exit Flash Video Encoder.

33
Index
AAdobe After Effects 6Adobe Soundbooth 15alpha channels 6, 23anamorphic video 12Apple Final Cut Pro 6Apple QuickTime Pro 6applications, video editing 6aspect ratio
about 11non-square pixels 12resizing 29
audioencoding 14settings, custom 24Soundbooth and 15
Audio tab 24Avid Xpress DV 6
Bbandwidth. See data ratebit rate. See data rateblue screen 23
Ccable modem, and frame size 11codecs. See video codecscompression, audio 14compression, video. See video codecsconnection speed. See data ratecropping 28cue points
about 14Adobe Soundbooth 15
embedding 25removing 27XML file 15
custom encoding settings 21, 22
Ddata rate
about 9specifying 24
deinterlaced video 13DSL, and frame size 11
Eediting. See video editingencoding
adding files 17audio 14, 24customizing 21, 22for XML file 15non-square pixels and 12stopping 20troubleshooting 32video settings 17
Encoding panel 17encoding queue
removing files 19, 31saving settings 19skipping files 20
end points 28, 29errors 17, 32events and FLVPlayback component 14, 25
34 Index
Ffiles, encoding 17Final Cut Pro 6Flash Player versions 7Flash Video Encoder
about 5codecs 7error messages 32log file 31preferences 30
FLV QuickTime Export plug-in (Flash Video Exporter) 6
FLVPlayback component 25folder name, specifying 18, 31frame rate
reducing 9SWF files and 23
frame size. See aspect ratio
Iin and out points 28, 29interframes and intraframes 7interlaced and noninterlaced video 13
Kkeyframes
about 10default interval 10, 23specifying 23
LLAN, and frame size 11log file
cue point errors 17Flash Video Encoder 31
MMaintain Aspect Ratio check box 29Maximum Data Rate text box 9modem connection, and frame size 11
Nnon-square pixels 12noninterlaced video 13NTSC video frame rate 9
OOn2 VP6 codec 7
PPAL video frame rate 9path, specifying 18pixels, non-square 12plug-in, FLV QuickTime Export 6preferences 30profile, encoding 17
Qquality setting 24queue. See encoding queueQuickTime Export plug-in 6QuickTime Pro 6
Rresolution. See aspect ratio
SSorenson Spark codec 7Soundbooth 15
Tterminology 8transparency 23trimming 28troubleshooting 32

Index 35
Vvideo
aspect ratio, about 11cropping 28cue points 14, 25data rate, about 9data rate, specifying 24encoding with Flash Video Encoder 17frame rate 9interlaced versus noninterlaced 13keyframes 10, 23quality setting, specifying 24resizing aspect ratio 29trimming 28troubleshooting 32
video codecsabout 7On2 VP6 versus Sorenson Spark 7terminology 8
video editingapplications for 6cropping, trimming, resizing 28in and out points 29
XXML file, cue point 15Xpress DV 6

36 Index