FLASH GLUCOSE MONITORING SYSTEM - … · health care professional to determine your Target Glucose...
124
User’s Manual FLASH GLUCOSE MONITORING SYSTEM
-
Upload
nguyennguyet -
Category
Documents
-
view
214 -
download
0
Transcript of FLASH GLUCOSE MONITORING SYSTEM - … · health care professional to determine your Target Glucose...

User’s Manual
FLASH GLUCOSE MONITORING SYSTEM

Contents
Reader Symbols . . . . . . . . . . . . . . . . . . . . . . . . . . . . . . . . . . . . . . . . . 1
Important Safety Information . . . . . . . . . . . . . . . . . . . . . . . . . . . 3Indications for Use . . . . . . . . . . . . . . . . . . . . . . . . . . . . . . . . . . . . . . . . 3Contraindications . . . . . . . . . . . . . . . . . . . . . . . . . . . . . . . . . . . . . . . . 4
Getting to Know Your System . . . . . . . . . . . . . . . . . . . . . . . . . . . 8Reader Kit . . . . . . . . . . . . . . . . . . . . . . . . . . . . . . . . . . . . . . . . . . . . . . . 9Sensor Kit . . . . . . . . . . . . . . . . . . . . . . . . . . . . . . . . . . . . . . . . . . . . . . . 10FreeStyle Libre Software . . . . . . . . . . . . . . . . . . . . . . . . . . . . . . . . . 13
Setting up Your Reader for the First Time . . . . . . . . . . . . . . 14
Using Your Sensor . . . . . . . . . . . . . . . . . . . . . . . . . . . . . . . . . . . . . . 17Applying Your Sensor . . . . . . . . . . . . . . . . . . . . . . . . . . . . . . . . . . . . 18Starting Your Sensor . . . . . . . . . . . . . . . . . . . . . . . . . . . . . . . . . . . . . 22Checking Your Glucose . . . . . . . . . . . . . . . . . . . . . . . . . . . . . . . . . . 23
Adding Notes . . . . . . . . . . . . . . . . . . . . . . . . . . . . . . . . . . . . . . . . . . . 29

Reviewing Your History . . . . . . . . . . . . . . . . . . . . . . . . . . . . . . . . 31Logbook . . . . . . . . . . . . . . . . . . . . . . . . . . . . . . . . . . . . . . . . . . . . . . . . 33Daily Graph . . . . . . . . . . . . . . . . . . . . . . . . . . . . . . . . . . . . . . . . . . . . . 34Other History Options . . . . . . . . . . . . . . . . . . . . . . . . . . . . . . . . . . . 35
Removing Your Sensor . . . . . . . . . . . . . . . . . . . . . . . . . . . . . . . . . 37
Replacing Your Sensor . . . . . . . . . . . . . . . . . . . . . . . . . . . . . . . . . 38
Using Reminders . . . . . . . . . . . . . . . . . . . . . . . . . . . . . . . . . . . . . . . 39
Using the Built-in Meter . . . . . . . . . . . . . . . . . . . . . . . . . . . . . . . . 41Blood Glucose Testing . . . . . . . . . . . . . . . . . . . . . . . . . . . . . . . . . . . 43Blood Ketone Testing . . . . . . . . . . . . . . . . . . . . . . . . . . . . . . . . . . . . 47Control Solution Testing . . . . . . . . . . . . . . . . . . . . . . . . . . . . . . . . . 52Using the Rapid-Acting Insulin Calculator . . . . . . . . . . . . . . . . 56
Charging the Reader . . . . . . . . . . . . . . . . . . . . . . . . . . . . . . . . . . . 63
Changing the Reader Settings . . . . . . . . . . . . . . . . . . . . . . . . . 64
Living With Your FreeStyle Libre System . . . . . . . . . . . . . . . 67
Maintenance and Disposal . . . . . . . . . . . . . . . . . . . . . . . . . . . . . 69
Troubleshooting . . . . . . . . . . . . . . . . . . . . . . . . . . . . . . . . . . . . . . . 70Reader Does Not Power On . . . . . . . . . . . . . . . . . . . . . . . . . . . . . . 70Problems at the Sensor Application Site . . . . . . . . . . . . . . . . . . 71Problems Starting Your Sensor or Receiving Sensor Readings . . . . . . . . . . . . . . . . . . . . . . . . . . . . . . . . . . . . . . . . . . . . . . . . 72Blood Glucose or Ketone Error Messages . . . . . . . . . . . . . . . . . 75Problems Checking Your Blood Glucose or Ketone . . . . . . . . 79Perform a Reader Test . . . . . . . . . . . . . . . . . . . . . . . . . . . . . . . . . . . . 81Customer Service . . . . . . . . . . . . . . . . . . . . . . . . . . . . . . . . . . . . . . . 81
Professional Options . . . . . . . . . . . . . . . . . . . . . . . . . . . . . . . . . . . 82Changing Dose Increments . . . . . . . . . . . . . . . . . . . . . . . . . . . . . . 83Setting up the Insulin Calculator . . . . . . . . . . . . . . . . . . . . . . . . . 84Easy Setup of the Insulin Calculator . . . . . . . . . . . . . . . . . . . . . . 86Advanced Setup of the Insulin Calculator . . . . . . . . . . . . . . . . . 90Changing the Insulin Calculator Settings . . . . . . . . . . . . . . . .101
System Specifications . . . . . . . . . . . . . . . . . . . . . . . . . . . . . . . . .102
Rapid-Acting Insulin Calculator Specifications . . . . . . . .106
Labelling Symbols . . . . . . . . . . . . . . . . . . . . . . . . . . . . . . . . . . . . .108
Electromagnetic Compatibility . . . . . . . . . . . . . . . . . . . . . . . .109

Reader Symbols
Symbol What It Means
Active sensor
Direction your glucose is going . See Checking Your Glucose section for more information
Caution
View previous/next screen
Notes
+ Add more information to notes
Food note
Rapid-acting insulin note
Time changed on Reader
Reminders
1

Symbol What It Means
Blood glucose or ketone test
Settings
Control solution test result
Rapid-acting insulin calculator
Details of your suggested insulin dose
Estimated rapid-acting insulin remaining in body
Low battery
Battery charging
Sensor too cold
Sensor too hot
2

Important Safety Information
Indications for UseThe FreeStyle Libre Flash Glucose Monitoring System is indicated for measuring interstitial fluid glucose levels in adults aged 18 years and older . It is designed to replace blood glucose testing in the self-management of diabetes with the exceptions listed below . Under the following circumstances, use a blood glucose meter to check the current glucose readings from the FreeStyle Libre Flash Glucose Monitoring System Sensor:
•During times of rapidly changing glucose levels, interstitial glucose levels as measured by the Sensor and reported as current may not accurately reflect blood glucose levels . When glucose levels are falling rapidly, glucose readings from the Sensor may be higher than blood glucose levels . Conversely when glucose levels are rising rapidly, glucose readings from the Sensor may be lower than blood glucose levels .
• In order to confirm hypoglycaemia or impending hypoglycaemia as reported by the Sensor .
• If symptoms do not match the FreeStyle Libre Flash Glucose Monitoring System reading . Do not ignore symptoms that may be due to low blood glucose or high blood glucose .
3

Contraindications The FreeStyle Libre Flash Glucose Monitoring System must be removed prior to Magnetic Resonance Imaging (MRI) .
WARNING: • The FreeStyle Libre Flash Glucose Monitoring System contains
small parts that may be dangerous if swallowed .•During times of rapidly changing glucose (more than 0 .1 mmol/L
per minute), interstitial fluid glucose levels as measured by the FreeStyle Libre Flash Glucose Monitoring System Sensor may not accurately reflect blood glucose levels . Under these circumstances, check the Sensor glucose readings by conducting a fingerstick test using a blood glucose meter .
• In order to confirm hypoglycaemia or impending hypoglycaemia as reported by the FreeStyle Libre Flash Glucose Monitoring System Sensor, conduct a fingerstick test using a blood glucose meter .
•Do not ignore symptoms that may be due to low or high blood glucose . If you have symptoms that do not match the FreeStyle Libre Flash Glucose Monitoring System reading or suspect that your reading may be inaccurate, check the reading by conducting a fingerstick test using a blood glucose meter . If you are experiencing symptoms that are not consistent with your glucose readings, consult your health care professional .
4

CAUTION: • On rare occasions, you may get inaccurate Sensor glucose
readings . If you believe your glucose readings are not correct or are inconsistent with how you feel, perform a blood glucose test on your finger to confirm your glucose . If the problem continues, remove the current Sensor and apply a new one .
• Performance of the System when used with other implanted medical devices, such as pacemakers, has not been evaluated .
•The Reader is for use by a single person . It must not be used on more than one person including other family members due to the risk of spreading infection . All parts of the Reader are considered biohazardous and can potentially transmit infectious diseases, even after performing the cleaning procedure .
5

System-Related Information •The FreeStyle Libre Flash Glucose Monitoring System is designed to be
used only with FreeStyle Optium blood glucose and blood ketone test strips and MediSense control solution .
• Avoid getting dust, dirt, blood, control solution, water or other substances in the Reader’s USB and test strip ports .
•Physiologic differences between the interstitial fluid and capillary blood may result in differences in glucose readings . Differences in glucose readings between interstitial fluid and capillary blood may be observed during times of rapid change in blood glucose, such as after eating, dosing insulin or exercising .
•Severe dehydration and excessive water loss may cause inaccurate results . If you believe you are suffering from dehydration, consult your health care professional immediately .
6

• If you have a medical appointment that includes strong magnetic or electromagnetic radiation, for example an X-ray, MRI (Magnetic Resonance Imaging), or CT (Computed Tomography) scan, remove the Sensor you are wearing and apply a new one after the appointment . The effect of these types of procedures on the performance of the system has not been evaluated .
•The FreeStyle Libre Flash Glucose Monitoring System has not been evaluated for use in pregnant women, persons on dialysis, or people less than 18 years of age .
7

Getting to Know Your SystemThe FreeStyle Libre Flash Glucose Monitoring System has two main parts: a handheld Reader and a disposable Sensor, which you wear on your body . You use the Reader to wirelessly scan the Sensor and get your glucose readings . The Reader also has a built-in blood glucose and ketone meter, which works with FreeStyle Optium blood glucose and blood ketone test strips .
Your System comes in a Reader Kit and a Sensor Kit . When opening your kits, check that the contents are undamaged and that you have all parts listed . If any parts are missing or damaged, contact Customer Service .
IMPORTANT: Safety information about the System is in this User’s Manual . Read all of the information in the User’s Manual and the FreeStyle Optium blood glucose and ketone test strip instructions for use before using your System .
8

Reader Kit
The Reader Kit includes:
•1 FreeStyle Libre Reader•1 USB Cable
•1 Power Adapter•User’s Manual
•Quick Start Guide
The Reader is used to get glucose readings from your Sensor . It can store approximately 90-days of glucose history and notes you enter about activities, such as taking insulin, eating food, or exercising . This information can help you understand how these activities affect your glucose .
USB Port
Used to charge the Reader and connect it to a computer.
Test Strip Port
Insert a test strip here to use the built-in meter.
Touchscreen
Home Button
Turns the Reader on/o� and takes you to the
Home screen from any other screen.
9

Sensor Kit
The Sensor Kit includes:
•1 Sensor Pack•1 Sensor Applicator
•1 Alcohol wipe•Product insert
Sensor PackUsed with the Sensor Applicator to prepare the Sensor for use .
Sensor ApplicatorApplies the Sensor to your body .
The Sensor measures and stores glucose readings when worn on your body . It initially comes in two parts: one part is in the Sensor Pack and the other part is in the Sensor Applicator . By following the instructions, you prepare and apply the Sensor on the back of your upper arm . The Sensor has a small, flexible tip that is inserted just under the skin . The Sensor can be worn for up to 14 days .
SensorMeasures your glucose while on your
body (only visible after applied).
10

The Reader Home Screen provides access to information about your glucose and the System . You can press the Home Button to get to the Home Screen .
Home Screen
Ends in 14 days
22:23
CheckGlucose
ReviewHistory
Time
Current time set on the Reader.
Sensor Status
Information about your current Sensor.
Battery Level
Battery charge remaining.
Settings
Touch to change the Reader’s settings.
Review History
Touch to review information about your past glucose
readings.
Check Glucose
Touch to check your Sensor glucose.
Reminder
Touch to set or change reminders.
11

The Sensor Glucose Readings screen appears after you use the Reader to scan your Sensor . Your Reading includes your Current Glucose, a Glucose Trend Arrow indicating which way your glucose is going, and a graph of your current and stored glucose readings .
Sensor Glucose Readings
21
15
9
314:00 18:00 22:00
4.0 mmolL
Glucose Going Low
Rapid-Acting Insulin Note
Message
Touch for more information.
Add Notes
Touch to add notes to the glucose reading.
Food Note
Current Glucose
Glucose from your latest scan.
Glucose Trend Arrow
Direction your glucose is going.
Glucose Graph
Graph of your current and stored glucose
readings.
12
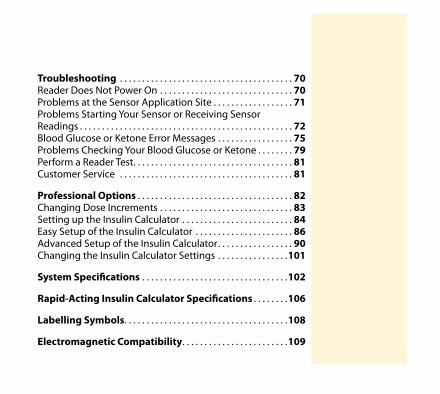
FreeStyle Libre SoftwareFreeStyle Libre software can be used to view reports and change Reader settings . The software is compatible with most Windows and Mac operating systems . Go to www .FreeStyleLibre .com and follow onscreen instructions to download and install the software .
INTENDED USE FreeStyle Libre software is intended for use by individuals and health care professionals to aid in the review, analysis, and evaluation of information such as Sensor glucose readings, blood glucose test results, blood ketone test results, and other data uploaded from the FreeStyle Libre Flash Glucose Monitoring System, in support of an effective diabetes health management program .FreeStyle Libre software is not intended for the diagnosis of or screening for diabetes mellitus . Users should be aware that FreeStyle Libre software is merely an information management tool and it is therefore not intended to substitute for the support of a health care professional . Individuals should always consult their health care professional if they have any queries or concerns about diabetes management .
13

Setting up Your Reader for the First TimeBefore using the System for the first time, the Reader must be set up .
Step Action
1 Press the Home Button to turn on the Reader .
2 If prompted, use the touchscreen to select your preferred language for the Reader . Touch OK to continue . Note: Use the pad of your finger . Do NOT use your fingernail or any other object on the screen .
3 Set the Current Date using the arrows on the touchscreen . Touch next to continue .
14
back next
Current Date
June2014
14

Step Action
4 Set the Current Time . Touch next to continue .
5 Set your Target Glucose Range . Work with your health care professional to determine your Target Glucose Range . Touch next to continue . Note: Your Target Glucose Range is displayed on glucose graphs on the Reader and used to calculate your Time In Target .
12 00
back next
Current Time
CAUTION: It is very important to set the time and date correctly . These values affect the Reader data and settings .
mmolL4.4 to 7.8
back next
Target Glucose Range
?
15

Step Action
6 The Reader now displays important information about two key topics to help you use the system:
• How to understand the Glucose Trend Arrow included on the Glucose Reading screen .
• How to return to the Home Screen from any other screen .
Touch next to move to the next topic . At the end of the Reader setup, touch done to go to the Home Screen .
Note: Charge the Reader if the battery level is low . Only use the USB cable and power adapter included with the System .
nextback
When you scan your Sensor an arrow will indicate your recent glucose trend:
Rising quickly
Rising
Changing slowly
Falling
Falling quickly
doneback
While using the Reader, press the home button to return to the Home screen.
16

Using Your Sensor
CAUTIONS: • The Sensor Pack and Sensor Applicator are packaged as a
set (separately from the Reader) and have the same Sensor code . Check that the Sensor codes match before using your Sensor Pack and Sensor Applicator . Sensor Packs and Sensor Applicators with the same Sensor code should be used together or your Sensor glucose readings may be incorrect .
• Intense exercise may cause your Sensor to loosen due to sweat or movement of the Sensor . If your Sensor comes loose, you may get no readings or unreliable readings, which may not match how you feel . Follow the instructions to select an appropriate application site .
CODE
FreeStyle LibreSensor Pack
Abbott Diabetes Care Ltd. Range Road, Witney, Oxon, OX29 0YL, UK DOC30391 Rev.
B 09
/13
XXXXXXXXX
XXX
YYYY/MM
17

Applying Your Sensor
Step Action
1 Apply Sensors only on the back of your upper arm . Avoid areas with scars, moles, stretch marks or lumps . Select an area of skin that generally stays flat during your normal daily activities (no bending or folding) . Choose a site that is at least 2 .5 cm (1 inch) away from an insulin injection site . To prevent discomfort or skin irritation, you should select a different site other than the one most recently used .
2 Clean application site with an alcohol wipe and allow site to dry before proceeding . This helps the Sensor stay attached to your body . Note: The area MUST be clean and dry, otherwise the Sensor may not stick to the site .
18

Step Action
3 Open the Sensor Pack by peeling the lid off completely . Unscrew the cap from the Sensor Applicator and set the cap aside .
4 Line up the dark mark on the Sensor Applicator with the dark mark on the Sensor Pack . Press firmly down on the Sensor Applicator until it comes to a stop .
5 Lift the Sensor Applicator out of the Sensor Pack .
Lid
Cap
CAUTION: Do NOT use if the Sensor Pack or the Sensor Applicator seem to be damaged or already opened . Do NOT use if past expiry date .
19

Step Action
6 The Sensor Applicator is prepared and ready to apply the Sensor .
7 Place the Sensor Applicator over the prepared site and push down firmly to apply the Sensor to your body .
CAUTION: The Sensor Applicator now contains a needle . Do NOT touch inside the Sensor Applicator or put it back into the Sensor Pack .
CAUTION: Do NOT push down on the Sensor Applicator until placed over prepared site to prevent unintended results or injury .
20

Step Action
8 Gently pull the Sensor Applicator away from your body . The Sensor should now be attached to your skin .Note: Applying the Sensor may cause bruising or bleeding . If there is bleeding that does not stop, remove the Sensor, and apply a new one at a different site .
9 Make sure the Sensor is secure after application . Put the cap back on the Sensor Applicator . Discard the used Sensor Pack and Sensor Applicator according to local regulations .
Sensor
21

Starting Your Sensor
Step Action
1 Press the Home Button to turn on the Reader .
2 Touch Start New Sensor .
3 Hold the Reader within 4 cm (1 .5 inches) of the Sensor to scan it . This starts your Sensor . If sounds are turned on, the Reader beeps when the Sensor has been successfully activated . The Sensor can be used to check your glucose after 60 minutes .Note: If the Sensor is not successfully scanned within 15 seconds, the Reader displays a prompt to scan the Sensor again . Touch OK to return to the Home Screen and touch Start New Sensor to scan your Sensor .
No Active Sensor
22:23
Start NewSensor
ReviewHistory
minutes
OKNew SensorStarting Up
60 Sensor can be used in:
22

Checking Your Glucose
Step Action
1 Turn the Reader on by pressing the Home Button or touch Check Glucose from the Home Screen .
2 Hold the Reader within 4 cm (1 .5 inches) of your Sensor to scan it . Your Sensor wirelessly sends glucose readings to the Reader . If sounds are turned on, the Reader beeps when the Sensor has been successfully scanned .
Note: If the Sensor is not successfully scanned within 15 seconds, the Reader displays a prompt to scan the Sensor again . Touch OK to return to the Home Screen and touch Check Glucose to scan your Sensor .
22:23
CheckGlucose
ReviewHistory
Ends in 14 days
OR
23
Step Action
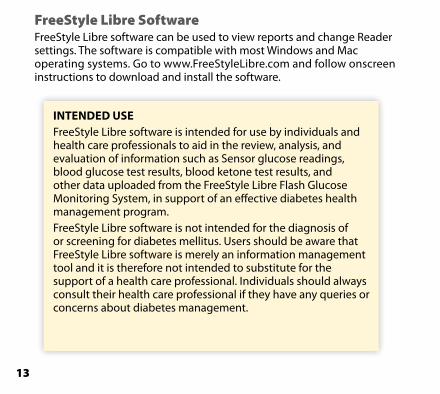
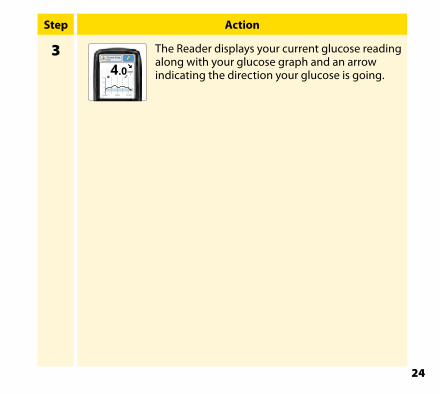
3 The Reader displays your current glucose reading along with your glucose graph and an arrow indicating the direction your glucose is going .21
15
9
3
mmolL
Glucose Going Low
14:00 18:00 22:00
4.0
24

Sensor Glucose Readings
Notes:•The graph displays glucose readings up to 21 mmol/L . Glucose
readings above 21 mmol/L are displayed at 21 mmol/L .•The symbol may appear, indicating the Reader time was changed .
Gaps in the graph may result or glucose readings may be hidden .
21
15
9
314:00 18:00 22:00
Glucose Going Low
4.0 mmolL
Glucose Trend Arrow
Current Glucose
Target Glucose Range
25

The Glucose Trend Arrow gives you an indication of the direction your glucose is going .
Glucose is rising quickly (more than 0 .1 mmol/L per minute)
Glucose is rising(between 0 .06 and 0 .1 mmol/L per minute)
Glucose is changing slowly(less than 0 .06 mmol/L per minute)
Glucose is falling(between 0 .06 and 0 .1 mmol/L per minute)
Glucose is falling quickly(more than 0 .1 mmol/L per minute)
Note: The Glucose Trend Arrow may not always appear with your reading .
26

The following table shows messages you may see with your glucose readings .
Display What To Do
21
15
9
314:00 18:00 22:00
mmolL
Low Glucose
LO
21
15
9
314:00 18:00 22:00
mmolL
High Glucose
HI
If LO appears on the Reader, your reading is lower than 2 .2 mmol/L . If HI appears on the Reader, your reading is higher than 27 .8 mmol/L . You can touch the message button for more information . Check your blood glucose on your finger with a test strip . If you get a second LO or HI result, contact your health care professional immediately .
21
15
9
314:00 18:00 22:00
3.5 mmolL
Low Glucose
21
15
9
314:00 18:00 22:00
16.1 mmolL
High Glucose
If your glucose is higher than 13 .3 mmol/L or lower than 3 .9 mmol/L, you will see a message on the screen . You can touch the message button for more information and set a reminder to check your glucose .
27

Display What To Do
21
15
9
314:00 18:00 22:00
4.0 mmolL
Glucose Going Low
21
15
9
314:00 18:00 22:00
13.2 mmolL
Glucose Going High
If your glucose is projected to be higher than 13 .3 mmol/L or lower than 3 .9 mmol/L within 15 minutes, you will see a message on the screen . You can touch the message button for more information and set a reminder to check your glucose .
Note: If you are not sure about a message or reading, contact your health care professional before you do anything .
28

Adding NotesNotes can be saved with your glucose readings . You can add a note at the time of your glucose reading or within 15 minutes after your reading was obtained . You can track food, insulin, exercise and any medication you take .
Step Action
1 From the Glucose Reading screen, add notes by touching the symbol in the upper right corner of the touchscreen . If you do not want to add notes, you can press the Home Button to go to the Home Screen or hold the Home Button to turn the Reader off .
2 Select the tickbox next to the notes you would like to add . Touch the down arrow to view other Note options .
21
15
9
314:00 18:00 22:00
Glucose Going Low
4.0 mmolL
OKAdd Notes
1 / 4
Rapid-Acting Insulin
Long-Acting Insulin
Food
29

Step Action
3 After you tick the box for food and insulin notes, the + symbol appears to the right of the Note . You can touch it to add more specific information to your note . Then touch OK .• Insulin notes: Enter the number of
units taken . • Food notes: Enter grams or carb
portion information .
Note: Food and rapid-acting insulin notes are shown on your glucose graphs and in your Logbook as symbols .
4 Touch OK to save your Notes .
You can review your Notes from the Logbook . See Reviewing Your History section for more information .
+++
OKAdd Notes
1 / 4
Rapid-Acting Insulin
Long-Acting Insulin
Food
units
Enter Rapid-Acting Insulin
OK
+++
OKAdd Notes
1 / 4
Rapid-Acting Insulin
Long-Acting Insulin
Food
30
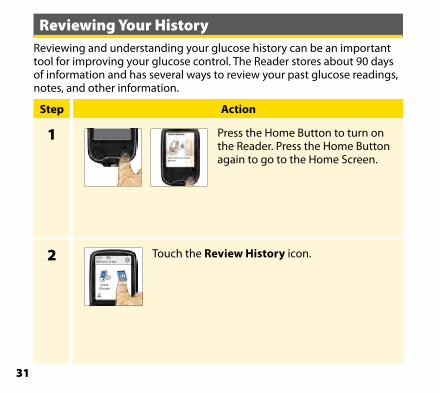
Reviewing Your HistoryReviewing and understanding your glucose history can be an important tool for improving your glucose control . The Reader stores about 90 days of information and has several ways to review your past glucose readings, notes, and other information .
Step Action
1 Press the Home Button to turn on the Reader . Press the Home Button again to go to the Home Screen .
2 Touch the Review History icon .
Check Glucose
Scan Sensor to checkglucose.
22:23
CheckGlucose
ReviewHistory
Ends in 14 days
31

Step Action
3 Use the arrows to view the available options .Logbook
Daily Graph
Average Glucose
Review History
1 / 2
Daily Patterns
Time In Target
Low-Glucose Events
Sensor Usage
IMPORTANT: Work with your health care professional to understand your glucose history .
32

The Logbook and Daily Graph show detailed information, while other history options show summaries of information over a number of days .
Logbook
Entries for each time you scanned your Sensor or performed a blood glucose or ketone test . If you entered Notes with a glucose reading, the symbol appears in that row . For more information about the symbols, see Reader Symbols section . Touch the entry to review the detailed information, including any Notes you entered . You can add or edit (change) Notes for the most recent Logbook entry, provided your glucose reading was within the last 15 minutes and you have not used FreeStyle Libre software to create reports .
OKLogbook
23 Feb10:23
23 Feb06:37
22 Feb23:09
7.9
5.4
6.0mmol/L
33

Daily Graph
A graph of your Sensor glucose readings by day .The graph shows your Target Glucose Range and symbols for food or rapid-acting insulin notes you have entered .Notes:• The graph displays glucose readings up to
21 mmol/L . Glucose readings above 21 mmol/L are displayed at 21 mmol/L .
• You might see gaps in the graph during times when you have not scanned at least once in 8 hours .
•The symbol may appear indicating the Reader time was changed . Gaps in the graph may result or glucose readings may be hidden .
21
15
9
3
00:00 12:00 24:00
OKDaily Graph (mmol/L)
22 FebWednesday
34

Other History OptionsUse the arrows to view information about your last 7, 14, 30 or 90 days .
Average Glucose
Information about the average of your Sensor glucose readings . The overall average for the time is displayed above the graph . The average is also shown for four different 6-hour periods of the day .Readings above or below your Target Glucose Range are orange, while readings in range are blue .
Daily Patterns
A graph showing the pattern and variability of your Sensor glucose over a typical day . The thick black line shows the median (midpoint) of your glucose readings . The gray shading represents a range (10-90 percentiles) of your Sensor readings .Note: Daily Patterns needs at least 5 days of glucose data .
OK
Last 7 Days
6.7
8.47.4
Average: 6.6 mmol/L
3.8
Average Glucose
00:00 12:00 24:00
21
15
9
3
00:00 12:00 24:00
OKDaily Patterns (mmol/L)
Last 7 Days
35

Time In Target
A graph showing the percentage of time your Sensor glucose readings were above, below or within your Target Glucose Range .
Low Glucose Events
Information about the number of low glucose events measured by your Sensor . A low glucose event is recorded when your Sensor glucose reading is lower than 3 .9 mmol/L for longer than 15 minutes . The total number of events is displayed above the graph . The bar graph displays the low glucose events in four different 6-hour periods of the day .
Sensor Usage
Information about how often you scan your Sensor . The Reader reports an average of how many times you scanned your Sensor each day and the percentage of possible Sensor data the Reader recorded from your scans .
OK
34%
54%
12%
Time In Target
Above
In Target
Below
Target Range4.4-10.0 mmol/L
Last 7 Days
OK
Last 7 Days
1 0
Total Events: 10
3
6
Low GlucoseEvents
00:00 12:00 24:00
OK
100%
5Scans PerDay
Sensor DataCaptured
Sensor Usage
Last 7 Days
36

Removing Your Sensor
Step Action
1 Pull up the edge of the adhesive that keeps your Sensor attached to your skin . Slowly peel away from your skin in one motion .Note: Any remaining adhesive residue on the skin can be removed with warm soapy water or isopropyl alcohol .
2 Discard the used Sensor according to local regulations . See Maintenance and Disposal section .When you are ready to apply a new Sensor, follow the instructions in the Applying Your Sensor and Starting Your Sensor sections . If you removed your last Sensor before 14 days of use, you will be prompted to confirm that you would like to start a new Sensor when you first scan it .
37

Replacing Your Sensor
Your Sensor automatically stops working after 14 days of wear and must be replaced . You should also replace your Sensor if you notice any irritation or discomfort at the application site or if the Reader reports a problem with the Sensor currently in use . Taking action early can keep small problems from turning into larger ones .
CAUTION: If the glucose readings from the FreeStyle Libre Flash Glucose Monitoring System do NOT seem to match with how you feel, check to make sure that your Sensor has not come loose . If the Sensor tip has come out of your skin, or your Sensor is coming loose, remove the Sensor and apply a new one .
38
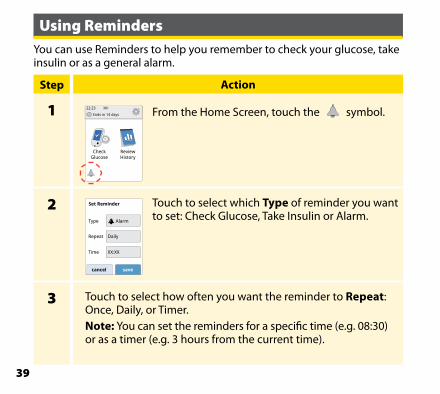
Using RemindersYou can use Reminders to help you remember to check your glucose, take insulin or as a general alarm .
Step Action
1 From the Home Screen, touch the symbol .
2 Touch to select which Type of reminder you want to set: Check Glucose, Take Insulin or Alarm .
3 Touch to select how often you want the reminder to Repeat: Once, Daily, or Timer .Note: You can set the reminders for a specific time (e .g . 08:30) or as a timer (e .g . 3 hours from the current time) .
Ends in 14 days
22:23
CheckGlucose
ReviewHistory
cancel save
Set Reminder
Alarm
Daily
XX:XX
Type
Repeat
Time
39

Step Action
4 Set the reminder Time using the arrows on the touchscreen . Touch save .
5 From the Reminders screen, you can turn the reminder On/Off or add new reminders .Touch done to return to the Home Screen .
When reminders are On, the next reminder time appears next to the reminder symbol on the Home Screen .
For example, 08:30
Your reminder comes on even if the Reader is turned off . Touch OK to dismiss your reminder or snooze to be reminded again in 15 minutes .Note: Reminders will not appear if the Reader is connected to a computer .
add new done
Reminders
08:30
12:30
00:00:00
On
On
Off
08:30Alarm
Reminder
snooze15 min OK
40

Using the Built-in Meter
The Reader has a built-in meter that can be used to test your blood glucose and blood ketone or to test the meter and strips with control solution .
WARNING: Do NOT use the built-in meter while the Reader is connected to an electrical outlet or a computer .
41

IMPORTANT:•Use the Reader within the test strip operating temperature
range as blood glucose and ketone results obtained outside the range may be less accurate .
•Use only FreeStyle Optium test strips .•Use a test strip immediately after removing from its foil
packet . •Only use a test strip once . •Do not use expired test strips as they may cause inaccurate
results . •Do not use a wet, bent, scratched, or damaged test strip . •Do not use the test strip if the foil packet has a hole or is torn .•Results from the built-in meter are shown only in your
Logbook and not in other history options . •Refer to your lancing device instructions for use for how to
use your lancing device .
42

Blood Glucose TestingYou can use the built-in meter to check your blood glucose, whether you are wearing a Sensor or not . You can perform a blood glucose test on your fingertip or approved alternate site . Be sure to read the test strip instructions for use prior to using the built-in meter .
Step Action
1
Wash your hands and the test site with warm soapy water for accurate results . Thoroughly dry your hands and the test site . To warm the site, apply a warm dry pad or rub vigorously for a few seconds .
Note: Avoid areas near bones and areas with lots of hair . If a bruise forms, consider selecting another site .
CAUTION: If you think you have low glucose (hypoglycaemia) or you suffer from hypoglycaemia unawareness, test on your fingers .
43

Step Action
2 Check the test strip expiry date .
3 Open the foil test strip packet at the notch and tear down to remove the test strip . Use the test strip immediately after removing from the foil packet .
4 Insert the test strip with the three black lines at the end facing up . Push the strip in until it stops .
5 Use your lancing device to obtain a blood drop and apply blood to the white area at the end of the test strip .
If sounds are turned on, the Reader beeps once to let you know you have applied enough blood . Note: See test strip instructions for use for re-application instructions .
E .g . Expiry date: March 31, 2016
D5
2016/03
13758
Abbo
tt Di
abet
es C
are
Ltd.
Rang
e Ro
adW
itney
, Oxo
n, O
X29
0YL
Mad
e in
UK.
Bloo
d Gl
ucos
eSe
nsor
Ele
ctro
deAb
bott
Diab
etes
Car
e Lt
d.Ra
nge
Road
Witn
ey, O
xon,
OX2
9 0Y
LM
ade
in U
K.
4˚C
Apply Blood
44

Step Action
You will see a butterfly on the screen while you wait for your result . If sounds are turned on, the Reader beeps once when your result is ready .
6 After reviewing your result, remove and discard the used test strip according to local regulations .
Your Blood Glucose ResultsBlood glucose results are marked on the results screen and in the Logbook with the
symbol .
Note: Contact your health care professional if you have symptoms that do not match your test results .
IMPORTANT: After performing a blood glucose test, wash your hands and the test site with soap and water and thoroughly dry them .
7.9 mmolL
22:23
45

Display What To Do
mmolL
Low Glucose
LO
mmolL
High Glucose
HI
If LO appears on the Reader, your result is lower than 1 .1 mmol/L . If HI appears on the Reader, your result is higher than 27 .8 mmol/L . You can touch the message button for more information . Check your blood glucose again with a test strip . If you get a second LO or HI result, contact your health care professional immediately .
3.5 mmolL
Low Glucose
16.1 mmolL
High Glucose
If your glucose is higher than 13 .3 mmol/L or lower than 3 .9 mmol/L, you will see a message on the screen . You can touch the message button for more information and set a reminder to check your glucose .
46

After you get your blood glucose result, you can add Notes by touching the symbol . If you do not want to add a Note, press the Home Button to go to the Home Screen or hold the Home Button to turn the Reader off .
Blood Ketone TestingYou can use the built-in meter to check your blood ketone (β-hydroxybutyrate) . It is important to consider doing this when:
• You are sick• Your glucose is higher than 13 .3 mmol/L• You and your health care professional decide you should
Note: Be sure to read the test strip instructions for use prior to performing a ketone test .
Step Action
1 Wash your hands with warm soapy water for accurate results . Thoroughly dry your hands . To warm the site, apply a warm dry pad or rub vigorously for a few seconds .
Note: Use only fingertip samples for blood ketone testing .
47

Step Action
2 Check the test strip expiry date .
3 Open the foil test strip packet at the notch and tear down to remove the test strip . Use the test strip immediately after removing from the foil packet .
4 Note: Use only blood ketone test strips . Do not put urine on the test strip . Insert the test strip with the three black lines facing up . Push the strip in until it stops .
E .g . Expiry date: March 31, 2016
D5
2016/03
13758
Abbo
tt Di
abet
es C
are
Ltd.
Rang
e Ro
adW
itney
, Oxo
n, O
X29
0YL
Mad
e in
UK.
Bloo
d Gl
ucos
eSe
nsor
Ele
ctro
deAb
bott
Diab
etes
Car
e Lt
d.Ra
nge
Road
Witn
ey, O
xon,
OX2
9 0Y
LM
ade
in U
K.
4˚C
48

Step Action
5 Use your lancing device to obtain a blood drop and apply blood to the white area at the end of the test strip .If sounds are turned on, the Reader beeps once to let you know you have applied enough blood .Note: See test strip instructions for use for re-application instructions .
You will see a butterfly on the screen while you wait for your result . If sounds are turned on, the Reader beeps once when your result is ready .
6 After reviewing your result, remove and discard the used test strip according to local regulations .
Ketone Test
Apply Blood
IMPORTANT: After performing a blood ketone test, wash your hands with soap and water and thoroughly dry them .
49

Your Blood Ketone ResultsBlood ketone results are marked on the results screen and in the Logbook with the word Ketone .
Notes:•Blood ketone is expected to be lower than 0 .6 mmol/L .•Blood ketone may be higher when you are sick, fasting, have
exercised hard or if glucose levels are not controlled .•If your blood ketone result remains high or becomes higher than
1 .5 mmol/L, contact your health care professional immediately .
22:23
0.4 mmolL
Ketone Test
50

Display What To Do
If your blood ketone is high, you will see a message on the screen . You can touch the message button for more information .
High Ketone
HI mmolL
Ketone Test
If HI appears on the Reader, your ketone result is higher than 8 mmol/L . You can touch the message button for more information . Repeat the ketone test with a new test strip . If you get a second HI result, contact your health care professional immediately .
1.7 mmolL
Ketone Test
High Ketone
51

Control Solution TestingYou should do a control solution test when you are not sure of your test strip results and want to check that your Reader and test strips are working properly . You can do a control solution test with a blood glucose or ketone test strip .
IMPORTANT:• Control solution results should fall within the control
solution range printed on the test strip instructions for use .• Do NOT use control solution past the expiry date . Discard
control solution 3 months after opening . • The control solution range is a target range for control
solution only, not for your blood glucose or ketone results .•The control solution test does not reflect your blood glucose
or ketone levels .• Use only MediSense glucose and ketone control solution .•Check that the LOT number printed on the test strip foil
packet and instructions for use match .•Replace the cap securely on the bottle immediately after use .• Do NOT add water or other liquid to the control solution . •Contact Customer Service for information on how to obtain
control solution .
52

Step Action
1 From the Home Screen, touch the Settings symbol . Touch Control Solution Test to do a control solution test .
2 Check the test strip expiry date .
3 Open the foil test strip packet at the notch and tear down to remove the test strip .
Ends in 14 days
22:23
CheckGlucose
ReviewHistory
Sounds
Target Range
Control Solution Test
Settings
1 / 3
E .g . Expiry date: March 31, 2016
D5
2016/03
13758
Abbo
tt Di
abet
es C
are
Ltd.
Rang
e Ro
adW
itney
, Oxo
n, O
X29
0YL
Mad
e in
UK.
Bloo
d Gl
ucos
eSe
nsor
Ele
ctro
deAb
bott
Diab
etes
Car
e Lt
d.Ra
nge
Road
Witn
ey, O
xon,
OX2
9 0Y
LM
ade
in U
K.
4˚C
53

Step Action
4 Insert the test strip with the three black lines facing up . Push the strip until it stops .
5 Shake the control solution bottle to mix the solution . Apply a drop of control solution to the white area at the end of the test strip . If sounds are turned on, the Reader beeps once to let you know that you have applied enough control solution .
You will see a butterfly on the screen while you wait for the result . If sounds are turned on, the Reader beeps once when the result is ready .
Apply Control Solution
54

Blood Glucose Control Solution Test
Control Solution ResultsCompare the control solution result to the range printed on the test strip instructions for use . The result on your screen should be in this range .
Control solution results are marked on the results screen and in the Logbook with a symbol .
Note: Repeat the control solution test if the results are outside of the range printed on the test strip instructions for use . Stop using the built-in meter if the control solution results are repeatedly outside of the printed range . Contact Customer Service .
Ketone Control Solution Test
5.6 mmolL
22:23
Control Solution Test
0.4 mmolL
22:23
Ketone ControlSolution Test
55

Using the Rapid-Acting Insulin Calculator
This optional feature requires an understanding of the use of insulin . Misuse or misunderstanding of this feature and the suggested dose may lead to inappropriate insulin dosing . The calculator suggests doses for rapid-acting insulin only . The calculator is only for use with fingerstick blood glucose results from the built-in meter . You cannot use the insulin calculator with Sensor glucose readings .
If you are not sure about the calculator’s suggested dose, you can adjust it based on instructions from your health care professional .
An access code is required to set up or change the rapid-acting insulin calculator settings . This access code is available only to your health care professional . Work with your health care professional to set up or change the calculator for you .
56

If you have added a rapid-acting insulin note to a glucose result without indicating how much insulin you took, the calculator will not be available for up to 8 hours .
Step Action
1 Test your blood glucose on your finger . Touch Insulin Calculator from the blood glucose results screen . You can also access the insulin calculator by touching the calculator icon next to Rapid-Acting Insulin from the Add Notes screen .
CAUTION: The rapid-acting insulin calculator cannot account for all the factors that may affect your insulin dose . These include incorrectly entered data, incorrectly set date or time, un-logged insulin, smaller or larger meals, sickness, exercise, etc . It is important that you review your suggested dose and account for these factors before taking insulin .
22:23
Insulin Calculator
7.9 mmolL
57
Step Action
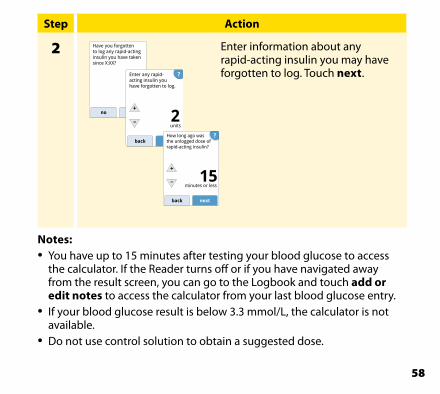
2 Enter information about any rapid-acting insulin you may have forgotten to log . Touch next .
Notes:•You have up to 15 minutes after testing your blood glucose to access
the calculator . If the Reader turns off or if you have navigated away from the result screen, you can go to the Logbook and touch add or edit notes to access the calculator from your last blood glucose entry .
• If your blood glucose result is below 3 .3 mmol/L, the calculator is not available .
•Do not use control solution to obtain a suggested dose .
no yes
Have you forgottento log any rapid-actinginsulin you have takensince X:XX?
?
units2
back next
Enter any rapid-acting insulin youhave forgotten to log.
?
minutes or less15
back next
How long ago wasthe unlogged dose of rapid-acting insulin?
58

Step Action
3 If your calculator was programmed with Easy Setup, touch the meal you plan to eat now . Touch next .
Or
If your calculator was programmed with Advanced Setup, enter the grams of carbohydrates or carbohydrate portions you plan to eat now . Touch done .
back next
Breakfast
Lunch
Dinner
No meal
?
grams20
back done
Enter Carbs
?
carb. portions= 30g carbs
2.0
back done
Enter carb portions
Or
59
Step Action
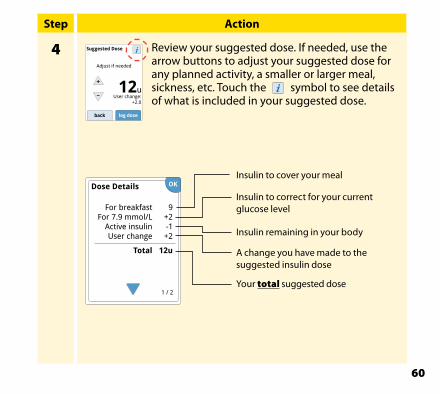
4 Review your suggested dose . If needed, use the arrow buttons to adjust your suggested dose for any planned activity, a smaller or larger meal, sickness, etc . Touch the symbol to see details of what is included in your suggested dose .User change:
+2.0
12u
back log dose
Adjust if needed
Suggested Dose
OKDose Details
For breakfast 9 For 7.9 mmol/L +2 Active insulin -1 User change +2
Total 12u
1 / 2
Insulin to cover your meal
Insulin to correct for your current glucose level
Insulin remaining in your body
A change you have made to the suggested insulin dose
Your total suggested dose
60

Step Action
5 Touch log dose to save to your Logbook and take your dose . Your dose is only saved to the Logbook if you touch log dose .
Note: The total dose is rounded up or down to the nearest whole number unless your health care professional has changed your Reader to count by half unit steps .
CAUTION: It is important to log all your rapid-acting insulin doses so your Reader can account for active insulin when calculating your suggested doses . Failure to log all your rapid-acting insulin doses may result in a suggested dose that is too high .
61

If your health care professional turned on the Active Insulin feature, the symbol may appear on your Home Screen . It shows an estimate of the amount of rapid-acting insulin left in your body and how much longer it may be active . Touch the symbol to see more information about the remaining rapid-acting insulin from your logged doses .
Ends in 3 days
22:23
08:30
CheckGlucose
ReviewHistory
Estimated percentage of active insulin remaining in your body
100-87% 86-62% 61-37% 36-12% 11-1% 0%
No symbol
62

Charging the ReaderA fully charged Reader battery should last up to 7 days . Your battery life may vary depending on your usage . A Low Battery message accompanies your result when you have enough charge remaining for about one day of use .
Plug the included USB cable into an electrical outlet using the included power adapter . Then, plug the other end of the USB cable into the USB port on the Reader .
Notes:•You must charge the Reader when the battery
is low to keep using the Reader .•To fully charge the battery, charge the Reader
for at least 3 hours .•Only use the USB cable and power adapter
included with the system .• Fully charge your Reader before storing it for
more than 3 months .
OK
Please charge the Reader to continue using it.
Low Battery
Charging
CAUTION: Be sure to select a location for charging that allows the power adapter to be easily unplugged .
63

Changing the Reader SettingsYou can go to the Settings menu to change many settings on the Reader, like Time & Date or Sounds . The Settings menu is also where you go to do a Control Solution Test or to check the System Status .
Step Action
1 To get to the Settings menu, touch the Settings symbol on the Home Screen .
Ends in 14 days
22:23
CheckGlucose
ReviewHistory
Sounds
Target Range
Control Solution Test
Settings
1 / 3
64

Step Action
2 Touch the setting you want to change: Sounds – Set tones and vibrationsTarget Range – Set range displayed on Reader glucose graphsControl Solution Test – Perform a Control Solution testTime & Date – Change the Time or DateLanguage – Change the language on the Reader (option only available on Readers with multiple languages)System Status – Check Reader information and performance •View System Information: The Reader will display information
about your System including:- Current Sensor end date and time- Reader serial number and version number- Serial numbers of most recent Sensors (up to three)- Sensor version for most recent Sensor- Number of Sensors that have been used with Reader - Number of tests that have been performed using test strips
65

Step Action
2(cont.)
•View Event Logs: A list of events recorded by the Reader, which may be used by Customer Service to help troubleshoot your System•Perform a Reader Test: The Reader Test will perform internal
diagnostics and allow you to check that the Display is showing all pixels, Sounds (including both tones and vibrations) are working and the Touchscreen is responding when touched
Calculator Settings – Review the currently programmed settings (option only available if your health care professional has activated your insulin calculator)Reader Basics – Review the information screens shown during the Reader setupProfessional Options – Set by health care professionals only
Touch OK when you are done .
66

Living With Your FreeStyle Libre SystemYour FreeStyle Libre Flash Glucose Monitoring System can be used during a wide variety of activities .
Activity What You Need To Know
Bathing, Showering and Swimming
The Reader is not water-resistant and should NEVER be submerged in water or other liquids . Your Sensor is water-resistant and can be worn while bathing, showering or swimming .Note: Do NOT take your Sensor deeper than 1 metre (3 feet) or immerse it longer than 30 minutes in water .
Sleeping Your Sensor should not interfere with your sleep . It is recommended that you scan your Sensor before going to sleep and when you wake up because your Sensor holds 8 hours of data at a time . If you have reminders set to go off while you are sleeping, place the Reader nearby .
67

Activity What You Need To Know
Travelling by Air Check with the airline prior to departure as rules and regulations may change without notice . Follow these guidelines when travelling:
• Notify security personnel of the presence of the device when going through security systems .
• Do not scan your Sensor or power on the Reader using the Home Button while flying, if restricted by flight regulations . You may insert a strip to perform a blood glucose or ketone test .
Note: If you are changing time zones, you can change the time and date settings on the Reader by touching the Settings symbol from the Home Screen, then Time & Date . Changing the time and date affects the graphs, statistics, and settings programmed by time of day . The
symbol may appear on your glucose graph indicating the Reader time was changed . Gaps in the graph may result, or glucose readings may be hidden .
68

Maintenance and DisposalCleaningYou may clean the Reader using a cloth dampened with a mixture of 1 part household bleach to 9 parts water . Gently wipe the exterior of the Reader and allow to air dry .
MaintenanceThe FreeStyle Libre Flash Glucose Monitoring System has no serviceable parts .
DisposalThis product should be disposed of in accordance with all applicable local regulations related to the disposal of electronic equipment, batteries, sharps, and materials potentially exposed to body fluids .
Contact Customer Service for further information on the appropriate disposal of system components .
CAUTION: Do NOT place the Reader in water or other liquids . Avoid getting dust, dirt, blood, control solution, water or any other substance in the test strip or USB ports .
69

TroubleshootingThis section lists problems or observations that you may have, the possible cause(s) and recommended actions . If the Reader experiences an error, a message will appear on the screen with directions to resolve the error .
Reader Does Not Power On
Problem What It May Mean What To Do
Reader does not power on after you press the Home Button or insert a test strip .
Reader battery is too low .
Charge the Reader .
Reader is outside of its operating temperature range .
Move the Reader to a temperature between 10 °C and 45 °C and then try to power it on .
If the Reader still does not power on after trying these steps, contact Customer Service .
70

Problems at the Sensor Application Site
Problem What It May Mean What To Do
The Sensor is not sticking to your skin .
The site is not free of dirt, oil, hair or sweat .
1 . Remove the Sensor .2 . Consider shaving and/or
cleaning the site with soap and water .
3 . Follow the instructions in Applying and Starting Your Sensor sections .
Skin irritation at the Sensor application site .
Seams or other constrictive clothing or accessories causing friction at the site .
Ensure that nothing rubs on the site .
You may be sensitive to the adhesive material .
If the irritation is where the adhesive touches skin, contact your health care professional to identify the best solution .
71

Problems Starting Your Sensor or Receiving Sensor Readings
Display What It May Mean What To Do
New Sensor Starting Up
Sensor is not ready to read glucose .
Wait until the 60 minute Sensor start-up period has completed .
Scan Timeout
The Reader is not held close enough to the Sensor .
Hold the Reader within 4 cm (1 .5 inches) of the Sensor . Bring the screen of the Reader close to the Sensor .
Sensor Ended
The Sensor life has ended .
Apply and start a new Sensor .
72

Display What It May Mean What To Do
New Sensor Found
You scanned a new Sensor before your previous Sensor ended .
Your Reader can only be used with one Sensor at a time . If you start a new Sensor, you will no longer be able to scan your old Sensor . If you would like to begin using the new Sensor, select “Yes” .
Scan Error The Reader was unable to communicate with the Sensor .
Try scanning again .Note: You may need to move away from potential sources of electromagnetic interference .
Sensor Error The System is unable to provide a glucose reading .
Scan again in 10 minutes .
73

Display What It May Mean What To Do
Glucose Reading Unavailable
Your Sensor is too hot or too cold .
Move to a location where the temperature is appropriate and scan again in a few minutes .
Sensor Already in Use
The Sensor was started by another Reader .
A Sensor can only be scanned by the Reader that started it . Scan the Sensor again with the Reader that started it . Or, apply and start a new Sensor .
Check Sensor The sensor tip may not be under your skin .
Try to start your Sensor again . If Reader displays “Check Sensor” again, your Sensor was not applied properly . Apply and start a new Sensor .
Replace Sensor
The System has detected a problem with your Sensor .
Apply and start a new Sensor .
74

Blood Glucose or Ketone Error Messages
Error Message What It May Mean What To Do
E-1 The temperature is too hot or too cold for the Reader to work correctly .
1 . Move the Reader and test strips to a location where the temperature is within the test strip operating range . (See test strip instructions for use for the appropriate range) .
2 . Wait for the Reader and test strips to adjust to the new temperature .
3 . Repeat the test using a new test strip .
4 . If the error reappears, contact Customer Service .
E-2 Reader error . 1 . Turn off the Reader .2 . Repeat the test using a new
test strip .3 . If the error reappears, contact
Customer Service .
75

Error Message What It May Mean What To Do
E-3 Blood drop is too small .orIncorrect test procedure .orThere may be a problem with the test strip .
1 . Review the testing instructions .
2 . Repeat the test using a new test strip .
3 . If the error reappears, contact Customer Service .
E-4 The blood glucose level may be too high to be read by the system .orThere may be a problem with the test strip .
1 . Repeat the test using a new test strip .
2 . If the error reappears, contact your health care professional immediately .
76

Error Message What It May Mean What To Do
E-5 Blood was applied to the test strip too soon .
1 . Review the testing instructions .
2 . Repeat the test using a new test strip .
3 . If the error reappears, contact Customer Service .
E-6 The test strip may not be compatible with the Reader .
1 . Check that you are using the correct test strip for the Reader . (See test strip instructions for use to verify your strip is compatible with the Reader) .
2 . Repeat the test using a test strip for use with your Reader .
3 . If the error reappears, contact Customer Service .
77

Error Message What It May Mean What To Do
E-7 Test strip may be damaged, used or the Reader does not recognise it .
1 . Check that you are using the correct test strip for the Reader . (See test strip instructions for use to verify your strip is compatible with the Reader) .
2 . Repeat the test using a test strip for use with your Reader .
3 . If the error reappears, contact Customer Service .
E-9 Reader error . 1 . Turn off the Reader .2 . Repeat the test using a new
test strip .3 . If the error reappears, contact
Customer Service .
78

Problems Checking Your Blood Glucose or Ketone
Problem What It May Mean What To Do
The Reader does not start a test after inserting a test strip .
Test strip is not inserted correctly or not inserted fully into the strip port .
1 . With the 3 black lines facing up, insert the test strip into the strip port until it stops .
2 . If the Reader still does not start a test, contact Customer Service .
Reader battery is too low .
Charge the Reader .
The test strip is damaged, used or unrecognisable by the Reader .
Insert a new FreeStyle Optium test strip .
Reader is outside of its operating temperature range .
Move the Reader to a temperature between 10 °C and 45 °C and then try to power it on .
Reader is in a power saving mode .
Press the Home Button then insert a test strip .
79
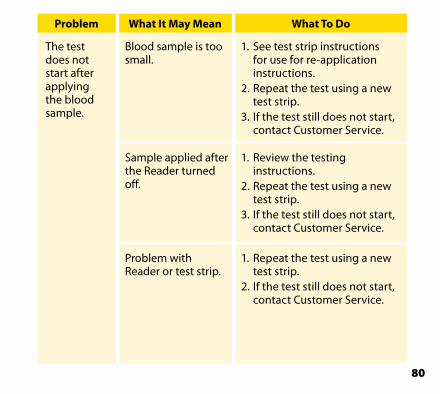
Problem What It May Mean What To Do
The test does not start after applying the blood sample .
Blood sample is too small .
1 . See test strip instructions for use for re-application instructions .
2 . Repeat the test using a new test strip .
3 . If the test still does not start, contact Customer Service .
Sample applied after the Reader turned off .
1 . Review the testing instructions .
2 . Repeat the test using a new test strip .
3 . If the test still does not start, contact Customer Service .
Problem with Reader or test strip .
1 . Repeat the test using a new test strip .
2 . If the test still does not start, contact Customer Service .
80

Perform a Reader Test
If you think the Reader is not working properly, you can check the Reader by performing a Reader Test . Touch the Options symbol from the Home Screen, select System Status and then select Reader Test .Note: The Reader Test will perform internal diagnostics and will allow you to check that the display, sounds and touchscreen are working properly .
Customer Service Customer Service is available to answer any questions you may have about your FreeStyle Libre Flash Glucose Monitoring System . Please go the back cover of this manual for your Customer Service phone number .
System Info
Reader Test
Event Log
System Status OK
81

Professional Options
This section is only meant for health care professionals . It describes the access code-protected features of the Reader . Health care professionals can change dose increments or set up the insulin calculator .
From the Home Screen, touch the Settings symbol . Scroll down using the arrows and touch Professional Options . Enter the access code .
Note: If you are a health care professional, contact Customer Service for more information .
System Status
Calculator Settings
Reader Basics
Professional Options
?Enter Code to Unlock
cancel done
A
B
C
1
2
3Dose Increment
Insulin Calculator
Professional Options
OK
Pro
fession
al Op
tion
s
82

Changing Dose IncrementsYou can set the insulin dose increments to either 1 .0 or 0 .5 units for use with the Rapid-acting insulin calculator and insulin notes .
From the Professional Options screen, select Dose Increment . Then choose 1 unit or 0.5 unit . Touch done .
?
done
1 unit
0.5 unit
Dose Increment
Pro
fess
ion
al O
pti
on
s
83

Setting up the Insulin CalculatorThe insulin calculator can help your patients calculate their rapid-acting insulin doses based on meal and fingerstick blood glucose level information . From the Professional Options screen, select Insulin Calculator .
Complete the setup to store your patient’s individual insulin settings in the Reader . The calculator uses the fingerstick blood glucose results, meal information and the stored settings to calculate a suggested insulin dose based on this formula:
CAUTION: This feature requires an understanding of the use of insulin . Misuse or misunderstanding of this feature and the suggested dose may lead to inappropriate insulin dosing . The calculator suggests doses for rapid-acting insulin only .
Blood glucosecorrection (if needed)
Meal | Carbohydrate Intake+ =
Active Insulin(if present)
Totalsuggesteddose
Pro
fession
al Op
tion
s
84

You can set up the insulin calculator using the Easy or Advanced settings . The Easy Setup is for patients who start with a fixed dose of rapid-acting insulin for meals . The Advanced Setup is for patients who count carbohydrates (in grams or carbohydrate portions) to adjust their rapid-acting insulin dose for meals .
You must complete all of the steps in the insulin calculator setup in order for the patient to use the calculator . When you have finished setting up the insulin calculator, you can review the settings to make sure they are correct for your patient . You can also review settings at a later time . Touch the Settings symbol from the Home Screen, then select Calculator Settings .
IMPORTANT: If the time on the Reader is wrong, this may lead to an incorrect suggested dose .
Pro
fess
ion
al O
pti
on
s
85

Easy Setup of the Insulin Calculator
Step Action
1 Choose the Easy option on the slide bar and touch next .Note: You need to know your patient’s mealtime insulin doses, target glucose range and correction factor .
2 Enter the mealtime rapid-acting insulin doses . Touch next after each entry .
3 Enter the blood glucose Correction Target . This is the desired target range for blood glucose values before meals . Touch next . Note: If you just want to set one target instead of a range, set both the low and high values to the same number .
nextback
Easy
For patients who start with a fixed dose of rapid-actinginsulin at meals.
Choose Setup Option
?
units of insulin4
back next
Breakfast
mmolL3.9 to 7.2
back next
Correction Target ?
Pro
fession
al Op
tion
s
86

Step Action
4 Enter the Correction Factor (for example: if 1 unit of insulin lowers blood glucose 2 .8 mmol/L, then the correction factor is 2 .8) . If the blood glucose value is outside the blood glucose target, the calculator will use the correction target and factor to calculate a correction dose .
Notes:• If your patient does not take correction insulin, touch the
down arrow to go below 1 to set “No correction insulin” . If you set “No correction insulin”, the calculator only includes meal doses . Additionally, active insulin is not tracked or calculated .
• The calculator corrects a blood glucose value to the single target or the average of the target range .
•The calculator will not suggest a dose that is estimated to drop the blood glucose below the lower end of the target range or single target .
Touch next . Then touch done to complete the setup . You can now review the calculator settings . Touch OK when done .
mmolL
1 u insulin for
back next
Correction Factor ?
0.6
Pro
fess
ion
al O
pti
on
s
87

Notes about the Easy Option:•The calculator estimates the amount of rapid-acting insulin still in the
body and how much longer it may be active (if the correction factor is set to “no correction insulin”, active insulin is not calculated) . The active insulin estimate is based on a 4-hour insulin duration calculated from the time and amount of the last logged rapid-acting insulin dose .
•Both meal and correction doses are included in the active insulin tracking .
• Insulin doses calculated 0-2 hours after a previously logged dose will only include a meal dose . Active insulin will not be subtracted from the meal or carbohydrate dose, and a correction dose will not be included even if the blood glucose is outside the target . During this time period, the previous dose has not reached peak action and additional correction doses, referred to as `insulin stacking’, may result in hypoglycaemia .
• Insulin doses calculated 2-4 hours after a previously logged dose will have active insulin subtracted from the suggested dose .
•All previously injected rapid-acting insulin should be logged to ensure accurate active insulin tracking and calculations .
Pro
fession
al Op
tion
s
88

Calculator Settings - Easy OptionThis page can be used to record insulin calculator settings .
This is the insulin required to cover food .
This is the desired range for before meal blood glucose .
This is the estimated amount blood glucose will drop by taking one unit of insulin .
Changes to these settings can only be made by a health care professional .
0-50
units of insulin
BreakfastDose
0-50
units of insulin
DinnerDose
0-50
units of insulin
LunchDose
3.9-10.0 3.9-10.0
mmol/L mmol/L
Correction Target
_
0.1-5.5 (or No Correction)
mmol/L
Correction Factor1 unit of insulin for
Pro
fess
ion
al O
pti
on
s
89

Advanced Setup of the Insulin Calculator
Step Action
1 Choose the Advanced option on the slide bar and touch next .Note: You need to know your patient’s mealtime insulin settings, target glucose range, correction factor and insulin duration .
2 Touch to select how meal/carbohydrate information will be entered . Touch next .
For Grams of carbs, go to Step 3 .For Carb portions, go to Step 4 .
nextback
Advanced
For patients who count carbs (in grams or portions) to adjust their rapid-acting insulin dose at meals.
Choose Setup Option
nextback
Grams of carbs
Carb. portions
Enter food by: ?
Pro
fession
al Op
tion
s
90

Step Action
3 If you chose to enter Grams of carbs in Step 2: The rapid-acting insulin dose suggestion is based on grams of carbs .
Enter the Carbohydrate Ratio (1 unit of rapid-acting insulin for ______ grams of carbs) . Touch next when complete .
Note: If you want to set different carbohydrate ratios for different times of day, touch the option by time of day . Touch each time period to change the carbohydrate ratio . Touch OK after each entry to save . Touch done .
Go to Step 5 .
Time of day blocks cannot be adjusted . They correspond to the following times:
Morning 4:00 AM - 9:59 AM (04:00 - 09:59) Midday 10:00 AM - 3:59 PM (10:00 - 15:59) Evening 4:00 PM - 9:59 PM (16:00 - 21:59)Night 10:00 PM - 3:59 AM (22:00 - 03:59)
1 u insulin for
grams carbs
Carbohydrate Ratio ?
back next
by timeof day
10 Optional:
?
back done
Carbohydrate ratio 1 unit insulin for:
10gmorning
15gnight
15gmidday
20gevening
1 u insulin for
grams carbs
OKCarbohydrateRatio
Morning:4am to 10am
10
Pro
fess
ion
al O
pti
on
s
91

Step Action
4 If you chose to enter Carb Portions in Step 2: The rapid-acting insulin dose suggestion is based on carbohydrate portions .
Enter the Carb Portions (10 to 15 grams of carbs) and touch next . Enter the Carb Portion Ratio (____ units of rapid-acting insulin per 1 carb portion) . Touch next when complete .
Note: If you want to set different carb portion ratios for different times of day, touch the option by time of day . Touch each time period to change the carb portions ratio . Touch OK after each entry to save . Touch done .
?
grams carbs
1 portion =
10.0
back next
Carb Portions Definition
For 1 portion:
units insulin
Carb Portion Ratio ?
back next
by timeof day
1.5 Optional:
?
back done
Carb portion ratio for 1 portion:
2 u insmorning
3 u insnight
3 u insmidday
4 u insevening
units insulin
OKCarb Portion Ratio
Morning:4am to 10am
For 1 portion:
2
Pro
fession
al Op
tion
s
92

Step Action
5 Select how you want your patient to correct their glucose . Touch next .
6 Enter the Correction Target value or range . This is the desired target value or range for blood glucose values before meals . Touch next when complete .
Note: If the Correction Target is based on time of day, touch the option by time of day . Touch each time period to change the correction target for that period . Touch OK after each entry to save . Touch done .
nextback
To a single target
To a target range
?How does your patient correct their glucose?
mmol/L
Correction Target ?
back next
by timeof day
5.6Optional:
?
back done
Correction Target in mmol/L:
5.6morning
6.7night
6.1midday
5.6evening
mmol/L
OKCorrection Target
Morning:4am to 10am
5.6
Pro
fess
ion
al O
pti
on
s
93

Step Action
7 Enter the Correction Factor (for example: if 1 unit of insulin lowers blood glucose 2 .8 mmol/L, then the correction factor is 2 .8) . If the blood glucose reading is outside the blood glucose target, the calculator will use the correction target and factor to calculate a correction dose . Touch next when complete .
Notes:•If the Correction Factor is based on time of
day, touch the option by time of day . Touch each time period to change the correction factor for that period . Touch OK after each entry to save . Touch done .
•The calculator corrects a blood glucose value to the single target or the average of the target range .
•The calculator will not suggest a dose that is estimated to drop the blood glucose below the lower end of the target range or single target .
mmolL
1 u insulin for
back next
Correction Factor ?
0.6 by timeof dayOptional:
?
back done
Correction Factor 1 u insulin for:
1.7 mmol/Lmorning
1.1 mmol/Lnight
1.1 mmol/Lmidday
0.8 mmol/Levening
1 u insulin for
OKCorrection Factor
Morning:4am to 10am
mmolL0.6
Pro
fession
al Op
tion
s
94

Step Action
8 Enter the Insulin Duration . This is the amount of time that rapid-acting insulin remains active in the patient’s body .
Touch next .
1 Product Inserts: HumaLog®, NovoLog®, Apidra®
4:30 hrs:min
Insulin Duration ?
back next
IMPORTANT: In general, the insulin duration for rapid-acting insulin ranges from 3-5 hours, and can vary for each person1 . The Reader allows an insulin duration from 3-8 hours .
Pro
fess
ion
al O
pti
on
s
95

Step Action
9 Select whether or not to show the Active Insulin symbol on the Home Screen .This symbol shows an estimate of the amount of rapid-acting insulin still in the body and how much longer it may be active . If you select “No”, active insulin is still included in the suggested dose calculation .
Touch next . Then touch done to complete the setup . You can now review the calculator settings . Touch OK when done .
nextback
Yes
No
?Do you want the Active Insulin symbolto be displayed on the Home Screen?
Pro
fession
al Op
tion
s
96

Notes about the Advanced Option: •The calculator estimates the amount of rapid-acting insulin still in
the body and how much longer it may be active . The active insulin estimate is calculated from the set insulin duration, the time, and amount of the last logged rapid-acting insulin dose .
•Both meal and correction doses are included in the active insulin tracking .
• Insulin doses calculated 0-2 hours after a previously logged dose will only include a meal dose . Active insulin will not be subtracted from the meal or carbohydrate dose, and a correction dose will not be included even if the blood glucose is outside the target . During this time period, the previous dose has not reached peak action and additional correction doses, referred to as `insulin stacking’, may result in hypoglycaemia .
• Insulin doses calculated between 2 hours and the set insulin duration will have active insulin subtracted from the suggested dose (for example if insulin duration is set at 5 hours, active insulin will be subtracted from doses calculated between 2-5 hours) .
•All previously injected rapid-acting insulin should be logged to ensure accurate active insulin tracking and calculations .
Pro
fess
ion
al O
pti
on
s
97

This graph shows how the insulin calculator estimates the amount of active insulin as a function of logged insulin dose and insulin duration over time . It also shows the relationship between the symbol and amount of active insulin .
10 20 30 40 50 60 70 80 90 100
100
0
90
80
70
60
50
40
30
20
10
Active insulin curvilinear model
% insulin duration
% a
ctiv
e in
sulin
Adapted from Mudaliar et al . Diabetes Care, Volume 22(9), Sept 1999, pp 1501-1506
Pro
fession
al Op
tion
s
98

Calculator Settings - Advanced OptionThis page can be used to record insulin calculator settings .
This is the number of grams of carbs that one unit of rapid-acting insulin will cover OR the number of units of rapid-acting insulin that will cover one carb portion . (Option to enter by time of day .)
This is the desired target or range for before meal blood glucose . (Option to enter by time of day .)
CarbohydrateRatio
1 unit of insulin for
1-50grams of carbs
10-15grams of carbs
Carb Portions De�nition
0.5-15units of insulin
Carb Portions RatioFor 1 carb portion take
OR
OR
3.9-10.0mmol/L
CorrectionTarget
3.9-10.0 3.9-10.0mmol/L mmol/L
CorrectionTarget Range
to
Pro
fess
ion
al O
pti
on
s
99

This is the estimated amount blood glucose will drop by taking one unit of insulin . (Option to enter by time of day .)
This is the amount of time that a dose of rapid-acting insulin remains active in the body .
Active Insulin feature?
Changes to these settings can only be made by a health care professional .
0.1-5.5
Correction Factor1 unit of insulin for
mmol/L
3-8
Insulin DurationInsulin is active in the body for
hours:mins
Yes No
Pro
fession
al Op
tion
s
100

Changing the Insulin Calculator Settings
Step Action
1 From the Home Screen, touch the Settings symbol . Scroll down using the arrows and touch Professional Options . Enter the access code . Touch Insulin Calculator .
2 Touch Turn Off Calculator to turn off the insulin calculator or Change Calculator Settings to change the insulin calculator settings .Note: If you turn off the insulin calculator, your patient will no longer see the calculator button after a blood glucose test . You can turn the calculator back on by repeating the insulin calculator setup .
System Status
Calculator Settings
Reader Basics
Professional Options
back
Turn Off Calculator
Change CalculatorSettings
Calculator Settings
Pro
fess
ion
al O
pti
on
s
101

System SpecificationsSee test strip and control solution instructions for use for additional specifications .
Sensor Specifications
Sensor glucose assay method Amperometric electrochemical sensor
Sensor glucose reading range 2 .2 to 27 .8 mmol/L
Sensor size 5 mm height and 35 mm diameter
Sensor weight 5 grams
Sensor power source One silver oxide battery
102

Sensor life Up to 14 days
Sensor memory 8 hours (glucose readings stored every 15 minutes)
Operating temperature 10 °C to 45 °C
Sensor Applicator and Sensor Pack storage temperature
4 °C to 30 °C
Operating and storage relative humidity 10-90%, non-condensing
Sensor water resistanceIP27: Can withstand immersion into one metre (3 ft) of water for up to 30 minutes
Operating and storage altitude
-381 metres (-1,250 ft) to 3,048 metres(10,000 ft)
103

Reader Specifications
Blood glucose assay range 1 .1 to 27 .8 mmol/L
Blood ketone assay range 0 .0 to 8 .0 mmol/L
Reader size 95 mm x 60 mm x 16 mm
Reader weight 65 grams
Reader power source One lithium-ion rechargeable battery
Reader battery life 7 days of typical use
Reader memory 90 days of typical use
Reader operating temperature 10 °C to 45 °C
Reader storage temperature -20 °C to 60 °C
104
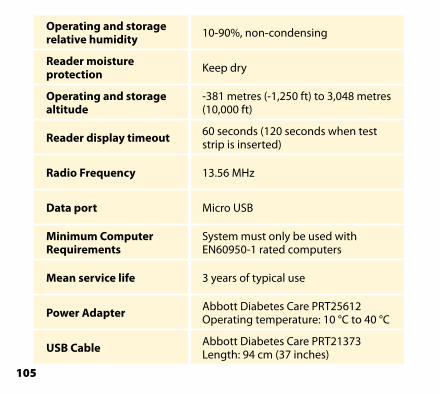
Operating and storage relative humidity 10-90%, non-condensing
Reader moisture protection Keep dry
Operating and storage altitude
-381 metres (-1,250 ft) to 3,048 metres (10,000 ft)
Reader display timeout 60 seconds (120 seconds when test strip is inserted)
Radio Frequency 13 .56 MHz
Data port Micro USB
Minimum Computer Requirements
System must only be used with EN60950-1 rated computers
Mean service life 3 years of typical use
Power Adapter Abbott Diabetes Care PRT25612Operating temperature: 10 °C to 40 °C
USB Cable Abbott Diabetes Care PRT21373 Length: 94 cm (37 inches)
105

Rapid-Acting Insulin Calculator Specifications
Parameter Unit Range or Value
Correction target mmol/L 3 .9 to 10 .0
Carbohydrate ratio 1 unit per X grams of carbs 1 to 50
Carb portion ratio Units of insulin per carb portion 0 .5 to 15
Carb portions definition Grams of carbs 10 to 15
Mealtime insulin doses (breakfast, lunch, dinner) Units of insulin 0 to 50
Correction factor 1 unit per X mmol/L 0 .1 to 5 .5
Insulin duration(duration of insulin action) Hours Easy: 4
Advanced: 3 to 8
106

Parameter Unit Range or Value
Dose increments Units of insulin 0 .5 or 1
Maximum insulin dose Units of insulin 50
107

Labelling Symbols
Consult instructions for use Use-by date
Temperature limit Catalogue number
Manufacturer Serial number
CE Mark Do not use if package is damaged
Batch code Keep dry
Type BF applied part Non-ionizing radiation
CODE Sensor code Caution
Do not re-use Sterilised using irradiation
This product must not be disposed of via municipal waste collection . Separate collection for electrical and electronic equipment waste per Directive 2012/19/EC in the European Union is required . Contact the manufacturer for details .
108

Electromagnetic Compatibility• TheSystemneedsspecialprecautionsregardingEMCandneedstobeinstalledandputintoserviceaccordingtotheEMCinformationprovidedinthismanual.
• PortableandmobileRFcommunicationsequipmentcanaffecttheSystem.• Theuseofaccessories,transducersandcablesotherthanthosespecifiedbyAbbottDiabetesCaremayresultinincreasedEMISSIONSordecreasedIMMUNITYoftheSystem.
• TheSystemshouldnotbeusedadjacenttoorstackedwithotherequipmentandthatifadjacentorstackeduseisnecessary,theSystemshouldbeobservedtoverifynormaloperationintheconfigurationinwhichitwillbeused.
109

Guidance and manufacturer’s declaration – electromagnetic emissionsTheSystemisintendedforuseintheelectromagneticenvironmentspecifiedbelow.ThecustomerortheuseroftheSystemshouldassurethatitisusedinsuchanenvironment.
Emissions test Compliance Electromagnetic environment – guidance
RFemissionsCISPR11
Group1 TheSystemusesRFenergyonlyforitsinternalfunction.Therefore,itsRFemissionsareverylowandarenotlikelytocauseanyinterferenceinnearbyelectronicequipment.
RFemissionsCISPR11
ClassB TheSystemissuitableforuseinallestablishments,includingdomesticestablishmentsandthosedirectlyconnectedtothepubliclowvoltagepowersupplynetworkthatsuppliesbuildingsusedfordomesticpurposes.
HarmonicemissionsIEC61000-3-2
ClassA
Voltagefluctuations/flickeremissionsIEC61000-3-3
Complies
110

Guidance and manufacturer’s declaration – electromagnetic immunityTheSystemisintendedforuseintheelectromagneticenvironmentspecifiedbelow.ThecustomerortheuseroftheSystemshouldassurethatitisusedinsuchanenvironment.
IMMUNITYtest
IEC 60601test level
Compliance Level
Electromagnetic environment – guidance
Electrostaticdischarge(ESD)IEC61000-4-2
±6kVcontact±8kVair
±6kVcontact±8kVair
Floorsshouldbewood,concreteorceramictile.Iffloorsarecoveredwithsyntheticmaterial,therelativehumidityshouldbeatleast30%.
Electricalfasttransient/burstIEC61000-4-4
±2kVforpowersupplylines±1kVforinput/outputlines
±2kVforpowersupplylines±1kVforinput/outputlines
Mainspowerqualityshouldbethatofatypicaldomestic,commercialorhospitalenvironment.
111

IMMUNITYtest
IEC 60601test level
Compliance Level
Electromagnetic environment – guidance
SurgeIEC61000-4-5
±1kVdifferentialmode±2kVcommonmode
±1kVdifferentialmode±2kVcommonmode
Mainspowerqualityshouldbethatofatypicaldomestic,commercialorhospitalenvironment.
Voltagedips,shortinterruptionsandvoltagevariationsonpowersupplyinputlinesIEC61000-4-11
<5% UT (>95%dipinUT)for0.5cycle40%UT (60%dipinUT)for5cycles70%UT(30%dipinUT)for25cycles<5%UT(>95%dipinUT)for5seconds
<5% UT (>95%dipinUT)for0.5cycle40%UT (60%dipinUT)for5cycles70%UT(30%dipinUT)for25cycles<5%UT(>95%dipinUT)for5seconds
Mainspowerqualityshouldbethatofatypicaldomestic,commercialorhospitalenvironment.IftheuseroftheSystemrequirescontinuedoperationduringpowermainsinterruptions,itisrecommendedthattheSystembepoweredfromanuninterruptiblepowersupplyorabattery.
112

IMMUNITYtest
IEC 60601test level
Compliance Level
Electromagnetic environment – guidance
Powerfrequency(50/60Hz)magneticfieldIEC61000-4-8
3A/m 3A/m Powerfrequencymagneticfieldsshouldbeatlevelscharacteristicofatypicallocationinatypicaldomestic,commercialorhospitalenvironment.
NOTEUTisthea.c.mainsvoltagepriortoapplicationofthetestlevel.
113

IMMUNITYtest
IEC 60601test level
Compliance Level
Electromagnetic environment – guidance
ConductedRFIEC61000-4-6
3Vrms150kHzto80MHz
3Vrms PortableandmobileRFcommunicationsequipmentshouldbeusednoclosertoanypartoftheSystem,includingcables,thantherecommendedseparationdistancecalculatedfromtheequationapplicabletothefrequencyofthetransmitter.Recommended separation distance
= 1.2d
114

IMMUNITYtest
IEC 60601test level
Compliance Level
Electromagnetic environment – guidance
RadiatedRFIEC61000-4-3
3V/m80MHzto2.5GHz
3V/m Recommended separation distance
80MHzto800MHz
800MHzto2.5GHz
P isthemaximumoutputpowerratingofthetransmitterinwatts(W)accordingtothetransmittermanufacturerand d istherecommendedseparationdistanceinmetres(m).FieldstrengthsfromfixedRFtransmitters,asdeterminedbyanelectromagneticsitesurvey,a shouldbelessthanthecompliancelevelineachfrequencyrange.b
Interferencemayoccurinthevicinityofequipmentmarkedwiththefollowingsymbol:
NOTE1At80MHzand800MHz,thehigherfrequencyrangeapplies.
NOTE2Theseguidelinesmaynotapplyinallsituations.Electromagneticpropagationisaffectedbyabsorptionandreflectionfromstructures,objectsandpeople.
= 1.2d
= 2.3d
115

a Fieldstrengthsfromfixedtransmitters,suchasbasestationsforradio(cellular/cordless)telephonesandlandmobileradios,amateurradio,AMandFMradiobroadcastandTVbroadcastcannotbepredictedtheoreticallywithaccuracy.ToassesstheelectromagneticenvironmentduetofixedRFtransmitters,anelectromagneticsitesurveyshouldbeconsidered.IfthemeasuredfieldstrengthinthelocationinwhichtheSystemisusedexceedstheapplicableRFcompliancelevelabove,theSystemshouldbeobservedtoverifynormaloperation.Ifabnormalperformanceisobserved,additionalmeasuresmaybenecessary,suchasre-orientingorrelocatingtheSystem.
b Overthefrequencyrange150kHzto80MHz,fieldstrengthsshouldbelessthan3V/m.
116
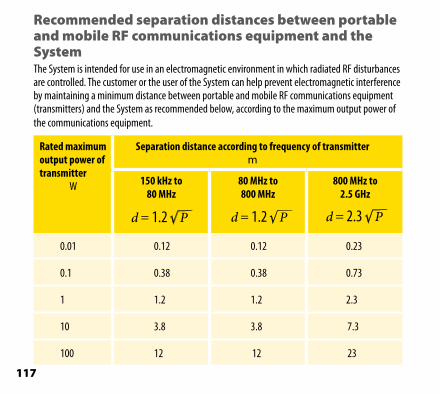
Recommended separation distances between portable and mobile RF communications equipment and the SystemTheSystemisintendedforuseinanelectromagneticenvironmentinwhichradiatedRFdisturbancesarecontrolled.ThecustomerortheuseroftheSystemcanhelppreventelectromagneticinterferencebymaintainingaminimumdistancebetweenportableandmobileRFcommunicationsequipment(transmitters)andtheSystemasrecommendedbelow,accordingtothemaximumoutputpowerofthecommunicationsequipment.
Rated maximum output power of transmitter
W
Separation distance according to frequency of transmitterm
150 kHz to 80 MHz
80 MHz to800 MHz
800 MHz to2.5 GHz
0.01 0.12 0.12 0.23
0.1 0.38 0.38 0.73
1 1.2 1.2 2.3
10 3.8 3.8 7.3
100 12 12 23
= 1.2d = 1.2d = 2.3d
117

Fortransmittersratedatamaximumoutputpowernotlistedabove,therecommendedseparationdistancedinmetres(m)canbeestimatedusingtheequationapplicabletothefrequencyofthetransmitter,whereP isthemaximumoutputpowerratingofthetransmitterinwatts(W)accordingtothetransmittermanufacturer.NOTE1At80MHzand800MHz,theseparationdistanceforthehigherfrequencyrangeapplies.NOTE2Theseguidelinesmaynotapplyinallsituations.Electromagneticpropagationisaffectedbyabsorptionandreflectionfromstructures,objectsandpeople.
118

Hereby, Abbott Diabetes Care Ltd, declares that the FreeStyle Libre Flash Glucose Monitoring System is in compliance with the essential requirements and other relevant provisions of the R&TTE Directive . A copy of the original declaration of conformity may be obtained from Abbott Diabetes Care Ltd ., Range Road, Witney, Oxon, OX29 0YL, UK .
Font Licence ©2013 Abbott Licensed under the Apache Licence, Version 2 .0 (the “Licence”); you may not use this file except in compliance with the Licence .You may obtain a copy of the Licence at: http://www .apache .org/licenses/LICENSE-2 .0 Unless required by applicable law or agreed to in writing, software distributed under the Licence is distributed on an “AS IS” BASIS, WITHOUT WARRANTIES OR CONDITIONS OF ANY KIND, either express or implied . See the Licence for the specific language governing permissions and limitations under the Licence .
119

Abbott Diabetes Care Ltd.Range RoadWitney, OxonOX29 0YL, UK©2014 Abbott ART28697-101 Rev. A 03/14
FreeStyle and related brand marks are trademarks of Abbott Diabetes Care Inc. in various jurisdictions. Other trademarks are the property of their respective owners.
This product(s) and/or its manufacture and/or use are protected by one or more of the following patents:US6,134,461; US6,175,752; US6,560,471; US6,565,509; US6,605,200; US6,605,201; US6,932,894; US7,090,756; US7,620,438; US7,670,470; US7,826,382; US7,918,976; US7,920,907; US8,092,662; US8,106,780; US8,115,635; US8,147,666; US8,168,052; US8,223,021; US8,260,392; US8,268,143; US8,280,474; US8,306,598; US8,346,336; US8,358,210; US8,368,556; US8,377,271; US8,380,273; US8,380,274; US8,390,455; US8,410,939; US8,414,761; US8,435,682; US8,437,829; US8,444,834; US8,463,351; US8,512,534; US8,514,086; US8,542,122; EP1230249; EP1466156; EP1927602; EP2292671; CA2391425; CA2447871; JP4112499B2; JP4932113B2; JP5021115B2.Additional patents may be issued and/or pending.
Distributed by:Abbott Laboratories Ltd.Abbott Diabetes CareAbbott HouseVanwall Business ParkVanwall RoadMaidenheadBerkshireSL6 4UDUK0500 467 466
Abbott Laboratories Ireland, Ltd.Abbott Diabetes Care4051 Kingswood DriveCitywest Business CampusDublin 24Ireland1800 77 66 33