Flash Adventure Tutorials
102
description
Collection of AS3, Flex and Flash Tutorials from Flanture blog.
Transcript of Flash Adventure Tutorials


Flash Adventure Tutorials

If you have downloaded this Flash Tutorials e-book, you are one of the people who helped my blog keep running.
Thank you.
http://flanture.blogspot.com
Adobe®, Flash®, Flex®, Photoshop® and Illustrator® are registered trademarks of Adobe Systems Incorporated.
Tutorials
1. AS3 Random Star Field Animation 2. How to split ActionScript Array in two or more 3. Flash Tutorial : How to create vertigo animation 4. Simple AS3 Data Structure - part II 5. Simple AS3 Data Structure 6. Using BitmapSplit function with Tweener 7. How to start with PaperVision3D 8. AS3: Dynamic Bitmap Split Function 9. Running Flex 4 SDK and FlashDevelop 10. Energy Bar Flash Game AS3 Tutorial 11. Using Deco Tool in Flash CS4 (Vine Fill) 12. Improved Spiderweb AS3.0 Class 13. Coding spiderwebs in ActionScript3.0 14. Pyramids using AS3 drawing API 15. ActionScript3.0 Triangle Class 16. Understanding shearing using Matrix object 17. HowTo create Flash video captions using Subtitle Workshop 18. AS3.0 preloader part II : adding transparency 19. AS3.0 Flash Preloader With Moving TextField 20. Level Timer code explained 21. How To Create Flash Game Level Timer 22. Curves and Fills with AS3 Drawing API 23. Flash AS3 Star System Simulation Tutorial 24. AS3 Loading Animation Tutorial 25. AS3 Drawing API examples 26. ActionScript Random Number Generator With Blur Effect 27. Manipulating Shapes Using Bone Tool in Flash CS4 28. Create Flash Banner Using FuseKit Simple Tutorial 29. Using ActionScript Point class distance method for constant speed
moving in roadMap function 30. Maui Flash Zoom Tool 31. Flash Pixel Explosion Tutorial 32. It's never to late (shuffle AS function + more)
33. Free FLV to WMV Conversion 34. Object Movement Functions 35. Tiled Flash Backgrounds Tutorial PART II 36. Tiled Flash Backgrounds Tutorial PART I 37. Making Zoom Tool with Masking in Flash 38. Flash Tutorial : Rain Effect 39. Flash Scale Menu Explained 40. Simple Flex Effects Example 41. Math2 ActionScript functions 42. Custom Gradients Flash Tutorial 43. Code for scale menu 44. Simple Event Mechanism Flash Tutorial

AS3 Random Star Field Animation
This simple function creates star field animation. You need MovieClip in your library with 'star' class linkage. If stars are not your thing, feel free to try it with any other image you make.
swf
code ::
import flash.events.Event; import flash.events.MouseEvent; function starField():void { var i:uint = 0; while (i < 30) { var a:star = new star(); a.x = Math.random()*400; a.y = Math.random()*260; var size:Number = Math.random()*40+20; a.width = a.height = size; a.addEventListener(Event.ADDED_TO_STAGE, getSpeed); function getSpeed(evt:Event):void { evt.target.speed = Math.random()*20-10; } a.addEventListener(Event.ENTER_FRAME, onFrame); function onFrame(evt:Event):void { evt.target.rotation += evt.target.speed; } addChild(a); i++; } } starField(); addEventListener(MouseEvent.MOUSE_UP, onup); function onup(evt:MouseEvent):void { while(this.numChildren > 0) { this.removeChildAt(0); } starField(); }

How to split ActionScript Array in two or more
Until today my ActionScript Search Array functions have been downloaded 2386 times, according to Box.net counter. Despite of this number I do think every piece of code can and should be improved. That's way I'm adding new function: splitTo(Array, int):Array This function splits given Array to int parts. Resulting Array is two-dimensional. How it works? Let's say you have Array of Numbers
Array a has 10 elements and you want to split this Array into 3 new Arrays. Resulting Array will return new Array as image shows.
As you can see remaining elements (in this case element 11) will be attached to last the Array. If you don't want to attach any residual elements just delete the only while loop in the code. Here is the function:
// function splitTo splits array 'ar1' to 'parts' number of arrays public static function splitTo(a1:Array, parts:uint):Array { if (parts > 1) { var aCount:Number = a1.length / parts; var limit:int = int(aCount); var res:Array = new Array();

// if aCount <= 1 if (aCount <= 1) { // put every element in new array for (var i:uint = 0; i<a1.length; i++) { // make new array and resulting array var newarray:Array = new Array(); newarray.push(a1[i]); res.push(newarray); } } else { for (var k:uint = 0; k<parts; k++) { var newarray2:Array = new Array(); if (a1.length > 0) { // if a1 is not empty for (var j:uint = 0; j<limit; j++) { newarray2.push(a1.splice(0, 1)); } res.push(newarray2); } } // put rest of the elements inside last array while (a1.length > 0) { res[res.length-1].push(a1.splice(0, 1)); } } // return resulting Array of Array[s] return res; } else { return a1; } }
More similar functions coming soon.
Stay updated by subscribing to blog RSS feed, or follow me on Twitter. Thanks for sharing.
Flash Tutorial : How to create vertigo animation
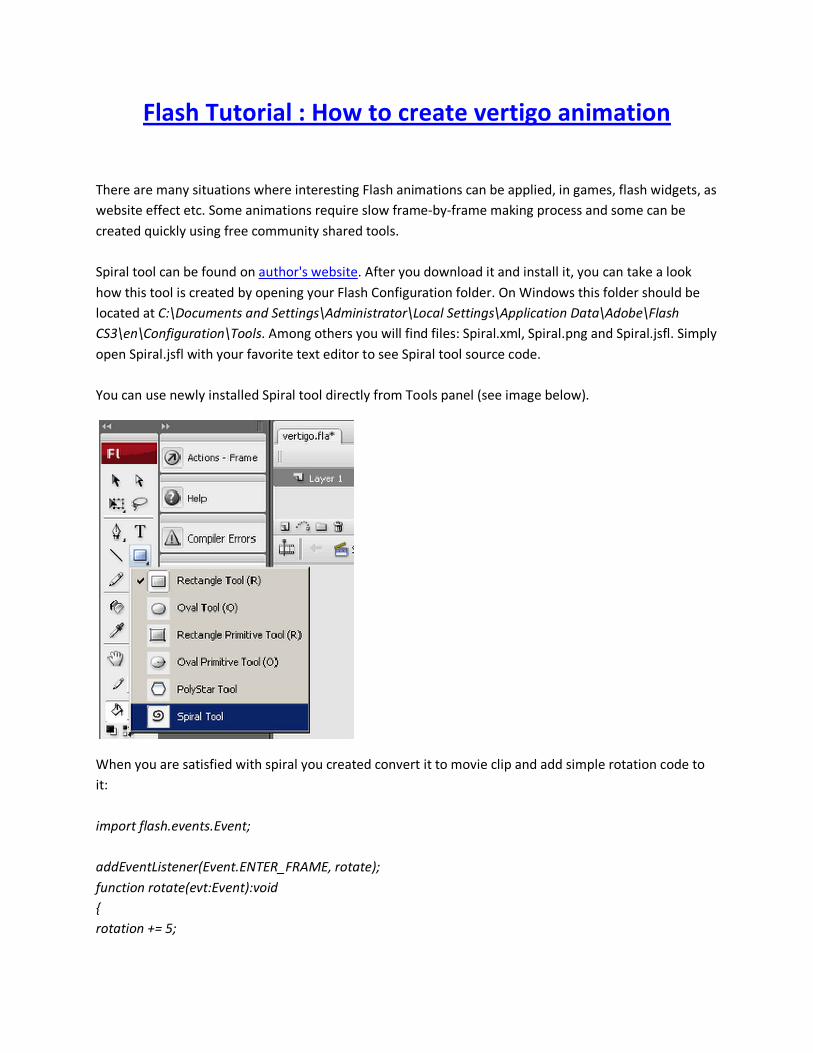
There are many situations where interesting Flash animations can be applied, in games, flash widgets, as website effect etc. Some animations require slow frame-by-frame making process and some can be created quickly using free community shared tools. Spiral tool can be found on author's website. After you download it and install it, you can take a look how this tool is created by opening your Flash Configuration folder. On Windows this folder should be located at C:\Documents and Settings\Administrator\Local Settings\Application Data\Adobe\Flash CS3\en\Configuration\Tools. Among others you will find files: Spiral.xml, Spiral.png and Spiral.jsfl. Simply open Spiral.jsfl with your favorite text editor to see Spiral tool source code. You can use newly installed Spiral tool directly from Tools panel (see image below).
When you are satisfied with spiral you created convert it to movie clip and add simple rotation code to it: import flash.events.Event; addEventListener(Event.ENTER_FRAME, rotate); function rotate(evt:Event):void { rotation += 5;

} Click on image to see live demo.
swf
That's just a starting point. You can go further and make all kinds of complex vertigo animations. Simple adjustments would be to change drawing line size, style and color. Combine few different spiral lines with different rotation speeds to get even more complex vertigo.

Simple AS3 Data Structure - part II
Student data structure from previous post doesn't have to be created like I have shown earlier. There is one more OOP way of doing it, to create a class. Private variables will hold particular information and we can use getters and setters to assign and retrieve values. Here is the code for Student.as class:
package { public class Student { private var _name:String; private var _age:uint; private var _grades:Array; public function Student (sName:String):void { _name = sName; } public function set name (studentName:String):void { _name = studentName; } public function get name ():String { return _name; } public function set age (studentAge:uint):void { _age = studentAge; } public function get age ():uint { return _age; } public function set grades (studentGrades:Array):void { _grades = studentGrades; }

public function get grades ():Array { return _grades; } public function getAverage():Number { var sum:Number = 0; for (var j:uint = 0; j < grades.length; j++) { sum = sum + grades[j]; } return sum / grades.length; } } }
As you may noticed there is built-in getAverage function to make things easier. Now, you can test this class functionallity by creating TestStudent.fla in same directory where you saved Student.as file. In first frame of the TestStudent file enter next code: import Student; var student1:Student = new Student("John"); student1.age = 22; student1.grades = [4, 5, 5, 3]; var student2:Student = new Student("Ella"); student2.age = 20; student2.grades = [4, 5, 5, 4, 5]; var average:Number = student1.getAverage(); trace(average); average = student2.getAverage(); trace(average);
Which method you will use depends on your needs and style.

Simple AS3 Data Structure
In ActionScript 3 Arrays play very important role. This is powerfull class for storing and manipulating different type of values. If I have only one type of data, for example, only Strings, I will use Vector class which is almost exaclty like Array class, but it can store one data type only. Simple Array with different data types would be created like this:
var student = new Array(); student[0] = "John"; student[1] = 22; student[2] = "Elle"; student[3] = 21;
Here I have strings representing names of students and numbers representing their age. I can trace all info at once with a loop: for (var i:uint = 0; i<student.length; i++) { trace("info : "+student[i]); }
Since my collection of data have clear "units" where single unit holds data for single student I need to structure data differently so I can take advantage of language for easier data manipulation. In this particular case indexed array is fine, but in some other cases it will be better and more efficient to use associative arrays or not use arrays at all. For this example I'm using Objects to store data about students, one Object per student. Simplified example would look something like this: var st1 = new Object(); st1.name = "John"; st1.age = 22; st1.grades = [5, 4, 4, 3, 5, 3];
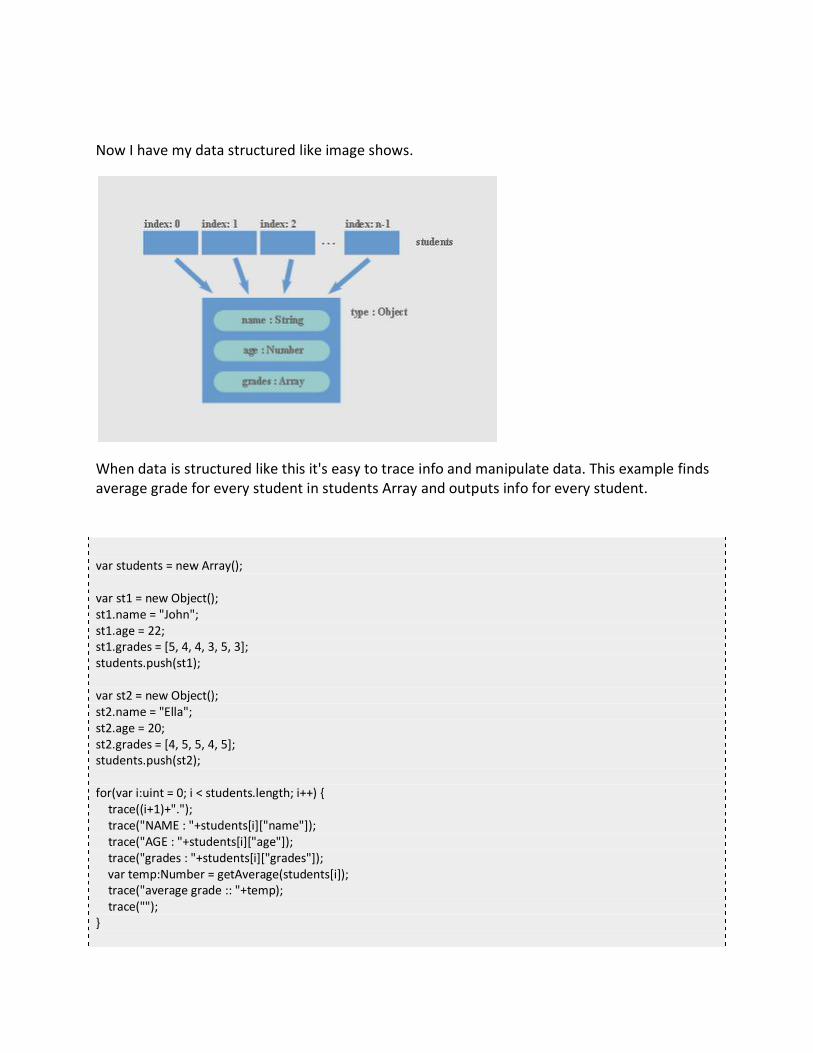
Now I have my data structured like image shows.
When data is structured like this it's easy to trace info and manipulate data. This example finds average grade for every student in students Array and outputs info for every student. var students = new Array(); var st1 = new Object(); st1.name = "John"; st1.age = 22; st1.grades = [5, 4, 4, 3, 5, 3]; students.push(st1); var st2 = new Object(); st2.name = "Ella"; st2.age = 20; st2.grades = [4, 5, 5, 4, 5]; students.push(st2); for(var i:uint = 0; i < students.length; i++) { trace((i+1)+"."); trace("NAME : "+students[i]["name"]); trace("AGE : "+students[i]["age"]); trace("grades : "+students[i]["grades"]); var temp:Number = getAverage(students[i]); trace("average grade :: "+temp); trace(""); }

function getAverage(o:Object):Number { var sum:Number = 0; for (var j:uint = 0; j < o.grades.length; j++) { sum = sum + o.grades[j]; } return sum / o.grades.length; }
You can use Array class methods to add new students // students.push(st3) // or remove them from array with splice. To remove John use // students.splice(0,1);
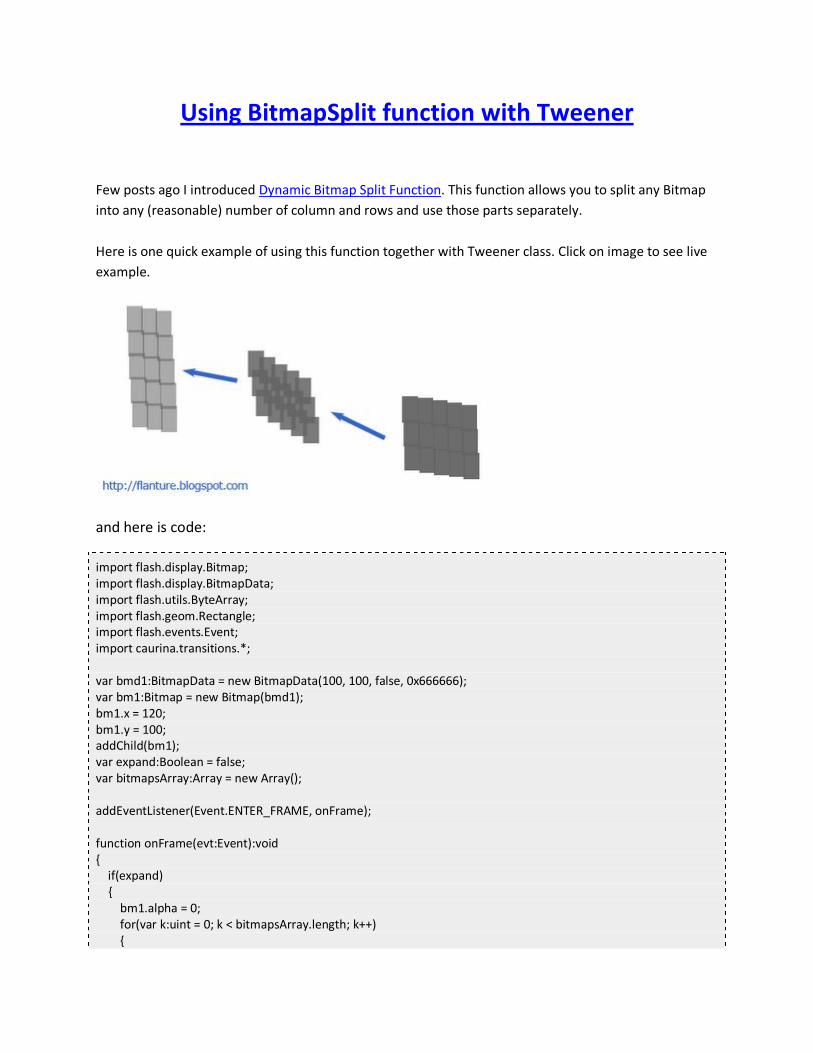
Using BitmapSplit function with Tweener
Few posts ago I introduced Dynamic Bitmap Split Function. This function allows you to split any Bitmap into any (reasonable) number of column and rows and use those parts separately. Here is one quick example of using this function together with Tweener class. Click on image to see live example.
and here is code:
import flash.display.Bitmap; import flash.display.BitmapData; import flash.utils.ByteArray; import flash.geom.Rectangle; import flash.events.Event; import caurina.transitions.*; var bmd1:BitmapData = new BitmapData(100, 100, false, 0x666666); var bm1:Bitmap = new Bitmap(bmd1); bm1.x = 120; bm1.y = 100; addChild(bm1); var expand:Boolean = false; var bitmapsArray:Array = new Array(); addEventListener(Event.ENTER_FRAME, onFrame); function onFrame(evt:Event):void { if(expand) { bm1.alpha = 0; for(var k:uint = 0; k < bitmapsArray.length; k++) {
var curr:uint = bitmapsArray[k].length; for(var l:uint = 0; l < curr; l++) { Tweener.addTween(bitmapsArray[k][l], {x:20*l+10, y:33*k+10, alpha:0.5, time:3, transition:"linear"}); expand = false; } } } } function splitBitmap(_source:BitmapData, _columns:int, _rows:int):void { var _bitmapWidth:int = _source.width; var _bitmapHeight:int = _source.height; var _onePieceWidth:Number = Math.round(_bitmapWidth / _columns); var _onePieceHeight:Number = Math.round(_bitmapWidth / _rows); var _copyRect:Rectangle = new Rectangle(0, 0, _onePieceWidth, _onePieceHeight); for(var i:int = 0; i < _columns; i++) { var tempArray:Array = new Array(); for(var j:int = 0; j < _rows; j++) { var _piece:String = "piece"+String(i)+String(j); var temp:* = [_piece]; temp = new BitmapData(_onePieceWidth, _onePieceHeight, true, 0xFF0000CC); var newBytes:ByteArray = _source.getPixels(_copyRect); newBytes.position = 0; temp.setPixels(_copyRect, newBytes); var _newBitmap:String = "newBitmap"+String(i)+String(j); var tempBitmap:* = [_newBitmap]; tempBitmap = new Bitmap(temp); tempBitmap.x = i * (_onePieceWidth) + bm1.x; tempBitmap.y = j * (_onePieceHeight)+ bm1.y; addChild(tempBitmap); tempArray.push(tempBitmap); } bitmapsArray.push(tempArray); } expand = true; } splitBitmap(bmd1, 5, 3);

How to start with PaperVision3D
While searching for some instructions on how to start with PaperVision3D for complete idiots there were few very good and few outdated places. One very detailed set of tutorials starting with Papervision 3D Programming Tutorial written in September 2009 doesn't work with Flex 4 SDK, but requires older compiler version or changing some of the code provided.
Getting Started with PaperVision3D
Most useful tutorial I found on downloading and installing PaperVision3D came from YouTube. This 9 minutes video is walk-through of how to find and install Tortoise SVN, how to use it to download PaperVision3D files and how to start new Flex project using those files.
video: http://www.youtube.com/watch?v=sgFWaGheR6g&feature=player_embedded
Video is narated by Amanda V. from Northern Kentucky University, Office of Instructional Design. Another option is to setup Papervision3D in FlashDevelop and explore some cool PaperVision3D examples . Feel free to share a link or two with PaperVision3D Tutorials. Thanks.

AS3: Dynamic Bitmap Split Function
Recently I had most rewarding moments while playing around with Bitmap and BitmapData classes in ActionScript3.0 and also I must mention how this becomes more fun than really learning the language. While reading about copying pixels from one Bitmap to another this idea fall into my mind about writing function to allow me to split any loaded or drawn image into desired number of columns and rows. Solution was quite easy actually, with a little help of ByteArray class. Here is the function which allows you to do just that, dynamic split of any image:
function splitBitmap(_source:BitmapData, _columns:int, _rows:int):void { var _bitmapWidth:int = _source.width; var _bitmapHeight:int = _source.height; var _onePieceWidth:Number = Math.round(_bitmapWidth / _columns); var _onePieceHeight:Number = Math.round(_bitmapWidth / _rows); var _copyRect:Rectangle = new Rectangle(0, 0, _onePieceWidth, _onePieceHeight); for(var i:int = 0; i < _columns; i++) { var tempArray:Array = new Array(); for(var j:int = 0; j < _rows; j++) { var _piece:String = "piece"+String(i)+String(j); var temp:* = [_piece]; temp = new BitmapData(_onePieceWidth, _onePieceHeight, true, 0xFF0000CC); var newBytes:ByteArray = _source.getPixels(_copyRect); newBytes.position = 0; temp.setPixels(_copyRect, newBytes); var _newBitmap:String = "newBitmap"+String(i)+String(j); var tempBitmap:* = [_newBitmap]; tempBitmap = new Bitmap(temp); tempBitmap.x = i * (_onePieceWidth) + bm1.x; tempBitmap.y = j * (_onePieceHeight)+ bm1.y; addChild(tempBitmap); tempArray.push(tempBitmap); } bitmapsArray.push(tempArray);
} }
Setting tempBitmap x and y properties is optional, because I wanted to put new pieces in original place (above bm1, original Bitmap) so viewer can't see these are new DisplayObjects. In this way transition effect is masked. You may also notice bitmapsArray, two-dimensional Array to hold all pieces in one place for later easy manipulation. There can be some improvements to it, like limiting max number of columns and rows or adding image import with Loader class etc. but main functionality is there, working like a charm. Now, you can use this function to produce all kinds of transition effects and image manipulations. Some examples might follow in future posts.

Running Flex 4 SDK and FlashDevelop
Using only Flash IDE for ActionScript or AIR projects is almost never final choice for many developers. In fact, majority of developers use all kind of available tools. When team work is involved usable knowledge of these tools is a must and this is also a big plus in anyone's portfolio. Here is small intro how to introduce Flex 4 SDK + FlashDevelop workflow. First of all go and download Flex 4 SDK from Adobe Opensource Pages. Install downloaded files somewhere on your hard drive C:\flex4sdk for example. Set path to this folder. Right click on My Computer icon, go to Advanced tab and click on Environment Variables. In System variables list choose path, click edit and add path to newly created folder to the end of line. Go to Command Prompt and test your work with compc -version command. You will also need FlashDevelop from their site, downloaded and installed. I have 3.0.6 RTM running, but more recent version is now available. Simple HelloWorld AS3 Project is enough to see if everything is OK. I got following error after I tried to compile my project: 'C:\Documents and Settings\[USER]\My Documents\FDProjects\HelloWorld\HelloWorld.as: Warning: This compilation unit did not have a factoryClass specified in Frame metadata to load the configured runtime shared libraries. To compile without runtime shared libraries either set the -static-link-runtime-shared-libraries option to true or remove the -runtime-shared-libraries option.' In order to solve this problem, right click on project name, open Properties and choose Compiler Options. Within Additional Compiler Options add this line: -static-link-runtime-shared-libraries=true (see image). This will solve warning issue.

One more thing. I highly recommend using Senocular's pseudo output panel for testing purposes. So, there you have it, basic setup of Flex 4 SDK and FlashDevelop. If you like this post leave comment or share. Thanks.

Energy Bar Flash Game AS3 Tutorial
In some Flash games author often has a need to display energy bar for hero character or enemy character or both. In this tutorial you will learn how to create reusable energy bar which you can ..., well reuse, in all your future projects. Code is pure ActionScript 3.0. I'm trying to develop this habit to write small chunks of useful code for my future games :)
step 1 - energyBar class First obvious step is to write energyBar class. Here is the code: package { import flash.display.Sprite; import flash.geom.Rectangle; import flash.events.Event; public class energyBar extends Sprite { private var _do:Sprite; private var _ev:uint; public function energyBar(displayObj, energyValue) { _do = displayObj; _ev = energyValue; init(); addEventListener(Event.ENTER_FRAME, onFrame); } private function onFrame(evt:Event):void { x = _do.x; y = _do.y - 20; } private function init():void {

x = _do.x; y = _do.y - 20; this.graphics.lineStyle(1); this.graphics.beginFill(0x000000); this.graphics.drawRect(0,0,102,15); this.graphics.endFill(); this.graphics.beginFill(0x00ff00); this.graphics.drawRect(1,1,_ev,13); this.graphics.endFill(); } public function updateBar(newval):void { _ev = newval; this.graphics.clear(); this.graphics.lineStyle(1); this.graphics.beginFill(0x000000); this.graphics.drawRect(0,0,102,15); this.graphics.endFill(); this.graphics.beginFill(0x00ff00); this.graphics.drawRect(1,1,newval,13); this.graphics.endFill(); } } } And now code explanation. First we need to import some classes like Sprite, Rectangle and Event. Then we write our class. We are extending Sprite class so we can draw that energy bar. We have two private variables: _do which is Display Object, in this case Sprite of our hero character and _ev which holds energy value. With this kind of class you can pass what ever Sprite you want and attach energy bar to it. Inside constructor function we have init() function call and on enter frame event listener. Listener function will change energy bar position on every frame so our bar can follow hero around the stage. Change value to suit your needs. Now, init function will draw energy bar with provided values. Notice updateBar function which is almost the same as init function, but it is declared as public, so we can update energy value later.
step 2 - hero class
Insert your hero. My hero is simple blue circle shape with big H letter inside. Very creative. Anyway, set linkage properties as image shows, name this class 'hero' and use next code to create hero class. package
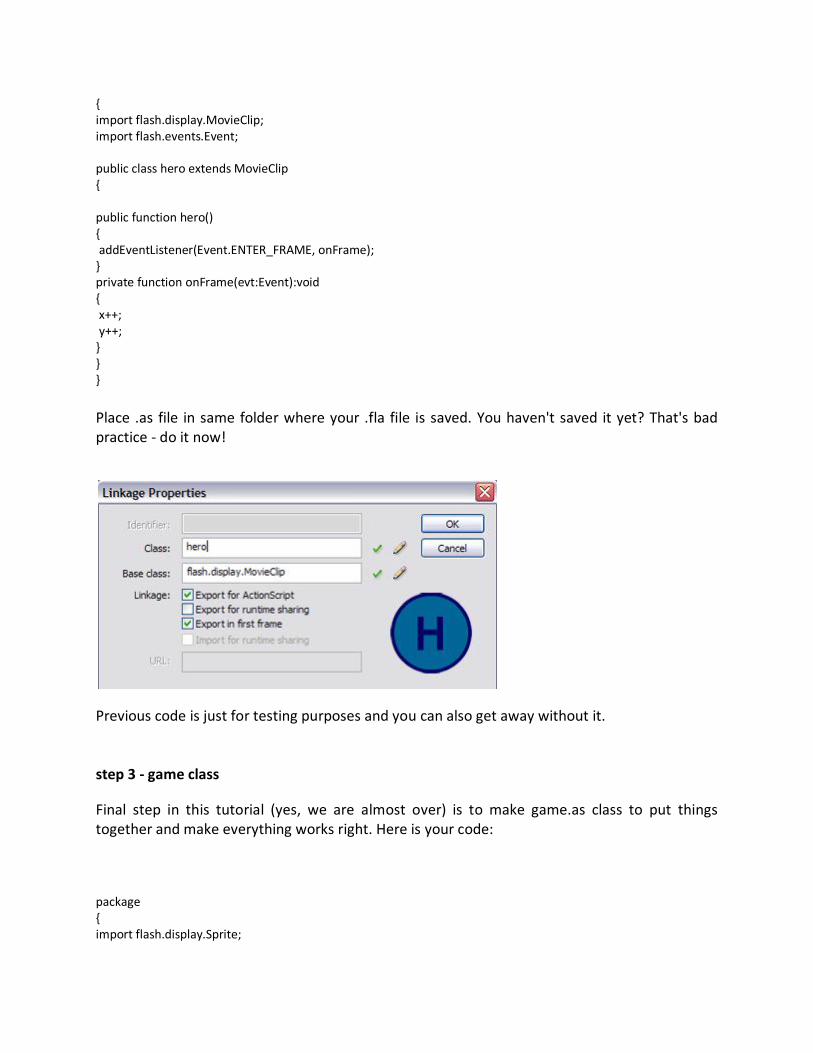
{ import flash.display.MovieClip; import flash.events.Event; public class hero extends MovieClip { public function hero() { addEventListener(Event.ENTER_FRAME, onFrame); } private function onFrame(evt:Event):void { x++; y++; } } } Place .as file in same folder where your .fla file is saved. You haven't saved it yet? That's bad practice - do it now!
Previous code is just for testing purposes and you can also get away without it. step 3 - game class
Final step in this tutorial (yes, we are almost over) is to make game.as class to put things together and make everything works right. Here is your code: package { import flash.display.Sprite;

import energyBar; import flash.events.Event; import flash.events.MouseEvent; public class game extends Sprite { private var b:energyBar; private var val:uint = 80; public function game() { init(); } private function init():void { var a:hero = new hero(); a.x = 50; a.y = 50; addChild(a); b = new energyBar(a, val); addChild(b); a.addEventListener(MouseEvent.CLICK, onClick); } private function onClick(evt:Event):void { if(val > 1) { val-=5; b.updateBar(val); }else{ trace("game over."); } } } } Notice that we have to import energyBar class besides other classes. MouseEvent is for testing purposes too. When you click the hero, energy will decrease if energy value is greater than 1 and accordingly using updateBar function from energyBar class (remember that public function ?) we will update our drawing. However, if energy value drops below 0, you will get nice relaxing message in output panel that says "game over." When you make your own game you will probably not use energyBar in this way, but instead energy value will decrease if your hero character gets shot or is eaten by invisible cosmic monster from Betelgeuse star system or whatever. Thanks for your time, I hope you have found this tutorial useful. And fun.

Using Deco Tool in Flash CS4 (Vine Fill)
One of the exciting new features in Flash CS4 is Deco Tool (shortcut U). This is actually 3 tools in one, because if you check properties panel while deco tool is selected you will notice 3 different drawing effects: Vine Fill, Grid Fill and Symmetry Brush. Now we have nice set of tools to create best patterns out there. Default settings for Vine Fill tested on empty Stage can give you pretty good example how this tool works. When you click on the Stage, pattern expands from mouse position to every direction where there are no boundaries of other objects. This means you can limit where your pattern should expand. However expanding is not perfect with default settings and you will often find some space left blank (see image below).
You can reduce unwanted empty space using advanced options located on properties panel. If you change pattern scale to 50%, you will probably fill entire given shape. You can also change segment length, but be careful not to over-do-it or you will lose segment integrity and you may not see flowers, only leafs.

Another parameter available in advanced options is branch angle if you want to rotate your pattern. It seems this doesn't change the way pattern is expanding, something I expected. Last parameter in advance options gives you a way to animate pattern, thus to record pattern expanding! Nice, but most interesting option for Vine Fill is to edit Leaf and Flower shapes.
Here is one trick - when using Vine Fill deco tool for branches choose same color as background and you will see only leafs and flowers. For creating static patterns, use graphics shapes and you can achieve amazing things, but you are not limited only by graphics. Just as easy you can create animated MovieClip and use it as both custom Leaf or Flower inside your pattern.
Improved Spiderweb AS3.0 Class
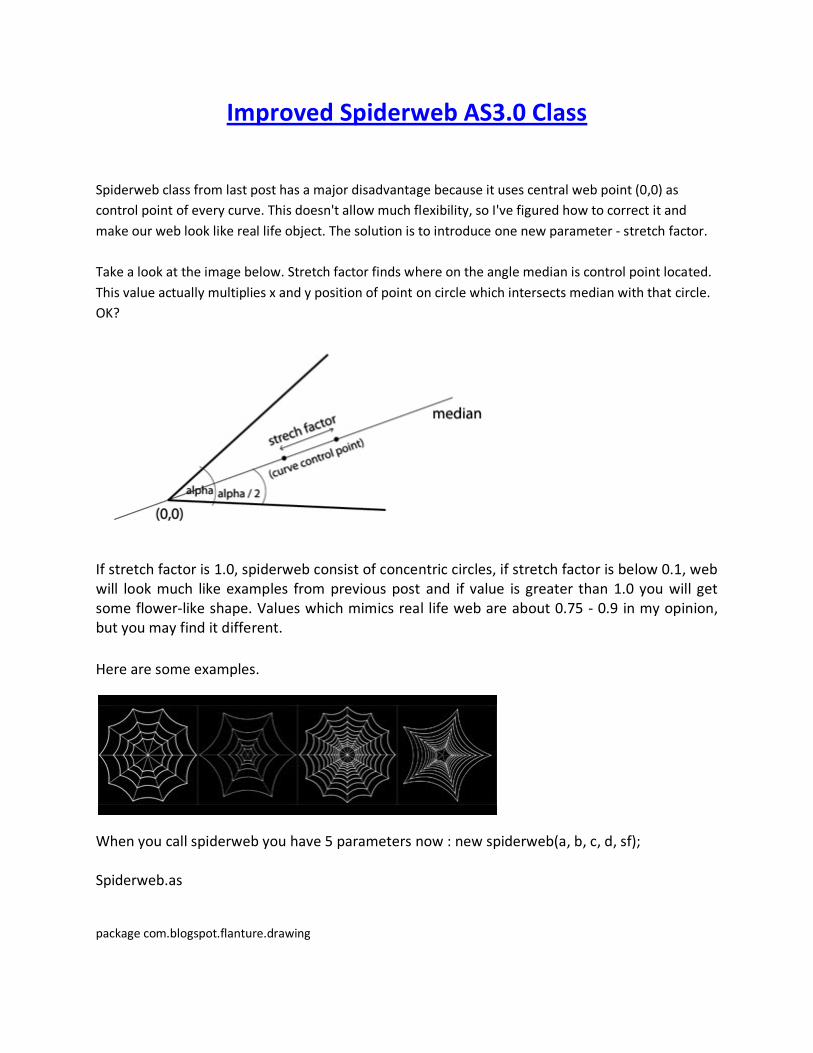
Spiderweb class from last post has a major disadvantage because it uses central web point (0,0) as control point of every curve. This doesn't allow much flexibility, so I've figured how to correct it and make our web look like real life object. The solution is to introduce one new parameter - stretch factor. Take a look at the image below. Stretch factor finds where on the angle median is control point located. This value actually multiplies x and y position of point on circle which intersects median with that circle. OK?
If stretch factor is 1.0, spiderweb consist of concentric circles, if stretch factor is below 0.1, web will look much like examples from previous post and if value is greater than 1.0 you will get some flower-like shape. Values which mimics real life web are about 0.75 - 0.9 in my opinion, but you may find it different. Here are some examples.
When you call spiderweb you have 5 parameters now : new spiderweb(a, b, c, d, sf); Spiderweb.as package com.blogspot.flanture.drawing
{ // Spiderweb drawing class // author: http://flanture.blogspot.com // version: 1.0 // February 2010 import flash.display.Sprite; import flash.geom.Point; public class spiderweb extends Sprite { private var _circles:uint; // number of concentric circles private var _nods:uint; // number of nods on each circle private var _df:Number; // circles distance factor private var _fr:Number; // smallest circle radius private var _sf:Number; // stretch factor public function spiderweb(circles:uint, nods:uint, fr:Number, df:Number, sf:Number) { _circles = circles; _nods = nods; _fr = fr; _df = df; _sf = sf; init(); } private function init():void { var cx = 0; var cy = 0; var coords:Array = new Array(); var controls:Array = new Array(); var angle:Number; var controlAngle:Number; var currR:Number; var angleStep:Number = 360 / _nods; currR = _fr; for(var k:uint = 0; k < _circles; k++) { currR += currR * _df; for (var i:uint = 0; i < _nods; i++) { angle = angleStep * (i + 1); controlAngle = angle - angleStep / 2; controlAngle = controlAngle * Math.PI / 180; angle = angle * Math.PI / 180;
var x1:Number = trim(currR * Math.cos(angle)); var y1:Number = trim(currR * Math.sin(angle)); var tx:Number = trim(currR * Math.cos(controlAngle)); var ty:Number = trim(currR * Math.sin(controlAngle)); tx *= _sf; ty *= _sf; var cpoint:Point = new Point(tx, ty); controls.push(cpoint); var point:Point = new Point(x1, y1); coords.push(point); } drawStraights(coords); drawCurves(coords, controls); coords.splice(0, _nods); controls.splice(0, _nods); } } private function trim(num:Number):Number { var nstr:int = int(num*100); return Number(nstr / 100); } private function drawStraights(array):void { this.graphics.lineStyle(1, 0xffffff); this.graphics.moveTo(0,0); for (var i:uint = 0; i < array.length; i++) { this.graphics.lineTo(array[i].x, array[i].y); this.graphics.moveTo(0,0); } } private function drawCurves(arrayA, arrayB):void { this.graphics.lineStyle(2, 0xffffff); for (var j:uint = 0; j < arrayA.length-1; j++) { this.graphics.moveTo(0,0); this.graphics.moveTo(arrayA[j].x, arrayA[j].y); this.graphics.curveTo(arrayB[j+1].x, arrayB[j+1].y, arrayA[j+1].x, arrayA[j+1].y); this.graphics.moveTo(0,0); }

this.graphics.moveTo(arrayA[arrayA.length-1].x, arrayA[arrayA.length-1].y); this.graphics.curveTo(arrayB[0].x, arrayB[0].y, arrayA[0].x, arrayA[0].y); } } }
Coding spiderwebs in ActionScript3.0
Coding spiderwebs First of all, I'll give you entire code for spiderweb class and than we'll discuss it. spiderweb.as package { import flash.display.Sprite; import flash.geom.Point; public class spiderweb extends Sprite { private var _circles:uint; private var _nods:uint; private var _df:Number; // circles distance factor private var _fr:Number; // first circle radius public function spiderweb(circles:uint, nods:uint, fr:Number, df:Number) { _circles = circles; _nods = nods; _fr = fr; _df = df; init(); } private function init():void { var cx = 0; var cy = 0; var angles:Array = new Array();

var coords:Array = new Array(); var angle:Number; var currR:Number; var angleStep:Number = 360 / _nods; currR = _fr; for(var k:uint = 0; k < _circles; k++) { currR += currR * _df; for (var i:uint = 0; i < _nods; i++) { angle = angleStep * (i + 1); angle = angle * Math.PI / 180; angles[i] = angle; var x1:Number = trim(currR * Math.cos(angle)); var y1:Number = trim(currR * Math.sin(angle)); var point:Point = new Point(x1, y1); coords.push(point); } drawStraights(coords); drawCurves(coords); // trace(coords); coords.splice(0, _nods); } } private function trim(num:Number):Number { var nstr:int = int(num*100); return Number(nstr / 100); } private function drawStraights(array:Array):void { this.graphics.lineStyle(1, 0xffffff); this.graphics.moveTo(0,0); for (var i:uint = 0; i < array.length; i++) { this.graphics.lineTo(array[i].x, array[i].y); this.graphics.moveTo(0,0); } } private function drawCurves(array2:Array):void { var extA:Array = new Array(); extA = array2; this.graphics.lineStyle(2, 0xffffff);
for (var j:uint = 0; j < extA.length-1; j++) { this.graphics.moveTo(0,0); this.graphics.moveTo(extA[j].x, extA[j].y); this.graphics.curveTo(0, 0, extA[j+1].x, extA[j+1].y); this.graphics.moveTo(0,0); } this.graphics.moveTo(extA[extA.length-1].x, extA[extA.length-1].y); this.graphics.curveTo(0, 0, extA[0].x, extA[0].y); } } }
This class extends Sprite class, so we can take advantages of drawing API (once again). Don't worry about private variables, we will explain that later when I present test class. What this class does is draws spiderweb dinamically using few predefined properties. When you think about it, perfect spiderweb has same angles between any thread, so we only need to define single angle as parameter and fill new angles Array with other values which depends on number of threads we want to draw (which is another parameter). Init function first creates two Arrays, just mentioned angles and coords Array which will hold coordinate points of each threads intersection! This will change on every thread iteration using for loop. We have separate functions drawStraights and drawCurves and simple trim function because we need points coordinates cut to two decimal points. Take a look at drawCurves function when after for loop we have additional step. Now, this code can be improved by changing control points for drawing curves. In this case we used (0,0) point, but real life web would have control points somewhere closer to circle thread, not center of the web. This can be easily calculated and stored within new Array. Now, let's see how test class looks like: sptest.as package { import spiderweb; import flash.display.Sprite; public class sptest extends Sprite { public function sptest() { var sp:spiderweb = new spiderweb(6, 16, 40, 0.4); addChild(sp); sp.x = stage.stageWidth / 2;

sp.y = stage.stageHeight / 2; } } } That's all ! Long live OOP. Let's take a look at parameters you can change. new spiderweb(a, b, c, d); a - number of circular threads to draw b - number of points on any given circular thread c - radius of first circular thread d - distance factor
Here is how distance factor works. If you set parameter c = 100 you will have 100 for first circular thread radius and than 100 + (100 * d) for second, etc, which means threads will be closer and closer to each other. In this way we can mimic real life spiderweb look. Finally, here are some examples.

Pyramids using AS3 drawing API
Let's continue from where we finished last post. We have Triangle AS3.0 class up and running and we want to use it and draw some pyramids.
If you look carefully you will notice that every pyramid consist of two triangles. This is actually simplified version where only two sides are visible and front side triangle has 3 x 60 degrees angles. This is the reason why we need only top pyramid point coordinates and its height, because with some simple math we can easily find other points. Here is Pyramide.as class package com.blogspot.flanture.triangles { import com.blogspot.flanture.triangles.Triangle; import flash.display.Sprite; import flash.geom.Point; public class Pyramide extends Sprite { private var p:Point; // top pyramide point private var h:Number; // pyramide height // for pyramide we need single Point and height value public function Pyramide(_p:Point, _h:Number) { p = _p;

h = _h; var b:Number = Math.sqrt((4/3)*h*h); var p1x:Number = p.x - b; var p2x:Number = p.x + b; var p1y:Number = Math.floor(p.y + h); var p2y:Number = Math.floor(p.y + h); var t1:Triangle = new Triangle(p, new Point(p1x, p1y), new Point(p2x, p2y), true); t1.color = 0xDCF479; t1.drawIt(); addChild(t1); var p3x:Number = p2x + 0.1 * b; var p3y:Number = p.y + 0.7 * h; var t2:Triangle = new Triangle(p, new Point(p2x, p2y), new Point(p3x, p3y), true); t2.color = 0xC9EE33; t2.drawIt(); addChild(t2); } } } Coordinates for smaller triangle free corner are arbitrarily and it depends on how you want your pyramid to look like. That's why you can try and change 0.1 and 0.7 values in finding p3x and p3y.
Here is the code for test example shown on image above: import com.blogspot.flanture.triangles.Triangle; import com.blogspot.flanture.triangles.Pyramide; var pyr:Pyramide = new Pyramide(new Point(100, 100), 50); addChild(pyr); var pyr2:Pyramide = new Pyramide(new Point(250, 125), 75); addChild(pyr2); var pyr3:Pyramide = new Pyramide(new Point(300, 180), 150); addChild(pyr3); Learn more about triangles and math behind them.
ActionScript3.0 Triangle Class
Next two posts are my continuing effort to understand drawing AS3.0 API. Before reading this one you might be interested in previous posts: - Visual rectangles intersection AS3 example - Understanding shearing using Matrix object - Curves and fill with AS3 drawing API - AS3 drawing API examples
This post will introduce custom ActionScript3.0 Triangle class and next post will show you how to use it with Pyramide class to draw a pyramid using one Point and pyramid height as only parameters. Triangle class is very simple. It uses 3 Point parameters and one Boolean parameter. public function Triangle(a:Point, b:Point, c:Point, d:Boolean)
Parameter d acts as flag, if you make it TRUE triangle will be drawn on stage with predefined color using 3 Point parameters, but if you make it FALSE, triangle will be crated but it will not appear on the stage right away. This option is added if you want to change triangle color before adding it visually. Now, here is Triangle.as package com.blogspot.flanture.triangles { import flash.geom.Point; import flash.display.Sprite; public class Triangle extends Sprite { private var _a:Point; private var _b:Point; private var _c:Point; private var _draw:Boolean; private var _color:uint = 0x0000ff; public function set color(newcolor:uint):void { _color = newcolor; } public function get color():uint {

return _color; } public function set draw(newdraw:Boolean):void { _draw = newdraw; } public function get draw():Boolean { return _draw; } public function Triangle(a:Point, b:Point, c:Point, d:Boolean) { _a = a; _b = b; _c = c; _draw = d; // draw it if required if(_draw) { drawIt(); } } public function drawIt():void { this.graphics.clear(); this.graphics.lineStyle(1); this.graphics.beginFill(_color); this.graphics.moveTo(_a.x, _a.y); this.graphics.lineTo(_b.x, _b.y); this.graphics.lineTo(_c.x, _c.y); this.graphics.lineTo(_a.x, _a.y); this.graphics.endFill(); } } } Now we need some example to see if it works OK. Create new document and enter next code: import com.blogspot.flanture.triangles.Triangle; for (var i:uint=0; i<20; i++) { var t:Triangle = new Triangle(grp(), grp(), grp(), true) addChild(t); } // get random Point function grp():Point {
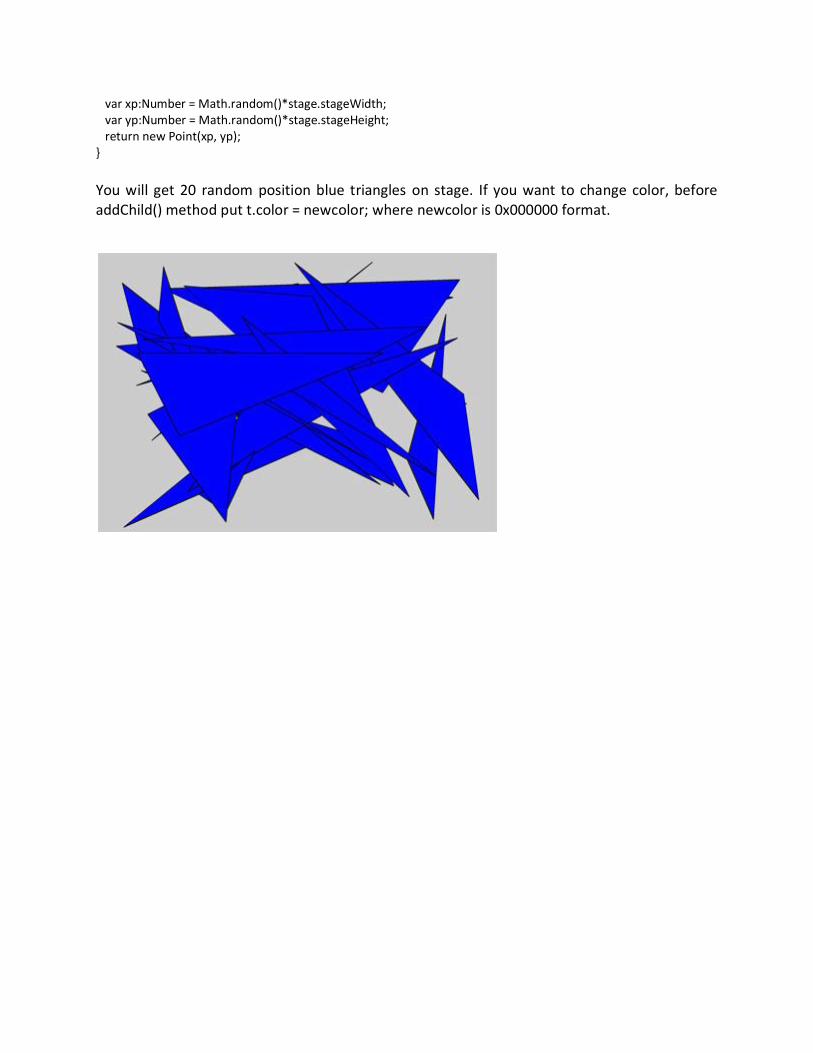
var xp:Number = Math.random()*stage.stageWidth; var yp:Number = Math.random()*stage.stageHeight; return new Point(xp, yp); } You will get 20 random position blue triangles on stage. If you want to change color, before addChild() method put t.color = newcolor; where newcolor is 0x000000 format.

Understanding shearing using Matrix object
Any display object in AS3.0 Flash project has transform property and among other things you can use this property to shear (skew) that object. Easy way to do this is to use Matrix object. Now, Matrix object isn't so difficult to understand, although it is scary to some (for unexplainable reasons). All you have to do is understand it's parameters and what they do. Here is simple list. Matrix(a, b, c, d, tx, ty) a - x scale of display object b - y shearing of display object c - x shearing of display object d - y scale of display object tx - x translation ty - y translation
Let's add some Sprites and see how different parameters values change display object. First create new Flash AS3 project, open actions panel and input these import statements. import flash.display.Sprite; import flash.geom.Matrix; import flash.display.MovieClip; import flash.events.Event; We will create few boxes and place them on stage. var box:Sprite = new Sprite(); box.graphics.lineStyle(1, 0x0000ff); // blue object box.graphics.drawRect(0, 0, 100, 100); addChild(box); box.transform.matrix = new Matrix(1, 0, 0, 1, 50, 100); var box1:Sprite = new Sprite(); box1.graphics.lineStyle(1, 0x00ff00); // green object box1.graphics.drawRect(0, 0, 100, 100); addChild(box1); box1.transform.matrix = new Matrix(1, .5, 0, 1, 50, 200); var box2:Sprite = new Sprite(); box2.graphics.lineStyle(1, 0xff0000); // red object box2.graphics.drawRect(0, 0, 100, 100);

addChild(box2); box2.transform.matrix = new Matrix(1, 0, .5, 1, 150, 100); var box3:Sprite = new Sprite(); box3.graphics.lineStyle(1, 0x000000); // black border object box3.graphics.drawRect(0, 0, 100, 100); addChild(box3); box3.transform.matrix = new Matrix(1, .5, .5, 1, 150, 200);
Take a look how different values of b and c parameter shear display object along x and y axis.
This also works for any display object. Feel free to create new MovieClip, give it linkage name gBox. Use next code: var gBox1:gBox = new gBox(); addChild(gBox1); gBox1.x = 400; gBox1.y = 150; var gBox2:gBox = new gBox(); gBox1.x = 400; gBox1.y = 150; addChild(gBox2); gBox2.transform.matrix = new Matrix(1, .5, .5, 1, 550, 300); Here is the result.

You can even include shearing effect inside animation. Create another box Sprite and add counter variable. This variable will track amount of shearing. For testing purposes use simple onFrame function. var box4:Sprite = new Sprite( ); box4.graphics.lineStyle(1, 0x000000); box4.graphics.drawRect(0, 0, 100, 100); addChild(box4); box4.x = 500; box4.y = 50; var counter:Number = 0; stage.addEventListener(Event.ENTER_FRAME, onFrame, false, 0, true); function onFrame(evt:Event):void { if (counter > .98) { counter = 0; }else{ counter += 0.01; box4.transform.matrix = new Matrix(1, 0, counter, 1, 0, 0); } } That's all. Now you understand shearing using Matrix object. So do I.

HowTo create Flash video captions using Subtitle Workshop
My choice for creating Flash video captions is simple work-flow which uses Subtitle Workshop, free subtitle editor. I'm using software version 2.51 which has support for 56 different formats, but doesn't have support for TT format (Timed Text), W3C standard used for Flash video files. More about Timed Text specifications. However, you can very easily find this format support and implement it into Subtitle Workshop. Learn about integration. Bottom line is you only need single .cfp (custom format) file.
Download custom format file. (by LongTailVideo) What you do after downloading this 1 Kb file is unzipp it and move to ...\URUSoft\Subtitle Workshop\CustomFormats folder. Open your Subtitle Workshop software, go to File - New Subtitle and create few dummy lines. When you need to save, choose Save as - custom formats and select (or load) your new TT format.
That's all there is about it, you are ready to make captions with you home made videos. Multilingual support is available.
AS3.0 preloader part II : adding transparency
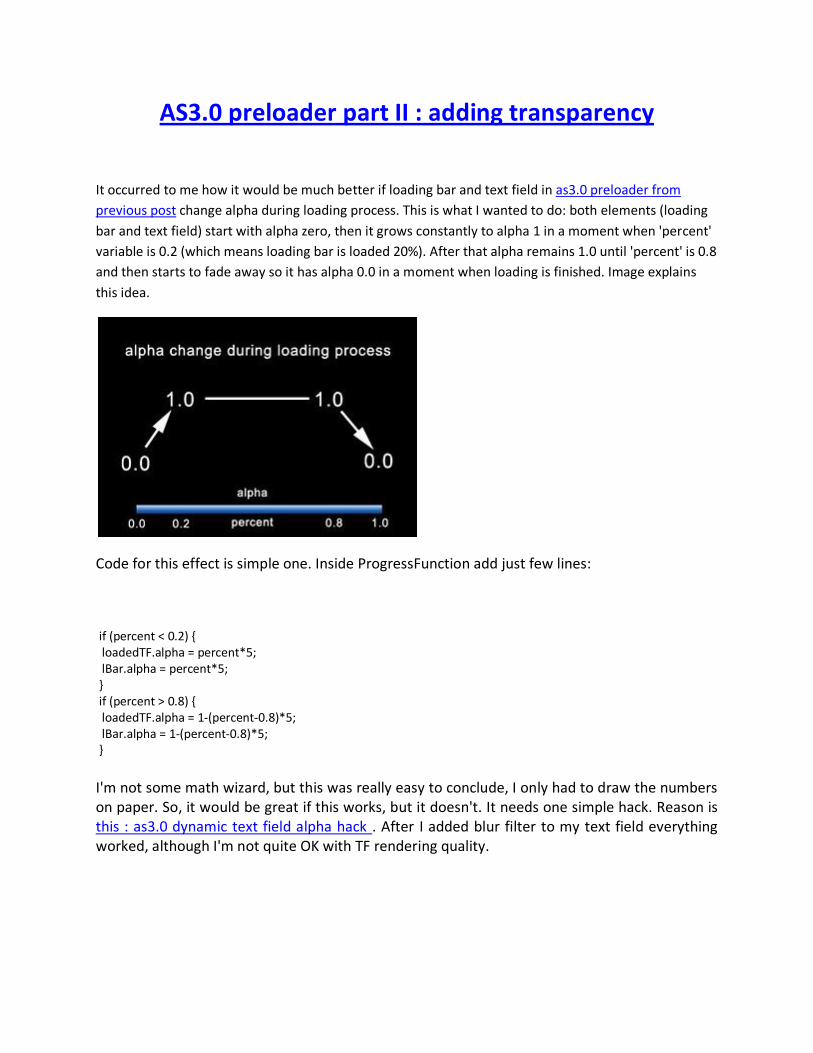
It occurred to me how it would be much better if loading bar and text field in as3.0 preloader from previous post change alpha during loading process. This is what I wanted to do: both elements (loading bar and text field) start with alpha zero, then it grows constantly to alpha 1 in a moment when 'percent' variable is 0.2 (which means loading bar is loaded 20%). After that alpha remains 1.0 until 'percent' is 0.8 and then starts to fade away so it has alpha 0.0 in a moment when loading is finished. Image explains this idea.
Code for this effect is simple one. Inside ProgressFunction add just few lines: if (percent < 0.2) { loadedTF.alpha = percent*5; lBar.alpha = percent*5; } if (percent > 0.8) { loadedTF.alpha = 1-(percent-0.8)*5; lBar.alpha = 1-(percent-0.8)*5; } I'm not some math wizard, but this was really easy to conclude, I only had to draw the numbers on paper. So, it would be great if this works, but it doesn't. It needs one simple hack. Reason is this : as3.0 dynamic text field alpha hack . After I added blur filter to my text field everything worked, although I'm not quite OK with TF rendering quality.

AS3.0 Flash Preloader With Moving TextField
This simple ActionScript3.0 preloader has two graphic elements, gradient filled loading bar and text field 'loadedTF'. Code contains two functions, progressFunction and completeFunction. Variable named 'percent' inside progressFunction can have values between 0.0 and 1.0. Since loading bar graphic width = 300 we use single line code:
loadedTF.x = percent * 300; to move our text field along with loading bar, which we animate using scaleX property.
Dummy page.swf which this preloader uses is small only 22kb, so in order to see preloader working you will have to use view - simulate download when you test preloader movie.
If you have any questions, leave comment.
download source files

Level Timer code explained
It seems like my code in How To Create Flash Game Level Timer post is not as straightforward as I thought, because it was rejected as Tutorial on one of the directories, so I decided to give detailed explanation of it. var count:Number = 0; // this is a counter variable var maxCount:Number = 75; // maxCounter is duration of level in seconds var intervalID:Number; // Identification variable for repeating interval function var timerStarted = false; // variable which tells us if timer has started or not var temp:Number; // variable for shortening code writing // next, we format and display seconds left if(maxCount < 60) { // if we have less then 60 seconds, timeleft.text = "0 : "+maxCount; // we display '0 minutes' in our Text Field 'timeleft' and concatenate maxCount seconds } else { // but if we have more than 60 seconds left if((maxCount%60)<10) { // and if we have to display seconds as one cipher number timeleft.text = Math.floor((maxCount/60))+" : 0"+(maxCount%60); // we display zero } else { // otherways,

timeleft.text = Math.floor((maxCount/60))+" : "+(maxCount%60); // if we have two cipher number for seconds, we don't display zero } } startlevel.onRelease = function() { // when click is released on startlevel button if(!(timerStarted)) { // if timerStarted variable is false (we don't want to duplicate interval) intervalID = setInterval(_root, "hronos", 1000); // we set interval function 'hronos' to repeat once every second to act as counter timerStarted = true; // we declare that timer has started this._alpha = 0; // and we make invisible startLevel button. // We chould also remove it from stage! } } function hronos():Void { // function hronos repeats every second if(count < maxCount) { // if counter is still less than maxCounter count++; // we increase counter by 1 temp = maxCount - count; // temp variable holds seconds left until level end // next piece of code is for formating and displaying purposes, // same as above except instead maxCount we have temp variable. if(temp < 60) { if(temp < 10) {

timeleft.text = "0 : 0"+temp; } else { timeleft.text = "0 : "+temp; } } else { if((temp%60)<10) { timeleft.text = Math.floor((temp/60))+" : 0"+(temp%60); } else { timeleft.text = Math.floor((temp/60))+" : "+(temp%60); } } } else { // if counter is greater than maxCounter clearInterval(intervalID); // we clear our interval timerStarted = false; // we declare that timer is out of business count = 0; // we set counter to 0 so we can use it again startlevel._alpha = 100; // and we make startLevel button visible again } } I hope this explanation is clear enough. If you have any questions, don't hesitate to ask.

How To Create Flash Game Level Timer
In this post I'll explain how to create Flash game level timer mechanism. Code I'm using here is very simple, it's not something you should use in your final product. Code is ActionScript2.0. Sample FLA is Flash 8 file and it demonstrates how timer works.
Graphic elements are simple. We have startBtn movie clip in Library with 'startlevel' instance on Stage. Another graphic element is dynamic single-line text field with instance name 'timeleft'. When you start sample file situation our text field shows time left in minutes and seconds. Start level button is visible and waiting for click. When that happens button get zero alpha (should be moved from Stage) and countdown timer start to work.

Some formating is done, so numbers are displayed like they should, instead of 1:1 we have 1:01 etc. Timer resets when reach 0:00 and start level button is visible again, waiting for action. In real time situation, you can have different level durations for different levels. That means you should replace maxCount variable with Array of different intervals each represents duration of levels in seconds. Here is the code: var count:Number = 0; var maxCount:Number = 75; var intervalID:Number; var timerStarted = false; var temp:Number; if(maxCount < 60) { timeleft.text = "0 : "+maxCount; } else { if((maxCount%60)<10) { timeleft.text = Math.floor((maxCount/60))+" : 0"+(maxCount%60); } else { timeleft.text = Math.floor((maxCount/60))+" : "+(maxCount%60); } } startlevel.onRelease = function() { if(!(timerStarted)) { intervalID = setInterval(_root, "hronos", 1000); timerStarted = true; this._alpha = 0; }

} function hronos():Void { if(count < maxCount) { count++; temp = maxCount - count; if(temp < 60) { if(temp < 10) { timeleft.text = "0 : 0"+temp; } else { timeleft.text = "0 : "+temp; } } else { if((temp%60)<10) { timeleft.text = Math.floor((temp/60))+" : 0"+(temp%60); } else { timeleft.text = Math.floor((temp/60))+" : "+(temp%60); } } } else { clearInterval(intervalID); timerStarted = false; count = 0; startlevel._alpha = 100; } }
Curves and Fills with AS3 Drawing API
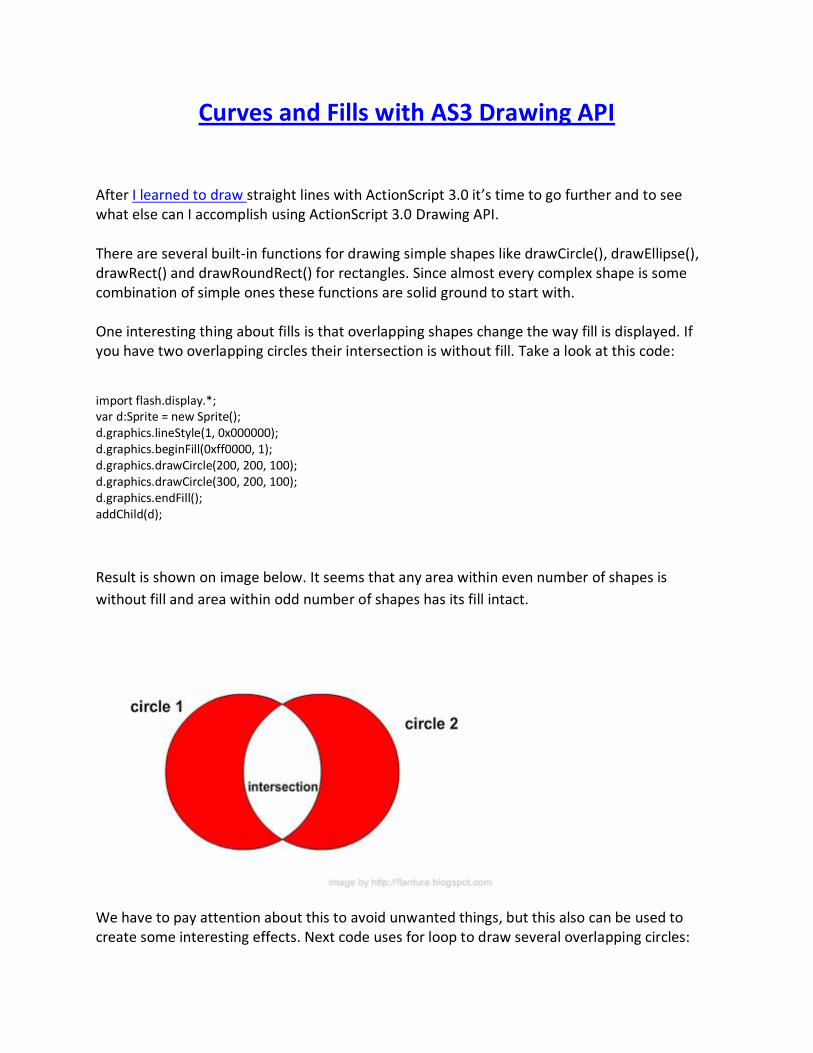
After I learned to draw straight lines with ActionScript 3.0 it’s time to go further and to see what else can I accomplish using ActionScript 3.0 Drawing API. There are several built-in functions for drawing simple shapes like drawCircle(), drawEllipse(), drawRect() and drawRoundRect() for rectangles. Since almost every complex shape is some combination of simple ones these functions are solid ground to start with. One interesting thing about fills is that overlapping shapes change the way fill is displayed. If you have two overlapping circles their intersection is without fill. Take a look at this code:
import flash.display.*; var d:Sprite = new Sprite(); d.graphics.lineStyle(1, 0x000000); d.graphics.beginFill(0xff0000, 1); d.graphics.drawCircle(200, 200, 100); d.graphics.drawCircle(300, 200, 100); d.graphics.endFill(); addChild(d); Result is shown on image below. It seems that any area within even number of shapes is without fill and area within odd number of shapes has its fill intact.
We have to pay attention about this to avoid unwanted things, but this also can be used to create some interesting effects. Next code uses for loop to draw several overlapping circles:
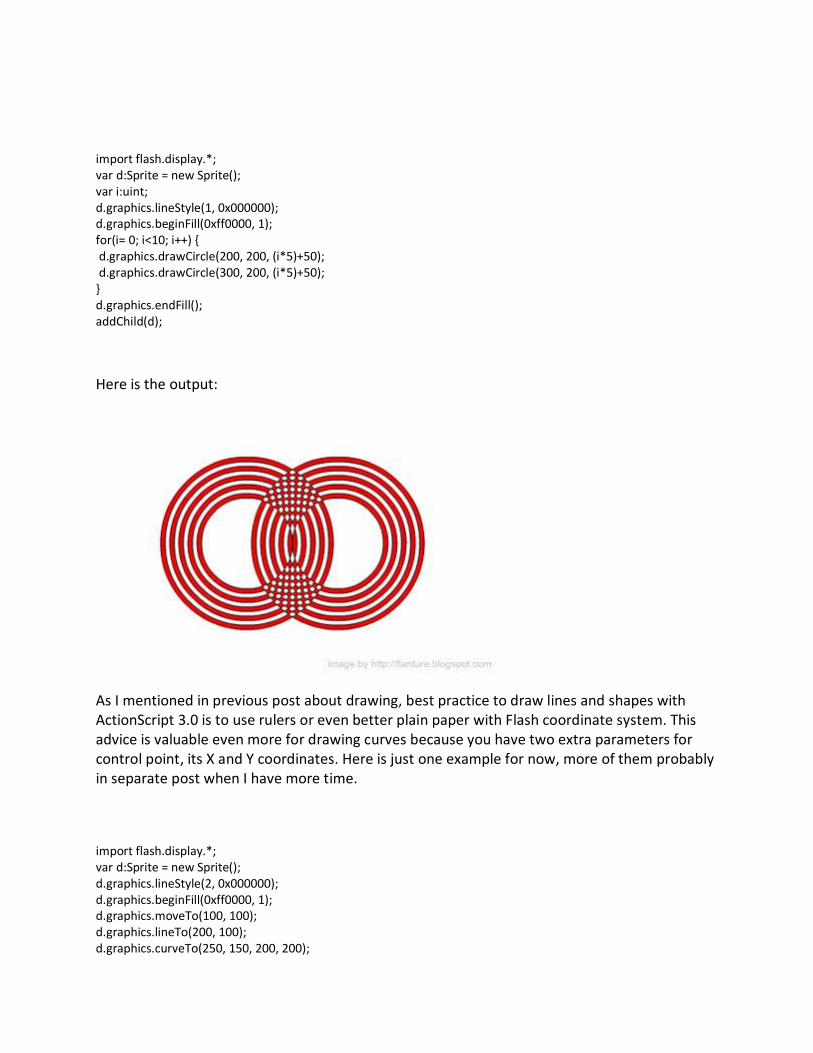
import flash.display.*; var d:Sprite = new Sprite(); var i:uint; d.graphics.lineStyle(1, 0x000000); d.graphics.beginFill(0xff0000, 1); for(i= 0; i<10; i++) { d.graphics.drawCircle(200, 200, (i*5)+50); d.graphics.drawCircle(300, 200, (i*5)+50); } d.graphics.endFill(); addChild(d); Here is the output:
As I mentioned in previous post about drawing, best practice to draw lines and shapes with ActionScript 3.0 is to use rulers or even better plain paper with Flash coordinate system. This advice is valuable even more for drawing curves because you have two extra parameters for control point, its X and Y coordinates. Here is just one example for now, more of them probably in separate post when I have more time. import flash.display.*; var d:Sprite = new Sprite(); d.graphics.lineStyle(2, 0x000000); d.graphics.beginFill(0xff0000, 1); d.graphics.moveTo(100, 100); d.graphics.lineTo(200, 100); d.graphics.curveTo(250, 150, 200, 200);

d.graphics.lineTo(100, 200); d.graphics.curveTo(-50, 150, 100, 100); d.graphics.moveTo(200, 100); d.graphics.curveTo(150, 150, 200, 200); d.graphics.endFill(); addChild(d);
Flash AS3 Star System Simulation Tutorial
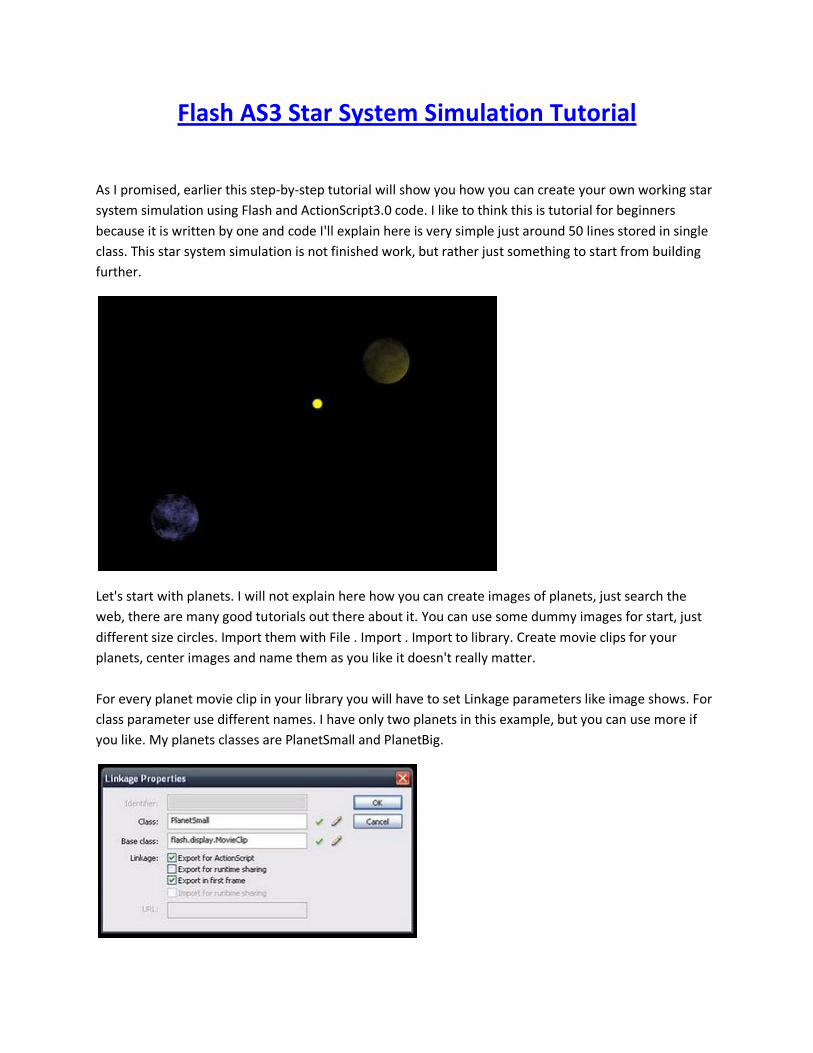
As I promised, earlier this step-by-step tutorial will show you how you can create your own working star system simulation using Flash and ActionScript3.0 code. I like to think this is tutorial for beginners because it is written by one and code I'll explain here is very simple just around 50 lines stored in single class. This star system simulation is not finished work, but rather just something to start from building further.
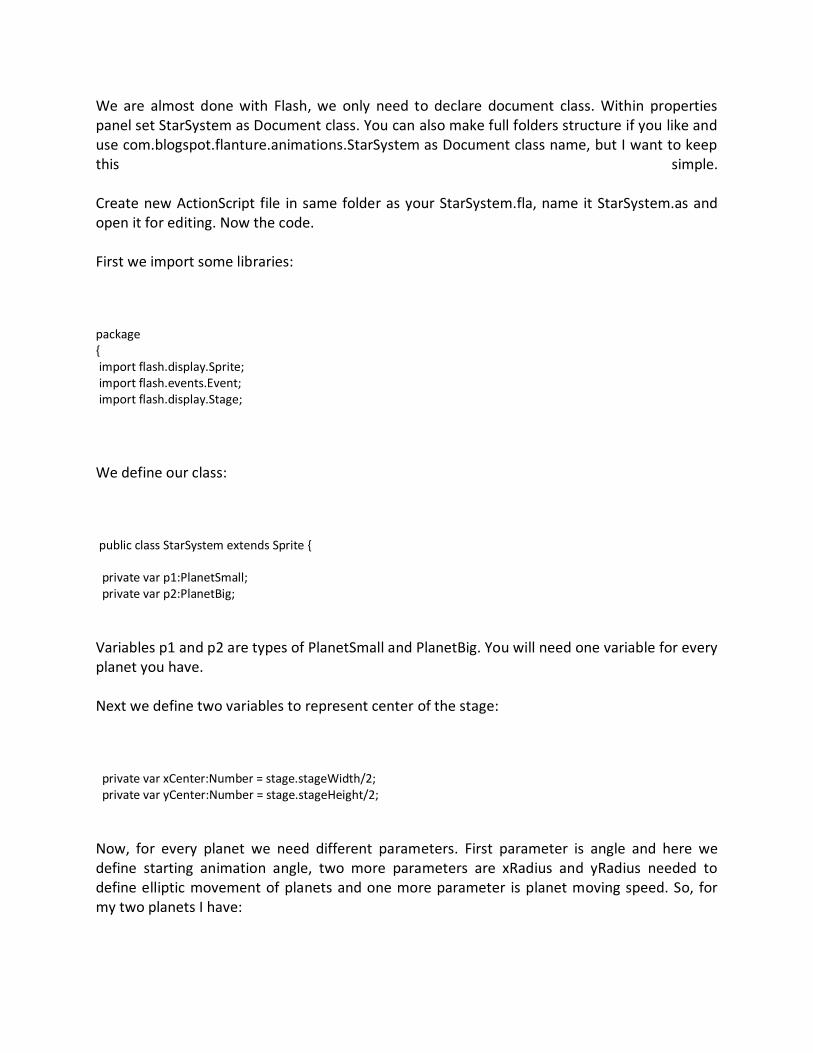
Let's start with planets. I will not explain here how you can create images of planets, just search the web, there are many good tutorials out there about it. You can use some dummy images for start, just different size circles. Import them with File . Import . Import to library. Create movie clips for your planets, center images and name them as you like it doesn't really matter. For every planet movie clip in your library you will have to set Linkage parameters like image shows. For class parameter use different names. I have only two planets in this example, but you can use more if you like. My planets classes are PlanetSmall and PlanetBig.
We are almost done with Flash, we only need to declare document class. Within properties panel set StarSystem as Document class. You can also make full folders structure if you like and use com.blogspot.flanture.animations.StarSystem as Document class name, but I want to keep this simple. Create new ActionScript file in same folder as your StarSystem.fla, name it StarSystem.as and open it for editing. Now the code. First we import some libraries: package { import flash.display.Sprite; import flash.events.Event; import flash.display.Stage;
We define our class: public class StarSystem extends Sprite { private var p1:PlanetSmall; private var p2:PlanetBig;
Variables p1 and p2 are types of PlanetSmall and PlanetBig. You will need one variable for every planet you have. Next we define two variables to represent center of the stage: private var xCenter:Number = stage.stageWidth/2; private var yCenter:Number = stage.stageHeight/2;
Now, for every planet we need different parameters. First parameter is angle and here we define starting animation angle, two more parameters are xRadius and yRadius needed to define elliptic movement of planets and one more parameter is planet moving speed. So, for my two planets I have:

private var angle:Number = 20; private var xRadius:Number = 250; private var yRadius:Number = 150; private var speed:Number = .008; private var _angle:Number = -45; private var _xRadius:Number = 100; private var _yRadius:Number = 65; private var _speed:Number = .01; All these variables are something you need to test for yourself to find right numbers. Then we define main method, public function StarSystem() { init(); } note how main method must be declared as public not private. Init function goes like this: private function init():void { p1 = new PlanetSmall(); addChild(p1); p2 = new PlanetBig(); addChild(p2); addEventListener(Event.ENTER_FRAME, onEnterFrame); }
Here we simple set p1 as new PlanetSmall instance, and p2 as PlanetBig instance. Then we add those instances to the stage using standard addChild method. Finally we have event listener which file will fire on every enter frame event and this is where we define planets movement: public function onEnterFrame(event:Event):void { p1.x = xCenter + Math.sin(angle) * xRadius; p1.y = yCenter + Math.cos(angle) * yRadius; p1.scaleX = p1.scaleY = p1.y/400; p1.alpha = p1.scaleX*2;

angle += speed; p2.x = xCenter + Math.sin(_angle) * _xRadius; p2.y = yCenter + Math.cos(_angle) * _yRadius; p2.scaleX = p2.scaleY = p2.y/300; p2.alpha = p2.scaleX*1.2; _angle += _speed; } } } Last part of the code defines elliptic movement of the planets and it consists of two parts. If you have more planets you will need one block of code for every planet. Position x of the planet is calculated using sin function and y position is calculated using cos function. We use scale functions to make our planets smaller when they are away from viewing point (means they have smaller y value) and bigger when they are closer (bigger y value). Remember, Flash has different coordinate system, x axis has higher values from left to right and y axis has higher values from top to down. We also set alpha as function of scale which is nice trick to use. Feel free to play with these numbers and see what suits your needs. Last line of the code changes angle of the planets as function of defined speed and this happens every new frame. Test your star system. I hope you will make better looking rotating planets , some supernovas, stars and galaxies on background, animated Sun, maybe some starship or even planets with moons orbiting around them! When you do that, send me the link, I would like to see your creation.

AS3 Loading Animation Tutorial
I've seen many loading animations people selling via Envato Flash Marketplace and other flash stock websites at prices like $1, $2 or more. Some of them are really great and some of them are just regular. Truth is, you can make simple loading animation in minutes and enhance it as you like and I'm going to show you how in this step-by-step tutorial. step 1: Create new Flash document. Choose File _ New... and than Flash File (ActionScript 3.0). Take a look at how finished loading animation will look like. It will display 6 rectangles and we will simulate 'color movement'.
step 2: We need only one movie clip, so go to Insert _ New Symbol (or use keyboard shortcut CTRL+F8, choose Movie Clip and name it 'rectangle'. While in edit mode choose Rectangle tool, set black color for stroke and yellow for fill #ffff00. Draw any rectangle on stage, select it and type these setting width:20 height:50 X:0 and Y:0 in Property panel. Now, on movie clip's timeline, right-click on first frame, copy it and paste it on second frame. Do the same for frames 3, 4, 5 and 6. Get back to frame 2, deselect shape and select only fill. Choose slightly brighter yellow color #ffff33. Continue same thing, for frame 3 fill set #ffff66, for frame 4 #ffff99 for frame 5 #ffffcc and finally for frame 6 use white #ffffff.
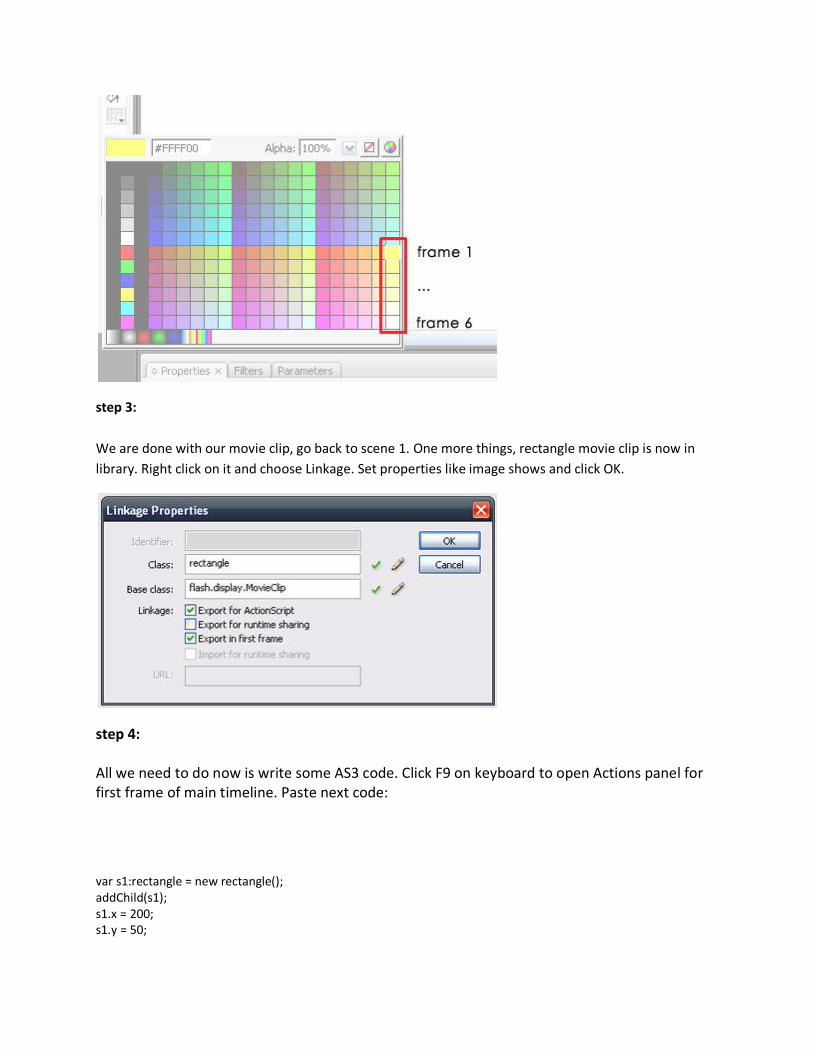
step 3: We are done with our movie clip, go back to scene 1. One more things, rectangle movie clip is now in library. Right click on it and choose Linkage. Set properties like image shows and click OK.
step 4: All we need to do now is write some AS3 code. Click F9 on keyboard to open Actions panel for first frame of main timeline. Paste next code: var s1:rectangle = new rectangle(); addChild(s1); s1.x = 200; s1.y = 50;

var s2:rectangle = new rectangle(); addChild(s2); s2.x = 170; s2.y = 50; var s3:rectangle = new rectangle(); addChild(s3); s3.x = 140; s3.y = 50; var s4:rectangle = new rectangle(); addChild(s4); s4.x = 110; s4.y = 50; var s5:rectangle = new rectangle(); addChild(s5); s5.x = 80; s5.y = 50; var s6:rectangle = new rectangle(); addChild(s6); s6.x = 50; s6.y = 50; s1.addEventListener(Event.ENTER_FRAME, onFrame1); function onFrame1(evt:Event) { s2.gotoAndPlay((s1.currentFrame+1)%6); s3.gotoAndPlay((s1.currentFrame+2)%6); s4.gotoAndPlay((s1.currentFrame+3)%6); s5.gotoAndPlay((s1.currentFrame+4)%6); s6.gotoAndPlay((s1.currentFrame+5)%6); }
Code is simple. Variables s1 .. s6 are our rectangles. We add them to Stage with addChild and we set positions using x and y movie clip properties, since rectangle class extends Movie Clip class, remember Linkage step? Finally we attach onFrame1 function to s1 instance on enter frame event. Formula (s1.currentFrame+i)%6 will give us values for i=1, 2, ..., 5 which means all rectangles will have different colors during current frame - and that's how we simulate color movement needed for loading animation. Feel free to improve appearance and play with the code. Final swf is only 805 bytes. That's all. Easy, right?

AS3 Drawing API examples
OK, so with ActionScript 3.0 drawing API you can draw almost anything. You can use straight or curved lines, solid colors or gradients and more. I have been searching for some interesting drawing examples but almost everyone will show you single example and that's it. In order to feel comfortable with this library I needed some practice, so here they are - some basic shapes with AS3 drawing library.
shape 1 ActionScript class:
package { import flash.display.MovieClip; import flash.display.Graphics; public class shape1 extends MovieClip { public function shape1() { this.graphics.lineStyle(1, 0x000000); this.graphics.beginFill(0xe6e6e6); this.graphics.moveTo(100,160); this.graphics.lineTo(100,100); this.graphics.lineTo(120,100); this.graphics.lineTo(120,120); this.graphics.lineTo(140,120); this.graphics.lineTo(140,100);

this.graphics.lineTo(160,100); this.graphics.lineTo(160,160); this.graphics.lineTo(140,160); this.graphics.lineTo(140,140); this.graphics.lineTo(120,140); this.graphics.lineTo(120,160); this.graphics.endFill(); } } } shape 2 ActionScript class: package { import flash.display.MovieClip; import flash.display.Graphics; public class shape2 extends MovieClip { public function shape2() { this.graphics.lineStyle(1, 0x000000); this.graphics.beginFill(0xe6e6e6); this.graphics.moveTo(130,100); this.graphics.lineTo(140,120); this.graphics.lineTo(160,120); this.graphics.lineTo(150,140); this.graphics.lineTo(110,140); this.graphics.lineTo(100,120); this.graphics.lineTo(120,120); this.graphics.endFill(); } } } shape 3 ActionScript class: package { import flash.display.MovieClip; import flash.display.Graphics; public class shape3 extends MovieClip {

public function shape3() { this.graphics.lineStyle(1, 0x000000); this.graphics.beginFill(0xe6e6e6); this.graphics.moveTo(120,100); this.graphics.lineTo(150,100); this.graphics.lineTo(170,140); this.graphics.lineTo(100,140); this.graphics.endFill(); } } } shape 4 ActionScript class: package { import flash.display.MovieClip; import flash.display.Graphics; public class shape4 extends MovieClip { public function shape4() { this.graphics.lineStyle(1, 0x000000); this.graphics.beginFill(0xe6e6e6); this.graphics.moveTo(100,110); this.graphics.lineTo(110,100); this.graphics.lineTo(120,110); this.graphics.lineTo(130,100); this.graphics.lineTo(140,110); this.graphics.lineTo(150,100); this.graphics.lineTo(160,110); this.graphics.lineTo(160,150); this.graphics.lineTo(100,150); this.graphics.endFill(); } } } shape 5 ActionScript class: package { import flash.display.MovieClip;
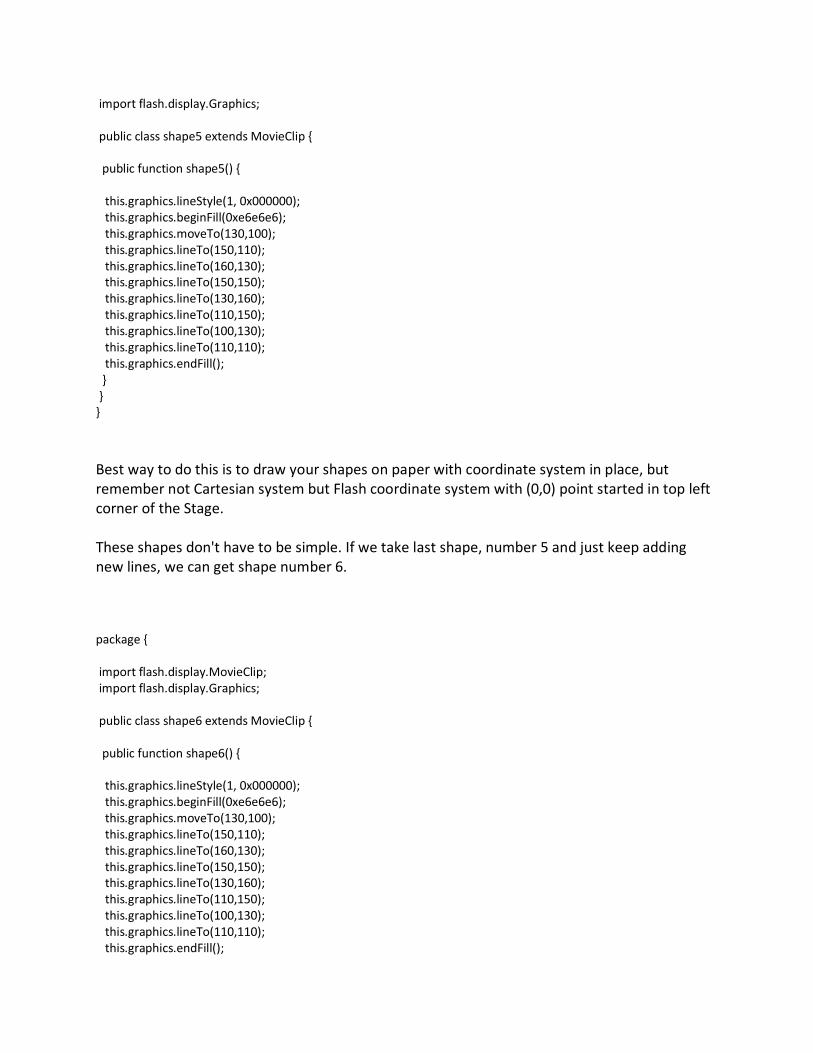
import flash.display.Graphics; public class shape5 extends MovieClip { public function shape5() { this.graphics.lineStyle(1, 0x000000); this.graphics.beginFill(0xe6e6e6); this.graphics.moveTo(130,100); this.graphics.lineTo(150,110); this.graphics.lineTo(160,130); this.graphics.lineTo(150,150); this.graphics.lineTo(130,160); this.graphics.lineTo(110,150); this.graphics.lineTo(100,130); this.graphics.lineTo(110,110); this.graphics.endFill(); } } } Best way to do this is to draw your shapes on paper with coordinate system in place, but remember not Cartesian system but Flash coordinate system with (0,0) point started in top left corner of the Stage. These shapes don't have to be simple. If we take last shape, number 5 and just keep adding new lines, we can get shape number 6. package { import flash.display.MovieClip; import flash.display.Graphics; public class shape6 extends MovieClip { public function shape6() { this.graphics.lineStyle(1, 0x000000); this.graphics.beginFill(0xe6e6e6); this.graphics.moveTo(130,100); this.graphics.lineTo(150,110); this.graphics.lineTo(160,130); this.graphics.lineTo(150,150); this.graphics.lineTo(130,160); this.graphics.lineTo(110,150); this.graphics.lineTo(100,130); this.graphics.lineTo(110,110); this.graphics.endFill();

this.graphics.beginFill(0xeffffff); this.graphics.moveTo(120,120); this.graphics.lineTo(140,120); this.graphics.lineTo(140,140); this.graphics.lineTo(120,140); this.graphics.endFill(); } } } This kind of drawing we used to call 'turtle graphics'. Next time some examples including curves and gradients.
ActionScript Random Number Generator With Blur Effect
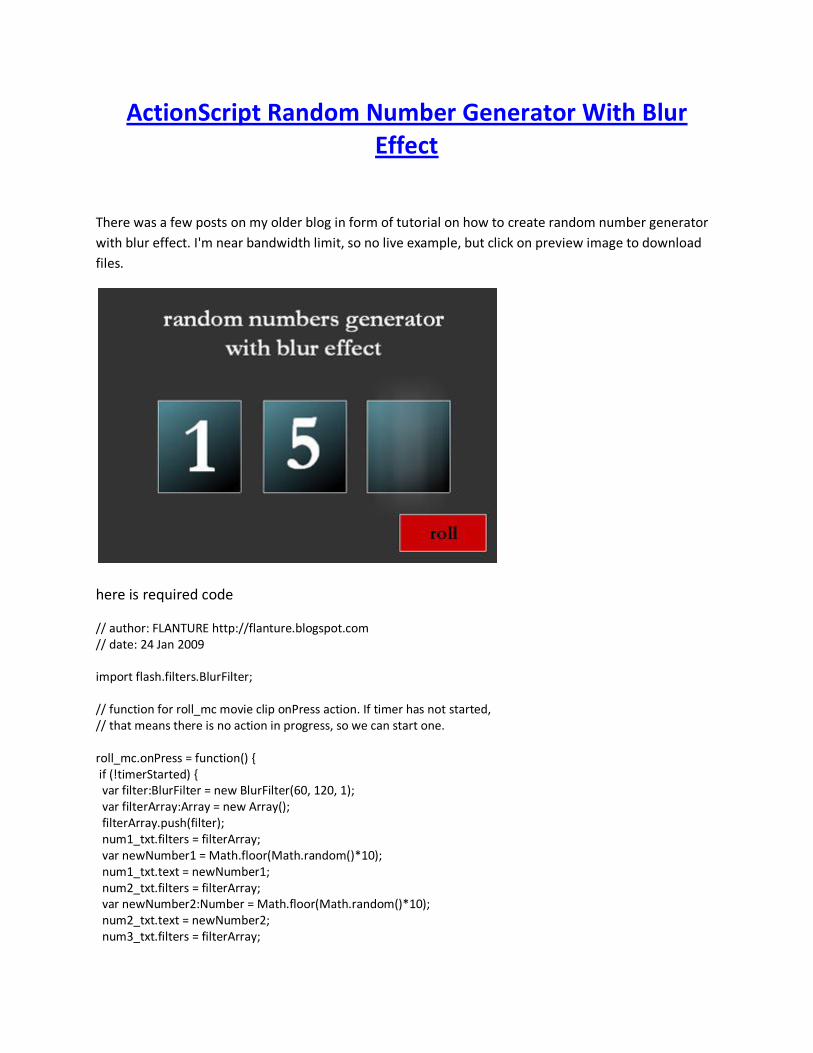
There was a few posts on my older blog in form of tutorial on how to create random number generator with blur effect. I'm near bandwidth limit, so no live example, but click on preview image to download files.
here is required code
// author: FLANTURE http://flanture.blogspot.com // date: 24 Jan 2009 import flash.filters.BlurFilter; // function for roll_mc movie clip onPress action. If timer has not started, // that means there is no action in progress, so we can start one. roll_mc.onPress = function() { if (!timerStarted) { var filter:BlurFilter = new BlurFilter(60, 120, 1); var filterArray:Array = new Array(); filterArray.push(filter); num1_txt.filters = filterArray; var newNumber1 = Math.floor(Math.random()*10); num1_txt.text = newNumber1; num2_txt.filters = filterArray; var newNumber2:Number = Math.floor(Math.random()*10); num2_txt.text = newNumber2; num3_txt.filters = filterArray;

var newNumber3:Number = Math.floor(Math.random()*10); num3_txt.text = newNumber3; timerStarted = true; } } // functions for restoring blur effect function restoreBlur1() { num1_txt.filters = new Array(filter); } function restoreBlur2() { num2_txt.filters = new Array(filter); } function restoreBlur3() { var filter:BlurFilter = this.filters[0]; filter.blurY = 0; filter.blurX = 0; num3_txt.filters = new Array(filter); } // next function controls when blur should stop and numbers should display. onEnterFrame = function () { if (timerStarted) { if (counter < thirdDigitStop) { counter += 1; if (counter == firstDigitStop) { restoreBlur3(); } if (counter == secondDigitStop) { restoreBlur2(); } } else { timerStarted = false; counter = 0; restoreBlur1(); } } } // you can change firstDigitStop and other variables to suit your needs. onLoad = function () { timerStarted = false; counter = 0; firstDigitStop = 8; secondDigitStop = 16; thirdDigitStop = 24; }
This example can be used as slot machine simulation or anything similar you can think of.

Manipulating Shapes Using Bone Tool in Flash CS4
Bone Tool in Flash CS4 can be used in various ways to create IK effects with animations, but also you can use this powerful tool to manipulate shapes. Here is quick tutorial on how to do it. Create new Flash AS3 file. Go to Insert - new symbol or CTRL+F8 to create new movie clip. Give it some name or leave default, it doesn't matter. Select Polystar Tool and draw single pentagon shape on Stage. Now, select Bone Tool from tool box or press X on keyboard. You will create 5 bones all starting from the center of pentagonal shape all the way to shape vertices like image shows.
Now, you have noticed new Armature layer and that's what will work on next. We have to introduce some new armature positions, so right click on frame 10 and select insert pose. Use selection tool (V) to move bones around. Continue to do same thing on frames 20, 30, etc. Finally when you think you have enough changes, move for another 10 frames and insert another pose. Now, you can actually copy and past different poses with right click on specific armature frame, but you will need a lot of patience to make this operation work. Paste first pose onto last armature frame. When you are done, go back to do Scene 1 and from library drag and drop movie clip instance on the Stage. That's it, test your movie.
This is just one simple example on how to use bone tool to manipulate shapes in Flash CS4, but that's enough for you see how incredible effects can be achieved with just playing around with new Flash tools.

Create Flash Banner Using FuseKit Simple Tutorial
Animating multiple objects in AS2.0 projects can be real pain. To make things ease, many open source libraries exists out there. One of them (and probably most popular one) is The Fuse Kit. In order to finish this Flash banner tutorial, you need to download FuseKit code and add new classpath if you use Flash Authoring Tool. From main menu choose Edit _ Preferences _ ActionScript _ ActionScript2.0 setting. Than click + sign and enter path to FuseKit code. When done, you are ready to make your banner. step 1 Create new document with dimensions 468 px width and 60 px height, which is full banner dimensions. I have background color set to #333333 and 18 fps. step 2 You will create 3 new movie clips: problem_mc, solution_mc and company_mc. Graphic isn't that important, you can draw what ever you want, but just as reference here are dimensions for my graphics (shown below): problem_mc (75px width and 25px height), solution_mc (200px width and 18px height) and company_mc (383px width and 26px height). Place instances of movie clips like on image below and name them: 'problem1' lower left, 'problem2' lower middle, 'problem3' lower right, 'problem4' upper left and upper right instance should be named 'problem5'. Another two instances are 'solution' and 'company'.
step 3 Open Actions panel for Frame 1 and enter single line of code: #include "banner_code.as" Save your document. step 4
When done, create new ActionScript file 'banner_code.as' and enter next code: import com.mosesSupposes.fuse.*; ZigoEngine.simpleSetup( Shortcuts, PennerEasing, Fuse ); var f:Fuse = Fuse.open(); f.label = "animation"; Fuse.openGroup(); problem1.tween("_y, _rotation", [45, "-360"], 0.5, "easeInExpo"); problem2.tween("_y, _rotation", [45, "-360"], 0.75, "easeInExpo"); problem3.tween("_y, _rotation", [45, "-360"], 1, "easeInExpo"); problem4.tween("_y, _rotation", [17, "360"], 1.5, "easeInExpo"); problem5.tween("_y, _rotation", [17, "360"], 2, "easeInExpo"); Fuse.closeGroup(); Fuse.addCommand("delay", 2); Fuse.openGroup(); solution.tween("_x", 345, 1.5, "easeOutBack"); solution.tween("_y", 25, 1.5, "easeOutBack"); Fuse.closeGroup(); Fuse.addCommand("delay", 2); Fuse.openGroup(); company.tween("_x", 234, 0.75, "easeOutQuint"); company.tween("_y", 25, 0.75, "easeOutQuint"); problem1.tween("_y", 100, 0.5, "easeInExpo"); problem2.tween("_y", 100, 0.5, "easeInExpo"); problem3.tween("_y", 100, 0.5, "easeInExpo"); problem4.tween("_y", 100, 0.5, "easeInExpo"); problem5.tween("_y", 100, 0.5, "easeInExpo"); solution.tween("_x", 700, 0.5, "easeInExpo"); Fuse.closeGroup(); Fuse.close(); f.start(); Test your movie. Here is what code does. First two lines we set FuseKit to be available. Fuse open and close lines are start and end code for fuse sequence. Labeling the fuse isn't necessary here. We have 3 groups of tweens and small delays between them. First group is for problem_mc instances. We change their y position and rotation in different time intervals and in that way instances are 'falling' one after another. Second group changes solution_mc position and finally third group moves all instances so in the end we have only company_mc on Stage. This is very simple tutorial on how to create flash banner using FuseKit in only 4 easy steps. To further improve this technique, take a look at FuseKit documentation to see what is available.
DOWNLOAD banner example

Using ActionScript Point class distance method for constant speed moving in roadMap function
This have to be longest post title ever, at least it is in my blogging history, but it precisely explains post subject and I was so tempted to use it, I couldn't resist. Ok, first of all if you are not familiar with roadMap function, don't worry, it's a custom function which enables movie clip movement along given points on Stage. Read about it in this post and download example. Code works just fine, but there is one thing missing. Object speed between different points is inside arrs Array and has to be added manually, thus it is very hard to achieve same speed along entire path without a lot of calculations. To address this issue some basic math knowledge is required. If we accept that speed = distance / time, to achieve constant speed we have to know distances between different points. Lets say path consist of two parts, first one is 10 pixels and second is 100 pixels. We want our object to move with speed 10 pixels per frame on entire path. In that case v1, speed on part one should be 10 pixels / frame same as v2, speed on second part. All we have to do is to push value of (distance / 10) to arrs Array and constant speed is there, because actually we are pushing values for object speed. Changes we have to make are inside onMouseUp function where instead arrs.push(someValue); we have next code:
if(arrx.length > 1) { var point_1:Point = new Point(arrx[arrx.length-1], arry[arry.length-1]); var point_2:Point = new Point(arrx[arrx.length-2], arry[arry.length-2]); var distanceBetween:Number = Point.distance(point_1, point_2); arrs.push(distanceBetween/10); }else{ var point_1:Point = new Point(arrx[arrx.length-1], arry[arry.length-1]); var point_2:Point = new Point(obj_mc._x, obj_mc._y); var distanceBetween:Number = Point.distance(point_1, point_2); arrs.push(distanceBetween/10); }

Don't forget to add import flash.geom.Point; at the beginning of code. There is nothing to explain here, we just use Point class distance method to calculate speeds and push those values into arrs Array. That's how we achieve constant speed moving in roadMap function, just as title says.

Maui Flash Zoom Tool
Previously made Flash Zoom Tool have several restrictions and one obvious is not-continuously zooming since you have only few scaling steps. Let's update that feature. This time I'm using Maui island map by Mike Johnston. It will be even better and it is recommended to use vector maps instead of bitmaps, but this time that's not important. Moving around the map is the same. Only new things are dragging functions and scaling. Here is entire code: var rpoint = line._y - (line._height / 2); // reference point onLoad = function() { stool._x = line._x; stool._y = line._y; } onEnterFrame = function() { if (Key.isDown(Key.RIGHT)) { map_mc._x -= 5; } else if (Key.isDown(Key.LEFT)) { map_mc._x += 5; } else if (Key.isDown(Key.UP)) { map_mc._y += 5; } else if (Key.isDown(Key.DOWN)) { map_mc._y -= 5; } } stool.onEnterFrame = function () { // restrictions for stool mc movement if (this._y < rpoint) { this._y = rpoint; } if (this._y > (rpoint+line._height)) { this._y = (rpoint+line._height); } this._x = line._x; // scale amount

var ypos = Math.abs(stool._y-rpoint); map_mc._xscale = map_mc._yscale = ypos*2 + 50; } stool.onPress = function () { this.startDrag(); } stool.onRelease = function () { this.stopDrag(); } stool.onDragOut = function () { this.stopDrag(); }
ypos value range is between 0 and 50 and accordingly scaling is between 50 and 150. I'm using formula ypos*2+50 but you can use whatever numbers suits you. If you let's say use ypos*4+20 you will have scaling in range from 20 to 220 because : ypos = 0 : ypos*4+20 = 0*4+20 = 20 ypos = 50 : ypos*4+20 = 50*4+20 = 220 etc.
download Maui Flash Zoom Tool
Flash Pixel Explosion Tutorial
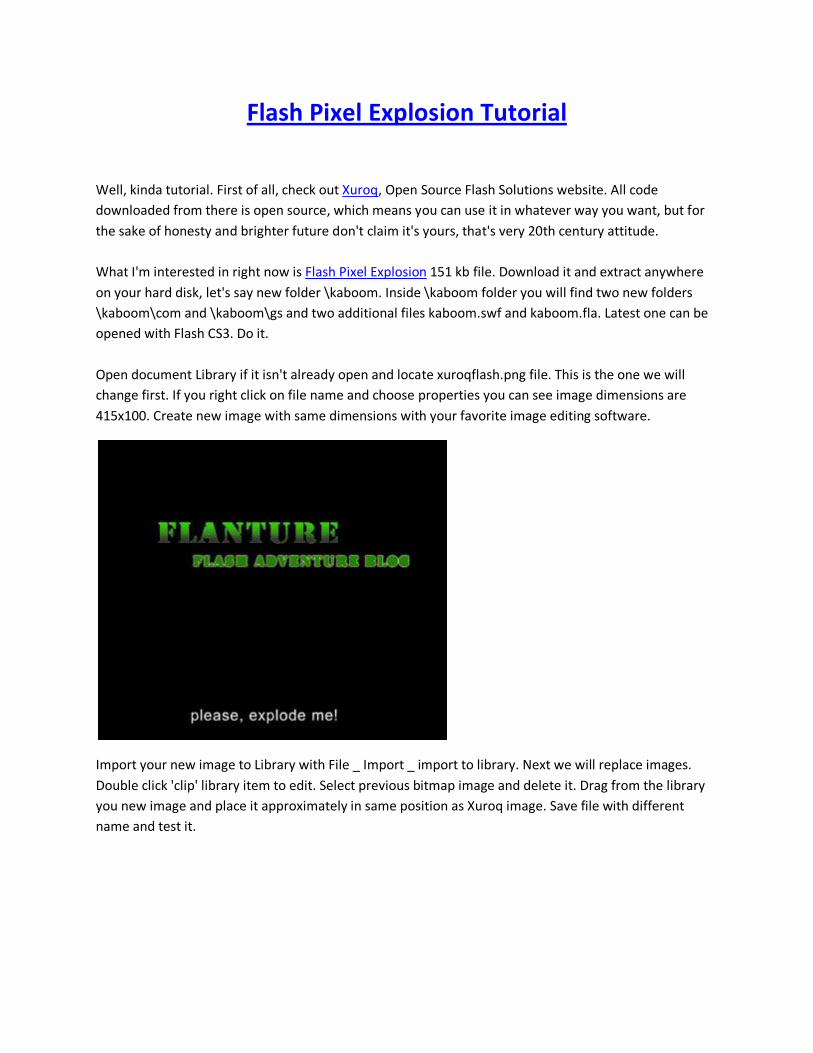
Well, kinda tutorial. First of all, check out Xuroq, Open Source Flash Solutions website. All code downloaded from there is open source, which means you can use it in whatever way you want, but for the sake of honesty and brighter future don't claim it's yours, that's very 20th century attitude. What I'm interested in right now is Flash Pixel Explosion 151 kb file. Download it and extract anywhere on your hard disk, let's say new folder \kaboom. Inside \kaboom folder you will find two new folders \kaboom\com and \kaboom\gs and two additional files kaboom.swf and kaboom.fla. Latest one can be opened with Flash CS3. Do it. Open document Library if it isn't already open and locate xuroqflash.png file. This is the one we will change first. If you right click on file name and choose properties you can see image dimensions are 415x100. Create new image with same dimensions with your favorite image editing software.
Import your new image to Library with File _ Import _ import to library. Next we will replace images. Double click 'clip' library item to edit. Select previous bitmap image and delete it. Drag from the library you new image and place it approximately in same position as Xuroq image. Save file with different name and test it.

You can also edit 'btn' movie clip, add action buttons or just edit text like me.
It's never to late (shuffle AS function + more)
My statistics show how search array AS functions post is very popular, even two and a half years old! I also see how I never answered Lance to his comment how shuffle function works. So, Lance, two and a half years later here it is. How does shuffle function works?
We have two arrays, starting array 'before' (b) and final array 'after' (temp). In every while step we have next process: 1 - first we take randomly chosen element from first array, 2 - than we push that element into new array temp 3- and finally with splice we remove that element from first array, which reduces its length. Iteration works while there are element inside 'before' array. OK? example: before = [3, 65, 202, -4]; trace(before); after = shuffle(before); trace(after);
Variable templen doesn't have to be Number. If you change type to Object, function will work with Strings, arrays within arrays, Objects. example 2: before = [3, "hello", [4, 7, 9], -8]; trace(before); after = shuffleB(before); trace(after);
Here is one more ActionScript search arrays function. This one takes two arrays and returns difference array, meaning it deletes all elements of second function which appear inside first function: function difference(a:Array, b:Array):Array{ var bCounter = b.length-1; while(bCounter >= 0) {

var aCounter = a.length-1; while(aCounter >=0) { if(a[aCounter]==b[bCounter]) { a.splice(aCounter, 1); } aCounter -= 1; } bCounter -= 1; } return a; } example 3: a1 = [3, 5, 7, 9, 3]; a2 = [3]; trace(a1); a3 = difference(a1, a2); trace(a3); To be continued ...

Free FLV to WMV Conversion
update: if you can't manage by yourself contact me and I'll help you with conversion - - -
This is something I've been asked about several times, so I decided to post quick and free solution on how to convert FLV file into WMV. There are several ways to make this video formats conversion and I'll show you one simple solution which doesn't require and previous knowledge. Go to and download small freeware program flvtowmv from Lumixsoft. Setup file is 3.76 Mb in size and installation is straightforward.
How to use it? Click on Add button and locate FLV file you wish to convert. Set output folder if you wish. Set video quality somewhere between lowest and highest. Output file size depends on this settings. Set video size. Finally click Convert button. Process is pretty fast. You are done. Quick and easy.

Object Movement Functions
Recently I needed some custom movie clips movement functions, but none of those free ones out there didn't fit and I had to write few of them on my own. First function is moveToPoint which uses 4 arguments, obj is Object to move (MovieClip), fx is end x point, fy is end y point and sp (speed) is number of frames to reach the goal. This means function is frame based, not time based. function moveToPoint(obj:Object, fx:Number, fy:Number, sp:Number) { var dx = (fx - obj._x) / sp; var dy = (fy - obj._y) / sp; var counter = 0; obj.onEnterFrame = function() { if(counter < sp) { obj._x += dx; obj._y += dy; counter += 1; }else{ delete obj.onEnterFrame; } } } OK, so dx and dy are distances object will need to move in sp frames. Counter is exit loop variable so we know when to delete onEnterFrame function. As you may noticed this is AS2.0 code. Next function is what I was looking for. I'm using 3 arrays arguments where first array stores x positions of movement steps, second array stores y positions and third array stores speed, number of frames needed to move from one point to another. This has its down sides since if you want constant speed over entire road you have to calculate frame for each part, but this was not something I need, so roadMap function works for me just fine. function roadMap2(obj:Object, arx:Array, ary:Array, ars:Array) { var dx = (arx[0] - obj._x) / ars[0]; var dy = (ary[0] - obj._y) / ars[0]; var counter = 0; obj.onEnterFrame = function() { if(counter < ars[0]) { obj._x += dx; obj._y += dy; counter += 1;

}else{ delete obj.onEnterFrame; counter = 0; if(ars.length > 0) { // remove first point from all arrays arrx.splice(0, 1); arry.splice(0, 1); arrs.splice(0, 1); roadMap2(obj_mc, arrx, arry, arrs); }else{ delete arrx; delete arry; delete arrs; obj.unloadMovie(); // this method is optional } } } } I'm using exactly the same thing as in moveToPoint function but difference is recursive call after point is reached and deleted from arrays. Requirement here is same length for all 3 arrays. Note also that ars array value of 1 will move desired MovieClip in single frame. Functions usage example: (obj_mc MovieClip instance is needed on Stage) var arrx:Array = new Array(0, 200, 300, 400, 550); var arry:Array = new Array(200, 200, 300, 50, 200); var arrs:Array = new Array(1, 10, 10, 20, 20); roadMap2(obj_mc, arrx, arry, arrs); I thing there is 1000 points limit on recursive calls, so keep that in mind.
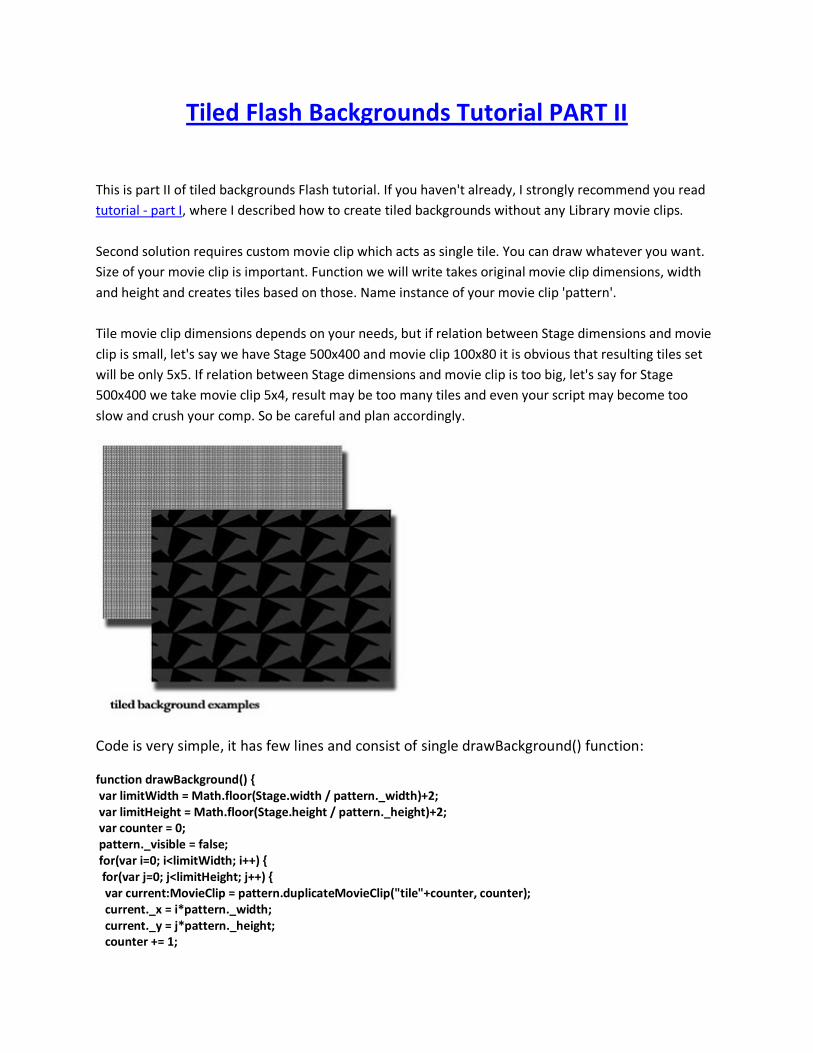
Tiled Flash Backgrounds Tutorial PART II
This is part II of tiled backgrounds Flash tutorial. If you haven't already, I strongly recommend you read tutorial - part I, where I described how to create tiled backgrounds without any Library movie clips. Second solution requires custom movie clip which acts as single tile. You can draw whatever you want. Size of your movie clip is important. Function we will write takes original movie clip dimensions, width and height and creates tiles based on those. Name instance of your movie clip 'pattern'. Tile movie clip dimensions depends on your needs, but if relation between Stage dimensions and movie clip is small, let's say we have Stage 500x400 and movie clip 100x80 it is obvious that resulting tiles set will be only 5x5. If relation between Stage dimensions and movie clip is too big, let's say for Stage 500x400 we take movie clip 5x4, result may be too many tiles and even your script may become too slow and crush your comp. So be careful and plan accordingly.
Code is very simple, it has few lines and consist of single drawBackground() function: function drawBackground() { var limitWidth = Math.floor(Stage.width / pattern._width)+2; var limitHeight = Math.floor(Stage.height / pattern._height)+2; var counter = 0; pattern._visible = false; for(var i=0; i<limitWidth; i++) { for(var j=0; j<limitHeight; j++) { var current:MovieClip = pattern.duplicateMovieClip("tile"+counter, counter); current._x = i*pattern._width; current._y = j*pattern._height; counter += 1;

} } } Nothing much to explain here. We add 2 to limitWidth and limitHeight just to make sure no empty space is created on Stage. We use variable counter to name new movie clips and set their depth. Since we don't need pattern movie clip on Stage, we set it's visibility to false. For loops are doing their job and create nice tiled background.
Tiled Flash Backgrounds Tutorial PART I
Already scratched the backgrounds subject in two separate occasions and now I'm gonna finish this chapter. Once again, I'm sure there are other, better solutions on how to generate Flash backgrounds, but this is what I figured. Don't have a clue why I need to constantly warn readers how I don't produce best code out there - I got to stop doing it right now! First solution doesn't require any Library movie clip, but background is generated dynamically, which means we use single function to create background pattern and entire tiled background based on that pattern. This first option is suitable for small pattern usually with dimensions like 6x6, 8x8 or 10x10 pixels. Off course, pattern can have not equal dimensions too. We will create drawBackground function and call it right away. All this happens in first root frame: function drawBackground() {...}; drawBackground();
Now instead dots, our function have two parts, first one to create pattern and second one to tile it. Best practice for pattern creation is to take pen and paper and draw pattern there and then mark coordinates. This is what we are making with next code:

this.createEmptyMovieClip("mc", this.getNextHighestDepth()); mc.lineStyle(1, 0x111111, 100); mc.beginFill(0x111111, 100); mc.moveTo(1,2); mc.lineTo(4,2); mc.lineTo(4,1); mc.lineTo(5,1); mc.lineTo(5,4); mc.lineTo(4,4); mc.lineTo(4,5); mc.lineTo(1,5); mc.endFill(); All is left to do is tile our pattern over entire document. We will do this using new 'back' movie clip. Variables mcw and mch will hold pattern dimensions, mc._width and mc._height. They are there just to shorten the code a little bit. OK, now we use Stage properties width and height to calculate limitWidth and limitHeight, borders of our pattern generator, when they are exceeded, we are done. For loops will draw our background until limits are reached. You can copy and paste pattern code and make small modifications, instead mc write back. this.createEmptyMovieClip("back", this.getNextHighestDepth()); var mcw = mc._width; var mch = mc._height; var limitWidth = Math.floor(Stage.width / mcw)+1; var limitHeight = Math.floor(Stage.height / mch)+1; back.lineStyle(1, 0x111111, 100); back.beginFill(0x111111, 100); for(var i=0; i<limitWidth; i++) { for(var j=0; j<limitHeight; j++) { back.moveTo(i*mcw+1,j*mch+2); back.lineTo(i*mcw+4,j*mch+2); back.lineTo(i*mcw+4,j*mch+1); back.lineTo(i*mcw+5,j*mch+1); back.lineTo(i*mcw+5,j*mch+4);

back.lineTo(i*mcw+4,j*mch+4); back.lineTo(i*mcw+4,j*mch+5); back.lineTo(i*mcw+1,j*mch+5); } } back.endFill(); That's all in part I of this tutorial on how to generate tiled Flash backgrounds. Next part will explore another technique which uses drawings as patterns.
Making Zoom Tool with Masking in Flash
This quick tutorial will show you how to create simple zoom tool with masking in Flash. Only few minutes and basic Flash knowledge are required. Before we begin, make sure you have some appropriate image to use with zoom tool, something with details, perhaps. I've found this image by arimoore. Open new Flash document and set some properties. I have used 350 px for width, 250 px for height, #0099FF as background color and frame rate 24. Add two more layers and rename them like this: layer3 - tool, layer2 - mask_layer and layer1 - map. First we will create some movie clips. You need to import your image into Library. Go to File - Import - Import to library... Now create new movie clip (ctrl + f8 or Insert - New symbol) and name it map_mc and press OK. Drag your image from library to center of the Stage. It doesn't have to be exactly in the center in pixels, but closely enough. Go back to scene 1, you are done with this movie clip. Two more movie clips are needed as scaling tool. Create new movie clip, name it 'line' and press OK. Draw solid white (or whatever color) line with 50 height, set stroke height to 2, place it vertically in the center of the stage (see example). This one has to be exactly in the center, so make sure you set X:0.0 and Y:-25.0. Name second movie clip 'stool' (scaling tool) and draw some rectangle like shape, approximately 20 px width and 10 px height and place it in center of the stage. Done with movie clips, now on layers. Lock both tool and mask_layer and select first and only frame of map layer. Drag map_mc from library and place movie clip in the center. While movie clip is selected, name your instance 'map_mc' (imagine that!). Next, lock and hide map layer and unlock mask_layer. Select rectangle tool, add some corner radius (5-10), set stroke color to none and fill color to some light green. Draw a rectangle with right margin larger than left one (we need extra space for zoom tool). Lock all layers, right click on mask_layer and choose mask option. Save your work if you haven't before. You can test your movie if you like to see if masking is working. Now, actions. Unlock and select first frame of tool layer. Drag line movie clip from the library to the right of the map, name instance 'line'. Drag stool movie clip also and place it near line movie clip. Name stool instance with 'stool' off course! Exact position of stool isn't matter because we will use ActionScript to position it right. Press F9 to open actions panel. First, we will write onLoad function like this: onLoad = function() { stool._x = line._x; stool._y = line._y; }

Next we need arrow movement commands. We use keyboard arrows to move our map in all 4 directions by 5 pixels per frame. onEnterFrame = function() { if (Key.isDown(Key.RIGHT)) { map_mc._x -= 5; } else if (Key.isDown(Key.LEFT)) { map_mc._x += 5; } else if (Key.isDown(Key.UP)) { map_mc._y += 5; } else if (Key.isDown(Key.DOWN)) { map_mc._y -= 5; } }
Finally, last function we need is scale function. stool.onMouseDown = function () { var ypos = _ymouse-line._y; var distance = Math.abs(_xmouse-line._x); if (distance < 20) { if(ypos<-10 && ypos>-20) { this._y = line._y-20; map_mc._xscale = 50; map_mc._yscale = 50; } if(ypos<0 && ypos>-10) { this._y = line._y-10; map_mc._xscale = 75; map_mc._yscale = 75; } if(ypos<10 && ypos>0) { this._y = line._y; map_mc._xscale = 100; map_mc._yscale = 100; } if(ypos<20 && ypos>10) { this._y = line._y+10; map_mc._xscale = 120; map_mc._yscale = 120; } if(ypos<30 && ypos>20) {

this._y = line._y+20; map_mc._xscale = 150; map_mc._yscale = 150; } } }
This function is easy to understand actually. With ypos variable we make sure only mouse clicks close to line object are detected and with distance we can find out how far mouse is from line center. Based on that distance we create different commands, first one is to move stool movie clip. We use 'this' keyword because MouseDown function is attached to stool movie clip. Second command is actually our zoom tool. We change scale factor for map_mc in a range from 50 to 150 by 25. In this way we get 5 different views, but you can change this to whatever you like. You can easily create drag and drop functionality if you like. I hope you have enjoyed this tutorial. Share it, use it, abuse it in any way you like.
download zoom tool

Flash Tutorial : Rain Effect
This is simple tutorial on how to create more real life rain effect (or snow or whatever falls down in your neighborhood). You will need just few minutes to complete full tutorial, just follows explanations. 1. Create new flash document. I have used dimensions 500px and 400px with #699 background color and 30 frame per second. Higher value of fps will make animation smoother. 2. Create new movie clip that will represent single raindrop. My dimensions of movie clip is 10px by 10px. Drag mc from library to stage to position approximately y=0, x=-20, just left from top-left Stage corner but outside of view. Name your instance 'raindrop'. Now, the code. 3. First, we will create raindrops counter like this: var counter:Number = 0;
4. Next, we write onEnterFrame for 'raindrop' instance. This function will act as timer. Every time 'raindrop' passes Stage height it returns to the top and fires clone function which creates new raindrop. Actually, it's kinda unusual to create new instances this way, but I was in a hurry... raindrop.onEnterFrame = function() { if (this._y < Stage.height) { this._y += 30; }else{ clone(); } } 5. Now let's see that clone function and I'll try to explain it. function clone() { if(counter < 50) { var dx:Number = random(500); var dy:Number = random(800); var myObject = new Object(); myObject._x = dx; myObject._y = dy-800; myObject._alpha = random(100); myObject._xscale = 50 + myObject._alpha; myObject._yscale = myObject._xscale; myObject.onEnterFrame = function() { if (this._y < Stage.height) {
this._y += this._alpha / 10; }else{ this._y -= 400 + Math.floor(Math.random()*400); this._x = Math.floor(Math.random()*500); } } raindrop.duplicateMovieClip("nr" + counter, this.getNextHighestDepth(), myObject); counter += 1; } }
Counter is there to stop producing new raindrops when their number is greater then 49. New raindrops are created using duplicateMovieClip method. It uses 3 parameters. First one is unique instance name, second one is depth and third one myObject is most important. Object is obviously the type of myObject and everything needed is congregated here. Start position is defined using random function to dx and dy variables. Raindrops alpha is also defined using random function. Based on alpha we create scale values and with this we have effect that closer raindrops have less transparency. We also use alpha value to define raindrops speed inside onEnterFrame function. This way we create effect that closer raindrops move faster than those behind. That's all actually. SWF is 597 bytes total. I hope you enjoyed this tutorial. You are free to use it in any way you like, mentioning this blog highly appreciated. Thanks.

Flash Scale Menu Explained
It seems that my expectations were to high when I thought this post is enough to explain how Flash Scale Menu works. One visitor, Francesco has convinced me indirectly to post complete Flash scale menu tutorial. Please, read first just mentioned posts to find out what we are talking about here. Open new Flash document. Create few menu items (movie clips). For the sake of simplicity, let's say we have 5 items. Name movie clips instances item1, item2, ..., item5. You can name movie clips whatever you like, it doesn't matter. In the first and only frame of main Timeline enter 18 lines of code. This onEnterFrame is the only function needed for menu to work properly.
Now let's talk math. We use common math formula to find d - distance between mouse pointer and center of menu item. Dx is radius of circle inside which xscale and yscale properties of menu item change. Amount of change is equal to subtraction dx-d, thus when d=0 and mouse pointer is in the center of menu item, scale is biggest. In this case 100+(70-0)=170. When mouse is on the circle itself, change is 100+(70-70)=100, which means scale is 100 - no change! You can experiment with different values for dx. It depends on dimensions of your menu items movie clips.

Remember that registration points of menu item movie clips have to be centered. That's all. Share this explanation/tutorial if you like it. Thanks.
Simple Flex Effects Example
Open Flex Builder and go to File > New Project > Flex Project and name your project as MyEffects. In Design view take new Panel to the stage, set ID - mPanel , title – My Effects, Horizontal align – center, Vertical align – middle. Now inside this new panel, drag Image component. Set ID – mImage, scale content – true. Move to Category View for Image component, within Style choose center horizontalAlign and middle verticalAlign. Create assets folder inside your project, insert any image and for Image component, set Source for that image. OK, we created our playground and we can open our box with toys. Let’s try Zoom effect first. Just below Application tag, insert Zoom tag like this:
< id="over" duration="100" zoomheightto="1.3" zoomwidthto="1.3"> Everything is simple here, but you also have to add another property inside Image tag:
rollOverEffect="{over}" In this way we have made connection between two tags Image and Zoom with over ID. In the same way you can add rollOutEffect or any other like this: < id="”out”" duration="200" zoomheightto="1" zoomwidthto="1"> and rollOutEffect="{out}" as Image tag property. You may notice different duration properties, which means, as you expected, that rollOut will last twice longer than rollOver. Insert another tag, Blur tag for mouseDownEffect:
< id="down" duration="1000"> In order to apply more than one effect on one action we need to use Parallel tag. If we put Zoom and Blur tags between Parallel tag, give new tag id – over while deleting Zoom and Blur id property. Something like this:
< id="over"> < duration="100" zoomheightto="1.3" zoomwidthto="1.3">
< duration="1000"> < /mx:Parallel >
Don’t forget also to delete mouseDown property or you will get an error. You can combine several effects for same action. It’s up to you to decide when is enough. You can choose

between AnimateProperty, Blur, Dissolve, Fade, Glow, Iris, Move, Pause, Resize, Rotate, SoundEffect, Wipe, Zoom.
download source p.s. this is post number 100! . update: since this Flex example still gets lot of attention here is the source: <?xml version="1.0" encoding="utf-8"?> <mx:Application xmlns:mx="http://www.adobe.com/2006/mxml" layout="absolute" height="422" width="481"> <mx:Parallel id="over"> <mx:Zoom duration="100" zoomHeightTo="1.3" zoomWidthTo="1.3"/> <mx:Blur duration="1000"/> </mx:Parallel> <mx:Rotate id="down" angleFrom="0" angleTo="360" duration="500"/> <mx:Zoom id="out" duration="200" zoomHeightTo="1" zoomWidthTo="1"/> <mx:Panel x="10" y="10" width="458" height="400" layout="absolute" title="My Effects" id="mPanel" horizontalAlign="left" verticalAlign="top"> <mx:Image id="mImage" scaleContent="true" horizontalAlign="center" verticalAlign="middle" source="frost.jpg" width="332" height="240" rollOutEffect="{out}" rollOverEffect="{over}" mouseDownEffect="down" horizontalCenter="0" verticalCenter="-7"/> </mx:Panel> </mx:Application>
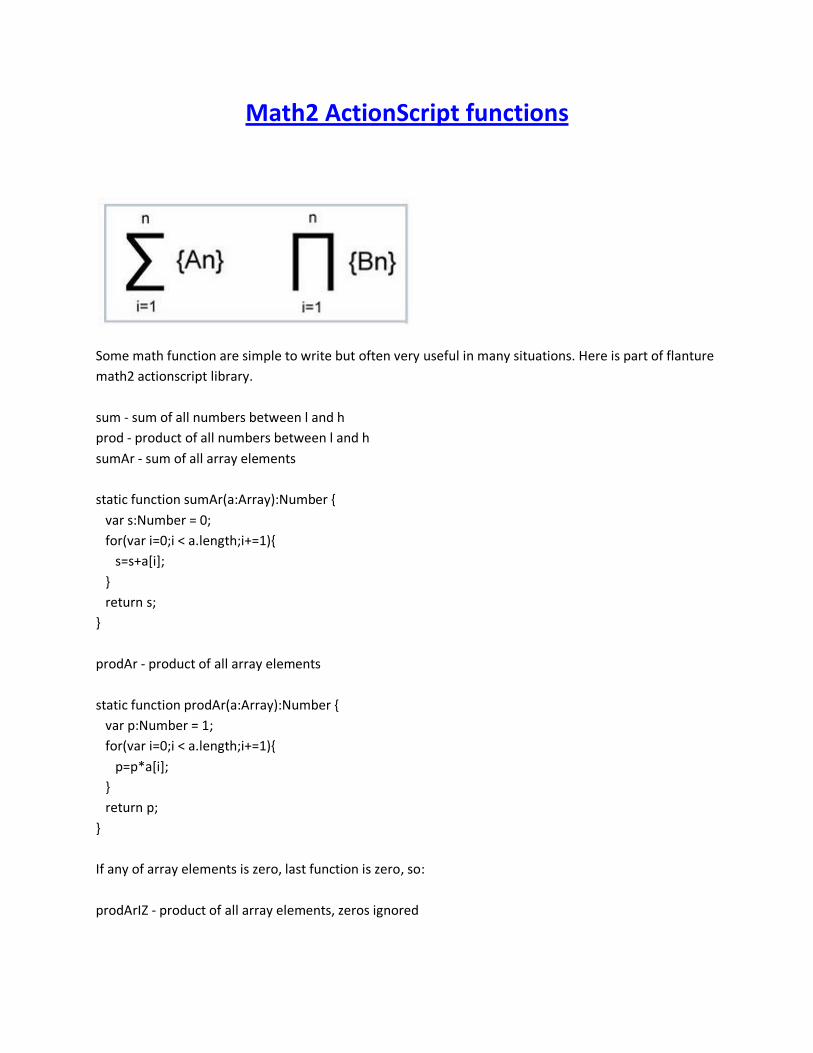
Math2 ActionScript functions
Some math function are simple to write but often very useful in many situations. Here is part of flanture math2 actionscript library. sum - sum of all numbers between l and h prod - product of all numbers between l and h sumAr - sum of all array elements static function sumAr(a:Array):Number { var s:Number = 0; for(var i=0;i < a.length;i+=1){ s=s+a[i]; } return s; } prodAr - product of all array elements static function prodAr(a:Array):Number { var p:Number = 1; for(var i=0;i < a.length;i+=1){ p=p*a[i]; } return p; } If any of array elements is zero, last function is zero, so: prodArIZ - product of all array elements, zeros ignored
static function prodArIZ(a:Array):Number { var p:Number = 1; for(var i=0;i < a.length;i+=1){ if(a[i]!=0){ p=p*a[i]; } } return p; } Homework for newbies: write function that returns all prime numbers between 1 and n?
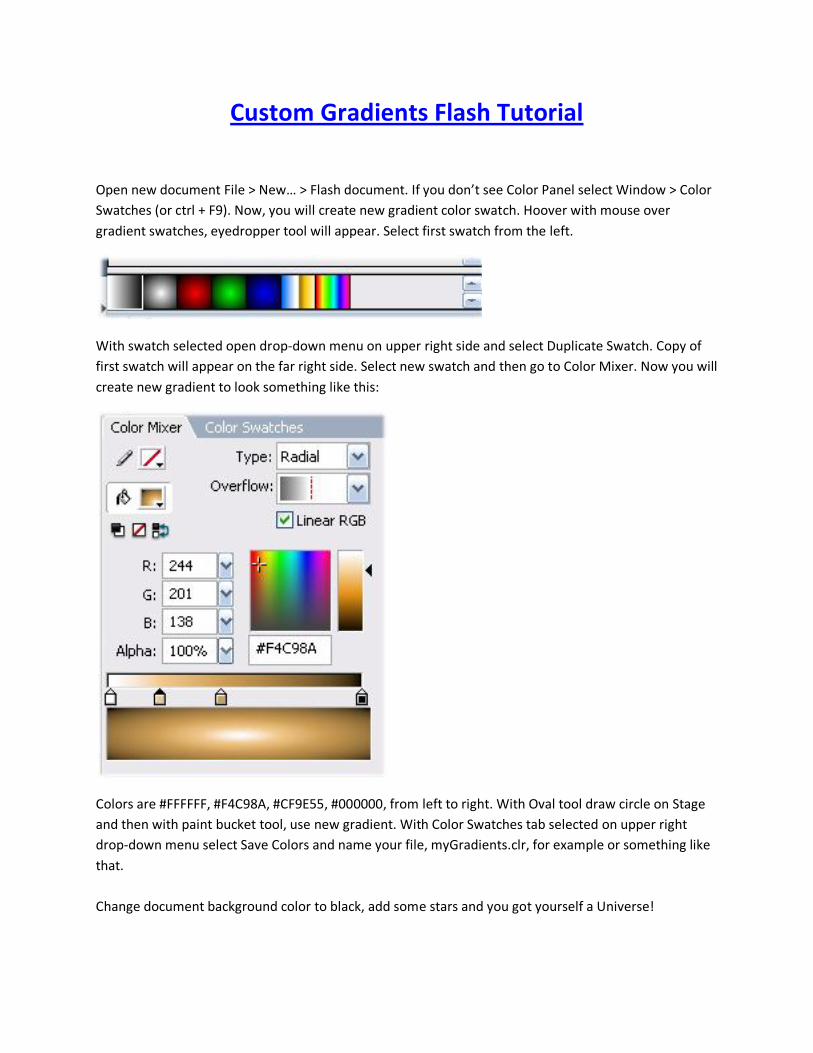
Custom Gradients Flash Tutorial
Open new document File > New… > Flash document. If you don’t see Color Panel select Window > Color Swatches (or ctrl + F9). Now, you will create new gradient color swatch. Hoover with mouse over gradient swatches, eyedropper tool will appear. Select first swatch from the left.
With swatch selected open drop-down menu on upper right side and select Duplicate Swatch. Copy of first swatch will appear on the far right side. Select new swatch and then go to Color Mixer. Now you will create new gradient to look something like this:
Colors are #FFFFFF, #F4C98A, #CF9E55, #000000, from left to right. With Oval tool draw circle on Stage and then with paint bucket tool, use new gradient. With Color Swatches tab selected on upper right drop-down menu select Save Colors and name your file, myGradients.clr, for example or something like that. Change document background color to black, add some stars and you got yourself a Universe!

This tutorial teaches you how to create custom gradient swatch in Flash. Expand this knowledge by creating several gradients. This technique can make you easy organizing your work. You can create different gradients for planets, balloons etc. In this way, when your collection of gradients become large, you will save a lot of time on making them.

Code for scale menu
Previous scale flash menu has just few lines of code in first frame of Timeline.
Menu items instances are named from "item1" ... "item5". They change xscale and yscale property as a function of distance from xmouse position. That is all. If you need to add more menu items, code is the same, you only have to change line 2. If you have 10 menu items, you will write in line 2: i<11. Everything else is unchanged.

Simple Event Mechanism Flash Tutorial
This tutorial will teach you how to create simple event mechanism.
First, create MovieClip ball, place instance on Stage and name that instance mc_ball. Then, enter next code in first and only frame on main Timeline and test your movie.
Function doIt() is activated when some event happens. In this case, when ball x coordinate is smaller than 25. Function doIt() places ball on right side of Stage. Point is that doIt() executes only once but it is placed on onEnterFrame for instance. In this way you can create very complex movements and reactions. For example, you can write event2, …, event3, etc and every event reacts on different occasion. Also, you can use different actions and function when event1 AND event2 are true, but something else when only event1 has values true. You can also put within onEnterFrame function for root, doIt() function inside for or while loop for multiple executions. Simple code, but useful.