Fixing a Dukkaboard Shower-Tray to a concrete floor · PDF fileFixing a Dukkaboard Shower-Tray...
2
42 Fixing a Dukkaboard Shower-Tray to a concrete floor-Using a solid bed of tile adhesive Ensure that the floor surface is clean and free from any loose materials. www.dukkaboard.com Document Number DTI-2016 / Version Number 1.01 1. Ensure waste pipe is suitably located for fitting of the Dukkaboard Shower-Tray. 4. Prime the floor using Aqua 77 Pro-Tile Primer before applying adhesive or Dukkaboard. Pro Tip - The correct notch size for combing out the adhesive bed is at least double the maximum undulation of the floor, measured under a 1m straight edge. 2. Solvent weld the trap into the waste pipe. Pro Tip – Check pipe is suitable for solvent weld and check connections are watertight before final installation of the Dukkaboard Shower-Tray. 5. Carefully place the Dukkaboard Shower-Tray directly onto the adhesive layer, ensuring the alignment of the outlet in the tray with the trap. Tamp the tray down so it makes full contact with the adhesive. 3. Ensuring the seal on the top of the tap is level with the surrounding subfloor, and the centre of the trap corresponds with the centre of the outlet in the tray, back fill around the waste pipe (using tile adhesive is ideal) and allow to set. 6. Check the installed Dukkaboard Shower-Tray is level on leading edges. DUKKABOARD SHOWER-TRAYS
Transcript of Fixing a Dukkaboard Shower-Tray to a concrete floor · PDF fileFixing a Dukkaboard Shower-Tray...
42
Fixing a Dukkaboard Shower-Tray to a concrete floor-Using a solid bed of tile adhesiveEnsure that the floor surface is clean and free from any loose materials.
www.dukkaboard.com Document Number DTI-2016 / Version Number 1.01
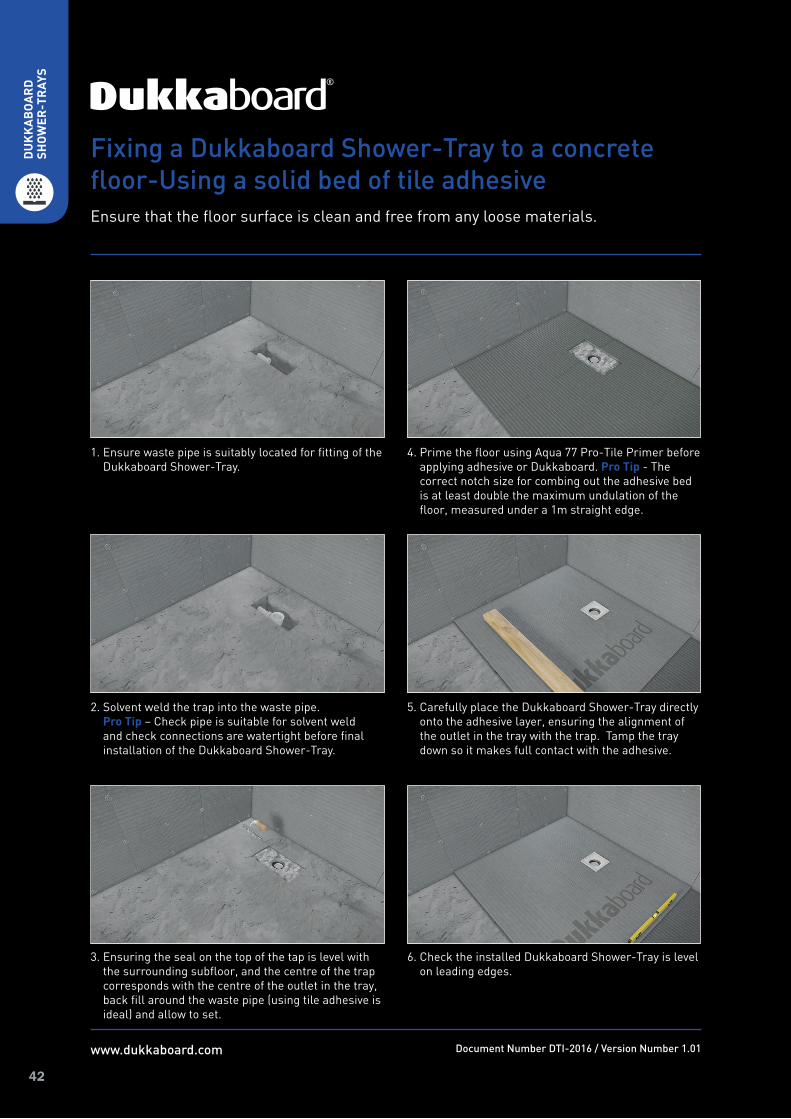
1. Ensure waste pipe is suitably located for fitting of the Dukkaboard Shower-Tray.
4. Prime the floor using Aqua 77 Pro-Tile Primer before applying adhesive or Dukkaboard. Pro Tip - The correct notch size for combing out the adhesive bed is at least double the maximum undulation of the floor, measured under a 1m straight edge.
2. Solvent weld the trap into the waste pipe. Pro Tip – Check pipe is suitable for solvent weld and check connections are watertight before final installation of the Dukkaboard Shower-Tray.
5. Carefully place the Dukkaboard Shower-Tray directly onto the adhesive layer, ensuring the alignment of the outlet in the tray with the trap. Tamp the tray down so it makes full contact with the adhesive.
3. Ensuring the seal on the top of the tap is level with the surrounding subfloor, and the centre of the trap corresponds with the centre of the outlet in the tray, back fill around the waste pipe (using tile adhesive is ideal) and allow to set.
6. Check the installed Dukkaboard Shower-Tray is level on leading edges.
DU
KK
AB
OA
RD
SH
OW
ER-T
RAY
S

43
For technical information, support and more installation guides and videos from the expert team at Dukkaboard, visit www.dukkaboard.com/the-knowledge-network
7. Insert the threaded collar to join the Dukkaboard Shower-Tray to the trap.
10. Continue fitting Dukkaboard Original-Panels to the remainder of the floor, ensuring all the boards are tamped down and level.
8. Pro Tip - The protection cap can be used to screw down the threaded collar by hand, and can be inserted to prevent dirt and debris entering the drain body until installation is complete.
11. Once adhesive is dry, insert bucket and dip tube.
9. Pro Tip - To create a level floor surface meeting the edge of the Dukkaboard Shower-Tray, use the same thickness of Dukkaboard Original-Panel.
12. Waterproof all joints with Dukkaboard Waterproof Tape (for wet zones). Ensure all joints and screw heads are taped. If preferred, Dukkaboard Aqua77 Fleece+ and Neo-Flex can be used for all board-to-board joints.
DU
KK
AB
OA
RD
SH
OW
ER-T
RAY
S