FIRST AID MANUAL AND RELATED HEALTHCARE ISSUES FOR FOOTBALL · · 2015-08-31FIRST AID MANUAL AND...
148
FIRST AID MANUAL AND RELATED HEALTHCARE ISSUES FOR FOOTBALL FOR USE BY FIRST AIDERS AND COACHES
Transcript of FIRST AID MANUAL AND RELATED HEALTHCARE ISSUES FOR FOOTBALL · · 2015-08-31FIRST AID MANUAL AND...

FIRST AID MANUAL AND RELATED HEALTHCARE
ISSUES FOR FOOTBALL
FOR USE BY FIRST AIDERS AND COACHES


FIRST AID MANUAL AND RELATED HEALTHCARE
ISSUES FOR FOOTBALL
FOR USE BY FIRST AIDERS AND COACHES
Dr Lisa HodgsonProfessor Efraim Kramer

CONTENT
ROLES, DUTIES AND RESPONSIBILITIES OF THE FIRST AIDER 11A SCENE SAFETY 3
1B PROVIDING A SAFE ENVIRONMENT – HYGIENE AND HAND WASHING 4
1C CONTENTS OF A FIRST AID KIT 6
1D CLEAN WATER 8
1E INJURY RECORDING 9
1F PREVENTION 11
ASSESSMENT OF THE UNRESPONSIVE CASUALTY AND BASIC LIFE SUPPORT 13UNRESPONSIVE PLAYERS – APPROACH AND CONTACT 15
ABCDE APPROACH – FOR THE ASSESSMENT OF ALL INJURIES ON THE FIELD OF PLAY 16
BASIC LIFE SUPPORT (BLS), CARDIO-PULMONARY RESUSCITATION (CPR) 19
A FLOW DIAGRAM TO FOLLOW FOR CPR ON THE FOOTBALL FIELD OF PLAY 26
AUTOMATED EXTERNAL DEFIBRILLATION 31
RESUSCITATION IN CHILDREN 32
THE RECOVERY POSITION 33
CHOKING 37
DEALING WITH CHILDREN WHO ARE CHOKING 40
PLAYER HANDOVER TO THE AMBULANCE OR HOSPITAL 41
WOUNDS AND BLEEDING 43BLEEDING 45
FIRST AID MANAGEMENT OF EXTERNAL BLEEDING 48
WOUND DRESSINGS 50
WOUND CLEANING 51
FIRST AID MANAGEMENT OF INTERNAL BLEEDING 52
SHOCK 53
SOFT TISSUE INJURIES 57SOFT TISSUE INJURIES 58
HOW SHOULD A FIRST AIDER RECOGNISE AND TREAT A SOFT TISSUE INJURY? 60
FIRST AID MANAGEMENT 61
P.R.I.C.E. 62
DISLOCATION 70
RETURN TO FOOTBALL 71

BONE INJURIES: FRACTURES OF THE LOWER AND UPPER LIMBS AND RIBS 73BONE FRACTURE 74
FRACTURE DISLOCACTION 76
FIRST AID MANAGEMENT OF A FRACTURE 77
HEALING AFTER A FRACTURE 79
RETURN TO PLAY AFTER A FRACTURE TO THE ARM OR LEG 81
INJURIES TO THE CHEST 82
IMMOBILISING AND SUPPORTING A FRACTURED LIMB 84
INJURIES TO THE HEAD AND NECK 89CERVICAL SPINE AWARENESS 90
MANAGEMENT OF SPINAL INJURIES 91
PLAYER ASSESSMENT WITH C-SPINE INJURY 94
RESUSCITATION WITH A NECK INJURY 95
CONTROLLED LOG ROLL 96
STINGER OR BURNER 101
HEAD INJURIES AND CONCUSSION MANAGEMENT 102
RETURN TO FOOTBALL AFTER A CONCUSSION 110
CONCUSSION IN CHILDREN AND ADOLESCENTS 111
OTHER HEAD INJURIES 113
JAW AND ASSOCIATED FRACTURES OF THE FACE 114
EYE INJURIES 114
NASAL INJURIES 116
DENTAL INJURIES 116
MEDICAL EMERGENCIES THAT MAY OCCUR IN FOOTBALL 119ASTHMA AND EXERCISE-INDUCED BRONCHOSPASM (EIB) 121
DIABETES AND HYPOGLYCAEMIA 123
EPILEPSY 125
HEART CONDITIONS 126
SUDDEN CARDIAC ARREST (SCA) 127
ANAPHYLAXIS 129
FAINTING 132
EXERTIONAL HEAT STROKE 133
REFERENCES 136
F-MARC PLAYER RECORD FORM 137
GLOSSARY 138


FOREWORD
This is a booklet designed for use by coaches and non-medically qualified First Aiders working within football around the world and specifically in developing countries. This is a short and practical guide to dealing with injuries and illnesses, mainly on the field of play, both in training and in matches. It will provide a comprehensive guide to immediate first aid management of player injuries and illnesses from critical to minor. The intention is to provide a “holistic” view of first aid because of the limited medical resources that may exist. It will also advise on appropriate return to play guidelines for a wide range of conditions and advise on equipment the First Aider should carry to all events when dealing with players. This manual may also be of use to those therapists and doctors just starting out in their football medical careers.
What is recommended in this text is “best first aid practice within the limited resources of a developing country”. If it is not possible to practice at this level, do the best you can whilst you slowly increase the standard of first aid practised.
Injury prevention, risk reduction, nutrition, anatomy and physiology are not discussed in detail in this manual. For more in-depth information on these topics please see other F-MARC publications, such as – Football Medicine Manual
(2nd edition; 2009) – Football Emergency Medical
Manual (2009) – 11+ a complete warm up to prevent
injuries (Manual; DVD) – Health and Fitness for the Female
Football Player – a guide for players and coaches
– Nutrition for Football (2010) – Prevention and Management of
Sudden Cardiac Arrest in Football (2013)
This booklet has been prepared by those who deal with incidents of this nature on a regular basis and we hope you find this international publication of use to you in your team.
Dr Lisa Hodgson PhD MSc(SEM) MCSP PGCHE FHEA
Assistant Professor in Sport and Exercise Medicine
Centre for Sports Medicine
University of Nottingham, United Kingdom
Managing Director Corobeus Sports
Consultancy Ltd, UK.
Professor Efraim Kramer
Head: Division of Emergency Medicine,
Witwatersrand University.
Hon. Adjunct Professor: Centre for Exercise Science
+ Sports Medicine, Witwatersrand University.
Extraordinary Professor: Section Sports Medicine,
University of Pretoria.


1ROLES, DUTIES AND
RESPONSIBILITIES OF THE FIRST AIDER

2 ROLES, DUTIES AND RESPONSIBILITIES OF THE FIRST AIDER
The most important role is prevention. Prevention of harm to oneself as the First Aider and prevention of further harm to the player requiring assistance.
In order to achieve this, each of the following points should be followed by the First Aider in charge of training or a match: 1. ensure scene safety 1A and provide a
safe environment 1B.2. be present at all football events including
training and matches.3. always carry a suitably stocked first aid
box or have one easily accessible at all times 1C.
4. have access to clean / sterile water (and ice) 1D.
5. advise the local hospital emergency department of the match to be played so that they are aware of potential injuries that may come into their department during or after the match.
6. have access to a telephone (mobile or landline) for emergency calls.
7. advise the visiting team coach or First Aider / medic of where you will be standing if they require first aid, and give them details and directions of the local hospital emergency department, and the location and access to a (mobile or landline) telephone.
8. keep records of all treatments administered to any player or persons 1E.
9. understand how to help prevent illness and injuries of the players (FIFA 11 for Health¹ and FIFA 11+²) 1F.

3 ROLES, DUTIES AND RESPONSIBILITIES OF THE FIRST AIDER
1A SCENE SAFETY
An important part of any administration of first aid is the safety of the all people involved. The first active role of the First Aider is to ensure their own safety and then the safety of the persons who require first aid help.
The Laws of the Game state that the referee will decide, once the ball is no longer in play, whether a player requires first aid assistance from the First Aider. Do not enter the field until the referee has signalled for you to come onto the field.
If the field is not safe to enter, for whatever reason, do not enter the field until it has been declared safe by the referee or local security personnel.
For injuries that occur in a training session, use your judgement and check your own personal safety before approaching the player.
You will not be of help if you become a casualty.
Although the risks on any football field are going to be reasonably well controlled, it is always worth taking a few seconds to make sure the area is safe and if necessary stop the match or training session whilst first aid treatment is carried out.
Safety issues specific to a football field of play include: – Other players – there may be
arguments amongst opposing team players
– Spectators – field of play invasion by spectators, throwing of missiles onto field of play
– Unsuitable field of play conditions – uneven surfaces or slippery surfaces
– Adverse weather conditions – e.g. lightning
Remember that no matter how well equipped or qualified the First Aider is, in serious medical emergencies the best place for the player to be treated is the nearest hospital. Do not forget to request ambulance assistance as early as possible. If you are in a stadium where an ambulance is on standby, be sure to request for it to come to assist you.

4 ROLES, DUTIES AND RESPONSIBILITIES OF THE FIRST AIDER
1B PROVIDING A SAFE ENVIRONMENT – HYGIENE AND HAND WASHINGInfection control is the prevention of the invasion and growth of harmful bacteria in the tissues of the body. Infection can enter the body through wounds that are in contact with dirt from the field of play or from someone else’s blood or other bodily fluids, e.g. coughing or sneezing into the wound.
In order to prevent the spread of infection, it is very important that the First Aider considers the following important points: – Have a high standard of personal
hygiene: – Clean and wash hands thoroughly
before and after treating each individual player with soap and water as per the guidance given below.
– If the First Aider has to cough, sneeze or blow their nose, use a tissue or paper towel, and then wash their hands afterwards.
– Try to wear clean clothes / uniform – germs can be present on soiled clothing.
– Protect oneself by covering all cuts, lacerations or abrasions on ones body, particularly on hands and arms, with waterproof dressings e.g. plasters.
– Keep finger nails short, clean and free of nail varnish.
– Avoid wearing sharp jewellery, e.g. rings, especially when dealing with
the player, since they are a perfect environment for bacteria to live and multiply. Such jewellery might scratch the player and cause the player to have an open wound that is then at risk of getting an infection.
– Wear protective gloves (ideally disposable) when administering first aid treatment to players and change gloves between every player.
– Ensure that, ideally, all equipment is single use especially bandages, gloves, dressings, swabs and pocket masks. If this is not possible, then please make sure that the equipment is thoroughly washed as described below.
– Use bleach solution (5 mls of standard washing-up liquid and 30 mls of standard household bleach, ideally freshly made at every session) for cleaning up spilled body fluids from work surfaces and any equipment that you will use again.
– Dispose of soiled dressings appropriately so that bacteria do not multiply inside the dressing and then infect someone else who may come into contact with them. Seal them in a plastic bag type container and enquire how medical waste is disposed of in your community. Seek advice from your doctor about protecting yourself against common infectious and community diseases such as vaccinating yourself against

5 ROLES, DUTIES AND RESPONSIBILITIES OF THE FIRST AIDER
diseases like Hepatitis B, Tetanus and Tuberculosis that may be found in your community.
HAND WASHING – Wash your hands before and after
any contact with injured players, after removing protective gloves, or after touching any soiled dressings with bare hands.
– Routine hand washing with soap and water removes most bacteria from soiled hands. As a general rule, use soap and water when hands are visibly dirty or contaminated blood / body fluids.
– Always wet hands under running water (as hot as you can bear) before using soap, then rinse and dry hands thoroughly with a clean towel or cloth.
– It is preferable to remove rings and watches when washing hands to ensure no area of the hands are missed. If you have treated a player without gloves, it is important to also wash any jewellery with soap and water.
– It is better to use liquid soap from a dispenser than a bar of soap if possible.
– Wash hands for a minimum of 15 seconds vigorously and thoroughly without adding more water.
– Clean all parts of your hands, especially your thumbs, fingertips and fingernails.
– Rinse hands thoroughly under running water.
– Dry hands with disposable paper towels. Brisk rubbing movements of paper towels – remembering the back of hands and between fingers. If paper towels are not available, wave your hands in the air until they are dry. Do not dry them on your clothes.
– Dispose of the paper towels carefully, do not contaminate your hands when disposing them.
– Try not to use communal hand towels because they can be a source of cross infection.
– Alcohol-based hand rubs can be used as an alternative to hand washing on clean skin (if you are field of play side and your hands are free of dirt). Alcohol based gels are not a replacement for soap and water! They will not kill all germs.
– Use hand cream to keep your skin in good condition. Skin integrity is an important barrier to cross infection.
– Bring your own soap and a clean towel, in case they are missing.

6 ROLES, DUTIES AND RESPONSIBILITIES OF THE FIRST AIDER
1C CONTENTS OF A FIRST AID KIT
Below is a recommended list that deals with the majority of injuries described in this manual. The football clubs should be responsible for providing this first aid equipment. However, it is your responsibility as a First Aider to check the contents of the first aid kit before each match or training session so that you are sure that all the items of first aid equipment are in date, sterile and present.
Minimum contents:1 Protective gloves, (two pairs minimum)
2 Rescusi Face Shield or Pocket Mask for rescue breathing (➔ see chapter 2)
3 Plasters (various sizes, waterproof)4 Sterile trauma type clean dressings
(variety of sizes)5 Tape 6 Gauze swabs 7 Access to ice on the day or ice packs8 Crepe bandages 9 Triangular bandages (6 minimum)
10 Foil space blankets or preferably ambulance type blankets to keep players warm when injured
11 Rescue type scissors 12 Paper and pencil / pen13 Packet or sachet of sugar14 Tweezers
You should ideally also have access to the following equipment for a football match: – An Automated External Defibrillator
(AED) (➔ see chapter 2) – A first aid room or space to treat
players away from direct sunlight – A stretcher or bed or trolley. If you do
not have these, keep the player still and warm on the field of play until the ambulance arrives.
– Access to hot and cold running water or sterile water (see page 8) at the side of the field of play or close by
– First aid manual – Player injury record forms (kept inside
lockable cupboard)
If you have a healthcare professional affiliated with your club (doctor or physiotherapist), they may wish to give further advanced treatment to an injury and it may therefore be advisable to have access to other items.
As a First Aider you cannot provide the player with medications.

Picture 1: A basic first aid kit for a First Aider to cover a football match
7 ROLES, DUTIES AND RESPONSIBILITIES OF THE FIRST AIDER
1
311
12
13
14
4
5
6
107
8
9
2

8 ROLES, DUTIES AND RESPONSIBILITIES OF THE FIRST AIDER
1D CLEAN WATER
Access to clean water is important at all times, both for player’s to drink and for use in cleaning wounds.
Safe clean water is bottled water with the cap sealed – not a bottle that has been re-filled with water from a tap.
Unfortunately tap water cannot be guaranteed not to contain bacteria that might cause an infection if poured onto open wounds.
If you do not have access to bottled water, please BOIL tap water (for 60 seconds after the first column of bubbles), then seal it, cool it completely and store in a clean place for use. Ideally this should be done an hour prior to each training or match. Throw away any unused water that has been left exposed and open to the environment.
Clean water can be applied to wounds to wash away dirt and debris (➔ see chapter 3).

9 ROLES, DUTIES AND RESPONSIBILITIES OF THE FIRST AIDER
1E INJURY RECORDING
If at all possible administratively, because of your responsibility for the care of your team, it is advisable for you to complete a medical record file of all your players detailing their age, date of birth, address, emergency contact details, previous medical history, allergies and illnesses, current medication and any relevant information (➔ see Appendix I). This will help you know the players with specific medical conditions that you can monitor and will help you if or when you need to handover the player to the ambulance services. You can also use this file to record your current first aid treatment as below.
Following an injury or illness to a player on the field that you deal with as a First Aider you should record the details of: – Date and time of the injury / illness
and if an injury, what was the cause e.g. tackle, heading football, collision with another player
– Player’s name – Date of birth or age – Location of incident (e.g. training or
match) – First aid treatment given – Player observations since the
injury / illness e.g. is the player improving or deteriorating
This information can then be used to handover to the ambulance service if required or to be kept by yourself for your medical records. If you are using the above for medical records, each time you see the player for further treatment (if required) you can add subsequent treatments to the above record so that a full record of the player’s progress is recorded for each injury / illness sustained.
All medical and personal information that you keep must always comply with the data protection act in your own country, which you can source from your sport or Governing Body. Any data with confidential information (name, address, medical condition and such) must be held in a secured environment, e.g. a locked cupboard.
The role of the First Aider is a position of trust and maintaining confidentiality is a large part of the role. Player details, medical information and treatment should never be discussed with anyone not directly involved with their care.

10 ROLES, DUTIES AND RESPONSIBILITIES OF THE FIRST AIDER
Accident / Incident bookAs many players at clubs, particularly junior sides, will not be employees of the club, there may be confusion over the requirement for the completion of accident books. It is good practice and can provide documented evidence to the benefit of the First Aider, if an accurate record of any untoward incidents or injury and treatment is recorded at the time.
It is advisable to discuss the requirements for an accident book with the governing body of your sport or team to ensure the compliance of your sport or team with any health legislation or governing body byelaws and recommendations. This would be good practice.

11 ROLES, DUTIES AND RESPONSIBILITIES OF THE FIRST AIDER
1F PREVENTION
This section will concentrate on some of the preventions that, as a First Aider, you can assist with. Other preventable interventions you can assist with as a First Aider are discussed in the asthma, anaphylaxis and sudden cardiac arrest sections in chapter 7 “other medical emergencies”.
TRAINING WITH FEVER Exercise plus infection is an important area of concern and risk for active individuals. The risk of a player exercising when they have an infection can have serious effects on the heart and therefore players with symptoms of infection must not undergo training nor partake in any matches until they are symptom free.
Minimise the risk of infections with the following steps: – Do not allow infectious players,
i.e. players with the following symptoms: diarrhoea, fever, vomiting or flu-type symptoms, to attend training or play in a match. They must also avoid contact with other players so as not to spread the infection to others.
– Ensure players wash their hands and do not share towels.
– Monitor player training – avoid over-training leading to excessive fatigue and declining performance.
– Control the players' diet, ensure they eat adequately to match their activity (see F-MARC Nutrition for Football 20102).
– Consider immunisation / vaccination – e.g. for flu or tetanus. Speak with their doctor if they are particularly prone to specific types of infection or illness or if they have a cut that has an infection.
Will infection affect the performance of a footballer?Research suggests that an “average” cold does not significantly impair the parameters of athletic performance.
However, please be cautious and use the following parameters as a guide:
If they have any systemic symptoms, such as a fever (high temperature), muscle pains, productive cough, severe sore throat or other symptoms such as diarrhoea and vomiting then they should not play or train until they are symptom-free.


2ASSESSMENT OF THE
UNRESPONSIVE CASUALTY AND BASIC LIFE SUPPORT

14 ASSESSMENT OF THE UNRESPONSIVE CASUALTY AND BASIC LIFE SUPPORT
The aim of the First Aider is to ensure what is known as the 3Ps
- Preserve life - Prevent deterioration of the player’s health situation - Promote recovery
15 ASSESSMENT OF THE UNRESPONSIVE CASUALTY AND BASIC LIFE SUPPORT
UNRESPONSIVE PLAYERS – APPROACH AND CONTACTPlayers should always be approached and managed in the following manner. This is known simply as the “ABCDE” approach.
NB: If any life-threatening problem is found it should be dealt with immediately before moving on to the next stage. An example would be a life-threatening catastrophic bleed (➔ see chapter 3).
NB: If the player is not breathing or not breathing normally, the assessment would be stopped and CPR commenced immediately.
There are many potential causes of a player becoming unresponsive on the field of play. The following is a list of the most common causes:
- Sudden cardiac arrest (➔ see chapter 7) - Asphyxia – lack of oxygen into the body (➔ see Choking in this chapter) - Shock (➔ see chapter 3) - Head injury (➔ see chapter 6) i.e. traumatic injury on the field of play* - Heat exhaustion (➔ see chapter 7) - Epilepsy (➔ see chapter 7) - Diabetes (➔ see chapter 7) - Fainting (➔ see chapter 7)
* In all situations that involve trauma it is important to immobilise the head and neck until a cervical spine injury is ruled out (➔ see chapter 6). The method of dealing with the airway will be different where trauma has occurred and spinal injury is suspected.

16 ASSESSMENT OF THE UNRESPONSIVE CASUALTY AND BASIC LIFE SUPPORT
ABCDE APPROACH – FOR THE ASSESSMENT OF ALL INJURIES ON THE FIELD OF PLAYThis approach is applicable for assessing all injuries you encounter on entering the football or training field and is not just applicable to Basic Life Support (BLS). The A-E approach is always preceded by checking firstly for your own safety to attend to the player, i.e. dangers, and secondly for the player’s response (DR ABCDE).
DANGER – On approach look for any dangers to
yourself and the player. – Approach, if it is safe to do so. – Remember, if you are incapacitated
you will be of no help to anybody. – If it is unsafe, wait for the referee or local
security personnel to sort out the matter. Remember to call the ambulance.
RESPONSE – Speak to the player in a clear, loud voice. – If they do not respond apply painful
stimuli by squeezing their earlobe between your thumb and finger and if they still do not respond assess the airway to see if it is clear (see below).
– Always consider a neck injury and do not “shake” an unresponsive player in order to assess their response.
AIRWAYLook inside the player’s mouth to assess if anything is blocking their airway. Examples of items that may block a player’s airway on the field of play: – loose and poor fitting gum shield if the
player wears one – blood in the mouth – broken and loose teeth – mud (especially if the ground is wet
and the player falls face down)
The usual thing that blocks the player’s airway is the player’s own tongue. This occurs when the player is unresponsive. The muscles of the tongue go floppy and the tongue falls back into the back of the throat completely blocking the airway. The way to lift the tongue from off the back of the throat is to tilt the head back (see page 20) if there is no potential of a neck injury being present. If there is suspicion of a neck injury or trauma involved, then lift up the chin, also known as a jaw thrust (➔ see chapter 6).
Remove any obvious obstructions if they are clearly visible and to the front of the mouth, use a pair of tweezers to do this from the first aid kit. Do not place your fingers inside their mouth.

17 ASSESSMENT OF THE UNRESPONSIVE CASUALTY AND BASIC LIFE SUPPORT
Open the airway using the Head Tilt Chin Lift manoeuvre (see page 20). If you suspect trauma or the player has fallen onto their head, neck or face, then in this case a neck injury may be present and in opening the airway you should not move the neck. In that case, use the chin lift method only, (➔ see chapter 6 ). If the player is face down or on their side and you need to get them onto their back, a safe way of achieving this is discussed in chapter 6.
If well-fitting dentures or gum shields* are present, leave them where they are inside the mouth.
* Well-fitting gum shields are the custom-made shields made for individual players by their dentist or orthodontist.
BREATHINGLook, listen and feel for breathing for a maximum of ten seconds. This should all be done at the same time, by looking to see if the player’s chest is rising and falling as they breathe in and out. Listen by placing your ear close to the player’s mouth and nose to listen for sounds of breathing. Feeling for breathing can be done in two ways, first by placing your hand on the players chest to feel if it rises and falls as they breathe, or second by placing your cheek close to the players mouth in order to feel air being expelled onto your cheek as they breath out.
If the player appears not to be breathing (that is, you cannot see, feel or hear breathing) or not breathing normally, begin Cardio-Pulmonary Resuscitation (CPR) – see page 22. Not breathing normally is when the player is only taking the occasional gasp of air. Do not mistake this for normal breathing. For a player to be breathing normally they must take at least ten breaths in and out every minute.
If the player is breathing normally continue with the assessment.
CIRCULATIONLook for and stop any life-threatening bleeding (➔ see chapter 3).
DISABILITYIf the player is breathing normally and has signs of life, i.e. their chest is rising and falling and their airway is open but they remain unresponsive, you can reassess and monitor the player’s level of response for signs of improvement (disability level). This is achieved by noting whether: – the player is fully alert and responsive
to you – the player is not alert but is responsive
to your voice – the player is not alert but does respond
to your touch or to a painful stimulus e.g. earlobe squeeze
– the player is totally unresponsive – does not respond to any of the above

18 ASSESSMENT OF THE UNRESPONSIVE CASUALTY AND BASIC LIFE SUPPORT
EXPOSE / EXAMINEYou cannot treat what you cannot see. You must be able to see the injury in order to be able to effectively treat it. Injuries may be hidden under the players' clothing.
Expose the relevant injury by removing as much clothing as is necessary to look for underlying injuries.
Consider the player’s medical history that you are aware of so that you can pass this information onto the ambulance on arrival.
A good way of remembering the information required to be passed onto the ambulance, is to use the following pneumonic – SAMPLE:
S Signs and symptoms – that player complains of or you have seen.
A Allergies – any known allergies e.g. hayfever, penicillin.
M Any current medication prescribed or other.
P Previous medical history – any relevant medical conditions that may affect the current injury or its management.
L Last food or drink that the player consumed.
E Events leading to the incident and shortly after i.e. mechanism of injury - does the player recall all events, i.e. is the player concussed, time of injury and what first aid you have provided so far.

Picture 2: Checking for response (non-trauma)
Picture 3: Pinching earlobe (non-trauma)
19 ASSESSMENT OF THE UNRESPONSIVE CASUALTY AND BASIC LIFE SUPPORT
BASIC LIFE SUPPORT (BLS) CARDIO-PULMONARY RESUSCITATION (CPR)Sequence for the collapsed player. This section has the same initial approach as the unresponsive player, but if there are no signs of life CPR should commence immediately as described on page 22.
1. DANGER Ensure your personal safety (➔ see page 16).
2. RESPONSE Shout for help. If you are called to help a player on the field, then make sure you have others to help you. If you come across the player unresponsive and you are alone, call immediately for help.
Assess if the player is responsive by asking them loudly “are you alright?” (picture 2) and if no response applying a painful stimuli (e.g. pinching their ear) see picture 3.

Picture 4: Look inside the mouth
Picture 5: Head Tilt Chin Lift
20 ASSESSMENT OF THE UNRESPONSIVE CASUALTY AND BASIC LIFE SUPPORT
3. AIRWAY AND BREATHINGIf the player responds – Assess the player using the ABCDE
approach (➔ see page 16 and 17). – Check to see if further medical
assessment is required. This may be in the form of an ambulance being summoned, for example for a suspected neck injury or a profusely bleeding wound that cannot be managed with basic first aid.
If the player does not respond: – Look in the mouth (picture 4). If a
foreign body or debris / mud / blood is clearly visible, attempt to remove it (➔ see page 16).
– Open the airway – head tilt and chin lift (picture 5) is the manoeuvre of choice if there has been no associated trauma, i.e. in a witnessed collapse with no suspicion of a neck injury.
– A head tilt and chin lift is done by placing two fingers under the players chin and your other hand along the players forehead.
– Apply pressure to tilt the head backwards with your top hand and with the hand under the chin, lift the chin.
– This movement may allow breathing to restart.

Picture 7: Look, listen and feel for breathing for no longer than ten seconds.
Picture 6: Jaw thrust / chin lift technique used to open the airway where there is suspicion of a neck injury
21 ASSESSMENT OF THE UNRESPONSIVE CASUALTY AND BASIC LIFE SUPPORT
If you suspect that trauma has been involved, such as an uncontrolled fall or a foul, the technique of choice would then be a jaw thrust or chin lift (picture 6) whilst maintaining in-line stabilisation of the neck (➔ see chapter 6, page 92 for further details).
If there is a risk of neck injury, establishing a clear airway takes priority over concerns about a potential neck injury – Keeping the airway open, look,
listen and feel (for no more than ten seconds) to determine if the player is breathing normally.
– Listen at the player’s mouth for breath sounds.
– Look for chest movement (can you see the player's chest rising and falling as they breath in and out).
– Feel for air on your cheek – place your head to the side close to the player’s mouth and see if you can feel their breath on your cheek (picture 7).
Please be aware: occasional gasps, slow, laboured or noisy breathing is common in the early stages of cardiac arrest – these are signs of cardiac arrest and should not be mistaken for a sign of life. Normal breathing is at least ten breaths every minute.
If in doubt start CPR.

Picture 8: Chest compressions (side view) Picture 9: Chest compressions (front view)
22 ASSESSMENT OF THE UNRESPONSIVE CASUALTY AND BASIC LIFE SUPPORT
4. IF THERE IS NO BREATHING OR THE PLAYER IS NOT BREATHING NORMALLY: – One person should start CPR by
starting external chest compressions. – Other people, if present, should
call for the ambulance if it has not already been called and report back afterwards.
– If you are alone, this will mean leaving the player to go to summon for help before you start CPR.
– Give 30 chest compressions followed by two breaths (pictures 8, 9 and 10).
Chest compressions – Kneel next to the player’s chest. – Place the heel of one hand on the
centre of the player’s chest, then place the heel of your other hand on-top and interlock your fingers, ensuring that your shoulders are directly over the player’s chest and your arms and elbows all straight, perpendicularly.
– Press down using the heels of your hand in a rhythmic manner, then release the pressure without losing contact between your hands and the player’s chest.
– Pressure / compression and release should take an equal length of time.
– The recommended depth of compression is 5 - 6 cm but push as far down as you can.
– The recommended rate is 100 – 120 compressions in one minute, which you can count as 1 and 2 and 3 and etc, pushing down on the number and releasing on the “and”.
– Once chest compressions have started you must continue with this in a ratio of 30 compressions to two breaths until the player recovers (shows signs of life) or medical help arrives.

Picture 10: Rescue breathing using a pocket mask ventilation / breathing using a head tilt chin lift method
23 ASSESSMENT OF THE UNRESPONSIVE CASUALTY AND BASIC LIFE SUPPORT
Rescue breathing – Open the airway (chin lift is
recommended for a football match as c-spine injury cannot be ruled out) and start rescue breathing of the lungs with the most appropriate equipment immediately at hand. A pocket mask is highly recommended to be a standard piece of equipment carried by First Aiders in attendance at a football match or training session.
– Place the face mask onto the player’s face, over the mouth and nose (round edge to chin, pointed end to nose).
– Ensure there is a good seal between mask and skin. The seal is maintained by ensuring your fingers pull the chin into the mask, this also has the dual role of opening the airway at the same time. The thumbs rest on the cheek bones, but minimal pressure is applied downward onto the face.
– Use a breath-in time of one second and give enough volume to produce a chest rise as in normal breathing.
– Watch the chest rise and then fall after you remove your mouth.
– Take another breath of fresh air and repeat the process.
– Give a total of two breaths. – Then return to chest compressions.
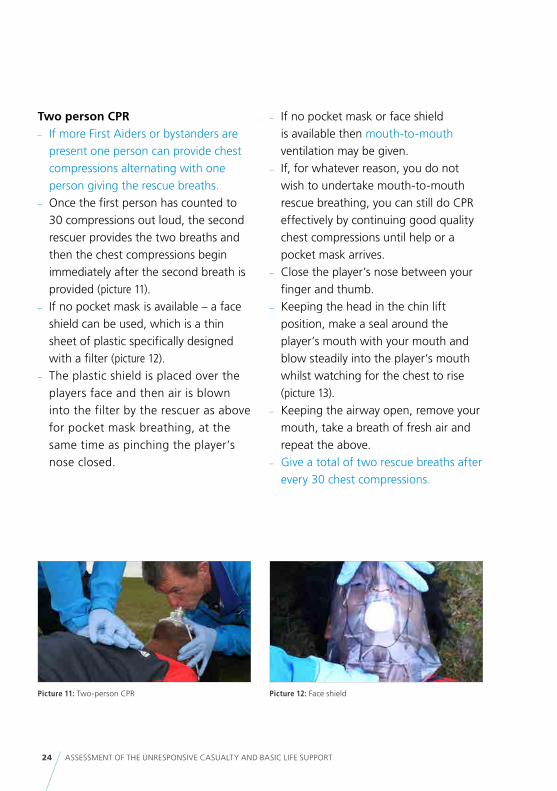
Picture 11: Two-person CPR Picture 12: Face shield
24 ASSESSMENT OF THE UNRESPONSIVE CASUALTY AND BASIC LIFE SUPPORT
Two person CPR – If more First Aiders or bystanders are
present one person can provide chest compressions alternating with one person giving the rescue breaths.
– Once the first person has counted to 30 compressions out loud, the second rescuer provides the two breaths and then the chest compressions begin immediately after the second breath is provided (picture 11).
– If no pocket mask is available – a face shield can be used, which is a thin sheet of plastic specifically designed with a filter (picture 12).
– The plastic shield is placed over the players face and then air is blown into the filter by the rescuer as above for pocket mask breathing, at the same time as pinching the player’s nose closed.
– If no pocket mask or face shield is available then mouth-to-mouth ventilation may be given.
– If, for whatever reason, you do not wish to undertake mouth-to-mouth rescue breathing, you can still do CPR effectively by continuing good quality chest compressions until help or a pocket mask arrives.
– Close the player’s nose between your finger and thumb.
– Keeping the head in the chin lift position, make a seal around the player’s mouth with your mouth and blow steadily into the player’s mouth whilst watching for the chest to rise (picture 13).
– Keeping the airway open, remove your mouth, take a breath of fresh air and repeat the above.
– Give a total of two rescue breaths after every 30 chest compressions.
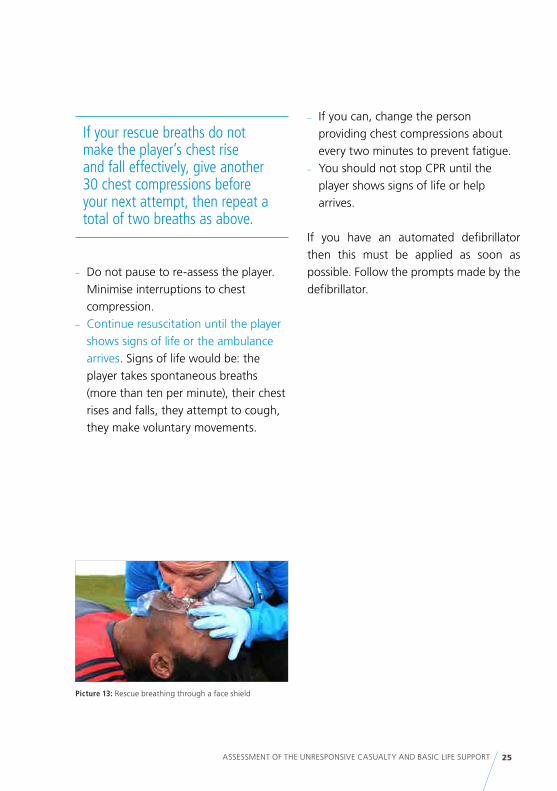
Picture 13: Rescue breathing through a face shield
25 ASSESSMENT OF THE UNRESPONSIVE CASUALTY AND BASIC LIFE SUPPORT
If your rescue breaths do not make the player’s chest rise and fall effectively, give another 30 chest compressions before your next attempt, then repeat a total of two breaths as above.
– Do not pause to re-assess the player. Minimise interruptions to chest compression.
– Continue resuscitation until the player shows signs of life or the ambulance arrives. Signs of life would be: the player takes spontaneous breaths (more than ten per minute), their chest rises and falls, they attempt to cough, they make voluntary movements.
– If you can, change the person providing chest compressions about every two minutes to prevent fatigue.
– You should not stop CPR until the player shows signs of life or help arrives.
If you have an automated defibrillator then this must be applied as soon as possible. Follow the prompts made by the defibrillator.

26 ASSESSMENT OF THE UNRESPONSIVE CASUALTY AND BASIC LIFE SUPPORT
A FLOW DIAGRAM TO FOLLOW FOR CPR ON THE FOOTBALL FIELD OF PLAY
Collapsed player – unresponsive
Shout for help
Open the airway – chin lift
Breathing or not breathing normally?
NO YES
Call for ambulance
Assess ABCDE
CPR 30:2 *Call
ambulanceif appropriate
Continue until signs of life
or ambulance arrives
Handover to ambulance
crew
* If you do not wish to provide ventilations, compression-only CPR can be done until the ambulance arrives. Continuous com-pressions are applied in this instance.
Automated External DefibrillationThe automated external defibrillator (AED) allows a quick and easy way to administer an electrical shock to a patient with the minimum of fuss. Although most AEDs will vary in their shape and size, the gen-eral principles remain the same. Not all people who collapse in a cardiac arrest will have a shockable rhythm, so the AED will not shock everyone. However, the ma-jority of initial arrythmias are shockable which is why an AED is an essential part of your first aid equipment.
The aim of defibrillation is to stun the car-diac cells in order for the natural pacemak-er of the heart to resume its natural role and allow effective cardiac contractions.
AEDs are easily stored and have a long battery life, however these should be checked on a regular basis e.g. prior to every match and training session. Please refer to the manufacturer's guidelines for care of the defibrillator and its contents.

Picture 14: FIFA Medical Emergency Bag (FMEB)
Picture 15a: AED and supplementary equipment
Picture 15b: AED contents and lid
27 ASSESSMENT OF THE UNRESPONSIVE CASUALTY AND BASIC LIFE SUPPORT
AEDs will normally come with some additional equipment such as a razor to shave extremely hairy chests to allow the pads to fix securely, a pocket mask or face shield, a pair of sterile gloves, and a set of AED pads (picture 14 and 15a / b).
AEDs are normally activated spontaneously on opening the cover but some units may have an on / off button. Please check your own machine so you are aware how it works.
Remember! It is essential that as the operator you are fully conversant with the model and control features of the AED machine used at your facility. Please know where it is stored and ensure you have an access key!

Picture 16: AED – pad position
28 ASSESSMENT OF THE UNRESPONSIVE CASUALTY AND BASIC LIFE SUPPORT
SAFETY RULES TO BE OBSERVED BEFORE EACH SHOCK SEQUENCENobody must touch the player once the AED has given verbal instructions not to touch the patient. This is the phase when the AED is analysing the situation and deciding whether to administer a shock.
The stand clear shout must always be given and always have a good look to make sure no one is touching the player before you press the button to deliver the shock.
If the player’s chest is wet with sweat or water, wipe it with a towel before applying the AED pads.
Although it is better for the player not to be lying on a wet surface, AED use can still be underataken in the wet and rain. If the player is in a puddle / pool of water, to be safe move the player quickly out of the puddle before attaching the AED pads. Damp conditions are acceptable and you can administer the shock. If it is raining, use an umbrella or coat to shield the top of the AED and the patient's chest from above.
Remove any supplemental oxygen away from the face and immediate area before AED use (if oxygen present).
If the player has to be shocked whilst lying on a metal stretcher e.g. scoop, make sure nobody is touching the stretcher.
Remove immediately any jewellery (e.g. necklace if present) or underwired bra.
NORMAL PAD POSITION The positions shown (picture 15) should be used wherever possible. Right upper chest and left lower chest, slightly to the side.
AUTOMATED DEFIBRILLATOR CONTROLSAlthough all machines will vary, a typical AED will have the following controls: – On / off button – Discharge button – a flashing button
that once pressed will deliver a shock to the player

Picture 17: Placement of right upper chest pad
Picture 18: Placement of left lower chest pad
29 ASSESSMENT OF THE UNRESPONSIVE CASUALTY AND BASIC LIFE SUPPORT
APPLYING THE AED TO THE PLAYER – Apply both pads onto the player’s
bare chest, checking that all wires are firmly in place (picture 16). If there are other people present, one person can continue with chest compressions whilst the other person puts the AED pads in place.
– The AED present in the FIFA Medical Emergency Bag has a number application system (1,2,3) for step by step application of the pads (pictures 17 and 18).
– If you have a different AED, follow the pictures on the pads of your own equipment, placement will be similar to the one on picture 16.
– The lid of the AED can also be placed underneath the player’s head or upper back in a non-trauma arrest (picture 17) - this helps to keep the airway open in the head tilt chin lift position. Clear instructions are placed in pictoral form both on the pads and the inside casing of the AED for ease of instruction.
– Once the pads are correctly and safely in place, the AED will analyse the rhythm and request that the player is not touched.

Picture 20: Continue CPR with 30 chest compressions to two breaths
Picture 19: Stand clear, AED safety, push flashing button now
30 ASSESSMENT OF THE UNRESPONSIVE CASUALTY AND BASIC LIFE SUPPORT
– Ask the persons performing CPR to stop and “stand clear”. The machine will then follow the algorithm.
– If a shock is advised, the discharge button will flash and the AED will prompt you by saying “Shock advised, push flashing button now.”
– It is important that you check that neither you nor any other rescuer is touching the patient, once you are certain everyone is clear then push the flashing button (picture 19).
– A shock will then be given to the player. – Commence CPR again immediately. – The AED will automatically re-analyse
the player again after every two minutes. During this time period continue with effective CPR.
– Continue until the ambulance arrives and takes over or the player recovers.
– If a shock is not advised by the AED and it says “no shock advised continue with CPR” this means that no shockable rhythm is present. Continue with CPR at the ratio of 30 compressions (picture 20) to two breaths and do not stop this cycle until the AED asks you to “stand clear: analysing”.
– The AED will automatically analyse the player every two minutes.
– Continue to follow the voice prompts of the AED until the ambulance arrives and takes over or the player recovers.
In the unlikely event that a child collapses in cardiac arrest, then an AED (with adult pads) can be applied to a child above the age of one (see UK Resuscitation Council guidelines). Paediatric pads are available to purchase for those persons dealing with young children on a regular basis.

31 ASSESSMENT OF THE UNRESPONSIVE CASUALTY AND BASIC LIFE SUPPORT
AUTOMATED EXTERNAL DEFIBRILLATION
Assess playerAccording to BLS guidelines
BLSIf AED not immediately available
Responsive? No Breathing? NoStart CPR
Switch AED on, attach electrode padsFollow verbal instructions
Continue CPR whilst pads attached if more than one person attending
ANALYSE
Shock indicated No shock indicated
After shock CPR 2 Minutes
If no signs of life CPR 2 Minutes
The AED will time each two minute time period for you and then re- analyse the player. Each time the AED wants to re-analyse it will say “do not touch the patient – analysing“ make sure at this point that no one is touching the player.

32 ASSESSMENT OF THE UNRESPONSIVE CASUALTY AND BASIC LIFE SUPPORT
RESUSCITATION IN CHILDREN
Although football may not necessarily be a sport formally played by the very young, CPR for cardiac arrest is included here for completeness' sake because of its possible occurrence domestically and in schools and the need to have this life-saving skill so as to treat immediately.
The CPR procedure and ratio is the same as for adults of 30:2. Hand positions are the same as for adults, i.e. centre of the chest. Whether one will perform rhythmic chest compressions using one hand or two hands will depend on the size of the child and the size of the rescuers hands. The goal is always rhythmic, regular, fast and effective compression of the chest with minimal interruption. In babies, use the same ratio but begin chest compressions using the index and middle fingers together to compress the chest rhythmically. Whether you use two fingers, one hand or two hands will depend on what you find more practical and comfortable to achieve the correct results.
Do not be worried about doing any harm to the child during resuscitation, because the technique saves lives.
The only differences for children are to: – Give five initial rescue breaths before
starting compressions – If you are alone, provide one minute of
CPR before going for help – Depress the chest by 1/3 of its depth
If your player (adult or child) shows signs of life, place them gently, carefully and slowly into the recovery position so that you protect their airway, and continue to monitor them regularly.

33 ASSESSMENT OF THE UNRESPONSIVE CASUALTY AND BASIC LIFE SUPPORT
THE RECOVERY POSITION
For a player who is unresponsive, the most immediate danger is airway obstruction caused by their tongue relaxing against the back of the throat and / or other obstructions such as vomit, mucus, blood. When dealing with a player who is unresponsive, therefore, the First Aiders main concern remains the maintenance of a clear airway at all times.
Having conducted the initial assessment (airway clear, breathing adequate, any major bleeding controlled) the First Aider should ensure that the player is in a position of continued airway safety – this may entail moving them if they are on their back. The most effective position is lying propped on the side with the mouth and head positioned to allow drainage. This is commonly known as The Recovery Position. The First Aider should obviously be very careful if neck or other injury is suspected but remember airway always comes first!
The recovery position is used for1. Any unresponsive player who is breathing
normally, (rescue breathing is not required) but you are concerned about a risk to their airway, e.g. they may vomit.
2. Any conscious player if they are going to be left alone whilst help is summoned and they are at risk of lapsing back into unconsciousness, and becoming unresponsive. This would only occur
where you are alone with a player – a rare event in football.
The recovery position allows the relaxed tongue to remain forward, keeping the airway clear and preventing vomit from entering the lungs. Where there has been no trauma or suspicion of trauma involved, it is important that all unresponsive players are placed into this position to protect their airway until the ambulance arrives.
Please note: in a sporting situation (e.g. where body contact has occurred with a risk of associated neck injury) if the player is conscious, there is generally no need to move the player, but continue to monitor them for airway safety. If they are unconscious, turn them slowly, gently and carefully into the recovery position ➔ see chapter 6 for a safe and effective way to perform this where a spinal trauma is suspected. These methods of turning a player safely may also be used where the player has not landed initially on his / her back, a frequent event in contact sport where the player will land on either their side or front.

Picture 21 to 24: Picture series of a single responder place-ment of a player into the Recovery Position
Picture 24
Picture 22
Picture 23
34 ASSESSMENT OF THE UNRESPONSIVE CASUALTY AND BASIC LIFE SUPPORT
To place a player into the recovery position – Remove bulky objects from the player’s
pockets (this could be in training). – Kneel beside the player and make sure
that both their legs are straight. – Place the arm nearest to you out
of the way so it does not cause an obstruction when you turn the player towards you.
– Bring the far arm across the chest and hold the back of the hand against the player’s nearest cheek (picture 21).
– With your other hand, grasp their far leg just above the knee and pull it up keeping the foot on the ground.
– Keeping the hand pressed against the cheek, pull on the leg and roll the player towards you onto their side (pictures 22 and 23).
– Adjust the upper leg so that both the hip and knee are bent at right angles (picture 24).

Picture 25: Open the players mouth
Picture 27
Picture 26 and 27: Picture series of a two person modified log roll
35 ASSESSMENT OF THE UNRESPONSIVE CASUALTY AND BASIC LIFE SUPPORT
– Open the player’s mouth (picture 25) and keep it open so that the player can breathe through the mouth and allows any vomit to spill onto the ground and not into the lungs.
– Check breathing regularly.
If the player deteriorates and / or you cannot detect signs of life, then the player must be turned back onto their back.
It is important to turn the player over as quickly as possible whilst exercising great care, particularly not to injure the head and neck. Reassess the player as you may have to begin BLS again. You do this by using your ABCDE response check-list as described earlier in this chapter.
If other people are present to assist then the recovery position (player turning) can be performed using more people to help and the head and neck can be supported at the same time. The same hand hold positions and placement of the player limbs is as for the single person recovery, but the head is stabilised and held in a neutral position by the second First Aider (pictures 26 to 30).

Picture 29
Picture 30
Picture 28 and 29: Showing the serial movement of a two person turn
36 ASSESSMENT OF THE UNRESPONSIVE CASUALTY AND BASIC LIFE SUPPORT
The player is then held in this position rather than the final position of the recovery position, with the neck maintained in alignment until the airway is clear and or the ambulance has arrived (picture 30).
If the player deteriorates and shows no signs of life the player should be lowered down to the ground extremely carefully and a full ABCDE assessment initiated.

37 ASSESSMENT OF THE UNRESPONSIVE CASUALTY AND BASIC LIFE SUPPORT
CHOKING
Choking is obstruction of the flow of air from the environment into the lungs. Because of this, choking prevents breathing and can cause death from a lack of oxygen (asphyxia). The life-threatening nature of choking depends on whether the airway obstruction is partial or complete i.e. whether some air or no air can be breathed in.
Signs of choking include: – Difficulty in breathing and / or speaking – Vigorous coughing attempts as the
player tries to dislodge the obstruction – Player turning blue around the lips – Player loses consciousness after a short
time showing signs of complete airway obstruction
Things that can cause choking on the field of play are: – Broken gum guards after collision or
loose teeth – Severe allergic reaction e.g. bee sting – Chewing gum whilst in training or
during matches – Eating during physical activity
DEALING WITH ADULTS WHO ARE CHOKINGIf the airway obstruction is partial, the player will usually be able to dislodge the foreign body by coughing. However, if obstruction is complete, urgent intervention is required to prevent death.
Partial obstruction:The player shows signs of choking but is able to make some noise / speak and can breathe. – Calm the player and instruct them to
follow your instructions. – Encourage them to breathe slowly,
deeply and to cough as hard as they can when breathing out.
– There is no need to do anything else as long as their condition does not deteriorate.

Picture 31: Initiating back blow
Picture 32: Back blow
38 ASSESSMENT OF THE UNRESPONSIVE CASUALTY AND BASIC LIFE SUPPORT
Complete obstructionIf an obstruction is complete, the player’s cough will be ineffective and the player is unable to speak or make any noises, cannot breathe in any air, starts to turn blue and will lose consciousness if the obstruction is not removed immediately. If this begins to happen to the player, and they are still standing and conscious, then do the following: – Stand to the side and slightly behind the
player. – Support the player with one hand and
lean the player well forwards. – Give up to five sharp back blows between
the shoulder blades with the heel of the other hand.
Each blow should be aimed at relieving the obstruction, so all five need not necessarily be given.

Picture 33: Abdominal thrust
39 ASSESSMENT OF THE UNRESPONSIVE CASUALTY AND BASIC LIFE SUPPORT
Abdominal thrustsIf the back blows fail to relieve the airway obstruction and player remains concsious, carry out abdominal thrusts (picture 33). – Stand behind the player and put both
arms around the upper part of the abdomen generally between the bottom of the breast bone and belly button.
– Clench your fist, and turn it so that your thumb is up against the abdomen and then grasp the outer side of the clenched fist with your other hand pull sharply inwards and upwards, with the aim of producing a sudden expulsion of air, thereby expelling the foreign body from the airway.
If the obstruction is still not relieved continue alternating five back blows with five abdominal thrusts until the obstruction is relieved or the patient loses consciousness and starts to collapse to the ground. If that happens, assist their fall so that they do not injure themselves.
Once the player is lying on the ground unconscious, with no breathing, due to the airway obstruction: – Open the mouth, look for, and if possible,
remove the foreign body if it can be seen. – If the obstruction cannot be seen and
removed, and there is no breathing, begin chest compressions (see BLS/CPR section).
– At the end of each cycle of compressions, quickly check the mouth to see if the object has been expelled.

40 ASSESSMENT OF THE UNRESPONSIVE CASUALTY AND BASIC LIFE SUPPORT
DEALING WITH CHILDREN WHO ARE CHOKINGOne should differentiate between children and babies because there is a difference in treatment.
You should suspect that a child might be choking if there is: – Sudden noisy breathing or sudden
silence, especially if they have been eating and playing at the same time
– Associated coughing and / or gagging
If the child is conscious – Try and calm them down and get them
to follow your instructions. – Encourage them to breathe in slowly,
deeply and to try and cough hard when they breathe out.
– Monitor for deterioration.
If the child cannot cough effectively, regard this as a complete airway obstruction. Perform up to five back blows and then alternate with five abdominal thrusts, until the obstruction is relieved or the child loses consciousness (same as for the adult).
If the child is unconscious and not breathing because of the airway obstruction, do standard CPR.
Start CPR (➔ see BLS section). Standard CPR with rescue breathes and chest compression allows you to try and breath some air into the lung with your breaths whilst the chest compression tries to force the obstruction out of the airway.

41 ASSESSMENT OF THE UNRESPONSIVE CASUALTY AND BASIC LIFE SUPPORT
PLAYER HANDOVER TO THE AMBULANCE OR HOSPITALIdentify one person to handover the player to the ambulance on its arrival.
Advise the ambulance of as much detail as you can. For example, player's name, age, mechanism of injury, time of incident, previous medical history, medication, emergency first aid treatment already given and all relevant signs and symptoms you have seen (➔ refer to Appendix I).
It is easier for the First Aider who works with a team regularly to know about the player’s previous medical health. It is harder for the First Aider who is covering a one-off tournament with players they have not met before. Take as much information as you can from bystanders and family members present if the player is unable to respond.


3WOUNDS AND
BLEEDING

44 WOUNDS AND BLEEDING
A wound is an abnormal break in the skin or other tissues of the body that permits the escape of blood internally or externally and may allow the entrance of germs and infection.
All organs of the body depend on an adequate and uninterrupted supply of blood in order to survive and function. Any substantial loss of blood is dangerous and the degree of danger depends on the amount of blood that is lost.
The ability to recognise that bleeding is taking place and how to stop it is one of the most important aspects of first-aid casualty survival.

45 WOUNDS AND BLEEDING
BLEEDING
There are two types of bleeding:1. External bleeding that can be seen at the site of injury: blood may spurt out very fast (arterial bleed), be a constant flow (venous bleed) or just ooze out of the wound surface. Another form of external bleeding is catastrophic bleeding.
Catastrophic bleedingThis occurs when there has been damage to a major vessel. It is unlikely in football and is a more usual occurrence for gun shot and stabbing wounds. However, a laceration by a football boot to the groin area, could result in a catastrophic bleed if the major vessel was lacerated (extremely rare injury). These types of bleeds can also occur after major trauma for example blunt trauma to the abdomen or a fracture to the pelvis, but in these types of injury the blood is not visible but internal (➔ see page 46).
When referring to a catastrophic bleed it is important to note that in this instance the blood would be spurting (pumping) out of the wound at a very fast pace and in large copious amounts and would quickly cause the person to bleed to death if not stopped. This is not a wound that oozes blood and appears bad, such as would occur with small lacerations to the face and head.
In this rare instance, the bleeding takes priority over the airway and breathing. The bleeding must be stopped before the airway can be attended to. If several First Aiders are present, one can take the bleeding wound and the other deal with the airway.
Treatment of a catastrophic bleedDirect pressure, as for any wound, is the first response. Deep and firm direct pressure is applied to try to stem and control the bleeding and keep the blood inside the body. Cover up as much of the area as you can with your gloved hand and a sterile towel (if you have one) to stop as much bleeding as you can. You must get the bleeding under control and then assess the player’s airway. This is a medical emergency and requires urgent medical attention.
These types of wound would always take precedence over the airway and breathing, but are rare on a football field of play.

46 WOUNDS AND BLEEDING
2. Internal bleeding cannot be seen but can sometimes be detected by areas of swelling. Examples are given below: – with contusions (bruises)
Most contusions are minor with minimal internal bleeding that just cause discolouration of the skin. Severe contusions are apparent with mass swelling and discolouration and severe pain felt by the player and an inability to move the body part. This requires emergency treatment and should be sent immediately to hospital.
– with closed fractures (swelling) (➔ see chapter 5)
– in the abdominal cavity (from damage to internal organs, e.g. spleen, liver)
– in the thoracic cavity (from damage to lungs)
Internal bleeding may be difficult to diagnose for the First Aider because quite often blood cannot be seen. However, if internal organs are affected, blood may appear via the existing channels from the body and have certain characteristics. These characteristics are listed below for your information, all require immediate referral to hospital: – Lungs – bright red and frothy and
coughed up through the mouth – Stomach – a dark coffee colour and is
vomited up – Kidneys – blood stains the urine into a
smoky grey colour
– Large intestine – blood passed by the bowel as a black sticky tarry substance
– Brain – blood escapes through the ears, nose and eye orbits as blood stained watery fluid
– Utero – vaginal bleeding from trauma, ruptured ectopic pregnancy or miscarriage / abortion in female players
Blood LossThe percentage of blood volume lost is of importance for the development of the clinical picture, therefore, you should assess how severely the player is bleeding. A small amount of blood loss in a child may be of serious significance, whereas a similar volume lost by an adult may be of no consequence.
To assess the severity of bleeding, look out for the amount of blood lost:
- in body tissues (swelling). - on the floor, taking into account the type of surface (absorbent), and the player being moved. - on the player’s clothing taking into account the clothing, being thick, thin, absorbent or non-absorbent. - on the wound dressings and bandages.

47 WOUNDS AND BLEEDING
The severity of bleeding can be assessed through monitoring and assessing the player for signs of: – Faintness – Dizziness – Restlessness – Feeling sick – Feeling thirsty – Feeling cold and shivering – Blurred vision – Pulse rate increasing and becoming
weaker as the condition is deteriorating – Breathing rate increasing from normal,
if “gasping” occurs it indicates a severe bleeding somewhere
– Pupils become larger as the condition worsens
– Skin is pale and the limbs are cold, with blueness developing on the lips
WOUNDSThere are many types of wounds, the commonest in football are listed below.All wounds can be prone to bleeding and it is important as a First Aider that you know the types of wounds and how to manage them.
The management of a wound centres on:
- Control of bleeding. - Prevention of infection. - Prevention of further complications.
– Abrasion – is a superficial wound to the skin usually caused by scraping of the skin across a rough surface. A good example of these are friction burns (grass burns).
– Contusion – bruising occurs after a blow by a blunt instrument e.g. kick onto the thigh or shin. This can cause bleeding that is under the skin (internal).
– Laceration – results from a snagging and tearing of tissues, e.g. clash of heads can cause a cut above the eye.
– Incision – is a straight cut to the tissues. On the field it can be caused by the studs on players boots that can become sharp with wear and tear.
– Puncture – is a penetrating wound, caused by an object that may or may not still be in place. Usually caused by knives or animal / insect bites. Assessing the depth and severity of this type of wound can be difficult. These are not common on the sporting field unless the player falls onto something on the field of play that should not be there e.g. broken glass. All football fields-of-play should be checked for foreign objects prior to training and playing on them to prevent such wounds occurring.
– Amputation – is a complete separation of bone and tissue from the rest of the body. This is not common in football but there are instances where players have got fingers caught in training on fence wire surrounding the field of play or park causing amputation of the finger end.

Picture 35: Direct pressure onto a bleeding wound
Picture 36: Direct pressure and elevation of a bleeding wound
Picture 34: Direct pressure onto a bleeding wound
48 WOUNDS AND BLEEDING
FIRST AID MANAGEMENT OF EXTERNAL BLEEDING – Always ensure the player has an open
airway first (➔ see chapter 2 – ABCDE approach).
– Inspect the injury for foreign bodies or debris; remove anything that is not embedded.
– Control any obviously serious blood loss by applying direct pressure over the wound with a clean dressing (if no foreign objects are embedded in the wound) (pictures 34 and 35).
– If bleeding passes through the dressing, apply a further clean dressing on top. Please be aware if blood passes through the pad there may not be enough direct pressure being applied. Place a further dressing on top and increase the direct pressure applied.
– Place the player in a lying position to slow the heart rate and lessen blood flow.
– Elevate and immobilise the injured area to allow the effects of gravity to slow the blood flow. For example, place an arm in a triangular sling or raise the legs with your arms (picture 36) or by placing the feet on a soft pad.

Picture 37b: Indirect pressure applied using the thumbs into the groin
Picture 37a: Indirect pressure applied with fingers into the groin
Picture 38: Indirect pressure upper limb
49 WOUNDS AND BLEEDING
– If a foreign body (e.g. glass) is embedded in a wound, leave it where it is and apply a dressing around the area.
– Transfer the player to hospital for a doctor to remove the object safely. Removing embedded objects can cause severe bleeding and should only be done under medical guidance.
– If the wound is still bleeding or if foreign objects are in the wound, apply indirect pressure. Pressure should be applied for ten minutes into the groin and then released until colour comes back to the limb (picture 37).
– If the bleeding is still heavy then pressure should be reapplied to the pressure point for a further ten minutes.
– For upper limb bleeds, indirect pressure should be placed at the top of the arm (picture 38).

Picture 39: Wound dressing
50 WOUNDS AND BLEEDING
WOUND DRESSINGS
A wound dressing will help in stemming the blood loss and in keeping the area clean.
Sterile and clean dressings that are large enough to cover the wound should be used if possible. When applying a sterile dressing the First Aider should have washed their hands and be wearing gloves. Do not touch the part of the dressing that is to be in contact with the wound to prevent the transfer of germs / infection to the bleeding wound (picture 39).
However, in the first instance of a serious bleeding injury the priority is to stop the flow of blood out of the body by any means necessary, so if no appropriately sterile dressing is available towels, pieces of cloth or clothing (player shirt) or your hand can be used (preferably if you are wearing gloves).
Wound dressings should be rechecked for effectiveness, that is the correct placement and that the wound is covered on all four sides. If the dressing becomes soaked with blood, apply another dressing over the top and increase the direct pressure applied, do not remove the original one.
Continue to observe the player and note if the bleeding is slowing or stopped, for example dressings are no longer being soaked with blood. It is important to monitor the player for signs of impairment of circulation (e.g. the limb is going pale), if this is the case your dressing might be too tight.

51 WOUNDS AND BLEEDING
WOUND CLEANING
Superficial wounds (where the wound does not penetrate through the whole skin) may be managed effectively at the sideline without requiring hospital intervention. However you must ensure that the wound is clean and not dirty, i.e. with any mud or grass inside.
If the wound is dirty, clean water can be applied to wounds to wash away dirt and debris present on the wound from the field of play and / or to wash away blood so that the wound can be examined for the full extent of the injury. The wound should be washed with clean / sterile water or salt water. A large volume of water is required to effectively clean a wound for example at least a 250 – 500 mls bottle of sterile water as a minimum or 250 – 500 mls of cooled boiled water (as discussed in chapter 1).
Dry the wound with a clean towel and then manage as above.
For deep wounds, the player may require stitches and therefore after stopping the bleeding and cleaning as much as you are able to see, the player must be sent to hospital for wound closure. The hospital will then consider the risks of infection and whether the player requires immunisation.

52 WOUNDS AND BLEEDING
FIRST AID MANAGEMENT OF INTERNAL BLEEDINGEffective management until medical help arrives may be achieved by: – Ensuring the player has an open airway
(➔ see chapter 2). ABCDE approach. – Positioning the player lying down
in their most comfortable position. Abdominal injuries may be more comfortable if the knees are bent. Lung injuries should be inclined to the injured side. Unconscious players should be placed in the recovery position, with the injured area on the lower side, if no spinal injury is suspected.
– If the player is bleeding from an ear from a simple blow, covering the ear with a sterile dressing and inclining the head so the affected ear is downwards, to allow for drainage. If there is or you suspect an associated head and neck injury follow the process in chapter 6.
– Elevating the legs to help with circulation if the injury allows you to do so.
– Loosening restrictive clothing. – Anticipating vomiting and giving
nothing by mouth. – Moving the player as little as possible. – Keeping constant observation of the
player, regularly noting and recording their breathing rate and level of consciousness and the presence of pain.
– Watching out for signs of shock (➔ see next page).

53 WOUNDS AND BLEEDING
SHOCK
Shock is not a specific entity, but the name given to a clinical syndrome. The condition exists where there is an inadequate blood supply and oxygen to the tissues in the body, either because of a lack of fluid or due to a failure of the circulatory system.
Severe shock causes a fall in blood pressure and, if untreated, it can lead to death.
To function normally the body requires three intact mechanisms: – An effective heartbeat – An adequate quantity of blood – Intact blood vessels
Certain players are at high risk in terms of suffering from shock under the following circumstances: – Bleeding injuries or broken bones
resulting in loss of blood either from internal or external bleeding
– Congenital heart conditions or older players or coaches who may suffer a heart attack resulting in an inadequate circulation, thus blood is not getting around the body
– Illness e.g. meningitis – Injection or sting – causing an allergic
reaction (➔ see chapter 7).
Signs and symptoms The player may appear to be: – Pale or ashen (grey in colour) – Cyanosed (blueness evident around
lips, nose, ears and finger tips) – Internal injuries (example swelling) – Feeling cold or cold to touch – Feeling sweaty or clammy to touch – Feeling dizzy – Complaining of blurred vision – Complaining of pain – Increased breathing rate, but taking
shallow breaths – Difficulty in talking in sentences due to
shortness of breath – If you are qualified to check for a
pulse, it may be difficult to find at the extremities and it will be rapid and weak
– May feel tired and sleepy and eventually may go unconscious
MANAGEMENT OF SHOCKEarly recognition and management can prevent or limit the effects of shock.
The player requires fluid replacement immediately and requires urgent transfer to hospital. Call for an ambulance immediately. For external bleeding stop the bleeding (see above) and for heart conditions provide BLS (➔ see chapter 2) until further medical help arrives.

54 WOUNDS AND BLEEDING
Until ambulance help arrives, effective management may be achieved by: – Ensuring an open airway
(A – E approach). – Keeping the airway clear as much as
you can, if you have a suction use this, should they vomit. If you do not have a suction unit lay them on their side to drain the vomit from their airway (recovery or modified recovery position
➔ see chapter 2 and 6 respectively). – Placing the player in an appropriate
position, usually lying down flat if conscious or in the recovery position if unconscious or bleeding from the mouth and face.
– Call for help, if medical help is available administering high concentrations of oxygen.
– Treating other injuries that might be the cause of the shock, example supporting fractures, reducing pain and controlling bleeding if present.
– Keeping the player at normal temperature. Do not overheat or allow to become too cold.
– Raising their legs to maintain the blood pressure to the vital organs (if their injuries permit you to do this).
– Avoiding unnecessary movement and rough handling.
– Providing reassurance by keeping the player calm and still until the ambulance arrives.
– Keep the player under constant observation, constantly checking breathing and level of consciousness (➔ see chapter 2).
Other important points: – Give nothing by mouth, as the player
may need an anaesthetic to treat the underlying injury cause.
– Note and report any relevant information, changes in condition, your estimate of blood loss to be able to give to the ambulance to treat the cause.

55 WOUNDS AND BLEEDING


4SOFT TISSUE
INJURIES

58 4 SOFT TISSUE INJURIES
SOFT TISSUE INJURIES
The majority of lower limb injuries in football are sprains of the ankle and knee ligaments, and strains and contusions of the thigh and calf muscles. Soft tissue injuries, whilst very common, are not always the easiest to manage and to treat. Some severe ligament sprains can take as long to heal as a fracture (broken bone) does.
A “sprain” is an injury to the ligament. A ligament attaches two bones together to form a joint. Ligament sprains can be graded into minor (where only a few ligament fibres are torn), moderate (where the ligament is partially torn) or severe (where the ligament is completely torn).
The common mechanism is when the ligaments are stretched too far from their normal position, displacing the surrounding joint from its normal alignment.
Typical symptoms of a sprain are: bruising, swelling and pain on movement. Moderate and severe injuries may cause problems with walking. Severe ligament sprains can lead to an unstable joint, as the ligament ends are no longer attached, meaning the ligament cannot stabilise the joint. Some players may feel a “pop” or tear when the injury happens.
A common example in football is an ankle sprain. The player can be running for a ball or making a tackle, when his ankle suddenly
twists inwards beneath them tearing the outside ligaments of the ankle joint.
Another common example is a complete tear of the anterior cruciate ligament (ACL) of the knee. The mechanism is a sudden twisting injury e.g. the foot caught in the ground as the player twists to kick a ball or make a tackle.
A “strain” is an injury to the muscle or tendon. A tendon attaches muscle to bone. A strain usually results from an overstretch or overworking of the muscle or tendon causing some damage or tearing of the muscle or tendon fibres. The grades of a strain are like those for a sprain.
A common mechanism of injury causing a muscle strain is sudden acceleration e.g. running for a ball from a static position or deceleration (slowing down). For a tendon injury a common mechanism is overstretching; example falling to the ground with the arm fully extended.
Typical symptoms of a strain are pain in the injured area, weakness of the muscle when trying to move it and muscular spasm. There can also be localised swelling to the area and it may feel swollen and hot to the touch due to local inflammation. Bruising can also be evident when the strain is moderate or severe. A severe strain can sometimes result in a complete rupture where a gap is palpable within the
59 4 SOFT TISSUE INJURIES
muscle itself, these injuries are often very painful and can be disabling to the player for a short period of time.
A common example in football is a hamstring (posterior thigh muscle) strain when the footballer tries to slow down after a fast sprint. A common example in the upper limb is when the goalkeeper lands onto the ground with his arm fully extended, causing damage to the tendons of the rotator cuff muscles that support and hold the shoulder joint.
A “contusion” is a bruise to the skin and underlying tissues.
A common mechanism of injury causing a contusion is direct contact; either a blow or severe knock to a body area. Damage to the underlying tissues and muscle causes bleeding into the area.
Typical symptoms are swelling, discolouration and pain on touching or, in the instance of a severe contusion, pain on moving the area.
A common example of this is a contusion to the front thigh muscles (quadriceps), which is commonly called a “dead-leg” or “cork” injury caused by the knee catching the opposition player’s thigh during a tackle.
TYPES OF SWELLING TO BE AWARE OF FOR THE FIRST AIDER IN FOOTBALLSwelling can be caused by either fluid leaking from tissues or from bleeding into the tissues.
After a traumatic (serious) injury there can be dramatic bleeding. Dramatic bleeding into tissues is visible by the injury swelling up immediately (within 5 – 15 minutes of the injury occurring). This type of swelling is always due to blood and is a sign of a very serious injury. The player should be referred to hospital. This type of bleeding occurs due to a total rupture of a ligament, muscle or tendon or in response to a broken bone.
Swelling that gradually appears over the first 24 hours is not as severe and can be managed as described below. This type of swelling occurs as a result of minor or moderate injuries as discussed above.
Swelling is linked with inflammation (which is heat and redness of the area) and may present as a localised bump or general swelling of the injured area. It is important to try to minimise this swelling to prevent damage to other surrounding structures.
60 4 SOFT TISSUE INJURIES
HOW SHOULD A FIRST AIDER RECOGNISE AND TREAT A SOFT TISSUE INJURY?Signs and symptoms of a soft tissue injury can be very similar to those of a fracture (broken bone). A fracture must be ruled out by careful evaluation before continuing to manage the injury (➔ see chapter 5). This may require the player being first seen by a doctor or therapist.
AIMS OF FIRST AID MANAGEMENT – To minimise bleeding and swelling
into the soft tissue. Excess bleeding or swelling into the injured area will cause pressure on the surrounding tissues that will increase the player’s pain. Excessive swelling and inflammation can cause damage to the tissues in the surrounding area.
– To prevent further injury – rest and immobilise the injured area to prevent the injury becoming worse.
– To promote recovery – to give the healing tissues the best environment in which to heal.

61 4 SOFT TISSUE INJURIES
FIRST AID MANAGEMENT
1. Check that the player is alert with no confusion / concussion, no symptoms / signs of a neck injury or any other serious injury.
2. Check if the player can be moved. A player should not be moved if a serious injury is suspected e.g. a broken bone is visible through the skin (➔ see chapter 5) or if a neck or back injury is suspected (➔ see chapter 6). In this instance keep the player still, comfortable and warm. Support the injured site and reassure them until an ambulance arrives to transfer them to hospital. Suspected severe injuries should be sent to hospital. If the player is moving or can be safely moved, transfer them from the field of play or activity that they are doing, so that you can assess the extent of the injury.
3. Assess the injury – First, exclude a fracture. Feel the injury
for warmth, deformity and swelling. The player may feel tenderness or pain indicating the exact site of the injury. Abnormal movements or malalignment may indicate a fracture (➔ see chapter 5). Remember, it is not always easy to distinguish a soft tissue
injury from a broken bone, so be gentle and careful. If you are not sure, treat as a broken bone and refer to hospital by ambulance.
– If there is an immediate large swelling at the injury site, then this usually indicates bleeding into the area. This indicates serious damage. Apply ice (if you can) or cold wet clean towels if that is all you have and transfer the player to hospital immediately. An example is a complete rupture of the anterior cruciate ligament of the knee. The knee joint would swell to a mini-size football immediately after the injury.
– For upper limb injuries or lower limb injuries where the player is partially mobile, somebody may be able to drive the player to hospital and not wait for an ambulance.
– Please note: where serious injury is present then calling for an ambulance is always the preferred and recommended option.
4. Treat the Injury Use the Protection, Rest, Ice, Compression and Elevation regime (PRICE) for treatment of soft tissue injuries.

62 4 SOFT TISSUE INJURIES
P.R.I.C.E.
As a First Aider, the aim of treatment is to give the injured footballer the appropriate initial basic care. The player will probably not be able to continue playing if it is a serious injury, but the player with a minor injury may try to continue playing. If you have ruled out a serious injury and ruled out the need for the player to be transferred to hospital by ambulance, then the following regime can be followed to manage the player’s minor injury.
PROTECTION AND RESTConsider the following treatment within the first 72 hours of the injury that you are going to treat. (Acute injury phase). – Stop the player performing any
movements that are the same as that which caused the initial injury, to prevent further damage occurring.
– External supports or braces will help to stop these movements, if you have them. If you do not have these, then bandages and tapes that limit the movement are also effective.
– If you have no external supports or bandages, long football socks or towels can be used to tie legs together whilst resting or awaiting transport to hospital, so that the good leg acts as a splint for the injured leg (➔ see chapter 5.2).
– For those players that cannot put any weight on a limb, transfer them to hospital. If you cannot transfer them to
hospital because you are playing out of your local area and need to wait until you return to your local hospital, then crutches may be necessary for travel purposes to help the injured player be mobile.
– For injuries to the upper limb the player’s shirt can be lifted up and over the injured arm and this will act as a good support (sling) for injuries to the shoulder, collar bone, elbow, hand or wrist (➔ see picture 45, page 85).
– Good support often helps relieve the player’s pain from the injury.
After 72 hours following the injury If no medical referral is necessary or practical: – Early mobilisation and weight
bearing is more effective than total immobilisation / rest after an ankle sprain, particularly for minor sprains, so avoid total immobilisation where you can.
– Be guided by what pain your player feels but some “loading” e.g. weight bearing is recognised as an essential component of soft tissue injury management.
– Where there is no fracture or complete rupture or risk of causing further damage, total rest and immobilisation should be avoided after the acute phase (after the first 72 hours). Use the following steps as guidance through this process, but if possible, always seek advice from a doctor or therapist.

Picture 40a and b: Ice application
63 4 SOFT TISSUE INJURIES
– Progress the player to full weight bearing as his injury improves i.e. as his pain and swelling reduces and his range of movement returns to full range. A safe transition is required from protection / rest to tissue loading after injury and this can be guided by the level of pain that the player experiences with full consideration of the injury. If the player experiences pain or the swelling returns, stop all activity and refer the player to hospital via an ambulance.
ICE - First 72 hours – Apply ice immediately after an acute soft
tissue injury (pictures 40a and b). This is an essential part of your first aid equip-ment and should be carried with you in a cool box or stored close by in a freezer during every training session and match. Ice will help in preventing and reducing the heat and redness to the area as well as reducing the swelling that is occurring and relieving some of the pain the player is experiencing.
– The best type of ice to use is crushed ice - an alternative is ice cubes in a plastic bag.
– Apply the ice over a damp / wet paper tissue (or something similar like cling-film wrap) that is thin and will not stop the body part from being cooled. Avoid applying ice directly to the skin as ice burns can occur. Applying over towels or bandages will reduce the effect the ice will have on the underlying tissues.
Ensure the ice is moulded around the affected area for the maximum effect.
– Ice should be applied for a period of ten minutes.
– The time between ice applications should be guided by the players pain and discomfort and can be more frequent than ten minutes every two hours if the symptoms are severe. Frequent application will help with pain relief.
– Ice application should be continued for the duration of the acute phase (first 72 hours).
– Application of ice for longer periods e.g. more than 20 – 30 minutes should be avoided.

64 4 SOFT TISSUE INJURIES
– Smaller body parts such as the hands and fingers or feet and toes will cool at a quicker rate than other areas of the body so may require less application time. These body parts can also be easily immersed in a bowl of cold water for cooling (preferably with ice cubes added). This type of treatment is known as ice-immersion and is a very effective treatment.
– If the player’s signs and symptoms deteriorate during this period then they should be referred to the local doctor or straight to hospital for further evaluation.
72 hours onwardsIf ice is effective and helping the player then it can be continued beyond the acute phase for as long as it is effective.
Ice is also beneficial when the player begins to return to training, as it can be used to cool the recovering injury site down after exercise.
An alternative to ICEIf you do not have ice, very cold-water application via a wet towel or cloth is another option. The aim is to try to cool the area as much as possible, to reduce the heat and swelling in the area and to prevent further injury. If you are using cold towels then remember the player’s body heat, especially after exercise, will be quite high and will warm the wet towel up quickly. Replace the wet towel with fresh cold wet towels every couple of minutes. Please ensure that the towels are very wet with cold water before application to maximise the benefit.
For players self-treating at home – advising them to immerse their injury in a cold bowl of water for upper limbs or cold water bath for the lower limb injuries for up to ten minutes (or as long as they are able) might also be a suitable alternative to ice application if they have no ice at home.
Cold water and iced water can occasionally be uncomfortable and can often cause a headache. Advise players to immerse their injury for as long as they can. This type of application might have to be intermittent.
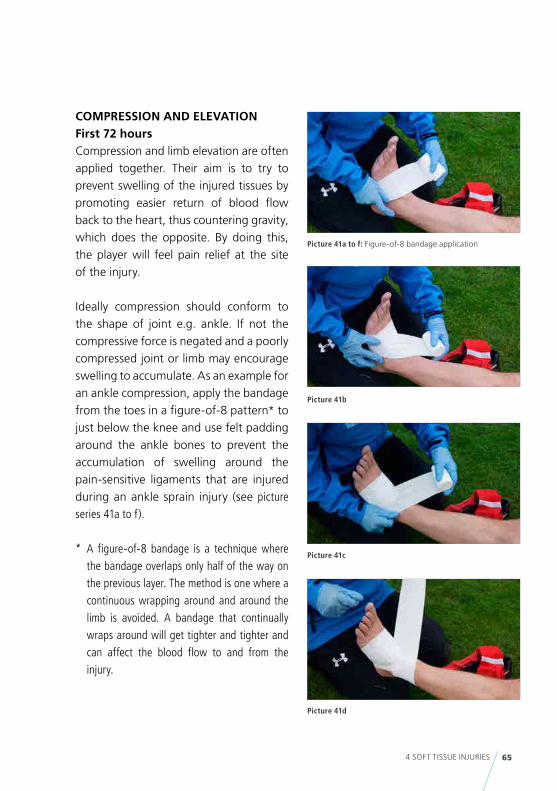
Picture 41d
Picture 41a to f: Figure-of-8 bandage application
Picture 41b
Picture 41c
65 4 SOFT TISSUE INJURIES
COMPRESSION AND ELEVATIONFirst 72 hoursCompression and limb elevation are often applied together. Their aim is to try to prevent swelling of the injured tissues by promoting easier return of blood flow back to the heart, thus countering gravity, which does the opposite. By doing this, the player will feel pain relief at the site of the injury.
Ideally compression should conform to the shape of joint e.g. ankle. If not the compressive force is negated and a poorly compressed joint or limb may encourage swelling to accumulate. As an example for an ankle compression, apply the bandage from the toes in a figure-of-8 pattern* to just below the knee and use felt padding around the ankle bones to prevent the accumulation of swelling around the pain-sensitive ligaments that are injured during an ankle sprain injury (see picture series 41a to f).
* A figure-of-8 bandage is a technique where the bandage overlaps only half of the way on the previous layer. The method is one where a continuous wrapping around and around the limb is avoided. A bandage that continually wraps around will get tighter and tighter and can affect the blood flow to and from the injury.

Picture 42: Elevation with ice
Picture 41e
Picture 41f
66 4 SOFT TISSUE INJURIES
Compression provides support to the injured limb. This support can control the range of movement (and help to restrict the movement if required) at a joint and provide reassurance to the player after the injury. External supports (compression) can also be used to convince a player of the severity of an injury, particularly when the player is insistent that they wish to return to active play.
Compression should be removed during ice application and then reapplied following the ice. Ideally, if this can be done whilst the leg is elevated it will provide additional benefits for healing (see picture 42).
Elevation of the injured limb is used to limit the amount of swelling around the injury. Reducing the amount of swelling will help to reduce the amount of pain the player feels. Ideally, elevate the limb above the level of the heart.
There is no time restriction on how long elevation can be applied, however the lower down the leg the injury, the longer the application time of elevation should be so as to assist with drainage of excess fluid (swelling) back to the heart.

67 4 SOFT TISSUE INJURIES
Placing and securing the injured hand at rest onto the opposite shoulder is an easy way of elevating upper limb injuries e.g. hand and wrist injuries.
With any lower limb injury the player should be encouraged to elevate his leg on a stool or bed whenever he is resting for the first few days after the injury. Sitting in a chair with the leg dependent (where the foot is resting on the floor) should be avoided for long periods of time, because this causes swelling to occur.
After a period of resting and elevating the leg, the player should be encouraged to slowly and gradually return the leg to the dependent position (foot onto the floor) as there is a risk of increasing swelling at the injury site if the player begins to stand and become mobile too soon.
After 24 hours the player can be encouraged to do light non-weight-bearing exercises in the elevated position, e.g. for an ankle sprain, with the leg elevated on a stool, the player can be encouraged to do circular ankle movements to try to regain ankle motion
and to again assist with decreasing the swelling that may have accumulated. For the upper limb e.g. shoulder injuries, the player can be encouraged to stand and lean forwards and let his affected arm hang down and gently swing it around in circular movements to regain movement in the shoulder.
72 hours onwardsCompression and elevation can be used as long as they are effective and as long as the swelling remains. The use of elevation is stopped before the use of compression. Compression may be applied for longer periods for the benefit of providing support to the injury site as the player recovers and in helping restrict the range of movement until you wish the player to gain full range (i.e. when there is no more pain or swelling).
Compression can later be used as a support for return to full activity providing the player with reassurance. Eventually the player should wean off compression in order for the soft tissues to regain their full strength.

68 4 SOFT TISSUE INJURIES
Protection - Remove from the field of play. - Move to a safe location to assess - Support the injury by applying a bandage.
Rest - Avoid stress to the injury (do not mimic the injury mechanism that caused the injury in the first instance). - Reduce activity during the first 72 hours.
Ice - Use crushed ice (or ice cubes in a bag) and apply for ten minute periods immediately after injury. - Apply regularly and intermittently e.g. at least every two hours during the first couple of days, during waking hours.
Compression - Should conform well over the area it is applied (e.g. should fit well). Poorly fitting compression bandages will lead to areas of increased swelling. - Should be taken off at night and reapplied before getting out of bed the next morning.
- Should be applied from below to above the injury and the pressure of the compression should be kept uniform along the limb. - Should not restrict the circulation above or below the bandaged area. - If there is pain after application of the compression bandage, you may have put it on too tight and may need to undo it and reapply again but less tight.
Elevation - Elevate the limb where possible above the level of the heart. - After elevation slowly return the limb to the dependent position. - Can be used in isolation or combined with compression or non-weight-bearing exercise.
The PRICE regime should be used at least for the first 72 hours after the injury and for as long as it is effective. Some injuries will respond quicker than others to this treatment and it depends upon the severity and position of the injury.
69 4 SOFT TISSUE INJURIES
Players should be advised how to use the PRICE regime at home and continue with the process until you or the doctor / therapist review them again. Ideally if you can see them again 24 hours after the injury to reassess you should do so. At this point the injury should be responding to the treatment, if the injury is noticeably worse then the player should be referred to a doctor or local hospital for further review if they have not already done so.
When the injury is responding (i.e. reducing pain and swelling and the player is able to walk better) then the player can be gradually rehabilitated back to full fitness, by gaining full range of movement of the joint and full strength. Always be guided by the player’s pain levels and do not push through these. With ankle sprains the player's balance is also very important and balance exercises like standing on one leg with eyes open and closed and walking on heels and toes can be easy exercises that the player can do at home as his injury improves. It is very important to load any injured tissue in a normal way, therefore encourage where possible a normal walking pattern at all times, this will help in preventing problems becoming chronic.
For the upper limb it is important to gain full range of movement at the hand, wrist, elbow and shoulder. This can be done by pendular swinging exercises or by taking the affected hand and interlocking with the good hand and using the good limb to lift the affected limb. Initially this can be done whilst lying down, which minimises the forces of gravity making the movement easier. Eventually as strength and movement return and pain decreases there is no need to use the good limb to help. The upper limb also weight bears and it is good to sit and try to put weight through the upper limb by leaning through the hand. Eventually half press-ups and full press-ups can be done.
Another type of injury affecting the soft tissues are dislocations.

70 4 SOFT TISSUE INJURIES
DISLOCATION
Dislocation – where a bone is partially or fully dislodged at a joint, usually as a result of a wrenching or tearing action.
The most common dislocations in the lower limbs are to the patella (kneecap) often caused by a direct blow. In the upper limb most dislocations occur to the shoulder and elbow as a result of a fall or the arm being knocked backwards during a contact tackle e.g. trying to grab another player. Shoulder dislocations, whilst not common in football, do occur in goalkeepers.
Management of dislocations may involve normal soft tissue management if the joint is partly dislocated (subluxed). Usually the player will feel this occur and will also feel it relocate back to its normal position. If the joint is completely dislocated that means that the two bones forming the joint are no longer in contact. Dislocations can be associated with multiple soft tissue injuries including sprains. They can also be associated with fractures (➔ see chapter 5). This injury will require immediate transfer to hospital and may require an ambulance if the player is unable to move.
The player with a dislocation will be in significant pain and the injury may be very easy to see for example with a dislocated patella will you will find the kneecap usually lying on the outside of the knee rather than in the centre. The player will be unable to move the knee joint and it will look deformed. On asking the player how the injury happened or what they felt, they often say that they felt something “popping out". These are clear indications that a dislocation has happened.
The dislocation requires “reducing” which means “putting the bone back in place”. The safest place for this to occur is in hospital. The player requires an urgent transfer to hospital. The limb can be supported (➔ see chapter 5 on immobilisation) and ice can be applied for pain relief.
Following the reduction of the dislocation, the limb will be immobilised for a short period of time, after which time the aims of treatment are the same as for other soft tissue injuries. The player needs to return to full range of motion of the joint and regain full strength. The PRICE regime can be used to assist this process as described above. This process should be guided by what the doctor has said as this injury could occur again.

71 4 SOFT TISSUE INJURIES
RETURN TO FOOTBALL
The footballer can return to full training and competition when they can perform the full requirements of the game of football. If the player is self-treating or being managed by the First Aider, return to play can occur when the player no longer has any pain, swelling, heat or loss of movement from the injury and when they can jog, run, land, stop, tackle and be tackled. This can be assessed by using a simple fitness test.
A fitness test is a physical activity test that puts the player through the full range of movements and requirements of a football match or training session, according to the player’s level and age group i.e. what is normally expected of them at their competitive level. For football this will include being able to run in all directions (forwards, backwards, sideways) at differing speeds; being able to stop and start, being able to jump and land on one leg, dribble a football, tackle an opponent and kick a ball. For a goalkeeper other skills are also required in saving a ball and being able to dive onto the field of play.
Short-term problems of these types of injuries include loss of training or playing time and loss of fitness. Longer-term problems include recurrent injuries and continued impairment unless they are managed correctly.
Dislocations to the shoulder or elbow may take even longer to heal than most other soft tissue injuries and the player should be able to move the shoulder or elbow in all directions (equal to the good arm) and have full strength in the arm before return to playing is attempted, otherwise the shoulder or elbow is likely to dislocate again. Difficulties are often found with dislocated shoulders in being able to put the arm behind the back to touch the opposite shoulder blade or put the arms behind the head (hand onto back of neck). This is because these movements require the player to be able to move the shoulder in a combination of movements. They cannot play until they can do these movements equally well as on the good side.


5BONE INJURIES:
FRACTURES OF THE LOWER AND UPPER LIMBS AND RIBS

74 BONE INJURIES: FRACTURES OF THE LOWER AND UPPER LIMBS AND RIBS
BONE FRACTURE
Injuries to the bones in football are not common but when they do occur are generally serious injuries. The usual cause of any fracture to one of the limbs or to the ribs is due to contact with another player, an object such as a goalpost or the ground.
Fractures account for about 4 % of all football injuries4.
There is another type of fracture known as a stress fracture which is an incomplete break in a bone. It is caused by “unusual or repeated stress,” rather than one severe impact or event. It could be described as a very small crack in a bone. Stress fractures usually occur in weight-bearing bones, such as the shin bone or small bones in the foot. They are characterised by the player complaining of localised pain that is made worse by activity. Local pressure by your finger on the area will make the pain worse.
All fractures, even if only suspected, should be immediately referred to the hospital for investigation and management. Missing any fractures can result in poor union or delayed healing of the bone as well as development of complications.
A fracture can be classified into different types
Closed The bone(s) are broken but the skin is kept intact over the area of the break.
Open The skin has been damaged over the area of the broken bone. This can have a high risk of infection.
ComplicatedBesides the broken bone there is damage to other nearby structures e.g. trapped blood vessels or nerves.
Greenstick fracture (found only in children because they have flexible bones) – one side of a bone is broken while the other is bent. Because a child’s bones are much more pliable than adult bones, an incomplete, or “greenstick” fracture may occur.

75 BONE INJURIES: FRACTURES OF THE LOWER AND UPPER LIMBS AND RIBS
Greenstick fractures are commonly mistaken for strains or sprains because there are only a few signs and symptoms present. Young children who fall onto an outstretched hand suffer a greenstick fracture to the forearm and this presents as a “bump” along the forearm, often painful to touch.
Should such a “bump” be felt after a fall, a greenstick fracture should be suspected in a younger child. If this injury is not sent to hospital for treatment (straightening) the bone will begin to heal in this position and the child may be left with a deformity and resulting movement difficulties and muscle weakness later on.

76 BONE INJURIES: FRACTURES OF THE LOWER AND UPPER LIMBS AND RIBS
FRACTURE DISLOCACTION
This is when a bone is broken and also partially or fully dislodged at the joint simultaneously, usually as a result of a wrenching or tearing action, e.g. a fracture to the lower leg resulting in a dislocation of the ankle. This results in the foot being turned at right angles to the rest of the leg. For more information on dislocations
➔ see Chapter 4.
The most common fracture dislocations in the upper limb are to the shoulder and elbow and result from a fall or from the arm being knocked backwards during a contact tackle e.g. trying to grab another player. Shoulder dislocations whilst not common in football do occur in goalkeepers.
Signs and Symptoms of Fractures
Pain at the site of the injury (can be severe pain).
Weakness / loss of power e.g. weak leg and the player unable to place any weight on it.
Abnormal / unnatural movement e.g. movement occurs that is not normal for that limb.
Swelling
Deformity / irregularity e.g. a normally straight bone is bent or there is a lump within a bone.
Crepitus e.g. the bone makes crunching noises as you palpate /touch it or when the player tries to move it.
Tenderness e.g. player feels tenderness when you touch the injury site.
There may also be associated bruising over the fracture site. The player may be able to give you a history of hearing something “snap”.

77 BONE INJURIES: FRACTURES OF THE LOWER AND UPPER LIMBS AND RIBS
FIRST AID MANAGEMENT OF A FRACTURE
Effective management may be achieved by: – Always assuming there may be a
fracture, if you are in doubt. – Reassuring the player and explaining
what you are doing as you carry out the assessment.
– Don’t move the player unless absolutely necessary. It may be best to keep the player comfortable and await the arrival of the ambulance.
– Looking at the injury may give you important clues as to the diagnosis and management. For example, you may see a bony lump (deformity) that suggests a break in the bone or you may see immediate bruising alerting you to some immediate bleeding into the area.
– Listen to what the player is telling you they felt or heard, for example, did the player here a “snap” as the injury occurred?
– Support and immobilise the affected part of the body by using your hand, avoiding any direct pressure to the injury site, to prevent further movement and to control the area.
➔ see section 5.2 on Immobilisation.
– Apply a wound dressing to open fractures. If heavy bleeding is present, consider application of direct or indirect pressure, whichever is effective (➔ see chapter 3 on wounds and bleeding).
– Keep the player warm by the application of a blanket.
– Call the ambulance as this player will need hospital admission to treat the fracture.
Be aware that in some serious injuries or complicated fractures the blood vessels or nerves can be affected or damaged. It is important to check for circulation and nerve impairment above and below the injury site. You can quickly and easily do this as described below.
Colour (circulatory) check – is done by looking at the colour of the limb, does it compare with the opposite limb or is it pale or mottled (patchy colour) and looks as if it is not receiving a blood supply. It may also feel cold to the touch. In order to have a look you may have to very carefully remove the players clothing e.g. a boot and sock in the case of an injury to the ankle.

78 BONE INJURIES: FRACTURES OF THE LOWER AND UPPER LIMBS AND RIBS
Movement check – can be done by asking the player to wiggle their toes or fingers or gently bend their knee or arm. Being able to move a limb is an indication that the injury is not as severe as you think, however be careful that they are not just moving areas above the injury. Reluctance or inability to move an injured body part may be a sign of a severe injury.
Sensation can be evaluated by asking the player if they can feel you touching them at different points, compare this with the opposite limb.
All fractures are emergencies, but some fractures are stable and others have associated complications that make them a priority emergency.
Associated complicationsAn open fracture – where the bone has damaged the skin and may be protruding. This is at risk of developing a severe infection from an open wound or the player losing a lot of blood.
Reduced circulation – the fracture may have slowed or stopped the blood supply because of pressure on or damage to the blood supply to the limb and if not treated urgently in hospital can result in severe damage to the limb below the fracture site. For a limb with a compromised blood supply there is a window of six hours before irreversible tissue damage occurs so do not delay in getting the player to hospital.
Fractures with dislocations – these require immediate transfer to hospital so that the dislocation can be corrected to avoid damaging other tissues and blood vessels that might be under stress from the abnormal position of the joint.
Fractures to the ribs may affect the players breathing. Their breathing may become fast and shallow. This could be a sign of damage to the underlying lungs and the player requires urgent treatment in hospital to correct this (➔ see chapter 5.1).

79 BONE INJURIES: FRACTURES OF THE LOWER AND UPPER LIMBS AND RIBS
HEALING AFTER A FRACTURE
LOWER LIMB FRACTUREFor a lower limb fracture, the usual time for healing is 6 – 12 weeks after the injury. Your player may attend training to see you during this time. Within the limits of their injury, the player may be able to train their upper body and good leg to maintain their general fitness whilst not stressing their broken leg. It may be 8 – 12 weeks after the injury before the player can begin to put their full weight on the leg.
If a plaster cast has been applied then it might be 12 weeks before this is removed by the doctor or hospital. The limb will then be very weak and the muscles will have wasted (i.e. reduced muscle bulk and therefore weaker muscle) and the joints that have been inside the cast will be very stiff. Your aim is to return the player to full match fitness within his own time frame that will depend on the weakness, stiffness and pain. After the removal of the cast the limb may swell and gentle exercises will help in reducing the swelling and ice may help after exercise to prevent the swelling from returning. To begin with gentle exercises may just be simply asking the player to sit with their leg on a stool and getting them to circle their ankles and pump the foot up and down. The muscles will gradually require
building up (strengthening) until they are equal to the good leg. The joints will require gentle movement exercises until the joint can move through all ranges of motion (always compare with the good leg). Jogging, side stepping, jumping and sprinting should only be introduced once the strength and movement have returned. Activities should be introduced one at a time and only when the player is able to perform one comfortably should the other be added. It is normal after a severe injury of this type for the muscles to ache after rehabilitative exercises. This aching pain should not last longer than 20 – 30 minutes after the exercises. If the ache becomes a pain or lasts longer than 30 minutes the player is doing too much and should be dropped back down a level of rehabilitation.
UPPER LIMB FRACTUREFor a fracture to the upper limb the usual time to healing is 3 – 6 weeks after the injury. The player may return to some training during this time and can train their lower limbs on a static bike for example to try to maintain their fitness. It will probably be at least six weeks before they are able to participate in a competitive match.

80 BONE INJURIES: FRACTURES OF THE LOWER AND UPPER LIMBS AND RIBS
If a plaster cast has been applied, this may be on for up to six weeks and when it is removed the player will have a weak and stiff arm with the muscles wasted. Initial aims are to restore full range of motion (equal to the good arm) and strength. Care should be taken building up the strength and movement until the player can support their body weight through their arm (e.g. press-up). This may take 3 – 6 weeks after the cast has been removed.
Following fractures that affect the elbow it is always difficult to gain the return of a full range of movement. Being able to straighten the elbow fully is always the hardest and last movement to return. It is important to get a full range of motion in order to achieve a fully functioning arm and in order to regain full strength. Holding heavy objects such as bags of shopping in the hands with the arm straight can help the player stretch the arm into a good position when putting the limb as straight as possible is no longer painful.
Whilst football is not associated with a significant number of injuries to the upper limbs, the footballer requires fully functioning upper limbs to be an effective football player. The full use of the arms will assist the player in running and the arms are often the first body part the player lands on when they are falling from a running position or from a tackle. A weak arm will not support the player and they will be at risk of further injury if they fall or land on their arm or shoulder.
81 BONE INJURIES: FRACTURES OF THE LOWER AND UPPER LIMBS AND RIBS
RETURN TO PLAY AFTER A FRACTURE TO THE ARM OR LEGThis return is guided by what the doctor has said to the player following the injury. Once their plaster cast is removed the player will present with a weak arm or leg that requires building up to full strength and mobility before returning to football training and playing otherwise they are at risk of further injury.
REHABILITATIONRehabilitation will be guided by what the player can do and how much fitness they had before the injury and what they have been able to do with the injury. The time period for this rehabilitation will be similar to the time it has taken for the break to heal i.e. 6 – 12 weeks for a lower limb and 3 – 6 weeks for an upper limb, some injuries however will take longer. Refer to chapter 4 for a full fitness test and requirements before returning to full functional and contact training and playing.
It is also important to remember the position the footballer plays in the team. Some positions will require different rehabilitation aims than others. For example the goalkeeper will require more special attention to his upper limbs than the average striker.

82 BONE INJURIES: FRACTURES OF THE LOWER AND UPPER LIMBS AND RIBS
INJURIES TO THE CHEST Chest injuries are relatively rare in football. Any injury to the chest can cause difficulties with breathing leading to a lack of oxygen to the body. First Aiders must be able to recognise the severity of the injury in order to be able to take immediate action.
Injuries to the chest usually result from a direct contact (tackle) with another player or a goal post.
Chest injuries may be minor but they could become life threatening and may cause associated injuries. Chest injuries if left untreated, can cause one or both lungs to collapse due to accumulation of air. This, in turn can cause increased pressure around the heart, leading to cardiac arrest if not recognised and treated early.
The two main types of chest injury are:1. Closed – where the skin is not broken
and air does not have access through the chest wall. However there still could be damage to internal organs.
2. Open – where the skin has been penetrated by an object (this can be external e.g. landing on a sharp object or internal by a broken rib).
One type of open wound is called a sucking chest wound, as air is sucked into the lung cavity with breathing causing the lungs to collapse. The First Aider can deal with this type of chest injury, and prevent further deterioration by taping a dress ing on three sides over the open wound, leaving the lower fourth side free (not taped down) this should allow air to escape whilst blocking air coming in via the wound which could cause the lung to collapse. These players need an urgent ambulance and very careful monitoring even with the dressing on.
Fractures of the ribsThe player may complain of pain that is made worse when breathing in (especially a deep breath) or when coughing even if no other complaints are present.
Signs for the First Aider to look out for with chest injuries: – Any difficulty in breathing – Blueness around the lips after injury – Coughing up blood – Increased breathing rate – Unequal movements of the chest wall
i.e. one side rises more than the other – Pain at the site of injury – the player
can pinpoint the painful area

83 BONE INJURIES: FRACTURES OF THE LOWER AND UPPER LIMBS AND RIBS
Rib fractures (or occasionally fractures to the collar bone) can also cause damage to the underlying lungs. In this instance, the player will complain of difficulty breathing and their breathing may become fast and shallow. This can be potentially life threatening and the player should be immediately transferred to hospital. Any injury to the chest with pain and / or difficulty with breathing must be transferred to hospital urgently.
MANAGEMENT OF CHEST INJURIES BY THE FIRST AIDER – Ensure that the player can breath
comfortably and without pain. Count how many breaths the player is taking in one minute. Make a note of this. If they are breathing more than 30 breaths per minute then transfer the player to hospital. Likewise, if the breathing rate drops below ten per minute, the player needs medical attention and you may need to consider resuscitation (➔ see chapter 2). You can use this figure to reassess the player at regular intervals.
– Make the player comfortable by allowing them to choose their position of comfort, either sitting or half lying. Lying down fully is often really painful with fractures to the ribs.
– Placing the arm on the side of the injury into a sling can often assist in stabilising the chest (➔ see section 5.2)
– Urgent, rapid and smooth transport to hospital.
– If the player is unconscious with a chest injury – put them into the recovery position with the injured side lower, allowing the non-injured side to work effectively and not be restricted.
After a life-threatening injury has been ruled out (usually involving an x-ray of the chest by the doctor) then management of the player usually involves pain relief. The player may not be able to lay flat due to pain for seven to ten days and your role will be to advise them to lay on pillows to rest. All treatment will be guided by what the player feels as these injuries can be very painful.
Most injuries to the chest experienced by footballers are minor bruising with few rib fractures. Life-threatening chest injuries are very rare. Attention by referees to aggressive play with red cards will decrease these injuries even more.
RETURN TO FOOTBALLOnce the injury has been confirmed as being purely a fracture to the rib the player is advised to avoid physical activity that causes pain for between 4 – 6 weeks. A return to training and playing may take up to ten weeks. This should be guided by the pain the player feels. Breathing exercises (such as deep breathing) should be advised.

84 BONE INJURIES: FRACTURES OF THE LOWER AND UPPER LIMBS AND RIBS
IMMOBILISING AND SUPPORTING A FRACTURED LIMBARM SLINGSArm slings using triangular bandages are tied at various points (see below) to make a sling for the arm on the injured side to rest in. If you do not have access to triangular bandages, than any kind of towel, cloth or small sheet can be used. In some instances the players own clothing is sometimes the most effective sling (see picture 45).
Arm slings are used to support fractures of the – Upper arm – Collar bone – Shoulder – Ribs, sternum and scapula
(by immobilising the arms on the injured side to prevent movement)
– Wrist – Hand – Lower arm (forearm)
Low arm sling – The lower arm is positioned at right
angles across the body, slightly inclined.
– Place the sling between the arm and the body.
– Bring the lower end of the bandage up and over the injured arm and …
– … the sling is tied off just above the collarbone on the same side of the body as the injured arm (picture 43).
High arm sling – Triangular slings are also used for
elevating wounds of the hand. – The injured arm is placed diagonally
across the chest with the fingertips resting on the collar bone on the opposite side of the body.
– The sling is tucked underneath the affected arm, elbow, wrist and hand and …
– … tied just above the collar bone on the uninjured shoulder side (picture 44).
Of all the techniques of immobilising an upper limb injury, the players shirt is possibly the easiest and most effective as well as most comfortable for the player as it requires little movement.
Player’s shirt as a splint – The shirt or clothing is pulled up
from the bottom and encases the player’s arm.
– If the playing shirt is tight enough it will hold itself in place, if it is large a safety pin or knot can be tied at the back (picture 45).

Picture 43: Low arm sling
Picture 44: High arm sling
Picture 45: Player’s shirt as a splint
85 BONE INJURIES: FRACTURES OF THE LOWER AND UPPER LIMBS AND RIBS
For some injuries to the upper limb the player can use his good arm / hand to support the injury site. For example, with wrist and hand injuries, you may find the player holds his injury site in his good arm or cups it into their own chest. This is obviously a comfortable position for the player and if it can be maintained this way, leave them this way and monitor until medical help arrives or they transfer to hospital.

Picture 46: A box splint Picture 47: An inflatable splint
86 BONE INJURIES: FRACTURES OF THE LOWER AND UPPER LIMBS AND RIBS
SPLINTSThe purpose of splinting is to: – Immobilise a limb – Reduce pain – Prevent further damage – Reduce bleeding from
moving fragments – Minimise the progress of shock
(➔ see chapter 3).
If splints are to be used they must be: – Long enough to immobilise the joint
above and the joint below the fracture – Wide enough to provide full support – Well padded to provide full comfort – Strong enough to prevent movement

Picture 48: A makeshift splint
87 BONE INJURIES: FRACTURES OF THE LOWER AND UPPER LIMBS AND RIBS
If you do not have access to any splints, then it is easy to make your own splints using football socks to tie around the leg in similar points to the picture shown below.
It is best to tie the good leg to the injured leg, so that the good leg acts as a “splint” for the injured leg.
An alternate to using socks is the use of towels, bandages or sheets.
Many items can be used to provide splints as long as they can be adequately padded and will fit into place e.g. cardboard, wood, rolled up newspaper.
The application of any splint or support usually has the desired effect of immediately reducing the pain the player is suffering because the injury is now supported. If you do not have any support at all, using your gloved hands cupped underneath the injury site is the best support you can offer until medical help arrives.
Once a player has been immobilised with a splint they will require a stretcher to transfer them from the field of play. A player with an injury to one limb can usually use their good (uninjured) limb to help them move onto a stretcher. However, if you have used the good limb as a splint as in the above paragraph the player will need to be lifted onto the stretcher (➔ see chapter 6). Be careful when placing a player onto a stretcher that they are always secured (tied) onto the stretcher to avoid the possibility of them falling off. If you do not have access to a stretcher, you will have to call an ambulance and await its arrival before moving the player from the field.


6INJURIES TO THE
HEAD AND NECK

90 INJURIES TO THE HEAD AND NECK
CERVICAL SPINE AWARENESS
Injuries to the head and neck can be very serious and occasionally fatal. Fortunately these injuries are very rare in football4. It is important to have an awareness of the potential problems that can occur to a player who suffers an injury to the head and / or neck. This chapter will focus on these potential problems beginning with neck (cervical spine) injuries.
It is important that you deal with all known or suspected spinal injuries (fractures) and dislocations quickly and correctly. Proper immobilisation and player management may mean the difference between complete recovery and lifelong paralysis, or even death.
Mechanism of injurySpinal injuries are caused by direct or indirect forces and should always be suspected in all cases where: – There is a history of accident or
injury to the spine or neck e.g. high tackle, (blow to the head from an outstretched hand or kick to the head) or fall onto the head and neck.
– The player complains of pain in their back or neck after injury.
– There has been forced chin to chest or whiplash (head back) injuries of the neck as the player was hit or fell.
– A heavy weight has fallen on the player’s shoulders e.g. another player.
– A fall from a height and landing on the heels has occurred e.g. jumping to
head a ball or diving to save the ball and then landing awkwardly onto the head or neck or two players colliding whilst heading a ball and landing awkwardly on their head or neck.
A neck injury should be considered for - any injury occurring above the collar bone. - any head injury with loss of consciousness. - where abnormal flexion or extension of the neck has occurred. - a clash of heads, resulting in the player having an altered level of consciousness.
Signs and symptoms of a spinal fractureAs well as the normal signs and symptoms of a fracture (➔ see chapter 5), there may be other features, which are specific to a spinal injury. – The player may complain of a loss of
feeling or sensation in the body below the site of injury.
– The player may complain of a hot feeling, or “pins and needles” sensation above the site of the injury.
– There is evidence of paralysis or generalised weakness below the injury site, e.g. the player is unable to wiggle fingers or toes or squeeze your hand when asked.

Picture 49: Manual in-line stabilisation of the head and neck while prone
91 INJURIES TO THE HEAD AND NECK
MANAGEMENT OF SPINAL INJURIES
The management of spinal injuries will be reinforced several times in this chapter due to the great importance effective first aid can have under these circumstances.
Management of the player who is CONSCIOUS – Do not move the player unless they are
in immediate danger. Unless life is at risk never attempt to move the player, await further medical help / arrival of the ambulance.
– Immediate manual immobilisation (picture 49) of the player is paramount. Once applied it should not be released until the player is firmly strapped to a long board or suitable immobilisation device and some form of head restraints are applied, usually by the ambulance crew. This could take a long-time to achieve, so the First Aider may be applying manual immobilisation for a prolonged period of time from 5 – 30 minutes, dependent on how long it takes the ambulance to arrive. Ensure you take up a comfortable position as you will not be able to move or let go of the head until medical help arrives and takes over the head control.
– Check their ABCDE once you have control of the injured player’s head (➔ see chapter 2). An airway must always take priority, so check airway with cervical spine (neck) control when a neck injury is suspected. It is always
best to check and keep re-checking frequently their ABC until medical help arrives.
– If there is any doubt as to the presence of a spinal injury, you must immobilise and secure the player, prevention is better than a cure!
– Talk to the player at all times, tell them what you are doing to help them keep calm.
– Movement of the player must only be carried out by the ambulance service.
Manual immobilisation – The First Aider’s hands should be
placed on either side of the player’s head, cupped around the ears (not over the ears as this allows the player to hear).
– Always talk to them to provide reassurance.
– The same technique is applied to hold the head and neck regardless of the position that the player lands in. Players do not always fall onto their backs.

Picture 50: In-line stabilisation of a player on their side, lone rescuer opening airway looks inside the mouth
Picture 51: In-line stabilistation of the head and neck with second rescuer opening the airway to look inside the mouth
Picture 52: Jaw thrust with in-line stabilisation of the head
92 INJURIES TO THE HEAD AND NECK
Management of the player who is UNCONSCIOUS – Do not move the player unless they are
in immediate danger. Unless life is at risk never attempt to move the player with a suspected spinal injury, await further medical help.
– Manual immobilisation (picture 49) of the player is paramount and must be performed immediately on arrival at the player on the field of play.
– Ensure an open airway. – Look inside the mouth. This can be done
with the player in any position (i.e. the position that you find them). Keep the head and neck still and supported and gently open the mouth (picture 50 and 51).
If the athlete has noisy breathing (snoring) it implies that the airway is being obstructed, apply a jaw thrust to open the airway (picture 52). A jaw thrust can be applied in any position. – A jaw thrust (chin lift) allows the tongue
to be lifted off the back of the throat and opens up the player’s airway. This technique only causes minimal movement of the head and neck.
– To apply a jaw thrust the First Aider places their hands either side of the head, as in manual in-line stabilisation, and then places their index (first) fingers under the jaw at the base of the ear on either side and gently pushes the jaw upwards and forwards.

Picture 53: Jaw thrust in side lying Picture 54: Jaw thrust lying on front
93 INJURIES TO THE HEAD AND NECK
– A jaw thrust may be enough to open a player’s airway and the noisy breathing will stop.
– If the noisy breathing returns when you stop performing the jaw thrust, for example when a player is lying on their back and is unresponsive, the jaw thrust may need to be held in place until the player awakes and can maintain their own airway or until an ambulance arrives to take over. If it cannot be held open then the player will have to be moved onto their side to open the airway (picture 53).
– A jaw thrust may be used to open up the airway in a side lying or prone position (lying on the front) and gravity will keep the airway open and maintain this without having to continue the application in most cases (picture 54).
– A clear airway must take priority over all other injuries.
– If a clear airway cannot be maintained because of the position of the player's head and neck then the player will have to be turned (see the log roll on page 96) and the head moved to a neutral position, if this is the case do it slowly, gently and very carefully.
– Manual immobilisation of the player’s spine is essential. Once applied it should not be released until the player is firmly strapped to a spinal / long board, scoop stretcher or suitable immobilisation device and a head restraint device is applied by the ambulance crew.
– Movement of the player onto a stretcher must only be carried out by the ambulance crew.
– Keep the player still and warm - have someone cover them with a blanket.
– Talk to them to reassure them even if they are unconscious - they may still be able to hear you.

94 INJURIES TO THE HEAD AND NECK
PLAYER ASSESSMENT WITH C-SPINE INJURY
Player’s should always be approached and managed in the following manner:NB: If any life-threatening problem e.g. arterial bleed (➔ see chapter 3) or airway obstruction (➔ see chapter 2) is found it should be dealt with immediately before moving on to the next stage. In some cases full resuscitation (➔ see chapter 2) may be required. In this instance it may become difficult to maintain manual immobilisation of the neck.
- Danger - Response - Airway with neck control (manual immobilisation) - Breathing - Circulation - Disability - Expose / Examine
If a player is unconscious due to trauma, it is reasonable to assume that there is also a neck injury present until ruled out by an x-ray.
However a clear airway must always take priority

95 INJURIES TO THE HEAD AND NECK
RESUSCITATION WITH A NECK INJURY
A player in cardiac arrest regardless of suspected or known neck injuries must be resuscitated. Try and move the patient gently and if you have to turn them onto their backs take as much care of the spine as you can. Do not be aggressive in preparing for the resuscitation, but do not waste valuable time.
REMEMBER!The importance of summoning ambulance assistance.
Resuscitation is performed as per chapter 2. Where there are a sufficient number of persons present an attempt at maintaining manual immobilisation should be made if at all possible, but if insufficient persons are present then the emphasis should be on chest compressions and ventilations. The actual act of performing CPR will cause minor movement of the head and neck and in order to achieve adequate rescue breathing. If an AED is present and applied then when it is performing the analysis everyone MUST let go of the player’s neck making continued manual immobilisation impossible and impractical in this situation.
If resuscitation is successful it is important to maintain a clear airway and ensure that the tongue does not cause an obstruction by falling back against the back of the throat. This does not mean that the player has to be moved and a jaw thrust will usually suffice. However if the airway cannot be maintained adequately then the player needs to be turned onto their side. Best practice would be to log roll* however, if you are alone and unable to summon any assistance, then the recovery position will have to be implemented.
* A log roll is the turning of a player onto their side or onto a piece of extrication equipment, such as a spinal board or scoop stretcher, when a neck injury is suspected. One person has manual immobilisation of the neck and three other people roll the player onto their side with the person who is holding the head controlling and directing when the others move. It is important that the movement is controlled and timed so that the player is rolled as a “log” all in one piece.
If only two or three persons are present then this technique is adapted as previously in the two person recovery / log roll (➔ see chapter 2).

Picture 55: The log roll start position of First Aider's hands and head support
Picture 56: The movement onto the side to check the back and insert the stretcher or long board
96 INJURIES TO THE HEAD AND NECK
CONTROLLED LOG ROLL
A controlled log roll is the manoeuvre of choice when moving a player. The per-son in charge of each movement is the person who has control of the neck, this may not necessarily be the same person who is in charge of the medical or first aid management. This ensures that the head and neck are moved at precisely the right time.
In an ideal situation at least four persons are required, one to control the neck, the tallest person at the shoulders, the next tallest per-son at the chest region and the fourth person at the pelvic / leg region. Each of the three persons on the body will interlink arms and when all hands are on the player to be moved, three hands will be on top of the body and
three hands will be underneath (picture 55). The player is then turned towards the bodies of the persons completing the manoeuvre.
The manoeuvre is executed on the com-mand of the person controlling the neck, the command is usually "is everyone ready, on my command we will turn the player onto their side, ready, steady, roll". A quick re-check when the player is on their side and then the manoeuvre is repeated: "onto their back, ready, steady, roll". Ready, steady, roll could also be ready, steady, move or 1,2,3. However it is less likely to cause confusion if words rather than numbers are used. Neither however is wrong.

Picture 57: The second stage of a log roll of a player from their front
Picture 58: The log roll continues so that the player is on their side
Picture 59: The log roll is completed with the player lying on their back
97 INJURIES TO THE HEAD AND NECK
This technique is used to move the player with a suspected neck or back injury in all instances, regardless of their initial starting position. For example the same movements are applied if the player started out on their front or on their side.
Turning a player from their front to their back for further assessment or to get them onto a stretcher / board to extricate them from the field of play has exactly the same hand positions as the movement from their back.

Picture 61: Showing the completion of the log roll from side lying
Picture 60: The hand positions for a log roll with a player lying on their side
98 INJURIES TO THE HEAD AND NECK
The same technique is applied if the player begins on their side, this might even be a player that is curled up onto their side (picture 60 and 61).
The player is then gently log rolled onto their back in one move when everyone is ready with the person holding the head and neck in control of the timing of the movement.
Once the ambulance arrives the player will be transferred onto a lifting and extrication device, usually a spinal / long board or scoop stretcher for a suspected neck or back injury. This is known as
triple immobilisation where the player is strapped to the device both in body and at the head and neck. The neck will have a rigid collar that is well fitting applied and the head and neck is also supported by head blocks and tape at the chin and forehead. The ambulance crew will bring this equipment and apply it, you can assist them if trained and able.
Once this triple immobilisation is in place the person at the head can let go of the head and neck, but they will always stay at this end of the stretcher closely monitoring the player for signs of deterioration (picture 62).

Picture 62: Triple immobilisation on a long board.
Picture 63: Lifting the player
99 INJURIES TO THE HEAD AND NECK
REMOVING FROM THE FIELDTo lift a player and remove from the field of play requires a minimum of 6 – 8 persons: one to stay at the head end to talk to and monitor the player; two or three persons either side of the stretcher to lift and carry (two or three dependent on the size of the player, two either side if a smaller player); and the last person to guide the stretcher off the field of play and ensure no-one and nothing is in the way as a trip hazard (picture 63). As with the log roll the tallest persons are always at the head end, with decreasing height down to the foot end. The stretcher is lifted only to the height of the smallest persons hip height on the command of the person at the head end monitoring the player. The stretcher is always carried off feet first with everyone facing the same way.

Picture 64: Manual in-line stabilisation in sitting.
Picture 65a to c: Serial picture sequence of in-line stabilisation whilst lowering a player from sitting to lying
Picture 65b
Picture 65c
100 INJURIES TO THE HEAD AND NECK
MANUAL IN-LINE STABILISATION Manual in-line stabilisation should be applied at all times that a neck or back injury is suspected with any trauma – whilst it is rare in football it may happen. The player does not have to be unresponsive or lying on the ground, in-line stabilisation can be applied in any position (picture 64).
If you have to lower the player to the ground then do so slowly, carefully and with as much help as you can. Another rescuer can assist with in-line stabilisation of the head while two rescuers slowly lower the player safely to the ground. Once the player is flat, in-line stabilisation can be resumed from the head end whilst a full A-E assessment is carried out.
Manual in-line stabilisation whilst lowering a player from sitting to lying with a suspected neck injury (pictures 65a, b, c).

101 INJURIES TO THE HEAD AND NECK
STINGER OR BURNER
This is a soft tissue injury to the neck, which is quite common during tackling, for example if a player hands off another player in a tackle, or can occur during a fall to the ground. It is a traction injury occurring when the neck is bent to the side with simultaneous shoulder depression. It is usually caused by nerve root compression and the symptoms are of burning / tingling in the outer arm, thumb and index finger.
The signs and symptoms are usually temporary and often the player can be seen to “shake off” the symptoms in their arm and usually does not require them to be removed from the field of play.
A weakness in the muscles of the arm or persistent tingling or burning means that the player should be removed and not return back to the field of play during that match. The assessment of these muscles can be done by checking their resistance. For example resisting the arm being moved away from the side of the body; resisting the player turning their arm palm up whilst simultaneously bending at the elbow and resisting the shoulder rotating outwards (laterally). The player will require further medical assessment if the symptoms do not settle.

102 INJURIES TO THE HEAD AND NECK
HEAD INJURIES AND CONCUSSION MANAGEMENT A head injury is one that results in any injury above the collar bone. They can range from minor (bruise or cut) to serious brain injury. They are common sporting injuries and of relevance in football due to the head being used as a means of propelling the ball. All head injuries should be taken seriously even if the player initially appears normal and unaffected. Some head injuries take time to develop and it could take several hours before symptoms develop. This section will focus on how to manage head injuries in football and what advice players and carers should be given by the First Aider.
The incidence of head injuries in football has been shown to increase with age and level of play. Injuries at the elite level occur four times more often than at amateur level4. The majority of these injuries are minor and occur in aerial duels due to contact with another player's elbow or from head to head contact.
There are two main types of head injuries that this chapter will focus on before discussing injuries that can occur to the face and jaw. These are structural brain injuries and concussive brain injuries. They differ in that the former is a structural brain injury that can rapidly deteriorate and become fatal. This injury usually requires neurosurgery and fortunately is extremely rare in football4. The latter
injury is concussion, which is also a brain injury that results in the player suffering problems related to awareness, memory and attention, reflecting a functional disturbance rather than a structural injury. Injuries leading to concussion occur about two to three times more often in female football players4.
Even for experienced medical staff it is difficult to distinguish between the types of head injury, which is why both should be managed with great care and in exactly the same way by the First Aider.
STRUCTURAL BRAIN INJURYA structural injury is usually a “bleed” within the head that causes pressure on the brain. This pressure results in the brain becoming starved of oxygen and due to the enclosed nature of the skull, the pressure continues to build up inside the head. This build up of pressure can lead to fatal results if not dealt with immediately by transferring the player to hospital for treatment.
These injuries may be caused by a direct force to the head. For example: when a player receives a blow to the head from another player, an object strikes the head such as a ball or a player’s boot, or from a fall onto the pitch itself. They may be associated with other injuries such as a fracture of the skull (see later in this chapter).

103 INJURIES TO THE HEAD AND NECK
If any player who has taken a knock or blow to the head is not fully alert and aware of time, place and person, transfer to the hospital immediately.
Signs and symptoms – many listed below are later signs. A bleed can occur over a matter of hours or days. The main signs are that the player is not improving, in fact they are deteriorating.
The player: - may complain of headaches due to the pressure building up in their head. - continues to be confused and suffer continued memory loss. - vomits repeatedly. - appears drowsy and does not improve. - may have convulsions (begin to fit as their brain is starved of oxygen). - may have abnormal and slow breathing as the bleed increases. - may have a very slow pulse. - may have pupils that are uneven sizes (this is usually a very late sign). - may have decreasing levels of consciousness.
NB: All players who have had trauma to their heads are also regarded as having an injury to the neck as well and must be treated as such by also immobilising the neck.
Remember your ABCDE approach for assessment and management.
CONCUSSIONConcussion can be caused by a blow to the head region. In football, this can be from contact with another player, with the pitch or more likely contact with the football itself.
Concussion has a rapid onset of symptoms that usually last from seven to ten days in duration and that may or may not involve the player losing consciousness. The recovery in children and adolescents may be longer.
Symptoms and signs of acute concussion If any one or more of the following symptoms or problems are present, a head injury should be suspected. A player does not need to have lost consciousness to suffer a concussion injury. Loss of consciousness does not predict the occurrence, severity, duration or outcome of concussion.
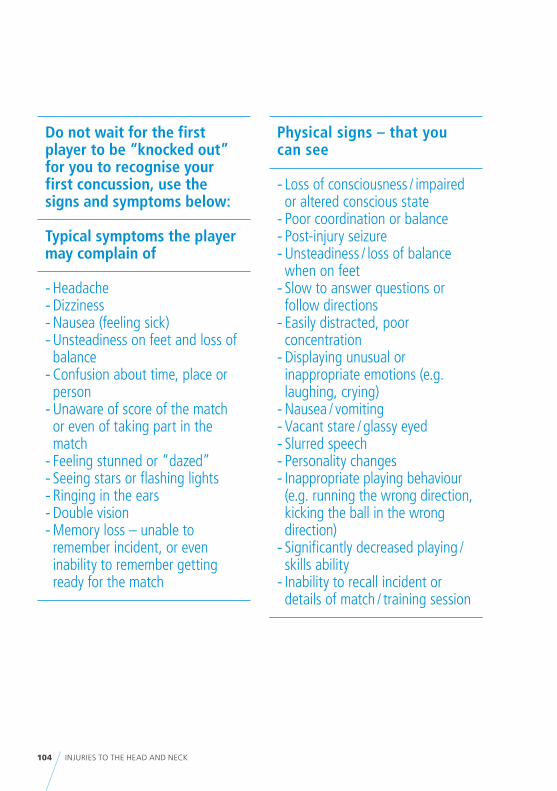
104 INJURIES TO THE HEAD AND NECK
Do not wait for the first player to be “knocked out” for you to recognise your first concussion, use the signs and symptoms below:
Typical symptoms the player may complain of
- Headache - Dizziness - Nausea (feeling sick) - Unsteadiness on feet and loss of balance - Confusion about time, place or person - Unaware of score of the match or even of taking part in the match - Feeling stunned or “dazed” - Seeing stars or flashing lights - Ringing in the ears - Double vision - Memory loss – unable to remember incident, or even inability to remember getting ready for the match
Physical signs – that you can see
- Loss of consciousness / impaired or altered conscious state - Poor coordination or balance - Post-injury seizure - Unsteadiness / loss of balance when on feet - Slow to answer questions or follow directions - Easily distracted, poor concentration - Displaying unusual or inappropriate emotions (e.g. laughing, crying) - Nausea / vomiting - Vacant stare / glassy eyed - Slurred speech - Personality changes - Inappropriate playing behaviour (e.g. running the wrong direction, kicking the ball in the wrong direction) - Significantly decreased playing /skills ability - Inability to recall incident or details of match / training session

105 INJURIES TO THE HEAD AND NECK
IMMEDIATE MANAGEMENT OF A PLAYER SUFFERING A CONCUSSION ON THE FIELD OF PLAYThe major priorities at this early stage are the basic principles of first aid as you learnt in chapter 2.
If the mechanism of injury leaves you with a high suspicion of a neck injury and the player is confused and unable to answer your questions, you must treat it as for a neck injury and secure the head and neck as discussed on page 91. Remember to call an ambulance as the player will require medical attention.
If the player is unconscious, then a neck injury should be assumed until proven otherwise. Remember to open and protect the airway whilst also protecting the spine.
– Support the head and neck (manual immobilisation).
– Perform your assessment as above. Assuming A, B and C are fine then progress as follows (if there is no A, B or C then resuscitate as chapter 2).
– Keep the player still until the ambulance arrives, do not attempt to move them (treat as for a neck injury as on page 91).
– First Aiders are not qualified to diagnose or rule out a neck injury, only doctors can.
– The removal of helmets or other head protectors should only be performed by individuals who have been trained in this. If the player is wearing a soft helmet and it is not restricting the airway, leave it alone. If the airway is obstructed then loosen the fastening only, do not attempt to remove until qualified medical help arrives.
– Keep the player warm. – Reassure them and whether they are
conscious or unconscious speak to them to keep them calm.
– Wait until an ambulance arrives to move the player and transport to hospital.
If the player is unconscious, a neck injury must be suspected. Do not move them, keep them still until medical help arrives.
For the footballer that is conscious following a head injury – the following management should be followed:You can assume that a conscious player who is talking to you and responding to you has a clear airway, is breathing and has an adequate circulation. Continue to monitor this for signs of deterioration.

106 INJURIES TO THE HEAD AND NECK
If an alert player complains of neck pain, has evidence of neck tenderness or deformity (e.g. you can feel a step in the back of their neck as you are supporting it) or has neurological signs (i.e. complains of numbness or tingling / pins and needles) suggestive of a spinal injury, this requires qualified medical personnel i.e. an ambulance to manage them with spinal immobilisation and transport to hospital. Optimum care is the same as you would provide for an unconscious player – keep them still, immobilise the head and neck, keep them warm, reassure them until an ambulance arrives.
However, in a conscious player, the management may involve the treatment of a disorientated, confused, uncooperative player. These are the typical symptoms of concussion and the player will not be able to control these. The immediate treatment priorities remain the basic first aid principles of “ABC - airway, breathing and circulation”. In this situation, especially if the player is fighting your help or is uncooperative, it is unwise to try to restrain them or support the head, unless you can reassure them, have them lie down and allow you to support the head until such time as medical help arrives.
In concussion it is important for the First Aider to recognise the injury and remove the player. The Concussion Recognition Tool can help you with this (see picture 66).
In a concussed player, it is difficult to rule out a neck injury because the player may be confused. In this instance assume a neck injury and transfer the player to hospital by ambulance (as advised above). If you cannot get the player to lie down then keep an eye on them to ensure they don’t collapse, try to reassure them and explain what you want them to do, wait until they calm down and then have them assessed by a doctor in hospital.
For a conscious player who suffer no signs of neck pain, it is still advisable to have them checked out at the local hospital. This may not however require the use of an ambulance, unless the mechanism of injury leaves you with a high suspicion of neck injury.Management of the head and neck is as shown earlier on page 91.
ASSESSING THE CONCUSSED PLAYER’S PROGRESSION IN THE FIRST 30 MINUTES AFTER THE INJURY After you have recognised the concussion and removed the player safely from the field of play, all symptoms and signs should gradually begin to resolve (but not go away completely) to a manageable state within 30 minutes of the incident, that is to say the player will stop vomiting or feeling as sick, will be able to make and retain new memories and stop asking you “what happened?”.

© 2013 Concussion in Sport Group© 2013 Concussion in Sport Group
Pocket CONCUSSION RECOGNITION TOOL™
To help identify concussion in children, youth and adults
3. Memory functionFailure to answer any of these questions correctly may suggest a concussion.
“What venue are we at today?”
“Which half is it now?”
“Who scored last in this game?”
“What team did you play last week / game?”
“Did your team win the last game?”
Any athlete with a suspected concussion should be IMMEDIATELY REMOVED FROM PLAY, and should not be returned to activity until they are assessed medically. Athletes with a suspected concussion should not be left alone and should not drive a motor vehicle.
It is recommended that, in all cases of suspected concussion, the player is referred to a medical professional for diagnosis and guidance as well as return to play decisions, even if the symptoms resolve.
Remember:
- In all cases, the basic principles of first aid (danger, response, airway, breathing, circulation) should be followed.
- Do not attempt to move the player (other than required for airway support) unless trained to so do
- Do not remove helmet (if present) unless trained to do so.
RED FLAGSIf ANY of the following are reported then the player should be safely and immediately removed from the field. If no qualified medical professional is available, consider transporting by ambulance for urgent medical assessment:
- Athlete complains of neck pain - Deteriorating conscious state - Increasing confusion or irritability - Severe or increasing headache - Repeated vomiting - Unusual behaviour change - Seizure or convulsion - Double vision - Weakness or tingling / burning in arms or legs
from McCrory et. al, Consensus Statement on Concussion in Sport. Br J Sports Med 47 (5), 2013
RECOGNIZE & REMOVEConcussion should be suspected if one or more of the following visible clues, signs, symptoms or errors in memory questions are present.
1. Visible clues of suspected concussionAny one or more of the following visual clues can indicate a possible concussion:
Loss of consciousness or responsivenessLying motionless on ground / Slow to get upUnsteady on feet / Balance problems or falling over / IncoordinationGrabbing / Clutching of head Dazed, blank or vacant lookConfused / Not aware of plays or events
2. Signs and symptoms of suspected concussionPresence of any one or more of the following signs & symptoms may suggest a concussion:
- Loss of consciousness - Headache - Seizure or convulsion - Dizziness - Balance problems - Confusion - Nausea or vomiting - Feeling slowed down - Drowsiness - “Pressure in head” - More emotional - Blurred vision - Irritability - Sensitivity to light - Sadness - Amnesia - Fatigue or low energy - Feeling like “in a fog“ - Nervous or anxious - Neck Pain - “Don’t feel right” - Sensitivity to noise - Difficulty remembering - Difficulty concentrating
Picture 66: Concussion Recognition Tool
107 INJURIES TO THE HEAD AND NECK
Although the player will still be unable to remember the incident itself or arriving at the match / training session they will remember what you have told them happened, you may have had to repeat this several times but eventually they will retain the new memory – this is a good sign that the player is improving. The player may still have a headache and show other symptoms for days to come, but at this stage the symptoms and signs are not deteriorating.
Please note concussive signs and symptoms may be delayed – a player may seem
orientated and satisfactory on initial checking on the field of play, but several moments later may become confused or lose their balance. Continue to monitor your player: after an incident that had the potential to cause a head injury, they should be removed from the playing field. Any player who has been concussed (received a injury to the head) should be assessed by a doctor / hospital as soon as practical. Any player who has suffered an injury which includes any one of the symptoms described above should NOT be returned to the field of play on the day of injury.

108 INJURIES TO THE HEAD AND NECK
Indications for referral immediately to hospital via ambulance
Any player who has or develops any of the following: - High-risk injury mechanism (e.g. penetrating skull trauma, severe stud injury from a football boot to the head, high velocity injury). - Deterioration in conscious state following injury e.g. progressively loses consciousness. - Focal neurological signs e.g. pins and needles in the hands or feet or loss of sensation in one of the limbs. - Confusion or impairment of consciousness which lasts greater than 30 minutes e.g. does not remember anything that has been said to them and is unable to make new memories post the incident. - Loss of consciousness for more than one minute. - Persistent vomiting (is sick more than once) or has an increasing headache after the injury. - Any convulsive movements (the player who fits after receiving a blow on the head).
- More than one episode of concussive injury in a match or training session (should not occur as players should never be allowed back onto the field if they have suffered a concussion). - Where there is assessment difficulty (e.g. an intoxicated player). - All children with head injuries (below age 19 years. There is evidence to show children behave differently to adults with brain trauma and have different risks and prolonged signs and symptoms). - High-risk athletes (e.g. haemophilia, anticoagulant use). - Inadequate post-injury supervision, e.g. no one to take them home and stay overnight with them to monitor them.
CONVULSION MANAGEMENTConvulsive movements (fitting) may result from a concussion / head injury. This is not a seizure that would occur for example in an epileptic person, but as a result of the blow to the head. Although dramatic, these clinical features are generally benign. The player’s airway remains the main priority and assisting the player to maintain their airway will ensure the convulsion (fit) is short lived. Support and protect the head and neck but do not restrain the player.

109 INJURIES TO THE HEAD AND NECK
Once the convulsion has ceased, manage the player as for any other concussion i.e. manual immobilisation, reassurance and keep warm until the ambulance arrives. Transfer to hospital via ambulance is essential to be assessed by a doctor.
Usually the player will have some signs or symptoms as with any other acute concussion. In this instance, even if the player is confident that they are fine, they still require referral to a hospital.
The hospital will provide head injury advice on discharge, unless the player is admitted, which is usually the following: – The player should return to hospital
immediately if any signs or symptoms develop that were not there initially or if those present deteriorate i.e. their headache increases
– If the player vomits more than once within a few hours of each other
– If the player suffers any other signs and symptoms such as pins and needles or loss of sensation in his limbs
– If they develop severe neck or head pains
– If they become drowsy or very sleepy
Whilst managing any player with concussion please inform family and friends of all advice as the player may not recall what you have said at a later stage. It does require family members to observe
the player for a minimum of 24 hours post head injury and usually they are the only ones who notice if a player is becoming more drowsy or sleeping more – this may require another visit to the emergency department.
Never let a player who has suffered a head injury go alone to a hospital or home alone. They must not be allowed to drive a motor vehicle even if family members are present.
For all instances that require an ambulance to attend, do not move the player unless the environment has life threatening implications. Even if you are on a wet and boggy field, do not attempt to move the player to a firmer location for the ambulance crew, they will decide what is best for the extrication of the player and may even drive the ambulance directly onto the field of play.
The management of concussion is the management of the “Invisible Injury” as we cannot see the actual injury only the signs and symptoms. Female footballers could be at a greater risk of sustaining a concussive injury, and therefore for those who are managing female footballers this is something to be aware of.

110 INJURIES TO THE HEAD AND NECK
RETURN TO FOOTBALL AFTER A CONCUSSIONIt is important to emphasise that any concussed player must be medically assessed as soon as possible following injury. It is not within the scope or expertise of a First Aider to manage a concussive injury or determine the timing of return to play. This is a medical decision.
Return to play on the same day – should not / never be allowed in the presence of any suspected or actual signs and symptoms of concussion.
Once return-to-football has been medically advised the player should follow a graduated return to play protocol (Zurich 2012). Each stage lasts 24 hours and if at any point the player’s signs or symptoms return, activity should be stopped immediately and the player returned back to the hospital for medical advice. It is beyond the scope of a First Aider to manage. Medical clearance would again be required before the graduated return to play programme would be commenced again.
A typical programme for a First Aider to follow under medical guidance would be: – Stage 1
Complete rest until sign and symptom free (medical clearance provided).
– Stage 2 Light exercise e.g. walking, low intensity cycling or jogging for about 20 minutes.
– Stage 3 Sports specific football skills with a ball e.g. dribbling, running drills. No head impact activities.
– Stage 4 Non-contact training drills e.g. passing drills in football.
– Stage 5 Full contact football training.
– Stage 6 Return to play football at next available game.

111 INJURIES TO THE HEAD AND NECK
CONCUSSION IN CHILDREN AND ADOLESCENTSGuidelines discussed in this chapter can be applied to all players as young as the age of 13 years. However for safety it is advisable to be cautious with children and adolescents below the age of 19. The assessment of a child or adolescent may require the input of a parent. Children are generally at a higher risk of receiving a concussive injury because they have: – Decreased neck muscle strength
compared with adults – Thinner skull bones compared to adults
All concussive incidents in children must likewise be referred for medical evaluation and management before return to play is allowed. Children and adolescents are slower to recover and have prolonged memory effects. Children should not
be returned to practice or matches until clinically completely symptom-free, which may require a longer time frame than for adults. In addition for children you need to limit exertion with activities of daily living as well as football and other sports they may do at school or at home. It is also advisable to limit scholastic and other cognitive stressors (e.g. text messaging, video games, television) while symptomatic. School attendance and activities may also need to be modified to avoid provocation of symptoms in the first day or so post injury. Return to play should not occur before return to school.
Management will be individual and conservative with a minimum seven to ten days symptom-free rest and being cleared by a doctor before return to activity i.e. there must be 7 – 10 days of total symptom-free days (i.e. after their symptoms have resolved) before the child can return to light training. Training would then commence initially with very light training. The next day moderate training, the day after moderate training for a longer period, the next day some football skills practice and the final day football-specific training. If the player shows no return of signs or symptoms at each stage then they can return to play (so six further days in total). If at any stage symptoms return they should seek a doctor's opinion and as a minimum return to the stage of the previous 24 hours where they were asymptomatic. This should include missing at least one subsequent match. If a child takes five days for symptoms to resolve and to be medically cleared, then another 7 – 10 days symptom-free rest with a six day gradual return to play programme, they will not play for 18 – 21 days in total. It
is contraindicated for a child or adolescent with concussion to return to play on the same day as the injury regardless of the level of football performance.
Always have appropriate medical advice and a medical decision before returning a child player back to participation.

112 INJURIES TO THE HEAD AND NECK
Concussion and Head Injury Management in Conclusion
- A First Aider cannot distinguish between a structural or concussive injury, so must manage all head injuries in the same way and refer them to hospital for medical check up. Where a high suspicion of neck injury exists or where the player is unconscious this will definitely require an ambulance. - Effects of concussion last from 7 – 10 days. - Recovery of most players is usually within 7 – 10 days after injury. - All activities of training and playing football (including leisure and school sports) should be stopped for the duration of symptoms. - Miss one match after a diagnosis of concussion, especially in the absence of any preseason baseline and neuropsychological testing. - Symptoms are headache, nausea, vomiting, irritable, blurred vision, tiredness.
- For safety, all injuries to the head in Under 19s without medical attention at a match should go to the hospital for a check up. - If symptoms do not resolve over several days or appear to get worse re-seek hospital advice immediately.
HEAD GUARDS AND MOUTH GUARDSMouth guards have a definite role in preventing dental and orofacial injuries but neither mouth guards or soft helmet head guards have a current effect on preventing concussive injuries.
The overwhelming view of international experts in sport-related head injury is that soft helmets do not prevent brain injury (as opposed to superficial head injury e.g. cuts and bruises) and there is a risk that encouraging helmet use in children and adolescents may paradoxically increase the head injury rates as children feel the head guard protects them and thus are not as careful.

113 INJURIES TO THE HEAD AND NECK
OTHER HEAD INJURIES
Fractures to the skullBecause fractures of the skull often involve brain damage, they are serious injuries. Not only may the underlying brain be bruised, but the risk of an intra-cranial bleed (structural injury) is more than 60 times greater when there is a skull fracture present.
Depressed fractures to the skull may occur, these usually follow a direct blow e.g. from a football stud to the head. There may be a dent in the skull where the injury occurs. Careful handling is required to avoid direct pressure to the site of the injury as underlying structures are damaged.
TreatmentUnless scalp wounds are superficial and obviously clinically not serious, you must assume that there is a fracture of the skull. An x-ray will be needed to decide the extent of the injury. The player should be managed as above using the DRABC approach (with neck immobilisation) and sent immediately to the hospital.
Any player with a suspected fracture of the skull must also be suspected to have an injury to the cervical spine (neck). These players should be treated with care and full immobilisation and only moved by appropriate medical personnel.
Some players with a suspected fracture to the skull may have an associated concussion and present with disorientation and confusion. These players may be hard to manage and should not be forced to sit or lie down against their will. Urgent medical attention must be sought.

114 INJURIES TO THE HEAD AND NECK
JAW AND ASSOCIATED FRACTURES OF THE FACEFractures to the jaw and face are some of the most common injuries to the face in a contact sport, usually caused by a direct blow. Some of these injuries occur outside of the rules of the game e.g. foul play.
In a conscious player very little can be done other than care and support with rapid transport to hospital. The player may well support his own jaw with his hands, using them like a cup to support the chin. Ask the player to move their jaw from side to side and open their mouth fully. If they
can do this with little pain an associated jaw fracture is unlikely.
In an unconscious player the primary concern is maintenance of an airway and urgent medical assistance. In this instance, due to trauma to the head, face and neck the player will be managed as a neck injury because an associated neck injury cannot be ruled out with any player who receives a blow to the head above the level of the collar bone or who is unconscious.
EYE INJURIES
Eye injuries in sport are very common, and should be regarded as a medical emergency. Half of eye injuries admitted to hospital result in residual problems, thus recognising and promptly dealing with eye injuries is therefore of paramount importance for the First Aider.
There are four main types of injury:1. Blunt injury to the globe e.g. from a
finger, boot or ball striking the eye. 2. Injury to adjacent structures i.e.
cheekbone, nose.
3. Corneal abrasion and foreign body in the eye. These have the potential to lead to infection or scarring. Abrasions occur commonly from fingers entering the eye during contact or from dust or flying mud / grass on the field.
4. Penetrating injury – very rare but could occur from sharp fingernails or studs.
A serious injury to the eye is bleeding into the anterior part of the eye. The player must stop playing football, have a patch placed over the eye using a gauze swab or similar dressing and be immediately transferred to hospital.

115 INJURIES TO THE HEAD AND NECK
MANAGEMENT OF EYE INJURIES FOR THE FIRST AIDEREarly assessment is vital to reduce the risk of further damage and safeguard the player’s vision. On the field of play it is extremely difficult, the player should be removed from the field of play to allow for a better examination and medical evaluation.
– Obtain a full history including how it happened and what symptoms are being experienced e.g. pain, double vision, blurred vision, watering.
– Inspection of the eye and surrounding structures. Particular attention should be paid to signs of any foreign bodies (mud) or blood in the eye, pupil irregularity or any other clearly abnormal changes.
– Adjacent structure assessment e.g. is the cheekbone or nasal bone fractured (look for deformity, bruising or depression).
– Common sense is required when assessing a player but if any of the above are clearly abnormal, the player must be referred to hospital for further examination.
As a general rule, if a serious eye problem is suspected, even if no evidence is found e.g. persistent blurred vision for no obvious cause, then one should make no further attempt at examination, but send the player to hospital with an adequate
eye patch (see below). They should be kept quiet and settled to prevent further problems and not allowed food until seen in hospital.
If any grit or dirt is in the eye then it is acceptable to irrigate the eye using clean flowing water, prior to sending the athlete to hospital.
List of equipment that you might need for the treatment of eye injuries – Access to clean water (➔ see chapter 1). – Eye pad / dressing and tape. A dressing
could be a sterile piece of gauze swab or clean square of clothing that the player cannot see through. The idea of a patch is to rest the eye (as well as protect it). Do not place pressure on the eye with the pad.
– When placing an eye patch, remember the player will be worried and distressed and the uncovered eye will continue to work. Any movement of the good eye will lead to automatic movement of the injured eye as well, therefore place a patch over both eyes to completely rest them, reassuring the player as to why this is necessary prior to transfer to hospital.
– Always talk to and reassure your player.

116 INJURIES TO THE HEAD AND NECK
NASAL INJURIES
The most common nasal injury in sport is a blow to the nose causing a nosebleed, with other common injuries being nasal fractures. Primary consideration of the First Aider is to maintain a clear airway at all times.
A conscious player who is bleeding from the nose should be treated by the First Aider in the following manner: – Sit the player down, leaning forwards. – Pinch the soft part of the nose closed
between your finger and thumb (or player's own fingers) to close the bleeding vessels.
– Maintain the above pressure for ten minutes.
– Ask the player to breath through their mouth whilst you are doing this.
– If bleeding continues seek medical attention / send to hospital.
– If the bleeding stops, advise the player to avoid rubbing or scratching their nose for several hours, to prevent dislodging a clot and causing bleeding to recommence.
– If there is evidence of a fracture (deformity) to the nose, or any problems with breathing through the nose, send to hospital.
For an unconscious player or player with an altered level of consciousness: – Manage as you would any unconscious
player (see earlier in this chapter) but if bleeding is persistent, a side lying immobilised position is required to allow the blood to drain.
DENTAL INJURIES
Blows to the mouth and jaw are not uncommon in football, whether accidental or intentional (illegal). They result in damage to soft tissues, teeth, nerves or bone. They may also result in a concussion / altered level of consciousness due to transfer of force to the brain.
When making an assessment of a player having received such a blow, initially exclude concussion.

117 INJURIES TO THE HEAD AND NECK
Symptoms – Ask the player where it hurts. – Ask the player if there is any numbness. – Ask if their teeth meet together
normally and if they can move their jaw from side to side and open their mouth fully (checking for associated jaw fracture).
– Ask if any of their teeth feel like they are missing or deformed by running their tongue over them.
– You or the player, if possible, check for wobbly, damaged or missing teeth.
If there is a suspicion of a fracture to the jaw after assessing the above, the player should be sent immediately to hospital.
If there are damaged teeth then a dental opinion should be sought as soon as possible if the players have access to a dentist.
FOR AVULSED TEETH (i.e. teeth that are torn out of their socket) First aid treatment can be provided by: – if the player does not continue to
play, which they should not because of other associated injuries, the tooth should be replaced in the socket as soon as possible, if possible. If the tooth has been picked up from the floor, wash with sterile water being careful not to touch the root. It may require firm pressure to put the tooth
back into the correct place. If this is not possible then place it between lip and gum or in a small container in their own saliva or milk. In either case seek dental help straight away.
– The success of replacing an avulsed tooth is the speed with which it is replaced. If this can be done within an hour the tooth has a good chance of surviving.
– Silver foil wrapped around a players gum and tooth can act as a good splint to keep the tooth in place or if they have a mouth guard put this back in.
– Please note: If a player has suffered an injury to the head and an altered level of consciousness is suspected, store the tooth outside the mouth in a small container covered with the players own saliva.
– With children, dependent on the age, consideration needs to be given to any forming teeth and potential damage to underlying structures. The traumatic avulsion / loss of a milk tooth should not be accepted without the opinion of the player’s dentist being sought.
PREVENTION OF DENTAL INJURYIt is advisable that all players wear a properly prepared mouth / gum shield preferably provided by a dentist. This will help reduce soft tissue and dental injury. There is some evidence it may also reduce the incidence and severity of fractures to the jaw.


7MEDICAL EMERGENCIES
THAT MAY OCCUR IN FOOTBALL

120 MEDICAL EMERGENCIES THAT MAY OCCUR IN FOOTBALL
This chapter will focus on the “other” conditions that might require first aid attention that are not a direct result of football participation but are conditions that the player may suffer from during football training or matches.
In this chapter the acute (first aid) management of common medical conditions and illnesses (such as asthma, diabetes, epilepsy, heart disease) are described and not the routine chronic treatment of the underlying condition itself.
It is advisable when working as a First Aider in a team environment, that for every new player signing, and also at the start each season, you ask the players to complete a questionnaire asking about their previous medical history and illnesses so that you are aware of any underlying medical conditions your players might have as well as previous injuries that they have suffered. If your players are below the age of 16, you might wish parents to complete the form.

121 MEDICAL EMERGENCIES THAT MAY OCCUR IN FOOTBALL
ASTHMA AND EXERCISE-INDUCED BRONCHOSPASM (EIB)
Asthma is an inflammatory reaction of the airways. It is a condition that is characterised by difficulty in breathing as the passages of the lungs become narrow.
Signs and symptoms of an acute asthma attack: – Difficulty in breathing and shortness of
breath – A cough – Wheezing on breathing out – noisy
breathing as the air is forced through the narrow passageways in the lungs
– Tightness of the chest – Accessory muscles may be used to
breathe i.e. use of neck muscles and shoulders to try to get air into and out of the lungs
– Player may look pale, clammy, sweaty and cyanotic (blue) around lips
– The player will speak in broken sentences – Player is often quiet, subdued and
if the attack is severe, may become unconscious
Asthma occurs in 1 in 12 adults and 1 in 11 children, 80 % of those with asthma also have exercised-induced bronchospasm (EIB). It is common in sport. EIB symptoms include the same symptoms listed above and may also include early fatigue and poor performance. EIB can occur after a few minutes of exercise and may continue to worsen for another ten minutes after activity
has finished. Triggers for EIB are cold, dry air conditions such as football played in the winter months in cold countries or where there are high pollen levels or polluted air.
Treatment – Always start with ABCDE. – The best treatment is prevention.
Check that your players understand their medical condition, what each of their prescribed medication is used for and that they always carry emergency medications (usually an inhaler) with them.
– The best prevention is the use of the medication prior to exercise for exercise-induced symptoms. Players usually have their own medication. It is essential to know which of your players use inhalers and check the medication is at the field of play side if required during training or matches.
– Help to give the players their own medication if they require it urgently.
– Reassure and calm your player. – Help the player to sit down and lean
forwards – this will help free the chest and allow the player to take in deeper breaths.
– Do not get the player to lay down flat this will not help their breathing.
– Seek urgent medical help – this may be calling an ambulance, especially if: – the player’s medication does not

Picture 67a and b: Making a spacer device
122 MEDICAL EMERGENCIES THAT MAY OCCUR IN FOOTBALL
relieve their symptoms or … – … if the player has not got their
medication with them. – Or if due to the severity of the acute
asthma attack they cannot get their required medication into them. If your player is too short of breath to take their medication adequately a spacer device can be used. Take a 500 ml plastic soft drink bottle, cut a hole in the bottom to fit the pressurised dose inhaler. The player can add his dose into the bottle by depressing the spray and then allow them to breathe in the medication by placing their lips around the screw top end and breathing in and out.
It is most important that you are aware of any players under your care who are asthmatic. Check that they satisfactorily understand the nature of their condition, what the inhaler does and that they know to always carry a supply of their inhalers.
Please ensure that you and the player are aware of the anti-doping rules and regulations concerning the use of asthmatic medications in football.
Any player who has an asthma attack which is not successfully treated within ten minutes with an inhaler must be sent to hospital for medical assessment and treatment.

123 MEDICAL EMERGENCIES THAT MAY OCCUR IN FOOTBALL
DIABETES AND HYPOGLYCAEMIA Hypoglycaemia (low blood sugar) is fairly common in sport and is due to an imbalance between physical activity and nutrition but can be influenced by external factors, such as heat. Low blood sugar can be prevented by adequate training and ingesting an appropriate carbohydrate meal.
Signs and symptoms of hypoglycaemia: – Premature fatigue / tiredness – Pale, clammy, sweaty – Unusual behaviour
(may appear drunk or be aggressive) – not their normal behaviour
– Confusion – Pulse rapid and weak – Possible seizures – Decreasing level of consciousness
Hypoglycaemia is easily remedied by giving the player some sugar preferably in the form of glucose (see page 124).
In a diabetic, especially one who is insulin-dependent, hypoglycaemia can be much more rapid in onset and lead to collapse. The early manifestations will often include poor decision-making, reduced skill level resulting from loss of coordination, fatigue, yawning and confusion. Being aware of any players who suffer from this
condition will assist in the early recognition of this disorder and may prevent the early manifestations progressing.
Signs and symptoms of hypoglycaemia in a diabetic: – Poor decision-making – Reduced skill level due to
loss of coordination – Fatigue – Yawning – Confusion – Collapse
Hypoglycaemia may occur in the hours after intense exercise not just during exercise. The player will most likely be aware of their condition, but additional advice on this is always helpful especially if playing away from home or you are away on tour.
In general, it is preferable for the blood sugar of an insulin-dependent diabetic to be slightly high rather than low around the time of exercise in an attempt to avoid hypoglycaemia. Most of these players are, however, well versed in the treatment of their condition and will check their blood sugars before a match, at half time and at intervals after the match.

124 MEDICAL EMERGENCIES THAT MAY OCCUR IN FOOTBALL
TreatmentAlways began by assessing your ABCDE. Hypoglycaemia should be treated initially with 10 – 20 g of glucose (see examples below) by mouth in the conscious player who is able to orally ingest the food or drink. This may be repeated after 10 – 15 minutes.
10 g of glucose is equivalent to
- 2 teaspoons of sugar - 3 sugar lumps - Hypostop gel (if you have access to this) - 200 ml of milk - 50 – 55 mls of non-diet Lucozade - 90 mls of Coca-Cola - 5 mls of Ribena original (to be diluted) or similar concentrated soft drink
If hypoglycaemia has caused unconsciousness in someone using insulin, emergency help is required immediately, do not delay.
Although most of the above treatments require the player to be conscious in order to swallow the food/drink, one can use sugar, honey, syrup or glucose powder or gel in unconscious players. Initially place these patients into the recovery position to protect their airway. Then rub one of the substances mentioned on the inside of the unconscious player’s cheek and it will be absorbed in a few minutes, waking up the player. Once the player is awake, give them some additional sugar by mouth to drink. Every player that becomes unconscious without an obvious head injury as a cause, should be regarded as having a low blood sugar and treated as such without exception. In players being treated by oral anti-diabetic drugs rather than insulin, hypoglycaemia can last many hours and the player must be admitted to hospital for observation.

125 MEDICAL EMERGENCIES THAT MAY OCCUR IN FOOTBALL
EPILEPSY
Epilepsy is a condition affecting the electrical pathways in the brain. The common symptom of epilepsy is seizures / convulsions.
It is a misconception that anybody convulsing is suffering from epilepsy. There are many other causes for a player to convulse such as low blood sugar, low levels of oxygen, heat stroke and head injury / concussion (➔ see relevant chapters 3 and 6).
If a player is known to have epilepsy, check with the player’s doctor (if possible) and / or parents of young players prior to sanctioning participation in football.
Most epileptic seizures are self-limiting within 1 – 2 minutes and require no treatment, except to ensure that the player is positioned safely and comfortably in the recovery position with something soft under the head so as to keep the airway open and to avoid injury. Assess using your ABCDE approach. The possibility of hypoglycaemia must always be considered even if the player is a known epileptic but especially if they are not.
All players who suffer a seizure should be sent to hospital, via ambulance.
The management of the fitting player: – ABCDE approach. – Call an ambulance. – Loosen any tight clothing so as not to
compromise the airway. – Turn player into the recovery position,
and place something soft under the head to prevent injury by the hitting the hard ground during seizure movements.
– Move any objects that may cause harm to the player away from the area.
– If it is not possible to move items away and their presence is potentially life threatening, you will have to move the player.
– Move any bystanders and other players away.
– Take a note of the length of the fit (time the fit's duration so you can advise the ambulance).
– Do not restrain the player i.e. do not hold them down.
– Do not attempt to place anything in the mouth, especially your fingers.
– Do not attempt to remove a well fitting gum-shield if it is in place.
Prolonged seizures require the player to receive medication that is beyond the remit of a First Aider to carry.
Send the player to hospital by ambulanceThe player’s doctor will advise if and when the player can to return to football participation following an epileptic event.

126 MEDICAL EMERGENCIES THAT MAY OCCUR IN FOOTBALL
HEART CONDITIONS
Many diseases can affect the heart. Generally, heart diseases are classified according to the part of the heart that they affect or the changes they produce.
Management of these conditions is often beyond the scope of basic first aid. However, as a First Aider you must be able to recognise life threatening cardiac conditions and take the necessary action for the players in your care.
Players may be predisposed to a cardiac injury and the early recognition will allow an emergency ambulance to be called to the scene early. A calm, reassuring approach from the First Aider will assist in calming the player in these situations, which will assist in their management.
Heart attack – this is when the blood supply to a part of the heart is obstructed suddenly causing severe pain. The player may have no previous cardiac history that you are aware of. This is more common in players older than 35 years of age.
Signs and symptoms of a heart attack: – Severe crushing central chest pain – Pain spreading into the jaw and down
left arm – Breathlessness – Pale, cold and clammy skin – Sudden collapse
Treatment – Always start with your ABCDE approach. – Minimise the workload of the heart i.e.
sit the player down. – If conscious, place the player in a
comfortable position. – Do not allow the player to move
around. – Loosen any tight clothing. – Reassure the player, in a calm voice. – If player has their own medication,
encourage them to take it. This may be the case in players / coaches who have known heart conditions.
– If they collapse, they will need CPR, so look for this and begin immediately (➔ see chapter 2). If an AED is present this is required urgently.
– Call an ambulance.
127 MEDICAL EMERGENCIES THAT MAY OCCUR IN FOOTBALL
SUDDEN CARDIAC ARREST (SCA) The death of an apparently healthy young player is a dramatic and stressful event but fortunately it is infrequent in relation to the number of young people involved in sport.
Male athletes appear to be at increased risk of exercise-related SCA.
There are several inherited cardiovascular diseases (whose explanation is beyond the scope of this manual) that are the leading causes of sudden cardiac arrest. The majority of these players do not know they suffer from these underlying conditions and only suffer symptoms just prior to their cardiac arrest. Less than 20 % who have these conditions have warning symptoms that allow the conditions to be investigated.
Signs and symptoms that indicate a player may be at risk for SCA: – Chest tightness during or after exercise – Chest pain during or after exercise – Chest palpitations during or after
exercise – Dizziness – unexplained episode of
dizziness during or after exercise – Episodes of syncope (unexplained
fainting) during or after exercise, but can also occur at rest
– Shortness of breath disproportionate to the exercise they are doing e.g. not in line with the other players' reactions
– Unable to keep up with the other players (often labelled lazy) due to fatigue, during or after exercise
If you become suspicious – if the player presents with any of the above, then do not hesitate to refer them to their doctor immediately.
One of the main features is a positive familial history. Usually a player will have had a close relative that has died young from natural causes (not trauma). Asking about their relevant past medical history and family history may help save a life!
Apparently healthy young players with chest pain or syncope during exercise are often given inappropriate reassurance that they are fit and well rather than being investigated.
MYOCARDITISAnother cause of SCA is acute myocarditis. This is an inflammation of the heart muscle with no initial underlying risk factors that can be screened for. Training or playing with an illness, especially an infection e.g. upper respiratory infection or flu, can lead to the development of myocarditis.

128 MEDICAL EMERGENCIES THAT MAY OCCUR IN FOOTBALL
COMMOTIO CORDIS This is another condition with no underlying risk factors and a perfectly normal heart and thus cannot be screened for. This is caused by a direct blow to chest wall at a particular time in cardiac cycle which sends the heart into an abnormal rhythm. For example, a ball, knee, head or elbow hitting a player in the chest during contact. It is more prevalent in younger players as they do not have the muscle bulk in their chest wall to absorb some of the impact of the blow.
Treatment of Sudden Cardiac Arrest – Call for help – someone needs to call
for an ambulance immediately and request them to bring an automated external defibrillator (AED) or other type of defibrillator (machine that shocks the heart back into a normal rhythm). If, however, there is an AED available inside the stadium, send someone immediately to fetch it and bring it to you.
– Begin CPR with chest compressions being done at a fast rate (more or less two compressions every second) and as hard as possible. (Should be at same time as set-up of AED if more than one rescuer is present) ➔ see chapter 2. Once the AED is working, follow its instructions exactly.
– Checking for signs of life using the A,B,C approach.
– The time taken to initiate CPR and AED defibrillation is an important determinant of successful cardiac resuscitation, thus any delay in entering the field of play and
identifying the player who has collapsed without contact must be minimised. The FIFA Laws of the Game state that medical personnel should only enter the field of play following a signal from the referee, except in the case of a serious injury 7. Any player who collapses without any prior contact is therefore regarded as a potential SCA and must be classified as a serious injury.
– If the player presents with a brief seizure-like activity, these slow involuntary movements on-top of the above history i.e. collapse with no contact should not be mistaken and treated as a seizure, but dealt with as a cardiac arrest and resuscitation started. The aim is to get the first shock in within three minutes of their collapse 7.
– The decision to transfer the player will be that of the ambulance. When the ambulance arrives do not attempt to move the player, continue with CPR and AED on the field of play until the paramedics reach the player.
Early recognition is vital to treat this. If you have any concerns regarding any of your players please speak directly with them or their parents (if younger) and ask them to consult their own doctor. There are screening tests that can be conducted on players to test the heart and this might be appropriate for their doctor to arrange – if in doubt and you suspect something it is better to have them reviewed than collapse at a later date.

129 MEDICAL EMERGENCIES THAT MAY OCCUR IN FOOTBALL
ANAPHYLAXIS
Players who are allergic to a specific substance (allergens) will show a pattern of disease known as allergic reactions when exposed to that substance. Allergic reactions can occur immediately after exposure or sometimes even a few days later. Generally allergic reactions can be easily managed but on occasion a very serious life threatening allergic reaction can occur called anaphylaxis.
Anaphylaxis is characterised by rapidly developing life-threatening airway and / or breathing and / or circulation problems, associated with a rash.
Signs and symptoms of anaphylaxis: – Sudden swelling of the face, tongue,
lips, eyes or neck that can quickly lead to airway compromise and total airway blockage if early treatment is not provided
– Hoarse sounding voice – Wheezing – asthma-type symptoms – Difficulty speaking – unable to speak in
sentences – Difficulty breathing – breathlessness – Itchiness – Flushing / redness – Red rashes on the skin – Nausea and vomiting – Diarrhoea – Abdominal pain / cramps
Not all of these symptoms will be necessarily present at the same time.
Anaphylaxis is caused by a very broad range of substances, often peanuts, penicillin, or bites and stings from insects particularly bees and spiders.
Treatment – Anyone suffering an anaphylactic
reaction requires immediate hospital treatment. A player suffering a severe allergic reaction (anaphylaxis) will present with immediate and progressive swelling and tingling of the lips and tongue. There may be obvious noisy breathing, increased breathing rate, audible wheeze, difficulty swallowing, unable to talk in sentences, the player feel light headed, clammy, sweaty and may faint or go unconscious.
– Call an ambulance – this is a medical emergency.
– ABCDE approach. Protect their airway and ensure it is open and clear.
– Lay player flat. Players with a breathing difficulty may prefer to sit up and lean forwards to aid their breathing.
– Lie them down and elevate their legs if they begin to lose consciousness.
– If the player deteriorates, you may have to provide CPR – monitor their ABC (➔ see chapter 2) and be prepared.
– If they are breathing but unconscious, lay them on their side, but sit so you can always see their face and monitor their breathing until the ambulance arrives.

Picture 68: Various forms of adrenaline pens
Picture 69 a and b: Self administration of an adrenaline pen
130 MEDICAL EMERGENCIES THAT MAY OCCUR IN FOOTBALL
– Players with a known allergy may carry their own life saving drug called adrenaline / epinephrine in the form of an adrenaline pen which is a prescribed, prefilled, spring-loaded, self injecting syringe of adrenaline.
– You should be aware of which of your players are allergic and carry such medication.
Players who feel they are having an anaphylactic reaction will generally self-administer their own adrenaline pen. If the player is showing signs and symptoms (detailed above) of an anaphylactic reaction they should be able to self-inject this life saving medication into the upper outer thigh, through clothing if necessary (picture 69 a and b). The player still requires emergency treatment, but the adrenaline pen will save the player.

131 MEDICAL EMERGENCIES THAT MAY OCCUR IN FOOTBALL
However if the reaction is severe and rapid or the pen is not immediately accessible, the player may be unconscious by the time the pen arrives, in this instance the adrenaline pen can be administered by a First Aider or bystander.
Adrenaline pens come in a pre-filled syringe with a self-limiting dose and are administered by opening the container, removing the safety cap at the end of the pen, jabbing the pen firmly against the player’s thigh (preferably in direct contact with the skin however in can be administered through clothing) and pressing down firmly on the pen until a click is heard/felt. The pen should be held in place for ten seconds so that the entire dose is injected into the thigh. Any player who uses their adrenaline pen must go to hospital.
Immediate ambulance assistance is required, do not delay.

132 MEDICAL EMERGENCIES THAT MAY OCCUR IN FOOTBALL
FAINTING
Fainting is a brief loss of consciousness caused by a reduction in the flow of blood to the brain. As a result of this lack of blood, there is loss of consciousness and the player may fall to the ground, allowing oxygenated blood to return to the brain. Fainting is usually a transient incident of which the player will fully recover from although they may still suffer from the initial cause of the faint
Signs and symptoms: – Player feels dizzy – Player is cold and clammy to the touch – Player looks pale – Player may suffer a brief loss of
consciousness
Possible causes: – Heat effects – Exhaustion – Emotional distress – Low blood sugars (not eaten prior to
extensive training or competition) – Pain (due to an injury e.g. broken
bone)
Treatment – Ensure a clear airway (ABCDE
approach, ➔ see chapter 2). – If there are no obvious lower leg
fractures and the player is conscious raise the legs, to allow blood to flow back to the head.
– If they are unconscious, but breathing normally, place them into the recovery position, they will soon awaken.
– Reassure the player. – Seek medical advice to check out the
reason for the fainting episode or to treat the reason if it is obvious e.g. broken bone.
The player will usually regain consciousness quite quickly once laid down.
The player will fully recover from a faint, although they may still suffer from the initial cause of the faint i.e. pain or low blood sugar or perhaps a reaction to seeing someone bleeding.
Please be aware that healthy fit individuals do not faint for no apparent reason. If there is no obvious trigger, as referred to above, such as low blood sugar (not having eaten), fear of blood or severe pain due to an injury, then the player should be medically assessed. The player may have an underlying cardiac disorder that requires follow-up.

133 MEDICAL EMERGENCIES THAT MAY OCCUR IN FOOTBALL
EXERTIONAL HEAT STROKE
Heat stroke (sometime referred to as sunstroke) is a medical emergency that can lead to death if not properly and promptly treated. It is defined as a body temperature of 104° F (40° C) or higher with accompanying physical symptoms.
Heat cramps and heat exhaustion (two other forms of hyperthermia) are less severe. Please see the table below showing the differences in symptoms and severity of heat exhaustion in comparison to heat stroke.
Symptoms of heat exhaustion
- Sweating - Redness - Dizziness - Cramps - Headaches - Exhaustion - Nausea
Symptoms of heat strokeLack of sweating*
- Skin hot and dry - Body temperature rises - Confusion - Seizure - Coma - Death
* as temperature regulation mechanism in the brain has failed
First aid treatment – Remove from heat source. – Rest. – If conscious, give cool fluids. – Cool by covering with wet sheet or
clothing. – Sprinkle water onto the body and then
use a fan to cause evaporation which cools the body down.
– Place ice packs wrapped in a cloth to the groin, armpits and neck area.
– Call an ambulance.


136 MEDICAL EMERGENCIES THAT MAY OCCUR IN FOOTBALL
REFERENCES
F-MARC Football for Health Manual
1. FIFA 11+ A complete warm up to prevent injuries.
2. F-MARC Nutrition for Football 2010
3. F-MARC Football Emergency Medicine Manual
4. Bille K, Figueiras D, Schamasch P et al. Sudden cardiac death in athletes: The Lausanne Recommendations. Eur J Cardiovasc Prev Rehabil 2006;13(6):859-875.
5. Maron BJ, Carney KP, Lever HM et al. Relationship of race to sudden cardiac death in competitive athletes with hypertrophic cardiomyopathy. Am J Coll Cardiol 2003;41(6):974-980.
6. F-MARC Prevention and Management of Sudden Cardiac Arrest in Football Manual 2013.
7. Consensus statement on concussion in sport: the 4th International Conference on Concussion in Sport held in Zurich, November 2012. Br J Sports Med 2013:47:25-58.

137 MEDICAL EMERGENCIES THAT MAY OCCUR IN FOOTBALL
F-MARC PLAYER RECORD FORM
APPENDIX I Name of First Aider: Player's Name: D.O.B: Age: Contact No.: Male / Female: Home Address: Emergency Contact Name: Number:
Previous Medical History: Medication Taken for the Above: Allergies: Previous Football-related Injuries:
CURRENT INJURYDate: Time: Location: History of Incident: Time Ambulance or Medical Help called: Current Injury / Illness:
Last Eaten:
First Aid Observations – here comment on breathing rate, level of consciousness, are they improving or deteriorating, include timelines where you have them: First Aid Treatment Given: Time of Handover to Ambulance / Medical Staff: Signature of First Aider:

138 MEDICAL EMERGENCIES THAT MAY OCCUR IN FOOTBALL
GLOSSARY
First AiderThe person tasked with the responsibility of taking care of the players and match officials at the training and match venue. Preferably suitably trained with an up-to-date qualification in first aid in sport.
Refer to HospitalA case where a player is too ill to continue playing and also requires hospital treatment. The First Aider will have to use their own first aid judgement about whether the player can be sent in a car with a relative or whether an ambulance is required to transport the player as their injury is too severe to risk being taken by car. You could send your player notes (➔ see appendix I) with the player so that the hospital have full details of the injury.
MatchThe playing of the game of football on the field of play, regardless of age or level.
Field of playThe playing area i.e. pitch and surrounding pitchside area.
AmbulanceThe emergency medical services in your region / country.
CPRCardio pulmonary resuscitation. Chest compressions and breathing in a cardiac arrest.
AEDAutomated External Defibrillator. A shock box with the aim of stunning the heart to try to “shock” the heart back into a normal rhythm.
ABCDEThe step-wise approach to assessment and management of an injured player. Starting with Airway, Breathing, Circulation, Disability and Expose/Examine. Often preceded by DR – the checking for danger and response of the player.
SCA Sudden Cardiac Arrest
BLS Basic Life Support

139 MEDICAL EMERGENCIES THAT MAY OCCUR IN FOOTBALL
Official publication of the Fédération Internationale
de Football Association (FIFA)
Published by
FIFA Medical Assessment and Research Centre
(F-MARC)
Content
Dr Lisa Hodgson (Assistant Professor)
Professor Efraim Kramer
Graphic design and layout
von Grebel Motion AG
Tara Gschwend
Photos
Corobeus Sports Consultancy Limited UK and
ABC First Aid Limited UK
galledia ag, Switzerland / 5.15 2000 JDV/pto/pma