FIRST AID EMERGENCY MANAGEMENT - We are...
150
FIRST AID EMERGENCY MANAGEMENT THE AUTHOR Dr.Sanapala Seetharamaiah M.B.B.S.PGD IN DIABETES CONSULTANT DIABETOLOGIST Untitled-1 9/1/2009, 11:31 AM 1
Transcript of FIRST AID EMERGENCY MANAGEMENT - We are...

FIRST AID
EMERGENCY MANAGEMENT
THE AUTHORDr.Sanapala Seetharamaiah
M.B.B.S.PGD IN DIABETESCONSULTANT DIABETOLOGIST
Untitled-1 9/1/2009, 11:31 AM1

Contents 1.FEW WORDS ABOUT
2.FIRST AID
3.THE HUMAN BODYRibsUpper limbsLower limbs
4.THE RESPIRATION
Artificial Respiration Methods of Artificial Respiration
Priorities of ABC of First AidSuffocation (Asphyxia)DrowningStrangulation/hangingChocking
Heimlich maneuver Smoke/gases/fumes
5. HE HEART
Circulatory SystemHow to take pulseCardiac resuscitationCardiopulmonary resuscitation (CPR)CPR in Nutshell
6. WOUNDS & BLEEDING
7. BLEEDINGPressure pointsTourniquetRecovery position (prone position)Other common causes of bleeding
Untitled-1 9/1/2009, 11:31 AM2

8. DRESSING & BANDAGES
Triangular bandageBasic wound dressing
Applications of triangular bandagesRoller bandage for hand and wristRoller bandage for elbowRoller bandage for fingersRoller bandage for heelRoller bandage for ankle and footRoller bandage for leg
9. FRACTUREFracture Upper ArmFracture ForearmFracture Wrist and HandFracture Of The Hands And FingersFracture ThighFracture leg and patellaFracture AnkleSprains & StrainFracture Collar bone (Clavicle)Fracture ribsFracture Neck and spineFracture Jaw
10. SLINGS AND SPLINTSElevated sling:Collar and cuff slingSplints
11. MOVING A VICTIM (TRANSPORT)Fireman lift/carryOther types of carryStretcher
Untitled-1 9/1/2009, 11:31 AM3

12. BURNS & SCALDS
Percentage of the area of body burnt:Thermal Burns:Electrical Injuries/BurnsWhy are burns Dangerous?Management of Extensive BurnsManagement of Other type of burns
13. UNCONSCIOUSNESS
14. SHOCK
15. HEART ATTACK
16. STROKE
17. POISONING
Snake BiteInsect bites and stings:Scorpion strings and Spider bitesAnimal bites
18. FOREIGN OBJECTS
Foreign body in the eyeForeign body in the earForeign body in the Nose
19. FIRST AID BOX
Small sized first aid boxMedium sized first aid boxLarge sized first aid box
Untitled-1 9/1/2009, 11:31 AM4

MISCELLANEOUS
20. EPILEPSY (FITS)
21. FEVER (PYREXIA)
22. CHICKEN POX
23. MEASLES
24. ASTHMA
25. DIARRHOEA ( MOTIONS)
26. DIABETES
27. IMMUNIZATION SCHEDULE
28. HIV- AIDS
29. BLOOD GROUPS & DONATION
30. WHOM & WHEN TO GIVE BLOOD
Untitled-1 9/1/2009, 11:31 AM5

. 1 Few words about………..
Being Author is Secretary of St.John AmbulanceAssociation Visakhapatnam branch, Andhra Pradesh re-sponsibility to say few words about my parent organiza-tion.
St.John Ambulance Association
St.John Ambulance Association is a worldwide organization with
National Head quarters at New DelhiState Head quarters at HyderabadDistrict Head quarters at Visakhapatnam
This organization imparts training in “First aid tothe injured” and issues certificates to those qualifiedwhich are recognized throughout the world
we are conducting regular training Programs “Firstaid to the injured” to the general public , industrialestablishments and others at our District centre:
SecretarySt.John Ambulance AssociationBhavani Diabetic care centre premises39.11.31, Muralinagar Jn.MadhavadharaIndustrial Estate (PO)Visakhapatnam 530 007Andhra Pradesh
Address for Communication:
Phones: 6523999 (R) Cell 9885754766
Untitled-1 9/1/2009, 11:31 AM6

First Aid has been practised ever since the beginningof humanity. Learning First Aid is the civic responsibilityof every citizen. Methods of first aid have been prac-tised ever since one person desired to help another insickness or after an injury. But, an organized worldwideeffort at recognizing the importance of first aid cameonly in the year 1877 with the formation of the St. JohnAmbulance Association of England named after the greatapostle St. John. Over the decades, the importance givento First Aid has grown. Mahatma Gandhi was a greatsupporter of the cause of First Aid, and led a band ofdedicated Ambulance Corps volunteers in 1906 during thetime of the Zulu Rebellion and earlier in 1899 during the
2 FIRST AID
FIRST AID
First aid is the immediate skilled assistance givento a victim of an accident or sudden illness before medicalaid is available (doctor).
AIM OF THE FIRST AID:
1. PRESERVE THE LIFE
2.PROMOTE THE RECOVERY
3.PREVENTS WORSENING CONDITION
4.TRANSPORT THE CASUALTY
Untitled-1 9/1/2009, 11:31 AM7

♦ Reach the accident spot immediately♦ Observe the scene which is endanger us to you or
casualty♦ Becalm, confident and quick in action♦ Clear the crowd and ensure fresh air to casualty♦ Assure & reassure the casualty♦ Find and remove the cause♦ Attend the priorities of ABC of first aid♦ If possible, sent information to family members
Golden rules for the first aid
1. Preserve the life:a. Maintain airwayb. Breathingc. Circulation
2. Promote recovery:a. Encourage confidenceb. Attempt to relieve the pain and discomfortc. Handle the casualty gentlyd. Protect from cold and wet
3. Prevent the worsening:a. Unnecessary movements of the injured partb. Dress the woundc. Comfortable support to fracture sited. Place the casualty on well ventilated area
4. Transport the casualty to the hospital:a. Call immediate assistance to 108 in Andhra
Pradeshb. Shift the casualty by other transport
Untitled-1 9/1/2009, 11:31 AM8

Human body consists of bones and flesh having206 bones. It has Skull, spines, ribs, upper & lower limbsand pelvis,
THE HUMAN BODY
Skull 22Middle ear 6Throat 1Shoulder 4Thorax 25Vertebrae 26Arms 6Hands 54Pelvis 2Legs 8Feet 52
Human Skeleton
Fibula Tibia
Femur
Hum
erus
Ulna Radius
Skull
Pelvis
Ribs
3.
Spine
Untitled-1 9/1/2009, 11:31 AM9

Ribs: consists of 12 pairs which forms cage and protectsvital organs like heart and lungs.
Uses of Bones:
1) Firm shape to the body2) Protect the vital organs3) Attached to muscle and make movements4) Bone marrow produces blood cells (RBC)
Untitled-1 9/1/2009, 11:31 AM10

Upper limbs: clavicle, scapula, humerus, radius, ulnaand wristShoulder: clavicle and scapulaUpper arm: humerusForearm: radius and ulnaWrist carpel (8)Palm metacarpals (5)
Phalanges (three in each finger except little finger having two) (14)
Untitled-1 9/1/2009, 11:31 AM11

Lower limbs: Pelvis, Thigh bones. Leg bones, Knee,Ankle and Foot
Thigh bones FemurLeg bones Tibia&FibulaKnee cap PatellaAnkle Tarsals(7)Foot MetatarsalsPhalanges (three small
bones in eachtoe exceptlittle toehaving2 bones)
Untitled-1 9/1/2009, 11:31 AM12

4 THE RESPIRATIONBreathing is the process by which air is drawn into
the chest through nose and mouth and is the blown out againthough the same passage
Respiratory system consists of:
1. Respiratory tracta. Air passages- mouth, nose and tracheab. Lungs
2. Muscles connecting with respiratory mechanisma. Ribsb. Diaphragm
3. Respiratory Centrepresent in the brain
Untitled-1 9/1/2009, 11:31 AM13

Any where in the Respiratory system injured orblocked leads to suffocation
1) Conditions affecting the air passage:a) Obstruction by foreign bodyb) Allergens like gases, food leading to spasmc) Compression of trachea e.g.. Hanging, smothering
2) Conditions affecting the respiratory mechanisma) Diseases like tetanus and rabiesb) Nerve diseases like paralysis of chest wall and
diaphragm
3) Conditions affecting the respiratory centrea) Electric shockb) Large doses of sleeping pillsc) Chr.Alcoholism
4) Compressing of chesta) Falling of sand, stones and mud
5) Lack of oxygena) High altitudesb) Mines (under ground)
Signs & symptoms
1. Difficulty in breathinga. Rate of respiration increasesb. Respiration gets shortened
2. Bluish discoloration of lips, tips of fingers & toes3. Prominent neck veins4. Gradual loss of consciousness5. Fits may occurs6. Froth from the mount & nostril
Untitled-1 9/1/2009, 11:31 AM14

How to Asses, if breathing stops:
Look and see: chest wall will not moves up anddown
Listen: you will not hear air flow, when place yourear near nose or mouth
Feel: your hand will not move up and down, whenkept on the chest. No feeling of airflow when handkept near nose and mouth.
Management:
• Remove the cause• Ensure an open airway, to allow the air to
reach lungs• If the casualty not able to breath normal, to
apply artificial respiration
What to do if breathing stops:
Untitled-1 9/1/2009, 11:31 AM15

ARTIFICIAL RESPIRATION
This means providing air for a person who is notbreathing or is not making sufficient respiratory efforton their own.
It consists of clear Airway and Breathing
A : Airway - The passage from the nose and throatto the lungs, which allows air containing oxygen to enterthe body during normal Respiration or Artificial Venti-lation. The main causes of an obstructed airway are:
* Conscious: Food or other Foreign Body * Unconscious: Tongue or Epiglottis
Fall of tongue
Untitled-1 9/1/2009, 11:31 AM16

Procedure of Artificial Respiration
♦♦♦♦♦ Lay the casualty on a hard surface in supine position(face to sky)
♦ Kneel next to the casualty neck and shoulders♦ Ensure patients airway is clear by checking the
mouth for any obstruction i.e.. any vomits, saliva andremove dentures if any
♦ Open airway using the head tilt-chin liftTilt victim’s head back so chin points upward
♦ Take a deep breath and place your mouth tightlyover the patient's mouth.
♦ Blow air twice steadily for 2 seconds and watch thechest movements (chest raising)
B : Breathing - The casualty needs to be breath-ing for themselves, or assisted in breathing, in order tomaintain oxygen in the body, particularly to the brain.The body and brain in particular can only survive with-out oxygen for a few short minutes before permanentdamage or death will result.
ARTIFICIAL RESPIRATION
Untitled-1 9/1/2009, 11:31 AM17

If it does not rise, further check for any airwayobstruction
Repeat the procedure 15 times per minute till thepatient recovered or medical attendance
It is the most effective method of givingartificial respiration, given appropriatelywithout delay,can be life saving.
♦♦♦♦♦ Place your mouth over mouth and nose of casualty
♦ ♦ ♦ ♦ ♦ Breath gently without over distending the lungs
For Babies and Children:
♦ Children should receive smaller breaths repeated at the rate of 20 times per minute.
Untitled-1 9/1/2009, 11:31 AM18

In certain conditions, artificial respiration cannotbe administered like injury to face, jaw bones fracture,consumed poison and drowning. Alternate methods are:
Schafer’s method:
♦ Place the casualty face downwards, his head rest onhis hand and head turned on side
♦ Kneel at legs and place hands on the casualty backjust below the shoulder blades, and rock forwardsand pressing down to compress the chest. Repeatthe procedure for 12 times/minute
Other Methods of Artificial Respiration
SYLVESTER Method :
♦ Place the casualty lying on the back, face upwards♦ Extend casualty's hand above head then rock for
ward and placing hands on the casualty's chest♦ Repeat 12 times a minute.
Untitled-1 9/1/2009, 11:31 AM19

Priorities of ABC of First Aid
A AIRWAYB BREATHINGC CIRCULATION
Any casualty who is in serious condition and requiresimmediate attention on airway, breathing, circulation.
Choose priorities of ABC of first aid depends onsituation or CPR
A. Airway -The passage from the nose and throat tothe lungs, which allows air containing oxygen to enter thebody during normal Respiration or Artificial Ventilation.See for any obstruction and remove the cause.
B : Breathing - The casualty needs to be breathingfor themselves, or assisted in breathing, in order tomaintain oxygen in the body, particularly to the brain.The body and brain in particular can normally only sur-vive without oxygen for a few short minutes before per-manent damage or death will result. To look for artificialrespiration.
Untitled-1 9/1/2009, 11:31 AM20

C : Circulation - The Heart is pumping bloodthroughout the body at a sufficient rate to allow forthe exchange of gases (Oxygen and Carbon Dioxide).
if fails to do, cardiac compression which is vitalmethod to recover from the cardiac arrest
To look for carotid artery pulse (see above pic-ture), if no pulse starts cardiac resuscitation
Untitled-1 9/1/2009, 11:31 AM21

SUFFOCATION
1 Drowning
2 Strangulation
3 Choking
4 Smoke
5 Gases and fumes
Asphyxia is a condition in which the lungs do not getsufficient oxygen supply of air for breathing. If thiscontinues for some minutes breathing and heart actionstops and death occurs.
kinds of Suffocation:
Signs and symptoms
Initial phase
1. Rate of breathing increases 2. Breath gets shorter 3. Veins of the neck become swollen 4. Face, Lips, nails, fingers and toes turn blue. 5. Pulse gets faster and feeble (tachycardia)
Later phase 6. Consciousness is lost totally or partially. 7. Froth may appear at the mouth and nostrils. 8. Fits may occur.Note: Even after breathing has stopped the heart
may continue to beat for five to ten minutes. In suchcases it is possible to restore breathing through artificialrespiration, and bring the casualty back to life.
Untitled-1 9/1/2009, 11:31 AM22

Drowning is the result of complete immersion of thenose and mouth in water (or any other liquid). Water en-ters the windpipe and lungs, clogging the lungs completelythus making the person unable to breath.
Always perform the Helmlich maneuver on anydrowning victim before you do CPR
DROWNING
ManagementThe aim of first aid is to drain out water (or other
matter) from lungs and to give artificial respiration.1. Act quickly. Remove sea weeds and mud from the
nose and throat. Start artificial ventilation immediately.This is possible even when the casualty is in water.
2. Turn the victim face down with head to one sideand arms stretched beyond his head. Infants or childrencould be help upside down for a short period.
3. Raise the middle part of the body with your handsround the belly. This is to cause water to drain out of thelungs.
4. Priorities of ABC of First Aid5. Remove wet clothing.6. Kept the body warm, cover with blankets.7. When victim becomes conscious, give hot drinks
viz coffee or tea8. Do not allow him to sit up.9. After doing the above, remove quickly to hospital
as a stretcher case.
Untitled-1 9/1/2009, 11:31 AM23

STRANGULATION/HANGING
1. Cut or remove the band constricting the throat.
2. If suspended, raise the body and loosen or cut the rope.
3. Priorities of ABC of First Aid
4. Inform to police authorities
Strangulation is pressure on the neck that can causeinjury to the spinal cord, brain stem, or neck structures;complete airway obstruction; cardiac arrest; or death.
Strangulation may be
1. Purposeful action
OR
2. Result from an accident.
Observe the scene and do immediately
Untitled-1 9/1/2009, 11:31 AM24

CHOKING
Choking is suffocation caused by blockage of thewindpipe (trachea)
Common causes:n A weed or a button may get struck on the air
passage commonly seen in childrenn Food may go down in the wrong wayn Water going into the air passage as in Drowningn Irritant gasesn Hanging and Soothering leads pressure on
wind pipe
If choking is occurring, the Red Cross recommendsa "five-and-five" approach to delivering first aid
♦ First, deliver five back blows between the person's shoulder blades with the heel of your hand.
♦ Next to, perform five abdominal thrusts (also knownas the Heimlich maneuver).
♦ Alternate between five back blows and five abdomi-nal thrusts until the blockage is dislodged.
Untitled-1 9/1/2009, 11:31 AM25

Individual with choking:
Assisted Chocking:
victim is difficulty in breathing:
Untitled-1 9/1/2009, 11:31 AM26

Management:
If the victim is in difficulty breathing:
Bend her/him over, head lower then the chest,he /she should try to cough out the obstructingobject.
Slap her/him between the shoulder blades 5 times, ifthe above procedure fails, give up to 5 (five) abdominalthrusts (stand behind the person, interlocking your handsbelow the rib case. Pull inwards and upwards)
If victim unconscious, turn the victim on to theside,then slap between shoulder blades up to 5 times. Tryto remove obstruction.
If the above procedure fails, kneel over victim andgive up 5 abdominal thrusts and see for recovery
:
If Unsuccesful, perform artificial respiration/CPR
Untitled-1 9/1/2009, 11:31 AM27

Heimlich maneuver
AHA (American Heart Association) Recommendation
Abdominal thrusts (also known as the “Heimlich maneu-ver” (HIM'lik mah-NOO'ver) are a series of under-the-diaphragm abdominal thrusts. They’re recommended for
helping a person who's choking on a foreign object(foreign-body airway obstruction).
To simplify training of cardiopulmonary resuscitation,abdominal thrusts are recommended for rescuers to use inclearing a blocked airway in conscious adults and children
over the age of 1. It's not recommended for choking ininfants under age 1.
Abdominal thrusts lift the diaphragm and force enoughair from the lungs to create an artificial cough. The coughis intended to move and expel an obstructing foreign bodyin an airway. Each thrust should be given with the intent of
removing the obstruction.
1. Hold the child upside down by the legs and smackhis/her back hard three or four times.
2. If not successful, lay the child prone with hishead hanging downwards over the knee and give sharpsmacks between shoulders.
3. It still not successful, induce vomiting by passingtwo fingers right to the back of the throat.
Management in case of an infant
Untitled-1 9/1/2009, 11:31 AM28

SMOKE/GASES/FUMES
1. Protect yourself by a towel or a cloth (preferablywet) over your mouth and nose.
2. Always bend low (crawling) while enter into theroom
3. Remove the casualty as quickly as possible awayfrom the smoke zone to fresh area.
4. Priorities of ABC of First Aid
Signs & symptoms:
1. Rapid, weak pulse
2. Headache
3. Blurred vision
4. Drowsiness (may lead to unconsciousness)
5. Breathing difficulties
Management:
1. Before entering the enclosed space take two orthree deep breaths and hold your breath as longas you can.
2. Immediately carry or drag victim to fresh air (minimize your exposure to the fumes)
3. If the victim is not breathing, start mouth-to-mouthrespiration
Untitled-1 9/1/2009, 11:31 AM29

5 THE HEART
The function of the right side of the heart (see rightheart) is to collect deoxygenated blood, in the rightatrium, from the body and pump it, via the right ventricle,into the lungs (pulmonary circulation) so that carbondioxide can be dropped off and oxygen picked up (gasexchange). This happens through the passive process ofdiffusion. The left side (see left heart) collects oxygen-ated blood from the lungs into the left atrium
Human body having 5 to 6 liters bloodHeart rate 72 beats/minuteBlood is purified by exchange of gases in lungs
Cardio vascular system consists of a) Heart b) Arteriesc) Veins d) Capillaries
HEART: is a hollow muscular organ having 4 chambers
consits of:
a) Rt. Atrium b) Lt. Atrium c) Rt. Ventricle d) Lt.Ventricle and having non-return valves
Blood Consists of:a) R.B.C: contains Hemoglobin, which caries
oxygen to cellsb) WBC: contains protective antibodies which
fights against the bacteriac) Platelets: used for clot when injured
Untitled-1 9/1/2009, 11:31 AM30

Untitled-1 9/1/2009, 11:31 AM31

Arteries:They present all over the body and bright red incolor, which carries pure blood (oxygenated) fromthe heart to the tissues of bodyNature of blood flow is spurts, when injury
Veins:They are along with arteries, dark red in colorThey carry impure blood from the body to heartand purified in lungsNature of blood flow is continues, when injury
Capillaries:They are fine and minute blood vessels of arteriesand veins, which exchange the gases and return thegases and nutrients to every tissue of body.Nature of blood flow is oozing, when injury
How to asses the function of heart failure:
If the heart is not functioning, following symptoms andsigns are noticed
1. Heart beat is not heard (by placing ear on leftchest)
2. Pulse is not felta. Radial artery pulse which is felt below the
wrist along thumb sideb. Carotid artery pulse
3. No air through nose4. Blue color of lips, tips of fingers and toes5. Dilated pupil
In such circumstance external cardiac compression to begiven to revive the heart function
Untitled-1 9/1/2009, 11:31 AM32

CIRCULATORY SYSTEM
Untitled-1 9/1/2009, 11:31 AM33

How to take pulse
pulse at the carotid artery
A pulse is the beat you can feel against the wall of anartery, that comes close to the skin. It is the same as theheart rate i.e. 60 to 80 beats/minute
following are the most common arteries for countingand feeling your pulse
* Radial . This artery is located at the wrist jointjust below the thumb.
Pulse at the radial artery
* Carotid . This artery is found on the neck on thesides of the wind pipe and neck muscle, lower jaw bone.
if heart is not functioning do cardiac compression
Untitled-1 9/1/2009, 11:31 AM34

CARDIAC RESUSCITATION
1. Place the casualty on the hard surface in supineposition (face to sky)
2. Kneel at one side of the chest3. Give direct blow the chest4. Place the heal of the one hand over the centre of
the persons chest , between the nipple .place yourother hand on the top of the first hand.
5. Press the chest for 60 to 100 times/minute6. Same time observe for breathing, it no breathing do
artificial respiration too.after 30 compressions, tilt the head back and lift the
chin up to open the airway. Prepare to give tworescue breaths. (ratio 30:2)
Untitled-1 9/1/2009, 11:31 AM35
CPR is taught to the general public in order to in crease the chance of CPR being performed in the crucial few minutes before emergency personnel are available
Cardiopulmonary resuscitation (CPR) is a lifesavingtechnique useful in many emergencies, including heartattack or near drowning, in which someone's breathing orheartbeat has stopped.
CPR involves a combination of chest compression andmouth-to-mouth rescue breathing that keeps oxygenatedblood flowing to the brain and other vital organs untilmore definitive medical treatment can restore a normalheart rhythm.
CARDIOPULMONARY RESUSCITATION (CPR)
Remembers the ABCsAirway, Breathing and Circulation
AIRWAY: Clear the airway
1. Put the person on his or her back on a firmsurface.
2. Kneel next to the person’s neck and shoulders.3. Open the person’s airway using the head tilt-
chin lift. Put your palm on the person’s fore-head and gently push down. Then with theother hand, gently lift the chin forward toopen the airway.
4. clear the any contens, broken dentures, vomi-tus and saliva in the mouth
4. Check for normal breathing, taking no morethan 10 seconds: Look for chest motion, listenfor breath sounds, and feel for the person’sbreath on your cheek and ear. If the personisn’t breathing normally or you aren’t sure,begin mouth-to-mouth breathing.
Untitled-1 9/1/2009, 11:31 AM36

BREATHING: Breathe for the person
Rescue breathing can be mouth-to-mouth breathing or mouth-to-nose breathing if the mouth is seriously injured or can’t be opened.
1. With the airway open (using the head tilt-chin lift),pinch the nose and cover the person’s mouth withyours, making a seal.
2. Prepare to give two rescue breaths. Give the firstrescue breath — lasting one second — and watch tosee if the chest rises. If it does rise, give the secondbreath. If the chest doesn’t rise, repeat the proce-dure for 15 times/minute
3. Begin chest compressions — go to “CIRCULATION”
Untitled-1 9/1/2009, 11:31 AM37

CIRCULATION: Restore blood circulation
Location of chest compression: Place your hand two fingers width above the bottom of the sternum ie.l lower end of the chest bone.
1. Place the heel of one hand over the center of theperson’s chest, between the nipples (sternum). Placeyour other hand on top of the first hand. Keep yourelbows straight and position your shoulders directlyabove your hands.
2. Use your upper body weight (not just your arms) asyou push straight down on (compress) the chest 1 1/2to 2 inches. Push hard and push fast — give twocompressions per second, or about 100 compressionsper minute.
3. After 30 compressions, tilt the head back and liftthe chin up to open the airway. Prepare to give tworescue breaths. Pinch the nose shut and breathe intothe mouth for one second. If the chest rises, give asecond rescue breath. If the chest doesn’t rise,repeat the head tilt-chin lift and then give thesecond rescue breath. That’s one cycle. If someoneelse is available, ask that person to give two breathsafter you do 30 compressions.
4. Continue CPR until there are signs of movement oruntil emergency medical personnel take over.
Open your mouth wide, place it tightly over thevictim’s mouth. Pinch victim’s
Untitled-1 9/1/2009, 11:31 AM38

Untitled-1 9/1/2009, 11:31 AM39

CPR IN NUTSHELLSteps to save a life
If the victim . . you should
Is breathing andhas a pulse
stop CPR, and staywith them until help arrives
continue rescue breathing.begin chest compressions,alternating with rescuebreathing.
Is not breathingand has a pulse continue rescue breathing.
if no breathing.
select the procedure depends on situation
New CPR Guidlines of Americaian Heart Assiociation1. Increase the chest compression delivered per
minute and reduced interruptions in chest compressions.2.Elimination assessment of signs of circulation
before beginning of chest compressions3,the first aider to start the chest compressions
immediately after delivery 2 rescue breaths to theunresponsive victim who is not breathing.
simplification of instructions for rescue breaths: allbreaths whether delivered mouth to mouth, to nose,
mouth to mask, bag mask or advanced airway should begiven over 1 second with sufficient volume to raise thechest.
recommendation of compression to ventilation in theratio of 30:2 whether single or two first aid providers
push hard and push fast at a rate of 100 compres-sions per minute to allow complete chest recoil and mini-mize in interruptions in the chest compressions.
recommendation that emergency medical services
Untitled-1 9/1/2009, 11:31 AM40

CHECK FOR BREATHING
NEED ASSESMENT
call assistant/ 108 ambulance services
continue rescue breathing.begin chest compressions,alternating with rescue
Untitled-1 9/1/2009, 11:31 AM41

TWO RESCUE BREATHS
CHECK THE CAROTID PULSEneed assesment for circulation
Untitled-1 9/1/2009, 11:31 AM42

POSITION HANDS IN THE CENTRE OF CHEST
FIRMLY PUSH DOWN TWO INCHES ON THECHEST 30 TIMES
CONTINUE WITH TWO BREATHS AND 30COMPRESSIONS UNTIL HELP ARRIVES.
Untitled-1 9/1/2009, 11:31 AM43

WOUNDS & BLEEDING
Wounds: break in the continuity of tissues of the body
Bleeding: injury to the blood vessels due to wounds
Types of the wounds:1) Abrasions: scratch injury to the superficial layers
of the skin2) Contusions: caused by blunt instruments or by
crushing. Tissues are bruised3) Incised: caused by sharp instruments like knives,
razor. The tissue having clear edges and bleedsprofusely.
4) Lacerations: caused by machinery, claws of animals,fall on rough objects and tissues having irregularand rough edges, bleeds less
5) Punctured: caused by sharp, pointed objects likenail and needle and knife that pierces or penetratesor pierce the skin. Wound is deep in nature, infec-tion spreads easily
6) Gun shot wounds: caused by firing having smallopening and large exit wound. It is very serouswound immediate medical and surgical treatment.
Squeal of wounds:
v Infectionv Bleeding
Causes of infection:1. Object caused by the wound and
depth of the wounds2. Skin & clothes of casualty3. Dirty dressing4. Contaminated water cleaning
6
Untitled-1 9/1/2009, 11:31 AM44

Untitled-1 9/1/2009, 11:31 AM45

Wound Management:
There are six main steps for treating a wound.
1 Put on rubber gloves ( if available)2 Stop the bleeding3 Clean the wound4 Apply an antibiotic ointment5 Dress the wound6 Check for infections
1. Put on Rubber Gloves (optional)
If you are treating a person with a communicable orinfectious disease, pull on a pair of rubber gloves.
2. Stop the BleedingBefore you clean or dress the wound, you need to
stop the bleeding by direct pressure (light pressure).Most wounds stop bleeding with light pressure. Cover thewound with sterile gauze or a clean cloth and then applygentle pressure with the palm of your hand. The clothabsorbs the blood and will promote clotting. If bloodsoaks through, don’t disturb the cloth. Apply a secondcloth on top of the first.
if the bleeding is not controlled,l by applying Indi-rect pressure point on major artery supplying tothewound /or apply tournquet (details in bleeding chapter)
If the wound is on an arm or leg that doesn’t appearto be broken, applying light pressure and elevating thebody part to a height above the person’s heart will allowgravity to slow the blood flow.
Untitled-1 9/1/2009, 11:31 AM46

3. Clean the Wound
Run water over a wound, and use a cotton ball withwater to remove dirt from the wound. If dirt or debrisremains in the wound after washing, use tweezers cleanedwith alcohol to remove the particles. If debris remainsembedded in the wound after cleaning, see your doctor.Thorough wound cleaning reduces the risk of tetanus. Toclean the area around the wound, use sterile cloth/gauge.There's no need to use hydrogen peroxide, iodine or aniodine-containing cleanser. These substances irritateliving cells and delay the healing.
4. Apply an Antibiotic ointment
After you clean the wound, apply a thin layer of anantibiotic ointment to help prevent infection. Theseointments may help the wound heal better (without scar-ring), and act as a barrier against infection. ointmentslike soframycin and betadin are preferable
5. Dress the Wound
After covering the wound with an antibiotic oint-ment, gently cover the wound with sterile gauze pad andbandage the wound
6. Check for Infection
Swelling, tenderness, localized pain and fever aresymptoms for infections of the wound See your doctorimmediately if you notice any sign of infection.
Untitled-1 9/1/2009, 11:31 AM47

Bleeding: injury to the blood vessels due to wounds orany other causeThere are two types of bleeding:
1.external bleeding which is obvious and apparent2. Internal bleeding where the bleeding is not
apparent at the outset but may manifest itself later inthe form of bleeding from the nose, ear, lungs or stomach.
Signs and Symptoms of Bleeding:
* Giddiness* The skin becomes cold and clammy.* The pulse becomes rapid and weak.* Profuse sweating may occur.* Breathing becomes shallow and the patient may gasp for air and sigh deeply.
* Thirst may be prominent.
BLEEDING
* The patient may feel faint and even collapse * Death
Identify the source of bleeding:
Bleeding may occur from the arteries, veins or capil-laries or from combinations of the three. It can be iden-tified by the following characteristics:
Arteries are bright red in colorNature of blood flow is spurts, when injury
Veins are dark red in colorNature of blood flow is continues, when injury
Capillaries are fine and minute blood vesselsNature of blood flow is oozing, when injury
7
Untitled-1 9/1/2009, 11:31 AM48

Our aim is to a rrest the bleeding at any cost by direct or indirectmethods
METHODS OF ARREST THE EXTERNAL BLEEDING:1. Direct Method2. Indirect Method
Direct Pressure: apply direct pressure with pad/kerchief about 5 to 10 minutes and observe furtherbleeding.
n If no bleeding, apply bandage firmlyn If bleeding persists, don’t remove the
previous pad and apply more pads andbandage firmly
n If bleeding is profuse, apply indirect pressure
Indirect pressure:
a) Apply pressure on the nearest pressurepoint
orb) Apply constriction bandage (Tourniquet)
n Make the victim lie down to preventfainting.
nnnnn Immobilise and Elevate the injured partnnnnn Treat for shocknnnnn Shift the patient to a hospital as soon
Untitled-1 9/1/2009, 11:31 AM49

What is the pressure point: pressure point is one whichartery can be compressed on the underlying bone to pre-vent further flow of blood beyond that point
Untitled-1 9/1/2009, 11:31 AM50

Untitled-1 9/1/2009, 11:31 AM51

Tourniquet
A tourniquet should be used only as a last resort tocontrol severe bleeding after all other methods havefailed and is used only on the extremities. Before use, youmust thoroughly understand its dangers and limitations.
The standard tourniquet is normally a piece of clothfolded until it is 3 or more inches wide and 6 or 7 layersthick. A tourniquet can be a strap, belt, neckkerchief,towel, or other similar item. A folded triangular bandagemakes a great tourniquet.
To apply a tourniquet ,do the following:
1. While maintaining the proper pressure point, placethe tourniquet between the heart and the wound, leavingat least 2 inches of uninjured skin between the tourniquetand wound.
2. Place a pad (roll) over the artery.
3. Wrap the tourniquet around the extremity twice,and tie a half-knot on the upper surface.
4. Place a short stick or similar object on the half-knot, and tie a square knot.
5. Twist the stick to tighten, until bleeding is con-trolled.
6. Secure the stick in place.
7. Never cover a tourniquet.
8. Using lipstick or marker, make a 'T" on thecasualty's forehead and the time tourniquet was applied.
Untitled-1 9/1/2009, 11:31 AM52

Never use wire, cord, or any material that will cutthe skin.
9. Never loosen or remove a tourniquet once ithas been applied. The loosening of a tourniquet maydislodge clots and result in enough blood loss tocause shock and death.
10. Advice to remove tournique about 30 to 45minutes.
Note the application tome. After 30 minutes, releasethe bandage and check for bleeding . If there is nobleeding, remove it .If bleeding recommences, applydirect pressure. If this is unsuccessfully, reapply theconstrictive bandage, and recheck every 30 minutes.
Simple tourniquet:Select a strip of firm cloth, at least 7.5 centimeters
(3 inches) wide and about 75 centimeters (30 inches)long. This may be improvised from clothing or a narrowfolded triangular bandage
Untitled-1 9/1/2009, 11:31 AM53

Causes of Internal bleeding:
� Bleeding from body cavities (such as the ears, nose, rectum or vagina)
� Vomiting or coughing up blood
� Bruising on neck, chest, abdomen or side (between ribs and hip)
�Wounds that have penetrated the skull, chest or abdomen
� Abdominal tenderness, possibly accompanied by rigidity or spasm of abdominal muscles
� Fractures
Management of Internal Bleeding:
1 Lay the patient head low. Raise his legs using pillows.
2 Keep the patient calm and relaxed with reassurance. Do not allow the patient to move.
3 Maintain the body heat with blankets, rugs or coats.
4 Do not give anything to drink/eat (Nil Oral)
5 Patient unconscious, keep them recovery position
6 Priorities of ABC of first aid
7 Look for shock and treat
8 Arrange for the patient to be shifted to the hospital at the earliest.
Untitled-1 9/1/2009, 11:31 AM54

Recovery position (prone position)
Kneel next to the person.Place the arm closest to youstraight out from the body.Position the far arm with theback of the hand against thenear cheek
Grab and bend the person’sfar knee
Protecting the head with onehand, gently roll the persontoward you by pulling the farknee over and to the ground
Tilt the head up slightly so thatthe airway is open. Make surethat the hand is under thecheek. Place a blanket or coatover the person (unless he orshe has a heat illness or fever)and stay close until help ar-rives
This technique is used for unconscious patient
Untitled-1 9/1/2009, 11:31 AM55

Other common causes of bleeding
Bleeding from the nose: common causes are nosepricking (damage to little’s area), hypertension and non-specific conditions.
1. sit the casualty in comfortable position
2. Pinch the nose
3. Ice compression
4. Send to medical advice
Untitled-1 9/1/2009, 11:31 AM56

Haemoptysis (coughing blood): common causes areT.B, cancer and other lung diseases
1. Lay the casualty on the comfortable position, headend to be raised
2. Nil oral
3. Reassurance
4. Call medical attendance
Haemetamesis (vomiting blood): common causes areulcer stomach, cancer stomach
1. Lay the casualty down with feet and legs raised above the body
2. Keep the head lateral position
3. Don’t give anything by mouth
4. If the patient is unconscious, turned to recovery position
5. Keep the body ward
6. Send to Hospital
Bleeding per rectum: common causes are piles, fissures and cancer colon
1. Bland diet
2. Sofen faecal matter by giving phenolphthalein liquid
3. sitz bath
Untitled-1 9/1/2009, 11:31 AM57

Dressing is a protective covering applied to the wound1. Prevent infection2. Control bleeding3. Absorb discharge4. Avoid further injury
Quality:Dressing materials are prepared from gauge, bandage andcotton
1. It should be soft, light, absorbent and sterlizable2. Cotton compressed in gauge/bandage is known as
dressing pad to apply on the wound.3. Do not apply the cotton directly on the wound
Bandages: A bandage is a piece of material used eitherto support a medical device such as a dressing or splint,or on its own to provide support to the body. They areavailable as various sizes depends on need.
1. Fix the dressing in position2. Maintain pressure on dressing to control bleeding3. Reduce the swelling4. To provide support to limbs when used as slings5. Restrict the movements of limbs, for immobiliza-
tion6. Assist in lifting and carrying the casualty
Types of bandages:a) Roller bandages (gauge bandage)
i. Spiralreverse spiral
b) Compressed bandagec) Triangular bandages:
i. Used as slingsii.Used as bandageiii. Used as tournique if Used as large
bandage
Dressing & bandages8
Untitled-1 9/1/2009, 11:31 AM58

Procedure for Triangular Bandages
a. Triangular and cravat bandages are fashioned from atriangular piece of muslin (37 by 37 by inches) providedin the general-purpose first aid kit. If it is folded into astrip, it is called a cravat. Two safety pins are packagedwith each bandage. These bandages are valuable in anemergency since they are easily applied.
b. To improvise a triangular bandage, cut a square ofavailable material, slightly larger than 3 feet by 3 feet,and FOLD it DIAGONALLY. If two bandages areneeded, cut the material along the DIAGONAL FOLD.
c. A cravat can be improvised from such common items asT-shirts, other shirts, bed linens, trouser legs, scarf’s, orany other item made of pliable and durable material thatcan be folded, torn, or cut to the desired size.
Adhesive plaster: Instead of bandage , plaster isused in small wounds dressing.
Untitled-1 9/1/2009, 11:31 AM59

Triangular bandage
Triangular bandage is a piece of cloth cut in the shape ofa right-angled triangle. This is felt by many trainers tobe the most versatile of the bandages available, as it canbe used fully unrolled as a sling, folded as a normalbandage, or for specialist bandages such as on the head.
Untitled-1 9/1/2009, 11:31 AM60

BASIC WOUND DRESSING
Untitled-1 9/1/2009, 11:31 AM61

Applications of traingular bandages
bandaging a wound on the foot.
The triangular bandage used for head wounds.
The triangular bandage used for knee injuries.
Untitled-1 9/1/2009, 11:31 AM62

Various sizes of Roller Bandages
Applying a roller bandage.
Untitled-1 9/1/2009, 11:31 AM63

ROLLER BANDAGE FOR HAND AND WRIST.-For the hand and wrist, a figure-eight bandage is ideal.Anchor the dressing, whether it is on the hand or wrist,with several turns of a 2-or 3-inch bandage. If on thehand, anchor the dressing with several turns and continuethe bandage diagonally upward and around the wrist andback over the palm. Make as many turns as necessary to
Roller bandage for the hand and wrist.
ROLLER BANDAGE FOR ARM.-The spiral reversebandage must be used to cover wounds of the forearm;
.
Untitled-1 9/1/2009, 11:31 AM64

Roller bandage for the elbow.
ROLLER BANDAGE FOR ELBOW.-Aspica orfigure-eight type of bandage is used around the elbowjoint to retain a compress in the elbow region and toallow a certain amount of movement. Flex the elbowslightly (if you can do so without causing further pain orinjury), or anchor a 2-or 3-inch bandage above the elbowand encircle the forearm below the elbow with a circularturn. Continue the bandage upward across the hollow ofthe elbow to the starting point. Make another circularturn around the upper arm, carry it downward, repeatingthe figure-eight procedure, and gradually ascend the arm.Overlap each previous turn about two-thirds of the widthof the bandage. Secure the bandage with two circularturns above the elbow, and tie. To secure a dressing onthe tip of the elbow, reverse the procedure and cross thebandage in the back
Untitled-1 9/1/2009, 11:31 AM65

bandageing hand with foreign body
Bandaging fingers
1. By using a long roll of narrow bandage or a stripof cloth, place one end at the base of the finger.
2. Hold the strip down with your thumb as you rollup one side of the finger and down the other side.
3. Hold the other side down with third finger as youroll the tape up and over with the other hand.
4. After wrapping several layers of tape up anddown the finger, move gauge roll to the side and begin tocircle the finger.
5. Knot the bandage at base of the finger as shownhere in the figure.
Untitled-1 9/1/2009, 11:31 AM66

ROLLER BANDAGE FOR HEEL.-
The heel is one of the most difficult parts of thebody to bandage. Place the free end of the bandage onthe outer part of the ankle and bring the bandage underthe foot and up. Then carry the bandage over the instep,around the heel, and back over the instep to the startingpoint. Overlap the lower border of the first loop aroundthe heel and repeat the turn, overlapping the upperborder of the loop around the heel. Continue this proce-dure until the desired number of turns is obtained, andsecure with several turns around the lower leg
Roller bandage for the heel.
Untitled-1 9/1/2009, 11:31 AM67

ROLLER BANDAGE FOR ANKLE AND FOOT.-
The figure-eight bandage is also used for dressingsof the ankle, as well as for supporting a sprain. Whilekeeping the foot at a right angle, start a 3-inch bandagearound the instep for several turns to anchor it. Carrythe bandage upward over the instep and around behindthe ankle, forward, and again across the instep and downunder the arch, thus completing one figure-eight. Continuethe figure-eight turns, overlapping one-third to one-halfthe width of the bandage and with an occasional turnaround the ankle, until the compress is secured or untiladequate support is obtained
Roller bandage for the ankle and foot.
Untitled-1 9/1/2009, 11:31 AM68

Bandaging leg
ROLLER BANDAGE FOR LEG.
The spiral reverse bandage must be used to coverwounds of the lower extremities;
Bandaging toes
1. By using a long roll of narrow bandage or a stripof cloth, place one end at the base of the toes.
2. Hold the strip down with your thumb as you rollup one side of the foe and down the other side.
3. Hold the other side down with third foe as you rollthe tape up and over with the other hand.
4. After wraping several layers of tape up and downthe toe, move gauge roll to the side and begin to circlethe toe.
5. Knot the bandage at base of the toe as shown herein the figure.
Untitled-1 9/1/2009, 11:31 AM69

FRACTURE
Partial or Complete breakdown of bone called frac-ture
Types of fractures:
1. Closed (simple) fracture: Where the bone iscracked or broken without any damage to the skin ororgans
2.Opened (Compound) fracture: where the fracturebone come out by piercing the muscle with out damage toother structures.
3.Complicated fracture: in addition to the fractureof the bone with damage to vital structures.
4. Green stick fractures: bone bends without damageto cortex commonly seen in children.
9
Untitled-1 9/1/2009, 11:31 AM70

causes of broken bones:
1.Direct force - a blow that breaks thebone at the point of impact
♦ Fall from a height♦ Motor vehicle accidents♦ Direct blow♦ Repetitive forces, such as those caused by
running, can cause stress fractures of the foot, ankle,tibia, or hip
2. Indirect force - when the bone breaks atsome distance from the point of impact, e.g. where a fallon an outstretched hand results in a fracture of thecollarbone
3. Abnormal muscular contraction - A sudden contraction of a muscle may result in a
fracture, e.g. an elderly person snapping the keep aftertripping and trying to prevent a fall.
Untitled-1 9/1/2009, 11:31 AM71

How to recognizes (signs & symptoms)
1 Pain
2 Tenderness
3 Swelling
4 Discoloration
5 Deformity
6 Crepitus
Management:
1 Immobilize the fracture part by available splints
2 Handle gently to prevent the complications
3 If the broken bone ends pierces out of the skin, simply cover the area with dressing, pad and bandage
4 Treat bleeding if any
5 Treat shock if any
6 Priorities of ABC of first aid
Purpose of Immobilization of fractures
A fracture is immobilized is to prevent the sharpedges broken bone to cut/damage the tissues, muscles,blood vessels and nerves.
It also reduces pain and swellingIn closed fracture, immobilization keeps bone frag-
ments intact and prevents conversion to open fractureFor this purpose use splints/or available natural
available material.
Untitled-1 9/1/2009, 11:31 AM72

Untitled-1 9/1/2009, 11:31 AM73

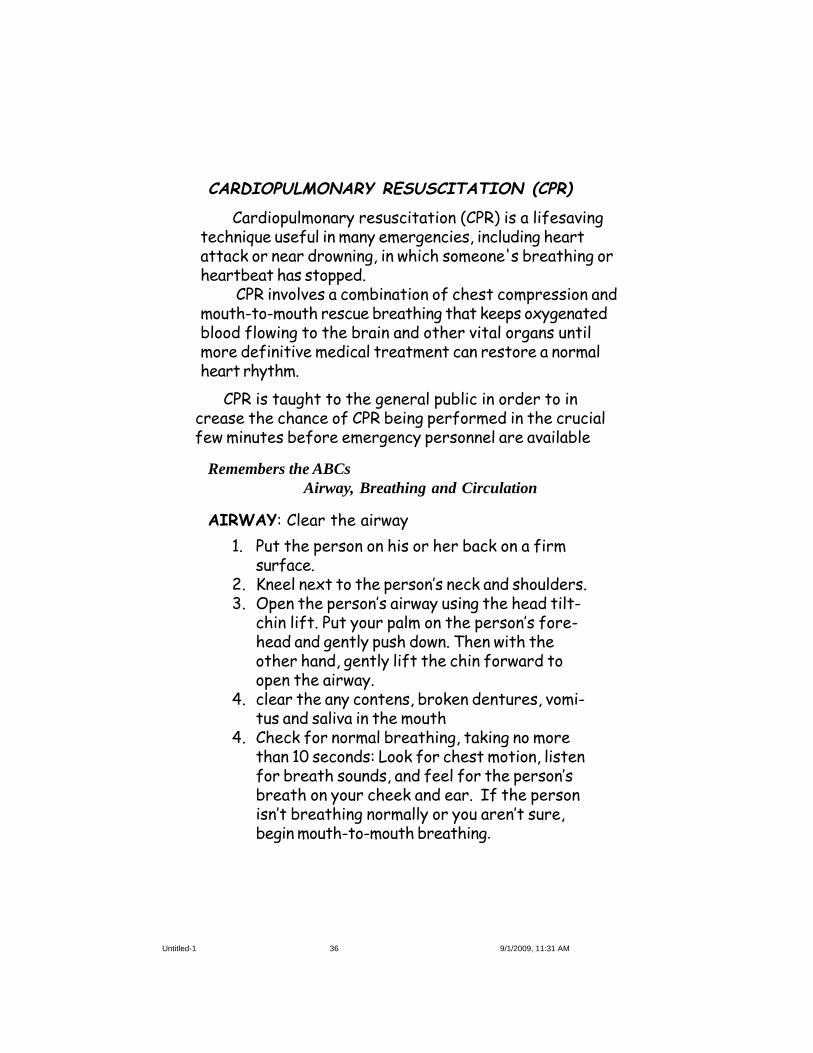
Fracture Upper ArmSymptoms & Signs:
♦ History of fall on to the outstretched arm or elbow♦ Pain, made worse by movements arm/shoulder♦ Tenderness and swelling of upper arm/color bone♦ The casualty may support the arm at the elbow and
incline the head towards the injured side.♦ The shoulder appears to be lower than the other
side (non-injured)
♦ If the fracture is in the upper part of the armnear shoulder, place a pad or folded towel in the armpit,bandage the arm to the body, and support the fore arm ina sling/triangular bandage.
♦ If the fracture is in the middle of the upper arm,you can use one well padded splint on the out side of thearm, The splint should extend from the shoulder to theelbow. Secure the arm firmly to the body with bandageand support the forearm in a sling/triangular bandage.
♦ If the fracture is at or near the elbow, the armmay be bent or straight. Regardless what position youfinds the arm, do not attempt to straighten or move it.Gently splint the arm in position in which you find appro-priate.
♦ Look for the priorities of ABC of first aid♦ Sent for medical advise.
Management
Fracture Upper Arm
Untitled-1 9/1/2009, 11:31 AM74
Splint and Sling for a Fractured Upper Arm
Untitled-1 9/1/2009, 11:31 AM75

Fracture Forearm
Symptoms and signs
n Painn Loss of powern Deformityn The casualty may support the injured forearm
with the other arm.
Management
1 Follow the general rules for fracture management.2 Priorities of ABC of first aid3 Immobilize the limb firmly to a splint which
extents from the elbow to the wrist. Once the forearm is sprinted, place the forearm across the chest and sling with triangular bandage.
4 Check pulse and color of finger.5 Seek medical aid urgently.
Untitled-1 9/1/2009, 11:31 AM76

.
Untitled-1 9/1/2009, 11:31 AM77

Fracture Wrist and Hand
Commonly occurs in outstretched hand, known ascollle’s fracture.
1 Fall injury2 Direct blow3 Crush injury4 Sports5 Boxing punch
78
Untitled-1 9/1/2009, 11:31 AM78

Fracture Of The Hands And Fingers
A fractured or dislocated hand, finger, or wristshould be placed and splinted in a normal resting position.Rest the fingers around a padded object such as a sock,wadded cloth, or rolled elastic bandage. If the hand orwrist is injured, place the object in the victim's palm, anduse a circumferential wrap to maintain the position of theobject. If the victim has a broken wrist, place a rigidsplint on the underside of the wrist, hand, and forearm torestrict any motion. Broken fingers can be splinted inde-pendently or taped together sound finger
Untitled-1 9/1/2009, 11:31 AM79

Fracture Thigh
If the fracture is open and severe bleeding:√ Priority given to stop bleeding before attempt to
first aid to the fracture. Bleeding is very common dangerin this type of injuries because broken bone may tear orcut the artery in the thigh.
√ Immobilizations of the injured leg: Carefullystraightened leg (to prevent the nerve damage and injuryto blood vessel) and apply two splints
√ One on the out side of the injured leg and otherone on the inside.
CAUSES:
♦ Direct trauma as in Motor vehicle accident♦ Fall from height
Untitled-1 9/1/2009, 11:31 AM80

The two splints should be fastened in five places
1. Just below the armpit
2. Around the pelvis
3. Just below the hip
4. Over the knee
5. Around the ankle
√ If the splints are not available, the injured leg tiedwith other normal leg
√ Treat the shock, if present
√ To apply prioritizes of ABC of first aid
√ Sent the patient at the earliest possible formedical aid
Untitled-1 9/1/2009, 11:31 AM81

Fracture leg and patella
Causes: (leg)
♦ Trauma (motor vehicle accidents, fall from height)♦ Stress fractures
Knee cap:
♦ Forcible direct blow to knee (dash board of a car inaccident)
♦ Direct trauma from opponent during sports.♦ Forceful contraction of muscle
Signs & symptoms:
1. Intensive pain immediate after injury2. Knee swollen3. Unable to bend the injured kne
Untitled-1 9/1/2009, 11:31 AM82

Apply padded splint under the injured part
The splint should be atleast 4 inches wide and shouldextend from the buttock to the heel. Place the extrapadding under the knee and above the heal.
The splint should be secured in four places
1. Below the hip
2. Above the knee
3. Below the knee
4. Above the ankle
fracture patella and treatment
Untitled-1 9/1/2009, 11:31 AM83

♦ Rolling the ankle in or out
♦ Twisting the ankle side to side
♦ Extreme flexing or extending of the joint
♦ Severe force applied to the joint by coming straight down on it as in jumping from a high level
♦ Some times fracture associated with tear of ligaments too..
Fracture Ankle
Some times ankle fractures may be mistaken for asprain, if no deformity is present.
Causes:
Untitled-1 9/1/2009, 11:31 AM84

Management
If no deformity is present :
# Stay off the injured ankle so you do not injure itfurther.
# Keep the ankle elevated to help decrease swellingand pain.
# Apply cold packs to the injured area to decreaseswelling and pain. Do not apply ice directly.Cold packs are effective for the first 12-24 hours.
If deformity is present :
1. Steady and support the injured limb on pillows or folded blanket
2. Do not apply any compression bandages around the ankle
3. Seek medical aid urgently.
Symptoms and signs
♦ History of a twisting injury♦ Pain and swelling on either or both sides of the
ankle♦ Inability to bear weight on the ankle♦ Tenderness, particularly over the bony promi-
nences on either side of the ankle♦ Deformity, which may be severe.
Untitled-1 9/1/2009, 11:31 AM85

86
Untitled-1 9/1/2009, 11:31 AM86

Management
n Immobilize fractures with figures of eight bandageor with triangular slings.
n Treat the bleeding if anyn Handle gentlyn Seek medical aid
Fracture Collar bone (Clavicle)Clavicle fractures are common injuries, they can
occur in various ways.Some patients fall on outstretched handFall and hit the outside their shoulderdirect force on the clavicleindirect force- when the bone breaks at some dis-
tance from the point of impact, e.g.. Fall on an out-stretched hand results in a fracture of the collar bone
Signs & symptoms:
Pain at the site of injuryTendernessdeformityInjured shoulder lower than the sound/uninjured sideThe victim unable to raise the hand above theshoulder
Untitled-1 9/1/2009, 11:31 AM87

Fracture ribs
causes:
1. Direct force from blow or fall upon chest2.Motor vehicle accidents3.Crushing of the chest
In this fracture the broken ends maybe driven in-wards causing injury to lung, which then become compli-cated fracture and bleeding
Signs& symptoms:Pain at the injured site, increases while coughing and
breathing.Difficulty to breath due to painMovement of chest leads to pain
Management:
√ Two broad bandages should be applied round thechest
√ The centre of the first should be below the areaof the pain and the centre of the second above it.
√ support the arm on the side of the injury in a sling√ Look for any bleeding√ Priorities of ABC of first aid
A rib fracture is a crack or break in one of the bonesof the rib case or cartilage.
Untitled-1 9/1/2009, 11:31 AM88
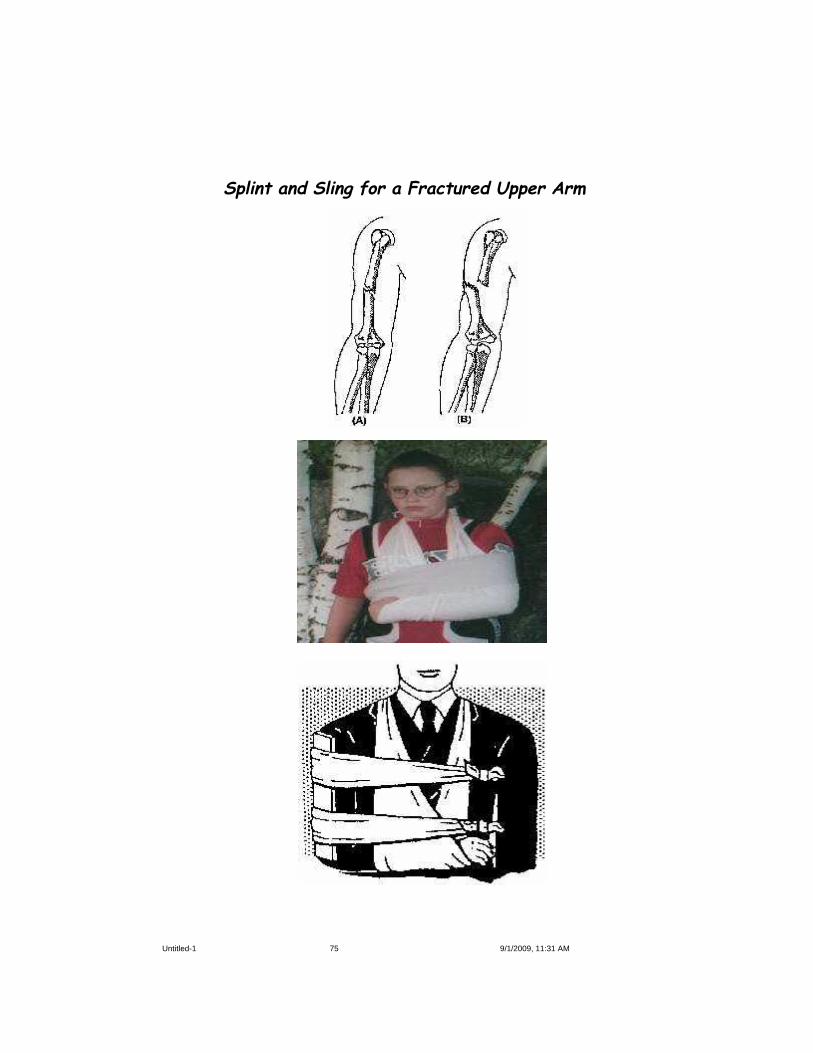
Untitled-1 9/1/2009, 11:31 AM89

Place the bandage under the chin and carry its endsupward. Adjust the bandage to make one end longer thanthe other (Figure A).
(b) Take the longer end over the top of the head tomeet the short end at the temple and cross the ends over(Figure B).
(c) Take the ends in opposite directions to the otherside of the head and tie them over the part of the bandagethat was applied first (Figure C).
Untitled-1 9/1/2009, 11:31 AM90

10 Slings and Splints
A sling is a device used to support and immobilize aninjured part of the body (in particular, an injured shoul-der, arm and color bone
Arm sling
This simple arm sling help to support and immobiliseyour forearm, upper arm and wrist when injured. Armslings can also help support your arm if you have frac-tured ribs
A splint is a rigid piece of wood or plastic materialor metal applied to a fractured limb to prevent move-ment of the broken bone
Types of slings:
1. Arm Slings
2. Elevated slings
3.Collor and cuff slings
Untitled-1 9/1/2009, 11:31 AM91

The procedure for arm sling for which needstraingular bandage and safety pin
Untitled-1 9/1/2009, 11:31 AM92

Procedure for elevated sling:
To make an arm slings requiresTraingular bandage1. Stand infron of the injured person2.Support the arm3..Ask the injured person to support their injured
arm by placeing it across the chest with their finger tipstouching the opposite shoulder.
4. place the traingular bandage over the injured armwith the longest straight edge lying over the uninjuredshoulder and the point extending beyond the elbow on theinjured side
5.take lower end of bandage up,now take the lowerend of the bandage up and around the back to meet theother end at the shoulder on the injured side.
6. tie a reef knit7. tuck loose ends and secure8.check c irculation and movement
Elevated sling:This is used to support fracture forearm and wrist
injuries
Untitled-1 9/1/2009, 11:31 AM93

Collor and cuff slingThis sling for a suspected fracture of collar bone or
elbow when traingular sling is not available. Commonlyused wrap a strip of sheet, a pant leg around the wristand tie the ends behind neck
Collar-and-Cuff' (Clove Hitch)
1. Allow the elbow to hang naturally at the side andplace the hand extended towards the shoulder on theuninjured side.
2. Form a clove hitch by forming two loops — onetowards you, one away from you.
3. Put the loops together by sliding your hands underthe loops and closing with a "clapping" motion. If you areexperienced at forming a clove hitch, then apply a clovehitch directly on the wrist, but take care not to move theinjured arm.
4. Slide the clove hitch over the hand and gently pullit firmly to secure the wrist.
5. Extend the points of the bandage to either side ofthe neck and tie firmly with a reef knot.
6. Allow the arm to hang comfortably. Should fur-ther support be required, ex. For support to fracturedribs, apply triangular bandages around the body andupper arm to hold the arm firmly against the chest.
Untitled-1 9/1/2009, 11:31 AM94

Splints:
* A splint is a rigid piece of wood or plasticmaterial or metal applied to a fractured limb to preventmovement of the broken bone.
* Reasonably wide splints are better than narrow * Splints should be long enough so that the joints
above and below the fractured bones can be made immo-bile.
* The splints should be well padded with cotton orcloth so as to fit snugly and softly on the injured limb.
* Splints are best applied over the clothing. * In an emergency, splints can be improvised using
a walking stick, an umbrella, a piece of wood, a book oreven a firmly folded newspaper, naturally availablematerial
* Use of splints becomes obligatory only whenboth legs or both thigh bones are broken, preferablywood boards.
Untitled-1 9/1/2009, 11:31 AM95

Untitled-1 9/1/2009, 11:31 AM96

Moving a victim can be done in variety ways. The aimis to the safest way to carry a victim
1. Support of single helpera. Fireman liftb. Hand on the shoulder
a) one person moveb) Two person move
2.Support with two helpers using handsetsa. Two hand setsb. Four hand sets
3. Blanket lift4. Stretcher
a. Two individualsb. Four Individuals
5. Ambulance and other motor vehicles6. By water: boat and steamer7. By air: Aeroplane and helicopter
One-person move Two-person move
11 Moving a Victim (Transport)
Untitled-1 9/1/2009, 11:31 AM97

Fireman lift/carry:
It is one of the easiest ways to carry an unconsciouscasualty
Untitled-1 9/1/2009, 11:31 AM98

The Fireman's Carry;It is one of the easiest ways to carry an unconscious
casualty.
1 .Place the casualty face down. Face the casualty,and kneel on one knee at the casualty's head. Pass yourhands under the armpits; then slide your hands down thesides and grasp them across the back.
2. Raise the casualty to his knees. Take a better holdacross the casualty's back.
3. Raise the casualty to a standing position and placeyour right leg between the casualty's legs. Grasp theright wrist in your left hand and swing the arm aroundthe back of your neck and down your left shoulder.
4. Stoop quickly and pull the casualty across yourshoulders and, at the same time, put your right arm be-tween the casualty's legs.
5. Grasp the casualty's right wrist with your righthand and straighten up. The procedure for lowering thecasualty to the deck is also illustrated. Do not attempt ifthe casualty has an injured arm, leg, ribs, neck, or back!
Support with two helpers using hand sets:
Untitled-1 9/1/2009, 11:31 AM99

This technique is for carrying conscious and alertvictims moderate distances. The victim must be able tostand unsupported and hold themselves upright duringtransport.
1. Position the hands as indicated in graphic.2 Lower the seat and allow the victim to sit3. Lower the seat using your legs, not your back4. when the victim is in place, stand using your legs,
Two handed seat
1. Pick up the victim by havingboth rescuers squat down on eitherside of the victim
2.Reach under the victim’s shoul-der and under their knees.
3.Grasp the other rescuer’swrists
4.From the squat, with goodlifting technique, stand
5.Walk in the direction that thevictim is facing
This technic is carrying a victim longer distances.This technique can support an unconscious victim.
Untitled-1 9/1/2009, 11:31 AM100

Thee Person Carry/Stretcher lift
Untitled-1 9/1/2009, 11:31 AM101

Second-Degree Burns
Third-Degree Burns
First Degree Burns
Untitled-1 9/1/2009, 11:31 AM102

Classification of Burns:First-degree burns: In which only outer layer of skin
(epidermis) is burned.The skin usually red,surroundings area is swollen.Usually heals in 3 to 6 days.
Second-degree burns:When the first layer of skin has been burned through
and the second layer of skin (dermis) also burned, theinjury is termed as a second-degree burns.
Blisters developedskin extensively reddenedsevere painswellingusually heals in 2 to 3 weeks
Third-degree burns:Most serious burn. It destroy all the layers of the
skin ,vessels, nerves , fat, muscles.
Causes of third degree burns:
1. Clothing on fire2.Immersion on hot water3.Contact with flames, hot objects and electrocution4.Corrosive chemicals
Symptoms:
103
Areas may be charred black or appear dry and white.ShockInfectionUsually takes long time to heal, if heals contractures
and other complications are present.edges are healed. remaining area to be covered with
skin grafting (surgical Procedure)
Untitled-1 9/1/2009, 11:31 AM103

Untitled-1 9/1/2009, 11:31 AM104

Percentage of the area of body burnt:Area of burns are calculated by way of % “ Rule of
Nines”The body divided 11 parts each consists of 9% + 1%scrotal area.By the rule of Nines estimate the area of burnt and
asses the severity of the victim
<20% burns treated as outpatient with doctor advisebetween 20% to 40% treated as inpatient and admit in
hospital, recovery takes more tome.>40% risk is very high.
Untitled-1 9/1/2009, 11:31 AM105

Thermal Burns:commonly this type of burns occurs in kitchen and
suicidal tendency.Stop the burn sourceIf clothes catch on fire,STOP, DROP AND ROLL on the floor or ground or
douse with cold water or wrap the victim in a cottonblanket or rug to put out flames.
if clother catch on fire, stop-drop-roll
Hunting partner can assist by smothering with blan-kets.
Untitled-1 9/1/2009, 11:31 AM106

Electrical Injuries/Burns
If any part of the body comes into contact with alive wire or with a cable from which current is leakingthen the person gets an electric shock.
In houses the blowing out of faulty switches, fuses orfaulty electrical connections can cause such injury.
The injury may be mild or can be severe enough tocause death. It is due depression of respiratory centrewhich is present in the brain.
Electric shock is produced only when an electriccurrent passes through the human body, which is in con-tact with the earth. It passes even more quickly if thepart is wet.
The Effects of Electric Shock
* There may be fatal stoppage of the heart.
* There may be sudden stoppage of breathing dueto sudden paralysis of the muscles of breathing.
* There may be burns that are either superficialor deep. They depend on the strength of the electriccurrent causing the injuries.
Untitled-1 9/1/2009, 11:31 AM107

Management
Intelligent and prompt action is required.First aider observe the scene and cautious about his
safety.
1. If the patient is still in contact with the sourceof current switch off the source of current. This shouldbe done with the rescuer standing on a dry piece ofwooden board. When the current is of low voltage thenthe rescuer should stand on an insulated material that isdry. (Insulated materials include rubber-soled shoes,wooden planks, or piles of newspapers.) Rubber gloves ifavailable should be worn. Dry clothing like a coat or afolded newspaper may give some protection.
2. When the current is of a very high voltage thenthe danger is greater even though the patient may noteven be in contact with the wire as the current can passthrough the gap causing an arc. The rescuer should keepas far away from the electric wires as possible. Thepatient should be dragged out using a nonconductingmaterial like a wooden walking stick, dry bamboo pole,wooden plank or a dry rope.
3. If the patient is not breathing properly or theheart has stopped beating, give artificial respiration andexternal cardiac massage (ABC of First aid)
4. Treat for shock.
5. Treat for burns.
6. Transfer the patient to a hospital as soon aspossible.
Untitled-1 9/1/2009, 11:31 AM108

Management of Minor Burns and Scalds:it including second-degree burns with limited to an
area no longer than 2 to 3 inches in diameter.
Clean the area gently with clean water. Submerge the burnt area in cold water. Cover the burn rea with sterile gauge and bandage Do not apply cotton wool directly over the burnt
area. Do not apply any greasy substance. Give the patient warm drinks.
Why are burns Dangerous?Burns are dangerous because they produce
SHOCK: They can very quickly lead to shock in theimmediate period following the burn due to loss of exces-sive fluids from the body.
INTENSIVE PAIN: They produce intense pain. INFECTION: They lead to infection in the affected
area. SCARS: When they heal they leave scars behind,
which are disfiguring and can restrict movements.
AIM OF THE FIRST AID PROVIDER:1. To get ride of residual heat2.To control the shock3.To prevent the infection4.To act ABC of the First Aid
Untitled-1 9/1/2009, 11:31 AM109

Management of Extensive Burns 1. Keep the patient quiet and reassure him. 2. Wrap him up in a clean cloth. 3. Do not remove adhering particles of charred
clothing. 4. Cover the burnt area with a sterile or clean
dressing and bandage. In the case of burns that cover alarge part of the body it is sufficient to cover the areawith a clean sheet or towel.
5. Keep the patient warm but do not over heat. 6. If the hands are involved, keep them above the
level of the victim's heart. 7. Keep burnt feet or legs elevated. 8. If the victim's face is burnt, sit or prop him up
and keep him under continuous observation for breathingdifficulty. If respiratory problems develop, an openairway should be maintained.
9. Do not immerse the extensively burnt area orapply ice water over it because cold may intensify theshock reaction. .
10. Do not remove the blisters or burnt skin. 11. Treat for shock. 12. Remove quickly from the body anything of
constricting nature like rings, bangles, belt and boots. Ifthis is not done early, it may be difficult later on as thelimbs begin to swell.
13. If patient conscious and no vomiting, give water and hot liquid.
14. Do not apply ointments, grease or any other material over the wound.
15. Priorities of ABC of First Aid
Dont”sDont’s use Ice:putting ice directly on the burn
damaging skin and tissue. so ice wraped in clothDon’t break the blisters: Broken blister are
vulnarable to infection.
Untitled-1 9/1/2009, 11:31 AM110

Management of Chemical Burns
♦ Remove the cause of burn by Wash off thechemical with a large quantity of running water for 20minutes or more. If the burning chemical is a powdersubstance, such as lime, brush it off the skin beforeflushing. This flooding with water will wash away much ofthe irritants.
♦ Cut out contaminated clothing or jewelry♦ Do not touch the burnt area.♦ Treat as for burns.♦ If victim has signs of shock, treat for shock♦ Apply priorities of ABC of First Aid
all chemicals does not rinse with water. They are
Carbolic acid/Phenol: does not mix with water, souse isopropyl alcohol first to flush the chemical off theskin and then flush with water. If alcohol is not available,flush with large amount of water. Don’t flush the eye withalcohol.
Sulphuric acid: is flushed with mild, soapy solution ifthe burns are not severe. Sulphuric acid feels hot whenwater is added to the acid.
Hydrochloric acid: is flushed with a soda bicarbon-ate (baking soda) solution. Later wash with large amountof water. Dent flush the eye with baking soda solution.
Dry powders, such as lime are first brushed laterwash with eater
Eyes should not be washed with any above solutions.wash with water only, to reduce the chances of dam-
age of eye.
Management of Other type of burns:
Untitled-1 9/1/2009, 11:31 AM111

Management of Electrical Burns:
1 Look first, Dont touch
2 The person may still be in contact with electricalsource, turn off electrical current/ remove thesource
3 Priorities of ABC of first aid
4 Burns often results in serious muscle breakdown, electrolyte abnormalities leads to kidney failureand cardiac arrest.
5 Prevent the shock
6 Cover the affected area
7 Treat as for burns
8 Send immediately to the hospital
Cold Burns (frost bite):
♦ Individual to be removed to hot zone♦ Frost bite initially looks like reddened first degree
burns,♦ First rewarm the frozen skin by submerging it in
warm, not hot, water.♦ Don’t rub the frozen skin to warm it with friction
♦ Remove from hot exposure of cold area♦ Drink plenty of water to prevent dehydration♦ Cover with cold cloth if no blisters♦ If burn is severe and blisters develop, seek medical
attention.
Sun Burns:
Untitled-1 9/1/2009, 11:31 AM112
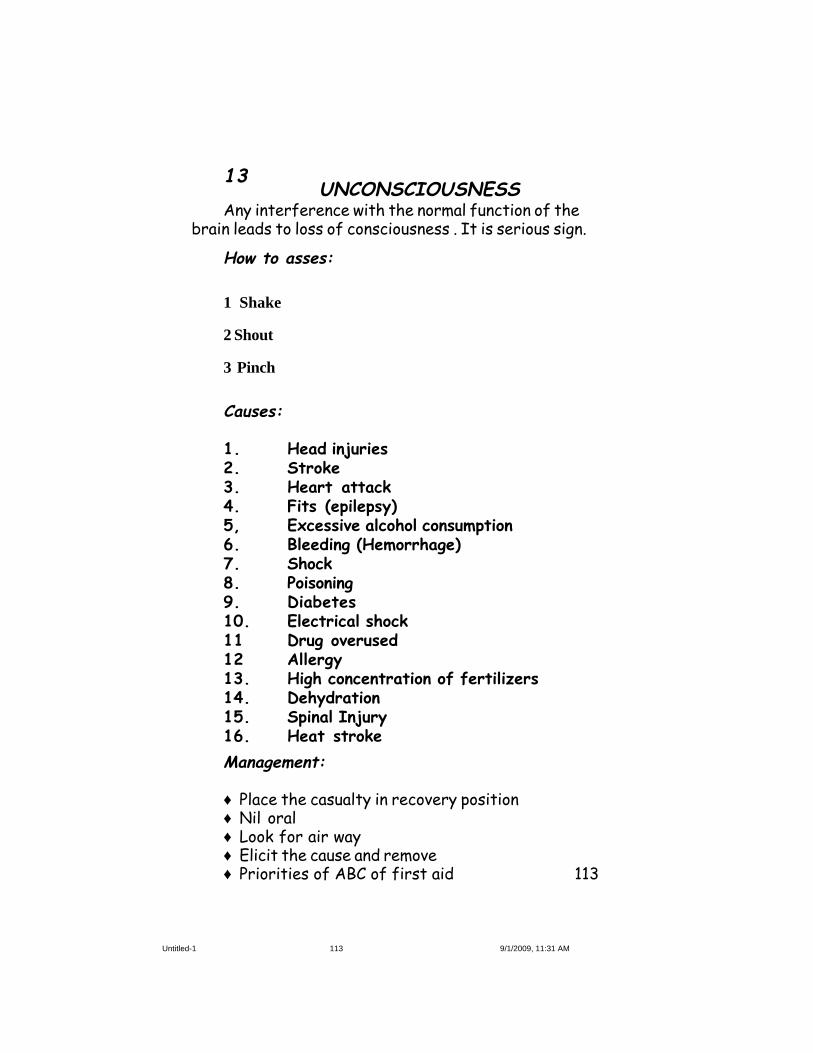
UNCONSCIOUSNESSAny interference with the normal function of the
brain leads to loss of consciousness . It is serious sign.
How to asses:
1 Shake
2 Shout
3 Pinch
Causes:
1. Head injuries2. Stroke3. Heart attack4. Fits (epilepsy)5, Excessive alcohol consumption6. Bleeding (Hemorrhage)7. Shock8. Poisoning9. Diabetes10. Electrical shock11 Drug overused12 Allergy13. High concentration of fertilizers14. Dehydration15. Spinal Injury16. Heat stroke
Management:
♦ Place the casualty in recovery position♦ Nil oral♦ Look for air way♦ Elicit the cause and remove♦ Priorities of ABC of first aid 113
13
Untitled-1 9/1/2009, 11:31 AM113

SHOCKSevere depression of vital functions of the body
associated with changes in circulating system. It is alife-threatening condition
Causes:
1. Severe bleeding (hemorrhage)2.Heart attack3.Sever burns (third degree burns)4.Dehydration5.Sun stroke6.Severe bacterial infection (septicemia)7.Acute abdominal emergencies8.Crush injuries9. Electrical shock10. Allergy
How to recognise shock ( sings ans symptoms):
1. Skin cool and clammy2.dizziness and fainting3.Nausea and vimiting4.Pallor5.Shallow Breathing6. Slow and thredy pulse7. lose of conscouness
Managemnt:
1. Reasuurence2. Head low and elevation legs3. loosen the clothrs4. Wrap with clothes5. Nil oral6.keep him in recovery position7.Priorities of ABC of first aid8. transport to hospital
14
Untitled-1 9/1/2009, 11:31 AM114

Heart AttackIt is due to an obstruction of coronary arteries that
supply the heart muscles.How to recognize (Signs and symptoms):
♦ Severe chest pain (pricking/stabing/squeezeing)
♦ Pain spreads to left arm, neck, jaw, back ofthe chest
♦ Fullness of chest (unexplained)♦ Breathlessness♦ Sweating♦ Pale and clammy of skin♦ Rapid pulse♦ Discoloration of lips and finger tips♦ Nausea and vomiting♦ Dyspepsia and abdominal pain♦ Unconsciousness♦ Pupils dilated♦ Death
Causes:
n Deposition of cholesterol/calciumn Hereditary factorsn Obesityn High Blood pressuren Consumption of tobaccon Emotional stress
15
Untitled-1 9/1/2009, 11:31 AM115

Management:
n Keep the patient calm and reassurancen Loosen the tight clothing, if anyn Ask for any previous episodes of heart attack, if so
give sorbitrate tablets under the tonguen If the pain does not relief within short time call,
send to hospital for medical emergencyn If the person is unconscious and unresponsive, then
begin CPRn Priorities of ABC of First aidn Better to shift the heart patient where cardiac
felicities are availablen Any chest pain not responds within 1/2 hr, suspect
as heart attack and needs immediate medical advice.
Untitled-1 9/1/2009, 11:31 AM116

STROKEIt is due to ruputure/blokage f blood vessels of BrainIt may be mild or severe depends on damage
Signs and Symptoms:
¨ Numbness of face, arm, leg, especiallyone side of the body;
¨ Blurring of the vision, particularly one side¨ Sudden severe headache , not known cause¨ Patient looks pale and shock¨ Rapid pulse (tachycardia)¨ Noisy breathing¨ Froth from nose and mouth¨ Inability to stand or raise the hand¨ May pass urine and motion¨ Uneven pupil dilatation¨ Unconsciousness
Stroke warning signs: “FAST”
FACE: Ask the patient to smile
Ö stoke can cause one side of the face to drop
ARM: Ask the patient to raise arms
Ö not able raise the hand, arm drifts downwards
SPEECH: Ask the person to repeat small sentences
Ö stoke victim may slur their words
TIME: Important factor to recovery the victim
Ö early attention to reduce the complications
117
16
Untitled-1 9/1/2009, 11:31 AM117

Management:
n Patient is conscious, comfortable, send to hospital
n Patient is unconscious, keep in recovery position
n Nil Oral
n Apply the Priorities of ABC of first aid118
Untitled-1 9/1/2009, 11:31 AM118

POISONINGAny gases or substances which when taken into body
by large quantities will harm or destroy the life.
They enter in three ways.
1. By mouth
2. By inhalation
3. Through skin
It may occur accidentally or suicidal tendency
1. Accidentally:
Consumption of large dosestablets within reach of childreninhalation of poisonous gasesgas leakage as Bhopal trazady
2. Suicidal:
Pesticides (Organo-Phosphorous compoundsConsume Large quantity of sleeping pillsInsulin injection
Management:
Preserve the material and vomitus for conformationPatient is conscious:
♦ Aid vomiting by making him/her tepid water ( two spoons of common salt in a glass water)
♦ Large quantities of cold water should be given♦ If poison is corrosive, do not induce vomiting,
it further damage food pipe.
17
Untitled-1 9/1/2009, 11:31 AM119

Patient is Unconsciousness:♦ Nil oral♦ Do not induce vomiting♦ Keep the patient in recovery position (Prone)♦ Look for air way and breathing♦♦♦♦♦ Priorities of ABC of first aid♦♦♦♦♦ Transport the patient to hospitalSigns and symptoms of poisoning:
• Burns and redness around the mouth and lips as inthe case of corrosive poisoning
• Breath that smell like chemicals• Burns, stains and odors at the surrounding area• Empty medication bottles and scattered pills• Vomiting• Difficulty in breathing• Confusion• Unexpected signs• Pupil dilatation• Coma, DeathCarbon Monoxide poisoning: is colorless, odorless
and tasteless gas. It is produced by appliances that burngases, petroleum products, wood and other fuels.
Signs and symptoms:• Dull headache• Dizziness• Nausea and vomiting• Chest pain• Confusion• Irritability• Impaired judgement• Loss of consciousness• When seek medical advice: if you suspect you have
been exposed to carbon monoxide, get into fresh air imme-diately and seek medical care. If possible, open windowsand doors on the way out of the house.
• Priorities of ABC or first aid
Untitled-1 9/1/2009, 11:31 AM120

Poisonous snake bites are medical emergency requiresimmediate medical attention
80 to 90 percentage of Indian Snakes are Nonpoisonous snakes and the remaining 10 percent are poi-sonous
Treatment:
♦ Keep the victim calm and reassurance♦ Keep the affected area below the level of heart,
so as to contain venom locally.♦ Wash hands thoroughly or put on the latex gloves before attending the wound.♦ If the bite is not bleeding, wash the wound well with mild soap and water and part dry with
clean swabs or other non-fluffy material.♦ If the bite is actively bleeding, control the
bleed ing by applying direct pressure with a clean and dry cloth until the bleeding subsides.
♦ Remove any of the constricting items.♦ Lightly compress the limb above the wound with
roller bandage.♦ Immobilize the injury, immobilize an injured ar
arm with a sling and an injured leg by binding it to the injured leg.
♦ If the patient stops breathing, be ready to resuscitate if needed. (ABC of first aid)♦ Observe the bite for signs of infection (increse
ing skin redness, swelling) and other vital signs (temperature, pulse, rate of breathing, blood
pressure).♦ If the area around the wound begins to swell an change color, the snake was probably poisonous.♦ Get medical help as soon as possible.
Snake Bite
Untitled-1 9/1/2009, 11:31 AM121

Warning
* Do not apply ice or a cold pack to snakebitebecause cold can cause the venom to spread further.
* Do not apply a Tourniquet such as a belt, neck-tie or cord.
* Do not slash the wound with a knife. * Never try to suck the venom orally. * Patient should never be put to strenuous physi-
cal exercises. * Site of the bite should not be raised above the
heart level. * No stimulants or pain medicators should be
taken without the prescription of the doctor. * Removal of the dressing/elastic wraps to be
avoided until you are at a facility ready and able toadminister antivenom.
* Do not eat or drink unless told by the doctor.
Untitled-1 9/1/2009, 11:31 AM122

Pressure Immobilisation technique
Untitled-1 9/1/2009, 11:31 AM123

Insect bites and stings:
Signs and symptoms of an insect bite result from theinjection of venom or other substances into your skin. Thevenom triggers an allergic reaction. The severity of yourreaction depends on your sensitivity to the insect venomor substance.
Bites from bees, wasps, hornets, and red ants aretypically the most troublesome. Bites from mosquitoes,ticks, biting flies and some spiders also can cause reac-tions, but these are generally milder.
Symptoms: Majority are mild in nature
¨ Move to safe area to avoid more stings
¨ Scrap or brush off the stinger
¨ wash the affected area with soap and water
¨ apply cold pack filled with ice to reduce pain andswelling
¨ Apply hydrocortisone cream
¨ Take anti histamine table for to relieve from allergy
If symptoms are severe consult immediately doctorfor further treatment.
In rarest conditions produces severe reactions, so observe for some time for any untoward effects.
Untitled-1 9/1/2009, 11:31 AM124

Scorpion strings and Spider bites
The majority of scorpions are harmless to humans,although the sting is extremely painful and will requirepain killing treatment.
The following may be observed in cases of moderateto more serious poisoning.
♦ Sweating
♦ Palpitation
♦ Nausea and Vomiting
♦ Salivation
♦ Raised blood pressure
In our country no sevre reactions of spider bites and are harmless.
Treatment:
n There is no specific treatment
n Give analgesics to relieve the pain
n Remove the strings
n Give an Injection of Xylocaine around the bite, to reduce the pain to male numbness
In the rare occasions, severe reaction may produce in such circumstances treat like snake poisoning.
n Reassurance to victim
Untitled-1 9/1/2009, 11:31 AM125

ANIMAL BITES
Domestic pets cause most animal bites. Dogs are morelikely to bite than cats are. Cat bites, however, are morelikely to cause infection. Bites from non immunized do-mestic animals and wild animals carry the risk of rabies.Rabies is more common in bats and foxes than in cats anddogs. Rabbits, squirrels and other rodents rarely carryrabies.
Rabies is a serious viral disease that affects yourcentral nervous system. Typically rabies spreads by wayof the saliva of infected animals — often, but not always,through a bite.
Signs and symptoms
Signs and symptoms of rabies usually appear withinten days to three months after exposure, though there havebeen rare cases appear for more than six months afterexposure.
Rabies is nearly always fatal once symptoms appear.Death from breathing failure often happens within a weekafter the appearance of signs and symptoms
♦ Fever, headache, malaise♦ Anxiety♦ Confusion♦ Excitation♦ Hallucination♦ Insomnia♦ Agitation♦ Salivation♦ Difficulty swallowing♦ Hydrophobia (fear of water)
Once rabid dog/ animal bites better to take antirabies vaccine without delya.Once rabies affected, mortality rate is zero
Untitled-1 9/1/2009, 11:31 AM126

Treatment:
n Self care treatment followed by medical treatmentn Whether bite is major or minor:n Wash with soap and water thoroughlyn Apply the antiseptic ointment and dressingn Don’t suture the woundsn Take T.T.shotn Treat infection, if anyn Immediately take antirabies vaccine of 5 does
(0,3,7,14,30 days), preferably on the day of biten Delay leads to death
Untitled-1 9/1/2009, 11:31 AM127

Foreign object in the eye: First aid
If you get a foreign object in the eye, try to flush itout with clean water or saline solution. Use an eyecup or asmall, clean glass positioned with its rim resting on thebone at the base of your eye socket.
1 Wash your hands.2 Seat the person in a well-lighted area.3 Gently examine the eye to find the object. Pull
the lower lid down and ask the person to look up. Thenhold the upper lid while the person looks down.
4 If the object is floating in the tear film on thesurface of the eye, try flushing it out. If you're able toremove the object, flush the eye with a saline solution orclean, lukewarm water.
5 Do not try to remove the foreign body by otherways
FOREIGN OBJECTS18
Untitled-1 9/1/2009, 11:31 AM128

Foreign object in the Ear:
Common objects found in ears include food mate-rial, beads, seeds and insects. Children often place itemsin their ears out of curiosity.
Ear wax (cerumen) which produces pain and dis-comfort
♦ Donot push foreign material leads to damage the earand tympanic membrane
♦ if earwax present pour oil into ear thrice a day forthree days. Some times wax may expelled, if not consultdoctor
♦ if insects enters pour coconut oil or water in theaffected ear and wait some time, due to suffocation theinsect dies off and come out
♦ Do not try to remove Other objects, consult doctor.
Management:
Untitled-1 9/1/2009, 11:31 AM129

If a foreign object becomes lodged in your nose:
n Don't probe at the object with a cotton swab orother tool.
n Don't try to inhale the object by forcefullybreathing in. Instead, breathe through your mouth untilthe object is removed.
n Blow your nose gently to try to free the object,but don't blow hard or repeatedly. If only one nostril isaffected, close the opposite nostril by applying gentlepressure and then blow out gently through the affectednostril.
n Gently remove the object if it's visible and youcan easily grasp it with tweezers. Don't try to remove anobject that isn't visible or easily grasped.
Consult doctor for removal foreign object
Foreign Object in Nose
Foreign object in the skinIf a foreign object is projecting from your skin:n Use tweezers to remove splinters of wood or
fiberglass, small pieces of glass or other foreign objects.
If the object is completely embedded in yourskin:
♦ Sterilize a clean, sharp needle by wiping it withrubbing alcohol. If rubbing alcohol isn't available, cleanthe needle with soap and water.
♦ Use the needle to break the skin over the ob-ject and gently lift the tip of the object out.
♦ Use tweezers to remove the object. A magnify-ing glass may help you see the object better.
♦ Wash and pat-dry the area. Follow by applyingantibiotic ointment.
♦ Seek medical help if the particle doesn't comeout easily or is close to your eye.
Untitled-1 9/1/2009, 11:31 AM130

Three types of First Aid Boxes are listed below.These provide guidelines, but you will know from experi-ence what to add to the contents in your specific envi-ronment.
Large First Aid Box (For Factories etc.)Medium First Aid Box (Motor vehicles etc.)
Small First Aid Box
Size :(5" × 3 ½ “ × 2 ½” )For Personal travel
Contents
1. Sterilised Finger Dressings 1 No2. Sterilised Hand or Foot Dressings 1 No3. Sterilised Large Dressings 1 No5. Sterilised medium burn dressing 16. Adhesive plaster (1.25 cms×90 cms) 1 spool7. Safety pins 68. Roller bandage 1" (2.5 cms) 19. Roller bandage 2" (5.0 cms) 110. Sterile gauge pads 211. Eye pad 112. Small scissors 113. Disposable hand gloves 1 pair14. Antiseptic Ointment 1 tube
FIRST AID BOX19
Untitled-1 9/1/2009, 11:31 AM131

Medium First Aid Box
Size: (16" × 7 ¾” ×4” )Type: Dust-ProofEnvironment: Small Institution, Motor Vehicles etc.
Contents
1. First aid splints wooden (ordinary) 1 set2. Triangular bandages 63. Sterilised cotton wool (25gms) 2 pkts4. First aid dressings 6
(3 large & 3 medium)5. Roller bandages (three sizes) 96. Burn dressings (large) 37. Burn dressings (small) 38. Eye pads 29. Safety pins (10 Nos) 1 pkt10. Scissors, ordinary, 12.7cm, 111. Spool adhesive plaster 112. Antiseptic ointment 1 tube13. Liquid antiseptic 50 ml bottle 114. Eye oinment 1 tube15. Loose woven gauze 1 Pack16. Aspirin 300mg (24 tables) 1 bottle17. Tear off scribbling pad with pen 1
18. Adhesive dressing (band aid) 10 strips19. Torch, medium size, without cells 120. Hand gloves (disposable) 2 pairs21. Sterile gauge pads 1022. First aid Book 1 copy23. Forceps toothed and non-toothed 2 each one
Untitled-1 9/1/2009, 11:31 AM132

Large First Aid Box
Size: (17 ½ " × 10" ×6 ½ “)Type: Dust-ProofEnvironment: Small factories etc.
Contents1. First Aid Book 1 copy2. Sterilized Finger Dressings 12 Nos3. Sterilized Hand or Foot Dressings 12 Nos4. Sterilized Body or Large Dressings 12 Nos5. Sterilized Burn Dressings Small 6 Nos
Large 4 Nos Extra Large 2 Nos
6. Sterilized Cotton Wool (25gms) 6 Nos7. Antiseptic ointemt 2 Nos8. Eye Pad 6 Nos9. Adhesive Plaster (2.5cms5M) 110. Assorted Roller Bandage
25 cms × 5.5M 6 Nos5 cms × 5.5M 6 Nos 7.5 cms × 5.5M 6 Nos
11. Triangular Bandages 12 Nos12 Safety pins (10 nos) Set13. Scissors Ordinary, 12.7 cms 1 Pair (Both sides sharp)14. Liquid Antiseptic (betadine) 115. Cotton wool for padding 50 gms 116. Eye ointment (soframycin) tube 117. Loose woven gauze (28" × 8" 1 pkt18. Aspirin (300mg) 24 tabs19. Tear off Scribbling Pad with pen 120. Adhesive Dressing Strips (band aid) 10 No21. Torch, medium size, without cells 1 No22. Hand gloves (disposable) 20 Pairs23. First aid splints wooden (ordinary) 4 sets24.Forceps toothed and non-toothed 2 each one
.
Untitled-1 9/1/2009, 11:31 AM133

Epilepsy is a disease, occur in all ages, where thepatient has repeated episodes of convulsions. The specificcause is not known
Epilepsy patients are in danger of hurting them-selves when they fall down, when they bite their tongueor may either aspirate or even asphyxiate during theepisode.
Cause may be hereditary and high temperature asfebrile convulsion seen in children
It is divided into Major and Miner fits
Identification of a seizure or convulsion
Minor Seizure
1. Patient may become pale and anxiety
2.The eyes become fixed and staring and he maybecome unconscious for a few seconds.
3.He soon resumes his work as though nothing hashappened.
4. Precaution to be taken is to observe if the patientis progressing into a major epileptic attack and totreat as for a fainting spell.
Major Seizure
1. This kind of seizure may follow headache, restlessness or a feeling of dullness.
2.The patient may be aware that he is likely to havea fit soon.
3. Unconscious and froth from mouth and nostrils.
MiscellaneousEpilepsy (Fits)
20
Untitled-1 9/1/2009, 11:31 AM134

The fit itself is divided into four phases:
1. Phase I - Sudden loss of consciousness whichcauses the patient to fall to the ground. The patientmay cry or scream.
2. Phase II - The body becomes rigid for a fewseconds and the face becomes flushed.
3. Phase III - The fits begin in full force. Thepatient may injure himself by striking himself hardagainst nearby objects. There is frothing at the mouthand the tongue may be bitten. The patient may passurine or motion during this phase.
4. Phase IV - The attack lasts for a few minutesand then the convulsion stops. The patient appearsdazed and confused. He may lapse into slumber or mayact in a strange manner for a few hours without know-ing the exact nature of his actions. After a few hourshe becomes normal again.
Management:
Recurrent episodes of epilepsy candidates not to drive vehicles
To give support in phase III begin with forceful convulsion, to prevent injuries/fractures of the body
Take care not to bite the tongueNil oral till the patient recoveryKeep patient in recovery position as froth comes from
the mouth and nostrilsPriorities of ABC of first aid
Don’ts:Don’t give any keys ( no use)Don’t give waterdon’t pour the water on the body
Untitled-1 9/1/2009, 11:31 AM135

Fever (Pyrexia)
Normal body temperature 98.4 degrees Fahrenheitor 37 degrees centigrade.If the temperature higher than normal body tempara-
ture is called as feverFever is a symptom not a disease. This indicates some
abnormal process going in the bodyTemperate monitor by clinical Thermometer
Causes:Bacterial/viral infectionsExtreme hot weatherChildren immunization (polio, DPT)RashSymptoms:
Hot flushed face and hot when touches bodyHeadache and body painsLake of interest on foodNausea and vomitingDiarrhoeaHigh fever may be associated with:DeliriumConvulsions (fits)
Treatment:Whatever the cause of fever, cool body with cold
sponging and keep the wet cloth on the foreheadRemove the excessive clothingPlenty of fluids ( oral/IV)Give paracetmol tablet twice/thrice dailyConsult doctorTreat as emergency in following disease:Stiff neckdifficulty in breathingRashes (measles and chikenpox)Persistence sore throat in children, diarrhea and
21
Untitled-1 9/1/2009, 11:31 AM136

Chicken pox
Common viral infectious child hood diseasecaused by varicella-Zoster virusSpreads through air and contactIt is contagious till blisters disappearincubation period: 14 to 21 days
Symptoms:
♦ Fever♦ Rash♦ Blister all over the body♦ Itching♦ Normally regress within 7 to 10 days, some time pro
duces complications like Pneumonia and septicemia
Treatment:
n Fever treated with paracetmoln Use antibiotic to prevent the complicationsn Light digestible foodn Plenty of fluidsn Apply lotiocalmine liquidn Acyclovir, antiviral drug shows remarkable effectn Medical advice
Prevention:
√ Infected person isolated, if possible√ Chikenpox vaccination between 12 to 18 months
Vaccination should not be given to:
1. Allergy to vaccines2. Pregnant women3. Immuno-compromised patients (HIV-AIDS)
22
Untitled-1 9/1/2009, 11:31 AM137

Measles
Measles is an infectious disease caused by a virus.It spreads easily from person to person.Incubation period: 7 to 14 days
Symptoms
♦ The rash often starts on the head and moves downthe body.
♦ Fever♦ Cough♦ Runny nose♦ Rash♦ Itching♦ Conjunctivitis (pink eye)
Treatment:
n Fever treated with paracetmol
n No specific treatment
n Vitamin A to be given to two consecutive days
Prevention:
√ Measles vaccination can prevent the disease, shouldbe given at the 10th month (9 completed months)
√ There is proposal to give booster dose as numbercases seen in children age of 10 years too.
.
23
Untitled-1 9/1/2009, 11:31 AM138

This is a condition where sudden constriction ofairways causing difficulty in breathing, especially inbreathing out.
Causes
♦♦♦♦♦ Allergy,
♦♦♦♦♦ Pollen
♦♦♦♦♦ Dust
♦♦♦♦♦ Infection,
♦♦♦♦♦ Anxiety or tension can trigger an attack.
Management
1. Reassure the patient
2. Make them sit up in bed or chair and allow him to lean forward with couple of pillows and/or a small table on which to rest his/her head
3. Ensure fresh air by opening the windows.
4. Seek medical aid from a nearby doctor.
5. To rule out cause of allergen
6. Hydrocortisone inhalers are proven results
7. Sensitize with known allergens
Asthma24
Untitled-1 9/1/2009, 11:31 AM139

Diarrhoea is defined as copious watery motions orthree or more motions within 24 hours.
Causes of DiarrhoeaWater borne diseaseViruses and toxins of microorganismsParasitesDigestive disturbances
Diarrhoea ( Motions)
Signs and Symptoms of Diarrhoea
♦♦♦♦♦ Frequency of motion is more than usual.♦♦♦♦♦ Consistency of the stool changes from formed
to fluid.♦♦♦♦♦ There may be associated pain in the abdomen.♦♦♦♦♦ Stools may be mixed with blood or mucus.♦♦♦♦♦ There may be vomiting.♦♦♦♦♦ Dehydration
Why is Diarrhoea dangerous?The main danger from diarrhoea results from the loss
of body water and salts in the watery stools, which canlead to shock and a number of electrolyte abnormalitiesand eventually death. Children are more prone to dehy-dration.
ManagementPrinciple: Replace the water and electrolytes lost in
the stools.Oral Rehydration Powder packets (WHO Formula-
tion) are available in the market with various brandnames and may be used as per the instructions mentionedon the packets. If Commercial Oral Rehydration solu-tions are not available, then salt-sugar solution can beprepared at home and used instead. Mix 8 teaspoonful ofsugar (40 gms) and ¾ teaspoonful of common salt (3.5gms) in a litre of boiled water and after cooling use asOral Rehydration solution.
25
Untitled-1 9/1/2009, 11:31 AM140

Diabetes
Diabetes is a chronic metabolic disorder, resultinginsufficient insulin production by the pancreas, ineffec-tive insulin action (insulin resistance) or both.
In simple terms:Food eaten converted to glucose, this glucose pro-
duces energy and transport to every tissue of body withhelp of insulin.
Deficiency to produce insulin or action leads toDiabetes i.e. increases the blood sugar levels.
Normal blood sugar level: 80 to 110 mg/dl (fasting) <140 (2 hrs after food)
Diabetic Levels: fasting blood sugar <126 mgs/dl Post prandial sugar <200 mg/dl
Types:
nnnnn Type 1: Mostly occurs in children , adolescenceand young adults. Commonly seen in western population,as seen in India <1% cases .
nnnnn Types 2: Mostly occur in adults after 35 yrs.Recently observed cases older than 25 years. Commonlythis type of diabetes seen in Indian population.
nnnnn Gestational diabetes: This type of diabetes seenin pregnant women and majority cases subsided afterdelivery.
Symptoms:♦ Excessive urination♦ Increased thirst♦ Increase appetite♦ Weight loss♦ Weakness♦ Vision changes♦ Burning feet and hands♦ Dryness and dehydration
if diabetes not treated regularly it may leads tofollowing complications.
26
Untitled-1 9/1/2009, 11:31 AM141

Complications:
n Diabetic Retinopathy ( vision damage)n Diabetic Nephropathy( kidney diseases)n Diabetic Neuropathy (Nerve diseases)n Heart diseasesn Brain stroke (paralysis)n Peripheral vascular diseases)n Impotence (sexual disorder))
Treatment:
Type 1 diabetes:No oral pillsDaily insulin injectionsDiabetic dietAerobic Exercise ( walking/swimming)
Type 2 diabetes
Diabetic dietAerobic Exercise ( walking/swimming)Diabetic oral medicines/ insulin injections
Serve complications :Hypoglycemia: blood sugar levels decline, produces
sweating, weakness, yawning, causes , vomiting and uncon-sciousness. This symptoms due irregular food and over-dose of medicines.
In such circumstances, give sugar water or cooldrinks
to prevent this complicationHyperglycemia: Blood sugar levels a re very high,produces dehydration and shock leads to death.Immediately admit in hospital for further treatmentAlways consult with diabetologist to reduce
the above complications
Untitled-1 9/1/2009, 11:31 AM142

Immunization schedule
Proper administration of immunization Prevents seven preventable diseases.
Age Vaccination
0 days Oral Polio drops
First few days BCG
1 month 15 days 1st dose of Oral Polio drops1st dose of DPT injection1st dose of Hepatitis B inj
2 months15 days 2nd dose of Oral Polio drops2nd dose of DPT injection2nd dose of Hepatitis B inj
3 months15 days 3rd dose of Oral Polio drops3rd dose of DPT injection3rd dose of Hepatitis B inj
10th Month Measles + 1st dose of Vit.Afollowed by every six months upto 5 years
1 1/2 year- 2 years(preschool going)
Booster dose of Oral Polio drops Booster dose of DPT injection Booster dose of Hepatitis B inj
5th YearSchool going) Booster dose of Oral Polio drops
Booster dose of DT injection
10th and 16th year Booster Tetanus toxoid Antennal Mother 2 doses of T.T. monthly interval
Guidelines of A.P.Government (WHO)27
Untitled-1 9/1/2009, 11:31 AM143

HIV- AIDSAIDS is
Acquired – must do something to contract
Immune – ability to fight off infectious agents
Deficiency – lack of
Syndrome – cluster of symptoms that are Character-istic for a disease
HIV is:
Human – isolated to the human species
Immuno-Deficiency – Lacking the ability to fight offinfectious agents
Virus – a disease causing agent
How Hiv infect
AIDS is caused by HIV, a very fragile RNA type ofretrovirus. Outside body it doesn’t survive for more thanhalf an hour
There are two types of HIV virus, i.e. HIV-1 andHIV-2. HIV-1 is present all over the world and in Indiamore than 80% people are affected by it. HIV-2 ismainly found in Africa and also presents in India. Somepeople are infected with both the viruses. People onlyinfected with HIV-2 live longer than those infected withHIV-1 and chances of transmission of HIV-2 from motherto child are very rare.
Once in body, HIV attacks CD4 type of White BloodCells (WBCs) in blood and gradually kills them.
28
Untitled-1 9/1/2009, 11:31 AM144

How does HIV Spread
Infected person’s1. Blood2. Semen,3. Vaginal fluid are rich in HIV.
HIV is transmitted by:
♦ Unprotected sexual intercourse with infectedperson (either heterosexual or homosexual)
♦ Transfusion of hiv infected blood or blood prod-ucts
♦ Use of infected needles and instruments withoutsterilization or sharing of needles and syringes by HIVdrug addicts
♦ Infected mother to her baby during pregnancy,birth process and through breast – feeding
How HIV is not transmittedThere is no risk of contracting HIV infection in
daily routine activities and by casual contact with HIVpositive person.
⊗ AIDS virus is not transmitted through:⊗ Kissing (social)⊗ Touching hand shaking or hugging⊗ Sharing bathroom or toilet⊗ Coughing, tears, saliva, sweating, urine or sneezing⊗ Eating together or sharing utensils⊗ Swimming pools⊗ Sharing clothes⊗ Mosquito bite, Insect bite or houseflies⊗ Patient caring
Untitled-1 9/1/2009, 11:31 AM145

SYMPTOMS OF AIDS
An HIV infected person initially looks normal andperfectly healthy. The symptoms of AIDS develop afterfew years (7 to 10 years) and include: -
♦ Long standing, unexplained fever ( > 1 month)
♦ Unexplained diarrhoea (> 1 month)
♦ Persistent cough (> 1 month)
♦ Persistent unexplained fatigue and weight loss of more than 5 to 10 kg within short period
♦ White blotches in the mouth or on tongue (fungal infection)
1 Spot test: ELISA, TRIDOT for HIV1 and HIV 2
2 Confirmation Test: Western Blot test
3 Confirmation without window period: PCR Test
4 CD4 and Viral load testing
It is mandatory to do pre-test and post-test counselling of all the patients before and after thetest respectively.
Where should I get the Blood tests:VCTC centers : All government HospitalsPPTCT Centers: Hospitals to look antenatal cases
Untitled-1 9/1/2009, 11:31 AM146

CARE OF HIV / AIDS PATIENT
GENERAL CARE:
Sympathetic attitude, family and public support
Patient should be advised to take adequate rest and diet rich in proteins and vitamins
Patient should be advised not to donate blood or organs
Patient should be advised to use condom with any sexual partner
Patient should be encouraged to give up all habits i.e. smoking, alcohol or chewing pan or tobacco
Patient should drink boiled water to prevent water borne disease
Patient should be advised to do regular exercise or yoga
If patients follow above general care tips they can live 1-2 year longer.
Still there is research is going on immunization andnew drugs to stop the spread of the disease
Prevention is better than cure
"AIDS, Difficult to get, Impossible tocure but, Easy to prevent"
Untitled-1 9/1/2009, 11:31 AM147

SYMPTOMATIC TREATMENT:
Early treatment of common problems like fever,cough, diarrhea etc. from family doctor
Early detection and treatment of opportunisticinfections like TB , oral candidiasis, skin infections etc.
SPECIFIC ANTI-HIV TREATMENT:
Many new anti-HIV drugs which prevent the spreadof the virus and can postpone various complications arenow available at selected places in market and few ofthem are also manufactured in India e.g. AZT, 3TC, D4T,Saquinavir, ddc, nevirapine etc. But these medicines arevery costly and in India 90% of HIV patients cannot eventhink of them. One year expenses of good combinations ofthese drugs and blood testing comes to around 1.5 to 2.5lacs. These medicines can prolong the life of the patientbut not cure him.
Presently Govt of India giving pre medicines to HIV
Prevention:
Abstinence (safe sex)
Befaith with life partner
Condom usage
Safe blood transfusion in recognized blood banks
Use disposable Needle (insists doctors/nurses) / boil ing the needle and instruments
Safe motherhood and child
Untitled-1 9/1/2009, 11:31 AM148

29 Blood groups & Blood donation
The ABO blood group system was discovered by KarlLand Steiner in 1901 by Australian Scientist
Four Groups of Blood groups1 A Group2 B Group3 AB Group4 O Group
O Group blood is universal donorAB Group Universal recipient
ABO Blood Group System
Blood donation is a procedure by which an individualdonates blood voluntarily either for immediate use in atransfusion or to be stored for later use.
The process of giving blood involves -
Screening the donor for infectious diseases. This ismandatory in most blood banks across the world.
The actual process of donation where the donor goesthrough the procedure of donating blood.
Untitled-1 9/1/2009, 11:31 AM149

Let’s about Blood Donation♦ You are between age group of 18-60 years.♦ Your weight is 45 kgs or more.♦ Your haemoglobin is 12.5 gm% minimum.♦ Your last blood donation was 3 months earlier.♦ You are healthy and have not suffered from malaria, typhoid or other transmissible disease in
the recent♦ Collected blood is tested for venereal diseases,
hepa titis B & C and AIDS♦ 350 ml of blood only taken for donation and proce-
dure takes about 10 minutes.♦ You can donated blood every three months, there is
no harm.♦ You can donate your blood at donation camp, work
place, IRS blood bank and Govt.Blood Banks♦ Brief recovery, no weakness, resume normal works
after snacks
Do not donate blood if you have any of theseconditions
n Cold / fever in the past 1 week.n Under treatment with antibiotics or any other
medication.n Cardiac problems, hypertension, epilepsy, diabetes
(on insulin therapy), history of cancer, chronic kidney or liver disease, bleeding tendencies, vene real disease etc.
n Major surgery in the last 6 months.n Vaccination in the last 24 hours.n Shared a needle to inject drugs/ have history of
drug addiction.n Had sexual relations with different partners or
with a high risk individual.n been tested positive for antibodies to HIV. Donate blood---Save Life
30 Whom and when to give blood
Untitled-1 9/1/2009, 11:31 AM150