Fireworks I - LaGuardia Community College · Fireworks I This Adobe Fireworks Tutorial will help...
33
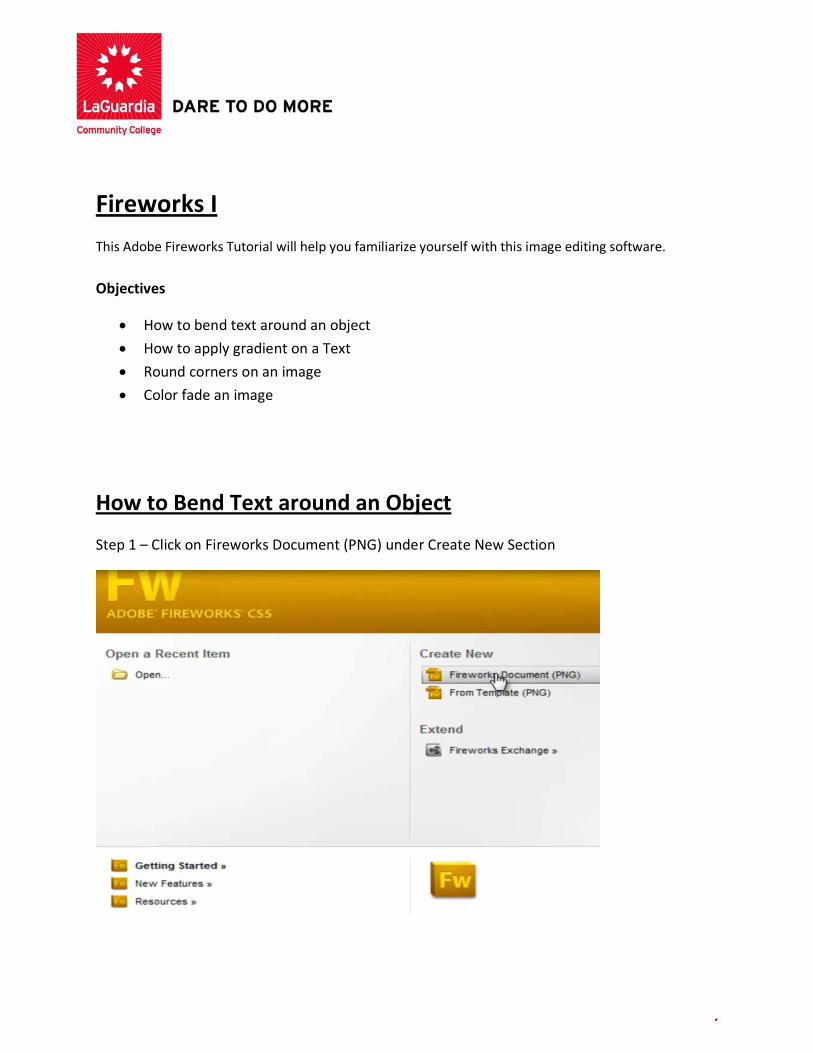
. Fireworks I This Adobe Fireworks Tutorial will help you familiarize yourself with this image editing software. Objectives • How to bend text around an object • How to apply gradient on a Text • Round corners on an image • Color fade an image How to Bend Text around an Object Step 1 – Click on Fireworks Document (PNG) under Create New Section
Transcript of Fireworks I - LaGuardia Community College · Fireworks I This Adobe Fireworks Tutorial will help...
.
Fireworks I This Adobe Fireworks Tutorial will help you familiarize yourself with this image editing software. Objectives
• How to bend text around an object • How to apply gradient on a Text • Round corners on an image • Color fade an image
How to Bend Text around an Object
Step 1 – Click on Fireworks Document (PNG) under Create New Section
2 | P a g e
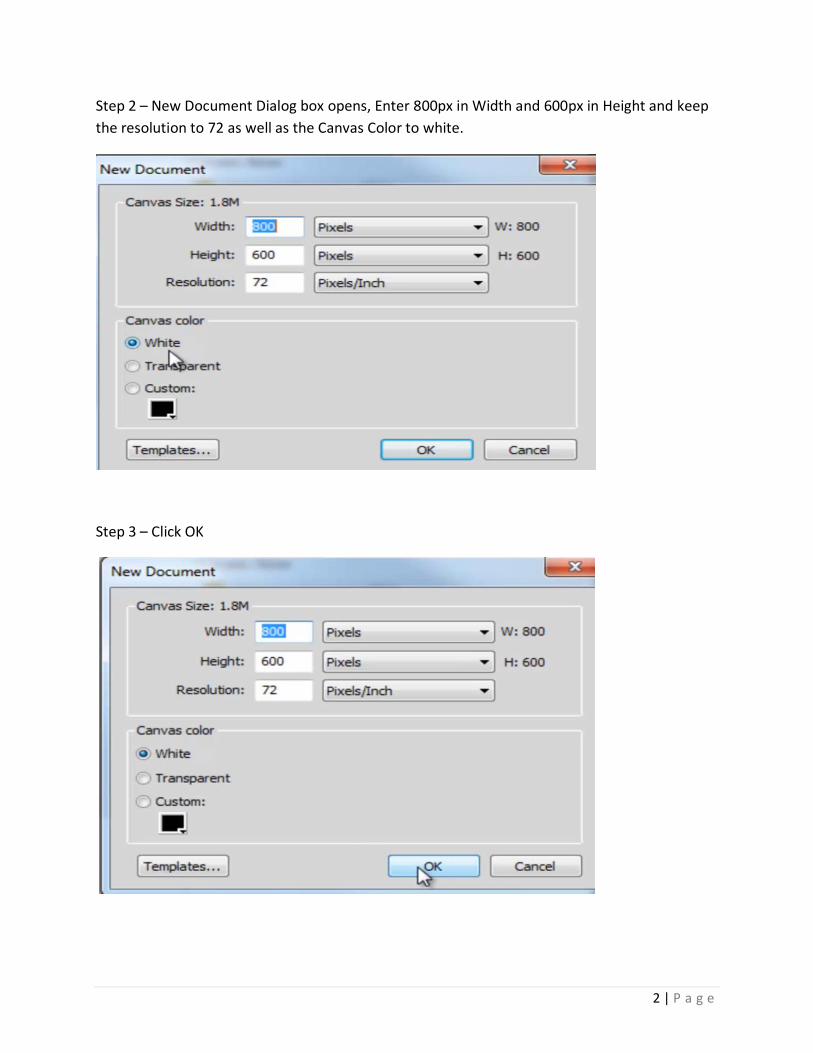
Step 2 – New Document Dialog box opens, Enter 800px in Width and 600px in Height and keep the resolution to 72 as well as the Canvas Color to white.
Step 3 – Click OK
3 | P a g e
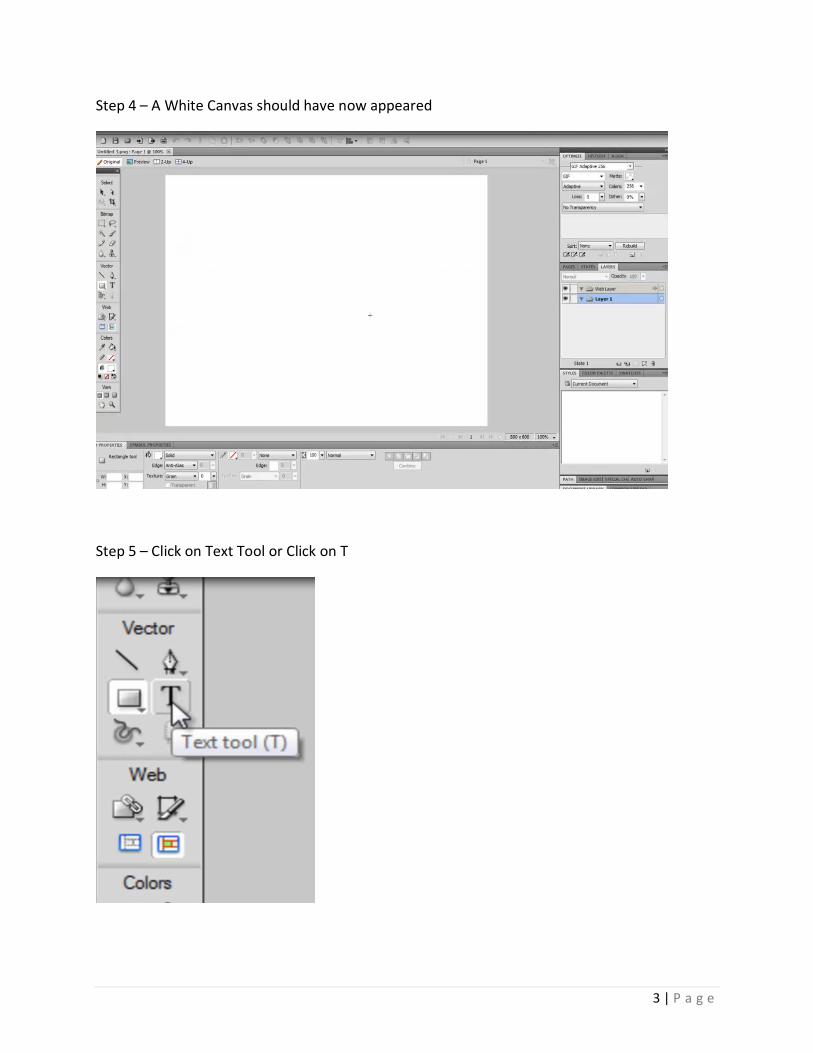
Step 4 – A White Canvas should have now appeared
Step 5 – Click on Text Tool or Click on T

4 | P a g e
Step 6 – Click and Drag to draw your text box
Step 7 – Now Type the text of your choice
5 | P a g e
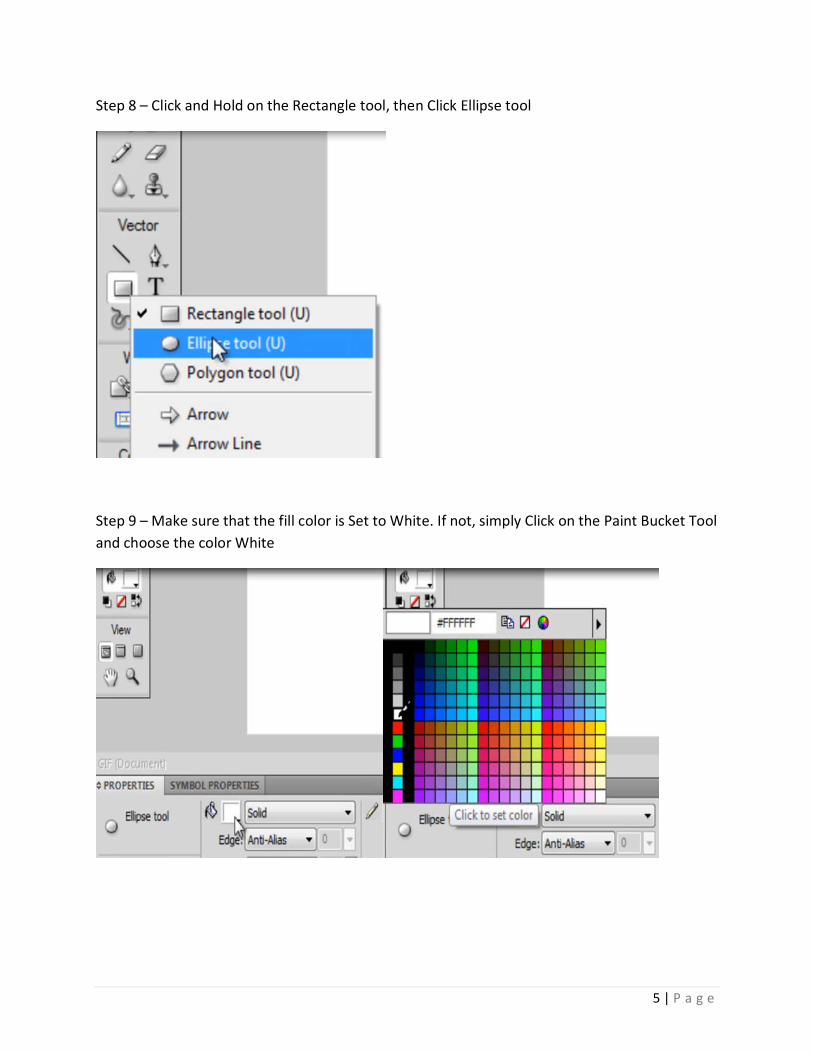
Step 8 – Click and Hold on the Rectangle tool, then Click Ellipse tool
Step 9 – Make sure that the fill color is Set to White. If not, simply Click on the Paint Bucket Tool and choose the color White
6 | P a g e
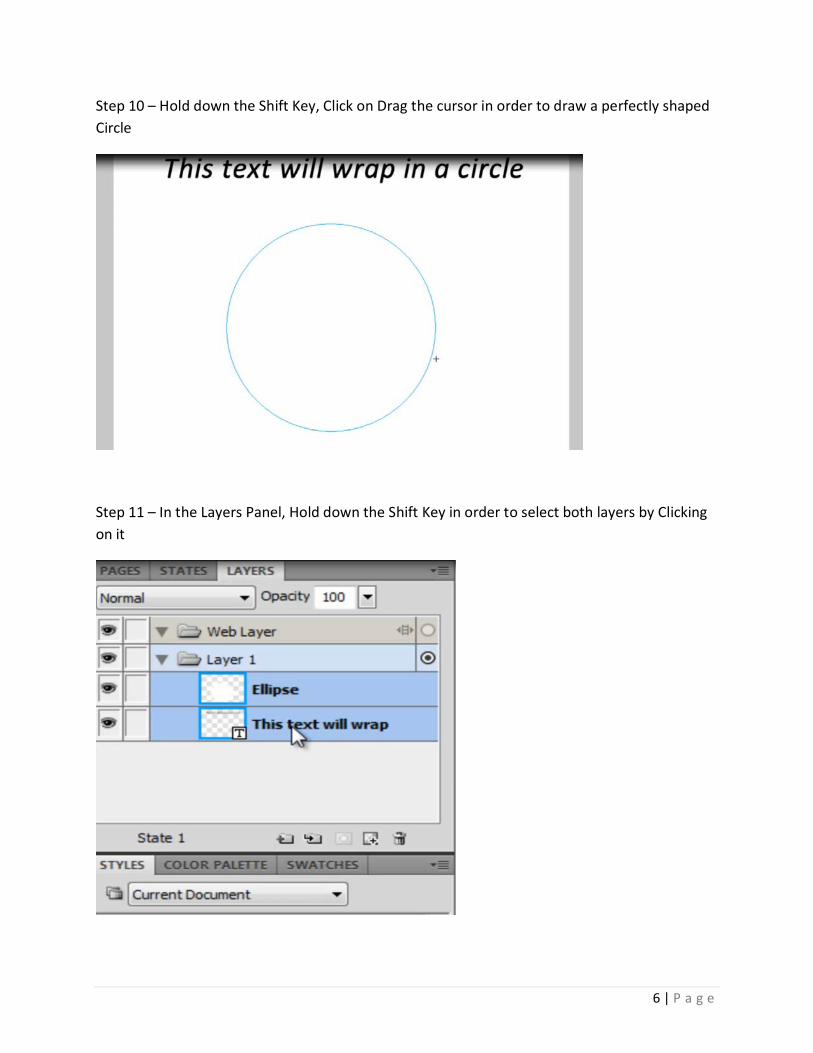
Step 10 – Hold down the Shift Key, Click on Drag the cursor in order to draw a perfectly shaped Circle
Step 11 – In the Layers Panel, Hold down the Shift Key in order to select both layers by Clicking on it
7 | P a g e
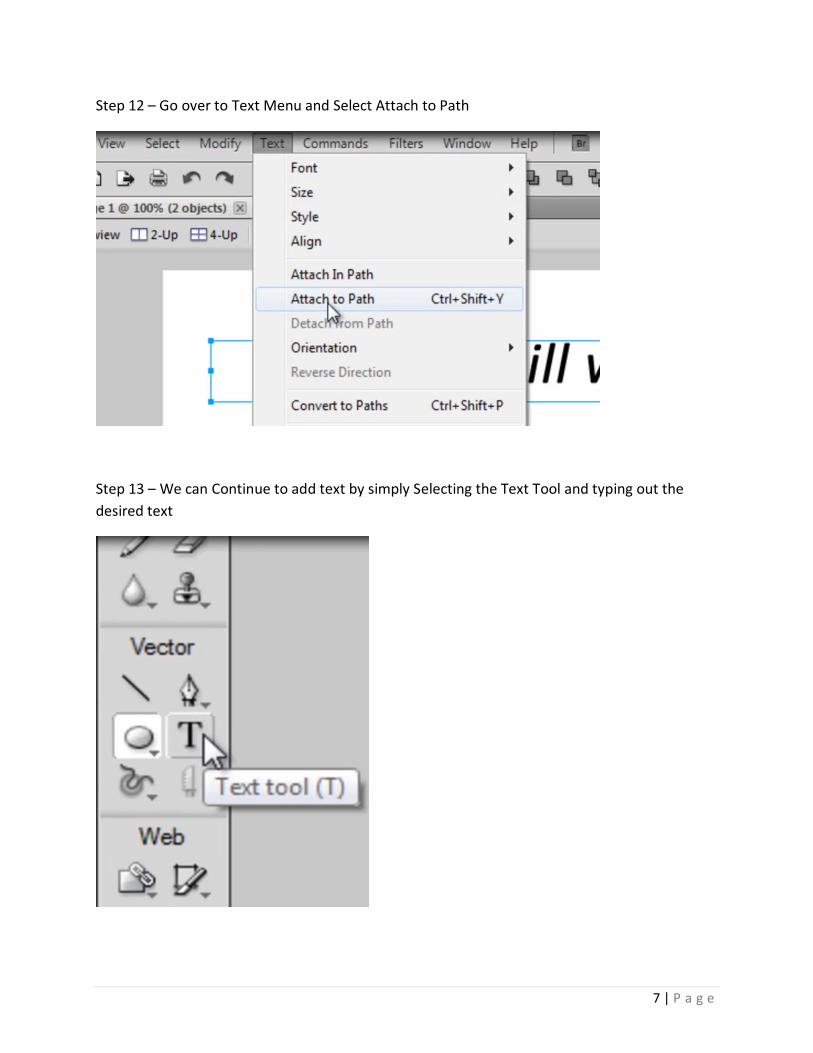
Step 12 – Go over to Text Menu and Select Attach to Path
Step 13 – We can Continue to add text by simply Selecting the Text Tool and typing out the desired text
8 | P a g e
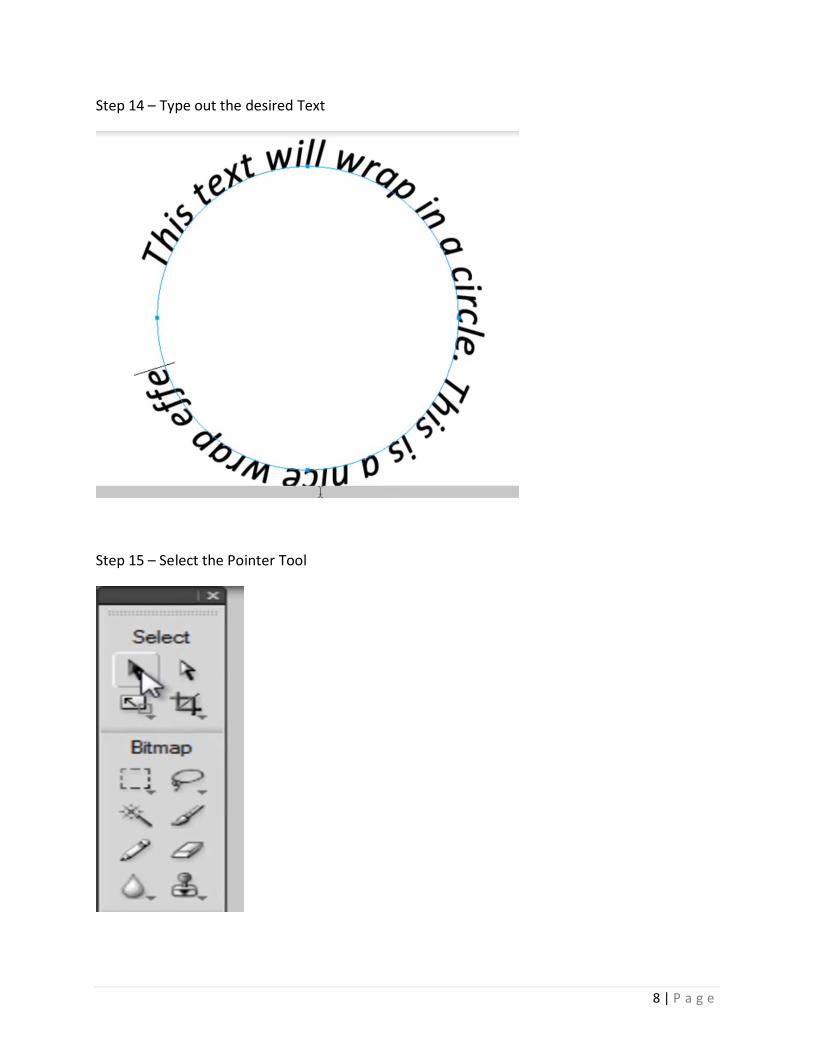
Step 14 – Type out the desired Text
Step 15 – Select the Pointer Tool
9 | P a g e
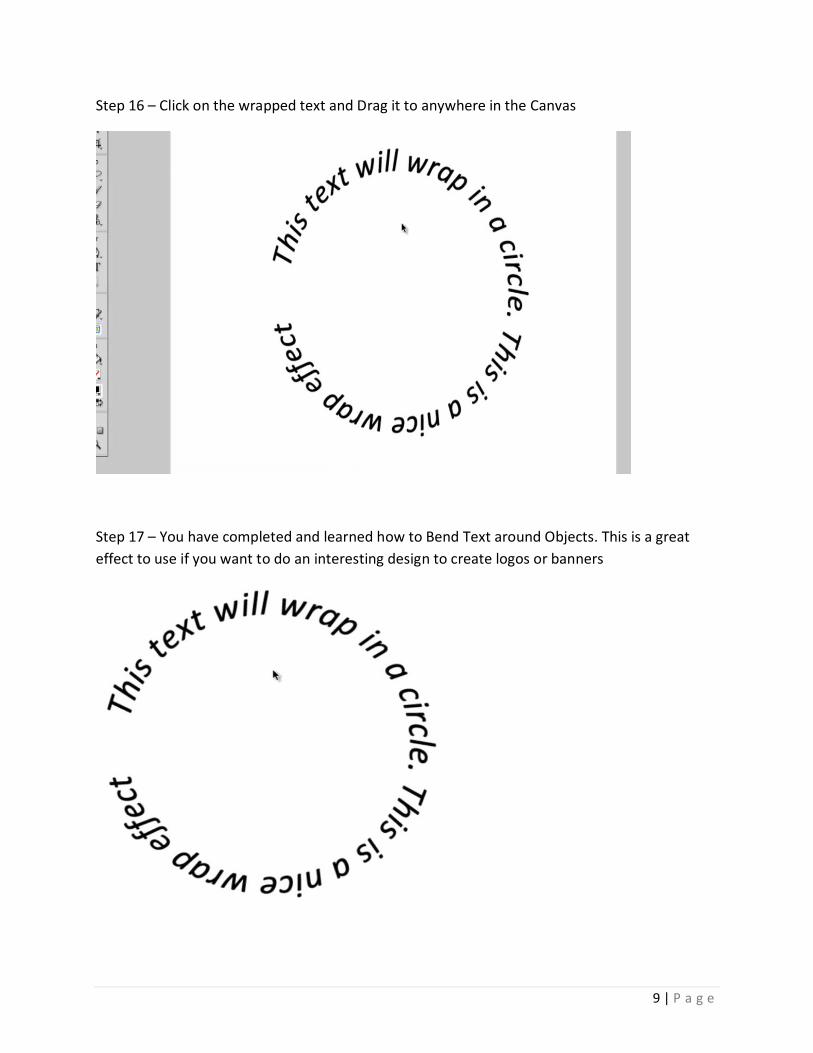
Step 16 – Click on the wrapped text and Drag it to anywhere in the Canvas
Step 17 – You have completed and learned how to Bend Text around Objects. This is a great effect to use if you want to do an interesting design to create logos or banners
10 | P a g e
How to Apply Gradient on a Text
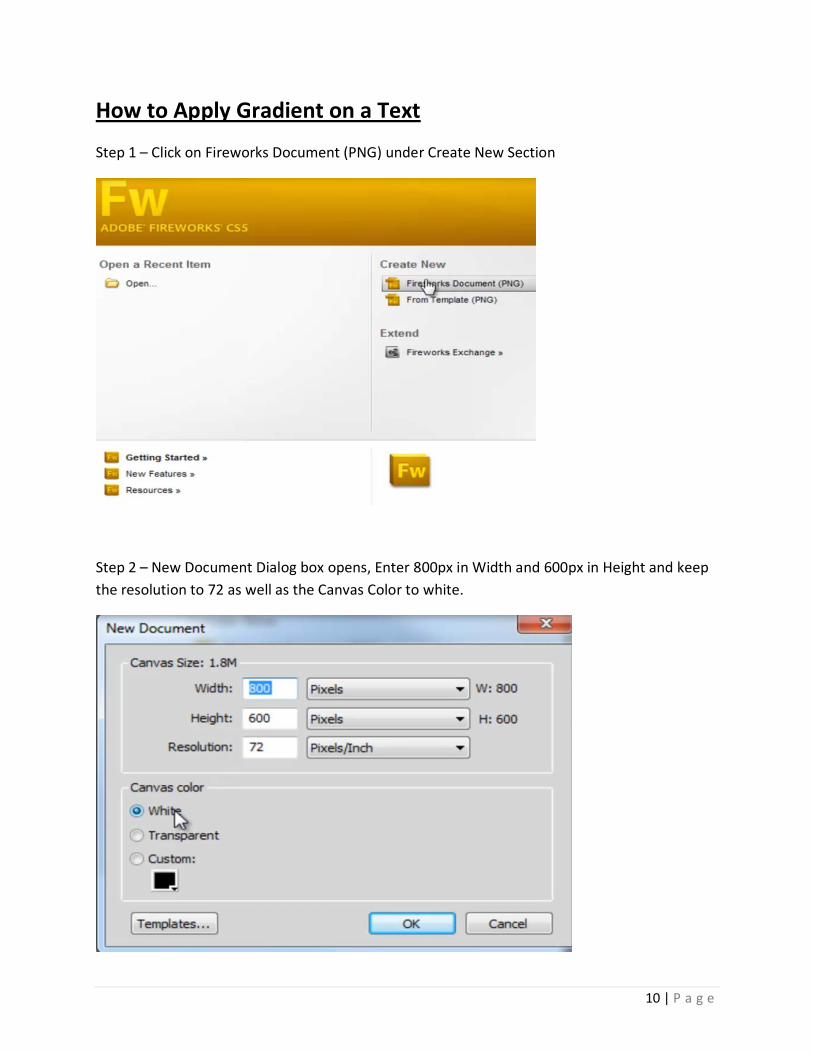
Step 1 – Click on Fireworks Document (PNG) under Create New Section
Step 2 – New Document Dialog box opens, Enter 800px in Width and 600px in Height and keep the resolution to 72 as well as the Canvas Color to white.
11 | P a g e
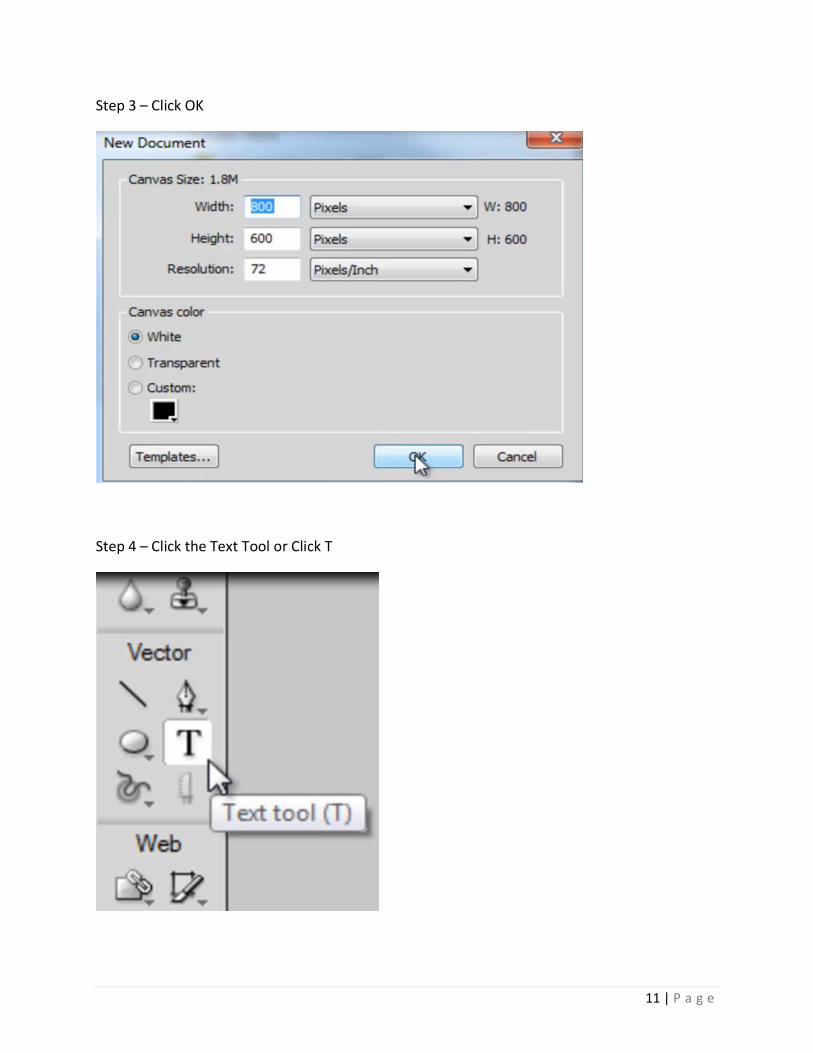
Step 3 – Click OK
Step 4 – Click the Text Tool or Click T
12 | P a g e
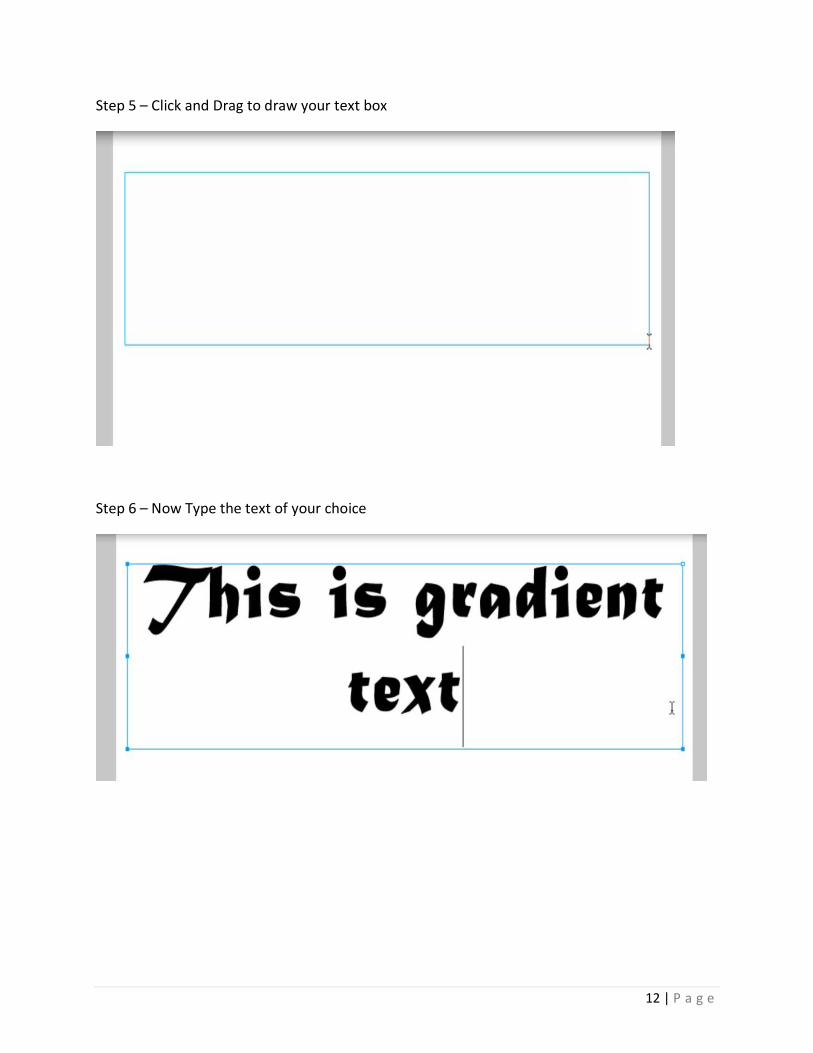
Step 5 – Click and Drag to draw your text box
Step 6 – Now Type the text of your choice
13 | P a g e
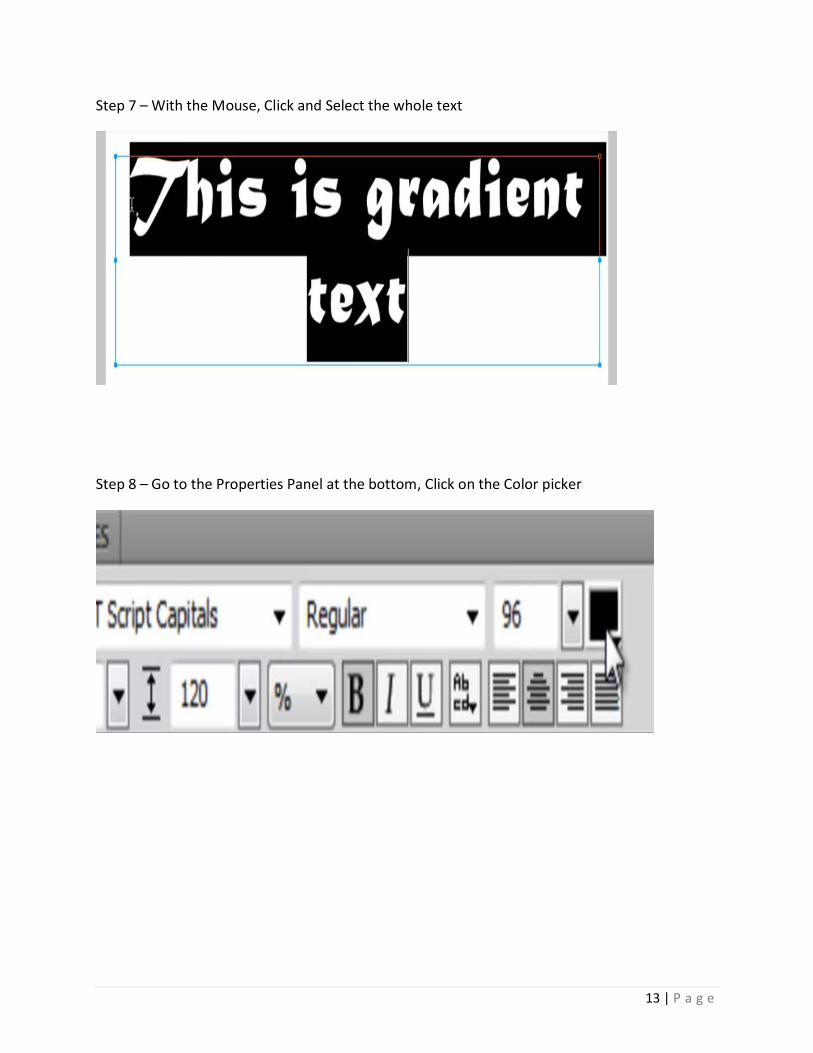
Step 7 – With the Mouse, Click and Select the whole text
Step 8 – Go to the Properties Panel at the bottom, Click on the Color picker
14 | P a g e
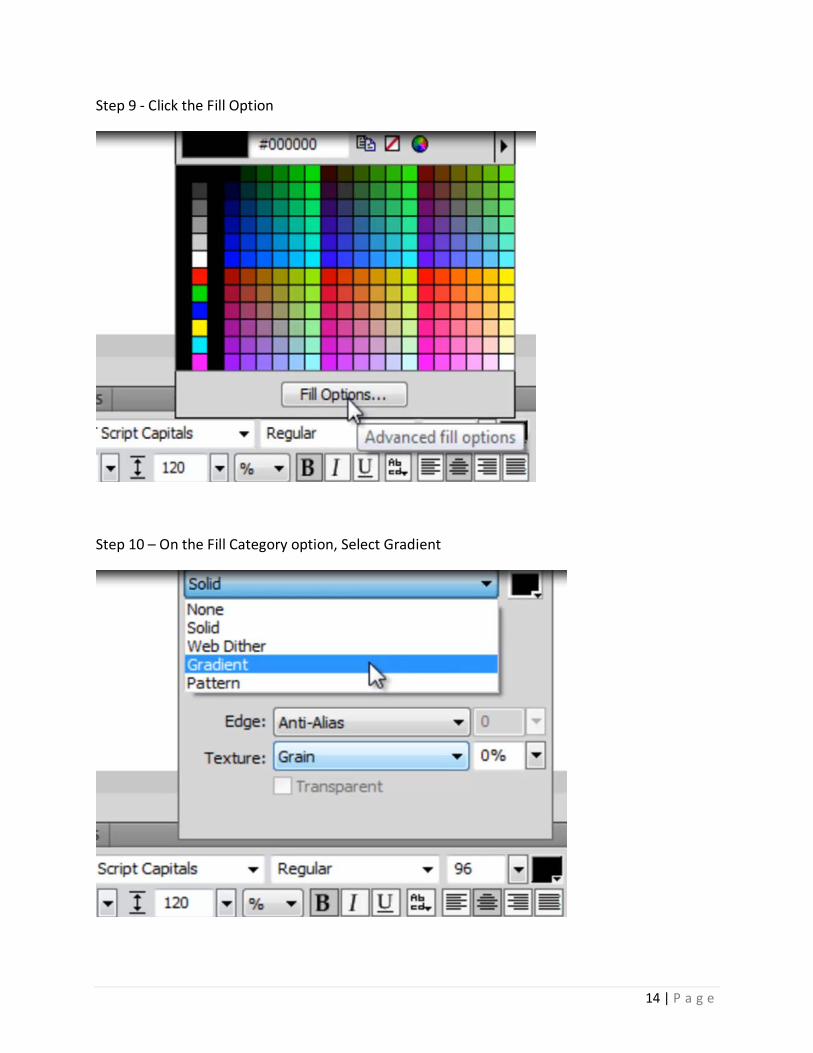
Step 9 - Click the Fill Option
Step 10 – On the Fill Category option, Select Gradient
15 | P a g e
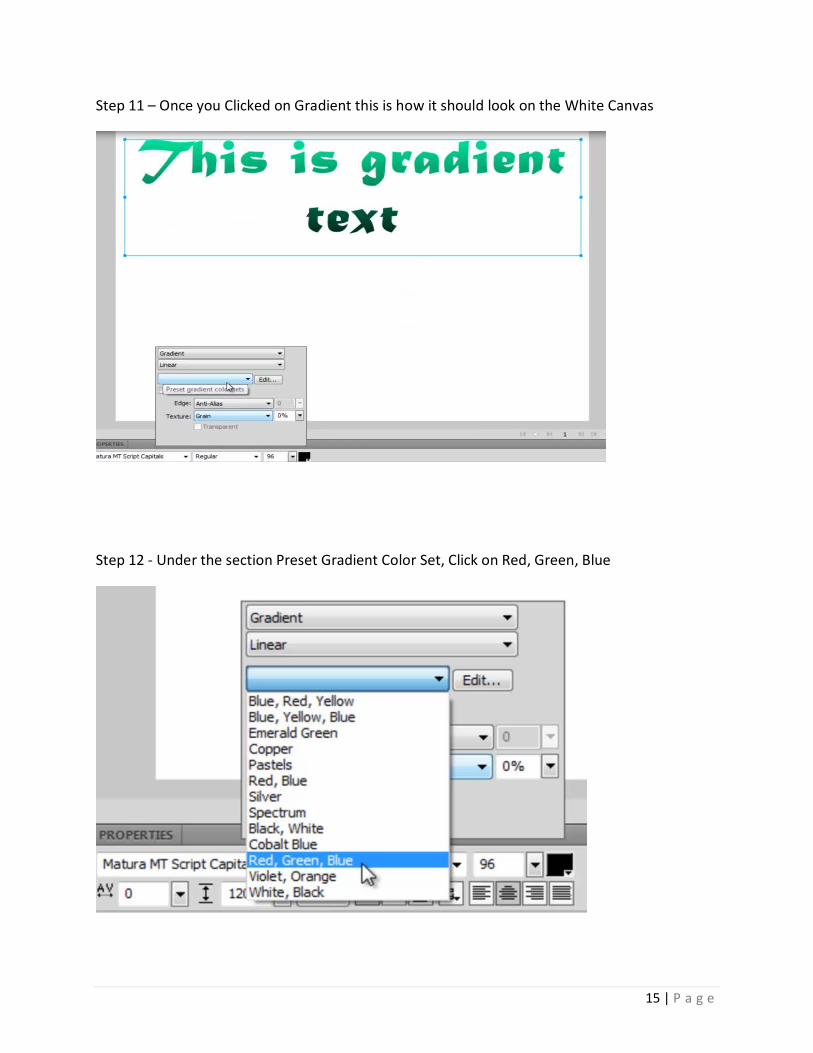
Step 11 – Once you Clicked on Gradient this is how it should look on the White Canvas
Step 12 - Under the section Preset Gradient Color Set, Click on Red, Green, Blue
16 | P a g e
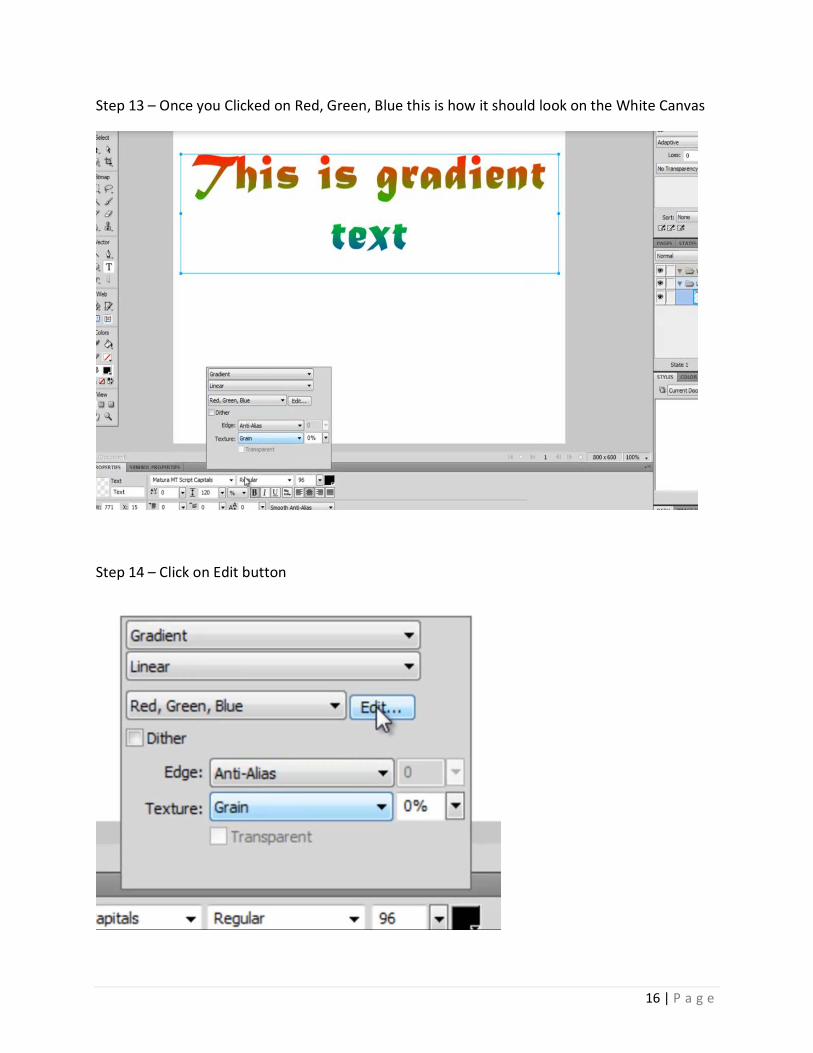
Step 13 – Once you Clicked on Red, Green, Blue this is how it should look on the White Canvas
Step 14 – Click on Edit button
17 | P a g e
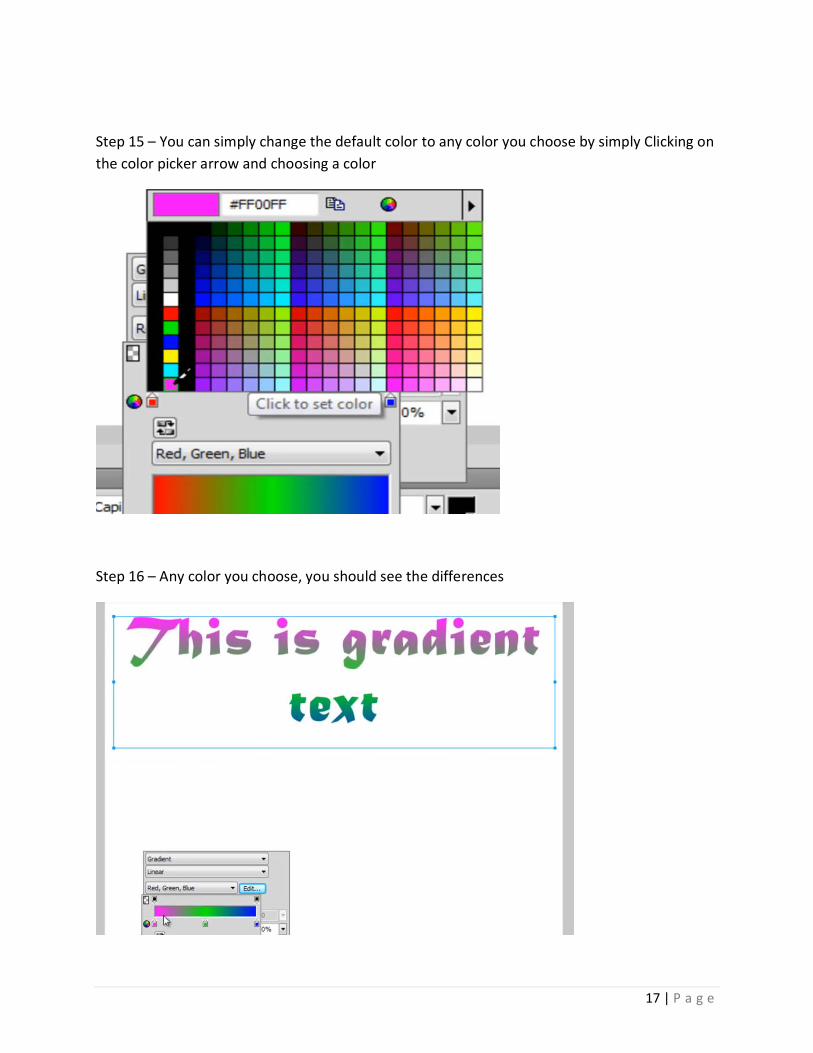
Step 15 – You can simply change the default color to any color you choose by simply Clicking on the color picker arrow and choosing a color
Step 16 – Any color you choose, you should see the differences
18 | P a g e
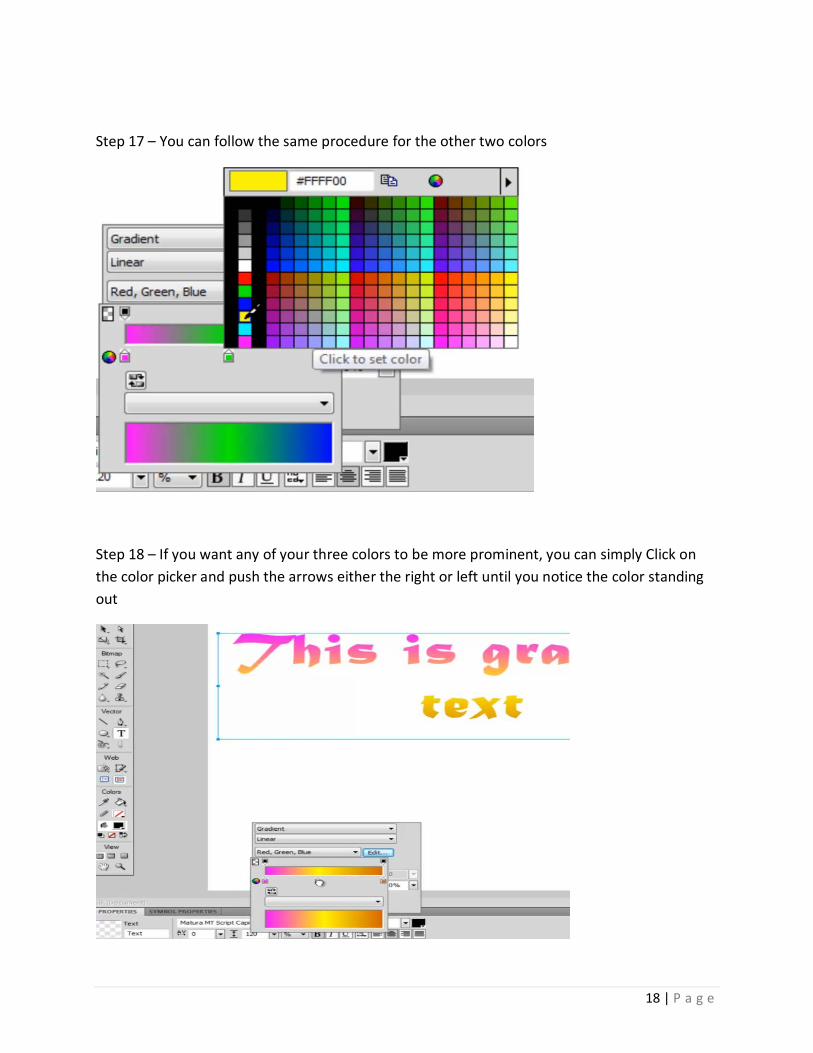
Step 17 – You can follow the same procedure for the other two colors
Step 18 – If you want any of your three colors to be more prominent, you can simply Click on the color picker and push the arrows either the right or left until you notice the color standing out
19 | P a g e
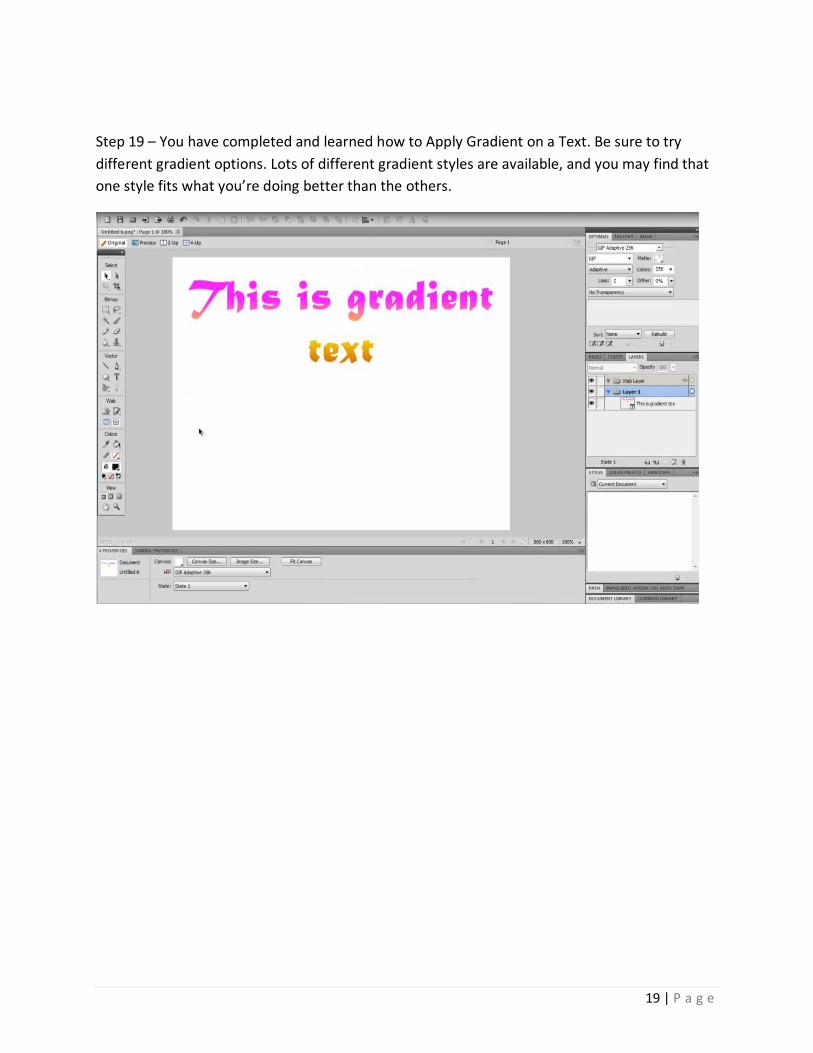
Step 19 – You have completed and learned how to Apply Gradient on a Text. Be sure to try different gradient options. Lots of different gradient styles are available, and you may find that one style fits what you’re doing better than the others.
20 | P a g e
Round Corners on an Image
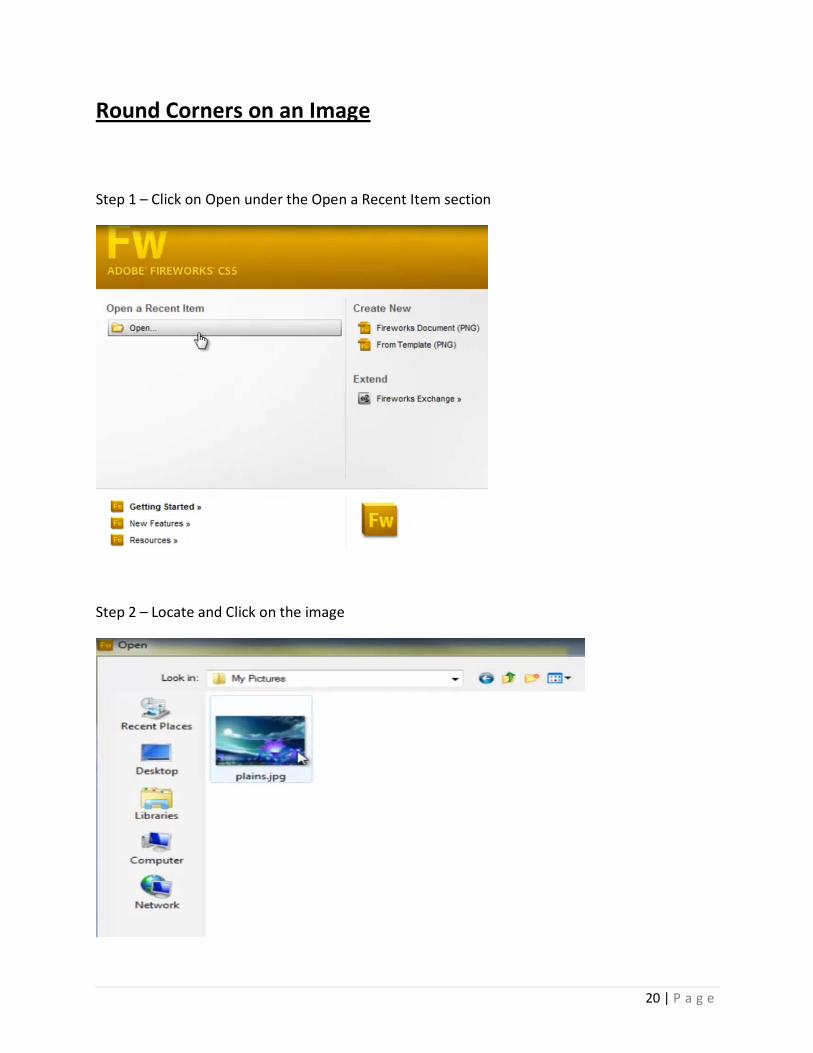
Step 1 – Click on Open under the Open a Recent Item section
Step 2 – Locate and Click on the image
21 | P a g e
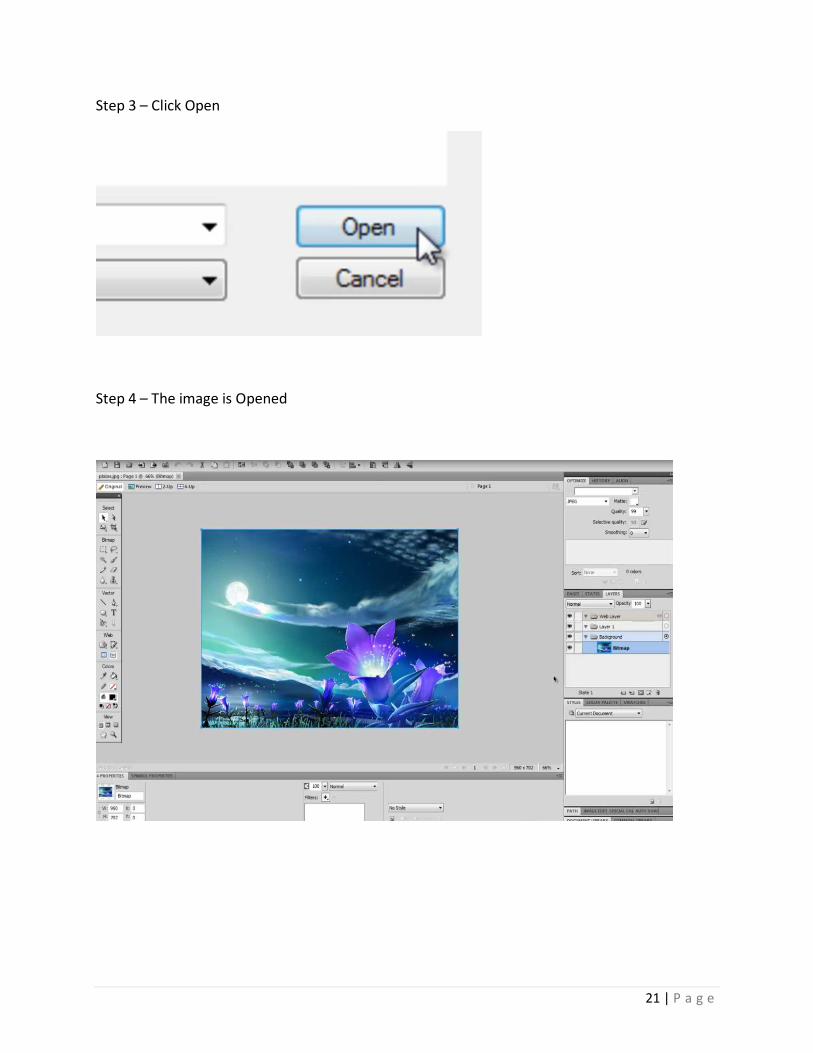
Step 3 – Click Open
Step 4 – The image is Opened
22 | P a g e
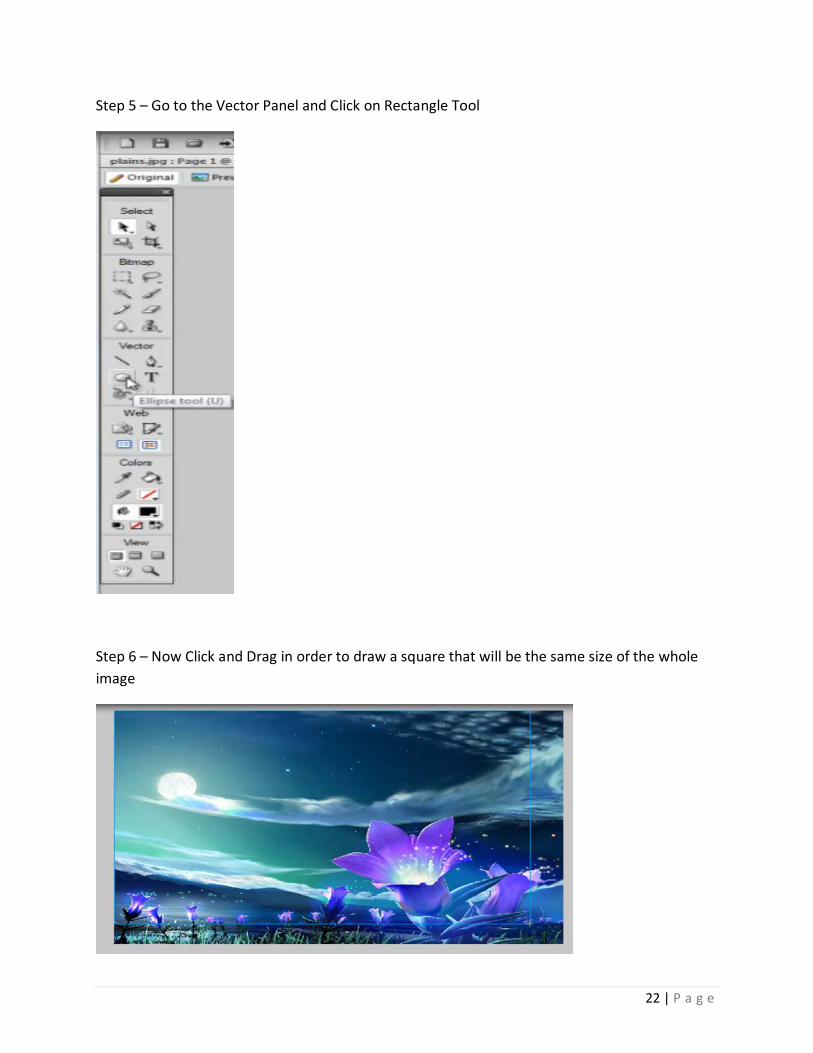
Step 5 – Go to the Vector Panel and Click on Rectangle Tool
Step 6 – Now Click and Drag in order to draw a square that will be the same size of the whole image

23 | P a g e
Step 7 – This is how it will look
Step 8 – Now to change the color of this square to white by going to our Color Panel located in our Properties and Click color White
24 | P a g e
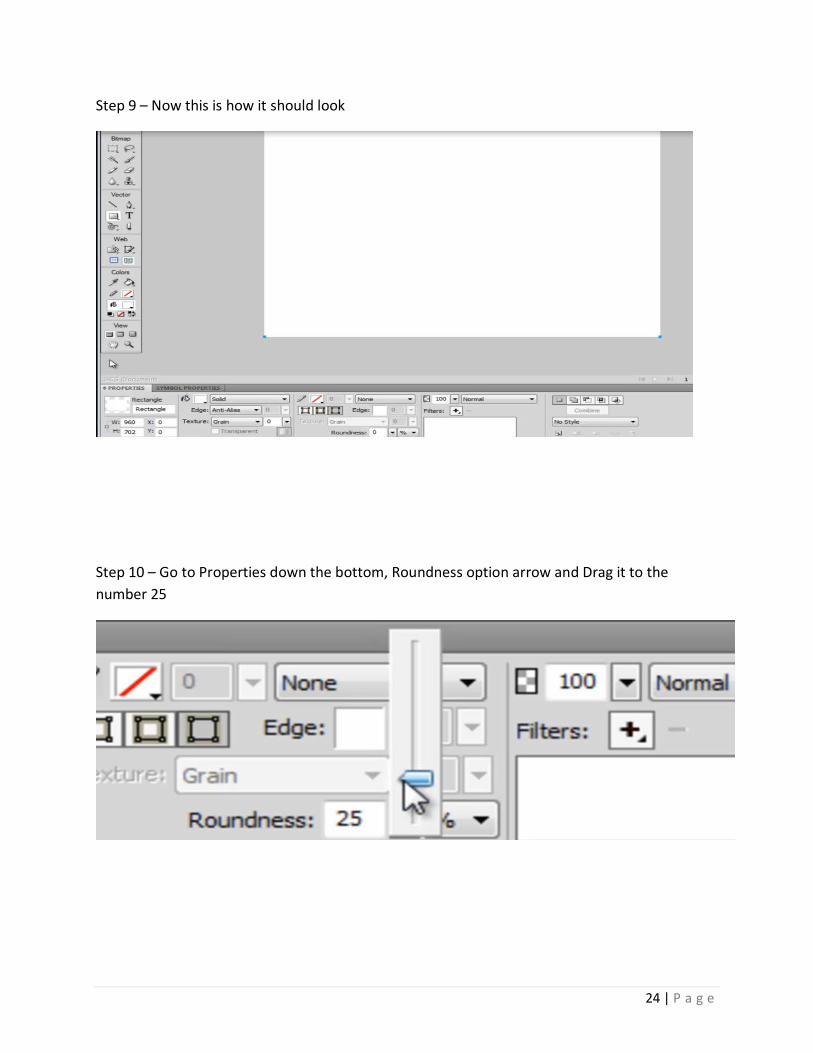
Step 9 – Now this is how it should look
Step 10 – Go to Properties down the bottom, Roundness option arrow and Drag it to the number 25
25 | P a g e
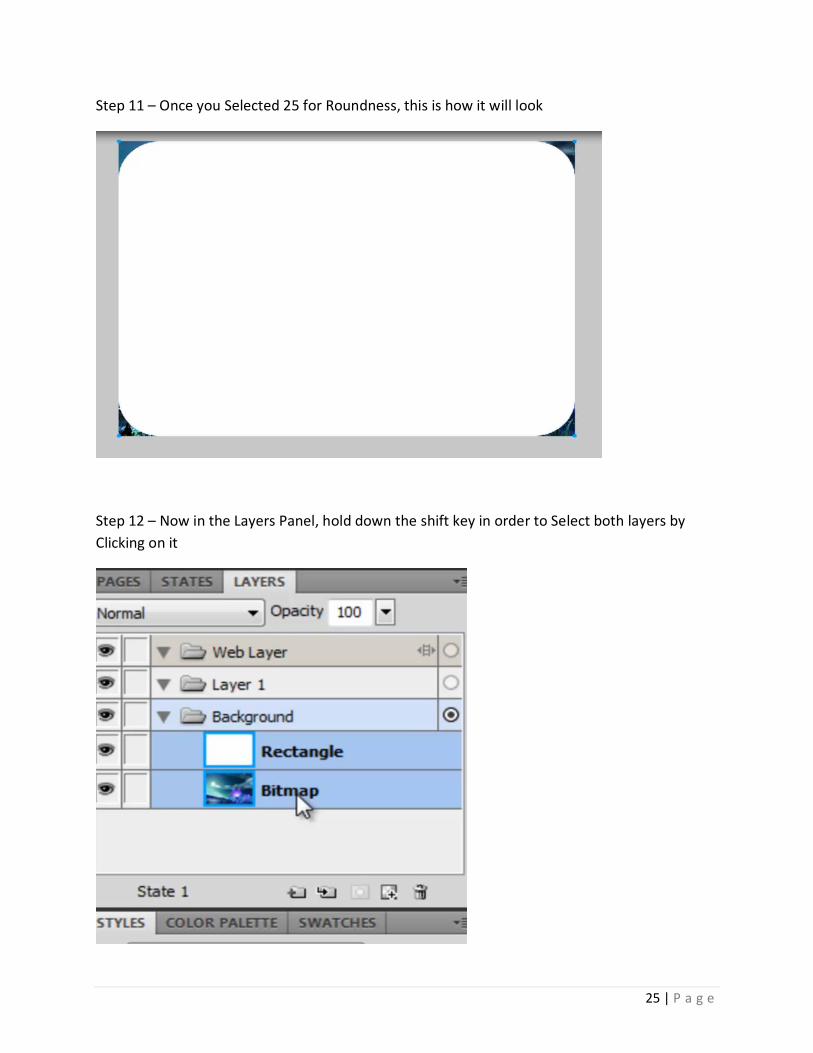
Step 11 – Once you Selected 25 for Roundness, this is how it will look
Step 12 – Now in the Layers Panel, hold down the shift key in order to Select both layers by Clicking on it
26 | P a g e
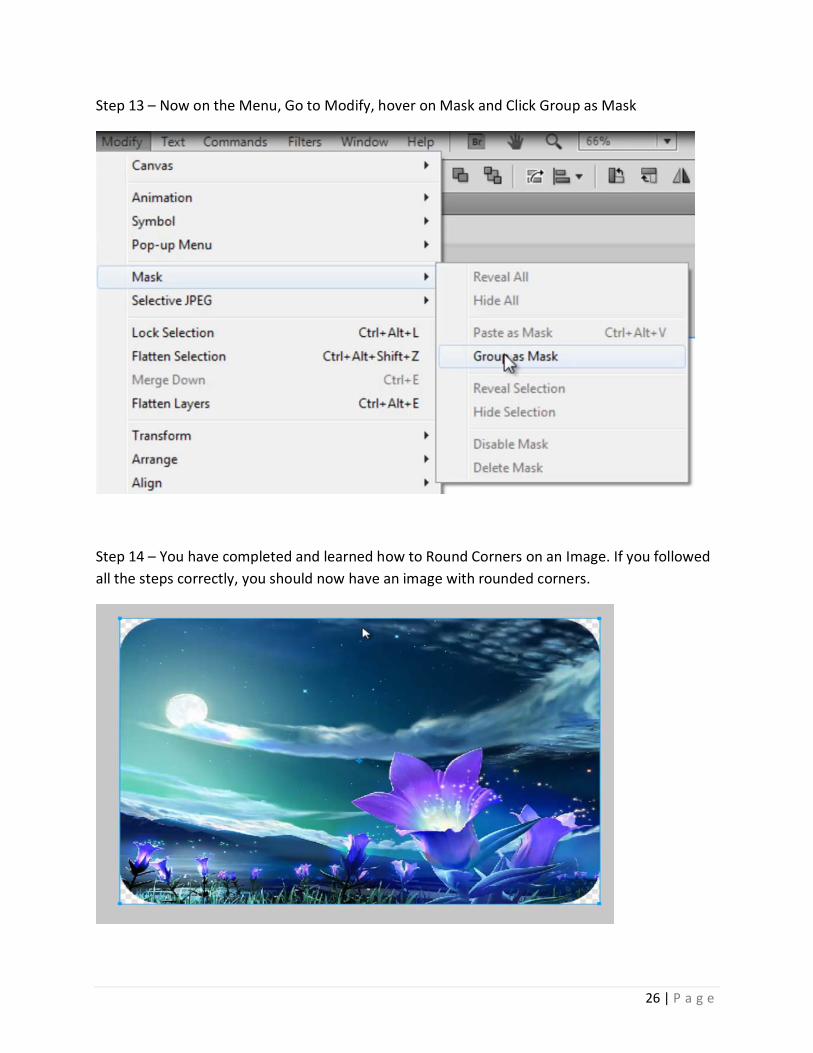
Step 13 – Now on the Menu, Go to Modify, hover on Mask and Click Group as Mask
Step 14 – You have completed and learned how to Round Corners on an Image. If you followed all the steps correctly, you should now have an image with rounded corners.

27 | P a g e
Color Fade an Image
Step 1 – Click on Open under the Open a Recent Item section
Step 2 – Locate and choose your image by Clicking on it
28 | P a g e
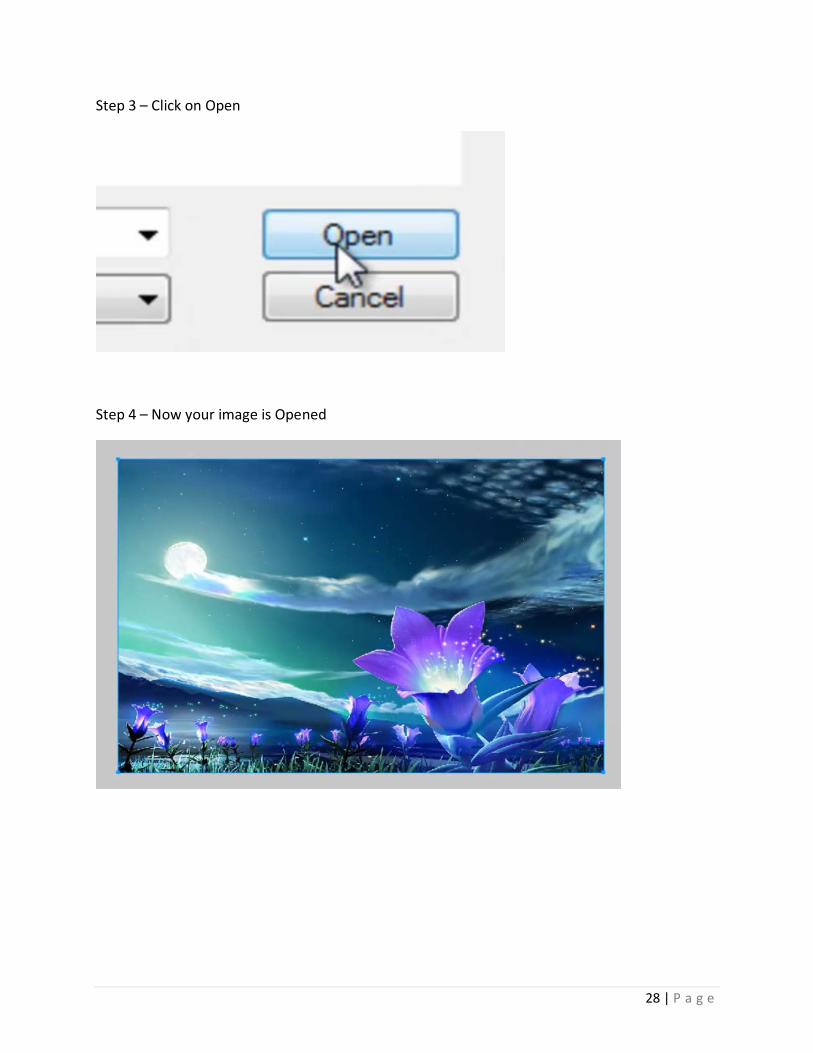
Step 3 – Click on Open
Step 4 – Now your image is Opened
29 | P a g e
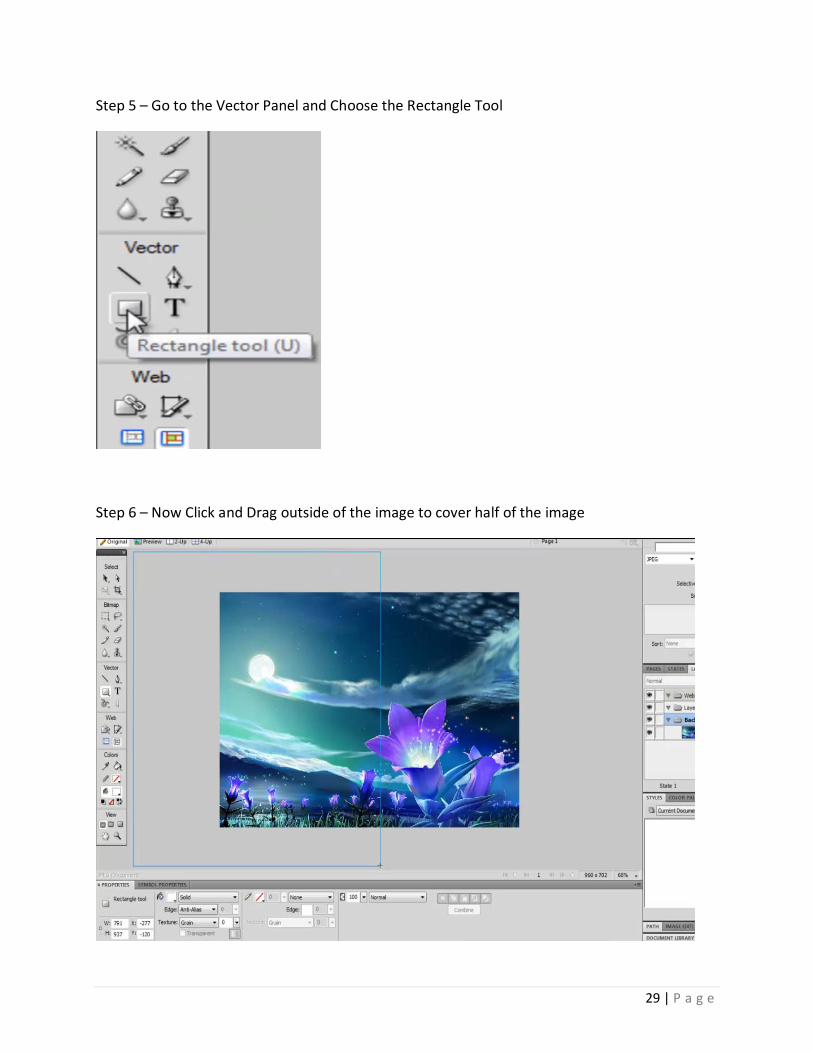
Step 5 – Go to the Vector Panel and Choose the Rectangle Tool
Step 6 – Now Click and Drag outside of the image to cover half of the image

30 | P a g e
Step 7 – Go towards the Properties Panel to our Edge option and Select Feather
Step 8 – In the Feather Selection dialog box, we’ll increase the Feather strength to 100
31 | P a g e
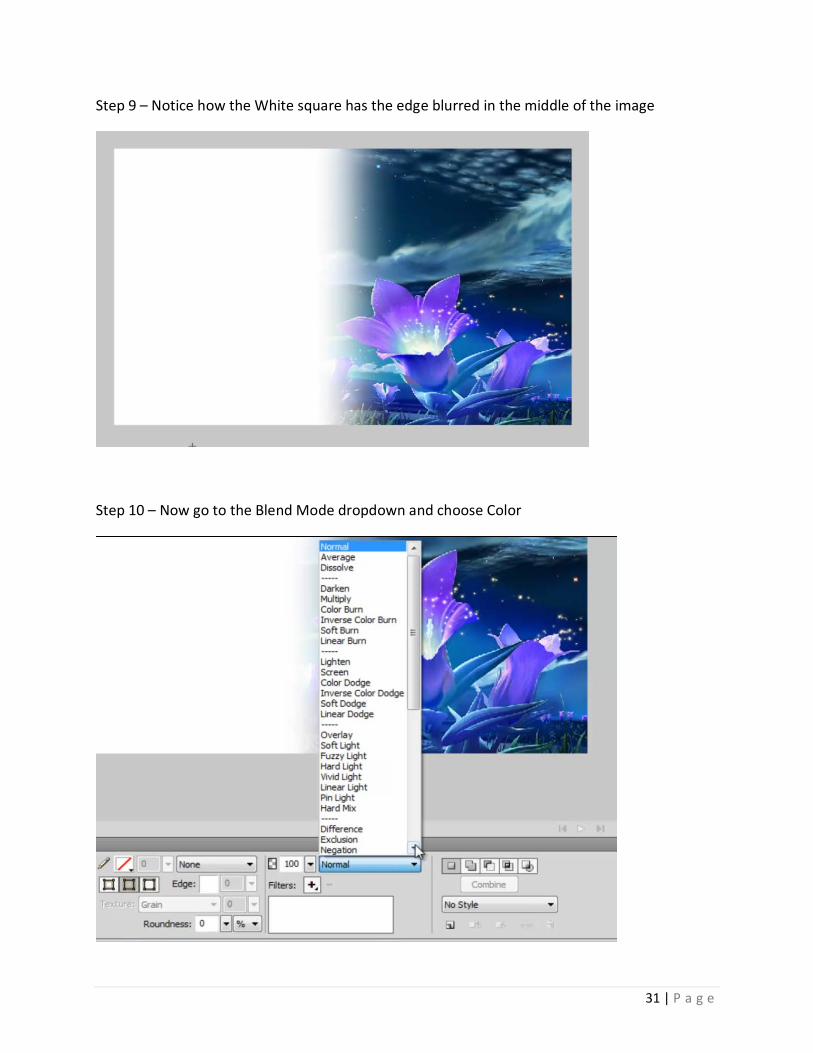
Step 9 – Notice how the White square has the edge blurred in the middle of the image
Step 10 – Now go to the Blend Mode dropdown and choose Color
32 | P a g e
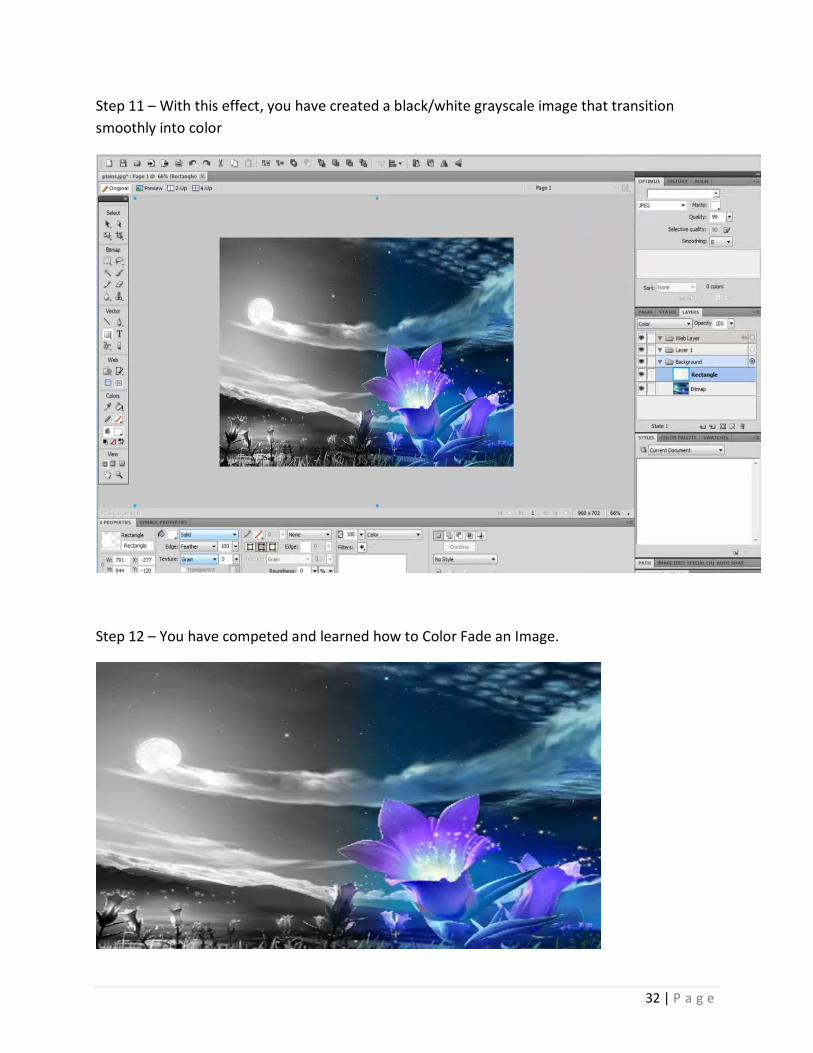
Step 11 – With this effect, you have created a black/white grayscale image that transition smoothly into color
Step 12 – You have competed and learned how to Color Fade an Image.

33 | P a g e