Firestop Documentation Manager - Hilti · 13 The basic desktop screen “projects ... CFS-DM...
56
Hilti CFS-DM Firestop Documentation Manager Instructions for use January 2016
-
Upload
truongdien -
Category
Documents
-
view
233 -
download
0
Transcript of Firestop Documentation Manager - Hilti · 13 The basic desktop screen “projects ... CFS-DM...

Hilti CFS-DMFirestop Documentation Manager
Instructions for use
January 2016

CFS-DM Firestop Documentation Manager
CFS-DM Firestop Documentation Manager page 2
Contents
3 START-UP GUIDE4 License users5 Types of contractors, Project Management6 Documentation options7 Photos, 2D plan, QR code8 Label, Project layout9 Sharingaproject,Createthefirstproject
10 DESKTOP APPLICATION11 Welcome email and desktop application Your account and login information12 Login to your desktop application, forget password13 The basic desktop screen “projects”14 Usersettings,buildprofile15 Defineyourcompanyanduploaddocuments16 Upload engineering judgement and UL systems17 Sharing a project18 Definetheusers,back-officeuserandmobileuser19 Project management20 Create a project new21 Create a project, step 1, tab 1 project attributes22 Create a project, step 2, tab 2 building hierarchy23 Upload documents, step 3, 2D plans24 Definestandardpenetationattributes,step4,tab426 Add and delete UL-Systems27 Definebuildinghierarchy,step4,tab4entervalues28 Definecustomattributes,step4,tab4pricingattitudes29 Defineprojectuser,step5,assignusers 30 Starting screen and logout31 Edit project and penetration information36 Project attributes37 Createareportusingfilters39 Overviewreport
40 MOBILE APPLICATION41 Mobile application, Welcome email with login42 Login to your mobile application, Download CFS-DM43 Start the mobile application, Login44 Start the mobile application, User settings45 Synchronization of the project information46 Thebasicprojectscreenoverview,navigatingprojectsonapp47 Retrievalofpenetrationinformation48 Thebasicpenetrationscreenoverview,attributesandphoto49 Create a new penetration, capture information51 Create a new penetration, take a picture52 Create a new penetration, scan QR code53 Create a new penetration, set a marker54 Finish your documentation
Softwarespecifications,functionalityandappearancearesubjecttochange.

HOW TO STARTchapter 1

CFS-DM Firestop Documentation Manager
CFS-DM Firestop Documentation Manager page 4
Step 1
Prepare the project
Step 3
Firestop reports
Create a report
Step 2
Record the penetration
Theinformationinthisguideprovidessuggestionsondifferentwaystoestablishandunderstandhowtosetupaprojectanddocument.Itwillexplaineachaspectofthesoftwareandallowyoutomaximizethefunctionsofusers,tradeneeds,andvariouslevelsofdocumentation,reportbuildingandprojectsharing.Eachuserwillhaveuniqueneedsfortheirprojectorfacility.
License Users
YouareaBackOfficeuser.Youwillbethemaincontact/managerresponsibleformanagingtheprojectonCFS-DMsoftware.Youhavetheabilitytocontrolallfunctionsforeachproject.YoumayassignMobileuserstohelpdocumentpenetrationsinthefield.
Type of User Description Functions
BackOffice ABackOfficeusercontrolsandmanagesallprojectsintheCFS-DMsoftware.YoucanuseyourlogincredentialstologintoboththeBackOfficewebsiteandMobiledevice.Youcanbeloggedinatthesametime.
•Add/edit/deleteprojectandpenetrations• Create reports•Assign/deleteMobileusers• Edit “My Company” information• All Mobile user functions
Mobile A Mobile user is assigned to selected projects to capture penetrationinformation.Youcanonlylogintoamobiledevice.
•Add/editpenetration• Add Photos•Scan/assignQRcodestopenetrations• Locate penetrations on 2D plans
Congratulations
Youhavejustsigned-uptousetheHiltiFirestopDocumentationManagerSoftwareCFS-DMtosimplifyfirestopdocumentationinyourfacilityorproject.Therearethreebasicstepsforusingthesoftware,projectsetup,capturingpenetrationinformationandcreatingareport.
ThisStart-upguideisdesignedtohelpyouunderstandhowtobestsetupyourfirstprojectbasedonyourprojectneeds.
CFS-DM Firestop Documentation Manager
CFS-DM Firestop Documentation Manager page 5
Types of contractors
Howdodifferenttypesofcontractorsdocument?
Project Management
ACFS-DMsoftwarelicensecanbeusedtomanageinformationorganizedinavarietyofsituations.
FSCScenario:AsinglelicenseisusedbyoneFSCtomanagedifferentprojects.Eachprojectmayconsistofajoborbuildinginwhichfirestopinstallationisbeingperformed.
HealthcareFacilityScenario:Asinglelicenseisusedbyahospitaltomanagedifferentbuildingsonahospitalcampus.Eachprojectwouldrepresentabuildingwithinthecampus.Asinglelicenseisusedbyahospitaltomanageonefacilityandeachprojectisusedtomanagetheworkperformedbydifferenttradesinthatfacility.
GeneralContractorScenario:AsinglelicenseisusedbytheGCtomanageoneconstructionproject.Eachprojectwithinthesoftwarewouldbeusedtotrackthefirestopperformedbyeachtrade.Thelicensecouldthenbepassedontothebuildingownerorfacilitymanagertobeusedasamaintenancetoolforfutureretrofittingofpenetrations.
Scenario: Single license, singe project (large construction project or hospital facility)Backofficeusers:2Mobile users: 5
Scenario: Single license, multiple projects Backofficeusers:2Mobile users: 5
Type of Contractor
Firestop Specialty Contractor FSC‘saregenerallyonmanydifferentprojectsdocumentingfirestopduetotheownerrequesttodifferentialtheirlevelofserviceandprofessionalismfromotherFSCs.AnFSCcanbetheownerofaCFS-DMlicensethatmanagesanddeliversreportstoprojectGCsorHealthcarefacilitymanagers,ortheycanbeaddedtoanexistingCFS-DMlicenseasmobileuserstodocumentspecificwork.
General Contractor GeneralContractorsusuallyuseonelicenseonalargeconstructionproject.IncorporatingCFS-DMsoftwaremayberequiredbytheownerformanagingfirestopinstallationduringtheconstructionphaseandlaterasamaintenancetoolforfuturemodifications.TheGCcan assign a project to different sections of the project or building and assign each trade as mobileuserstodocumentthefirestopinstalledbyeachrelativetrade.
HealthcareFacility FacilityManagerstypicallyusetheCFS-DMsoftwaretomanagethefirestopconditionsforeitherasinglehospitalbuildingorfacilitycampus.TheHealthcareFacilitymayusethesoftwaretoonlydocumentdeficienciesastheyoccurinthefacilityordocumentallpenetrations.TheCFS-DMsoftwarecanbeintegratedintoaWorkPermitprocesstohelpdocumentthependingorcompleteworkforeachpermit.AfinalreportcanbecreatedusingtheCFS-DMsoftwareandincludedinthefinalWorkPermitreporttoprovetheworkwascompletedcorrectlyandontime.
License Manager(Healthcare Facility General Contractor)
ElectricalTrade
B. O. User 1B. O. User 2M. User 1M. User 2M. User 3M. User 4M. User 5
B. O. User 1B. O. User 2M. User 1M. User 2M. User 3M. User 4M. User 5
HVACTrade
DrywallTrade
Project Visibility Project Visibility
PlumbingTrade
Low VoltageTrade
License Manager(FSC, Subcontractor)
Project 1Hospital
Project 2University
Project 3College
Project 4Hospital
Project 5Data Center

CFS-DM Firestop Documentation Manager
CFS-DM Firestop Documentation Manager page 6
Level of documentation required
Howmuchinformationwillbedocumentedperpenetrationonyourprojectorfacility?
Whatinformationisrequiredtobedocumentedforeachpenetration?
CFS-DMoffersdifferentdocumentationoptionstomatchprojectrequirements.
Attributes:Eachprojectwillrequiredifferentinformationtoberecordedabouteachpenetration.TheCFS-DMsoftwareautomaticallyincludesbasicinformationbasedonwhoisloggedintothemobiledevice.OtherinformationisreloadedintoprojectssuchafirestopproductsandULsystems.TheBackOfficeusercreatingtheprojectdetermineswhichadditionalattributesareneededtocreatereportsrelevanttotheprojectneeds.Wehaveprovidedseveralsuggestionsforcustomattributes.
HiltiproductsandULSystemsarealreadypreloadedintotheCFS-DMforeachproject.IfaprojectrequiresEngineeringJudgment(EJs),thesedocumentscanbeaddedtotheprojectandtopenetrationsonaprojectbasis.
Information documented for each penetration
Attributes Record with QR code
Locate on 2D plan
Capture a photo
Full Documentation X X X X
Simple Documentation X X
VerifierDocumentation X
Material Needed QR code labels 2D life safety plan
Automatically Generated Pre-loaded Attributes Custom attribute suggestions
•Installer’sname• Date of installation•Hierarchylevel(Building,Floor,Wing,
Room, Wall)
•Productname:AllHiltiFirestopProducts
•Approval:AllHiltiULSystems (ProjectspecificEJs)
• Work Permit #•InspectionStatus• Firestop Status•Service• Subcontactor Name• F-Rating• Assembly Type
CFS-DM Firestop Documentation Manager
CFS-DM Firestop Documentation Manager page 7
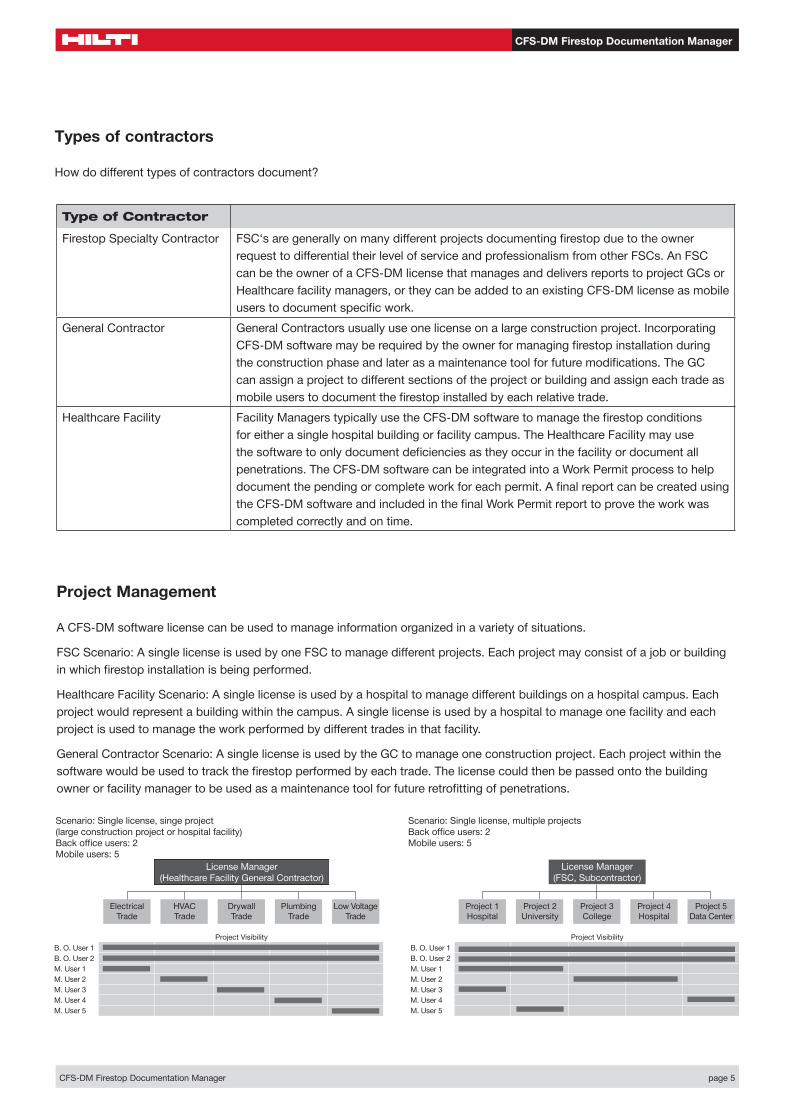
Photos
Photoscanbeusedtorecordthestateofthepenetration.TheCFS-DMsoftwareallowsthemobileusertocaptureupto7photosperpenetration.Thesephotoscanthen be assigned as pre-installation, which is commonly used to include in facility surveyofoutstandingwork,orasapost-installationtoprovethefirestopwasinstalledonlocation.
2D Plan
Locatingthepenetrationona2DPlanallowstheusertoknowexactlywherethepenetrationislocatedinthebuilding.Thisoptioncanbeperformedindependentlyforeachpenetrationbyselectingthe“marker”icon.Themarkerbubblecanbecreated,movedordeletedforaccommodatingadjacentbubbles.
Thebubbleisautomaticallynumbereduponsynchronizationwiththecloud.
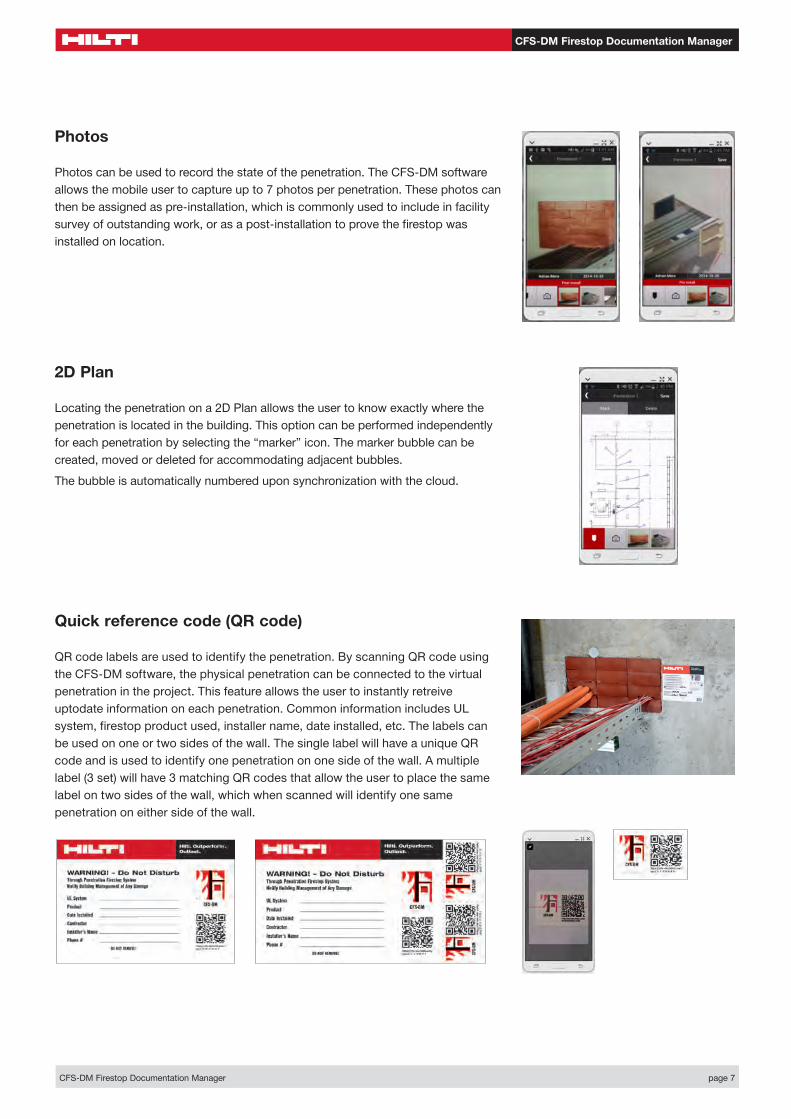
Quick reference code (QR code)
QRcodelabelsareusedtoidentifythepenetration.ByscanningQRcodeusingtheCFS-DMsoftware,thephysicalpenetrationcanbeconnectedtothevirtualpenetrationintheproject.Thisfeatureallowstheusertoinstantlyretreiveuptodateinformationoneachpenetration.CommoninformationincludesULsystem,firestopproductused,installername,dateinstalled,etc.Thelabelscanbeusedononeortwosidesofthewall.ThesinglelabelwillhaveauniqueQRcodeandisusedtoidentifyonepenetrationononesideofthewall.Amultiplelabel(3set)willhave3matchingQRcodesthatallowtheusertoplacethesamelabel on two sides of the wall, which when scanned will identify one same penetrationoneithersideofthewall.

CFS-DM Firestop Documentation Manager
CFS-DM Firestop Documentation Manager page 8
Label
Project layout (Hierarchy)
AsyoubuildyourprojectsastheBackOfficeuser,theCFS-DMsoftwarewillaskyoutodeterminetheprojecthierarchy.Theuserhastheoptionoflayingouttheprojectintoandupto3levels.Forexamplethebuildingmaybelaidoutinabuilding,floor,roomorientation.TheBackOfficeusermustunderstandthelayoutofaprojectandchoosethebesthierarchyfortheirproject.Knowinghowthefinalreportswillbecreatedcanhelpdeterminetheprojecthierarchy.Forexample,willthereportsbedividedbybuilding,wing,floor,firezone,etc.Hereisalistoftypicallevelsintowhichprojectsaredivided.(RemembertheCFS-DMsoftwareoffersupto4levels)
Label Description Matching QR codes
Sample Single side of wall
Double side of wall (underside of ceiling grid)
Identificationsticker QR set Largeadhesive
label set3 No Yes
Identificationsticker QR small
Single small adhesivelabel
1 Yes No
Identificationplate QR Single large hard
plastic1 Yes (hanging) No
Hierarchy Level Example 1 (Typical) Example 2 Example 3
Level1(Project) Building Wing Floor
Level2 Floor Floor Room
Level3 Room Firezone or Wing Wall direction (N, E, S, W)
Level4 Empty Room Empty
NOTE:Levelnamescannotbechangedonceprojectiscreated.
Level 1 Project
BuildingBuilding Building
FloorFloor Floor
RoomRoom Room
PenetrationPenetration Penetration
Level 2
Level 3
Level 4
CFS-DM Firestop Documentation Manager
CFS-DM Firestop Documentation Manager page 9
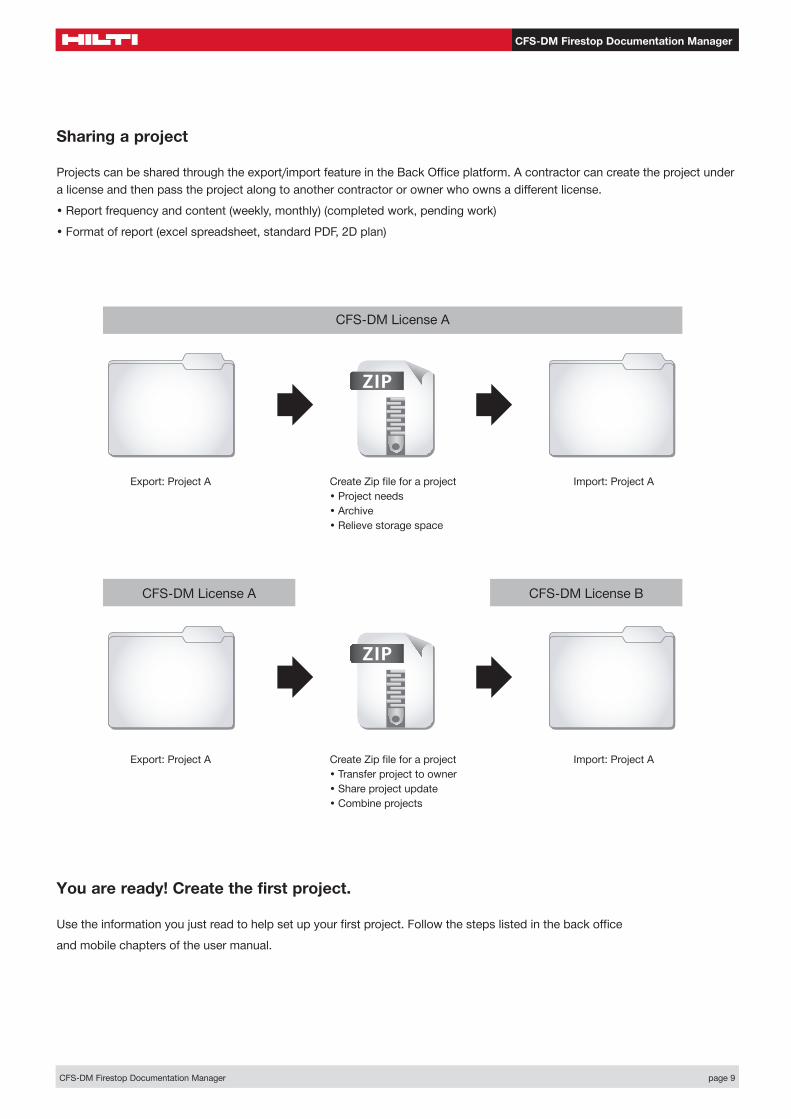
Sharing a project
Projectscanbesharedthroughtheexport/importfeatureintheBackOfficeplatform.Acontractorcancreatetheprojectunderalicenseandthenpasstheprojectalongtoanothercontractororownerwhoownsadifferentlicense.
•Reportfrequencyandcontent(weekly,monthly)(completedwork,pendingwork)
•Formatofreport(excelspreadsheet,standardPDF,2Dplan)
You are ready! Create the first project.
Usetheinformationyoujustreadtohelpsetupyourfirstproject.Followthestepslistedinthebackoffice
andmobilechaptersoftheusermanual.
CFS-DM License A
CFS-DM License A CFS-DM License B
Export:ProjectA
Export:ProjectA
Import:ProjectA
Import:ProjectA
CreateZipfileforaproject• Project needs•Archive•Relievestoragespace
CreateZipfileforaproject• Transfer project to owner• Share project update• Combine projects

CFS-DM Firestop Documentation Manager
CFS-DM Firestop Documentation Manager page 10
DESKTOP APPLICATIONchapter 2

CFS-DM Firestop Documentation Manager
CFS-DM Firestop Documentation Manager page 11
Welcome email and desktop application
Your account and login information
AfteryouhaveorderedtheHiltiCFS-DMFirestopDocumentationManagersoftware,youwillreceiveane-mailthatyouraccountwassuccessfullycreated,alongwithinformationonhowtoaccessyouraccount.
2. Account confirmation: youre-mailaddressandpassword.WARNING: Please do not forward your passwordtonon-authorizedpersons.
3. Your LOGIN information:First link: login with this link from your PC InternetbrowsertoaccessthesoftwareSecond link: to downloadthe app for mobile use, click on the appropriatelink.Therearetwodifferentlinks – one for Apple®devicesandoneforAndroid™devices.
1. Initial e-mail information: usercreatedsuccessfully.

CFS-DM Firestop Documentation Manager
CFS-DM Firestop Documentation Manager page 12
Login to your desktop application
Tostartyouronlinedesktopapplication,entertherespectiveURLlinkintoyournavigationbar.
1. Copy or write the desktop application link fromyoure-mailontoyournavigationbar.
2. Enter your registered e-mail address and your password from your e-mail into the respectivefields.
3.Click“Login.”
Ifyouforgotyourpassword,click on the link and you will be instructed to register for a newpassword.
Congratulations:welcometotheHiltiFirestopDocumentationManager.

CFS-DM Firestop Documentation Manager
CFS-DM Firestop Documentation Manager page 13
Project icon: Overviewofyourprojects and create a new project.
Your number of capturedprojects.
Click on to add a new project or building.
Hereyoumayedityour project attributes or delete aproject.
Deleteaproject.Status of project must be set as inactivebeforeitispossible to delete it (Attributes,Status).
Overviewofallyourprojects/buildings.
User icon:Overviewandcreationof your authorized desktop and mobile users.
My Company icon:Your company data, logo, and license information.
Your current license and howmanypenetrations/datavolumeyouhave actuallyused. Your name and
photo, which you may upload optionallyviausersettings.
Click on arrow to change your user settings
Thisfieldshowsandoffersallactivitieswhen clicking on a specificproject:
• Project attributes• Documents• Mobile user for this
project• Penetrations• Reports
The basic desktop screen “Projects”
Thebasicdesktopscreenofferssomekeyfunctionalities.

CFS-DM Firestop Documentation Manager
CFS-DM Firestop Documentation Manager page 14
User settings
First,defineyourusersettings.
1.Placeyourmouseonthisfieldandclickonthelittlearrow,thenclick“Settings.”
2.Uploadyourpersonalpicture.Touploadclick“Browse...”andselectapicturefromyourpersonalfilesand“Upload.”
3.Selectlanguagefromavailableparameters.
4.Resetpassword.

CFS-DM Firestop Documentation Manager
CFS-DM Firestop Documentation Manager page 15
Define your company and upload documents
Under“MyCompany,”youmayprovideinformationforyourcompanyprofile.Thisisimportant,asthisinformationwillalsobeshownonyourreports.Youmayuploadapprovaldocumentsandlistingsaswell.
Export of Report:
Thedataenteredin“MyCompany”willbeincludedinthefrontpageofthereport.
1.Clickthe“CompanyDetails”icon.
2. Upload your company logo from your personalfilesifdesired.Browseyourfiles,clickonyourlogoandupload.
3. Enter all your company data in the respectivefields.
Onlyfieldsmarkedinredarerequired.Otherdataisnotmandatory.Youcanalwaysgobacklaterandchangethedata.
Enter your personalized report title, which willappearonthecoverpageofyourreport.
4.Saveyourinput.
Report title
Project name
Company details
CFS-DM Firestop Documentation Manager
CFS-DM Firestop Documentation Manager page 16
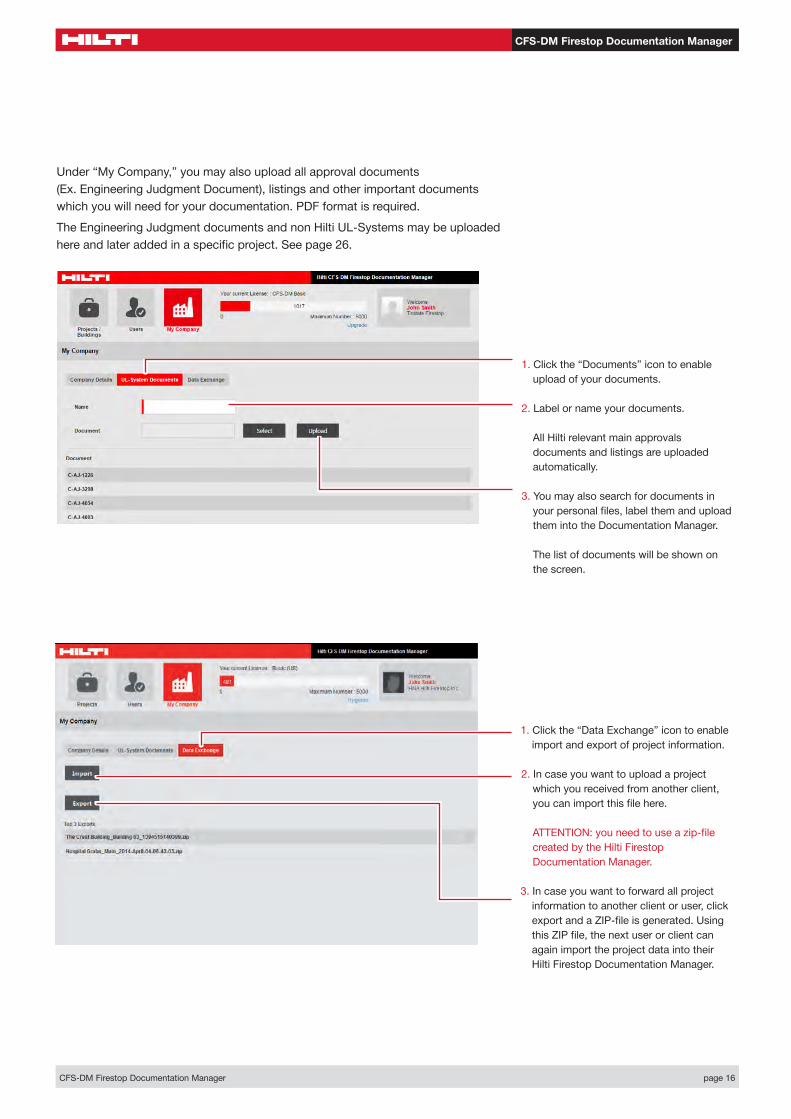
1. Click the “Documents” icon to enable uploadofyourdocuments.
1.Clickthe“DataExchange”icontoenableimportandexportofprojectinformation.
2.Labelornameyourdocuments.
AllHiltirelevantmainapprovalsdocuments and listings are uploaded automatically.
3.Incaseyouwanttoforwardallprojectinformation to another client or user, click exportandaZIP-fileisgenerated.UsingthisZIPfile,thenextuserorclientcanagain import the project data into their HiltiFirestopDocumentationManager.
3. You may also search for documents in yourpersonalfiles,labelthemanduploadthemintotheDocumentationManager.
The list of documents will be shown on thescreen.
2.Incaseyouwanttouploadaprojectwhichyoureceivedfromanotherclient,youcanimportthisfilehere.
ATTENTION:youneedtouseazip-filecreatedbytheHiltiFirestopDocumentationManager.
Under“MyCompany,”youmayalsouploadallapprovaldocuments (Ex.EngineeringJudgmentDocument),listingsandotherimportantdocumentswhichyouwillneedforyourdocumentation.PDFformatisrequired.
TheEngineeringJudgmentdocumentsandnonHiltiUL-Systemsmaybeuploadedhereandlateraddedinaspecificproject.Seepage26.

CFS-DM Firestop Documentation Manager
CFS-DM Firestop Documentation Manager page 17
Sharing a project:
Projectscanbesharedthroughthe“export/import”featurein“MyCompany”.
CFS-DM License A
CFS-DM License A CFS-DM License B
Export:ProjectA
Export:ProjectA
Import:ProjectA
Import:ProjectA
CreateZipfileforaproject• Project needs•Archive•Relievestoragespace
CreateZipfileforaproject• Transfer project to owner• Share project update• Combine projects

CFS-DM Firestop Documentation Manager
CFS-DM Firestop Documentation Manager page 18
Define the users
By clicking on the mobile user icon,youwillseeanoverviewofallyourdefinedmobileusers.
By clicking on the desktop user (BO) icon,youwillseeanoverviewofallyourdefineddesktop(BO)users.
Once authorized, you can manage all desktop and mobile users under the“Users”tab.
Delete
Edit user
1. Click the “Add a new User” icon to reachthisscreen.
2. Select type of user, include name, e-mail and password of the users you want to create.Allinformationisrequired. HINT:Defaulttomobileuser.
3.Click“AddanewUser.”Aconfirmationemail with login information is then sent to thenewlycreateduser.
CreateuserswhowillhavetheauthorizationtousetheDocumentationManagerdesktop(BO)and/ortheirmobiledevices.

CFS-DM Firestop Documentation Manager
CFS-DM Firestop Documentation Manager page 19
Project management:
Scenario: Single license, single project
License Manager(Healthcare Facility General Contractor)
ElectricalTrade
B. O. User 1B. O. User 2M. User 1M. User 2M. User 3M. User 4M. User 5
B. O. User 1B. O. User 2M. User 1M. User 2M. User 3M. User 4M. User 5
HVACTrade
DrywallTrade
Project Visibility Project Visibility
PlumbingTrade
Low VoltageTrade
License Manager(FSC, Subcontractor)
Project 1Hospital
Project 2University
Project 3College
Project 4Hospital
Project 5Data Center
Scenario: Single license, multiple projects
CFS-DM Firestop Documentation Manager
CFS-DM Firestop Documentation Manager page 20
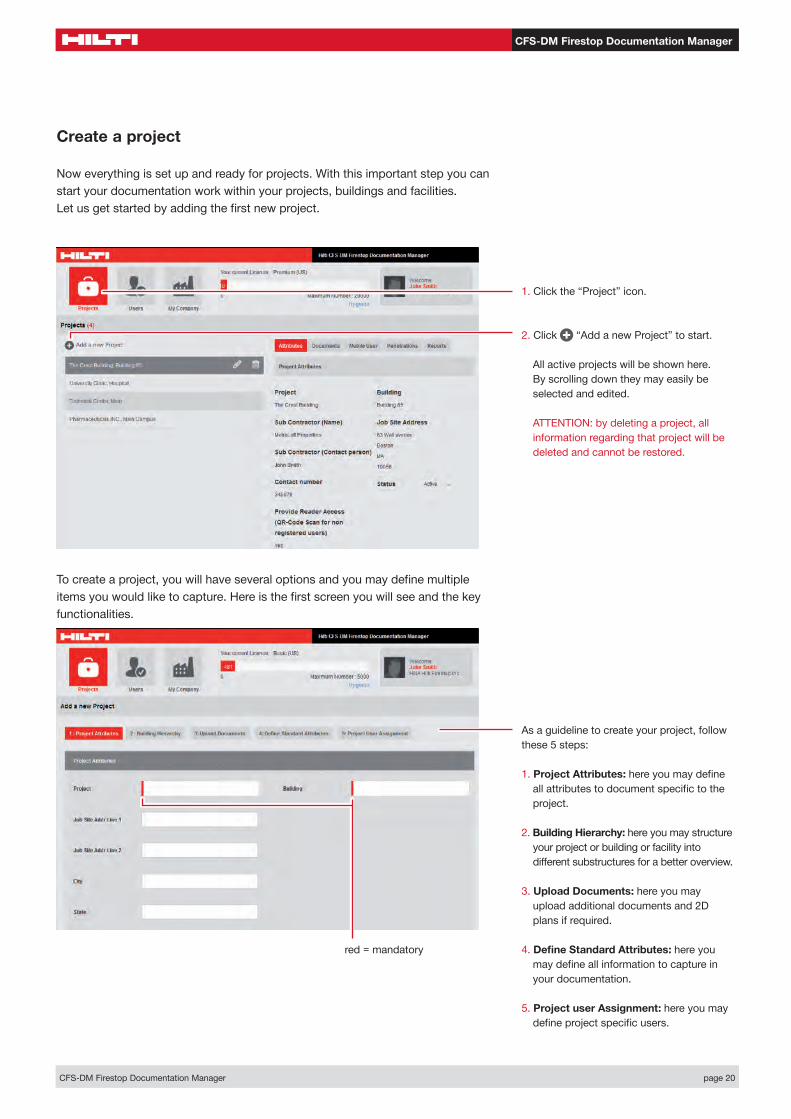
red = mandatory
1.Clickthe“Project”icon.
2. Click “AddanewProject”tostart.
Allactiveprojectswillbeshownhere.By scrolling down they may easily be selectedandedited.
ATTENTION: by deleting a project, all information regarding that project will be deletedandcannotberestored.
Create a project
Noweverythingissetupandreadyforprojects.Withthisimportantstepyoucanstartyourdocumentationworkwithinyourprojects,buildingsandfacilities. Letusgetstartedbyaddingthefirstnewproject.
Tocreateaproject,youwillhaveseveraloptionsandyoumaydefinemultipleitemsyouwouldliketocapture.Hereisthefirstscreenyouwillseeandthekeyfunctionalities.
As a guideline to create your project, follow these 5 steps:
1. Project Attributes:hereyoumaydefineallattributestodocumentspecifictotheproject.
2. Building Hierarchy: here you may structure your project or building or facility into differentsubstructuresforabetteroverview.
3. Upload Documents: here you may upload additional documents and 2D plansifrequired.
4. Define Standard Attributes: here you maydefineallinformationtocaptureinyourdocumentation.
5. Project user Assignment: here you may defineprojectspecificusers.
CFS-DM Firestop Documentation Manager
CFS-DM Firestop Documentation Manager page 21
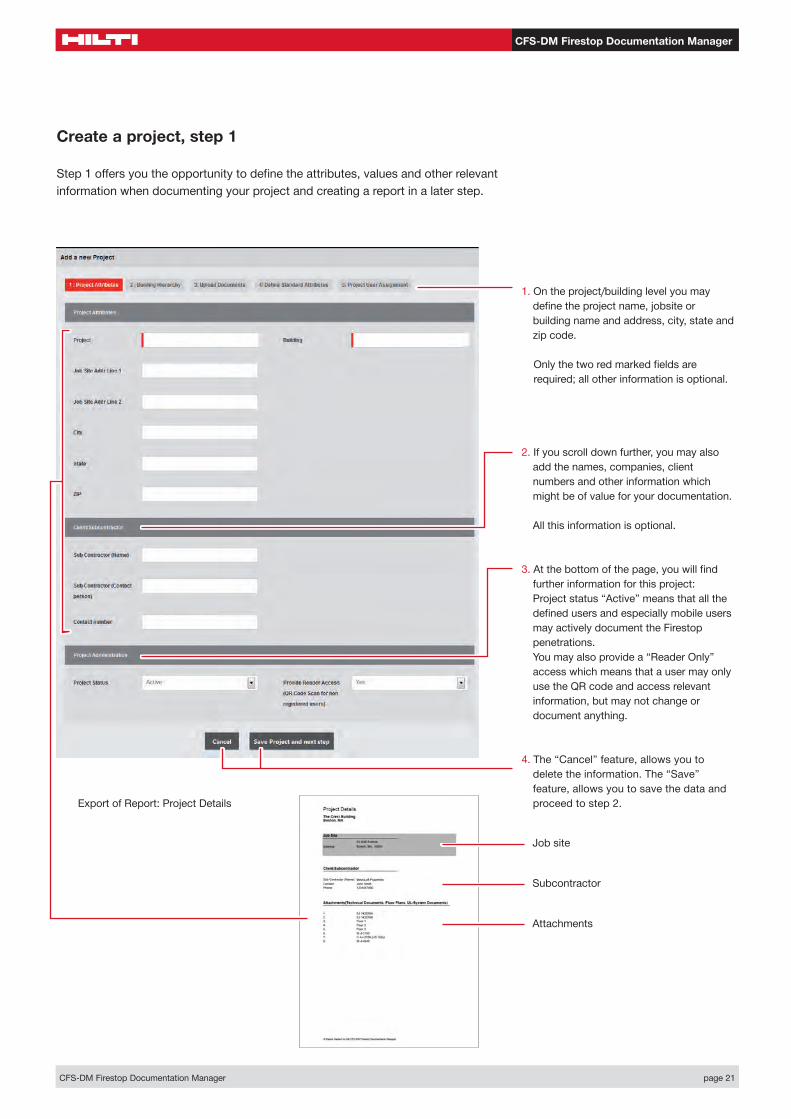
1.Ontheproject/buildinglevelyoumaydefinetheprojectname,jobsiteorbuilding name and address, city, state and zipcode.
2.Ifyouscrolldownfurther,youmayalsoadd the names, companies, client numbers and other information which mightbeofvalueforyourdocumentation.
Allthisinformationisoptional.
3.Atthebottomofthepage,youwillfindfurther information for this project:Projectstatus“Active”meansthatallthedefinedusersandespeciallymobileusersmayactivelydocumenttheFirestoppenetrations.Youmayalsoprovidea“ReaderOnly”access which means that a user may only usetheQRcodeandaccessrelevantinformation, but may not change or documentanything.
4. The “Cancel” feature, allows you to deletetheinformation.The“Save”feature,allowsyoutosavethedataandproceedtostep2.
Onlythetworedmarkedfieldsarerequired;allotherinformationisoptional.
Create a project, step 1
Step1offersyoutheopportunitytodefinetheattributes,valuesandotherrelevantinformationwhendocumentingyourprojectandcreatingareportinalaterstep.
ExportofReport:ProjectDetails
Job site
Subcontractor
Attachments

CFS-DM Firestop Documentation Manager
CFS-DM Firestop Documentation Manager page 22
1.Level1waspreviouslydefinedbynamingyourprojectorbuildinginStep1.
2.Enterthelevelyouwanttoaddforyourprojectorbuilding.
Thislevelingisoptional.Youmayalsoincludeonly1or2additionallevels.
Tosupportyou,herearetwoexampleswhich you may take for your own structure.
3.Ifyouhavedonestep2,click“Next” andgotostep3.
ATTENTION:onlyinsertthenamesofeachlevel.Donotinputthevaluesforeachlevelsuchas1,2,3,4forfloornumbers or 101, 102, 103, 104 for roomnumbers.
ATTENTION:Canonlychangehierarchytitleonthisstep.Itisnotpossibletochangeanythinglater.
Step2iscalled“BuildingHierarchy.”
Create a project, step 2
Step2offersyoutheopportunitytostructureyourproject,buildingorfacility.Youwillhavedifferentoptionsandyoumayincludeintotal4additionalsubstructuresor,asitiscalledhere,“Levels.”
Project Layout (Hierarchy):
Level 1 Project
BuildingBuilding Building
FloorFloor Floor
RoomRoom Room
PenetrationPenetration Penetration
Level 2
Level 3
Level 4
CFS-DM Firestop Documentation Manager
CFS-DM Firestop Documentation Manager page 23
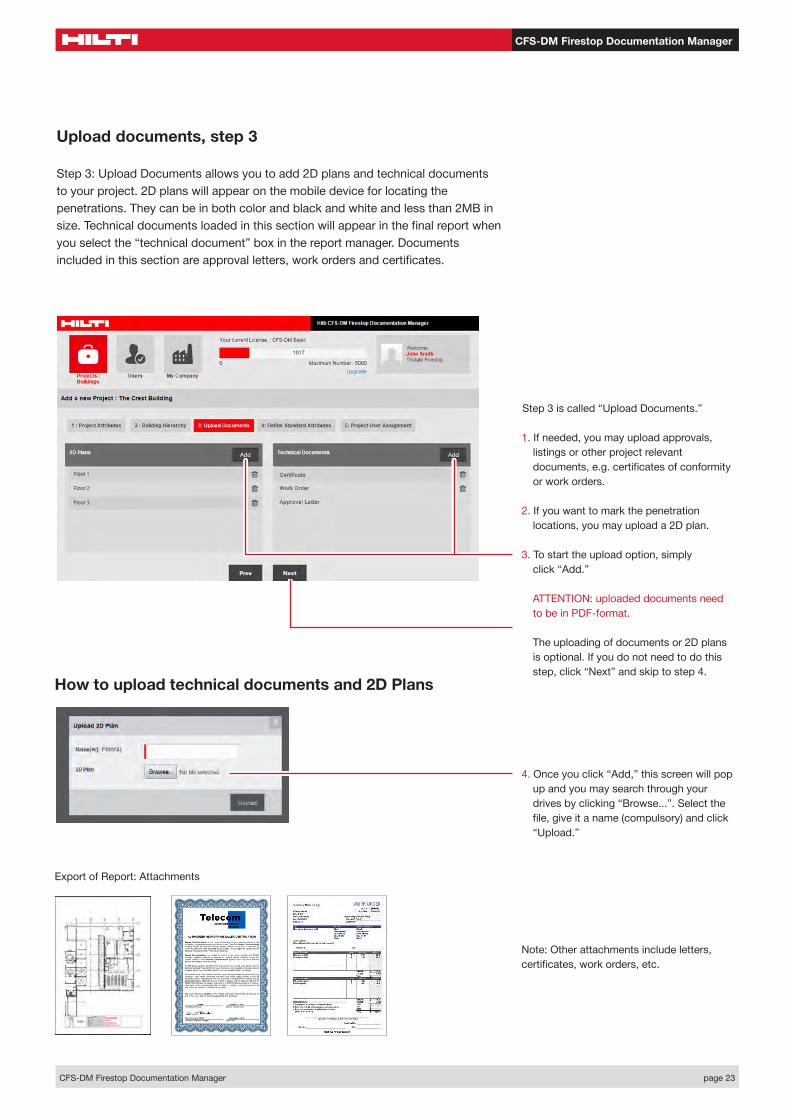
1.Ifneeded,youmayuploadapprovals,listingsorotherprojectrelevantdocuments,e.g.certificatesofconformityorworkorders.
4. Once you click “Add,” this screen will pop up and you may search through your drivesbyclicking“Browse...”.Selectthefile,giveitaname(compulsory)andclick“Upload.”
2.Ifyouwanttomarkthepenetrationlocations,youmayuploada2Dplan.
3. To start the upload option, simply click“Add.”
ATTENTION: uploaded documents need tobeinPDF-format.
The uploading of documents or 2D plans isoptional.Ifyoudonotneedtodothisstep,click“Next”andskiptostep4.
Step3iscalled“UploadDocuments.”
Upload documents, step 3
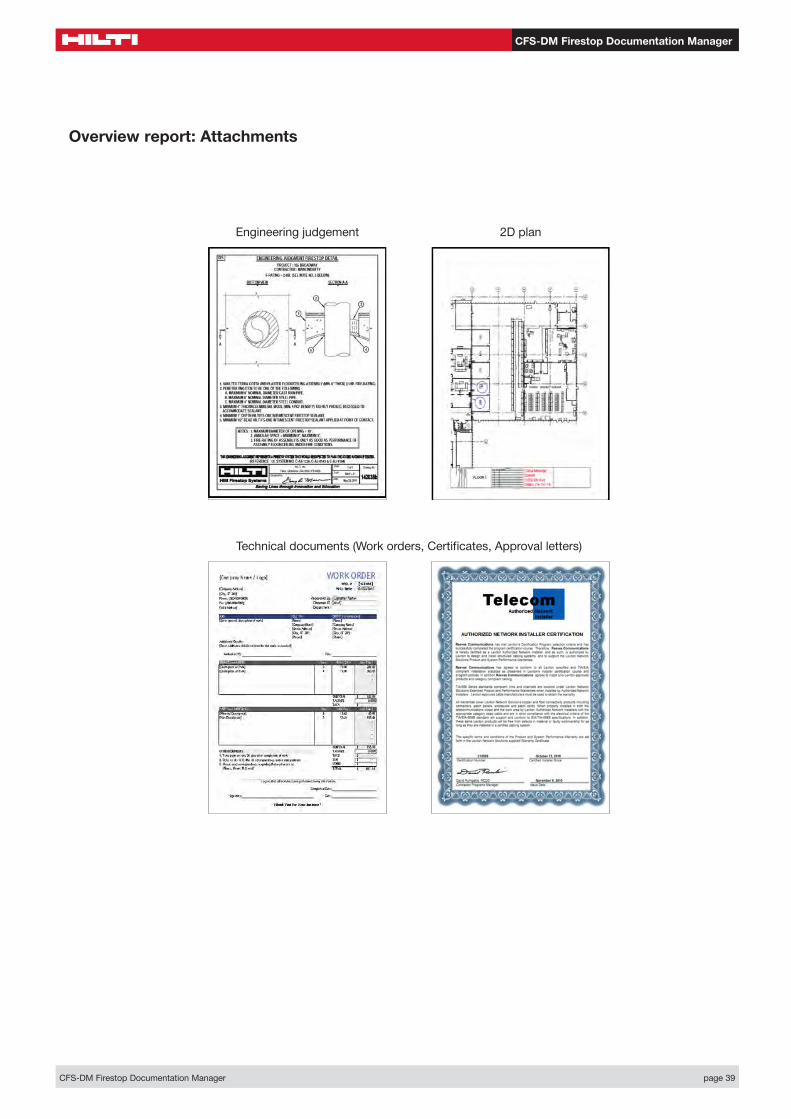
Step 3: Upload Documents allows you to add 2D plans and technical documents toyourproject.2Dplanswillappearonthemobiledeviceforlocatingthepenetrations.Theycanbeinbothcolorandblackandwhiteandlessthan2MBinsize.Technicaldocumentsloadedinthissectionwillappearinthefinalreportwhenyouselectthe“technicaldocument”boxinthereportmanager.Documentsincludedinthissectionareapprovalletters,workordersandcertificates.
How to upload technical documents and 2D Plans
Note: Other attachments include letters, certificates,workorders,etc.
ExportofReport:Attachments
CFS-DM Firestop Documentation Manager
CFS-DM Firestop Documentation Manager page 24
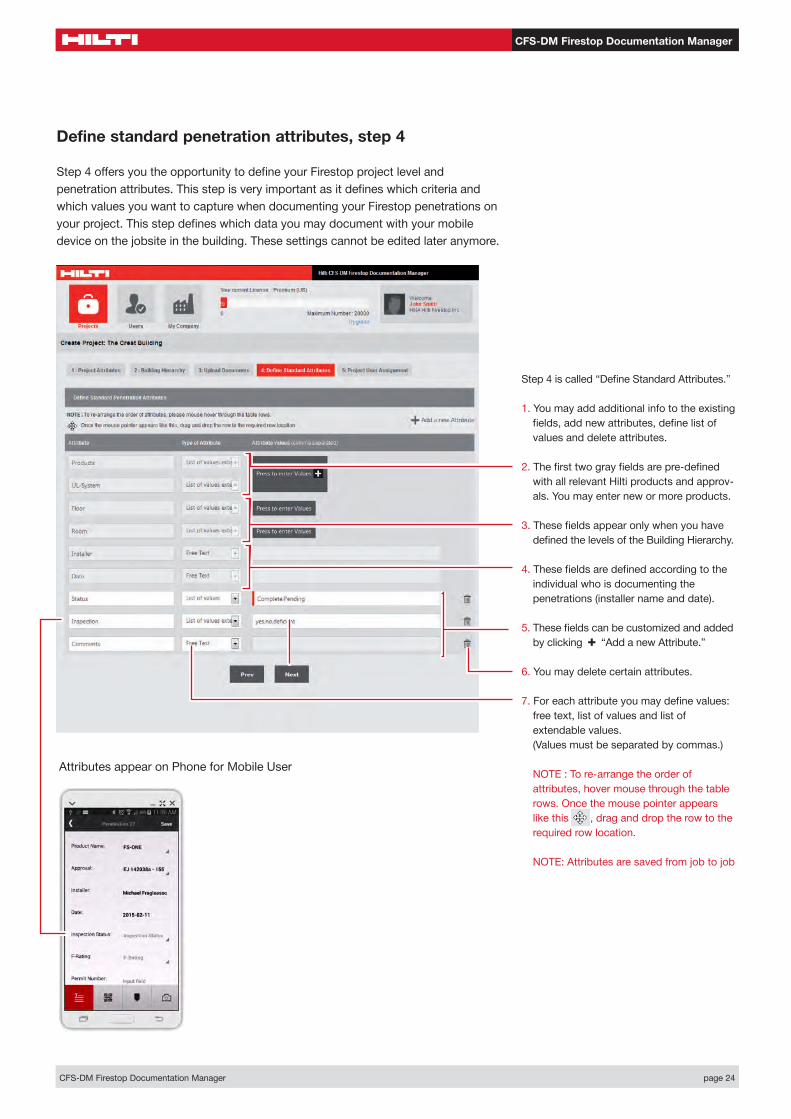
Attributes appear on Phone for Mobile User
1.Youmayaddadditionalinfototheexistingfields,addnewattributes,definelistofvaluesanddeleteattributes.
2.Thefirsttwograyfieldsarepre-definedwithallrelevantHiltiproductsandapprov-als.Youmayenternewormoreproducts.
4.Thesefieldsaredefinedaccordingtotheindividualwhoisdocumentingthepenetrations(installernameanddate).
3. ThesefieldsappearonlywhenyouhavedefinedthelevelsoftheBuildingHierarchy.
5.Thesefieldscanbecustomizedandaddedby clicking “AddanewAttribute.”
6.Youmaydeletecertainattributes.
7.Foreachattributeyoumaydefinevalues:freetext,listofvaluesandlistofextendablevalues. (Valuesmustbeseparatedbycommas.)
NOTE : To re-arrange the order of attributes,hovermousethroughthetablerows.Oncethemousepointerappearslike this , drag and drop the row to the requiredrowlocation.
NOTE:Attributesaresavedfromjobtojob
Step4iscalled“DefineStandardAttributes.”
Define standard penetration attributes, step 4
Step4offersyoutheopportunitytodefineyourFirestopprojectlevelandpenetrationattributes.ThisstepisveryimportantasitdefineswhichcriteriaandwhichvaluesyouwanttocapturewhendocumentingyourFirestoppenetrationsonyourproject.Thisstepdefineswhichdatayoumaydocumentwithyourmobiledeviceonthejobsiteinthebuilding.Thesesettingscannotbeeditedlateranymore.

CFS-DM Firestop Documentation Manager
CFS-DM Firestop Documentation Manager page 25
1. Click toentervalues.
2.Next,youmayaddordeleteaproductbysimplyclickingtherespectiveicon.
Add UL System
3. Click “AddProduct;”anewfieldwillopen.Enterthenametoaddthenewproduct.
4.Addtherespectiveapproval/listingdocumentifrequired.
Foraddedsimplicity,allHiltiFirestopproductsarepreloadedinthesystem.Approvalsandlistingsrelevanttoeachproductarelinkedandincluded.
How to enter a new product.
NOTE: all included additional products will automaticallybesavedandappearagainanewprojectiscreated.Ifyoudonotprefer this option, click “Reset” to reset productandapprovalrangetoreloadtheoriginalHiltiproductportfolio.
Define standard penetration attributes, step 4
Belowisinformationonhowtoenterproductsandapprovals.
Add and delete products

CFS-DM Firestop Documentation Manager
CFS-DM Firestop Documentation Manager page 26
1. To add a UL-System, click +“Add UL-System” and window will open to add approvals.
2.Choosetheapproveddocumenttoadd.
3.Selecttheapprovalandclick“+Add.”
Select a product, on the right side all UL-Systems appear
TodeleteaUL-System,ticktheboxandclickdeleteUL-System.Deletedattributeswillnotbevisibleinthemobilesolution.
NOTE: To add new Engineering Judgment documentsandnon-HiltiUL-Systemsfirstupload the documents under “My Company”.Seepage16.
Add and delete UL-Systems

CFS-DM Firestop Documentation Manager
CFS-DM Firestop Documentation Manager page 27
1.Clickthe“PresstoenterValues”icon.
2.Typeinthefloorandroomnumbersseparatelyoneachline.Confirmeachentrybyclickingenter.
Define building hierarchy, step 4
Belowisinformationonhowtoenteralistoffloorsandrooms.These settings can be edited later again within the project in the section “Penetrations”.EdittheHierarchy(Predefinedunderstep2,BuildingHierarchy)
Thebuildinghierarchydefinedherewilllaterbeshownintheappasthebasicprojectscreen

CFS-DM Firestop Documentation Manager
CFS-DM Firestop Documentation Manager page 28
2.Includetheattributeyouwanttohavedocumented.
Createattributesthatwillhelpfilterprojectinformationlaterwhencreatingreports.
3.Youaregivenachoiceofthreeoptionswhen doing the documentation later on the jobsite:
• Free text: givesyoutheoptiontowriteacomment.
• List of values: youmaydefinedifferentvalues.Alwaysseperatevalueswithacomma(e.g.:1,2,3,4,5).Themobileusermaysimplychoosefromthesedefinedvalues.
• List of values extendable: you may includealistofvalues.Onthejobsite,mobileusersmayaddothervalues.
Additional attributes may be deleted at anytime.
1.Ifyouwouldliketoincludemoreattributes, just click “Add a new attribute,”andanewfieldwillopenautomatically.
Inadditiontoproductsandapprovals/listingsyoumayenter,addandactivateotherpenetrationrelatedattributes.Thisinformationisoptionalandprovidestheopportunity for you to enter more content foryourdocumentation.
Define custom attributes, step 4
InStep4,thefollowinginfodescribeshowtoenterotherpenetrationattributes and all information which should be included during documentation of your penetrations.

CFS-DM Firestop Documentation Manager
CFS-DM Firestop Documentation Manager page 29
1. All your assigned users appear in a list and you may easily select the users you wanttoassigntothisspecificprojectbyclickingontherespectivename.
Nowyouhavefinishedallmajorstepstodefineyourproject.Youcompletedall5basicstepsandtheprojectisnowdefinedandyouarereadytogo.
Once you click “Finish”, you are ready to go! Your project is now displayed as an official project and all your assigned users (mobile and desktop) may start working on the documentation immediately.
Step 5: Project User Assignment
Ifyouneedtoedit,click“Prev”andyouwillgobacktotheprevioussteps.
Define project user assignments, step 5 …and finish the project setup
Step5:“ProjectUserAssignment.”Withthislaststep,youmaydefineanddelegateauthorizedmobilesoftwareuserstothecurrentproject.
Itisonlypossibletoassignusertoprojectswhichhavebeendefinedasmobileusersunder“Users”.Seepage10.

CFS-DM Firestop Documentation Manager
CFS-DM Firestop Documentation Manager page 30
Starting screen and Logout
Onceyouhavefinishedyourproject/buildingsetup,youautomaticallyreturntothestartscreen.
You may edit, add, change or workonthecontent.Onceobsolete,deletetheproject.
ATTENTION: once deleted, the project information cannotberetrieved!
To log out, go to the upperrightfield,clickon the little arrow and click“Logout.”
Your newly created project is now shown inyourprojectlist.

CFS-DM Firestop Documentation Manager
CFS-DM Firestop Documentation Manager page 31
Edit project and penetration information
NowyoumayworkanddocumentyourFirestoppenetrations.As soon as your mobile users document penetrations locally with their smartphone or tablet, you are immediately able to see their work online once the captured information,picturesorotherdataissynchronized.
Attributes
Should you need to create a new project, just click “Add a New Project” and startthefivebasicstepsagain(seepreviouspages“CreateaProject”ofthisinstructionbooklet).
The starting screen shows and offers all activitieswhenclickingonaspecificproject.Hereyouhave5possibleactivitiesincludingthecreationofyourprojectreport.
• Project attributes• Documents• Mobile user for this project• Penetrations• Reports

CFS-DM Firestop Documentation Manager
CFS-DM Firestop Documentation Manager page 32
This option controls the accessability of the penetration information using the QR code.Selecting“Yes”allowsthepenetration information to be read by anyoneusingagenericQRcodescanner.Select “No” and the information is only accessibletoindividualsassignedtotheprojectusingtheCFS-DMapp.
Ifyouneedtofreezeallmobileactivitiesofthis project, just set the status on “inactive”.Ifyouwanttodeleteacertainproject,theprojectstatushastobeseton“inactive.”
Add hierarchy levelAllows Mobile Users to add hierarchy levelsontheirdevices(i.e.addingadditionalfloororroomsintheproject).Select“Yes”toallowand“No”todeny.
Add token textGenerate a token to allow non-registered usersaccesstopenetrationinformation.They must enter the token when they scan a CFS-DM QR Code label with a generic QR Code reader app on their mobile device.
1. Click on the icon “Attribute” and you are able to see all Attribute pertinent information.
2.Clickonthe“Edit”iconandyouhavethepossibility to edit the information in the respectivefields.
3.Click“Save”tosaveallchangesor“Cancel” in case you do not want to changeyourinput.

CFS-DM Firestop Documentation Manager
CFS-DM Firestop Documentation Manager page 33
1. Click on the icon “Documents” and you areabletoseeallrelevantinformation.
1. Click on the icon “Mobile User” and you may add a new mobile user or delete a mobileuser.
2.Onceyouseetheoverview,youmayaddordelete2Dplansperdefinedfloorleveland you may add or delete technical documents,approvalsorlistings.
2. When you want to add a new mobile user, click on “Add.”
3. When you want to add a new 2D plan or technical document, a new window opens and you may upload the 2D plan or document.EnterthenameanduploadthefilePDFbyclickingon“Upload.”
3.Addanewmobileuserandclick“Add.”
Documents
Mobile user

CFS-DM Firestop Documentation Manager
CFS-DM Firestop Documentation Manager page 34
2.HereyouseeallthecapturedFirestoppenetration details for your selected hierarchylevel.Now you may edit or delete the penetrations.
3.Byclickingontherespectivepenetration,youmayviewallinformationforthatpenetration:
• Attributes• Pictures
1. Click on each room to see the penetrationswithinthatroom.
NOTE:tosearchforaspecificpenetration(number or name) you may use the search field.
Penetrations

CFS-DM Firestop Documentation Manager
CFS-DM Firestop Documentation Manager page 35
6. To upload a picture, a new window opens and you may upload a picture from your personalfiles.
4. Click on “Edit” and you are able to edit, change or add attributes as a desktop user.
Saveyourchangesbyclickingonthe“Save”icon.
5. You may add a new picture or delete an existingpicture.
CFS-DM Firestop Documentation Manager
CFS-DM Firestop Documentation Manager page 36
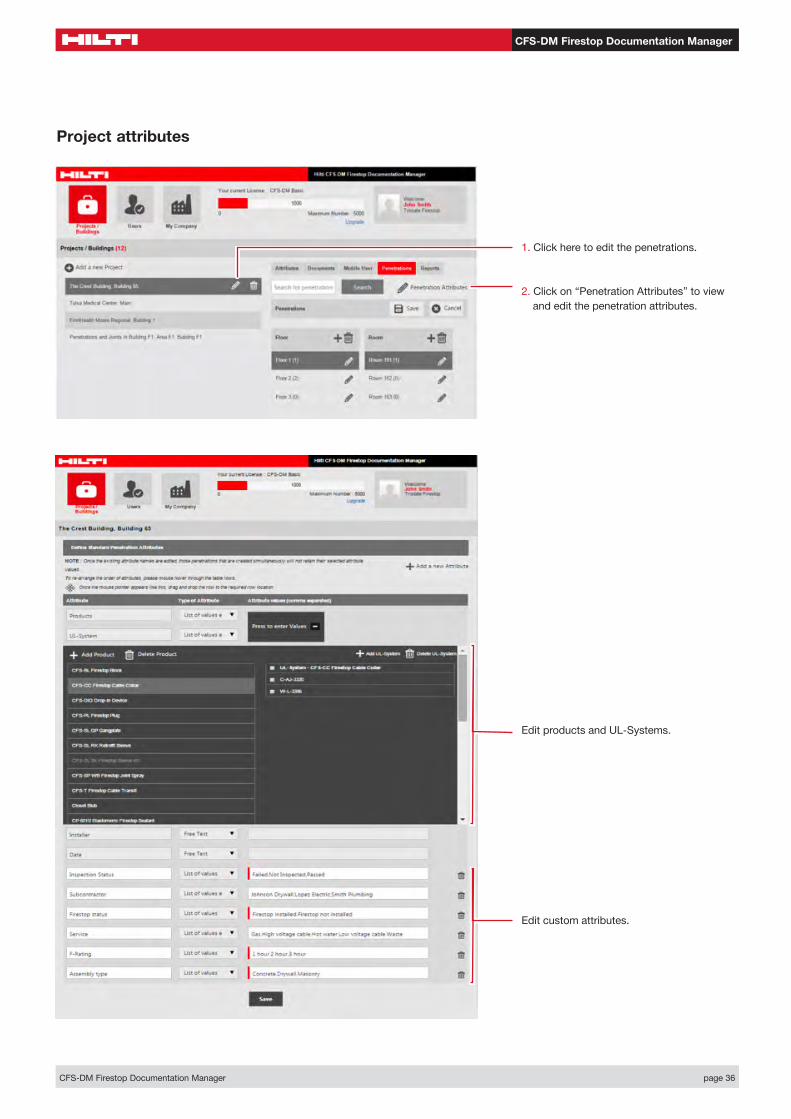
1.Clickheretoeditthepenetrations.
2.Clickon“PenetrationAttributes”toviewandeditthepenetrationattributes.
EditproductsandUL-Systems.
Editcustomattributes.
Project attributes

CFS-DM Firestop Documentation Manager
CFS-DM Firestop Documentation Manager page 37
Tocreateareport,youhavemultiplepossibilities.
1.Clickon“Reports.”
1. To create a new report, the following screenopens.
Youwillseealistofallyourdefinedattributesforyourprojectorbuilding.
2. You may decide the type of report:• Standardreport:coverpagesandone
page per penetration and attachments (pdf).
• Listreport:alistofattributesinexcelformat.
• 2Dfloorplan:printoutyouruploaded2Dplan including the markers made by the mobileusers.
3. Decide which content (attributes) you wanttoincludeinyourreport.Ifyouwanttodisplayaspecialvalueonlyinyourreport,setthefilteraccordingly.
4.Inthestandardreport,youhavethechoicetodefinetheformatandwhethertoinclude technical documents (letter, certificates,workorders)andthe2Dplansasattachments. Select the tech documents to include approvalsandEJ’sinthereport.
5.Click“GenerateReport.”Anewreportwillbegenerated.Thismaytakeafewminutes.Thegeneratedreportwillbeautomatically stored in the sofware and maybereviewedorprintedanytime.
2.Clickontheicon“CreateanewReport.”
Hereyou’llseealistofallcreatedreports.This enables you to create a history of reports(e.g.foreachyear,semesterorinspectioncycle).Whenyouhoveroverareport,adeletesymbolappears.
ATTENTION: by deleting a report, the report will be completely deleted and may notberestored.
Create a report using filters
NOTE: you may download the report into your personal folders and then delete the reportifneeded.
CFS-DM Firestop Documentation Manager
CFS-DM Firestop Documentation Manager page 38
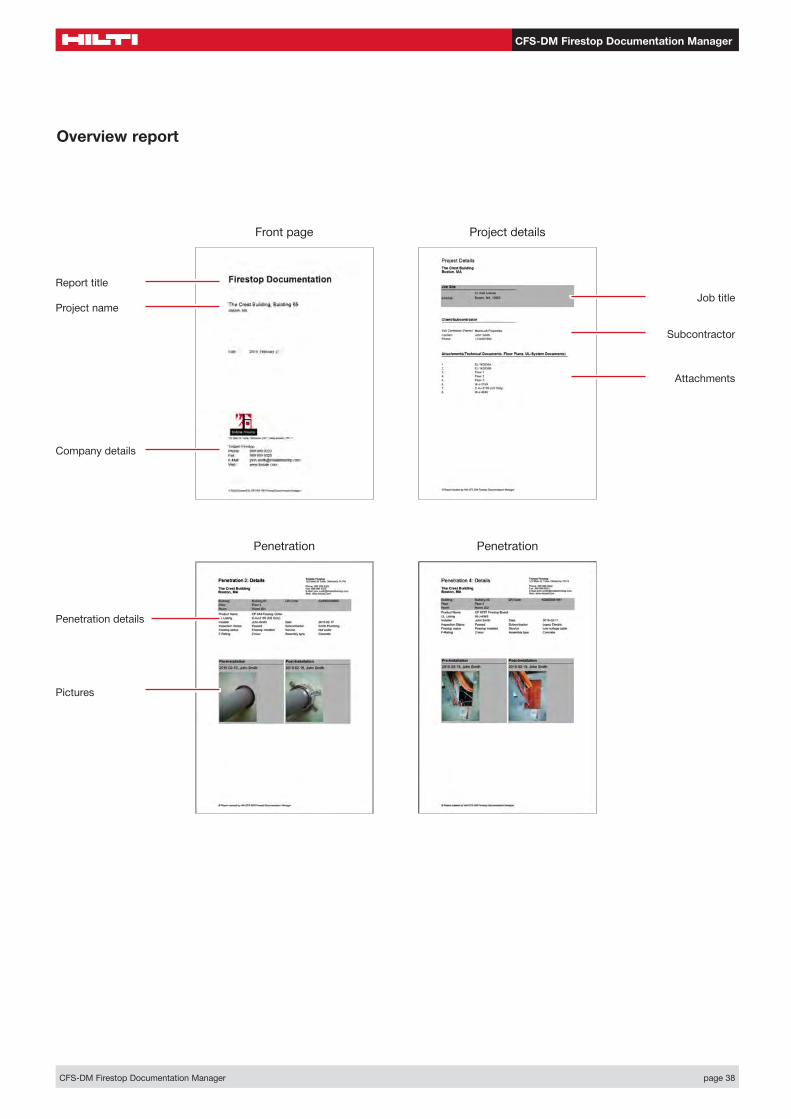
Front page
Penetration Penetration
Project details
Report titleJob title
Project name
Subcontractor
Company details
Attachments
Penetration details
Pictures
Overview report
CFS-DM Firestop Documentation Manager
CFS-DM Firestop Documentation Manager page 39
Engineering judgement
Technicaldocuments(Workorders,Certificates,Approvalletters)
2D plan
Overview report: Attachments

CFS-DM Firestop Documentation Manager
CFS-DM Firestop Documentation Manager page 40
MOBILE APPLICATIONchapter 3

CFS-DM Firestop Documentation Manager
CFS-DM Firestop Documentation Manager page 41
Your mobile application
Mobile application, Welcome email with login
UseyourmobiledevicetoperformdocumentationofFirestopapplicationsonthejobsiteorinabuilding.AfterorderingtheHiltiCFS-DMFirestopDocumentationManagersoftware,youwillreceiveaccessinformationinane-mail.
2. Account confirmation: youre-mailaddressandpassword.WARNING: Please do not forward your passwordtonon-authorizedpersons.
3. Your LOGIN information:First link: login with this link from your PC InternetbrowsertoaccessthesoftwareSecond link: to downloadthe app for mobile use, click on the appropriatelink.Therearetwodifferentlinks – one for Apple®devicesandoneforAndroid™devices.
1. Initial e-mail information: usercreatedsuccessfully.
CFS-DM Firestop Documentation Manager
CFS-DM Firestop Documentation Manager page 42
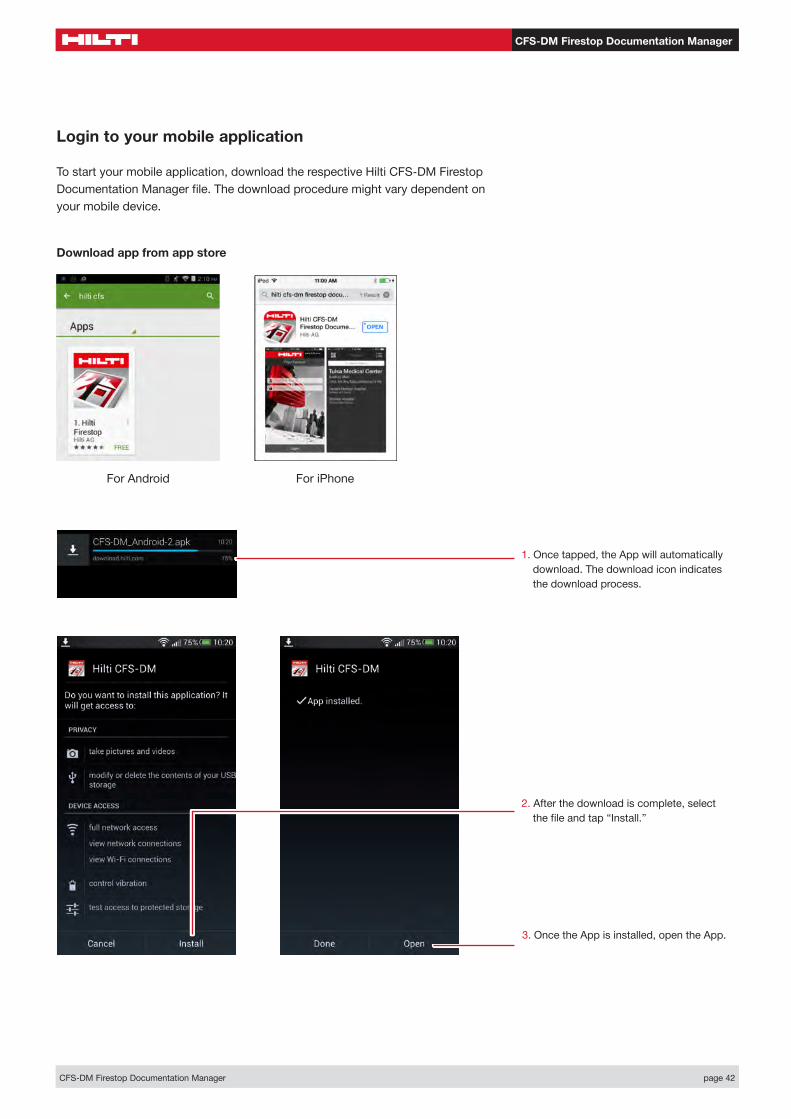
Login to your mobile application
1. Once tapped, the App will automatically download.Thedownloadiconindicatesthedownloadprocess.
2. After the download is complete, select thefileandtap“Install.”
Tostartyourmobileapplication,downloadtherespectiveHiltiCFS-DMFirestopDocumentationManagerfile.Thedownloadproceduremightvarydependentonyourmobiledevice.
Download app from app store
For Android For iPhone
3.OncetheAppisinstalled,opentheApp.

CFS-DM Firestop Documentation Manager
CFS-DM Firestop Documentation Manager page 43
Start the mobile application
5. The App login screen will open with two fieldsblank.Enterthelogincriteria(registered e-mail address and password) fromyourloginemail.TheAppwillstoreyourlogininformation.
6.Tap“Login.”Thesynchronizationprocessmaytakeafewseconds.
Youmaynowstarttheapplication.
4.LocatetheHiltiCFS-DMApponyourmobilephone.Tapontheicontoopentheapplication.

CFS-DM Firestop Documentation Manager
CFS-DM Firestop Documentation Manager page 44
Start the mobile application, user settings
The App will then take you to the Projects Page.Anyprojectsthathavebeenloadedor created by the Desktop User will appear onthisscreen.Youmayselectaprojectandbegindocumentingpenetrations.
1.Tapthesettingsiconofyourmobiledevicetoopenandreviewthesettings.
Theexactlocationofthisiconmightvarydependingonyourmobiledevice.
You may also create a completely new projectviayourmobiledeviceifneeded.
Inthesettingsyoumay:• Defineyourpreferredlanguage• Ifrequired,start3G/4Gconnection• Decide whether you want a picture taken
before or after creating a new penetration• Definethesizeofamarkerinyour2Dplan
(see instructions later)
WelcometotheFirestopDocumentationmanagermobileapplication.YoumaynowstarttodocumentyourFirestoppenetrationswithallavailablefeatures.
AllprojectsarevisibleforBackOfficeUsers.MobileUseronlyseetheprojectstheyareassignedto.
CFS-DM Firestop Documentation Manager
CFS-DM Firestop Documentation Manager page 45
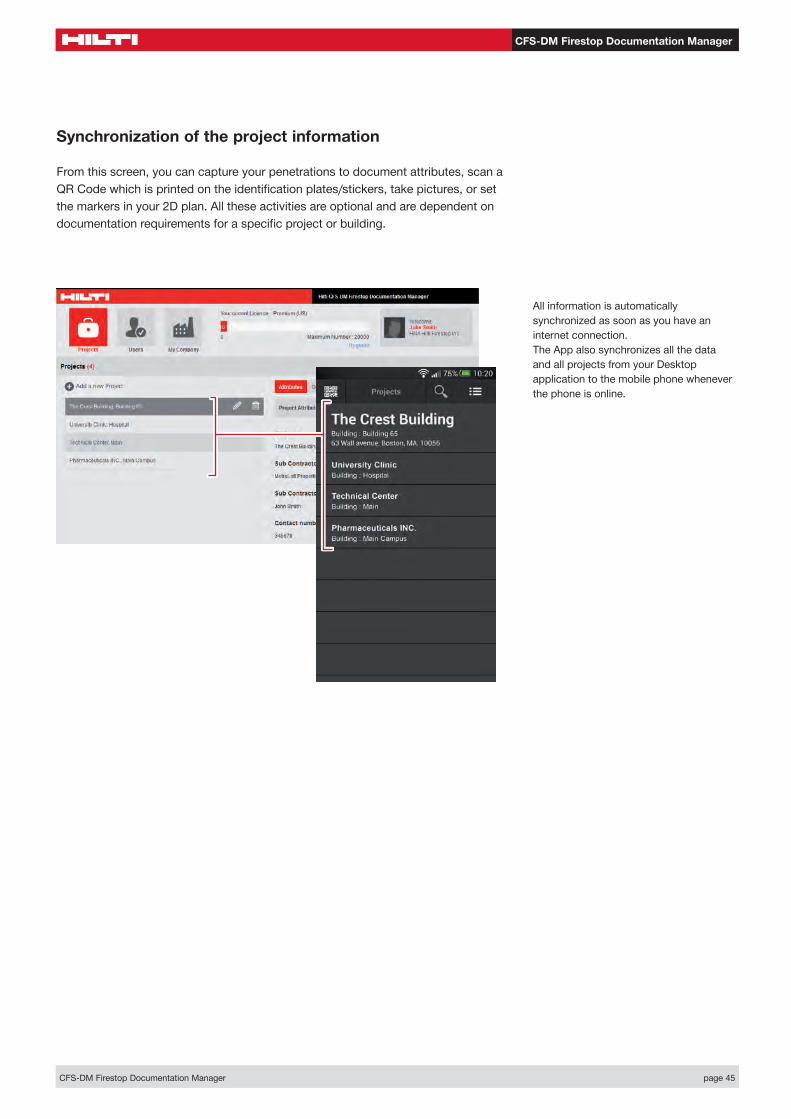
Synchronization of the project information
All information is automatically synchronizedassoonasyouhaveaninternetconnection.The App also synchronizes all the data and all projects from your Desktop applicationtothemobilephonewheneverthephoneisonline.
From this screen, you can capture your penetrations to document attributes, scan a QRCodewhichisprintedontheidentificationplates/stickers,takepictures,orsetthemarkersinyour2Dplan.Alltheseactivitiesareoptionalandaredependentondocumentationrequirementsforaspecificprojectorbuilding.

CFS-DM Firestop Documentation Manager
CFS-DM Firestop Documentation Manager page 46
The basic project screen
1.Selectaproject.
2.Toreachfurtherprojectlevels,justcontinuetotaptherespectivefields
3.Onceyoureachyourpenetrationlevel,you’llfindalistofallcapturedpenetrations.Bytappingonaspecificpenetration,youwillfindalldata,picturesandattributes.
Thebasicfunctionsofyourprojectscreenandhowtonavigateinputfieldstocreateanewpenetration.
Hereyoumaygobackonestep.
Hereyoumaycreateanewpenetration.
Ifyouneedtosearchforaspecificprojectorpenetration(e.g.ifyouhavetoomanylinesonyourmobiledevice),just tap on the “Search” icon and enter a search word to findyourspecificprojectorpenetration.
CFS-DM Firestop Documentation Manager
CFS-DM Firestop Documentation Manager page 47
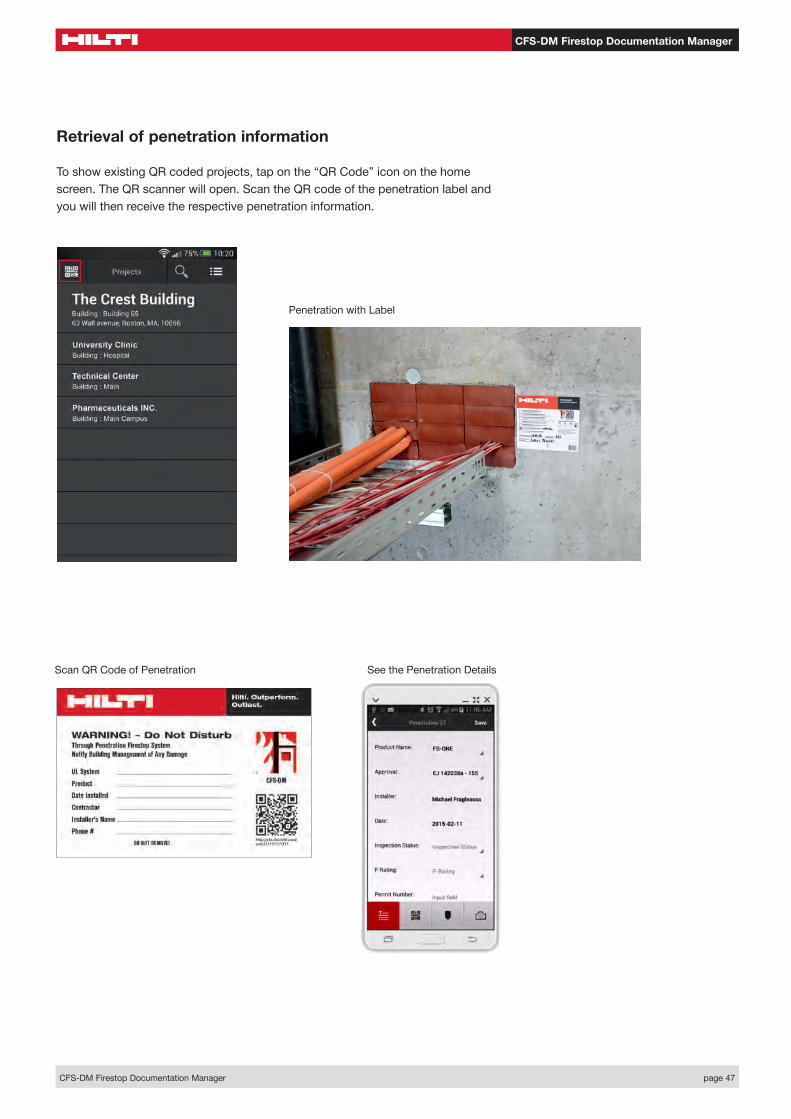
Retrieval of penetration information
ToshowexistingQRcodedprojects,taponthe“QRCode”icononthehomescreen.TheQRscannerwillopen.ScantheQRcodeofthepenetrationlabelandyouwillthenreceivetherespectivepenetrationinformation.
Penetration with Label
Scan QR Code of Penetration See the Penetration Details

CFS-DM Firestop Documentation Manager
CFS-DM Firestop Documentation Manager page 48
The basic penetration screen
There are four basic functionalities:
1. Penetration attributes.Listofallrelevantinformation.
2. Scan QR codeoftheidplatesorstickers.ThisopensyourQRCodescanner. AspecificQRcodeislinkedtothespecificpenetration.
3.Ifa2D plan isavailable(uploadedinyourdesktopapplications)setasimplemarker.
4. Take a picture (photographer‘s name and dateautomaticallystored).
Seeinformationofallrelevantanddefinedpenetrationattributeshere.Scrolldownforfurtherdata.
You may enter, change or adapt new informationintotherespectivefields.Thentap“Save”tocaptureyournewinformation.
Iftherearealreadysavedpicturesforaspecificpenetration,youcanseethembyslidingonthisfield.Taponthepictureandyouwillseethepicturedetails,incl.dateandphotographerinformation.As soon as you take a picture it will also bedisplayedhereforeasyaccess.
Thebasicfunctionsofyourprojectscreenwithallfunctionalities.
Attributes:
NOTE: Up to 7 photos can be recorded for each penetration

CFS-DM Firestop Documentation Manager
CFS-DM Firestop Documentation Manager page 49
Create a new penetration, capture information
1. Tap the icon to create or document a newpenetration.
2.Enteralldatabytappingontherespectivefields.
3.Whentappingonanattribute,anewboxopens dependent on which content was definedinthedesktopapplication.Simplytaponitandentertextasnecessary.
Createand/ordocumentanewpenetrationinjustafewsteps.
Ifyouarefinished(nomorepicturesorQRcodes),thensaveyourinformation.You will return to the penetration list to createthenextpenetrationifrequired.
CFS-DM Firestop Documentation Manager
CFS-DM Firestop Documentation Manager page 50
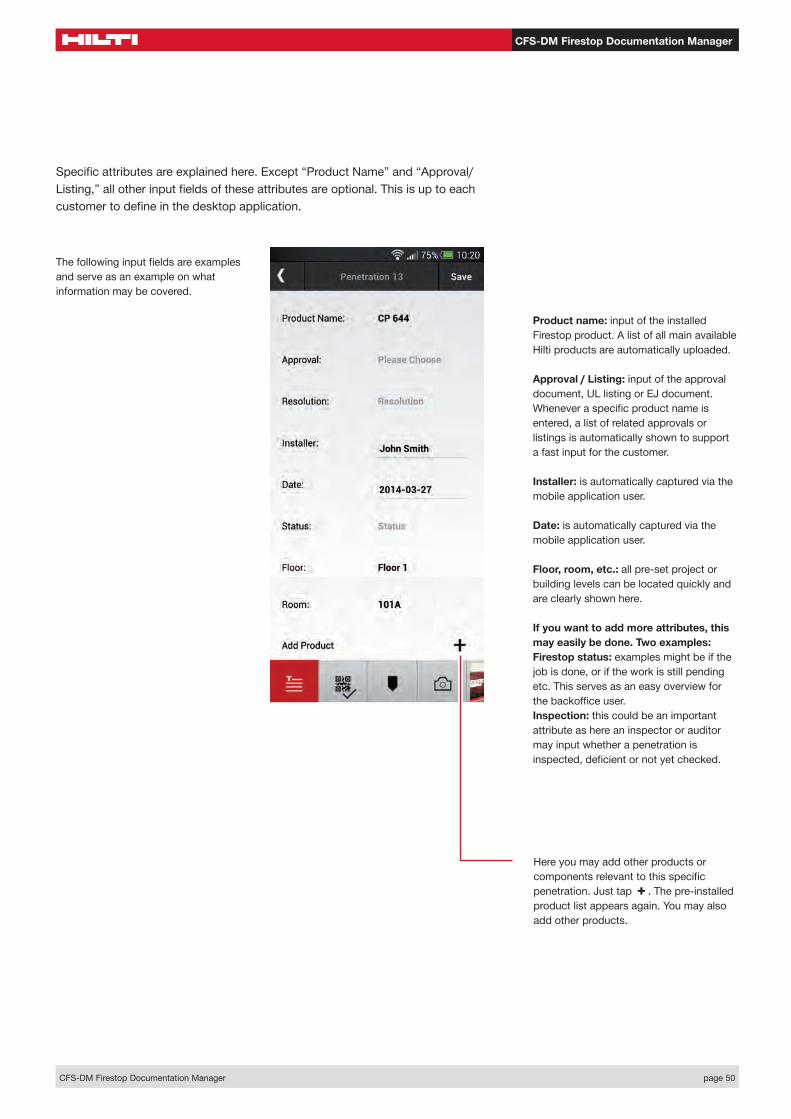
Thefollowinginputfieldsareexamplesandserveasanexampleonwhatinformationmaybecovered.
Hereyoumayaddotherproductsorcomponentsrelevanttothisspecificpenetration.Justtap .Thepre-installedproductlistappearsagain.Youmayalsoaddotherproducts.
Product name: input of the installed Firestopproduct.AlistofallmainavailableHiltiproductsareautomaticallyuploaded.
Approval / Listing:inputoftheapprovaldocument,ULlistingorEJdocument.Wheneveraspecificproductnameisentered,alistofrelatedapprovalsorlistings is automatically shown to support afastinputforthecustomer.
Installer:isautomaticallycapturedviathemobileapplicationuser.
Date:isautomaticallycapturedviathemobileapplicationuser.
Floor, room, etc.: all pre-set project or buildinglevelscanbelocatedquicklyandareclearlyshownhere.
If you want to add more attributes, this may easily be done. Two examples: Firestop status:examplesmightbeifthejob is done, or if the work is still pending etc.Thisservesasaneasyoverviewforthebackofficeuser.Inspection: this could be an important attribute as here an inspector or auditor may input whether a penetration is inspected,deficientornotyetchecked.
Specificattributesareexplainedhere.Except“ProductName”and“Approval/Listing,”allotherinputfieldsoftheseattributesareoptional.Thisisuptoeachcustomertodefineinthedesktopapplication.
CFS-DM Firestop Documentation Manager
CFS-DM Firestop Documentation Manager page 51
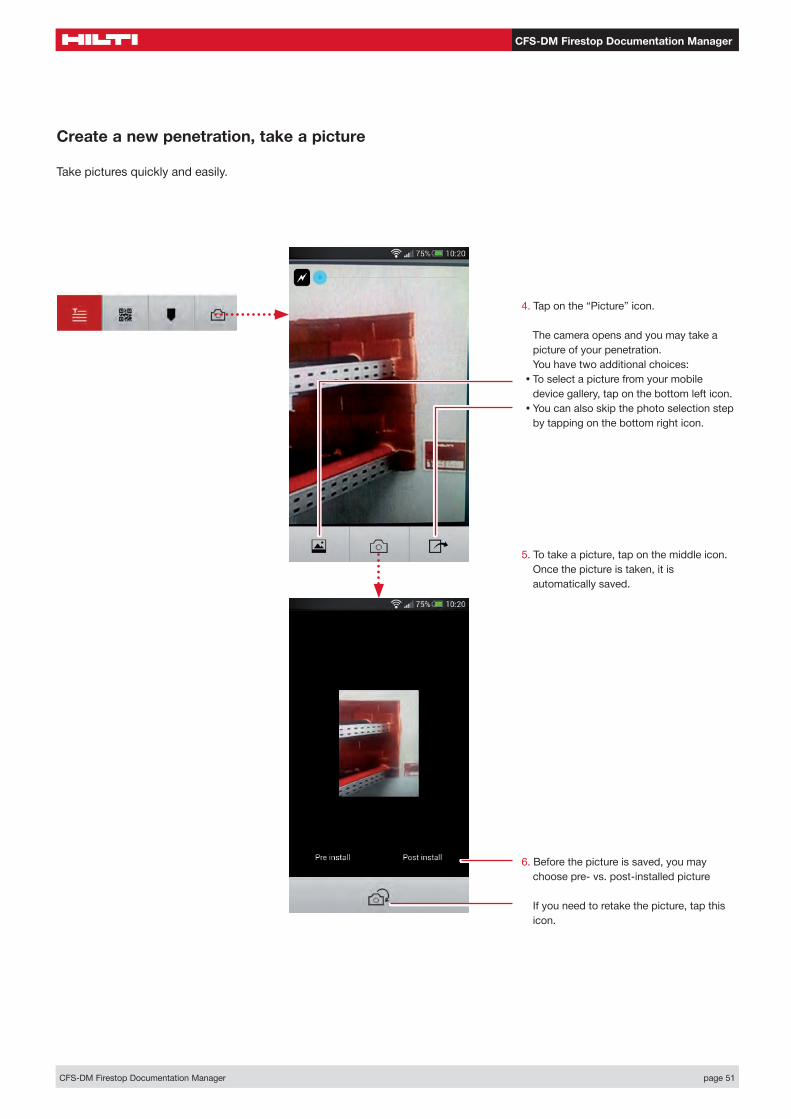
Create a new penetration, take a picture
4.Taponthe“Picture”icon.
The camera opens and you may take a pictureofyourpenetration.Youhavetwoadditionalchoices:
• To select a picture from your mobile devicegallery,taponthebottomlefticon.
• You can also skip the photo selection step bytappingonthebottomrighticon.
5.Totakeapicture,taponthemiddleicon.Once the picture is taken, it is automaticallysaved.
6.Beforethepictureissaved,youmaychoosepre-vs.post-installedpicture
Ifyouneedtoretakethepicture,tapthisicon.
Takepicturesquicklyandeasily.

CFS-DM Firestop Documentation Manager
CFS-DM Firestop Documentation Manager page 52
Create a new penetration, scan QR code
1.Taponthe“QRcode”icon.
2.ScantheQRcode.Themessage“QRcodescansuccessful”willappear.TheuniqueQRcodenumberappearsontheappwhichallowsforeasyverification.
3. Once the message “QR code scan successful” appears, a little tick on the bottom icon indicates that a QR code is clearlylinkedtothisspecificpenetration.
AnotherimportantfunctionistolinkaQRcodewhichisprintedontheidentificationplateorstickerwiththepenetration.EachQRcodeisunique.
CFS-DM Firestop Documentation Manager
CFS-DM Firestop Documentation Manager page 53
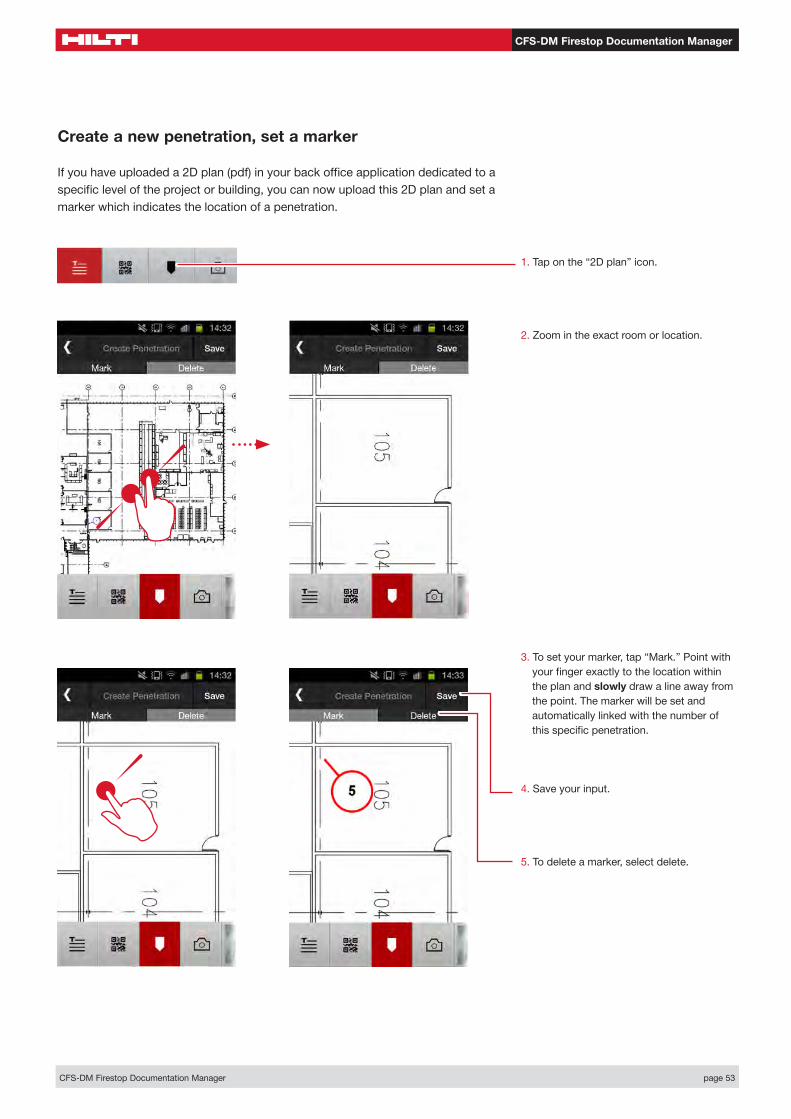
Create a new penetration, set a marker
Ifyouhaveuploadeda2Dplan(pdf)inyourbackofficeapplicationdedicatedtoaspecificleveloftheprojectorbuilding,youcannowuploadthis2Dplanandsetamarkerwhichindicatesthelocationofapenetration.
1.Taponthe“2Dplan”icon.
2.Zoomintheexactroomorlocation.
3.Tosetyourmarker,tap“Mark.”Pointwithyourfingerexactlytothelocationwithinthe plan and slowly draw a line away from thepoint.Themarkerwillbesetandautomatically linked with the number of thisspecificpenetration.
5.Todeleteamarker,selectdelete.
4.Saveyourinput.
CFS-DM Firestop Documentation Manager
CFS-DM Firestop Documentation Manager page 54
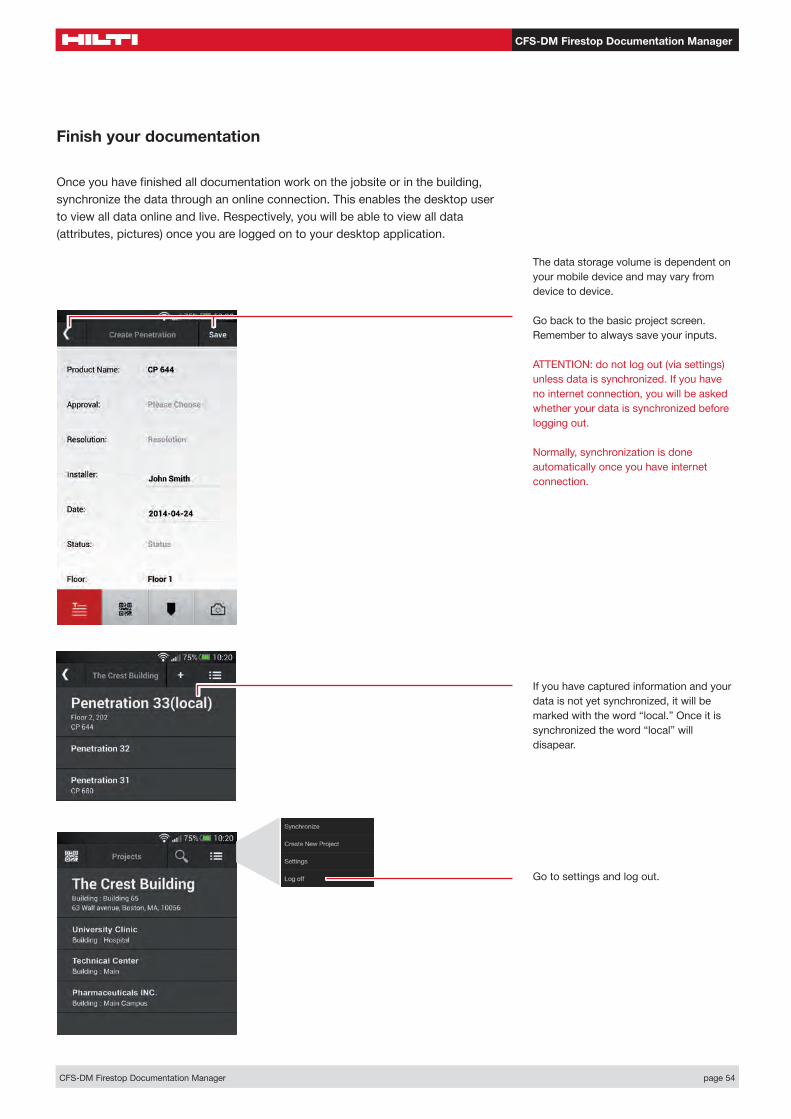
Finish your documentation
Thedatastoragevolumeisdependentonyourmobiledeviceandmayvaryfromdevicetodevice.
Ifyouhavecapturedinformationandyourdata is not yet synchronized, it will be markedwiththeword“local.”Onceitissynchronized the word “local” will disapear.
Gobacktothebasicprojectscreen.Remembertoalwayssaveyourinputs.
ATTENTION:donotlogout(viasettings)unlessdataissynchronized.Ifyouhaveno internet connection, you will be askedwhether your data is synchronized beforeloggingout.
Onceyouhavefinishedalldocumentationworkonthejobsiteorinthebuilding,synchronizethedatathroughanonlineconnection.Thisenablesthedesktopusertoviewalldataonlineandlive.Respectively,youwillbeabletoviewalldata(attributes,pictures)onceyouareloggedontoyourdesktopapplication.
Gotosettingsandlogout.
Normally, synchronization is done automaticallyonceyouhaveinternetconnection.

Hilti=re
gistered
trad
emarkofHiltiC
orp.,S
chaan|P
rintedinUSA
|©2015I04/15SM|Rightoftechnicaland
program
mechangesreserved
S.E
.&O.

Hilti,Inc.(U.S.)|1-800-879-8000|www.us.hilti.com
Hilti. Outperform. Outlast.