
FINGERPRINTING - · PDF fileObtain the fingerprints of one hand Materials: Ink pad, micropore...
14
Fingerprinting © 2005, 2004, 2002, 1993 by David A. Katz. All rights reserved. Fingerprinting is the most cost effective method of suspect identification. The fingers of a person contain small ridges which are nature’s way of allowing one to grip objects. These ridges, although genetic in nature, form while the child is developing in the womb. As the fetus stretches or bends his/her fingers, stretching the skin, the ridges form or stop forming with the tension of the skin. The ridges form a pattern that is unique to each individual. Those ridges contain sweat pores from which are excreted perspiration, salts and oils. The oils that are left on a surface are known as latent fingerprints. (See Figure F-1) Individuals have tried a number of methods to obliterate or remove their fingerprints. These methods include abrading or trying to rub off their fingerprints, burning the fingers, trying to dissolve their fingerprints with strong acids, covering their fingertips with superglue, and even having doctors transplant skin from one finger to another. In general, these methods have been unsuccessful. Materials such as superglue can be removed with acetone or other solvents and even with physical mutilation, there is usually sufficient fingerprint remaining, even with the resulting scarring, to provide a match with those fingerprints in an existing database. Transplanting of skin leaves scars which are telltale signs of attempts to change fingerprints. In the case where fingerprints on a body are badly scared or deteriorated, the criminalist may have to resort to the pattern of sweat pores in comparing the fingerprints to those in a database. Basics of fingerprinting A Note on Privacy: All fingerprints are the personal property of the individual student. No fingerprints are to be turned in to your instructor as part of these laboratory exercises. Each student should keep or discard their fingerprint materials as they see fit. Paper copies should be torn up before discarding. Figure F-1: Cross section of skin showing fingerprint ridges and sweat pores. Reference: Saferstein, Criminalistics, 5 th Ed, Prentice Hall, 1995
Transcript of FINGERPRINTING - · PDF fileObtain the fingerprints of one hand Materials: Ink pad, micropore...

Fingerprinting © 2005, 2004, 2002, 1993 by David A. Katz. All rights reserved.
Fingerprinting is the most cost effective method of suspect identification. The fingers of a person contain small ridges which are nature’s way of allowing one to grip objects. These ridges, although genetic in nature, form while the child is developing in the womb. As the fetus stretches or bends his/her fingers, stretching the skin, the ridges form or stop forming with the tension of the skin. The ridges form a pattern that is unique to each individual. Those ridges contain sweat pores from which are excreted perspiration, salts and oils. The oils that are left on a surface are known as latent fingerprints. (See Figure F-1) Individuals have tried a number of methods to obliterate or remove their fingerprints. These methods include abrading or trying to rub off their fingerprints, burning the fingers, trying to dissolve their fingerprints with strong acids, covering their fingertips with superglue, and even having doctors transplant skin from one finger to another. In general, these methods have been unsuccessful. Materials such as superglue can be removed with acetone or other solvents and even with physical mutilation, there is usually sufficient fingerprint remaining, even with the resulting scarring, to provide a match with those fingerprints in an existing database. Transplanting of skin leaves scars which are telltale signs of attempts to change fingerprints. In the case where fingerprints on a body are badly scared or deteriorated, the criminalist may have to resort to the pattern of sweat pores in comparing the fingerprints to those in a database. Basics of fingerprinting
A Note on Privacy: All fingerprints are the personal property of the individual student. No fingerprints are to be turned in to your instructor as part of these laboratory exercises. Each student should keep or discard their fingerprint materials as they see fit. Paper copies should be torn up before discarding.
Figure F-1: Cross section of skin showing fingerprint ridges and sweat pores. Reference: Saferstein, Criminalistics, 5th Ed, Prentice Hall, 1995

Obtain the fingerprints of one hand
Materials:
Ink pad, micropore type preferred fingerprint card Magnifier waterless hand cleaner and/or moist towelettes paper towels
Safety Precautions There are no safety hazards in this procedure, however, fingerprint ink does stain clothing. Keep your hands away from your clothing or other objects. Clean your hands immediately with waterless hand cleaner or moist towelettes.
Procedure
If using the right hand, roll the index finger, in a clockwise rotation, over the ink pad. Then roll the finger over the proper space on the fingerprint card. Do not press hard. Repeat, one finger at a time, for each of the remaining three fingers.
Roll the right thumb, in a counterclockwise direction, over the inkpad and then over the proper space on the fingerprint card.
If using the left hand, roll fingers in a counterclockwise rotation and the left thumb in a clockwise direction.
Clean ink from hand using waterless hand cleaner and/or a moist towelette.
Examine the fingerprints Use a magnifier to examine the fingerprints. Classify each print as a loop, whorl, or arch type according to Figure F-2 or any fingerprint patterns sheet provided by your instructor. Select at least one print to examine for minutiae. Note as much of the minutiae as possible, such as islands, ridges, enclosures, bifurcations, abrupt ridge endings, and any scars, and mark at least 10 different points on the fingerprint. The more minutiae you can identify, the easier it will be to match that fingerprint to a suspect. It is this minutiae that makes one’s fingerprints unique from all others in the world. If time permits, examine each of the other prints. (See Figure F-3)

Figure F-2. Fingerprint patterns. Provided by Criminal Research Products, LLC.

Figure F-3. Detail of a fingerprint pattern showing minutiae. Provided by Criminal Research Products, LLC.
Dusting and lifting latent fingerprints
Materials: Microscope slide (plastic preferred to minimize any breakage) Fingerprint powder Latent print dusting brush Clear tape (scotch Magic tape, ¾ inch or 1 inch wide) White card, 2 x 4 inches (blank 3 x 5 inch cards are excellent for this procedure) Magnifier
Safety glasses or goggles Optional: flashlight
Safety Precautions Wear safety glasses to protect your eyes from the powder. There is a small probability of an allergic reaction to the fingerprint powder. Avoid large excesses of the powder and creating too much dust in the air. As an alternative, magnetic fingerprint powder may be used. (See the alternative procedure which follows.) Procedure Place a fingerprint on a clean microscope slide. Use the fingerprint which you examined for minutiae on your fingerprint card, previously. (A latent fingerprint is the result of oil from your finger being deposited on a surface. If your finger is relatively oil free, you can increase the amount of oil on your finger by rubbing your fingertip lightly on your forehead or nose.)
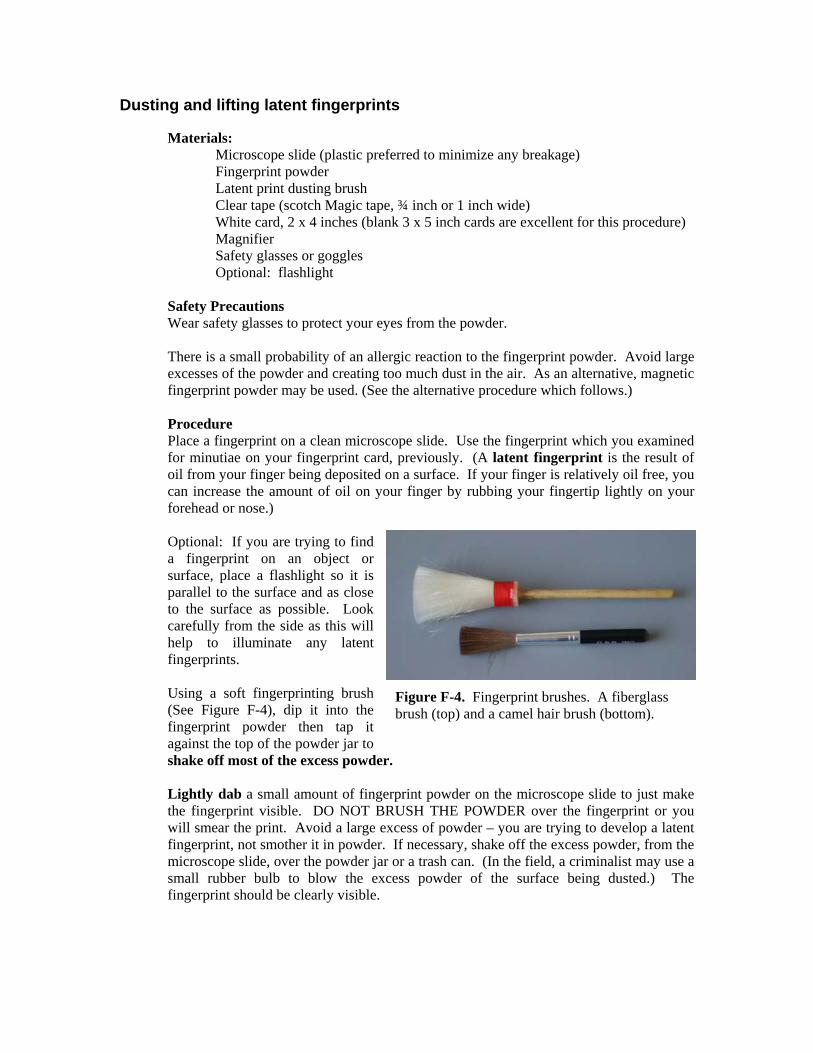
Optional: If you are trying to find a fingerprint on an object or surface, place a flashlight so it is parallel to the surface and as close to the surface as possible. Look carefully from the side as this will help to illuminate any latent fingerprints. Using a soft fingerprinting brush (See Figure F-4), dip it into the fingerprint powder then tap it against the top of the powder jar to shake off most of the excess powder. Lightly dab a small amount of fingerprint powder on the microscope slide to just make the fingerprint visible. DO NOT BRUSH THE POWDER over the fingerprint or you will smear the print. Avoid a large excess of powder – you are trying to develop a latent fingerprint, not smother it in powder. If necessary, shake off the excess powder, from the microscope slide, over the powder jar or a trash can. (In the field, a criminalist may use a small rubber bulb to blow the excess powder of the surface being dusted.) The fingerprint should be clearly visible.
Figure F-4. Fingerprint brushes. A fiberglass brush (top) and a camel hair brush (bottom).

Use a piece of clear tape to “lift” the fingerprint from the slide and place the tape on a white card or sheet of paper. (Note: if you are using a light colored fingerprint powder, the tape would be placed on a black colored card or sheet of paper.)
This procedure takes practice. If you did not get a clear fingerprint, repeat the process using a new fingerprint on the other side of the microscope slide, or clean off the microscope slide to provide a fresh surface.
Examine the fingerprint. Determine the fingerprint pattern and as much minutiae as possible. Compare the lifted fingerprint to an inked fingerprint. Can you make a definite match? (Note: Remember, the minutiae, not just the arches and whorls, make the fingerprint unique. The more points of comparison you can determine, the better the identification.)
Alternative method: Magnetic fingerprinting powder can be used. In place of a brush, a special magnet is used to pick up iron-based fingerprint powder. The clump of magnetic powder, on the end of the magnetic wand, is used as a brush. The powder is lightly dabbed onto the latent fingerprint. After removing the clump of powder from the magnet, the excess powder, around the fingerprint, is picked up using the magnet. The resulting fingerprint is lifted off the surface using clear tape.

Developing fingerprints: Superglue method. The superglue method normally uses a fuming chamber to develop latent fingerprints. In this procedure, a small jar is used as an inexpensive alternative. Materials:
Microscope slide (plastic preferred) Superglue Small jar, such as a spice jar Aluminum foil Magnifier NOTE: The container used for Superglue development of fingerprints should be large enough to hold the object. In this case, a spice jar will hold a microscope slide. You can use any covered large jar or a large metal can, such as a coffee can or gallon paint can, depending on the size of the object.
Safety Precautions The vapors from the superglue are toxic. Work in a well ventilated space and keep all containers closed when not in use.
If any superglue gets on your skin, do not touch it. Let it dry and remove it with a small amount of acetone (nail polish remover).
Procedure Place a fingerprint, or several fingerprints, on a clean microscope slide. Use the finger which print you examined for minutiae on your fingerprint card, previously.
Place a small piece of aluminum foil in the bottom of the small jar. Add a few drops of superglue onto the aluminum foil. (This will prevent the microscope slide from becoming glued to the jar.)
Place the microscope slide into the jar and close it. Allow this to stand for at least 5 minutes and up to 30 minutes. (See Figure F-5) You should be able to see the fingerprint developing on the microscope slide. (Note: this procedure can be speeded up by warming the container slightly.) Remove the slide with the developed fingerprint from the jar. Examine the fingerprint. Determine the fingerprint pattern and then identify as much of the minutiae as possible Compare the developed fingerprint to an inked fingerprint. Can you make a definite match?
.
Figure F-5: Superglue development of a fingerprint on a microscope slide in a spice jar

Developing Fingerprints: Fuming with iodine
Materials: Paper gallon size Zip-Loc bag Iodine beads (available from forensic supply companies) Note: Iodine crystals can be used along with a small amount of powdered vermiculite. Rubber or plastic gloves are recommended Safety glasses or goggles
Safety Precautions Wear safety glasses or goggles to protect your eyes from iodine vapors. Iodine is toxic, both as vapor and through excessive skin contact. Work in a well ventilated area. Keep all containers closed. A small amount of iodine on the skin can be removed with soapy water, but it will leave an orange colored stain. Dispose of any iodine waste in a safe manner.
Procedure Have someone write a note on a sheet of paper. Generally, they leave fingerprints on the paper as they hold the paper in place with one hand while writing with the other hand.
Handle the paper by the edges only, preferably using tongs, or wear rubber gloves. Place the paper in a large Zip-Loc bag. Add a SMALL amount of iodine beads or crystals and close the bag.
Iodine fumes will develop the fingerprints. (Note: The developed fingerprints are not permanent. Once the paper is removed from the bag, the iodine will sublime into the atmosphere. In a forensic examination, the fingerprint would be photographed for further examination.)
Examine the fingerprints. Determine the fingerprint pattern. If you have an inked fingerprint, can you make a definite match?

Developing Fingerprints: Ninhydrin
Ninhydrin, (2,2-dihydroxy-1H-indine-1,3(2H)-dione) C9H6O4 is a reagent used for detection of free amino and carboxyl groups in proteins and peptides. In 1910, Siegfried Ruhemann discovered that when heated to a temperature of between 80° to 100°C, it will produce a blue to purple color, now known as Ruhemann’s purple. In 1954, Odén and von Hofsten suggested its use for the development of latent fingerprints in criminal investigations. Ninhydrin is probably the most widely used method for developing latent fingermarks on porous surfaces such as paper. In some cases, however, certain treated or printed papers may react with the ninhydrin, limiting its use. The amino acid secretions that make up latent fingerprints are stable compounds that do not migrate through dry paper with time. As a result, latent prints on paper that has been protected from the elements have been developed after 30 years. Materials:
Paper Ninhydrin solution, 0.5% (w/v) in acetone. In a small spray bottle. Zinc chloride, ZnCl2, 3% solution (w/v). In a small spray bottle. 2 Cloth towels Steam iron UV light Rubber or plastic gloves Safety glasses or goggles Newspaper or large sheets of paper to cover spraying area
Safety Precautions Wear safety glasses or goggles to protect your eyes from iodine vapors. Ninhydrin is an irritant. Ninhydrin will react with any protein, particularly with that on your skin. Wear disposable plastic gloves and work in a fume hood. If you are sloppy, you will have purple hands or skin for over a week. Use the ninhydrin solution in low light conditions.
Procedure Add water to the steam iron. Turn on the steam iron and set it for cotton. Have someone handle or write a note on a sheet of paper. Generally, they leave fingerprints on the paper as they hold the paper in place with one hand while writing with the other hand.
O
O
OH
OH
Figure F-6. The structure of ninhydrin

Handle the paper by the edges only, preferably using tongs, or wear rubber gloves. Place the paper on a sheet of newspaper or other surface covering the bench top under a hood. Spray the paper lightly with ninhydrin solution. Allow the paper to dry.
Place the dry paper on a cloth towel. Cover with a second cloth towel. This will keep the paper from scorching. Iron the upper towel for about 3 to 5 minutes. Remove the upper towel. The developed latent fingerprints should be visible. Can you match the fingerprints to those of a suspect? To enhance the fingerprints, spray the paper lightly with a 3% solution of zinc chloride. Allow the paper to dry.
Did the fingerprints change color? If so, what color? Are the fingerprints easier to see?
FINGERPRINTING
Data and Results
Name _______________________________________ Course and Section _______________ Partner(s) _______________________________________ Date _________________________ Fingerprinting 1. Which hand did you fingerprint? [] left [] right
2. What fingerprint patterns do your fingerprints have?
Thumb Index Finger Middle Finger Ring finger Little finger
3. Focus on a single fingerprint. Detail some of the minutiae in that fingerprint.
4. How did the lifted fingerprint compare to an inked fingerprint. Were you able to make a definite match?

5. How did the fingerprint developed with the superglue compare to an inked fingerprint. Were you able to make a definite match?
Dusting and Lifting Latent Fingerprints 7. Were you able to successfully dust and lift a fingerprint? 8. How many points of the “lifted” fingerprint were you able to match up with he ink fingerprint? Developing Fingerprints: Superglue method 9. Were you successful in developing a fingerprint with superglue? 10. How many points of the developed fingerprint were you able to match up with he ink
fingerprint?

Developing Fingerprints: Fuming with Iodine 11. Did the iodine develop fingerprints on the “note”?
12. Were you able to match a fingerprint from the note to an inked fingerprint?
Developing Fingerprints: Ninhydrin 13. Did the ninhydrin develop fingerprints on the “note”
14. Were you able to match a fingerprint from the note to an inked fingerprint?

15. Were the fingerprints successfully enhanced with the zinc chloride solution? 16. Compare the methods of developing fingerprints. Which method do you think is best?


![Office of Pesticide Programs - epa.gov · [To Dispense TOWELETTES] [or WIPES] [or TOWELS] [or CLOTHS]: Remove lid [and discard inner seal] [from container or canister,] Find center](https://static.fdocuments.in/doc/165x107/5c66970c09d3f2e33b8c5101/office-of-pesticide-programs-epagov-to-dispense-towelettes-or-wipes-or.jpg)


