Finger extension Extensor digitorum Radial nerve Part 1 ... · The neurological examination must be...
33
Part 1 – Clinical skills Dr William P. Howlett 2012 CHAPTER 1 HISTORY AND EXAMINATION
Transcript of Finger extension Extensor digitorum Radial nerve Part 1 ... · The neurological examination must be...

Part 1 – Clinical skills
Dr William P. Howlett2012
Finger extensionExtensor digitorumRadial nerveC7
CHAPTER 1 HISTORY AND EXAMINATION

Kilimanjaro Christian Medical Centre, Moshi, Kilimanjaro, Tanzania
BRIC 2012 University of Bergen PO Box 7800 NO-5020 Bergen Norway
NEUROLOGY IN AFRICAWilliam HowlettIllustrations: Ellinor Moldeklev Hoff, Department of Photos and Drawings, UiBCover: Tor Vegard TobiassenLayout: Christian Bakke, Division of Communication, University of BergenPrinted by Bodoni, Bergen, NorwayCopyright © 2012 William HowlettNEUROLOGY IN AFRICA is freely available to download at Bergen Open Research Archive (https://bora.uib.no) www.uib.no/cih/en/resources/neurology-in-africaISBN 978-82-7453-085-0
Notice/DisclaimerThis publication is intended to give accurate information with regard to the subject matter covered. However medical knowledge is constantly changing and information may alter. It is the responsibility of the practitioner to determine the best treatment for the patient and readers are therefore obliged to check and verify information contained within the book. This recommendation is most important with regard to drugs used, their dose, route and duration of administration, indications and contraindications and side effects. The author and the publisher waive any and all liability for damages, injury or death to persons or property incurred, directly or indirectly by this publication.
MILJØMERKET
241 Trykksak 699

CONTENTS
HISTORY AND EXAMINATION 13HISTORY TAKING� � � � � � � � � � � � � � � � � � � � � � � � � � � � � � � � � � � � � � � � � � � � � � � � � � 13NEUROLOGICAL EXAMINATION � � � � � � � � � � � � � � � � � � � � � � � � � � � � � � � � � � � � � � � � 16CRANIAL NERVE EXAMINATION � � � � � � � � � � � � � � � � � � � � � � � � � � � � � � � � � � � � � � � � 16EXAMINATION OF THE LIMBS � � � � � � � � � � � � � � � � � � � � � � � � � � � � � � � � � � � � � � � � � 28EXAMINATION OF THE GAIT � � � � � � � � � � � � � � � � � � � � � � � � � � � � � � � � � � � � � � � � � � 36CONSCIOUSNESS � � � � � � � � � � � � � � � � � � � � � � � � � � � � � � � � � � � � � � � � � � � � � � � � � 37KEY TO BASIC NEUROLOGICAL EXAMINATION � � � � � � � � � � � � � � � � � � � � � � � � � � � � � � 41

CHAPTER 1
HISTORY AND EXAMINATIONIntroductionNeurology relies on the fundamental skills of history taking and physical examination. The aim of this section is to help the medical student to learn the basic clinical skills necessary to carry out a neurological history and examination and interpret the findings. Most students find neurology difficult to remember and in particular what to do, how to do it and what it all means. The history is the most important part of neurological evaluation because it is a guide to the underlying disease and also determines which part of the examination needs to be focused on. Indeed many neurological diseases like migraine have symptoms but no abnormal signs. The neurological examination determines abnormal neurological findings and helps to localize the site of the disease (Chapters 2 & 12). The history, examination and localization all together help to determine which disease has occurred at that site. The necessary competence required to carry out these tasks is formed by a combination of knowledge, skills and experience. Neurological knowledge is mostly self learned while clinical skills are taught at the bedside and experience gained over time. The nervous system by its nature is complex but its assessment can be learned with patience, plenty of practice and time.
HISTORY TAKINGIntroductionThe history is the most important part of the neurological assessment. The student should aim to be a good listener showing interest and sympathy as the patient’s story unfolds. It is important to get the patient’s trust and confidence. First introduce yourself to the patient, explain who you are and ask permission to take a history and to carry out an examination. Find out the patient’s name, age, address, occupation. Determine handedness by asking which hand do you write with or use more often. Some clinical findings are apparent to the examiner during history taking; these include general state of health and obvious neurological deficits and disabilities. If there is alteration in the level of consciousness or the patient is unable to give a history then it may be necessary to obtain a history and witnessed account from a relative or friend before proceeding directly to neurological examination. The patient’s history reveals his personality, intelligence, memory and speech and his body language his attitude and mood. The questions should aim to learn the character, severity, time course and the particular circumstances of each main symptom. The order of history taking is summarized below under
William Howlett Neurology in Africa 13

key points. While the history is being taken the level of alertness, mental well being and higher cerebral function becomes apparent to the examiner.
Key points in a neurological history · age, sex, occupation, handedness · presenting complaints · history of presenting complaints · neurology system review questions
· past history · family history and social history · drug history · gynaecological and obstetrical history
Presenting complaintStart the formal history by asking the patient to state what the problems are and the reason for hospital admission or referral. This could begin with open questions such as “what is the main problem or “tell me about it from the start”. Try to let the patient tell the story of the illness as it has happened without any interruption. Make certain that you understand clearly what the patient is describing by their complaints. Determine the order of the presenting complaints, these should ideally not number more than three or four and be in order of importance. For each complaint determine the main site, character, onset, time course, exacerbating and relieving factors, associated symptoms and previous investigations and treatments.
Key points · what are the problems · what is the main problem · when did it start
· site, character, time course, exacerbating & relieving factors, associated symptoms
· previous investigations and treatments
Time courseThe time course of symptoms is essential to understanding the underlying cause. Ask the patient to describe the onset, progress, duration, recovery and frequency of each main complaint. In particular ask if the onset was sudden over seconds or minutes as occurs in stroke or more slowly over weeks or months as occurs in mass lesion e.g. tumour. Describe progress whether it was stationary as in a stroke or worsening as in an infection or intermittent as in epilepsy. If the symptoms are intermittent enquire about their frequency and the interval between them. Ask about precipitating or relieving factors, associated neurological symptoms and any particular circumstances in which the symptoms occur.
Key points · onset · progress · duration
· frequency · recovery
Systems reviewA systematic enquiry may reveal symptoms related to the patient’s illness. This may include a general medical review in addition to neurological systems review. Carry out a neurological systems review by asking the patient specific screening questions concerning symptoms
Part 1 – Clinical skills Neurological Examination14
Chapter 1 history and examinationChapter 1 history and examination

affecting the various levels of higher cerebral and nervous system functioning. Finally ask if there is anything else that the patient would like to tell you.
Neurology systems review key questions · change in mood, memory, concentration or sleep
· pain, headache, face or limbs · loss of consciousness or dizzy spells · loss of vision or double vision · loss of hearing or balance · difficulty speaking or swallowing
· weakness or heaviness in limbs · difficulty walking · pins and needles or numbness in arms, legs or body
· difficulty with passing urine, bowels and sexual function
InterpretationAs the history unfolds the examiner begins to hypothesize about the meaning of the history and the cause of the disorder. To reinforce this information it may be necessary to rephrase the questions in different ways or ask some direct questions. The main potential sites of disease are the brain, spinal cord, cranial and peripheral nerves, neuromuscular junction and muscles. It is helpful to attempt to anatomically localize the main site of the disease. Defining an anatomical limit to main symptoms is also helpful e.g. the upper limit of a sensory level in paraplegia, or the motor loss on one side in hemiplegia, or the glove and stocking sensory loss in a polyneuropathy. If the amount of time is limited then it is better to spend time on the history and be selective about the examination concentrating it on the main areas of interest.
Past medical history (PMH)Enquire about past medical illnesses and accidents including hospitalizations and operations, and record their details in the notes. Where relevant ask specifically about a history of infections, seizures, head injuries, birth and childhood development, diabetes, hypertension and stroke. Enquire if there is a past history of neurological episodes similar to the presenting complaint and outline any investigations, their results and treatments received, and any persisting disabilities.
Family historyDocument the patient’s first degree relatives i.e. parents, siblings and children including their ages, sex and health. Enquire if there is anyone else in the family with the same illness, if so record the full family tree with their names and ages and indicating any affected family members and any deaths and their causes if known.
Personal & social historyAsk concerning occupation, employment, travel, alcohol intake in number of units per week and smoking in pack years (packs per day times years smoked); if relevant ask concerning the use of recreational drugs. Enquire how the current illness has affected work and social life including time lost from work over the last 6 months. Have a neurological patient describe the home environment, caregivers, community and financial circumstances if relevant.
Drugs, allergiesList the medications the patient is taking including names, duration and dosages. Describe any problems with medications and known allergies.
history taking
William Howlett Neurology in Africa 15

MensesRecord whether menses are normal and if the patient is pregnant or on the pill.
Key points · allow the patient time to tell the story of their illness
· listen to the patient · if patient is unable to give a history obtain it from family or friends
· ask if there “is anything else you wish to tell me” · history determines the site of interest for neurological examination
General examinationThe neurological examination must be performed in the context of a general physical examination. This includes recording the vital signs and examination of the cardiovascular system including listening for carotid bruits, and the respiratory, abdominal, and musculoskeletal systems.
NEUROLOGICAL EXAMINATIONNeurological examination is often considered by the student to be the most difficult part of neurological evaluation. This arises mainly because of technique and uncertainty over what is normal or abnormal. The best way to overcome this is to spend time early on learning the basic neurologic skills and then to practise on colleagues and patients until confident. The main aim is to become familiar with the routine of neurological examination and range of normal findings. The student will then gradually be introduced to abnormal findings in patients with neurological disorders and to what are termed neurological signs. In general, neurological signs are objective, reproducible and cannot be altered by the patient whereas less reliable findings tend to be variable, subjective and less reproducible. The neurological examination may involve an assessment of the level of consciousness, cognitive and mental function, cranial nerves, limbs and gait. Details concerning the clinical examination of level of consciousness and cognitive function are at the end of this chapter. In summary it is wise to listen attentively to the patient’s complaints, stick to the routine of a basic neurological examination and to concentrate the neurological exam on the problem area highlighted by the history.
General observationsObserve the patient’s general appearance, for any obvious neurological deficit and level of consciousness. The patient’s level of consciousness, alertness, higher cerebral function, mental state and ability to give a history become apparent during the history taking. Neurological disorders affecting speech, posture, movement and gait may also become apparent at this stage.
CRANIAL NERVE EXAMINATIONThese are tested with the patient in the sitting position.
Olfactory nerve (cranial nerve 1)The olfactory nerve is responsible for smell. In a routine neurological examination it is sufficient to ask the patient if there is any loss of smell (anosmia). If anosmia is suspected then it should be tested at the bedside. This can be done by simply asking the patient to identify up to four familiar bedside items: e.g. orange peel, cloves, coffee, and soap. Before the test the nasal airway
Part 1 – Clinical skills Neurological Examination16
Chapter 1 history and examinationChapter 1 history and examination

should be shown to be clear by getting the patient to sniff. Explain to the patient to close both eyes and block off one nostril by applying pressure with a finger. In the manner shown in the diagram the item to be identified is then presented to the other open nostril and the patient tries to identify the smell and its source. The procedure is then repeated for each item and on the other side. Patients may only become aware of the loss of smell whilst eating when the perception is often a loss of taste. The most common cause of loss of smell is local disease in the nose or sinuses e.g. head cold, hay fever and smoking. Figure 1.1 Testing smell
Optic nerve (cranial nerve 2)Visual acuityAsk if the patient has any difficulty seeing. Visual acuity (VA) is tested and measured routinely by using a Snellen chart. The patient should stand 6 metres away from the chart and correct for any known refractive error by wearing appropriate glasses. Ask the patient to cover each eye in turn with his hand and find the smallest line that he can read fully without difficulty. VA is expressed as the distance between the chart and the patient over the smallest line completely visible to the patient. The numbers on the chart (below the line) correspond to the distance at which a person with normal vision should be able to see and identify the appropriate line. Below the age of 40 years most should see 6/6 or better. If 6/6 is normal and 36 represents the line that the patient can comfortably read at 6 metres with both eyes then visual acuity for that patient should be recorded as 6/36 in the right (VAR) and left eye (VAL). If VA is 6/60 or less then you can assess the patient’s ability to see at 1 meter distance by counting fingers (CF), VA = CF, or seeing hand movements (HM), VA = HM or perceiving light (PL) VA = PL, if unable to perceive light then the patient is blind (NPL). At the bedside setting crude levels of visual acuity can be established by using a small hand held chart e.g. Jaeger chart or by using ordinary newspaper print. Colour vision is not tested routinely, however it can be tested by a using a book of Ishihara plates where at least 15/17 coloured plates identified correctly is considered normal. The most common causes of decreased visual acuity are optical problems, mainly refractive errors in lens, followed by cataracts and lastly diseases involving the retina, macula and optic nerve.
Figure 1.2 Testing visual acuity
Testing smell
Olfactory nerve
Distance6 metres
Testing visual acuity The Snellen chart
Cranial nerve examination
William Howlett Neurology in Africa 17

Key points · VA is measured standing 6 metres from a Snellen chart
· VA is distance between patient and chart over the smallest line identified correctly
· VA can be tested at bedside using a small hand held chart or newspaper
· most common causes of decreased VA are refractive errors and cataracts
Visual fieldsThe organization of the visual pathways means that the pattern of visual field loss varies at different sites along its way. This means that testing for the pattern of visual field loss is useful for localization of lesions along the visual pathway. Visual fields are always described and recorded from the perspective of the patient looking outwards with the fields divided into nasal and temporal halves. At the bedside visual fields are examined by confrontation. The main patterns of loss are homonymous & bitemporal hemianopia, & monocular blindness.
ConfrontationThis involves sitting about 1 meter in front of the patient with your eyes at the same horizontal level. Ask the patient to look with both eyes at your eyes (the bridge of your nose). Hold your hands upright halfway between you and the patient held approximately half a meter apart and at about 30 cm above the horizontal. While looking at the patient’s eyes first move the index finger tip of one hand (or a 5-7 mm red pin head) and ask the patient to correctly identify which finger moved. The patient should immediately point or indicate the hand on which the finger moved. Do the same with the other hand. Repeat the manoeuvre with the hands held about 30 cm below the horizontal. To examine the visual fields in each eye separately, ask the patient to cover one eye e.g. patient’s right eye and the examiner covers the eye opposite, in this case his own left eye. Ask the patient to focus on your uncovered eye. Move your index finger in each of the four quadrants starting in the temporal field followed by the nasal field in same manner as you did on confrontation for both eyes. Repeat for the other eye. Remember that the nose and prominent eyebrows may partially block vision and mistakenly give a field deficit.
Figure 1.3 Examining visual fields� Testing for visual defects by confrontation�
Field perimetryField perimetry can be tested in the same manner using a moving finger tip or a white pin head 5-7 mm target. Start behind the patient’s visual field coming forward diagonally in a convex plane from all four quadrants at a 45 degree angle, northeast to southwest and northwest
1 metre
Testing visual �elds by confrontationTesting for visual �eld defects by confrontation
Part 1 – Clinical skills Neurological Examination18
Chapter 1 history and examinationChapter 1 history and examination

to southeast and the same in reverse asking the patient to indicate as soon as he sees the movement. This establishes the posterior limit of the patient’s visual field. The blind spot (optic nerve head) and any central field defects can be easily identified using red pin head moving in the horizontal plane from outside.
Key points · patients are often unaware of loss of visual fields
· major visual field loss is identified by confrontation
· peripheral visual fields are tested by perimetry examination
· main patterns of loss are homonymous & bitemporal hemianopia & monocular blindness
Ocular fundiOcular fundi are tested by fundoscopy. The aim of fundoscopy is to inspect the optic nerve head, arterioles, veins and retina. This is an important part of the neurological examination and is used mainly to exclude papilloedema or swelling of the optic nerve. The main cause of papilloedema in Africa is raised intracranial pressure secondary to CNS infections and mass lesions. Swelling of the optic disc may also be caused by inflammation of the optic nerve and this is called papillitis. The main cause of papillitis is optic neuritis.
How to use an ophthalmoscopeStudents and young doctors at first find fundoscopy difficult but the skill comes with training and practice. The most important thing to understand is the position of the optic nerve head within the field of vision you are testing. The optic nerve head lays 15-20 degrees lateral to the point of fixation of the patient’s eyes and slightly below the horizontal and corresponds to the blind spot. The following instructions should be helpful. The patient should fix his gaze straight ahead. Check the focus on the ophthalmoscope is set at zero and the light is bright, then sit opposite the patient and examine the right eye. With the ophthalmoscope in the right hand approach from the patient’s right side, look at the patient’s right eye from 30 cm away with the ophthalmoscope
level or slightly below the patient’s eye about 15-20 degrees outside or lateral to the patient’s line of fixation or direction of gaze. Aim at the centre of the back of head and keep out of the line of sight of the other eye. You should be able to see the pupil as pink in colour; this is the normal retinal or red reflex. Gradually move in towards the eye, encourage patient to continue to look or fixate at a point behind you straight ahead and bring ophthalmoscope to within 1-2 cm of the patient’s right eye. It’s important to keep patient’s eye, point of fixation and ophthalmoscope all on the same plane. Adjust the lens for focus so that you can see the blood vessels clearly and follow blood vessels as they get larger and converge on the disc. Look at the optic disc, blood vessels, retinal background and repeat for the other eye. Figure 1.4 Fundoscopy
Examining the eye with an ophthalmoscope
Cranial nerve examination
William Howlett Neurology in Africa 19

What you findThe normal disc is circular and pale pink in colour, the edge of the disc is clear although not as well demarcated on the nasal side as the temporal side (Chapter 12). The temporal half of the disc is normally paler than the nasal half. The physiological optic cup from which the blood vessels emerge is a well defined depression in the centre of the nerve head. It is pale and occupies about 40-50% of size of the optic disc. The rest of the fundus has an even red background because of blood in the choroid layer. The retina may be darkly pigmented depending on racial background. The macula with a central darker area called fovea lies about one and a half disc spaces from the disc on its temporal side and is free of blood vessels. It can easily be found by asking the patient to look directly at the light of the ophthalmoscope. The arterioles are normally two thirds the sizes of veins and appear a brighter shade of red than veins. The veins on the disc appear to pulsate in 70-80% of normal people in the sitting position, and the absence of pulsation may be an early sign of papilloedema. In papilloedema the whole disc is usually pink red and the veins become distended and lose their pulsation. The optic cup is lost and the edge of the disc and the vessels emerging may appear elevated. Later the whole disc itself becomes indistinct and blurred especially on the nasal side which is normally less distinct and haemorrhages and exudates may be seen on or near its margins and vessels disappearing without an obvious optic disc (Chapter 12). In chronic papilloedema the disc becomes pale as occurs in optic atrophy.
Key points · approach patient’s right eye at same eye level from 30 cm out & 15-20 degrees laterally
· identify red reflex and follow beam of light into eye looking for a normal pale pink disc
· main sign of papilloedema is swelling of the optic disc with blurring of the disc margins
· main sign of optic atrophy is a pale white optic disc
· practise on colleagues and patients with normal eyes
Pupillary reactionsThese are examined after the optic nerve and before eye movements. The normal pupillary reactions include the light reflex, the accommodation reflex and the consensual reflex.
Assessing the pupilsInspect the pupils at rest for size and shape and whether they are equal, central and circular and react to light. It’s not always easy to assess pupillary size in a darkened room or in patients with a darkened iris. A difference in pupil size is called anisocoria. It helps to inspect the pupils at rest by shining a torch on the bridge of the patient’s nose allowing light to scatter but not affecting the pupils.Figure 1.5 Testing the light reflex
Testing the light re�exOptic nerve
Part 1 – Clinical skills Neurological Examination20
Chapter 1 history and examinationChapter 1 history and examination

The light reflexTo test the pupillary light reflex, ask the patient to look in the distance and not into direct light. It may help to block off the other eye in the manner shown in the diagram.
Then bring a bright light in from behind or from the side into the patient’s field of vision and observe the eye for direct or ipsilateral pupillary constriction. This is called the direct light reflex. Then repeat this again in the same eye now looking for the same response in the other eye. This is called the consensual reflex. Check for the same reflexes in the other eye.
The accommodation reflexThe accommodation reflex has two components and is much less clinically important than the light reflex. To test this reflex ask the patient to look in the distance and then at the examiner’s finger held 10 cm in front of the patient’s nose. As the gaze is shifted from a distant to near object the eyes adduct and pupils constrict. The first component is convergence which requires adduction of both eyes at the same time. The other component involves bilateral simultaneous constriction of the pupils; this combined with adduction is the normal accommodation reflex.
Pupillary disordersLarge and small pupils which react to light and accommodation can occur normally in young and old persons respectively. Pupillary disorders are generally categorized as those resulting in large dilated non or slowly reacting pupils and those resulting in small constricted reacting or non reacting pupils. The main causes of these are to be found in disorders affecting the optic nerve and the iris and its autonomic parasympathetic and sympathetic nerve supply.
Key points · inspect pupils for size, shape and whether they are equal or not
· light reflex: shine a bright light into the eye and watch for pupillary constriction
· consensual reflex: inspect the other eye at the same time for pupillary constriction
· accommodation reflex: watch eyes adduct & pupils constrict as gaze is shifted to a near object
Oculomotor, Trochlear and Abducens (cranial nerves 3, 4 & 6)Eye movementsThe 3rd 4th and 6th cranial nerves are tested together by examining eye movements. Eye movements are generated in two main ways each of which should be tested separately. Firstly voluntary movements are generated from the frontal lobe; they are also called saccadic because of the rapid jumping movement from one point of fixation to another. These are tested by asking the patient to look rapidly from one side to the other or right and left and are impaired in cortical brain disease. Secondly and more important clinically are pursuit eye or tracking movements which are generated from the occipital lobe when the eyes stay on and follow the point of fixation. These are tested by asking the patient to follow the examiner’s moving finger and are impaired in brain stem and cranial nerve disorders. Lastly the cerebellum also plays a main role in controlling eye movements in response to body movements in order to keep the point of fixation. All eye movements are integrated in the brain stem so that the eyes can move together conjugately in all directions. Eye movement abnormalities are usually noted because the patient complains of double vision or diplopia and because the eyes appear to the observer be looking in different directions. When this happens it is called a squint or strabismus. The
Cranial nerve examination
William Howlett Neurology in Africa 21

main causes of diplopia are disorders affecting the function of the 3rd 4th and 6th cranial nerves. The main sites for these disorders are eye muscles, the neuromuscular junction, or the individual nerves and their central connections in the brain stem. The most common causes are vascular and inflammatory disorders affecting the individual nerves and neuromuscular junction respectively.
Testing for pursuit eye movementsPursuit eye movements are routinely examined during the neurological examination. The examiner tests for horizontal and vertical eye movements by instructing the patient “to follow my finger with your eyes” whilst keeping the patient’s head steady. The examiner holds a finger about half a meter away from the patient’s face and makes horizontal and vertical movements in the shape of a cross sign being careful not to move the hand too rapidly. The movement is carried out with the index finger held vertically moving horizontally 30-45 degrees right and left from mid point and then repeated in the same way moving vertically with the finger held horizontally. The trochlear nerve is tested by repeating the same movements but this time in the shape of H sign. This should be carried out in each eye field separately to confirm any weakness. Any loss or impairment of normal eye movement or jerkiness (nystagmus) should be noted.Figure 1.6 Testing eye movements
NystagmusNystagmus is an involuntary rhythmic oscillatory movement of the eyes. Nystagmus is usually asymptomatic. To test for nystagmus ask the patient to follow the examiner’s fingers using the same method as when testing for normal eye movements. Nystagmus should be examined in three main positions, at rest, looking right and left horizontally and looking up and down vertically. Be careful not to move the eyes too quickly or too far laterally (not beyond 30 degrees from midline) and note the presence of any nystagmus. Nystagmus is only considered pathological when it is sustained. The characteristics of nystagmus help to localize the site of neurological disease. The main causes of nystagmus are disorders affecting the vestibular system and its central connections, the brain stem, cerebellum and the eye including early onset blindness. It can also rarely be congenital.
up
down
inferior oblique superior rectus
medialrectus
lateralrectus lateralmedial
superior oblique inferior rectus
Muscles involved in eye movements
Part 1 – Clinical skills Neurological Examination22
Chapter 1 history and examinationChapter 1 history and examination

Key Points · eye movements are tested by following examiner’s finger as it traces a cross (+) or (H) sign in the air · H sign tests the trochlear nerves in addition to the oculomotor and the abducens · nystagmus is an involuntary oscillatory movement of the eyes · diplopia is mostly caused by weakness of the ocular muscles
Trigeminal nerve (cranial nerve 5)The trigeminal nerve has three divisions ophthalmic (V1), maxillary (V2), and mandibular (V3). It is responsible for facial sensation and mastication.
SensationTo test sensation, first ask if the patient feels any numbness or altered sensation on the face. Then test for light touch (and gentle pinprick and temperature only if necessary) in each of the three divisions of the trigeminal nerve comparing one side with the other. If a sensory loss is found then determine its limits by moving from an abnormal area to normal. Remember that the ophthalmic division extends posteriorly to the vertex and also supplies the cornea and the tip of the nose. The angle of the jaw is supplied by the C2 nerve root rather than the trigeminal nerve. Sensory loss on the face is caused mainly by lesions in the brain stem and the trigeminal nerve.
Figure 1.7 Testing facial sensation
MotorThe motor division of the trigeminal nerve can be tested by inspecting for wasting above the zygomatic arch and asking the patient to clench the teeth and to palpate the masseters and pterygoids for force of contraction. Power can be assessed by jaw opening and jaw closure and side to side movements against resistance. Ask the patient to open and close his mouth against the resistance of your hand. In unilateral paralysis the jaw deviates to the weak or affected side. Motor involvement affecting the trigeminal nerve is very uncommon. Causes include myasthenia gravis, motor neurone disease and muscular dystrophy.
Jaw jerkThe jaw jerk is a brain stem stretch reflex which may be absent or present in normal people. To elicit the reflex the patient should let his jaw sag open. Place your finger lightly on the chin. Then tap your finger gently and feel and observe for a brief contraction or movement upwards
V2
V1
V3
V2
V1
V3
Facial sensation: left side ophthalmic ( ), maxillary ( ) and mandibular ( )divisions of the trigeminal nerve
V2V1 V3
Cranial nerve examination
William Howlett Neurology in Africa 23

of the lower jaw. The jaw jerk may be increased in an upper motor neurone lesion and indicates a lesion in the midbrain or above.
Corneal reflexThe trigeminal nerve provides the afferent arc of the corneal reflex. The facial nerve provides the efferent arc. It is a consensual reflex and may be tested by lightly touching the cornea (the coloured part of the eye) with a wisp of cotton wool and observe for reflex blinking in both eyes. The lower lid may be held down while the patient looks up making access to the cornea from below easy. The normal response to touching the cornea is that blinking of both eyes should occur. A unilateral trigeminal nerve lesion therefore results in loss of blinking on both sides whereas a unilateral seventh nerve lesion results in loss of the reflex on the affected side. Figure 1.8 Testing the corneal reflex (V and VII)
Key points · trigeminal nerve supplies sensation to the face and power to the muscles of mastication · sensation is tested touching in each division of trigeminal nerve & comparing sides · power is tested by resisting jaw opening, closure & side to side movements · corneal reflex is tested by touching the cornea lightly from below with a wisp of cotton · loss of the corneal reflex may be caused by either a 5th or 7th cranial nerve lesion
Facial nerve (cranial nerve 7)The facial nerve is primarily a motor nerve that is responsible for facial expression, which includes wrinkling of the forehead, eye closure, closure of the lips and smiling. The sensory portion is responsible for special sensation to the anterior two thirds of tongue via the chorda tympani branch. There are also a few sensory fibres to the outer ear canal. In clinical practice there are two types of facial nerve paralysis, a lower motor neurone type which includes Bell’s palsy and an upper motor neurone type which is most frequently seen in stroke. It is important to be able to distinguish clinically these two types from each other. In a lower motor neurone facial palsy there is a complete ipsilateral facial weakness with loss of forehead wrinkling, eye closure, nasolabial fold and drooping of the lips on the affected side. This is in contrast to an upper motor neurone lesion where the facial paralysis affects mainly the lower half of the face with preservation of wrinkling and partial eye closure although they may be reduced.
Examining the facial nerveTo objectively test motor function in the facial nerve start in the upper half of the face by asking the patient to look upwards towards the ceiling by elevating his eyebrows or wrinkling the forehead. Then test eye closure by asking the patient to shut the eyes tightly and assess strength by trying to open patient’s eyes with your fingers. If there is a lower motor neurone pattern of weakness there is loss of wrinkling and reduced or no resistance to forced eye opening on the affected side. Movements in the lower half of the face are tested by asking the patient to
Corneal re�ex (V and VII)Touch cornea from below with wisp of cotton wool
Part 1 – Clinical skills Neurological Examination24
Chapter 1 history and examinationChapter 1 history and examination

smile, whistle and finally to blow out of the cheeks and to keep the lips closed against the examiner’s attempt to open them. Any weakness or asymmetry implies a lesion in the seventh nerve. The reason that both the forehead and eye closure are partially spared in a unilateral upper motor neurone lesion is that they are bilaterally innervated. A bilateral lower motor neurone weakness can be easily missed clinically unless the facial nerves are specifically tested. To assess taste apply a solution of salt, sweet, sour or bitter to the anterior tongue comparing the response on both sides. Figure 1.9 Testing facial movements� Facial nerve palsy, right (lower motor neurone lesion) Loss of wrinkling of forehead� Loss of nasolabial fold� Drooping of mouth�
Key points · inspect for drooping of the mouth, loss of nasolabial fold, eye closure and wrinkling · ask the patient to smile, close their eyes and look up · a complete facial weakness on one side indicates a lower motor neurone lesion · facial weakness on one side confined to the lower half indicates an upper motor neurone lesion
Acoustic nerve (cranial nerve 8)The acoustic nerve has two divisions: the cochlear (hearing) and the vestibular (balance).
HearingHearing is first assessed by asking if the patient has a hearing problem. Hearing can be tested clinically by rubbing the thumb and finger close to the patient’s ear and asking if hearing is different between the two sides. Hearing loss is then crudely confirmed by whispering numbers and asking the patient to repeat them whilst standing behind the patient about 60 cm away from the test ear. At the same time hearing in the non affected ear is masked by rubbing fingers close to the tragus or by occluding it with a finger. If the patient cannot hear whispering, then a normal or louder voice is used. The test is then repeated on the other side if necessary. Bedside testing is relatively insensitive and may miss lower levels of hearing loss for which audiometry is required. There are two main types of hearing loss, conductive deafness where there is a failure of transmission of sound (air conduction AC) from the outer to the inner ear or cochlea, and sensorineural deafness or (bone conduction BC) which is due to disease in the cochlea or its neural connections. The Rinne and Weber tuning fork tests can help distinguish whether the hearing loss is conductive or sensorineural in type. The main causes of conductive hearing loss are wax in the outer ear and infection in the middle ear. The main causes of sensorineural hearing loss deafness are ototoxicity, infections, Ménière’s disease and presbycusis.Figure 1.10 Testing hearing
Facial nerve palsy, right(lower motor neurone lesion)
Loss of wrinkling of forehead Loss of nasolabial fold Drooping of the mouth
A B
Testing for hearing Auditory nerve
Cranial nerve examination
William Howlett Neurology in Africa 25

Rinne’s testUse a 256 Hz tuning fork, tap on knee or forearm, then hold the base of beating tuning fork on the mastoid process behind the ear. When the patient stops hearing it then place it beside the external auditory meatus in line with the ear canal. In normal hearing air conduction is greater than bone conduction (AC>BC) so the patient will still hear the tuning fork. In conductive deafness there is impairment of conduction and bone conduction is better (BC>AC). In sensorineural deafness the normal pattern is retained AC>BC but both components are reduced compared to the normal ear.
Weber’s testThe base of a vibrating tuning fork is placed on the middle of the forehead or on the top of the head (vertex) and the patient asked in which ear the sound is loudest in, normally the sound is heard equally in both ears or in the middle. If the sound is heard best in the affected ear then there is unilateral conductive hearing loss on that side as only the vibration transmitted directly through bone to the middle ear ossicles can be heard. In contrast if it is heard best in the good ear then there is sensorineural hearing loss in the affected ear.
Figure1.11 Distinguishing the type of deafness� The Rinne test A + B� The Weber test C�
BalanceThe vestibular portion of the eight nerves transmits sensory information from the vestibular apparatus to the brain stem and cerebellum. Balance depends on normal input from this system in combination with proprioception and eyes. Symptoms and signs suggestive of vestibular dysfunction include positional vertigo, ataxia, nausea, vomiting and nystagmus on looking away from the side of the lesion. Vestibular balance is not routinely tested in a bedside examination but can be tested clinically in disease by the caloric and Hallpike’s manoeuvre. The main vestibular causes of loss of balance are benign positional vertigo, vestibular neuronitis and Ménière’s disease.
Key points · hearing is crudely tested by whispering numbers in one ear while blocking the other ear · conductive hearing loss is failure of transmission through air, BC > AC · sensorineural hearing loss is failure of transmission through cochlea/neural connections, AC > BC · Rinne test can discriminate between unilateral conductive and sensorineural hearing loss · Weber test lateralizes to the affected ear in conductive loss & to normal ear in sensorineural loss
Glossopharyngeal and Vagus nerves (cranial nerves 9 and 10)Together these supply power to the palate, throat and larynx and are responsible for normal speech and swallowing. The glossopharyngeal nerve supplies ordinary sensation to the posterior pharyngeal wall and sensation to the posterior one third of tongue. The vagus supplies the
A
B
C
Testing the type of deafnessThe Rinne test A+BThe Weber test C
A
B
C
Testing the type of deafnessThe Rinne test A+BThe Weber test C
A
B
C
Testing the type of deafnessThe Rinne test A+BThe Weber test C
A
B
C
Testing the type of deafnessThe Rinne test A+BThe Weber test C
Part 1 – Clinical skills Neurological Examination26
Chapter 1 history and examinationChapter 1 history and examination

muscles of the palate, pharynx and larynx. The vagus also has a large autonomic innervation including heart lungs and abdomen.
Testing the gag reflexRoutine testing can be performed by watching the soft palate and uvula move upwards in the midline in response to the patient saying “aah”. This is called the voluntary gag reflex. The gag reflex can also be elicited by gently touching each side of the soft palate with an orange stick or tongue depressor and asking the patient if the sensation was the same on both sides and watching the palate rise involuntarily. This is called the involuntary gag reflex. The involuntary gag tests both the afferent glossopharyngeal and the efferent vagus nerve whereas
the voluntary gag tests the efferent vagus nerve only. A unilateral paralysis of the palate deviates away from the side of the lesion. It indicates a lower motor neurone lesion of the vagus nerve e.g. a bulbar palsy. An upper motor neurone lesion has to be bilateral to result in any palatal paralysis and then the paralysis of the palate is total e.g. pseudo bulbar palsy. The main causes are brain stem stroke and motor neurone disease. Figure 1.12 Testing the gag reflex� Glossopharyngeal and vagus nerves�
Accessory nerve (cranial nerve 11)The accessory nerve supplies the sternomastoid and trapezius muscles as shown in the diagrams respectively. Wasting of both muscles should be checked for on inspection. Power is assessed by resisting the movements of both muscles. Note that the right sternomastoid turns the head to the left and vica versa. The strength is gauged by asking the patient to twist the head and the examiner placing a hand on the opposite side of the lower face and resisting the movement. Similarly the strength of the trapezius muscle can be gauged by asking the patient to first elevate or shrug the shoulders and then against resistance. Weakness of these muscles is unusual in clinical practice but does occur mostly in muscle disease and myasthenia gravis.
Figure 1.13 Examining the accessory nerve� Testing the sternomastoid and the trapezius�
Key point · test the sternomastoid and trapezius by resisting head turning and shoulder elevation
palate
uvula
tongue
Testing the gag re�exglossopharyngeal and vagus nerves
Testing the trapezius
Accessory nerveTesting the sternomastoid
Accessory nerve
Cranial nerve examination
William Howlett Neurology in Africa 27

Hypoglossal nerve (cranial nerve 12)The hypoglossal nerve is a purely motor nerve which supplies the muscles of the tongue. Testing the 12th cranial nerve is done by inspecting the tongue at rest and on protrusion. It is first inspected in the floor of the mouth checking carefully for evidence of wasting or fasciculation or spasticity. The mobility and strength of the tongue can be assessed by asking the patient to protrude it in and out quickly as well as from side to side. The strength of the two sides can be assessed by pushing the tongue into either cheek whilst opposing it with your thumb from the
outside and comparing the sides. A unilateral lower motor neurone weakness will result in atrophy and fasciculations on the affected side and also deviation towards the same side as the lesion. A unilateral upper motor neurone lesion will result in tongue deviation away from affected side.Figure 1.14 Examining the tongue� Hypoglossal nerve�
Key points · voluntary gag reflex is tested by getting the patient to say “aah” · involuntary gag reflex is tested by touching the soft palate on both sides · normal gag reflex causes a symmetrical elevation of the soft palate and uvula · tongue should be inspected at rest in the mouth, protruded & during movement
EXAMINATION OF THE LIMBSThe arms and legs are examined in the following order, inspection, tone, power, coordination, reflexes and sensation. The upper limbs are examined in the sitting position and the lower in the lying position.
InspectionThe examination starts with bedside observation for obvious deformities, disabilities, postures, contractures or involuntary limb movements or any other abnormality. The way the patient moves to undress for the examination also provides useful information concerning power and coordination. Start the inspection with the patient in the sitting position and the limbs exposed by looking at the skin for scars and trophic changes and the muscles for size, wasting and fasciculation. Compare the right side with the left. Muscle wasting should be looked for in the hands, arms, shoulders, trunk, thighs and legs. In the hands the front and back of the hands, including thenar and hypothenar eminences and the small hand muscles should be checked. Fasciculations are spontaneous rippling movements of muscle motor units and their presence implies a lower motor neurone lesion. They may take a few minutes of continuous observation to see. However they are often benign especially in the calves and after exercise.
ToneTone is tested by moving the limbs passively as the examiner feels the degree of resistance. Muscle tone is maintained by the stretch reflex which occurs on passive moving and stretching of muscles around joints. The patient should be relaxed and the joint put through its full range of movement while comparing sides. Tone is categorized as normal, decreased or increased. Decreased tone is uncommon and occurs in lower motor neurone lesions, muscle
A B C
Testing the tongue
Hypoglossal nerve
Part 1 – Clinical skills Neurological Examination28
Chapter 1 history and examinationChapter 1 history and examination

and cerebellar disease. Increased tone is classified as either pyramidal (upper motor neurone) or as extrapyramidal (Parkinson’s disease). In an upper motor neurone lesion increased tone is best appreciated in the arm as a spastic catch on rapid flexing and extending the elbow and on pronation and supination of the forearm. In the leg tone is best appreciated in the lying position with the legs straight by rolling the knee from side to side and on rapid flexing and extending the leg at the knee and ankle joints. The initial resistance and the sudden give away or release is called clasp knife rigidity. This is best appreciated just at the start of flexion at the knee and extension at the elbow. It may be necessary to get the patient to relax by distracting him by asking to count backwards from 100 and to try different speeds of passive movement. A rapid rhythmic persistent contraction and relaxation of the muscles is called clonus. This can be best elicited by dorsiflexing the ankle briskly and maintaining the pressure on the forefoot with the knee flexed to about 90 degrees. Persistent clonus or more than 5 beats is always abnormal and indicates an upper motor neurone lesion. Clonus occurs less commonly around other joints but may be present at the knee and wrist. In extrapyramidal disease the tone is increased and is classified as either lead pipe or cogwheel in type. The rigidity is equally stiff throughout both flexion and extension and is best appreciated by slowly fully flexing and extending the elbow and knee and by pronating and supinating the wrist. It may be increased by distracting the patient by asking him to move the contralateral limb e.g. tapping the thigh at the same time. Cog wheeling represents intrusion of rest tremor into lead pipe rigidity.
Figure 1.15 Testing tone� Roll the wrist� Roll the knee�
Key points · patient should be relaxed and the joint put through full range of movement passively · increased tone is either pyramidal (clasp knife) or extrapyramidal (lead pipe or cogwheel) · pyramidal rigidity is best appreciated at the start of rapid flexion at the elbow and knee · extrapyramidal rigidity is best elicited by slow flexion/extension of elbow/knee or rolling wrist · clonus is elicited by dorsiflexing the ankle briskly & maintaining pressure on the forefoot
PowerPower is tested in a proximal to distal direction comparing sides with the patient in the seated position for the upper limbs and the lying position for the lower limbs. The patient first demonstrates muscle strength by active movements and then the examiner opposes those movements. This is done by the examiner stabilizing the limb proximal to the joint where the movement is being tested and then passively resisting the movement. Recognizing normal power is a matter of experience and allowances have to be made for the sick, old, young and for
Testing tone Roll the wrist
Roll the knee
examination of the limbs
William Howlett Neurology in Africa 29
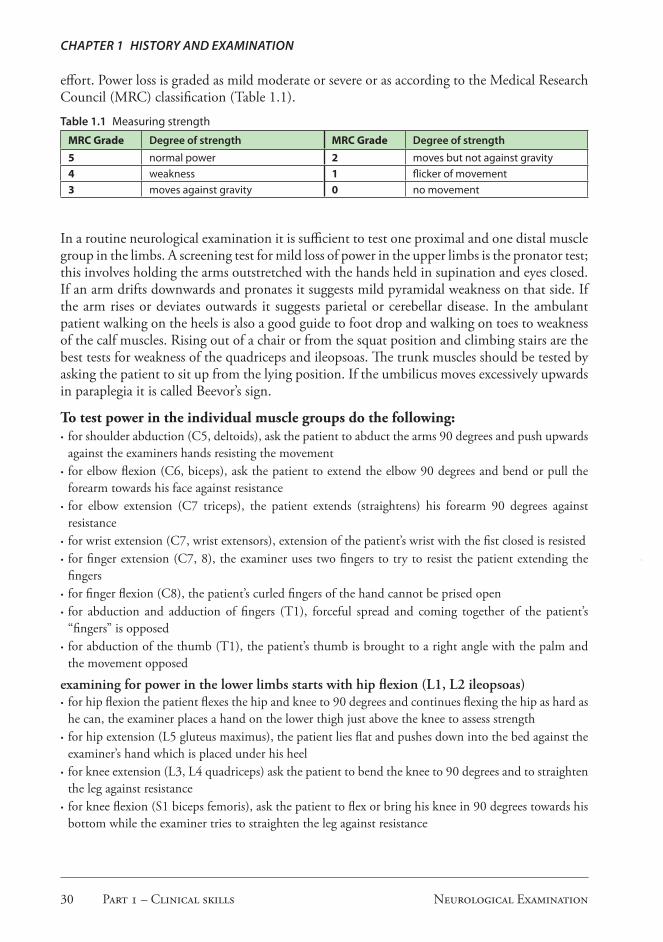
effort. Power loss is graded as mild moderate or severe or as according to the Medical Research Council (MRC) classification (Table 1.1).
Table 1.1 Measuring strength
MRC Grade Degree of strength MRC Grade Degree of strength
5 normal power 2 moves but not against gravity 4 weakness 1 flicker of movement3 moves against gravity 0 no movement
In a routine neurological examination it is sufficient to test one proximal and one distal muscle group in the limbs. A screening test for mild loss of power in the upper limbs is the pronator test; this involves holding the arms outstretched with the hands held in supination and eyes closed. If an arm drifts downwards and pronates it suggests mild pyramidal weakness on that side. If the arm rises or deviates outwards it suggests parietal or cerebellar disease. In the ambulant patient walking on the heels is also a good guide to foot drop and walking on toes to weakness of the calf muscles. Rising out of a chair or from the squat position and climbing stairs are the best tests for weakness of the quadriceps and ileopsoas. The trunk muscles should be tested by asking the patient to sit up from the lying position. If the umbilicus moves excessively upwards in paraplegia it is called Beevor’s sign.
To test power in the individual muscle groups do the following: · for shoulder abduction (C5, deltoids), ask the patient to abduct the arms 90 degrees and push upwards against the examiners hands resisting the movement
· for elbow flexion (C6, biceps), ask the patient to extend the elbow 90 degrees and bend or pull the forearm towards his face against resistance
· for elbow extension (C7 triceps), the patient extends (straightens) his forearm 90 degrees against resistance
· for wrist extension (C7, wrist extensors), extension of the patient’s wrist with the fist closed is resisted · for finger extension (C7, 8), the examiner uses two fingers to try to resist the patient extending the fingers
· for finger flexion (C8), the patient’s curled fingers of the hand cannot be prised open · for abduction and adduction of fingers (T1), forceful spread and coming together of the patient’s “fingers” is opposed
· for abduction of the thumb (T1), the patient’s thumb is brought to a right angle with the palm and the movement opposed
examining for power in the lower limbs starts with hip flexion (L1, L2 ileopsoas) · for hip flexion the patient flexes the hip and knee to 90 degrees and continues flexing the hip as hard as he can, the examiner places a hand on the lower thigh just above the knee to assess strength
· for hip extension (L5 gluteus maximus), the patient lies flat and pushes down into the bed against the examiner’s hand which is placed under his heel
· for knee extension (L3, L4 quadriceps) ask the patient to bend the knee to 90 degrees and to straighten the leg against resistance
· for knee flexion (S1 biceps femoris), ask the patient to flex or bring his knee in 90 degrees towards his bottom while the examiner tries to straighten the leg against resistance
Part 1 – Clinical skills Neurological Examination30
Chapter 1 history and examinationChapter 1 history and examination

· for foot dorsiflexion (L4, L5 tibialis anterior), ask the patient to extend the foot to 90 degrees while the examiner opposes the movement
· for plantar flexion (S1 gastrocnemius), the patient pushes his foot down towards the ground against resistance
Figure 1.16 Testing power
Key points · power should be attempted actively by the patient before being examined passively by doctor · power should be tested proximally before distally · weakness is graded as mild moderate and severe or 0-5 according to MRC classification · pattern of muscle weakness is a clue to the underlying disorder
Hip �exionIliopsoasLumbar plexus and femoral nerveL1 L2
Knee extensionQuadriceps femorisFemoral nerveL3 L4
Knee �exionHamstringsSciatic nerveL5 S1
Hip extensionGluteus maximusSciatic nerveL5 S1
Hip �exionQuadriceps femorisFemoral nerveL3 L4
Ankle dorsi�exionTibialis anteriorCommon peroneal nerveL4 L5
Plantar �exionGastrocnemius and soleusSciatic nerveS1 S2
Finger extensionExtensor digitorumRadial nerveC7
Elbow extensionTricepsRadial nerveC7
Elbow �exion (forearm midpronated)BrachioradialisRadial nerveC6
Finger �exionFlexor digitorumMedian and ulnar nerveC8
Shoulder abductionDeltoidAxillary nerveC5
ExtensorsRadial nerveC7
Wrist extension
Finger abductionDorsal interosselUlnar nerveT1
Thumb abductionAbductor pollicis brevisMedian nerveT1
examination of the limbs
William Howlett Neurology in Africa 31

CoordinationThe cerebellum and its connections are responsible for the coordination of voluntary movement. These movements depend on normal power and joint position sense. Any significant weakness or impairment of joint position sense invalidates the tests for coordination. Abnormalities of the cerebellar hemispheres produce ipsilateral signs. Cerebellar dysfunction is characterized by incoordination of speech, limbs and gait. The speech in cerebellar disease is dysarthric or slow and slurred with a typical scanning quality of getting stuck on the consonants. Nystagmus is a sign of cerebellar disease and is worse on looking to the side of the lesion. The main tests of incoordination are the finger nose test, the heel shin test and gait. These are carried out with the eyes open. Other clinical features are dysarthria, nystagmus and hypotonia of muscles.
The finger nose testThis test is carried out with the arms fully extended horizontally by asking the patient to touch the tip of his nose with the tip of the index finger of his right hand followed by the same with his left hand. An alternative method involves asking the patient to touch the tip of his nose
followed by touching the tip of the examiner’s index finger. This is called the finger nose finger test and has the advantage of two targets. The examiner’s index finger should be held at arm’s length away in front of the patient ensuring that the patient has to fully stretch to touch the finger. The examiner should observe the patient for any obvious limb ataxia and intention tremor with increased oscillation on nearing the target.Figure 1.17 Testing co-ordination� The finger-nose test�
The heel shin testThis is a two step test. The first step is asking the patient to first hold the foot up in the air, then step two to place the heel on the other knee and slowly run it down the shin. Any wobble on reaching the target or side to side or falling off movement on sliding down the shin points to cerebellar disease on the same side. Figure 1.18 Testing co-ordination� The heel-shin test�
Other tests of cerebellar incoordination are rapid alternating hand movements and dysmetria. The former is known as dysdiadochokinesia and is demonstrated by rapid tapping the palm of one hand alternately with the palm and back of the other hand and then repeating on the opposite hand. In the normal person the alternate movements are smooth and regular whereas in cerebellar disease they are irregular in amplitude and timing and are jerky. Difficulty judging distance or dysmetria is shown by repeatedly tapping the back of one hand with the palm of the other. This can normally be done rhythmically and quickly but in cerebellar disease the movement is uneven and jerky which can be both seen and heard. The rebound phenomenon occurs in cerebellar disease where the tapped outstretched hand oscillates before coming back to rest. The gait in cerebellar disease is wide based and ataxic and worse on walking a straight line with a tendency to fall to the side of the lesion.
Testing co-ordination
The �nger-nose test
Testing co-ordination The heel-shin test
Part 1 – Clinical skills Neurological Examination32
Chapter 1 history and examinationChapter 1 history and examination
Key points · finger nose test is performed with the patient sitting & observed for intention tremor · rapid alternating hand movements (dysdiadochokinesia) is a test of cerebellar disease · heel shin test is performed with the patient lying flat being observed for ataxia · the gait in cerebellar disease is wide based and ataxic · the main signs of cerebellar disease are dysarthria, nystagmus & incoordination
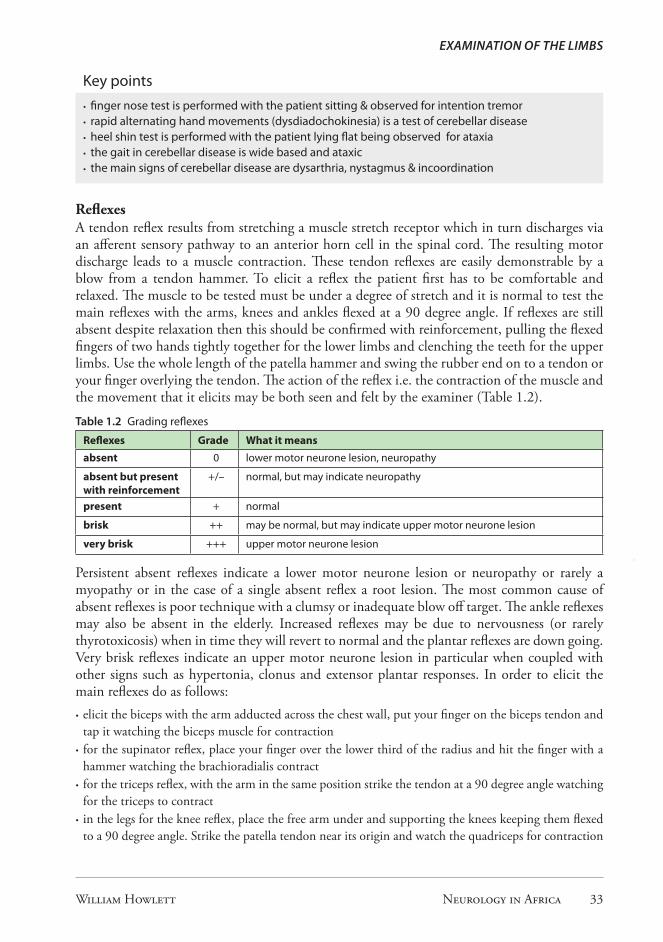
ReflexesA tendon reflex results from stretching a muscle stretch receptor which in turn discharges via an afferent sensory pathway to an anterior horn cell in the spinal cord. The resulting motor discharge leads to a muscle contraction. These tendon reflexes are easily demonstrable by a blow from a tendon hammer. To elicit a reflex the patient first has to be comfortable and relaxed. The muscle to be tested must be under a degree of stretch and it is normal to test the main reflexes with the arms, knees and ankles flexed at a 90 degree angle. If reflexes are still absent despite relaxation then this should be confirmed with reinforcement, pulling the flexed fingers of two hands tightly together for the lower limbs and clenching the teeth for the upper limbs. Use the whole length of the patella hammer and swing the rubber end on to a tendon or your finger overlying the tendon. The action of the reflex i.e. the contraction of the muscle and the movement that it elicits may be both seen and felt by the examiner (Table 1.2).
Table 1.2 Grading reflexes
Reflexes Grade What it meansabsent 0 lower motor neurone lesion, neuropathy
absent but present with reinforcement
+/– normal, but may indicate neuropathy
present + normal
brisk ++ may be normal, but may indicate upper motor neurone lesion
very brisk +++ upper motor neurone lesion
Persistent absent reflexes indicate a lower motor neurone lesion or neuropathy or rarely a myopathy or in the case of a single absent reflex a root lesion. The most common cause of absent reflexes is poor technique with a clumsy or inadequate blow off target. The ankle reflexes may also be absent in the elderly. Increased reflexes may be due to nervousness (or rarely thyrotoxicosis) when in time they will revert to normal and the plantar reflexes are down going. Very brisk reflexes indicate an upper motor neurone lesion in particular when coupled with other signs such as hypertonia, clonus and extensor plantar responses. In order to elicit the main reflexes do as follows: · elicit the biceps with the arm adducted across the chest wall, put your finger on the biceps tendon and tap it watching the biceps muscle for contraction
· for the supinator reflex, place your finger over the lower third of the radius and hit the finger with a hammer watching the brachioradialis contract
· for the triceps reflex, with the arm in the same position strike the tendon at a 90 degree angle watching for the triceps to contract
· in the legs for the knee reflex, place the free arm under and supporting the knees keeping them flexed to a 90 degree angle. Strike the patella tendon near its origin and watch the quadriceps for contraction
examination of the limbs
William Howlett Neurology in Africa 33

· for the ankle reflex, the knee should be flexed to 90 degrees with the leg in external rotation lying to the side and the medial malleolus pointing upwards. Hold the foot at 90 degree angle exerting gentle pressure on the toes and strike the Achilles tendon and look at the calf muscles for contraction.
· in order to elicit the plantar reflex, explain to the patient what you are going to do. Gently draw a blunt key up the lateral border of the sole of the foot crossing the foot pads or metatarsal heads. Look for the first movement of the big toe at the metatarsophalangeal joint. If the first movement is up going or extensor then this a Babinski sign and indicates an upper motor neurone lesion. In the calloused foot it may be useful to run the stimulus on the outside or lateral aspect of the foot
Figure 1.19 Testing reflexes
Key points · reflexes are elicited in the upper limbs with the patient sitting and in the lower limbs lying
· examiner needs to be skilled in placing finger over appropriate tendons and tapping them
· reflexes are either absent, reduced, normal or increased
· plantar response can be either up going (abnormal), or down going or mute (normal)
SensationThe sensory examination is often difficult, time consuming and requires the concentration of the examiner and the cooperation of the patient. The technique should be speedy and efficient. The aim of the examination is to detect any loss of sensation and the pattern of loss. There are five main modalities of sensation to test for, these are light touch, pin prick and temperature (superficial) and vibration and joint position (deep). The patient should be instructed about
The biceps reflexThe biceps reflex The supinator re�ex
C5,6The supinator re�exC5,6The triceps re�ex
C 7
The triceps re�exC 7
The knee re�exL3,4
The knee re�exL3,4
Testing the plantar responseTesting the plantar response
A
B
Testing the plantar response
A Normal
B Upgoing plantar response or Babinski sign
A
B
Testing the plantar response
A Normal
B Upgoing plantar response or Babinski sign
The ankle re�exS1The ankle re�ex
S1
Part 1 – Clinical skills Neurological Examination34
Chapter 1 history and examinationChapter 1 history and examination
the test being performed and first demonstrate the test you are using on familiar non affected places e.g. the face by asking the patient to say yes every time he feels the stimulus. Then start the examination with the patient’s eyes closed by testing from a distal to proximal direction touching main dermatomes and comparing right and left sides. The patient indicates that he has felt the stimulus by saying “yes” or by communicating some other way.
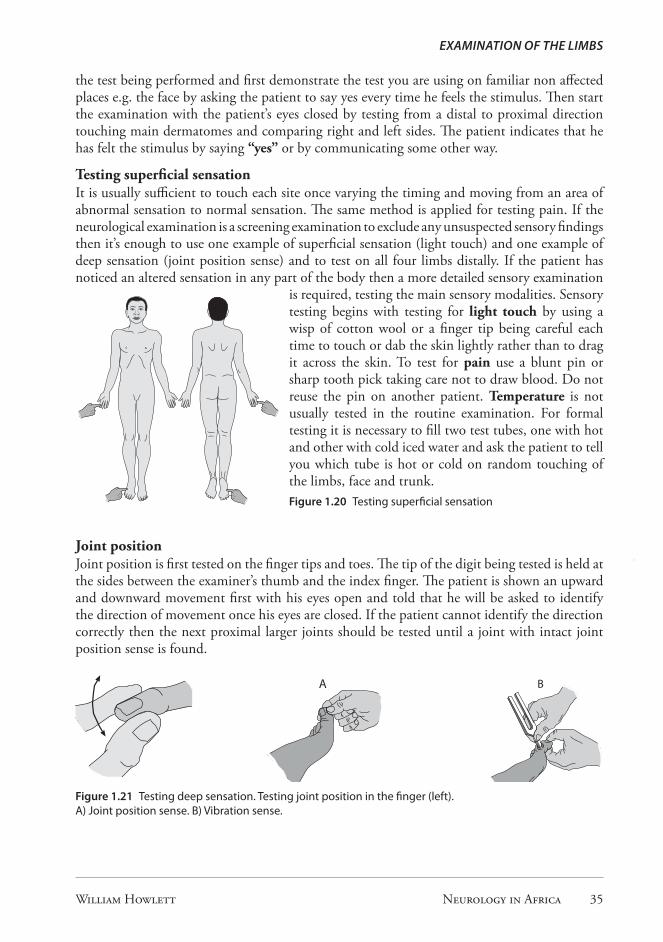
Testing superficial sensationIt is usually sufficient to touch each site once varying the timing and moving from an area of abnormal sensation to normal sensation. The same method is applied for testing pain. If the neurological examination is a screening examination to exclude any unsuspected sensory findings then it’s enough to use one example of superficial sensation (light touch) and one example of deep sensation (joint position sense) and to test on all four limbs distally. If the patient has noticed an altered sensation in any part of the body then a more detailed sensory examination
is required, testing the main sensory modalities. Sensory testing begins with testing for light touch by using a wisp of cotton wool or a finger tip being careful each time to touch or dab the skin lightly rather than to drag it across the skin. To test for pain use a blunt pin or sharp tooth pick taking care not to draw blood. Do not reuse the pin on another patient. Temperature is not usually tested in the routine examination. For formal testing it is necessary to fill two test tubes, one with hot and other with cold iced water and ask the patient to tell you which tube is hot or cold on random touching of the limbs, face and trunk.Figure 1.20 Testing superficial sensation
Joint positionJoint position is first tested on the finger tips and toes. The tip of the digit being tested is held at the sides between the examiner’s thumb and the index finger. The patient is shown an upward and downward movement first with his eyes open and told that he will be asked to identify the direction of movement once his eyes are closed. If the patient cannot identify the direction correctly then the next proximal larger joints should be tested until a joint with intact joint position sense is found.
Figure 1.21 Testing deep sensation� Testing joint position in the finger (left)� A) Joint position sense� B) Vibration sense�
Testing super�cial sensation light touch
Testing joint position in the �nger
A
B
Testing deep sensation
A Joint position senseB Vibration sense
A
B
Testing deep sensation
A Joint position senseB Vibration sense
examination of the limbs
William Howlett Neurology in Africa 35

VibrationVibration sense is tested using a 128 Hz or 256 Hz tuning fork. The beating fork should be first placed on the back of terminal phalanx of the index finger and big toe and the patient asked if he can feel the vibration. If not felt distally it must then be placed on the metacarpal phalangeal joints, wrist, elbow and shoulder in the upper limbs and the medial malleolus, tibial tuberosity in the lower limbs moving onto the anterior iliac crest, rib margin, sternum or clavicle in search of an intact vibration level. Vibration is often lost early on in neuropathies.
LocalizationThe pattern of sensory loss may indicate the underlying disease. A distal glove and stocking loss of sensation points to a peripheral neuropathy, loss of sensation below a level on the trunk points to a spinal cord lesion, hemisensory loss on the body points to a central brain lesion, loss of temperature discrimination on the face and trunk should suggest a spinothalamic lesion, and a dermatomal loss points to a nerve or nerve root lesion. Details concerning cortical sensory loss including sensory extinction, two point discrimination, graphanaesthesia, and astereognosis can be found in chapter 2.
Key points · patient should be trained to indicate each stimulus & the direction of movement of the joint · patient indicates stimulus by saying “yes” and type e�g� “sharp or blunt”, “hot or cold” · testing should be speedy, efficient, starting distally before moving proximally · routine sensory testing should be restricted to peripheral light touch & joint position · pattern and type of sensory loss helps to determine the underlying disorder
EXAMINATION OF THE GAITThe gait provides useful clues to the underlying neurological disorder and it is important to examine it. Ask the patient to walk normally with the arms hanging loose by the sides and observe the gait for the following; movement, balance, posture, arm swing, turning and symmetry. If the gait is abnormal note the main characteristic and whether the patient walks unaided or uses a stick or crutch. Note whether the patient is unsteady and if he is able to walk a straight line by putting one foot in front of the other. Gaits can then be categorized as symmetrical or asymmetrical. Examples are the small symmetrical steps of Parkinson’s disease and asymmetrical steps of hemiplegic gait. The main abnormal types of gaits are: hemiplegic, paraplegic, cerebellar, Parkinsonian, sensory ataxic, neuropathic and myopathic. These are described in chapter 2.Figure 1.22 Testing gait
Testing gait
The Romberg test (eyes closed)
Testing joint position sense
Part 1 – Clinical skills Neurological Examination36
Chapter 1 history and examinationChapter 1 history and examination

Romberg’s testTo carry out a Romberg’s test ask the patient to stand unsupported with his heels together, toes apart and eyes closed. Reassure the patient that you will catch him if he falls. If he falls or sways repeatedly with eyes closed but not with eyes open this is a positive test indicating impairment of joint position sense in the feet or posterior columns in the spinal cord (proprioception).
Key points in testing gait · ask the patient to stand with heels together, feet apart and eyes closed · observe for swaying or falling · ask the patient to walk normally with arms hanging loosely by the sides · observe for balance, posture, arm swing and unsteadiness · if ataxia is still suspected, ask the patient to walk a straight line & place one foot in front of the other
CONSCIOUSNESSConsciousness is a state of awareness of self and environment and any alteration or impairment requires objective measurement. In neurology patients the level of consciousness may range from being awake and fully conscious which is normal through confusion to altered consciousness and coma (Table 1.3). The level of alertness or confusion can be measured by checking for orientation in time, person and place. Coma can be measured using the Glasgow Coma Scale (GCS) (Table 1.5). Their value is that they produce objective measurement of the patient’s level of alertness (orientation) and consciousness (coma) which are important for the assessment and ongoing care of the patient.
Table 1.3 States of consciousness
Level Clinical features Measurement scaleNormal awake and fully conscious Confused inability to think and speak clearly with lack of
attention and memory and disorientation orientation in time, person and place (10/10)
Coma altered level of consciousness Glasgow Coma Scale (15/15)
Table 1.4 Testing for orientation 10/10*
Time Person Placetimedaymonthyear
nameageyear of birth
hospitaltown/districtcountry
* score one for each correct answer
ConsCiousness
William Howlett Neurology in Africa 37
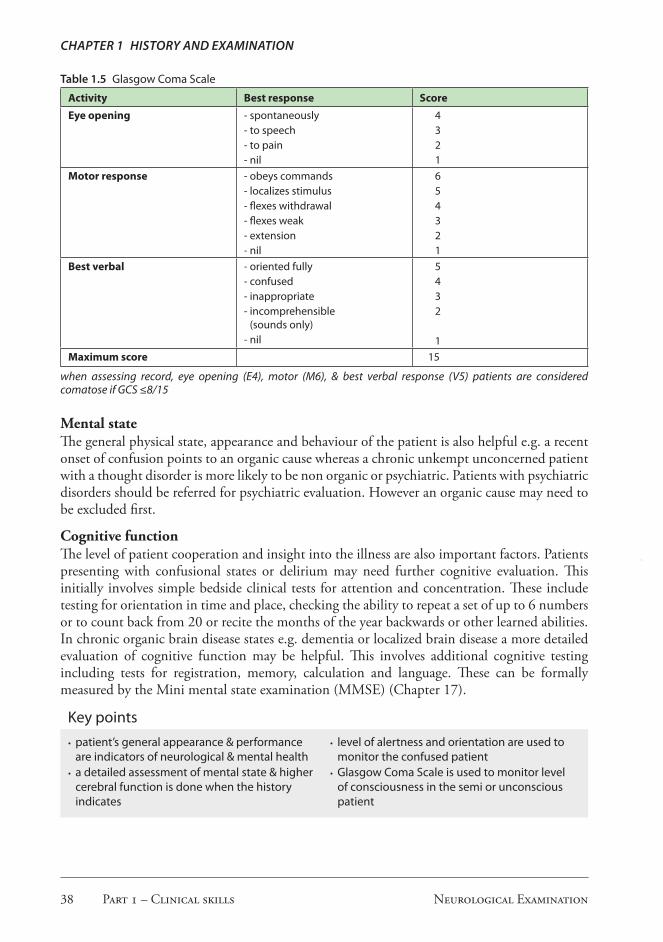
Table 1.5 Glasgow Coma Scale
Activity Best response ScoreEye opening - spontaneously
- to speech- to pain- nil
4321
Motor response - obeys commands- localizes stimulus- flexes withdrawal- flexes weak- extension- nil
654321
Best verbal - oriented fully- confused- inappropriate- incomprehensible
(sounds only)- nil
5432
1Maximum score 15
when assessing record, eye opening (E4), motor (M6), & best verbal response (V5) patients are considered comatose if GCS ≤8/15
Mental stateThe general physical state, appearance and behaviour of the patient is also helpful e.g. a recent onset of confusion points to an organic cause whereas a chronic unkempt unconcerned patient with a thought disorder is more likely to be non organic or psychiatric. Patients with psychiatric disorders should be referred for psychiatric evaluation. However an organic cause may need to be excluded first.
Cognitive functionThe level of patient cooperation and insight into the illness are also important factors. Patients presenting with confusional states or delirium may need further cognitive evaluation. This initially involves simple bedside clinical tests for attention and concentration. These include testing for orientation in time and place, checking the ability to repeat a set of up to 6 numbers or to count back from 20 or recite the months of the year backwards or other learned abilities. In chronic organic brain disease states e.g. dementia or localized brain disease a more detailed evaluation of cognitive function may be helpful. This involves additional cognitive testing including tests for registration, memory, calculation and language. These can be formally measured by the Mini mental state examination (MMSE) (Chapter 17).
Key points · patient’s general appearance & performance are indicators of neurological & mental health
· a detailed assessment of mental state & higher cerebral function is done when the history indicates
· level of alertness and orientation are used to monitor the confused patient
· Glasgow Coma Scale is used to monitor level of consciousness in the semi or unconscious patient
Part 1 – Clinical skills Neurological Examination38
Chapter 1 history and examinationChapter 1 history and examination

Other neurological signs · Signs of meningism · Frontal lobe release signs
· Superficial reflexes · Straight leg raising test
Signs of meningismThese signs are found in patients with meningitis, subarachnoid haemorrhage and other causes of meningism. However be aware that the neck may be stiff or rigid in other conditions such as cervical spondylosis, Parkinsonism and tetanus giving rise to a false positive sign of meningism.
· neck stiffness · Kernig’s sign · Brudzinski’s sign
Neck stiffnessThe patient should be lying flat. The head should be supported by placing your hands under the patient’s occiput until the weight of the head is carried in the hands indicating the patient has relaxed. Neck flexion should be induced slowly by gently lifting the head off the bed whilst at the same time feeling for tone or resistance to the movement. In the normal person the neck flexes easily without resistance with the chin usually reaching the chest. Neck stiffness is present when the neck is rigid or resists any attempt to passively flex the neck. This will result in failure to bring the chin onto the chest. Neck stiffness is the most sensitive of the signs of meningism. Figure 1.23 Examining for neck stiffness� Use your fingers to flex the neck whilst assessing the degree of resistance�
Kernig’s signThe patient should be lying flat. This is elicited by passively attempting to straighten the leg after flexing both the thigh and knee to an angle of greater than 90 degrees. In meningitis this is met by pain and resistance in the lumbar area as a result of stretching of inflamed nerve roots. In patients with meningeal irritation the sign is positive on both sides. Figure 1.24 Testing for meningism� Kernig’s sign�
Brudzinski’s signWhilst examining the patient for neck stiffness observe whether forward flexing of the neck induces any involuntary hip and knee flexion. Involuntary lower limb flexion indicates meningeal irritation. This is a sensitive test for meningitis in young children but not in adults.
Use your �ngers to �ex the neck whilst assesing the degree of resistance
Testing for neck sti�ness.
pain
Kernig´s sign
ConsCiousness
William Howlett Neurology in Africa 39

Frontal lobe release signs (FLRSs)These signs may be present infrequently in normal persons. However they occur more frequently and are usually exaggerated in frontal lobe disorders and other diffuse mainly cortical neurological disorders.
Snout reflexThis is elicited by pressing or tapping on the closed lips in the midline with a patella hammer or closed knuckle. In positive cases this elicits a puckering of the lips (orbicularis oris) and occasionally a contraction of the chin (mentalis muscle).
Palmomental reflexScratch the palm of the hand at the base of the thumb in a distal direction with a key. In positive cases there is a contraction of the chin (mentalis muscle) on the same side as the stimulus.
Grasp reflexPlace your fingers in the palm of the patient’s hand and stroke it gently whilst pulling your hand away. In positive cases the patient’s hand will involuntarily curl and grasp the examiner’s hand. A unilateral grasp reflex indicates contralateral frontal lobe pathology.
Superficial reflexesThese are present in healthy persons but are absent in an UMNL. The abdominal reflexes may also be absent in obese persons and after pregnancy and after abdominal surgery.
Abdominal reflexTest by stroking lightly with the sharp end of the patella hammer in each of the four quadrants of the abdomen from the outside in a diagonal or horizontal approach. The abdominal wall contracts in each quadrant in the normal patient.
Cremasteric reflexThis is performed in men. The inner aspect of the upper thigh is stroked lightly from below upwards. In the normal male this results in an elevation of the testes on the same side. Its absence may indicate an UMNL above the level of L1.
Straight leg raising testThis is a test for entrapment of the lumbar and sacral nerve roots. With the patient lying flat after placing a hand under the patient’s heel lift the fully extended or straightened leg. An angle of 90 degrees is normal but may be less in older patients. Limitation of movement with pain suggests nerve root entrapment on the affected side. Note the angle achieved and the difference if any between the two sides. The most common cause is herniation of an intervertebral disc.
Figure 1.25 Testing for sciatica� Lift leg to 90 degrees with leg fully extended�
pain
Lift leg to 90 degrees with leg fully extended
Part 1 – Clinical skills Neurological Examination40
Chapter 1 history and examinationChapter 1 history and examination

KEY TO BASIC NEUROLOGICAL EXAMINATIONGENERAL ASSESSMENT assess for alertness, orientation, level of consciousnessCRANIAL NERVESVisual acuity can you see normally, if vision is decreased then check VA
first cover one eye & read letters on this chart, repeat for other eyeVisual fields tell me when you see my finger tip moving, test on each side Fundoscopy look at the optic disc and fundusPupils shine bright light in each eye, look for pupillary constrictionEye movements follow my finger moving right left and up down
check for diplopia and any loss of eye movementsFacial sensation with your eyes shut, say “yes” when you feel me touching your face Facial movements inspect the face
look up at the ceilingclose your eyes tightly & don’t let me open them smile or show me your teeth
Hearing can you hear normally, if not examine each ear “repeat numbers I am whispering or speaking”use tuning fork tests only if deafness is confirmed
Palatal movement & tongue open your mouth and say “aah”, inspect gag reflex inspect tongue at rest, protruded and on movement
Neck/shoulders turn your head against my handshrug your shoulders against my hands
LIMBSInspection look for wasting and fasciculation in arms, legs & trunkTone bend and straighten the patient’s elbow & kneePower: Arms
Power: Legs
hold elbows out from your sides & push upwards bend & straighten your elbow bend your wrist & fingers upwards separate your fingers sideways bend your thumb upwards push your thigh upwards bend & straighten your knee push your foot down & upwards towards your face
Co-ordination touch tip of your nose with tip of your index fingerhold foot in the air, touch knee with heel & run it down the shin
Reflexes tap briskly the biceps, triceps, supinator, knee and ankle tendonselicit the plantar response
Sensation (eyes closed) say “yes” or ”indicate” when you feel me touching you “I am moving your finger/big toe� Tell me is it up or down”
GAITobserve standing, heels together & toes separated (eyes closed) observe walking normally, straight line, heel to toe
key to basiC neurologiCal examination
William Howlett Neurology in Africa 41

Selected referencesGinsberg Lionel, Neurology, Lecture Notes. Blackwell Publishing 8th edition 2005.Wilkinson Iain & Lennox Graham, Essential Neurology. Blackwell Publishing 4th edition 2005.Harrison Michael, Neurological Skills, A guide to examination and management in Neurology. Butterworth’s
1st edition 1987.Fuller Geraint, Neurological examination made easy, Churchill Livingstone. 3rd edition 2004.Donaghy Michael, Neurology. Oxford University Press 1st edition 1997.Turner, Bahra, Cikurel, Neurology. Crash Course, Elsevier Mosby 2nd edition 2006.O’Brien MD. Aids to the examination of the peripheral nervous system. Saunders 1st edition 2000.
Part 1 – Clinical skills Neurological Examination42
Chapter 1 history and examinationChapter 1 history and examination


![Rom J Morphol Embryol R J M E CASE REPORT Romanian … · Extensor digitorum brevis manus with “X” tendons 717 [8] McManis PG, Daube JR, Electromyographic evaluation of an accessory](https://static.fdocuments.in/doc/165x107/5d16a02888c993f36f8c67d9/rom-j-morphol-embryol-r-j-m-e-case-report-romanian-extensor-digitorum-brevis.jpg)


