Final Fantasy X guide
97
===================== III. Game Information ===================== ---------------- i. Game Controls ---------------- ---------------------------------------------------------- Circle |Confirm/Talk/Examine | ------------------------|---------------------------------| X |Cancel/Hold down to walk/Dive | ------------------------|---------------------------------| Triangle |Go to Menu Screen/Show character | |status window in sphere grid | |menu/Defend in battle(skip turn) | ------------------------|---------------------------------| Square |Scout Blitzball players | ------------------------|---------------------------------| Directional Buttons/ |Move character/Move cursor in | Left Analog Stick |battle | ------------------------|---------------------------------| Right Analog Stick |Used during Lulu's overdrive | |(rotate clockwise) | ------------------------|---------------------------------| L1 |Change characters in menu screen/| |Display switch window in battle | ------------------------|---------------------------------| L2 |Scroll menus back/Scroll down | |switch window in battle | ------------------------|---------------------------------| R1 |Change characters in menu screen/| |Scroll CTB window up | ------------------------|---------------------------------| R2 |Scroll menus forward/Scroll CTB | |window down | ------------------------|---------------------------------| L1+R1+L2+R2+Select+Start|Soft Reset(Press the buttons | |simultaneously) | ------------------------|---------------------------------| -------------- ii. Game Menus -------------- 1. The main menu screen ------------------------ ----------------------------------------------------- |HP ???/??? / \ | Sphere Grid | Lulu |MP ??/?? S|LvL. 2 ||--------------| -----------------------------\ / | Item | |HP ???/??? / \ |--------------| Tidus |MP ??/?? S|LvL. 1 || Ability | -----------------------------\ / |--------------| |HP ???/??? / \ | Overdrive | Rikku |MP ??/?? S|LvL. 0 ||--------------| -----------------------------\ / | Equip | |--------------| | Status | |--------------| | Aeons | |--------------| | Formation |
description
how to beat ff x
Transcript of Final Fantasy X guide

=====================III. Game Information=====================
----------------i. Game Controls----------------
----------------------------------------------------------Circle |Confirm/Talk/Examine |------------------------|---------------------------------|X |Cancel/Hold down to walk/Dive |------------------------|---------------------------------|Triangle |Go to Menu Screen/Show character |
|status window in sphere grid ||menu/Defend in battle(skip turn) |
------------------------|---------------------------------|Square |Scout Blitzball players |------------------------|---------------------------------|Directional Buttons/ |Move character/Move cursor in |Left Analog Stick |battle |------------------------|---------------------------------|Right Analog Stick |Used during Lulu's overdrive |
|(rotate clockwise) |------------------------|---------------------------------|L1 |Change characters in menu screen/|
|Display switch window in battle |------------------------|---------------------------------|L2 |Scroll menus back/Scroll down |
|switch window in battle |------------------------|---------------------------------|R1 |Change characters in menu screen/|
|Scroll CTB window up |------------------------|---------------------------------|R2 |Scroll menus forward/Scroll CTB |
|window down |------------------------|---------------------------------|L1+R1+L2+R2+Select+Start|Soft Reset(Press the buttons |
|simultaneously) |------------------------|---------------------------------|
--------------ii. Game Menus--------------
1. The main menu screen------------------------
-----------------------------------------------------|HP ???/??? / \ | Sphere Grid |
Lulu |MP ??/?? S|LvL. 2 ||--------------|-----------------------------\ / | Item |
|HP ???/??? / \ |--------------|Tidus |MP ??/?? S|LvL. 1 || Ability |-----------------------------\ / |--------------|
|HP ???/??? / \ | Overdrive |Rikku |MP ??/?? S|LvL. 0 ||--------------|-----------------------------\ / | Equip |
|--------------|| Status ||--------------|| Aeons ||--------------|| Formation |

|--------------|| Customize ||--------------|| Config ||--------------|| Help ||--------------|
-------------------------------------|Playing Time ?????? Gil-----------------------------------------------------Current Location-----------------------------------------------------
2. Config Menu---------------
-----------------------------------------------------------Sound | Stereo Mono |-----------------------------------------------------------|Subtitles | On Off |-----------------------------------------------------------|Names | On Off |-----------------------------------------------------------|Cursor | Default Memory |-----------------------------------------------------------|Help | On Off |-----------------------------------------------------------|Aeons | Default Short |-----------------------------------------------------------|Map | On Off |-----------------------------------------------------------|Language | English Japanese |-----------------------------------------------------------|Loading | HDD DVD-ROM |-----------------------------------------------------------
----------------iii. Game Basics----------------
1. Character Navigation-----------------------This is in fact no different from the previous installments of the series.Except that now, there will be an overhead map located at the top left cornerof your screen. The RED ARROW indicates the path you must take to proceed.The YELLOW ARROW indicates where you are. GREEN SQUARES are doors/rooms,while WHITE SQUARES are save spheres.
2. Battle System-----------------This game features a totally turn-based battle system, since the ATB is gone.Meaning, your opponents will not move until you have finished taking yourturn. There will be something called CTB on the right side of your screenindicating the order of turns to be taken during battle. Your turnscome either faster or slower depending on several factors, such as: timemagics (haste or slow) and what a party member did during his/her turn.
3. Element System-----------------As usual elements are used. There are 4 elements namely: Fire, Ice, Waterand Lightning. Fiends of a certain element are weak against opposingelements. Fire fiends are weak against ice while lightning fiends areweak against water and vice versa.
4. Character Customization--------------------------Characters are customized via the sphere grid. You receive AP after
every battles won. When enough AP has been accumulated then, you gainsphere levels (S.LVL) which permits you to move around the sphere gridand activate nodes.
5. Equipment Customization--------------------------Equiments, that is weapons and armors can be customized by addingdifferent abilities to them. But you must have all the necessary itemsrequired to add an ability you want a weapon or armor to have.
6. Save Spheres---------------There are 3 types of save sphere in this game:- Traveler's Save Sphere Level 1: Allows you to save your game.- Traveler's Save Sphere Level 2: Allows you to save your game
and play blitzball.- Traveler's Save Sphere Level 3: Allows you to save your game,
play blitzball and board the airship.
/////////////////////////////////////////////////////////////////////Note: Touching the save sphere fully restores your party's HP and MP./////////////////////////////////////////////////////////////////////
-------------------iv. Character Stats-------------------
Strength Determines the overall power of your physical attacks.The higher the value, the stronger your attacks.
Defense - Determines your character's resistance to physicalattacks.
Magic - Determines the strength of the character's magic. Thisseems to affect the strength of your aeons as well.
Magic Defense - Determines your character's resistance againstmagical attacks.
Agility - Determines the speed of the character's CTB. The higherthe value, the character is more likely to have more turnsduring battle.
Luck - Determines the amount of items stolen.
Evade - Determines the character's ability to evade physical attacks.
Accuracy - Determines the character's chances in successfully hittingan opponent with physical attacks.
================IV. Walkthrough================
+=+=+=+=+=+=+=+=+=+=+=+=+=+=+=+=+=+=+=+=+=+=+=+=+=+=+=+=+=+=+=+=+=+=+=+=+=+=+i. WALKTHROUGH+=+=+=+=+=+=+=+=+=+=+=+=+=+=+=+=+=+=+=+=+=+=+=+=+=+=+=+=+=+=+=+=+=+=+=+=+=+=+
First of all, when you choose NEW GAME on the main menu screen, you'll begiven several options, which you should confirm to proceed with the game.Here are the choices:
First set of options--------------------You'll be asked about which sphere grid you want to use.
-> Original Sphere Grid

-> International Sphere Grid
Second set of options---------------------You'll be asked to confirm whether or not you're sure about the choiceyou've made above.
-> Yes-> No
Third set of options--------------------Your choice here, affects the language in which the subtitles, game menus,etc, will be in. (The voiceovers are in English only.)
-> Japanese-> English
With that done, let's move on to the guide!
////////////////////////////////////////////////////////////////////////////Note: Press Ctrl+F and check match case, then type the keyword in CAPITAL
letters to jump to a specific part of the walkthrough. Look at thetable of contents for the keywords :)
////////////////////////////////////////////////////////////////////////////
=================ZANARKAND STADIUM=================
After the FMV, you'll be controlling Tidus. Just go south and talk to the2 girls or the 3 children. You can rename him if you want. Afterwards thegame will begin and Tidus will leave. When you regain control, just keepgoing east. On the next screen head north into the building. You'll watchthe blitzball game, then Sin will attack Zanarkand. When you regain control,head south towards the screen and you'll meet up with Auron. After theirshort talk about Sin, you'll have to fight some sinscales. These are easy,just attack. After that there will be a boss.
+=+=+=+=+=+=+=+=+=+=+=+=+=+=+=+=+=+=+=+=+=+=+=+=+=+=+=+=+=+=+=+=+=+=+=+=+=BOSS: SINSPAWN AMMES+=+=+=+=+=+=+=+=+=+=+=+=+=+=+=+=+=+=+=+=+=+=+=+=+=+=+=+=+=+=+=+=+=+=+=+=+=HP: 2400AP: 0Gil: 0Items: noneEquip: noneSteal: N/A
This one is very easy. First, you'll be taught about how to use overdrives.Auron's Dragon Fang will get rid of all the sinscales. As for the Ammes,just attack it and unleash your Overdrive when available. It can't killyou even at 1 HP so don't worry.+=+=+=+=+=+=+=+=+=+=+=+=+=+=+=+=+=+=+=+=+=+=+=+=+=+=+=+=+=+=+=+=+=+=+=+=+=+=
There will be a save sphere here, so save your game if you want. You'llfight those sinscales again. Just keep attacking them until Auron tellsyou to destroy the machine on the right. After a few scenes you'll seean FMV of Tidus being absorbed into Sin with Auron.
=====RUINS=====Treasures: Hi-Potion x2, Ether, Potion x2, 200 GilKey Items: Withered Bouquet, Flint
Head to the circular platform with a boy on it. Hold X to dive. You'll be in
the ruins. Head west for a chest with 2 Potions. Go back into the water thenhead east for a chest with 200 Gil. Head back into the water again, thistime go north. There's a save sphere here, take the west path to the end fora chest with a Hi-Potion. Go back, then head north. You'll fight a groupof Sahagins. Kill two of them and a big fish will come.
+=+=+=+=+=+=+=+=+=+=+=+=+=+=+=+=+=+=+=+=+=+=+=+=+=+=+=+=+=+=+=+=+=+=+=+=+=+=BOSS: GEOSGAENO+=+=+=+=+=+=+=+=+=+=+=+=+=+=+=+=+=+=+=+=+=+=+=+=+=+=+=+=+=+=+=+=+=+=+=+=+=+=HP: ?AP: 0Gil: 0Items: noneEquip: noneSteal: N/A
This is another easy one. Just attack it, for about three to four times andheal when you need to.+=+=+=+=+=+=+=+=+=+=+=+=+=+=+=+=+=+=+=+=+=+=+=+=+=+=+=+=+=+=+=+=+=+=+=+=+=+=
After some scenes, go north and up the stairs. You'll be at the main halland you'll need fire. Now, head north into the room, then inside head alittle bit south for a chest with an Ether. Still in the same room, headnorth and up the stairs to get the Withered Bouquet, keep going until theend of the path for a chest with a Hi-Potion. Head back to the main hall,then into the room southwest. There will be a save sphere here, you can saveyour game here if you want before going in. In the room, take the Flint.Head back out to the main hall and examine the wood at the center.
There will be some more scenes, then Tidus will be attacked.
+=+=+=+=+=+=+=+=+=+=+=+=+=+=+=+=+=+=+=+=+=+=+=+=+=+=+=+=+=+=+=+=+=+=+=+=+=+=BOSS: KLIKK+=+=+=+=+=+=+=+=+=+=+=+=+=+=+=+=+=+=+=+=+=+=+=+=+=+=+=+=+=+=+=+=+=+=+=+=+=+=HP: 1500+AP: 5Gil: 100Items: Ability Sphere x2Equip: noneSteal: Grenades x3
This is another easy one. Have Rikku use her grenades to deal about 300+damage every turn. If you happen to run out of grenades, just steal. HaveTidus attack it or use Potions if necessary. You'll win eventually.+=+=+=+=+=+=+=+=+=+=+=+=+=+=+=+=+=+=+=+=+=+=+=+=+=+=+=+=+=+=+=+=+=+=+=+=+=+=+=
You'll be taken to their ship afterwards.
============SALVAGE SHIP============Treasures: Potion x3Key Item: Al Bhed Primer Vol. 1
The people here will be speaking the Al Bhed language. Tidus will be asked towork. When you regain control, save your game. Then head to the right side ofthe upper deck to get the Al Bhed Primer Vol. 1. Then talk to one of the guysand he'll give you 3 Potions. Talk to Rikku and you'll learn how to usethe sphere grid. Talk to Rikku again. You'll be swimming now, dive andmove towards the red indicator at the end. Keep going until after the nextscreen.
================UNDERWATER RUINS================
There will be a save sphere behind you, save if you want. Examine the blue

panel up ahead. This will open a new path. Go in. You'll be fighting agroup of Piranhas here, I suggest that you steal some grenades from them,you'll need it later. After the battle, examine the machine at the center.Then head back out. You'll have to fight another boss.
+=+=+=+=+=+=+=+=+=+=+=+=+=+=+=+=+=+=+=+=+=+=+=+=+=+=+=+=+=+=+=+=+=+=+=+=+=+=BOSS: TROS+=+=+=+=+=+=+=+=+=+=+=+=+=+=+=+=+=+=+=+=+=+=+=+=+=+=+=+=+=+=+=+=+=+=+=+=+=+=HP: 2,100+AP: 5Gil: 100Items: noneEquip: noneSteal: Grenades x2
This is also quite easy. He'll be hiding behind the pillar, thus Tidus won'tbe able attack him. So, have Tidus cast Cheer or on Standby using theTrigger Command. As for the Rikku use her grenades, you'll be able to hit himeven from that distance. Tros will attack you and hide again. With Tidus,open the Trigger Command menu again then choose Pincer Attack. They will nowattack Tros from both sides, and this time he can't escape so just pummel himuntil he dies.+=+=+=+=+=+=+=+=+=+=+=+=+=+=+=+=+=+=+=+=+=+=+=+=+=+=+=+=+=+=+=+=+=+=+=+=+=+=+=
After the battle follow Rikku towards the exit. You'll be back on the ship.There will be another scene with Tidus talking to Rikku about Zanarkandand other things. Sin will come and attack the ship. You'll be asked if youwish to save your game afterwards.
======BESAID======Treasures: Potion x5, Hi-Potion x2, Pheonix Down x5, Antidote x4, 600 Gil,
Ether, Seeker's Ring, RemedyKey Items: Moon Crest, Al Bhed Primer Vol. 2
You'll have to watch some scenes again. When you regain control, headashore then go west for a chest with 2 Antidotes. Go back into the water,this time head east for a chest with a Moon Crest. Head to where theBesaid Aurochs are. then you'll see more scenes. When you regain control,talk to the Blitball players several times and you'll receive some items.
Just follow Wakka to the valley, and he'll push Tidus off the cliff andinto the water. In the water you should notice a chest, dive to get aPheonix Down. Head towards the red indicator at the end, dive along theway for a chest with a Hi-Potion. There will be another chest fartherahead with 2 Antidotes.
After a short talk between Wakka and Tidus, you'll be at Besaid Village.Here, you'll have to look around. Proceed to the shop(the first houseto your left) there will be a chest with a Pheonix Down. Head for theCrusader's Lodge. Get the Al Bhed Primer Vol. 2 by the entrance.With that done, head for the temple up ahead.
You'll see another scene here, about Braska. After that, head back outand find Wakka. After the scene, go all the way back to the temple.Some more scenes will take place and you'll end up in the Cloisterof Trials.
===========================CLOISTER OF TRIALS (BESAID)===========================Treasures: Rod of Wisdom
Examine the glyph to the north, then touch the one to the right. Take theGlyph Sphere in the next room, then head down the next flight of stairs.Insert it into the recess you see on the door. Now, in the next room,

go west and you'll see a pedestal. Now, examine the symbols on the wallon the opposite side of the pedestal. The wall will open, take the BesaidSphere inside and insert it into the pedestal. Now, head back to the doorwhere you inserted the Glyph Sphere. Remove the sphere. Insert it into therecess on the left wall, take the Destruction Sphere. Insert it into therecess where you found the Besaid Sphere. This will reveal a treasurewith the Rod of Wisdom. Head back to where the pedestal is and push ittowards the shining glyph on the floor.
Wakka will come in. You will see some scenes, then an FMV. After that,head out of the temple and proceed to where Wakka is. There will beanother scene and you will receive your first aeon, Valefor.
Later, you'll see some scenes again. Just talk to Wakka afterwards. Thenext morning, Wakka will give you a new sword. When you regain control,you'll now have Yuna and Lulu in your party. Just follow the path to theend, you'll also have some tutorials on battling basics.
Keep going towards the red indicator and Tidus will be ambushed by a Ronso.
+=+=+=+=+=+=+=+=+=+=+=+=+=+=+=+=+=+=+=+=+=+=+=+=+=+=+=+=+=+=+=+=+=+=+=+=+=+=BATTLE: KIMAHRI+=+=+=+=+=+=+=+=+=+=+=+=+=+=+=+=+=+=+=+=+=+=+=+=+=+=+=+=+=+=+=+=+=+=+=+=+=+=HP: 750AP: 3Gil: 100Items: Ability Sphere x2Equip: Metal Shield/Metal Armguard (varies)Steal: N/A
This is an ordinary battle, not a boss. Just use normal attacks againsthim. He's quite easy, the only move you have to watch out for is his Jumpwhich deals considerable damage. Heal when you run low on HP. Unleash yourOverdrive when available.+=+=+=+=+=+=+=+=+=+=+=+=+=+=+=+=+=+=+=+=+=+=+=+=+=+=+=+=+=+=+=+=+=+=+=+=+=+=
Wakka will interrupt the fight. Keep following the path, you'll have atutorial on using Aeons, and on using status attacks along the way.You'll be at the beach. Save your game. Talk to the people here andreceive some items. Board the ship afterwards.
=========S.S. LIKI=========Treasures: None
After the scene talk to Wakka, then to Yuna. There will be more scenes.Then Sin will come and attack the ship.
+=+=+=+=+=+=+=+=+=+=+=+=+=+=+=+=+=+=+=+=+=+=+=+=+=+=+=+=+=+=+=+=+=+=+=+=+=+=BOSS: SIN/SINSCALES+=+=+=+=+=+=+=+=+=+=+=+=+=+=+=+=+=+=+=+=+=+=+=+=+=+=+=+=+=+=+=+=+=+=+=+=+=+=HP: 2,000/200 eachAP: 0Gil: 0Items: noneEquip: noneSteal: N/A
This is another easy one. First, have Tidus cast Cheer and/or Haste (if youhave it) As for Wakka and Lulu, have them to focus on the fin. Have Yuna inas the main healer. Then have Tidus and Kimahri attack the sincales. Don'tkill all three though, just leave one. You should be fine.+=+=+=+=+=+=+=+=+=+=+=+=+=+=+=+=+=+=+=+=+=+=+=+=+=+=+=+=+=+=+=+=+=+=+=+=+=+=
After the battle, there will be a scene. Then another boss.

+=+=+=+=+=+=+=+=+=+=+=+=+=+=+=+=+=+=+=+=+=+=+=+=+=+=+=+=+=+=+=+=+=+=+=+=+=+=BOSS: SINSPAWN ECHUILLES+=+=+=+=+=+=+=+=+=+=+=+=+=+=+=+=+=+=+=+=+=+=+=+=+=+=+=+=+=+=+=+=+=+=+=+=+=+=HP: 2,268AP: 10Gil: 573Items: Power Sphere, Ability Sphere x3, Mana Sphere x4Equip: Red Ring, Blue Armguard/Liquid Steel, Ice Ball (varies)Steal: N/A
This fight is easy but long. First, have Wakka use Dark Attack on Echuilles,so that his Drain Touch won't hurt you. Have Tidus attack, and cast Cheerpreferably every other turn. As for Wakka, have him concentrate on the bossas well. Ignore the little fishies, even though they can get pretty annoying.What are those potions for anyway, right? Once the boss uses Blender,heal at once. When your Overdrives become available use it.+=+=+=+=+=+=+=+=+=+=+=+=+=+=+=+=+=+=+=+=+=+=+=+=+=+=+=+=+=+=+=+=+=+=+=+=+=+=
There will be an FMV of Sin obliterating Kilika.
======KILIKA======Treasures: Potion x3, EtherKey Item: Al Bhed Primer Vol. 4
When you regain control after some scenes, save your game first. Head eastthen west. There'll be more scenes about the "sending" and an FMV. Thenext morning, leave the inn. Datto will tell you to go see Wakka. Head forthe house to the west first to get 3 Potions from the chest there. Go eastto the next screen and into the Tavern to get the Al Bhed Primer Vol. 4.Go back to the previous screen and head west, save the kid there. Now goback to the Tavern, and grab the chest with an Ether. Go back to theprevious screen again and head east to find Wakka. Head all the way westto get to the woods.
============KILIKA WOODS============Treasures: Remedy, Elixir, Hi-Potion, NulBlaze Shield, Scout,
Mana Sphere x2, Luck Sphere, Antidote x4
I suggest you get all the treasures here first before fighting Lord Ochu.
When you regain control after the short scene, save your game first. Now,from the save sphere head east to the end for a chest with 2 Mana Spheres.Go back to the save sphere and this time head west, then north for a chestwith a Scout. Follow the path and talk to the Crusader to receive a Remedy.Keep following the same path and talk to another Crusader for a Hi-Potion.From there, go north then west for a Luck Sphere. Now go all the way backto the save sphere and head north, talk to Luzzu several times and you'llreceive 4 Antidotes. Its time to fight Lord Ochu. But before you do thatsave first, just in case :)
+=+=+=+=+=+=+=+=+=+=+=+=+=+=+=+=+=+=+=+=+=+=+=+=+=+=+=+=+=+=+=+=+=+=+=+=+=+=BATTLE: LORD OCHU+=+=+=+=+=+=+=+=+=+=+=+=+=+=+=+=+=+=+=+=+=+=+=+=+=+=+=+=+=+=+=+=+=+=+=+=+=+=HP: 4,649AP: 40Gil: 420Items: HP Sphere/MP Sphere (varies)Equip: Variable Mog/Bright Bangle (varies)Steal: N/A
Just have Lulu use Fire magic against this guy. That should deal about 400+damage every turn. Have Tidus and Kimahri attack and Yuna heal or use Esunawhen you get poisoned. As for Wakka, have him use his Silence Attack to

prevent it from casting Water magic. Once you have dealt sufficient damage,Lord Ochu will sleep. When this happens, summon Valefor and wake it up.Its Earthquake won't hurt you now. Keep casting Fire and that should do it.+=+=+=+=+=+=+=+=+=+=+=+=+=+=+=+=+=+=+=+=+=+=+=+=+=+=+=+=+=+=+=+=+=+=+=+=+=+=
/////////////////////////////////////////////////////////////////////////////Note: You can avoid fighting Lord Ochu by going around it through the back.
Also, never try to distill anything from him, because if you do, youwon't receive any HP Sphere or MP Sphere.
/////////////////////////////////////////////////////////////////////////////
Talk to Luzzu after you win to receive an Elixir. Continue north. Once youregain control after the short scene, go up and save your game. You'll befighting another boss.
+=+=+=+=+=+=+=+=+=+=+=+=+=+=+=+=+=+=+=+=+=+=+=+=+=+=+=+=+=+=+=+=+=+=+=+=+=+=BOSS: SINSPAWN GENEAUX/TENTACLES+=+=+=+=+=+=+=+=+=+=+=+=+=+=+=+=+=+=+=+=+=+=+=+=+=+=+=+=+=+=+=+=+=+=+=+=+=+=HP: 3,000/450 eachAP: 82Gil: 350Items: Speed Sphere x2, Power Sphere x6Equip: Bright Armlet/Bright Bangle (varies)Steal: N/A
Kill its tentacles first. Once they're out, use magic (Fire especially) onGeneaux. It'll reveal itself. Now just attack or use Fire magic on it. Youcan also summon Valefor here and use Sonic Wings to delay its turn severaltimes. Just heal when you need to.+=+=+=+=+=+=+=+=+=+=+=+=+=+=+=+=+=+=+=+=+=+=+=+=+=+=+=+=+=+=+=+=+=+=+=+=+=+=
After the battle, continue up into the temple.
=============KILIKA TEMPLE=============
Here, go north and you'll see some scenes. Proceed to the temple afterwards.Wakka will be praying, you can choose to pray too if you like. Then therewill some more scenes, this time with Dona. Once you regain control, gonorth into the door. After the short scene, wait for the elevator to comeback up. Dona and Barthello will come in and play a little game with Tidusjust as she said. You'll be taken down to another Cloister of Trials.
===========================CLOISTER OF TRIALS (KILIKA)===========================Treasures: Red Armlet
Take the Kilika Sphere from the pedestal on the left and insert it into thedoor. This will burn the door down. Take the sphere back out and go throughthe door. In the next room, insert the Kilika Sphere into the slot on thenorthern wall. A glyph will appear. Take the Kilika Sphere out and insert itinto the recess on either side. Now examine the glyph on the wall, a newpath will open. In the next area, take the Kilika Sphere from the right walland insert it into any empty slot outside. Take the Glyph Sphere from thepedstal and insert it into the recess in the next room. A new path will open.Go in and take the Destruction Sphere. Now step on the shining panel on thefloor to make the pedestal appear near you. Go back to the previous room,take one Kilika Sphere and insert it into the pedestal. Push the pedestalonto the shining panel on the floor. It will reveal another Kilika Spherebelow. Take the Kilika Sphere and insert it into the recess in the roomwhere you got the Destruction Sphere. Now, insert the Destruction Sphereinto the recess below. This will destroy the wall and reveal a chest withthe Red Armlet. Head back up and take the Kilika Sphere. Insert it intorecess at the door up ahead, then take it back out. Go through the door.

In the next room, talk to Wakka. Then try to leave and Yuna will come out.You now have Ifrit. Leave the temple and you'll see some scenes. When youregain control once more, go all the way back to the village and board theship (head south from the Tavern).
==========S.S. WINNO==========Treasures: Hi-PotionKey Item: Al Bhed Primer Vol. 5
When you regain control of Tidus in the Cabin go a little bit north andcheck along the left side for a chest with a Hi-Potion. Then head eastinto the door. You'll meet O'aka here, you can lend him some gil. Notethat the more gil you lend him, the cheaper his stuffs will be later on.Go up the stairs to the deck, head to the bridge (the door to your left)and get the Al Bhed Primer Vol. 5. Go up the stairs listen to thedialogue between Wakka and Lulu. Keep going back up to hear the entirestory. When that's done, head back down and head north to the frontdeck (where the blitzball is)
Its time for the Jecht Shot Challenge. Here, you have to press thecorresponding directional buttons plus circle simultaneously depending onwhere the text appears on your screen. For example, if the text appears atthe TOP LEFT corner of your screen, then you would have to press UP+LEFT+CIRCLE simultaneosly. Just press CIRCLE if it appears at the CENTER though.
///////////////////////////////////////////////////////////////////////////Tip: I recommend using the LEFT ANALOG STICK in executing the directional
button commands since its easier that way.///////////////////////////////////////////////////////////////////////////
If you manage to execute all the commands correctly, Tidus will hit the ball.If not, he will miss. Also, if you manage to successfully perform it you'llbe able to use the technique in all your Blitzball games once you reachlevel 3.
After that you'll see some scenes, then you'll be asked if you wish to saveyour game.
====LUCA====Treasures: Hi-Potion x2, Pheonix Down x2, Tidal Spear, 1600 Gil, HP Sphere,
Magic Sphere, Strength SphereKey Items: Al Bhed Primer Vol. 6, Al Bhed Primer Vol. 7
There will be an FMV, and some scenes where Yuna will suggest that you gosee Mika. When you regain control just go south, there will be more scenes.Then you'll be asked to save your game again. After that, Yuna will askTidus to accompany her and find Auron.
////////////////////////////////////////////////////////////////////////////Note: I won't be giving directions on where to find the treasures here,
since it can become extremely confusing if I did. So, I'll just givethe locations instead.
////////////////////////////////////////////////////////////////////////////
When you regain control once more, find the treasures. Here are thelocations:
Stadium Basement B: Hi-Potion x2, Al Bhed Primer Vol. 6Number 1 Dock: Tidal Spear, 600 GilNumber 2 Dock: Pheonix Down x2Number 5 Dock: HP Sphere, Magic SphereSphere Theater: Al Bhed Primer Vol. 7City Limits: 1000 Gil

When you're done, go all the way back to the save sphere (main gate) and gosouth. After the scene head east towards the red indicator. Again, therewill be a short scene. When you regain control, head north into the bar.
Yuna will be kidnapped by the Al Bhed Psyches. Proceed to Dock 4, justfollow the red indicator. You'll be fighting some Al Bhed machinas alongthe way. After the scenes, save your game and head east. Another boss fight.
+=+=+=+=+=+=+=+=+=+=+=+=+=+=+=+=+=+=+=+=+=+=+=+=+=+=+=+=+=+=+=+=+=+=+=+=+=+=BOSS: OBLITZERATOR+=+=+=+=+=+=+=+=+=+=+=+=+=+=+=+=+=+=+=+=+=+=+=+=+=+=+=+=+=+=+=+=+=+=+=+=+=+=HP: 6,000AP: 36Gil: 58Items: ElixirEquip: Metal Armlet/Thunder Moomba (varies)Steal: N/A
Another easy one. First, have Tidus cast Haste on Lulu. Then have Lulu castThunder on the crane (3 times) to activate it. Once activated, have Tidusoperate it using the Trigger Command. Doing this will damage the boss for5200+ HP. Now just attack it with Tidus and Lulu cast one last Thundermagic to kill it.+=+=+=+=+=+=+=+=+=+=+=+=+=+=+=+=+=+=+=+=+=+=+=+=+=+=+=+=+=+=+=+=+=+=+=+=+=+=
After a long scene. Go all the way back to the Auroch's locker room. Morescenes. Talk to Wakka afterwards. Its time for your first Blitzball match.
This one will be tough. The Goers have very good shooters, so its highlyunlikely that Keepa will be able to stop their shots. But its possibleto win even without the Jecht Shot ability. I won after 4 overtimes! :)
You'll receive a Strength Sphere if you win.
////////////////////////////////////////////////////////////////////////////Here are some tips: Try to pass the ball around to enable your shooter tohave a clear path towards the goal. Secondly, if you see 1 opposing playerbehind you, press square immediately so that you'll have an easier timebreaking through. And lastly, once you score just pass the ball around towaste the clock, this one is risky but it works.////////////////////////////////////////////////////////////////////////////
Strategy from: Ulrich Unterbrunner ([email protected])---------------------------------------------------------------
In Luca it is also possible to win the Blitzball-match without overtimeusing the sphere shot. In the first half you have to play around withinyour team, so that Tidus gets enought experience for lvl 3 and the Lucaguys don't score. In the second half (at least I did it that way - and itcost me about 25 tries) by using Tidus' sphere-technique I scored first.Then Luca scored. Wakka came in at 1-1. Using his Venom Shot. I scored,2-1 at 4:50. No time for Luca to hit me another time. Repeated it twiceand it worked out properly.+=+=+=+=+=+=+=+=+=+=+=+=+=+=+=+=+=+=+=+=+=+=+=+=+=+=+=+=+=+=+=+=+=+=+=+=+=+=
After the match, fiends will pop out of nowhere. Just fight your way through.Outside, you'll be controlling Auron against a cheap fiend (one attack and itdies) Wakka and Tidus will meet up with him. You'll battle a bird this time.There will be an FMV of Seymour showing off Anima. You'll be asked to saveyour game again afterwards.
Watch a long scene between Tidus and Auron. Once you regain control, followAuron to the City Limits. You'll see more scenes. Now off to Djose.
========HIGHROAD

========Treasures: Hi-Potion x3, Antidote x6, Hunter Spear, Ice Brand, Red Ring,
Echo Ring/Seeker's Ring, Remedy, 2000 Gil, Soft x3, Ether,Eye Drops x3, Lv. 1 Key Sphere x2, Mega Potion x2
Key Items: Al Bhed Primer Vol. 8, Saturn Crest
Save Spheres from this point onwards are at level 2. Meaning, you can nowplay Blitzball at every save sphere anytime.
Make sure to talk to every person you see along the way, as most of themgive you items. Alright, now go north. You'll meet Maechan, the scholar.Continue north, then west and around the structure for an Ice Brand.Proceed to the next screen, then go east. You'll meet Belgemine, she'llchallenge Yuna to a one-on-one Aeon battle.
+=+=+=+=+=+=+=+=+=+=+=+=+=+=+=+=+=+=+=+=+=+=+=+=+=+=+=+=+=+=+=+=+=+=+=+=+=+=BATTLE: BELGEMINE (IFRIT)+=+=+=+=+=+=+=+=+=+=+=+=+=+=+=+=+=+=+=+=+=+=+=+=+=+=+=+=+=+=+=+=+=+=+=+=+=+=
She will be using Ifrit. Her Aeon's pattern will be ATTACK-METEORSTRIKE-ATTACK-METEORSTRIKE, just like that. So, use Blizzard on him, then Shield.Keep repeating the process. You can also try boosting Valefor. Once yourAeon's Overdrive gauge is full use it. You shouldn't have any problemwinning.+=+=+=+=+=+=+=+=+=+=+=+=+=+=+=+=+=+=+=+=+=+=+=+=+=+=+=+=+=+=+=+=+=+=+=+=+=+=
You'll receive an Echo Ring if you win, or a Seeker's Ring otherwise.Proceed to the next screen, go east then north for a Remedy. There will bea short scene here. When you regain control, continue east to the next screen.Here, go north then east for a chest with 2000 Gil. Keep going north then alittle bit west, talk to the soldier for an Ether. Continue north. You'llsee some scenes with Shelinda. Just follow the path to the end, get the chestwith 3 Eye Drops.
You'll be at the Inn/Agency, save your game then leave. Watch the longscene between Tidus and Yuna. Once you regain control again, you'll receivea Lv. 1 Key Sphere. Try to leave the Inn, Rin will come in and you'llreceive the Al Bhed Primer Vol. 8.
Somebody will then be screaming for help about the chocobos. You'll receive2 Mega Potions from Rin. Save your game then leave. Outside, just go alittle bit north. A boss fight once more.
+=+=+=+=+=+=+=+=+=+=+=+=+=+=+=+=+=+=+=+=+=+=+=+=+=+=+=+=+=+=+=+=+=+=+=+=+=+=BOSS: CHOCOBO EATER+=+=+=+=+=+=+=+=+=+=+=+=+=+=+=+=+=+=+=+=+=+=+=+=+=+=+=+=+=+=+=+=+=+=+=+=+=+=HP: 10,000AP: 90Gil: 970Items: noneEquip: White RingSteal: N/A
First, have Tidus cast Haste on everyone, and Wakka use Dark Attack. Now justattack it or use magic on it (Fire especially) to make it fall on its back.Once this happens keep attacking to push it back. You can use Aeons here ifyou want. Also, Delay Attack works very well here, I recommend that you useit if you have it.+=+=+=+=+=+=+=+=+=+=+=+=+=+=+=+=+=+=+=+=+=+=+=+=+=+=+=+=+=+=+=+=+=+=+=+=+=+=
/////////////////////////////////////////////////////////////////////////////Note: It won't be Game Over if you get pushed off the cliff. You'll be near
the chest with the Saturn Crest. But you'll miss out on the AP though./////////////////////////////////////////////////////////////////////////////
If you did defeat it, you'll be given the priveledge of a free chocobo ride,which is a good thing if you don't want any random encounters. Alright, lets

assume you defeated it. Continue north. When you reach the north end of theHighroad, get the chest with 2 Hi-Potions. Take the path to the right andfollow it to the end to get the Saturn Crest. Go back up and head north.
Talk to the guy on the right and you'll be asked to donate. Any amount willdo, but the higher your donation the better the item you will receive inreturn. Here's the list:
100 Gil - Scout1,000 Gil - Ice Lance10,000 Gil - Moon Ring
Try to go through the gate, the guard will not let you pass. So, go backthen Seymour will come. After the short scene, go through the gate. On thenext screen, just go west.
=============MUSHROOM ROCK=============Treasures: Hi-Potion, 1000 Gil, Potion x10, Remedy, X-Potion, Serene Armlet,
Mega Potion x2
There's a save sphere here, you can save if you like. Talk to the man andreceive a Hi-Potion. Take the platform up and follow the path east. Talk tothe soldier and receive 10 Potions, get the chest here with 1000 Gil. Turnback and go north, get the chest for a Remedy. Follow the red indicator tothe end and take the platform up. Here, talk to the soldier for an X-Potion.Go north then east and take the platform down to get the chest with a SereneArmlet. Head north and take the platform up. Talk to the guard for a MegaPotion. Save your game. Don't go up yet, head south first to watch aninteresting scene between Luzzu, Wakka and Lulu, about Chappu. After thescene go up. Here, just head south.
When you regain control after the scenes, head east to the command center.You can buy some items from Oaka if you like (Pheonix Downs especially)Go east a bit and get the chest with a Mega Potion. Talk to the guard,choose yes.
There will be some scenes, then a boss fight.
+=+=+=+=+=+=+=+=+=+=+=+=+=+=+=+=+=+=+=+=+=+=+=+=+=+=+=+=+=+=+=+=+=+=+=+=+=+=+BOSS: SINSPAWN GUI+=+=+=+=+=+=+=+=+=+=+=+=+=+=+=+=+=+=+=+=+=+=+=+=+=+=+=+=+=+=+=+=+=+=+=+=+=+=+HP: 12,000 (Head: 4,000/Arms: 800 each)AP: 0Gil: 0Items: noneEquip: noneSteal: N/A
This can be tough. First, if you have your Aeons at Overdrive use it. Isuggest you use Valefor and save Ifrit for later. This will eliminate thearms. Now, have Lulu and Wakka focus on the head, since it can dealsevere damage on a character with its Venom attack. Once the arms regenerate,summon Ifrit. There's not much strategy after that, so just unload on itwith all you got and heal whenever anyone takes serious damage. Of course,once your party's Overdrives are full use it. You'll win after a while.+=+=+=+=+=+=+=+=+=+=+=+=+=+=+=+=+=+=+=+=+=+=+=+=+=+=+=+=+=+=+=+=+=+=+=+=+=+=+
There will be an FMV of the Crusaders and the Al Bhed fighting Sin, then somescenes. You'll be fighting Gui again.
+=+=+=+=+=+=+=+=+=+=+=+=+=+=+=+=+=+=+=+=+=+=+=+=+=+=+=+=+=+=+=+=+=+=+=+=+=+=+BOSS: SINSPAWN GUI+=+=+=+=+=+=+=+=+=+=+=+=+=+=+=+=+=+=+=+=+=+=+=+=+=+=+=+=+=+=+=+=+=+=+=+=+=+=+HP: 6,000 (Head: 1,000/Arms: 800 each)AP: 850
Gil: 4,500Items: Lv. 1 Key Sphere x6Equip: Alert ArmguardSteal: N/A
This one is easy. Just use Seymour's level 2 magics and you'll win no time.+=+=+=+=+=+=+=+=+=+=+=+=+=+=+=+=+=+=+=+=+=+=+=+=+=+=+=+=+=+=+=+=+=+=+=+=+=+=+
After the battle, you'll see another FMV and some more scenes. When youregain control of Tidus, go to the northmost end of the map and talk toGattta. There will be an FMV and a long scene afterwards.
When you regain control once more go south and save your game. Headsouthwest from the save sphere for a Hi-Potion. Talk to Auron. Continue eastto the red indicator afterwards. You'll be at Djose Highroad, just follow thepath, get the chest with 2 Pheonix Downs. Talk to the people along the wayfor some items.
============DJOSE TEMPLE============Treasures: 4,000 Gil, Ability Sphere x4, Mega Pheonix, Remedy
Outside the temple, go northeast for a chest with 4 Ability Spheres. Get achest with 4,000 Gil on the other side. Proceed into the temple. You'll meetIsaaru. When you regain control after the scene, go into the northeast roomand get the chest with a Mega Pheonix. Leave the room, and into the onenorthwest for a Remedy. Head into the room at the center. Maroda will warnabout a rumor he heard. Proceed into the Cloister of Trials.
==========================CLOISTER OF TRIALS (DJOSE)==========================Treasures: Magic Sphere
Take the 2 Djose Spheres and insert it into the slots at the door. In thenext room take the 2 Djose Spheres from the side and insert it into the slotsat the right wall. This will light up the pillar above. Now push the pedestalwith a Djose Sphere to right. Take the the charged Djose Sphere and insert itinto the right slot at the north wall. The wall will open. Take the 2 DjoseSpheres (those at the right recesses) and insert them into the pedestal.Now, push the pedestal north until it falls into the pit. It will stay afloat.Step on it to get to the other side. Here, press O to push the pedestal. Thiswill activate a part of the symbol outside. Go back to the previous room andtake the charged Djose Sphere and insert it into the left slot on the samewall. In this same room, go left and step on the shining panel on the floorto get the pedestal back at the center. Take the 2 Djose Spheres and insertit into the slots in the first room. This will complete the symbol. Aplatform will appear at the center. Ride it up to the next area.
Push the 5 pedestals here. Once done, another pedestal will appear. Go backdown to the previous area and head left. Examine the glowing glyph on thewall. This will reveal a Destruction Sphere. Take it and go up to the nextarea. Here, insert the Destruction Sphere into the lone pedestal to reveala chest with a Magic Sphere. Go up the stairs to the next area.
Here, talk to Lulu. Dona will come and insult Auron, calling him a riffraff.Then you'll see a scene between Barthello and Auron. Try to leave the roomand Yuna will come out, you'll then receive your 3rd Aeon, Ixion.
=====================DJOSE PILGRIMAGE ROAD=====================Treasures: Switch Hitter, Halberd, Hi-Potion x2, Potion x10
Go back inside the inn once you regain control to get the chest with aSwitch Hitter. Talk to Wakka afterwards and go back into the temple. Go
to the northeast room and talk to the woman beside the bed. Just gosouth after some scenes and talk to the people along the way for someitems. Continue towards Moonflow.
========MOONFLOW========Treasures: X-Potion, Lv. 1 Key Sphere x3, Dragon Scale x2, Pheonix Down x2,
5000 GilKey Item: Summoner's Soul
Here, just keep going north. Biran and Yenke will warn your party about thedisappearance of Summoners. Continue on afterwards. Get the chest with anX-Potion here. There will be a chest with 3 Lv. 1 Key Spheres a little bitwest farther ahead. Keep going and you'll meet Belgemine again.
+=+=+=+=+=+=+=+=+=+=+=+=+=+=+=+=+=+=+=+=+=+=+=+=+=+=+=+=+=+=+=+=+=+=+=+=+=+=+BATTLE: BELGEMINE (IXION)+=+=+=+=+=+=+=+=+=+=+=+=+=+=+=+=+=+=+=+=+=+=+=+=+=+=+=+=+=+=+=+=+=+=+=+=+=+=+
This is a lot easier compared to the first one. His pattern is the same asIfrit's, ATTACK-AEROSPARK-ATTACK. But he'll cast Haste on himself after afew turns, so make sure you kill him quickly after he does that.+=+=+=+=+=+=+=+=+=+=+=+=+=+=+=+=+=+=+=+=+=+=+=+=+=+=+=+=+=+=+=+=+=+=+=+=+=+=+
You'll receive 2 Dragon Scales if you win and a Summoner's Soul which allowsyour Aeons to learn abilities. Keep going north. You'll be at the southshoopuf wharf. Get the chest with 2 Pheonix Downs. Continue west and you'llsee some scenes between the Chocobo Knights and the Shoopuf driver. Go intothe tent and get the chest with 5000 Gil afterwards. Go back to the previousarea and talk to the Shoopuf driver.
You'll see some scenes aboard the Shoopuf. Yuna will be kidnapped by the AlBhed again. Another boss fight.
+=+=+=+=+=+=+=+=+=+=+=+=+=+=+=+=+=+=+=+=+=+=+=+=+=+=+=+=+=+=+=+=+=+=+=+=+=+=+BOSS: EXTRACTOR+=+=+=+=+=+=+=+=+=+=+=+=+=+=+=+=+=+=+=+=+=+=+=+=+=+=+=+=+=+=+=+=+=+=+=+=+=+=+HP: 4,000AP: 600Gil: 2,400Items: Mega Pheonix x4Equip: Ice LanceSteal: N/A
If you have any weapon with the Lightningstrike ability it'll be wise toequip it here. Have Tidus cast Haste and Cheer on himself and Wakka.Then use Delay Attack to give you an advantage. Once it pulls up, keepattacking it until it comes back down to prevent it from unleashing itsDepth Charges. Another thing, don't be adventurous enough to try andProvoke it. Believe me, you'll regret it.+=+=+=+=+=+=+=+=+=+=+=+=+=+=+=+=+=+=+=+=+=+=+=+=+=+=+=+=+=+=+=+=+=+=+=+=+=+=+
You'll be at the North Bank now, save your game and go west 2 screens. Getthe chest with an Ether. Continue west once more and you'll find Rikku.There will be an FMV and some scenes. Continue north afterwards. You'llhave a tutorial on Stealing and Mixing here. Keep going north and get thechest with 4 Antidotes. There's a chest with a Mega Potion farther ahead.
==========GUADOSALAM==========Treasures: Mega Potion, Elixir, Hi-Potion x2, 3000 Gil
Tromell will greet you upon arrival, telling you to go see Seymour. Whenyou regain control, go into the Inn and save your game. From here go northfor a Mega Potion. Then go south and into the house for a chest with 3,000

Gil. Continue to the end of the path for an Elixir. Now go into Seymour'smanor. Here, go upstairs and check around the area for a chest with 2Hi-Potions. Head back down and into the door. Talk to everyone. There willbe some scenes and you'll be shown an FMV of Zanarkand. When you regaincontrol once more, leave the manor and go south.
Yuna wants to go to the Farplane, so go south then east to get there. Here,you'll see more scenes. Continue on afterwards. Talk to everyone exceptKimahri, since he won't say anything anyway. Go back to the manor once youregain control and keep talking to Lulu. Head back to the Inn and take theother path to find Shelinda. She will tell Tidus that Seymour left for theTemple of Macalania. Go back to the manor. Head to the Farplane first tohear Oaka's story, then proceed to the Thunder Plains afterwards.
==============THUNDER PLAINS==============Treasures: Pheonix Down x2, Water Ball, Yellow Shield, Remedy
Rikku will be scared stiff. When you regain control after the funny scene,go north and get a chest with 2 Pheonix Downs. Keep going north, then lookfor an L-shaped indention on the map to the east for a Water Ball, thencontinue east to the end. You'll be at the Inn, save your game and talk toRikku, now she'll tell you why she is very scared of lightning. Proceednorth into the room after that. There will be some scenes. Talk to Rikkuand leave the Inn, pick up the Yellow Shield outside. Keep going north tothe next area. There will be more scenes. When you regain control again,continue north and get the chest with a Remedy along the way.
===============MACALANIA WOODS===============Treasures: 2000 Gil
You'll have to listen to a short conversation between Tidus and Auron. Whenyou regain control, save your game and follow the path north. Get the chestwith 2,000 Gil at the end. At the next area, follow the path again andBarthello will come. Dona is missing. Continue along the path, and you'll beable to catch some butterflies here. Keep going towards the red indicator.In the next area, save your game and go north. There will be a short scene,then a boss fight once more.
+=+=+=+=+=+=+=+=+=+=+=+=+=+=+=+=+=+=+=+=+=+=+=+=+=+=+=+=+=+=+=+=+=+=+=+=+=+=+BOSS: SPHERIMORPH+=+=+=+=+=+=+=+=+=+=+=+=+=+=+=+=+=+=+=+=+=+=+=+=+=+=+=+=+=+=+=+=+=+=+=+=+=+=+HP: 11,800AP: 3,000Gil: 3,800Items: Power Sphere, Lv. 2 Key SphereEquip: White BracerSteal: Ether
This is a pretty simple battle. Just use magic with an element opposite towhat he is using. So, have Lulu, Yuna and Auron manage this fight. Wheneveryou damage him with magic of the opposing element, his element will shift.So, have Auron attack to find out what his element is and simply use theopposite. That's about it.+=+=+=+=+=+=+=+=+=+=+=+=+=+=+=+=+=+=+=+=+=+=+=+=+=+=+=+=+=+=+=+=+=+=+=+=+=+=+
Watch the Jecht Sphere. You are now allowed to find all the Jecht Spheres.When you regain control, just follow the path to the next area. Here, gointo the inn and save your game. You can buy some items from Oaka if youlike. Go south afterwards. Continue south once more after the short scene.You'll have to fight another machina.
+=+=+=+=+=+=+=+=+=+=+=+=+=+=+=+=+=+=+=+=+=+=+=+=+=+=+=+=+=+=+=+=+=+=+=+=+=+=+BOSS: CRAWLER/NEGATOR

+=+=+=+=+=+=+=+=+=+=+=+=+=+=+=+=+=+=+=+=+=+=+=+=+=+=+=+=+=+=+=+=+=+=+=+=+=+=+HP: 16,000/1,000AP: 6,820Gil: 6,800Items: Potion x2, Power Sphere x2Equip: Blue Armlet/Survivor (varies)Steal: Lunar Curtain
You have 2 options here, either kill the Negator which prevents you fromusing any type of magic or keep it there and attack Crawler normallyinstead. I prefer that you use the first option since this can finish thebattle pretty quickly. Use Wakka to attack the Negator. Once it is dead,bring Lulu in and just use Thundara and equip a weapon with the Lightningstrike ability on your attacking characters to speed up the process. Buttake note that the Negator also prevents Crawler from unleashing ManaBeam which deals about 900+ damage on a character, this comes slowly though.+=+=+=+=+=+=+=+=+=+=+=+=+=+=+=+=+=+=+=+=+=+=+=+=+=+=+=+=+=+=+=+=+=+=+=+=+=+=+
Wakka will be furious about Rikku being Al Bhed. You'll see more scenes witheither Rikku or Lulu aboard the snowmobile afterwards. (I think this dependson who you use more often.)
================MACALANIA TEMPLE================Treasures: Mega Potion, 400 Gil, Shell Targe, Elixir, Ether, Pheonix Down x3,
Remedy x2, Hi-Potion x2
When you regain control after those scenes, get the chest with a Mega Potion.Go north down the stairs and follow the path to the temple. Talk to the manby the entrance to receive 400 Gil. In the temple, talk to Tromell for aShell Targe, then go to the northwest room first for 3 Pheonix Downs, be sureto talk to the people here too for an Ether and Elixir. Go back out and thisthis time head into the northeast room to watch Jyscal's Sphere. Get the chestwith 2 Remedies and talk to one of the guys here for 2 Hi-Potions afterwards.
Go back to the main hall and SAVE your game. Proceed into the room at thecenter. You'll find Seymour here, after some scenes you will have to fighthim.
+=+=+=+=+=+=+=+=+=+=+=+=+=+=+=+=+=+=+=+=+=+=+=+=+=+=+=+=+=+=+=+=+=+=+=+=+=+=+BOSS: SEYMOUR/2 GUADO GUARDS/ANIMA+=+=+=+=+=+=+=+=+=+=+=+=+=+=+=+=+=+=+=+=+=+=+=+=+=+=+=+=+=+=+=+=+=+=+=+=+=+=+HP: 6,000/2,000 each/18,000AP: 7,620Gil: 8,600Items: Ability Sphere x4, Blk Magic Sphere x2Equip: Hunter's Blade, Alert Shield, Echo Shield, Double PenaltySteal - 1st Seymour: Elixir; Anima: Silence Grenade x3;
2nd Seymour: Turbo Ether
He is tough and annoying. Your primary concern will be to get rid of the 2Guado Guards. You have 2 options in acheiving this, either steal their Hi-Potions to prevent them from healing themselves or have Auron use Threaten tostop them from moving. Once they are frozen just focus your attacks onSeymour, since if he dies so will the Guado Guards and vice versa.
He will summon Anima now. If you talked to Seymour earlier, it will makethis battle a bit easier. Have Tidus cast Haste on everyone, then attacknormally. Bring Lulu in and keep casting ice magics (preferably Blizzara).Another problem is Anima's Pain which causes instant death on a character,and it comes every other turn. So it is recommended, though not required tohave at least 2 characters with Life magic. Auron deals a decent amount ofdamage against Anima as well, so be sure to have him in. Now once Animahas about 9000+ HP left, summon Shiva and use her Overdrive to finish it off.Also, if Anima does Oblivion its game over, so make sure you kill him beforethis happens.

Seymour will reappear. Have Yuna cast all 4 Nuls on your party to protectagainst his Multi Level 2 magic attacks. Then just attack normally afterthat.
/////////////////////////////////////////////////////////////////////////////Note: You can also summon an aeon to block Anima's overdrive. Thanks to
David Curran ([email protected]) for telling me this./////////////////////////////////////////////////////////////////////////////
Strategy vs. Guado Guardians from Rhys Hughes <[email protected]>-----------------------------------------------------------------------
Add the ability 'stonetouch' to either Tidus or Auron on one of theirweapons. This, with luck, will shatter the guards in one hit.
Strategy vs. Anima from Charles Thio------------------------------------
When Seymour summons Anima, have Yuna summon Shiva immediately. Now on yournext succeeding turns, keep using Heavenly Strike. When Shiva's HP is below500 cast Blizzara on her to heal. Keep doing this and Anima will be gonebefore she gets her chance to use her overdrive.+=+=+=+=+=+=+=+=+=+=+=+=+=+=+=+=+=+=+=+=+=+=+=+=+=+=+=+=+=+=+=+=+=+=+=+=+=+=+
After the battle, you'll be given a chance to rename Shiva. The party will bebranded as traitors now. Once you regain control after the scenes save yourgame and proceed into the west door.
==============================CLIOSTER OF TRIALS (MACALANIA)==============================Treasure: Luck Sphere
This one is a bit tricky. First push the pedestal east, this will break theice. Then take the Macalania Sphere from the slot at the RIGHT wall andinsert it into the pedestal. Now, push the pedestal north, this will reveala passage that leads below. Remove the Glyph Sphere from the CENTER pillarand go down to the next area. Here, insert the Glyph sphere into the LEFTrecess on the north wall. This will reveal another Macalania Sphere. Pushthe pedestal with a Macalania Sphere east into the gap on the pillar toform a part of the ice bridge above. Go back up, take the new MacalaniaSphere and head back down. Insert it into the recess on the LEFT pillar toform another part of the bridge. Now go back up, take the last MacalaniaSphere and insert it into the recess on the CENTER pillar to complete thebridge.
Go up but don't cross the bridge just yet, instead step on the shiningpanel on the floor to make the pedestal appear near you. Then take theMacalania Sphere and push the pedestal down. It will embed itself tothe ice on the other side. Go down and insert the Macalania Sphere intoany slot below. Head back up and step on the shining panel again. Thepedestal will be beside you once more, but this time with the DestructionSphere. Take it and go down to the basement area. Here, insert theDestruction Sphere into the RIGHT recess at the north wall. This willreveal a treasure chest with the Luck Sphere. With that done, rebulid thebridge and proceed to the next area.
==============LAKE MACALANIA==============Treasures: Lv. 1 Key Sphere, Lv. 2 Key Sphere
There will be some scenes, then Tromell will send guards to go after you.Once you regain control save your game, Oaka will be here so you can buyhis pricey items if you want. Continue south and keep running. Take theright path first and go south to the end for a chest with a Lv. 1 Key

Sphere. Continue following the path towards the red indicator. In thenext area, save your game and prepare for another boss fight.
+=+=+=+=+=+=+=+=+=+=+=+=+=+=+=+=+=+=+=+=+=+=+=+=+=+=+=+=+=+=+=+=+=+=+=+=+=+=+BOSS: WENDIGO/2 GUADO GUARDS+=+=+=+=+=+=+=+=+=+=+=+=+=+=+=+=+=+=+=+=+=+=+=+=+=+=+=+=+=+=+=+=+=+=+=+=+=+=+HP: 18,000/1,200 eachAP: 3,160Gil: 3,800Items: Ability Sphere x4, Power Sphere x2Equip: Seeker's BangleSteal: Hi-Potion
Wendigo is powerful especially when Berserked. First, it is important thatyou get rid of the 2 Guado Guards quickly. Steal their Hi-Potions toprevent them from healing themselves. They also cast Protect and Shell onWendigo before they die, so it is recommended that you have Dispel by now.Once the 2 cronies are dead cure Wendigo of Berserk and start attacking andusing Fira. Have Yuna ready since healing and reviving will be quite often.You can also have her summon Ifrit to deal massive damage on Wendigo withHellfire.+=+=+=+=+=+=+=+=+=+=+=+=+=+=+=+=+=+=+=+=+=+=+=+=+=+=+=+=+=+=+=+=+=+=+=+=+=+=+
The party will fall all the way down the bottom of the lake. Here, save yourgame and talk to everyone. Get the chest with a Lv. 2 Key Sphere besideKimahri. There will be some scenes, you'll at the Oasis afterwards.
===============================SANUBIA DESERT (BIKANEL ISLAND)===============================Treasures: Remedy x4, Al Bhed Potion x36, Hi-Potion x16, Ether x2,
X-Potion x2, Mega Potion x2, Lv. 2 Key Sphere, Megalixir x3,10,000 Gil
Key Item: Venus Crest
Tidus will be alone here, in the water get the chest with 4 Remedies. Saveyour game. Go north. You'll battle a Zuu and meet up with Auron and Luluduring that same battle. Continue north afterwards to find Wakka, get thechest with 8 Al Bhed Potions here. In the next area, head east for Kimahri.Follow the path to the next area and you'll find Rikku, get the 2 chestsfor 8 Al Bhed Potions and 2 Ethers. Continue along the path and go west for4 Hi-Potions, keep going to get the chest with another 4 Hi-Potions. At theend, go west for 2 Mega Potions proceed north afterwards. From the savesphere head west to for 8 Al Bhed Potions, keep going west and around thestructure for 2 chests with a Lv. 2 Key Sphere and 10,000 Gil. Continuenorth to the next area. Here, go north then west for 8 Hi-Potions. Keep goingwest and into the whirlpool to get the Venus Crest. Continue north, thereis another chest near the whirlpool here but you have to fight a Sandragorato get it, the chest contains 3 Megalixirs. Go a little bit northwest for 2X-Potions afterwards. Continue towards the Al Bhed home but before you getthere, you'll have to fight another Sandragora.
============AL BHED HOME============Treasures: Hi-Potion x2, Al Bhed Potion x6, Special Sphere, Friend Sphere,
Skill Sphere, Lv. 2 Key Sphere, Lv, 4 Key Sphere, 10,000 Gil
The Home will be under attack, you'll see Cid here for the first time too.When you regain control, search one of the bodies here for 2 Hi-Potions.Save your game and go in, then go north. Follow the others into the room.Cid will tell Rikku to go underground, just follow her to the Summoner'sSanctum. Here, there will be an intersection with 3 split roads. Proceedto the center to get a chest with 6 Al Bhed Potions. Then go northeast andinto the room at the end. Examine the chest here, the code is 5633 to getthe Special Sphere, there's another chest here and when you examine ityou'll be prompted to answer several questions:

- Are you Al Bhed? --> Yes- Name the son of the Al Bhed leader --> Brother- Name the island where the Al Bhed live --> Bikanel- What is Al Bhed in Al Bhed? --> Al Bhed
Get a Skill Sphere from the chest. Leave the the room and go all the way backsouth and into the room on the left. Here, there will be 2 more chests. Onewith a Friend Sphere, and the other one depends on what you choose:
- The treasure chest of dreams asks: What do I contain?
Bomb Elixir Hi-PotionMega Potion Soft ChimeraPotion Remedy Evil Eye
Once done proceed to the northwest room. Save your game first then go in.When you regain control after some scenes, go down and check around the areafor 2 chests with a Lv. 2 Key Sphere and a Lv. 4 Key Sphere. Proceed intoroom afterwards. You'll see some scenes here, Tidus will be very upset. Thensome flashbacks follow. Once you regain control, check around the area for achest with 10,000 Gil. Leave the room and follow the path to the airship.
=======AIRSHIP=======
Here, save your game after the scenes. Leave and take a tour around the ship.Talk to the Summoners here to listen to their story, you can buy some stuffsfrom Rin too if you like. Go back to the bridge. There will be some morescenes. After that proceed to the Cabin and you'll see Evrae, the protectorof Bevelle. Cid will tell you to fight it, so save your game and head for thedeck.
+=+=+=+=+=+=+=+=+=+=+=+=+=+=+=+=+=+=+=+=+=+=+=+=+=+=+=+=+=+=+=+=+=+=+=+=+=+=+BOSS: EVRAE+=+=+=+=+=+=+=+=+=+=+=+=+=+=+=+=+=+=+=+=+=+=+=+=+=+=+=+=+=+=+=+=+=+=+=+=+=+=+HP: 32,000AP: 8,100Gil: 2,500Items: Blk Magic Sphere x2Equip: Fossil Cait SithSteal: Water Gem
This can get very annoying if you don't know what to do. Before you fightmake sure that at least one of your characters has an armor that protectsagainst Poison equipped (Poison Ward will do) just in case Evrae manages tounleash Poison Breath before Cid takes his turn. First, have Tidus cast Slowon him then Haste on your party. Now bring Rikku in to cast Reflect on him.
Just keep attacking until he inhales, once this happens pull back immediatelywith either Rikku or Tidus. After his Poison Breath fails move in again andcontinue attacking. Alright, now Evrae will cast Haste on himself. But withReflect, he won't be able to. He'll be repeating the same move every turn soyou shouldn't worry. Just do whatever you please to finish him off.+=+=+=+=+=+=+=+=+=+=+=+=+=+=+=+=+=+=+=+=+=+=+=+=+=+=+=+=+=+=+=+=+=+=+=+=+=+=+
/////////////////////////////////////////////////////////////////////////////Alternate Strategy Against Evrae:---------------------------------
This is a strategy for those who don't have Reflect. Your first move shouldbe to cast Slow on him, then Haste on your party. It is IMPORTANT thatyou have Shell or Protect with you as this reduces the damage from PoisonBreath by 1/2. (if you fail to pull back) Now once he uses Haste, don'tpanic just attack him with all you got and heal your party using Al BhedPotions.

/////////////////////////////////////////////////////////////////////////////
=======BEVELLE=======
You'll see an FMV where the party infiltrates Bevelle using the airship. Whenyou regain control, fight your way through the sea of guards. There will besome scenes at the end, and another FMV where Seymour will kiss Yuna. Therewill more of those afterwards. When you regain control once more proceed intothe temple and save your game.
============================CLOISTER OF TRIALS (BEVELLE)============================Treasures: HP Sphere, Knight Lance
This is the most confusing cloister in the game. But I'll try my best toexplain this clearly. First, there will be glyphs with arrows on the floorindicating the directions you could go to. Press O to go to that direction.
-At the first intersection, go right. Follow the path down to the end.-Take the Bevelle Sphere here and insert it into the pedestal.-Push the pedestal and ride it back up to the previous area.-Here, ignore the 1st intersection and go right at the 2nd.-Take 1 sphere from the pedestal and insert it into the slot here. This willreveal a new section of the cloister.
-Ride the pedestal all the way north to return to the starting point.-Ignore the 1st intersection once more then go left at the 2nd. Take thesphere here and insert it into the pedestal.
-Ride the pedestal all the way north once more to return to the startingpoint.
-At the 1st intersection head right to get to the lower area. At the glyphhere go left.
-Ignore the 1st and and 2nd intersection then go right at the 3rd.-Take 1 sphere from the pedestal and insert it into the slot here. This willunlock a new path with a purple glyph.
-Push the pedestal back on track and ride it south to return to the startingpoint.
-Ignore the 1st intersection and go right at the 2nd. Take the Glyph Spherehere and put it into the pedestal. Ride the pedestal again all the waynorth to return to the starting point.
-Ignore the 1st and 2nd intersection then go right at the 3rd.-Take the Glyph Sphere from the pedestal and insert it into the slot farnorth to obtain the Destruction Sphere.
-Push the pedestal and ride it again north to return to the starting pointonce more.
-Ignore the 1st intersection and turn right at the 2nd. Insert theDestruction Sphere into the slot where you first got the Glyph Sphere.This will open a new path.
-Ride the pedestal all the way north to return to the starting point.-Ignore the 1st and 2nd intersection and turn right at the 3rd.-Take the Bevelle Sphere here and insert it into the pedestal.-Ride the pedestal north once more to return to the starting point.-Now turn right at the 1st intersection. Push the pedestal south to proceedto the new area.
Here, go up and get the chest east for an HP Sphere. This will reveal ashining panel on the floor, step on it to make the pedestal appear near you.Take 1 sphere from the pedestal and insert it into the slot on the right.Push the pedestal west and ride it to get the chest with a Knight Lance atthe other side. Go back and up the stairs to the right.
You'll reach the Chamber of the Fayth. Tidus will force his way in. Yuna willbe praying here. Kinoc and his cronies will then ambush the party outside.
Watch the entire trial. You'll be controlling Yuna in Via Purifico
afterwards.
============VIA PURIFICO============Treasures: Elixir, Mega Potion, Blk Magic Sphere, Wht Magic Sphere
Save your game here, then go east to the end for a Mega Potion. Kimahri willbe here too. Go back to the save sphere and this time go west, follow thepath into the room for an Elixir. Proceed into the next room for a chestwith a Blk Magic Sphere. From here go north then east to find Lulu and achest with a Wht Magic Sphere. Head for the red indicator, you'll findAuron here. Save your game and continue north.
Isaaru will not let you pass so you'll have to fight his Aeons.
+=+=+=+=+=+=+=+=+=+=+=+=+=+=+=+=+=+=+=+=+=+=+=+=+=+=+=+=+=+=+=+=+=+=+=+=+=+=+BOSS: GROTHIA/PTERYA/SPATHI (IFRIT/VALEFOR/BAHAMUT)+=+=+=+=+=+=+=+=+=+=+=+=+=+=+=+=+=+=+=+=+=+=+=+=+=+=+=+=+=+=+=+=+=+=+=+=+=+=+HP: 7,800+/11,800+/20,600+AP: noneGil: noneItems: noneEquip: noneSteal: N/A
Yuna will be alone in this battle. Just use whichever Aeon you want,preferably those with elements (Shiva, Ifrit, Ixion) so that you can healwhenever your Aeons take serious damage. Also note that Grothia startswith a full Overdrive gauge, so Shield on your first turn.+=+=+=+=+=+=+=+=+=+=+=+=+=+=+=+=+=+=+=+=+=+=+=+=+=+=+=+=+=+=+=+=+=+=+=+=+=+=+
You'll regain control of Tidus now. There will be a treasure chest that sellsitems behind you, you can buy here if you want. Save your game. Keep goinguntil you reach the second save sphere. Another boss will show up.
+=+=+=+=+=+=+=+=+=+=+=+=+=+=+=+=+=+=+=+=+=+=+=+=+=+=+=+=+=+=+=+=+=+=+=+=+=+=+BOSS: EVRAE ALTANA+=+=+=+=+=+=+=+=+=+=+=+=+=+=+=+=+=+=+=+=+=+=+=+=+=+=+=+=+=+=+=+=+=+=+=+=+=+=+HP: 16,000AP: 5,700Gil: 3,000Items: Blk Magic Sphere x4Equip: Soft ArmguardSteal: Water Gem x2
Don't fight him just yet. Instead open the 2 locks using the Trigger Command.This will give you a chance to escape. Now, at the next area you'll notice2 treasure chests. Once the battle begins again, fight him. Evrae Altana willbe inflicted with the Zombie status from the very beginning which means thatany curative magic or items will damage him. Now, just use 2 Pheonix Downs tofinish him off.+=+=+=+=+=+=+=+=+=+=+=+=+=+=+=+=+=+=+=+=+=+=+=+=+=+=+=+=+=+=+=+=+=+=+=+=+=+=+
Go back south after the battle to get the chest with an Avenger. (*I couldn'tfind the other treasure chest so I don't know whats in there :)*) Continuenorth to the next area.
There will some scenes here, once you regain control save your game and goback to Kimahri. You'll battle Seymour once more.
+=+=+=+=+=+=+=+=+=+=+=+=+=+=+=+=+=+=+=+=+=+=+=+=+=+=+=+=+=+=+=+=+=+=+=+=+=+=+BOSS: SEYMOUR NATUS/MORTIBODY+=+=+=+=+=+=+=+=+=+=+=+=+=+=+=+=+=+=+=+=+=+=+=+=+=+=+=+=+=+=+=+=+=+=+=+=+=+=+HP: 36,000/?AP: 9,450Gil: 3,500
Items: Lv. 2 Key Sphere x4Equip: Shocking Fist/Shell Bangle (varies)Steal: Tetra Elemental x2
First utilize all Trigger Commands. Forget about Seymour and justconcentrate all your attacks on Mortibody. Have Yuna cast all 4 Nuls onyour party. Once Mortibody is low on HP, it'll drain 4,000 HP fromSeymour! (note that the amount of HP it drains decreases everytime youdefeat it) That will provide some help. If you think Mortibody's drain isno longer enough, go for Seymour. Don't bother using your Aeons hereunless they are at Overdrive since Seymour will simply Banish them anyway.+=+=+=+=+=+=+=+=+=+=+=+=+=+=+=+=+=+=+=+=+=+=+=+=+=+=+=+=+=+=+=+=+=+=+=+=+=+=+
The party will be running once more. You'll be at Macalania Woods againafterwards. Once you regain control here, save your game and go south theneast. There will be a long scene between Yuna and Tidus then a very nice FMVfollows.
When regain control once more, go back to the Campsite and get the chest witha Lucid Ring there. Follow the others east afterwards.
==========CALM LANDS==========Treasures: Lv. 2 Key Sphere, 15,000 Gil
This place is huge, so you'll probably get annoyed with all the randomencounters if you are cover the entire area on foot. Anyway, just go northtowards the central area. There will be a save sphere here, you'll also seesome scenes with Father Zuke. When you regain control go around to the backand get the chest with a Lv. 2 Key Sphere. Continue northwest to find theChocobo Trainer, talk to her to train your chocobo. (I recommend riding achocobo here since it will make your exploring a lot easier.) Now go all theway back southeast to get the 2 chests with 10,000 and 5,000 Gil. You'llalso find the Training Arena here. (its the green square on the map)Continue towards the red indicator. In the next area, save your game then gonorth. A boss fight once more.
+=+=+=+=+=+=+=+=+=+=+=+=+=+=+=+=+=+=+=+=+=+=+=+=+=+=+=+=+=+=+=+=+=+=+=+=+=+=+BOSS: DEFENDER X+=+=+=+=+=+=+=+=+=+=+=+=+=+=+=+=+=+=+=+=+=+=+=+=+=+=+=+=+=+=+=+=+=+=+=+=+=+=+HP: 64,000AP: 9,900Gil: 3,500Items: Lv. 2 Key Sphere x2Equip: noneSteal: Lunar Curtain x4
First of all you must know that he is made of stone not steel. Use Auron'sArmor and Mental Breaks, then have Tidus Provoke him. This way, he'll onlyuse Blast Punch which works like Demi so it won't kill you even at 1 HP.Now bring Lulu in and use Water magic (preferably Waterga) since this dealsno less than 4,000 damage. Use your Aeons only if they are at Overdrive.
Another thing, he'll cast Mighty Guard on himself when his HP is low. So,make sure you Dispel him immediately after that.+=+=+=+=+=+=+=+=+=+=+=+=+=+=+=+=+=+=+=+=+=+=+=+=+=+=+=+=+=+=+=+=+=+=+=+=+=+=+
Head down the valley to get to the Cavern of Stolen Fayth. From here, gosouth then east for the Rusty Sword. Head back up and go north across thebridge to Mt. Gagazet.
=============MOUNT GAGAZET=============Treasures: Mega Potion x2, Defending Bracer, HP Sphere, Lv 4 Key SphereKey Item: Jupiter Crest
Here, you'll see some scenes. When you regain control, save your game there'sa Ronso here that sells weapons so buy from him if you like. Continue to thenext area. Biran and Yenke will stop you once more, after some scenes you'llhave to fight both of them with Kimahri alone.
+=+=+=+=+=+=+=+=+=+=+=+=+=+=+=+=+=+=+=+=+=+=+=+=+=+=+=+=+=+=+=+=+=+=+=+=+=+=+BOSS: BIRAN & YENKE+=+=+=+=+=+=+=+=+=+=+=+=+=+=+=+=+=+=+=+=+=+=+=+=+=+=+=+=+=+=+=+=+=+=+=+=+=+=+HP: (depends on Kimahri's strength)AP: 8,000Gil: 3,000Items: Return Sphere x2/Friend Sphere x2Equip: Sorcery Bangle/Sorcery ArmletSteal: Lv. 3 Key Sphere x2
You can learn a lot of skills from them, so use Lancet as much as possible.First, if Kimahri has his Overdrive available use Doom on Yenke and leave himto die on his own (you can learn that skill from Biran) With that, justconcentrate on attacking Biran.
When Biran's HP is low, he'll use Mighty Guard but only if both of them arealive. That's why I recommended that you use Doom, since the countdown startsat 20. Yenke on the other hand will use White Wind under the same situation.But since White Wind is a much more common skill compared to Mighty Guard, Isuggest that you learn Mighty Guard instead.+=+=+=+=+=+=+=+=+=+=+=+=+=+=+=+=+=+=+=+=+=+=+=+=+=+=+=+=+=+=+=+=+=+=+=+=+=+=+
After the battle go back down and save your game once more. Continue on.There will be more scenes here. Go north then west for 2 Mega Potions. Keepgoing then head northwest to the end for the Braska's Sphere. After the scenekeep going until tou see a path that leads up, go there to get the DefendingBracer. Head back down and follow the path north, you'll see Wantz here, buysome Holy Waters from him. Go back south then west to reach the area below.Get the 2 chests with an HP Sphere and a Lv. 4 Key Sphere. Head towards thered indicator and save your game. In the next area just go north, there willbe some scenes. You'll fight Seymour again.
+=+=+=+=+=+=+=+=+=+=+=+=+=+=+=+=+=+=+=+=+=+=+=+=+=+=+=+=+=+=+=+=+=+=+=+=+=+=+BOSS: SEYMOUR FLUX/MORTIORCHIS+=+=+=+=+=+=+=+=+=+=+=+=+=+=+=+=+=+=+=+=+=+=+=+=+=+=+=+=+=+=+=+=+=+=+=+=+=+=+HP: 70,000/?AP: 15,000Gil: 6,000Items: Lv. 4 Key Sphere x2Equip: JammerSteal: Elixir
I suggest having your characters with the highest Agility in first, so thatonce he does Lance of Atrophy you'll still get at least one turn beforeMortiorchis follows with Full-Life. Thus, giving you a chance to remove theZombie status. Its even better if you enter this battle with at leastBahamut at Overdrive. Use Auron's various Breaks on Seymour, Tidus castHastega, then just attack. Seymour will cast Reflect on himself after sometime. Make sure you Dispel him once this happens since he will most likelyREFLECT FLARE on his next turn. If you manage to remove his Reflect, hiscounterstrike will fail and damage himself instead for 6,000+ HP. When hehas about 24,000 HP left, summon Bahamut and unleash Mega Flare for the kill.
Also, note that Cross Cleave can be quite powerful too so having Protectshould help. If he does Total Annihilation, you will most likely die. Justmake sure you kill him before he gets his chance to do it.+=+=+=+=+=+=+=+=+=+=+=+=+=+=+=+=+=+=+=+=+=+=+=+=+=+=+=+=+=+=+=+=+=+=+=+=+=+=+
After the battle you'll see some more scenes. When you regain control gonorth and save your game. Check behind the pillars on the left for a chestwith the Jupiter Crest.

There will be some more scenes here, then you'll regain control of Tidusin his dream. Here, just go east then north into the door. You'll see thekid (Bahamut's Fayth) follow him once he runs out. He'll reveal one of thefew major twist in this game. Tidus will wake up afterwards. When you regaincontrol continue to the next area.
=====================GAGAZET MOUNTAIN CAVE=====================Treasures: Lv. 1 Key Sphere, Fortune Sphere, Return Sphere, Recovery Ring,
Pep Talk
////////////////////////////////////////////////////////////////////////////Note: Solving the Trials of Gagazet opens the way to some treasures.////////////////////////////////////////////////////////////////////////////
Keep going towards the red indicator. You'll be swimming once more, justproceed to the next area. Here, go north. You'll encounter the First Trialof Gagazet, simply hit the center using Wakka's blitz ball. Get the chestwith a Lv. 1 Key Sphere. Go all the way back to the previous screen and gosouth to the next area. There's a save sphere here, you can save if youlike. Climb the stairs and keep going north. You'll see the Second Trialof Gagazet, here send Rikku into the GREEN hole, Tidus into the BLUE holeand Wakka into the RED hole. You should see a chest underwater, dive to geta Fortune Sphere. Swim back to the previous area then go northwest and upthe stone steps. In the next area, save your game and head out. Anotherboss will show up.
+=+=+=+=+=+=+=+=+=+=+=+=+=+=+=+=+=+=+=+=+=+=+=+=+=+=+=+=+=+=+=+=+=+=+=+=+=+=+BOSS: SANCTUARY KEEPER+=+=+=+=+=+=+=+=+=+=+=+=+=+=+=+=+=+=+=+=+=+=+=+=+=+=+=+=+=+=+=+=+=+=+=+=+=+=+HP: 40,000AP: 16,500Gil: 6,500Items: Return Sphere x2Equip: Arc Sword/Magic Armguard (varies)Steal: Turbo Ether
He isn't hard, in fact it is possible to defeat him even before he takes hisfirst turn. Alright, have your 3 characters with the highest Agility at thebeginning of the battle. Now, switch any of the 2 characters (except Tidus)with Auron then have him use Threaten. Sanctuary Keeper will freeze! HaveTidus cast Hastega on your party to make the boss' turn drop way downbelow (you'll see it on the CTB) Just do whatever you want afterwards.Once it starts moving, recast Threaten (you will most likely miss the 3rdtime. But remember, its miss NOT immune so just try again.) You can keeprepeating this as many times as you want until it dies.+=+=+=+=+=+=+=+=+=+=+=+=+=+=+=+=+=+=+=+=+=+=+=+=+=+=+=+=+=+=+=+=+=+=+=+=+=+=+
Afterwards, there will be more scenes. When you regain control just keepgoing until you reach the end. The party will now see Zanarkand. ExamineYuna's sphere. You'll hear her last words to everyone. Continue on toZanarkand. The FMV from the beginning replays.
=========ZANARKAND=========Treasures: Fortune Sphere, Spiritual Targe, Friend Sphere, Lv. 3 Key Sphere,
Luck SphereKey Item: Sun Crest
Save your game and keep going to the end, get the 2 chests with a FortuneSphere and Spiritual Targe along the way. You'll reach the Dome now. Here,someone will tell the party to go see Yunalesca. Go in.
==============

ZANARKAND DOME==============
Inside, you'll see the memories of the other summoners and their guardians.When you regain control, just follow the path until you reach the savesphere. From here go north then east for a Friend Sphere, go back andcontinue north. Look at the map and you'll notice a narrow path that leadsbelow, go there to get the chest with a Lv. 3 Key Sphere. Go back up andcontinue towards the red indicator. In the next area, just go north and getthe chest with a Luck Sphere to the right. You'll see a scene between Braska,Jecht and Auron. Once you regain control save your game and proceed to thenext area.
==============================CLOISTER OF TRIALS (ZANARKAND)==============================
Here, examine the pattern at the north wall, then just step on the shinysquares on the floor that correspond to a particular block. Once done,the door will open and 6 pedestals will appear. Just push a pedestal(Except the 2 at the center) to reveal another puzzle at the next room.You need to complete all 4. In order to move the 2 center pedestals,take 1 sphere fom the recess at the north wall of the 2nd room and insertit into the pedestal. Once completed, a platform will appear at thecenter as well as a save sphere. Save and go to the next room. You'llhave to battle another boss.
+=+=+=+=+=+=+=+=+=+=+=+=+=+=+=+=+=+=+=+=+=+=+=+=+=+=+=+=+=+=+=+=+=+=+=+=+=+=+BOSS: SPECTRAL KEEPER+=+=+=+=+=+=+=+=+=+=+=+=+=+=+=+=+=+=+=+=+=+=+=+=+=+=+=+=+=+=+=+=+=+=+=+=+=+=+HP: 52,000AP: 12,000Gil: 7,000Items: Lv. 4 Key SphereEquip: Red Shield/Elemental Bracer (varies)Steal: Ether
Before you fight, give Tidus an armor that protects against Berserk. Once thebattle begins, have Tidus cast Hastega and move your 2 other characters, pre-ferably Auron and Yuna behind the boss. Now, have Tidus Provoke SpectralKeeper and Yuna cast Protect on Tidus. On your next succeeding turns keepTidus IN FRONT of the boss ALL THE TIME. This will give your other 2characters freedom to pummel him from behind without being disturbed. Youmay use your Aeons here too, but only if they are at Overdrive since Keeperwill kill them at once with Glyph Mines anyway.
If you use the strategy above, Keeper will only use Berserk Tail and nothingelse as long as Tidus remains alive. So have Yuna heal him as often aspossible.+=+=+=+=+=+=+=+=+=+=+=+=+=+=+=+=+=+=+=+=+=+=+=+=+=+=+=+=+=+=+=+=+=+=+=+=+=+=+
/////////////////////////////////////////////////////////////////////////////ZANARKAND DESTRUCTION SPHERE PUZZLE
Go back to Zanarkand Dome after you kill Sin. Your goal is to step on allthe SQUARE blocks. (7 of them) If you make a mistake you'll have to startover. Once done, the wall will open and reveal the final Destruction Sphere.Take it and proceed to the other room. Insert the sphere into the rightpedestal to the north. This will destroy a part of the wall, get the chestthere with a Magistral Rod./////////////////////////////////////////////////////////////////////////////
After the scenes continue on and save your game. You'll meet Yunalesca, shewill tell you the whole truth about the final aeon and stuff. When you regaincontrol go back out and save your game once more. Follow Yunalesca afterwards.
There will be some more scenes here, then you'll have to fight her.

+=+=+=+=+=+=+=+=+=+=+=+=+=+=+=+=+=+=+=+=+=+=+=+=+=+=+=+=+=+=+=+=+=+=+=+=+=+=+BOSS: YUNALESCA+=+=+=+=+=+=+=+=+=+=+=+=+=+=+=+=+=+=+=+=+=+=+=+=+=+=+=+=+=+=+=+=+=+=+=+=+=+=+HP: 1ST FORM: 24,000/2ND FORM: 48,000/3RD FORM: 60,000AP: 19,000Gil: 9,000Items: Lv. 3 Key SphereEquip: Blessed TargeSteal: Stamina Tablet x2
Her first form should be easy. Have Tidus cast Hastega, then Yuna castReflect on your attackers. Now, just attack her until she dies.
For her second form, Dispel your Reflect and start attacking her. She willuse Hellbiter, which will inflict Zombie on everyone, feel free to removethis status with Holy Water for now. But once she uses Hellbiter when she'sdying, keep your Zombie status don't remove it. Also, her physical attacksare quite weak but it Dispels all good status effects. It will really helpif you have Holy here since it does 9,999 damage against her.
For her third and final form she will use Mega Death on her first turn, soit will be game over if all your characters are not Zombies. Now is thetime to use your Overdriven Aeons, that should get the job done.+=+=+=+=+=+=+=+=+=+=+=+=+=+=+=+=+=+=+=+=+=+=+=+=+=+=+=+=+=+=+=+=+=+=+=+=+=+=+
Climb the broken ladder to the left, this will reveal a hidden area. Get theSun Crest here. (DON'T FORGET THIS OR ELSE YOU WON'T BE ABLE TO GET IT LATERUNLESS YOU KILL DARK BAHAMUT!) Leave the room afterwards. Outside, Auronwill talk to Tidus about himself. He will also show Tidus his memories.When you regain control again, go all the way out the Dome. Later, theairship will come and pick you up.
=======AIRSHIP=======
You'll see some scenes here, save your game afterwards. Go to the Cabin andtalk to Yuna twice. She will tell you to go to Bevelle. Go back to the bridgeand talk to Cid. Choose Highbridge from the destination list.
=======BEVELLE=======
Here, you'll find out that Shelinda has become the new captain of the guards.Tidus will tell her that the party wishes to see Mika. She'll leave. ThenMika will appear, after the talk he'll go away. Yuna and Tidus will go seethe fayth. He'll ask you if you've found a way to defeat Sin. Its up to youwhat to choose. You'll see more scenes with Shelinda afterwards.
When you get back to the airship, talk to Cid and head straight for Sin. Whenyou regain control after some scenes go to the Cabin and save your game.Continue to the deck. There will be a short scene between Yuna and Tidus.The battle with Sin commences.
+=+=+=+=+=+=+=+=+=+=+=+=+=+=+=+=+=+=+=+=+=+=+=+=+=+=+=+=+=+=+=+=+=+=+=+=+=+=+BOSS: LEFT FIN+=+=+=+=+=+=+=+=+=+=+=+=+=+=+=+=+=+=+=+=+=+=+=+=+=+=+=+=+=+=+=+=+=+=+=+=+=+=+HP: 65,000AP: 17,000(normal) 24,000(overkill)Gil: 10,000Items: HP Sphere x2Equip: Venomous Blade/SidewinderSteal: Mega Potion
This is easy. Just move in and attack with all you got. If you try to cast

any positive status effects on your party, Sin will simply dispel that withNegation. Once you see its core begin to energize pull back immediately sinceGravija will most likely follow.+=+=+=+=+=+=+=+=+=+=+=+=+=+=+=+=+=+=+=+=+=+=+=+=+=+=+=+=+=+=+=+=+=+=+=+=+=+=+
There will be some scenes, then you'll have to battle the other fin.
+=+=+=+=+=+=+=+=+=+=+=+=+=+=+=+=+=+=+=+=+=+=+=+=+=+=+=+=+=+=+=+=+=+=+=+=+=+=+BOSS: RIGHT FIN+=+=+=+=+=+=+=+=+=+=+=+=+=+=+=+=+=+=+=+=+=+=+=+=+=+=+=+=+=+=+=+=+=+=+=+=+=+=+HP: 65,000AP: 17,000(normal) 24,000(overkill)Gil: 10,000Items: Lv. 3 Key SphereEquip: Stone ColdSteal: X-Potion x2
Same as the other Fin.+=+=+=+=+=+=+=+=+=+=+=+=+=+=+=+=+=+=+=+=+=+=+=+=+=+=+=+=+=+=+=+=+=+=+=+=+=+=+
You'll see some more scenes where Brother fires the main gun which will severeSin's other Fin. The main gun will be broken. Just as Cid tells everyone to goback inside the ship, the party decides to jump. You'll battle another bossbelow.
+=+=+=+=+=+=+=+=+=+=+=+=+=+=+=+=+=+=+=+=+=+=+=+=+=+=+=+=+=+=+=+=+=+=+=+=+=+=+BOSS: SINSPAWN GENAIS/SIN+=+=+=+=+=+=+=+=+=+=+=+=+=+=+=+=+=+=+=+=+=+=+=+=+=+=+=+=+=+=+=+=+=+=+=+=+=+=+HP: 20,000/36,000AP: 27,000 (overkill)Gil: 20,000Items: Return Sphere x2, MP Sphere x2Equip: Baroque Sword, Light RingSteal - Genais: Shining Gem; Sin: Stamina Spring x9
The battle against Genais is easy. First, it is weak against Fire attacks soFiraga will deal a decent amount of damage. Once you've dealt sufficientdamage, it returns into its shell, if you attack at this state it recoverswith Cura. So if you have any weapon with the Zombiestrike ability, equip itand attack Genais until it becomes a Zombie. Once this happens, its Cura willdamage it instead of heal it. When you defeat Genais, Sin will emerge.
Sin's moves will be pretty much the same as the Fins, only this time therewill be nothing to pull you back from its Gravija. So just heal if thishappens.+=+=+=+=+=+=+=+=+=+=+=+=+=+=+=+=+=+=+=+=+=+=+=+=+=+=+=+=+=+=+=+=+=+=+=+=+=+=+
Sin will crash and you'll be back in the airship, when you regain control goto the deck then talk to Yuna. There will be some scenes, then something willhappen to Sin. You'll be back on the bridge once more, save your game andproceed to the deck.
+=+=+=+=+=+=+=+=+=+=+=+=+=+=+=+=+=+=+=+=+=+=+=+=+=+=+=+=+=+=+=+=+=+=+=+=+=+=+BOSS: SIN+=+=+=+=+=+=+=+=+=+=+=+=+=+=+=+=+=+=+=+=+=+=+=+=+=+=+=+=+=+=+=+=+=+=+=+=+=+=+HP: 140,000AP: 20,000(normal) 30,000(overkill)Gil: 10,000Items: Lv. 3 Key Sphere x2Equip: Echo TargeSteal: Ether x2
This is quite hard. First have Tidus cast Hastega, then Yuna Grand SummonAnima. This will deal incredible damage especially if Yuna's magic is high.On Yuna's next turn, summon Bahamut and unleash Mega Flare. Sin will now haveonly about 60,000 HP left. When he gets close enough, use Auron's Armor andMental Breaks on him and Tidus use Quick Hit. Attack as normal afterwards.

Make sure you kill him before his Overdrive gauge is full or else he'll useGiga-Graviton and its instant Game Over for you.+=+=+=+=+=+=+=+=+=+=+=+=+=+=+=+=+=+=+=+=+=+=+=+=+=+=+=+=+=+=+=+=+=+=+=+=+=+=+
==========WITHIN SIN==========
You'll find yourself inside Sin afterwards. Here, save your game and continueon. In the next area, just find your way towards the red indicator. Therewill be a save sphere at the end. Save and continue up.
You'll see Seymour again. He'll brag about having been chosen by Sin and all.You'll fight him again for the last time after that.
+=+=+=+=+=+=+=+=+=+=+=+=+=+=+=+=+=+=+=+=+=+=+=+=+=+=+=+=+=+=+=+=+=+=+=+=+=+=+BOSS: SEYMOUR OMNIS+=+=+=+=+=+=+=+=+=+=+=+=+=+=+=+=+=+=+=+=+=+=+=+=+=+=+=+=+=+=+=+=+=+=+=+=+=+=+HP: 80,000AP: 32,000 (overkill)Gil: 13,000Items: Lv. 3 Key Sphere x4Equip: Flexible ArmSteal: Shining Gem x2
He isn't that hard especially when you know how to counter the elements heis using. First let me explain how his wheels work. Whenever you attack awheel with magic it spins to the right, if you attack it physically it'llspin to the left. Now, if 3 orbs of the same color are facing Seymour, he'lluse Lv. 3 magic with that element 4 times. If only 2 orbs of the same colorare facing him, then he'll use Lv. 2 magic with that element twice. If nocolors are the same, then he'll use Lv. 2 magic of the 4 elements onlyonce. With that in mind, have Yuna cast NulBlaze on your party, since heuses Fire as his element by default. Then have Tidus cast Hastega, Auron useArmor and Mental Breaks and Lulu cast Blizzaga. When he has only about25,000-30,000 HP left, summon Bahamut at overdrive to get it over with.+=+=+=+=+=+=+=+=+=+=+=+=+=+=+=+=+=+=+=+=+=+=+=+=+=+=+=+=+=+=+=+=+=+=+=+=+=+=+
Yuna finally succeeds in sending him. After that, go back down and saveyour game once more. Head back up and continue on. Here, just keep goingtowards the red indicator at the end. Press O while stepping on the bluepanels you see along the way, this will lead to hidden treasures around thearea. Continue on until you reach your last save sphere. Once you're readycontinue north. A large pillar will drop from the sky, approach the largepink circle to get to the next area.
Here, you have to collect the white crystals that appear. (10 of them) Ifyou happen to get hit by the crystal shards that protrude from the ground,you'll fight fiends. Once you've collected all 10 crystals you'llautomatically be taken to the next area.
The party will see Jecht here, just go towards where he is and you'll see along scene between him and Tidus. The toughest battle of the game willcommence after that.
+=+=+=+=+=+=+=+=+=+=+=+=+=+=+=+=+=+=+=+=+=+=+=+=+=+=+=+=+=+=+=+=+=+=+=+=+=+=+BOSS: BRASKA'S FINAL AEON+=+=+=+=+=+=+=+=+=+=+=+=+=+=+=+=+=+=+=+=+=+=+=+=+=+=+=+=+=+=+=+=+=+=+=+=+=+=+HP: 1ST FORM: 60,000/2ND FORM: 120,000AP: NothingGil: NothingItems: NothingEquip: NothingSteal: Turbo Ether x2
Your first move here should be Hastega then Auron's various Breaks

(Full Break recommended) You should also have a Stoneproof or Stone Wardarmor equipped as Jecht Beam causes Petrify. If you have a weapon withthe Zombiestrike ability it will be a very good idea to equip it in thisbattle since Jecht is NOT immune to Zombie. Start attacking him after that.Once Jecht turns green (zombie) repeatedly cast Curaga on him as this dealsmassive damage especially if Yuna has a weapon with Break Damage Limit.(22,000-25,000 damage per Curaga) He'll also take damage from the YuPagoda's Power Wave (1,500 HP) If the zombie status wears off, reinflict itagain. Also have Tidus talk to him only when his Overdrive gauge is 3/4 full,since you are only allowed to use the Trigger Command twice. Just use thesame strategy for his second form. Good Luck!
Strategy from Martin Lindell <[email protected]>----------------------------------------------------
There's an easy way to beat Braska's Final Aeon. Just have Yuna Grand SummonYojimbo then pay him 200,000 gil, and hope for Zanmato. This will result toan instant kill.
////////////////////////////////////////////////////////////////////////////Note: The odds of having Yojimbo perform Zanmato are completely random. But
then it's worth a try. since Martin's tip will save you a lot of timein fighting Jecht. Besides you're at the end of the game, so you don'thave to worry about money. :)
////////////////////////////////////////////////////////////////////////////+=+=+=+=+=+=+=+=+=+=+=+=+=+=+=+=+=+=+=+=+=+=+=+=+=+=+=+=+=+=+=+=+=+=+=+=+=+=+
The game is practically over now. You'll see more scenes between Tidus andJecht after that. Then Yu Yevon will come. The final battle of the game willbegin.
+=+=+=+=+=+=+=+=+=+=+=+=+=+=+=+=+=+=+=+=+=+=+=+=+=+=+=+=+=+=+=+=+=+=+=+=+=+=+FINAL BOSS: AEONS & YU YEVON+=+=+=+=+=+=+=+=+=+=+=+=+=+=+=+=+=+=+=+=+=+=+=+=+=+=+=+=+=+=+=+=+=+=+=+=+=+=+HP: varies/99,999AP: NothingGil: NothingItems: NothingEquip: NothingSteal: Nothing
The Aeons will have the same amount of HP as they did when they are stillwith Yuna. This should be very easy, since you won't lose here even ifyou wanted to. You have infinite Auto-Life! Just do whatever you think isbest, trust me you'll be fine!+=+=+=+=+=+=+=+=+=+=+=+=+=+=+=+=+=+=+=+=+=+=+=+=+=+=+=+=+=+=+=+=+=+=+=+=+=+=+
Sit back and watch the ending (such a tear jerker =)) Congratulations! you'refinished!
+=+=+=+=+=+=+=+=+=+=+=+=+=+=+=+=+=+=+=+=+=+=+=+=+=+=+=+=+=+=+=+=+=+=+=+=+=+=+ii. EXTRA ENDING+=+=+=+=+=+=+=+=+=+=+=+=+=+=+=+=+=+=+=+=+=+=+=+=+=+=+=+=+=+=+=+=+=+=+=+=+=+=+
****************************SPOILER WARNING**********************************IF YOU HAVEN'T FINISHED THE GAME YET I STRONGLY SUGGEST THAT YOU SKIP THISSECTION AND CONTINUE ON TO THE SIDEQUEST. THIS PART WILL CONTAIN NOTHING BUTSPOILERS! YOU'VE BEEN WARNED!****************************SPOILER WARNING**********************************
////////////////////////////////////////////////////////////////////////////Foreword: Here's the full translation of the extra ending, as contributed
to me by Evan Panahi <[email protected]> He told me that hegot this from The GIA <www.thegia.com> so credit goes to them too.
////////////////////////////////////////////////////////////////////////////
----------------------------------------------------------------------------
The Eternal Calm: Final Fantasy X Another Story----------------------------------------------------------------------------
----------------------Scene 1: Besaid Beach----------------------
Yuna (thinking): 37, 38, 39, 40, 41...
(Sound of surfacing, gasp of breath)
Yuna (thinking): --two minutes, forty one seconds--a new high!
(Wakka runs onto Besaid beach and yells to Yuna)
Wakka: Yuna! C'mon!
Yuna: Be right there!
(Close up on Wakka. He crosses his hands and sighs contentedly.)
Wakka: Pretty good at holding your breath now, ya?
Yuna (laughing): Not as good as you!
Wakka: Yeah, well, I haven't even practiced recently.
Yuna (jokingly): You sure look it.
(Embarassed by his spare tire, Wakka brings his hand to his forehead.)
Wakka: Eh--ah...
Yuna: It's not like you're the one having a baby!
(Wakka turns, sighs, and runs off, leaving Yuna alone on the beach.)
(Yuna turns towards the beach and thinks to herself.)
Yuna (thinking): It's been two years since then. I can hold mybreath underwater for two whole minutes now. It takes more thanjust physical strength, there's a few tricks to it that youneed to figure out--I didn't understand when it was explainedin words, but after a lot of practice I finally got it.
Yuna (thinking): I'd never thought there was any kind of trickto it--I couldn't afford to think about anything back then.
Yuna (thinking): The Eternal Calm. It's my two minutes andforty one seconds and Wakka's pudgy stomach. It's notmuch--just a quiet kind of happiness.
-----------------------Scene 2: Besaid Temple-----------------------
(Yuna stands at the door and looks around before entering thedimly lit temple. She walks over to where Wakka is talkingwith a man. The pair walk towards her and the man begins to speak.)
Tasgio: I saw you from a distance at the stadium two years ago...but I never thought I'd get to see you in person. You're asbeautiful as ever...
Yuna: Thank you.
Tasgio: I have a favor to ask about my grandson. He's joined up with

the Young Persons' Alliance.
Tasgio: Now, not to say the Alliance is bad in and of itself... butme and the missus are both with New Yevon--my son and daughter-in-law too. My grandson used to come to our meetings, too, but one dayhe just...
Tasgio: There's a lot of young folks in the Alliance, so I'm sureit's exciting for him, but still--
Yuna (thinking): A number of groups have formed across Spira sincethen. How should we build this new world? What should Spira belike in the future? Everyone is looking for their own path.
Tasgio: I feel that ... my grandson and his companions aremoving too quickly.
Yuna (thinking): With so many different ways of thinking, at timesconflict is inevitable. Some people are uncomfortable with the newway of things. Honestly, I am too, sometimes... But this is goodenough for now. That's what I keep telling myself.
Yuna: I understand your feelings. But try talking over with yourgrandson. His actions may appear reckless to you, but his feelingsfor Spira are the same as your own.
-----------------------Scene 3: Besaid Island-----------------------
(Yuna is walking along an island path when Wakka runs in fromoff screen.)
Wakka: He-ey!
Yuna: Who is it? A visitor?
Wakka: Ya, you know how it is - the village geezers are shootingtheir mouths off about that again...
Yuna: Who is it this time?
Wakka: The son of the head of New Yevon.
Yuna: No way. I'd probably just end up being used by him.
Wakka: Man... sorry, Yuna.
Yuna: I'll go turn them down.
Wakka: No problem, I got it. I mean, you don't wanna hafta see theirfrowning faces, do ya?
Yuna: ...right.
(A messenger runs on screen.)
???: Lady Yuna!
Yeivel: Lady Yuna! I am Yeivel of the Young Persons' Alliance!I have come today to deliver a message from our leader Nurge!
Wakka: She's not joining the Alliance.
Yeivel: But--
Yuna: Is that why you came?

Yeivel: ...yes, it is.
Yuna: I'm not going to join with any group.
Yeivel: Are you perhaps going to form your own group?
Yuna: Please leave.
(Rikku runs on screen, screaming and out of breath.)
Rikku: Yuna! Wakka!
(Close up on Rikku, fade to black. Fade in on:)
----------------------Scene 4: Salvage Ship----------------------
Yuna (thinking): Rikku sometimes comes by Besaid Island. She travelsabout Spira, teaching people how to use machines, excavating oldmachines from undeground or underwater... She's awfully busy--butshe seems to be enjoying herself.
(Rikku pokes Wakka's stomach, making little poking noises.)
Wakka: Stop that!
Rikku: Quite the tummy you've got now! So how's Lulu?
Wakka: She's in the village. Go say "hi" later, ya?
Rikku: Of course! And Yunie--same as always, huh?
Yuna (cheerfully): That's right. Same as always.
(A seagull flies overhead.)
Wakka: So Kimahri's still at Mt. Gagazet?
Rikku: You betcha! He's teaching the Ronso children tons of stuff--he's really quite the teacher!
Rikku: Anyway, I got something from Kimahri for you--he said hefound it up in the mountain.
Yuna: A Sphere?
Wakka: Weird shape, huh?
(Rikku activates the Sphere and holds it out for Yuna.)
Rikku: Look closely, Yunie.
----------------Scene 5: A Cage----------------
(This scene is difficult to see and hear; the screen is awash incolored noise, and the sound is distorted and strung out. Thecage may be underwater, though it's difficult to tell. Though thelocation of the cage is uncertain, it is clearly Tidus trappedinside.)
Tidus: What the hell do I get arrested for? Let me go already!
Tidus: You hear me, don't you? What'd you think if she was your girl?

Tidus: Who cares if I used the enemy's machina? It was the only wayto save the Summoner!
Tidus: What would you have done instead?!
Tidus: Let me out of here! Let me see her!
----------------------Scene 6: Salvage Ship----------------------
Yuna (thinking): A voice... a voice that had been close by for whatseemed like forever...
Wakka: What's this about? What's he doing there? Is that really him?What's this all about?
Rikku: I don't really know... but you want to find out, don't you?
Wakka: Well, yeah!
Yuna: Yes.
Rikku: Then let's go!
Yuna: Where to?
Rikku: No idea! Let's go talk to Kimahri first and think about itthen, okay?
Wakka: But we don't know anything! Shouldn't we look into it alittle first?
Rikku: And just who's gonna find it out for us?
(Yeivel appears suddenly on the bridge.)
Yeivel: Leave it to us!
Yeivel: Our leader Nurge should agree as well! I'll convince himmyself!
Wakka: Get outta here!
Yeivel: Y-yessir! I'll return as soon as something has beenlearned!
(Yeivel runs off.)
Rikku: I think that Yunie ought to go herself.
Wakka: That's impossible.
Rikku: Why's that?
Wakka: The next three months are completely booked. Everyone wantsto meet Yuna.
Rikku: And what about what Yunie wants!
Wakka: Well, y'know...someday, when the world's settled down and all...
(Rikku is furious at Wakka.)
Rikku: Whaddya mean, someday? What someday? What's the matter with you,Wakka? Yunie always worked so hard, she should only have to worry about

herself now--so why!? Everytime I come here, I always think about howeveryone's busy finding their own happiness... except for Yuna.
Wakka: Well, that's--
(Rikku runs over and shouts in Wakka's face.)
Rikku: Has your head gone as soft as your belly?!
Rikku: Yunie!
Yuna (thinking): I... I want to go. But--if I leave, I maydisappoint people.
Yuna: I...
[Ed. Note: The following line is a direct quotation from FinalFantasy X; however, since we couldn't find the exact wording ofthe English version we have gone ahead and retranslated it.]
Tidus (voiceover): Well, if acting grown up means not beingable to say what I want, then screw it! Nothing'll changethat way!
Yuna: I'll go.
Wakka: Yuna!!
(Rikku sighs with relief.)
Yuna: After all... this is my story.
Rikku: Ha! I knew you'd say that, so I went ahead and broughtsome stuff for you.
Wakka: Oh, no...
Rikku: First off, we gotta get you into some new clothes! You'refamous, after all, so you'd better go undercover!
Wakka: J--just a sec, ya? Lemme go get Lu.
Yuna (thinking): The Eternal Calm. It's my two minutes and fortyone seconds and Wakka's pudgy stomach. It's a small and quietkind of happiness ... but, I guess I can ask for a little more,can't I?
Yuna: Rikku, let's get going!
~~~~~~~~~~The End...~~~~~~~~~~----------------------------------------------------------------------------
===============V. SIDE QUESTS===============
+=+=+=+=+=+=+=+=+=+=+=+=+=+=+=+=+=+=+=+=+=+=+=+=+=+=+=+=+=+=+=+=+=+=+=+=+=+=+i. AIRSHIP COORDINATES / PASSWORDS+=+=+=+=+=+=+=+=+=+=+=+=+=+=+=+=+=+=+=+=+=+=+=+=+=+=+=+=+=+=+=+=+=+=+=+=+=+=+
===========COORDINATES===========
SEARCH MODE

-------------------------------------------------------------------------LOCATION | COORDINATES | TREASURES |--------------------------------------------------------------Omega Ruins | x = 74.101, y = 36.099 | - |Sanubia Sands | x = 15.028, y = 41.836 | Ascalon |Baaj Temple | x = 16.726, y = 57.986 | - |Besaid Falls | x = 29.688, y = 73.073 | Dragoon Lance |Battle Site | x = 39.676, y = 57.985 | Phantom Bangle |Mi'ihen Ruins | x = 33.938, y = 57.135 | Sonar |--------------------------------------------------------------
=========PASSWORDS=========
INPUT MODE-----------------------------------------------------------LOCATION | PASSWORDS | TREASURES |-------------------------------------------------Mushroom Rock | GODHAND | God Hand |Besiad Ruins 1 | VICTORIOUS | Victorious |Besaid Ruins 2 | MURASAME | Murasame |-------------------------------------------------
+=+=+=+=+=+=+=+=+=+=+=+=+=+=+=+=+=+=+=+=+=+=+=+=+=+=+=+=+=+=+=+=+=+=+=+=+=+=+ii. LUCA SPHERE THEATER+=+=+=+=+=+=+=+=+=+=+=+=+=+=+=+=+=+=+=+=+=+=+=+=+=+=+=+=+=+=+=+=+=+=+=+=+=+=+
You can watch some movies and listen to some music here. But you will needa lot of gil to purchase the entire collection of spheres that they have,since a movie sphere costs 5,000 each and a music sphere for 2,000 each.There's a total of 50 movie spheres and 71 music spheres. Here's the list.
-----------------------------------------------------------------------------MOVIE SPHERES-----------------------------------------------------------------------------#1: Zanarkand #26: Otherworld#2: We Call It "Sin" #27: Sin Sleeps#3: Sinspawn #28: Homecoming#4: This Is It #29: Dry Dock#5: Blitzball! #30: Nayto Du Ku#6: A Summoner Is Born #31: Leaving Home#7: Lulu's Contempt #32: The Glory of Yevon#8: Kimahri's Challenge #33: The Red Carpet#9: Fear On The Sea #34: False Vows#10: Sin Arises #35: Believe#11: Sin's Threat #36: The Spring#12: Futile Resistance #37: The Summit#13: Failure #38: The Last Chapter#14: Kilika Dusk #39: Sinrise#15: The Dance #40: Departure#16: Luca Harbor #41: The Approach#17: Let The Games Begin #42: Terra Graviton#18: The Legend Lives #43: Gravity Sucks#19: The Dark Aeon #44: Heaven's Fall#20: No Better Plan #45: Vena!#21: Judgement #46: Machina Redux#22: Ex Machina #47: Sinfall#23: Sin's Wake #48: Evenfall#24: Reunion #49: Face Off#25: Metropolis #50: Breaking Through-----------------------------------------------------------------------------
-----------------------------------------------------------------------------MUSIC SPHERES
-----------------------------------------------------------------------------#M01: Zanarkand #M37: Moment Of Truth#M02: Prelude #M38: Djose Temple#M03: Tidus' Theme #M39: Ridess The Shoopuf?#M04: Run!! #M40: Rikku's Theme#M05: Creep #M41: Oui Are Al Bhed#M06: Battle Theme #M42: Guadosalam#M07: Enemy Attack #M43: Thunder Plains#M08: Game Over #M44: Jecht's Theme#M09: Out Of The Frying Pan #M45: The Burning Sands#M10: Victory Fanfare #M46: The Wedding#M11: Leap In The Dark #M47: Assault#M12: Underwater Ruins #M48: Tragedy#M13: The Blitzers #M49: Believe#M14: Wandering #M50: Servants Of The Mountain#M15: Besaid #M51: Macalania Woods#M16: Spira Unplugged #M52: Via Purifico#M17: Phantoms #M53: Bravely Forward#M18: The Trials #M54: The Unsent Laugh#M19: The Summoning #M55: Seymour's Ambition#M20: Braska's Daughter #M56: Illusion#M21: Yuna's Theme #M57: Yuna's Decision#M22: Good Night #M58: Nostalgia#M23: Decision On The Deck #M59: Peril#M24: Movement In Green #M60: Launch#M25: A Fleeting Dream #M61: Challenge#M26: Calm Before The Storm #M62: Beyond The Darkness#M27: Face Off #M63: The Void#M28: Grand Maester Mika #M64: The Truth Revealed#M29: Luca #M65: Pursuit#M30: The Splendid Performance #M66: Gloom#M31: Auron's Theme #M67: Patricide#M32: Blitz Off! #M68: The Temple Players#M33: Mi'ihen Highroad #M69: Hum Of The Fayth#M34: Chocobo Jam #M70: Lulu's Theme#M35: The Travel Agency #M71: Wakka's Theme#M36: Seymour's Theme-----------------------------------------------------------------------------
Tracks 69 to 71 are part of the special music sphere set which can be boughtfor 40,000 Gil once you've completed the collection from Tracks 1 to 68.
+=+=+=+=+=+=+=+=+=+=+=+=+=+=+=+=+=+=+=+=+=+=+=+=+=+=+=+=+=+=+=+=+=+=+=+=+=+=+iii. CHAMBER OF FAYTH TREASURES+=+=+=+=+=+=+=+=+=+=+=+=+=+=+=+=+=+=+=+=+=+=+=+=+=+=+=+=+=+=+=+=+=+=+=+=+=+=+
You can only revisit the temples after you defeat Sin and the dark aeons thatare blocking the entrance to some of them. You have to solve the puzzlesagain to gain access to the Chamber of the Fayth. Here, the Fayth will tella part of the story about Sin, Jecht and their dream. You'll receive sometreasures too, which are mostly rare spheres.
--------------------------------------------------------------------------|LOCATION | TREASURES |--------------------------------------------------------------------------|Besaid Temple | Evasion Sphere, Potion x2, Wht Magic Sphere, |
| Hi-Potion, Elixir |--------------------------------------------------------------------------|Kilika Temple | Luck Sphere, Defense Sphere, Agility Sphere, |
| Accuracy Sphere |--------------------------------------------------------------------------|Djose Temple | Luck Sphere, Magic Defense Sphere, Agility |
| Sphere |--------------------------------------------------------------------------|Macalania Temple | Magic Sphere, Accuracy Sphere, Magic Defense |
| Sphere |--------------------------------------------------------------------------|

Cavern of Stolen Fayth | Strength Sphere |--------------------------------------------------------------------------|Remiem Temple | Defense Sphere |--------------------------------------------------------------------------|
+=+=+=+=+=+=+=+=+=+=+=+=+=+=+=+=+=+=+=+=+=+=+=+=+=+=+=+=+=+=+=+=+=+=+=+=+=+=+iv. REMIEM TEMPLE (CHOCOBO RACING)+=+=+=+=+=+=+=+=+=+=+=+=+=+=+=+=+=+=+=+=+=+=+=+=+=+=+=+=+=+=+=+=+=+=+=+=+=+=+
=============REMIEM TEMPLE=============Key Item: Cloudy Mirror
In order to get to this area, go to the southwest part of Calm Lands on achocobo. Press O on the feather and the chocobo will fly down below.
Here, there will be an intersection. Go left and examine the sphere, you'llalso see the champion chocobo. Now, go right at the intersection and ridethe chocobo. The race will start, your goal is to get to the centralplatform ahead of the champion chocobo. You'll receive the Cloudy Mirrorif you win.
+=+=+=+=+=+=+=+=+=+=+=+=+=+=+=+=+=+=+=+=+=+=+=+=+=+=+=+=+=+=+=+=+=+=+=+=+=+=+v. HIDDEN AEONS+=+=+=+=+=+=+=+=+=+=+=+=+=+=+=+=+=+=+=+=+=+=+=+=+=+=+=+=+=+=+=+=+=+=+=+=+=+=+
1. Anima--------
You have to go to Baaj Temple, enter the coordinates at the airship to accessthis area.
===========BAAJ TEMPLE===========Treasures: Megalixir, Mega Pheonix x4
Save your game first then go north, Tidus will automatically jump at the end.When you regain control after the short scene, head for the entrance. You'llmeet the big fish once more.
+=+=+=+=+=+=+=+=+=+=+=+=+=+=+=+=+=+=+=+=+=+=+=+=+=+=+=+=+=+=+=+=+=+=+=+=+=+=+BOSS: GEOSGAENO+=+=+=+=+=+=+=+=+=+=+=+=+=+=+=+=+=+=+=+=+=+=+=+=+=+=+=+=+=+=+=+=+=+=+=+=+=+=+HP: 32,767AP: 4,200Gil: 1,000Items: Ability Sphere x4Equip: Reflect Shield/Variable MogSteal: Water Gem
Make sure your party has a Stone Ward armor equipped since his Stone Punchcauses Petrification. Cast Hastega on yourself first then attack. Use BombCore on him if you have it. After a few turns he'll swallow one of yourcharacters, use the Trigger Command: Struggle to deal twice as much damage.
But take note that if one of your characters are still inside him the momenthe dies, he'll spit that character out dealing 9,999 damage on everyone! Sojust make sure his stomach is empty before you kill him.+=+=+=+=+=+=+=+=+=+=+=+=+=+=+=+=+=+=+=+=+=+=+=+=+=+=+=+=+=+=+=+=+=+=+=+=+=+=+
After that, dive and go south. Check around the area to find the chest withthe Onion Knight, you'll need the Celestial Mirror to open it though. (moreon that later) Proceed into the temple.
Inside, you'll see 6 statues. Approch each one to activate it. If you managed

to GET ALL THE DESTRUCTION SPHERE TREASURES FROM EACH TEMPLE INCLUDING THEONE IN ZANARKAND the door will open. After some scenes, you'll receive Anima.+=+=+=+=+=+=+=+=+=+=+=+=+=+=+=+=+=+=+=+=+=+=+=+=+=+=+=+=+=+=+=+=+=+=+=+=+=+=+
2. Yojimbo----------
He is inside the Cavern of the Stolen Fayth. It is located below the valleywhere you fought Defender X. Get down there and proceed to the next area.
==========================CAVERN OF THE STOLEN FAYTH==========================Treasures: Megalixir, Lv. 2 Key Sphere, Fortune Sphere, Mega-Potion x2,
Flexible Arm, X-Potion x2, Teleport Sphere x2, MP Sphere
Here, check every corner of the cavern for some treasures. Then keepgoing towards the end, there will be a save sphere here. Save first andcontinue on. There will be some scenes, you'll battle Yojimbo afterwards.
+=+=+=+=+=+=+=+=+=+=+=+=+=+=+=+=+=+=+=+=+=+=+=+=+=+=+=+=+=+=+=+=+=+=+=+=+=+=+BOSS: LADY GINNEM/YOJIMBO+=+=+=+=+=+=+=+=+=+=+=+=+=+=+=+=+=+=+=+=+=+=+=+=+=+=+=+=+=+=+=+=+=+=+=+=+=+=+HP: 33,000AP: 0Gil: 0Items: noneEquip: noneSteal: nothing
Just unload on him with all you got and use your aeons here as much aspossible to kill him quickly. Once his overdrive gauge is full, he'll doZanmato so summon an aeon immediately to shield yourself.+=+=+=+=+=+=+=+=+=+=+=+=+=+=+=+=+=+=+=+=+=+=+=+=+=+=+=+=+=+=+=+=+=+=+=+=+=+=+
Step on the teleport panel and go to the areas which are indicated with ???for some treasures. Proceed to the Chamber of Fayth afterwards. Inside,you'll see some scenes. Yojimbo will ask you to pay him 250,000 Gil. Its upto you how much you'll offer, the higher the price the better the items he'llgive you in return. Yojimbo will join you after that.+=+=+=+=+=+=+=+=+=+=+=+=+=+=+=+=+=+=+=+=+=+=+=+=+=+=+=+=+=+=+=+=+=+=+=+=+=+=+
3. Magus Sisters----------------
To get this aeon you need 2 items:
- Flower Scepter - defeat Belgemine's Bahamut aeon in Remiem Temple- Blossom Crown - You'll receive this from the monster trainer at the Calm
Lands training arena once you've captured all the monstersin Mt. Gagazet and Gagazet Mountain Cave.
Once you have both items, go back to Remiem Temple and examine the glowingglyph on the door to the north and use the 2 items there.
/////////////////////////////////////////////////////////////////////////////Reminder: You must have both Anima and Yojimbo before going to the Remiem
Temple to get the Magus Sisters./////////////////////////////////////////////////////////////////////////////
+=+=+=+=+=+=+=+=+=+=+=+=+=+=+=+=+=+=+=+=+=+=+=+=+=+=+=+=+=+=+=+=+=+=+=+=+=+=+vi. CELESTIAL WEAPONS+=+=+=+=+=+=+=+=+=+=+=+=+=+=+=+=+=+=+=+=+=+=+=+=+=+=+=+=+=+=+=+=+=+=+=+=+=+=+
You need the Celestial Mirror in order to acquire the ultimate weapons foreach character but first you should have the Cloudy Mirror. Now, go toMacalania Woods. Talk to the mother and child here and they will tell you

that their husband/father is missing. Go east to the next area, here gowest and you'll see the guy. Tell him that his family is waiting for him.
Go back to the couple and they'll tell you that their child is missing. Nowfrom the save sphere, find a crystal path and go up, at the intersectionhead north and you'll find the boy. Use the Cloudy Mirror there and it willbecome the Celestial Mirror.
Another thing, you should know that when you initially get a weapon, it willpossess nothing more than the No AP ablity, rendering it useless. You willneed Crests and Sigils to maximize the power of each weapon.
1. Tidus (Caladbolg)--------------------Requirements: Sun Crest, Sun Sigil
You can obtain the Sun Crest from a chest at the area where you foughtYunalesca.
As for the Sigil, well... you have to endure hours after hours of annoyanceand frustration. =) Anyway, to get it you have to race with the ChocoboTrainer in Calm Lands. You need to acheive a time of 0.0, that would meangetting 14 balloons and hitting only 1 bird, if you reach the finish lineat 39 seconds or less. But it is better if you don't let any birds hityou. It is very important that you get 4 or better yet all of the balloonsat the beginning of the race. As you progress however, getting the balloonswill be significantly harder since it will be scattered randomly allover the track. Not to mention both the Trainer herself and the birdsgetting in your way. Good Luck!
Once you have both items, go to the northern area of Calm Lands and find aslope that leads below. Examine the glyph and use the Celestial Mirrorthere. You'll receive the Caladbolg.+=+=+=+=+=+=+=+=+=+=+=+=+=+=+=+=+=+=+=+=+=+=+=+=+=+=+=+=+=+=+=+=+=+=+=+=+=+=+
2. Yuna (Nirvana)-----------------Requirements: Moon Crest, Moon Sigil
You can get the Moon Crest from a chest at Besaid Beach.
You'll receive the Moon Sigil from Belgemine once you beat all her aeons inRemiem Temple.
Here's a list of all the items you'll receive from her every time you defeateach of her aeons:
------------------------------------------------AEON | ITEMS------------------------------------------------Valefor | Aeon's Soul / Lightning Gem x4Ifrit | X-Potion x30Ixion | Chocobo Feather x10Shiva | Mega-Potion x60Bahamut | Flower ScepterYojimbo | Shadow Gem x8Anima | Stamina Spring x60Magus Sisters | Shining Gem x40------------------------------------------------
If you caught all the monsters in Calm Lands, the Trainer will give you achest which requires the Celestial Mirror to open. Get the Nirvana there.+=+=+=+=+=+=+=+=+=+=+=+=+=+=+=+=+=+=+=+=+=+=+=+=+=+=+=+=+=+=+=+=+=+=+=+=+=+=+
3. Auron (Masamune)-------------------Requirements: Saturn Crest, Saturn Sigil

You can get the Saturn Crest from a chest at the southmost end of the OldRoad. (Mi'ihen Highroad)
You will receive the Saturn Sigil from the Monster Trainer in Calm Landsonce you have captured at least 1 of all the fiends from at least 10 areas.
To get the Masamune, you will need the Rusty Sword which can be foundstuck in the ground to the east of the Cavern of the Stolen Fayth.Once you have all the items, go back to Mushroom Rock and examine LordMi'ihen's statue. Insert the Rusty Sword there and a glyph will appear,examine it and you'll receive the Masamune.+=+=+=+=+=+=+=+=+=+=+=+=+=+=+=+=+=+=+=+=+=+=+=+=+=+=+=+=+=+=+=+=+=+=+=+=+=+=+
4. Wakka (World Champion)-------------------------Requirements: Mercury Crest, Mercury Sigil
Go back to the Auroch's Locker Room in Luca and get the Mercury Crest fromone of the lockers there.
The Mercury Sigil will appear as a prize at the Blitz Ball League once youcompleted all of Wakka's Reels. (Attack, Status, Aurochs)
Talk to the bartender at the Cafe in Luca. If you've won enough Blitz Ballgames, you'll receive the World Champion.+=+=+=+=+=+=+=+=+=+=+=+=+=+=+=+=+=+=+=+=+=+=+=+=+=+=+=+=+=+=+=+=+=+=+=+=+=+=+
5. Lulu (Onion Knight)----------------------Requirements: Mars Crest, Mars Sigil
The Mars Crest can be found in a chest at the Farplane, go back there onceyou have the airship.
The Mars Sigil will be a little harder to acquire. It will require lots ofconcentration and very little distraction. Now go to the Thunder Plains andtry to dodge 200 consecutive lightning bolts. (I strongly recommend havingthe No Encounters ability here since any random battle might distract you.)Once you're done claim your prize at the Rin Travel Agency.
------------------------------------------------------# of bolts dodged | Prize------------------------------------------------------
5 | X-Potion x210 | Mega-Potion x220 | MP Sphere x250 | Strength Sphere x3100 | HP Sphere x3150 | Megalixir x4200 | Mars Sigil
------------------------------------------------------
You can get the Onion Knight from a chest that is underwater outside BaajTemple.+=+=+=+=+=+=+=+=+=+=+=+=+=+=+=+=+=+=+=+=+=+=+=+=+=+=+=+=+=+=+=+=+=+=+=+=+=+=+
6. Rikku (Godhand)------------------Requirements: Venus Crest, Venus Sigil
You'll find the Venus Crest in a chest that is within a whirlpool at BikanelIsland.
You need to complete the Cactuar Village side quest to get the Venus Crest.This event is triggered once you examine the cactuar stone located somewherein Bikanel Island. (I don't know the exact location) You have to find all 10

cactuars to gain access to the area blocked by the sandstorm. Here's a listof the 10 Cactuars.
----------------------------------------------------------------------------1st Cactuar: Tomay
Clue: Tomay's gone to fetch water.Location: OasisTime Limit: 10 seconds----------------------------------------------------------------------------2nd Cactuar: Rovivea
Clue: Rovivea's gone walkaboutLocation: Running around to the west of Sanubia Desert EastTime Limit: 13 seconds----------------------------------------------------------------------------3rd Cactuar: Chava
Clue: Little Chava likes big numbers.Location: 20% off sign post at Sanubia Desert WestTime Limit: 13 seconds----------------------------------------------------------------------------4th & 5th Cactuar: Alek & Aloja
Clue: Alek & Aloja play tag in the ruins of men.Location: From the save sphere at Sanubia Desert Central, go west to the
ruins.Time Limit: 13 seconds.----------------------------------------------------------------------------6th Cactuar: Vachella
Clue: Vachella seeks the shining blue.Location: Examine the save sphere at Sanubia Desert East.Time Limit: 14 seconds----------------------------------------------------------------------------7th Cactuar: Robeya
Clue: Robeya's stuck inside.Location: Southwest area of Sanubia Desert Central, look for a treasure
chest near the wire fence.Time Limit: 14 seconds----------------------------------------------------------------------------8th Cactuar: Isrra
Clue: The lord of the hole is gone, Isrra thinks.Location: Check among the whirlpools at Sanubia Desert West (he appears
randomly.)Time Limit: 15 seconds----------------------------------------------------------------------------9th Cactuar: Elio
Clue: Much curious, Elio has left on a journey.Location: He's at the airship, go all the way back to the Oasis and watch a
scene where Elio teleports into the airship. Find him on the DeckTime Limit: 11 seconds----------------------------------------------------------------------------10th Cactuar: Flaile
Clue: Flaile is always behind.Location: Just put Elio's sphere into the stone and he'll show up
automatically.Time Limit: 13 seconds----------------------------------------------------------------------------
If you managed to find all 10 cactuars the sandstorm that once blocked yourpath will disappear. You can now go that area and get the Venus Sigil froma chest there.
To get the Godhand, go to Mushroom Rock (the one that was unlocked by theGODHAND password) and use the Celestial Mirror to open the treasure chest.+=+=+=+=+=+=+=+=+=+=+=+=+=+=+=+=+=+=+=+=+=+=+=+=+=+=+=+=+=+=+=+=+=+=+=+=+=+=+
7. Kimahri (Spirit Lance)-------------------------Requirements: Jupiter Crest, Jupiter Sigil
The Jupiter Crest can be found in a chest situated behind one of the pillarsat Gagazet Prominence. (where you fought Seymour Flux)
For the Jupiter Sigil you need to catch 7 blue butterflies at Macalania Woods
To get the Spirit Lance, go to the Thunder Plains and examine 3 CactuarStones there with the SQUARE button. A Ghost Cactuar will appear. Now goto Thunder Plains South, then a bit northeast from the save sphere. When yousee a fallen lightning rod tower examine it with the SQUARE btton to receivethe weapon.+=+=+=+=+=+=+=+=+=+=+=+=+=+=+=+=+=+=+=+=+=+=+=+=+=+=+=+=+=+=+=+=+=+=+=+=+=+=+
Once you have all the weapons and the necessary crests and sigils, go toMacalania Woods and examine one of the white orbs there to complete theritual and maximize the power of the weapons.
+=+=+=+=+=+=+=+=+=+=+=+=+=+=+=+=+=+=+=+=+=+=+=+=+=+=+=+=+=+=+=+=+=+=+=+=+=+=+vii. DARK AEONS+=+=+=+=+=+=+=+=+=+=+=+=+=+=+=+=+=+=+=+=+=+=+=+=+=+=+=+=+=+=+=+=+=+=+=+=+=+=+
Defeating these aeons is indeed the most difficult task to accomplish in thisgame. But I'll try my best to help you out. Very well then, lets begin.
REMINDERS: All Dark Aeons are IMMUNE to all types of status ailments,including all Breaks.
Ribbon DOES NOT prevent KO / Death, but Deathproof DOES.
I'm using the max stats cheat when fighting these dark aeons,meaning all my stats are at 255 with 99,999 HP and 9999 MP.
-----------------------------------------------------------------------------1. Dark Velefor-----------------------------------------------------------------------------HP: 800,000AP: 10,000 (normal) 15,000 (overkill)Items: Dark Matter x2Equip: Double Header / Genji ShieldSteal: X-Potion x4Attacks: Energy Ray - deals 10,000+ damage on all characters
Energy Blast - deals 52,000+ damage on all charactersPhysical Attack - 3,500+ damage on 1 character
Elemental Immunities: none, but half damage all elementsRecommended Armor Abilities: Break HP Limit, Auto PheonixRecommended Weapon Abilities: Break Damage Limit, One MP Cost----------------------------------------------------------------------------
Location: You'll find him at the entrance of Besaid Village. A summoner willblock your path and summon Dark Valefor.
I recommend that you have an Accuracy of at least 80, if not repeatedly castAim on yourself. Cast Hastega immediately at the beginning of the battle.Set your Overdrive Mode to Stoic (this is your best choice) Start attackingafter that, use Tidus' Blitz Ace Overdrive and Wakka's Attack Reels. He'lldie soon enough.
Dark Valefor uses Energy Ray first then immediately follows with Energy Blastonce his overdrive gauge is full. Save yourself with Auto-Life.
----------------------------------------------------------------------------2. Dark Ifrit----------------------------------------------------------------------------HP: 1,400,000AP: 20,000 (normal) 30,000 (overkill)Items: Dark Matter x2Equip: Arcane Ring / Soul of MogSteal: Mega Pheonix x2Attacks: Meteorstrike - 20,000+ damage on 1 target.
Hellfire - 33,000+ damage against all targets.Physical Attacks - 9000+ damage on 1 character
Elemental Immunities: Absorbs fire, immune against lightning & water, halfdamage against ice
Recommended Armor Abilities: Break HP Limit, Auto Pheonix, Fire EaterRecommended Weapon Abilities: Break Damage Limit, Counterattack, One MP Cost----------------------------------------------------------------------------
Location: Entrance to Al Bhed Home, a man will ask you to help him find hisdaughter. You must choose yes and he'll ask you to look by thecliff. You'll see Dark Ifrit there.
It is recommended that all members of your battle party has Auto-Life andHastega with them. This will be easy if you have the Fire Eater ability.Now, cast Hastega on yourself, then Auto-Life on all your party members. Hisphysical attacks are pretty powerful so you should also have Protect, buteven so you'll still die if your HP isn't high enough. If you have the FireEater ability, Meteorstrike won't hurt you but heal you instead. Recast AutoLife if necessary and continue attacking. Once his overdrive gauge is full,summon an aeon to block.
----------------------------------------------------------------------------3. Dark Ixion----------------------------------------------------------------------------HP: 1,200,000AP - 1st Battle: 20,000 (normal) 30,000 (overkill)
- 2nd Battle: 40,000 (normal) 50,000 (overkill)Items: Dark Matter x4Equip: Ochre Bangle / Ochre Bracer / Genji ShieldSteal: Stamina Tablet x2Attacks: 1st Battle: Thundaja - 4000+ damage on 1 character.
Aerospark - 6000+ damage 1 character.Physical Attacks - causes Sleep
2nd Battle: Aerospark - instant kill (99,999 damage) on 1 characterThor's Hammer - 19,000+ damage on all charactersPhysical Attacks - causes Sleep & Full Break
Elemental Immunities: absorbs lightning, immune against ice & fire, halfdamage against water.
Recommended Armor Abilities: Sleepproof, Auto-Pheonix, Break HP Limit,Lightning Eater
Recommended Weapon Abilities: Break Damage Limit, Counterattack, MagicBooster, One MP Cost
----------------------------------------------------------------------------
Location: Talk to the soldier under the lightning rod tower, north of theagency. Once you do, he'll run off and call a summoner who willthen summon Dark Ixion.
Your very first move should be Hastega then Auto-Life on all your partymembers. Lightning Eater will protect you from Thundaja, but not fromAerospark. Remember that there is no way you can prevent Full Break. Now,with that in mind start attacking. Doublecast Ultima as much as you can.If you have your overdrives available, don't use it just yet, save it forlater. His overdrive will only be Aerospark.
When you fight him for the second time, cast Hastega on yourself then Auto-Life on all your party members. Unleash your overdrives and keep Double-casting Ultima. Once he does Aerospark, one of your characters will die

for sure, but with Auto-Life you shouldn't worry. When his overdrivegauge is full it is important that you immediately summon an aeon to blockif your HP isn't high enough.
----------------------------------------------------------------------------4. Dark Shiva----------------------------------------------------------------------------HP: 1,100,000AP: 20,000 (normal) 30,000 (overkill)Items: Dark Matter x2Equip: Rod of Ice / ExcaliburSteal: Mana Tablet x4Attacks: Physical Attacks - 4000+ damage to a character.
Heavenly Strike - causes KO / deathDiamond Dust - 84,000+ damage! on all characters.
Elemental Immunities: absorbs ice, immune against water & lightning, halfdamage against fire
Recommended Armor Abilities: Break HP Limit, Auto Pheonix, DeathproofRecommended Weapon Abilities: Break Damage Limit, Double Overdrive, One MP
Cost, Counterattack / Magic Booster----------------------------------------------------------------------------
Location: Macalania Temple Entrance. A Guado Guard will block your path andsummon Dark Shiva.
It is required for your party to have high defense, otherwise she willsimply kick you and you're dead. Cast Hastega first, Aim, then Auto-Life onyour entire party, start attacking with Quick Hit after that. Her HeavenlyStrike causes Death, but with Deathproof you'll be fine. Recast Auto-Lifeif necessary. Once her overdrive gauge is full, summon an aeon immediatelyto save yourself.
Once she's dead, an infinite supply of Guado Guadians will emerge from thetemple, so never bother to think about killing all of them. Just run.
----------------------------------------------------------------------------5. Dark Bahamut----------------------------------------------------------------------------HP: 4,000,000AP: 30,000 (normal) 40,000 (overkill)Items: Dark MatterEquip: Super GoalieSteal: Twin Stars x2Attacks: Physical Attacks - 12,000-13,000 damage on 1 character.
Impulse - 6,000+ damage in addition to Slow, Full Break & Petrifyon all characters.
Mega Flare - Massive damage to all characters, that is if you'renot inflicted with Full Break, which never happens
Elemental Immunites: Half damage against all elements including HolyRecommended Armor Abilities: Ribbon, Auto-Pheonix, Break HP Limit.Recommended Weapon Abilities: Break Damage Limit, Magic Booster, Double
Overdrive, One MP Cost----------------------------------------------------------------------------
Location: Zanarkand Dome. (the place where you fought Yunalesca) Dark Bahamutwill be waiting there.
This battle is long and hard. First cast Hastega then Auto-Life on yourparty, Protect will help too. Start attacking with Quick Hit after that.Make sure your party ALWAYS has Auto-Life, meaning when a character dies andis revived, recast Auto-Life immediately. Be very prepared because once hisoverdrive gauge is full, he'll use Impulse then immediately follow with MegaFlare, so make sure your HP is high enough to survive from Impulse topreserve your Auto-Life, because you'll definitely die from Mega Flare.
----------------------------------------------------------------------------6. Dark Yojimbo
----------------------------------------------------------------------------HP: 1,600,000AP: 8,000 (normal) 10,000 (overkill)Items: Dark Matter x7, Master Sphere x1Equip: Nemesis Rod / Ashura / Vendetta / Genji Bracer / Heaven's CloudSteal: Stamina Tonic x2Elemental Immunities: Regular damage against all elements including HolyAttacks: Daigoro - 6,000+ damage with Petrify on 1 character
Kozuka - 12,000+ damage with Full Break and Curse on 1 characterWakizashi - 22,000+ damage on all charactersZanmoto - instant death on all characters
Recommended Armor Abilities: Ribbon, Auto Pheonix, Break HP LimitRecommended Weapon Abilities: Break Damage Limit, Triple Overdrive, Magic
Booster, One MP Cost----------------------------------------------------------------------------
Location: Cavern of the Stolen Fayth, step on the teleport panel to get tothe back of the cave then try to go back out. A summoner willblock your path and call Dark Yojimbo.
You have to fight him 5 times by going after the summoner towards theentrance of the cave. Set your overdrive mode to Stoic. Now, cast Hastegathen Auto-Life on your first turn as usual. Start attacking with QuickHit and keep Doublecasting Ultima. Once his overdrive gauge is full,summon an aeon to block Zanmoto because if you don't you'll die andreviving won't be possible even with Auto-Life. Use your Overdrives asmuch as possible.
There will be a save sphere here, but saving will be useless since if youreload you'll have to start over again. So just use it to recover your HPand MP.
----------------------------------------------------------------------------7. Dark Anima----------------------------------------------------------------------------HP: 8,000,000AP: 30,000 (normal) 40,000 (overkill)Items: Dark Matter x2Equip: SanctuarySteal: Three Stars x2Attacks: Physical Attacks - 10,000+ damage with Petrify and Curse on 1
characterMega-Graviton - MASSIVE damage (46,000+ at 99,999) with Sleep,
Blind, Doom, Silence, Curse on all characters.Pain - Instant death on 1 characterOblivion - Instant death + Osmose on all characters.
Elemental Immunuties: absorbs all elements, immune to Ultima and DrainRecommended Armor Abilities: Ribbon, Auto-Pheonix, Break HP Limit,
CurseproofRecommended Weapon Abilities: Break Damage Limit, Triple Overdrive,
Counterattack, One MP Cost, Magic Booster----------------------------------------------------------------------------
Location: Mt. Gagazet Gate. Go to Gagazet Mountain Cave and repeat the 1stTrial of Gagazet (Wakka's ball challenge). Once you're done, Animawill be waiting at the gate of Mt. Gagazet.
This fight is extremely long and quite hard too. Cast Hastega then Auto-Lifeon your party and start attacking with Quick Hit. Again, make sure all yourparty members ALWAYS has Auto-Life. Just summon an aeon once his overdrivegauge is full to block his DEADLY attack. Also, remember that his Pain willkill a character even with Deathproof, your aeons are not immune to this aswell. Rely on Auto-Life to revive you from Mega-Graviton.
----------------------------------------------------------------------------8. Dark Magus Sisters----------------------------------------------------------------------------

HP: Mindy - 2,000,000Sandy - 2,500,000Cindy - 3,000,000
AP: 30,000 (normal) 40,000 (overkill)Items: Dark Matter x4, Master Sphere x1Equip: Excalibur x3Steal: Mindy - Teleport Sphere
Sandy - Friend SphereCindy - Return Sphere
Attacks: Mindy - Calamity - casts Poison, Blind, Curse, Silence, Full Breakon 1 character
- Passado - inflicts Death on 1 characterSandy - Physical Attacks - 12,000+ damage with Petrify on 1
character- Razzia - Instant death on 1 character (99,999 damage)
Cindy - Camisade - Instant death on 1 character (99,999 damage)plus Osmose
All of them - Delta Attack - Instant Game OverElemental Immunities: Regular damage against all elements including HolyRecommended Armor Abilities: Ribbon, Auto-Pheonix, Deathproof, Break HP LimitRecommended Weapon Abilities: Break Damage Limit, Magic Booster, One MP Cost,
Triple Overdrive----------------------------------------------------------------------------
Location: From the North End of Mi'ihen Highroad, go north to Mushroom Rock.You'll see 2 summoners there, approach them.
You can run from them and beat them one by one. But lets assume you gotcaught by all 3.
The most important thing to remember here is that they start with a fulloverdrive gauge. First cast Hastega then Auto-Life on your party. Afterthat summon an aeon at overdrive immediately, preferably Anima and have himdo Oblivion and at the same time save you from Delta Attack. Now, pummelMindy with your character overdrives (Blitz Ace and a perfect 2-Hit AttackReels) to get rid of her quickly and prevent further Delta Attacks. Onceone of them is gone, the two left will do Mega-Graviton when theiroverdrive gauges are full. Make sure all your party members ALWAYS haveAuto-Life, since its hard to predict what they will do next.
If it so happened that you got tired of killing each one of them manually,just grand summon Yojimbo and pay him lots of gil (I paid him 1.7 million)and hope that he'll do Zanmato to kill one of them instantly.
----------------------------------------------------------------------------9. Penance----------------------------------------------------------------------------HP: Body - 7,000,000
Arms - 600,000 eachAP: 100,000 (normal) 130,000 (overkill)Items: Dark Matter x3, Master Sphere x3Equip: EternitySteal: Elixir x6Attacks: Body - Obliteration - 22,000+ damage plus Slow on all characters
Right Arm - Calamity - Casts Poison, Blind, Silence, Curse,Full Break on 1 character
- Mighty Guard - casts Shell, Protect + Regen- Physical Attack - 33,000+ damage on 1 character
Left Arm - Tetra-Graviton - MASSIVE damage on all characters(74,000+ at 99,999) with status ailments
- Physical Attack - 33,000+ damage on 1 characterElemental Immunities - Body - Absorbs all elements including Holy; Half damage
against Ultima- Arms - Absorbs all elements including Holy; Half damage
against UltimaRecommended Armor Abilities: Ribbon, Auto-Pheonix, Break HP Limit, CurseproofRecommended Weapon Abilities: Break Damage Limit, Triple Overdrive, One MP

Cost, Magic Booster, Counterattack-----------------------------------------------------------------------------
Location: Select from airship destination list once all Dark Aeons are dead.
He's extremely tough! First cast Hastega then Auto-Life on all your partymembers. Now, your primary concern is to get rid of the left arm quicklysince it carries the biggest threat. (Tetra-Graviton) Once its gone, Doublecast Ultima repeatedly. Summon your aeons at overdrive, especially Anima andMagus Sisters. The right arm will cast Mighty Guard on all the parts after afew turns so be ready to use Dispel or Purifying Salt to remove it. Butremember that the arms regenerate so you'll have to kill it again.
Another alternative in defeating Penance is to grand summon Yojimbo and payhim lots of gil again then hope for Zanmato. This occurs randomly and theworst thing is, he does Wakizashi the moment he appears, thus he dies evenbefore you get to pay him for Zanmato.
////////////////////////////////////////////////////////////////////////////Tips vs. Penance from Nic Musson <[email protected]>-------------------------------------------------------------
Before entering this battle, be sure that you have the following:
Weapons: Lengendary weapons for the 3 characters who are going to face it.
Armor: Equip all characters with the following abilities: Break HP Limit,Auto-Haste, Auto-Protect, Stoneproof (or Ribbon if available)
The five important stats that the characters would need are: Luck: 100+;Strength: 255; Accuracy 255; Agility 255; HP 30,000+.
Items needed include a few Three-Stars, around 10-20 Megalixirs/Elixirs,around 10 or so Hi-Potions, and the equivalent amount of Power/Mana/Speed/Ability Distillers.
I also recommend having Rikku in team as she has Ultra-Potion (Hi-Potion +Ability Distiller). Quick-hit and Quick-pockets for all characters is amust.
Battle Tips:------------
The key to defeating Penance is in two main objectives:
- Do not let any of the arms have a turn (quick-hit with all characters onthe arms when they regenerate)
- Do not let any of the characters die (heal when below 10,000HP)
* No need for Auto-Life... why waste three valuable turns when there arearms to kill?
* Auto-Haste means no wasting time casting Haste on any character at thebeginning of the fight or after being dispelled no thanks to Power/MentalBreak from Penance's Tail.
* No need for Auto-Phoenix since the objective is to stay alive, and theonly physical attack that Penance does will be halved thanks to Auto-Protect. If a character so happens to die through human error... thenthere's normally enough time to revive him/her using Quick-pockets.
* No need for anything other then Stoneproof as the objective is to defeatthe arms that do status effects before they can have a turn.
Once Penance looses it's posterior, the attack will be on a single target,and causes Power/Mental Break. Cast Dispel on characters. Since they will

have Auto-Protect and Auto-Haste, there will not be any time wasted onrecasting protection and haste. Big time saver, no? :)
I don't recommend characters using their Overdrives unless the Arms needmore then two hits before it's their turn. I don't recommend using Aeons asthe fight instantly becomes unfair (3 vs 1?) and Magnus Sisters suck at bossfights (IMO). Besides, the arms will attack and send the Aeon back where itcame from, leaving all three characters running back for some serious pain.Therefore, Yuna is kinda hopeless in this one.
I used Rikku, Tidus, and Auron... defeated Penance in 1hr 18mins.
----------------------------------------------------------------------------Extra Tip: Having Master Thief should allow your characters to steal
Megalixirs off Penance; while stealing without the Master Thiefability will give you Elixirs. This can be very useful whenyou're a little short on healing items.
----------------------------------------------------------------------------////////////////////////////////////////////////////////////////////////////
==============VI. OVERDRIVES==============
+=+=+=+=+=+=+=+=+=+=+=+=+=+=+=+=+=+=+=+=+=+=+=+=+=+=+=+=+=+=+=+=+=+=+=+=+=+=+i. OVERDRIVE MODES+=+=+=+=+=+=+=+=+=+=+=+=+=+=+=+=+=+=+=+=+=+=+=+=+=+=+=+=+=+=+=+=+=+=+=+=+=+=+
I believe most or if not all of you already know how to use overdrives so Iwon't explain how it works or anything that concerns basics. Anyway, here'sa list of the available overdrive modes that you can set for use on yourcharacters.
----------------------------------------------------------------------------MODE NAME: STOIC
DESCRIPTION: Overdrive meter charges when character receives damage.REQUIREMENT: None; DefaultNOTES: This mode is most ideal when you are fighting strong enemies,
particularly the Dark Aeons, since their attacks deal massivedamage. Thus, your meter is always full.
----------------------------------------------------------------------------MODE NAME: WARRIOR
DESCRIPTION: Overdrive meter charges when character damages an enemy.REQUIREMENT: Allow a character to receive damage from an enemy.NOTES: none for now----------------------------------------------------------------------------MODE NAME: COMRADE
DESCRIPTION: Overdrive meter charges when allies take damage.REQUIREMENT: This mode is learned automatically as your party receives damage
from an enemyNOTES: Mode is useless especially when a character fights alone.----------------------------------------------------------------------------MODE NAME: SLAYER
DESCRIPTION: Overdrive meter charges when character defeats an enemy.REQUIREMENT: Allow a character to defeat as many enemies as possible.NOTES: This mode is the best possible substitute for Entrust.
(Instant overdrive is very possible)----------------------------------------------------------------------------MODE NAME: HERO
DESCRIPTION: Overdrive meter charges when character defeats strong enemies.REQUIREMENT: Allow a character defeat strong enemies.NOTES: You can easily learn this mode if you fight often in Omega

Ruins.----------------------------------------------------------------------------MODE NAME: ALLY
DESCRIPTION: Overdrive meter charges on character's turn.REQUIREMENT: Let character have more turns during battle. (cast Haste)NOTES: Meter charges very slowly, not that useful.----------------------------------------------------------------------------MODE NAME: DAREDEVIL
DESCRIPTION: Overdrive meter charges when character's HP is critical.REQUIREMENT: Fight with character's HP at criticalNOTES: None for now.----------------------------------------------------------------------------MODE NAME: TACTICIAN
DESCRIPTION: Overdrive meter charges when character inflicts status ailmentson an enemy.
REQUIREMENT: Allow character to use status attacks more often.NOTES: None for now.----------------------------------------------------------------------------MODE NAME: AVENGER
DESCRIPTION: Overdrive meter charges when a party member gets KO'd.REQUIREMENT: Your party should get KO'd more often.NOTES: Ideal for fights in which you get killed pretty often.
(battles against Wendigo and Defender X)----------------------------------------------------------------------------MODE NAME: SUFFERER
DESCRIPTION: Overdrive meter charges when character is inflicted with statusailments.
REQUIREMENT: Allow character to suffer from status ailments as much aspossible.
NOTES: None for now----------------------------------------------------------------------------MODE NAME: VICTOR
DESCRIPTION: Overdrive meter charges whenever your party wins a battleREQUIREMENT: Fight and win as many battles as possible.NOTES: None for now----------------------------------------------------------------------------MODE NAME: VICTIM
DESCRIPTION: Overdrive meter charges when hit with status attacks.REQUIREMENT: This is learned automatically, but it will take some time.NOTES: If you want to learn this mode faster, hit yourself with status
attacks.----------------------------------------------------------------------------MODE NAME: COWARD
DESCRIPTION: Overdrive meter charges when party runs away from battle.REQUIREMENT: Flee from battle more often.NOTES: None for now----------------------------------------------------------------------------MODE NAME: SOLO
DESCRIPTION: Overdrive meter charges when character fights alone.REQUIREMENT: Have your other 2 characters escape from battle.NOTES: None for now----------------------------------------------------------------------------MODE NAME: DANCER
DESCRIPTION: Overdrive meter charges when character successfully evades anopponent's attack.
REQUIREMENT: Allow character to evade attacks from enemies.NOTES: This mode is difficult to learn so it is strongly recommended

that you have the Evade & Counter ability.----------------------------------------------------------------------------MODE NAME: HEALER
DESCRIPTION: Overdrive meter charges when a character heals an ally.REQUIREMENT: Allow character to use curative magic and items more often.NOTES: None for now----------------------------------------------------------------------------MODE NAME: ROOK
DESCRIPTION: Overdrive meter charges when character magically blocks attack.REQUIREMENT: Cast Protect magic on your characters to block physical attacks
from enemies.NOTES: None for now.----------------------------------------------------------------------------
+=+=+=+=+=+=+=+=+=+=+=+=+=+=+=+=+=+=+=+=+=+=+=+=+=+=+=+=+=+=+=+=+=+=+=+=+=+=+ii. OVERDRIVE LIST+=+=+=+=+=+=+=+=+=+=+=+=+=+=+=+=+=+=+=+=+=+=+=+=+=+=+=+=+=+=+=+=+=+=+=+=+=+=+
Here's the list of all the overdrives of the characters. I'll also includeinfo on how to get the particular technique.
-----TIDUS-----Ovedrive Name: Swordplay
----------------------------------------------------------------------------TECHNIQUE NAME: Spiral CutDESCRIPTION: Inflicts moderate damage on 1 target.REQUIREMENT: None, default----------------------------------------------------------------------------TECHNIQUE NAME: Slice & DiceDESCRIPTION: Performs 6 consecutive slashes against random targetsREQUIREMENT: Execute 10 Spiral Cuts----------------------------------------------------------------------------TECHNIQUE NAME: Energy RainDESCRIPTION: Deals massive damage against all targetsREQUIREMENT: Execute 30 Slice & Dice----------------------------------------------------------------------------TECHNIQUE NAME: Blitz AceDESCRIPTION: Performs 9 consecutive powerful slashes plus massive damage
with the Blitz ball against 1 target.REQUIREMENT: Execute 80 Energy Rains----------------------------------------------------------------------------
-----YUNA-----Overdrive Name: Grand Summon
----------------------------------------------------------------------------DESCRIPTION: Summons an Aeon at OverdriveREQUIREMENT: None, default----------------------------------------------------------------------------
------AURON------Overdrive Name: Bushido
----------------------------------------------------------------------------TECHNIQUE NAME: Dragon FangBUTTON COMBINATION: Down, Left, Up, Right, L1, R1, X, ODESCRIPTION: Deals moderate damage against all targets.REQUIREMENT: None, default

----------------------------------------------------------------------------TECHNIQUE NAME: Shooting StarBUTTON COMBINATION: Triangle, X, Square, O, Left, Right, ODESCRIPTION: Ejects target from battleREQUIREMENT: Obtain 1 Jecht Sphere----------------------------------------------------------------------------TECHNIQUE NAME: Banishing BladeBUTTON COMBINATION: Up, L1, Down, R1, Right, Left, TriangleDESCRIPTION: Inflicts Full Break on 1 targetREQUIREMENT: Obtain 3 Jecht Spheres----------------------------------------------------------------------------TECHNIQUE NAME: TornadoBUTTON COMBINATION: O, Right, R1, Left, L1, TriangleDESCRIPTION: Inflicts massive damage against all targetsREQUIREMENT: Obtain 10 Jecht Spheres----------------------------------------------------------------------------
------WAKKA------Overdrive Name: Slots
----------------------------------------------------------------------------TECHNIQUE NAME: Element ReelsDESCRIPTION: - no match means a critical hit without any elemental
attribute.- 2 matches would mean a hit with that element against
1 random target.- 3 matches means elemental damage against all targets.
REQUIREMENT: None, default----------------------------------------------------------------------------TECHNIQUE NAME: Attack ReelsDESCRIPTION: Allows Wakka to deal a large number of hits depending on
the matches you managed to get.REQUIREMENT: Win 1st place at the Blitz Ball Tournament.----------------------------------------------------------------------------TECHNIQUE NAME: Status ReelsDESCRIPTION: Adds status to your attack depending on the match you
got.REQUIREMENT: Win 1st place at the Blitz Ball League.----------------------------------------------------------------------------TECHNIQUE NAME: Auroch ReelsDESCRIPTION: Allows Wakka to deal massive damage (over 9999 if you
managed to match 3 Auroch logos)REQUIREMENT: Win 1st place at the Blitz Ball Tournament.----------------------------------------------------------------------------
-----LULU-----Overdrive Name: Fury
----------------------------------------------------------------------------DESCRIPTION: You'll have to rotate the right analog stick clockwise
to cast a spell several times.AVAILABLE SPELLS: Fire, Ice, Thunder, Water, Fira, Blizzara, Thundara,
Watera, Firaga, Blizzaga, Thundaga, Waterga, Bio, Demi,Death, Drain, Osmose, Flare, Ultima
REQUIREMENT: None, default----------------------------------------------------------------------------
------RIKKU------Overdrive Name: Mix
----------------------------------------------------------------------------

DESCRIPTION: You have to pick two items from your inventory and seewhat you created.
REQUIREMENT: None, default.----------------------------------------------------------------------------
--------KIMAHRI--------Overdrive Name: Ronso Rage
----------------------------------------------------------------------------TECHNIQUE NAME: Seed CannonDESCRIPTION: Inflicts Confusion on 1 target.LEARNED FROM: Ragora, Grat----------------------------------------------------------------------------TECHNIQUE NAME: JumpDESCRIPTION: Kimahri jumps and disappears from the screen, then comes
back down on the enemy dealing moderate damage.LEARNED FROM: Default----------------------------------------------------------------------------TECHNIQUE NAME: Stone BreathDESCRIPTION: Inflicts Petrify on all targets.LEARNED FROM: Basilisk, Anacodaur, Biran----------------------------------------------------------------------------TECHNIQUE NAME: Self DestructDESCRIPTION: Kimahri explodes, dealing damage on all targets. But he
will be gone all throughout the battle.LEARNED FROM: Grenade, Bomb----------------------------------------------------------------------------TECHNIQUE NAME: Fire BreathDESCRIPTION: Deals Fire elemental damage on all targetsLEARNED FROM: Dual Horn, Yenke----------------------------------------------------------------------------TECHNIQUE NAME: Aqua BreathDESCRIPTION: Deals Water elemental damage on all targets.LEARNED FROM: Chimera, Chimera Brain, Yenke----------------------------------------------------------------------------TECHNIQUE NAME: Bad BreathDESCRIPTION: Inflicts a number of status ailments on all targetsLEARNED FROM: Malboro, Great Malboro----------------------------------------------------------------------------TECHNIQUE NAME: DoomDESCRIPTION: A countdown begins, which starts at 20. When it reaches
0 the target dies.LEARNED FROM: Ghost, Wraith, Biran----------------------------------------------------------------------------TECHNIQUE NAME: Thrust KickDESCRIPTION: Ejects target from battle.LEARNED FROM: YKT-11, Yenke----------------------------------------------------------------------------TECHNIQUE NAME: White WindDESCRIPTION: Heals party equal to the amount of Kimahri's HP, plus
removes all negative status effects.LEARNED FROM: Dark Flan, Yenke----------------------------------------------------------------------------TECHNIQUE NAME: Mighty GuardDESCRIPTION: Casts Protect, Shell, and NulAll on party.LEARNED FROM: Behemoth, Behemoth King, Biran----------------------------------------------------------------------------TECHNIQUE NAME: NovaDESCRIPTION: Massive non-elemental damage on all targets.LEARNED FROM: Omega Weapon----------------------------------------------------------------------------
==========VII. AEONS==========

+=+=+=+=+=+=+=+=+=+=+=+=+=+=+=+=+=+=+=+=+=+=+=+=+=+=+=+=+=+=+=+=+=+=+=+=+=+=+i. AEON INFORMATION+=+=+=+=+=+=+=+=+=+=+=+=+=+=+=+=+=+=+=+=+=+=+=+=+=+=+=+=+=+=+=+=+=+=+=+=+=+=+
Here are the various info about the different aeons.
-----------------------------------------------------------------------------AEON NAME: ValeforSPECIAL ATTACK: Sonic WingsEFFECT: Delays target's next turnOVERDRIVE: Energy Ray, Energy BlastELEMENT: NoneBREAKS DAMAGE LIMIT BY: Obtain Yuna's Nirvana-----------------------------------------------------------------------------AEON NAME: IfritSPECIAL ATTACK: MeteorstrikeEFFECT: Inflicts normal damage even with ProtectOVERDRIVE: HellfireELEMENT: FireBREAKS DAMAGE LIMIT BY: Obtain Wakka's World Champion-----------------------------------------------------------------------------AEON NAME: IxionSPECIAL ATTACK: AerosparkEFFECT: Dispels positive status effectsOVERDRIVE: Thor's HammerELEMENT: LightningBREAKS DAMAGE LIMIT BY: Obtain Kimahri's Spirit Lance-----------------------------------------------------------------------------AEON NAME: ShivaSPECIAL ATTACK: Heavenly StrikeEEFECT: Inflicts Threaten status on targetOVERDRIVE: Diamond DustELEMENT: IceBREAKS DAMAGE LIMIT BY: Obtain Lulu's Onion Knight-----------------------------------------------------------------------------AEON NAME: BahamutSPECIAL ATTACK: ImpulseEFFECT: ?OVERDRIVE: Mega FlareELEMENT: NoneBREAKS DAMAGE LIMIT BY: Automatically-----------------------------------------------------------------------------AEON NAME: YojimboSPECIAL ATTACK: Daigoro, Kozuka, Wakizashi, ZanmotoEFFECT: ? (random)OVERDRIVE: *not specific* (random)ELEMENT: NoneBREAKS DAMAGE LIMIT BY: Obtain Auron's Masamune-----------------------------------------------------------------------------AEON NAME: AnimaSPECIAL ATTACK: PainEFFECT: Inflicts Death status on targetOVERDRIVE: OblivionELEMENT: NoneBREAKS DAMAGE LIMIT BY: Automatically-----------------------------------------------------------------------------AEON NAME: MAGUS SISTERS (CINDY, SANDY, MINDY)SPECIAL ATTACK: Camisade, Razzia, PassadoEFFECT: ?OVERDRIVE: Delta AttackElement: NoneBREAKS DAMAGE LIMIT BY: Automatically-----------------------------------------------------------------------------
+=+=+=+=+=+=+=+=+=+=+=+=+=+=+=+=+=+=+=+=+=+=+=+=+=+=+=+=+=+=+=+=+=+=+=+=+=+=+ii. AEON ABILITIES

+=+=+=+=+=+=+=+=+=+=+=+=+=+=+=+=+=+=+=+=+=+=+=+=+=+=+=+=+=+=+=+=+=+=+=+=+=+=+
In order to make you aeons learn abilities, you must first have theSummoner's Soul which you will receive from Belgemine when you first met her.Here's the list of abilities that can be learned by your aeons.
----------------------------------------------------------------------------ABILITY REQUIRED ITEM QUANTITY----------------------------------------------------------------------------Dark Attack Smoke Bomb 6Silence Attack Silence Grenade 3Sleep Attack Sleeping Powder 3Dark Buster Smoke Bomb 12Silence Buster Silence Grenade 10Sleep Buster Sleeping Powder 10Zombie Attack Holy Water 99Triple Foul Skill Sphere 4Delay Attack Silver Horglass 30Delay Buster Gold Hourglass 30Extract Power Power Sphere 20Extract Mana Mana Sphere 20Extract Speed Speed Sphere 20Extract Ability Ability Sphere 20Power Break Stamina Spring 8Magic Break Mana Spring 4Armor Break Lv. 2 Key Sphere 2Mental Break Shining Thorn 4Full Break Dark Matter 2Pray Healing Water 5Cheer Power Sphere 5Aim Speed Sphere 5Focus Mana Sphere 10Reflex Speed Sphere 10Luck Fortune Sphere 2Jinx Fortune Sphere 2Lancet Soul Spring 20Doublecast Three Stars 5Cure Hi-Potion 99Cura X-Potion 30Curaga Mega-Potion 60NulBlaze Bomb Fragment 2NulShock Electro Marble 2NulTide Fish Scale 2NulFrost Arctic Wind 2Scan Ability Sphere 10Life Elixir 8Full-Life Megalixir 1Haste Chocobo Feather 10Hastega Chocobo Wing 16Slow Silver Hourglass 4Slowga Gold Hourglass 8Shell Lunar Curtain 4Protect Light Curtain 6Reflect Star Curtain 3Dispel Purifying Salt 3Regen Healing Spring 60Holy Blessed Gem 60Fire Bomb Fragment 1Thunder Electro Marble 1Water Fish Scale 1Blizzard Arctic Wind 1Fira Bomb Core 2Thundara Lightning Marble 2Watera Dragon Scale 2Blizzara Arctic Wind 2Firaga Fire Gem 4Thundaga Lightning Gem 4

Waterga Water Gem 4Blizzaga Ice Gem 4Bio Poison Fang 8Demi Shadow Gem 8Death Farplane Shadow 30Drain Stamina Spring 30Osmose Mana Spring 10Flare Shining Gem 60Ultima Supreme Gem 99----------------------------------------------------------------------------
+=+=+=+=+=+=+=+=+=+=+=+=+=+=+=+=+=+=+=+=+=+=+=+=+=+=+=+=+=+=+=+=+=+=+=+=+=+=+iii. AEON ATTRIBUTES+=+=+=+=+=+=+=+=+=+=+=+=+=+=+=+=+=+=+=+=+=+=+=+=+=+=+=+=+=+=+=+=+=+=+=+=+=+=+
You need the Aeon's Soul to customize an aeon's attributes. You'll receivethe key item from Belgemine when you defeat Valefor in Remiem Temple. Here'sa list of the different attributes and the amount of items required to raiseeach of them.
Valefor-------
----------------------------------------------------------------------------STAT ITEM REQUIRED QUANTITY----------------------------------------------------------------------------HP Power Sphere 32MP Mana Sphere 17Strength Power Sphere 52Defense Power Sphere 71Magic Mana Sphere 65Magic Defense Mana Sphere 58Agility Speed Sphere 28Luck Fortune Sphere 9Evasion Speed Sphere 38Accuracy Speed Sphere 31----------------------------------------------------------------------------
Ifrit-----
----------------------------------------------------------------------------STAT ITEM REQUIRED QUANTITY----------------------------------------------------------------------------HP Power Sphere 35MP Mana Sphere 17Strength Power Sphere 55Defense Power Sphere 99Magic Mana Sphere 63Magic Defense Mana Sphere 52Agility Speed Sphere 25Luck Fortune Sphere 9Evasion Speed Sphere 9Accuracy Speed Sphere 31----------------------------------------------------------------------------
Ixion-----
----------------------------------------------------------------------------STAT ITEM REQUIRED QUANTITY----------------------------------------------------------------------------HP Power Sphere 35MP Mana Sphere 18Strength Power Sphere 59Defense Power Sphere 84Magic Mana Sphere 62

Magic Defense Mana Sphere 73Agility Speed Sphere 22Luck Fortune Sphere 9Evasion Speed Sphere 21Accuracy Speed Sphere 35----------------------------------------------------------------------------
Shiva-----
----------------------------------------------------------------------------STAT ITEM REQUIRED QUANTITY----------------------------------------------------------------------------HP Power Sphere 34MP Mana Sphere 18Strength Power Sphere 57Defense Power Sphere 51Magic Mana Sphere 71Magic Defense Mana Sphere 60Agility Speed Sphere 40Luck Fortune Sphere 9Evasion Speed Sphere 58Accuracy Speed Sphere 31----------------------------------------------------------------------------
Bahamut-------
----------------------------------------------------------------------------STAT ITEM REQUIRED QUANTITY----------------------------------------------------------------------------HP Power Sphere 39MP Mana Sphere 19Strength Power Sphere 69Defense Power Sphere 99Magic Mana Sphere 55Magic Defense Mana Sphere 73Agility Speed Sphere 28Luck Fortune Sphere 9Evasion Speed Sphere 40Accuracy Speed Sphere 31----------------------------------------------------------------------------
Anima-----
----------------------------------------------------------------------------STAT ITEM REQUIRED QUANTITY----------------------------------------------------------------------------HP Power Sphere 41MP Mana Sphere 20Strength Power Sphere 99Defense Power Sphere 84Magic Mana Sphere 66Magic Defense Mana Sphere 58Agility Speed Sphere 25Luck Fortune Sphere 9Evasion Speed Sphere 40Accuracy Speed Sphere 31----------------------------------------------------------------------------
Yojimbo-------
----------------------------------------------------------------------------STAT ITEM REQUIRED QUANTITY----------------------------------------------------------------------------
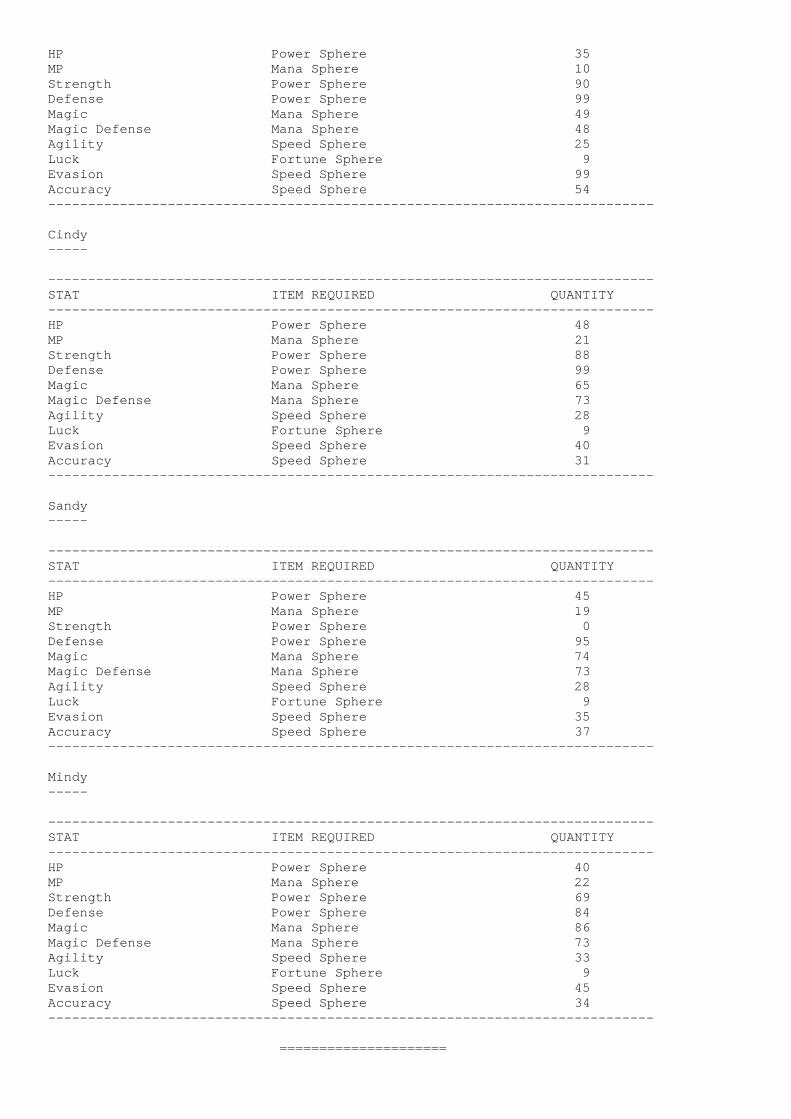
HP Power Sphere 35MP Mana Sphere 10Strength Power Sphere 90Defense Power Sphere 99Magic Mana Sphere 49Magic Defense Mana Sphere 48Agility Speed Sphere 25Luck Fortune Sphere 9Evasion Speed Sphere 99Accuracy Speed Sphere 54----------------------------------------------------------------------------
Cindy-----
----------------------------------------------------------------------------STAT ITEM REQUIRED QUANTITY----------------------------------------------------------------------------HP Power Sphere 48MP Mana Sphere 21Strength Power Sphere 88Defense Power Sphere 99Magic Mana Sphere 65Magic Defense Mana Sphere 73Agility Speed Sphere 28Luck Fortune Sphere 9Evasion Speed Sphere 40Accuracy Speed Sphere 31----------------------------------------------------------------------------
Sandy-----
----------------------------------------------------------------------------STAT ITEM REQUIRED QUANTITY----------------------------------------------------------------------------HP Power Sphere 45MP Mana Sphere 19Strength Power Sphere 0Defense Power Sphere 95Magic Mana Sphere 74Magic Defense Mana Sphere 73Agility Speed Sphere 28Luck Fortune Sphere 9Evasion Speed Sphere 35Accuracy Speed Sphere 37----------------------------------------------------------------------------
Mindy-----
----------------------------------------------------------------------------STAT ITEM REQUIRED QUANTITY----------------------------------------------------------------------------HP Power Sphere 40MP Mana Sphere 22Strength Power Sphere 69Defense Power Sphere 84Magic Mana Sphere 86Magic Defense Mana Sphere 73Agility Speed Sphere 33Luck Fortune Sphere 9Evasion Speed Sphere 45Accuracy Speed Sphere 34----------------------------------------------------------------------------
=====================

VIII. THE SPHERE GRID=====================
+=+=+=+=+=+=+=+=+=+=+=+=+=+=+=+=+=+=+=+=+=+=+=+=+=+=+=+=+=+=+=+=+=+=+=+=+=+=+i. SPHERE GRID BASICS+=+=+=+=+=+=+=+=+=+=+=+=+=+=+=+=+=+=+=+=+=+=+=+=+=+=+=+=+=+=+=+=+=+=+=+=+=+=+
Yeah, I know most of you already understand this, but I'll explain it anywayfor the sake of those who are new to the game.
1. Moving----------
In order to move around the grid you'll need sphere levels (S.LvL) whichyou will then spend as you move around. Gaining them is just like levelingup your characters in previous FFs. But now, instead of getting EXP aftereach battle, you receive AP.
If you wish to move from one node to another, you have to spend the sameamount of S.LvL depending on how far you want to go. For example, if youmove 1 step forward then you will have to spend 1 sphere level and so on.
What if you want to return to a certain part of the grid? You'll also useyour S.LvL. But this time you'll be allowed to move 4 STEPS BACKWARD USING1 SPHERE LEVEL.
2. Activating Nodes-------------------
You activate nodes that contain character attributes (strength+, magic+,defense+, etc) and abilities. Just press O then choose Use from the commandwindow. Another menu will appear, there choose the necessary sphere toactivate the node.
+=+=+=+=+=+=+=+=+=+=+=+=+=+=+=+=+=+=+=+=+=+=+=+=+=+=+=+=+=+=+=+=+=+=+=+=+=+=+ii. SPHERE LIST+=+=+=+=+=+=+=+=+=+=+=+=+=+=+=+=+=+=+=+=+=+=+=+=+=+=+=+=+=+=+=+=+=+=+=+=+=+=+
-----------------------------------------------------------------------------SPHERE NAME FUNCTION-----------------------------------------------------------------------------Power Sphere Activates HP, Defense and Strength nodesMana Sphere Activates Magic, Magic Defense and MP nodesSpeed Sphere Activates Accuracy, Agility and Evasion nodesAbility Sphere Activates Ability nodesFortune Sphere Activates Luck nodesAttribute Sphere Activates Attribute node already used by allySpecial Sphere Activates Special node already used by allySkill Sphere Activates Skill node already used by allyWht Magic Sphere Activates Wht Magic node already used by allyBlk Magic Sphere Activates Blk Magic node already used by allyMaster Sphere Activates any Ability or Attribute nodeHP Sphere Converts empty node to HP nodeMP Sphere Converts empty node to MP nodeStrength Sphere Converts empty node to Strength nodeDefense Sphere Converts empty node to Defense nodeMagic Sphere Converts empty node to Magic nodeMagic Defense Sphere Converts empty node to Magic Defense nodeAgility Sphere Converts empty node to Agility nodeLuck Sphere Converts empty node to Luck nodeEvasion Sphere Converts empty node to Evasion nodeAccuracy Sphere Converts empty node to Accuracy nodeLv 1 Key Sphere Opens Level 1 lockLv 2 Key Sphere Opens Level 2 lockLv 3 Key Sphere Opens Level 3 lockLv 4 Key Sphere Opens Level 4 lockClear Sphere Turns any non-empty node to empty node
Return Sphere Return to any previously activated nodeFriend Sphere Move to any ally's locationTeleport Sphere Move to any node activated by an allyWarp Sphere Move to any node-----------------------------------------------------------------------------
+=+=+=+=+=+=+=+=+=+=+=+=+=+=+=+=+=+=+=+=+=+=+=+=+=+=+=+=+=+=+=+=+=+=+=+=+=+=+iii. CHARACTER ABILITY LIST+=+=+=+=+=+=+=+=+=+=+=+=+=+=+=+=+=+=+=+=+=+=+=+=+=+=+=+=+=+=+=+=+=+=+=+=+=+=+
==========1. Skills==========
-----------------------------------------------------------------------------SKILL NAME: Dark AttackDESRIPTION: Inflicts darkness on an enemy for 3 turns.MP COST: 5-----------------------------------------------------------------------------SKILL NAME: Silence AttackDESRIPTION: Inflicts silence on an enemy for 3 turns.MP COST: 5-----------------------------------------------------------------------------SKILL NAME: Sleep AttackDESRIPTION: Puts an enemy to sleep for 3 turns.MP COST: 5-----------------------------------------------------------------------------SKILL NAME: Delay AttackDESRIPTION: Delays target's next turn.MP COST: 8-----------------------------------------------------------------------------SKILL NAME: Zombie AttackDESRIPTION: Inflicts zombie status on an enemy.MP COST: 10-----------------------------------------------------------------------------SKILL NAME: Dark BusterDESRIPTION: Always inflicts darkness on an enemy for 1 turn.MP COST: 10-----------------------------------------------------------------------------SKILL NAME: Silence BusterDESRIPTION: Always inflicts silence on an enemy for 1 turn.MP COST: 10-----------------------------------------------------------------------------SKILL NAME: Sleep BusterDESRIPTION: Always infilicts sleep on an enemy for 1 turn.MP COST: 10-----------------------------------------------------------------------------SKILL NAME: Delay BusterDESRIPTION: Greatly delays target's next turn.MP COST: 18-----------------------------------------------------------------------------SKILL NAME: Triple FoulDESRIPTION: Inflicts darkness, silence & sleep on an enemy for 3 turns.MP COST: 24-----------------------------------------------------------------------------SKILL NAME: Extract PowerDESRIPTION: Allows target to drop power spheres.MP COST: 1-----------------------------------------------------------------------------SKILL NAME: Extract ManaDESRIPTION: Allows target to drop mana spheres.MP COST: 1-----------------------------------------------------------------------------SKILL NAME: Extract SpeedDESRIPTION: Allows target to drop speed spheres.MP COST: 1-----------------------------------------------------------------------------

SKILL NAME: Extract AbilityDESRIPTION: Allows target to drop ability spheres.MP COST: 1-----------------------------------------------------------------------------SKILL NAME: Power BreakDESRIPTION: Lowers opponent's strength.MP COST: 8-----------------------------------------------------------------------------SKILL NAME: Magic BreakDESRIPTION: Lowers opponent's magic.MP COST: 8-----------------------------------------------------------------------------SKILL NAME: Armor BreakDESRIPTION: Lowers opponent's physical defense.MP COST: 12-----------------------------------------------------------------------------SKILL NAME: Mental BreakDESRIPTION: Lowers opponent's magic defense.MP COST: 12-----------------------------------------------------------------------------SKILL NAME: Full BreakDESRIPTION: Inflicts Power, Magic, Armor & Mental Breaks on an enemy.MP COST: 99-----------------------------------------------------------------------------SKILL NAME: MugDESRIPTION: Attack and steal items at the same time.MP COST: 10-----------------------------------------------------------------------------SKILL NAME: Nab GilDESRIPTION: Attack and steal gil at the same time.MP COST: 30-----------------------------------------------------------------------------SKILL NAME: Quick HitDESRIPTION: Strike quickly with reduced recovery time.MP COST: 36-----------------------------------------------------------------------------
===========2. Special===========
-----------------------------------------------------------------------------ABILITY NAME: FleeDESCRIPTION: Aids party's escape from battle.MP COST: 0-----------------------------------------------------------------------------ABILITY NAME: StealDESCRIPTION: Steal items from enemies.MP COST: 0-----------------------------------------------------------------------------ABILITY NAME: UseDESCRIPTION: Use special items.MP COST: 0-----------------------------------------------------------------------------ABILITY NAME: PrayDESCRIPTION: Restores a small amount of HP to all allies.MP COST: 0-----------------------------------------------------------------------------ABILITY NAME: CheerDESCRIPTION: Raises party's strength and defense.MP COST: 0-----------------------------------------------------------------------------ABILITY NAME: AimDESCRIPTION: Raises party's accuracy.MP COST: 0-----------------------------------------------------------------------------ABILITY NAME: Focus

DESCRIPTION: Raises party's magic & magic defense.MP COST: 0-----------------------------------------------------------------------------ABILITY NAME: ReflexDESCRIPTION: Raises party's evasion.MP COST: 0-----------------------------------------------------------------------------ABILITY NAME: LuckDESCRIPTION: Raises party's luck.MP COST: 0-----------------------------------------------------------------------------ABILITY NAME: JinxDESCRIPTION: Lowers opponent's luck.MP COST: 0-----------------------------------------------------------------------------ABILITY NAME: LancetDESCRIPTION: Absorb HP & MP from an enemy.MP COST: 0-----------------------------------------------------------------------------ABILITY NAME: GuardDESCRIPTION: Allows character to take damage for an ally.MP COST: 0-----------------------------------------------------------------------------ABILITY NAME: SentinelDESCRIPTION: Allows character to guard allies while in defensive stance.MP COST: 0-----------------------------------------------------------------------------ABILITY NAME: Spare ChangeDESCRIPTION: Attack by throwing gil.MP COST: 0-----------------------------------------------------------------------------ABILITY NAME: ThreatenDESCRIPTION: Immobilize an enemy with fear; inflicts Stop.MP COST: 12-----------------------------------------------------------------------------ABILITY NAME: ProvokeDESCRIPTION: Draw an enemy's attack toward you.MP COST: 4-----------------------------------------------------------------------------ABILITY NAME: EntrustDESCRIPTION: Contribute your overdrive charge to an ally's gauge.MP COST: 8-----------------------------------------------------------------------------ABILITY NAME: CopycatDESCRIPTION: Mimic an ally's previous action.MP COST: 28-----------------------------------------------------------------------------ABILITY NAME: Pilfer GilDESCRIPTION: Steal gil from an enemy.MP COST: 20-----------------------------------------------------------------------------ABILITY NAME: Quick PocketsDESCRIPTION: Swiftly use items with reduced recovery time.MP COST: 70-----------------------------------------------------------------------------ABILITY NAME: DoublecastDESCRIPTION: Allows character to cast black magic spells twice.MP COST: 0-----------------------------------------------------------------------------ABILITY NAME: BribeDESCRIPTION: Pay an enemy to make it go away.MP COST: 0-----------------------------------------------------------------------------
===============3. White Magic===============

-----------------------------------------------------------------------------SPELL NAME MP COST-----------------------------------------------------------------------------Cure 4Cura 10Curaga 20NulBlaze 2NulShock 2NulTide 2NulFrost 2Scan 1Esuna 5Life 18Full-Life 60Haste 8Hastega 30Slow 12Slowga 20Shell 10Protect 12Reflect 14Dispel 12Regen 40Holy 85Auto-Life 97-----------------------------------------------------------------------------
===============4. Black Magic===============
-----------------------------------------------------------------------------SPELL NAME MP COST-----------------------------------------------------------------------------Fire 4Thunder 4Water 4Blizzard 4Fira 8Thundara 8Watera 8Blizzara 8Firaga 16Thundaga 16Waterga 16Blizzaga 16Bio 10Demi 32Death 20Drain 12Osmose 0Flare 54Ultima 90-----------------------------------------------------------------------------
+=+=+=+=+=+=+=+=+=+=+=+=+=+=+=+=+=+=+=+=+=+=+=+=+=+=+=+=+=+=+=+=+=+=+=+=+=+=+iv.THE INTERNATIONAL SPHERE GRID+=+=+=+=+=+=+=+=+=+=+=+=+=+=+=+=+=+=+=+=+=+=+=+=+=+=+=+=+=+=+=+=+=+=+=+=+=+=+
In my opinion, this is the better sphere grid of the two as it makes the gameso much easier due to 2 major differences:
1. Initial position of your characters in the grid--------------------------------------------------
It will be impossible to illustrate the sphere grid accuately, so I just

made a diagram to emphasize my point.
-----------------------------------------------------------------------------Legend:EN --> Empty Node Str --> Strength Node MP --> MP Node(T) --> Tidus Def --> Defense Node Mag --> Magic Node(W) --> Wakka Ag --> Agility Node MagDef --> Magic Defense(Y) --> Yuna Acc --> Accuracy Node Node(A) --> Auron Eva --> Evasion Node(R) --> Rikku HP --> HP Node(L) --> Lulu L1 --> Lv.1 Lock(K) --> Kimahri L2 --> Lv.2 Lock-----------------------------------------------------------------------------
Ag+2------------HP-----------------------|\ |\ Ag+2----------- |
-------Def+2 | | MP| Str+1 | || |-----Mag+4 | \ Def+2 |
Delay | Haste \ \ |MP---Attack---L1 / | EN \ |
/ Eva+2 | \ |MP | E. Speed Str+1---Provoke
/ Str+1 | |HP | MagDef+3 |
Flee \ || \ || Mag+3 EN| \
Acc+1 Ag+1 \\ / | -------\------Str+1 | | EN |
---------------------- | | || | Cheer-----Def+1 | Rikku's || Auron's | | | Table || Table | | | || | | | EN(R) || EN L2 EN | | ---------------------/----|------\-- EN----------------|
/ | \ (T) |EN Power----EN(A) |/ Break EN
/ // D. Attack Jinx---------| /
EN---EN | \ | | //| | \ | | /
/ | (W) | \ EN-----| |/Si Att EN--EN----EN---EN \ | EN
EN EN| \ /| \ (K) /
Def+2 Lancet Scan--EN--L1| \ / | || \/ | |HP--Str+1 EN | |
| | || E. Ability--| || |
EN---E. Mana |/ |
/ |---Fire Bliz.--------EN-----EN-----EN---------EN-------EN EN| \ / (L) (Y) \ /|| \ / | EN || EN | || EN Cure-----Esuna

| /---Thunder---Water /
NulB. NulF.| \ /| EN|
NulS.-----NulT.-----------------------------------------------------------------------------Well, I sure hope you guys can understand the diagram. What I'm trying topoint out is that in the international sphere grid all your characters startout at the center table (the one with the Lancet ability) and its up to youas to where you want to move your characters. For example, you can let Luluor Kimahri learn Cure and Esuna quickly and that will definitely be anadvantage later on.-----------------------------------------------------------------------------
2. Easier access to useful magics---------------------------------
This is very true for most magics such as Cure, Esuna, Haste, Life, Full-Life,and Hastega. As you might have noticed from the diagram above, (*if youunderstood it*) its so much easier to learn Haste compared to the othersphere grid. You can also let 2 characters (Kimahri & Lulu) learn Cure andEsuna first before proceeding to their own tables. As for Full-Life, it isonly closed off with a single Lv. 2 lock. These are just a few of the easyaccess magics, you'll notice more of those as you move around the grid.-----------------------------------------------------------------------------
============================IX. EQUIPMENT CUSTOMIZATION============================
Later in the game, you'll be allowed to customize your equipments, that isadd specific abilities to your weapons and armor. In order to do so, youmust have a sufficient amount of the item required to add that abilty toyour equipment. Here's a list of the available abilities.
+=+=+=+=+=+=+=+=+=+=+=+=+=+=+=+=+=+=+=+=+=+=+=+=+=+=+=+=+=+=+=+=+=+=+=+=+=+=+i. WEAPON ABILITIES+=+=+=+=+=+=+=+=+=+=+=+=+=+=+=+=+=+=+=+=+=+=+=+=+=+=+=+=+=+=+=+=+=+=+=+=+=+=+
----------------------------------------------------------------------------ABILITY REQUIRED ITEM QUANTITY----------------------------------------------------------------------------Sensor Ability Sphere 2Piercing Lv 2 Key Sphere 1First Strike Return Sphere 1Initiative Chocobo Feather 6Firestrike Bomb Fragment 4Lightningstrike Electro Marble 4Waterstrike Fish Scale 4Icestrike Antarctic Wind 4Darktouch Eye Drops 60Darkstrike Smoke Bomb 20Silencetouch Echo Screen 60Silencestrike Silence Grenade 20Sleeptouch Sleeping Powder 10Sleepstrike Dream Powder 16Poisontouch Antidote 99Poisonstrike Poison Fang 24Stonetouch Petrify Grenade 10Stonestrike Petrify Grenade 60Deathtouch Farplane Shadow 30Deathstrike Farplane Wind 60Zombietouch Holy Water 70Zomiestrike Candle of Life 30Slowtouch Silver Hourglass 16

Slowstrike Gold Hourglass 30Distill Power Power Sphere 2Distill Mana Mana Sphere 2Distill Speed Speed Sphere 2Distill Ability Ability Sphere 2Strength + 3% Power Sphere 3Strength + 5% Stamina Spring 2Strength + 10% Skill Sphere 1Strength + 20% Supreme Gem 4Magic + 3% Mana Sphere 3Magic + 5% Mana Spring 2Magic + 10% Blk Magic Sphere 1Magic + 20% Supreme Gem 4Counterattack Friend Sphere 1Evade and Counter Teleport Sphere 1Magic Counter Shining Gem 16Magic Booster Turbo Ether 30Alchemy Healing Water 4Half MP Cost Twin Stars 20One MP Cost Three Stars 30Double AP Megalixir 20Triple AP Wings to Discovery 50Overdrive -> AP Door to Tomorrow 10SOS Overdrive Gambler's Spirit 30Double Overdrive Underdog's Secret 30Triple Overdrive Winning Formula 30Gillionaire Designer Wallet 30Break Damage Limit Dark Matter 60----------------------------------------------------------------------------
=======================1. Ability Description=======================
-----------------------------------------------------------------------------SENSOR-
The enemy's HP and elemental immunities/weaknesses automatically becomesviewable.-----------------------------------------------------------------------------PIERCING-
Allows character to deal regular damage even against enemies with tougharmors.-----------------------------------------------------------------------------FIRST STRIKE-
Allows character to always have the very first turn in a battle, even whenambushed.-----------------------------------------------------------------------------INITIATIVE-
Allows character to make the first move in a battle; also somewhat preventsambush.-----------------------------------------------------------------------------FIRESTRIKE-
Adds fire element to your physical attacks.-----------------------------------------------------------------------------LIGHTNINGSTRIKE-
Adds lightning element to your physical attacks.-----------------------------------------------------------------------------WATERSTRIKE-
Adds water element to your physical attacks.----------------------------------------------------------------------------

-ICESTRIKE-
Adds ice element to your physical attacks.-----------------------------------------------------------------------------DARKTOUCH-
Adds Darkness status to your attacks.-----------------------------------------------------------------------------DARKSTRIKE-
Adds Darkness status to your attacks; works more often than Darktouch.-----------------------------------------------------------------------------SILENCETOUCH-
Adds Silence status to your attacks.-----------------------------------------------------------------------------SILENCESTRIKE-
Adds Silence status to your attacks; works more often than Silencetouch.-----------------------------------------------------------------------------SLEEPTOUCH-
Adds Sleep status to your attacks.-----------------------------------------------------------------------------SLEEPSTRIKE-
Almost always inflicts Sleep on an enemy when you attack.-----------------------------------------------------------------------------POISONTOUCH-
Adds Poison status to your attacks.-----------------------------------------------------------------------------POISONSTRIKE-
Almost always inflicts Poison on an enemy when you attack.-----------------------------------------------------------------------------STONETOUCH-
Adds Petrify status to your attacks.-----------------------------------------------------------------------------STONESTRIKE-
Almost always inflicts Petrification on an enemy when you attack.-----------------------------------------------------------------------------DEATHTOUCH-
Adds Death status to your attacks.-----------------------------------------------------------------------------DEATHSTRIKE-
Almost always inflicts Death on an enemy when you attack.-----------------------------------------------------------------------------ZOMBIETOUCH-
Adds Zombie status to your attacks.-----------------------------------------------------------------------------ZOMBIESTRIKE-
Almost always inflicts Zombie on an enemy when you attack.-----------------------------------------------------------------------------SLOWTOUCH-
Adds Slow status to your attacks.-----------------------------------------------------------------------------SLOWSTRIKE-
Almost always inflicts Slow on an enemy when you attack.

-----------------------------------------------------------------------------DISTILL POWER-
Automatically extracts Power Spheres from enemies when you attack.-----------------------------------------------------------------------------DISTILL MANA-
Automatically extracts Mana Spheres from enemies when you attack.-----------------------------------------------------------------------------DISTILL SPEED-
Automatically extracts Speed Spheres from enemies when you attack.-----------------------------------------------------------------------------DISTILL ABILITY-
Automatically extracts Ability Spheres from enemies when you attack.-----------------------------------------------------------------------------STRENGTH + 3%-
Raises character's overall strength stat by 3%.-----------------------------------------------------------------------------STRENGTH + 5%-
Raises character's overall strength stat by 5%.-----------------------------------------------------------------------------STRENGTH + 10%-
Raises character's overall strength stat by 10%.-----------------------------------------------------------------------------STRENGTH + 20%-
Raises character's overall strength stat by 20%.-----------------------------------------------------------------------------MAGIC + 3%-
Raises character's overall magic stat by 3%.-----------------------------------------------------------------------------MAGIC + 5%-
Raises character's overall magic stat by 5%.-----------------------------------------------------------------------------MAGIC + 10%-
Raises character's overall magic stat by 10%.-----------------------------------------------------------------------------MAGIC + 20%-
Raises character's overall magic stat by 20%.-----------------------------------------------------------------------------COUNTERATTACK-
Character counters if attacked physically.-----------------------------------------------------------------------------EVADE & COUNTER-
Character evades the opponent's attack and counters at the same time.-----------------------------------------------------------------------------MAGIC COUNTER-
Character counters when attacked with magic.-----------------------------------------------------------------------------MAGIC BOOSTER-
Doubles the damage dealt by magic, but also consumes twice as much MP.-----------------------------------------------------------------------------ALCHEMY-

Doubles the potency of healing items.-----------------------------------------------------------------------------HALF MP COST-
Reduces MP consumption of all magics by 1/2.-----------------------------------------------------------------------------ONE MP COST-
Reduces MP consumption of all magics to 1.-----------------------------------------------------------------------------DOUBLE AP-
Receive twice as much AP after every battle.-----------------------------------------------------------------------------TRIPLE AP-
Receive 3x as much AP after every battle.-----------------------------------------------------------------------------OVERDRIVE -> AP-
Your overdrive gauge is converted to AP gauge, which means that every timethe meter charges, you receive AP instead of going into overdrive.-----------------------------------------------------------------------------SOS OVERDRIVE-
Overdrive meter fills faster once character's HP is at critical.-----------------------------------------------------------------------------DOUBLE OVERDRIVE-
Overdrive gauge charges 2x faster than normal.-----------------------------------------------------------------------------TRIPLE OVERDRIVE-
Overdrive gauge charges 3x faster than normal.-----------------------------------------------------------------------------GILLIONAIRE-
Doubles the amount of gil earned after every battle.-----------------------------------------------------------------------------BREAK DAMAGE LIMIT-
Allows max damage to exceed 9999.----------------------------------------------------------------------------
+=+=+=+=+=+=+=+=+=+=+=+=+=+=+=+=+=+=+=+=+=+=+=+=+=+=+=+=+=+=+=+=+=+=+=+=+=+=+ii. ARMOR ABILITIES+=+=+=+=+=+=+=+=+=+=+=+=+=+=+=+=+=+=+=+=+=+=+=+=+=+=+=+=+=+=+=+=+=+=+=+=+=+=+
----------------------------------------------------------------------------ABILITY REQUIRED ITEM QUANTITY----------------------------------------------------------------------------Fire Ward Bomb Fragment 4Fireproof Bomb Fragment 8Fire Eater Fire Gem 30Lightning Ward Electro Marble 4Lightningproof Electro Marble 8Lightning Eater Lightning Gem 30Water Ward Fish Scale 4Waterproof Fish Scale 8Water Eater Water Gem 30Ice Ward Arctic Wind 4Iceproof Arctic Wind 8Ice Eater Ice Gem 30Dark Ward Eye Drops 40Darkproof Smoke Bomb 10Silence Ward Echo Screen 30Silenceproof Silence Grenade 10

Sleep Ward Sleeping Powder 6Sleepproof Dream Powder 8Poison Ward Antidote 40Poisonproof Poison Fang 12Stone Ward Soft 30Stoneproof Petrify Grenade 30Death Ward Farplane Shadow 15Deathproof Farplane Wind 30Zombie Ward Holy Water 30Zombieproof Candle of Life 10Slow Ward Silver Hourglass 10Slowproof Gold Hourglass 20Confuse Ward Musk 16Confuseproof Musk 48Berserk Ward Hypello Potion 8Berserkproof Hypello Potion 32Curseproof Tetra Elemental 12SOS NulBlaze Bomb Core 1SOS NulShock Lightning Marble 1SOS NulTide Dragon Scale 1SOS NulFrost Arctic Wind 1SOS Shell Lunar Curtain 8SOS Protect Light Curtain 8SOS Reflect Star Curtain 8SOS Haste Chocobo Feather 10SOS Regen Healing Spring 12Auto-Shell Lunar Curtain 80Auto-Protect Light Curtain 70Auto-Reflect Star Curtain 40Auto-Haste Chocobo Wing 80Auto-Regen Healing Spring 80Defense + 3% Power Sphere 3Defense + 5% Stamina Spring 2Defense + 10% Special Sphere 1Defense + 20% Blessed Gem 4Magic Defense + 3% Mana Sphere 3Magic Defense + 5% Mana Spring 2Magic Defense + 10% Wht Magic Sphere 1Magic Defense + 20% Blessed Gem 4HP + 5% X-Potion 1HP + 10% Soul Spring 3HP + 20% Elixir 5HP + 30% Stamina Tonic 1MP + 5% Ether 1MP + 10% Soul Spring 3MP + 20% Elixir 5MP + 30% Mana Tonic 1Auto-Potion Stamina Tablet 4Auto-Med Remedy 30Auto-Pheonix Mega-Pheonix 20Pickpocket Amulet 30Master Thief Pendulum 30HP Stroll Stamina Tonic 2MP Stroll Mana Tonic 2No Encounters Purifying Salt 30Break MP Limit Three Stars 30Break HP Limit Wings to Discovery 30Ribbon Dark Matter 99----------------------------------------------------------------------------
=======================1. Ability Description=======================
-----------------------------------------------------------------------------FIRE WARD-

Reduces damage received by a character from a fire based attack by 1/2.-----------------------------------------------------------------------------FIREPROOF-
Provides immunity to all kinds of fire elemental attacks.-----------------------------------------------------------------------------FIRE EATER-
Absorbs damage received from fire based attacks.-----------------------------------------------------------------------------LIGHTNING WARD-
Reduces damage received by a character from a lightning based attack by 1/2.-----------------------------------------------------------------------------LIGHTNINGPROOF-
Provides immunity to all kinds of lightning elemental attacks.-----------------------------------------------------------------------------LIGHTNING EATER-
Absorbs damage received from lightning based attacks.-----------------------------------------------------------------------------WATER WARD-
Reduces damage received by a character from a water based attack by 1/2.-----------------------------------------------------------------------------WATERPROOF-
Provides immunity to all kinds of water elemental attacks.-----------------------------------------------------------------------------WATER EATER-
Absorbs damage received from water based attacks.-----------------------------------------------------------------------------ICE WARD-
Reduces damage received by a character from a ice based attack by 1/2.-----------------------------------------------------------------------------ICEPROOF-
Provides immunity to all kinds of ice elemental attacks.-----------------------------------------------------------------------------ICE EATER-
Absorbs damage received from ice based attacks.-----------------------------------------------------------------------------DARK WARD-
Randomly protects against Darkness.-----------------------------------------------------------------------------DARKPROOF-
Provides immunity against Darkness.-----------------------------------------------------------------------------SILENCE WARD-
Randomly protects against Silence.-----------------------------------------------------------------------------SILENCEPROOF-
Provides immunity against Silence.-----------------------------------------------------------------------------SLEEP WARD-
Randomly protects against Sleep.-----------------------------------------------------------------------------SLEEPPROOF-
Provides immunity against Sleep.-----------------------------------------------------------------------------POISON WARD-
Randomly protects against Poison.-----------------------------------------------------------------------------POISONPROOF-
Provides immunity against Poison.-----------------------------------------------------------------------------STONE WARD-
Randomly protects against Petrification.-----------------------------------------------------------------------------STONEPROOF-
Provides immunity against Petrification.-----------------------------------------------------------------------------DEATH WARD-
Randomly protects against Death.-----------------------------------------------------------------------------DEATHPROOF-
Provides immunity against Death.-----------------------------------------------------------------------------ZOMBIE WARD-
Randomly protects against Zombie.-----------------------------------------------------------------------------ZOMBIEPROOF-
Provides immunity against Zombie.-----------------------------------------------------------------------------SLOW WARD-
Randomly protects against Slow.-----------------------------------------------------------------------------SLOWPROOF-
Provides immunity against Slow.-----------------------------------------------------------------------------CONFUSE WARD-
Randomly protects against Confuse.-----------------------------------------------------------------------------CONFUSEPROOF-
Provides immunity against Confuse.-----------------------------------------------------------------------------BERSERK WARD-
Randomly protects against Berserk.-----------------------------------------------------------------------------BERSERKPROOF-
Provides immunity against Berserk.-----------------------------------------------------------------------------CURSEPROOF-
Provides immunity against Curse.-----------------------------------------------------------------------------SOS NULBLAZE-
NulBlaze magic will automatically be activated once character's HP is atcritical.

-----------------------------------------------------------------------------SOS NULSHOCK-
NulShock magic will automatically be activated once character's HP is atcritical.-----------------------------------------------------------------------------SOS NULTIDE-
NulTide magic will automatically be activated once character's HP is atcritical.-----------------------------------------------------------------------------SOS NULFROST-
NulFrost magic will automatically be activated once character's HP is atcritical.-----------------------------------------------------------------------------SOS SHELL-
Shell magic will automatically be activated once character's HP is atcritical.-----------------------------------------------------------------------------SOS PROTECT-
Protect magic will automatically be activated once character's HP is atcritical.-----------------------------------------------------------------------------SOS REFLECT-
Reflect magic will automatically be activated once character's HP is atcritical.-----------------------------------------------------------------------------SOS HASTE-
Haste magic will automatically be activated once character's HP is atcritical.-----------------------------------------------------------------------------SOS REGEN-
Regen magic will automatically be activated once character's HP is atcritical.-----------------------------------------------------------------------------AUTO-SHELL-
Character automatically has Shell at the beginning of the battle.-----------------------------------------------------------------------------AUTO-PROTECT-
Character automatically has Protect at the beginning of the battle.-----------------------------------------------------------------------------AUTO-REFLECT-
Character automatically has Reflect at the beginning of the battle.-----------------------------------------------------------------------------AUTO-HASTE-
Character automatically has Haste at the beginning of the battle.-----------------------------------------------------------------------------AUTO-REGEN-
Character automatically has Regen at the beginning of the battle.-----------------------------------------------------------------------------DEFENSE + 3%-
Raises character's overall defense stat by 3%.-----------------------------------------------------------------------------DEFENSE + 5%-
Raises character's overall defense stat by 5%.-----------------------------------------------------------------------------DEFENSE + 10%-
Raises character's overall defense stat by 10%.-----------------------------------------------------------------------------DEFENSE + 20%-
Raises character's overall defense stat by 20%.-----------------------------------------------------------------------------MAGIC DEFENSE + 3%-
Raises character's overall magic defense stat by 3%.-----------------------------------------------------------------------------MAGIC DEFENSE + 5%-
Raises character's overall magic defense stat by 5%.-----------------------------------------------------------------------------MAGIC DEFENSE + 10%-
Raises character's overall magic defense stat by 10%.-----------------------------------------------------------------------------MAGIC DEFENSE + 20%-
Raises character's overall magic defense stat by 20%.-----------------------------------------------------------------------------HP + 5%-
Raises character's max HP by 5%.-----------------------------------------------------------------------------HP + 10%-
Raises character's max HP by 10%.-----------------------------------------------------------------------------HP + 20%-
Raises character's max HP by 20%.-----------------------------------------------------------------------------HP + 30%-
Raises character's max HP by 30%.-----------------------------------------------------------------------------MP + 5%-
Raises character's max MP by 5%.-----------------------------------------------------------------------------MP + 10%-
Raises character's max MP by 10%.-----------------------------------------------------------------------------MP + 20%-
Raises character's max MP by 20%.-----------------------------------------------------------------------------MP + 30%-
Raises character's max MP by 30%.-----------------------------------------------------------------------------AUTO-POTION-
Character automatically uses Potion when damaged.-----------------------------------------------------------------------------AUTO-MED-
Character automatically uses a specific item to remove a specific negativestatus effect.----------------------------------------------------------------------------

-AUTO-PHEONIX-
Character automatically uses Pheonix Down when a party member is KO'd.-----------------------------------------------------------------------------PICKPOCKET-
Raises the probability of stealing rare items.-----------------------------------------------------------------------------MASTER THIEF-
Steal only rare items.-----------------------------------------------------------------------------HP STROLL-
Gradually recover HP while walking.-----------------------------------------------------------------------------MP STROLL-
Gradually recover MP while walking.-----------------------------------------------------------------------------NO ENCOUNTERS-
No random encounters.-----------------------------------------------------------------------------BREAK MP LIMIT-
Allows character's max MP to exceed 999.-----------------------------------------------------------------------------BREAK HP LIMIT-
Allows character's max HP to exceed 9999.-----------------------------------------------------------------------------RIBBON-
Provides immunity against all negative status effects except Death, Curse &Full Break.----------------------------------------------------------------------------
==================X. MONSTER ARENA
==================
+=+=+=+=+=+=+=+=+=+=+=+=+=+=+=+=+=+=+=+=+=+=+=+=+=+=+=+=+=+=+=+=+=+=+=+=+=+=+i. FIEND LIST+=+=+=+=+=+=+=+=+=+=+=+=+=+=+=+=+=+=+=+=+=+=+=+=+=+=+=+=+=+=+=+=+=+=+=+=+=+=+
=============BESAID ISLAND=============----------------------------------------------------------------------------Fiend Name Price----------------------------------------------------------------------------Dingo 24Condor 18Water Flan 27----------------------------------------------------------------------------
======KILIKA======----------------------------------------------------------------------------Fiend Name Price----------------------------------------------------------------------------Dinonix 40Killer Bee 34Yellow Element 49Ragora 72
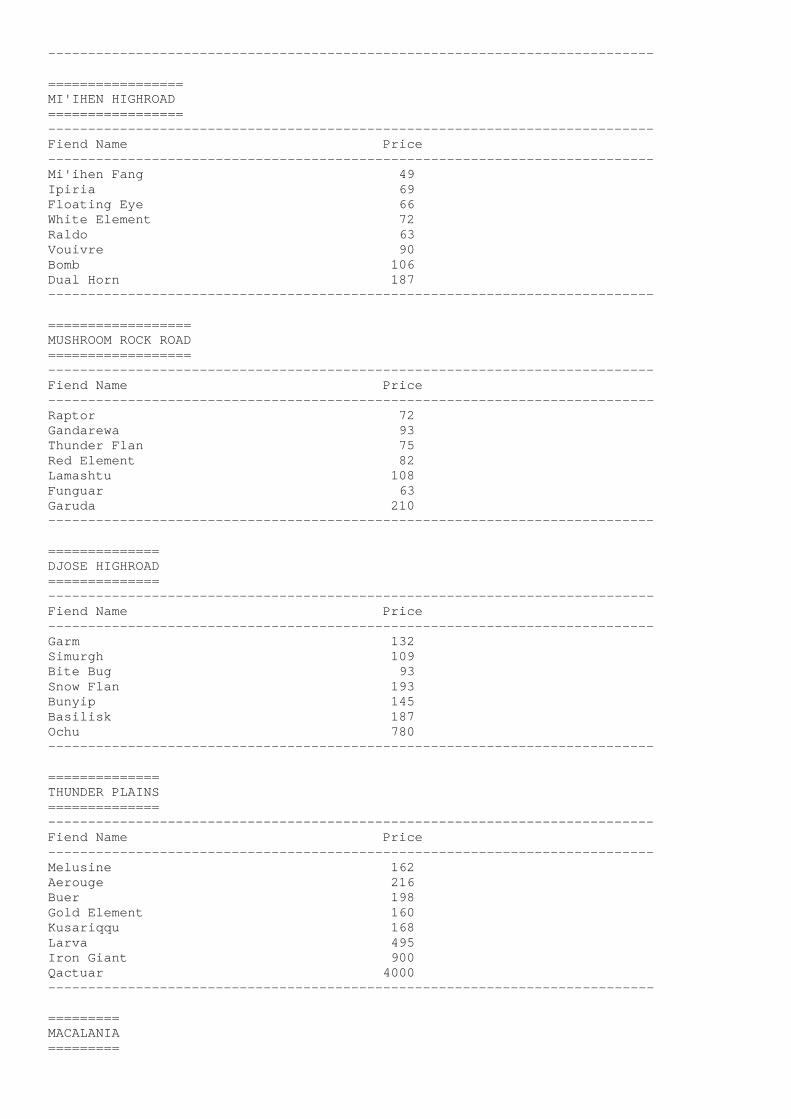
----------------------------------------------------------------------------
=================MI'IHEN HIGHROAD=================----------------------------------------------------------------------------Fiend Name Price----------------------------------------------------------------------------Mi'ihen Fang 49Ipiria 69Floating Eye 66White Element 72Raldo 63Vouivre 90Bomb 106Dual Horn 187----------------------------------------------------------------------------
==================MUSHROOM ROCK ROAD==================----------------------------------------------------------------------------Fiend Name Price----------------------------------------------------------------------------Raptor 72Gandarewa 93Thunder Flan 75Red Element 82Lamashtu 108Funguar 63Garuda 210----------------------------------------------------------------------------
==============DJOSE HIGHROAD==============----------------------------------------------------------------------------Fiend Name Price----------------------------------------------------------------------------Garm 132Simurgh 109Bite Bug 93Snow Flan 193Bunyip 145Basilisk 187Ochu 780----------------------------------------------------------------------------
==============THUNDER PLAINS==============----------------------------------------------------------------------------Fiend Name Price----------------------------------------------------------------------------Melusine 162Aerouge 216Buer 198Gold Element 160Kusariqqu 168Larva 495Iron Giant 900Qactuar 4000----------------------------------------------------------------------------
=========MACALANIA=========

----------------------------------------------------------------------------Fiend Name Price----------------------------------------------------------------------------Snow Wolf 288Iguion 207Wasp 213Evil Eye 307Ice Flan 282Blue Element 270Murussu 247Mafdet 258Xiphos 330Chimera 1455----------------------------------------------------------------------------
==============BIKANEL ISLAND==============----------------------------------------------------------------------------Fiend Name Price----------------------------------------------------------------------------Sand Wolf 337Alcyone 360Mushussu 405Zu 1800Sand Worm 1500Cactuar 4000----------------------------------------------------------------------------
==========CALM LANDS==========----------------------------------------------------------------------------Fiend Name Price----------------------------------------------------------------------------Skoll 630Nebiros 480Flame Flan 672Shred 552Anacondaur 1125Ogre 1470Coeuri 1650Chimera Brain 1500Malboro 1650----------------------------------------------------------------------------
===========SUNKEN CAVE===========----------------------------------------------------------------------------Fiend Name Price----------------------------------------------------------------------------Yowie 720Imp 915Dark Element 780Nidhogg 903Thorn 795Vahala 1080Epaaj 1425Ghost 1215Tonberry 3000----------------------------------------------------------------------------
=============MOUNT GAGAZET=============----------------------------------------------------------------------------

Fiend Name Price----------------------------------------------------------------------------Bandersnatch 1320Ahriman 975Dark Flan 1620Grenade 810Grat 780Grendel 1095Bashura 1095Mandragora 1800Behemoth 2025Splasher 300Achelous 630Maelspike 495----------------------------------------------------------------------------
==========INSIDE SIN==========----------------------------------------------------------------------------Fiend Name Price----------------------------------------------------------------------------Exoray 1260Wraith 1605Gemini 1666Gemini 1666Demonolith 2205Great Malboro 2250Barbatos 2325Adamantoise 3300Behemoth King 2775----------------------------------------------------------------------------
=============OMEGA DUNGEON=============----------------------------------------------------------------------------Fiend Name Price----------------------------------------------------------------------------Zaurus 1425Floating Death 1895Black Element 1560Halma 1545Puroboros 1455Spirit 1950Machea 2175Master Coeuri 3045Master Tonberry 3600Varuna 2670----------------------------------------------------------------------------
+=+=+=+=+=+=+=+=+=+=+=+=+=+=+=+=+=+=+=+=+=+=+=+=+=+=+=+=+=+=+=+=+=+=+=+=+=+=+ii. PRIZE LIST+=+=+=+=+=+=+=+=+=+=+=+=+=+=+=+=+=+=+=+=+=+=+=+=+=+=+=+=+=+=+=+=+=+=+=+=+=+=+
You'll receive a prize everytime you manage to capture every monster fromevery area or unlock a monster created by the trainer himself. Here's thelist of all the prizes.
=======================1. Area Conquest Prizes=======================
----------------------------------------------------------------------------AREA COMPLETED PRIZE QUANTITY----------------------------------------------------------------------------Besaid Island Stamina Tonic 99
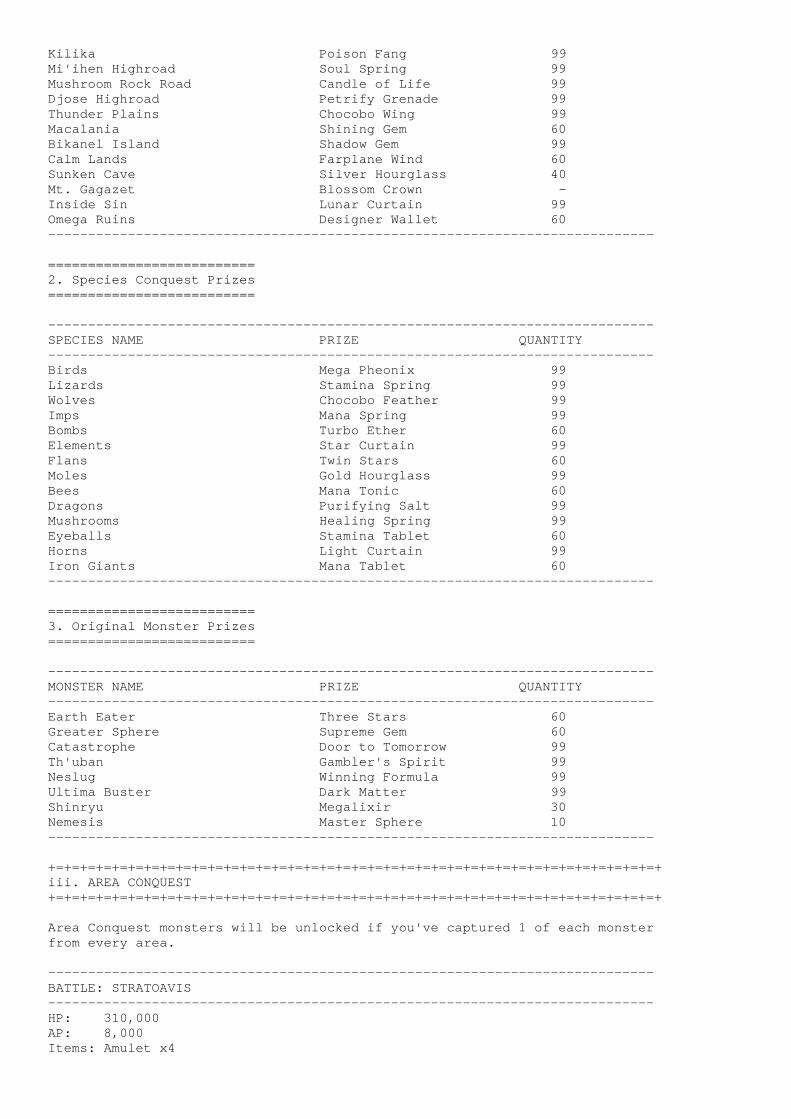
Kilika Poison Fang 99Mi'ihen Highroad Soul Spring 99Mushroom Rock Road Candle of Life 99Djose Highroad Petrify Grenade 99Thunder Plains Chocobo Wing 99Macalania Shining Gem 60Bikanel Island Shadow Gem 99Calm Lands Farplane Wind 60Sunken Cave Silver Hourglass 40Mt. Gagazet Blossom Crown -Inside Sin Lunar Curtain 99Omega Ruins Designer Wallet 60----------------------------------------------------------------------------
==========================2. Species Conquest Prizes==========================
----------------------------------------------------------------------------SPECIES NAME PRIZE QUANTITY----------------------------------------------------------------------------Birds Mega Pheonix 99Lizards Stamina Spring 99Wolves Chocobo Feather 99Imps Mana Spring 99Bombs Turbo Ether 60Elements Star Curtain 99Flans Twin Stars 60Moles Gold Hourglass 99Bees Mana Tonic 60Dragons Purifying Salt 99Mushrooms Healing Spring 99Eyeballs Stamina Tablet 60Horns Light Curtain 99Iron Giants Mana Tablet 60----------------------------------------------------------------------------
==========================3. Original Monster Prizes==========================
----------------------------------------------------------------------------MONSTER NAME PRIZE QUANTITY----------------------------------------------------------------------------Earth Eater Three Stars 60Greater Sphere Supreme Gem 60Catastrophe Door to Tomorrow 99Th'uban Gambler's Spirit 99Neslug Winning Formula 99Ultima Buster Dark Matter 99Shinryu Megalixir 30Nemesis Master Sphere 10----------------------------------------------------------------------------
+=+=+=+=+=+=+=+=+=+=+=+=+=+=+=+=+=+=+=+=+=+=+=+=+=+=+=+=+=+=+=+=+=+=+=+=+=+=+iii. AREA CONQUEST+=+=+=+=+=+=+=+=+=+=+=+=+=+=+=+=+=+=+=+=+=+=+=+=+=+=+=+=+=+=+=+=+=+=+=+=+=+=+
Area Conquest monsters will be unlocked if you've captured 1 of each monsterfrom every area.
----------------------------------------------------------------------------BATTLE: STRATOAVIS----------------------------------------------------------------------------HP: 310,000AP: 8,000Items: Amulet x4
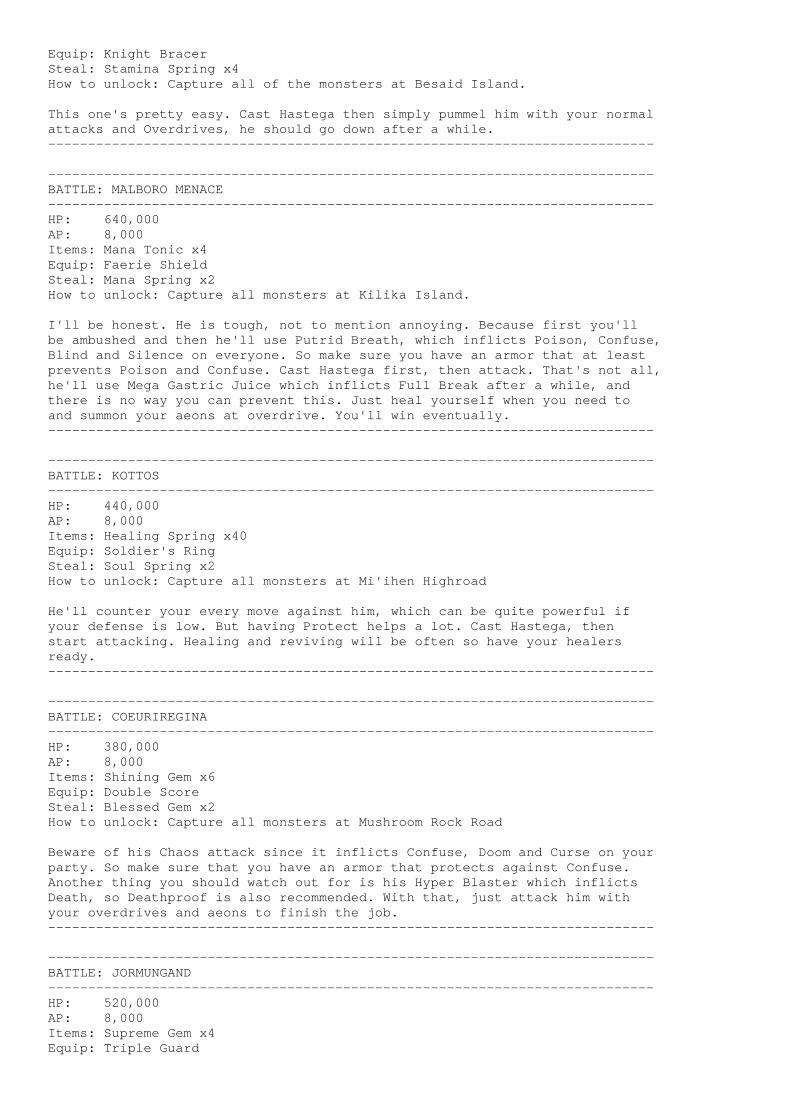
Equip: Knight BracerSteal: Stamina Spring x4How to unlock: Capture all of the monsters at Besaid Island.
This one's pretty easy. Cast Hastega then simply pummel him with your normalattacks and Overdrives, he should go down after a while.----------------------------------------------------------------------------
----------------------------------------------------------------------------BATTLE: MALBORO MENACE----------------------------------------------------------------------------HP: 640,000AP: 8,000Items: Mana Tonic x4Equip: Faerie ShieldSteal: Mana Spring x2How to unlock: Capture all monsters at Kilika Island.
I'll be honest. He is tough, not to mention annoying. Because first you'llbe ambushed and then he'll use Putrid Breath, which inflicts Poison, Confuse,Blind and Silence on everyone. So make sure you have an armor that at leastprevents Poison and Confuse. Cast Hastega first, then attack. That's not all,he'll use Mega Gastric Juice which inflicts Full Break after a while, andthere is no way you can prevent this. Just heal yourself when you need toand summon your aeons at overdrive. You'll win eventually.----------------------------------------------------------------------------
----------------------------------------------------------------------------BATTLE: KOTTOS----------------------------------------------------------------------------HP: 440,000AP: 8,000Items: Healing Spring x40Equip: Soldier's RingSteal: Soul Spring x2How to unlock: Capture all monsters at Mi'ihen Highroad
He'll counter your every move against him, which can be quite powerful ifyour defense is low. But having Protect helps a lot. Cast Hastega, thenstart attacking. Healing and reviving will be often so have your healersready.----------------------------------------------------------------------------
----------------------------------------------------------------------------BATTLE: COEURIREGINA----------------------------------------------------------------------------HP: 380,000AP: 8,000Items: Shining Gem x6Equip: Double ScoreSteal: Blessed Gem x2How to unlock: Capture all monsters at Mushroom Rock Road
Beware of his Chaos attack since it inflicts Confuse, Doom and Curse on yourparty. So make sure that you have an armor that protects against Confuse.Another thing you should watch out for is his Hyper Blaster which inflictsDeath, so Deathproof is also recommended. With that, just attack him withyour overdrives and aeons to finish the job.----------------------------------------------------------------------------
----------------------------------------------------------------------------BATTLE: JORMUNGAND----------------------------------------------------------------------------HP: 520,000AP: 8,000Items: Supreme Gem x4Equip: Triple Guard

Steal: Three Stars x2How to unlock: Capture all monsters at Djose Highroad.
This one's easy despite its high HP. Just get an armor with the Stoneproofability to protect you against its Cold Stare. Cast Hastega on your partyand start attacking. You'll win after a while.----------------------------------------------------------------------------
----------------------------------------------------------------------------BATTLE: CACTUAR KING----------------------------------------------------------------------------HP: 100,000AP: 8,000Items: Blessed Gem x6Equip: Tetra RingSteal: Designer WalletHow to unlock: Capture all monsters at Thunder Plains.
He's hard to hit so cast Aim on yourself several times. He has 2 moves called10,000 Needles and 99,999 Needles which are both deadly, so you'll have torevive often. But since he has pretty low HP, just use an overdrive that dealsat least that much damage (Wakka's Attack Reels or Tidus' Blitz Ace) to killhim instantly.----------------------------------------------------------------------------
----------------------------------------------------------------------------BATTLE: ESPADA----------------------------------------------------------------------------HP: 280,000AP: 8,000Items: Rename Card x2Equip: Knight SwordSteal: Farplane Wind x3How to unlock: Capture all monsters at Macalania.
An armor with the Deathproof ability is a must since he counters every oneof your moves with Hades Claws which inflicts Death on a character. He alsohas Auto-Regen. Cast Hastega on yourself first then attack him with all yougot. This fight should be easy enough if you have Deathproof, or you canalso use your aeons here if you want.----------------------------------------------------------------------------
----------------------------------------------------------------------------BATTLE: ABYSS WORM----------------------------------------------------------------------------HP: 480,000AP: 8,000Items: Stamina Tonic x2Equip: Dance MacabreSteal: Stamina TabletHow to unlock: Capture all monsters at Bikanel Island.
He isn't hard, its just his HP that's the problem. Cast Hastega on yourselffirst then attack. He'll swallow one of your characters after a while, butdon't worry he'll spit that character out later on anyway. There isn't muchstrategy here so just do whatever you wish to finish him off.----------------------------------------------------------------------------
----------------------------------------------------------------------------BATTLE: CHIMERAGEIST----------------------------------------------------------------------------HP: 120,000AP: 8,000Items: Return Sphere x2Equip: Tri-RodSteal: Stamina Spring x2How to unlock: Capture all monsters at Calm Lands

This ones easy. He's pretty slow so if you use Hastega, it'll be possible foryou to delay his turn considerably. But beware of his Aqua Breath and MediggoFlame though, as this can really hurt you. Just attack him and you'll win inno time.----------------------------------------------------------------------------
----------------------------------------------------------------------------BATTLE: DON TONBERRY----------------------------------------------------------------------------HP: 480,000AP: 8,000Items: Farplane Wind x6Equip: Faerie RingSteal: Designer Wallet x2How to unlock: Capture all monsters at the Cavern of Stolen Fayth
He's really tough. Because first he counters your every move against himwith Karma. So I strongly recommend that you customize an armor with theAuto-Pheonix ability for this fight, as this prevents you from wasting yourturns on reviving every time a character gets killed. But the damage Karmadeals depends on how many enemies a character has defeated, so chances areyour mages won't die. Cast Hastega on yourself first then summon an aeon atoverdrive, preferably Anima and Magus Sisters so that they'll be able todeal major damage before he kills them with Voodoo. This battle definitelytakes some time but you should win.----------------------------------------------------------------------------
----------------------------------------------------------------------------BATTLE: CATOBLEPAS----------------------------------------------------------------------------HP: 550,000AP: 8,000Items: Three Stars x2Equip: Faerie ArmletSteal: Stamina Tonic x2How to unlock: Capture all monsters at Mount Gagazet & Gagazet Mountain Cave
He can be tough if you don't know what to do. First cast Hastega on yourparty then bring in your white mages to cast Protect and Shell on everyone.This will help a lot especially against his physical attacks which can bequite deadly. Just unload on him with all you got, since this guy is immuneto sensors, you will have to count the damage you inflicted on him. Once hisHP is low, heal yourself with items, not magic since you have Shell. Nowhe'll cast Ultima before he dies, but with Shell you'll be fine.----------------------------------------------------------------------------
----------------------------------------------------------------------------BATTLE: ABADDON----------------------------------------------------------------------------HP: 380,000AP: 8,000Items: Mana Tablet x2Equip: EchelonSteal: Shining Gem x2How to unlock: Capture all monsters inside Sin
First be aware that he has Auto-Reflect and NulAll from the very beginning.He's also pretty fast even with Hastega. Now cast Hastega on your party thenattack. He'll use Level 3 magics repeatedly and you won't be able to reflectit, so just cast Shell. Another thing to watch out for is his Pharaoh'sCurse which inflicts Curse, Blind and Poison. This battle can be quite longsince he has high defense, so take your time.----------------------------------------------------------------------------
----------------------------------------------------------------------------BATTLE: VORBAN

----------------------------------------------------------------------------HP: 630,000AP: 8,000Items: Friend Sphere x2Equip: Double PlaySteal: Healing Spring x2How to unlock: Capture all monsters at Omega Dungeon
Your primary concern is to lower his defense, but since he's immune to ArmorBreak use Auron's Banishing Blade. Cast Hastega on yourself then unleashyour Overdrives especially Wakka's Attack Reels and Tidus' Blitz Ace. Hecounters with Mortar most of the time, so make sure you always keep your HPabove 5,500 to survive.
+=+=+=+=+=+=+=+=+=+=+=+=+=+=+=+=+=+=+=+=+=+=+=+=+=+=+=+=+=+=+=+=+=+=+=+=+=+=+iv. SPECIES CONQUEST+=+=+=+=+=+=+=+=+=+=+=+=+=+=+=+=+=+=+=+=+=+=+=+=+=+=+=+=+=+=+=+=+=+=+=+=+=+=+
To unlock these monsters you have to capture a specific number of monstersof a certain type.
----------------------------------------------------------------------------BATTLE: FENRIR----------------------------------------------------------------------------HP: 850,000AP: 10,000Items: Agility Sphere x2Equip: Faerie RingSteal: Chocobo Wing x3How to unlock: Capture 3 of the following fiends: Dingo, Mi'ihen Fang, Garm,
Snow Wolf, Skoll, Bandersnatch, Sand Wolf
He's pretty fast even with Hastega. In addition to that, his attacks arepowerful too. He has an attack called Fangs of Hell which is deadly sinceit inflicts Death on a character and Deathproof cannot prevent this. Anotherone of his attacks, Fangs of Chaos works like Demi so it won't kill you evenat 1 HP. Cast Hastega on yourself, then Aim to be able hit him. Now, justattack and summon your aeons at overdrive. This can be long so be patient.----------------------------------------------------------------------------
----------------------------------------------------------------------------BATTLE: ORNITHOLESTES----------------------------------------------------------------------------HP: 800,000AP: 10,000Items: Gambler's Spirit x4Equip: Gold TargeSteal: Chocobo Wing x2How to unlock: Capture 3 of the following fiends: Dinonix, Ipiria, Raptor,
Melusine, Iguion, Yowie, Zaurus
You should have an armor that protects against Poison for this fight. Now,cast Hastega on yourself then use Aim to be able to hit him if your accuracyis low. He has a move called Venomous Touch, which inflicts Poison so if youhave an armor with Poisonproof then that move will be sort of like Demi. Healso drains your HP. Just attack him and unleash your character and aeonoverdrives when available.----------------------------------------------------------------------------
----------------------------------------------------------------------------BATTLE: PTERYX----------------------------------------------------------------------------HP: 100,000AP: 10,000Items: Evasion Sphere x2Equip: Platinum BangleSteal: Candle of Life x2

How to unlock: Capture 5 of the following fiends: Condor, Simurgh, Alcyone
His Beak of Woe inflicts Curse on everyone, so it is recommended that youhave an armor with Curseproof. If you don't have that then just use HolyWater. Cast Hastega on yourself and use Wakka's Attack Reels or Tidus'Blitz Ace to finish the job.----------------------------------------------------------------------------
----------------------------------------------------------------------------BATTLE: HORNET----------------------------------------------------------------------------HP: 620,000AP: 10,000Items: Accuracy Sphere x2Equip: Platinum ArmletSteal: Purifying Salt x2How to unlock: Capture 5 of the following fiends: Killer Bee, Bite Bug,
Wasp, Nebiros
You should have an armor that protects against Poison, Confusion, Blind, andSilence since his attacks cause those status. Now cast Hastega on yourself,then use Aim to be able to hit him. Use your aeon and character overdriveswhen it becomes available.----------------------------------------------------------------------------
----------------------------------------------------------------------------BATTLE: VIDATU----------------------------------------------------------------------------HP: 95,000AP: 10,000Items: MP Sphere x2Equip: Golden HandSteal: Mana Tonic x2How to unlock: Capture 5 of the following fiends: Gandarewa, Aerouge, Imp
He as Auto-Regen and NulAll at the beginning of the fight. Cast Hastega firstthen Shell on your party to be able to survive from Ultima. With that, attackhim with all you got and unleash your overdrives when available.----------------------------------------------------------------------------
----------------------------------------------------------------------------BATTLE: ONE EYE----------------------------------------------------------------------------HP: 150,000AP: 10,000Items: Magic Defense Sphere x2Equip: Sorcery ShieldSteal: Blessed GemHow to unlock: Capture 5 of the following fiends: Floating Eye, Buer,
Ahriman, Evil Eye, Floating Death
This is easy, since he's pretty slow. But beware of his Shockwave as itinflicts Sleep, Confuse, and Silence. So make sure you are protected fromthose status. Cast Hastega on your paty then just attack. The battle will beover before you know it.----------------------------------------------------------------------------
----------------------------------------------------------------------------BATTLE: JUMBO FLAN----------------------------------------------------------------------------HP: 1,300,000AP: 10,000Items: Magic Sphere x2Equip: VigilanteSteal: Mana Tablet x2How to unlock: Capture 3 of the following fiends: Water Flan, Ice Flan,
Snow Flan, Thunder Flan, Flame Flan

This one is HARD! Believe me! First, he is immune to physical attacks.Secondly, he has Auto-Reflect and lastly, he absorbs all elemental magicsincluding Holy. Now, cast Hastega on yourself then doublecast Ultima withYuna or Lulu. Summon your aeons at overdrive, except the ones with elements.Let me remind you that this fight is extremely long, it actually took me anhour to beat this thing! Anyway, good luck!----------------------------------------------------------------------------
----------------------------------------------------------------------------BATTLE: NEGA ELEMENTAL----------------------------------------------------------------------------HP: 1,300,000AP: 10,000Items: Twin Stars x4Equip: Elemental ShieldSteal: Twin Stars x2How to unlock: Capture 3 of the following fiends: Yellow Element, White
Element, Red Element, Gold Element, Blue Element, DarkElement, Black Element
This one is tough too, but not as hard as the Jumbo Flan though. There area few things I would like to point out. First, he counters your every moveagainst him with Utima, second he absorbs all elemental magics except Holy.Now, cast Hastega first then Reflect on your party. With that just doublecast Ultima and Reflect Holy, since he does not counterattack when you dothat. Another thing, if you have Kimahri at overdrive, have him use MightyGuard as this will make the battle so much easier.----------------------------------------------------------------------------
----------------------------------------------------------------------------BATTLE: TANKET----------------------------------------------------------------------------HP: 900,000AP: 10,000Items: Defense Sphere x2Equip: Iron ClawSteal: Lunar Curtain x8How to unlock: Capture 3 of the following fiends: Raldo, Bunyip, Murussu,
Mafdet, Shred, Halma
This ones pretty easy. Cast Hastega on yourself first, and if you have Auronat overdrive, use Banishing Blade as this works extremely well. It is alsoa good idea to cast Protect on your characters to reduce the damage from hisphysical attacks. You can summon your overdriven aeons too if you want.----------------------------------------------------------------------------
----------------------------------------------------------------------------BATTLE: FAFNIR----------------------------------------------------------------------------HP: 1,100,000AP: 10,000Items: Light Curtain x40Equip: Phantom ArmletSteal: Stamina Spring x2How to unlock: Capture 5 of the following fiends: Vouivre, Lamashtu,
Kusariqqu, Mushussu, Nidhogg
This can be tough, because of his HP. Now cast Hastega on yourself and haveAuron use Banishing Blade to give you a significant advantage. Watch out forhis Triple Attack as this is quite deadly if your physical defense is low.Also, make sure you cast NulAll or Mighty Guard on your party to prevent hisBreath attack. Simply attack and summon your aeons (especially Anima) atoverdrive after that to finish the job.----------------------------------------------------------------------------
----------------------------------------------------------------------------

BATTLE: SLEEP SPROUT----------------------------------------------------------------------------HP: 98,000AP: 10,000Items: Teleport Sphere x2Equip: TalismanSteal: Farplane WindHow to unlock: Capture 5 of the following fiends: Funguar, Thorn, Exoray
I hope you have a high defense and magic defense value, because he has amove called Goodnight which inflicts Sleep, Berserk and Poison. I haven'treally found a way to prevent that since it affects my characters evenwith a Ribbon armor. So make sure you have the First Strike ability and hopethat you get a preemptive strike. Cast Hastega on your party then justattack and summon your overdriven aeons, especially Anima to kill him witha single blow.----------------------------------------------------------------------------
----------------------------------------------------------------------------BATTLE: BOMB KING----------------------------------------------------------------------------HP: 480,000AP: 10,000Items: Door to Tomorrow x2Equip: Baroque SwordSteal: Shining GemHow to unlock: Capture 5 of the following fiends: Bomb, Grenade, Puroburos
This isn't that hard. Cast Hastega on yourself first, then cast Shell. Nowjust attack him with your character and aeon overdrives. After 3 turns he'llcast Ultima, heal yourself using Mega-Potions since you have Shell. You'llwin after a while.----------------------------------------------------------------------------
----------------------------------------------------------------------------BATTLE: JUGGERNAUT----------------------------------------------------------------------------HP: 1,200,000AP: 10,000Items: Strength Sphere x2Equip: Platinum RingSteal: Shining GemHow to unlock: Capture 5 of the following fiends: Dual Horn, Grendel, Valaha
This is easy if you have an armor with a Fireproof or Fire Eater ability.He is also quite slow and considering the fact that he wastes his first turnto prepare his fire attack, Hastega should do the trick. Use Auron'sBanishing Blade on him too, as this works well. With that, just attack himwith all you got and he should go down after some time.----------------------------------------------------------------------------
----------------------------------------------------------------------------BATTLE: IRON CLAD----------------------------------------------------------------------------HP: 2,000,000AP: 10,000Items: HP Shere x2Equip: Soldier's ArmletSteal: Stamina Tablet x2How to unlock: Capture 10 of the following fiends: Iron Giant, Gemini (A),
Gemini (B)
This can be hard, because of the HP. Cast Hastega on yourself, then useProtect. Your primary concern is to lower his defense, but since Armor Breakdoesn't work use Banishing Blade instead. He also counters your every moveagainst him with a powerful sword attack, so heal often. Just unleash yourcharacter and aeon overdrives on him to deal a lot of damage every turn.

This will be a long fight, so be patient.
+=+=+=+=+=+=+=+=+=+=+=+=+=+=+=+=+=+=+=+=+=+=+=+=+=+=+=+=+=+=+=+=+=+=+=+=+=+=+v. ORIGINAL MONSTER CONQUEST+=+=+=+=+=+=+=+=+=+=+=+=+=+=+=+=+=+=+=+=+=+=+=+=+=+=+=+=+=+=+=+=+=+=+=+=+=+=+
These monsters will be unlocked once a specific condition is met. The monstertrainer will say something like this: "I've done it, I've created a monster."
----------------------------------------------------------------------------BATTLE: EARTH EATER----------------------------------------------------------------------------HP: 1,300,000AP: 50,000Items: Fortune Sphere x2Equip: NoneSteal: Lv. 1 Key SphereHow to unlock: Capture all the monsters from at least 2 areas.
I recommend that you enter this fight with a high defense stat since hisattacks are powerful. Cast Hastega first then use Protect on your party.Now try to hit him with your strongest attacks to make him fall on his back.Once this happens, pummel him with your character and aeon overdrives. Alsouse Anima's Pain as this deals no less than 90,000+ damage. This guy alsohas Auto-Reflect, so keep that in mind.----------------------------------------------------------------------------
----------------------------------------------------------------------------BATTLE: GREATER SPHERE----------------------------------------------------------------------------HP: 1,500,000AP: 50,000Items: Luck Sphere x2Equip: BuccaneerSteal: Return SphereHow to unlock: Capture all the monsters from 2 different species
Cast Hastega first, then Protect and Shell on all your party members, orbetter yet use Mighty Guard instead. Doing that will lessen the damage fromhis Hydraulic Press attack and Ultima. He counters with Ultima almost everytime you damage him, so heal often. Since it is very difficult to predictwhat element he is using, unleash the overdrives of your non-elementalaeons. Remeber that if you used magic with the wrong element on him, he'llabsorb it. Don't forget to use your character overdrives too.----------------------------------------------------------------------------
----------------------------------------------------------------------------BATTLE: CATASTROPHE----------------------------------------------------------------------------HP: 2,200,000AP: 50,000Items: Designer Wallet x2Equip: Faerie BracerSteal: Lv. 2 Key SphereHow to unlock: Capture all monsters from 6 areas.
First, make sure that you have a Poisonproof and Confuseproof armor equipped.Cast Hastega first then Shell. He will be in his shell, but he will emergeonce you've dealt sufficient damage. His Toxic Cloud attack inflicts Poison,Confuse and Curse on everyone. With that in mind start attacking and summonyour aeons at overdrive to get him out of his shell. Once this happens, hewill begin his patterned attack which is: Toxic Cloud, Demi, Hundred Thorns.Beware of Hundred Thorns since its quite deadly, just summon an aeon to saveyourself. Continue pummeling him until the word "OVERKILL" appears :)----------------------------------------------------------------------------
----------------------------------------------------------------------------

BATTLE: TH'UBAN----------------------------------------------------------------------------HP: 3,000,000AP: 50,000Items: Underdog's Secret x2Equip: Platinum ShieldSteal: Teleport SphereHow to unlock: Capture all monsters from 6 different species.
I'll admit that he looks intimidating at first, but he's actually prettyeasy. I assume that you've already learned the Doom skill for Kimahri. Justuse that on this guy and all you have to do is survive until the good ol'counter reaches 0. It will be all over after that.----------------------------------------------------------------------------
----------------------------------------------------------------------------BATTLE: NESLUG----------------------------------------------------------------------------HP: 4,000,000AP: 50,000Items: Pendulum x4Equip: Faerie TargeSteal: Friend Sphere x3How to unlock: Capture 1 of every monster from every area.
This ones pretty tough. First, cast Hastega then Protect on your party. Youhave to get rid of his shell before he manages to get into it and healhimself for 70,000+ HP every turn. To do this, use Wakka's Attack Reels andTidus' Blitz Ace on him at least twice, so use Entrust as often as you can.Once the shell is off, he'll use his Slime attack every turn. Just healyourself every time he does that. Summon your aeons and attack him with allyou got and the battle will be over after a while.----------------------------------------------------------------------------
----------------------------------------------------------------------------BATTLE: ULTIMA BUSTER----------------------------------------------------------------------------HP: 5,000,000AP: 50,000Items: Winning Formula x2Equip: KotetsuSteal: Lv. 3 Key Sphere x2How to unlock: Capture 5 of every monster from every area.
Be prepared for a long and painful battle. As usual cast Hastega first, thenProtect and Shell. Use Blitz Ace and Attack Reels along with your overdrivenaeons as much as possible. So, set your overdrive mode to Stoic and keepusing Entrust. There's nothing more I can tell you after that, except forthe fact that it took me at least 45 minutes to beat this thing. Good luck!----------------------------------------------------------------------------
----------------------------------------------------------------------------BATTLE: SHINRYU----------------------------------------------------------------------------HP: 2,000,000AP: 50,000Items: Wings to Discovery x6Equip: VendettaSteal: Three Stars x2How to unlock: Capture 3 of every monster at Mt. Gagazet and Gagazet
Mountain Cave.
You only have Tidus, Wakka and Rikku in this battle. So there won't be anyaeons. (*How I wish Yuna can swim ^_^*) First make sure you have an armorthat prevents Petrify to protect you from Eraser. Now, cast Hastega onyourself, and hopefully you have Protect and Shell with Rikku. Also, watchout for his attack called Shining as it deals massive damage. Just attack
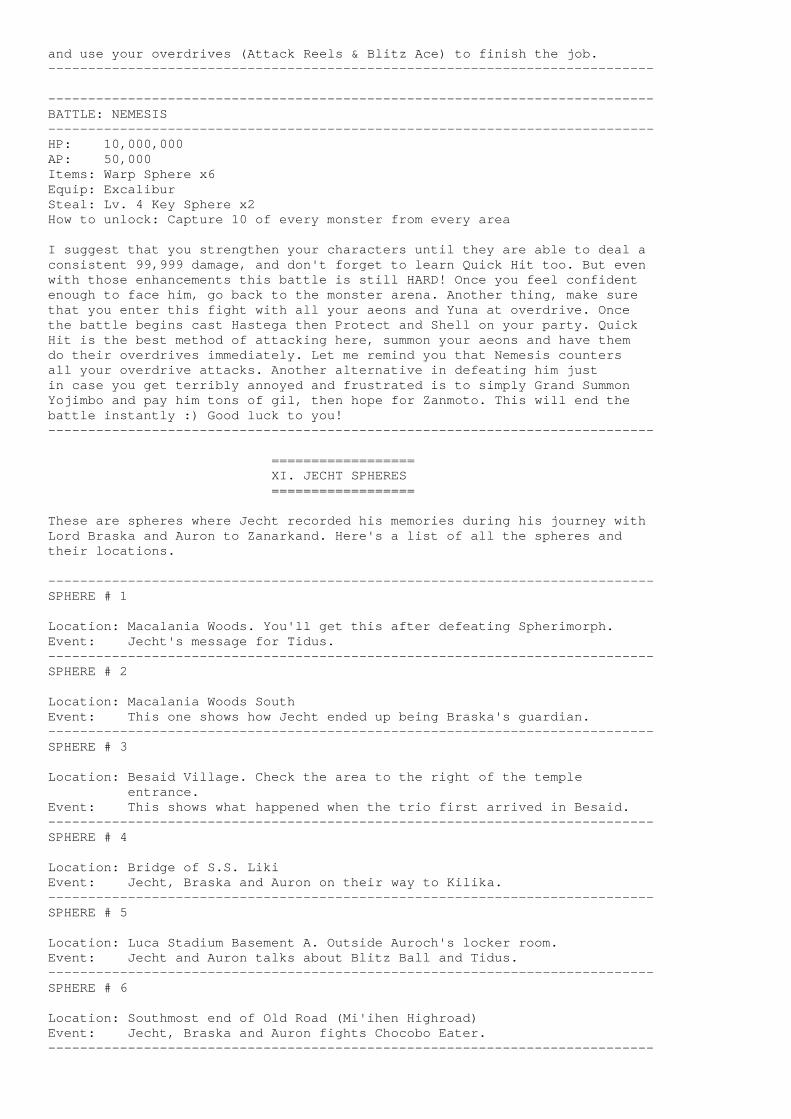
and use your overdrives (Attack Reels & Blitz Ace) to finish the job.----------------------------------------------------------------------------
----------------------------------------------------------------------------BATTLE: NEMESIS----------------------------------------------------------------------------HP: 10,000,000AP: 50,000Items: Warp Sphere x6Equip: ExcaliburSteal: Lv. 4 Key Sphere x2How to unlock: Capture 10 of every monster from every area
I suggest that you strengthen your characters until they are able to deal aconsistent 99,999 damage, and don't forget to learn Quick Hit too. But evenwith those enhancements this battle is still HARD! Once you feel confidentenough to face him, go back to the monster arena. Another thing, make surethat you enter this fight with all your aeons and Yuna at overdrive. Oncethe battle begins cast Hastega then Protect and Shell on your party. QuickHit is the best method of attacking here, summon your aeons and have themdo their overdrives immediately. Let me remind you that Nemesis countersall your overdrive attacks. Another alternative in defeating him justin case you get terribly annoyed and frustrated is to simply Grand SummonYojimbo and pay him tons of gil, then hope for Zanmoto. This will end thebattle instantly :) Good luck to you!----------------------------------------------------------------------------
==================XI. JECHT SPHERES==================
These are spheres where Jecht recorded his memories during his journey withLord Braska and Auron to Zanarkand. Here's a list of all the spheres andtheir locations.
----------------------------------------------------------------------------SPHERE # 1
Location: Macalania Woods. You'll get this after defeating Spherimorph.Event: Jecht's message for Tidus.----------------------------------------------------------------------------SPHERE # 2
Location: Macalania Woods SouthEvent: This one shows how Jecht ended up being Braska's guardian.----------------------------------------------------------------------------SPHERE # 3
Location: Besaid Village. Check the area to the right of the templeentrance.
Event: This shows what happened when the trio first arrived in Besaid.----------------------------------------------------------------------------SPHERE # 4
Location: Bridge of S.S. LikiEvent: Jecht, Braska and Auron on their way to Kilika.----------------------------------------------------------------------------SPHERE # 5
Location: Luca Stadium Basement A. Outside Auroch's locker room.Event: Jecht and Auron talks about Blitz Ball and Tidus.----------------------------------------------------------------------------SPHERE # 6
Location: Southmost end of Old Road (Mi'ihen Highroad)Event: Jecht, Braska and Auron fights Chocobo Eater.----------------------------------------------------------------------------
SPHERE # 7
Location: Mushroom Rock Precipice, close to elevator.Event: Auron talking to Kinoc about him leaving with Braska to Zanarkand----------------------------------------------------------------------------SPHERE # 8
Location: Moonflow South WharfEvent: Jecht's regrets about attacking the Shoopuf.----------------------------------------------------------------------------SPHERE # 9
Location: Thunder Plains South (east area)Event: The three of them leaving the Thunder Plains to Guadosalam.----------------------------------------------------------------------------SPHERE # 10
Location: Gagazet Mountain TrailEvent: Braska's message for Yuna----------------------------------------------------------------------------
====================XII. AL BHED PRIMERS====================
Volume 1 (Y -> A) - Deck of Salvage ShipVolume 2 (P -> B) - Crusader's Lodge EntranceVolume 3 (L -> C) - S.S. Liki Engine RoomVolume 4 (T -> D) - Kilika Tavern (bar)Volume 5 (A -> E) - S.S. Winno BridgeVolume 6 (V -> F) - Luca Stadium, Basement BVolume 7 (K -> G) - Luca Sphere TheaterVolume 8 (R -> H) - Receive from Rin at Mi'ihen Travel AgencyVolume 9 (E -> I) - Mi'ihen Highroad, North EndVolume 10 (Z -> J) - Mushroom Rock ValleyVolume 11 (G -> K) - Djose HighroadVolume 12 (M -> L) - Moonflow, North WharfVolume 13 (S -> M) - Guadosalam, in the house with 3,000 Gil treasureVolume 14 (H -> N) - Thunder Plains Travel AgencyVolume 15 (U -> O) - Macalania Lake RoadVolume 16 (B -> P) - Outside Macalania Travel AgencyVolume 17 (X -> Q) - Sanubia DesertVolume 18 (N -> R) - Northeast of Sanubia Desert CentralVolume 19 (C -> S) - Near the save sphere outside Al Bhed HomeVolume 20 (D -> T) - Al Bhed Home Living QuartersVolume 21 (I -> U) - Al Bhed Home Corridor (northeast)Volume 22 (J -> V) - Bevelle Priest's PassageVolume 23 (F -> W) - Calm Lands, northwest (near Chocobo Trainer)Volume 24 (Q -> X) - Outside Remiem TempleVolume 25 (O -> Y) - Cavern of Stolen FaythVolume 26 (W -> Z) - Omega Ruins
================XIII. BLITZ BALL================
+=+=+=+=+=+=+=+=+=+=+=+=+=+=+=+=+=+=+=+=+=+=+=+=+=+=+=+=+=+=+=+=+=+=+=+=+=+=+i. BLITZ BALL BASICS+=+=+=+=+=+=+=+=+=+=+=+=+=+=+=+=+=+=+=+=+=+=+=+=+=+=+=+=+=+=+=+=+=+=+=+=+=+=+
1. Game Modes-------------
League Mode - You'll have to play 10 games in this mode, wherein 3 pointsare awarded for every win and 1 point for a tie. Basically,you'll have to accumulate points.

Tournament Mode - 2 to 3 games will be played, where teams battle for thechampionship.
Exhibition - This one's fully intended for practice, no experience pointswill be given but you are allowed to learn techniques.
2. Character Stats------------------
Hit Points (HP) - Stamina of character, once it reaches 0 all the stats ofthat character will be halved. This includes BL, AT, PA,CA, SH, EN.
Speed (SPD) - Determines the quickness of the character.
Block (BLK) - Determines the ability of the character to intercept passes orblock shots.
Attack (AT) - Determines the ability of a character to steal the ball duringa breakthrough.
Pass (PA)- Determines the length of the pass a character can do.
Shoot (SH) - Determines the ability of a character in making a successfulshot / goal.
Catch (CA) - Determines the capability of a goal keeper to catch a shot madeby the opposing player.
Endurance (EN) - Determines the ability of a character to withstand tacklesdone during breakthroughs.
3. Action Commands------------------
The action menu appears whenever you press the square button, which enablesyou to choose between 3 commands.
Pass - Everytime you choose to pass, you should keep an eye on your PA statwhich depletes gradually during passing. If it reaches 0 before thereceiver catches the ball, the pass will fail.
Shoot - Here the SH stat is taken into consideration. Whenever you shoot,your SH decreases gradually, thus when your SH value is lower thanthe goal keeper's CA, chances are the shot will fail.
Dribble - This is when you try to take the ball closer to your net. Wheneveryou shoot very close to this area, the success rate of scoringgets significantly higher. But of course that still depends onyour SH value.
4. Encounters / Breakthroughs-----------------------------
This takes place once a defender/s confronts the ball carrier. Here, thecharacter's EN value comes into play. If you decide to breakthrough, youshould look at your opponent's AT value. When it is lower than your EN stat,there's a big chance that your breakthrough will be a success, but that'snot always the case, otherwise it will result in a turn over.
5. Techcopy-----------
In order to learn techs you should set marks so that your characters willfollow the opposing players they are assigned to before the game begins.During the game, press Triangle then choose Mark Mode. Now, once an opposingplayer uses a tech, you will see the word Techcopy appear at the top left

corner of you screen. Press O immediately when it appears to learn that tech.Be aware that the only techs you can learn are the ones highlighted in blue.
6. Status Ailments------------------
Just like in a regular battle, characters can also be inflicted with statusailments in Blitz Ball.
Poison - Character's HP depletes rapidly when he has the ball, also acharacter inflicted with Poison does not recover HP even after hegets rid of the ball. Techs also get disabled when a player ispoisoned.
Sleep - The affected character will be inactive for a while. You can wakehim up by throwing the ball to him.
Wither - When inflicted with wither, any of the following stat gets halved:SH, PA, EN, BL, CA.
+=+=+=+=+=+=+=+=+=+=+=+=+=+=+=+=+=+=+=+=+=+=+=+=+=+=+=+=+=+=+=+=+=+=+=+=+=+=+ii. BLITZ BALL TECHNIQUES+=+=+=+=+=+=+=+=+=+=+=+=+=+=+=+=+=+=+=+=+=+=+=+=+=+=+=+=+=+=+=+=+=+=+=+=+=+=+
-----------------------------------------------------------------------------TECH NAME: Jecht ShotHP COST: 120EFFECT: SH + 5SUCCESS RATE: Depends upon the distance the shot was taken, also depends on
goal keeper's CA value.DESCRIPTION: Removes 2 defenders without depleting SH value.-----------------------------------------------------------------------------TECH NAME: Jecht Shot 2HP COST: 999EFFECT: SH + 10SUCCESS RATE: Depends upon the distance the shot was taken, also depends on
goal keeper's CA value.DESCRIPTION: Removes 3 defenders and makes the ball invisible so that its
difficult to catch.NOTE: In order to learn this tech, you should have all of Tidus' key
techniques (Venom Tackle, Drain Tackle 2, Anti-Venom 2)-----------------------------------------------------------------------------TECH NAME: Sphere ShotHP COST: 90EFFECT: Adds random value to SH stat.SUCCESS RATE: Depends upon the distance the shot was taken, also depends on
goal keeper's CA value.DESCRIPTION: Adds random value to SH stat. Press O to stop.-----------------------------------------------------------------------------TECH NAME: Invisible ShotHP COST: 220EFFECT: SH + 3SUCCESS RATE: 60%DESCRIPTION: It disregards the SH and CA value and decides randomly whether
or not the shot succeeds.-----------------------------------------------------------------------------TECH NAME: Venom ShotHP COST: 20EFFECT: SH + 3SUCCESS RATE: 40%DESCRIPTION: Poisons goal keeper-----------------------------------------------------------------------------TECH NAME: Venom Shot 2HP COST: 35EFFECT: SH + 7SUCCESS RATE: 70%DESCRIPTION: Poisons goal keeper

-----------------------------------------------------------------------------TECH NAME: Venom Shot 3HP COST: 100EFFECT: SH + 7SUCCESS RATE: 100%DESCRIPTION: Poisons goal keeper-----------------------------------------------------------------------------TECH NAME: Nap ShotHP COST: 45EFFECT: SH + 4SUCCESS RATE: 40%DESCRIPTION: Inflicts Sleep status on goal keeper-----------------------------------------------------------------------------TECH NAME: Nap Shot 2HP COST: 80EFFECT: SH + 5SUCCESS RATE: 70%DESCRIPTION: Inflicts Sleep status on goal keeper-----------------------------------------------------------------------------TECH NAME: Nap Shot 3HP COST: 350EFFECT: SH + 7SUCCESS RATE: 100%DESCRIPTION: Inflicts Sleep status on goal keeper-----------------------------------------------------------------------------TECH NAME: Wither ShotHP COST: 30EFFECT: SH + 3SUCCESS RATE: 40%DESCRIPTION: Halves any stat of goal keeper-----------------------------------------------------------------------------TECH NAME: Wither Shot 2HP COST: 180EFFECT: SH + 5SUCCESS RATE: 70%DESCRIPTION: Halves any stat of goal keeper-----------------------------------------------------------------------------TECH NAME: Wither Shot 3HP COST: 390EFFECT: SH + 7SUCCESS RATE: 100%DESCRIPTION: Halves any stat of goal keeper-----------------------------------------------------------------------------TECH NAME: Venom PassHP COST: 40EFFECT: PA + 3SUCCESS RATE: 40%DESCRIPTION: Inflicts Poison if pass is deflected-----------------------------------------------------------------------------TECH NAME: Venom Pass 2HP COST: 120EFFECT: PA + 5SUCCESS RATE: 70%DESCRIPTION: Inflicts Poison if pass is deflected-----------------------------------------------------------------------------TECH NAME: Venom Pass 3HP COST: 350EFFECT: PA + 7SUCCESS RATE: 100%DESCRIPTION: Inflicts Poison if pass is deflected-----------------------------------------------------------------------------TECH NAME: Volley ShotHP COST: 10EFFECT: NoneSUCCESS RATE: 50%DESCRIPTION: Shoots a loose ball, disregards all defenders except the goal
keeper.

-----------------------------------------------------------------------------TECH NAME: Volley Shot 2HP COST: 40EFFECT: NoneSUCCESS RATE: 75%DESCRIPTION: Shoots a loose ball, disregards all defenders except the goal
keeper.-----------------------------------------------------------------------------TECH NAME: Volley Shot 3HP COST: 250EFFECT: NoneSUCCESS RATE: 100%DESCRIPTION: Shoots a loose ball, disregards all defenders except the goal
keeper.-----------------------------------------------------------------------------TECH NAME: Venom TackleHP COST: 30EFFECT: AT + 3SUCCESS RATE: 40%DESCRIPTION: Poisons ball carrier during breakthrough.-----------------------------------------------------------------------------TECH NAME: Venom Tackle 2HP COST: 70EFFECT: AT + 5SUCCESS RATE: 70%DESCRIPTION: Poisons ball carrier during breakthrough.-----------------------------------------------------------------------------TECH NAME: Venom Tackle 3HP COST: 160EFFECT: AT + 7SUCCESS RATE: 100%DESCRIPTION: Poisons ball carrier during breakthrough.-----------------------------------------------------------------------------TECH NAME: Nap TackleHP COST: 40EFFECT: AT + 3SUCCESS RATE: 40%DESCRIPTION: Inflicts Sleep on ball carrier during breakthrough.-----------------------------------------------------------------------------TECH NAME: Nap Tackle 2HP COST: 90EFFECT: AT + 5SUCCESS RATE: 70%DESCRIPTION: Inflicts Sleep on ball carrier during breakthrough.-----------------------------------------------------------------------------TECH NAME: Nap Tackle 3HP COST: 180EFFECT: AT + 7SUCCESS RATE: 100%DESCRIPTION: Inflicts Sleep on ball carrier during breakthrough.-----------------------------------------------------------------------------TECH NAME: Wither TackleHP COST: 8EFFECT: AT + 3SUCCESS RATE: 40%DESCRIPTION: Halves any of ball carrier's stats during breakthrough.-----------------------------------------------------------------------------TECH NAME: Wither Tackle 2HP COST: 80EFFECT: AT + 5SUCCESS RATE: 70%DESCRIPTION: Halves any of ball carrier's stats during breakthrough.-----------------------------------------------------------------------------TECH NAME: Wither Tackle 3HP COST: 250EFFECT: AT + 7SUCCESS RATE: 100%

DESCRIPTION: Halves any of ball carrier's stats during breakthrough.-----------------------------------------------------------------------------TECH NAME: Drain TackleHP COST: NoneEFFECT: NoneSUCCESS RATE: 40%DESCRIPTION: Drains 30 HP from opponent during breakthrough.-----------------------------------------------------------------------------TECH NAME: Drain Tackle 2HP COST: NoneEFFECT: NoneSUCCESS RATE: 70%DESCRIPTION: Drains 150 HP from opponent during breakthrough.-----------------------------------------------------------------------------TECH NAME: Drain Tackle 3HP COST: NoneEFFECT: NoneSUCCESS RATE: 100%DESCRIPTION: Drains 500 HP from opponent during breakthrough.-----------------------------------------------------------------------------TECH NAME: Tackle SlipHP COST: 40EFFECT: NoneSUCCESS RATE: 40%DESCRIPTION: Evade opponent's tackles.-----------------------------------------------------------------------------TECH NAME: Tackle Slip 2HP COST: 170EFFECT: NoneSUCCESS RATE: 100%DESCRIPTION: Evade opponent's tackles.-----------------------------------------------------------------------------TECH NAME: Anti-VenomHP COST: 5EFFECT: NoneSUCCESS RATE: 50%DESCRIPTION: Resists Poison.-----------------------------------------------------------------------------TECH NAME: Anti-Venom 2HP COST: 50EFFECT: NoneSUCCESS RATE: 100%DESCRIPTION: Resists Poison.-----------------------------------------------------------------------------TECH NAME: Anti-NapHP COST: 40EFFECT: NoneSUCCESS RATE: 50%DESCRIPTION: Resists Sleep.-----------------------------------------------------------------------------TECH NAME: Anti-Nap 2HP COST: 210EFFECT: NoneSUCCESS RATE: 100%DESCRIPTION: Resists Sleep.-----------------------------------------------------------------------------TECH NAME: Anti-WitherHP COST: 30EFFECT: NoneSUCCESS RATE: 50%DESCRIPTION: Resists Wither.-----------------------------------------------------------------------------TECH NAME: Anti-Wither 2HP COST: 200EFFECT: NoneSUCCESS RATE: 100%DESCRIPTION: Resists Wither.
-----------------------------------------------------------------------------TECH NAME: Anti-DrainHP COST: 30EFFECT: NoneSUCCESS RATE: 50%DESCRIPTION: Resists Drain.-----------------------------------------------------------------------------TECH NAME: Anti-Drain 2HP COST: 50EFFECT: NoneSUCCESS RATE: 100%DESCRIPTION: Resists Drain.-----------------------------------------------------------------------------TECH NAME: Spin BallHP COST: 30EFFECT: NoneSUCCESS RATE: NoneDESCRIPTION: When you shoot, the ball swings around thus the goal keeper
will have a much more difficult time catching it.-----------------------------------------------------------------------------TECH NAME: Grip GlovesHP COST: 30EFFECT: NoneSUCCESS RATE: NoneDESCRIPTION: Increases the chance of the goal keeper catching the ball.-----------------------------------------------------------------------------TECH NAME: Elite DefenseHP COST: 5EFFECT: NoneSUCCESS RATE: NoneDESCRIPTION: Enables player to intercept the ball from far away.-----------------------------------------------------------------------------TECH NAME: BrawlerHP COST: 10EFFECT: NoneSUCCESS RATE: 60%DESCRIPTION: Allows player to help with encounters even from far away.-----------------------------------------------------------------------------TECH NAME: Pile VenomHP COST: 30EFFECT: NoneSUCCESS RATE: NoneDESCRIPTION: Allows poison effect to disable other techs besides those that
involves shooting.-----------------------------------------------------------------------------TECH NAME: Pile WitherHP COST: 70EFFECT: NoneSUCCESS RATE: NoneDESCRIPTION: Allows wither effect to halve more than 1 stat at a time.-----------------------------------------------------------------------------TECH NAME: RegenHP COST: 50EFFECT: NoneSUCCESS RATE: NoneDESCRIPTION: Speeds up HP recovery when character moves without the ball.-----------------------------------------------------------------------------TECH NAME: Good Morning!HP COST: 180EFFECT: NoneSUCCESS RATE: 50%DESCRIPTION: Boosts stats when character wakes up from Sleep.-----------------------------------------------------------------------------TECH NAME: Hi RiskHP COST: 300EFFECT: NoneSUCCESS RATE: None
DESCRIPTION: All stats besides HP and Speed are halved, but characterreceives more experience points.
-----------------------------------------------------------------------------TECH NAME: Golden ArmHP COST: 30EFFECT: NoneSUCCESS RATE: NoneDESCRIPTION: Decreases the depletion of PA and SH when ball travels in
water.-----------------------------------------------------------------------------TECH NAME: GambleHP COST: 300EFFECT: NoneSUCCESS RATE: 50%DESCRIPTION: All stats except HP and Speed are randomized when character
wakes from Sleep.-----------------------------------------------------------------------------TECH NAME: Super GoalieHP COST: 30EFFECT: Adds random value to CASUCCESS RATE: 60%DESCRIPTION: Adds random value to CA.-----------------------------------------------------------------------------TECH NAME: Auroch's SpiritHP COST: 600EFFECT: SH + all original Aurochs SH valueSUCCESS RATE: NoneDESCRIPTION: Adds SH value of all original Aurochs to Wakka's SH value-----------------------------------------------------------------------------