FiLIP 2 USER GUIDE - FiLIP | THE WORLD'S FIRST SMART …€¦ · · 2018-02-12TABLE OF CONTENTS....
26
FiLIP 2 USER GUIDE 2015 © Filip Technologies, Inc. All Rights Reserved. APR 2015
Transcript of FiLIP 2 USER GUIDE - FiLIP | THE WORLD'S FIRST SMART …€¦ · · 2018-02-12TABLE OF CONTENTS....

FiLIP 2 USER GUIDE
2015 © Filip Technologies, Inc. All Rights Reserved.APR 2015

WELCOME TO THE FiLIP FAMILY
FiLIP helps children stay in touch with their parents… and helps parents know where their children are. The FiLIP is a phone, location tracking device, and watch worn by a child and syncs with the FiLIPcompanion app on the parent’s smartphone. FiLIP allows the parent to see where their child is at any point in time, call or text message their child, and receive notifications if their child has left a SafeZone or is in an emergency. With FiLIP, a child can easily call their parent, or one of five trusted contacts, and can alert those trusted contacts if they are in an emergency.
There are a couple of important things to do before you and your child start using your FiLIP.

TABLE OF CONTENTSWhat’s In The Box
Get To Know Your FiLIP • Turning Your FiLIP On and Off From the Device • Charging Your FiLIP • Latch & Size Spacers • Interchangeable Wristband
Downloading The FiLIP App
Creating A FiLIP Account
Connecting FiLIP To The FiLIP App
Setting Up The FiLIP App • The Map Screen • The Menu Screen • Location Settings • Adding Contacts • Adding A Guest User • Creating SafeZones • Notification Settings
Using The FiLIP & FiLIP App • Making & Receiving Calls From the FiLIP • Calling the FiLIP From the FiLIP App • Muting the FiLIP Ringer • Text Messaging • Locating the FiLIP • Emergency Mode: Triggering From the FiLIP • Emergency Mode: Triggering From the FiLIP App • Turning Your FiLIP Off From the App
----------------------------------------------------------------------------- 1
--------------------------------------------------------------------- 2----------------------------------- 2
--------------------------------------------------------------------- 3 ------------------------------------------------------------------- 4
------------------------------------------------------------ 5
---------------------------------------------------------------- 6
------------------------------------------------------------------- 7
------------------------------------------------------- 8
------------------------------------------------------------------- 9-------------------------------------------------------------------------- 9
----------------------------------------------------------------------- 10----------------------------------------------------------------------- 11
------------------------------------------------------------------------ 12------------------------------------------------------------------- 13
-------------------------------------------------------------------- 14 ------------------------------------------------------------------ 15
--------------------------------------------------------------- 16------------------------------------------- 16
------------------------------------------------ 17--------------------------------------------------------------- 18
------------------------------------------------------------------------- 19--------------------------------------------------------------------- 20
-------------------------------------- 21------------------------------- 22
----------------------------------------------- 23
1
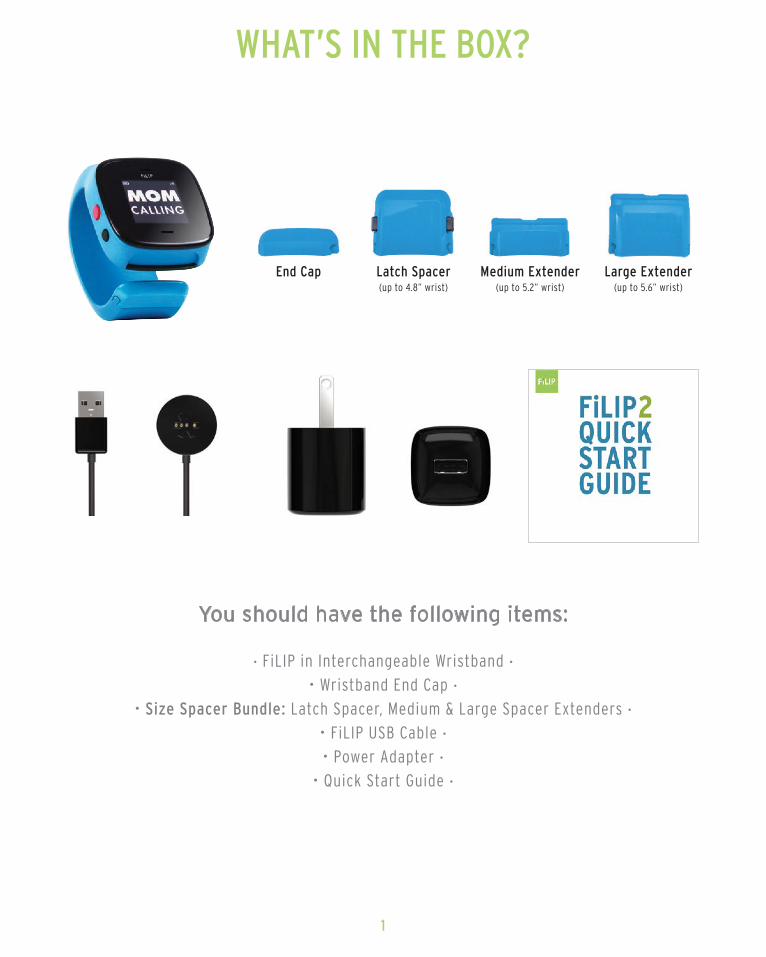
WHAT’S IN THE BOX?
• FiLIP in Interchangeable Wristband •
• Wristband End Cap •
• Size Spacer Bundle: Latch Spacer, Medium & Large Spacer Extenders •
• FiLIP USB Cable •
• Power Adapter •
• Quick Start Guide •
You should have the following items:
End Cap Latch Spacer(up to 4.8” wrist)
Medium Extender(up to 5.2” wrist)
Large Extender(up to 5.6” wrist)

2
GET TO KNOW YOUR FiLIP
Turning Your FiLIP On From the DevicePress the red button firmly for 1-2 seconds to turn the FiLIP on.
Press the red and black buttons simultaneously for approximately 30 seconds until the “Shutdown”option appears on the screen. Select “Shutdown” and follow the prompts to shutdown the FiLIP.
Turning Your FiLIP Off From the Device
Press & holdboth buttons
for 30 seconds
Press theblack button
to select“Shutdown”

3
GET TO KNOW YOUR FiLIP
Charging Your FiLIPTo charge your FiLIP, attach the star-shaped side of the charger to the underneath part of the FiLIP screen, aligning the connection until you see the yellow light illuminate. If you do not see the yellow light illuminate on the charger, then the charger is not properly attached to the FiLIP. There will be a magnetic pull that keeps the charger attached once it’s in place. We recommend that you lay the FiLIP on its screen while it is charging, and keep the charger attached for approximately 6-8 hours (at night while your child is sleeping) to ensure an optimal charge.

4
GET TO KNOW YOUR FiLIP
Latch & Size SpacersThe FiLIP can be worn either open or closed. To wear the FiLIP open, slide the end cap onto the end of your FiLIP to wear it open.
To wear the FiLIP closed, determine the size of your child’s wrist, and then select from one of theoptions below. If your child’s wrist is small (4.8” or less), they will only need the latch. If your child’s wrist is larger, then they will need either the latch + medium extender (up to 5.2” wrist) OR the latch + large extender (up to 5.6” wrist).
All spacers, extenders and end caps are designed to slide on and off the end of the FiLIP wristband, as shown. Do not try to push or snap them on or off, as that may cause them to break.
End Cap
End Cap Latch Spacer(up to 4.8” wrist)
Latch Spacer+ Medium Extender
(up to 5.2” wrist)
Latch Spacer+ Large Extender
(up to 5.6” wrist)
5
GET TO KNOW YOUR FiLIP
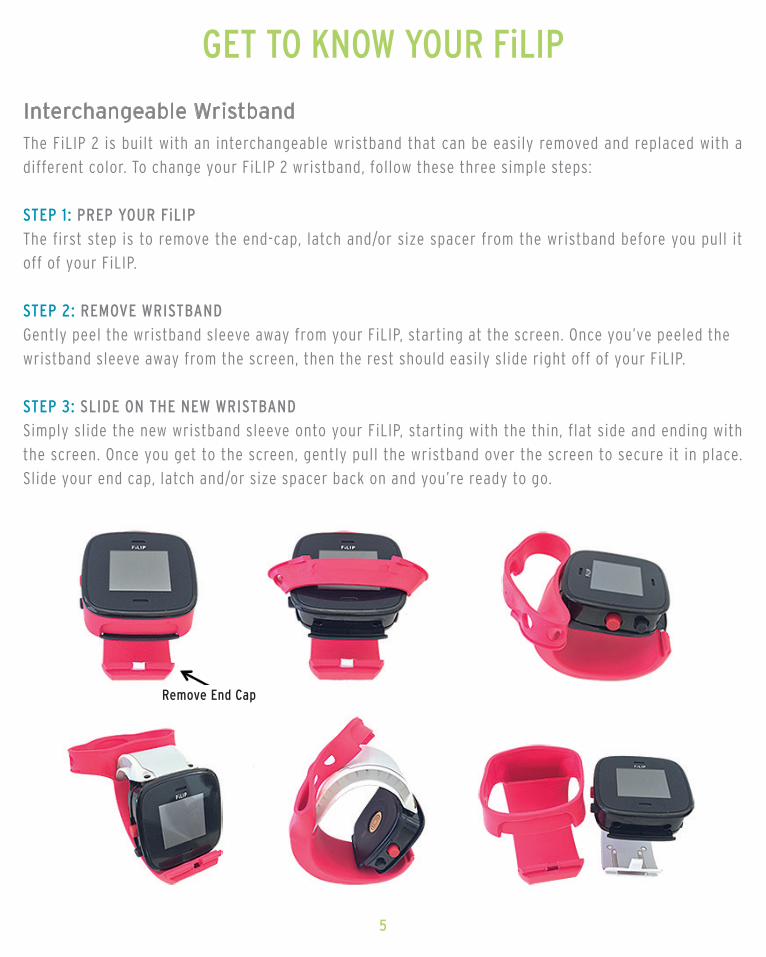
Interchangeable WristbandThe FiLIP 2 is built with an interchangeable wristband that can be easily removed and replaced with a different color. To change your FiLIP 2 wristband, follow these three simple steps:
STEP 1: PREP YOUR FiLIPThe first step is to remove the end-cap, latch and/or size spacer from the wristband before you pull it off of your FiLIP.
STEP 2: REMOVE WRISTBANDGently peel the wristband sleeve away from your FiLIP, starting at the screen. Once you’ve peeled thewristband sleeve away from the screen, then the rest should easily slide right off of your FiLIP.
STEP 3: SLIDE ON THE NEW WRISTBANDSimply slide the new wristband sleeve onto your FiLIP, starting with the thin, flat side and ending with the screen. Once you get to the screen, gently pull the wristband over the screen to secure it in place. Slide your end cap, latch and/or size spacer back on and you’re ready to go.
Remove End Cap

6
DOWNLOADING THE FiLIP APPIn order to set up and use your FiLIP, you must first download the free FiLIP companion app from the Apple App Store (if you have an Apple iPhone) or the Google Play shop (if you have an Android smartphone). Once the app is installed on your phone, tap the FiLIP icon to open the app.
If this is your first time creating a FiLIP account, select “Create Account” and then follow the prompts to create your FiLIP account.
If you have already created a FiLIP account, select “Sign In” and follow the prompts toconnect your FiLIP to the app if you have not done so already.

7
CREATING A FiLIP ACCOUNT
Open the app and enter your personal information in the designated fields.
We’ll send you a verification email. Please open the email from your smartphone and click on the link to confirm your email address and move forward in the process.
The final part of this step is to create a profile for your child.
1 2 3
Follow these simple steps:

8
CONNECTING FiLIP TO THE FiLIP APP
Turn on your FiLIP by holding down the red button for 2seconds (if you haven’t done so already).
Enter the 10 digit FiLIP phone number in the app (Available from your AT&T receipt).
Enter the 6 digit activation code from your FiLIP screen in to the app.
1 2 3
Your FiLIP can make and receive calls; therefore, it needs its own phone number. Before you attempt to connect your FiLIP with the FiLIP app, make sure an AT&T account for your FiLIP has been set up and you have received a phone number from AT&T for your FiLIP. The phone number for your FiLIP should be listed on your AT&T receipt.
If you have not set up an AT&T account for your FiLIP yet, simply visit a local AT&T store, call 1-800-331-0500 or visit att.com/activateFiLIP
1st – Plug your FiLIP into charge.2nd – Make sure your FiLIP is turned on and in front of you so it can receive the activation code.3rd – Have the phone number for your FiLIP in front of you.

9
SETTING UP THE FiLIP APP
The Map Screen
Main Menu Icon: This takes you to the Main Menu.
Location Icon: Select this to see your child(ren)’s last reported location
(*Updated based on your Automatic Updates setting)
Refresh Icon: Press this to initiate a Map Refresh for a real-time location update.
Message Center Icon: This is the Message Center, where a record of your actions and notifications are stored.
Child Icon: Not only is this your beautiful child, it’s also the button you push to call, message or initiate Emergency Mode for your child’s FiLIP.
The Map Screen is the first screen you’ll see when you log into your FiLIP app.
2
1
3
4
5
1
2 3
4
5
10
SETTING UP THE FiLIP APP
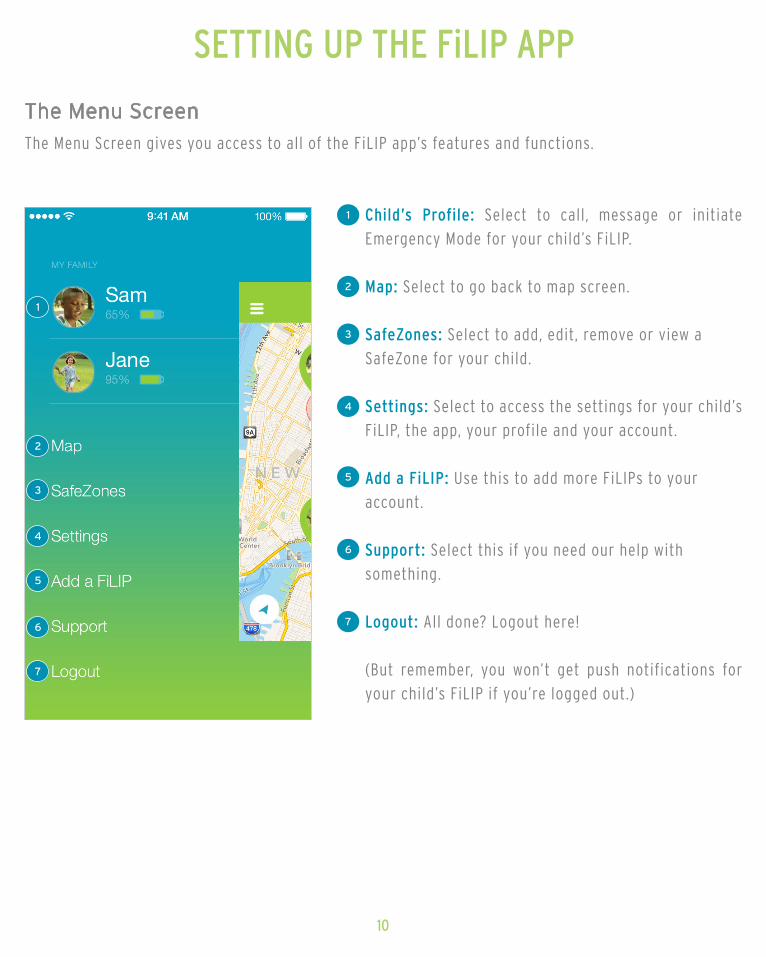
The Menu Screen
Child’s Profile: Select to call, message or initiate Emergency Mode for your child’s FiLIP.
Map: Select to go back to map screen.
SafeZones: Select to add, edit, remove or view aSafeZone for your child.
Settings: Select to access the settings for your child’s FiLIP, the app, your profile and your account.
Add a FiLIP: Use this to add more FiLIPs to youraccount.
Support: Select this if you need our help withsomething.
Logout: All done? Logout here!
(But remember, you won’t get push notifications for your child’s FiLIP if you’re logged out.)
The Menu Screen gives you access to all of the FiLIP app’s features and functions.
2
1
3
4
5
6
7
2
1
3
4
5
6
7

11
SETTING UP THE FiLIP APP
Location Settings
Automatic Updates: Slide this on (to the right) to have the FiLIP’s location automatically refresh. If“Automatic Updates” is turned off, the FiLIP’s location will NOT be automatically updated.
Update Intervals: Select the time intervals you like between each refresh. Note: The shorter the refreshintervals, the quicker the battery will drain.
Daytime Only: Slide this on (to the right) if you want the FiLIP’s location to automatically refresh between 7am and 7pm, otherwise the FiLIP’s location willautomatically refresh 24 hours a day.
Turbo Mode: Slide this on (to the right) to have the FiLIP’s location to update every 3 minutes for a 15minute period. After 15 minutes, Turbo Mode willautomatically turn off and the regular settings will be restored.
The location tracking and reporting for the FiLIP is not real-time, but instead, based on the ‘Location Update’ settings you select. Regardless of which options you choose, you can request an immediate location update at anytime by pressing the refresh icon at the bottom right corner of the map screen.
2
1
3
4
1
2
3
4

12
SETTING UP THE FiLIP APP
Adding Contacts
Use the name your child calls that person for the first name (i.e. “Grandma Smith” rather than “Mary Smith”)
Enter phone numbers without any spaces, dashes orparentheses (i.e. 1234567890)
If you would like one (or more) of the contacts to be able to locate and text your child from a FiLIP app on their phone, you can make them a Guest User by sliding the “Guest Status” slider to the on position (to green).
Decide which of the contacts you want to beemergency contacts, which means they’ll be in the call rotation if your child presses the emergency button on their FiLIP.
If you have more than one child with a FiLIP, they can each have different contacts. Simply turn the slider to the on position (to green) for the child that specific contact should apply to.
Finally, and most important, press the “Save” button in the top right corner before exiting the “Edit Contact” screen.
You can store up to five contacts in the FiLIP (yourself + four additional people). These are the only five people the FiLIP can make calls to and receive calls from.
To add a contact, press the + symbol at the top right of the page. To edit a contact, tap on that con-tact’s name. *911 cannot be one of the numbers stored as a Contact in a FiLIP*
Menu >> Settings >> Account Settings >> Contacts
2
1
3
4
5
6
1
2
3
4
5
6

13
SETTING UP THE FiLIP APP
Adding A Guest User
otherwise the invitation will expire and you will have to go through the process again.**
If your contact tries to accept your Guest Status invitation before they have downloaded the FiLIP app, or after the 12-hour period, you may need to delete their contact information from your FiLIP app, add it again, and then go through STEP 2 again.
STEP 1: Decide which contacts you would like to give Guest Status to and ask those individuals to download the FiLIP app to their mobile device (iOS or Android) and create an account. Once they get to the page in the app registration process that asks them to link their FiLIP, they can select “I don’t have a FiLIP yet” and log-out of the FiLIP app.
STEP 2: From the “Contacts” page, select the contact that you would like to grant Guest Status to. Make sure they have downloaded the FiLIP app and set up their account. Then, confirm that the email address you have listed for them in your app is the same as the email address they used to set up their FiLIP app. Finally, slide the “Guest Status” button on (to the right until you see green) and then press the “Save” button at the top of the screen.
STEP 3: The contact will then receive an email from us (Filip Technologies) with Guest Status invitation and a button to accept their Guest Status privileges. **Please make sure to have your contact open this email from their mobile device (where their FiLIP app lives), within 12 hours of receipt, and click the “Accept” button from their mobile device;
You can give Guest Status to any of the contacts on your child’s FiLIP, or none at all - your choice. There are several steps that must be followed in order to properly grant a contact Guest Status.

14
SETTING UP THE FiLIP APP
Creating SafeZones
Address Lookup: To create a SafeZone, simply add the address where the child is supposed to be at any given time.
Zone Name: Name the SafeZone. You can create and store up to five SafeZones (i.e. “home” and “school”) and just turn them on when needed.
Radius: Use the slider to determine the radius of the SafeZone. The red radius circle will expand or shrinkdepending on where you place the slider.
Child: Slide this on (to green) to select the child that the current SafeZone should apply to
Enable/Disable: Slide this on (to green) to activate that SafeZone and receive notifications alerting when the child has entered or exited that SafeZone.
Delete SafeZone: Select this option to delete theSafeZone.
A SafeZone is a virtual boundary around a particular location. You can set up to five SafeZones,receiving notifications when the FiLIP leaves or enters the boundary of those SafeZones.
2
2
1
3
4
5
6
3
1
3
4
4
5
6
15
SETTING UP THE FiLIP APP
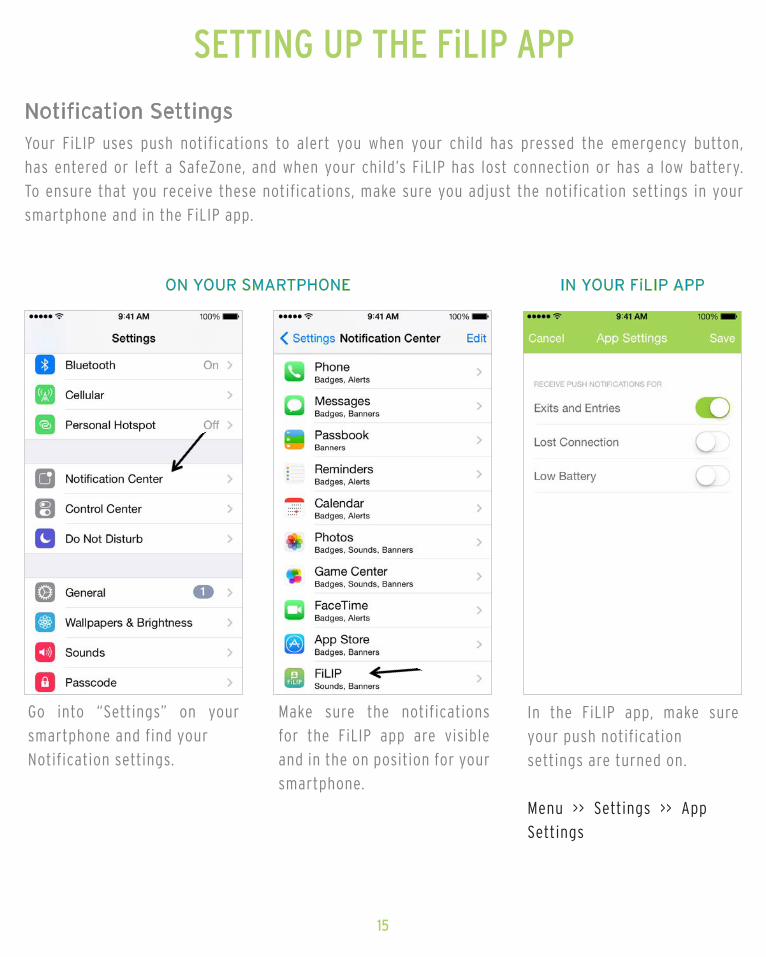
Notification SettingsYour FiLIP uses push notifications to alert you when your child has pressed the emergency button, has entered or left a SafeZone, and when your child’s FiLIP has lost connection or has a low battery. To ensure that you receive these notifications, make sure you adjust the notification settings in your smartphone and in the FiLIP app.
Go into “Settings” on your smartphone and find yourNotification settings.
Make sure the notifications for the FiLIP app are visible and in the on position for your smartphone.
In the FiLIP app, make sure your push notificationsettings are turned on.
Menu >> Settings >> AppSettings
ON YOUR SMARTPHONE IN YOUR FiLIP APP
16
USING THE FiLIP & FiLIP APP
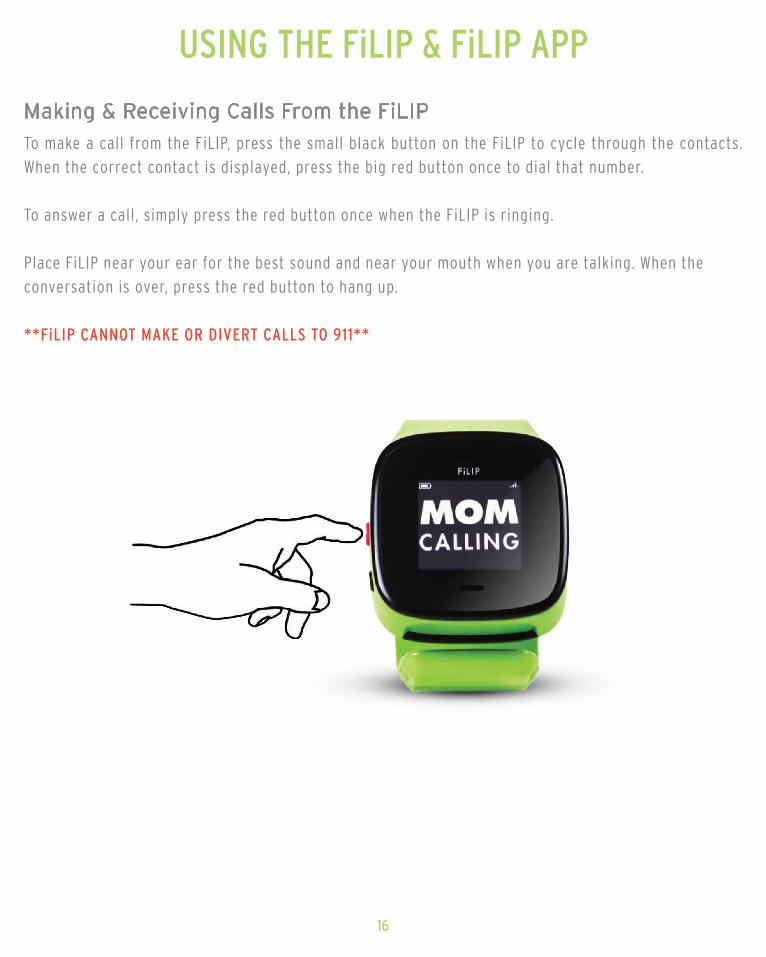
Making & Receiving Calls From the FiLIPTo make a call from the FiLIP, press the small black button on the FiLIP to cycle through the contacts. When the correct contact is displayed, press the big red button once to dial that number.
To answer a call, simply press the red button once when the FiLIP is ringing.
Place FiLIP near your ear for the best sound and near your mouth when you are talking. When theconversation is over, press the red button to hang up.
**FiLIP CANNOT MAKE OR DIVERT CALLS TO 911**
17
USING THE FiLIP & FiLIP APP
Calling the FiLIP From the FiLIP App
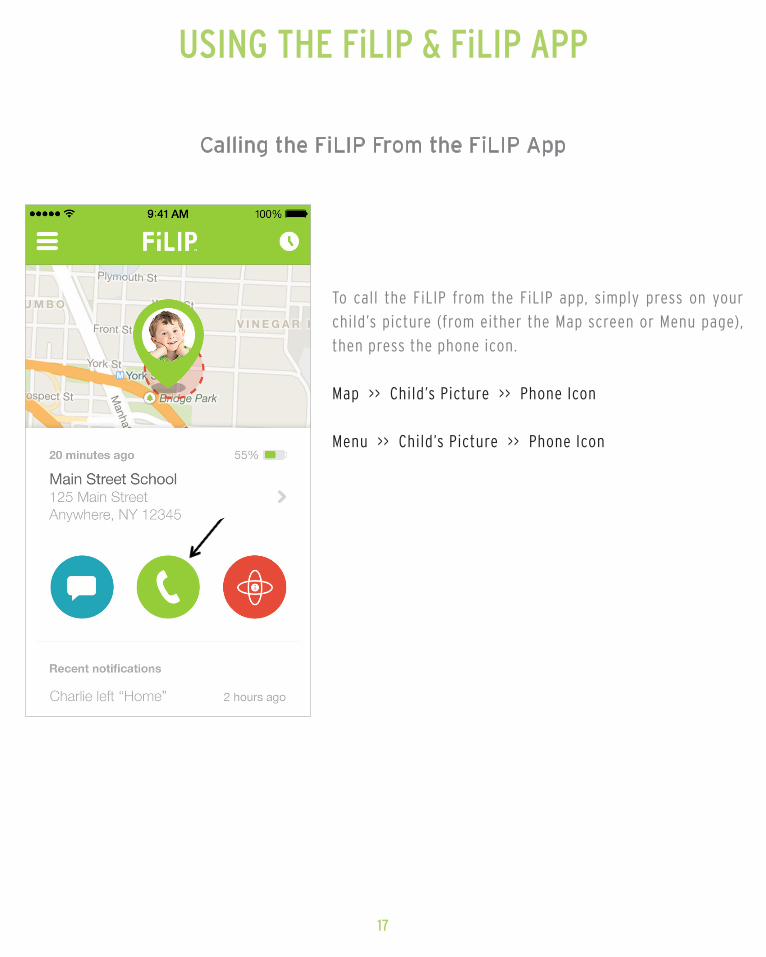
To call the FiLIP from the FiLIP app, simply press on your child’s picture (from either the Map screen or Menu page), then press the phone icon.
Map >> Child’s Picture >> Phone Icon
Menu >> Child’s Picture >> Phone Icon

18
USING THE FiLIP & FiLIP APP
Muting the FiLIP Ringer
You can turn the FiLIP ringer on and off right from your app. Follow the steps below to remotely turn off and on the ringer for your child’s FiLIP.
At the bottom of the settings page you can slide the ‘Mute Ringer’ button on and off. Just remember to press ‘Save’ at the top of the screen when you are done.
Menu >> Settings >> Watch Settings >> Mute Ringer

19
USING THE FiLIP & FiLIP APP
Click on the chat bubble to send a text message.
Enter the message you’d like to send.
Your message will appear on your child’s FiLIP.
1 2 3
Text MessagingFiLIP is designed to accept text messages only from the FiLIP app, and only by the parent (or primary contact) or contacts that have been granted Guest Status. Messages can be up to 24 characters long.
To send a text message to the FiLIP from the FiLIP app, simply press on your child’s image (from either the Map screen or Menu page), then press the message icon.
Map >> Child’s Picture >> Message IconMenu >> Child’s Picture >> Message Icon
20
USING THE FiLIP & FiLIP APP
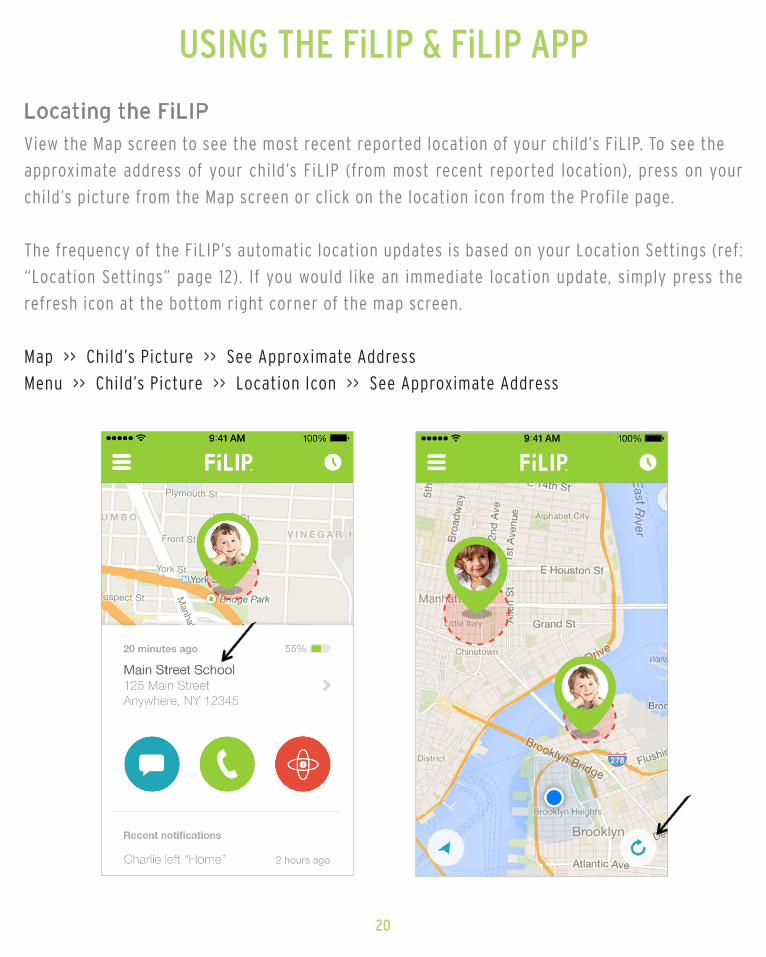
Locating the FiLIPView the Map screen to see the most recent reported location of your child’s FiLIP. To see theapproximate address of your child’s FiLIP (from most recent reported location), press on your child’s picture from the Map screen or click on the location icon from the Profile page.
The frequency of the FiLIP’s automatic location updates is based on your Location Settings (ref: “Location Settings” page 12). If you would like an immediate location update, simply press the refresh icon at the bottom right corner of the map screen.
Map >> Child’s Picture >> See Approximate AddressMenu >> Child’s Picture >> Location Icon >> See Approximate Address

21
USING THE FiLIP & FiLIP APP
Emergency Mode: Triggering From the FiLIPWhen the red button on the FiLIP is pressed for 4 seconds, FiLIP’s Emergency Mode is activated and the FiLIP will automatically call the primary contact (which is usually a parent). If they do not answer, the FiLIP will then call the other emergency contacts stored in the FiLIP app until one of the contacts is successfully connected. When the Emergency Mode is initiated from a FiLIP, it records the call andsurrounding sounds, starts tracking location info, and sends the parent (or primary contact)notifications through the app.
Press and hold the red button for 4 seconds.

22
USING THE FiLIP & FiLIP APP
Emergency Mode: Triggering From the FiLIP AppThe parent (or primary contact) can also activate the Emergency Mode feature for the FiLIP from theFiLIP app. To initiation Emergency Mode from the FiLIP app, select the child’s picture from the Map screen, and then select the emergency icon. The FiLIP will then follow the same sequence of events listed above (ref: “Emergency Mode: Triggering from the FiLIP”)
Map >> Child’s Picture >> Emergency Icon
**FiLIP CANNOT MAKE OR DIVERT CALLS TO 911**
23
USING THE FiLIP & FiLIP APP
Turning Your FiLIP Off From the App
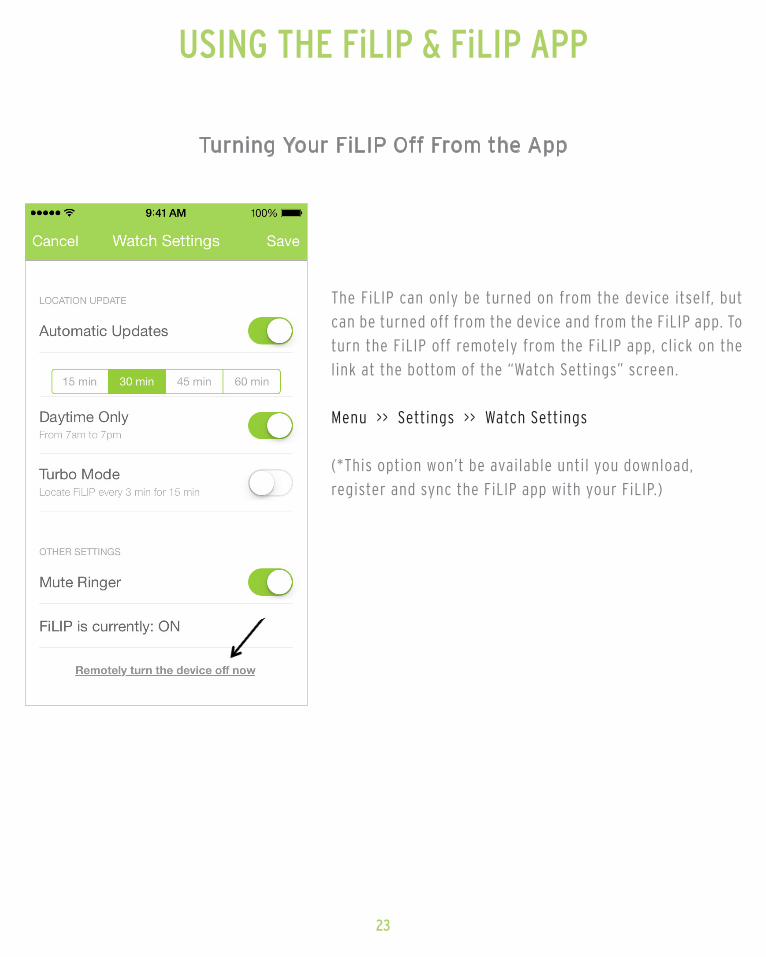
The FiLIP can only be turned on from the device itself, but can be turned off from the device and from the FiLIP app. To turn the FiLIP off remotely from the FiLIP app, click on the link at the bottom of the “Watch Settings” screen.
Menu >> Settings >> Watch Settings
(*This option won’t be available until you download,register and sync the FiLIP app with your FiLIP.)