File Systems Demonstrations Help - Microchip Technology
19
File Systems Demonstrations Help MPLAB Harmony Integrated Software Framework © 2013-2018 Microchip Technology Inc. All rights reserved.
Transcript of File Systems Demonstrations Help - Microchip Technology
File Systems Demonstrations Help
MPLAB Harmony Integrated Software Framework
© 2013-2018 Microchip Technology Inc. All rights reserved.

Volume I: Getting Started With MPLAB Harmony Libraries and Applications This volume introduces the MPLAB® Harmony Integrated Software Framework.
Description
MPLAB Harmony is a layered framework of modular libraries that provide flexible and interoperable software "building blocks" for developing embedded PIC32 applications. MPLAB Harmony is also part of a broad and expandable ecosystem, providing demonstration applications, third-party offerings, and convenient development tools, such as the MPLAB Harmony Configurator (MHC), which integrate with the MPLAB X IDE and MPLAB XC32 language tools.
Legal Notices
Please review the Software License Agreement prior to using MPLAB Harmony. It is the responsibility of the end-user to know and understand the software license agreement terms regarding the Microchip and third-party software that is provided in this installation. A copy of the agreement is available in the <install-dir>/doc folder of your MPLAB Harmony installation.
The OPENRTOS® demonstrations provided in MPLAB Harmony use the OPENRTOS evaluation license, which is meant for demonstration purposes only. Customers desiring development and production on OPENRTOS must procure a suitable license. Please refer to one of the following documents, which are located in the <install-dir>/third_party/rtos/OPENRTOS/Documents folder of your MPLAB Harmony installation, for information on obtaining an evaluation license for your device:
• OpenRTOS Click Thru Eval License PIC32MXxx.pdf
• OpenRTOS Click Thru Eval License PIC32MZxx.pdf
TIP!Throughout this documentation, occurrences of <install-dir> refer to the default MPLAB Harmony installation path:
• Windows: C:/microchip/harmony/<version>
• Mac OS/Linux: ~/microchip/harmony/<version>
Volume I: Getting Started With MPLAB Harmony
© 2013-2017 Microchip Technology Inc. MPLAB Harmony v2.06 2

Applications Help
This section provides information on the various application demonstrations that are included in MPLAB Harmony.
Description
Applications determine how MPLAB Harmony libraries (device drivers, middleware, and system services) are used to do something useful. In a MPLAB Harmony system, there may be one main application, there may be multiple independent applications or there may be one or more Operating System (OS) specific applications. Applications interact with MPLAB Harmony libraries through well defined interfaces. Applications may operate in a strictly polling environment, they may be interrupt driven, they may be executed in OS-specific threads, or they may be written so as to be flexible and easily configured for any of these environments. Applications generally fit into one of the following categories.
Demonstration Applications
Demonstration applications are provided (with MPLAB Harmony or in separate installations) to demonstrate typical or interesting usage models of one or more MPLAB Harmony libraries. Demonstration applications can demonstrate realistic solutions to real-life problems.
Sample Applications
Sample applications are extremely simple applications provided with MPLAB Harmony as examples of how to use individual features of a library. They will not normally accomplish anything useful on their own. They are provided primarily as documentation to show how to use a library.
File System Demonstrations
This section provides descriptions of the File System demonstrations.
MPLAB Harmony is available for download from the Microchip website by visiting: http://www.microchip.com/mplabharmony. Once you are on the site, click the Downloads tab to access the appropriate download for your operating system. For additional information on this demonstration, refer to the “Applications Help” section in the MPLAB Harmony Help.
Description
Introduction
MPLAB Harmony File System Demonstration Help.
Description
This help file contains instructions and associated information about MPLAB Harmony File System demonstration applications, which are contained in the MPLAB Harmony Library distribution.
Demonstrations
Provides instructions on how to run the demonstration applications.
nvm_fat_single_disk
This demonstration uses a FAT12 image of a file on NVM Flash memory and demonstrates the working of all file system functions.
Description
This demonstration shows an example of implementing a FAT12 disk in device Flash memory. The demonstration contains a FAT12 disk imageconsisting of a Master Boot Record (MBR) sector, Logical Boot Sector, File Allocation Table, and Root Directory Area.
The demonstration opens an existing file named FILE.TXT and performs all file system related function calls on the file: SYS_FS_FileStat,SYS_FS_FileSize, SYS_FS_FileSeek, and SYS_FS_FileEOF. Finally, the string "Hello World" is written to this file. The string is then read andcompared with the string that was written to the file. If the string compare is successful, LED indication is provided.
Building the Application
This section identifies the MPLAB X IDE project name and location and lists and describes the available configurations for the NVM FAT Single Disk Demonstration.
Description
To build this project, you must open the nvm_fat_single_disk.X project in MPLAB X IDE, and then select the desired configuration.
Volume I: Getting Started With MPLAB Harmony Applications Help File System Demonstrations
© 2013-2017 Microchip Technology Inc. MPLAB Harmony v2.06 3
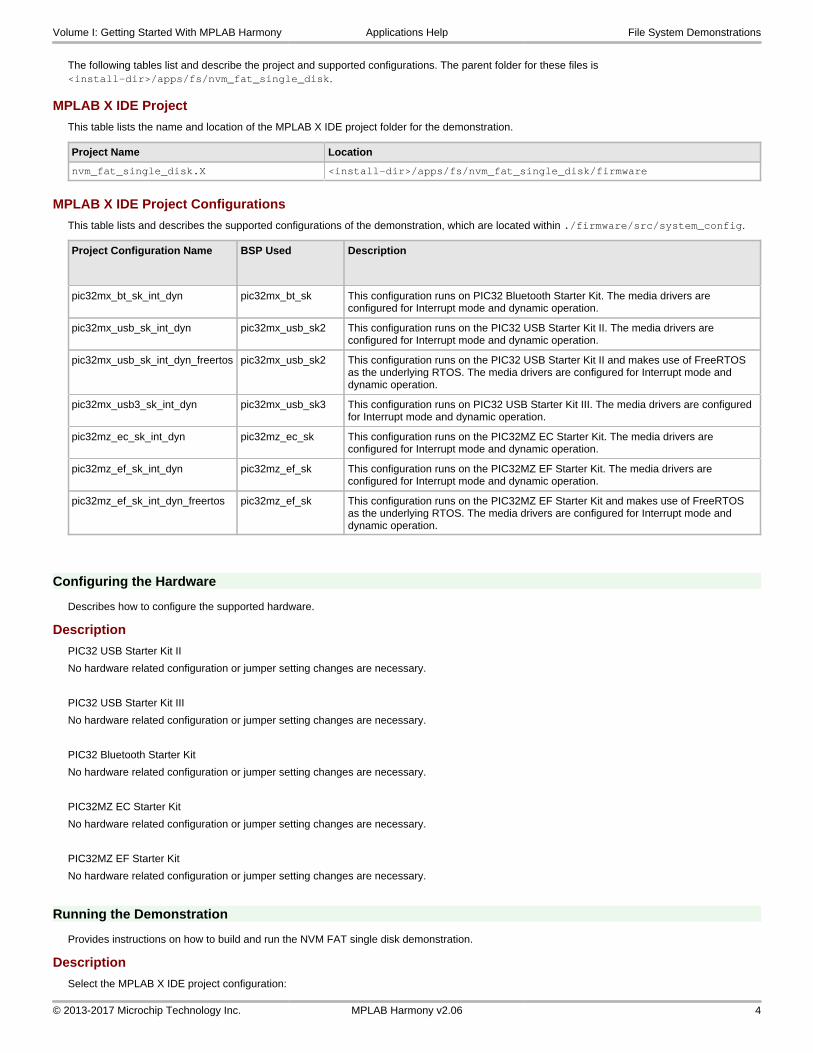
The following tables list and describe the project and supported configurations. The parent folder for these files is <install-dir>/apps/fs/nvm_fat_single_disk.
MPLAB X IDE Project
This table lists the name and location of the MPLAB X IDE project folder for the demonstration.
Project Name Location
nvm_fat_single_disk.X <install-dir>/apps/fs/nvm_fat_single_disk/firmware
MPLAB X IDE Project Configurations
This table lists and describes the supported configurations of the demonstration, which are located within ./firmware/src/system_config.
Project Configuration Name BSP Used Description
pic32mx_bt_sk_int_dyn pic32mx_bt_sk This configuration runs on PIC32 Bluetooth Starter Kit. The media drivers are configured for Interrupt mode and dynamic operation.
pic32mx_usb_sk_int_dyn pic32mx_usb_sk2 This configuration runs on the PIC32 USB Starter Kit II. The media drivers are configured for Interrupt mode and dynamic operation.
pic32mx_usb_sk_int_dyn_freertos pic32mx_usb_sk2 This configuration runs on the PIC32 USB Starter Kit II and makes use of FreeRTOS as the underlying RTOS. The media drivers are configured for Interrupt mode and dynamic operation.
pic32mx_usb3_sk_int_dyn pic32mx_usb_sk3 This configuration runs on PIC32 USB Starter Kit III. The media drivers are configured for Interrupt mode and dynamic operation.
pic32mz_ec_sk_int_dyn pic32mz_ec_sk This configuration runs on the PIC32MZ EC Starter Kit. The media drivers are configured for Interrupt mode and dynamic operation.
pic32mz_ef_sk_int_dyn pic32mz_ef_sk This configuration runs on the PIC32MZ EF Starter Kit. The media drivers are configured for Interrupt mode and dynamic operation.
pic32mz_ef_sk_int_dyn_freertos pic32mz_ef_sk This configuration runs on the PIC32MZ EF Starter Kit and makes use of FreeRTOS as the underlying RTOS. The media drivers are configured for Interrupt mode and dynamic operation.
Configuring the Hardware
Describes how to configure the supported hardware.
Description
PIC32 USB Starter Kit II
No hardware related configuration or jumper setting changes are necessary.
PIC32 USB Starter Kit III
No hardware related configuration or jumper setting changes are necessary.
PIC32 Bluetooth Starter Kit
No hardware related configuration or jumper setting changes are necessary.
PIC32MZ EC Starter Kit
No hardware related configuration or jumper setting changes are necessary.
PIC32MZ EF Starter Kit
No hardware related configuration or jumper setting changes are necessary.
Running the Demonstration
Provides instructions on how to build and run the NVM FAT single disk demonstration.
Description
Select the MPLAB X IDE project configuration:
Volume I: Getting Started With MPLAB Harmony Applications Help File System Demonstrations
© 2013-2017 Microchip Technology Inc. MPLAB Harmony v2.06 4

• pic32mx_usb_sk2_int_dyn (for PIC32MX devices)
• pic32mx_usb_sk_int_dyn_freertos (for PIC32MX devices)
• pic32mx_bt_sk_int_dyn (for PIC32MX devices)
• pic32mx_usb_sk3_int_dyn (for PIC32MX devices)
• pic32mz_ec_sk_int_dyn (for PIC32MZ EC devices)
• pic32mz_ef_sk_int_dyn (for PIC32MZ EF devices)
• pic32mz_ef_sk_int_dyn_freertos (for PIC32MZ EF devices)
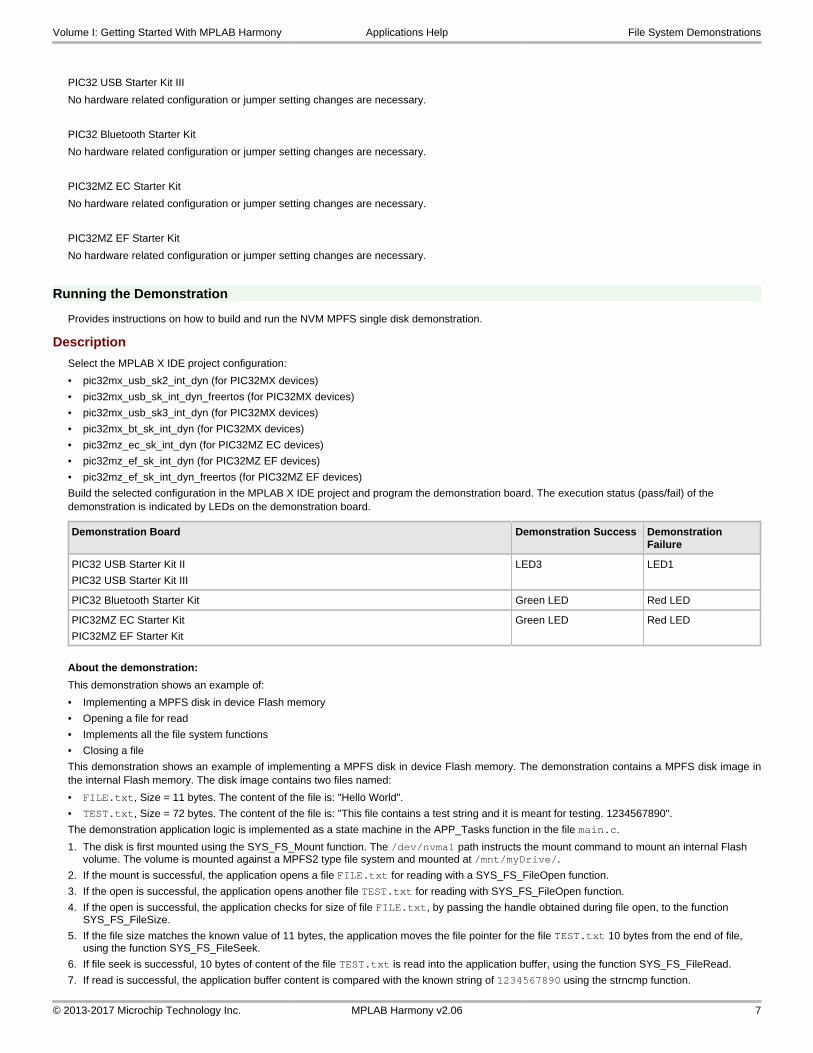
Build the selected configuration in the MPLAB X IDE project and program the demonstration board. The execution status (pass/fail) of the demonstration is indicated by LEDs on the demonstration board.
Demonstration Board Demonstration Success Demonstration Failure
PIC32 USB Starter Kit II LED3 LED1
PIC32 Bluetooth Starter Kit Green LED Red LED
PIC32 USB Starter Kit III LED3 LED1
PIC32MZ EC Starter Kit
PIC32MZ EF Starter Kit
Green LED Red LED
About the Demonstration:
This demonstration shows an example of:
• Implementing a FAT12 disk in device Flash memory
• Opening a file for read or write
• Implements file system functions
• Closing a file
The demonstration contains a FAT12 disk image consisting of a Master Boot Record (MBR) sector, Logical Boot Sector, File Allocation Table, andRoot Directory Area. This image is implemented in the file nvm_disk_images.c (this is project configuration specific file and is contained in thenvm_disk_images logical folder in the MPLAB X IDE project). The image contains a single file named FILE.TXT which contains the string"Data".
The demonstration opens an existing file named FILE.TXT and performs all file system related function calls on the file: SYS_FS_FileStat,SYS_FS_FileSize, SYS_FS_FileSeek, and SYS_FS_FileEOF. Finally, the string "Hello World" is written to this file. The string is then read andcompared with the string that was written to the file. If the string compare is successful, LED indication is provided.
The demonstration application logic is implemented as a state machine in the APP_Tasks function in the file main.c.
1. The disk is first mounted using the SYS_FS_Mount function. The /dev/nvma1 path instructs the mount command to mount an internal Flash volume. The volume is mounted against a FAT type file system and mounted at /mnt/myDrive/.
2. If the mount is successful, the application opens a file FILE.TXT for reading and writing (SYS_FS_FILE_OPEN_READ_PLUS) with a SYS_FS_FileOpen function. The valid file handle is received once a successful opening of the file is performed.
3. If file open is successful, the status of file FILE.TXT is stored in the appData.fileStatus structure, using SYS_FS_FileStat function.
4. If the file status check is successful, the size of the FILE.TXT is checked by passing the file handle to the SYS_FS_FileSize function.
5. If the file size check is successful, the size of file is compared with the size element received earlier as a part of appData.fileStatus structure. If both values match, the code moves to the next step of file seek.
6. The file pointer is then moved by 4 bytes from the start of the file by calling the function SYS_FS_FileSeek and passing parameter as SYS_FS_SEEK_SET (seek from the beginning of the file).
7. If the file seek operation is successful, the file pointer should have reached the end of the file. This is because, the content of the FILE.TXT had only 4 byte string = "Data". The end of file is verified by calling the function SYS_FS_FileEOF. If the function returns "true" (end of file reached), the next step is performed.
8. In the next step, the file pointer is moved again by [(-1)*size of file], from the end of the file by calling the function SYS_FS_FileSeek and passing parameter SYS_FS_SEEK_END (seek from the end of the file).
9. If the file seek operation is successful, the file pointer should have reached the beginning of the file. Then, 4 Bytes are read from the file using SYS_FS_FileRead function (into a buffer).
10. If the read is successful, the content of file (present in the buffer) is compared with the "Data" string. If the comparison passed, the code moves to the next step.
11. In the next step, the file pointer is moved again by [(-1)*size of file], from the end of the file by calling the function SYS_FS_FileSeek and passing parameter SYS_FS_SEEK_END (seek from the end of the file).
12. If the file seek operation is successful, the string "Hello World" is written to the file using SYS_FS_FileWrite function.
13. If the write operation is successful, the file pointer is moved to the beginning of the file.
14. If the file seek is successful, the contents of the file is read using SYS_FS_FileRead function (into a buffer).
15. If the read operation is successful, the content of the file (present in the buffer) is compared with the "Hello World" string using the strcmp function. A LED indicates the success of the demonstration.
Volume I: Getting Started With MPLAB Harmony Applications Help File System Demonstrations
© 2013-2017 Microchip Technology Inc. MPLAB Harmony v2.06 5
nvm_mpfs_single_disk
This demonstration uses a MPFS image of two files on NVM Flash memory and demonstrates the working of all file system functions.
Description
This demonstration shows an example of implementing a MPFS disk in device Flash memory. The demonstration contains a MPFS disk image in the internal Flash memory. The disk image contains two files named:
• FILE.txt, Size = 11 Bytes. The content of the file is: "Hello World".
• TEST.txt, Size = 72 Bytes. The content of the file is: "This file contains a test string and it is meant for testing. 1234567890".
The demonstration performs all file system related function calls on the file: SYS_FS_FileRead, SYS_FS_FileStat, SYS_FS_FileSize, SYS_FS_FileSeek, SYS_FS_FileEOF. If all tests are successful, LED indication is provided.
Building the Application
This section identifies the MPLAB X IDE project name and location and lists and describes the available configurations for the NVM MPFS Single Disk Demonstration.
Description
To build this project, you must open the nvm_mpfs_single_disk.X project in MPLAB X IDE, and then select the desired configuration.
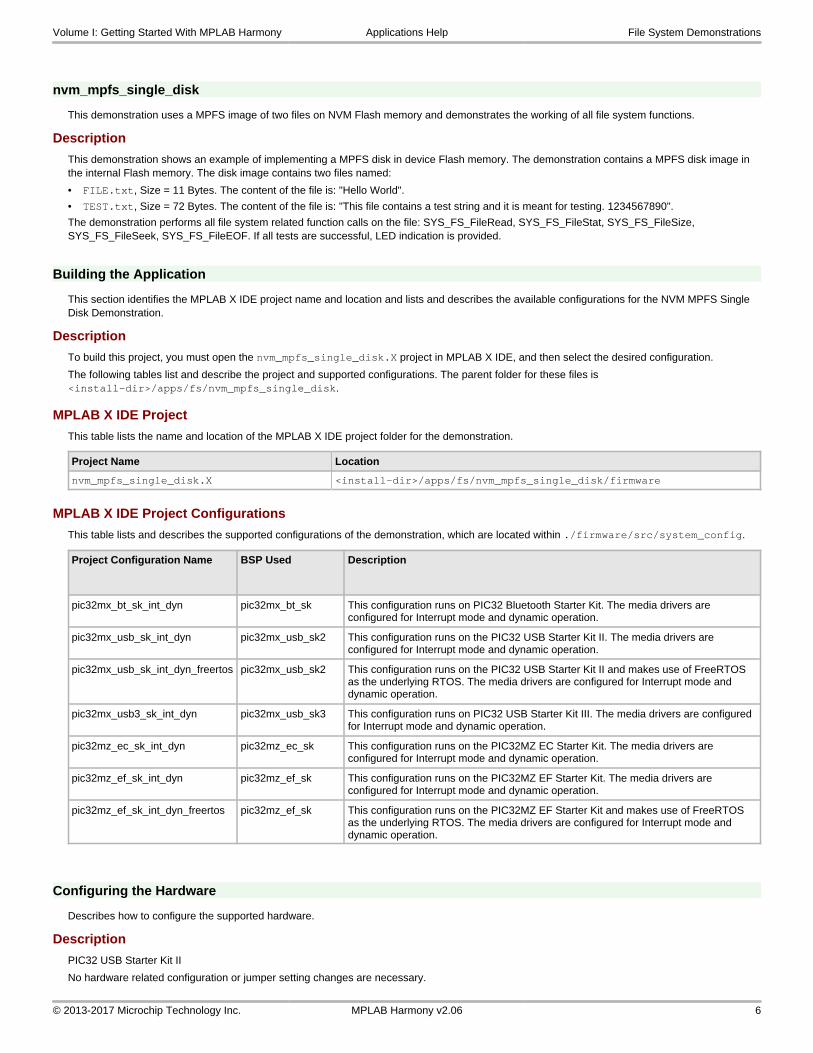
The following tables list and describe the project and supported configurations. The parent folder for these files is <install-dir>/apps/fs/nvm_mpfs_single_disk.
MPLAB X IDE Project
This table lists the name and location of the MPLAB X IDE project folder for the demonstration.
Project Name Location
nvm_mpfs_single_disk.X <install-dir>/apps/fs/nvm_mpfs_single_disk/firmware
MPLAB X IDE Project Configurations
This table lists and describes the supported configurations of the demonstration, which are located within ./firmware/src/system_config.
Project Configuration Name BSP Used Description
pic32mx_bt_sk_int_dyn pic32mx_bt_sk This configuration runs on PIC32 Bluetooth Starter Kit. The media drivers are configured for Interrupt mode and dynamic operation.
pic32mx_usb_sk_int_dyn pic32mx_usb_sk2 This configuration runs on the PIC32 USB Starter Kit II. The media drivers are configured for Interrupt mode and dynamic operation.
pic32mx_usb_sk_int_dyn_freertos pic32mx_usb_sk2 This configuration runs on the PIC32 USB Starter Kit II and makes use of FreeRTOS as the underlying RTOS. The media drivers are configured for Interrupt mode and dynamic operation.
pic32mx_usb3_sk_int_dyn pic32mx_usb_sk3 This configuration runs on PIC32 USB Starter Kit III. The media drivers are configured for Interrupt mode and dynamic operation.
pic32mz_ec_sk_int_dyn pic32mz_ec_sk This configuration runs on the PIC32MZ EC Starter Kit. The media drivers are configured for Interrupt mode and dynamic operation.
pic32mz_ef_sk_int_dyn pic32mz_ef_sk This configuration runs on the PIC32MZ EF Starter Kit. The media drivers are configured for Interrupt mode and dynamic operation.
pic32mz_ef_sk_int_dyn_freertos pic32mz_ef_sk This configuration runs on the PIC32MZ EF Starter Kit and makes use of FreeRTOS as the underlying RTOS. The media drivers are configured for Interrupt mode and dynamic operation.
Configuring the Hardware
Describes how to configure the supported hardware.
Description
PIC32 USB Starter Kit II
No hardware related configuration or jumper setting changes are necessary.
Volume I: Getting Started With MPLAB Harmony Applications Help File System Demonstrations
© 2013-2017 Microchip Technology Inc. MPLAB Harmony v2.06 6
PIC32 USB Starter Kit III
No hardware related configuration or jumper setting changes are necessary.
PIC32 Bluetooth Starter Kit
No hardware related configuration or jumper setting changes are necessary.
PIC32MZ EC Starter Kit
No hardware related configuration or jumper setting changes are necessary.
PIC32MZ EF Starter Kit
No hardware related configuration or jumper setting changes are necessary.
Running the Demonstration
Provides instructions on how to build and run the NVM MPFS single disk demonstration.
Description
Select the MPLAB X IDE project configuration:
• pic32mx_usb_sk2_int_dyn (for PIC32MX devices)
• pic32mx_usb_sk_int_dyn_freertos (for PIC32MX devices)
• pic32mx_usb_sk3_int_dyn (for PIC32MX devices)
• pic32mx_bt_sk_int_dyn (for PIC32MX devices)
• pic32mz_ec_sk_int_dyn (for PIC32MZ EC devices)
• pic32mz_ef_sk_int_dyn (for PIC32MZ EF devices)
• pic32mz_ef_sk_int_dyn_freertos (for PIC32MZ EF devices)
Build the selected configuration in the MPLAB X IDE project and program the demonstration board. The execution status (pass/fail) of the demonstration is indicated by LEDs on the demonstration board.
Demonstration Board Demonstration Success Demonstration Failure
PIC32 USB Starter Kit II
PIC32 USB Starter Kit III
LED3 LED1
PIC32 Bluetooth Starter Kit Green LED Red LED
PIC32MZ EC Starter Kit
PIC32MZ EF Starter Kit
Green LED Red LED
About the demonstration:
This demonstration shows an example of:
• Implementing a MPFS disk in device Flash memory
• Opening a file for read
• Implements all the file system functions
• Closing a file
This demonstration shows an example of implementing a MPFS disk in device Flash memory. The demonstration contains a MPFS disk image inthe internal Flash memory. The disk image contains two files named:
• FILE.txt, Size = 11 bytes. The content of the file is: "Hello World".
• TEST.txt, Size = 72 bytes. The content of the file is: "This file contains a test string and it is meant for testing. 1234567890".
The demonstration application logic is implemented as a state machine in the APP_Tasks function in the file main.c.
1. The disk is first mounted using the SYS_FS_Mount function. The /dev/nvma1 path instructs the mount command to mount an internal Flash volume. The volume is mounted against a MPFS2 type file system and mounted at /mnt/myDrive/.
2. If the mount is successful, the application opens a file FILE.txt for reading with a SYS_FS_FileOpen function.
3. If the open is successful, the application opens another file TEST.txt for reading with SYS_FS_FileOpen function.
4. If the open is successful, the application checks for size of file FILE.txt, by passing the handle obtained during file open, to the function SYS_FS_FileSize.
5. If the file size matches the known value of 11 bytes, the application moves the file pointer for the file TEST.txt 10 bytes from the end of file, using the function SYS_FS_FileSeek.
6. If file seek is successful, 10 bytes of content of the file TEST.txt is read into the application buffer, using the function SYS_FS_FileRead.
7. If read is successful, the application buffer content is compared with the known string of 1234567890 using the strncmp function.
Volume I: Getting Started With MPLAB Harmony Applications Help File System Demonstrations
© 2013-2017 Microchip Technology Inc. MPLAB Harmony v2.06 7
8. If the comparison is successful, the application checks if the file pointer for file "TEST.txt" has reached the end of file using the SYS_FS_FileEOF function.
9. If end of file is reached, a LED indicates the success of the demonstration.
nvm_sdcard_fat_mpfs_multi_disk
This demonstration uses NVM and a Secure Digital (SD) Card with MPFS and FAT image of file and performs a read/write/verify operation from file of one media to another media.
Description
This demonstration shows an example of using the MPLAB Harmony File System to access files across multiple disks and multiple file system. The demonstration contains a MPFS disk image in the internal Flash memory. The disk image contains a file named abc.txt with content "Hello World". Another disk is a SD card, which is formatted to FAT (FAT16 or FAT32). The demonstration reads the contents of abc.txt from the disk implemented on internal Flash memory and writes the contents to FILE.TXT on the SD card. A successful write is indicated by an illuminated LED.
Building the Application
This section identifies the MPLAB X IDE project name and location and lists and describes the available configurations for the NVM SD Card FAT MPFS Multi-disk Demonstration
Description
To build this project, you must open the nvm_sdcard_fat_mpfs_multi_disk.X project in MPLAB X IDE, and then select the desired configuration.
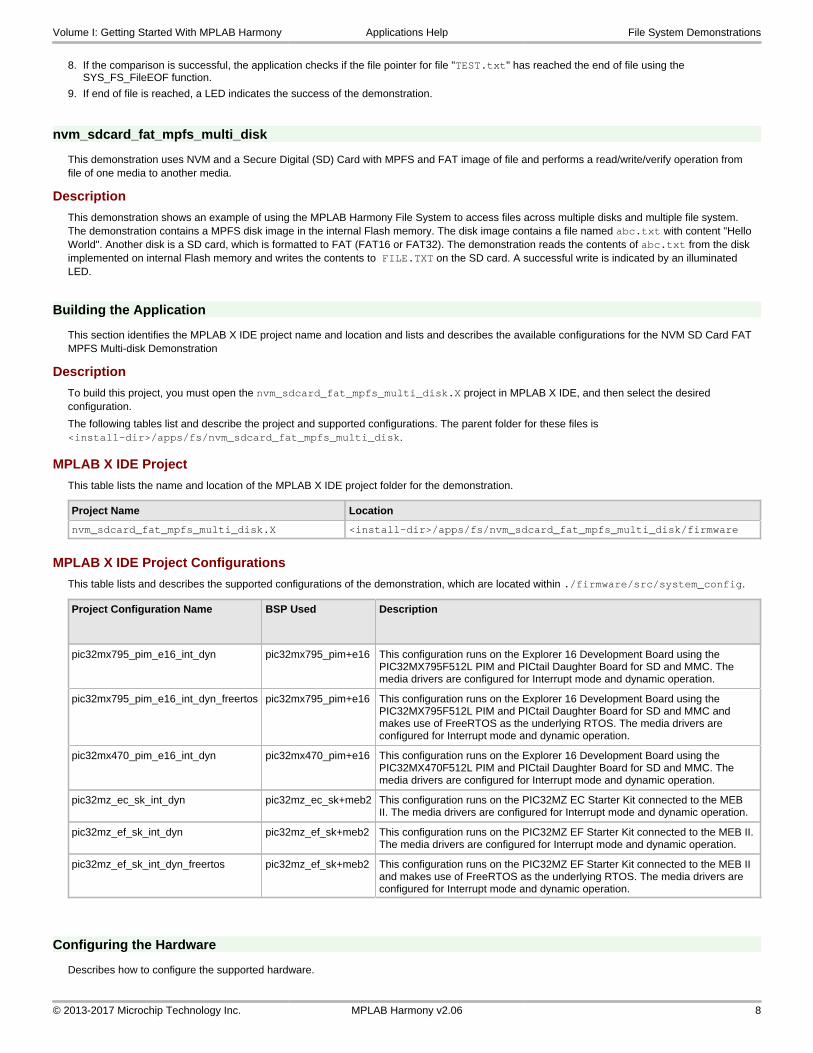
The following tables list and describe the project and supported configurations. The parent folder for these files is <install-dir>/apps/fs/nvm_sdcard_fat_mpfs_multi_disk.
MPLAB X IDE Project
This table lists the name and location of the MPLAB X IDE project folder for the demonstration.
Project Name Location
nvm_sdcard_fat_mpfs_multi_disk.X <install-dir>/apps/fs/nvm_sdcard_fat_mpfs_multi_disk/firmware
MPLAB X IDE Project Configurations
This table lists and describes the supported configurations of the demonstration, which are located within ./firmware/src/system_config.
Project Configuration Name BSP Used Description
pic32mx795_pim_e16_int_dyn pic32mx795_pim+e16 This configuration runs on the Explorer 16 Development Board using the PIC32MX795F512L PIM and PICtail Daughter Board for SD and MMC. The media drivers are configured for Interrupt mode and dynamic operation.
pic32mx795_pim_e16_int_dyn_freertos pic32mx795_pim+e16 This configuration runs on the Explorer 16 Development Board using the PIC32MX795F512L PIM and PICtail Daughter Board for SD and MMC and makes use of FreeRTOS as the underlying RTOS. The media drivers are configured for Interrupt mode and dynamic operation.
pic32mx470_pim_e16_int_dyn pic32mx470_pim+e16 This configuration runs on the Explorer 16 Development Board using the PIC32MX470F512L PIM and PICtail Daughter Board for SD and MMC. The media drivers are configured for Interrupt mode and dynamic operation.
pic32mz_ec_sk_int_dyn pic32mz_ec_sk+meb2 This configuration runs on the PIC32MZ EC Starter Kit connected to the MEB II. The media drivers are configured for Interrupt mode and dynamic operation.
pic32mz_ef_sk_int_dyn pic32mz_ef_sk+meb2 This configuration runs on the PIC32MZ EF Starter Kit connected to the MEB II. The media drivers are configured for Interrupt mode and dynamic operation.
pic32mz_ef_sk_int_dyn_freertos pic32mz_ef_sk+meb2 This configuration runs on the PIC32MZ EF Starter Kit connected to the MEB II and makes use of FreeRTOS as the underlying RTOS. The media drivers are configured for Interrupt mode and dynamic operation.
Configuring the Hardware
Describes how to configure the supported hardware.
Volume I: Getting Started With MPLAB Harmony Applications Help File System Demonstrations
© 2013-2017 Microchip Technology Inc. MPLAB Harmony v2.06 8
Description
Explorer 16 Development Board, PIC32MX450/470F512L Plug-in Module (PIM) or PIC32MX795F512L CAN-USB Plug-in Module (PIM), and PICtail Daughter Board for SD and MMC
Use the following instructions for all Explorer 16 Development Board-based demonstration boards.
Since some peripheral functions are multiplexed through the Peripheral Pin Select (PPS) feature, the hardware on the following PIM must be modified by connecting the PIM pins, as follows:
PIC32MX470F512L PIM (MA320002-2) - PIM pin 99 to PIM pin 24 for CS
Refer to PIC32MX450/470F512L Plug-in Module (PIM) or PIC32MX795F512L CAN-USB Plug-in Module (PIM) for PIM pin locations.
Use the following general test setup for either PIM:
1. Insert the PIM into the Explorer 16 Development Board PIM connector.
2. Jumpers JP1, JP2 and JP3 on the PICtail Daughter Board for SD and MMC should_connect_to points 1 and 2 on their respective connectors (see PICtail Daughter Board for SD and MMC).
3. Insert the Daughter Board into the PICtail Plus connector on the Explorer 16 Development Board.
4. Insert a SD card into the SD card connector on the Daughter Board.
5. Power up the board.
PIC32MZ EC Starter Kit and MEB II
No hardware setting change is required. Insert the microSD card into the connector and power up the board.
PIC32MZ EF Starter Kit and MEB II
No hardware setting change is required. Insert the microSD card into the connector and power up the board.
Running the Demonstration
Provides instructions on how to build and run the NVM SD card FAT MPFS multi disk demonstration.
Description
Select the MPLAB X IDE project configuration:
• pic32mx795_pim_e16_int_dyn (for PIC32MX devices)
• pic32mx795_pim_e16_int_dyn_freertos (for PIC32MX devices)
• pic32mx470_pim_e16_int_dyn (for PIC32MX devices)
• pic32mz_ec_sk_int_dyn (for PIC32MZ EC devices)
• pic32mz_ef_sk_int_dyn (for PIC32MZ EF devices)
• pic32mz_ef_sk_int_dyn_freertos (for PIC32MZ EF devices)
Insert the SD card, which contains the file FILE.TXT (the file contains some arbitrary existing content).
Compile the selected configuration in the MPLAB X IDE project and run the code. After a few seconds, once the LED illuminates, remove the SD card from the SD Card PICtail Daughter Board and insert it into the SD card reader on a personal computer. Examine the contents of the file named FILE.TXT. The file should contain the string "Hello World".
Demonstration Board Demonstration Success Demonstration Failure
Explorer 16 Development Board LED5 (D5) LED6 (D6)
PIC32MZ EC Starter Kit
PIC32MZ EF Starter Kit
Green LED Red LED
About the Demonstration:
This demonstration shows an example of:
• Implementing a multi-disk demonstration with MPFS on internal Flash memory (NVM) and FAT File system (FAT16/ FAT32) on SD card
• Opening two files from two different disks and read the contents of the file from the first disk and write into the file of the second disk
• Closing the files
The demonstration contains a MPFS disk image in the internal Flash memory. The disk image contains a file named abc.txt with content "HelloWorld". Another disk is a SD card, which is formatted to FAT (FAT16 or FAT32). The demonstration reads the contents of abc.txt from the diskimplemented on internal Flash memory and writes the contents to FILE.TXT on the SD card. A successful write is indicated by illumination of anLED.
The demonstration application logic is implemented as a state machine in the APP_Tasks function in the file main.c.
1. The first disk is mounted using the SYS_FS_Mount function. The /dev/nvma1 path instructs the mount command to mount a internal Flash volume. The volume is mounted against a MPFS2 type file system and mounted at /mnt/myDrive1/.
2. If the mount is successful, the second disks is mounted using the SYS_FS_Mount function. The /dev/mmcblka1 path instructs the mount command to mount a SD card volume. The volume is mounted against a FAT type file system and mounted at /mnt/myDrive2/.
3. If the mount is successful, the application opens the file abc.txt from /mnt/myDrive1/ for reading and FILE.TXT from /mnt/myDrive2/
Volume I: Getting Started With MPLAB Harmony Applications Help File System Demonstrations
© 2013-2017 Microchip Technology Inc. MPLAB Harmony v2.06 9
for writing with the SYS_FS_FileOpen function.
4. If the file open is successful, the application reads 13 bytes from abc.txt of the internal Flash volume using SYS_FS_FileRead.
5. If the read is successful, the application closes abc.txt from the internal Flash volume, and then writes the 13 bytes into FILE.TXT of the SD card volume using the SYS_FS_FileWrite function. If the file write is successful, the application closes FILE.TXT from the SD card volume.
6. If file close is successful, a LED indicates the success of the operation.
nvm_sdcard_fat_multi_disk
This demonstration uses NVM and a Secure Digital (SD) card as media, searches a file from the NVM media, opens and reads the file, and then writes the data into another file in the SD card media.
Description
This demonstration shows an example of using the MPLAB Harmony File System to access files across multiple media. The demonstrationcontains a FAT12 disk image consisting of a Master Boot Record (MBR) sector, Logical Boot Sector, File Allocation Table, and Root DirectoryArea, placed in the internal Flash memory (NVM). Also, a SD card is used as another disk, which might have FAT16 or FAT32 implemented on it(dependent on the formatting of SD card). The demonstration searches the NVM media for a named FILE.TXT, opens and reads the contents ofthe file in NVM and copies the contents to the file, FILE.TXT, in the SD card. Once the copy is successful, an addition string "Test is successful"is added to the file. If the write operation is successful, LED indication is provided.
Building the Application
This section identifies the MPLAB X IDE project name and location and lists and describes the available configurations for the NVM SD Card FAT Multi-disk Demonstration.
Description
To build this project, you must open the nvm_sdcard_fat_multi_disk.X project in MPLAB X IDE, and then select the desired configuration.
The following tables list and describe the project and supported configurations. The parent folder for these files is <install-dir>/apps/fs/nvm_sdcard_fat_multi_disk.
MPLAB X IDE Project
This table lists the name and location of the MPLAB X IDE project folder for the demonstration.
Project Name Location
nvm_sdcard_fat_multi_disk.X <install-dir>/apps/fs/nvm_sdcard_fat_multi_disk/firmware
MPLAB X IDE Project Configurations
This table lists and describes the supported configurations of the demonstration, which are located within ./firmware/src/system_config.
Project Configuration Name BSP Used Description
pic32mx795_pim_e16_int_dyn pic32mx795_pim+e16 This configuration runs on the Explorer 16 Development Board using the PIC32MX795F512L PIM and PICtail Daughter Board for SD and MMC. The media drivers are configured for Interrupt mode and dynamic operation.
pic32mx795_pim_e16_int_dyn_freertos pic32mx795_pim+e16 This configuration runs on the Explorer 16 Development Board using the PIC32MX795F512L PIM and PICtail Daughter Board for SD and MMC and makes use of FreeRTOS as the underlying RTOS. The media drivers are configured for Interrupt mode and dynamic operation.
pic32mx470_pim_e16_int_dyn pic32mx470_pim+e16 This configuration runs on the Explorer 16 Development Board using the PIC32MX470F512L PIM and PICtail Daughter Board for SD and MMC. The media drivers are configured for Interrupt mode and dynamic operation.
pic32mz_ec_sk_int_dyn pic32mz_ec_sk+meb2 This configuration runs on the PIC32MZ EC Starter Kit connected to the MEB II. The media drivers are configured for Interrupt mode and dynamic operation.
pic32mz_ef_sk_int_dyn pic32mz_ef_sk+meb2 This configuration runs on the PIC32MZ EF Starter Kit connected to the MEB II. The media drivers are configured for Interrupt mode and dynamic operation.
pic32mz_ef_sk_int_dyn_freertos pic32mz_ef_sk+meb2 This configuration runs on the PIC32MZ EF Starter Kit connected to the MEB II and makes use of FreeRTOS as the underlying RTOS. The media drivers are configured for Interrupt mode and dynamic operation.
Volume I: Getting Started With MPLAB Harmony Applications Help File System Demonstrations
© 2013-2017 Microchip Technology Inc. MPLAB Harmony v2.06 10
Configuring the Hardware
Describes how to configure the supported hardware.
Description
Explorer 16 Development Board, PIC32MX450/470F512L Plug-in Module (PIM) or PIC32MX795F512L CAN-USB Plug-in Module (PIM), and PICtail Daughter Board for SD and MMC
Use the following instructions for all Explorer 16 Development Board-based demonstration boards.
Since some peripheral functions are multiplexed through the Peripheral Pin Select (PPS) feature, the hardware on the following PIM must be modified by connecting the PIM pins, as follows:
PIC32MX470F512L PIM (MA320002-2) - PIM pin 99 to PIM pin 24 for CS
Refer to PIC32MX450/470F512L Plug-in Module (PIM) or PIC32MX795F512L CAN-USB Plug-in Module (PIM) for PIM pin locations.
Use the following general test setup for either PIM:
1. Insert the PIM into the Explorer 16 Development Board PIM connector.
2. Jumpers JP1, JP2 and JP3 on the PICtail Daughter Board for SD and MMC should_connect_to points 1 and 2 on their respective connectors (see PICtail Daughter Board for SD and MMC).
3. Insert the Daughter Board into the PICtail Plus connector on the Explorer 16 Development Board.
4. Insert a SD card into the SD card connector on the Daughter Board.
5. Power up the board.
PIC32MZ EC Starter Kit and MEB II
No hardware setting change is required. Insert the microSD card into the connector and power up the board.
PIC32MZ EF Starter Kit and MEB II
No hardware setting change is required. Insert the microSD card into the connector and power up the board.
Running the Demonstration
Provides instructions on how to build and run the NVM SD card FAT multi-disk demonstration.
Description
Select the MPLAB X IDE project configuration:
• pic32mx795_pim_e16_int_dyn (for PIC32MX devices)
• pic32mx795_pim_e16_int_dyn_freertos (for PIC32MX devices)
• pic32mx470_pim_e16_int_dyn (for PIC32MX devices)
• pic32mz_ec_sk_int_dyn (for PIC32MZ EC devices)
• pic32mz_ef_sk_int_dyn (for PIC32MZ EF devices)
• pic32mz_ef_sk_int_dyn_freertos (for PIC32MZ EF devices)
Insert the SD card, which contains the file FILE.TXT and the file contains "abc" (some arbitrary existing content).
Compile the selected configuration in the MPLAB X IDE project and run the code. After a few seconds, once the LED is illuminated, remove theSD card from the Board and insert it into the SD card reader on a personal computer. Examine the contents of the file named FILE.TXT. The fileshould contain the string "This data from NVM Disk Test is successful".
Demonstration Board Demonstration Success Demonstration Failure
Explorer 16 Development Board LED5 (D5) LED6 (D6)
PIC32MZ EC Starter Kit
PIC32MZ EF Starter Kit
Green LED Red LED
About the demonstration:
This demonstration shows an example of:
• Implementing a multi-disk demonstration with FAT12 on internal Flash memory (NVM) and FAT File system (FAT16/FAT32) on a SD card
• Opening two files from two different disks, read content of file from first disk and write into the file of second disk
• Closing the files
The demonstration contains a FAT12 disk image consisting of a Master Boot Record (MBR) sector, Logical Boot Sector, File Allocation Table, Root Directory Area, placed in the internal Flash memory (NVM). Also, a SD card is used as another disk, which might have FAT16 or FAT32 implemented on it (depends on the formatting of SD card).The demonstration searches the NVM media for a file named FILE.TXT, opens and reads the contents of the file in NVM and copies the contents to FILE.TXT to the SD Card. Once the copy is successful, an additional string "Test is successful" is added to the file. If the write operation is successful, LED indication is provided.
The demonstration application logic is implemented as a state machine in the APP_Tasks function in the file main.c.
Volume I: Getting Started With MPLAB Harmony Applications Help File System Demonstrations
© 2013-2017 Microchip Technology Inc. MPLAB Harmony v2.06 11

1. The first disk is mounted using the SYS_FS_Mount function. The /dev/nvma1 path instructs the mount command to mount a internal Flash volume. The volume is mounted against a FAT type file system and mounted at /mnt/myDrive1/.
2. If the mount is successful, the second disk is mounted using the SYS_FS_Mount function. The /dev/mmcblka1 path instructs the mount command to mount a SD card volume. The volume is mounted against a FAT type file system and mounted at /mnt/myDrive2/.
3. If the mount is successful, the application opens the root directory of /mnt/myDrive1/ with the function SYS_FS_DirOpen.
4. If the directory open is successful, the application searches for the file, FILE.TXT, using the wildcard character FIL*.*. The function used for directory search is SYS_FS_DirSearch.
5. If the directory search returns a file found, the directory is closed with the function SYS_FS_DirClose. Also, the searched file name is compared with the FILE.TXT name.
6. If the file name matches successfully, the application opens the file, FILE.TXT, from /mnt/myDrive1/ for reading and FILE.TXT from /mnt/myDrive2/ for writing with a SYS_FS_FileOpen function.
7. If the file open is successful, the application reads 27 Bytes from FILE.TXT of internal Flash volume using SYS_FS_FileRead.
8. If the read is successful, the application closes FILE.TXT from internal Flash volume and then writes the 27 bytes into FILE.TXT of SD card volume using SYS_FS_FileWrite.
9. If the write is successful, a character and string are written to the file using SYS_FS_FileCharacterPut and SYS_FS_FileStringPut.
10. If the write is successful, the application closes FILE.TXT from the SD card volume.
11. If file close is successful, a LED indicates the success of the operation.
sdcard_fat_single_disk
This demonstration uses a Secure Digital (SD) card with a FAT file system as media, performs a read/write/verify operation on the files using long file names (LFN), and performs directory creation.
Description
This demonstration shows an example of using the MPLAB Harmony File System to access and modify the contents of a SD card. Thedemonstration opens a file named FILE_TOO_LONG_NAME_EXAMPLE_123.JPG on the SD card, reads the content of the file, creates a directorynamed Dir1 and inside the directory, writes the content into another file FILE_TOO_LONG_NAME_EXAMPLE_123_1.JPG (creates a copy of onefile into another file, inside a directory).
The input file FILE_TOO_LONG_NAME_EXAMPLE_123.JPG is not provided along with the release package. It could be any arbitrary JPEG (image)file chosen by the user and then renamed to FILE_TOO_LONG_NAME_EXAMPLE_123.JPG. The reason for choosing a JPEG file for test purposesis that the duplicate file, FILE_TOO_LONG_NAME_EXAMPLE_123_1.JPG, created by the FS demonstration could be easily verified for correctnessby inserting the SD card into a computer and opening the FILE_TOO_LONG_NAME_EXAMPLE_123_1.JPG file. If the file opens for viewing on thecomputer, the test is deemed to have passed. Otherwise, if the file does not open (i.e., is corrupted), the test will be considered to have failed.Since the demonstration creates a directory named Dir1, it is important that the a folder with the same name does not exist on the SD card. If adirectory named Dir1 is already present on the SD card, the demonstration will fail.
Building the Application
This section identifies the MPLAB X IDE project name and location and lists and describes the available configurations for the SD Card FAT Single Disk Demonstration.
Description
To build this project, you must open the sdcard_fat_single_disk.X project in MPLAB X IDE, and then select the desired configuration.
The following tables list and describe the project and supported configurations. The parent folder for these files is <install-dir>/apps/fs/sdcard_fat_single_disk.
MPLAB X IDE Project
This table lists the name and location of the MPLAB X IDE project folder for the demonstration.
Project Name Location
sdcard_fat_single_disk.X <install-dir>/apps/fs/sdcard_fat_single_disk/firmware
MPLAB X IDE Project Configurations
This table lists and describes the supported configurations of the demonstration, which are located within ./firmware/src/system_config.
Project Configuration Name BSP Used Description
pic32mx795_pim_e16_int_dyn pic32mx795_pim+e16 This configuration runs on the Explorer 16 Development Board using the PIC32MX795F512L PIM and PICtail Daughter Board for SD and MMC. The media drivers are configured for Interrupt mode and dynamic operation.
Volume I: Getting Started With MPLAB Harmony Applications Help File System Demonstrations
© 2013-2017 Microchip Technology Inc. MPLAB Harmony v2.06 12

pic32mx795_pim_e16_int_dyn_freertos pic32mx795_pim+e16 This configuration runs on the Explorer 16 Development Board using the PIC32MX795F512L PIM and PICtail Daughter Board for SD and MMC and makes use of FreeRTOS as the underlying RTOS. The media drivers are configured for Interrupt mode and dynamic operation.
pic32mx470_pim_e16_int_dyn pic32mx470_pim+e16 This configuration runs on the Explorer 16 Development Board using the PIC32MX470F512L PIM and PICtail Daughter Board for SD and MMC. The media drivers are configured for Interrupt mode and dynamic operation.
pic32mz_ec_sk_int_dyn pic32mz_ec_sk+meb2 This configuration runs on the PIC32MZ EC Starter Kit connected to the MEB II. The media drivers are configured for Interrupt mode and dynamic operation.
pic32mz_ef_sk_int_dyn pic32mz_ef_sk+meb2 This configuration runs on the PIC32MZ EF Starter Kit connected to the MEB II. The media drivers are configured for Interrupt mode and dynamic operation.
pic32mz_ef_sk_int_dyn_freertos pic32mz_ef_sk+meb2 This configuration runs on the PIC32MZ EF Starter Kit connected to the MEB II and makes use of FreeRTOS as the underlying RTOS. The media drivers are configured for Interrupt mode and dynamic operation.
pic32mz_da_sk_adma pic32mz_da_sk_intddr This configuration runs on the PIC32MZ Embedded Graphics with Internal DRAM (DA) Starter Kit. The media driver is configured to use SD Host Controller ADMA2 Transfer mode operation.
Configuring the Hardware
Describes how to configure the supported hardware.
Description
Explorer 16 Development Board, PIC32MX450/470F512L Plug-in Module (PIM) or PIC32MX795F512L CAN-USB Plug-in Module (PIM), and PICtail Daughter Board for SD and MMC
Use the following instructions for all Explorer 16 Development Board-based demonstration boards.
Since some peripheral functions are multiplexed through the Peripheral Pin Select (PPS) feature, the hardware on the following PIM must be modified by connecting the PIM pins, as follows:
PIC32MX470F512L PIM (MA320002-2) - PIM pin 99 to PIM pin 24 for CS
Refer to PIC32MX450/470F512L Plug-in Module (PIM) or PIC32MX795F512L CAN-USB Plug-in Module (PIM) for PIM pin locations.
Use the following general test setup for either PIM:
1. Insert the PIM into the Explorer 16 Development Board PIM connector.
2. Jumpers JP1, JP2 and JP3 on the PICtail Daughter Board for SD and MMC should_connect_to points 1 and 2 on their respective connectors (see PICtail Daughter Board for SD and MMC).
3. Insert the Daughter Board into the PICtail Plus connector on the Explorer 16 Development Board.
4. Insert a SD card into the SD card connector on the Daughter Board.
5. Power up the board.
PIC32MZ EC Starter Kit and MEB II
No hardware setting change is required. Insert the microSD card into the connector and power up the board.
PIC32MZ EF Starter Kit and MEB II
No hardware setting change is required. Insert the microSD card into the connector and power up the board.
PIC32MZ Embedded Graphics with Internal DRAM (DA) Starter Kit and MEB II
No hardware setting change is required.
Running the Demonstration
Provides instructions on how to build and run the SD card FAT single disk demonstration.
Description
Select the MPLAB X IDE project configuration:
• pic32mx795_pim_e16_int_dyn (for PIC32MX devices)
• pic32mx795_pim_e16_int_dyn_freertos (for PIC32MX devices)
• pic32mx470_pim_e16_int_dyn (for PIC32MX devices)
• pic32mz_ec_sk_int_dyn (for PIC32MZ EC devices)
• pic32mz_ef_sk_int_dyn (for PIC32MZ EF devices)
• pic32mz_ef_sk_int_dyn_freertos (for PIC32MZ EF devices)
Volume I: Getting Started With MPLAB Harmony Applications Help File System Demonstrations
© 2013-2017 Microchip Technology Inc. MPLAB Harmony v2.06 13

• pic32mz_da_sk_adma (for PIC32MZ DA devices)
Insert the SD card, which contains the file named FILE_TOO_LONG_NAME_EXAMPLE_123.JPG. The file can be of any size.
Compile the selected configuration in the MPLAB X IDE project and run the code. After a few seconds, once the LED illuminates, remove the SD card from the SD Card PICtail Daughter Board (for PIC32MX) or MEB II (for PIC32MZ) and insert it into the SD card reader on a personal computer. Upon examining the contents of the SD card, a directory Dir1 will have been created. Inside the Dir1 folder, a file named FILE_TOO_LONG_NAME_EXAMPLE_123_1.JPG will be present. The file, FILE_TOO_LONG_NAME_EXAMPLE_123_1.JPG, will be a copy of FILE_TOO_LONG_NAME_EXAMPLE_123.JPG. Verify that both files open for viewing on a personal computer.
Demonstration Board Demonstration Success Demonstration Failure
Explorer 16 Development Board LED5 (D5) LED6 (D6)
PIC32MZ Embedded Connectivity (EC) Starter Kit Green LED Red LED
About the Demonstration:
This demonstration shows an example of:
• Implementing a FAT File system (FAT16/ FAT32) on a SD card
• Implementing long file name (LFN)
• Opening a file for read or write
• Closing a file
The demonstration opens a file named FILE_TOO_LONG_NAME_EXAMPLE_123.JPG on the SD Card, reads the content of the file, creates a directory named Dir1 and inside the directory, writes the content into another file FILE_TOO_LONG_NAME_EXAMPLE_123_1.JPG (creates a copy of one file into another file, inside a directory).
The demonstration application logic is implemented as a state machine in the APP_Tasks function in the file main.c.
1. The disk is first mounted using the SYS_FS_Mount function. The /dev/mmcblka1 path instructs the mount command to mount a SD card volume. The volume is mounted against a FAT type file system and mounted at /mnt/myDrive/.
2. If the mount is successful, the volume is unmounted by passing the mount name /mnt/myDrive to SYS_FS_Unmount function. This unmounting is done for demonstration purposes only. Real applications do not need to unmount unless it is required for the application.
3. If the unmount is successful, the mounting process is repeated.
4. If the mount is successful, the application opens the file FILE_TOO_LONG_NAME_EXAMPLE_123.JPG for reading with the SYS_FS_FileOpen function.
5. If the file open is successful,the application creates a directory named Dir1, with the SYS_FS_DirectoryMake function.
6. If the directory creation is successful, the application opens the file, FILE_TOO_LONG_NAME_EXAMPLE_123_1.JPG, inside the directory Dir1 for writing with the SYS_FS_FileOpen function. The attributes for file write is selected as "SYS_FS_FILE_OPEN_WRITE". Therefore, if the file does not exist, the file is created.
7. If the file open is successful, 512 bytes from the file FILE_TOO_LONG_NAME_EXAMPLE_123.JPG is read into application buffer using the SYS_FS_FileRead function.
8. If the file read successful, the 512 bytes is written from the application buffer to the FILE_TOO_LONG_NAME_EXAMPLE_123_1.JPG file using the SYS_FS_FileWrite function.
9. If the write operation is successful, the end of file for FILE_TOO_LONG_NAME_EXAMPLE_123.JPG is checked. If the end of file is not reached, the process of reading and writing continues (step 7 and step 8).
10. Once the end of the file is reached, both files are closed with the SYS_FS_FileClose function.
11. Finally, a LED indicates the success of the demonstration.
sdcard_msd_fat_multi_disk
This demonstration uses a USB Flash drive and a Secure Digital (SD) card as media. The application searches for a file on the USB Flash drive, opens and reads the file, and then writes the data into another file in the SD card media.
Description
This demonstration searches for a file using wildcard characters "mch*.*", reads the content of the file, and then writes the contents of the file to the SD card.
The demonstration application logic is implemented as a state machine in the APP_USB_MSDTasks and APP_SDCardTasks functions in the file app.c.
Building the Application
This section identifies the MPLAB X IDE project name and location and lists and describes the available configurations for the SD Card MSD FAT Multi-disk Demonstration.
Description
To build this project, you must open the sdcard_msd_fat_multi_disk.X project in MPLAB X IDE, and then select the desired configuration.
The following tables list and describe the project and supported configurations. The parent folder for these files is
Volume I: Getting Started With MPLAB Harmony Applications Help File System Demonstrations
© 2013-2017 Microchip Technology Inc. MPLAB Harmony v2.06 14
<install-dir>/apps/fs/sdcard_msd_fat_multi_disk.
MPLAB X IDE Project
This table lists the name and location of the MPLAB X IDE project folder for the demonstration.
Project Name Location
sdcard_msd_fat_multi_disk.X <install-dir>/apps/fs/sdcard_msd_fat_multi_disk/firmware
MPLAB X IDE Project Configurations
This table lists and describes the supported configurations of the demonstration, which are located within ./firmware/src/system_config.
Project Configuration Name BSP Used Description
pic32mz_ec_sk_meb2 pic32mz_ec_sk+meb2 This configuration runs on PIC32MZ EC Starter Kit with the MEB II. The media drivers are configured for Interrupt mode and dynamic operation.
pic32mz_ef_sk_meb2 pic32mz_ef_sk+meb2 This configuration runs on PIC32MZ EF Starter Kit with the MEB II. The media drivers are configured for Interrupt mode and dynamic operation.
pic32mz_ef_sk_meb2_freertos pic32mz_ef_sk+meb2 This configuration runs on the PIC32MZ EF Starter Kit connected to the MEB II and makes use of FreeRTOS as the underlying RTOS. The media drivers are configured for Interrupt mode and dynamic operation.
Configuring the Hardware
Describes how to configure the supported hardware.
Description
PIC32MZ EC Starter Kit and MEB II
No hardware related configuration or jumper setting changes are necessary.
PIC32MZ EF Starter Kit and MEB II
No hardware related configuration or jumper setting changes are necessary.
Running the Demonstration
Provides instructions on how to build and run the SD card MSD FAT multi-disk demonstration.
Description
This demonstration shows an example of:
• Implementing a FAT File System on a SD card and a USB Flash drive
• Opening a file for read or write
• Searching for a file
• Checking for end of the file
• Closing a file
Do the following to run the demonstration:
1. Select the desired MPLAB X IDE project configuration for the hardware in use.
2. Copy the mchpLogo.bmp file from <install-dir>/apps/fs/sdcard_msd_fat_multi_disk/firmware/src to the USB Flash drive.
3. Insert the SD card into the MEB II.
4. Inset the USB Flash drive card into the starter kit.
5. Compile the selected configuration in the MPLAB X IDE project and run the code.
6. The demonstration searches for the mchpLogo.bmp on the USB Flash drive and copies it from the USB Flash drive to the SD card. The Green LED indicates the file has been successfully copied from the USB Flash drive to SD card.
7. Remove the SD card from the MEB II board and_connect_it to a personal computer to verify that the mchpLogo.bmp file is available on SD card.
Volume I: Getting Started With MPLAB Harmony Applications Help File System Demonstrations
© 2013-2017 Microchip Technology Inc. MPLAB Harmony v2.06 15
Demonstration Board Demonstration Success Demonstration Failure
PIC32MZ EC Starter Kit
PIC32MZ EF Starter Kit
PIC32MZ DA Starter Kit
Green LED ON Red LED ON
This demonstration searches for a file using wildcard characters "mch*.*", reads the content of the file, and then writes the contents of the file to the SD card.
The demonstration application logic is implemented as a state machine in the APP_USB_MSDTasks and APP_SDCardTasks functions in the file app.c.
The demonstration process is as follows:
1. The SD card is mounted using the SYS_FS_Mount function. The /dev/mmcblka1 path instructs the mount function to mount a SD card volume. The volume is mounted with a FAT file system and mounted as /mnt/sdDrive/.
2. If the mount is successful, the SD card state machine waits until the USB Flash drive is connected and mounted.
3. The USB MSD task function opens an instance of the USB Host stack and enables the USB Host operations before mounting the USB Flash drive.
4. The USB Flash drive is mounted once it is connected using the SYS_FS_Mount function. The /dev/sda1 path instructs the mount function to mount a SD USB Flash drive volume. The volume is mounted with the FAT file system as /mnt/msdDrive/.
5. If the USB Flash drive is mounted successfully, the application opens the root directory on the USB Flash drive and searches for the file using the wildcard characters "mch*.*" using SYS_FS_DirSearch.
6. If the search operation is successful, the application opens the file in read mode using SYS_FS_FileOpen.
7. If the file open is successful, the application sets the current working directory as sdDrive using SYS_FS_CurrentDriveSet and creates a new file on the SD card in write mode. The name of the new file is the same as was returned from SYS_FS_DirSearch.
8. If the file is created successfully, the application reads the data from the file on the USB Flash drive using SYS_FS_FileRead and writes it to the file on the SD card using SYS_FS_FileWrite until the end of file is reached.
9. Once the end of the file is reached, both files are closed with the SYS_FS_FileClose function.
10. Green LED indicates successful operation.
sqi_fat
This application demonstrates the use of the MPLAB Harmony File System with SQI Flash media.
Description
This application demonstrates the use of the MPLAB Harmony File System with SQI Flash media. The application formats the SQI Flash media, opens a file named “newFile.txt”, and writes the string “Hello World” to the file. The string is then read and compared with the string that was written to the file. If the string comparison is successful, LED indication is provided.
Building the Application
This section identifies the MPLAB X IDE project name and location and lists and describes the available configurations for the SQI Flash Demonstration.
Description
To build this project, you must open sqi_fat.X project in MPLAB X IDE, and then select the desired configuration.
The following tables list and describe the project and supported configurations. The parent folder for these files is <install-dir>/apps/fs/sqi_fat.
MPLAB X IDE Project
This table lists the name and location of the MPLAB X IDE project folder for the demonstration.
Project Name Location
sqi_fat.X <install-dir>/apps/fs/sqi_fat/firmware
MPLAB X IDE Project Configurations
This table lists and describes the supported configurations of the demonstration, which are located within ./firmware/src/system_config.
Project Configuration Name BSP Used Description
pic32mz_ef_sk pic32mz_ef_sk This configuration runs on PIC32MZ EF Starter Kit.
Volume I: Getting Started With MPLAB Harmony Applications Help File System Demonstrations
© 2013-2017 Microchip Technology Inc. MPLAB Harmony v2.06 16
Configuring the Hardware
Describes how to configure the supported hardware.
Description
PIC32MZ EF Starter Kit
No hardware related configuration or jumper setting changes are necessary.
Running the Demonstration
Provides instructions on how to build and run the SQI Flash demonstration.
Description
This demonstration illustrates how the MPLAB Harmony File System works with SST26VF SQI Flash media. The application does the following:
• Formats the SQI Flash media
• Opens a file named “newFile.txt”
• Writes the string “Hello World” to the file and then flushes the data onto the disk using the Sync operation
• Performs a file size check using the Stat operation, does a seek to the end of the file. The end of file is verified by using the EOF check operation.
• Another seek to the beginning of the file is done. The file data is read and compared. If the comparison is successful, the file is closed and the disk is unmounted.
• The application then enters an Idle state and LED3 is turned ON to indicate the the demonstration was successful
• If an error occurs at any stage of the demonstration, LED1 is turned ON to indicate the demonstration failed
sst25_fat
This application demonstrates the use of the MPLAB Harmony File System with SST25 Flash media.
Description
This application demonstrates the use of the MPLAB Harmony File System with SST25 Flash media. The application formats the SST25 Flash media, opens a file named “newFile.txt”, and writes the string “Hello World” to the file. The string is then read and compared with the string that was written to the file. If the string comparison is successful, LED indication is provided.
Building the Application
This section identifies the MPLAB X IDE project name and location and lists and describes the available configurations for the SST25 Flash Demonstration.
Description
To build this project, you must open sst25_fat.X project in MPLAB X IDE, and then select the desired configuration.
The following tables list and describe the project and supported configurations. The parent folder for these files is <install-dir>/apps/fs/sst25_fat.
MPLAB X IDE Project
This table lists the name and location of the MPLAB X IDE project folder for the demonstration.
Project Name Location
sst25_fat.X <install-dir>/apps/fs/sst25_fat/firmware
MPLAB X IDE Project Configurations
This table lists and describes the supported configurations of the demonstration, which are located within ./firmware/src/system_config.
Project Configuration Name BSP Used Description
bt_audio_dk_int_dyn bt_audio_dk This configuration runs on PIC32 Bluetooth Audio Development Kit.
Configuring the Hardware
Describes how to configure the supported hardware.
Volume I: Getting Started With MPLAB Harmony Applications Help File System Demonstrations
© 2013-2017 Microchip Technology Inc. MPLAB Harmony v2.06 17
Description
PIC32 Bluetooth Audio Development Kit
Ensure that switch S1 is set to PIC32_MCLR.
Running the Demonstration
Provides instructions on how to build and run the SST25 Flash demonstration.
Description
This demonstration illustrates the how the MPLAB Harmony File System works with the SST25VF SPI Flash media. The application does the following:
• Formats the SPI Flash media
• Opens a file named “newFile.txt”
• Writes the string “Hello World” to the file and then flushes the data onto the disk using the Sync operation
• Performs a file size check using the Stat operation, does a seek to the end of the file. The end of file is verified by using the EOF check operation.
• Another seek to the beginning of the file is done. The file data is read and compared. If the comparison is successful, the file is closed.
• The application then enters an Idle state and LED D9 is turned ON to indicate the demonstration was successful
• If an error occurs at any stage of the demonstration, LED D8 is turned ON to indicate the demonstration failed
Volume I: Getting Started With MPLAB Harmony Applications Help File System Demonstrations
© 2013-2017 Microchip Technology Inc. MPLAB Harmony v2.06 18

Index
A
Applications Help 3
B
Building the Application 3, 6, 8, 10, 12, 14, 16, 17
C
Configuring the Hardware 4, 6, 8, 11, 13, 15, 17
D
Demonstrations 3
File System 3
F
File System Demonstrations 3
I
Introduction 3
N
nvm_fat_single_disk 3
nvm_mpfs_single_disk 6
nvm_sdcard_fat_mpfs_multi_disk 8
nvm_sdcard_fat_multi_disk 10
R
Running the Demonstration 4, 7, 9, 11, 13, 15, 17, 18
S
sdcard_fat_single_disk 12
sdcard_msd_fat_multi_disk 14
sqi_fat 16
sst25_fat 17
V
Volume I: Getting Started With MPLAB Harmony Libraries and Applications 2
Index
© 2013-2017 Microchip Technology Inc. MPLAB Harmony v2.06 19