File Activity Tracking Format S ystem Manual A Real Estate and Relocation Services Aggregator...
30
File Activity Tracking Format System Manual A Real Estate and Relocation Services Aggregator Presented by BHIF Group Click On The Flag To Begin Or Press Enter
-
Upload
louise-powers -
Category
Documents
-
view
216 -
download
3
Transcript of File Activity Tracking Format S ystem Manual A Real Estate and Relocation Services Aggregator...

File Activity Tracking Format System
Manual
A Real Estate and Relocation Services AggregatorPresented by BHIF Group
Click On The Flag To BeginOr Press Enter

Quick Overview
What Is The Purpose Of This Presentation?
Introduce You To The System
Learn How To Operate Within The System
Navigation Through An Existing File
Press Enter To Continue>
Viewing Duration?
15-20 Minutes

Quick Link Index
Click On A Link To Go Directly To That Section Or Simply Press Enter To Continue.
Logging Into The System
Creating An Inspection Report
Creating A New Inspector
Printing This Presentation
Other Reports You Can Modify

First Things First
O.K., How Do I Get Started?
Connect To The Internet
Launch Internet Explorer Web Brower
Press Enter To Continue>
Log Onto www.fatform.net

O.K., Where Now?
Click “Login” To Get Started
Press Enter To Continue>

Logging In
Enter Your Assigned User Name And Password
Be Careful! Your User Name And Password Are Case Sensitive
Press Enter To Continue>

Your Home Page
Press Enter To Continue>

What is a TRIP Search?
Click TRIP Search Link To Find An Existing File Of A Relocation TRIP Kit Consumer
Press Enter To Continue>

Finding a File
Press Enter To Continue>
Click Submit To See All Files Assigned To You Or Enter Specific Info To Find A Particular File
Note 1: In performing a specific search, use only one field: “departure city”, “departure state” or “last name”. Also, the search is case sensitive.Note 2: Departure state drop-down includes all states. To see all files, you must select “choose” from the top of the drop-down list.

Sorting Columns
Should You Want To, The Columns May Be Sorted In Ascending And Descending Order By Clicking On The Appropriate Column Header.
Press Enter To Continue>

Sorting Columns
Important Tip: Should You Want To Sort The Files By Newest First, Click On The “Descending” (Z>A) File ID Column.
Press Enter To Continue>

Accessing The File
Click On The File # That You Would Like To Access
Press Enter To Continue>
Whoa! What Are These?
These Are Tabs. Each One Allows You To Modify Various Aspects Of An Individual File.
Press Enter To Continue>
Note: In the upper right section of the screen, notice that a brief summary is given as to whose file you are looking at.

General Information Tab
The Default Report Is The General Information Tab. Contains Basic Info About The Individual Relocation TRIP® Kit Consumer
Press Enter To Continue>

Creating an Inspection Report
Start By Clicking The “Inspections” Tab
Press Enter To Continue>
Note: You may create as many inspection reports for the consumer’s destination/departure properties as you would like. The same applies to the “Appraisal Report” tab and the “Repairs and Improvements” tab.

Creating an Inspection Report
Then, Click On The “New Inspection Record” Link
Press Enter To Continue>

Creating an Inspection Report
Scroll
Press Enter To Continue>
Important!
First, Check To See If Your Inspector Already Exists Within The System Before Completing The Form.

Attaching An “Existing” Inspector Already In The System
To Search For An Inspector That May Already Be In The System, Click “Find”
Press Enter To Continue>
Creating an Inspection Report
Note: Stay tuned, because in a short while we’ll learn how to create a new inspector.

Creating an Inspection Report
Attaching An “Existing” Inspector Already In The System
Press Enter To Continue>
Note 1: It is recommended that you search using only the “state” drop down.Note 2: For a national inspector, select “choose” from the state drop down list. For a local inspector, select the specific state of operation.

Creating an Inspection Report
Attaching an “Existing” Inspector Already In the System
Click On The “Contact ID” Of The Inspector You Would Like To Attach
Press Enter To Continue>

Creating an Inspection Report
Scroll
Complete All Or Part Of The Inspection Report And Click “Submit”
Press Enter To Continue>
Note: This process also applies to the “Appraisal Report” tab & the “Repairs and Improvements” tab.
Important: You must select a property ID. ID #1 is the consumer’s “departure” property and ID #2 is the destination property.
Also, do not forget to select as many of the “type of inspection” as applies

Creating a New Inspector
Press Enter To Continue>
Click On The “Inspections” Tab

Creating a New Inspector
Press Enter To Continue>
Then, Click On The “New Inspection Record” Link

Creating a New Inspector
Press Enter To Continue>
Great. Now, Click The “Add New” Link
Important: Do not fill in any other information until you created the inspector’s file and click submit. This will add him/her into the system, allowing for further definition in the future.

Creating a New Inspector
Press Enter To Continue>
Fill In All Or Part Of The Form To Include The Inspector’s Information & Click “Submit”
Scroll

Creating a New Inspector
Press Enter To Continue>
You’re Done! You’ll See “Record Added”
Note: This process also applies to the “Appraisal Report” tab & the “Repairs and Improvements” tab. Also, once you’ve added an inspector there is no need to add him/her again in the system.

Note: After a report has been modified, you may use it again as many times as you like and make as many changes as you like. So, if time does not permit for you to complete all fields of entry, simply complete those that are necessary, submit and come back later to add more information.
Some Other Reports That You Can Modify
Title Home Marketing & Activity
Appraisal Moving
Temporary Living Tax Preparation
Expense Tracking New Home Mortgage
Spouse Career Counseling
Press Enter To Continue>
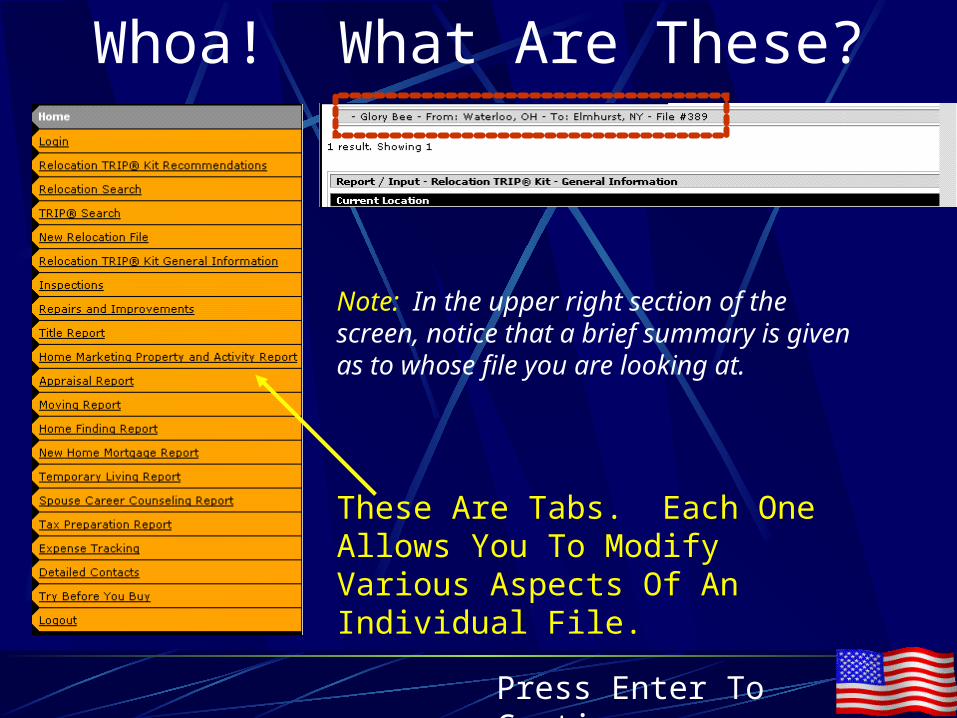
Logging Out
It’s A Good Habit To Log Out When You Are Finished Using The System Or Click The Orange Home Button To Work With Another File Or To Create A New One
Press Enter To Continue>

Now It’s Your Turn
Follow These Instructions For Printing This Presentation
Click “File”
Select “Print”
Make Sure “Print Range” is Set to “All”
Change “Print What” From “Slides” to “2 Per Page Handouts”
Click “OK”
Open Powerpoint and Then Find and Open “Fatform Training Manual” found on the CDROM Drive Letter

End
Press ESC Key To Exit