Fiery make-ready applications v4
92
Fiery make-ready applications v4.7
Transcript of Fiery make-ready applications v4

Fiery make-ready applications v4.7

© 2015 Electronics For Imaging. The information in this publication is covered under Legal Notices for this product.
27 February 2015

Contents
Fiery JobMaster-Fiery Impose-Fiery Compose . . . . . . . . . . . . . . . . . . . . . . . . . . . . . . . . . . . . . . . . . . . . . . 7
Fiery JobMaster . . . . . . . . . . . . . . . . . . . . . . . . . . . . . . . . . . . . . . . . . . . . . . . . . . . . . . . . . . . . . . . . . . . . . . . . . . . . . 8
Activate the Fiery JobMaster license . . . . . . . . . . . . . . . . . . . . . . . . . . . . . . . . . . . . . . . . . . . . . . . . . . . . . . . . . . . . . . . . . 8
Open a job in Fiery JobMaster . . . . . . . . . . . . . . . . . . . . . . . . . . . . . . . . . . . . . . . . . . . . . . . . . . . . . . . . . . . . . . . . . . . . . . 8
Add a new job . . . . . . . . . . . . . . . . . . . . . . . . . . . . . . . . . . . . . . . . . . . . . . . . . . . . . . . . . . . . . . . . . . . . . . . . . . . . . . . . . . 9
Import and edit a scan in Fiery JobMaster . . . . . . . . . . . . . . . . . . . . . . . . . . . . . . . . . . . . . . . . . . . . . . . . . . . . . . . . . . . . 9
Edit a page in Fiery JobMaster . . . . . . . . . . . . . . . . . . . . . . . . . . . . . . . . . . . . . . . . . . . . . . . . . . . . . . . . . . . . . . . . . . . . . 10
Advanced Page Numbering . . . . . . . . . . . . . . . . . . . . . . . . . . . . . . . . . . . . . . . . . . . . . . . . . . . . . . . . . . . . . . . . . . . . . . . 11
Advanced page numbering workspace . . . . . . . . . . . . . . . . . . . . . . . . . . . . . . . . . . . . . . . . . . . . . . . . . . . . . . . . . . . 13
Set Advanced Page Numbering options . . . . . . . . . . . . . . . . . . . . . . . . . . . . . . . . . . . . . . . . . . . . . . . . . . . . . . . . . . . 14
Add Auto Tabs . . . . . . . . . . . . . . . . . . . . . . . . . . . . . . . . . . . . . . . . . . . . . . . . . . . . . . . . . . . . . . . . . . . . . . . . . . . . . . . . . 15
Insert and edit tabs in Fiery JobMaster . . . . . . . . . . . . . . . . . . . . . . . . . . . . . . . . . . . . . . . . . . . . . . . . . . . . . . . . . . . . . . 16
Add multiple tab styles to a document . . . . . . . . . . . . . . . . . . . . . . . . . . . . . . . . . . . . . . . . . . . . . . . . . . . . . . . . . . . . . . 17
Bleed edge tabs in Fiery JobMaster . . . . . . . . . . . . . . . . . . . . . . . . . . . . . . . . . . . . . . . . . . . . . . . . . . . . . . . . . . . . . . . . 19
Add content to bleed edge tabs . . . . . . . . . . . . . . . . . . . . . . . . . . . . . . . . . . . . . . . . . . . . . . . . . . . . . . . . . . . . . . . . . 20
Specify position of bleed edge tabs . . . . . . . . . . . . . . . . . . . . . . . . . . . . . . . . . . . . . . . . . . . . . . . . . . . . . . . . . . . . . . 20
Fiery Impose . . . . . . . . . . . . . . . . . . . . . . . . . . . . . . . . . . . . . . . . . . . . . . . . . . . . . . . . . . . . . . . . . . . . . . . . . . . . . . . . 22
APPE processing in Fiery Impose and Fiery Compose or Fiery JobMaster . . . . . . . . . . . . . . . . . . . . . . . . . . . . . . . . . . 22
Access Fiery Impose . . . . . . . . . . . . . . . . . . . . . . . . . . . . . . . . . . . . . . . . . . . . . . . . . . . . . . . . . . . . . . . . . . . . . . . . . . . . . 23
Make a job spooled/held . . . . . . . . . . . . . . . . . . . . . . . . . . . . . . . . . . . . . . . . . . . . . . . . . . . . . . . . . . . . . . . . . . . . . . . 23
Access Fiery Impose from Command WorkStation . . . . . . . . . . . . . . . . . . . . . . . . . . . . . . . . . . . . . . . . . . . . . . . . . . 23
Access Fiery Impose from Job Properties . . . . . . . . . . . . . . . . . . . . . . . . . . . . . . . . . . . . . . . . . . . . . . . . . . . . . . . . . . 23
Understanding imposition layouts . . . . . . . . . . . . . . . . . . . . . . . . . . . . . . . . . . . . . . . . . . . . . . . . . . . . . . . . . . . . . . . . . 24
Make a folding model . . . . . . . . . . . . . . . . . . . . . . . . . . . . . . . . . . . . . . . . . . . . . . . . . . . . . . . . . . . . . . . . . . . . . . . . . 24
Imposition layouts . . . . . . . . . . . . . . . . . . . . . . . . . . . . . . . . . . . . . . . . . . . . . . . . . . . . . . . . . . . . . . . . . . . . . . . . . . . . . . 25
Binding methods . . . . . . . . . . . . . . . . . . . . . . . . . . . . . . . . . . . . . . . . . . . . . . . . . . . . . . . . . . . . . . . . . . . . . . . . . . . . . 26
Creep . . . . . . . . . . . . . . . . . . . . . . . . . . . . . . . . . . . . . . . . . . . . . . . . . . . . . . . . . . . . . . . . . . . . . . . . . . . . . . . . . . . . . . . 27
Adding blank pages to adjust layout . . . . . . . . . . . . . . . . . . . . . . . . . . . . . . . . . . . . . . . . . . . . . . . . . . . . . . . . . . . . . 28
Gangup printing in Fiery Impose . . . . . . . . . . . . . . . . . . . . . . . . . . . . . . . . . . . . . . . . . . . . . . . . . . . . . . . . . . . . . . . . . . . 28
Gangup with top finished edge . . . . . . . . . . . . . . . . . . . . . . . . . . . . . . . . . . . . . . . . . . . . . . . . . . . . . . . . . . . . . . . . . . . . 29
Create a gangup job with top finished edge . . . . . . . . . . . . . . . . . . . . . . . . . . . . . . . . . . . . . . . . . . . . . . . . . . . . . . . 30
Gang Up imposition methods for VDP jobs . . . . . . . . . . . . . . . . . . . . . . . . . . . . . . . . . . . . . . . . . . . . . . . . . . . . . . . . . . 31
Fiery make-ready applications v4.7
Contents
3

Set Fiery Impose preferences . . . . . . . . . . . . . . . . . . . . . . . . . . . . . . . . . . . . . . . . . . . . . . . . . . . . . . . . . . . . . . . . . . . . . . 33
Set imposition scale and finish size . . . . . . . . . . . . . . . . . . . . . . . . . . . . . . . . . . . . . . . . . . . . . . . . . . . . . . . . . . . . . . . 33
Set paths to imposition files . . . . . . . . . . . . . . . . . . . . . . . . . . . . . . . . . . . . . . . . . . . . . . . . . . . . . . . . . . . . . . . . . . . . 34
Set PostScript conversion for imposition . . . . . . . . . . . . . . . . . . . . . . . . . . . . . . . . . . . . . . . . . . . . . . . . . . . . . . . . . . 34
Set imposition measurement units . . . . . . . . . . . . . . . . . . . . . . . . . . . . . . . . . . . . . . . . . . . . . . . . . . . . . . . . . . . . . . . 34
Set the application language . . . . . . . . . . . . . . . . . . . . . . . . . . . . . . . . . . . . . . . . . . . . . . . . . . . . . . . . . . . . . . . . . . . . 34
Preview a job for imposition . . . . . . . . . . . . . . . . . . . . . . . . . . . . . . . . . . . . . . . . . . . . . . . . . . . . . . . . . . . . . . . . . . . . . . 35
View and measure sheet dimensions . . . . . . . . . . . . . . . . . . . . . . . . . . . . . . . . . . . . . . . . . . . . . . . . . . . . . . . . . . . . . 35
View sheets of imposed jobs . . . . . . . . . . . . . . . . . . . . . . . . . . . . . . . . . . . . . . . . . . . . . . . . . . . . . . . . . . . . . . . . . . . . 35
Imposing a job . . . . . . . . . . . . . . . . . . . . . . . . . . . . . . . . . . . . . . . . . . . . . . . . . . . . . . . . . . . . . . . . . . . . . . . . . . . . . . . . . 35
Imposition templates . . . . . . . . . . . . . . . . . . . . . . . . . . . . . . . . . . . . . . . . . . . . . . . . . . . . . . . . . . . . . . . . . . . . . . . . . 36
Apply an Imposition template . . . . . . . . . . . . . . . . . . . . . . . . . . . . . . . . . . . . . . . . . . . . . . . . . . . . . . . . . . . . . . . . . . . 36
Save an imposed job . . . . . . . . . . . . . . . . . . . . . . . . . . . . . . . . . . . . . . . . . . . . . . . . . . . . . . . . . . . . . . . . . . . . . . . . . . 37
Imposition template reference . . . . . . . . . . . . . . . . . . . . . . . . . . . . . . . . . . . . . . . . . . . . . . . . . . . . . . . . . . . . . . . . . . 38
Imposition settings . . . . . . . . . . . . . . . . . . . . . . . . . . . . . . . . . . . . . . . . . . . . . . . . . . . . . . . . . . . . . . . . . . . . . . . . . 47
Choose a product intent workflow . . . . . . . . . . . . . . . . . . . . . . . . . . . . . . . . . . . . . . . . . . . . . . . . . . . . . . . . . . . . . . . . . 47
Finish size options for Fiery Impose . . . . . . . . . . . . . . . . . . . . . . . . . . . . . . . . . . . . . . . . . . . . . . . . . . . . . . . . . . . . . . . . 47
Set sheet size in Fiery Impose . . . . . . . . . . . . . . . . . . . . . . . . . . . . . . . . . . . . . . . . . . . . . . . . . . . . . . . . . . . . . . . . . . . . . 48
Set Duplex in Fiery Impose . . . . . . . . . . . . . . . . . . . . . . . . . . . . . . . . . . . . . . . . . . . . . . . . . . . . . . . . . . . . . . . . . . . . . . . 48
Scale settings in Fiery Impose . . . . . . . . . . . . . . . . . . . . . . . . . . . . . . . . . . . . . . . . . . . . . . . . . . . . . . . . . . . . . . . . . . . . . 49
Specify Scale settings . . . . . . . . . . . . . . . . . . . . . . . . . . . . . . . . . . . . . . . . . . . . . . . . . . . . . . . . . . . . . . . . . . . . . . . . . . . . 49
Set cover media . . . . . . . . . . . . . . . . . . . . . . . . . . . . . . . . . . . . . . . . . . . . . . . . . . . . . . . . . . . . . . . . . . . . . . . . . . . . . . . . 49
Set the layout orientation . . . . . . . . . . . . . . . . . . . . . . . . . . . . . . . . . . . . . . . . . . . . . . . . . . . . . . . . . . . . . . . . . . . . . . . . 50
Bleeds for workflows in Fiery Impose . . . . . . . . . . . . . . . . . . . . . . . . . . . . . . . . . . . . . . . . . . . . . . . . . . . . . . . . . . . . . . . 50
Set bleeds . . . . . . . . . . . . . . . . . . . . . . . . . . . . . . . . . . . . . . . . . . . . . . . . . . . . . . . . . . . . . . . . . . . . . . . . . . . . . . . . . . . . . 50
Set printer's marks in Fiery Impose . . . . . . . . . . . . . . . . . . . . . . . . . . . . . . . . . . . . . . . . . . . . . . . . . . . . . . . . . . . . . . . . . 51
Define printer's marks . . . . . . . . . . . . . . . . . . . . . . . . . . . . . . . . . . . . . . . . . . . . . . . . . . . . . . . . . . . . . . . . . . . . . . . . . 51
Set Trim marks . . . . . . . . . . . . . . . . . . . . . . . . . . . . . . . . . . . . . . . . . . . . . . . . . . . . . . . . . . . . . . . . . . . . . . . . . . . . . . . 51
Set Fold marks . . . . . . . . . . . . . . . . . . . . . . . . . . . . . . . . . . . . . . . . . . . . . . . . . . . . . . . . . . . . . . . . . . . . . . . . . . . . . . . 52
Set job label attributes . . . . . . . . . . . . . . . . . . . . . . . . . . . . . . . . . . . . . . . . . . . . . . . . . . . . . . . . . . . . . . . . . . . . . . . . . 52
Set blank page text . . . . . . . . . . . . . . . . . . . . . . . . . . . . . . . . . . . . . . . . . . . . . . . . . . . . . . . . . . . . . . . . . . . . . . . . . . . 52
Set registration marks and barcode in Fiery Impose . . . . . . . . . . . . . . . . . . . . . . . . . . . . . . . . . . . . . . . . . . . . . . . . . 53
Specify booklet settings in Fiery Impose . . . . . . . . . . . . . . . . . . . . . . . . . . . . . . . . . . . . . . . . . . . . . . . . . . . 55
Specify binding settings for Booklet . . . . . . . . . . . . . . . . . . . . . . . . . . . . . . . . . . . . . . . . . . . . . . . . . . . . . . . . . . . . . . . . 55
Specify row & column settings for Booklet . . . . . . . . . . . . . . . . . . . . . . . . . . . . . . . . . . . . . . . . . . . . . . . . . . . . . . . . . . . 55
Specify Creep settings . . . . . . . . . . . . . . . . . . . . . . . . . . . . . . . . . . . . . . . . . . . . . . . . . . . . . . . . . . . . . . . . . . . . . . . . . . . 55
Fiery make-ready applications v4.7
Contents
4

Specify Gangup settings in Fiery Impose . . . . . . . . . . . . . . . . . . . . . . . . . . . . . . . . . . . . . . . . . . . . . . . . . . 57
Set Gangup style . . . . . . . . . . . . . . . . . . . . . . . . . . . . . . . . . . . . . . . . . . . . . . . . . . . . . . . . . . . . . . . . . . . . . . . . . . . . . . . 57
Specify Row & Column settings for Gangup . . . . . . . . . . . . . . . . . . . . . . . . . . . . . . . . . . . . . . . . . . . . . . . . . . . . . . . . . . 57
Set Page Order . . . . . . . . . . . . . . . . . . . . . . . . . . . . . . . . . . . . . . . . . . . . . . . . . . . . . . . . . . . . . . . . . . . . . . . . . . . . . . . . . 57
Set Gutters . . . . . . . . . . . . . . . . . . . . . . . . . . . . . . . . . . . . . . . . . . . . . . . . . . . . . . . . . . . . . . . . . . . . . . . . . . . . . . . . . . . . 57
Scale to fit options with gutters . . . . . . . . . . . . . . . . . . . . . . . . . . . . . . . . . . . . . . . . . . . . . . . . . . . . . . . . . . . . . . . . . . 58
Set Gang Up methods in Fiery Impose . . . . . . . . . . . . . . . . . . . . . . . . . . . . . . . . . . . . . . . . . . . . . . . . . . . . . . . . . . . . . . 58
Combining Gangup styles with Gangup methods . . . . . . . . . . . . . . . . . . . . . . . . . . . . . . . . . . . . . . . . . . . . . . . . . . . . . 59
Specify Repeat Booklet finish feature . . . . . . . . . . . . . . . . . . . . . . . . . . . . . . . . . . . . . . . . . . . . . . . . . . . . . . . . . . . . . . . 60
Styles available for edge-binding options . . . . . . . . . . . . . . . . . . . . . . . . . . . . . . . . . . . . . . . . . . . . . . . . . . . . . . . . . . . 60
Modify pages manually in Fiery Impose . . . . . . . . . . . . . . . . . . . . . . . . . . . . . . . . . . . . . . . . . . . . . . . . . . . 61
Rotate pages . . . . . . . . . . . . . . . . . . . . . . . . . . . . . . . . . . . . . . . . . . . . . . . . . . . . . . . . . . . . . . . . . . . . . . . . . . . . . . . . . . . 61
Edit page content . . . . . . . . . . . . . . . . . . . . . . . . . . . . . . . . . . . . . . . . . . . . . . . . . . . . . . . . . . . . . . . . . . . . . . . . . . . . . . . 61
Edit page content with PitStop . . . . . . . . . . . . . . . . . . . . . . . . . . . . . . . . . . . . . . . . . . . . . . . . . . . . . . . . . . . . . . . . . . . . 61
Reorder pages . . . . . . . . . . . . . . . . . . . . . . . . . . . . . . . . . . . . . . . . . . . . . . . . . . . . . . . . . . . . . . . . . . . . . . . . . . . . . . . . . 61
Insert blank pages manually . . . . . . . . . . . . . . . . . . . . . . . . . . . . . . . . . . . . . . . . . . . . . . . . . . . . . . . . . . . . . . . . . . . . . . 62
Delete pages . . . . . . . . . . . . . . . . . . . . . . . . . . . . . . . . . . . . . . . . . . . . . . . . . . . . . . . . . . . . . . . . . . . . . . . . . . . . . . . . . . . 62
VDP in Fiery Impose . . . . . . . . . . . . . . . . . . . . . . . . . . . . . . . . . . . . . . . . . . . . . . . . . . . . . . . . . . . . . . . . . . . . . . . . 63
Open or preview a VDP job . . . . . . . . . . . . . . . . . . . . . . . . . . . . . . . . . . . . . . . . . . . . . . . . . . . . . . . . . . . . . . . . . . . . . . . 63
Imposing a VDP job . . . . . . . . . . . . . . . . . . . . . . . . . . . . . . . . . . . . . . . . . . . . . . . . . . . . . . . . . . . . . . . . . . . . . . . . . . . . . 63
Print control strips for VDP jobs . . . . . . . . . . . . . . . . . . . . . . . . . . . . . . . . . . . . . . . . . . . . . . . . . . . . . . . . . . . . . . . . . . . . 64
Specify booklet, scale, or bleeds for VDP imposition . . . . . . . . . . . . . . . . . . . . . . . . . . . . . . . . . . . . . . . . . . . . . . . . . . . 64
Set multi-up booklet for VDP jobs . . . . . . . . . . . . . . . . . . . . . . . . . . . . . . . . . . . . . . . . . . . . . . . . . . . . . . . . . . . . . . . . 64
Set bleeds or scaling in VDP imposition . . . . . . . . . . . . . . . . . . . . . . . . . . . . . . . . . . . . . . . . . . . . . . . . . . . . . . . . . . . 65
Gang Up settings for VDP imposition . . . . . . . . . . . . . . . . . . . . . . . . . . . . . . . . . . . . . . . . . . . . . . . . . . . . . . . . . . . . . . . 65
Single Record Imposition for VDP jobs . . . . . . . . . . . . . . . . . . . . . . . . . . . . . . . . . . . . . . . . . . . . . . . . . . . . . . . . . . . . 66
Multiple Records Imposition for VDP jobs . . . . . . . . . . . . . . . . . . . . . . . . . . . . . . . . . . . . . . . . . . . . . . . . . . . . . . . . . 66
Duplo VDP Gang Up . . . . . . . . . . . . . . . . . . . . . . . . . . . . . . . . . . . . . . . . . . . . . . . . . . . . . . . . . . . . . . . . . . . . . . . . . . . 67
Fiery Compose . . . . . . . . . . . . . . . . . . . . . . . . . . . . . . . . . . . . . . . . . . . . . . . . . . . . . . . . . . . . . . . . . . . . . . . . . . . . . 68
Setting job options before using Fiery Compose . . . . . . . . . . . . . . . . . . . . . . . . . . . . . . . . . . . . . . . . . . . . . . . . . . . . . . 68
Open and view jobs in Fiery Compose . . . . . . . . . . . . . . . . . . . . . . . . . . . . . . . . . . . . . . . . . . . . . . . . . . . . . . . . . . . . . . 68
Open a job in Fiery Compose . . . . . . . . . . . . . . . . . . . . . . . . . . . . . . . . . . . . . . . . . . . . . . . . . . . . . . . . . . . . . . . . . . . 69
Set the Sheet View to thumbnails or full pages in Fiery Compose . . . . . . . . . . . . . . . . . . . . . . . . . . . . . . . . . . . . . . 69
View pages as a book . . . . . . . . . . . . . . . . . . . . . . . . . . . . . . . . . . . . . . . . . . . . . . . . . . . . . . . . . . . . . . . . . . . . . . . . . . 70
Fiery make-ready applications v4.7
Contents
5

Adjust thumbnail size . . . . . . . . . . . . . . . . . . . . . . . . . . . . . . . . . . . . . . . . . . . . . . . . . . . . . . . . . . . . . . . . . . . . . . . . . 70
Work with pages in Fiery Compose . . . . . . . . . . . . . . . . . . . . . . . . . . . . . . . . . . . . . . . . . . . . . . . . . . . . . . . . . . . . . . . . . 71
Open a job for editing in Acrobat . . . . . . . . . . . . . . . . . . . . . . . . . . . . . . . . . . . . . . . . . . . . . . . . . . . . . . . . . . . . . . . . 71
Reorder, delete, or set duplex for pages in Fiery Compose . . . . . . . . . . . . . . . . . . . . . . . . . . . . . . . . . . . . . . . . . . . . 71
Insert pages from another job in Fiery Compose . . . . . . . . . . . . . . . . . . . . . . . . . . . . . . . . . . . . . . . . . . . . . . . . . . . . 71
Insert a blank sheet or page in Fiery Compose . . . . . . . . . . . . . . . . . . . . . . . . . . . . . . . . . . . . . . . . . . . . . . . . . . . . . . 71
Assign media to pages in Fiery Compose . . . . . . . . . . . . . . . . . . . . . . . . . . . . . . . . . . . . . . . . . . . . . . . . . . . . . . . . . . 72
Convert to Grayscale . . . . . . . . . . . . . . . . . . . . . . . . . . . . . . . . . . . . . . . . . . . . . . . . . . . . . . . . . . . . . . . . . . . . . . . . . . 72
Work with chapter starts in Fiery Compose . . . . . . . . . . . . . . . . . . . . . . . . . . . . . . . . . . . . . . . . . . . . . . . . . . . . . . . . 73
Set tabs in Fiery Compose . . . . . . . . . . . . . . . . . . . . . . . . . . . . . . . . . . . . . . . . . . . . . . . . . . . . . . . . . . . . . . . . . . . . . . 73
Set tab text and other properties in Fiery Compose . . . . . . . . . . . . . . . . . . . . . . . . . . . . . . . . . . . . . . . . . . . . . . . . . . 73
Set up covers . . . . . . . . . . . . . . . . . . . . . . . . . . . . . . . . . . . . . . . . . . . . . . . . . . . . . . . . . . . . . . . . . . . . . . . . . . . . . . . . 74
Subset finishing in Fiery Compose . . . . . . . . . . . . . . . . . . . . . . . . . . . . . . . . . . . . . . . . . . . . . . . . . . . . . . . . . . . . . . . . . 74
Specify a set definition in Fiery Compose . . . . . . . . . . . . . . . . . . . . . . . . . . . . . . . . . . . . . . . . . . . . . . . . . . . . . . . . . . 75
Apply subset finishing in Fiery Compose . . . . . . . . . . . . . . . . . . . . . . . . . . . . . . . . . . . . . . . . . . . . . . . . . . . . . . . . . . 75
Specify subset finishing for Z-fold in Fiery Compose . . . . . . . . . . . . . . . . . . . . . . . . . . . . . . . . . . . . . . . . . . . . . . . . . 76
Manage jobs in Fiery Compose . . . . . . . . . . . . . . . . . . . . . . . . . . . . . . . . . . . . . . . . . . . . . . . . . . . . . . . . . . . . . . . . . . . . 76
Save a job in Fiery Compose . . . . . . . . . . . . . . . . . . . . . . . . . . . . . . . . . . . . . . . . . . . . . . . . . . . . . . . . . . . . . . . . . . . . 76
Delete a job that is open in Fiery Compose . . . . . . . . . . . . . . . . . . . . . . . . . . . . . . . . . . . . . . . . . . . . . . . . . . . . . . . . 77
Fiery Preview . . . . . . . . . . . . . . . . . . . . . . . . . . . . . . . . . . . . . . . . . . . . . . . . . . . . . . . . . . . . . . . . . . . . . . . . . . . . . . . 78
View information for processed jobs . . . . . . . . . . . . . . . . . . . . . . . . . . . . . . . . . . . . . . . . . . . . . . . . . . . . . . . . . . . . . . . . 78
View spooled, unprocessed jobs . . . . . . . . . . . . . . . . . . . . . . . . . . . . . . . . . . . . . . . . . . . . . . . . . . . . . . . . . . . . . . . . . . . 79
Page View, Sheet View, and Reader View . . . . . . . . . . . . . . . . . . . . . . . . . . . . . . . . . . . . . . . . . . . . . . . . . . . . . . . . . . 81
Settings pane . . . . . . . . . . . . . . . . . . . . . . . . . . . . . . . . . . . . . . . . . . . . . . . . . . . . . . . . . . . . . . . . . . . . . . . . . . . . . . . . 82
Open Reader View . . . . . . . . . . . . . . . . . . . . . . . . . . . . . . . . . . . . . . . . . . . . . . . . . . . . . . . . . . . . . . . . . . . . . . . . . . . . 83
Toolbar icons in Preview . . . . . . . . . . . . . . . . . . . . . . . . . . . . . . . . . . . . . . . . . . . . . . . . . . . . . . . . . . . . . . . . . . . . . . . 84
Preview a raster image . . . . . . . . . . . . . . . . . . . . . . . . . . . . . . . . . . . . . . . . . . . . . . . . . . . . . . . . . . . . . . . . . . . . . . . . . . . 85
Toolbar icons in Raster Preview . . . . . . . . . . . . . . . . . . . . . . . . . . . . . . . . . . . . . . . . . . . . . . . . . . . . . . . . . . . . . . . . . . 86
Merging pages in Raster Preview . . . . . . . . . . . . . . . . . . . . . . . . . . . . . . . . . . . . . . . . . . . . . . . . . . . . . . . . . . . . . . . . 86
VDP Raster Preview . . . . . . . . . . . . . . . . . . . . . . . . . . . . . . . . . . . . . . . . . . . . . . . . . . . . . . . . . . . . . . . . . . . . . . . . . . . 87
Index . . . . . . . . . . . . . . . . . . . . . . . . . . . . . . . . . . . . . . . . . . . . . . . . . . . . . . . . . . . . . . . . . . . . . . . . . . . . . . . . . . . . . . . 91
Fiery make-ready applications v4.7
Contents
6

Fiery JobMaster-Fiery Impose-Fiery Compose
Fiery make-ready software integrates labor-intensive document preparation activities at both the sheet level andpage level in one visual interface.These integrated job preparation tools offer the following modes, depending on what client license is available:
• Fiery JobMaster provides advanced PDF-based job preparation tools for scanning, tab creation and insertion,page numbering, chapter creation, and late stage editing. It includes all functions of Fiery Compose.
• Fiery Impose applies imposition layouts to jobs for custom printing, binding, and trimming. Fiery Impose alsoapplies impositions to variable data jobs and saves imposed jobs as PDF files.
• Fiery Compose allows you to define the chapter divisions of a job, print ranges of pages on varying types ofmedia, insert blank media between pages, and insert tab media containing text labels (if the printer supports tabprinting).
• Preview provides a preview of a job before it is processed and is a standard feature of Command WorkStation.Users can do a soft proof of each sheet surface of a job before it is processed. The visual interface changesdynamically to display any changes made in preparing documents for printing.
The Fiery make-ready applications are supported on both Windows and Mac OS computers. For information aboutsystem requirements, see Configuration and Setup for your Fiery Server.
Fiery make-ready applications v4.7
Fiery JobMaster-Fiery Impose-Fiery Compose
7

Fiery JobMaster
Fiery JobMaster is an advanced PDF-based job-preparation solution designed to help operators deal with complexdocument tasks such as tab insertion, scanning, chapterization, page numbering, and late stage editing. FieryJobMaster, along with Fiery Impose and Fiery Compose, is one of the Fiery make-ready applications.
Note: To use Fiery JobMaster (or Fiery Impose or Fiery Compose), you must have a license activated on your clientcomputer. You need a License Activation Code (LAC); if you do not have one, contact your Fiery dealer or printermanufacturer.Fiery JobMaster includes Fiery Compose options, although Fiery Compose is also available as a separate licensedoption.Fiery JobMaster is accessed from Command WorkStation and opens in the Fiery JobMaster window.Adobe Acrobat and Enfocus PitStop Pro are provided in the the Fiery JobMaster kit. Adobe Acrobat and PitStopallow editing in Acrobat from Fiery JobMaster, and can be used in some cases to convert PostScript files to PDF forFiery JobMaster. For more information about installing Acrobat and PitStop, see Utilities, which is part of the userdocumentation set.For important information about this release of Fiery JobMaster, see the release notes at http://help.efi.com/fea.
Activate the Fiery JobMaster license
To activate the Fiery JobMaster license, you must have a License Activation Code (LAC). You can activate the licenseautomatically if your computer is connected to the Internet, or manually if your computer is not connected to theInternet.1 In Command WorkStation, right-click a job and choose JobMaster, or Preview if JobMaster is not displayed.
• If you chose JobMaster, and you are asked whether to activate the option, click Yes.
• If you chose Preview, select Help > Manage License in the Fiery Preview window.
2 In the License Activation window, click the Help icon and follow the instructions.
Open a job in Fiery JobMaster
When you have activated your license, you can start to use Fiery JobMaster. Open a PostScript or Adobe PDF filefrom Command WorkStation. The job must be in a spooled/held state.If you select a processed/held job, and choose Actions > Preview, the job opens in the Raster Preview window. To edita processed job in Fiery JobMaster, you must first remove the raster from the job. Select the job in the Held list andchoose Actions > Remove Raster.
Fiery make-ready applications v4.7
Fiery JobMaster
8

1 Select a spooled/held job in the Held list of Command WorkStation.
2 Choose Actions > JobMaster.
3 Option-click (Mac OS) or Alt-click (Windows) a page in the Sheet View pane to select the same page in the PageView pane.
You can now acquire scans, edit them, and place them in your job; edit pages and add page numbering; and inserttabs and edit the tabs and the tab text.
Add a new job
You can create a blank new job in Fiery JobMaster (or Fiery Impose/Fiery Compose).You must have Fiery JobMaster (or Fiery Impose/Fiery Compose) licensed on your computer to create a new job.You cannot create a new job in Fiery Impose demo version.You can create a job entirely in Fiery JobMaster, including tab and scan jobs. This is useful when you do not have anydigital content already stored on the Fiery Server.
1 Click the New Job icon in the Command WorkStation tool bar.If the New Job icon is not visible in the tool bar, add it using the Customize feature in Command WorkStation.See Command WorkStation Help for more information.Your new job opens in Fiery JobMaster with a single blank page, with the default page size set in CommandWorkStation Preferences.
2 Apply settings as required.
3 Insert pages from an existing job, if required.You can only insert pages from the source PDF document. You cannot insert pages that were previously added asinserted tabs to that job.
Import and edit a scan in Fiery JobMaster
You can import a scan using Fiery Remote Scan TWAIN plug-in when it is installed on your computer. You can thenadjust aspects of the scan, such as size, brightness, and despeckling.You can use the functions in the Scan Preview & Edit window only during the scan operation. You cannot apply thesefunctions to pages that are already part of a Fiery JobMaster-Fiery Impose job.
1 Right-click a held job in Command WorkStation Job Center, and select JobMaster.
2 In the Fiery JobMaster window, select Actions > Insert Pages or Insert > Insert Pages.
3 In the Insert Pages window, select Scan.
4 If not selected, choose Fiery Remote Scan 6 from the list of scanners and click Scan.You can select a different scanner if its TWAIN plug-in is installed on your computer.
Fiery make-ready applications v4.7
Fiery JobMaster
9
5 Select the Fiery Server to connect to.For instructions on how to use Fiery Remote Scan, click the Help icon in the Fiery Remote Scan window.
6 Select From MailBox or Scan, and follow the instructions in Fiery Remote Scan Help.
7 To edit the scan, use the options in the Scan Preview & Edit window. These options are available on a per pagebasis, or if the Apply to All button is selected, to all pages in the scan job.
• Acquire - Acquires the scan from either the mailbox or the printer.
• Select , Move - Selects or moves the scanned image in the viewer.
• Zoom - Zooms in and out. Click the icon to fit the scanned page to the preview window.
• Deskew - Straightens an image.
• Despeckle - Removes tiny dots or specks that sometimes appear on scanned images.
• Media Size - Automatically applies the nearest page size from the page size list to the scanned page, rotated asnecessary. For example, 8.48 x 10.98in would result in 8.5 x 11in portrait and if the image is rotated, 8.5 x 11inlandscape.
Note: Scan Size sets the final page size to the original scan size. Page Size defines the imported document pagesize. The scanned image will be resized to that page size. The page sizes listed are determined by the printerdriver.
• Width, Height - Determined by the selections in Media Size and Orientation.
• Delete this page - Deletes the selected page in the preview window.
Note: Additional pages can also be scanned and added to the existing scan job.
8 Click Import.
9 In the Insert Pages window, select scanned pages and drag them onto the Page View pane in the Fiery JobMasterwindow.
Edit a page in Fiery JobMaster
With Fiery JobMaster, you can edit pages of a job by rotating, masking, and cropping. You can also change the trimsize or crop box size.1 Right-click a spooled/held job in Command WorkStation, and choose JobMaster.
2 In the Page View pane, select the page or pages you want to edit and choose Actions > Edit page.
Fiery make-ready applications v4.7
Fiery JobMaster
10

3 Specify the settings. Click OK when you finish.
• Panning - Moves the scanned image in the preview window.
• Mask - Masks one or more areas of the page. Click and then draw the area to be masked. Applies thesame masked areas to all of the selected pages before opening the Edit Page window. Overrides maskspreviously made on any of these pages.
• Zoom - Zooms in and out. (Click the icon to fit the scanned page to the preview window.)
• Mode - Margin lets you adjust the existing crop box or trim box. By applying a margin, you can define howmuch smaller (or larger) the new crop/trim box will be than the original one. Offset lets you (with the Sizeoption) define an entirely new size for the crop/trim box, and can position the new crop/trim size directlyagainst the existing content. It also enables the Predefined Crop Size menu for Crop Box.
• Crop Box, Trim Box - To enable, click the Disabled button. See Mode.
Advanced Page Numbering
Advanced page numbering allows you to add custom numbering to sections of a job, such as a range of pages orspecific chapters.You can specify different styles for different sections of your document, for instance, roman numerals for frontmatter and appendices, and Arabic numerals for the body of the document. Or you can designate pages that have nopage number printed, but are included in the counts.Some possible uses of the advanced page numbering feature are described in the following examples:
• In a five-page job where each page is counted, the pages are numbered (1, 2, 3, 4, 5).
• In a five-page job where each page is counted and the starting number is 10, the pages are numbered (10, 11, 12,13, 14).
• In a five-page job where each page is counted and the increment value is 2, the pages are numbered (1, 3, 5, 7, 9).
• In a five-page job where only the last page is counted, the pages are numbered (x, x, x, x, 1) where "x" indicates apage with no number printed on it.
• In a five-page job where the first two pages are skipped, the pages are numbered (x, x, 3, 4, 5) where "x" indicatesa page with no number printed on it.
• In a ten-page job set up as chapters, with two pages in each chapter (five total chapters), the pages are numbered([1, 2], [1, 2], [1, 2], [1, 2], [1, 2]) where [] shows each chapter.
For information about the controls available for the advanced page numbering feature and how to use them, see Advanced page numbering workspace on page 13 and Set Advanced Page Numbering options on page 14.
Fiery make-ready applications v4.7
Fiery JobMaster
11

Type and Range
Add a range of pages or chapters, or the whole document to make advanced page numbering options available. TheType and Range dialog possible settings are shown below:
Type Range
Page Page numbers, or page ranges, separated by commas
Document All pages
Chapter Chapter numbers, or chapter ranges, separated by commas
Numbering properties
Add the numbering properties for each of the ranges. Options are:
Element Options
Page • Current Page
• Total Pages
• Page {current}
• Page {current} of {total}
• Page {current}/{total}
• {current} of {total}
• {current}/{total}
Multiple formats:
1,2,3
a,b,c
A,B,C
i,ii,iii
I,II,III
Chapter • Current Page
• Total Pages
• Current Chapter
• Total Chapters
Multiple formats:
1,2,3
a,b,c
A,B,C
i,ii,iii
I,II,III
Document Name
Date & Time • Date
• Time
• Date & Time
• Date Formats
• Time Formats
Multiple formats
Fiery make-ready applications v4.7
Fiery JobMaster
12

Element Options
• Date Specifiers
• Time Specifiers
Advanced page numbering workspace
The Page Numbers & Stamping window provides a workspace for advanced page numbering.The Page Numbers & Stamping window is accessed by clicking Edit Numbering for your job in the Page View pane ofthe Fiery JobMaster window.
1 Add Range and Duplicate icons for adding ranges, and duplicating a range.
2 Type and Range dialog displays added ranges for document, chapters, and pages.
3 Presets menu, and Save and Delete icons.
4Text field displays macros for the numbering options you specify from clicking the plus sign below the text field.You can add text to the macros.
5 Controls for enabling/disabling a background for the page number field in the document.
6The plus sign opens menus for specifying page numbers, chapter numbers, date, time, and the name of thedocument.
Fiery make-ready applications v4.7
Fiery JobMaster
13

7 Advanced numbering and printing options.
8 Select, Move, and Zoom icons for the preview pane.
9 Preview of job. Navigation and zoom controls provided below the preview.
10 Field for page numbering display, can be re-sized and moved.
Set Advanced Page Numbering options
1 Right-click a spooled/held job in Command WorkStation, and choose JobMaster.
2 In the Page View pane, select a page or pages, and choose Actions > Edit numbering.
Note: If you want to add chapter starts to the job, do so before selecting Edit Numbering.
3In the Page Numbers & Stamping window, click the Add Range icon above the Type and Range dialog.a) Choose type of range from the Type menu.
b) Enter a range in the Range field.
c) To duplicate a range, select it and click .
d) To move a range up in the order, click .
e) To delete a range, click .For information about the possible settings, see "Type and Range" in Advanced Page Numbering on page 11.
4To add numbering properties, click below the Text field box.For information about the possible settings, see "Numbering properties" in Advanced Page Numbering on page11.The numbering choices are displayed on the page in the preview pane, and the macro, or macros, are displayed inthe Text field.
5 To change the size of the page number field and to move it to another location on the page, use the Selecticon at the top of the preview pane.
The Move icon moves the image in the preview pane when zoomed in.
6 To customize the numbering properties that you have selected, you can make changes in the Text field.
Note: If you add multiple numbering elements to a range, for instance, page numbers, chapter numbers, and dateor time, macros are added to the Text field in the order that you selected the elements from the menu, withoutspaces between the macros.
• To add spaces between the numbering elements, insert spaces between the macros.
• To create multiple lines in the page number display, use the Enter/Return key to insert a carriage returnbetween macros.
Fiery make-ready applications v4.7
Fiery JobMaster
14

• To remove a numbering element choice, delete the macro in the Text field.
• To add some static text to the numbering element, type the text where you want it to be in relation to themacro or macros.
• To pad a page number with zeroes, asterisks, or spaces, enter the padding character, followed by a numeralindicating how many characters the page number should be, followed by a colon. For example, to add zeroes topad the number to 7 characters, modify the page number text in the following way:{#07:DOCUMENT_PAGE_NUMBER}. If the page number was 6, the resulting output would be: "0000006".
7 To add a background to the number field, click . Select color and opacity of the background for thepage number field.
The icon changes to .
8 Choose Type settings, such as font, color, size, style, angle.
9 Choose from the Numbering options.
• Count only the specified pages - Select this to indicate that only the pages in the selected range are counted.
• Use custom numbering for this range -
• Pages to skip - If a page is skipped, the page will be included in the count, but will not show a page number.
• Start # - The document is numbered starting with the number you enter. If you selected the option to countonly the specified pages in the range, the section is numbered starting with the number you entered.
• Increment - For each page in the document or range, the page number will increment from the previouspage by the value you enter.
• Count tabs & inserts - Includes inserted tabs or blank pages when calculating the page numbers.
• Restart after inserts - Restarts the page numbering after an insert, according to the starting page number youhave set.
10 Choose the Print options.
• Print on - Print the page numbering on both pages, the front only, or the back only.
• Mirror - Positions page numbers in mirror image on facing pages.
• Print on tabs - Prints the page numbers on the inserted tabs, if you selected Count tabs & inserts in theNumbering options.
• Apply styles to all - Select the styles you want applied to all the ranges.
11 Click OK.You can preview the page numbering in the Sheet View pane in the Fiery JobMaster window. You can also save
the settings as a preset to the presets menu . For information aboutpresets, see Command WorkStation Help.
Fiery make-ready applications v4.7
Fiery JobMaster
15

Add Auto Tabs
Insert tabs at PDF bookmark locations or chapter start locations.To insert tabs at PDF bookmark locations, the imported job must be an Acrobat PDF with bookmarks alreadyspecified in the document. To insert tabs at chapter starts, add the chapter starts in Fiery JobMaster. You must havean activated Fiery JobMaster license.
1 Import a PDF job into the Hold queue of Command WorkStation.
2 Select the job in the Held list and choose JobMaster from the Actions menu.
3 In the View menu, select Show Bookmarks.The PDF bookmarks are shown with a red ribbon.
4 To add chapter starts to the PDF, select a page and choose Chapter Start from the Actions menu.Chapter starts are shown with a blue ribbon. If a page is both a bookmark and a chapter start, it is shown with ablue and red ribbon.
5 In the Actions menu, go to Auto Tabs and select one (or more) of the following:
Option Description
Convert Bookmarks toTabs
All bookmarked pages are converted to tabs. The Edit Tab dialog will automatically open; thetab text fields will be automatically populated with each bookmark's title. (Only enabled if theimported PDF has bookmarks.)
Insert BeforeBookmarks
A tab will be inserted before each bookmark. The Edit Tab dialog will automatically open; thetab text fields will be automatically populated with each bookmark's title. (Only enabled if theimported PDF has bookmarks.)
Convert Chapters toTabs
All chapter start pages will be converted to tabs. The Edit Tab dialog will automatically open.(Only enabled if chapter starts have been set.)
Insert BeforeChapters
A tab will be inserted before each chapter start page. The Edit Tab dialog will automaticallyopen. (Only enabled if chapter starts have been set.)
Note: Note the following:
• Only the top level bookmarks in the Acrobat PDF are extracted for Auto Tabs. If there are two or more toplevel bookmarks on a single page, the first bookmark is used.
• Longer bookmark titles that cannot fit in the tab ear text field appear to be cut off from both ends.
• Auto Tabs are always inserted in the first set, if multiple tab sets are supported on your Fiery Server.
• Even if Auto Tabs have been inserted, you can use the Insert Tab function to insert tabs.
When tabs have been added to a document, you can use the Filter Tabs icon in the Page View tool bar to displayonly those pages with tabs.
Fiery make-ready applications v4.7
Fiery JobMaster
16
Insert and edit tabs in Fiery JobMaster
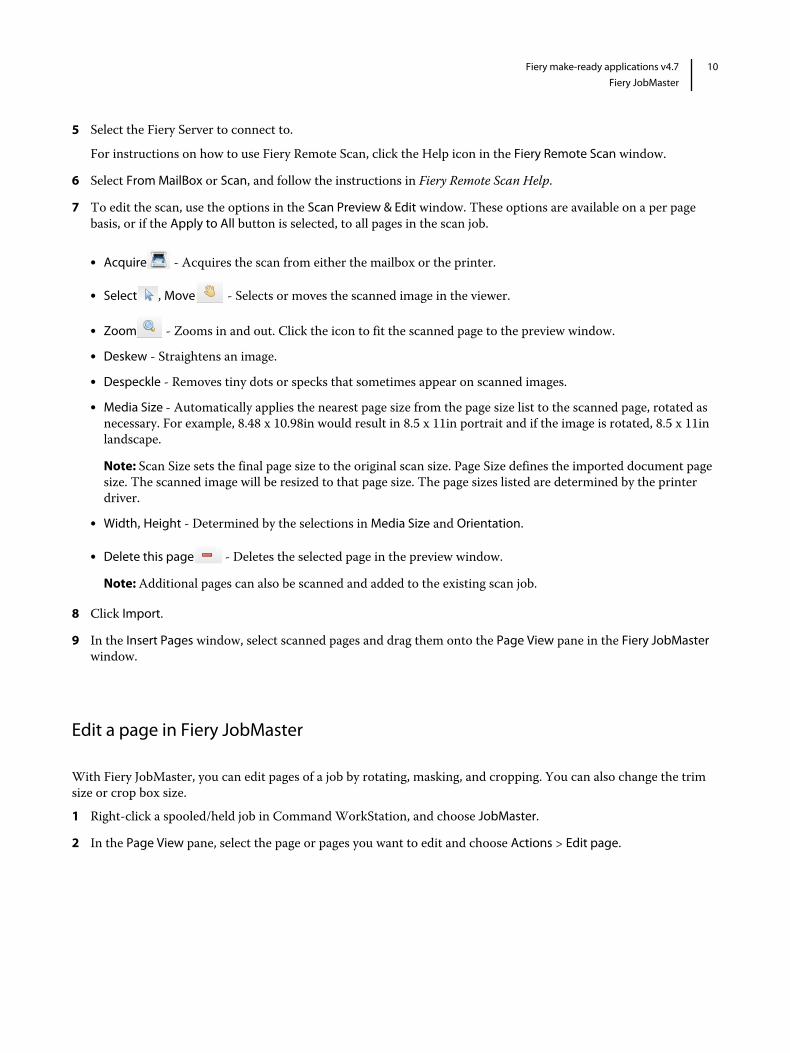
If tab printing is supported by the Fiery Server, you can insert tabs and specify text and media settings for them. Inthe Tab Media window you can save media settings as a preset. You can define custom tabs and those settings areincluded in the preset.You can specify two tab styles in a single document. This allows you to identify chapters and sub-chapters in longdocuments. See Add multiple tab styles to a document on page 18.The Tab Media window displays an image of the tab ear with measurements. When you change the number of tabs ina set, the measurements shown in the displayed tab change. You can specify up to 50 tabs in a set.To convert a normal page to a tabbed page, select the page’s Convert to tab option.
Note: The Convert to tab option in earlier versions of Fiery Compose has been removed. To convert an existing pagein the document, or an inserted page, to a tab in Fiery Compose, right-click and select Assign Media, then select a tabmedia from the list.
1 Right-click a spooled held job in Command WorkStation, and choose JobMaster.
2 To insert a tab, select a page or pages in the Page View pane, and click Actions > Insert tab.
3 To edit a tab, right-click it in the Page View or Sheet View pane, and click Edit Tab.
4 Specify settings in the Edit Tab window.
• Text - If you have more than one tab in your document, select the tab to specify settings for it. When you addtext to a tab, you can select the next or previous tab by pressing Ctrl+Right Arrow (Windows) or Cmd+RightArrow (Mac OS).
• Background Color - Click the Disabled button to enable.
• Background Image - A background image can be a BMP, JPEG (JPG), PNG, TIFF (TIF), or GIF file. When youselect a background image to place on the tab, you can specify opacity, scale, and rotation, and set marginsrelative to the tab size.
5 To specify media settings, click the Edit button beside the Media Preset field, and specify settings:
• Tab sequence - Indicates the order in which the tabs are printed.
• Output tray to kick out unused tabs - Use this setting if you are printing a job that does not use all the tabs inthe set. For instance, if you are using only three tabs of a five-tab set, the two unused tabs will be output to thetray you select.
• Tab shift (Convert to Tab) - Use for tabs that have been converted from an existing page.
6 (Optional) To save the media settings as a preset, click the Save Preset icon next to the Media Preset menu andname the Preset.Presets are displayed in the Tab Media window and the Edit Tab window.
7 Click OK in the Tab Media window.
8 Click OK in the Edit Tab window.When tabs have been added to a document, you can use the Filter Tabs icon in the Page View tool bar to displayonly those pages with tabs.
Fiery make-ready applications v4.7
Fiery JobMaster
17

Add multiple tab styles to a document
You can add multiple tab styles to a document in Fiery JobMaster, if your printer supports the feature. You can nestthe different tab styles also, if your printer supports the feature.Import the spooled job into Fiery JobMaster.You can create multiple tab styles and then either insert tabs or convert existing pages to tabs in a single job, andassign the tab styles.
1 Do one of the following in the Page View pane:
• To convert an existing page in your document, right-click and select Convert to Tab.
• To insert a new tab, right-click a page and select Insert Tab. The tab is inserted as the page before.
If your printer supports multiple tab styles, the available tab styles are listed. You can also create a new tab styleby clicking Create New if the option is available.
2 Select a tab style for your selected tab style.
3 Continue to add tabs and select one of the available styles. In addition, you can do the following:
• To change the tab media, right-click a tab page, and select Change Tab Media.
• Right-click a tab page, and select Edit Tab to make changes to the tab style. See Insert and edit tabs in FieryJobMaster on page 17.
• Choose to nest multiple tab sets by selecting Nest multiple tab sets in the Edit Tab window.
Note: If you choose not to select this option, each of the tab styles will be assigned sequentially wherever theyare in the job. See the example below.
4 To view the information about the tab style selected for a specific page, click on the tab page.The tab style information uses the following terminology:
• Tab ear - a single ear that sticks out from the edge of the media
• Tab bank - a single series of tab ears that often spans the media edge
• Tab cut - the position of the tab within a tab bank
• Tab set - multiple banks with the same tab styles that make up a tab set
• Tab style - media attributes of the tab set (number of ears, first tab offset, reading order)
Fiery make-ready applications v4.7
Fiery JobMaster
18

When you choose to nest multiple tab styles in a single job, the tabs usingthe second tab style selected will be nested within the first tab style's bankof tabs. For instance, you assign Tab Bank 1 with 3 sets of tabs to the firsttwo tabs in the job. You then assign Tab Bank 2 with 5 sets of tabs to thethird and fourth tabs in the job. When you assign the fifth tab in the jobto Tab Bank 1, the tab will be position number 3 in that bank. If you thenassign the sixth tab in the job to Tab Bank 2, the tab will be positionnumber 1 in that bank. If you move the first tab of Tab Bank 2 before thefirst tab of Tab Bank 1 in the job, then Tab Bank 2 becomes the primarystyle, and Tab Bank 1 is nested within Tab Bank 2. Unused tabs in a bankwill use the Output tray to kick out unused tabs option in the Tab Mediawindow.If you choose not to nest multiple tab styles in a single job, then the tabsfor each tab style will be assigned sequentially in the job. Then, using theTab Bank 1 and Tab Bank 2 example above, the sixth tab in the job whichhas been assigned to Tab Bank 2 will be position number 3 in that tabbank.
Bleed edge tabs in Fiery JobMaster
Bleed edge tabs are printed on the page itself, not on tabs. The tabs bleed 1/8-inch beyond the defined edge of thepage based on the trim box. You can position bleed edge tabs anywhere and specify different content for each set oftabs.The bleed edge tabs are applied to pages in the document. When pages are added or removed before the pages withthe bleed edge tabs, the page ranges in the bleed edge tabs List view are updated to reflect the new position of theoriginal pages in the job. When pages are inserted between, or removed from, pages listed in a bleed edge tab pagerange, the page range changes to reflect the changed pages.Bleed edge tabs cannot be added to the following types of pages in a job:
• Inserted sheets
• Inserted tabs
• Implicit blanks
• Pages converted to tabs
When adding bleed edge tabs to a job, first specify the content of the bleed edge tabs, and then the position of thetabs. You can preview the settings for both content and position.
Tools in Bleed Edge Tabs window
The Bleed Edge Tabs window provides several tools, including the following:
• - Use to select the image.
• - Use to move the image.
• - Select a zoom percentage, or click the icon to fit the page to the preview window.
Fiery make-ready applications v4.7
Fiery JobMaster
19

You can also page through the document by using the navigation arrows or entering a page number in the page textfield.
Add content to bleed edge tabs
In Fiery JobMaster you can define sets of bleed edge tabs, add styled text, and add background color and images.
1 Select a job in the Command WorkStation Held list and choose Actions > JobMaster.
2 Select any page of the job in the Page View pane and choose Actions > Edit Bleed Edge Tab.As you specify settings in the Bleed Edge Tabs window, you can preview your settings by clicking Preview.
3 In the Bleed Edge Tabs window, select the Content tab, and then select List.
4 Specify the ranges for the bleed edge tabs by entering the page numbers in the From and To fields. Press Enter tocreate a row for the next set.Page ranges must be sequential and cannot overlap. You can skip some pages for chapter beginnings. To delete apage range, select the range and the minus button at the bottom of the window.
5 To specify text for all bleed edge tabs in a range, select a range and enter text in the Type text field. Specify textsettings such as font and orientation.
6 To add a background fill, select a color and percentage opacity.To enable the Background option, click the Disabled button.
7 To add an image to all tabs, click the Disabled button to enable the Image area, and browse to select an image.The image can be in BMP, JPEG, TIFF, TIF, GIF, or PNG format. You can also specify settings such as opacityand set margins relative to the tab size.
8 Click the Apply styles to all button to specify which styles you want to apply to which sets of tabs.By default, styles apply only to the tabs in the current section. Selecting Apply styles to tabs of the same positionalso applies the checked items to all tab sections that are in the same tab position.
Specify position of bleed edge tabs
In the Fiery JobMaster Bleed Edge Tabs window, you can specify the position of the bleed tabs in the final output.The position you specify applies to all the tabs in the job.1 Select a job in the Command WorkStation Held list and choose Actions > JobMaster.
2 Select any page of the job in the Page View pane and choose Actions > Edit Bleed Edge Tab.
3 In the Bleed Edge Tabs window, select the Position tab.
4 Specify settings. To preview your settings, click Preview at any time.
• Number of tabs - Specify up to 99 tabs.
• Media size - Changes media size for output, and changes preview.
Note: The trimbox value specifies that the bleed edge tabs are placed along the trimbox by the side of thedocument, as defined in the original PDF file or in trimbox settings in the Edit Page feature.
Fiery make-ready applications v4.7
Fiery JobMaster
20

• Printing area - Use Auto to base the tab ear’s height and width on the media size, number of tabs, and distancesbetween the tabs. Use Custom to specify a different height and width.
• Repeat Style - Changes the pattern of how tabs are placed on the pages.
Fiery make-ready applications v4.7
Fiery JobMaster
21

Fiery Impose
Fiery Impose, which is one of the Fiery make-ready applications along with Fiery JobMaster and Fiery Compose,applies imposition layouts for special printing and binding needs. You can also impose variable data printing jobswhen you use Fiery Impose.Fiery Impose lets you:
• Specify how many rows and columns of pages to image on a sheet. You can use predefined layouts for commonimpositions or create custom layouts.
• Set the placement of pages on a sheet; the Fiery Impose layout designates the location of folds, cuts, and otherelements with printer's marks.Fiery Impose allows you to image multiple pages on a single sheet.
• Apply advanced job preparation tasks to your job in the same workflow using Fiery JobMaster, if enabled.
• Apply mixed media settings to your job in the same workflow as imposition settings, if you have enabled FieryCompose.
Note: Fiery Compose features are included in Fiery JobMaster.
Fiery Impose requires Adobe Acrobat with Enfocus PitStop. We recommend you use the version of Acrobatprovided in the kit.You access Fiery Impose, Fiery JobMaster, and Fiery Compose from Command WorkStation, and open them in theFiery Preview window.For more information about installing Acrobat and PitStop, see Utilities, which is part of the user documentation set.
Fiery Impose license
Your workstation must have an activated Fiery Impose license to use the full functionality of Impose. Without anactivated license, Fiery Impose runs in Demo mode, which:
• Applies a watermark to print jobs
• Lets you save imposed jobs in .dbp format to the Fiery Server
• Does not save imposed jobs in Adobe PDF format to a hard drive or Fiery Server
APPE processing in Fiery Impose and Fiery Compose or Fiery JobMaster
Fiery Impose and Fiery Compose, or Fiery JobMaster support APPE (Adobe PDF Print Engine), a PDF-basedprocessor that allows direct processing of PDF jobs without conversion to PostScript.You turn on APPE in Configure in Command WorkStation, but you can turn it off on a per-job basis in JobProperties.
Fiery make-ready applications v4.7
Fiery Impose
22

If the following options are set, the job is processed through CPSI (Configurable PostScript Interpreter) rather thanAPPE:
• Tab jobs in the Normal product intent
• Sheet Size specified through Mixed media in Normal, Booklet, and Gangup product intents
Note: Sheet Size changed in Compose product intent is supported.These restrictions apply for imposed jobs in Job Properties:
• N-up jobs with the Print border option
• 1-up Perfect binding jobs inside the Booklet layout option
Jobs using non-supported features are processed through the PostScript interpreter.
Access Fiery Impose
You can access Fiery Impose directly from Command WorkStation or from the Job Properties dialog box for aselected job.
Note: You can open a PostScript, Adobe PDF (Portable Document Format), or VDP file, but it must show a spooled/held status.
Make a job spooled/held
A job must be spooled/held to be opened in Fiery Impose.
• Do one of the following:
• For a processed/held job, select the job in the Held list and click Actions > Remove Raster.If you select a processed/held job, and choose Actions > Preview, the job opens in the Raster Preview window.
• For a printed job, select the job in the Printed list and click Actions > Hold.
Access Fiery Impose from Command WorkStation
You can open a job in Fiery Impose directly from Command WorkStation.1 Select a spooled/held job in the Held list of Command WorkStation.
2 Choose Actions > Impose.
Fiery make-ready applications v4.7
Fiery Impose
23

Access Fiery Impose from Job Properties
When you open a job in the Fiery Impose window from Job Properties, the job appears in wireframe view in theSheet View pane. Compose settings and product intent controls in the Settings pane are not available.1 Do one of the following:
• Click a spooled/held job in the Held list.
• For a Hot Folder, click the Hot Folder in the Fiery Hot Folders Console.
2 Click Actions > Properties.
3 Click the Layout tab, and then click Impose.
4 Click Edit Impose Templates.
Understanding imposition layouts
Fiery Impose arranges the pages of your application-specific file in the correct order and orientation for printing anda variety of binding styles to produce a bound book.Commercial offset printers and web presses use wide rolls of paper and large printing plates capable of imagingnumerous pages on a single sheet. Printers might image up to 32 full-size pages on a single press sheet, a processinherently faster than printing a single page at a time. Fiery Impose allows you to image multiple pages on a singlesheet, but the output devices it supports are digital copiers, rather than traditional printing presses. The paper onwhich a job is imaged is referred to as the sheet.The printed sheet is folded into something resembling a booklet with connected pages. The folded sheet, called asignature, is then trimmed to the finished size.For pages to appear in normal reading order and position in the final booklet, their ordering and positioning on thesheet must differ from the normal book-reading order. Some pages must be printed upside down on the sheet inorder for them to appear right-side-up in the final booklet, and pages must also be printed out of numerical sequenceon the sheet in order for them to appear in the correct numerical sequence in the final booklet.
Make a folding model
You can make a folding model of a signature to show how the pages would be laid out on the sheet and how the sheetwould be cut and folded.1 Fold a sheet of standard size paper in half horizontally, so the top edge of the sheet meets the bottom edge.
2 Fold the paper again vertically, so the left edge of the sheet meets the right edge.
3 Position the signature with the vertically folded edge to the left and the horizontally folded edge across the top.
Fiery make-ready applications v4.7
Fiery Impose
24

4 Page through the folded signature as if it was a book you were reading.a) Number each page sequentially, on both front and back, starting with page 1 on the front (the front cover) and
page 8 on the back (the back cover).
b) Underline each number to highlight the page orientation.
5 Unfold the piece of paper.The image below shows both sides of the paper.
The result is a model of the layout for an 8-page signature. Note the following:
• The folds subdivide the sheet into areas representing pages in the final booklet.
• Page numbers do not appear in book-reading order.
• Some page numbers are upside down.
Imposition layouts
Fiery Impose provides predefined layouts for common impositions such as booklets and brochures. You can alsocreate and save custom layouts.Fiery Impose supports layouts of up to 100 pages per sheet, in a matrix of up to 10 rows by 10 columns (200 pagesduplex). Gang Up printing methods support all layout of rows and columns. Binding methods (Saddle, NestedSaddle, Perfect) support only the 1 x 2, 2 x 1, and 2 x 2 layouts.The items below all affect the layout of the job.
Duplex printing
Not all printers support duplex printing, and of those that do, implementations can vary. Fiery Impose supportsduplex printing that corresponds to the print options of the printer.See Set Duplex in Fiery Impose on page 48.
Gutter sizes
Fiery Impose defines the locations of gutters for you according to the layout and sheet size governing the impositionof the job. For example, perfect-bound jobs typically require larger gutters than saddle-stitched jobs, in order toprovide room for trimming off the spines and gluing signatures together when the book is bound.See Set Gutters on page 58.
Fiery make-ready applications v4.7
Fiery Impose
25

Setting margins
The size and location of the margin (the area between the outside edge of a group of imposed pages and the edge ofthe sheet) depends on the printer associated with the job. You cannot set custom margins. But you can use Scale toFit to re-size the content on the sheet. Also, the Finish Size setting provides different options for setting the contentwith regard to the trim size.
Binding methods
A book layout also specifies the means by which sheets are gathered and bound. Three standard methods are saddlestitch, perfect binding, and nested saddle.The binding method affects the order in which pages are placed on the sheet. Your imposition settings must specifythe method by which the finished job will be bound to achieve the correct layout and finished output.
• Saddle stitch: Signatures are folded together as a group, and then stapled or stitched along the center fold, whichforms the spine of the booklet.
1
Callout Refers to
1 Saddle (left) binding
2 Saddle (right) binding
3 Saddle (top) binding
• Nested saddle: Combines saddle stitch and perfect binding methods. The signatures are folded together ingroups. Each group forms a subset. The subsets are then stacked one on top of another and glued, as with perfectbinding. When you specify nested saddle binding for a booklet in Fiery Impose, the sheets/subset setting allowsyou to specify the number of folded sheets in a group (subset). The cover is usually printed as a different jobbecause it is printed with different paper stock and different imposition layout and sheet size.
Fiery make-ready applications v4.7
Fiery Impose
26

11
Callout Refers to
1 Nested Saddle (left) binding
2 Nested Saddle (right) binding
3 Nested Saddle (top) binding
• Perfect binding: Separate, folded pages are printed and stacked in booklet order. Finished pages are trimmed andthen glued adjacent to one another. The cover is usually printed as a different job because it is printed withdifferent paper stock and different imposition layout and sheet size.
Creep
Creep is the shifting position of the page in a saddle-stitched bind. Creep moves the inside pages away from thespine.All books and brochures use a sheet that is folded to create separate page areas. Because the sheet itself has somethickness, each fold causes a very small incremental shift in the location of the edge of each page relative to theothers. The result is that the edges of pages furthest from the saddle's innermost fold seem to move away from theedges of pages closest to the innermost fold. As the number of pages in the saddle increases, so does the amount ofthis shift. To counteract the effects of this shift, the bindery trims the edges of the finished book to a common edge.
Trimming the bound pages resolves only part of the problem, however, as the edges of pages move, so do the contentareas imaged on them. The apparent shift of content area caused by folding a sheet multiple times is known as creepor binder's creep. The effect of creep is that the content area of pages closer to the innermost fold in a saddle appearto move towards the outer margins of the page.
Fiery make-ready applications v4.7
Fiery Impose
27

1 Creep
Creep becomes more noticeable as the number of sheets in a saddle increases, and its effect is most noticeable onpages farthest from the center fold of the saddle. Consequently, a book layout must also specify the number of sheetsin each saddle because the number of sheets in each saddle affects the amount of creep that needs to be accountedfor.
Adding blank pages to adjust layout
Fiery Impose and Fiery Compose allows you to add blank pages, and also inserts blank pages automatically wherenecessary for the imposition layout you select.A book layout must adjust the placement of pages according to the total number of pages in the job. If the total pagecount is not an even multiple of the number of pages in the layout, one signature may be laid out, typically with blankpages, to accommodate the discrepancy.The blank pages that are inserted automatically are called implicit blank pages. Because the implicit blank pages arenot part of the original working document, you can choose to show the implicit blank pages or not.
• To show implicit blank pages, select Show Implicit Blanks from the View menu in Fiery Compose.
Depending on the Row and Column setting, as many as seven blank pages may be created. (For example, seven blankpages may be created for a 2X2 layout).
Gangup printing in Fiery Impose
Fiery Impose provides Gang Up Repeat, Gang Up Unique, and Unique-Collate Cut imposition.Fiery Impose also offers Duplo Long Edge Feed and Duplo Short Edge Feed for imposition jobs being finished on aDuplo offline finisher with bindery features such as folding, slitting, cutting, and creasing.
Gang Up Repeat
The Repeat option enables "step-and-repeat" printing. Step-and-repeat is most often used when printing multiplecopies of a single document.
Gang Up Unique
The Unique option places pages in an arrangement that is often more appropriate for printing a single copy of a job.This option does not fully collate itself (hand collating is necessary), but optimizes the sheet size while limiting therun to a single copy.
Fiery make-ready applications v4.7
Fiery Impose
28

Unique-Collate Cut
Unique-Collate Cut places pages in an arrangement that allows the pages to fall into the correct order when thesheets are stacked and cut. This option minimizes the need for collating by hand and is most appropriate for printingsingle copies of a document.
Duplo - Short Edge Feed
Duplo Short Edge Feed sets a pagination direction that enables feeding the final printed sheet into a Duplo finisher atthe sheet's short edge. The columns or rows are perpendicular to the shortest sheet edge.VDP and non-VDP PDF and PostScript jobs can use Duplo finishing. You can automatically configure Duplo offlinefinishers by reading a simple barcode printed on the sheets. The finisher reads a registration mark on the sheet andpositions the sheet in relation to the mark as the sheet feeds through the machine. When specifying Duplo for agangup imposition layout, you can specify the registration and barcode in the printer's marks dialog box.
Duplo - Long Edge Feed
Setting Duplo Long Edge Feed for a gangup imposition layout creates a pagination direction that enables the finalprinted sheet to be fed into a Duplo finisher at the sheet's long edge. The columns or rows are arranged in a directionperpendicular to the longest sheet edge.You can use Duplo finishing for VDP and non-VDP PDF and PostScript jobs. Reading a simple barcode printed onthe sheets automatically configures Duplo offline finishers. The finisher compensates for stack drift and image shiftby reading a registration mark printed on the sheet and positioning the sheet in relation to the mark as the sheetfeeds through the machine.When specifying Duplo for a gangup imposition layout, you can specify the registration and barcode in the printer'smarks dialog box.
Fiery make-ready applications v4.7
Fiery Impose
29

Gangup with top finished edge
Gangup with top finished edge allows you to automatically rotate the individual “slots” (pages) on the back surface ofa sheet 180 degrees for top-edge binding of a duplex job.Gangup with top finished edge (slot rotation) works with the existing layout styles in Fiery Impose. You can set upslot rotation templates which can then be used for Hot Folders and Virtual Printers.Gangup with top finished edge is available for the following gangup styles:
• Repeat
• Unique Collate Cut
• Duplo
The following table shows the settings required for gangup with top finished edge.
Gangup style Finishing edge Duplex Layout style Slot rotation
Repeat Top On Any of the styles:
• Standard
• Head to Head
• Foot to Foot
• Reversal
• Reversal Alternate
Yes
Unique - collate cut Top On Yes
Duplo - short edgefeed
Top On Yes
Duplo - long edge feed Top On Yes
Create a gangup job with top finished edge
1 Import your job into the Hold queue in Command WorkStation.
2 Select the job and select Impose from the Actions menu, or the right-click menu.
3 Select Gangup in the Settings pane in the Fiery Impose window, and one of the following styles:
• Repeat
• Unique Collate Cut
• Duplo
4 Specify settings as outlined below:
• Finishing Edge: Top
• Duplex: On
• Layout Style: Any
Note: The settings above are required. You can specify other settings as required.The result of your choices are displayed in the Sheet View pane.
Fiery make-ready applications v4.7
Fiery Impose
30

Gang Up imposition methods for VDP jobs
For Variable Data Printing (VDP) jobs, you can use single-record or multiple-record imposition methods.
• Single-Record Imposition can use Gang-up repeat, Gang-up unique, or Unique collate cut. See Gangup printingin Fiery Impose on page 28.
• Multiple Record Imposition can use Multi-Record Collate, Cut and Stack, or Stack Size.
Multi-Record Collate
Multi-Record Collate places pages from different records sequentially on the sheet surface. The first page from eachrecord is placed on the sheet surface until all the records are exhausted. Then a new sheet is started, and the secondpage from each record is placed until all the records are exhausted. The process is repeated until all the pages areplaced.The following preview shows a 2-by-2, simplex, Multi-Record Collate layout applied to a VDP job that contains fourrecords. The records consist of four pages each. "R" stands for Record, and "P" for Page. For example, "R1 P1" is Page1 for Record 1.
Cut and Stack
Cut and Stack arranges pages on the sheet surface so that the sheets can be stacked and cut, and the cut piles stackedwithout any additional sorting. The Cut and Stack layout can be used with the Stack Size option.
Fiery make-ready applications v4.7
Fiery Impose
31

The following example shows a 2-by-2, simplex, Cut and Stack layout applied to a VDP job that contains 100 records.Each record consists of one page. When the sheets are stacked, cut, and stacked again, the records are arranged insequential order.
1 Print
2 Cut
3 Stack
Stack Size
Stack Size divides large VDP jobs into smaller batches to simplify the resulting Cut and Stack workflow. This lets youlimit the stacked sheets to quantities that are accommodated by standard cutting machines. Each batch is imposedindependently using the Cut and Stack layout, and separator sheets are placed in between the batches. (The StackSize option is only available when you choose the Cut and Stack layout.)The following example shows a 2-by-2, simplex, Cut and Stack layout applied to a VDP job that contains 12000records, each consisting of a single page. This results in 3000 sheets. The Stack Size option is set to 1500 sheets perbatch. The resulting layout consists of two batches, each of which can be cut, sorted, stacked, and packed in tandem.
Fiery make-ready applications v4.7
Fiery Impose
32

1 Print
2 Cut first pile and pack
3 Cut second pile and pack
Set Fiery Impose preferences
The Preferences dialog box lets you set the path to temporary files, defaults for converting PostScript to PDF,measurement units, application language, scaling, and the default finish size for imposed jobs.You set Fiery Impose preferences in Command WorkStation > Edit > Preferences.
Set imposition scale and finish size
In Preferences, Scale sets the default scale factor when Fiery Impose starts. Finish Size is based on the PDF crop boxor trim box settings. (Not all Fiery Servers support the Finish Size setting.)1 Click Size.
2 For Scale, click 100% or Scale to fit.
Fiery make-ready applications v4.7
Fiery Impose
33

3 For Finish size, click Based on Crop box or User Defined.
• Based on Crop Box, the default and legacy Fiery Impose workflow, depends on the PDF crop box.
• User Defined allows Impose to detect the trim box settings, when present within the document, and use theseas the default finish size. It does not depend on document size and crop box.
Set paths to imposition files
The Paths pane in the Preferences dialog box lets you set paths to the default location for temporary files and presettemplates.1 Click Paths
2 Set the following:
• For Temporary Path, set the default location for temporary files.
• For Imposition Template Path, specify the folder for storing the preset template files.
Set PostScript conversion for imposition
In Preferences, you can set the default for converting PostScript to PDF. VDP imposition jobs do not supportPostScript to Adobe PDF conversion.1 Click Paths.
2 In the PS to PDF Conversion pane, select a default setting from the Default settings menu.You can set additional job settings in Acrobat Distiller and add them to the list of available choices.
3 If you want, select Use server conversion, if supported.
Set imposition measurement units
You can set the unit of measurement to use in the Fiery Impose window. This setting does not affect predefined pagesize values.1 Click Regional Settings.
2 If you want to set a default unit of measurement for all fields, click a measurement unit in the Units menu.
3 If you want to set a unit of measurement for any field that accepts input, enter a value in the field. You can enter i,in, or the inch symbol (") for inches; mm for millimeters; or pt or pts for points.
Set the application language
Use Regional Settings to set the application language.
Fiery make-ready applications v4.7
Fiery Impose
34

1 Click Regional Settings.
2 For Application Language, set the language that Command WorkStation uses.
Preview a job for imposition
In the Command WorkStation Preview window, you can display sheet dimensions and navigate among the sheets ofan imposed job.When you select a job for imposition in Command WorkStation, the job opens in the Preview window. Jobs appearas thumbnails of the sheet in the Sheet View pane, either displaying the content or in wireframe view. Selecting apage in either view does not select the corresponding page in the other view.For more information about previewing jobs in Command WorkStation, see Fiery Preview on page 78.
View and measure sheet dimensions
Use the Measurement tool to display basic sheet dimensions, to determine distance from a point of origin to aspecific corner or edge of the page and sheet, and to change the point of origin (reference point).1 Click the Measurement tool icon.
2 Move the cursor around a page to make predefined Hot Spots appear.Hot Spots are indicated by a horizontal or vertical line of red dashes.
3 Press the Ctrl key (on Windows) or the Cmd key (on Mac OS X) and point and click to select a page.The nine possible reference points for the page appear.
4 Point and click to select a desired reference point. When it is selected, the reference point appears as a red square.
View sheets of imposed jobs
You can view and navigate to the sheets of an imposed job by dragging or by sheet number.• Do one of the following:
• Drag with the Drag tool to scroll across the sheets of the job.
• Click the Sheet number display at the bottom of the Sheet view and then enter a sheet number in the Go ToSheet dialog box.
Imposing a job
To impose a job, you open the job in the Preview window and apply a template.
Fiery make-ready applications v4.7
Fiery Impose
35

Fiery Impose lets you choose from the predefined templates or create a custom template by changing the impositionsettings and saving them. You can work in either wireframe view or thumbnail content view in the Sheet View pane.You can also import your own templates or specify imposition settings.If you specify imposition settings, you first choose one of four workflows (product intents):
• Compose - For specifying settings in Fiery Compose before printing. This is for working with documents withpaper sizes defined by the printer driver and source application. Allows you to build a job using Fiery Composefeatures.
• Normal - For 1-up imposition where clipping and printer's marks may be required.
• Booklet - For creating booklets of various types.
• Gangup - For creating various gangup pagination schemes.
Fiery Server system pages are designed for administrative, informational purposes only. You cannot impose pagessuch as configuration, calibration, test pages, post-flight reports, and PANTONE books and charts.
Booklet Maker settings in Fiery Impose
You can use Fiery Impose to open a job with Booklet Maker settings, and then preview or modify the impositionlayout. Fiery Impose translates and maps all Booklet Maker settings to Fiery Impose commands. See Booklet MakerHelp in Command WorkStation Help.
Important: After you edit a job in Fiery Impose, you cannot edit it in Booklet Maker.
Imposition templates
Fiery Impose provides predefined templates. You can also create custom templates.The predefined templates are Normal, Booklet, and Gangup:
• Normal includes Default Template and 1-up full bleed.
• Booklet includes 2-up perfect, 2-up saddle, and 4-up head to head.
• Gangup includes 3-up trifold brochure, 4-up gate fold, 4-up z Fold.
Note: The default pre-defined imposition templates use the Based on Crop Box finish size setting.You can create a custom template by changing the settings in a predefined template. Select the template, makechanges, and save the template with a new name. (Not all settings may be available for custom templates.) The newsettings are applied immediately.In the Preferences dialog box, you can set a path to the folder or directory where you want to store customtemplates.Imposition templates can also be edited from Hot Folders, if you have a Fiery Impose license. The custom impositiontemplates now support the User Defined finish size workflow, which uses the trim size set for the original PDF job.
Note: The User Defined finish size workflow requires PDF source files. PostScript files are not supported.
Fiery make-ready applications v4.7
Fiery Impose
36

Apply an Imposition template
You apply a custom template the same way as a predefined template.1 Click the arrow to the right of the Template field at the top of the Settings pane to open the Template browser.
2 Click the icon for the template.
The new settings are applied immediately when you select a template.
Save a custom Imposition template
You can save a custom template if you have a licensed version of Fiery Impose. It is a good idea to use a descriptivename for the custom template.1 Create a custom template.
2 Click the Save icon.
3 Type a name for the settings file in the Save Template dialog box.
Delete a custom template
You can delete a custom template. However, the currently selected job retains the deleted template settings until youselect another template or specify new imposition settings.1 Select the template you want to delete from the Template menu.
2 Click the Delete icon.
Save an imposed job
You can save an imposed job as a regular imposed job or "flattened" PDF on the Fiery Server or local disk.Saving a job as a "flattened" PDF allows you to print the job or file on different printers that may not have a processorimposition capability. The flattened PDF can easily be sent to customers for remote signature level proofing.
Note: Impose cannot save a VDP imposition job in Adobe PDF format.
Save a job as a regular imposed job
When you save as a regular imposed job, you save the job to the Fiery Server with extension .dbp with the job ticket.You can then reopen the job and make changes.1 Choose Save from the File menu.
2 Select Save as a regular imposed job and modify the Job Name if desired.
Fiery make-ready applications v4.7
Fiery Impose
37

Save a job as a flattened PDF
When you save as flattened PDF job/file, you can save back to the Fiery Server or local disk and archive the imposedPDF for future reprinting.
Important: When saving as flattened PDF, Fiery Impose adds the extension .dbp to avoid overwriting thesource file. To use a different extension and not overwrite the source file, give the job a new file name.
1 Choose Save from the File menu.
2 Select Save as a flattened PDF job/file and click Settings.
3 Set any of the following for Rotation and Security.
• Rotation - for the Front and Back of the signature
• Security - for the Adobe PDF
4 Choose one of the following:
• Choose Job Name if you want to save the job as a flattened PDF file back to the Fiery Server.
• Choose File Name if you want to save the job as a flattened PDF file to the local disk.
Imposition template reference
Fiery Impose provides predefined templates. The settings that a template covers depend on the specific template.
1-Up Full Bleed template
The 1-Up Full Bleed layout prints one page per sheet. The Printer's Marks indicate where to cut the paper so that thecolor content extends to the edge of the paper. The following settings apply for this layout:
• Bleeds
• Printer's Marks
• Scale to Fit
• Gang Up Unique
The 1-Up Full Bleed layout has no page number restrictions.
2-Up Perfect template
The 2-Up Perfect template creates signatures for a perfect-bound book, with each sheet folded once and stacked ontop of one another. The following settings apply for this layout:
• Duplex
• Bleeds
• Printer's Marks
• Scale to Fit
• Perfect binding
Fiery make-ready applications v4.7
Fiery Impose
38
The 2-Up Perfect layout is for jobs that have multiples of four pages, but you can use it with jobs that have anynumber of pages. Fiery Impose adds additional blank pages as necessary. Pages are ordered in groups of four so that,when folded, each sheet has four sequential pages.
Note: The Creep Adjustment option has no effect on this template.
2-Up Saddle template
The 2-Up Saddle layout creates sheets for a saddle bound book. All of the sheets are folded together, one inside theother. The following settings apply for this layout:
• Duplex
• Bleeds
• Printer's Marks
• Scale to Fit
• Saddle Stitch Binding
Fiery make-ready applications v4.7
Fiery Impose
39
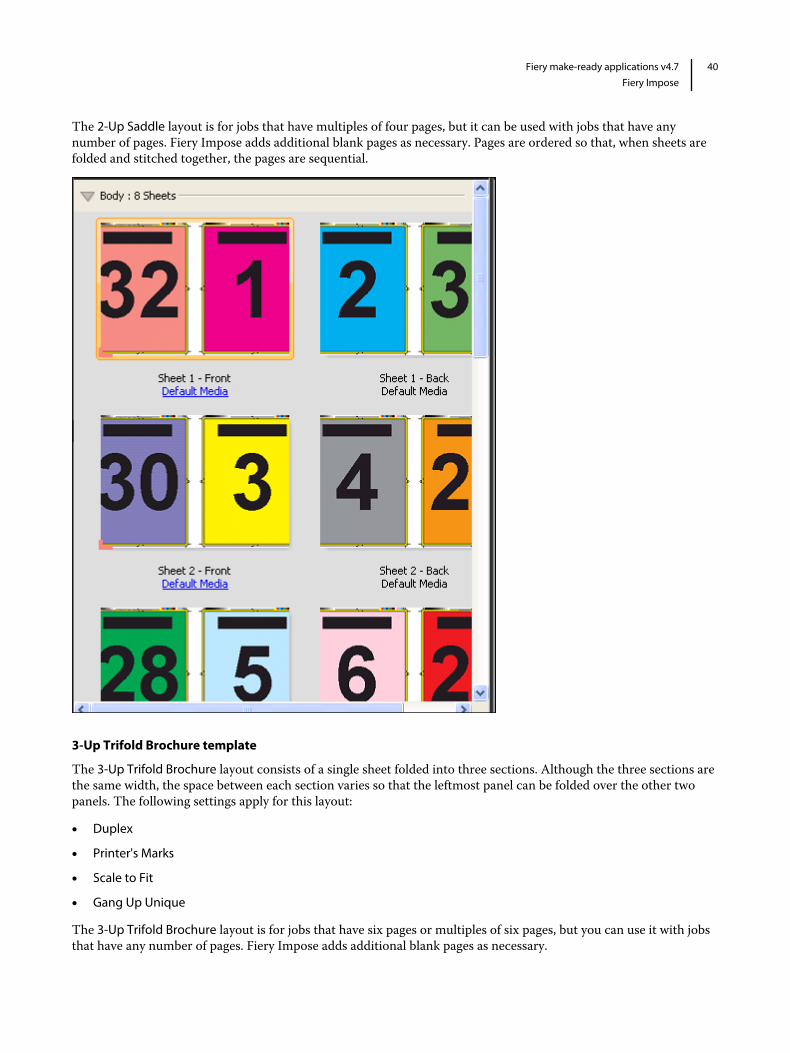
The 2-Up Saddle layout is for jobs that have multiples of four pages, but it can be used with jobs that have anynumber of pages. Fiery Impose adds additional blank pages as necessary. Pages are ordered so that, when sheets arefolded and stitched together, the pages are sequential.
3-Up Trifold Brochure template
The 3-Up Trifold Brochure layout consists of a single sheet folded into three sections. Although the three sections arethe same width, the space between each section varies so that the leftmost panel can be folded over the other twopanels. The following settings apply for this layout:
• Duplex
• Printer's Marks
• Scale to Fit
• Gang Up Unique
The 3-Up Trifold Brochure layout is for jobs that have six pages or multiples of six pages, but you can use it with jobsthat have any number of pages. Fiery Impose adds additional blank pages as necessary.
Fiery make-ready applications v4.7
Fiery Impose
40

The 3-Up Trifold Brochure is usually folded as shown in the following illustration.
Fiery make-ready applications v4.7
Fiery Impose
41

4-Up Gate Fold template
The 4-Up Gate Fold layout is used most often for a four-panel brochure. The finished brochure unfolds to double,then four times the original size. The following settings apply for this layout:
• Duplex
• Bleeds
• Printer's Marks
• Scale to Fit
• Gang Up Unique
The 4-Up Gate Fold layout is for jobs that have multiples of eight pages, but you can use it with jobs that have anynumber of pages. Impose adds additional blank pages as necessary.
The 4-Up Gate Fold is usually folded as shown in the following illustration.
Fiery make-ready applications v4.7
Fiery Impose
42

4-Up Head to Head template
The 4-Up Head to Head layout is for booklets created from a layout of four pages on each side of the printed sheet.Rotating the two topmost pages lets you fold the signature both horizontally and vertically, and trimmed. Thefinished booklet has all pages in the correct order and rotation.The following settings apply for this layout:
• Duplex
• Bleeds
• Gutters
• Printer's Marks
• Scale to Fit
• Saddle stitch binding
The 4-Up Head to Head layout is for jobs that have multiples of eight pages, but you can use it for jobs that have anynumber of pages. Fiery Impose adds additional blank pages as necessary. Pages are ordered so that, when sheets arefolded with two folds at 90 degrees, trimmed, and stitched together into signatures, the pages are sequential.
Note: Although this layout requires two folds, the template applies a fold mark on the spine fold only. For example:
Fiery make-ready applications v4.7
Fiery Impose
43

The 4-Up Head to Head is usually folded as shown in the following illustration. If you are folding more than onesheet, you must stack all the sheets and fold them together.
Fiery make-ready applications v4.7
Fiery Impose
44

4-Up Z-Fold template
The 4-Up Z-Fold layout lets you fold many panels on top of one another without stressing the folded spine. Acommon example is a road map. The following settings apply for this layout:
• Duplex
• Printer's Marks
• Scale to Fit
• Gang Up Unique
The 4-Up Z-Fold layout is for jobs that have eight pages, but you can use it with jobs that have any number of pages.Fiery Impose adds additional blank pages as necessary.
The 4-Up Z-Fold is usually folded as shown in the following illustration.
Fiery make-ready applications v4.7
Fiery Impose
45

Fiery make-ready applications v4.7
Fiery Impose
46

Imposition settings
Fiery Impose lets you set print job options including finish size, sheet size, duplex, scaling, cover media, layoutorientation, bleeds, and printer’s marks.The settings that are displayed in the Settings pane are determined by the product intent you choose. See Choose aproduct intent workflow on page 47.For a description of the templates available for each product intent, see Imposition templates on page 36.
Choose a product intent workflow
Fiery JobMaster-Fiery Impose-Fiery Compose supports a variety of workflows (product intents). When you choose aproduct intent, the Settings pane changes to show the options relevant to that product intent.
1 Click the arrow in the product intent box at the top of the Settings pane.
2 Click Compose, Normal, Booklet, or Gangup. Then choose from the options that appear.
3 If you choose Booklet in step 2 for the product intent, choose the binding method and the binding side.
4 If you chose Gangup in step 2, choose the gangup option and the binding side.
5 If the Finish Size menu is displayed, choose a finish size.Several of the intents (Normal, Booklet, Gangup) include a Finish Size setting, which allows you to choosebetween a crop box finish size workflow and a user-defined finish size workflow. If the Finish Size setting is notdisplayed, the user-defined finish size workflow is not supported by your Fiery Server, so the default workflow—the crop box finish size workflow—is used.
Finish size options for Fiery Impose
Finish Size sets the size of the final product after printing and applying finishing processes such as trimming, folding,or binding.If the Finish Size setting does not appear, the Fiery Server does not support the user-defined finish size workflowdescribed below. The default workflow is the Crop Box option.
Fiery make-ready applications v4.7
Imposition settings
47

The two possible workflows are:
• Based on Crop Box - The layout of the job is referenced to the Adobe PDF crop box. You must manually set thebleed size for the selected document page content, and specify the trim marks. In this finish size workflow, youmust manually estimate the finish size of the final product by subtracting bleed size from the size of the crop box.
• User Defined - The final finish size and bleed size are automatically detected for the PDF job, but you canchange both settings. The page content is aligned in the center of the media. In the User Defined finish sizeworkflow, the finish size is a static value independent of bleed, crop box, or document page size. The originalbleed sizes are automatically detected, as are the placement of the trim marks.The minimum dimension you can enter for the final finish size is 0.25 inch. The maximum depends on the papersize supported by the printer.
Advantages of the User Defined Finish Size
The user-defined finish size is based on the trim size specified in the original content. You specify the finish size andFiery Impose automatically positions the page content in the center of each sheet.Fiery Impose also automatically sets the default bleed size and the placement of the trim marks. If the job beingimposed comprises content positioned differently on each page, each with a different crop size, selecting the user-defined finish size allows Fiery Impose to automatically pick up the trim size set in the Adobe PDF.With the crop box finish size workflow, the user must figure out the bleeds and the trim marks and do somemanipulation to place the page content correctly for the imposition layout.
Set sheet size in Fiery Impose
The default Sheet setting applies to all sheets (signatures) and defines the dimension of the intended impositionlayout. Special sheet size assignments can be defined in Paper Catalog or Mixed Media in Job Properties.1 Click the arrow to the right of the Sheet field box to set the dimensions of a sheet of paper.
2 Click Edit to specify other media settings, such as weight, color mode, coating, and tab shift.
3 If Paper Catalog is supported, click the arrow to the right of the Media box to choose from the Paper Catalogmenu.
Set Duplex in Fiery Impose
Duplex sets how to handle content on opposing sides of a sheet. You can set duplex for right and left binding, topbinding, or turn duplex off. Duplex options depend on the Fiery Server you connect to.Fiery Impose automatically applies duplex settings for the selected booklet style and binding.The Duplex setting inFiery Impose overrides any Duplex setting performed in Command WorkStation Job Properties.
Fiery make-ready applications v4.7
Imposition settings
48
• Click one of the following:
• Off - Turns off duplex printing and uses simplex printing.
• Right & Left Binding - Sets duplex printing with both sides of the pages printed with the same orientation.
• Top Binding - Sets duplex printing with the content on the each side of the page oriented upside down fromthe other side. Top binding is not available for all jobs.
Note: Duplex does not necessarily appear in Sheet View with the orientation it will have when printed. For example,top binding duplex is displayed as both sides of the page right-side-up.
Scale settings in Fiery Impose
Scale settings enlarge or shrink the page by a specified amount.In Compose and Normal product intents, the Scale settings apply to all pages in a job. In Booklet and Gangupproduct intents, you can apply scaling to specific slots on sheets. The number of slots on a sheet depends on the Rowand Column values. The slot size equals the maximum imageable area of the sheet divided by the number of slots.The User-Defined Finish Size workflow provides more scale options than the Crop-Box Finish Size workflow.The Use non-printable area option uses the selected sheet's full physical dimensions for imposing your print job.This is helpful when creating custom templates that you may want to use with a variety of print engines. When thisoption is not selected, Fiery Impose determines position and scale factor of the imposed job by the imageable area ofthe final printed sheet, according to the printer. This constraint may prevent a custom template being used withanother printer.
Note: The Rows and Columns value interacts with the Scale settings. If you choose a value that causes content toextend beyond the edge of the sheet, Fiery Impose provides a visual warning.
Specify Scale settings
The Based on Crop Box finish size workflow (the default workflow) allows you to specify scaling, scale to fit, orprevent scaling. The User Defined finish size workflow provides more scaling options, letting you fit or fill the pageimage to the static boundary of the finish size or bleed.1 Choose a setting from the Scale menu.
2 If you chose Custom, type a scale value in the text box.
3 To use the selected sheet's full physical dimensions for imposing your print job, select the Use non-printable areacheckbox if it is available.
Fiery make-ready applications v4.7
Imposition settings
49

Set cover media
You can set whether to include a cover and specify its settings.1 Click the Cover check box to include a cover.
2 Click Define to specify media settings.Choose whether to apply the same settings for both front and back covers, specify settings only for the frontcover, or specify separate settings for the front and back covers.
Set the layout orientation
Use the Layout Orientation menu in the Settings pane to specify the orientation of a sheet.1 Click Portrait or Landscape in the Layout Orientation menu.
2 If the booklet style is Nested Saddle, specify the subset size, which is the number of sheets within each subset.The number of sheets for the last subset is not a fixed number, and Fiery Impose adjusts the sheets neededaccording to the actual page count of the job. The default setting for Subset Size (sheet/subset) is 2 and themaximum setting possible is 15.
Bleeds for workflows in Fiery Impose
How Fiery Impose applies bleeds depends on the workflow you set.
• For the Crop Box finish size workflow, the Bleeds option moves the trim marks into the image by the amount youspecify to ensure that the printed area extends beyond the edge of the trimmed sheet. You can specify separatebleed amounts for the left/right (horizontal) and top/bottom (vertical) edges of the page content.
• For the User Defined finish size workflow, the Bleeds option represents the amount of page content to be shownbeyond the boundary of the finish size. The trim marks adjust automatically and remain aligned to the edge ofthe finish size. When a job is opened in Fiery Impose and the User Defined option is set for finish size, thedimensions of the finish size and the bleeds are automatically entered, but you can change the settings.
Set bleeds
Fiery Impose lets you set horizontal and vertical bleeds.
• Do one of the following:
• To specify separate horizontal and vertical bleed amounts for a job, enter values from 0 to 720 points, 0 to 10inches, or 0 to 254 mm in the appropriate fields.
• To apply the same bleed values to all four edges of the page content, click the Apply Both check box and type avalue.
Fiery make-ready applications v4.7
Imposition settings
50

Set printer's marks in Fiery Impose
Fiery Impose lets you set printer’s marks. You can also turn on or turn off marks and individual elements of the joblabel.The location of a fold on a layout is defined by a dotted line called a fold mark; the location of a cut is defined by asolid line called a trim mark. Specialized marks also define the size and locations of margins (space surrounding thepage's content area); gutters (space between pages); and bleeds (extensions of content beyond a trim mark), used toensure that the printed area extends to the very edges of a trimmed page.
• Use printer's marks to add trim, fold, and job information to all sheets in a job. The printer's marks option turnsprinter’s marks on globally throughout a job. Layouts display only the relevant printer's marks. If the layout doesnot require folding the sheet, fold marks are not displayed, even if you selected them.
• Use the Marks dialog box to turn on or turn off trim marks, fold marks, and the individual elements of the joblabel.
Note: Printer's marks in the User Defined finish size workflow always align to the edge of the finish size.
Define printer's marks
You use the Marks dialog box to set printer’s marks.1 In the Settings pane, click Define to open the Marks dialog box.
2 Use the Trim, Fold, Job Label, Blank Text, and Registration and Barcode tabs to specify settings.
Note: The Job Label for VDP jobs displays different information than for non-VDP jobs.
Set Trim marks
Use the Trim tab to set trim marks.1 Click the Trim tab.
2 Select the Print trim marks checkbox.
3 Do any of the following:
• Set the horizontal and vertical mark length from 1 to 216 points.
• Set dotted or solid for Stroke type.
• Set Stroke width from 1/4 to 3 points.
• Set Stroke color.
• In the Horizontal Offset and Vertical Offset fields, enter values from –72 to +72 points, –1.0 to 1.0 inch, or –25.4 to 25.4 mm.
Fiery make-ready applications v4.7
Imposition settings
51

4 To disable or enable an individual mark, press the Ctrl key (on Windows) or Cmd key (on Mac OS X) and clickthe mark in the Fiery Impose window.An "X" indicates a mark is disabled.
Set Fold marks
The Fold tab lets you set fold mark length and appearance, and disable individual marks.1 In the Marks dialog box, click the Fold tab.
2 Select the Print fold marks checkbox.
3 Set any of the following:
• Set the horizontal and vertical lengths of marks from 1 to 216 points.
• Set Stroke type of Fold marks to either dotted or solid.
• Set Stroke width of Fold marks from 1/4 to 3 points.
• Set the Stroke color.
4 To disable or enable an individual mark, press the Ctrl key (on Windows) or Cmd key (on Mac OS X) and clickthe mark in the Fiery Impose window.An "X" indicates a mark is disabled.
Set job label attributes
The Job Label tab lets you set job label content and location. (Job label content for VDP jobs differs from non-VDPjobs.)1 Click the Job Label tab.
2 Click checkboxes (such as Job Name and Sheet Info) to display the associated information on the job label.Sheet info for standard jobs includes the sheet number and the surface information (front/back).For VDP jobs, you can also click the Output sheet number checkbox, which displays the absolute sheet number.If the total number of printed sheets is 500, the absolute sheet number is from 1 to 500.
3 Click the area where you want to place the label.
4 Click Horizontal or Vertical to set whether the job label is placed horizontal or vertical on the sheet.
5 If desired, enter offset X and Y values.The offset is measured from the point of origin.
Fiery make-ready applications v4.7
Imposition settings
52

Set blank page text
Use the Blank Page Text tab to set what appears on implicit blank pages.1 Click the Blank Page Text tab.
2 Enter text you want to appear on any implicit blank pages.
3 Select Print blank page text.
Set registration marks and barcode in Fiery Impose
Your imposed layout can include a registration mark, a barcode, or both. These options allow automatic driftcompensation and machine setup for the Duplo offline finisher.The registration mark position determines the leading edge of the sheet, as the Duplo finisher requires the mark tobe on the right of the leading edge of the upper surface of the sheet.
1 In the Marks dialog box, click the Registration and Barcode tab.
2 Click one of the following in the Print field:
• Do not print, which is the default
• Registration mark only
• Barcode only
• Registration mark and barcode
3 If you set Registration mark only, set the following:
• Position - The location of the registration mark on the sheet.
• Mark length and Mark width - The possible length is from 5 to 10 mm. The possible width is from 0.4 to 1.6mm.
• Mark Offset - Vertical and horizontal offset for the mark position. The default for both feed edge and rightedge is 5 mm. The possible range is 3 to 15 mm for each.
• Layout Offset - Amount to move the layout away from the feed edge of the sheet to accommodate theregistration mark and barcode. The possible range is 0 to 30 mm.
4 If you set Barcode only, set the following:
• Position - Barcode location on the sheet.
• Barcode Type - The barcode font.
• Barcode Text - A 2-digit number from 01 to 80.
• Print Text - Prints the numerical representation of the barcode on the sheet.
• Mark Offset - Vertical and horizontal offset for the barcode position. The default for feed edge is 5 mm, andthe possible range is 3 to 15 mm. The default for right edge is 25 mm, and the possible range is 25 mm to 42mm.
• Layout Offset - Amount to move the layout away from the feed edge of the sheet to accommodate theregistration mark and barcode. The possible range is 0 to 30 mm.
Fiery make-ready applications v4.7
Imposition settings
53

5 If you specified Registration mark and barcode, specify the settings in the Registration pane as described in step 3.The settings apply for both Registration marks and barcode. In the Barcode pane, specify the text and whether toprint the text.
6 Set Print mark on front surface of sheet only, if required.
Fiery make-ready applications v4.7
Imposition settings
54

Specify booklet settings in Fiery Impose
Booklet settings include binding settings for booklet product intent, rows and columns, and creep (the shift of thecontent area caused by the incremental fold of signatures in Saddle and Nested Saddle binding).
Specify binding settings for Booklet
You can specify a binding method and edge options. The binding method affects the order in which pages are placedon the sheet. (There are no binding selections available for layouts with more than two columns or rows.)1 Set one of the following binding methods:
• Saddle
• Nested Saddle
• Perfect
2 Set one of the following binding edge options:
• Left binding
• Right binding
• Top binding
Note: Top edge binding is available only when the layout setting is either 2 rows x 1 column or 2 rows x 2columns.
Specify row & column settings for Booklet
For booklet Row & Column settings, you can specify 1X2, 2X2, or 2X2 Repeat booklet.1 Click the arrow to the right of the Row & Column box to display the menu.
2 Select 1X2, 2X2, or 2X2 Repeat Booklet.Which settings are available depend on the binding style.
3 Click Align to Center to define the initial placement of the page content.If specifying a creep setting, and selecting In, you can use Align to Center to help space the imposed page orspecify a gutter to indicate the amount of creep.
Fiery make-ready applications v4.7
Specify booklet settings in Fiery Impose
55

Specify Creep settings
For Creep, you set a direction and sheet thickness.1 In the Creep menu, select one of the direction settings (or None).
• In - The positions of pages on the most outer sheet remain constant. The positions of the remaining pages onall other sheets move toward the spine.
• Out - The positions of pages on the most inner sheet remain constant. The positions of the remaining pages onall other sheets move away from the spine.
2 Set sheet thickness by doing one of the following:
• Click an option in the creep adjustment menu.
• Enter a custom thickness value between 0 and 2 pts (or the equivalent in another measurement unit).
Fiery make-ready applications v4.7
Specify booklet settings in Fiery Impose
56

Specify Gangup settings in Fiery Impose
You can specify gangup styles, page order, gutter size, and gangup method.Make sure that the gangup style and method can be used together. For details about which you can combine, see Combining Gangup styles with Gangup methods on page 59.
Set Gangup style
You can set gangup style.• In the menu under the Template menu, click Unique, Repeat, Unique-Collate Cut, Duplo-Short Edge Feed, or
Duplo - Long Edge Feed.
Specify Row & Column settings for Gangup
You can specify up to 25 rows and columns for Gangup.• Use the arrows to select a number up to 25, or type the desired value in each field.
Set Page Order
The Page Order options allow you to specify the flow direction of pagination within the layout.• Click one of the following in the Page Order section of the Settings pane:
• - Orders pages from left to right horizontally, by row, starting with the top row.
• - Orders pages from right to left horizontally, by row, starting with the top row.
• - Orders pages from top to bottom vertically, by column, starting with the furthest left column.
• - Orders pages from top to bottom vertically, by column, starting the furthest right column.
Fiery make-ready applications v4.7
Specify Gangup settings in Fiery Impose
57

Set Gutters
You can set gutters for gangup jobs. Gutters are extra margins that allow space for binding or other finishing options.Fiery Impose defines the locations of gutters for you according to the layout and sheet size governing the impositionof the job. For example, perfect-bound jobs typically require larger gutters than saddle-stitched jobs, in order toprovide room for grinding off the spines and gluing signatures together when the book is bound.
1 Click Define in the Gutter option.
2 In the Gutter dialog box, set the gutter measurement by typing in the available text entry fields for each gutter inyour layout.
3 If you entered a value in one of the fields and want all gutters to have the same measurement, click Apply All.
4 If you selected Scale to Fit before setting gutters in the Gutter dialog box, use the "Scale to fit" uses gutter settingscheck box to control the placement of the page content.
• Not selecting the check box (default setting) - Scale to Fit does not include the gutter size in the calculation.Changing the gutter size does not scale the page content, and instead shifts the content.
• Selecting the check box - Scale to Fit includes the gutter size in the calculation. Changing the gutter size scalesthe page content to fit within the area defined by the rows and columns and gutter settings.
Scale to fit options with gutters
Fiery Impose offers two different Scale to Fit behaviors with gutters.Scale to Fit is needed when the original page does not fit entirely within the available imposition slot on the sheet.The imposition slot size is defined by the sheet size and the number of imposition slots on the page (a function of thenumbers of rows and columns). The gutter setting defines the space between the imposition slots.If you have selected Scale to Fit, the Gutter dialog box offers a "Scale to fit" uses gutter settings check box. Thebehavior of the check box is as follows:
• Not selecting the check box (default setting) - Scale to Fit does not include the gutter size in the calculation.Changing the gutter size does not scale the page content, and instead shifts the content.
• Selecting the check box - Scale to Fit includes the gutter size in the calculation. Changing the gutter size scalesthe page content to fit within the area defined by the rows and columns and gutter settings.
If the user selected Scale to Fit, changing the gutter size automatically changed the scaling. The document wasresized so it continued to fit in the available area. Note the following: The user selected Scale to Fit option so thepage always fitted within the available imposition slot, no matter the gutter size or sheet size. Changing rows andcolumns or sheet size affected the scaled size. Changing gutter size affected the scaled size. Scale to Fit scaled down,not up.
Fiery make-ready applications v4.7
Specify Gangup settings in Fiery Impose
58

Set Gang Up methods in Fiery Impose
You can set one of five Gang Up methods. Not all Gang Up methods and styles are compatible.• Click one of the following Gang Up methods in the Layout Style menu:
• Standard
• Head to Head
• Foot to Foot
• Reversal
• Reversal-Alternate
Combining Gangup styles with Gangup methods
Which Gangup styles and methods you can use together depends on whether the job format is PostScript, PDF, orVDP.The following table shows which Gangup styles and methods you can use together for normal jobs in PostScript orPDF format.
Gangup styles Standard Head to Head Foot to Foot Reversal Reversal Alternate
Repeat Yes Yes Yes Yes Yes
Unique Yes Yes Yes Yes Yes
Unique-Collate Cut Yes Yes Yes Yes Yes
The following table shows which gangup styles and methods you can use together for VDP jobs.
Gangup styles Standard Head to Head Foot to Foot Reversal Reversal Alternate
Repeat Yes No No No No
Unique Yes Yes Yes Yes Yes
Unique-Collate Cut Yes Yes Yes Yes Yes
Multi-Record Collate Yes Yes Yes Yes Yes
Cut and Stack Yes Yes Yes Yes Yes
Duplo - Short Edge Feed Yes No No No No
Duplo - Long Edge Feed Yes No No No No
Standard style is the only layout style supported for variable data printing gangup repeat jobs. All layout styles aresupported for non-variable data printing jobs in PostScript or PDF format submitted to Command WorkStation
Fiery make-ready applications v4.7
Specify Gangup settings in Fiery Impose
59

through the Import function or printer driver. For jobs submitted through Hot Folders, Fiery Impose cannotdistinguish between variable data printing and non-variable data printing jobs, so Standard is the only Ganguprepeat style supported for variable data printing and non-variable data printing jobs.
Specify Repeat Booklet finish feature
The Repeat Booklet, which is for off-line finishing, not in-line finishing, allows step-and-repeat printing of twoidentical booklets on one sheet. Repeat Booklet requires a layout of 2 rows by 2 columns.1 Select Booklet for the product intent.
2 Select 2 X 2 Repeat booklet in the Row & Column option.
Styles available for edge-binding options
The following table shows which Style settings can be used with the edge binding options. These are applicable forPostScript or PDF jobs, but not for VDP jobs.
Note: For the Repeat Booklet binding layout, the Style setting modifies the orientation of the booklets. For Gang Uplayouts, the Style setting modifies the orientation of the pages.
Binding Method Standard Head to Head Foot to Foot Reversal Reversal Alternate
Left Edge Binding Yes Yes Yes No No
Right Edge Binding Yes Yes Yes No No
Top Edge Binding Yes No No Yes Yes
Fiery make-ready applications v4.7
Specify Gangup settings in Fiery Impose
60

Modify pages manually in Fiery Impose
When you use Fiery Impose, you can manually rotate, edit reorder, insert, and delete pages.
Rotate pages
In the Sheet View pane, you can only rotate pages in wire frame mode.• Do any of the following:
• To rotate a single page, click the Rotate icon on that page.If you zoomed out too far, you may not see the Rotate icon. You can zoom in until the icon becomes visible.
• To rotate all pages in the job, press the Shift and Ctrl keys and click the Rotate icon on any page.
• To rotate all pages in a certain location on the front side of each duplex sheet, press the Shift key and click theRotate icon on any page in that location on any sheet.
• To rotate all pages in a certain location on the front and back sides of each duplex sheet, press the Ctrl key(Windows) or Cmd key (Mac OS X) and click the Rotate icon on any page in that location on any sheet.
Edit page content
The Enfocus PitStop plug-in for Adobe Acrobat lets you edit the content of pages in a job.
Important: Edit page content before performing sheet-level operations such as adding, duplicating, or deletingsheets. Editing page content cancels all previous sheet-level operations.
• To see the PitStop documentation. click Help > Plug-In Help > Enfocus PitStop Professional in the Acrobat menu.
Edit page content with PitStop
The Enfocus PitStop plug-in for Adobe Acrobat lets you edit the content of pages in a job.1 Right-click a sheet in the Page View pane, and then choose Edit Page.
2 Use the PitStop editing tools to edit the document content.
Fiery make-ready applications v4.7
Modify pages manually in Fiery Impose
61

Reorder pages
You can reorder individual pages manually by arranging them in the main window.• In the Page View pane, select the thumbnail you want to move, and then drag the page to its new position.
Insert blank pages manually
You can add a blank page to your layout.• Select the page in the Page View pane where you want to add a page, and then click the Insert Blank Page icon in
the Page View toolbar.
Delete pages
You can quickly delete pages.• Right-click a page in the Page View pane and choose Delete from the menu that appears.
Fiery make-ready applications v4.7
Modify pages manually in Fiery Impose
62

VDP in Fiery Impose
In Fiery Impose, Variable Data Printing (VDP) imposition uses many of the features available for a normalimposition job. However, there are differences between VDP and normal imposition, and differences in the FieryImpose window.A Variable Data Printing (VDP) job consists of one or more variable-data records.Fiery Impose lets you impose jobs saved in any of the following VDP formats:
• FreeForm 1.0 and FreeForm 2.1 (FreeForm 2.0 is not supported.)
• VPS
• PPML
• PDF/VT
You can impose VDP jobs using predefined templates or custom templates created in Fiery Impose.When you apply a template to a VDP job, the template’s imposition layout is applied in sequence to each record inthe job.
• Each record begins on a new sheet.
• If a record does not fill the sheet completely, Fiery Impose inserts one or more blank pages to compensate forremaining slots on the sheet surface.
• The number of pages in each record can vary. Fiery Impose inserts blank pages to compensate for differences inpage length among records.
Open or preview a VDP job
You can open a VDP job from the Job Center Held list. To preview a processed VDP job, use the Raster Previewwindow.• Do one of the following:
• To open a VDP job, right-click it in the Job Center Held list.
• To preview an open VDP job, use the Raster Preview window (Actions > Preview).Previews include any imposition settings applied to the job. The job content display is actual size, organized byrecords or finished sets.
Fiery make-ready applications v4.7
VDP in Fiery Impose
63

Imposing a VDP job
Imposition settings apply to each page of the VDP job. Many VDP imposition settings are similar to those for a non-VDP job.
Note: Normal, Booklet, and Gangup are the workflows (product intents) available for VDP imposition. Compose isnot available.When you impose a VDP job, note that:
• The Sheet Size menu lists all the paper sizes supported by the Fiery Server and determined by the printer.
• The Template menu lets you select a predefined template or a non-VDP custom template created with FieryImpose.
• To create a custom template in the VDP Imposition window, you must define all imposition parameters. Youcannot copy and modify an existing template to create a custom template.
Print control strips for VDP jobs
A control strip identifies absolute surface number, output-set number, surface number relative to start of output-set,and logical pages for each record.• Click Marks and then click Define.
Specify booklet, scale, or bleeds for VDP imposition
VDP imposition settings for multi-up booklet, bleeds, and scale differ slightly from the settings for a standard FieryImpose job.
Set multi-up booklet for VDP jobs
You can specify a 2 x 2 Unique Booklet when you select Saddle for a VDP job. (This lets you print two records on asheet.) For records of different lengths, Fiery Impose automatically adds blank pages based on paginationrequirements.You can save the settings as a preset that you can select from Virtual Printers or Hot Folders.
1 Select a job in the Held list in Command WorkStation, and then click Actions > Impose.
2 In the Fiery Impose window, click Booklet for the product intent, and Saddle for the binding type.
3 Click Left, Right, or Top for the binding style.
4 To specify sheet size, click Edit beside the Sheet text field.
Fiery make-ready applications v4.7
VDP in Fiery Impose
64

5 To specify cover settings, click Cover, and then click None, Inside, Outside, or Both Sides in the Front Cover andBack Cover menus.
Note: You cannot change the media type for a VDP job’s cover.
6 Specify Layout Orientation, and then click 2 X 2 Unique Booklet for Row & Column.
Note: 2 x 2 Unique booklet is only available for VDP jobs. If you are imposing a PostScript or PDF job, and usingthe same template, the setting defaults to 2 x 2 Repeat booklet.
7 Specify other settings as required.
Set bleeds or scaling in VDP imposition
Setting bleeds in VDP imposition affects trim mark location. By default, Fiery Impose places the trim marks at theedge of the image. If you apply bleed values for VDP imposition, the trim marks are offset automatically by theamount of the bleed.
• Do any of the following:
• For Bleed, enter the bleed values in the Horizontal and Vertical fields.
• In the Scale pane, from the Scaling menu, select Scale to Fit, 100%, or Custom.If you chose Custom, enter a scale factor in the Scale Factor field.
Gang Up settings for VDP imposition
For VDP imposition, you can process Gang Up printing at either the page level or the record level.Choose one of the following:
• Single Record Mode - Applies imposition to one record at the same time. Impose performs Gang Up operation topages within a single record.
• Multiple Records Mode - Applies imposition to multiple records at a time. Impose performs Gang Up operationto pages from multiple records.
Gang Up VDP OptionsVDP Gang Up
Availability Earlier version of FieryImpose equivalent
Unique Single Record Mode
Multiple Records Mode
Enabled
Enabled
Unique
Multiple Records Gang Up
Repeat Single Record Mode
Multiple Records Mode
Enabled
N/A
Repeat
N/A
Unique-Collate Cut Single Record Mode Enabled Unique-Collate Cut
Fiery make-ready applications v4.7
VDP in Fiery Impose
65

Gang Up VDP OptionsVDP Gang Up
Availability Earlier version of FieryImpose equivalent
Multiple Records Mode Enabled Stack and Cut
Duplo - Short Edge Feed Single Record Mode
Multiple Records Mode
N/A
Enabled
N/A
N/A
Duplo - Long Edge Feed Single Record Mode
Multiple Records Mode
N/A
Enabled
N/A
N/A
Single Record Imposition for VDP jobs
With Single Record Imposition, each record within a VDP job is imposed one record at a time. The same impositionscheme is repeated for every record.Any imposed sheet (signature) contains pages from a single record only, and blank pages are inserted if pages fromthe record cannot completely fill the sheet.Single Record Imposition for VDP jobs supports Repeat Gang Up, Unique Gang Up, and Unique-Collate Cut.
Figure 1: Example of single-record imposition using Repeat Gang Up for 8 records, 2 pages per record, 1 row x 2columns layout, simplex. R = Record, P = Page, S = Sheet.
Figure 2: Example of single-record imposition using Unique Gang Up for 8 records, 2 pages per record, 1 row x 2columns layout, simplex. R = Record, P = Page, S = Sheet.
Figure 3: Example of single-record imposition using Unique-Collate Cut for 8 records, 4 pages per record, 1 row x 2columns layout, simplex. R = Record, P = Page, S = Sheet.
Fiery make-ready applications v4.7
VDP in Fiery Impose
66

Multiple Records Imposition for VDP jobs
With Multiple Records Imposition, multiple records within a VDP job are imposed onto one sheet. Multiple recordsare processed at the same time.Multiple Records Imposition for VDP jobs supports Multi-record Collate and Cut and Stack. Cut and Stack allows youto position multiple records on the sheets so that the cut piles can be quickly stacked without further sorting. For alarge job with many records, you can divide the job into sets for easier handling.
Figure 4: Example of Multi-Record Collate for 8 records, 2 pages per record, 1 row x 2 columns layout, simplex. R =Record, P = Page, S = Sheet
Figure 5: Example of Cut and Stack for 8 records, 2 pages per record, 1 row x 2 columns layout, simplex. R = Record, P= Page, S = Sheet
Duplo VDP Gang Up
Duplo VDP Gang Up layouts support the pagination scheme for the sheet-fed Duplo slitter/cutter/creaser finishingequipment. The Duplo gang up scheme creates pagination that lets you finish the printed sheets sequentially sheetby sheet.
Note: For Duplo Gang Up layouts, the Style setting is unavailable, and you cannot specify a Front Cover or a BackCover.The available Duplo Gang Up layouts are:
• Duplo - Short Edge Feed - Creates a pagination direction that lets you feed the final printed sheet into a Duplofinisher at the sheet's short edge.
• Duplo - Long Edge Feed - Creates a pagination direction that lets you feed the final printed sheet into a Duplofinisher at the sheet's long edge.
Fiery make-ready applications v4.7
VDP in Fiery Impose
67

Fiery Compose
Fiery Compose, one of the Fiery make-ready applications which also include Fiery Impose and Fiery JobMaster, letsyou prepare a job (spooled and held in Command WorkStation) for printing.Fiery Compose appears in the Fiery Preview window. Fiery Impose lets you specify imposition settings in the sameworkflow and immediately see the results actions you take in Fiery Compose and Fiery Impose.
Note: Fiery Compose options are a subset of Fiery JobMaster, which includes more advanced job preparationoptions.Fiery Compose is a dynamic application: The available options depend on which printer you select. For a single job,you can use Fiery Compose to:
• Set chapters and apply subset finishing, if supported
• Specify different media for front and back covers, body pages, and sections
• Insert blank pages, sheets, tabs, or other documents
• Edit a document using Adobe Acrobat and Enfocus PitStop
Note: The client computer must have an activated Fiery Compose license to use the full functionality of FieryCompose.Fiery Compose lets you work on any PDF or PostScript job at the page level. If you edit a PostScript job in FieryCompose, Fiery Compose converts it to PDF. Any changes you make to the job appear in the Sheet View pane.If a job contains Mixed Media settings that were set in the printer driver or Command WorkStation, these settingsappear when you view the job in Fiery Compose. After you save the job in Fiery Compose, you cannot go back andmake changes in the Mixed Media window.
Setting job options before using Fiery Compose
You can set finishing options, such as stapling, folding, and punching, using Command WorkStation (in JobProperties), the printer driver, or Fiery Compose.These methods can apply changes to an entire job. However, Fiery Compose can apply finishing options to subsetswithin the job. We recommend that you set subset finishing in Fiery Compose.
Fiery make-ready applications v4.7
Fiery Compose
68

Open and view jobs in Fiery Compose
You use the Fiery Compose window to view jobs and make changes. The Fiery Compose window has three panes:Page View, Sheet View, and Settings.
• Page View - Displays the selected job as single-page thumbnails.
• Sheet View - Displays either the entire job as thumbnails or a selected page as a full-screen preview. When youview the entire job, you can toggle between thumbnail view and wireframe view. (Displaying thumbnails aswireframes speeds up performance.) Changes immediately appear in the Page View.You can view page thumbnails as single pages. If the job is duplex, the Sheet View displays the front and back foreach sheet. You can also use Reader View to view left and right pages as in a book.
• Settings - Displays controls that affect the printing characteristics and layout on the final printing sheet surface.Which controls appear depend on the product intent.
Note: See Fiery Preview on page 78.
Open a job in Fiery Compose
You use Command WorkStation to open a spooled/held job in Fiery Compose.1 Choose a spooled/held job in the Held list of Command WorkStation.
2 Click Actions > Compose.
Set the Sheet View to thumbnails or full pages in Fiery Compose
The Sheet View can switch between thumbnails and full-page view. You can also display thumbnails as wireframes.
Note: When you view a full page, the page size shown is the document bounding box, not the size of the mediaassigned to the page.
• Do any of the following:
• To switch between thumbnail and full-screen views, click the Fit Page icon ( ) at the bottom of the window.
• To switch the thumbnail view between thumbnails and wireframe views, click the Toggle Sheet Content icon( ).
Fiery make-ready applications v4.7
Fiery Compose
69

View pages as a book
Reader View opens a separate window to display left and right side pages together as if reading a book.• Open Reader View by clicking File > Reader View.
Adjust thumbnail size
The Page View pane lets you set thumbnail size. The Sheet View pane lets you zoom or specify percentage zoom.• Do one of the following:
• To enlarge or reduce thumbnails in Page View, click View > Enlarge Thumbnails or View > Reduce Thumbnails.
• To zoom thumbnails in the Sheet View, drag the slider at the bottom of the Sheet View pane.
Fiery make-ready applications v4.7
Fiery Compose
70

Work with pages in Fiery Compose
Fiery Compose lets you add, rearrange, and delete pages, or insert pages from another job. You can also make pagestabs, chapter starts, or covers; assign media to pages; and set duplex for selected pages.
Important: You should edit the job before you specify any mixed media settings. Editing a job can change pagenumbers, which can affect mixed media settings. Always check any mixed media settings after you edit a job.
Open a job for editing in Acrobat
Fiery Compose can open a job for editing in Adobe Acrobat and Enfocus PitStop.• Right-click a page in the Page View pane and then click Edit in Acrobat.
Reorder, delete, or set duplex for pages in Fiery Compose
You can manipulate selected pages in a Fiery Compose job.• Do any of the following:
• To reorder pages, click the page’s thumbnail in the Page View pane and drag it to the new location.
• To delete pages, select one or more pages and click Edit > Delete.
• To apply duplex (if the printer supports it) to selected pages or chapters, select the pages, right-click them,click Page Duplex, and specify the setting that you want.
Note: To use duplex printing for an entire job, select the appropriate setting for the job in CommandWorkStation before opening the job in Fiery Compose, or choose Duplex in the Settings pane.
Insert pages from another job in Fiery Compose
You can insert pages from a job on the Fiery Server, or from your computer.1 Click Actions > Insert Page(s).
2 In the Insert Pages dialog box, do one of the following:
• From a local system, click Browse, select the file, and then click Open.
• From a Fiery Server, click Server Jobs, and click the file in the list.
3 Do one of the following:
• To insert specific pages, drag them to the Page View pane and arrange them in the order you want.
• To insert an entire job, drag the job label to the Page View pane.
Fiery make-ready applications v4.7
Fiery Compose
71

Insert a blank sheet or page in Fiery Compose
Fiery Compose lets you insert blank sheets or pages anywhere in a document. Fiery Compose inserts the sheet orpage before the selected page.
Note: You cannot add an insert when the selected page is a tab. If you want to add an insert before a tab, first add theinsert, and then add the tab after the insert.
1 Select a page in the Page View pane.
2 Click Actions > Insert Blank Sheet or Actions > Insert Blank Page.
Assign media to pages in Fiery Compose
The Sheet View and Page View panes let you assign media to individual pages, or to ranges of pages. You can alsoassign media to an entire job in the Page View pane.
1 Select a page or pages.
2 Click Actions > Assign Media.
3 Specify the media in the Page/Page Range Media dialog box.
Convert to Grayscale
You can convert individual color pages or surfaces to grayscale.Your job must contain color, and you must have an activated Fiery Compose or Fiery JobMaster license.
1 Import your job into the Hold queue of Command WorkStation.
2 Select the job in the Held list and select Fiery Compose or Fiery JobMaster.You can also access the feature by opening Fiery Impose if it is activated and either Fiery Compose or FieryJobMaster is also activated.
3 In either the Page View pane or the Sheet View pane, select a color page and either right-click, or go to theActions menu, and select Convert to Grayscale.The selected page or surface will be displayed as grayscale in the Sheet View pane. When that page is selected, theConvert to Grayscale option in the Actions menu has a check mark beside it.
4 To select multiple pages or surfaces in either Page View or Sheet View, do one of the following:
• To select a consecutive group of pages/surfaces, click the first item, press and hold down the Shift key, andthen click the last item.
• To select non-consecutive pages/surfaces, press and hold down the Ctrl key, and then click each item that youwant to select.
You can revert groups or individual pages/surfaces to color by selecting and choosing Convert to Grayscale fromthe Actions menu (even if they were selected as part of a group). The check mark is then removed.
Note: Actual conversion of the pages or surfaces occurs when the job is saved. If you modify the job after it issaved, any modifications that involve adding color will not be converted to grayscale.
Fiery make-ready applications v4.7
Fiery Compose
72

Work with chapter starts in Fiery Compose
To divide a document into chapters, you can mark the start of each chapter in the Page View pane, and then applyfinishing options in the Settings pane. You can also remove a chapter start mark.A chapter start page prints on the front side of a sheet. (This is the page on the right in a reader's spread.) Greencheckmarks in the Page View pane indicate chapter start pages.
• Do any of the following:
• To add a chapter start, select a page that has no chapter start mark and click Actions > Chapter Start.
• To remove a chapter start, select a page that has a chapter start mark and click Actions > Chapter Start.
• To show the blank pages that Fiery Compose inserts before chapter start pages, click View > Show ImplicitBlanks.Fiery Compose inserts implicit blanks if needed to accommodate chapter starts and duplex settings and toplace the chapter start page on the right side in the Reader View.
Set tabs in Fiery Compose
You can add a tab page anywhere in the document and select the tab media. (All tabs in a job must use the samemedia, even if multiple tab media are available.)The Convert to tab option in earlier versions of Fiery Compose has been removed. To convert an existing page in thedocument, or an inserted page, to a tab in Fiery Compose, right-click and select Assign Media, then select a tabmedia from the list, as described below.To add an insert before a tab, add the insert first, and then add the tab after the insert. You cannot add an insertwhen the selected page is a tab.You can add one tab at a time in the Preview pane. You can also set up and add multiple tabs in the Tab Text Setupwindow. When tabs have been added to a document, you can use the Filter Tabs icon in the Page View tool bar todisplay only those pages with tabs.
1 Select the page where you want to add a tab.
2 Click Actions > Insert Tab.A tab using the default tab media is added before the selected page. (If a tab already exists in the job, new tabsmust use the same media as the existing tab.)
3 Click the inserted tab, and then choose Actions > Assign Media.
4 Specify the media in the Edit Tab window.Changing the media for one tab changes it for all tabs in the job.
Note: In Fiery JobMaster, you can add multiple media for tabs in one job. See Add multiple tab styles to adocument on page 18.
Fiery make-ready applications v4.7
Fiery Compose
73

Set tab text and other properties in Fiery Compose
You use the Edit Tab window to set tab text and position properties, and the tab media.
Note: Earlier versions of Fiery Compose have the Tab Text option. Edit Tab replaced this option in later versions.
1 Select the tab page.
2 Right-click the selected tab page, and then click Tab Text.
3 Type the desired text in the Text field.
4 Use menus and buttons below the Text field to specify text attributes such as font, size, alignment, and textrotation.If the job uses portrait layout, the tab text appears vertically so you can check the text alignment.
5 To apply the same text settings to all tabs, click Apply the same text attributes for all tabs.
Set up covers
Fiery Compose lets you set up the front and back covers of the document independently and choose their mediafrom the Paper Catalog. You can use the document’s front and back pages as the front and back covers, or you caninsert covers.
Note: You cannot add an insert or tab or mark a chapter start when the selected page is the document front ordocument back. See Paper Catalog Help, which is part of Command WorkStation Help.
1 In the Settings pane, click Cover > Define.
2 Do one of the following in the Cover Media dialog box:
• To apply the same settings to the front and back cover, click Apply the same setting for both front and backcover.
• To set up the front cover and back cover separately, select Front Cover or Back Cover.
3 Specify the settings.
Subset finishing in Fiery Compose
If the printer supports it, you can apply individual finishing options to subsets in the job, thus applying a variety offinishing options in one pass. You can define subsets according to chapters, sheet ranges, or a custom range.First, you should specify finishing options for the whole job, including media and setting duplex if desired. Fordetails, see Set sheet size in Fiery Impose on page 48 and Set Duplex in Fiery Impose on page 48.You then create subsets within the job, and then specify finishing options and set media for individual subsets,ranges of sheets/pages, or individual sheets/pages.
Fiery make-ready applications v4.7
Fiery Compose
74

Subset finishing rules
• Sheets in a subset must be continuous, including any inserts or tabs added in Fiery Compose.
• You use the Page View pane to define chapter starts for chapter subset finishing.
• The Settings pane specifies the sheet count for sheet subset finishing. Each subset contains the same number ofsheets.
• The Sheet View pane defines custom subsets. Each subset can be of any length.
• If you switch the Set Definition from chapter or "number of sheets" to custom, the previously defined subsets arethe starting point for the Custom settings.
• Switching the Set Definition from custom to chapter or number of sheets removes the custom subsets andreplaces them with the new definition.
• All sheets within a subset must be of the same size, except for tabs and Z-fold inserts.
• You cannot specify covers for finishing subsets.
• If you define subsets for a single-sided or simplex job, and then specify duplex for the job, note that:
• For sheet subset finishing, the subsets maintain the sheet count. For example, a subset that was 3 pages on 3sheets remains as 3 sheets, but with 6 pages.
• For chapter and custom subset finishing, the subsets maintain the page count, adding blanks as necessary tofulfil the duplex requirement.
Specify a set definition in Fiery Compose
You specify subset finishing by specifying the Set Definition in the Settings pane, and then applying finishing options.1 In the Settings pane, click one of the following in the Set Definition menu:
• Custom - Defines subsets by selecting different ranges of sheets as desired in the Sheet View pane.
• Chapters - Specifies chapter starts to create subsets.
• Number of sheets - Specifies a fixed number of sheets to a subset, so that each subset consists of the samenumber of sheets.
2 Click OK.
Apply subset finishing in Fiery Compose
You can apply chapter, sheet, or custom subset finishing.To apply chapter subset finishing, specify chapter starts and then set finishing and media for the chapter subsets.The Sheet View pane displays the job divided into the chapter subsets.To apply sheet subset finishing, specify how many sheets are in a subset. Fiery Compose then divides the job intosubsets of equal length.Custom subset finishing provides full control of the length of subsets. You specify subsets in the Sheet View pane.Each custom subset can contain a different number of sheets.
Fiery make-ready applications v4.7
Fiery Compose
75

1 In the Settings Pane, click options in Fold, Hole-Punch , and Stapling menus.
2 If you are applying chapter subset finishing, do the following:a) Select a chapter start page in the Page View pane and click Actions > Chapter Start.
b) In the Settings pane, click Chapters in the Set Definition menu.
3 Assign global media, if desired.
4 If you want subsets of equal length (sheet subsets), select Number of Sheets from the Set Definition menu in theSettings pane. Then type the number of sheets you want in a subset.
5 If you are applying custom subset finishing, do the following:a) In the Settings pane, click Custom in the Set Definition menu.
b) In the Sheet View pane, select the beginning sheet of a subset, right-click, and click Create Subset. Repeat foreach subset.
6 Remove unwanted finishing options from individual subsets.
7 To assign media, do one of the following:
• To assign media to individual subsets, right-click the subset header and select Assign Media.
• To assign media to individual sheets or a range of sheets within a subset, select the sheets, right-click, andselect Assign Media.
8 To perform other functions on the subset, right-click the header bar and choose from the menu.
9 To remove a subset, select it, right-click, and then select Remove Subset.
Specify subset finishing for Z-fold in Fiery Compose
If your printer supports Z-fold finishing, you can specify Z-fold for individual sheets in a subset.The Z-fold insert is twice the size of the subset body paper, and both must be standard sizes that the printer and thefolding finisher support. (Custom sizes are unsupported.) The feed edge of both the body paper and the Z-fold insertmust be the same size.For example, if you have a Letter size job, the Z-fold insert will be 11 x 17, short-edge feed. If your job is A4, the Z-fold insert will be A3, short edge feed.
1 In the Settings pane, click Z-fold in the Fold menu.
2 In the Sheet View pane, select a sheet, right-click and then click Z-fold.
Manage jobs in Fiery Compose
Fiery Compose provides tools for saving, deleting, and printing a job.
Fiery make-ready applications v4.7
Fiery Compose
76

Save a job in Fiery Compose
If you make changes to a job in Fiery Compose, you must save it before you print it.1 Click File > Save.
2 Choose one of the following options:
• Save as a regular job - Saves to the Fiery Server.
• Save as PDF file - Saves to a local disk.
Delete a job that is open in Fiery Compose
To delete a job that is open in Fiery Compose, return to the Command WorkStation interface.1 Close the job in Fiery Compose.
2 Delete the job from Command WorkStation.For more information, see Command WorkStation Help.
Fiery make-ready applications v4.7
Fiery Compose
77

Fiery Preview
You can view the page and sheet content of a job in Fiery Preview and specify print options. You can performadditional make-ready tasks in preparation for printing jobs, including imposition.Fiery Preview is a pre-raster image process (pre-RIP) preview and displays jobs that have been spooled, but notprocessed. If you have Fiery Impose and Fiery Compose or Fiery JobMaster enabled, you can integrate the functionsof the combined workflows in the Preview window, and view the results of your actions before printing.
• Fiery Impose converts jobs to PDF file format and allows you to create imposition layouts.
• Fiery Compose allows you to set chapters, add blank pages, and specify different media for a job.
• Fiery JobMaster offers access to complex document preparation tasks such as tab insertion, scanning,chapterization, page numbering, and late stage editing. JobMaster includes Fiery Compose options.
Note: For information on Fiery Impose/Compose/JobMaster, see JobMaster Help.
Note: You can create a brand new print job in the Fiery Impose/Compose/JobMaster window by selecting the NewJob icon in the Command WorkStation tool bar. Create a new job when you want to prepare a job from a scanneddocument, print a tabs-only job, or combine existing jobs, starting from an empty job.Reader Preview is accessed from the main Fiery Preview window and displays jobs as they will look after they areprinted.If you select Preview for a processed job, the job opens in raster preview mode. Printed and archived jobs with rasterdata can be previewed. Archived jobs with raster data must be archived on the Fiery Server.If you have Fiery Graphic Arts Package, Premium Edition, installed, you can view the raster image of a processed jobin ImageViewer and adjust colors and perform other soft-proofing actions. ImageViewer is accessed from a button inthe raster preview window.To open a rasterized job and specify settings in Fiery Impose/JobMaster/Compose, select the job in CommandWorkStation Job Center and select Remove Raster from the Actions menu.
View information for processed jobs
The Job Summary pane lists specific information for the a selected job that has been processed and displaysthumbnails for all pages in that job. The selected job file name is shown at the top of the pane, along with thumbnailsfor all pages of the job, only if processed and held.If a job is processed, you can view it in the Job Summary pane in Job Center. The Raster Preview window for aprocessed job does not open Fiery Compose, Fiery JobMaster, or Fiery Impose. You can open ImageViewer if theFiery Graphic Arts Package, Premium Edition or the Fiery Productivity Package is supported on the Fiery Server.Start Command WorkStation and select a processed job in the held list to display it in the Job Summary pane.The Job Summary pane is at the right of the Command WorkStation window.
Fiery make-ready applications v4.7
Fiery Preview
78

1 Job name
2 Thumbnail of processed job
3 Number of page displayed
4 Navigation tools. The magnifying glass opens the job in the raster preview window.
5 Total number of pages in the job or number of VDP records (only for VDP jobs) and number of copies
6 Media information, such as page size, orientation, media type or media weight
7 Job instructions/notes to the operator
8 Run Preflight on the job or view the Preflight report
9 Last action taken on the job, such as spooled, processed, or printed, along with a date and time stamp
View spooled, unprocessed jobs
To view spooled jobs, you use the Preview window.1 In Job Center, select a spooled job in the Held queue.
Note: If the job is processed, you see the job in raster preview and have access to limited functions.
2 Choose one of the following ways to open the Preview window:
• Right-click and select Preview.
• In the Actions menu, select Preview.
Fiery make-ready applications v4.7
Fiery Preview
79

• Click the Preview icon in the Command WorkStation toolbar.
• In the Job Summary pane, click the Launch Preview icon (the magnifying glass icon below the thumbnail).
• Click the New job icon in the Command WorkStationtool bar.
Note: Choosing New job creates a blank job in the Fiery Impose/Compose/JobMaster workspace. You can thenapply Fiery Impose/Fiery Compose/Fiery JobMaster settings to the job.
The following illustration shows the standard Preview window. If the Page View and Settings panes are hidden whenyou first open Preview, click the arrows at the left and right of the toolbar respectively.
1 Toggle arrows to access page view See Page View, Sheet View, and Reader View on page 81
2 Menus See Fiery JobMaster on page 8
3 Toolbar icons See Toolbar icons in Preview on page 84
4 Thumbnails in sheet view See Open and view jobs in Fiery Compose on page 69
5 Arrows to access settings pane See Settings pane on page 82
6 Navigation tools See Open and view jobs in Fiery Compose on page 69
Fiery make-ready applications v4.7
Fiery Preview
80

7 Zoom controls See Fiery JobMaster on page 8
Page View, Sheet View, and Reader View
The Page View displays the thumbnail preview of the working document - the input.If you have Fiery Compose or Fiery JobMaster enabled, in Page View, you can accomplish the following tasks:
• Insert page(s) from other documents
• Insert blank pages
• Add tabs
• Insert other jobs
• Merge jobs
• Delete pages
• Reorder page(s)
• Replace page(s)
• Edit content
For more information, see JobMaster Help and Fiery Compose on page 68.The Sheet View shows the imposition (layout of the content on the sheets as they will be printed on the printer) ofthe job. It is a pre-RIP preview of the actual sheet.The Reader View opens a secondary window to display the document as it will look to the reader when printed, afterit has been folded, cut, and bound.The illustration below shows thumbnails displayed in the Page View and the Sheet View panes. Any actions youperform in the Page View pane are immediately displayed in the Sheet View.
Fiery make-ready applications v4.7
Fiery Preview
81

1 Page View pane See Open and view jobs in Fiery Compose on page 69
2 Page View toolbar icons See Toolbar icons in Preview on page 84
3 Thumbnails in Page View See Open and view jobs in Fiery Compose on page 69
4 Sheet View toolbar icons See Toolbar icons in Preview on page 84
5 Sheet View pane See Open and view jobs in Fiery Compose on page 69.
6 Thumbnails in Sheet View See Open and view jobs in Fiery Compose on page 69
Settings pane
In the Settings pane of the Preview window, you can specify imposition settings, and the changes you make aredisplayed in the Sheet View pane.Imposition settings are performed with Fiery Impose software. If you have not activated a Fiery Impose license, youcan still impose a spooled job in the Preview window and use Fiery Impose in Demo mode. You will be able to savethe job as a .dbp file to the Fiery Server, but not as Adobe PDF. You can print the job with a watermark.
Note: If the Settings Pane is not displayed in the Preview window, click the arrows in the Preview window toolbar.To view imposition settings, select Booklet or Gangup from the menu at the top of the Settings pane.
Fiery make-ready applications v4.7
Fiery Preview
82
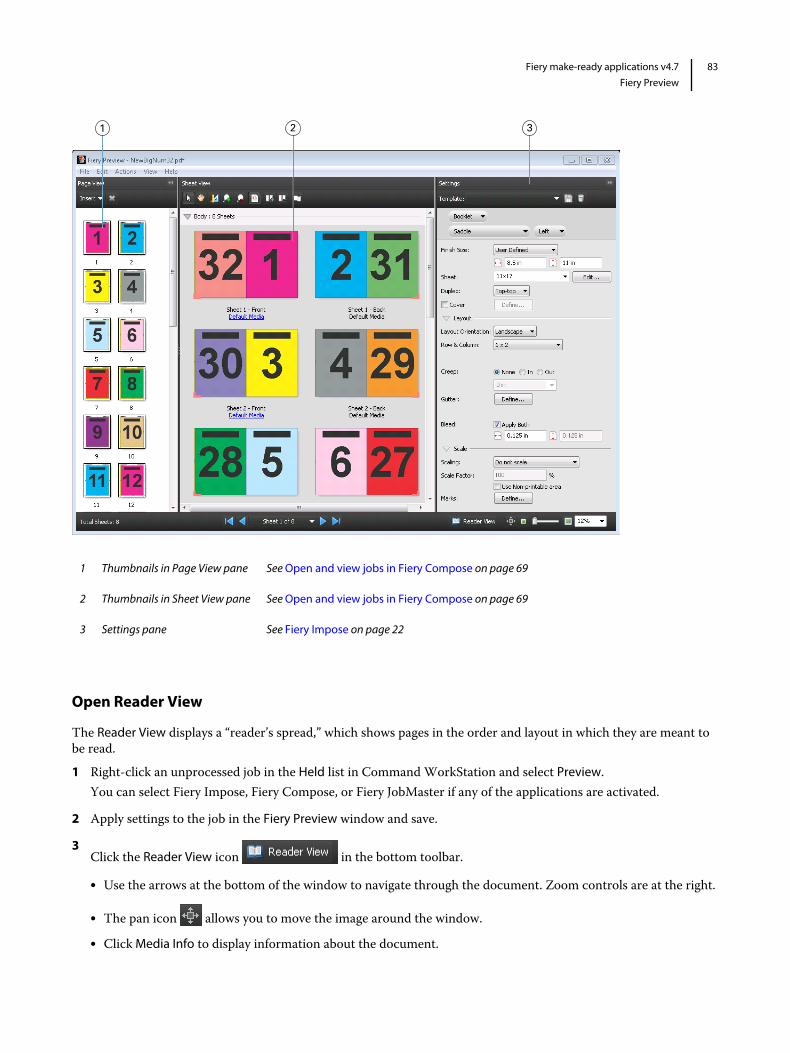
1 Thumbnails in Page View pane See Open and view jobs in Fiery Compose on page 69
2 Thumbnails in Sheet View pane See Open and view jobs in Fiery Compose on page 69
3 Settings pane See Fiery Impose on page 22
Open Reader View
The Reader View displays a “reader’s spread,” which shows pages in the order and layout in which they are meant tobe read.1 Right-click an unprocessed job in the Held list in Command WorkStation and select Preview.
You can select Fiery Impose, Fiery Compose, or Fiery JobMaster if any of the applications are activated.
2 Apply settings to the job in the Fiery Preview window and save.
3Click the Reader View icon in the bottom toolbar.
• Use the arrows at the bottom of the window to navigate through the document. Zoom controls are at the right.
• The pan icon allows you to move the image around the window.
• Click Media Info to display information about the document.
Fiery make-ready applications v4.7
Fiery Preview
83

• Rotate the document by holding down the Alt key and the left mouse. Rolling the mouse wheel allows you tozoom the image.
1 Media information about the pages displayed
2 Pages from the document displayed
3 Navigation controls
4 Zoom controls
Toolbar icons in Preview
The icons shown below are on the standard Preview toolbar. If you have Fiery Compose or Fiery JobMaster enabled,you have access to more tools.
Select a sheet or page in the Preview window.
Drag the preview around in the window.
Show measurement of page elements.
Zoom in.
Fiery make-ready applications v4.7
Fiery Preview
84

Zoom out.
Show sheet content toggles between thumbnail view and the wireframe view. The wireframe view shows thepagination of records.
Preview a raster image
If a job is processed, you can view it in the Job Summary pane in Job Center, or in the Raster Preview window, yousee the raster image that will be produced on the paper output. A job must be processed. Minimal functionality issupported.If a job is processed, you can view it in the Job Summary pane in Job Center. The Raster Preview window for aprocessed job does not open Fiery Compose, Fiery JobMaster, or Fiery Impose. You can open ImageViewer if theFiery Graphic Arts Package, Premium Edition or the Fiery Productivity Package is supported on the Fiery ServerTo open Raster Preview, do one of the following:
• Click Preview in the Actions menu.
• Click Preview button in the toolbar.
• Right-click (Windows) or Control-click (Mac OS) selected job in the Held list and select Preview.
The following illustration shows the raster preview of a job.
Fiery make-ready applications v4.7
Fiery Preview
85

1 Toolbar icons for saving, duplicating, or deleting the job
2 Thumbnails in the Page View pane
3 Raster file in the Raster View pane
4 Navigation tools for paging through the job and displaying the sheet number
Toolbar icons in Raster Preview
The icons shown below are on the standard Raster Preview toolbar. If you have Compose enabled, you have access tomore tools.
Save the currently displayed file under a new name.
Duplicate the selected page(s). Delete the selected page(s).
Launch ImageViewer opens the ImageViewer window if the Fiery Server supports either the FieryGraphic Arts package or the Fiery Productivity Package.
Fiery make-ready applications v4.7
Fiery Preview
86

Merging pages in Raster Preview
You can open multiple Preview windows with different jobs, but all jobs must come from the same Fiery Server. Youcan edit the jobs in each window separately. You can also drag pages from one window to another.When you drag a page from one window to another, the source window (from which you dragged the job) becomesRead Only. The destination window is editable, but you must save the new job with merged pages in the destinationwindow before the source window becomes editable again.
VDP Raster Preview
You can preview a processed Variable Data Printing (VDP) job in the Raster Preview window. Previews include anyimposition settings that may have been applied to the job. The content of the job is displayed actual size, organizedby records or finished sets.In the VDP Raster Preview, you can do the following:
• Navigate through the job by records or finished sets and pages or surfaces. The navigation parameters displayedchange dynamically, depending on whether the job is imposed or not.
• Change the size of the thumbnails in the Page View.
• Expand or collapse records or thumbnails.
• Open the job in the ImageViewer window.
Note: The Save, Duplicate, and Delete functions are not available for VDP jobs displayed in the Raster Previewwindow.
Preview of a VDP job before imposition
When a processed VDP job is displayed before imposition in the Raster Preview window, you can navigate by recordsand pages. You can also open the job in the ImageViewer window, if it is supported by the Fiery Server.
Note: The Save, Duplicate, and Delete functions are not available for VDP jobs displayed in the Raster Previewwindow.
Fiery make-ready applications v4.7
Fiery Preview
87

Preview of a VDP job after imposition
When a processed VDP job is displayed after imposition in the Raster Preview window, you can navigate by finishedsets and surfaces.If you want to impose a processed VDP job, you must remove the raster data, impose the job, save it in .dbp format,process it, and then open it in the Raster Preview window. You can also open the job in the ImageViewer window, ifit is supported by the Fiery Server.
Note: The Save, Duplicate, and Delete functions are not available for VDP jobs displayed in the Raster Previewwindow.
Fiery make-ready applications v4.7
Fiery Preview
88

Display of gangup VDP jobs
If a VDP job is imposed as Gangup (either Cut & Stack or Deploy) and the Stack Size is set to All, the job consists ofone finished set. In this workflow, you can navigate by surface only. If the Stack Size is set to more than one, you cannavigate by finished set and surface, as with any other imposed VDP job.
Fiery make-ready applications v4.7
Fiery Preview
89

Fiery make-ready applications v4.7
Fiery Preview
90

Fiery make-ready applications v4.7
Index
91
Index
AAbout
sheets 25signatures 25
Bbinding
specifying 55bleeds
setting for standard job 50setting for VDP 65
CCommand WorkStation 22Compose, about 7Cut and Stack 67
Dduplex 25
FFiery JobMaster 7
GGang Up
for VDP 65styles 59
gutterssetting for standard job 25
IImageViewer
previewing a job with 78Impose, about 7imposed job
saving 38imposing jobs 7imposition
Gang Up 28Gang Up Repeat 28Gang Up Unique 28templates 38Unique-Collate Cut 28
imposition layouts 7Imposition Template Path preference 34
JJobMaster, about 7
jobsVDP 7
job template, applying 37
Mmargin size 25measurement units 34measuring distances 35Mixed Media settings 68Multiple Records, imposing 67Multi-Record Collate 67
Oopening a job in Impose 23overwriting source file 38
Ppages
inserting blank 62page view 70Preferences
Imposition Template Path 34previewing
scrolling pages 78with ImageViewer 78
Printer's Marksadding 51
RRepeat Gang up, Single Record 66
Ssheet dimensions, displaying 35sheets
deleting 62simplex 25single records, imposing 66
Ttab properties 74tab text 74template
creating 36
UUnique
Single Records 66Unique-Collate Cut

Single Records 66
VVariable Data Printing
Cut and Stack 31Multi-Record Collate 31Stack Size 31
VDP jobsimposing 7
Fiery make-ready applications v4.7
Index
92