Fi nancial Accounting - Hyper Drive Solutions
29
Hyper Drive Information Technologies Pvt. Ltd Financial Accounting
Transcript of Fi nancial Accounting - Hyper Drive Solutions

Hyper Drive Information Technologies Pvt. Ltd
Financial Accounting
Financial Accounting
Accounting plays very important role in any business. The major importance of financial accounting is the recording of transactions, summarizing of cash-flow statement, maintenance of debit and credit, financial reports for operating business operations and a lot more. In any business proper management of accounting is required for managing the information regarding the financial position of the business, such as; profit and loss, cost and earnings, liabilities and assets, etc. HDPOS smart being double entry accounting system allows a business owner to keep track of all types of financial transactions, including purchases, liabilities etc. and is capable of generating reports that provides you complete details of financial When you get started with HDPOS smart, auto generated financial accounts such as sales, purchase etc. will be created. Financial Accounting module of HDPOS smart is integrated to all other core modules such as sales, purchase, supplier, customer accounts thus making automatic entries in the requisite accounts whenever a transaction is recorded in the system. You will hardly have to go any account to do financial account transaction unless you do JV entries. HDPOS smart also allows businesses to manage bank account details and perform banking transactions such Bank Payments, Bank Receipts and Money Transfer. All the FA Transactions created in HDPOS smart can be exported to external file and you can import the same transactions in third software such as Tally for auditing. In this manual we will explain how HDPOS smart help you in managing Financial Accounts.

Overview of Financial Accounts
When you get started with HDPOS smart for the first time, system will auto generate most of the important financial account required in your business such Sales, Purchase, Cash-In hand, Credit Card, etc. which are grouped in respective account groups. Apart this auto generated financial accounts you add your own financial accounts to manage your expenses.
Following are the auto generated system accounts;
Auto Generated System Accounts and Account Groups
All the system generated accounts are grouped automatically based on the nature of the account in the business. E.g. All your Credit Card and Bank Accounts are grouped as Bank Accounts. Further these account groups are categorized as Balance Sheet and Profit & Loss e.g. Account Groups such as Bank Accounts, Cash-in-hand, Current Liabilities etc. are categorized as Balance Sheet Accounts and Account Groups such as Sales Accounts, Purchase Accounts, Expense Accounts etc. are categorized as Profit & Loss. Auto generated Accounts with Account Type and Account Group:
Account Type Account Groups Account Name
Balance Sheet
Bank Accounts
1. Credit Card A/C 2. All Bank Accounts
Cash-in –hand
1. Petty Cash A/C
Current Liabilities
1. Advance Booking A/C 2. Exchange A/C 3. Gift Card A/C
Account Group Accounts
Bank Accounts 1. Credit Card A/C
Direct Expenses 1. Credit Card Commission Expense A/C 2. Food Coupon Commission Expense A/C
Indirect Expenses 1. Discount A/C 2. Petty Cash Adjustment A/C
Indirect Incomes 1. Credit Card Commission Collection A/C. 2. Food Coupon Commission Collection A/C.
Cash-in -hand 1. Petty Cash A/C
Current Liabilities 1. Advance Booking A/C 2. Exchange A/C 3. Gift Card A/C 4. Store Credit A/C
Purchase Accounts 1. Purchase A/C
Sales Accounts 1. Sales A/C 2. Gift Card SurCharge A/C

4. Store Credit A/C
Profit & Loss
Direct Expenses
1. Credit Card Commission Expense A/C
2. Food Coupon Commission Expense A/C
Indirect Expenses
1. Discount A/C 2. Petty Cash Adjustment
A/C
Purchase Accounts
1. Purchase A/C
Sales Accounts
1. Sales A/C 2. Gift Card SurCharge A/C
Managing FA Accounts
1. Add New Financial Account When you get started with HDPOS smart it generates an auto generated accounts in the system. In Addition you can create your own financial accounts to record your daily expenses.
Click on Add Financial Account.

Enter the account name and select the Account Type (Balance Sheet or Profit & Loss) and Account Group.
For expenses you need to select Profit & Loss as Account Type and Account Group as Direct/ Indirect Expense as required.
Optionally you can add Opening Balance for the account.
If you are adding opening balance to an account, transaction date for opening balance will be your Financial Year start date. You can change Transaction Date as required.
Click on Save (F8) to create an account.

2. Edit Financial Account To edit an account details, click on Edit Financial Account.
Make the required changes and click on Update.
3. Delete Account
You can only delete an account which has created manually and no financial transactions are associated with the account.
Auto generated system accounts cannot be deleted
4. View Accounts by Account Group and Account Type
By default Manage Financial Accounts window displays all the accounts created in the application. To view the accounts under selected Account Group.
Uncheck Show All checkbox.
Select the Account Group from left section of Manage Financial Accounts.
All the accounts under the Account Group will be displayed on the display area of Manage Financial Accounts window.

5. Filter Accounts by Account Type and Account Group To filter the accounts by Account Type and account group:
From the left section of Manage Financial Accounts first select the Account Type and select the account group.
This will display all the accounts under selected account type and account group.
6. User Defined Additional Account Fields As business owner you may wish to store additional information about your Accounts such as type of expense (Daily or Monthly), Branch details etc. and you can easily retrieve the required accounts by setting the filtering preferences.
To do this, the system allows you to name additional fields for each of these Account Types. You name the fields in the User Defined FA Fields function.
Select an account and click on Edit /Add Financial Account.
Click on FA Fields in User Filed List section of Edit Financial Account window.
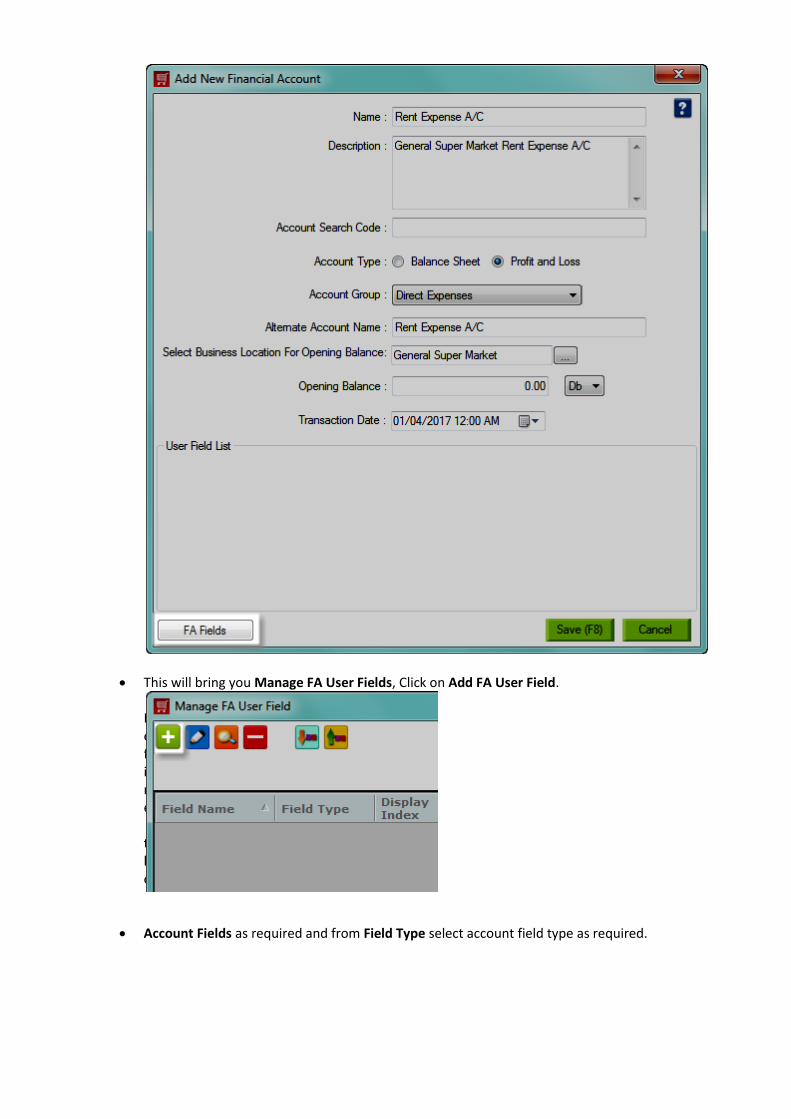
This will bring you Manage FA User Fields, Click on Add FA User Field. Define the
Account Fields as required and from Field Type select account field type as required.

Text - You can enter an alphanumeric description Number - You can enter numbers. Lookup Value – You can enter multiple values. Date Time - You can select date and time. Check Box - This is a check box, which you can check or uncheck.
In the above example I have selected Lookup Value as Field Type
Click on Create.
You will be prompted to restart the application, click on Yes to restart.
After restarting the application, you will see the user fields you have defined while Adding or Editing Financial Account.
Enter the user field values as required and click on Update.

Account Ledger Account Ledgers provides you complete information about a specific account. The Account Ledger contains a debit and credit entry for every transaction recorded within it, so that the total of all debit balances in the account ledger should always match the total of all credit balances. This makes it easy to determine the current balance of any account.
I. Account Ledger will record all Credit and Debit transactions within it. II. Debit aspect of all the transactions are recorded on the debit side and credit aspects of all the
transactions are recorded on credit side according to date. III. The difference of the Credit Total and Debit Total represents Net Total. The excess of debit side
over credit side indicates debit balance, while excess of credit side over debit side indicates the credit balance.
1. General Account Ledger
To view ledger of any account in HDPOS smart;
Select an Account to view the ledger.
Click on View Ledger.
This will display Opening and Closing Balances of the selected account.

By default this will display opening and closing balances on today’s date, change the From Date and To Date as required to view the Opening and Closing balances of the account within the selected date.
2. Combined Ledger
In your business you may want to view the combined ledger of multiple accounts. Example, you can view the combined ledger of multiple bank accounts which makes easy to determine the current balance of combined accounts. Combined Ledger provides you complete information such as opening balance and closing balance of combined accounts in the selected date range. To view the combined ledger of any accounts in HDPOS smart;
Select the accounts to view the combined ledger.( Use CTRL key for multi selection)
Click on View Combined Ledger.
This will display the Opening and Closing Balance of the selected accounts within
the selected date range.

Closing Balance: The difference of the Credit Total and Debit Total represents Net Total. The
excess of debit side over credit side indicates debit balance, while excess of credit side over debit side indicates the credit balance.
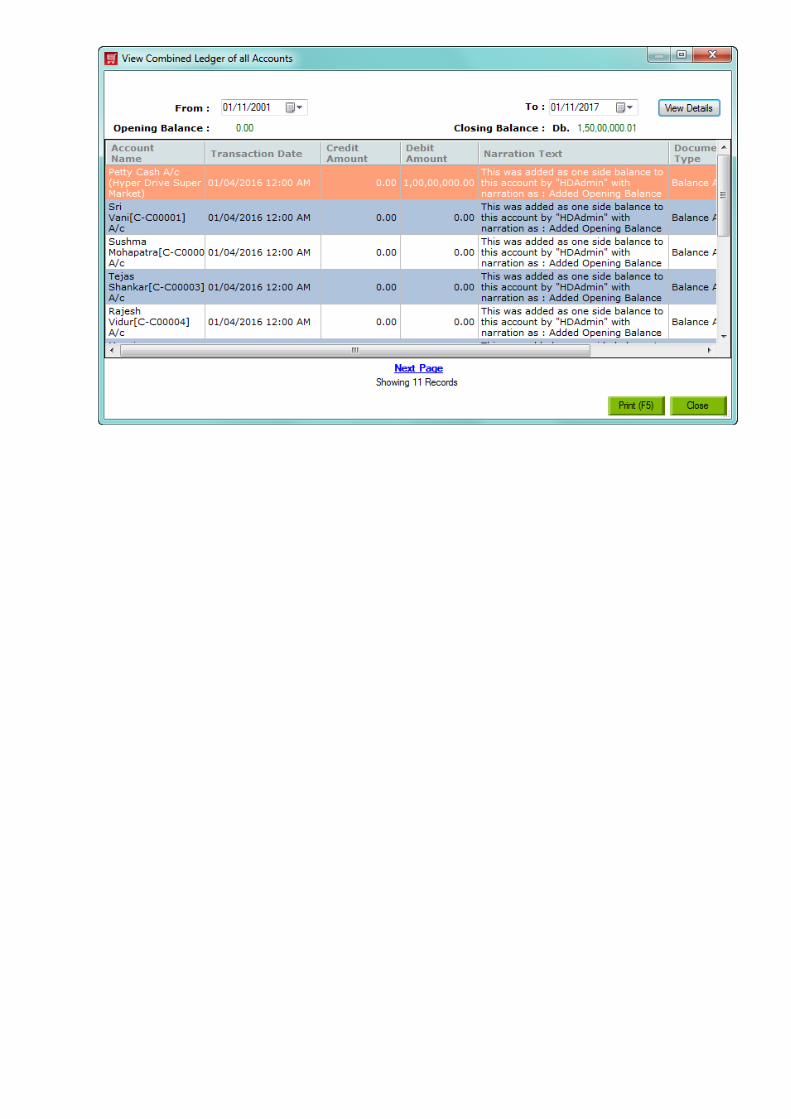
3. Combined Ledger of All Accounts
HDPOS smart also provides you option to view combined ledger of all accounts. To view combined ledger of all accounts;
Click on View Combined Ledger of all Accounts

Financial Transactions
1. Understanding Credit and Debit in HDPOS smart
HDPOS smart is double-entry accounting system i.e. for every transaction you create; atleast two accounts will be involved. For example – If you buy goods from your supplier in credit, for this particular transaction your Supplier A/C is Credited and your Purchase A/C is Debited.
Account Name Credit Debit
Supplier A/C XXX Cr -
Purchase A/C - XXX Db
Debit is abbreviated Db., while credit is abbreviated Cr.
Debits - that what we owe, which we can claim or in simple which belongs to us. Credits - that is claimed by others and they owe or in simple belongs to others and we have to
return or pay All expenses are always Db and all incomes are always Cr. Increase in Asset Db and Decrease in Asset Cr Increase in Expense Db and Decrease in Expense Cr
2. Basic Financial Transactions in HDPOS smart Sales Transaction with Cash
When sale is recorded in HDPOS smart with cash then following accounts will be Credited and Debited respectively. It is assumed that all the below transactions are recorded without Tax, discounts, Additional Charges, Round off etc. if sales include Tax, Discounts, Additional Charges etc.. You will notice different financial accounts involved in the financial transaction and will be credited and debited respectively.
Account Name Credit Debit
Sales A/C XXX -
Petty Cash A/C - XXX
Sales Transaction Credit/Debit Card When sale is recorded in HDPOS smart with Credit/Debit card then following accounts will be
Credited and Debited respectively.
Account Name Credit Debit
Sales A/C XXX -
Credit Card A/C - XXX
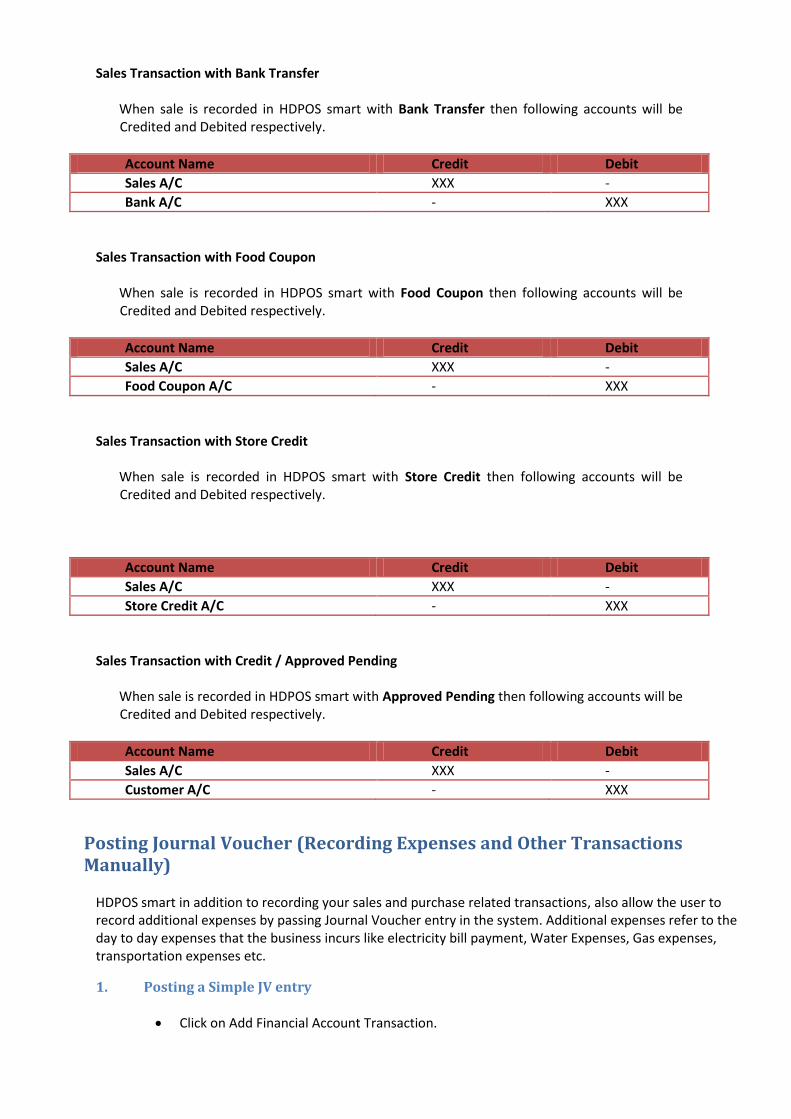
Sales Transaction with Bank Transfer When sale is recorded in HDPOS smart with Bank Transfer then following accounts will be
Credited and Debited respectively.
Account Name Credit Debit
Sales A/C XXX -
Bank A/C - XXX
Sales Transaction with Food Coupon When sale is recorded in HDPOS smart with Food Coupon then following accounts will be
Credited and Debited respectively.
Account Name Credit Debit
Sales A/C XXX -
Food Coupon A/C - XXX
Sales Transaction with Store Credit When sale is recorded in HDPOS smart with Store Credit then following accounts will be
Credited and Debited respectively.
Account Name Credit Debit
Sales A/C XXX -
Store Credit A/C - XXX
Sales Transaction with Credit / Approved Pending When sale is recorded in HDPOS smart with Approved Pending then following accounts will be
Credited and Debited respectively.
Account Name Credit Debit
Sales A/C XXX -
Customer A/C - XXX
Posting Journal Voucher (Recording Expenses and Other Transactions Manually)
HDPOS smart in addition to recording your sales and purchase related transactions, also allow the user to record additional expenses by passing Journal Voucher entry in the system. Additional expenses refer to the day to day expenses that the business incurs like electricity bill payment, Water Expenses, Gas expenses, transportation expenses etc.
1. Posting a Simple JV entry
Click on Add Financial Account Transaction.

Enter Transaction Amount.
Select the Financial Account to Credit.
Select the Financial Account to Debit.
Enter the Narration for the transaction and click on Save.
2. Delete JV Entry If you have wrongly posted JV entry, HDPOS smart allows you delete the JV entry and add new entry as required. To delete a JV entry;
From Manage Financial Account Transaction, select Show FA Transaction Documents.
This will display all the Financial Transactions created manually.
Select the transaction that you want to delete and Click on Delete FA Transaction

FA Transaction Documents
A simple journal entry has one debit and one credit whereas in FA Transaction Documents can have one or more debits and/or credits than a simple journal entry. FA Transaction Documents you may combine two or more debits and a credit, or a debit and two or more credits.
FA Transaction Documents Includes the following options:
Cash Payment
Bank Payment
Cash Receipt
Bank Receipt
Money Transfer
JV Credit
JV Debit
1. Cash Payment
Cash Payment is an accounting entry which allows you to record cash payment transactions in business. Cash Payments are accounted for by crediting cash-in hand account to recognize the decrease in the asset. Here you can select multiple accounts to debit (Db). Suppose if you are making payment of Electric City Bill, Internet Charges etc. by crediting cash account. Instead of recording numerous simple journal entries it is better to record journal entries of single accounting event as a compound entry because it saves time and keeps related debits and credits in one place.
To add Cash Payment in HDPOS smart:
Click on FA Transaction Document

This will bring up FA Transaction Document as shown below
Select Transaction Type as Cash Payment and Crediting Account (the accounts that appear in Crediting Account field are all Petty Cash Accounts of your business locations)
This will display current cash balance in the selected account.
From the bottom section of FA Transaction Document, click on button to select the accounts to debit.
This will bring you Add Account window, select the account to debit, enter the amount to debit and click on Save (F8).

You can add multiple accounts to debit by clicking on button.
Click on Save(F8) save the financial transaction.
In the above transaction following accounts will be credited and debited as shown below:
Account Credit Debit
Petty Cash A/C 4000 -
Electric City Bill A/C
- 1500
Internet Bill A/C - 2500
2. Bank Payment
Bank Payment is an accounting entry which allows you to record the payments made from bank accounts. Bank Payment usually used when you to credit your bank account and debit other account(s). Example: ABC Company obtained a loan of 10,000 RS @ 12% interest on July 1, 20XX. The loan was repaid on Dec 31, 20XX. Interest expense on loan = 10,000 × 6/12 × 12% = 600. The repayment can be recorded using the following compound journal entry:
Date Account Name Debit Credit
31 20XX Loan Payable 10000
Interest Expense 600
Bank Account 10600

3. Cash Receipt
Cash receipt is an accounting entry used to record the receipt of cash by a business. Cash receipts are accounted for by debiting cash ledger to recognize the increase in the asset.
Date Account Name Debit Credit
31 20XX Account A 5000
Account B 5000
Cash-In hand A/C 10000
4. Bank Receipt
Cash receipt is an accounting entry used to record the receipt of bank payment by a business. Bank receipts are accounted for by debiting bank account ledger to recognize the increase in the asset.
Date Account Name Debit Credit
31 20XX Account A 5000
Account B 5000
Bank A/C 10000
5. Money Transfer
Money Transfer is an accounting entry to record the transfer of money from Bank Account to Cash –In Hand. Bank receipts are accounted for by crediting bank account ledger to recognize the decrease in the asset.
Date Account Name Debit Credit
31 20XX Bank A/C 10000
Cash – In hand A/C 10000

Tally Transfer
In this section we will explain to you how HDPOS smart help you in exporting financial data to tally. Please note that our discussion here is purely based on our product functionalities and how it works with regards data export. This article is not about comprehensive explanation of Tally, for complete understanding of Tally and how to import the data to tally you will need to consult your accountant.
HDPOS smart allows you to transfer Financial Account and Financial Transactions to Tally this can be done in two ways:
Transfer through file
Direct Tally transfer
1. Transfer through File
In this method you can export the financial data from HDPOS smart to external file like XML or in Encrypted Format and you can import the same files in tally.
From search field of setup window type Transfer Data and click on Search icon.
Select Transfer Data
I. Exporting Company to XML file
Click on Export Company.
From Export Company window select the company and click on Export.

This will bring Target Info window, select the Financial Year, Books Beginning and select the file path and click on Export File.
II. Exporting Accounts to XML file
Click on Export Account.
Select the accounts you want to export to XML file and click on Export. Check Export All checkbox to export all the accounts being created in HDPOS smart.
Select the file path and click on Export to File.

1. Exporting Transactions to XML file
Click on Export Transaction.
Select the date range (From and To date) for exporting the financial transactions.
Check Export All check box and click on Export button.
Select the File Path and click on Export to File.
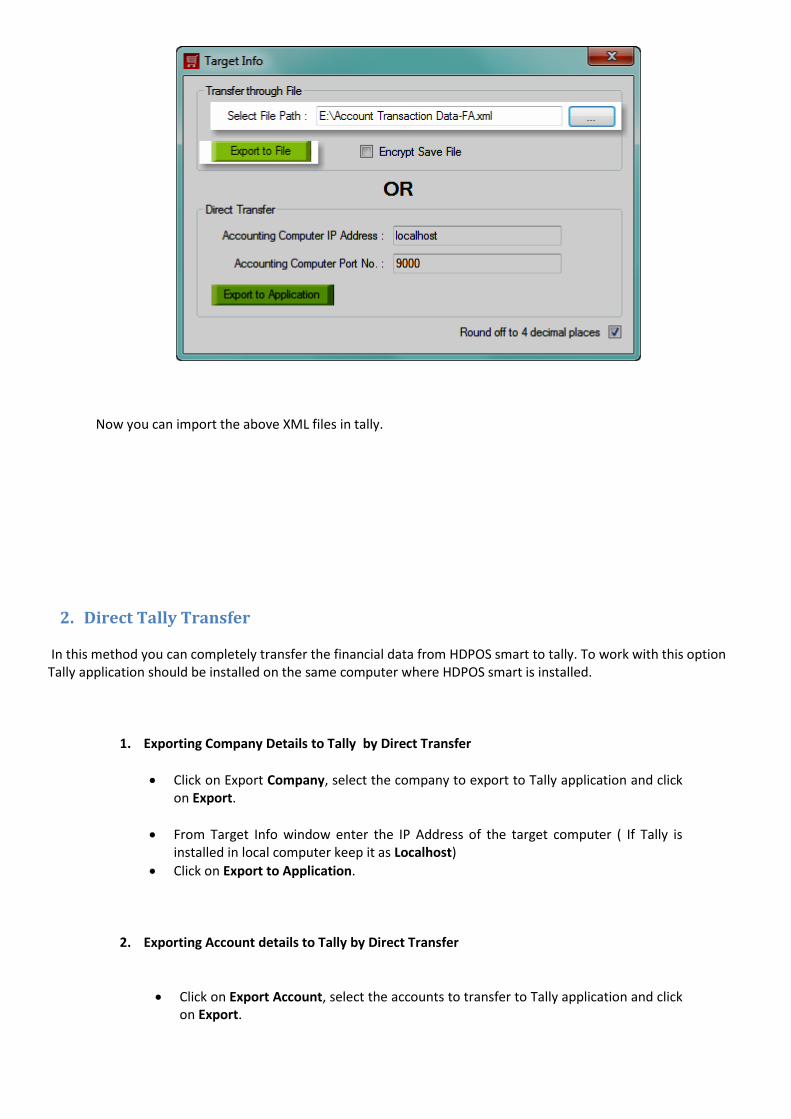
Now you can import the above XML files in tally.
2. Direct Tally Transfer
In this method you can completely transfer the financial data from HDPOS smart to tally. To work with this option Tally application should be installed on the same computer where HDPOS smart is installed.
1. Exporting Company Details to Tally by Direct Transfer
Click on Export Company, select the company to export to Tally application and click on Export.
From Target Info window enter the IP Address of the target computer ( If Tally is installed in local computer keep it as Localhost)
Click on Export to Application.
2. Exporting Account details to Tally by Direct Transfer
Click on Export Account, select the accounts to transfer to Tally application and click on Export.

From Target Info window enter the IP Address of the target computer ( If Tally is
installed in local computer keep it as Localhost)
Click on Export to Application.

3. Exporting Transactions to Tally by Direct Transfer
Click on Export Transaction and Select the date range (From and To date) for exporting the financial transactions and click on Export.
From Target Info window enter the IP Address of the target computer ( If Tally is
installed in local computer keep it as Localhost)
Click on Export to Application.
This will transfer the complete details to tally.

Profit & Loss
Profit and Loss is a financial statement that summarizes the revenues, costs and expenses incurred during a specific period of time. All the expenses are recorded in the debit side (left side) of the profit & loss and all the incomes, sales and closing stocks are recorded in the credit side (right side) of the profit & loss. In profit and loss account if debit side is excess the credit side, the difference is called net loss. If the credit side of profit and loss account is excess than the debit side, the difference is called net profit.
Here are a few things your profit and loss would include:
Left side Right Side
Purchase Account
This will show you the total of all purchase made for the selected date range. Purchases not made in the selected date range will not reflect in the purchase Account Total
Closing Stock Closing stock is the value of goods unsold at the end of the accounting period or the date range selected. Here the goods unsold will be multiplied with its purchase value to arrive at the closing stock value.
Opening Stock Opening stock is the value of goods available for sale in the beginning of an accounting period/ date range selected. The opening stock will be calculated at the price at which it was purchased. Here it will be assumed that the goods purchased first were sold first and the stock remaining is the stock that was purchased later.
Sales Account
This will show the total value of stock sold for the selected period. Here sales value is calculated as - (quantity sold * price at which it was sold).
Direct/ Indirect expenses
This will show all your expenses incurred in your business for the period selected. For e.g. Salaries, rent, depreciation of fixed assets, tax paid, discounts given etc.
Direct/ Indirect Income
This will show all your income earned in your business for the period selected. For e.g. Discount received, interest earned.
Net Profit
This will display any profit earned after deducting all the expenses shown on the left side with the income earned on the right side. If the income is more than the expense, you will see a net profit
Net Loss
This will display any loss incurred after deducting all income earned on the right side with the expenses shown on the left side If the expense is more than the income you will see a net loss.

At any point of time to know how the value is arrived at for each account/ account group mentioned in the profit and loss account you can simply double click on the account/ account group to bring up the ‘Manage Financial Account Screen’. In this screen on the left you will see the account groups checked and on the right side you will see all the accounts belonging to the selected account groups that go into calculating the value that appears in your Profit and loss, Balance sheet or Trail balance. If you need to further see how each account got their values you can select a specific account and click on View ledger option from the tool strip to see the transactions for the selected date range.
Balance Sheet
A balance sheet is a snapshot of your business financial position on a given day, usually calculated at the end of the quarter or year. It is a summary of your company’s assets, liabilities/obligations and owner’s financial involvement. To the left of the screen you would see Liabilities. Liabilities are amounts owed to creditors for a past transaction. Liability accounts will normally have credit balance. To the right of the screen you can see Assets. Assets are things that the company owns. Usually asset accounts will have debit balances.
Here are a few things your balance sheet would include:
Left side Right Side Current liabilities Current Assets
Current liabilities are the amounts that the company owes its Supplier or other payments that are still pending. This account group will show the difference between opening and closing balance of your below accounts for the selected date range.
Sundry Creditors
Duties and taxes
Current liabilities
Current Assets refer to your cash in hand and bank balances. This account group will show the difference between opening and closing balance of your below accounts for the selected date range.
Cash in hand
Bank accounts
Closing stock
Sundry Debtors
Loans and advances
Capital Account (investments made by the owners of the business/ company)
Profit and Loss A/C This could come in either your left side or right side of your balance sheet depending on whether your company has made profit or loss for the selected period. This value will be taken from the Profit and loss statement. If a profit has been incurred the amount will appear on the left
Fixed Assets
Fixed assets are assets which are purchased for long-term use and are not likely to be converted quickly into cash- such as land, buildings, and equipment. If you have recorded details of your fixed assets the same will appear here.

side of the balance sheet. If there was a loss it would appear on the right side of the balance sheet.
Loans & liabilities Here you will see total closing balance of loans taken by the business/ company.
Investments Any investments made by the business/ company will appear here.
Suspense Account
If you have created an account under ‘Suspense Account’ account group the closing value of this account as per the date range selected will appear here. A suspense account is generally created when the proper account cannot be determined at the time of recording transaction. When the proper account is determined, the amount will be moved from the suspense account to the proper account. This group can appear on either side of your balance sheet, based on the closing balance being debit or credit.
Trial Balance
Trial balance is a statement of all debits and credits. Trial balance ensures that for every debit entry recorded, a corresponding credit entry has been recorded in the books of accounts. If the totals of the trial balance do not agree, the differences may be investigated and resolved before financial statements are prepared. Asset and expense accounts appear on the left side of the trial balance whereas loans, liabilities and income from Sale appear on the credit side.