FECAL INDICATOR 7.1 BACTERIA · PDF fileFIB—9 SAMPLING EQUIPMENT AND 7.1.1 EQUIPMENT...
64
+ + + USGS TWRI Book 9–A7 (Third Edition) Fecal Indicator Bacteria (11/2003) FIB—1 FECAL INDICATOR 7.1 BACTERIA By D.N. Myers Page 7.1 Fecal indicator bacteria ................................................. FIB–5 7.1.1 Sampling equipment and equipment sterilization procedures.......................................... 9 7.1.1.A Autoclaving ............................................... 14 7.1.1.B Flame sterilization of the Hydrosol ® field filtration unit .................................... 15 7.1.2 Sample collection, preservation, storage, and holding times .......................................................... 17 7.1.2.A Surface-water sample collection ............. 18 Depth-and-width-integrating methods .... 19 Hand-dip method ...................................... 20 7.1.2.B Ground-water sample collection.............. 22 Supply wells .............................................. 22 Monitoring wells ....................................... 24 7.1.2.C Sample preservation, storage, and holding times ............................................. 29 7.1.3 Identification and enumeration methods.............. 30 7.1.3.A Culture media and reagents ..................... 32 7.1.3.B Membrane-filtration method ................... 34 7.1.4 Calculation and reporting of fecal indicator bacteria ................................................................... 49 7.1.5 Instructions for media preparation....................... 53
Transcript of FECAL INDICATOR 7.1 BACTERIA · PDF fileFIB—9 SAMPLING EQUIPMENT AND 7.1.1 EQUIPMENT...

+
+
+
USGS TWRI Book 9–A7 (Third Edition) Fecal Indicator Bacteria (11/2003)
FIB—1
FECAL INDICATOR 7.1 BACTERIA
By D.N. Myers
Page
7.1 Fecal indicator bacteria ................................................. FIB–5
7.1.1 Sampling equipment and equipment sterilization procedures.......................................... 9
7.1.1.A Autoclaving ............................................... 14
7.1.1.B Flame sterilization of the Hydrosol® field filtration unit .................................... 15
7.1.2 Sample collection, preservation, storage, and holding times .......................................................... 17
7.1.2.A Surface-water sample collection ............. 18
Depth-and-width-integrating methods.... 19
Hand-dip method...................................... 20
7.1.2.B Ground-water sample collection.............. 22
Supply wells .............................................. 22
Monitoring wells ....................................... 24
7.1.2.C Sample preservation, storage, and holding times ............................................. 29
7.1.3 Identification and enumeration methods.............. 30
7.1.3.A Culture media and reagents..................... 32
7.1.3.B Membrane-filtration method ................... 34
7.1.4 Calculation and reporting of fecal indicator bacteria ................................................................... 49
7.1.5 Instructions for media preparation....................... 53

Fecal Indicator Bacteria (11/2003) USGS TWRI Book 9–A7 (Third Edition)
+
+
+
2—FIB
Illustrations
7.1-1. Photograph showing procedure to flame sterilize the Millipore Hydrosol® field filtration unit ..............................................................................FIB–16
7.1-2. Diagram showing preparation of sample volumes by dilution .................................................... 37
7.1-3. Photograph showing steps in membrane- filtration procedure .................................................... 38
7.1-4. Diagram showing a method for counting colonies on gridded membrane filters....................... 43
7.1-5. Photographs of typical colonies of fecal indicator bacteria on culture media.......................... 46
Tables
7.1-1. Ranges of fecal indicator bacteria typically found in uncontaminated surface water and contaminated surface water ...................................... 8
7.1-2. Equipment and supplies used for membrane- filtration analysis of samples for fecal indicator bacteria testing ........................................... 11
7.1-3. Equipment cleaning and sterilization procedures.... 13
7.1-4. Summary of equipment for sample collection, procedures for sample preservation, and holding times for indicator bacteria ......................... 17
7.1-5. Fecal indicator test definitions, incubation times, and incubation temperatures.......................... 31
7.1-6. Recommended sample volumes for membrane-filtration analyses based on ideal colony count and concentration range...................... 36
7.1-7. Membrane-filter pore sizes for fecal indicator bacteria tests ............................................................... 40

+
+
+
USGS TWRI Book 9–A7 (Third Edition) Fecal Indicator Bacteria (11/2003)
FIB—3
7.1-8. Preparation guidelines for dilution of samples to volumes less than 1.0 milliliter for fecal indicator bacteria analysis ............................... FIB-41
7.1-9. Test (medium type), ideal colony count, and typical colony color, size, and morphology for indicator bacteria colonies .................................. 48
Notes:
References for section 7.1, Fecal indicator bacteria, are located at the end of Chapter A7 in the “Selected References and Documents” section, which begins on page REF-1.
See Appendix A7-A, Table 2, for parameter codes for fecal indicator bacteria that are used in the National Water Information System (NWIS) of the U.S. Geological Survey.
The citation for this section (7.1) of NFM 7 is as follows:
Myers, D.N., November 2003, Fecal indicator bacteria: U.S. Geological Survey Techniques of Water-Resources Investigations, book 9, chap. A7 (3d ed.), section 7.1, accessed ___date___, from http://pubs.water.usgs.gov/twri9A/.

Page left blank intentionally.
+
+
+
USGS TWRI Book 9–A7 (Third Edition) Fecal Indicator Bacteria (11/2003)
FIB—5
FECAL INDICATOR 7.1 BACTERIA
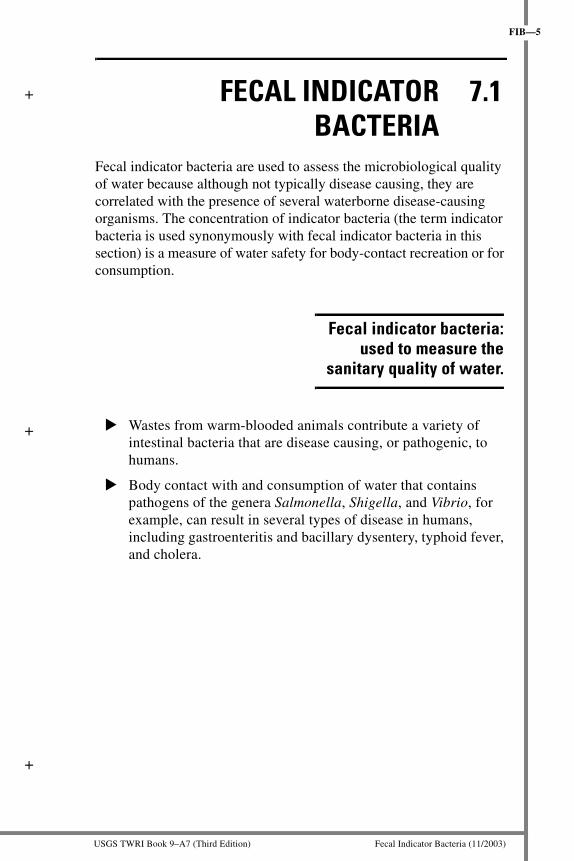
Fecal indicator bacteria are used to assess the microbiological quality of water because although not typically disease causing, they are correlated with the presence of several waterborne disease-causing organisms. The concentration of indicator bacteria (the term indicator bacteria is used synonymously with fecal indicator bacteria in this section) is a measure of water safety for body-contact recreation or for consumption.
Wastes from warm-blooded animals contribute a variety of intestinal bacteria that are disease causing, or pathogenic, to humans.
Body contact with and consumption of water that contains pathogens of the genera Salmonella, Shigella, and Vibrio, for example, can result in several types of disease in humans, including gastroenteritis and bacillary dysentery, typhoid fever, and cholera.
Fecal indicator bacteria: used to measure the
sanitary quality of water.

Fecal Indicator Bacteria (11/2003) USGS TWRI Book 9–A7 (Third Edition)
+
+
+
6—FIB
The presence of Escherichia coli (E. coli) in water is direct evidence of fecal contamination from warm-blooded animals and indicates the possible presence of pathogens (Dufour, 1977). A few strains of E. coli are pathogenic, such as E. coli O157:H7, but most strains are not.
The presence of Clostridium perfringens (C. perfringens) in water, as spores and (or) vegetative cells, indicates the contamination of water with treated or untreated sewage or similar wastes (Bisson and Cabelli, 1980; Fujioka and Shizumura, 1985).
Bacteriological tests are used to assess the sanitary quality of water and the potential public health risk from waterborne diseases. This section describes tests that can be completed in the field for identifying and enumerating five types of fecal indicator bacteria: total and fecal coliform bacteria, E. coli, fecal streptococci, and enterococci (Britton and Greeson, 1989; U.S. Environmental Protection Agency, 1985, 1991a, 1996, 1997, 2000a, 2000b). These are the most widely used indicator bacteria. Information for collecting samples for analysis of C. perfringens is included in this section, although membrane-filtration analysis of samples for C. perfringens is to be performed in a microbiological laboratory and not in the field.
CAUTION:When sampling for fecal indicator bacteria, wear protective apparel to prevent nose, mouth, eye, and direct skin contact with polluted water.

+
+
+
USGS TWRI Book 9–A7 (Third Edition) Fecal Indicator Bacteria (11/2003)
FIB—7
Water-quality criteria have been developed by the U.S. Environmental Protection Agency (USEPA) for concentrations of indicator bacteria in recreational waters, shellfish-growing waters, and in ambient waters (U.S. Environmental Protection Agency, 1986). In 1986, E. coli and enterococci bacteria became the recommended indicator bacteria for recreational waters, replacing fecal coliform and fecal streptococci bacteria (U.S. Environmental Protection Agency, 1986, 2000b). Public Law 106-284 (Beaches Environmental Assessment and Coastal Health Act of 2000) requires the use of E. coli and (or) enterococci to assess beach-water quality in all bathing beach monitoring programs.
E. coli and enterococci are the preferred indicators to be used for primary-contact recreational waters because both are superior to total coliform, fecal coliform, and fecal streptococci bacteria as predictors of swimming-associated gastroenteritis in marine and fresh waters (Cabelli, 1977; Dufour and Cabelli, 1984). “Primary-contact recreational waters are waters where people engage in or are likely to engage in activities that could lead to ingestion or immersion in the water and are designated for use as such in state and tribal water-quality standards” (U.S. Environmental Protection Agency, 2002). Examples of primary-contact recreational activities are swimming, canoeing, and water skiing.
Typical concentrations of indicator bacteria in contaminated and uncontaminated surface waters are shown in table 7.1-1.
Ground water typically contains substantially lower concentrations of indicator bacteria than surface water.
Although membrane-filtration procedures for total coliform and fecal coliform bacteria and E. coli are accepted for analysis of potable water, the Most Probable Number tests may provide superior results because they usually result in comparatively greater recoveries of microorganisms.
USEPA regulations stipulate the methods to be used for
monitoring and assessment of drinking water2 and recreational water (U.S. Environmental Protection Agency, 1991b, 2002).
2The term “drinking water” is used when the information presented is within the context of U.S. Environmental Agency regulations; otherwise, the more general term “potable water” is used.

Fecal Indicator Bacteria (11/2003) USGS TWRI Book 9–A7 (Third Edition)
+
+
+
8—FIB
Table 7.1-1. Ranges of fecal indicator bacteria typically found in uncontaminated surface water and contaminated surface water
[Modified from Bordner and Winter, 1978, p. 127; American Public Health Association and others, 1998; U.S. Environmental Protection Agency, 1986, 1996, 1997, 2000a, and 2000b; Francy and others, 2000. <, less than; >, greater than]
Bacterial group
Uncontaminated surface water, colonies per
100 milliliters
Fecal-contaminatedsurface water, colonies
per 100 milliliters
Total coliform <1 to 80,000 1,200 to > 4,000,000Fecal coliform <1 to 5,000 200 to > 2,000,000Escherichia coli <1 to 576 126 to > 2,000,000Fecal streptococcus <1 to 1,000 400 to > 1,000,000Enterococcus <1 to 100 100 to > 1,000,000Clostridium
perfringens<1 to 100 100 to > 10,000
+
+
+
USGS TWRI Book 9–A7 (Third Edition) Fecal Indicator Bacteria (11/2003)
FIB—9
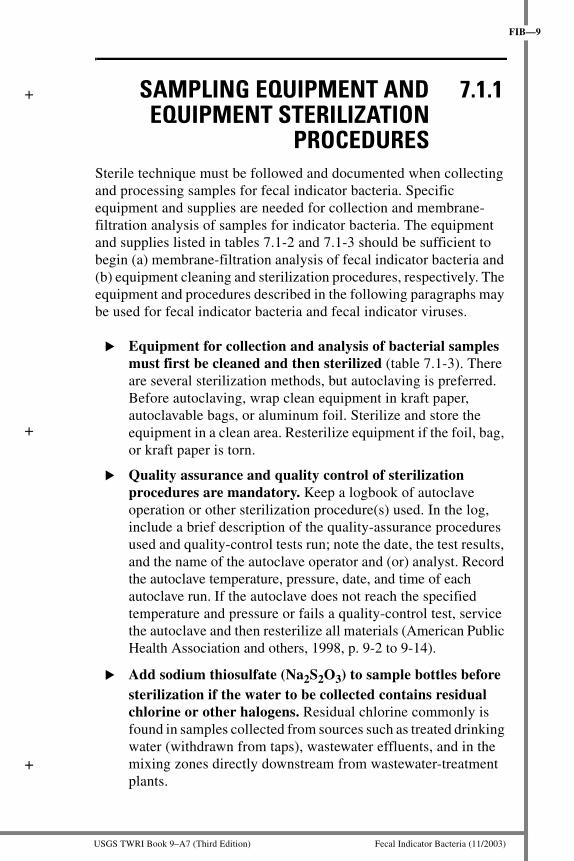
SAMPLING EQUIPMENT AND 7.1.1 EQUIPMENT STERILIZATION
PROCEDURESSterile technique must be followed and documented when collecting and processing samples for fecal indicator bacteria. Specific equipment and supplies are needed for collection and membrane-filtration analysis of samples for indicator bacteria. The equipment and supplies listed in tables 7.1-2 and 7.1-3 should be sufficient to begin (a) membrane-filtration analysis of fecal indicator bacteria and (b) equipment cleaning and sterilization procedures, respectively. The equipment and procedures described in the following paragraphs may be used for fecal indicator bacteria and fecal indicator viruses.
Equipment for collection and analysis of bacterial samples must first be cleaned and then sterilized (table 7.1-3). There are several sterilization methods, but autoclaving is preferred. Before autoclaving, wrap clean equipment in kraft paper, autoclavable bags, or aluminum foil. Sterilize and store the equipment in a clean area. Resterilize equipment if the foil, bag, or kraft paper is torn.
Quality assurance and quality control of sterilization procedures are mandatory. Keep a logbook of autoclave operation or other sterilization procedure(s) used. In the log, include a brief description of the quality-assurance procedures used and quality-control tests run; note the date, the test results, and the name of the autoclave operator and (or) analyst. Record the autoclave temperature, pressure, date, and time of each autoclave run. If the autoclave does not reach the specified temperature and pressure or fails a quality-control test, service the autoclave and then resterilize all materials (American Public Health Association and others, 1998, p. 9-2 to 9-14).
Add sodium thiosulfate (Na2S2O3) to sample bottles before sterilization if the water to be collected contains residual chlorine or other halogens. Residual chlorine commonly is found in samples collected from sources such as treated drinking water (withdrawn from taps), wastewater effluents, and in the mixing zones directly downstream from wastewater-treatment plants.

Fecal Indicator Bacteria (11/2003) USGS TWRI Book 9–A7 (Third Edition)
+
+
+
10—FIB
To prepare a 10-percent solution of Na2S2O3:
1. In a volumetric flask, dissolve 100 g (grams) of Na2S2O3 into 500 mL of deionized or distilled water; stir until dissolved, and fill flask to 1,000 mL (Bordner and Winter, 1978, p. 6; American Public Health Association and others, 1998, p. 9-19).
2. Using a pipet, dispense 0.5 mL of 10-percent Na2S2O3 solution for every 1 L of sample.
3. Store the Na2S2O3 solution in a dark bottle and keep it refrigerated; discard after 6 months and prepare a fresh solution. The Na2S2O3 solution may be sterilized before storing, but will need to be autoclaved again if the bottle is left open and in contact with air.
Add ethylenediaminetetraacetic acid (EDTA) to sample bottles when water to be collected contains trace elements. Although references to toxic concentrations vary somewhat, concentrations of trace metals such as copper, nickel, or zinc that are present at concentrations greater than 10–1,000 µg/L (micrograms per liter) can be toxic to bacteria (Britton and Greeson, 1989, p. 56; Bordner and Winter, 1978, p. 6; American Public Health Association and others, 1998, p. 9-19). When in doubt, add EDTA to sample bottles prior to collection. EDTA is prepared by dissolving 372 mg (milligrams) in 1,000 mL of deionized or distilled water (American Public Health Association and others, 1998, p. 9-19). Before sterilization, add 0.3 mL of the EDTA solution per 100 mL of sample to sample bottles. EDTA can be combined with the Na2S2O3 solution in the sample bottle before sterilization. Keep bottles tightly capped between uses, and prepare a fresh stock solution every 6 months; discard any expired stock solution.
Sterilize the filtration apparatus and sampling equipment between sites or for each sample collected at the same site at different times. Table 7.1-3 shows specifications for sterilizing equipment and supplies using a variety of techniques, including autoclaving. Autoclaving is the preferred method.

+
+
+
USGS TWRI Book 9–A7 (Third Edition) Fecal Indicator Bacteria (11/2003)
FIB—11
Table 7.1-2. Equipment and supplies used for membrane-filtration analysis of samples for fecal indicator bacteria testing
[mENDO, total coliform medium; mTEC, Escherichia coli medium; mL, milliliters; °C, degrees Celsius; µm, micrometer; mm, millimeters; TD, to deliver; TTC, triphenyltetrazolium chloride; NIST, National Institute of Standards and Technology; NA-MUG, Escherichia coli medium; MI, total coliform and Escherichia coli medium; nm, nanometers; lb/in2, pounds per square inch; cm, centimeters]
Item Description
Absorbent pads For use with total coliform test on mENDO medium and with Escherichia coli on mTEC medium for urease test
Alcohol burner Glass or metal, containing ethanol for flame sterilizing forceps
Alcohol bottle Wide mouth, 100 mL, containing ethanol for forceps sterilization
Autoclave For sterilization, capable of maintaining 121°CBottles Dilution bottles, 99 mL, with autoclavable screwcaps for
sample dilution
Buffered water Specific to the test method and prepared in advance of field work
Counter Handheld, for counting bacterial coloniesFilter disk Sterile, disposable, 0.2-µm pore size for sterilizing
reagents, to fit on 5-mL barrel syringeFiltration assembly Filter funnel, filter base, and stainless steel, glass, or
plastic filter holder; wrapped in aluminum foil, autoclavable bag, or kraft paper; sterile; autoclavable
Flasks, stir bars Narrow mouth, Erlenmeyer type flasks with stir bars for media preparation, 250 or 500 mL
Forceps Stainless steel, smooth tips Hot plate With magnetic stirrer or boiling water bath for media
preparationGraduated cylinders Borosilicate glass or plastic, 25 and 100 mL, wrapped in
sterile aluminum foil, autoclavable bag, or kraft paperIncubator Aluminum heat sink (heater block) or water bath, capable
of maintaining specified temperature ranges during incubation
Membrane filters 47-mm, sterile, white, gridded, mixed cellulose ester, cellulose acetate, or cellulose nitrate composition, 0.45-µm (or 0.65-µm) pore size depending on the test
(Table 7.1-2 is continued on the next page.)
Fecal Indicator Bacteria (11/2003) USGS TWRI Book 9–A7 (Third Edition)
+
+
+
12—FIB
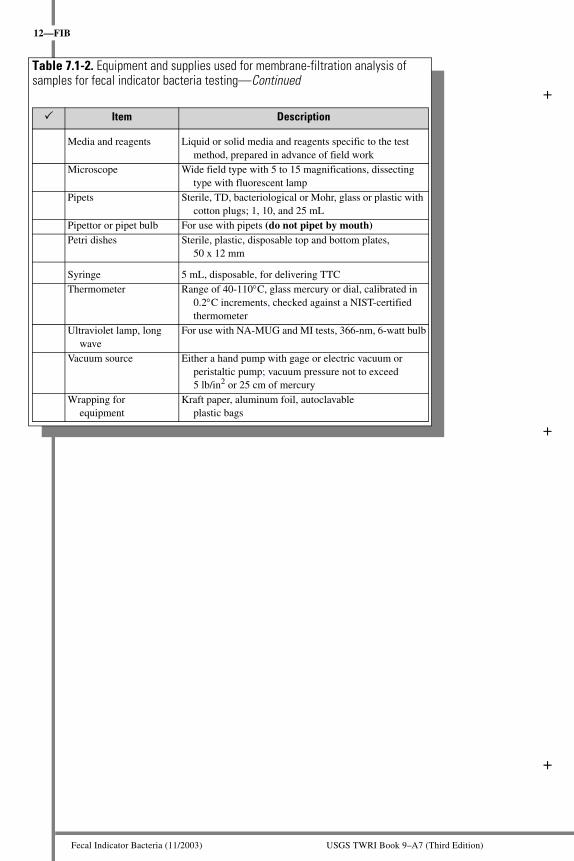
Table 7.1-2. Equipment and supplies used for membrane-filtration analysis of samples for fecal indicator bacteria testing—Continued
Item Description
Media and reagents Liquid or solid media and reagents specific to the test method, prepared in advance of field work
Microscope Wide field type with 5 to 15 magnifications, dissecting type with fluorescent lamp
Pipets Sterile, TD, bacteriological or Mohr, glass or plastic with cotton plugs; 1, 10, and 25 mL
Pipettor or pipet bulb For use with pipets (do not pipet by mouth)Petri dishes Sterile, plastic, disposable top and bottom plates,
50 x 12 mm
Syringe 5 mL, disposable, for delivering TTC Thermometer Range of 40-110°C, glass mercury or dial, calibrated in
0.2°C increments, checked against a NIST-certified thermometer
Ultraviolet lamp, long wave
For use with NA-MUG and MI tests, 366-nm, 6-watt bulb
Vacuum source Either a hand pump with gage or electric vacuum or peristaltic pump; vacuum pressure not to exceed 5 lb/in2 or 25 cm of mercury
Wrapping for equipment
Kraft paper, aluminum foil, autoclavable plastic bags
+
+
+
USGS TWRI Book 9–A7 (Third Edition) Fecal Indicator Bacteria (11/2003)
FIB—13
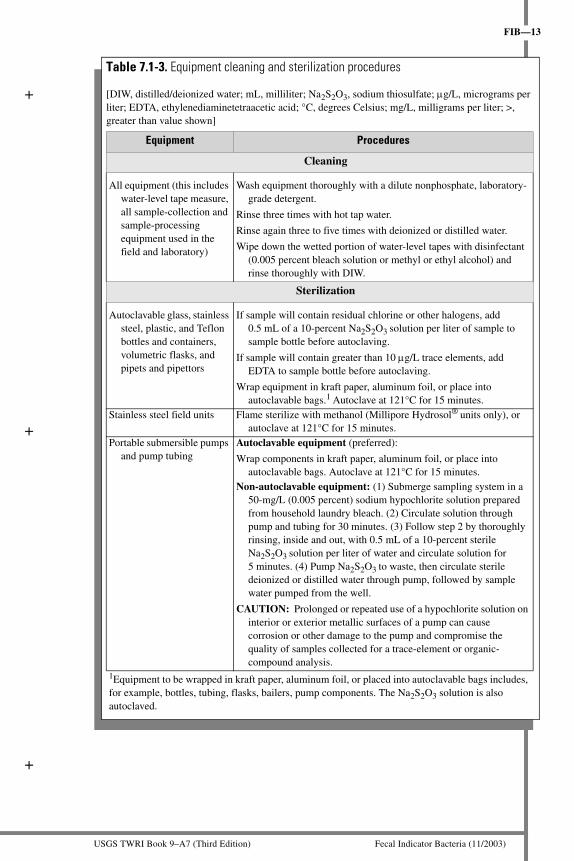
Table 7.1-3. Equipment cleaning and sterilization procedures
[DIW, distilled/deionized water; mL, milliliter; Na2S2O3, sodium thiosulfate; µg/L, micrograms per liter; EDTA, ethylenediaminetetraacetic acid; °C, degrees Celsius; mg/L, milligrams per liter; >, greater than value shown]
Equipment Procedures
Cleaning
All equipment (this includes water-level tape measure, all sample-collection and sample-processing equipment used in the field and laboratory)
Wash equipment thoroughly with a dilute nonphosphate, laboratory-grade detergent.
Rinse three times with hot tap water.
Rinse again three to five times with deionized or distilled water.
Wipe down the wetted portion of water-level tapes with disinfectant (0.005 percent bleach solution or methyl or ethyl alcohol) and rinse thoroughly with DIW.
Sterilization
Autoclavable glass, stainless steel, plastic, and Teflon bottles and containers, volumetric flasks, and pipets and pipettors
If sample will contain residual chlorine or other halogens, add 0.5 mL of a 10-percent Na2S2O3 solution per liter of sample to sample bottle before autoclaving.
If sample will contain greater than 10 µg/L trace elements, add EDTA to sample bottle before autoclaving.
Wrap equipment in kraft paper, aluminum foil, or place into autoclavable bags.1 Autoclave at 121°C for 15 minutes.
Stainless steel field units Flame sterilize with methanol (Millipore Hydrosol® units only), or autoclave at 121°C for 15 minutes.
Portable submersible pumps and pump tubing
Autoclavable equipment (preferred):
Wrap components in kraft paper, aluminum foil, or place into autoclavable bags. Autoclave at 121°C for 15 minutes.
Non-autoclavable equipment: (1) Submerge sampling system in a 50-mg/L (0.005 percent) sodium hypochlorite solution prepared from household laundry bleach. (2) Circulate solution through pump and tubing for 30 minutes. (3) Follow step 2 by thoroughly rinsing, inside and out, with 0.5 mL of a 10-percent sterile Na2S2O3 solution per liter of water and circulate solution for 5 minutes. (4) Pump Na2S2O3 to waste, then circulate sterile deionized or distilled water through pump, followed by sample water pumped from the well.
CAUTION: Prolonged or repeated use of a hypochlorite solution on interior or exterior metallic surfaces of a pump can cause corrosion or other damage to the pump and compromise the quality of samples collected for a trace-element or organic-compound analysis.
1Equipment to be wrapped in kraft paper, aluminum foil, or placed into autoclavable bags includes, for example, bottles, tubing, flasks, bailers, pump components. The Na2S2O3 solution is also autoclaved.

Fecal Indicator Bacteria (11/2003) USGS TWRI Book 9–A7 (Third Edition)
+
+
+
14—FIB
7.1.1.A AUTOCLAVINGUse only autoclaves that have temperature, pressure, and liquid- and dry-utensil-cycle controls (table 7.1-3). Steam sterilizers, vertical autoclaves, and pressure cookers without temperature controls are not recommended.
Take care to ensure that materials to be autoclaved, such as tubing and containers, are thermally stable. Plastic polymers that can be autoclaved include polycarbonate, polypropylene, polyallomer, polymethylpentene, Teflon® and Tefzel® (such as perfluoroalkyoxy-polymers (PFA), ethylene tetrafluoroethylene (ETFE), fluorinated ethylene propylene (FEP), and polytetrafluoroethylene polymers (PTFE)). Note that each material type has different thermal characteristics and tolerances to repeated autoclaving.
Consult the 20th edition of “Standard Methods for the Examination of Water and Wastewater” (American Public Health Association and others, 1998, p. 9-2 to 9-14) for specifications for the length of time, temperature, and pressure for autoclave sterilization of various media and materials.
In addition to the guidance listed above, it is necessary to:
— Use a sterilization indicator tape with each load.
— Use commercially available biological indicators at least quarterly to test autoclave performance. Biological indicators are composed of endospores—living cells that are resistant to heat but are destroyed by autoclaving.
— Wrap silicone tubing, in addition to other autoclavable equipment, in kraft paper, aluminum foil, or place in an autoclavable plastic bag.
— Drain the autoclave at the end of each period of use. Clean with mild soap and water once per week during periods of daily use. Record cleaning procedures in the logbook.
— Avoid overloading the autoclave with equipment or materials; overloading will result in incomplete sterilization.

+
+
+
USGS TWRI Book 9–A7 (Third Edition) Fecal Indicator Bacteria (11/2003)
FIB—15
.
FLAME STERILIZATION OF THE 7.1.1.B HYDROSOL® FIELD FILTRATION UNIT
The older style Millipore Hydrosol® field filtration units are designed to be flame sterilized with methanol. Formaldehyde gas, a byproduct of methanol combustion, kills all bacteria in the unit. The following sterilization procedure is acceptable for the Hydrosol® unit (fig. 7.1-1) in field situations where other sterilization techniques are not practicable (Millipore, 1973, p. 48–49).When following these procedures, work in a ventilated area and wear appropriate protective equipment such as safety glasses, face mask, and gloves. Avoid breathing noxious fumes.
To flame sterilize the Hydrosol® unit, carefully:
1. Remove the stainless steel flask from the base of the filter-holder assembly.
2. Saturate the asbestos ring (wick) around the base assembly with methanol dispensed from a Teflon squeeze bottle or with an eye dropper from a screw-top glass container.
3. Ignite the methanol on the asbestos wick and allow to burn for 30 seconds.
4. Invert the stainless steel flask over the funnel and the burning asbestos ring, and seat the flask on the base of the filter-holder assembly. Leave the flask in place for 15 minutes. Before filtering the next sample, rinse flask and funnel thoroughly with sterile buffered water to remove all residues of formaldehyde.
5. Repeat the sterilization procedure before processing the next sample.
Autoclaving is the preferred method for sterilizing equipment for fecal indicator bacteria.

Fecal Indicator Bacteria (11/2003) USGS TWRI Book 9–A7 (Third Edition)
+
+
+
16—FIB
Figure 7.1-1. Procedure to flame sterillize the Millipore Hydrosol® field filtration unit.
CAUTION:When flame sterilizing, have proper safety equipment such as a fire extinguisher on hand, and implement procedures carefully.
+
+
+
USGS TWRI Book 9–A7 (Third Edition) Fecal Indicator Bacteria (11/2003)
FIB—17
SAMPLE COLLECTION, 7.1.2 PRESERVATION, STORAGE,
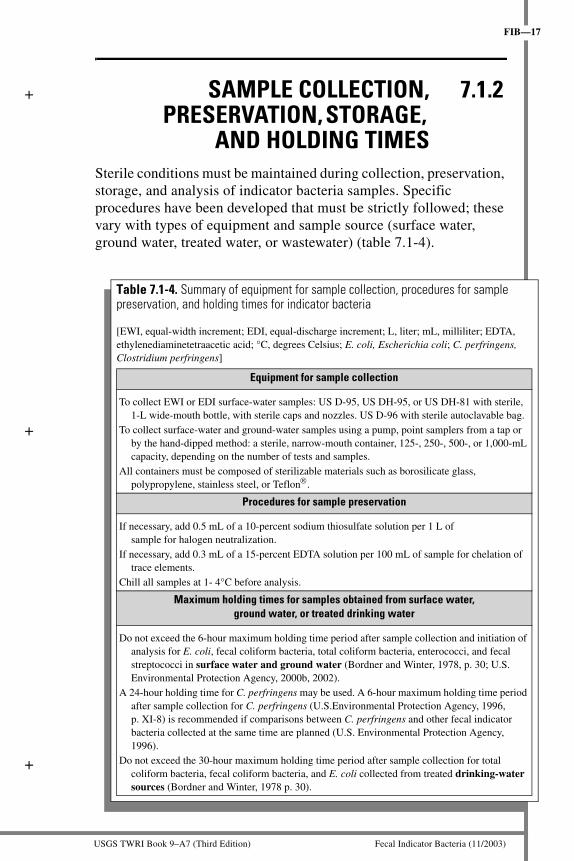
AND HOLDING TIMESSterile conditions must be maintained during collection, preservation, storage, and analysis of indicator bacteria samples. Specific procedures have been developed that must be strictly followed; these vary with types of equipment and sample source (surface water, ground water, treated water, or wastewater) (table 7.1-4).
Table 7.1-4. Summary of equipment for sample collection, procedures for sample preservation, and holding times for indicator bacteria
[EWI, equal-width increment; EDI, equal-discharge increment; L, liter; mL, milliliter; EDTA, ethylenediaminetetraacetic acid; °C, degrees Celsius; E. coli, Escherichia coli; C. perfringens, Clostridium perfringens]
Equipment for sample collection
To collect EWI or EDI surface-water samples: US D-95, US DH-95, or US DH-81 with sterile, 1-L wide-mouth bottle, with sterile caps and nozzles. US D-96 with sterile autoclavable bag.
To collect surface-water and ground-water samples using a pump, point samplers from a tap or by the hand-dipped method: a sterile, narrow-mouth container, 125-, 250-, 500-, or 1,000-mL capacity, depending on the number of tests and samples.
All containers must be composed of sterilizable materials such as borosilicate glass, polypropylene, stainless steel, or Teflon®.
Procedures for sample preservation
If necessary, add 0.5 mL of a 10-percent sodium thiosulfate solution per 1 L of sample for halogen neutralization.
If necessary, add 0.3 mL of a 15-percent EDTA solution per 100 mL of sample for chelation of trace elements.
Chill all samples at 1- 4°C before analysis.
Maximum holding times for samples obtained from surface water,ground water, or treated drinking water
Do not exceed the 6-hour maximum holding time period after sample collection and initiation of analysis for E. coli, fecal coliform bacteria, total coliform bacteria, enterococci, and fecal streptococci in surface water and ground water (Bordner and Winter, 1978, p. 30; U.S. Environmental Protection Agency, 2000b, 2002).
A 24-hour holding time for C. perfringens may be used. A 6-hour maximum holding time period after sample collection for C. perfringens (U.S.Environmental Protection Agency, 1996, p. XI-8) is recommended if comparisons between C. perfringens and other fecal indicator bacteria collected at the same time are planned (U.S. Environmental Protection Agency, 1996).
Do not exceed the 30-hour maximum holding time period after sample collection for total coliform bacteria, fecal coliform bacteria, and E. coli collected from treated drinking-water sources (Bordner and Winter, 1978 p. 30).

Fecal Indicator Bacteria (11/2003) USGS TWRI Book 9–A7 (Third Edition)
+
+
+
18—FIB
7.1.2.A SURFACE-WATER SAMPLE COLLECTION
The areal and temporal distribution of bacteria in surface water can be as variable as the distribution of suspended sediment because bacteria commonly are associated with solid particles. To obtain representative data for bacteria analysis, follow the same methods used to collect surface-water samples for suspended sediment analysis (Edwards and Glysson, 1999; NFM 4.1 and table 7.1-4).
Flowing water—use depth-and-width-integrating sampling
methods (NFM 4.1.1.A).3
Still water (lakes or other surface-water conditions for which depth-and-width-integrating methods may not be applicable)—use the hand-dip method or a sterile point sampler (NFM 4.1.1.B).
Beach water—use a hand-dip method in shallow wadable water and a sterile point sampler for deeper water. Collect samples by the hand-dip method at knee depth, a depth of approximately 6 to 12 inches (15 to 30 centimeters) below the water surface.
— Sample near known or suspected pollution sources, in areas of concentrated activity (for example, near lifeguard chairs), or for every quarter mile (approximately every 500 meters) of beach length (U.S. Environmental Protection Agency, 2002) and record sampling location.
— Position the sampler downstream from any water currents to collect the sample from the incoming flow (U.S. Environmental Protection Agency, 2002). Avoid contaminating the water sample with bottom material dislodged by disturbing the bottom while sampling.
— A Chain-of-Custody record is recommended for beach sampling done in support of beach closures or posting of warnings to swimmers (U.S. Environmental Protection Agency, 2002, Appendix J).
3Sample-collection methods may be modified to ensure consistency with study objectives and as appropriate for site conditions.
+
+
+
USGS TWRI Book 9–A7 (Third Edition) Fecal Indicator Bacteria (11/2003)
FIB—19
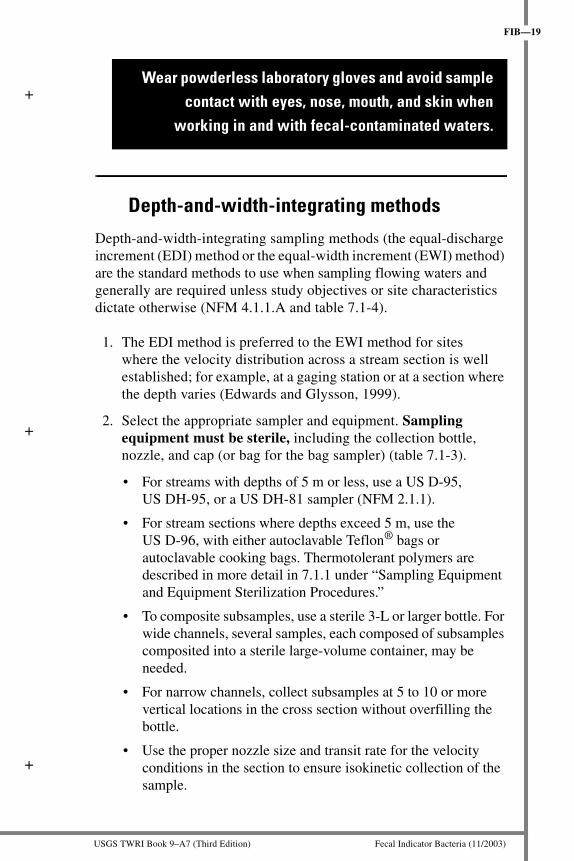
Depth-and-width-integrating methods
Depth-and-width-integrating sampling methods (the equal-discharge increment (EDI) method or the equal-width increment (EWI) method) are the standard methods to use when sampling flowing waters and generally are required unless study objectives or site characteristics dictate otherwise (NFM 4.1.1.A and table 7.1-4).
1. The EDI method is preferred to the EWI method for sites where the velocity distribution across a stream section is well established; for example, at a gaging station or at a section where the depth varies (Edwards and Glysson, 1999).
2. Select the appropriate sampler and equipment. Sampling equipment must be sterile, including the collection bottle, nozzle, and cap (or bag for the bag sampler) (table 7.1-3).
• For streams with depths of 5 m or less, use a US D-95, US DH-95, or a US DH-81 sampler (NFM 2.1.1).
• For stream sections where depths exceed 5 m, use the US D-96, with either autoclavable Teflon® bags or autoclavable cooking bags. Thermotolerant polymers are described in more detail in 7.1.1 under “Sampling Equipment and Equipment Sterilization Procedures.”
• To composite subsamples, use a sterile 3-L or larger bottle. For wide channels, several samples, each composed of subsamples composited into a sterile large-volume container, may be needed.
• For narrow channels, collect subsamples at 5 to 10 or more vertical locations in the cross section without overfilling the bottle.
• Use the proper nozzle size and transit rate for the velocity conditions in the section to ensure isokinetic collection of the sample.
Wear powderless laboratory gloves and avoid sample contact with eyes, nose, mouth, and skin when
working in and with fecal-contaminated waters.
Fecal Indicator Bacteria (11/2003) USGS TWRI Book 9–A7 (Third Edition)
+
+
+
20—FIB
Hand-dip method
If the stream depth and (or) velocity is not sufficient to use a depth-and-width-integrating method to collect a sample, then use the hand-dip method (table 7.1-4). Sampling still water or sampling at depth in lakes, reservoirs, estuaries, and oceans requires a sterile point sampler. Niskin, ZoBell, and Wheaton point samplers hold a sterilizable bottle or bag. Wearing laboratory gloves, collect a hand-dipped sample as follows:
1. Open a sterile, narrow-mouth borosilicate glass or plastic bottle; grasp the bottle near the base, with hand and arm on the downstream side of the bottle.
2. Without rinsing, plunge the bottle opening downward, below the water surface. Allow the bottle to fill with the opening pointed slightly upward into the current.
3. Remove the bottle with the opening pointed upward toward the water surface and tightly cap it, allowing about 2.5 to 5 cm of headspace (American Public Health Association and others, 1998, p. 9-19; Bordner and Winter, 1978, p. 8). This procedure minimizes collection of surface film and avoids contact with the streambed.
CAUTION:Do not sample in or near a water body without wearing a correctly fitted personal floation device (PFD).
+
+
+
USGS TWRI Book 9–A7 (Third Edition) Fecal Indicator Bacteria (11/2003)
FIB—21
Quality control in surface-water sampling. Depending on the data-quality requirements of the study and site conditions, quality-control samples (field blanks, procedure and filter blanks, positive and negative controls, and field replicates) generally constitute from 5 to 20 percent or more of the total number of samples collected over a given period of time. Quality-control terms (shown below in bold type) are defined at the end of this chapter, beginning on page CF-2.
Field blank—Collect and analyze field blanks at a frequency of 1 in every 10 to 20 samples to document that sampling and analysis equipment have not been contaminated. If sampling in a beach environment, collect a field blank at least once per sampling trip (U.S. Environmental Protection Agency, 2002, p. J-2). Process field blanks before collecting the water sample.
1. Pass sterile buffered water through sterile sampling equipment and into a sterile sampling container.
2. Analyze sterile buffered water for fecal indicator bacteria. If no growth is observed, then the sample was collected by use of sterile procedures.
Filter blank, procedure blank—Collect and analyze filter blanks and procedure blanks during sample processing to document that filtration equipment and buffered water were sterile and not contaminated by the analyst. A filter blank is processed for each sample before the sample is filtered. A procedure blank is processed through the filtration apparatus after the sample has been filtered at a frequency of 1 in every 10 to 20 samples.
Positive and negative controls—These types of quality-control samples are required if media are prepared from basic ingredients (not dehydrated media) by field or laboratory personnel. The analyses of positive and negative controls are performed in the laboratory, and not in the field.
Field replicate—Collect and analyze 1 field replicate for every 10 to 20 samples. A split sequential replicate is recommended. Two samples are collected and each sample is analyzed in duplicate by membrane filtration.
Fecal Indicator Bacteria (11/2003) USGS TWRI Book 9–A7 (Third Edition)
+
+
+
22—FIB
7.1.2.B GROUND-WATER SAMPLE COLLECTION
As with surface water, most bacteria in ground water are associated with solid particles. Stable values of field measurements (turbidity, temperature, dissolved-oxygen concentration, pH, and specific conductance), especially turbidity and dissolved oxygen, are important criteria for judging whether a well has been sufficiently purged for collection of a representative ground-water sample for indicator bacteria analysis (NFM 4.2 and 6.0.3.A). Sampling equipment that has been subjected to chlorinating and dechlorinating agents can affect the chemistry of samples collected for non-microbial analysis; therefore, collect blank samples to be analyzed for chloride, sulfate, and other constituents, as appropriate, to document that sample quality has not been compromised.
Collect samples for analysis of bacteria after all other water-quality sampling has been completed.
If using the same equipment for chemical-analysis and bacteria-analysis samples, then clean the equipment by first using standard procedures (NFM 3), followed by the disinfecting and rinsing procedures described in section 7.1.1. Purge the well as described in NFM 4.2 before collecting samples.
If different equipment will be deployed in a well for bacteria sampling, then first check for stable turbidity and dissolved-oxygen readings to ensure collection of a representative sample.
Supply wells
If samples are to be collected from a water-supply well (see definition in NFM 4.2), select a tap (spigot) that supplies water from a service pipe connected directly to the main: do not use a tap that leaks or one that is attached to a pipe served by a cistern or storage tank (American Public Health Association and others, 1998, p. 9-19 to 9-20; Britton
+
+
+
USGS TWRI Book 9–A7 (Third Edition) Fecal Indicator Bacteria (11/2003)
FIB—23
and Greeson, 1989, p. 5; Bordner and Winter, 1978, p. 5-16). Avoid sampling after downhole chlorination. Dechlorination with Na2S2O3 is required if you cannot avoid collecting the sample before the water has passed through the treatment unit (refer to Section 7.1.1).
To sample a supply well for indicator bacteria:
1. Before collecting the sample, remove screens, filters, or other devices from the tap.
2. Before sampling, swab the inside and outside rim of the tap with ethanol. Flame sterilize the tap and allow it to dry and cool. Rinse the tap with sterile deionized or distilled water.
3. Collect a sample directly from the tap into a sterile bottle without splashing or allowing the sample bottle to touch the tap.
• Supply wells commonly are equipped with permanently installed pumps. If the well is pumped daily, then
(a) purge the tap water for a minimum of 5 minutes, discarding the purged water appropriately;
(b) monitor field measurements and record stabilized values (NFM 6); and
(c) collect the sample directly from the tap into a sterile container (described in table 7.1-4).
• If the well is used infrequently, then
(a) purge the tap or well of water until a minimum of three borehole volumes are purged and stable field measurements are obtained in sequential measurements (NFM 4.2 and 6.0.3.A); and
(b) collect the sample directly from the tap into a sterile container (table 7.1-4).
Do not sample from leaking taps.

Fecal Indicator Bacteria (11/2003) USGS TWRI Book 9–A7 (Third Edition)
+
+
+
24—FIB
Monitoring wells
If a monitoring well does not have an in-place pump, then obtain samples by using a portable sampler, such as a submersible pump or a bailer (U.S. Environmental Protection Agency, 1982). The sampling devices, as well as the sample line, must be sterilized if possible or else disinfected (table 7.1-3). If disinfected, then the sampler and sample line must be dechlorinated and rinsed with sterile deionized or distilled water. In either case, finish by flushing the sampler and sample line with native ground water before samples are collected into sterile bottles.
Use autoclavable samplers, if possible. After flushing the sterilized pump lines with sample water, collect the sample directly into the sterile sample bottles.
Check data-collection objectives before using a disinfectant. Disinfectants are corrosive; they can damage the metal parts of a pump, and can render the pump inadequate for trace-element sampling and other constituent sampling.
Some sampling equipment does not require chlorine disinfection. If the water level in a well is less than 7 to 10 m (roughly 20 to 30 ft) below land surface, then a sample can be collected without contamination and without chlorine disinfection by use of a peristaltic or vacuum pump, as long as the tubing is sterile.
+
+
+
USGS TWRI Book 9–A7 (Third Edition) Fecal Indicator Bacteria (11/2003)
FIB—25
To disinfect a pump:
1. Submerge the pump and pump tubing in a 0.005 percent (50 mg/L) sodium hypochlorite solution prepared from household laundry bleach. Most bleach is about 5 to 7 percent sodium hypochlorite (50,000 to 70,000 mg/L), but bleach in a container that has been opened for more than 60 days before use may not be full strength. Prepare solutions fresh with each use, because concentrations will diminish with time. Add 1 mL of household laundry bleach to 900 mL of water and bring to a volume of 1,000 mL for a 0.005 percent disinfectant solution (U.S. Environmental Protection Agency, 1982, p. 253 and 1996, p. VIII-41). This concentration is sufficient for waters with a range of pH between 6 and 8 and for temperatures greater than 20°C. Outside of these ranges, a more concentrated disinfectant solution, up to 0.02 percent (200 mg/L), should be used (U.S. Environmental Protection Agency, 1982, p. 253).
2. Circulate the disinfectant through the pump and tubing for 30 minutes.
3. Afterwards, rinse the pump thoroughly with a sterile Na2S2O3 solution. The Na2S2O3 solution is prepared by adding 0.5 mL of a 10-percent sterile solution to every 1 L of sterile deionized or distilled water. Recirculate this solution for 5 minutes.
4. Rinse the exterior of the pump and tubing thoroughly with sterile deionized or distilled water.
5. Lower the pump carefully into the well. Purge the residual chlorine and Na2S2O3 from the system by pumping three tubing volumes of well water through the system; contain or appropriately discard this waste water. Take care not to contaminate samples for chemical analysis with residual disinfectant or Na2S2O3. The pump must have a backflow check valve (an antibacksiphon device) to prevent residual disinfectant from flowing back into the well.

Fecal Indicator Bacteria (11/2003) USGS TWRI Book 9–A7 (Third Edition)
+
+
+
26—FIB
To use a pump that cannot be disinfected:
1. Handle the pump and tubing carefully to avoid contamination. If the pump is a downhole dedicated pump, skip to step 3.
2. Collect field blanks through the sampling equipment. Lower the pump in the well to the desired intake location.
3. Purge the well with the pump used for sampling to allow the pump and tubing to be thoroughly flushed with aquifer water before sampling (NFM 4.2 and 6.0.3.A).
4. An alternative to sampling with the pump is to remove the pump after purging the well, complete the collection of other samples, and then collect the bacteria sample using a sterile bailer (U.S. Environmental Protection Agency, 1982, p. 252–253). When using the bailer method, the potential for bias exists from stirring up particulates during pump removal and bailing that would not otherwise be included in the sample.
Sampling-preparation activities, such as purging, must be carried out in such a way as to avoid contaminating the well, the equipment, or the samples. Avoid collecting surface film from the well water in the sample, and ensure that the sampler intake is within the screened interval targeted for study. Select a point-source sampler, such as a bailer with a double-check valve. Do not use a bailer unless the bailer can be sterilized.
Be aware that the type of well, its use, construction, composition, and condition can lead to alteration or contamination of samples. For example, a poor surface seal around the well opening can allow contaminants to move quickly from the land surface into the well water.
The type of well, its use, construction, composition, and condition could alter samples for fecal indicator bacteria analysis.
+
+
+
USGS TWRI Book 9–A7 (Third Edition) Fecal Indicator Bacteria (11/2003)
FIB—27
Exercise the following precautions when collecting samples from monitoring wells:
1. Avoid collecting samples from wells with casings made of galvanized materials; such casings can contain bacteriocidal metals. If samples must be collected from these types of wells, add 0.3 mL of EDTA solution per 100 mL of sample to the sample bottle prior to autoclaving. Collect the sample directly into the bottle.
2. Purge the well (see NFM 4.2 and 6.0.3.A) while monitoring field measurements. Measurements of turbidity and dissolved oxygen are especially relevant. For wells in which field measurements do not stabilize after increasing the total number of measurements, record measurements and proceed with sampling.
Quality control for ground-water sample collection. Depending on the data-quality requirements of the study, quality-control samples (field blanks and field replicates) will constitute from a small to a large percentage of the total number of samples collected over a given time period. Quality-control terms (shown below in bold type) are defined at the end of this chapter, beginning on page CF-2.
Field blanks—Collect field blanks with ground-water samples at a frequency of 1 in every 10 to 20 samples, if required by data-quality objectives. Process field blanks before collecting the water sample by passing sterile buffered water through sterile sampling equipment and into a sterile sampling container. Analyze sterile buffered water for fecal indicator bacteria and record results. If no growth is observed, the use of sterile procedures is confirmed and documented.

Fecal Indicator Bacteria (11/2003) USGS TWRI Book 9–A7 (Third Edition)
+
+
+
28—FIB
TECHNICAL NOTE: The field blank discussed herein is equivalent to the “pump blank” described in NFM 4.3.1. Refer to NFM 4.3.1 for more information on collecting a field blank for ground-water sampling. A standpipe may be used to collect a field blank, but first must be cleaned and then disinfected. This type of blank should be collected a week or more ahead of sampling so that results can be evaluated before field sampling.
Filter blank, procedure blank—Collect and analyze a filter blank and procedure blank to document that filtration equipment and buffered water were sterile and not subsequently contaminated by the analyst. A filter blank is processed with each sample through the filtration apparatus before the sample is filtered. A procedure blank is processed through the filtration apparatus after the sample has been filtered at a frequency of 1 in every 10 to 20 samples.
Field sequential replicates—Collect and analyze one set of sequential field replicates for every 10 to 20 samples. (Usually, a single 100-mL sample is collected from ground water.) Because few ground-water samples test positive for indicator bacteria, it may be necessary to collect field replicates at a higher frequency to determine variability.

+
+
+
USGS TWRI Book 9–A7 (Third Edition) Fecal Indicator Bacteria (11/2003)
FIB—29
SAMPLE PRESERVATION, STORAGE, 7.1.2.C AND HOLDING TIMES
After collection, immediately chill samples in an ice chest or refrigerator at 1 to 4°C. Do not freeze samples. Except for samples collected from drinking-water sources, process samples as quickly as possible, preferably within 1 hour but not more than 6 hours after sample collection for initiation of analysis for the coliform and enterococci groups (U.S. Environmental Protection Agency, 1985, 2000a, 2000b, and 2002). Adhering to holding times minimizes changes in the concentration of indicator bacteria. For treated drinking water, do not exceed 30 hours prior to initiation of analysis. C. perfringens spores can survive for extended periods of time, and a 24-hour holding time is acceptable if a relation between C. perfringens and other fecal indicator bacteria is not part of the planned study; otherwise, observe the same holding time as for the other indicators (U.S. Environmental Protection Agency, 1996). Holding times are summarized in table 7.1-4.
C. perfringens is analyzed at the laboratory, and not in the field. Ship samples for C. perfringens analysis to the laboratory in a double-bagged sample container separate from any bagged ice in the ice chest. Include a chain-of-custody form with sample identification and relevant information for use by the laboratory. Information on analysis of C. perfringens can be accessed at http://oh.water.usgs.gov/micro/clos.html (accessed November 25, 2003).
Strictly adhere to the maximum holding-time requirements for samples.
Chill at 1°C to 4°C and store samples in the dark until analysis.

Fecal Indicator Bacteria (11/2003) USGS TWRI Book 9–A7 (Third Edition)
+
+
+
30—FIB
7.1.3 IDENTIFICATION ANDENUMERATION METHODS
Membrane-filtration (MF) and most probable number (MPN) methods are used for the presumptive identification, confirmation, and enumeration of indicator bacteria. Procedures to analyze water samples using the MF method are described in this section. For general use, the MF method is preferable to the MPN method, with a few exceptions. The MPN method is preferred if toxic substances are present in the sample or if, after filtration, a residue heavy enough to block the micropores of the membrane filter is visible. The MPN method also is preferable for the analysis of treated drinking water. The MPN method is not typically used in the field. Instructions for the MPN method are described in “Standard Methods for the Examination of Water and Wastewater” (“Standard Methods”), 20th edition (American Public Health Association and others, 1998, p. 9-47 to 9-56) and in Britton and Greeson (1989).
Fecal indicator bacteria are operationally defined by the method employed for identification and enumeration, as shown in table 7.1-5. Presumptive identification and enumeration are made from colonies that develop on selective media after filtration of one or more sample volumes onto gridded membrane filters. Detailed confirmation, identification, and enumeration of these bacteria require additional culturing and biochemical testing, the details of which are beyond the scope of this manual. Additional confirmation methods are needed under certain circumstances, such as use of the data in support of environmental regulation and enforcement. Although all of the methods described herein are suitable for analysis of water, methods should be selected that are appropriate for the source of water. For example, methods for analyzing total coliform and E. coli in ground water and drinking water are different from those recommended for surface water and recreational water (table 7.1-5).

+
+
+
USGS TWRI Book 9–A7 (Third Edition) Fecal Indicator Bacteria (11/2003)
FIB—31
Table 7.1-5. Fecal indicator test definitions, incubation times, and incubation temperatures
[mENDO, total coliform medium; ±, plus or minus; °C, degrees Celsius; MI, total coliform and Escherichia coli medium; MgCl2, magnesium chloride; NA-MUG, E. coli medium; mTEC, E. coli medium; mFC, fecal coliform medium; KF, fecal streptococci medium; mE, enterococci medium; EIA, enterococci medium; mEI, enterococci medium; mCP, Clostridium perfringens medium
Test (medium)Typical
applicationIncubation timeand temperature
Buffered water type
Total coliform bacteria (mENDO)
Drinking water and ground water
24 ± 2 hours at 35.0 ± 0.5°C
Phosphate-buffered water with peptone
Total coliform bacteria (MI)
Drinking water and ground water
24 ± 2 hours at 35.0 ± 0.5°C
Phosphate-buffered water with MgCl2
Escherichia coli (NA-MUG)
Drinking water and ground water
4 hours at 35 ± 0.5°C after primary culture on mENDO medium
Phosphate-buffered water with peptone
Escherichia coli (MI) Drinking water and ground water
24 ± 2 hours at 35.0 ± 0.5°C
Phosphate-buffered water with MgCl2
Escherichia coli (modified mTEC)
Recreational and surface water
First resuscitate for 2 hours at 35.0 ± 0.5°C, then incubate for 22 to 24 hours at 44.5 ± 0.2°C
Phosphate-buffered saline water or phosphate-buffered water with MgCl2
Escherichia coli (on urea substrate broth after primary culture on mTEC)
Recreational and surface water
First resuscitate for 2 hours at 35.0 ± 0.5°C, and then incubate for 22 to 24 hours at 44.5 ± 0.2°C
After 22 to 24 hours, transfer filter to urea substrate broth for 15 to 20 minutes before counting
Phosphate-buffered saline water or phosphate-buffered water with MgCl2
Fecal coliform bacteria (mFC)
All waters 24 ± 2 hours at 44.5 ± 0.2°C
Phosphate-buffered water with peptone
Fecal streptococci (KF)
All waters 48 ± 2 hours at 35.0 ± 0.5°C
Phosphate-buffered water with peptone
Enterococci (mE and EIA)
All waters, but primarily recreational waters
48 to 50 hours at 41.0 ± 0.5°C on mE medium. Transfer filter to EIA medium for 20 minutes at 41.0°C before counting
Phosphate-buffered saline water or phosphate-buffered water with MgCl2
Enterococci (mEI) All waters, but primarily recreational waters
24 hours at 41.0°C ± 0.5°C Phosphate-buffered saline water or phosphate-buffered water with MgCl2
Clostridium perfringens (mCP)
All waters 24 ± 2 hours at 44.5 ± 0.2°C
Phosphate-buffered water with MgCl2
Fecal Indicator Bacteria (11/2003) USGS TWRI Book 9–A7 (Third Edition)
+
+
+
32—FIB
7.1.3.A CULTURE MEDIA AND REAGENTS MF analysis requires the use of several types of culture media and reagents, the types being dependent on the indicator bacteria and method. The necessary media and reagents include sterile buffered water, agar- or broth-based selective and differential growth media, and media and reagents for additional biochemical identification. The preparation of selective and differential culture media for indicator bacteria is an important part of analysis. Adhering to proper preparation, storage, and holding-time requirements will help ensure the quality of the analysis. Instructions for the preparation of 100 mL of primary culture media for MF tests and additional confirmation media or broth for three MF confirmation tests are described in section 7.1.5, “Instructions for Media Preparation.”
Sterile buffered water (distilled or deionized water that has been buffered and autoclaved)4 is used to dilute samples and to rinse the membrane-filter apparatus and utensils. USGS personnel can purchase sterile buffered water from the Ocala Water Quality and Research Laboratory in Ocala, Fla. (OWQRL or Ocala Laboratory). Sterile buffered water is provided in 250-mL bottles and in 99-mL dilution bottles. Three types of buffered water are available: (1) phosphate-buffered water with peptone, (2) phosphate-buffered saline water, and (3) phosphate-buffered dilution water with magnesium chloride (MgCl2). Table 7.1-5 provides information on the types of buffered water to use with various types of media. Buffered water that exceeds the expiration date indicated on the label should not be used. Buffered water not obtained from the Ocala Laboratory should be prepared and autoclaved ahead of time. Instructions for preparing sterile buffered water are described in Britton and Greeson (1989, p. 18).
Culture media for enumeration of fecal indicator bacteria for USGS studies are provided in kits from the Ocala Laboratory. These kits include instructions for media preparation. Dehydrated media also can be purchased from scientific suppliers.
4Sterile buffered water is described in Britton and Greeson (1989, p. 18), “Standard Methods” (American Public Health Association and others, 1998, p. 9-18), and USEPA (1996, 1997, 2000a, 2000b),
+
+
+
USGS TWRI Book 9–A7 (Third Edition) Fecal Indicator Bacteria (11/2003)
FIB—33
To store media and reagents:
1. Store media kit (supplied by the Ocala Laboratory) or dehydrated, commercially prepared media in a desiccator. Store other reagents in a dust-free laboratory cabinet (not in a field vehicle).
2. Label all media with the date received, date opened, and analyst’s initials. Discard media and reagents that have an expired shelf life.
3. Refrigerate reagents when necessary. When diluting a sample, use the sterile buffered water immediately after opening the bottle and discard any remainder.
4. Label all prepared petri dishes to identify the media type, the preparation date, and the analyst.
5. Store prepared petri dishes upside down in a plastic bag and refrigerate before use.
Quality control for culture media and reagents. Supplies of dehydrated media purchased either from the Ocala Laboratory or through established vendors of scientific supplies have been quality-control tested. Each batch of media that is prepared from basic ingredients by the analyst also must be quality-control tested. If sterile buffered water is prepared by the user, it should be prepared under laboratory conditions. In addition, quality-control procedures must be used to ensure that the sterile buffered water will produce a suitable medium for transfer of bacteria from samples to filters. To test the sterility of the buffered water, collect 100-mL blank samples and process them along with each set of environmental samples. Use the quality-control procedures applicable to microbiological testing found in the 20th edition of “Standard Methods” (American Public Health Association and others, 1998, p. 9-18).
If field work is conducted on a daily or weekly schedule, then analyze a positive control and negative control at least quarterly, when media are prepared from basic ingredients by field personnel. Analyze positive- and negative-control samples annually if sampling is performed intermittently. The positive-control sample tests the ability of the medium and reagents to support growth of the target microorganism. Negative-control samples are used to ensure that the test does not support the growth of nontarget organisms. Additional detailed information on positive and negative controls can be found in the 20th edition of “Standard Methods” (American Public Health Association and others, 1998, p. 9-10).
Fecal Indicator Bacteria (11/2003) USGS TWRI Book 9–A7 (Third Edition)
+
+
+
34—FIB
7.1.3.B MEMBRANE-FILTRATION METHOD After collecting the sample and selecting the appropriate sample volumes, label the petri dish with the station number (or other site identifiers), the volume of sample filtered, and the date and time of sample collection. Select those sample volumes that are anticipated to yield one or two filters in the ideal colony count range.
TECHNICAL NOTE: It is useful to review the historical data for each site to help determine the number of sample volumes to be filtered. Where past analyses of samples from a site have shown a small variation in the number of fecal indicator bacteria, the filtration of as few as three or four different sample volumes may suffice. However, where past analyses have shown the variation to be large or where the variation is not known, filtering five or more different sample volumes is recommended.
To prepare to filter samples and make colony counts:
1. When collecting and processing samples, work inside the field vehicle, if possible, and out of direct sunlight and wind.
2. Prevent contamination of the work area. Before and after processing the samples, clean counter tops in field vehicles with an antibacterial cleaning solution, such as a 7-percent phenolic solution; 50- to 70-percent isopropyl or ethyl alcohol; 5-percent bleach; or a 7-percent ammonia solution.
Always wear laboratory gloves when processing samples for fecal-indicator analysis.

+
+
+
USGS TWRI Book 9–A7 (Third Edition) Fecal Indicator Bacteria (11/2003)
FIB—35
3. Before beginning analysis, preheat incubators for at least 2 hours, according to specifications for each test (table 7.1-5). Portable heater-block incubators must not be left in closed, unventilated vehicles when the outside air temperature is less than 15°C (60°F) or greater than 37°C (98°F).
4. Using sterile equipment, collect field, filter, and procedure blank samples.
• One or more colonies on the field or filter blank indicates inadequate sterilization of either the equipment or the sterile buffered water or contamination during the sampling and analysis process.
• One or more colonies on the procedure blank indicates either inadequate rinsing or contamination of the equipment or the buffered water during sample processing.
To filter samples and make colony counts:
1. Select sample volumes (table 7.1-6, fig. 7.1-2) to provide at least one filter having colonies in the ideal counting range. The ideal range and number of sample volumes to filter depend on the test and the expected bacterial concentrations.
• Record the site name, date, time of sample collection, and sample volume on the petri dish and on the record sheet or field form. Record the time of sample processing on the record sheet or field form.
• Label replicates, blanks, filter blanks, and procedure blanks and other quality-control samples.
2. Assemble filtration equipment by inserting the base of the filter-holder assembly into a flask or manifold (fig. 7.1-3). Draw a vacuum by use of a hand-held pump, vacuum pump, or battery-operated peristaltic pump. If flame sterilization is used, rinse the inside of the filtration apparatus with sterile buffered water to remove any residue of formaldehyde.

Fecal Indicator Bacteria (11/2003) USGS TWRI Book 9–A7 (Third Edition)
+
+
+
36—FIB
Table 7.1-6. Recommended sample volumes for membrane-filter analyses based on ideal colony count and concentration range
[col/100 mL, colonies per 100 milliliters; mL, milliliters; <, less than value shown; >, greater than value shown]
Ideal colony-counting ranges for number of colonies per membrane filterwithin a range of concentrations from <1 to 2,000,000 col/100 mL
20–60 colonies 20–80 colonies
Samplevolume(mL)1
Added as(mL)2
Concen-trationrange
Samplevolume(mL)1
Added as(mL)2
Concen-trationrange
100 100 <1–60 100 100 <1– 8030 30 60–200 25 25 80–32010 10 200–600 6.0 6.0 330–
1,3003.0 3.0 600–
2,0001.5 1.5 1,300–
5,3001.0 1.0 2,000–
6,000.4 4.0 of a 1:10 dilution 5,000–
20,000.3 3.0 of a 1:10 dilution 6,000–
20,000.1 1.0 of a 1:10 dilution 20,000–
80,000.1 1.0 of a 1:10 dilution 20,000–
60,000.025 2.5 of a 1:100 dilution 80,000–
320,000.03 3.0 of a 1:100 dilution 60,000–
200,000.006 6.0 of a 1:1,000 dilution
prepared by diluting 11 mL of a 1:100 in 99 mL1
330,000–1,300,000
.01 1.0 of a 1:100 dilution 200,000–600,000
.003 3.0 of a 1:1,000 dilution prepared by diluting 11 mL of a 1:100 in 99 mL1
600,000–2,000,000
20–100 colonies
Samplevolume(mL)1
Added as(mL)2
Concen-trationrange
100 100 <1–100 20 20 100–500
5.0 5.0 400–2,500
1.0 1.0 2,000–10,000
.2 2.0 of a 1:10 dilution 10,000–50,000
.05 5.0 of a 1:100 dilution 50,000–200,000
.01 1.0 of a 1:100 dilution 200,000–1,000,000
1All sample volumes less than 1.0 mL require dilution in a 99-mL dilution bottle containing sterile buffered water. 2 Sample volumes smaller than those indicated may be needed when bacterial concentrations are greater than those listed.

+
+
+
USGS TWRI Book 9–A7 (Third Edition) Fecal Indicator Bacteria (11/2003)
FIB—37
3.0 mL
WATER SAMPLE
1.0 mL 3.0 mL 1.0 mL
0.3 mL 0.1 mL 0.03 mL 0.01 mL
11 mL in 99 mL 1 mL in 99 mL
WATER SAMPLE
1 mL11 mL
Figure 7.1-2. Preparation of sample volumes by dilution.
3. Sterilize stainless steel forceps:
a. Immerse tips in a small bottle or flask containing 70- or 90-percent ethanol.
b. Pass forceps through the open flame of an alcohol burner. Allow the alcohol to burn out and allow the forceps to cool for several seconds to prevent heat damage to the membrane filter.
c. Resterilize forceps before each use. Return cooled forceps to alcohol container between transfers. Do not set forceps on the countertop.
4. Remove the sterilized funnel from the base. Always hold the funnel in one hand while placing or removing the membrane filter. (Placing the funnel on anything other than the filter apparatus might result in contamination of the funnel.) Using sterile forceps, place a sterile, gridded membrane filter (47 mm (millimeters)) on top of the filter base, gridded side up (fig. 7.1-3). Be sure to use the correct pore-size membrane filter for the test procedure (table 7.1-7).
5. Carefully replace and secure the filter funnel on the filter base. Avoid tearing or creasing the membrane filter. Quality control. Rinse the funnel with 100 mL of sterile buffered water before filtering sample volumes to obtain a filter blank.

Fecal Indicator Bacteria (11/2003) USGS TWRI Book 9–A7 (Third Edition)
+
+
+
38—FIB
PROCEDURE1. Preheat the incubator; prepare
work areas.
Select sample volumes. If needed,prepare dilutions for filtration ofsample volumes less than 1.0 mL(tables 7.1-6 and 7.1-8; and figure7.1-2).
2.
Label petri dishes.
Assemble sterile filtration apparatus.
Place sterile filter on filtrationapparatus using sterile forceps (A).
Shake sample 25 times anddeliver to filtration apparatusby use of graduated cylinder(B) or pipet (C). Add 20 mLsterile buffered water to filtrationapparatus before filtering samplevolumes less than 10 mL.
Apply vacuum; afterwards, rinse filtration apparatus and cylinder twice with sterile buffered water.
3.
4.
5.
6.
7.
A
B
C
Figure 7.1-3. Steps in membrane-filtration procedure.
+
+
+
USGS TWRI Book 9–A7 (Third Edition) Fecal Indicator Bacteria (11/2003)
FIB—39
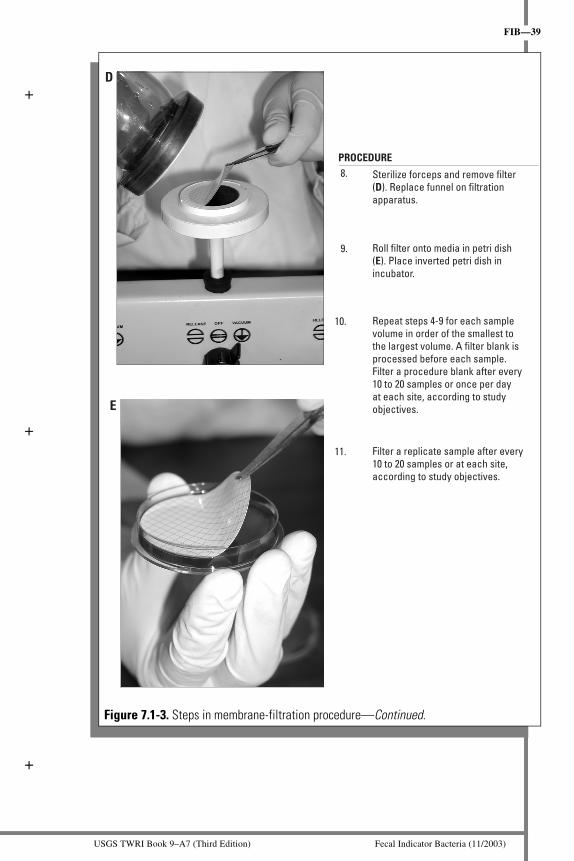
PROCEDURE8. Sterilize forceps and remove filter
(D). Replace funnel on filtrationapparatus.
Roll filter onto media in petri dish (E). Place inverted petri dish inincubator.
9.
Repeat steps 4-9 for each samplevolume in order of the smallest to the largest volume. A filter blank is processed before each sample.Filter a procedure blank after every10 to 20 samples or once per dayat each site, according to studyobjectives.
Filter a replicate sample after every10 to 20 samples or at each site,according to study objectives.
10.
11.
D
E
Figure 7.1-3. Steps in membrane-filtration procedure—Continued.

Fecal Indicator Bacteria (11/2003) USGS TWRI Book 9–A7 (Third Edition)
+
+
+
40—FIB
Table 7.1-7. Membrane-filter pore sizes for fecal indicator bacteria tests
TestPore size of membrane filter
(in micrometers)
Total coliform 0.45 Fecal coliform 0.45 or 0.65 Escherichia coli 0.45 Fecal streptococci 0.45 Enterococci 0.45 Clostridium perfringens 0.45
6. Filter the sample in order of smallest to largest sample volume. If the sample volume is less than 1.0 mL, prepare dilutions with sterile buffered water in a 99-mL dilution bottle and transfer the appropriate volume of dilution to the membrane filter (fig. 7.1-2 and table 7.1-8).
• When preparing dilutions, use a sterile pipet to measure each sample volume.
• After each sample-volume transfer, close and shake the dilution bottle vigorously at least 25 times.
• Filter the diluted samples within 20 minutes after preparation. Keep dilution bottles out of sunlight and do not transfer less concentrated sample volumes with pipets that were used to transfer concentrated sample volumes.
7. Shake the sample vigorously at least 25 times before each sample volume is withdrawn in order to break up particles and to ensure an even distribution of indicator bacteria in the sample container.
a. Pour or pipet the shaken sample into the filter funnel within 5 seconds (fig. 7.1-3B or C). Pipet the sample from the center of the sample volume. You can use the upper and lower graduations (line-to-line) to measure the volume. Proceeding from smallest to largest sample volume, deliver the sample volume to the membrane filter by use of a pipettor or pipet bulb with a valve for volume control.
+
+
+
USGS TWRI Book 9–A7 (Third Edition) Fecal Indicator Bacteria (11/2003)
FIB—41
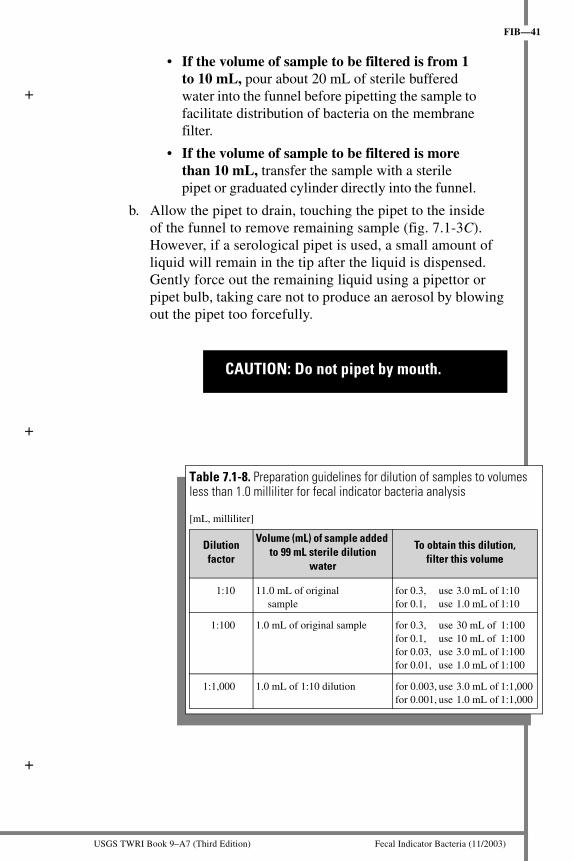
• If the volume of sample to be filtered is from 1 to 10 mL, pour about 20 mL of sterile buffered water into the funnel before pipetting the sample to facilitate distribution of bacteria on the membrane filter.
• If the volume of sample to be filtered is more than 10 mL, transfer the sample with a sterile pipet or graduated cylinder directly into the funnel.
b. Allow the pipet to drain, touching the pipet to the inside of the funnel to remove remaining sample (fig. 7.1-3C). However, if a serological pipet is used, a small amount of liquid will remain in the tip after the liquid is dispensed. Gently force out the remaining liquid using a pipettor or pipet bulb, taking care not to produce an aerosol by blowing out the pipet too forcefully.
CAUTION: Do not pipet by mouth.
Table 7.1-8. Preparation guidelines for dilution of samples to volumes less than 1.0 milliliter for fecal indicator bacteria analysis
[mL, milliliter]
Dilution factor
Volume (mL) of sample added to 99 mL sterile dilution
water
To obtain this dilution,filter this volume
1:10 11.0 mL of original sample
for 0.3, use 3.0 mL of 1:10for 0.1, use 1.0 mL of 1:10
1:100 1.0 mL of original sample for 0.3, use 30 mL of 1:100for 0.1, use 10 mL of 1:100for 0.03, use 3.0 mL of 1:100for 0.01, use 1.0 mL of 1:100
1:1,000 1.0 mL of 1:10 dilution for 0.003, use 3.0 mL of 1:1,000for 0.001, use 1.0 mL of 1:1,000
Fecal Indicator Bacteria (11/2003) USGS TWRI Book 9–A7 (Third Edition)
+
+
+
42—FIB
8. Apply a vacuum with a hand, peristaltic, or vacuum pump. To avoid damage to bacteria, do not exceed a pressure of about 5 lb/in2 (pounds per square inch) (25 cm of mercury).
9. Rinse the inside of the funnel twice with 20 mL to 30 mL of sterile buffered water while applying a vacuum. If a graduated cylinder is used, rinse the cylinder with sterile buffered water and deliver rinse water to the filtration apparatus.
10. Remove the funnel and hold it in one hand—do not set the funnel on the counter top. Remove the membrane filter using sterile forceps (fig. 7.1-3D). Release the vacuum. (Releasing the vacuum after removing the filter prevents backflow of sample water onto the filter. Unnecessarily wet filters promote confluent growth of colonies and poor results.) Replace funnel on filter base.
11. Open a petri dish and place the membrane filter on the medium, grid side up, and starting at one edge by use of a rolling action (fig. 7.1-3E). Avoid trapping air bubbles under the membrane filter. If air is trapped, use sterile forceps to remove the membrane filter and roll it onto the medium again. Do not expose prepared petri dishes to direct sunlight.
12. Close the petri dish by pressing the top firmly onto the bottom. Invert the petri dish. Incubate within 20 minutes to avoid growth of interfering microorganisms.
13. Continue to filter the other sample volumes in order, from smallest to largest volume. Record on the field forms the volumes filtered and the time of processing. Quality control. After filtrations are complete, place a sterile, gridded-membrane filter onto the funnel base and rinse the funnel with 100 mL of sterile buffered water to obtain a procedure blank. Procedure blanks are analyzed at a frequency of 1 in every 10 to 20 samples.
14. Place the inverted petri dishes into a preheated aluminum heater-block or into water-tight plastic bags and then into a water-bath incubator. Incubate at the prescribed times and temperatures (table 7.1-5). Wash, then flame sterilize or autoclave filter apparatus before the next use. Wash counter top between each sample with an antibacterial cleaning solution (see “To prepare to filter samples and make colony counts” in this section). Wash hands with bacteriocidal soap.

+
+
+
USGS TWRI Book 9–A7 (Third Edition) Fecal Indicator Bacteria (11/2003)
FIB—43
Quality control. Verify the incubator temperature on a regular schedule against a National Institute of Standards and Technology (NIST) thermometer or thermometer certified to a NIST thermometer. Record results in a logbook with the date and analyst’s name. Do not use incubators that fail to meet temperature criteria until they are repaired or the problem is corrected.
15. After the prescribed length of incubation, remove the petri dishes from the incubator. For each sample volume filtered, count and record on the field forms the number of typical colonies (table 7.1-9). Recount the colonies until results agree within 5 percent, and record the results. Recounting is accomplished by turning the plate 90 degrees to obtain a slightly different angle. Count by use of a preset plan (a side-to-side pattern along grid lines is suggested; fig. 7.1-4). Count the colonies with the aid of 5 to 15 magnification and a fluorescent illuminator or other light source placed directly above the filter.
Count with a preset pattern alonggrid lines as indicated by the
arrow (count top to bottom by rows)
Expanded view turned 90degrees (count left to right
by columns)
Figure 7.1-4. Method for counting colonies on gridded membrane filters.

Fecal Indicator Bacteria (11/2003) USGS TWRI Book 9–A7 (Third Edition)
+
+
+
44—FIB
• For total coliform colonies on mENDO medium, enhance sheen production by removing filters from media and placing them on absorbent pads to dry for at least 1 minute before counting (fig. 7.1-5A).
• For total coliform on MI medium, count under a long-wave ultraviolet light in a completely darkened room (U.S. Environmental Protection Agency, 2000a) or in a viewing box (fig. 7.1-5B).
• For E. coli on MI medium, count under natural light (with magnification) (fig. 7.1-5C).
• If the NA-MUG test is done for E. coli, transfer the total coliform filter onto NA-MUG petri dishes and incubate for 4 hours at 35°C. Afterwards, count under a long-wave ultraviolet light in a completely darkened room (U.S. Environmental Protection Agency, 1991b) or in a viewing box (fig. 7.1-5D).
• For E. coli on mTEC medium, transfer the filter to a filter pad saturated with urea-phenol reagent; count only yellow colonies after 15 to 20 minutes at room temperature (U.S. Environmental Protection Agency, 1985; fig. 7.1-5E).
• For E. coli on modified mTEC medium, count colonies directly from the petri dish under natural light (fig. 7.1-5F).
• For fecal coliform on mFC medium and fecal streptococci on KF medium, count colonies, using magnification, under fluorescent or incandescent light (fig. 7.1-5G and H, respectively).
• For enterococci on mE medium, transfer the filter to EIA medium after incubation for 20 minutes at 41°C; count colonies from the underside of the petri dish placed over a fluorescent illuminator (fig. 7.1-5I).
• For enterococci on mEI medium, count colonies directly from the petri dish under fluorescent or incandescent light (fig. 7.1-5J).
• For C. perfringens on mCP medium, count colonies directly from the petri dish under magnification, and under fluorescent or incandescent light (7.1-5K).

+
+
+
USGS TWRI Book 9–A7 (Third Edition) Fecal Indicator Bacteria (11/2003)
FIB—45
16. Check quality-control blanks for colony growth, and report results on the field forms. The presence of colonies on blanks indicates that results of the bacterial analyses are suspect and should not be reported or the results should be clearly qualified. It is not valid to subtract colony counts on blanks from results calculated for samples. Discard sample results bracketed by contaminated blanks. Quality control. A second analyst should recount the colonies on the petri dishes and record the results for 1 in every 20 samples. Table 7.1-9 and figure 7.1-5 contain information on colony identification.
17. Calculate the number of colonies per 100 mL of sample as described in section 7.1.4, “Calculation and Reporting of Fecal Indicator Bacteria.”
18. Put all petri dishes to be discarded into an autoclavable bag. Freeze or chill any petri dishes to be discarded until they can be autoclaved in the laboratory. Autoclave all cultures at 121oC for a minimum of 30 minutes before discarding.

Fecal Indicator Bacteria (11/2003) USGS TWRI Book 9–A7 (Third Edition)
+
+
+
46—FIB
(A) Total coliform bacteriaon mENDO medium
(B) Total coliform bacteriaon MI medium
(C) Escherichia coli onMI medium
(D) Escherichia coli onNA-MUG medium
(E) Escherichia coli onmTEC medium
(F) Escherichia coli onmodified mTEC medium
Figure 7.1-5. Photographs of typical colonies of fecal indicator bacteria on culture media.

+
+
+
USGS TWRI Book 9–A7 (Third Edition) Fecal Indicator Bacteria (11/2003)
FIB—47
(G) Fecal coliform bacteriaon mFC medium
(H) Fecal streptococcibacteria on KF medium
(I) Enterococci bacteria onEIA medium
(J) Enterococci bacteria on mEI medium
(K) Clostridium perfringenson mCP medium
Figure 7.1-5. Photographs of typical colonies of fecal indicator bacteria on culture media—Continued.
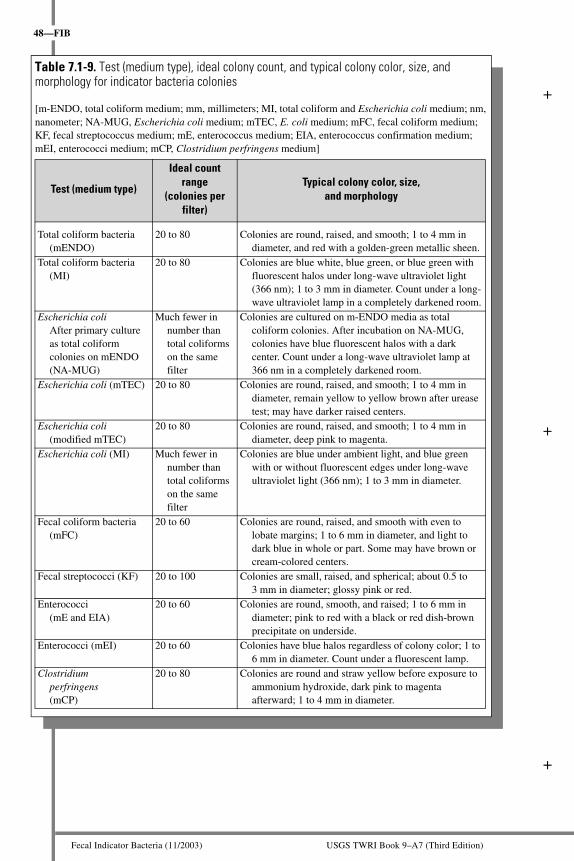
Fecal Indicator Bacteria (11/2003) USGS TWRI Book 9–A7 (Third Edition)
+
+
+
48—FIB
Table 7.1-9. Test (medium type), ideal colony count, and typical colony color, size, and morphology for indicator bacteria colonies
[m-ENDO, total coliform medium; mm, millimeters; MI, total coliform and Escherichia coli medium; nm, nanometer; NA-MUG, Escherichia coli medium; mTEC, E. coli medium; mFC, fecal coliform medium; KF, fecal streptococcus medium; mE, enterococcus medium; EIA, enterococcus confirmation medium; mEI, enterococci medium; mCP, Clostridium perfringens medium]
Test (medium type)
Ideal count range
(colonies per filter)
Typical colony color, size,and morphology
Total coliform bacteria (mENDO)
20 to 80 Colonies are round, raised, and smooth; 1 to 4 mm in diameter, and red with a golden-green metallic sheen.
Total coliform bacteria (MI)
20 to 80 Colonies are blue white, blue green, or blue green with fluorescent halos under long-wave ultraviolet light (366 nm); 1 to 3 mm in diameter. Count under a long-wave ultraviolet lamp in a completely darkened room.
Escherichia coli After primary culture as total coliform colonies on mENDO (NA-MUG)
Much fewer in number than total coliforms on the same filter
Colonies are cultured on m-ENDO media as total coliform colonies. After incubation on NA-MUG, colonies have blue fluorescent halos with a dark center. Count under a long-wave ultraviolet lamp at 366 nm in a completely darkened room.
Escherichia coli (mTEC) 20 to 80 Colonies are round, raised, and smooth; 1 to 4 mm in diameter, remain yellow to yellow brown after urease test; may have darker raised centers.
Escherichia coli (modified mTEC)
20 to 80 Colonies are round, raised, and smooth; 1 to 4 mm in diameter, deep pink to magenta.
Escherichia coli (MI) Much fewer in number than total coliforms on the same filter
Colonies are blue under ambient light, and blue green with or without fluorescent edges under long-wave ultraviolet light (366 nm); 1 to 3 mm in diameter.
Fecal coliform bacteria (mFC)
20 to 60 Colonies are round, raised, and smooth with even to lobate margins; 1 to 6 mm in diameter, and light to dark blue in whole or part. Some may have brown or cream-colored centers.
Fecal streptococci (KF) 20 to 100 Colonies are small, raised, and spherical; about 0.5 to 3 mm in diameter; glossy pink or red.
Enterococci (mE and EIA)
20 to 60 Colonies are round, smooth, and raised; 1 to 6 mm in diameter; pink to red with a black or red dish-brown precipitate on underside.
Enterococci (mEI) 20 to 60 Colonies have blue halos regardless of colony color; 1 to 6 mm in diameter. Count under a fluorescent lamp.
Clostridium perfringens (mCP)
20 to 80 Colonies are round and straw yellow before exposure to ammonium hydroxide, dark pink to magenta afterward; 1 to 4 mm in diameter.
+
+
+
USGS TWRI Book 9–A7 (Third Edition) Fecal Indicator Bacteria (11/2003)
FIB—49
CALCULATION AND REPORTING 7.1.4 OF FECAL INDICATOR BACTERIA
The range of ideal colony counts depends on the fecal indicator group to be enumerated (table 7.1-9). Crowding and insufficient media to support full development of colonies can result if the bacterial concentration on the filter exceeds the upper limit of the ideal range. The lower limit of the ideal range is set as a number below which statistical validity becomes questionable (Britton and Greeson, 1989, p. 14). For potable waters, results are routinely reported from counts of less than 20 colonies per filter. Consult table 7.1-9 and figure 7.1-5 for information on typical colony color, size, and shape. The computation for concentration is the sum of the colony counts for each sample volume, multiplied by 100, and divided by the sum of the sample volumes.
Enumeration results for the membrane-filtration method are expressed as a concentration in units of col/100 mL.
Whole numbers are reported for results less than 10, and two significant figures are reported for results greater than or equal to 10.
Parameter codes for use in reporting fecal indicator bacteria in the USGS National Water Information System are listed in Appendix A7-A, table 2.
Examples of scenarios that are commonly experienced when counting colonies are presented in the following five cases:
Case 1. Ideal colony counts.
Case 2. Colony counts less than or greater than the ideal range but not zero or too numerous to count.
Case 3. No typical colonies on any of the filters.
Case 4. Less than the ideal range, including some zero counts but no filters with colonies that are too numerous to count.
Case 5. Colony counts on all filters are too numerous to count.

Fecal Indicator Bacteria (11/2003) USGS TWRI Book 9–A7 (Third Edition)
+
+
+
50—FIB
Case 1: Ideal colony counts.
Example 1: Ideal colony count on one filter
Example 2: Ideal colony counts on two or more filters
Example 3: If dilutions of the original sample were made before
filtration (sample volumes less than 1 mL), calculate
the volume (in mL) of original sample as follows:
(TNTC, Too Numerous To Count)
col/100 mL = (21 x 100) / 25 = 84
Sample volume Colony count6.0 7 (do not use)
25 21100 101 (do not use)
Sum 21
col/100 mL = (21 + 58) x 100 / (100 + 25) = 63
Sample volume Colony count6.0 7 (do not use)
25 21100 58
Sum 125 79
Sample volume Colony count 0.1 (1:10) 0.3 (3:10) 1.0
50
Sum 50
TNTC (do not use)TNTC (do not use)
25
0.1
Colony count = 50
Volume of original sample = 0.1 mL
Volume of diluted sample = 1.0 mL
col/100 mL = 50 x 100 / 1 x 0.1 = 50,000

+
+
+
USGS TWRI Book 9–A7 (Third Edition) Fecal Indicator Bacteria (11/2003)
FIB—51
Case 2: Colony counts less than or greater than the ideal range but not zero or TNTC (Too Numerous To Count).
Results are reported with the statement, "Estimated count based on non-ideal colony count."
col/100 mL = (2 + 6 + 18) x 100 /(3 + 10 + 30) = 60
col/100 mL = (18 + 101) x 100 / (4 + 20) = 500
Example 1: Less than the ideal range on all filters
Sample volume Colony count
Sample volume Colony count
Sample volume Colony count
3.0 210 630 18
Sum
Example 2: Either greater than or less than the ideal range
4 1820 101
100
Sum
Case 3: No typical colonies on any of the filters.
col/100 mL = (1 x 100) / 30 = < 3
3.0 0 (do not use)10 30
Sum 30
43 26
24 119
1
0 (do not use)assume 1
TNTC (do not use)
Assume a colony count of one on the filter with the largest sample volume.
Result is reported as less than the calculated number per 100 mL. It is a maximum estimated number.
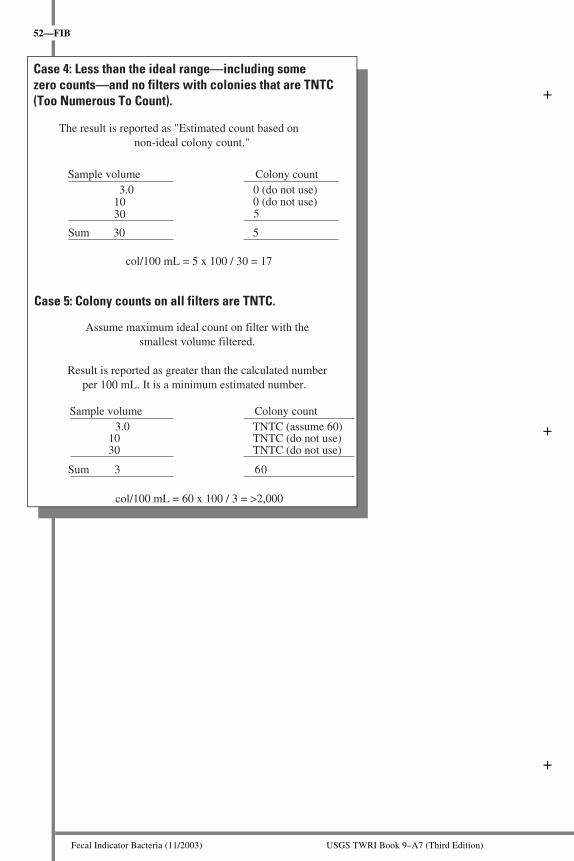
Fecal Indicator Bacteria (11/2003) USGS TWRI Book 9–A7 (Third Edition)
+
+
+
52—FIB
Case 4: Less than the ideal range—including some zero counts—and no filters with colonies that are TNTC (Too Numerous To Count).
Sample volume Colony count3.0 0 (do not use)
10 0 (do not use)
The result is reported as "Estimated count based on non-ideal colony count."
col/100 mL = 5 x 100 / 30 = 17
30 5
Sum 30 5
Case 5: Colony counts on all filters are TNTC.
col/100 mL = 60 x 100 / 3 = >2,000
Sample volume Colony count3.0 TNTC (assume 60)
10 TNTC (do not use)30 TNTC (do not use)
Sum 3 60
Assume maximum ideal count on filter with thesmallest volume filtered.
Result is reported as greater than the calculated numberper 100 mL. It is a minimum estimated number.

+
+
+
USGS TWRI Book 9–A7 (Third Edition) Fecal Indicator Bacteria (11/2003)
FIB—53
INSTRUCTIONS FOR MEDIA 7.1.5 PREPARATION
1. mENDO medium for total coliform analysis.
a. Empty the vial containing 4.8 g of dehydrated mENDO medium into a 250-mL flask and add 100 mL of a 2-percent ethanol solution.
b. Stir the mixture well for several minutes to break up clumps and prevent agar from adhering to the flask.
c. Place foil-covered flask in a heated water bath or on a hot plate and heat slowly to boiling. If using a hot plate, stir the mixture constantly or use a stir bar and magnetic stirring hot plate to prevent scorching. Do not autoclave.
d. When medium reaches the boiling point, promptly remove from the heat. Do not boil.
e. Cool the medium to a temperature of about 50°C and pour 6 to 7 mL into 50-mm petri-dish bottoms. Quickly place petri-dish tops loosely onto the bottoms to allow condensation to escape.
f. When the medium has solidified (about 10 minutes), close the petri dishes by pressing firmly on the tops. The plates are suitable for use after the medium has solidified. About 15 to 20 plates can be prepared from 100 mL of medium. Label and date the petri dishes.
g. Petri dishes that are not used immediately after preparation should be placed into small plastic bags to prevent drying and stored in darkness in a refrigerator for a maximum of 5 days.

Fecal Indicator Bacteria (11/2003) USGS TWRI Book 9–A7 (Third Edition)
+
+
+
54—FIB
2. NA-MUG medium for confirmation of E. coli after primary culturing of total coliform bacteria with mENDO medium.
a. Add 2.3 g of NA-MUG medium to 100 mL of deionized or distilled reagent-grade water in a 250-mL flask.
b. Stir the mixture well for several minutes to break up clumps and prevent medium from adhering to the flask.
c. Place the flask into a heated water bath or on a hot plate and heat slowly to boiling. If using a hot plate, stir the mixture constantly or use a stir bar and magnetic stirring hot plate to prevent scorching.
d. Autoclave at 121°C and 15 lb/in2 for 15 minutes. Allow to cool to 44-46°C, or when the flask is cool enough to pick up barehanded.
e. Pour 6 to 7 mL of medium into the bottom of a 50-mm petri dish. About 15 to 20 plates can be prepared from 100 mL NA-MUG medium. Quickly place petri-dish tops loosely onto the bottoms to allow condensation to escape.
f. When the medium has solidified (about 10 minutes), close petri dishes by pressing firmly on the tops. The plates are suitable for use after the medium has solidified. Label and date the plates. Prepared petri dishes that are sealed in small plastic bags to prevent drying can be stored in a refrigerator for up to 2 weeks.

+
+
+
USGS TWRI Book 9–A7 (Third Edition) Fecal Indicator Bacteria (11/2003)
FIB—55
3. MI medium for total coliform bacteria and E. coli analysis.
Commercial medium may be available; if so, prepare according to instructions. If not, prepare fresh medium in the laboratory prior to departing for the field site. Information on reagents and media preparation can be obtained from the U.S. Environmental Protection Agency (2000a).
a. Prepare fresh agar according to U.S. Environmental Protection Agency (2000a) by weighing and adding 36.52 g of the combined reagents to 900 mL of reagent-grade deionized or distilled water. Mix to break up clumps. Adjust the volume to 1,000 mL. If dehydrated medium is used, add 36.52 g of dehydrated MI medium to 1 L of reagent-grade deionized or distilled water in a flask and heat to boiling until the ingredients dissolve. This volume will produce approximately 200 petri dishes. To prepare fewer, proportionately reduce the quantities of reagents and volume of deionized or distilled water.
b. Prepare Cefsulodin (which is added to the MI medium after the medium is autoclaved and cooled). To prepare Cefsulodin solution, add 0.02 g of Cefsulodin to 20 mL of reagent-grade deionized or distilled water, sterilize the Cefsulodin solution by aseptically filtering through a disposable, sterile 0.22-µm-pore-size syringe filter. Store in a sterile tube in the refrigerator at about 5°C until needed. Prepare fresh solutions each time the test is used. Do not save any unused portion. Write the preparation date on the tube.
c. Dispense MI medium into 100-mL dilution bottles. Autoclave the medium for 15 minutes at 121°C, then cool in a 50°C water bath.
d. Allow the medium to cool to 45–50°C. Add 0.5 mL of freshly prepared Cefsulodin solution to each dilution bottle of tempered agar medium. The final pH should be 6.95 ± 0.2. Store medium in dilution bottles for up to 6 months in the refrigerator (about 5°C). Prepare petri dishes as needed from individual bottles of medium.

Fecal Indicator Bacteria (11/2003) USGS TWRI Book 9–A7 (Third Edition)
+
+
+
56—FIB
e. When ready to prepare petri dishes, melt the medium by autoclaving dilution bottles containing modified mTEC medium for 5 minutes at 121°C or by placing them in a boiling water bath. Cool the medium to 45–50°C. Pour 6 to 7 mL of the medium into each 50-mm petri dish. Be sure to loosen the screw tops on the bottles prior to heating to allow air to escape.
f. When the medium has solidified (about 10 minutes), close the petri dishes by pressing firmly on the tops. These dishes are suitable for use after the medium has solidified. About 15 to 20 plates can be prepared from 100 mL of medium.
g. Label and date the petri dishes. Prepared petri dishes, sealed in small plastic bags to prevent drying, can be stored in a refrigerator for up to 2 weeks.
h. All freshly prepared medium must be quality-control checked by the preparing laboratory through the use of positive and negative controls. Refer to “Standard Methods” (American Public Health Association and others, 1998, p. 9-1 to 9-78) for instructions.
4. mTEC medium for E. coli analysis.
a. Empty the vial containing 4.53 g of dehydrated mTEC medium into 100 mL of deionized or distilled water in a 250-mL flask.
b. Stir this mixture for several minutes to break up clumps. Make sure that none of the medium adheres to the bottom or side of the flask.
c. Place the flask containing the medium solution in a heated water bath or on a hot plate and begin heating slowly to boiling. If using a hot plate, stir the mixture constantly or use a stir bar and magnetic stirring hot plate to prevent scorching. After boiling begins, remove the flask from the hot plate or boiling water bath and autoclave at 121°C and 15
lb/in2 for 15 minutes. Allow to cool to 45–50°C.
d. Pour 6 to 7 mL of the medium into 50-mm petri-dish bottoms. Quickly place the petri-dish tops loosely onto the bottoms to allow condensation to escape.

+
+
+
USGS TWRI Book 9–A7 (Third Edition) Fecal Indicator Bacteria (11/2003)
FIB—57
e. When the medium has solidified (about 10 minutes), close the petri dishes by pressing firmly on the tops. These plates are suitable for use after the medium has solidified. About 15 to 20 plates can be prepared from 100 mL of medium. Label and date.
f. Prepared petri dishes, sealed in small plastic bags to prevent drying, can be stored in a refrigerator for up to 2 weeks.
g. Begin preparation of urea-phenol broth for mTEC. Identification of E. coli using urea-phenol broth is required.
i. After sample incubation, prepare the urea-phenol red broth by adding 100 mL of sterile deionized or distilled water to 2.0 g of urea and 0.01 g phenol red crystals in a 250-mL flask and mix thoroughly. Although all the phenol red crystals will not dissolve, the solution is nevertheless acceptable to use.
ii. Adjust the pH of the urea-phenol solution to 5.0 with a few drops of 1 N HCl (hydrochloric acid). The substrate solution should be a straw-yellow color at this pH.
iii. When preparing the filter pads for counting colonies, use a clean pipet or dropper and add 2.0 mL of the solution to each absorbent pad before placing the filter on the pad. Before transferring the filters from mTEC to urea-phenol broth, carefully drain excess solution from each pad by tilting the petri dish against a clean lab wipe.
iv. Urea-phenol broth can be stored in the refrigerator for up to 2 weeks, as long as the solution remains straw-yellow in color.
Fecal Indicator Bacteria (11/2003) USGS TWRI Book 9–A7 (Third Edition)
+
+
+
58—FIB
5. Modified mTEC medium for E. coli analysis.
Commercial dehydrated medium may be available; if so, prepare according to instructions. If not, prepare fresh medium in the laboratory prior to departing for the field site. Information on reagents and media preparation can be obtained from the U.S. Environmental Protection Agency (2000b).
a. Prepare fresh agar by weighing and adding 45.6 g of combined reagents to 900 mL of reagent-grade deionized or distilled water. Stir the mixture to break up clumps. After the reagents are dissolved, adjust the volume to 1,000 mL. This volume will produce approximately 200 plates. To prepare fewer petri dishes, proportionately reduce the quantities of reagents and volume of deionized or distilled water.
b. Autoclave the medium at 121°C for 15 minutes. Cool the medium. Store the medium in dilution bottles for up to 6 months in the refrigerator (at about 5°C). Prepare petri dishes as needed from individual bottles of medium. Write type of medium and date prepared on bottles.
c. When ready to prepare petri dishes, melt the modified mTEC medium by autoclaving dilution bottles containing MI medium for 5 minutes at 121°C or by placing them in a boiling water bath. Be sure to loosen the screw tops on the bottles prior to heating to allow air to escape.
d. Cool the medium to 45–50°C. Pour 6 to 7 mL of the medium into each 50-mm petri-dish bottom to a depth of about 1/8 inch (0.32 mm). Allow to cool 4 to 8 minutes and replace petri-dish tops tightly.
e. When the medium has solidified (about 10 minutes), close the petri dishes by pressing firmly on the tops. The plates are suitable for use after the medium has solidified. About 15 to 20 plates can be prepared from 100 mL of medium. Label and date the plates. Prepared plates, sealed in small plastic bags to prevent drying, can be stored in a refrigerator for up to 2 weeks.

+
+
+
USGS TWRI Book 9–A7 (Third Edition) Fecal Indicator Bacteria (11/2003)
FIB—59
f. All freshly prepared medium must be quality-control checked by the preparing laboratory by means of positive and negative controls. Refer to American Public Health Association and others (1998, p. 9-1 to 9-78) for instructions.
g. Sterile agar petri dishes prepared ready for use can be purchased from commercial suppliers and do not need to be refrigerated during shipping. These plates can be stored in the refrigerator at about 5°C for up to 1 year. Write the date received on the plates.
6. mFC medium for fecal coliform bacteria analysis.
a. Prepare a rosolic acid solution by adding 10 mL of 0.2 N NaOH (sodium hydroxide) to 0.1 g of rosolic acid crystals. Shake the mixture to dissolve crystals. Do not heat. The crystals will dissolve in 15 minutes. Prepare a new solution for each analysis.
b. Empty the vial containing 5.2 g of dehydrated medium into 100 mL of deionized or distilled water in a 250-mL flask.
c. Stir the mixture well for several minutes to break up clumps and prevent medium from adhering to the flask.
d. Place the flask in a heated water bath or on a hot plate and heat slowly to 90°C. If using a hot plate, stir the mixture constantly or use a stir bar and magnetic stirring hot plate to prevent scorching. Do not autoclave.
e. With a clean pipet, add 1 mL of rosolic acid solution per 100 mL of medium when the medium reaches 90°C. Continue heating until boiling begins; then remove from the heat.
f. Cool the medium to a temperature of about 45–50°C and pour 6 to 7 mL in 50-mm petri-dish bottoms. Quickly place petri-dish tops loosely on petri-dish bottoms to allow condensation to escape.
Fecal Indicator Bacteria (11/2003) USGS TWRI Book 9–A7 (Third Edition)
+
+
+
60—FIB
g. When the medium has solidified (about 10 minutes), close petri dishes by pressing firmly on the tops. The plates are suitable for use after the medium has solidified. About 15 to 20 plates can be prepared from 100 mL of medium. Label and date the petri dishes. Prepared petri dishes, sealed in small plastic bags to prevent drying, can be stored in a refrigerator for up to 72 hours.
7. KF medium for fecal streptococci analysis.
a. Empty the vial containing 7.64 g of dehydrated medium into 100 mL of deionized or distilled water in a 250-mL flask.
b. Stir the mixture well for several minutes to break up clumps and prevent medium from adhering to the flask.
c. In a separate small bottle, add 10 mL of deionized or distilled water to the 0.1 g of TTC (triphenyltetrazolium chloride crystals).
d. Place the flask in a heated water bath or on a hot plate and heat slowly to boiling. If using a hot plate, stir the mixture constantly or use a stir bar and magnetic stirring hot plate to prevent scorching. After boiling begins, reduce to a simmer for 5 minutes.
e. Remove the medium solution from the heat and cool to 50–60°C. Sterilize the TTC solution by aseptically filtering through a disposable sterile 0.22-mm pore-size membrane filter. Add 1 mL of sterile TTC solution to 100 mL of medium and stir. Prepare a fresh TCC solution each time the medium is prepared.
f. Cool the medium to a temperature of about 50°C and pour 6 to 7 mL into 50-mm petri-dish bottoms. Quickly place the petri-dish tops loosely on the petri-dish bottoms to allow condensation to escape.

+
+
+
USGS TWRI Book 9–A7 (Third Edition) Fecal Indicator Bacteria (11/2003)
FIB—61
g. When the medium has solidified (about 10 minutes), close the petri dishes by pressing firmly on the tops. The plates are suitable for use after the medium has solidified. About 15 to 20 plates can be prepared from 100 mL of medium. Label and date the plates. Prepared plates, sealed in small plastic bags to prevent drying, can be stored in a refrigerator for up to 2 weeks if a sterile TTC solution is used. If the TTC solution is not sterilized, use the medium within 24 hours.
8. mE medium, followed by EIA medium, for enterococci bacteria analysis.
a. Pour 5 to 10 mL of deionized or distilled water into a bottle containing 0.015 g of TTC crystals. Cap and shake the bottle to dissolve the crystals. If using a USGS kit, retain the remaining 90 mL of deionized or distilled water. Do not heat.
b. Empty the vial containing 7.12 g of mE medium into the remainder of the deionized or distilled water (approximately 90 mL) in a 250-mL flask. Stir this mixture for several minutes to break up clumps. It is important that none of the medium adheres to the bottom or the sides of the flask.
c. Prepare a nalidixic acid solution by adding 10 mL of 0.2 N NaOH solution to a bottle containing 0.25 g of nalidixic acid crystals. Shake the bottle to dissolve the crystals. Do not heat. Make sure all of the crystals dissolve.
d. Place the flask containing the medium solution in a heated water bath or on a hot plate and stir the solution constantly, or use a stir bar and magnetic stirring hot plate to prevent scorching. After ingredients dissolve, autoclave at 121°C
and 15 lb/in2 for 15 minutes. Allow to cool long enough to pick up barehanded.
e. Once cooled, the dissolved reagents can be added. Using a sterile pipet, add 1.3 mL of the nalidixic acid solution. If the medium is intended to be used within 24 hours, add all of the TTC solution directly from the bottle. If the prepared medium will be stored for a longer period before use, sterilize the TTC solution by passing it through a 0.22-mm membrane-filter syringe in an aseptic manner.

Fecal Indicator Bacteria (11/2003) USGS TWRI Book 9–A7 (Third Edition)
+
+
+
62—FIB
f. Pour 6 to 7 mL of the medium into 50-mm petri-dish bottoms. Quickly place the petri-dish tops loosely on the petri-dish bottoms to allow condensation to escape.
g. When the medium has solidified (about 10 minutes), close the petri dishes by pressing firmly on the tops. The petri dishes are suitable for use after the medium has solidified. About 15 to 20 petri dishes can be prepared from 100 mL of medium. Label and date the petri dishes. Prepared petri dishes, sealed in small plastic bags to prevent drying, can be stored in a refrigerator for up to 2 weeks, if sterile TTC is used. If the TTC solution is not sterilized, use the medium within 24 hours.
h. Begin preparation of EIA medium for enterococci bacteria. Use of the EIA medium is required.
i. If using the USGS kit from the Ocala Laboratory, a second bottle of 100 mL deionized or distilled water is used to prepare the EIA medium.
ii. Empty the vial containing 1.65 g of EIA medium into 133 mL of deionized or distilled water in a 250-mL flask.
iii. Stir this mixture for several minutes to break up clumps. Make sure that none of the medium adheres to the bottom or the side of the flask.
iv. Place the flask containing the medium solution in a heated water bath or on a hot plate and stir the solution constantly, or use a stir bar and magnetic stirring hot plate to prevent scorching.
v. After ingredients dissolve, autoclave at 121°C and 15 lb/in2 for 15 minutes. Allow the flask to cool long enough to pick up barehanded.
vi. Pour 6 to 7 mL of EIA medium into the bottom of a 50-mm petri dish. Quickly place the petri-dish tops loosely on the petri-dish bottoms to allow condensation to escape.

+
+
+
USGS TWRI Book 9–A7 (Third Edition) Fecal Indicator Bacteria (11/2003)
FIB—63
vii. When the medium has solidified (about 10 minutes), close the petri dishes by pressing firmly on the tops. The plates are suitable for use after the medium has solidified. About 15 to 20 plates can be prepared from 100 mL of medium. Label and date the plates. Prepared plates, sealed in small plastic bags to prevent drying, can be stored in a refrigerator for up to 2 weeks.
9. mEI medium for enterococci bacteria analysis.
a. Prepare the nalidixic acid solution by adding a few drops of 0.1 N NaOH solution to a bottle containing 5 mL deionized or distilled water and 0.24 g of nalidixic acid. Shake the mixture thoroughly to dissolve. Do not heat.
b. In another bottle, add 0.1 g of TTC to 10 mL of reagent-grade deionized or distilled water. Cap and shake for about 30 seconds to dissolve. Do not heat.
c. Add 71.2 g of mE agar to 900 mL of reagent-grade deionized or distilled water in a 1,000-mL flask. Add 0.75 g of the indoxyl β-D-glucoside reagent (rinsing thoroughly), and adjust the volume to 1,000 mL.
d. Stir this mixture for several minutes to break up clumps. It is important to make sure that none of the agar adheres to the bottom or sides of the flask.
e. Place the flask containing the agar solution on a stove or burner and begin heating slowly. Stir the solution constantly to prevent scorching. After ingredients have dissolved,
autoclave at 121°C and 15 lb/in2 for 15 minutes. Allow the solution to cool to 44–46°C. The pH of the medium should be 7.1 ± 0.2.

Fecal Indicator Bacteria (11/2003) USGS TWRI Book 9–A7 (Third Edition)
+
+
+
64—FIB
f. The dissolved reagents may now be added. If the medium is to be used within 24 hours, add the nalidixic acid solution and mix thoroughly. Add 2 mL of the TTC solution per 1 L of medium using a clean pipet. If, however, the prepared medium will be stored for a longer period prior to use, sterilize the nalidixic acid and TTC solutions by passing them through a 0.22-µm pore-size membrane filter aseptically, using a sterile syringe. Mix thoroughly.
g. Pour 6 to 7 mL of mEI medium into 50-mm petri-dish bottoms. Quickly place the petri-dish tops loosely on the petri-dish bottoms to allow condensation to escape.
h. When the medium has solidified (about 10 minutes), close the petri dishes by pressing firmly on the tops. The plates are suitable for use after the medium has solidified. About 15 to 20 plates can be prepared from 100 mL of medium. Label and date the plates. Prepared plates, sealed in small plastic bags to prevent drying, can be stored in a refrigerator for up to 2 weeks.
10. mCP media for C. perfringens analysis.
The mCP medium for the analysis of C. perfringens is prepared by the analyzing laboratory, so preparation instructions are not included in this section. A culture of C. perfringens requires anaerobic conditions and a special incubator, as well as a fume hood in which to expose colonies to the ammonium-hydroxide reagent for identification.