February 14th, 2017 Implementation / User Guide
88
February 14 th , 2017 KasPer Pro V1.7.4.0 Implementation / User Guide Julian Kirkness KIRKNESS ASSOCIATES SOFTWARE
Transcript of February 14th, 2017 Implementation / User Guide

February 14th, 2017
KasPer Pro V1.7.4.0 Implementation / User Guide
Julian Kirkness KIRKNESS ASSOCIATES SOFTWARE

KasPer Pro Implementation / User Guide
1 | P a g e
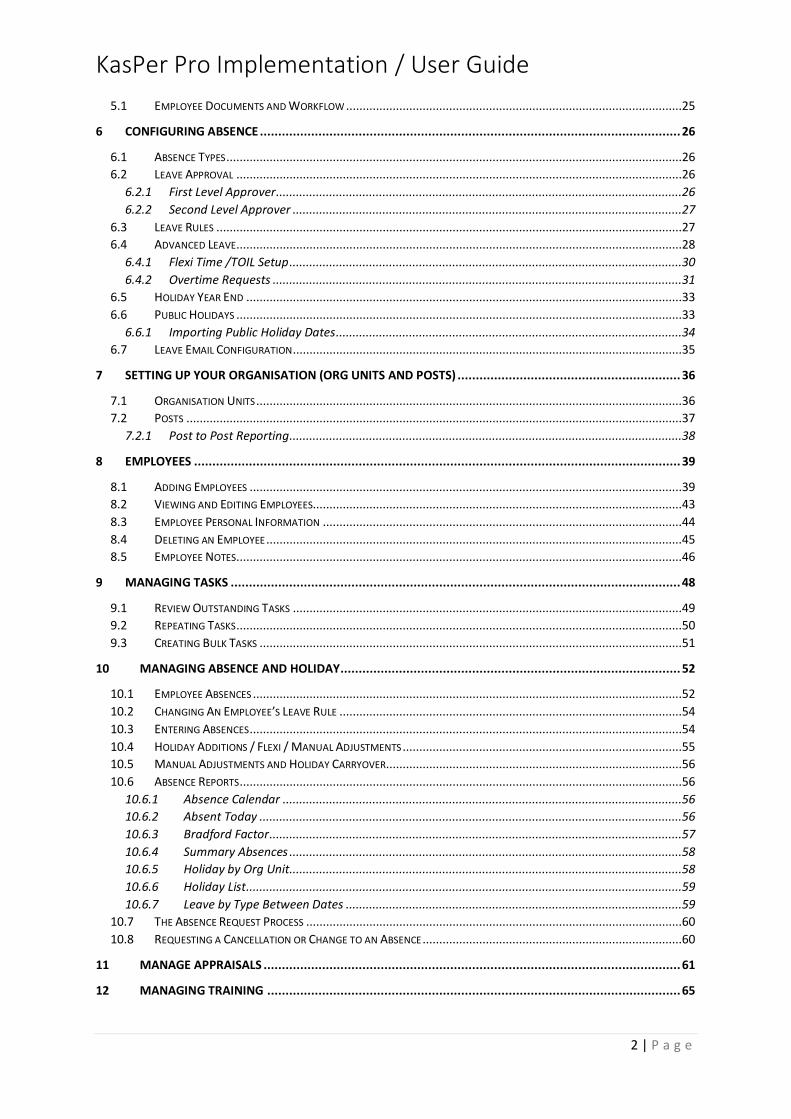
1 INTRODUCTION ................................................................................................................................. 4
2 INSTALLATION AND LICENCING ........................................................................................................... 5
2.1 DATE FORMATS ........................................................................................................................................... 5 2.2 SECURITY ................................................................................................................................................... 5 2.3 LICENCING KASPER PRO................................................................................................................................ 5
3 GETTING STARTED.............................................................................................................................. 7
3.1 USERS ....................................................................................................................................................... 7 3.1.1 Standalone Calendar .......................................................................................................................... 8 3.1.2 Request Leave for Others ................................................................................................................... 8 3.1.3 Restrict Benefits Access on MSS ......................................................................................................... 8
4 LOOK UP TABLES AND OTHER SETTINGS .............................................................................................. 9
4.1 APPRAISAL TYPES......................................................................................................................................... 9 4.1.1 Sends Alerts ......................................................................................................................................10 4.1.2 Manager Comments.........................................................................................................................10 4.1.3 Employee Comments ........................................................................................................................10 4.1.4 Overall ..............................................................................................................................................10 4.1.5 Set Objectives ...................................................................................................................................11 4.1.6 Assess Objectives ..............................................................................................................................11 4.1.7 Hide Assessments .............................................................................................................................11 4.1.8 Hide Update Skills from Employee ...................................................................................................11
4.2 BENEFIT TYPES ..........................................................................................................................................11 4.3 COMPETENCY CATEGORIES ..........................................................................................................................12 4.4 COMPETENCY FRAMEWORKS .......................................................................................................................12 4.5 CHECKLISTS / ON-BOARDING RULES ..............................................................................................................12 4.6 ORGANISATION UNIT TYPES.........................................................................................................................13 4.7 RATING LEVELS..........................................................................................................................................14 4.8 TIME PERIODS ...........................................................................................................................................14 4.9 COLOURS .................................................................................................................................................14 4.10 SETTING UP DEFAULTS AND WORKFLOW LINKS ...............................................................................................14
4.10.1 Default User Type ........................................................................................................................15 4.10.2 Currency Symbol / Tax ID Label / Tax Code Label ........................................................................15 4.10.3 Workflow – Setting up the link to Self Service .............................................................................15 4.10.4 Payroll Number Seed....................................................................................................................16 4.10.5 Anniversary Reminders ................................................................................................................16 4.10.6 Calendar Colours ..........................................................................................................................16 4.10.7 ‘Branding’ the System ..................................................................................................................17
4.11 USER FIELDS .............................................................................................................................................17 4.12 DATA EXPORT ...........................................................................................................................................18
4.12.1 Employees with Organisation Details ..........................................................................................19 4.12.2 Employees with Qualifications .....................................................................................................19 4.12.3 Employees with Training History .................................................................................................19 4.12.4 Organisation Structure for Org Charting .....................................................................................20 4.12.5 Absence Data Between Dates ......................................................................................................21 4.12.6 Equipment Items and Assignments .............................................................................................21 4.12.7 Exporting Overtime ......................................................................................................................21 4.12.8 Exporting Appraisal Data .............................................................................................................22
4.13 IMPORTING ORGANISATION UNITS, POSTS AND EMPLOYEES ..............................................................................22
5 MANAGING DOCUMENTS ................................................................................................................. 24
KasPer Pro Implementation / User Guide
2 | P a g e
5.1 EMPLOYEE DOCUMENTS AND WORKFLOW .....................................................................................................25
6 CONFIGURING ABSENCE ................................................................................................................... 26
6.1 ABSENCE TYPES .........................................................................................................................................26 6.2 LEAVE APPROVAL ......................................................................................................................................26
6.2.1 First Level Approver ..........................................................................................................................26 6.2.2 Second Level Approver .....................................................................................................................27
6.3 LEAVE RULES ............................................................................................................................................27 6.4 ADVANCED LEAVE ......................................................................................................................................28
6.4.1 Flexi Time /TOIL Setup ......................................................................................................................30 6.4.2 Overtime Requests ...........................................................................................................................31
6.5 HOLIDAY YEAR END ...................................................................................................................................33 6.6 PUBLIC HOLIDAYS ......................................................................................................................................33
6.6.1 Importing Public Holiday Dates ........................................................................................................34 6.7 LEAVE EMAIL CONFIGURATION .....................................................................................................................35
7 SETTING UP YOUR ORGANISATION (ORG UNITS AND POSTS) ............................................................. 36
7.1 ORGANISATION UNITS ................................................................................................................................36 7.2 POSTS .....................................................................................................................................................37
7.2.1 Post to Post Reporting ......................................................................................................................38
8 EMPLOYEES ..................................................................................................................................... 39
8.1 ADDING EMPLOYEES ..................................................................................................................................39 8.2 VIEWING AND EDITING EMPLOYEES...............................................................................................................43 8.3 EMPLOYEE PERSONAL INFORMATION ............................................................................................................44 8.4 DELETING AN EMPLOYEE .............................................................................................................................45 8.5 EMPLOYEE NOTES ......................................................................................................................................46
9 MANAGING TASKS ........................................................................................................................... 48
9.1 REVIEW OUTSTANDING TASKS .....................................................................................................................49 9.2 REPEATING TASKS ......................................................................................................................................50 9.3 CREATING BULK TASKS ...............................................................................................................................51
10 MANAGING ABSENCE AND HOLIDAY............................................................................................. 52
10.1 EMPLOYEE ABSENCES .................................................................................................................................52 10.2 CHANGING AN EMPLOYEE’S LEAVE RULE .......................................................................................................54 10.3 ENTERING ABSENCES ..................................................................................................................................54 10.4 HOLIDAY ADDITIONS / FLEXI / MANUAL ADJUSTMENTS ....................................................................................55 10.5 MANUAL ADJUSTMENTS AND HOLIDAY CARRYOVER .........................................................................................56 10.6 ABSENCE REPORTS .....................................................................................................................................56
10.6.1 Absence Calendar ........................................................................................................................56 10.6.2 Absent Today ...............................................................................................................................56 10.6.3 Bradford Factor ............................................................................................................................57 10.6.4 Summary Absences ......................................................................................................................58 10.6.5 Holiday by Org Unit......................................................................................................................58 10.6.6 Holiday List ...................................................................................................................................59 10.6.7 Leave by Type Between Dates .....................................................................................................59
10.7 THE ABSENCE REQUEST PROCESS .................................................................................................................60 10.8 REQUESTING A CANCELLATION OR CHANGE TO AN ABSENCE ..............................................................................60
11 MANAGE APPRAISALS .................................................................................................................. 61
12 MANAGING TRAINING ................................................................................................................. 65
KasPer Pro Implementation / User Guide
3 | P a g e
12.1 COURSE SETUP ..........................................................................................................................................65 12.2 COURSE EVENTS ........................................................................................................................................66 12.3 TRAINING HISTORY / BOOKING ....................................................................................................................66
13 SELF SERVICE ............................................................................................................................... 67
13.1 EMPLOYEE SELF SERVICE .............................................................................................................................67 13.1.1 Absence Requests ........................................................................................................................68 13.1.2 Requesting Leave Cancellations or Changes................................................................................71 13.1.3 Flexi Time /TOIL Requests ............................................................................................................72 13.1.4 Appraisals ....................................................................................................................................73 13.1.5 Notes ............................................................................................................................................73
13.2 SUMMARY OF MANAGER SELF SERVICE FEATURES ...........................................................................................75 13.2.1 Selecting Employees.....................................................................................................................75 13.2.2 Skill Search ...................................................................................................................................76 13.2.3 Multi Employee Absence Calendar ..............................................................................................76 13.2.4 Review Absence ...........................................................................................................................76
13.3 CONFIGURING STANDALONE SELF-SERVICE .....................................................................................................76 13.3.1 Linking Directly to Leave Requests...............................................................................................77 13.3.2 Standalone View for Flexi Time and Overtime requests ..............................................................78
13.4 COMPANY DIRECTORY ................................................................................................................................79 13.4.1 Linking Directly to the Directory ..................................................................................................79
13.5 STANDALONE ABSENCE CALENDAR................................................................................................................80 13.5.1 Linking Directly to the Calendar ...................................................................................................81
13.6 STANDALONE VIEW ENABLING ENTRY OF LEAVE REQUESTS FOR OTHER EMPLOYEES................................................81 13.7 WORKFLOW .............................................................................................................................................82 13.8 USER REMINDER EMAILS.............................................................................................................................83
14 PASSWORD RECOVERY ................................................................................................................. 84
14.1 OPTION 1.................................................................................................................................................84 14.2 OPTION 2 (THE LAST RESORT) ......................................................................................................................85
15 ‘BATCH’ PROCESSING OF EMAIL ALERTS ........................................................................................ 86
15.1 AUTOMATION IN TASK SCHEDULER ...............................................................................................................86 15.2 SENDING WORK ANNIVERSARY AND BIRTHDAY REMINDERS TO MANAGERS .........................................................86
KasPer Pro Implementation / User Guide
4 | P a g e
1 INTRODUCTION
First of all, thank you for buying your copy of KasPer Pro! In this guide, we will take you through the
essential steps required to set up KasPer Pro and get you and your team using it to the full. Most of
the screenshots included in this guide are taken from the demonstration version of the system so
you could benefit from installing that if you haven’t already had a look (it is available free from the
Sharepoint Store).
KasPer Pro is an HRMS which includes facilities for HR, Managers and Staff members to access
information which is relevant to them and their role (managers can have access to their team’s
information for example). We will look at how this works in conjunction with the security and
organization structure elements of the system.
KasPer Pro is a relatively sophisticated application and so in addition to the software purchased from
the app store, we also offer users the option of joining our support service and forum which
provides an area for users to communicate with us and each other, ask questions, make suggestions
(product or otherwise) and be kept up to date with news and developments around our software.
This service is available for an annual fee and can be ordered via our website – once payment is
received you will be invited to join our user ‘workspace’ and can start interacting with us and each
other immediately.
Within the app itself (from V1.6.0.0) there are some training videos available which cover some of
the key issues. We would particularly recommend viewing the Welcome video to new users.

KasPer Pro Implementation / User Guide
5 | P a g e
2 INSTALLATION AND LICENCING
2.1 DATE FORMATS It is likely that you have already installed KasPer PRO by the time you read this document. However,
this section aims to deal with an issue which many customers have had post installation.
The app uses a large number of date fields and the format for the majority of those is set by the
Language Option presented during installation of the app (which is very easy to miss). English US will
set dates to US format (mm/dd/yyyy) and English UK will set dates to dd/mm/yyyy. The US format
seems to be the default.
It is important to determine if dates are in the format you require before implementing the system
because they cannot be changed once the system is installed (they do not, for example, follow the
date settings of the Sharepoint site). If you find that your system has the incorrect format, you
should delete the app and re-install it.
2.2 SECURITY In addition to the date format issue, it is worth considering where to install KasPer Pro. All users of
the application will require, as a minimum, Contribute permissions to the Sharepoint site the
application is installed within. In many customers’ cases, this means that the best option is to install
KasPer Pro into it’s own subsite where giving this level of permission doesn’t compromise anything
else. This should be considered early on because the app cannot be moved – so it may be best to re-
install in a suitable subsite before continuing with implementation.
2.3 LICENCING KASPER PRO KasPer Pro is licenced on the basis of the number of Current Employees it is used for (i.e. leavers don’t count). This means that after the initial 14 day trial period you need to purchase sufficient licences for all the employees you have in the system (plus a few extra perhaps). This is done by clicking the Purchase User Licences button on the About Page:

KasPer Pro Implementation / User Guide
6 | P a g e
From here you are taken to a screen where you can link to our online Store to buy licences, support time (days or hours) and also ‘unlocked’ (i.e. customisable) versions of our other two apps.
This is also where you then apply the licence codes we send you. Note that generating and sending the licence codes is a manual process and, depending up time zones, etc., may take a while to arrive with you.
KasPer Pro Implementation / User Guide
7 | P a g e
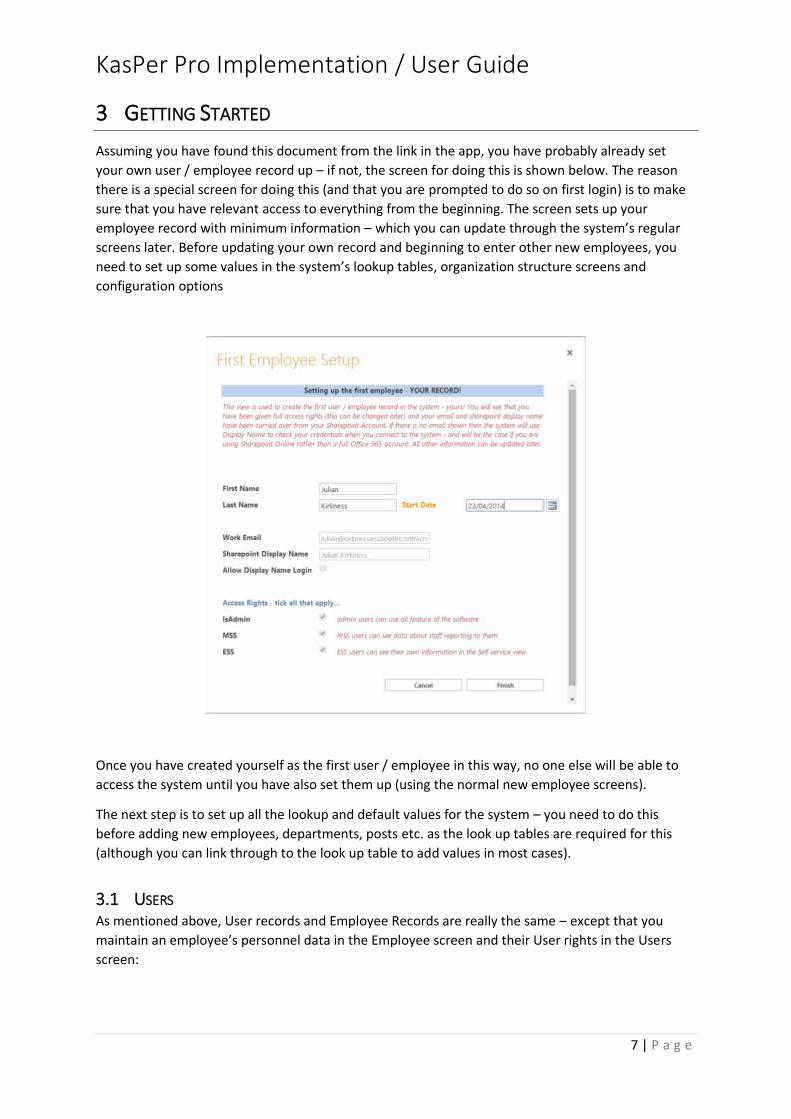
3 GETTING STARTED
Assuming you have found this document from the link in the app, you have probably already set
your own user / employee record up – if not, the screen for doing this is shown below. The reason
there is a special screen for doing this (and that you are prompted to do so on first login) is to make
sure that you have relevant access to everything from the beginning. The screen sets up your
employee record with minimum information – which you can update through the system’s regular
screens later. Before updating your own record and beginning to enter other new employees, you
need to set up some values in the system’s lookup tables, organization structure screens and
configuration options
Once you have created yourself as the first user / employee in this way, no one else will be able to
access the system until you have also set them up (using the normal new employee screens).
The next step is to set up all the lookup and default values for the system – you need to do this
before adding new employees, departments, posts etc. as the look up tables are required for this
(although you can link through to the look up table to add values in most cases).
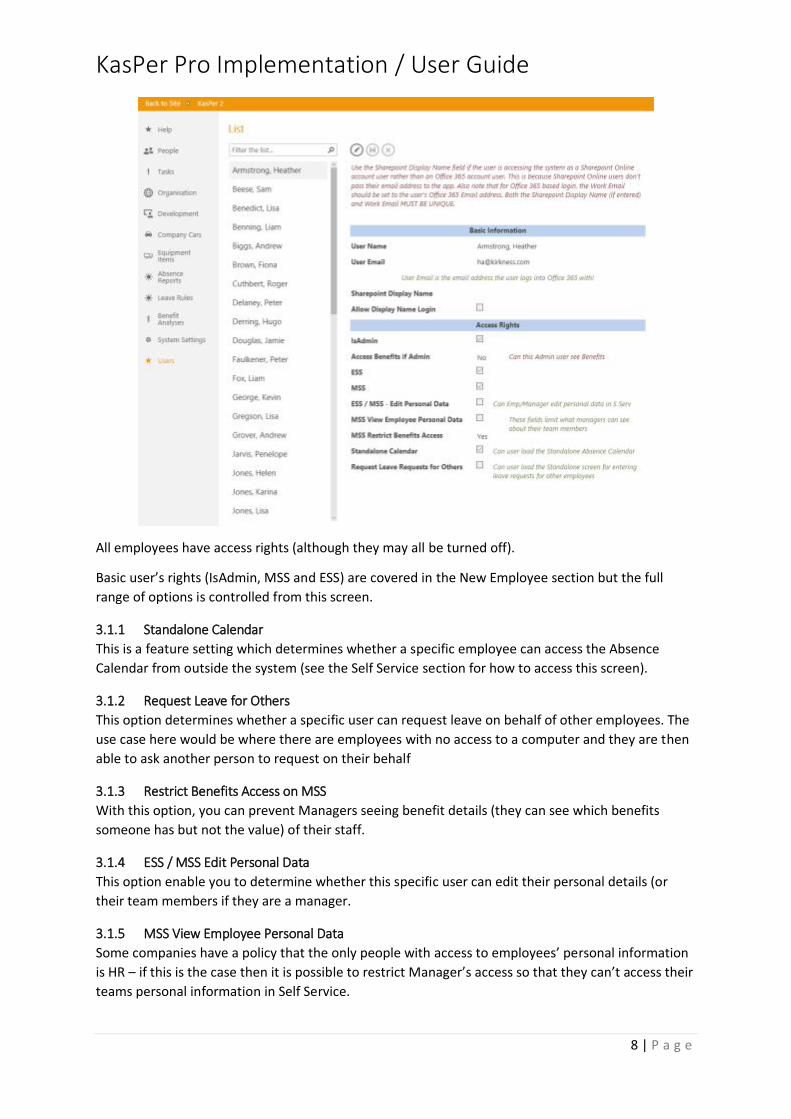
3.1 USERS As mentioned above, User records and Employee Records are really the same – except that you
maintain an employee’s personnel data in the Employee screen and their User rights in the Users
screen:
KasPer Pro Implementation / User Guide
8 | P a g e
All employees have access rights (although they may all be turned off).
Basic user’s rights (IsAdmin, MSS and ESS) are covered in the New Employee section but the full
range of options is controlled from this screen.
3.1.1 Standalone Calendar
This is a feature setting which determines whether a specific employee can access the Absence
Calendar from outside the system (see the Self Service section for how to access this screen).
3.1.2 Request Leave for Others
This option determines whether a specific user can request leave on behalf of other employees. The
use case here would be where there are employees with no access to a computer and they are then
able to ask another person to request on their behalf
3.1.3 Restrict Benefits Access on MSS
With this option, you can prevent Managers seeing benefit details (they can see which benefits
someone has but not the value) of their staff.
3.1.4 ESS / MSS Edit Personal Data
This option enable you to determine whether this specific user can edit their personal details (or
their team members if they are a manager.
3.1.5 MSS View Employee Personal Data
Some companies have a policy that the only people with access to employees’ personal information
is HR – if this is the case then it is possible to restrict Manager’s access so that they can’t access their
teams personal information in Self Service.

KasPer Pro Implementation / User Guide
9 | P a g e
4 LOOK UP TABLES AND OTHER SETTINGS
We will start by looking at the look up tables in the system. Here is the menu with all of the main
ones displayed:
Most of these are self-explanatory but we will look at some of them specifically, starting with
Absence Types:
4.1 APPRAISAL TYPES KasPer Pro includes facilities for Managers to record the results of appraisals with their staff using
the Self Service facilities. For new employees, you can determine which Appraisal Type is to be used
as a template at the end of the probationary period (see System Settings below) – and the system
will then automatically set up the review and associated tasks for you.
There is a degree of configurability to this process, whereby you can decide which features are
enabled for which type of appraisal as well as whether you wish to set up any specific questions for
that type of appraisal, as follows:
KasPer Pro Implementation / User Guide
10 | P a g e
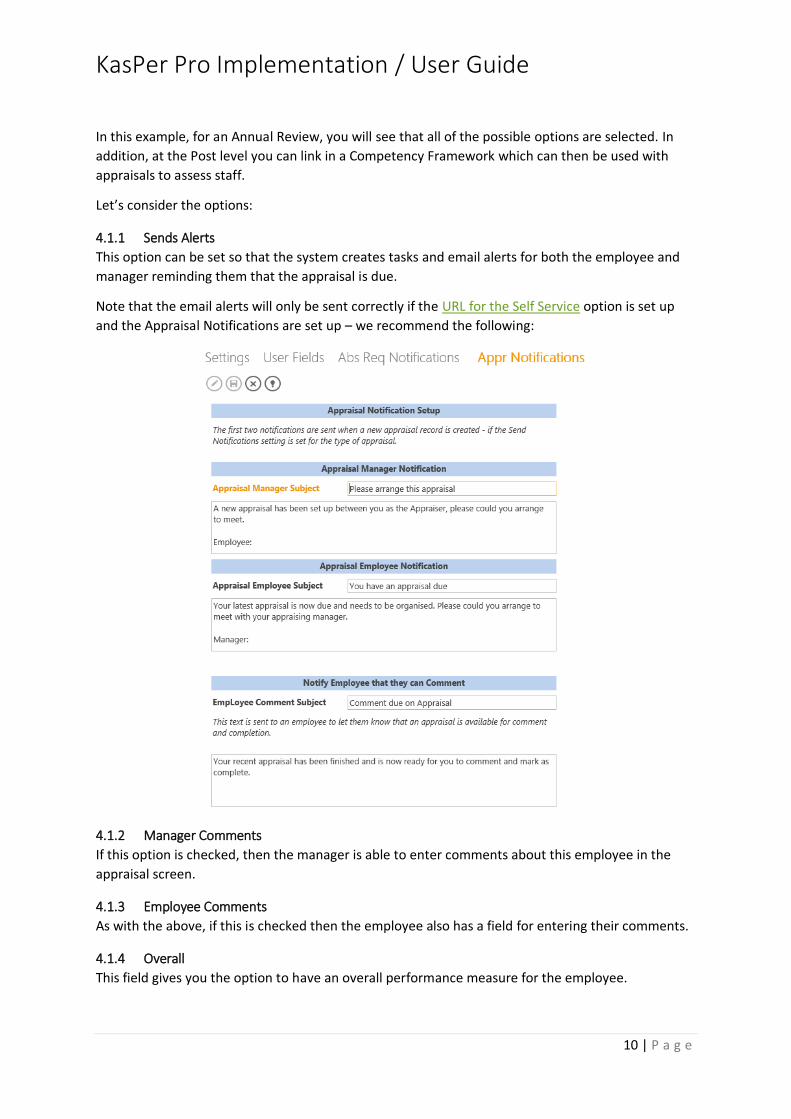
In this example, for an Annual Review, you will see that all of the possible options are selected. In
addition, at the Post level you can link in a Competency Framework which can then be used with
appraisals to assess staff.
Let’s consider the options:
4.1.1 Sends Alerts
This option can be set so that the system creates tasks and email alerts for both the employee and
manager reminding them that the appraisal is due.
Note that the email alerts will only be sent correctly if the URL for the Self Service option is set up
and the Appraisal Notifications are set up – we recommend the following:
4.1.2 Manager Comments
If this option is checked, then the manager is able to enter comments about this employee in the
appraisal screen.
4.1.3 Employee Comments
As with the above, if this is checked then the employee also has a field for entering their comments.
4.1.4 Overall
This field gives you the option to have an overall performance measure for the employee.
KasPer Pro Implementation / User Guide
11 | P a g e
4.1.5 Set Objectives
If this option is checked, then the manager will be able to set objectives to be assessed in a later
appraisal.
4.1.6 Assess Objectives
If this option is checked, then the manager can select a former appraisal from which to assess
performance against the set objectives.
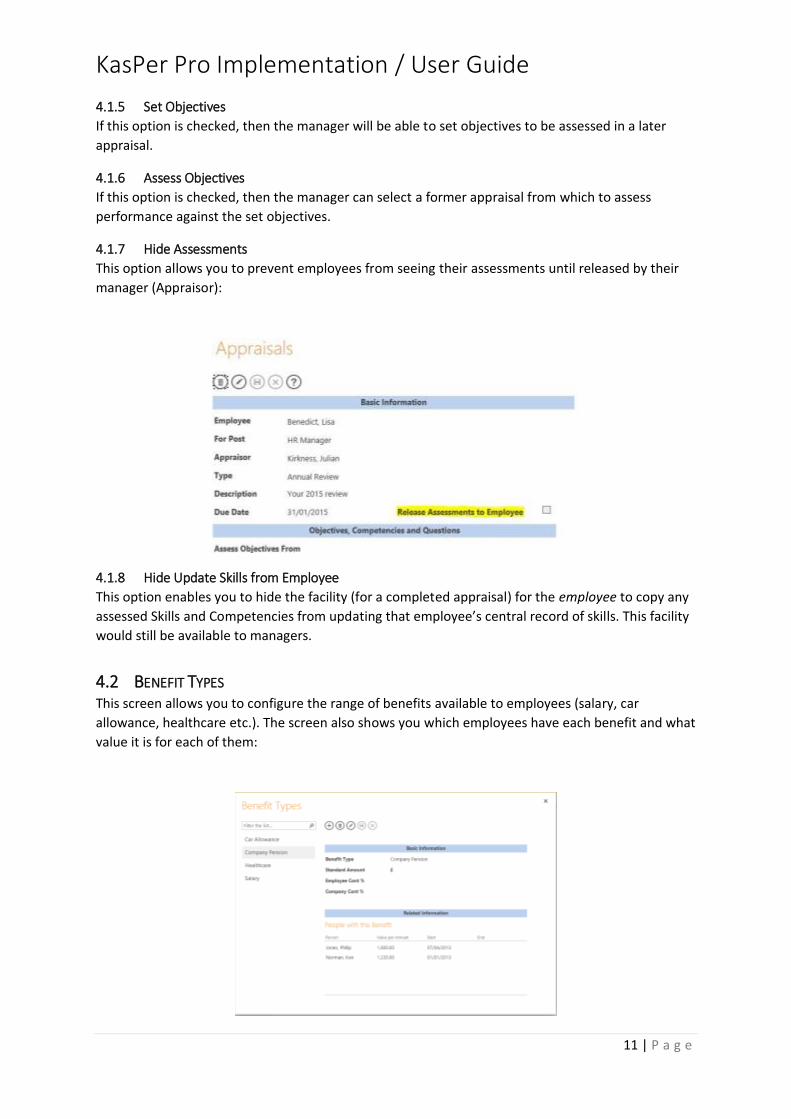
4.1.7 Hide Assessments
This option allows you to prevent employees from seeing their assessments until released by their
manager (Appraisor):
4.1.8 Hide Update Skills from Employee
This option enables you to hide the facility (for a completed appraisal) for the employee to copy any
assessed Skills and Competencies from updating that employee’s central record of skills. This facility
would still be available to managers.
4.2 BENEFIT TYPES This screen allows you to configure the range of benefits available to employees (salary, car
allowance, healthcare etc.). The screen also shows you which employees have each benefit and what
value it is for each of them:

KasPer Pro Implementation / User Guide
12 | P a g e
4.3 COMPETENCY CATEGORIES This feature allows you to define your own categories for Skills / Competencies which are then used
to sort them in Appraisal Competency Assessments
4.4 COMPETENCY FRAMEWORKS Competency Frameworks are lists of competencies and skills with required levels of competence
required for specific roles or categories of role:
Once created, they are associated with a Post and when a person’s appraisal is set up the system
looks up the framework for their Post (Current Job) and populates the appraisal’s list of
competencies and skills to asses.
4.5 CHECKLISTS / ON-BOARDING RULES This feature allows you to define checklists and other on-boarding processes to be used when
employees join or leave your organisation. Each checklist can have many tasks associated with it and
each task can be assigned to either the person’s Manager, the person creating the record, a
specified person or the new employee themselves. The result of the checklist is a set of tasks
associated with the employee appearing in the relevant employee / user’s task list. You have a
choice (from V1.6.7.0) to have these sent to users as individual email alerts or one alert per person.
If you do choose to have a single email per person, the system will also include the emails about the
objective setting and probation reviews. However, the system will also send these email separately
unless email alerting is also turned OFF for the particular Appraisal Type.
Finally, the feature allows you to set up default starter objective setting and probation reviews (for
On Boarding checklists), together with default notice and probations periods. This will also result in
the creation of associated ‘appraisals’ as associated tasks for the employee and appraiser (usually
the Manager).
KasPer Pro Implementation / User Guide
13 | P a g e
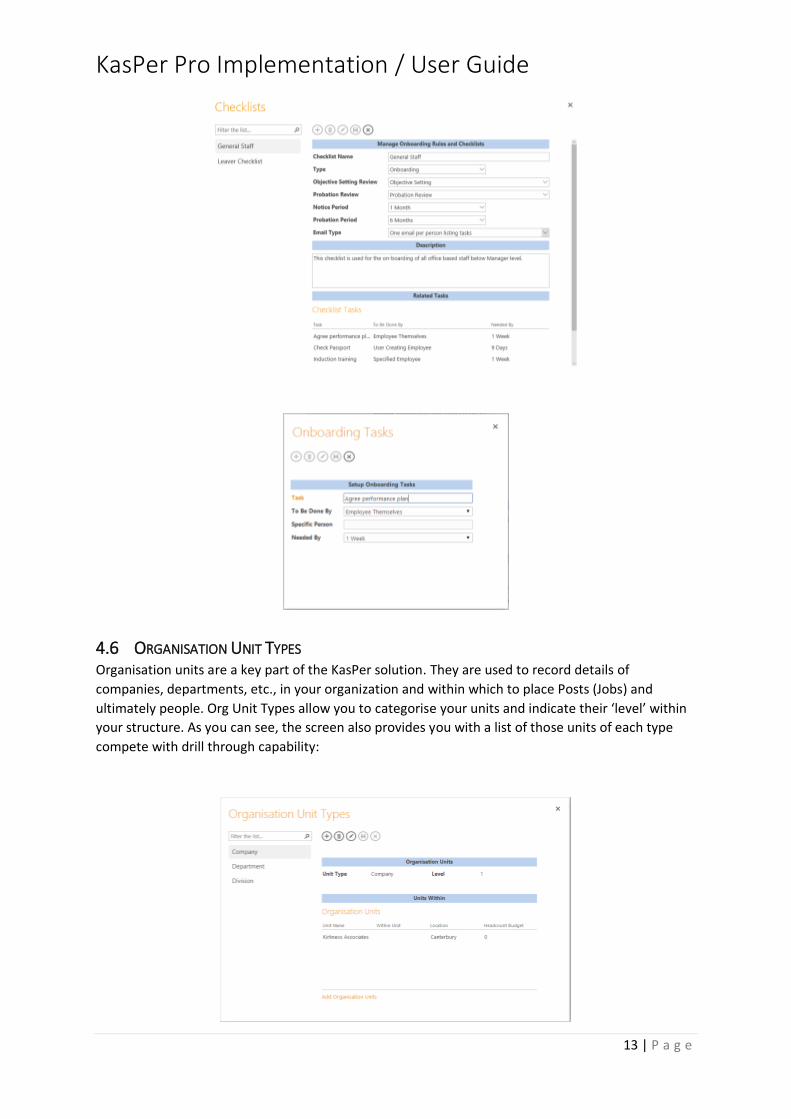
4.6 ORGANISATION UNIT TYPES Organisation units are a key part of the KasPer solution. They are used to record details of
companies, departments, etc., in your organization and within which to place Posts (Jobs) and
ultimately people. Org Unit Types allow you to categorise your units and indicate their ‘level’ within
your structure. As you can see, the screen also provides you with a list of those units of each type
compete with drill through capability:
KasPer Pro Implementation / User Guide
14 | P a g e
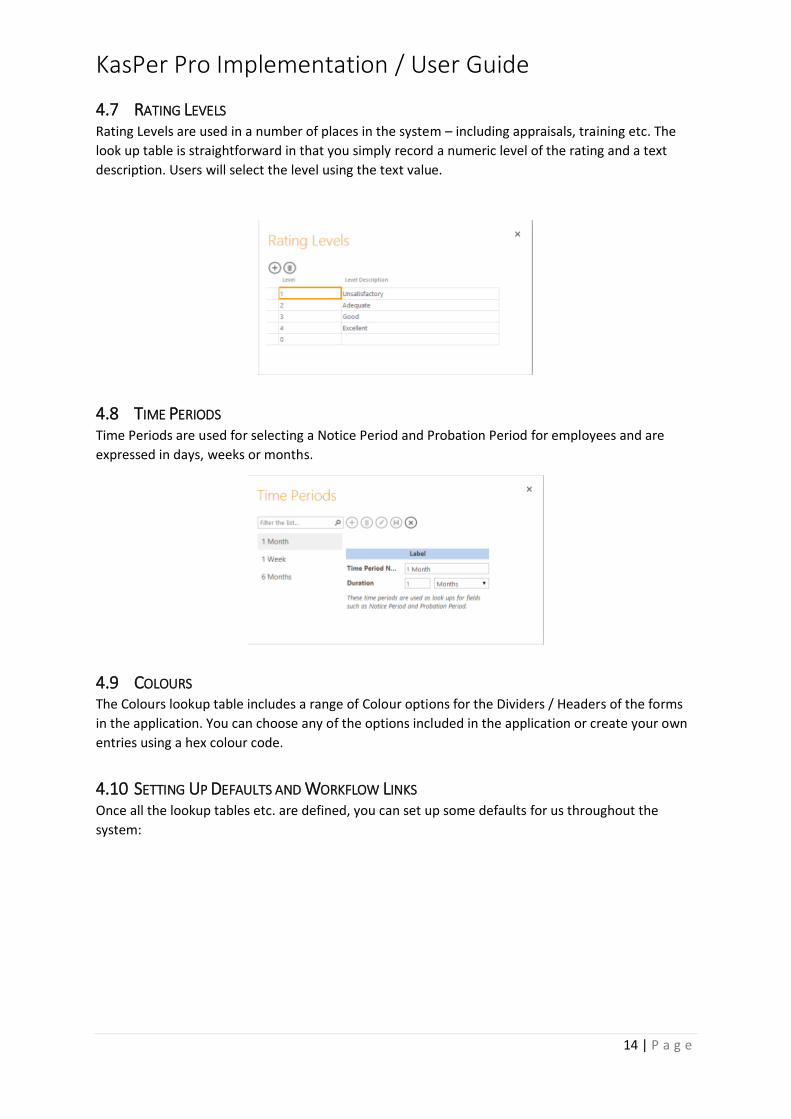
4.7 RATING LEVELS Rating Levels are used in a number of places in the system – including appraisals, training etc. The
look up table is straightforward in that you simply record a numeric level of the rating and a text
description. Users will select the level using the text value.
4.8 TIME PERIODS Time Periods are used for selecting a Notice Period and Probation Period for employees and are
expressed in days, weeks or months.
4.9 COLOURS The Colours lookup table includes a range of Colour options for the Dividers / Headers of the forms
in the application. You can choose any of the options included in the application or create your own
entries using a hex colour code.
4.10 SETTING UP DEFAULTS AND WORKFLOW LINKS Once all the lookup tables etc. are defined, you can set up some defaults for us throughout the
system:

KasPer Pro Implementation / User Guide
15 | P a g e
Most of these settings are self-explanatory, however here is an explanation of a few of them:
4.10.1 Default User Type
These 3 fields determine whether a) the user has access to the full set of screens (admin use), b)
MSS access allows the user to have access to information about employees directly or indirectly
reporting to them (if any) and c) ESS access allows the user/ employee to have access to their own
information through the ESS Screen.
4.10.2 Currency Symbol / Tax ID Label / Tax Code Label
These options allow you to specify a currency symbol (up to 3 characters) and text to describe
system’s tax ID field (NI Number for the UK as an example) and Tax Code (where used). Note that
leaving these blank may cause the label on screen to say Null.
4.10.3 Workflow – Setting up the link to Self Service
The Workflow processes in KasPer PRO send emails to notify employees and managers about tasks
they need to deal with. These emails contain a link to the Self Service page of the application.

KasPer Pro Implementation / User Guide
16 | P a g e
The system can create a Hyperlink automatically (see ‘View Via Standalone Form’ above) but this is
effectively abbreviated. In order to get the full link, it is necessary to copy the link from this first field
(right click) and then pasting it into the second field and then saving it. This only has to be done once
and then the system will include a link to Self Service at the bottom of each email it sends.
Finally, V1.6.3.0 introduces an option to allow managers to use a special page for authorising Leave
Requests – this speeds up the process. Ticking the relevant box on System Settings turns this on – as
long as the Self Service link is set up.
4.10.4 Payroll Number Seed
KasPer Pro can assign Payroll Numbers to employees when they are entered into the system. Users
can choose whether to do this manually or to get the system to generate the number based upon a
‘Seed’ number. In the latter case, this is entered into System Settings and from then on this number
will be incremented by one every time a new employee record is created.
4.10.5 Anniversary Reminders
This feature will send Manager’s emails to alert them of any forthcoming work anniversaries or
birthdays in their team. These emails will ONLY be sent if you set up the batch processing option
described later in this document.
4.10.6 Calendar Colours
We had a request to make the Colours representing the number of people off on any day in the
Calendar, along with the number bands, to be configurable – the screen below allows you to do this:
This screen is accessed via the calendar button on the Action Bar in the System Settings screen. Here
is the effect of the settings above:

KasPer Pro Implementation / User Guide
17 | P a g e
4.10.7 ‘Branding’ the System
Clients have requested the ability to change the banner on the home page of the app and apply
some branding to the Self Service screens. The form below allows this to be done:
The screen shot shows the default settings but you can choose your own graphics. The banner image
should be proportioned roughly as shown and the Icon should be square and shows in the top left
corner of Self Service pages:
4.11 USER FIELDS It is quite likely that you will need a few additional fields within the app to meet you own specific
requirements and KasPer Pro provides 10 user fields for Employees which are configured in a simple

KasPer Pro Implementation / User Guide
18 | P a g e
User Fields screen. The idea is that they will be displayed on the relevant screen once you have
assigned them a name.
You have the option for the numeric fields to display the currency symbol or not. Also note the User
EmployeeLink fields – these are links to other employees in the system and can be used for a range
of things. In the case above they are used to show the person an employee would interact in the
case of grievances or disciplinary processes. In ESS, these Employee Links also display an Email
button so the employee can easily email the contact if required:
Should you change a field’s use (or stop displaying it) then the system will give you the option to
clear the data previously held in the field (Clear Data). If this option is enabled for a field, then you
will be reminded that the action is IRREVERSIBLE before clicking confirm to continue.
The fields will automatically be displayed on both the Employee screen and on the Self Service
screen when activated. The column headed “Edit in ESS” allows you to configure whether the
employee can edit the field in their ESS screen or simply view it.
4.12 DATA EXPORT We have provided, currently, five data export ‘screens’ which display information and include a
Download to Excel option.
KasPer Pro Implementation / User Guide
19 | P a g e
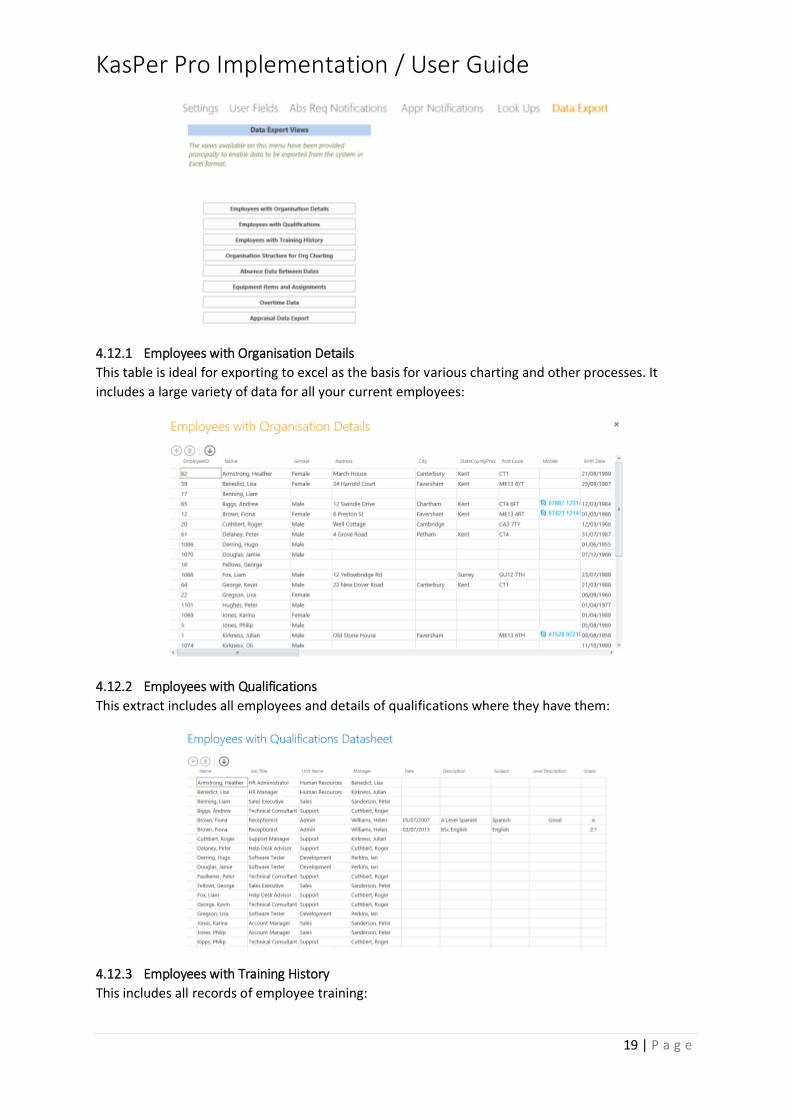
4.12.1 Employees with Organisation Details
This table is ideal for exporting to excel as the basis for various charting and other processes. It
includes a large variety of data for all your current employees:
4.12.2 Employees with Qualifications
This extract includes all employees and details of qualifications where they have them:
4.12.3 Employees with Training History
This includes all records of employee training:
KasPer Pro Implementation / User Guide
20 | P a g e
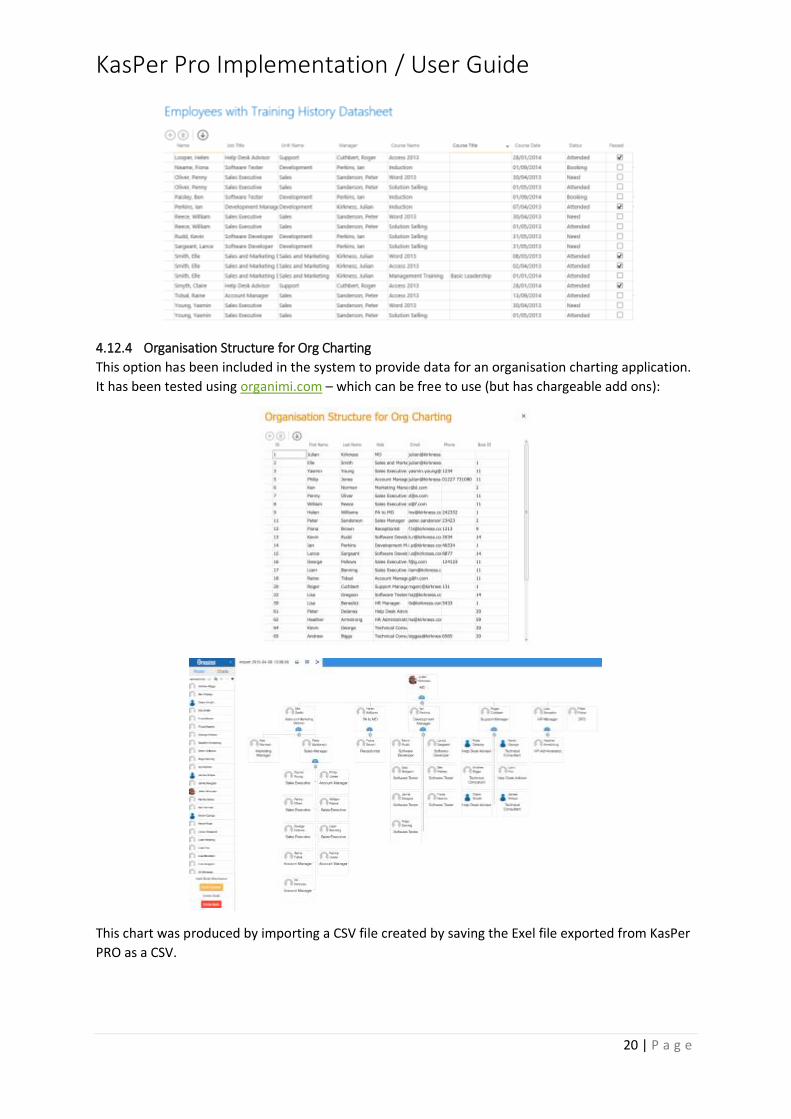
4.12.4 Organisation Structure for Org Charting
This option has been included in the system to provide data for an organisation charting application.
It has been tested using organimi.com – which can be free to use (but has chargeable add ons):
This chart was produced by importing a CSV file created by saving the Exel file exported from KasPer
PRO as a CSV.

KasPer Pro Implementation / User Guide
21 | P a g e
4.12.5 Absence Data Between Dates
This option allows you to export absence information between dates which you input first (and
which default to the past month):
The output includes the employee’s current position and department so the data could again be
used for reporting purposes – or to import into another system.
4.12.6 Equipment Items and Assignments
This export outputs all equipment items together with the Org Unit or Employee they are currently
assigned to:
4.12.7 Exporting Overtime
Designed to be used in conjunction with the Overtime Request / Approval feature, this export can be
used to export data which payroll would use to process employees’ overtime:
KasPer Pro Implementation / User Guide
22 | P a g e
4.12.8 Exporting Appraisal Data
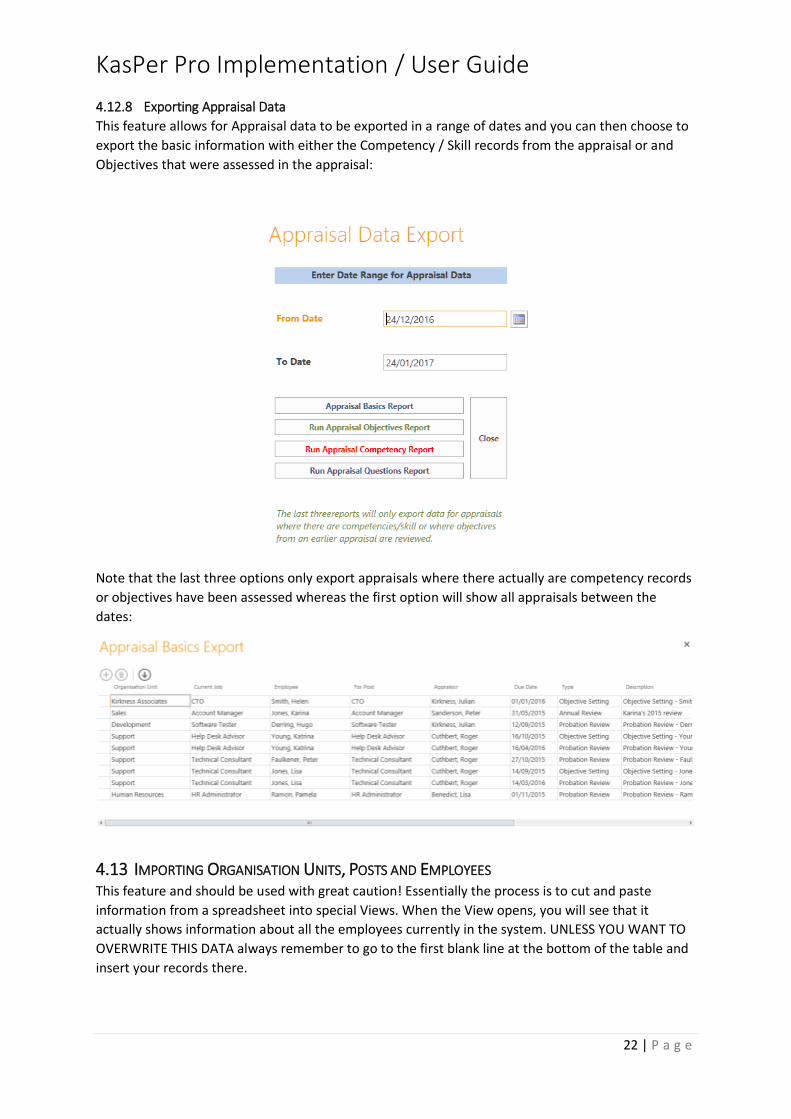
This feature allows for Appraisal data to be exported in a range of dates and you can then choose to
export the basic information with either the Competency / Skill records from the appraisal or and
Objectives that were assessed in the appraisal:
Note that the last three options only export appraisals where there actually are competency records
or objectives have been assessed whereas the first option will show all appraisals between the
dates:
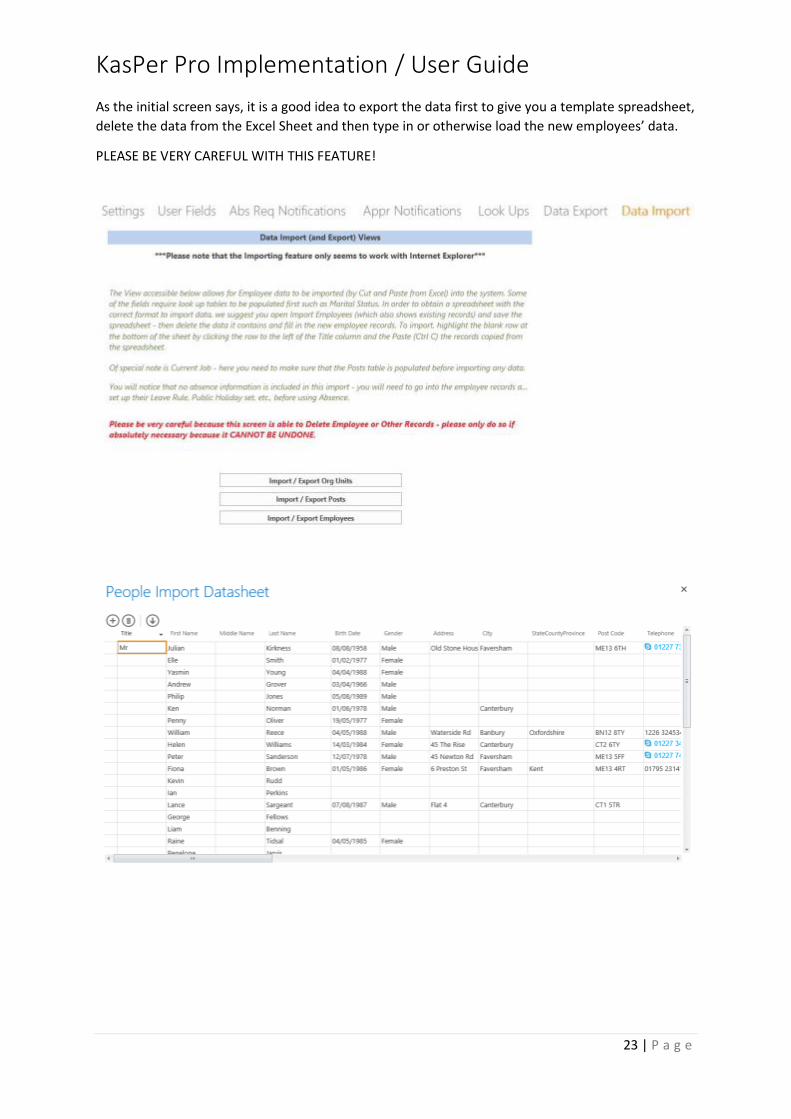
4.13 IMPORTING ORGANISATION UNITS, POSTS AND EMPLOYEES This feature and should be used with great caution! Essentially the process is to cut and paste
information from a spreadsheet into special Views. When the View opens, you will see that it
actually shows information about all the employees currently in the system. UNLESS YOU WANT TO
OVERWRITE THIS DATA always remember to go to the first blank line at the bottom of the table and
insert your records there.
KasPer Pro Implementation / User Guide
23 | P a g e
As the initial screen says, it is a good idea to export the data first to give you a template spreadsheet,
delete the data from the Excel Sheet and then type in or otherwise load the new employees’ data.
PLEASE BE VERY CAREFUL WITH THIS FEATURE!

KasPer Pro Implementation / User Guide
24 | P a g e
5 MANAGING DOCUMENTS
There are many parts of the system where you can attach documents to records using Hyperlink
fields. The documents are not actually stored within the application but can be accessed by clicking
on the link. For example, we have a documents tab associated with Training Courses:
Clicking on one of the document (or the Add link) takes the user to the screen where the link to the
document is maintained:
You can see the hyperlink button on the bottom right of the screen which, when clicked allows you
to connect the document (actually it can also be a web page or anything accessible with a URL):
KasPer Pro Implementation / User Guide
25 | P a g e
Actual documents also need to be able to be accessed with a URL and so need to be stored online
(such as in Sharepoint Lists, Onedrive, Dropbox etc).
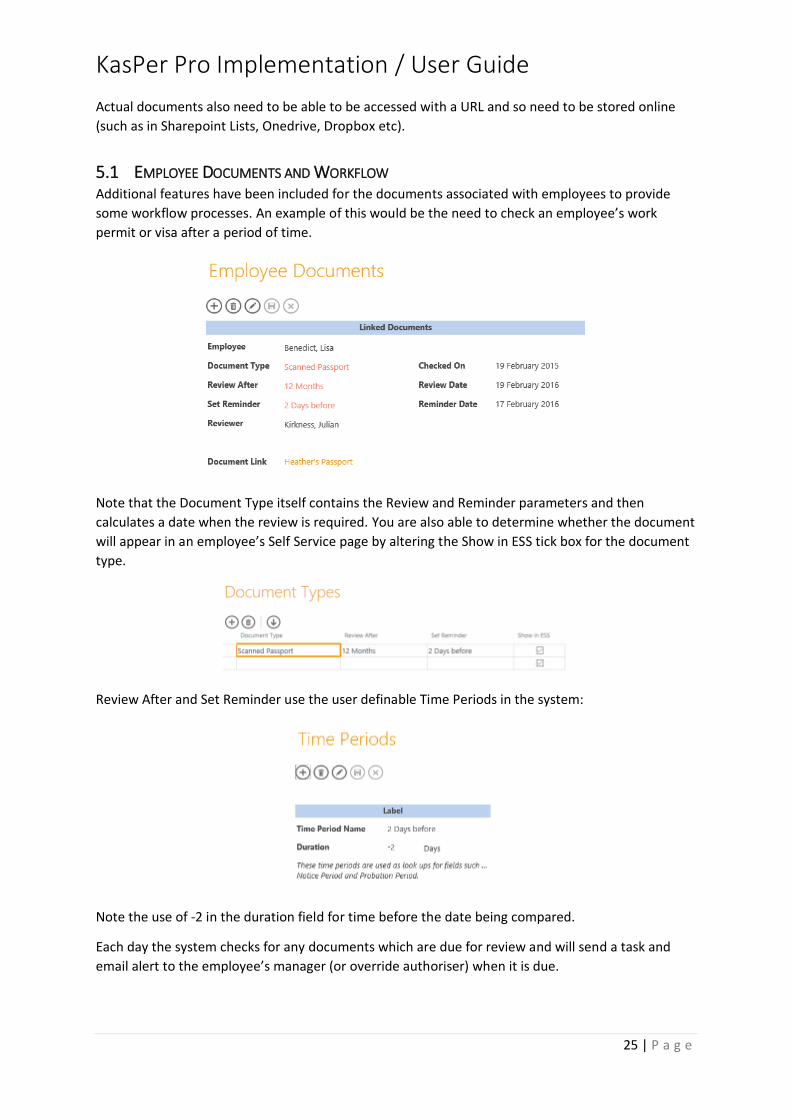
5.1 EMPLOYEE DOCUMENTS AND WORKFLOW Additional features have been included for the documents associated with employees to provide
some workflow processes. An example of this would be the need to check an employee’s work
permit or visa after a period of time.
Note that the Document Type itself contains the Review and Reminder parameters and then
calculates a date when the review is required. You are also able to determine whether the document
will appear in an employee’s Self Service page by altering the Show in ESS tick box for the document
type.
Review After and Set Reminder use the user definable Time Periods in the system:
Note the use of -2 in the duration field for time before the date being compared.
Each day the system checks for any documents which are due for review and will send a task and
email alert to the employee’s manager (or override authoriser) when it is due.
KasPer Pro Implementation / User Guide
26 | P a g e
6 CONFIGURING ABSENCE
Absence Management is one of the key features of any HR system and KasPer provides a
sophisticated set of capabilities which allow you to cover a wide range of scenarios. We will start
with Absence Types (accessible both from the lookup table and Leave Rules menus).
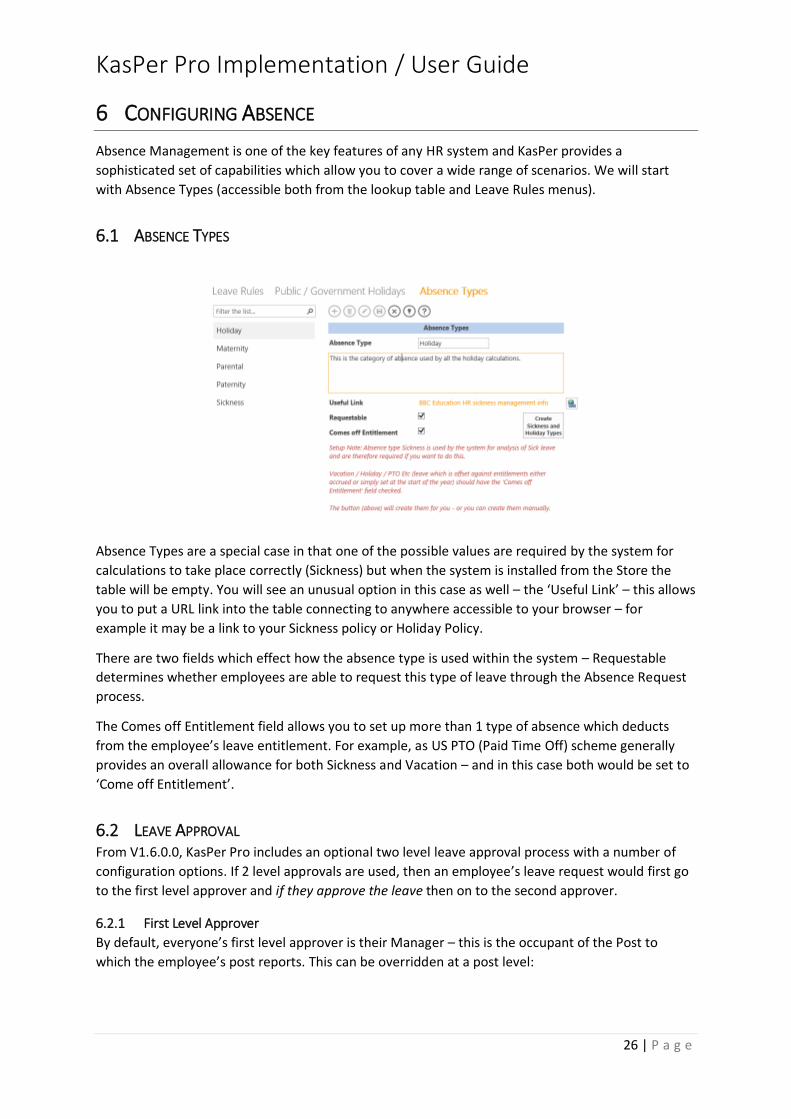
6.1 ABSENCE TYPES
Absence Types are a special case in that one of the possible values are required by the system for
calculations to take place correctly (Sickness) but when the system is installed from the Store the
table will be empty. You will see an unusual option in this case as well – the ‘Useful Link’ – this allows
you to put a URL link into the table connecting to anywhere accessible to your browser – for
example it may be a link to your Sickness policy or Holiday Policy.
There are two fields which effect how the absence type is used within the system – Requestable
determines whether employees are able to request this type of leave through the Absence Request
process.
The Comes off Entitlement field allows you to set up more than 1 type of absence which deducts
from the employee’s leave entitlement. For example, as US PTO (Paid Time Off) scheme generally
provides an overall allowance for both Sickness and Vacation – and in this case both would be set to
‘Come off Entitlement’.
6.2 LEAVE APPROVAL From V1.6.0.0, KasPer Pro includes an optional two level leave approval process with a number of
configuration options. If 2 level approvals are used, then an employee’s leave request would first go
to the first level approver and if they approve the leave then on to the second approver.
6.2.1 First Level Approver
By default, everyone’s first level approver is their Manager – this is the occupant of the Post to
which the employee’s post reports. This can be overridden at a post level:

KasPer Pro Implementation / User Guide
27 | P a g e
In this example, Julian Kirkness would be the approver for anyone in this post.
The first level approver can also be overridden at Employee level (on the Employee Absences View):
As the note says, the order of applying overrides is to take the setting at Employee level first, then
the setting at Post level and if both of these are blank then apply the normal rule (the employee’s
Manager).
6.2.2 Second Level Approver
There are several options (set in the Leave Rules View) for the second level approver:
These are fairly self-explanatory and when combined with the initial approver provide a range of
options which we intend to meet the vast majority of requirement.
6.3 LEAVE RULES KasPer is able to handle multiple sets of Leave Rules catering for different working patterns, absence
year dates, carry over rules and entitlements. If necessary, you can configure a rule to cater for the
needs of an individual employee.
The screenshot below shows all of the options available which are fairly self-explanatory apart from
Flexi Time and associated fields. You also need to know that you must manually calculate the
‘Average Hours Per Day’ field (which is simply used to calculate holiday hours from the days figure).

KasPer Pro Implementation / User Guide
28 | P a g e
Once these rules are in place (along with the Absence Types and Public Holidays), then the system
can be used to track employee holiday, sickness and other types of absenteeism. The system works
on the basis of tracking leave within a Leave Year (based on the start and end date). At the end of
the year, you will want to update each employee’s records to reflect the new year’s dates and also
carry over any outstanding leave entitlement (constrained by the Max Carry Over Days field). This
calculation is triggered using the indicated menu charm. This can also be used to apply any changes
to the rules that may occur during the period.
6.4 ADVANCED LEAVE It is also possible to configure more advanced absence rules where leave years are based upon the
anniversary of start dates, leave is accrued weekly, twice a month, monthly or annually, and to
determine length of service based rules for entitlement and carry over. This is the type of rule
customers in the US would use, for example, to configure a PTO (Paid Time Off) scheme.
The example above is of a rule using Advanced Leave features and therefore shows Leave Days as 0
on this screen (because it is set in the Rules screen as a length of service based table of values):

KasPer Pro Implementation / User Guide
29 | P a g e
In this example, the leave is accrued monthly (on the 20th) and the leave year is set to the
anniversary of the employee’s start date which means that each employee will have a different leave
year. We therefore also need to select the AutoProcess option which means that on the anniversary
the system will calculate the employee’s carry over (if allowed) and reset their leave year.
For Monthly and Weekly schemes you can specify the day of the month (or week) on which the
leave accrual is processed. Note for weekly, the week starts with 1 being the Sunday. Note that if
your accrual day is late in the week or month then you should consider setting up the DailyUpdates
process described at the end of this manual (other wise the accrual may not be processed if no one
accesses the system between the accrual date and the end of the month).
Semi Monthly schemes accrue leave twice a month on the 1st and 15th.
Annual schemes accrue once a year –either on the leave year start or anniversary of the employees
start date.
The First Year Accruals section allows you to set up accrual amounts applying for the first year of
employment based upon length of service in months – so for example you could set it so that no
accrual is created until 3 months service.
Finally, the Length of Service rules enable LOS based Accrual and Maximum Carryover. Both of these
values are in HOURS (and are converted into days as well).
In the example above, during the first year the employee gets 16 hours a month (2 days) in the first
year, 20 hours a month (2.5 days) after 1 year and 24 hours a month (3 days) after 5 years! After a
year’s service they can carry forward 40 hours (5 days) unused leave and after 5 this increases to 48
hours (6 days).

KasPer Pro Implementation / User Guide
30 | P a g e
6.4.1 Flexi Time /TOIL Setup
You will see in the Rules screen shot that there is a field to enable Flexi Time / TOIL (Time Off In Lieu)
for employees on this particular holiday rule. If this is enabled, then the employee is able to request
a number of hours Flexi Time – which if approved will be added to their holiday in the form of a field
called Holiday Additions. If your organisation imposes a limit on how much Flexi Time and employee
can take, then you are able to enter a Monthly limit (in hours) into the Flexi Rules view along with
options for the approval process:
If an employee tries to request over the limit in a month then they will be prevented from
submitting the request – which will be rounded down to the maximum they can request so that they
can submit an amount within the limit.
As you can see, you are able to specify options for who will authorise a flexi (or Overtime) request. It
can be the same as the normal leave approver or one of the 3 alternatives shown including the
Specified person (in which case you can choose a specific employee).
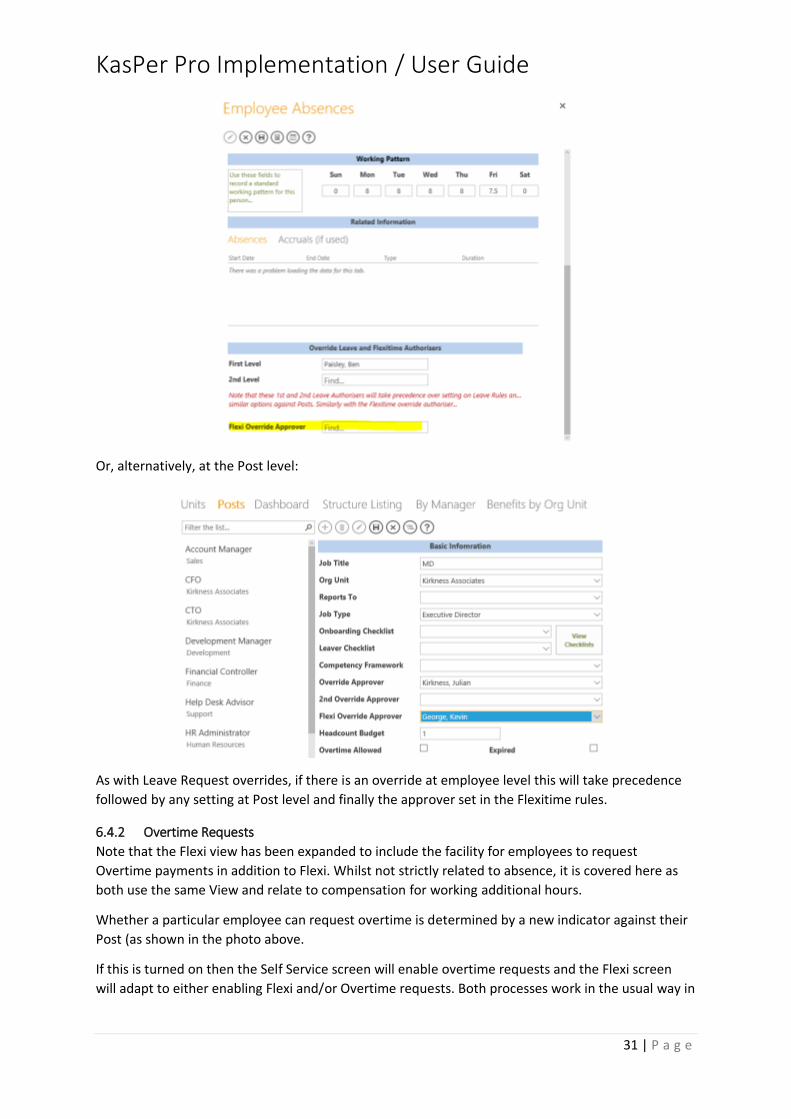
It is also possible to set up Override Approvers to handle any anomalies. These can be set at either
the employee level on the Employee’s absence screen:
KasPer Pro Implementation / User Guide
31 | P a g e
Or, alternatively, at the Post level:
As with Leave Request overrides, if there is an override at employee level this will take precedence
followed by any setting at Post level and finally the approver set in the Flexitime rules.
6.4.2 Overtime Requests
Note that the Flexi view has been expanded to include the facility for employees to request
Overtime payments in addition to Flexi. Whilst not strictly related to absence, it is covered here as
both use the same View and relate to compensation for working additional hours.
Whether a particular employee can request overtime is determined by a new indicator against their
Post (as shown in the photo above.
If this is turned on then the Self Service screen will enable overtime requests and the Flexi screen
will adapt to either enabling Flexi and/or Overtime requests. Both processes work in the usual way in
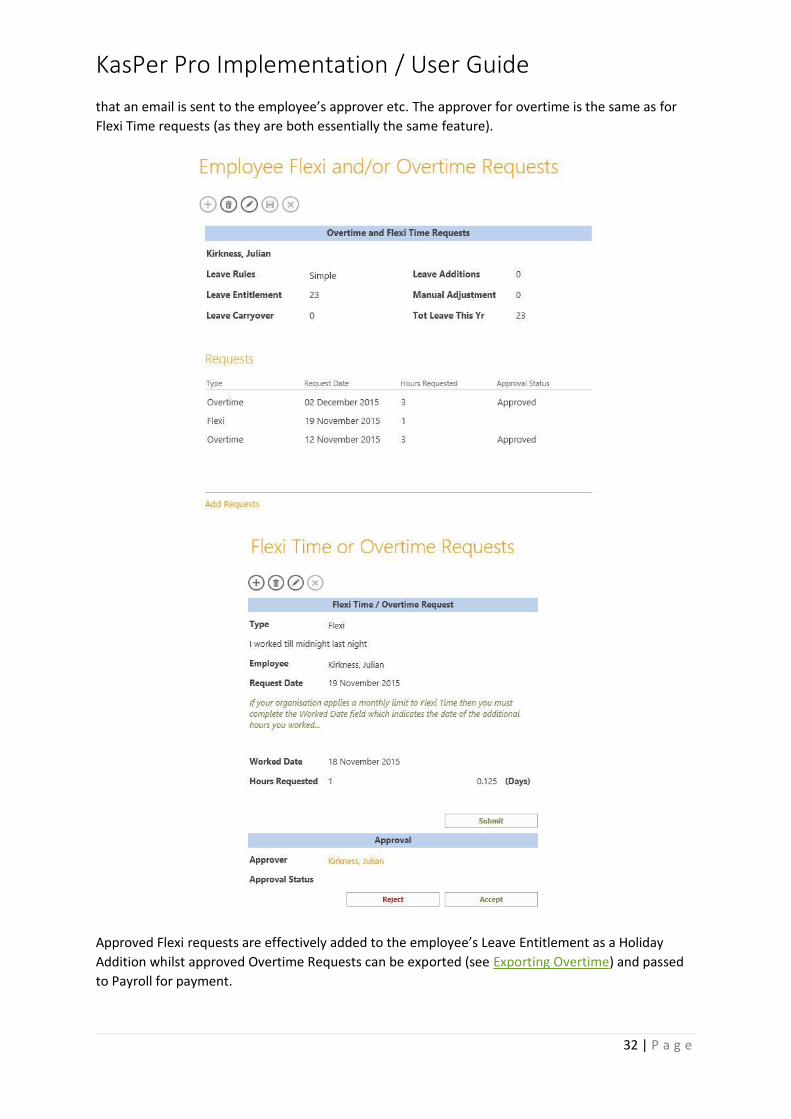
KasPer Pro Implementation / User Guide
32 | P a g e
that an email is sent to the employee’s approver etc. The approver for overtime is the same as for
Flexi Time requests (as they are both essentially the same feature).
Approved Flexi requests are effectively added to the employee’s Leave Entitlement as a Holiday
Addition whilst approved Overtime Requests can be exported (see Exporting Overtime) and passed
to Payroll for payment.

KasPer Pro Implementation / User Guide
33 | P a g e
6.5 HOLIDAY YEAR END At the holiday year end, you have the option as to whether to carry this over or not. In most
circumstances this will result in the same carry forward figure because the assumption during the
process is that effectively the Flexi time is taken first. This means that flexi time will only add to the
carry forward holiday if a) the amount of holiday taken in the year is less than the flexi time
accumulated in the year and b) the resulting carry forward holiday amount is less than the Max C/O
Days value for the holiday rule.
When you run the year end calculations, please note that the changes are irreversible and so should
not be run if you are uncertain. You will be reminded of this when you do click to run them by the
following dialog:
After clicking OK, the system will spend a little time doing all the calculations and will then present
you with a table of results:
This table shows all the key values which are calculated during the process and provides the option
to download the results into an Excel format for checking using the highlighted button.
Note that if you use the AutoProcess option in Advanced Rules then this process is not used and the
above report not available. However the more sophisticated rules are more likely to match your
absence process and therefore be correct.
6.6 PUBLIC HOLIDAYS The system includes a table for holding multiple sets of public holidays (as needed for employees in
different jurisdictions). You need to keep these up to date in order to ensure that absence
calculations remain correct (unless your employees work bank holidays that is).

KasPer Pro Implementation / User Guide
34 | P a g e
6.6.1 Importing Public Holiday Dates
This new feature has been incorporated to help customers implement unusual working patterns
(which don’t conform to the single week patterns allowed for in Leave Rules) and resulted from a
client who had employees working Wednesday, Thursday and Friday on week 1 and Thursday and
Friday on week two. In this case, setting every other Wednesday as a non work day in Public
Holidays in a special public holiday set ensure that the system will correctly calculate the person’s
leave.
KasPer Pro Implementation / User Guide
35 | P a g e
Ok, so you now have your holiday rules (including working patterns, public holidays, and absence
types) setup so you are in a position to begin to record absences once your employees are entered.
See Chapter 7 for more details.
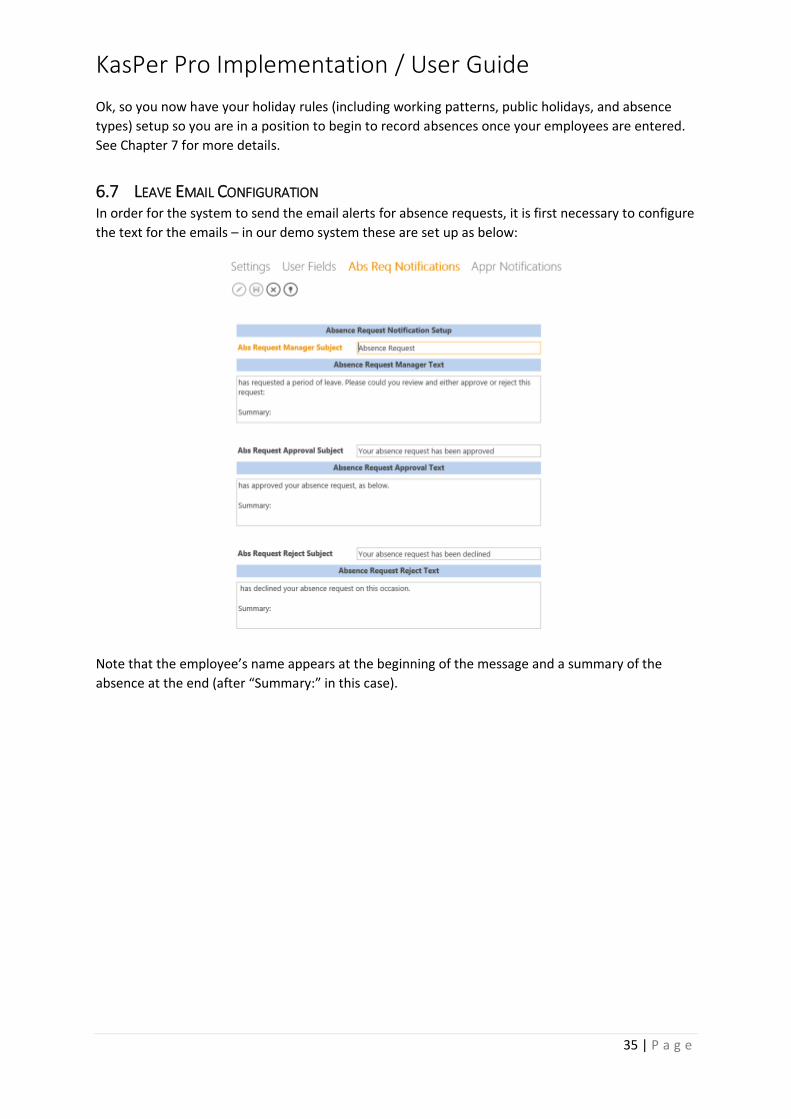
6.7 LEAVE EMAIL CONFIGURATION In order for the system to send the email alerts for absence requests, it is first necessary to configure
the text for the emails – in our demo system these are set up as below:
Note that the employee’s name appears at the beginning of the message and a summary of the
absence at the end (after “Summary:” in this case).
KasPer Pro Implementation / User Guide
36 | P a g e
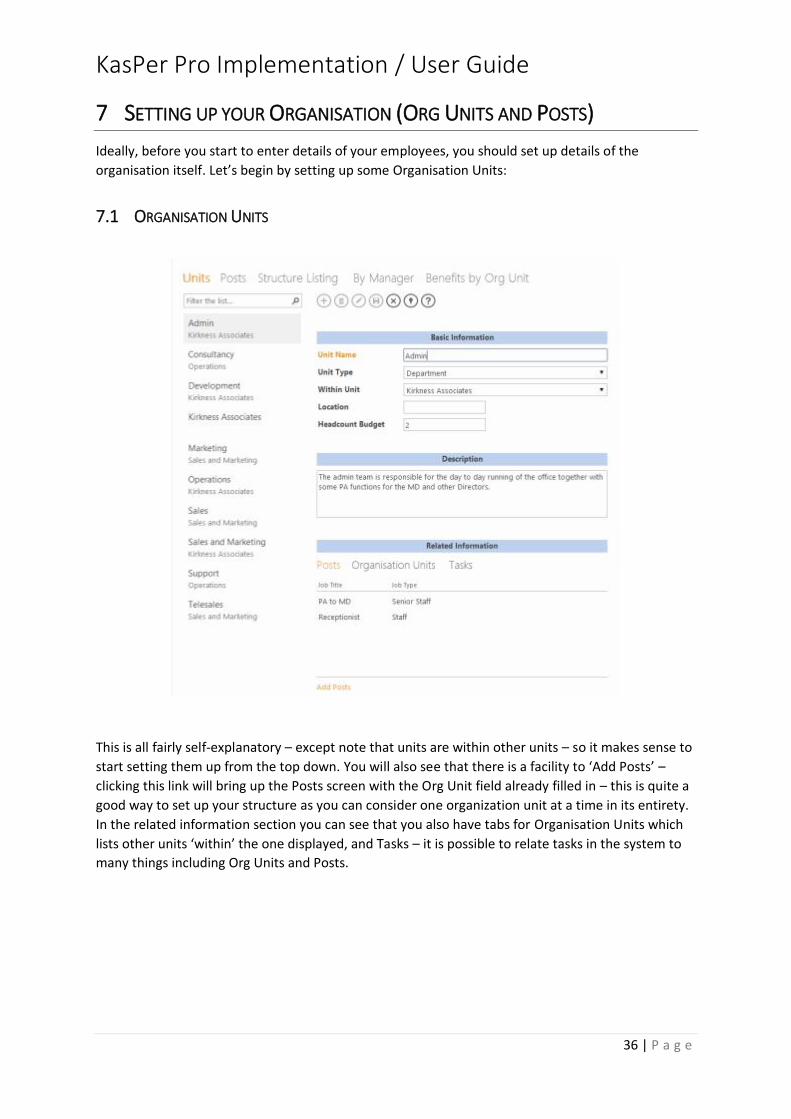
7 SETTING UP YOUR ORGANISATION (ORG UNITS AND POSTS)
Ideally, before you start to enter details of your employees, you should set up details of the
organisation itself. Let’s begin by setting up some Organisation Units:
7.1 ORGANISATION UNITS
This is all fairly self-explanatory – except note that units are within other units – so it makes sense to
start setting them up from the top down. You will also see that there is a facility to ‘Add Posts’ –
clicking this link will bring up the Posts screen with the Org Unit field already filled in – this is quite a
good way to set up your structure as you can consider one organization unit at a time in its entirety.
In the related information section you can see that you also have tabs for Organisation Units which
lists other units ‘within’ the one displayed, and Tasks – it is possible to relate tasks in the system to
many things including Org Units and Posts.
KasPer Pro Implementation / User Guide
37 | P a g e
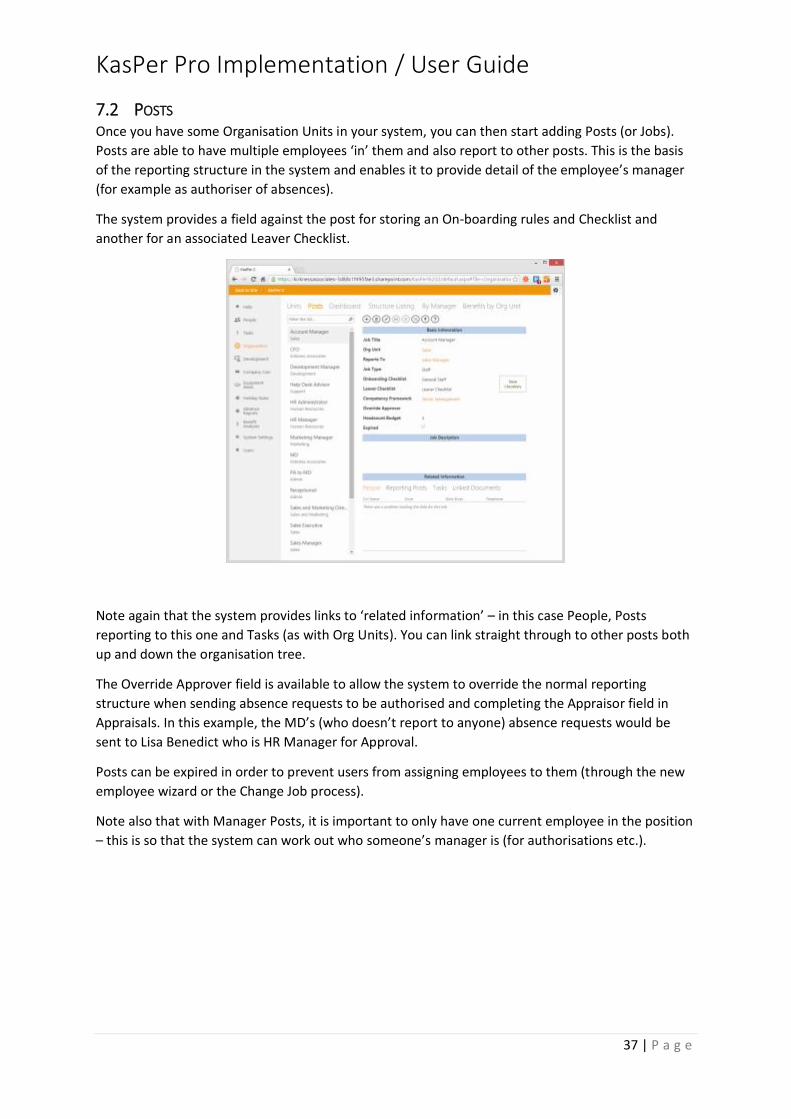
7.2 POSTS Once you have some Organisation Units in your system, you can then start adding Posts (or Jobs).
Posts are able to have multiple employees ‘in’ them and also report to other posts. This is the basis
of the reporting structure in the system and enables it to provide detail of the employee’s manager
(for example as authoriser of absences).
The system provides a field against the post for storing an On-boarding rules and Checklist and
another for an associated Leaver Checklist.
Note again that the system provides links to ‘related information’ – in this case People, Posts
reporting to this one and Tasks (as with Org Units). You can link straight through to other posts both
up and down the organisation tree.
The Override Approver field is available to allow the system to override the normal reporting
structure when sending absence requests to be authorised and completing the Appraisor field in
Appraisals. In this example, the MD’s (who doesn’t report to anyone) absence requests would be
sent to Lisa Benedict who is HR Manager for Approval.
Posts can be expired in order to prevent users from assigning employees to them (through the new
employee wizard or the Change Job process).
Note also that with Manager Posts, it is important to only have one current employee in the position
– this is so that the system can work out who someone’s manager is (for authorisations etc.).
KasPer Pro Implementation / User Guide
38 | P a g e
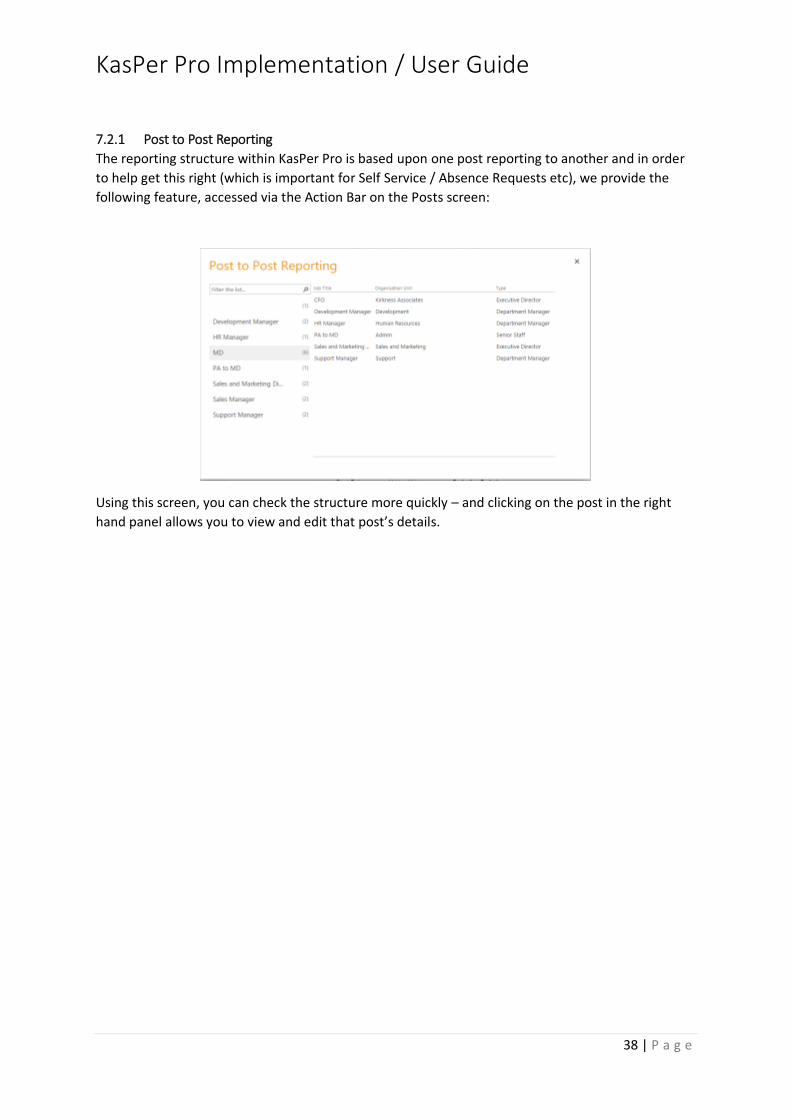
7.2.1 Post to Post Reporting
The reporting structure within KasPer Pro is based upon one post reporting to another and in order
to help get this right (which is important for Self Service / Absence Requests etc), we provide the
following feature, accessed via the Action Bar on the Posts screen:
Using this screen, you can check the structure more quickly – and clicking on the post in the right
hand panel allows you to view and edit that post’s details.

KasPer Pro Implementation / User Guide
39 | P a g e
8 EMPLOYEES
So, we now have a part or fully configured system so it’s now time to have a look at how we manage
employees in the system.
8.1 ADDING EMPLOYEES The Add option from the employee screen starts a four or five page wizard (depending upon
whether any On-boarding tasks were created) that takes you through setting up all of the basic
information required for a new employee – including their security set up as users of the system.
The process is started from the Employees screen in the usual way:
Rather than using the current form, however, the add option takes you to the wizard, the first page
of which creates their basic information:
KasPer Pro Implementation / User Guide
40 | P a g e
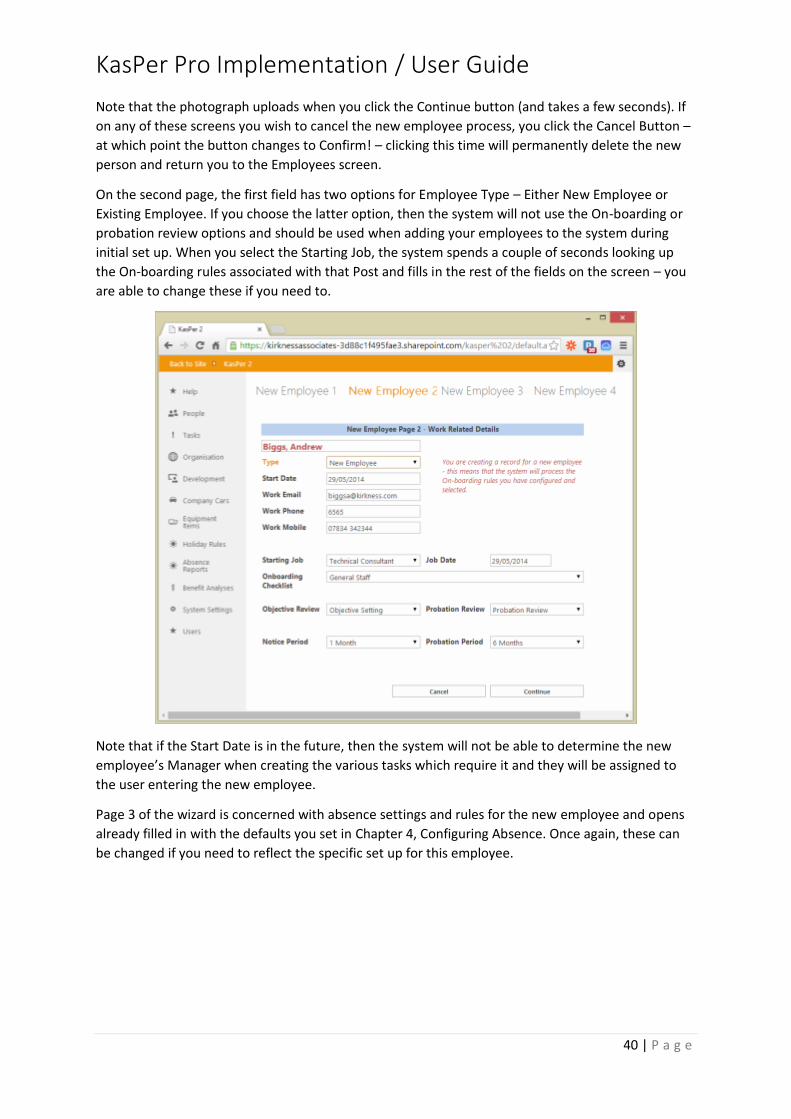
Note that the photograph uploads when you click the Continue button (and takes a few seconds). If
on any of these screens you wish to cancel the new employee process, you click the Cancel Button –
at which point the button changes to Confirm! – clicking this time will permanently delete the new
person and return you to the Employees screen.
On the second page, the first field has two options for Employee Type – Either New Employee or
Existing Employee. If you choose the latter option, then the system will not use the On-boarding or
probation review options and should be used when adding your employees to the system during
initial set up. When you select the Starting Job, the system spends a couple of seconds looking up
the On-boarding rules associated with that Post and fills in the rest of the fields on the screen – you
are able to change these if you need to.
Note that if the Start Date is in the future, then the system will not be able to determine the new
employee’s Manager when creating the various tasks which require it and they will be assigned to
the user entering the new employee.
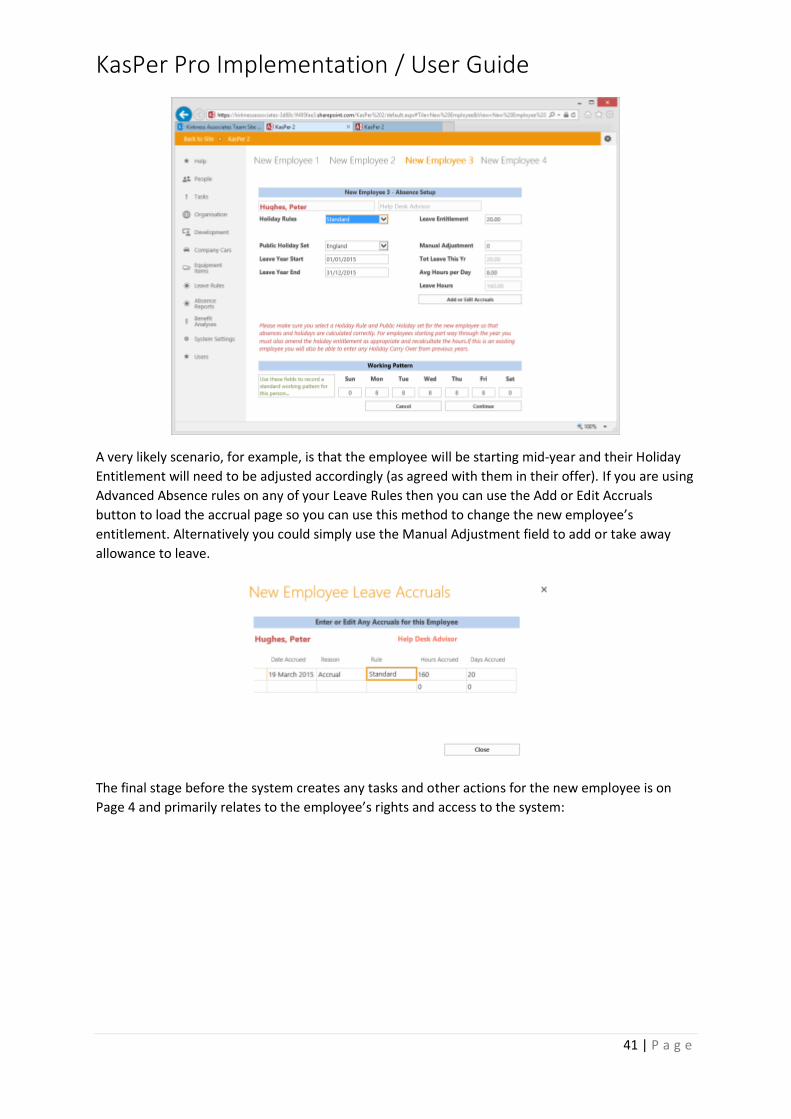
Page 3 of the wizard is concerned with absence settings and rules for the new employee and opens
already filled in with the defaults you set in Chapter 4, Configuring Absence. Once again, these can
be changed if you need to reflect the specific set up for this employee.
KasPer Pro Implementation / User Guide
41 | P a g e
A very likely scenario, for example, is that the employee will be starting mid-year and their Holiday
Entitlement will need to be adjusted accordingly (as agreed with them in their offer). If you are using
Advanced Absence rules on any of your Leave Rules then you can use the Add or Edit Accruals
button to load the accrual page so you can use this method to change the new employee’s
entitlement. Alternatively you could simply use the Manual Adjustment field to add or take away
allowance to leave.
The final stage before the system creates any tasks and other actions for the new employee is on
Page 4 and primarily relates to the employee’s rights and access to the system:

KasPer Pro Implementation / User Guide
42 | P a g e
Typically, if you are using Office 365, then users will ‘log into’ the system via their Office 365 email
address which are both unique and secure. If, however, you have one or more users accessing using
Sharepoint Online accounts then their identity can only be verified by checking their Display Name
from Sharepoint. Within KasPer, these must be unique! The following text displayed on the screen
makes this clear:
Use the Sharepoint Display Name field if the user is accessing the system as a Sharepoint Online
account user rather than an Office 365 account user. This is because Sharepoint Online users
don't pass their email address to the app. Also note that for Office 365 based login, the Work
Email should be set to the user's Office 365 Email address. Both the Sharepoint Display Name (if
entered) and Work Email MUST BE UNIQUE.
In this screen, you also set up the new employee’s access rights to the system. There are 4 options:
i. IsAdmin – selecting this option means that the new employee will have access to all of the
main menu options and features of the system. This is most likely to be reserved for your HR
staff (or equivalent).
ii. Access Benefits if Admin – this allows you to set up an Admin user but restrict their access to
benefits information (Salary etc).
iii. MSS – this option allows the employee / user to have access to information through the Self
Service screen to information about the people reporting to them by drilling down through
the hierarchy. They would also need to have ESS access to enter Self Service in the first
place. Typically, Managers would be given this access.
iv. ESS – Employee Self Service rights may well be given to all your staff so that they can see
their information (and edit parts of it as appropriate), request holidays and other absences
and interact with their task lists. This access would be given to all employees needing online
access to their data but remember that they must be set up as users.

KasPer Pro Implementation / User Guide
43 | P a g e
Once you click Finish on this screen, if the employee you are creating is a New Employee then the
system will create the required On-boarding tasks (notifications will also be sent by email to those
responsible to carry out the tasks), objective setting and probation reviews. The system will then
take you to a form where you can interact with these and check them off if appropriate:
Tasks can be ticked off directly in the listing or the edit button can be clicked to take you into the
detail of the specific task where you can make notes and other changes.
Finally, clicking Continue to Employee Record will return you to the Employees form with the new
employee selected (click one of the filter buttons at the top of the form to see other records) and
from here you can add or change any other information you may need to for the new employee.
8.2 VIEWING AND EDITING EMPLOYEES This is done through the main Employees screen on the People menu. This screen contains much of
the core HR / Employee information and is the route to many other parts of the system via the
buttons on the Action Bar (for example an Employee’s leave or Personal Details):

KasPer Pro Implementation / User Guide
44 | P a g e
You can see that there are some search fields at the top of this page and this shot shows searching
using two of them – people with status ‘Employees’ and Organisation Unit ‘Sales’. It is also possible
to search using the ‘Filter the list…’ box which can search over all fields on the screen. The screen
opens with search set to Employees (so that the display isn’t cluttered with leavers etc).
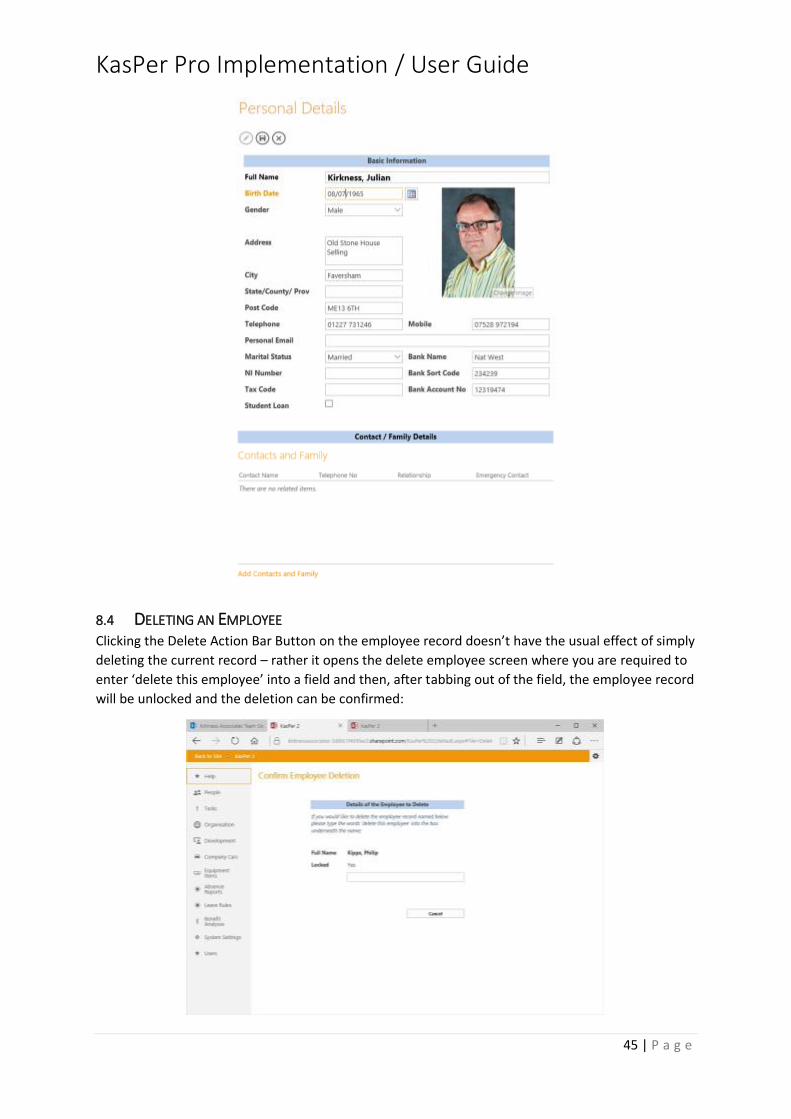
8.3 EMPLOYEE PERSONAL INFORMATION Personal Information for Employees is accessed via the Action Bar as a popup screen:
KasPer Pro Implementation / User Guide
45 | P a g e
8.4 DELETING AN EMPLOYEE
Clicking the Delete Action Bar Button on the employee record doesn’t have the usual effect of simply
deleting the current record – rather it opens the delete employee screen where you are required to
enter ‘delete this employee’ into a field and then, after tabbing out of the field, the employee record
will be unlocked and the deletion can be confirmed:
KasPer Pro Implementation / User Guide
46 | P a g e
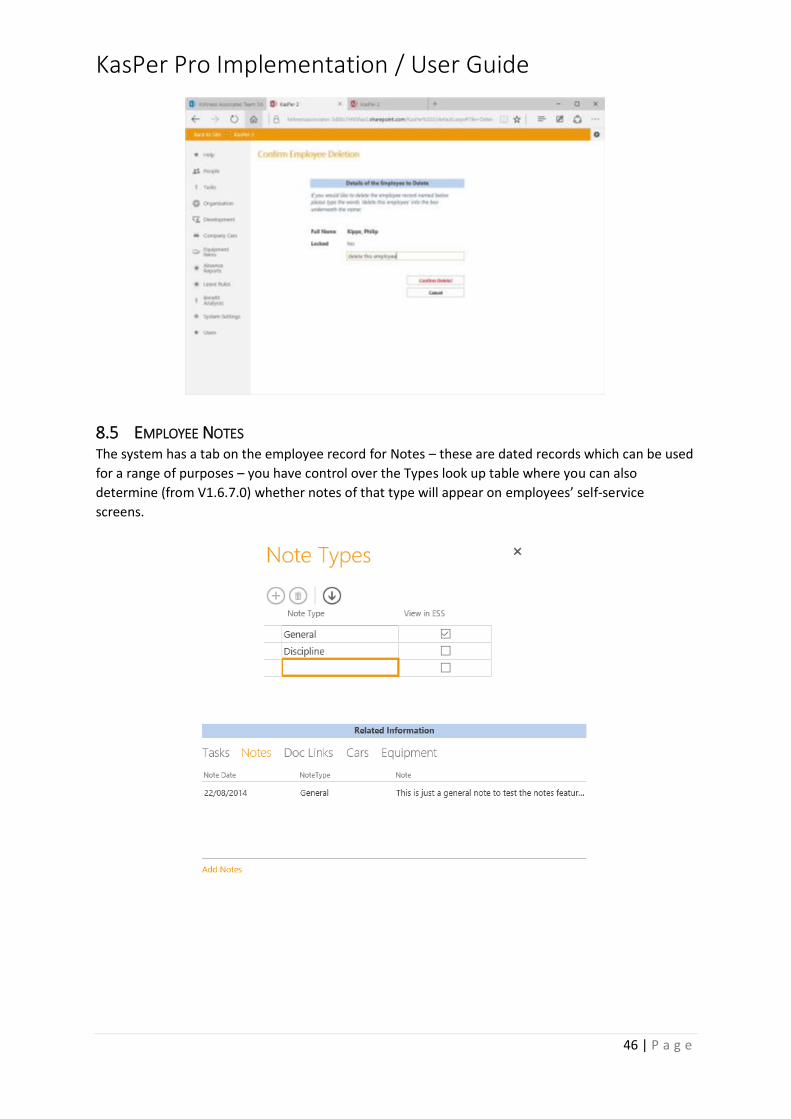
8.5 EMPLOYEE NOTES The system has a tab on the employee record for Notes – these are dated records which can be used
for a range of purposes – you have control over the Types look up table where you can also
determine (from V1.6.7.0) whether notes of that type will appear on employees’ self-service
screens.

KasPer Pro Implementation / User Guide
47 | P a g e

KasPer Pro Implementation / User Guide
48 | P a g e
9 MANAGING TASKS
Tasks are used throughout the system – including the creation of a range of on boarding tasks for
new employees as we saw in the previous section. Admin users can get access to their tasks through
the Tasks menu:
In the Task Actions screen, the user has the ability to look at their own task list:
This is where they can see all their tasks whether complete or otherwise and action them as required
(or mark as complete). They also have access here to ALL outstanding leave requests so that an HR
administrator can check (and action if necessary) and leave requests that managers have not
completed:
There is also the option here to review all Appraisals grouped by whether complete or not:
KasPer Pro Implementation / User Guide
49 | P a g e
Clicking on a record takes you to a summary screen – and from there is an option to edit the
appraisal itself.
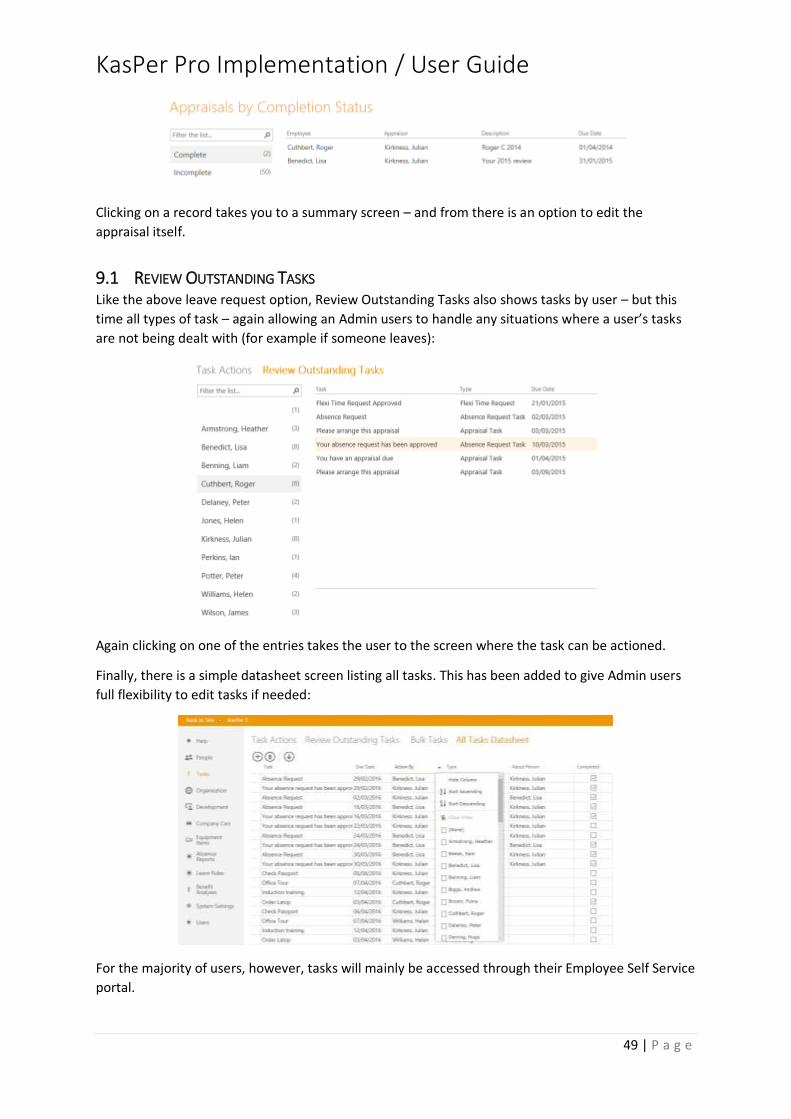
9.1 REVIEW OUTSTANDING TASKS Like the above leave request option, Review Outstanding Tasks also shows tasks by user – but this
time all types of task – again allowing an Admin users to handle any situations where a user’s tasks
are not being dealt with (for example if someone leaves):
Again clicking on one of the entries takes the user to the screen where the task can be actioned.
Finally, there is a simple datasheet screen listing all tasks. This has been added to give Admin users
full flexibility to edit tasks if needed:
For the majority of users, however, tasks will mainly be accessed through their Employee Self Service
portal.
KasPer Pro Implementation / User Guide
50 | P a g e
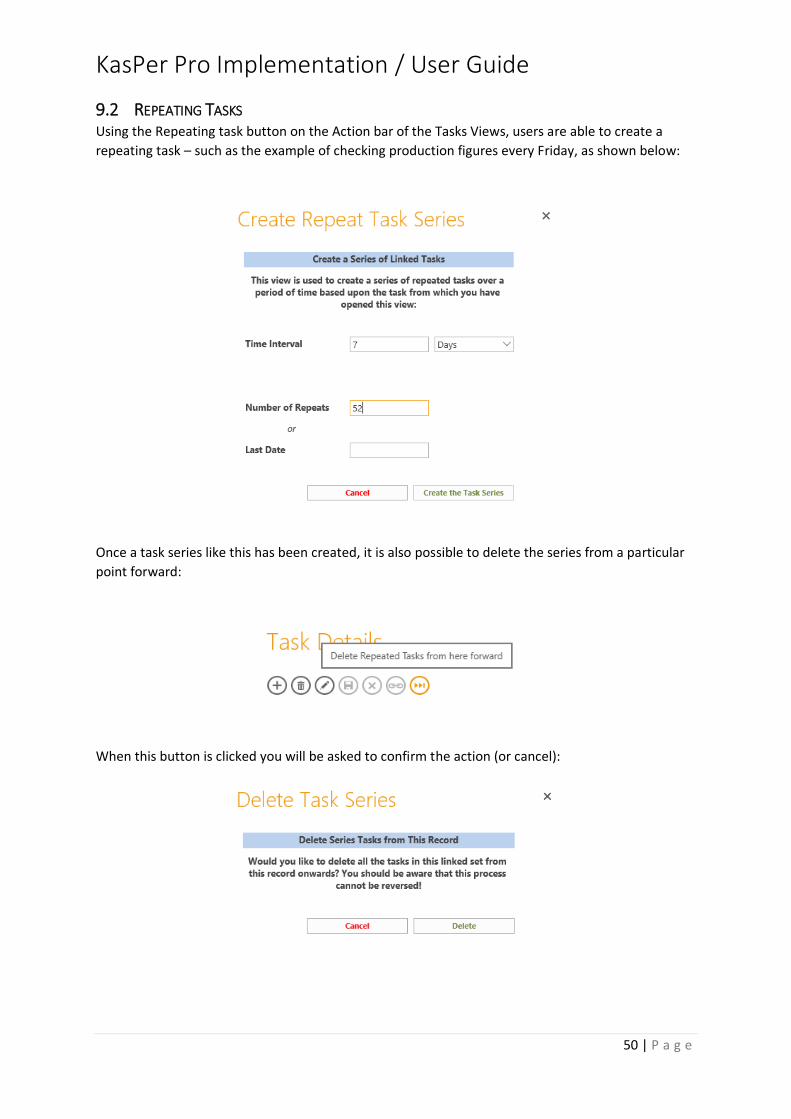
9.2 REPEATING TASKS Using the Repeating task button on the Action bar of the Tasks Views, users are able to create a
repeating task – such as the example of checking production figures every Friday, as shown below:
Once a task series like this has been created, it is also possible to delete the series from a particular
point forward:
When this button is clicked you will be asked to confirm the action (or cancel):
KasPer Pro Implementation / User Guide
51 | P a g e
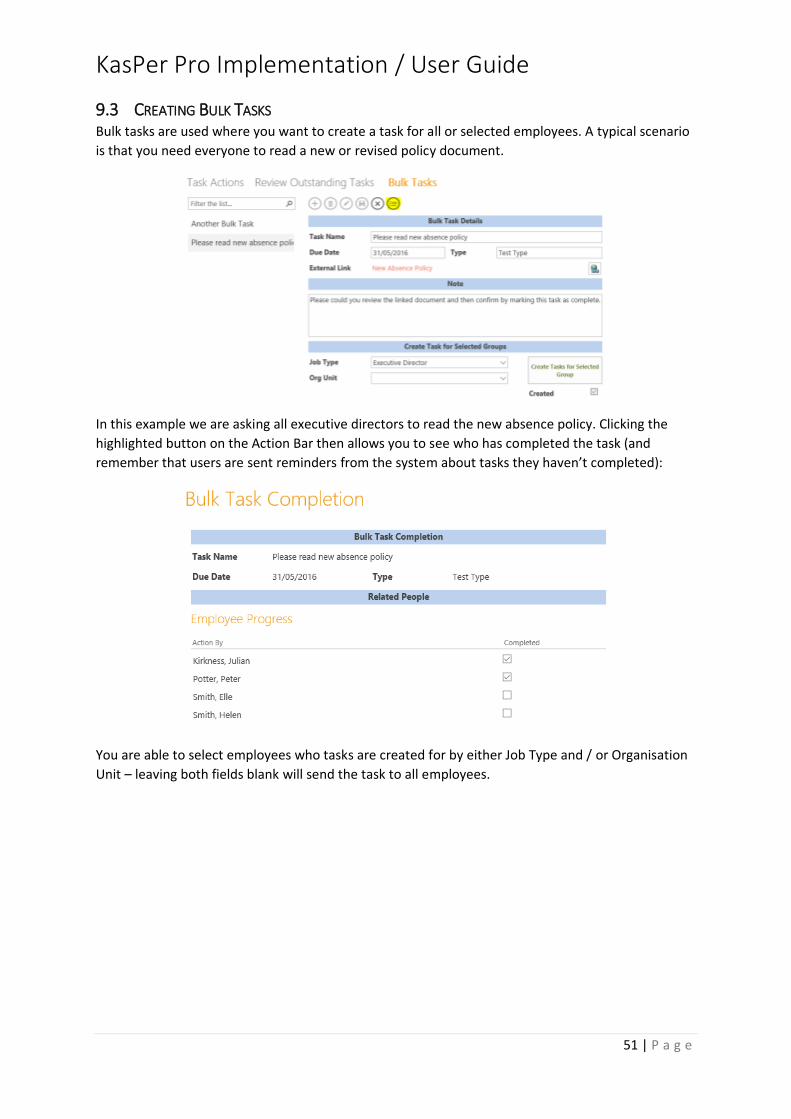
9.3 CREATING BULK TASKS Bulk tasks are used where you want to create a task for all or selected employees. A typical scenario
is that you need everyone to read a new or revised policy document.
In this example we are asking all executive directors to read the new absence policy. Clicking the
highlighted button on the Action Bar then allows you to see who has completed the task (and
remember that users are sent reminders from the system about tasks they haven’t completed):
You are able to select employees who tasks are created for by either Job Type and / or Organisation
Unit – leaving both fields blank will send the task to all employees.

KasPer Pro Implementation / User Guide
52 | P a g e
10 MANAGING ABSENCE AND HOLIDAY
10.1 EMPLOYEE ABSENCES We’ve configured the system, added some posts and employees – now one of the key benefits of
any HR system is the ability to manage absence and vacation / holiday. As this is such an important
area for most users, we will look at it in a bit more detail, starting with using the features available to
full HR / Admin users:
Access to the employee’s absence screen is via the button highlighted above (on the Employee
screen)…
Most of the static information on this screen is defaulted when you choose a Holiday Rule for the
employee – however much of it can be tailored for the individual – for example they may have a
different working pattern (which may need you to change the Average Hours per Day – used to
calculate remaining holiday days for the year). You also see a calculated summary for the individual
including days and hours remaining.
KasPer Pro Implementation / User Guide
53 | P a g e
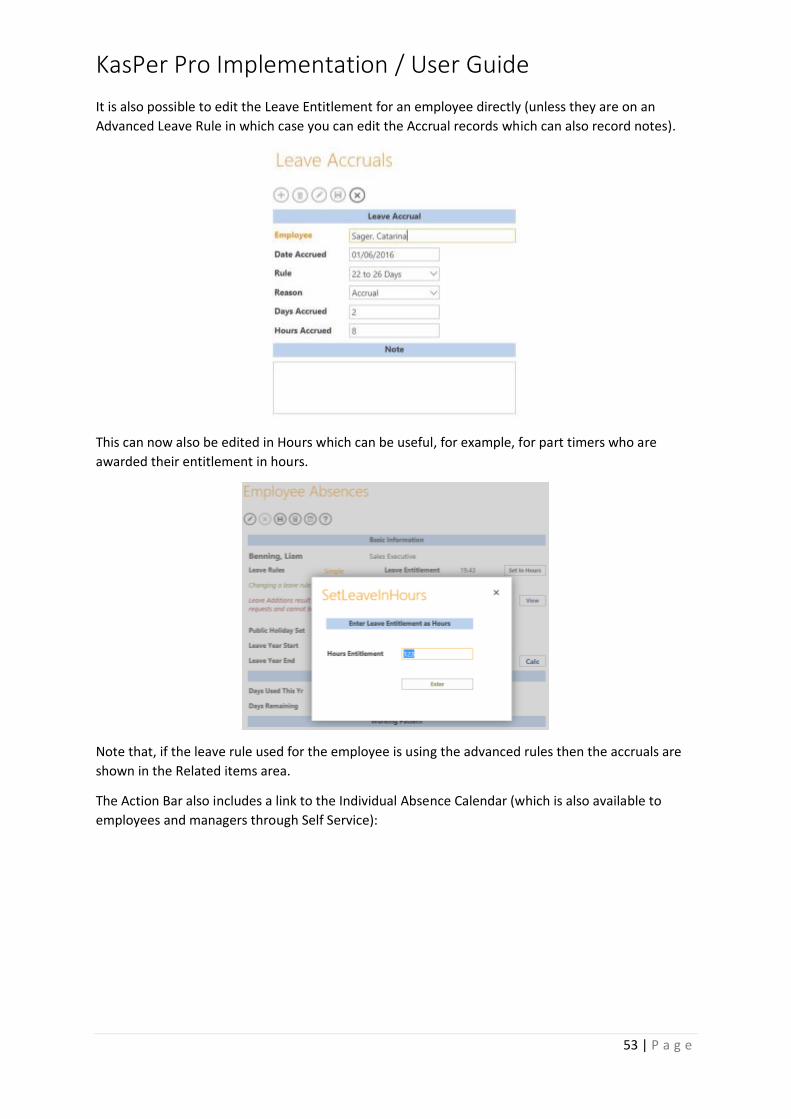
It is also possible to edit the Leave Entitlement for an employee directly (unless they are on an
Advanced Leave Rule in which case you can edit the Accrual records which can also record notes).
This can now also be edited in Hours which can be useful, for example, for part timers who are
awarded their entitlement in hours.
Note that, if the leave rule used for the employee is using the advanced rules then the accruals are
shown in the Related items area.
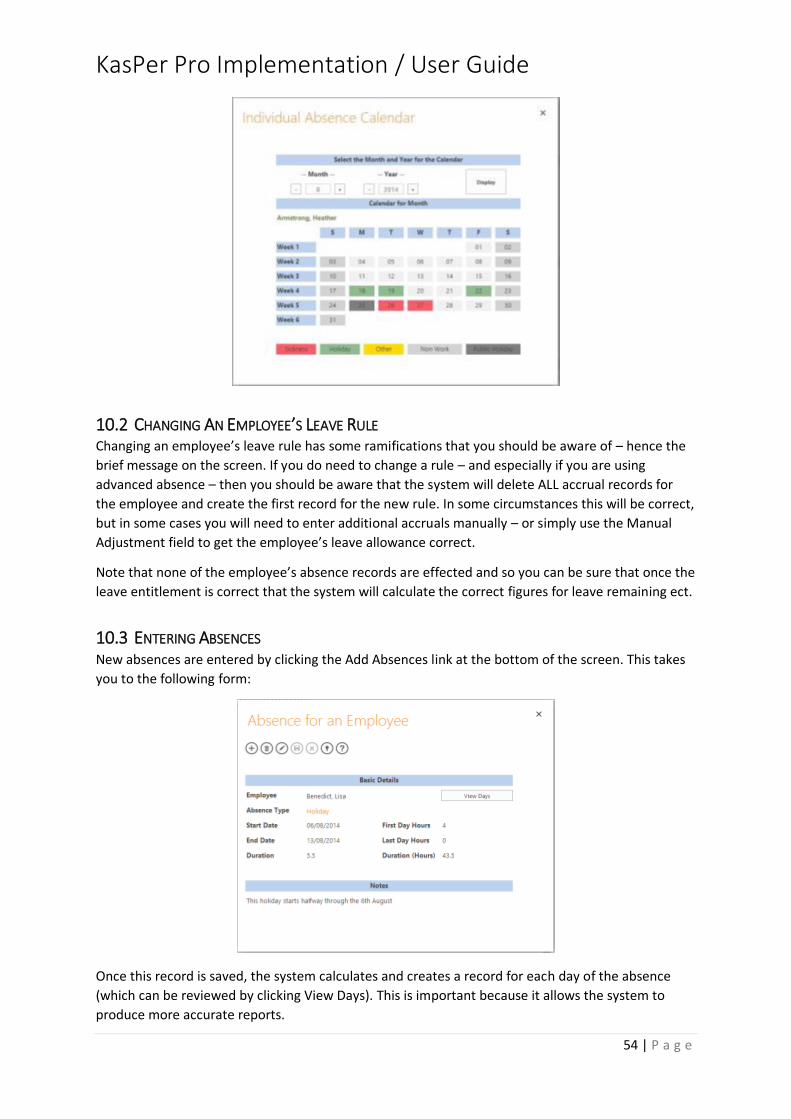
The Action Bar also includes a link to the Individual Absence Calendar (which is also available to
employees and managers through Self Service):
KasPer Pro Implementation / User Guide
54 | P a g e
10.2 CHANGING AN EMPLOYEE’S LEAVE RULE Changing an employee’s leave rule has some ramifications that you should be aware of – hence the
brief message on the screen. If you do need to change a rule – and especially if you are using
advanced absence – then you should be aware that the system will delete ALL accrual records for
the employee and create the first record for the new rule. In some circumstances this will be correct,
but in some cases you will need to enter additional accruals manually – or simply use the Manual
Adjustment field to get the employee’s leave allowance correct.
Note that none of the employee’s absence records are effected and so you can be sure that once the
leave entitlement is correct that the system will calculate the correct figures for leave remaining ect.
10.3 ENTERING ABSENCES New absences are entered by clicking the Add Absences link at the bottom of the screen. This takes
you to the following form:
Once this record is saved, the system calculates and creates a record for each day of the absence
(which can be reviewed by clicking View Days). This is important because it allows the system to
produce more accurate reports.

KasPer Pro Implementation / User Guide
55 | P a g e
Viewing the days, you can immediately see the effect of the working pattern, the part day start to
the absence and, had there been any, any public holidays.
10.4 HOLIDAY ADDITIONS / FLEXI / MANUAL ADJUSTMENTS The Holiday Additions field is used to display the total number of days of Flexi Time / TOIL the
employee has accumulated in the year (if enabled for their Holiday Rule). Whilst the figure cannot be
manually adjusted in the employee absence screen, HR Admin users can click the View button to see
and edit the employee’s Flexi requests. Here is the employee flexi time screen:
As usual, users can access specific records from the list at the bottom of the page.
So, we’ve seen how we can input absences and see how this is reflected in the employee’s summary
figures. If you recall from the configuration section, these figures are reset at the start of each
holiday year from the Holiday Rules form.
KasPer Pro Implementation / User Guide
56 | P a g e
10.5 MANUAL ADJUSTMENTS AND HOLIDAY CARRYOVER We have seen in section 4.2 how the system calculates Holiday Carryover at the start of a new
Holiday Year. In the event that this process is either individually agree between managers and
employees or, the rule needs to be adjusted manually, then the resulting Carryover days amount
may be edited by users in the Employee’s absence screen. There is also a Manual Adjustment field
with which you can also modify the holiday for the year (the figures in these fields can be positive or
negative).
10.6 ABSENCE REPORTS Once this information is entered, the system can provide you with a number of reports from the
data.
10.6.1 Absence Calendar
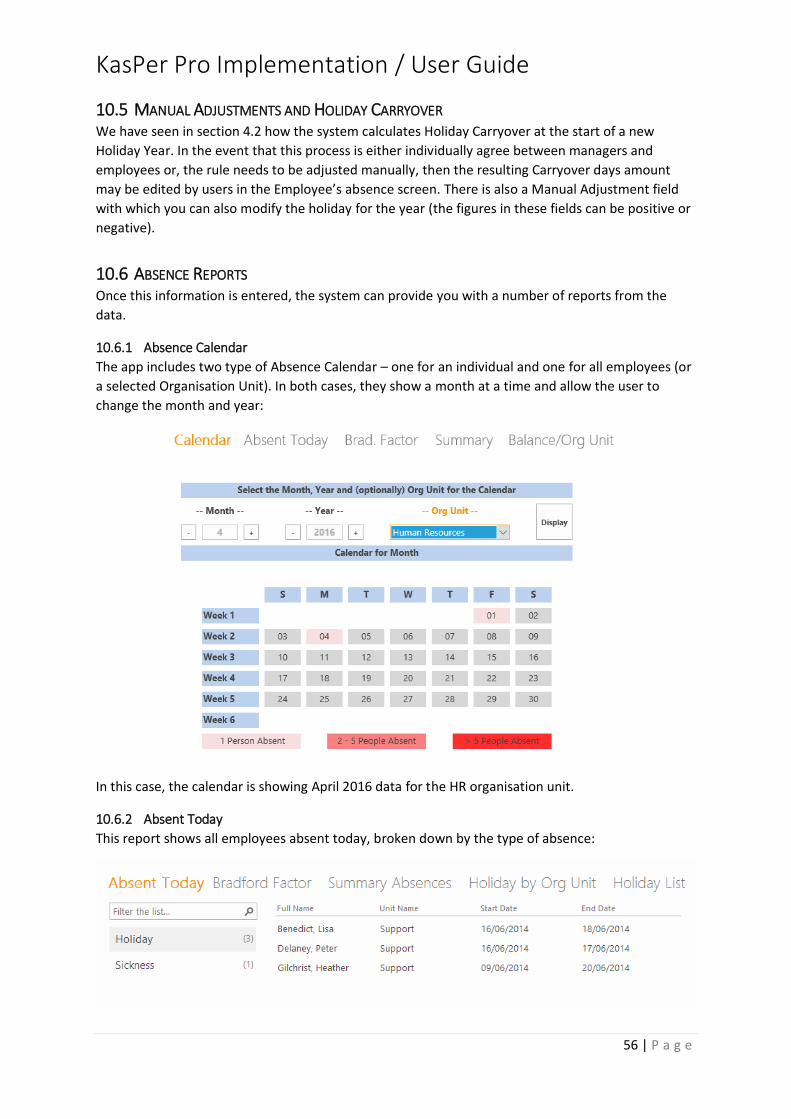
The app includes two type of Absence Calendar – one for an individual and one for all employees (or
a selected Organisation Unit). In both cases, they show a month at a time and allow the user to
change the month and year:
In this case, the calendar is showing April 2016 data for the HR organisation unit.
10.6.2 Absent Today
This report shows all employees absent today, broken down by the type of absence:
KasPer Pro Implementation / User Guide
57 | P a g e
10.6.3 Bradford Factor
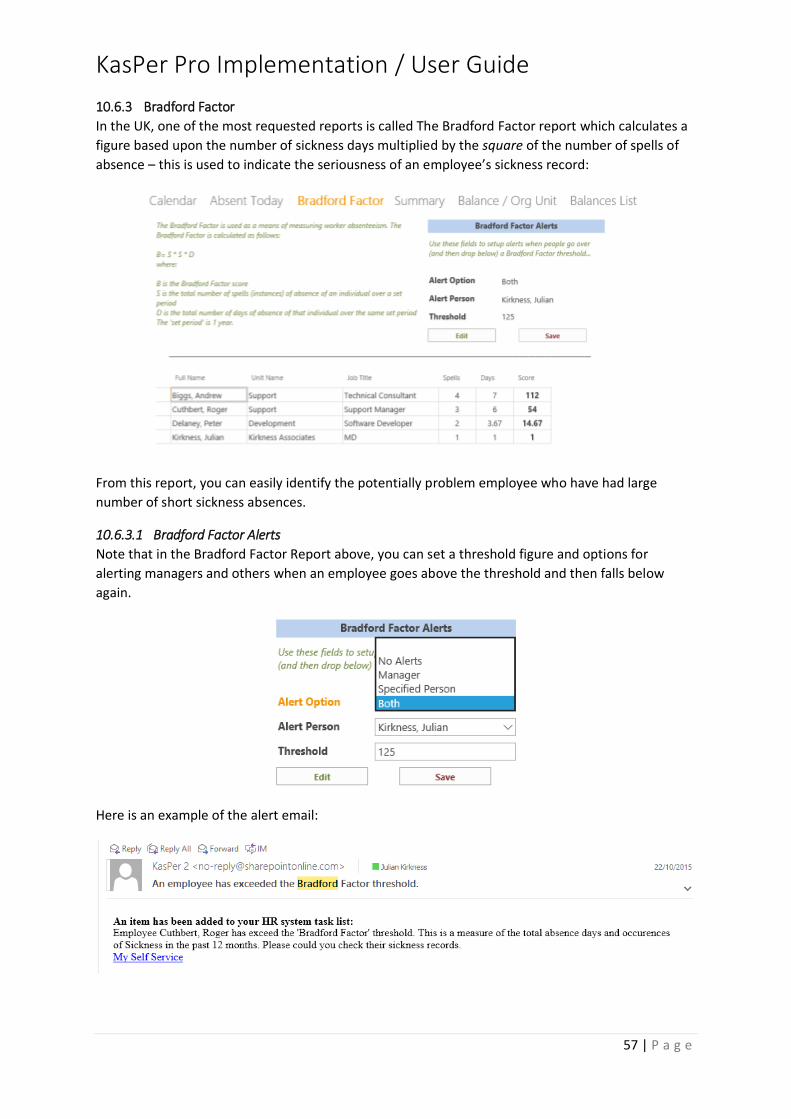
In the UK, one of the most requested reports is called The Bradford Factor report which calculates a
figure based upon the number of sickness days multiplied by the square of the number of spells of
absence – this is used to indicate the seriousness of an employee’s sickness record:
From this report, you can easily identify the potentially problem employee who have had large
number of short sickness absences.
10.6.3.1 Bradford Factor Alerts
Note that in the Bradford Factor Report above, you can set a threshold figure and options for
alerting managers and others when an employee goes above the threshold and then falls below
again.
Here is an example of the alert email:
KasPer Pro Implementation / User Guide
58 | P a g e
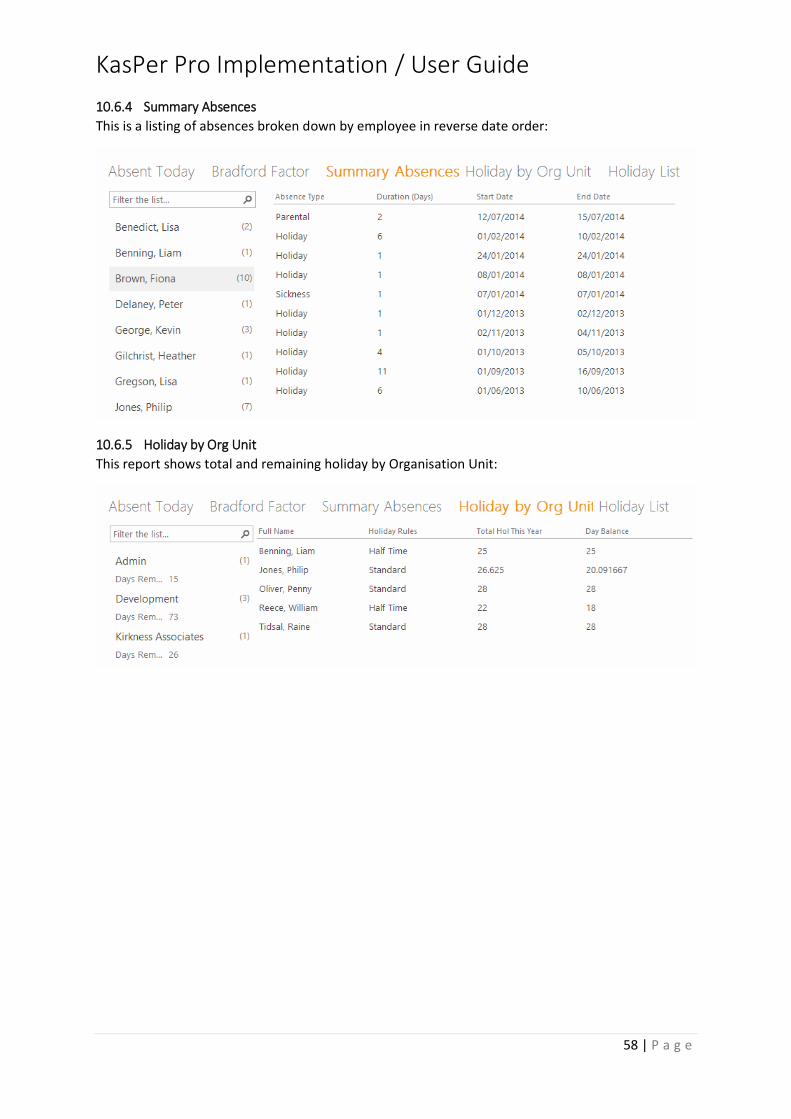
10.6.4 Summary Absences
This is a listing of absences broken down by employee in reverse date order:
10.6.5 Holiday by Org Unit
This report shows total and remaining holiday by Organisation Unit:

KasPer Pro Implementation / User Guide
59 | P a g e
10.6.6 Holiday List
This report details holiday for each employee in the organisation showing time taken and balances in
both days and hours:
10.6.7 Leave by Type Between Dates
This report gives the user a range of options to print out a summary of up to 6 types of leave totalled
by employee between two dates – here is the setup of the report:
This particular setup will produce the following output:
Note that this data can be downloaded into excel for further analysis.

KasPer Pro Implementation / User Guide
60 | P a g e
10.7 THE ABSENCE REQUEST PROCESS As part of the Self Service features for both Employees and Managers, the system includes the ability
for employees to request different types of leave (and Flexi Time) and for managers to accept or
reject those requests. Notifications in the form of system tasks are used to highlight the process.
This will be covered in the section dealing with Self Service.
10.8 REQUESTING A CANCELLATION OR CHANGE TO AN ABSENCE This feature is also a part of Self Service – an employee can review their absences on their Self
Service page and will have an option to request a change or deletion from the popup screen, this will
send a notification by email to the manager who can make the required change if in agreement.
10.9 LEAVE REMINDERS An option is available for the system to send leave reminders about staff absent Today to both
specific managers and also a single email listing all absentees to a specified email address (which
should be associated with a Microsoft account in your tenant). These options are in System Settings:
and here is a sample of the email sent to a manger:

KasPer Pro Implementation / User Guide
61 | P a g e
11 MANAGE APPRAISALS
We have discussed how appraisal types and Competency Frameworks are configured earlier in this
guide. In this section we are going to see how to set up appraisals for employees and then follow
those up by reviewing objectives later. In the section on Self Service later in the guide we will see
how these features are used by employees and managers.
Access to the appraisal feature is via the employee development charm on the main employee view:
This takes you to the employee development popup where you are also able to see the employees
training, skills and qualifications…
On the appraisal tab you can see a history of the employee’s appraisals from which you can select –
or you can create a new one by clicking Add Appraisals – filling it in up to the date field then results
in the rest of the form refreshing to show which features are available for the type of appraisal
selected (refer to the section dealing with setting up an appraisal for options).
The four buttons, Review Objectives, Appraisal Questions, Set Objectives and Competencies are
enabled dependent upon how the appraisal is configured, whether there are any questions and
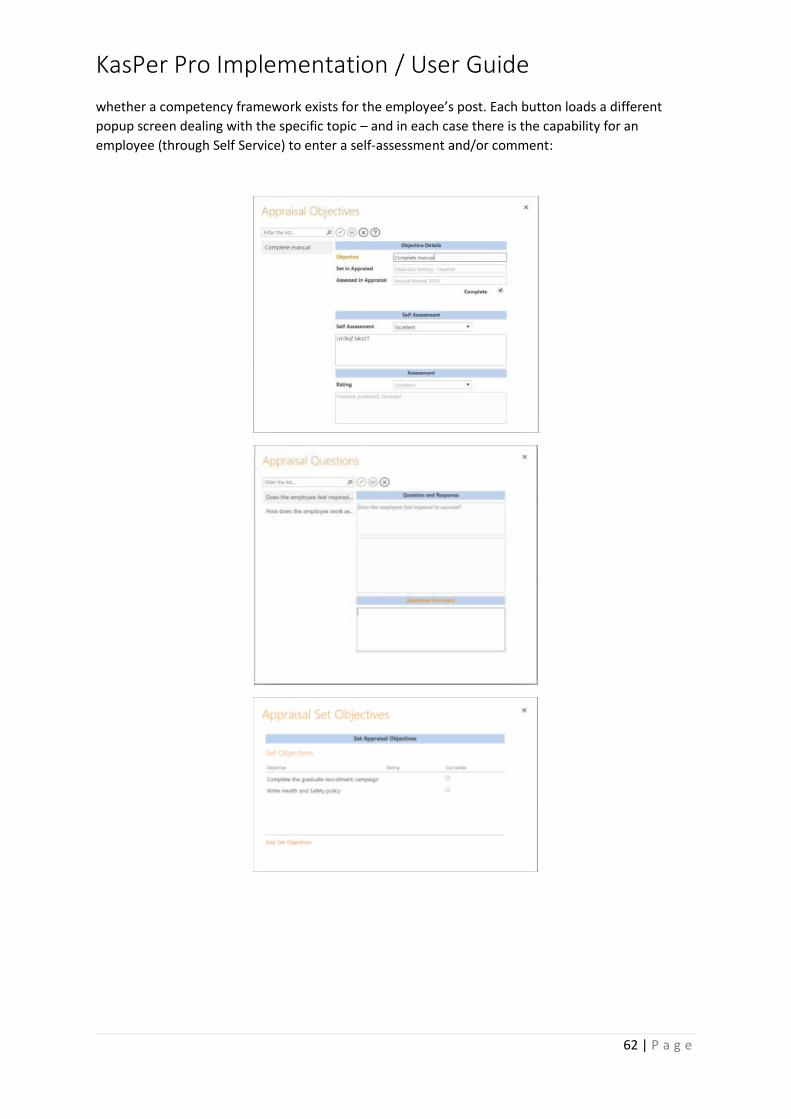
KasPer Pro Implementation / User Guide
62 | P a g e
whether a competency framework exists for the employee’s post. Each button loads a different
popup screen dealing with the specific topic – and in each case there is the capability for an
employee (through Self Service) to enter a self-assessment and/or comment:

KasPer Pro Implementation / User Guide
63 | P a g e
The Assessments sections will not be editable if you are looking at your own appraisal records (for
example through Self Service) – but the Self-Assessment fields will be. Remember that the level
values are also user definable.
The objectives are designed to be set in one appraisal and then reviewed in another later and as you
can see by clicking on the View button there is more information available about them:
Finally, there are fields for employee’s comments, an overall assessment field, a document link and a
facility to set a task for the employee to comment and sign off the appraisal (which is accessed by
the employee’s task list in Self Service).

KasPer Pro Implementation / User Guide
64 | P a g e
Note that when the appraisal is marked as completed, a new option is available to update the
employee’s central skills table with the results of any skill / competency assessment from the
appraisal.
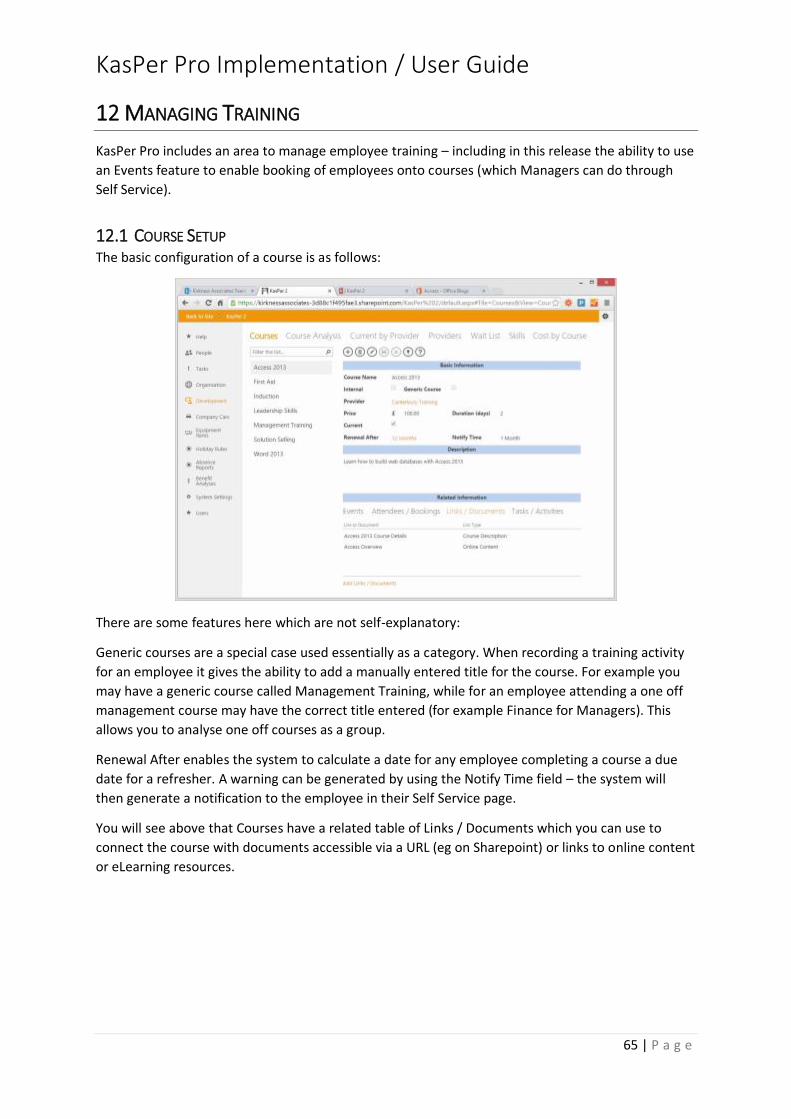
KasPer Pro Implementation / User Guide
65 | P a g e
12 MANAGING TRAINING
KasPer Pro includes an area to manage employee training – including in this release the ability to use
an Events feature to enable booking of employees onto courses (which Managers can do through
Self Service).
12.1 COURSE SETUP The basic configuration of a course is as follows:
There are some features here which are not self-explanatory:
Generic courses are a special case used essentially as a category. When recording a training activity
for an employee it gives the ability to add a manually entered title for the course. For example you
may have a generic course called Management Training, while for an employee attending a one off
management course may have the correct title entered (for example Finance for Managers). This
allows you to analyse one off courses as a group.
Renewal After enables the system to calculate a date for any employee completing a course a due
date for a refresher. A warning can be generated by using the Notify Time field – the system will
then generate a notification to the employee in their Self Service page.
You will see above that Courses have a related table of Links / Documents which you can use to
connect the course with documents accessible via a URL (eg on Sharepoint) or links to online content
or eLearning resources.

KasPer Pro Implementation / User Guide
66 | P a g e
12.2 COURSE EVENTS Optionally, you can use Course Events to manage your training schedule – including booking
employees onto courses and sending them notifications:
This form is fairly self-explanatory and note that you can use the Attendee link facility to either add
or edit attendees – for example to indicate who attended, passed etc after the event.
12.3 TRAINING HISTORY / BOOKING This screen can be used to both simply record a training activity that has occurred or a booking or
attendance on a scheduled event. If a course is entered first, then the event drop down will only
show events for the specific course.
Validation is included in this screen to make sure that information is input logically – for example you
can’t enter a booking after an Event has taken place. There are different statuses of this screen also
depending upon where they are accessed from – for example if, like above, it is opened from Events
then it assumes you are booking a person onto the event and enters it for you.
Bookings onto course events also creates a task and email notification for the employee to confirm
and to give them access to details of the course.
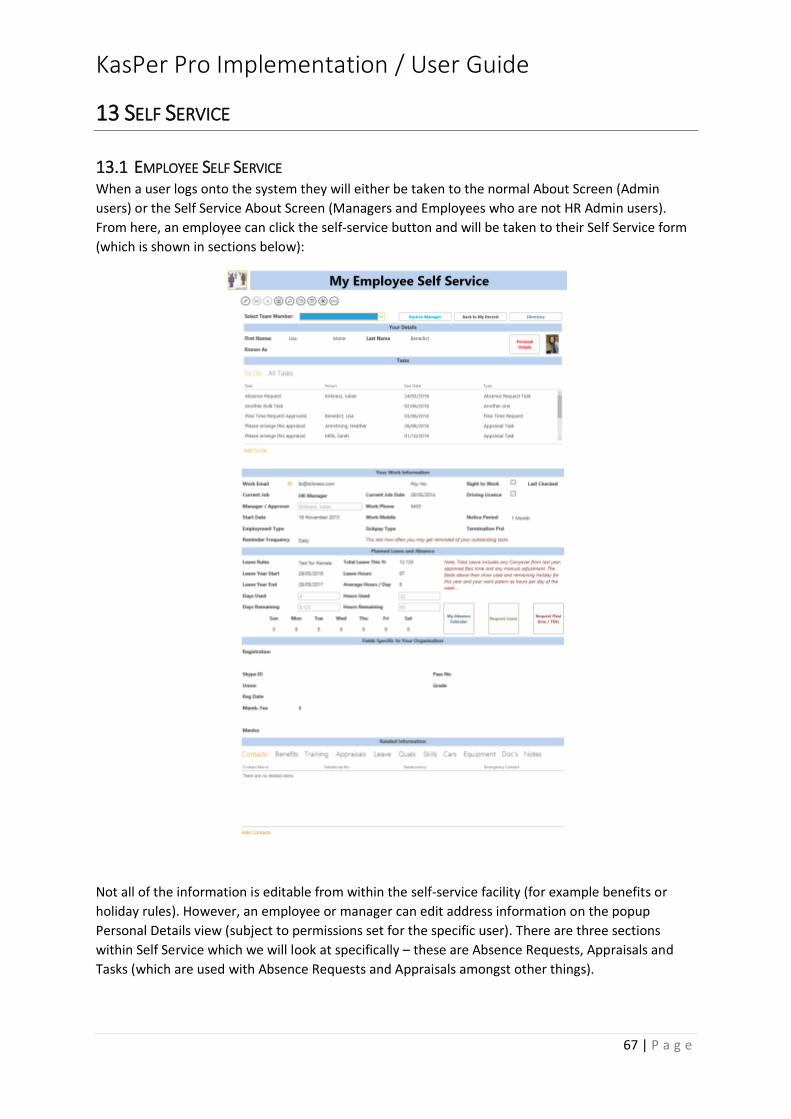
KasPer Pro Implementation / User Guide
67 | P a g e
13 SELF SERVICE
13.1 EMPLOYEE SELF SERVICE When a user logs onto the system they will either be taken to the normal About Screen (Admin
users) or the Self Service About Screen (Managers and Employees who are not HR Admin users).
From here, an employee can click the self-service button and will be taken to their Self Service form
(which is shown in sections below):
Not all of the information is editable from within the self-service facility (for example benefits or
holiday rules). However, an employee or manager can edit address information on the popup
Personal Details view (subject to permissions set for the specific user). There are three sections
within Self Service which we will look at specifically – these are Absence Requests, Appraisals and
Tasks (which are used with Absence Requests and Appraisals amongst other things).

KasPer Pro Implementation / User Guide
68 | P a g e
13.1.1 Absence Requests
With Self Service comes the ability for employees to request absences (of any type). We have
allowed any type of absence to be requested to cater (for example) for an employee to request sick
leave when scheduled for a period of time in hospital.
For example, here Roger is going to request a holiday for the start of August:
Once the employee has entered the dates for the absence, they can use the Who’s Away button to
see who else’s leave overlaps. This is intended to help reduce the chance of leave requests being
rejected because the employee can check for themselves before completing the request.
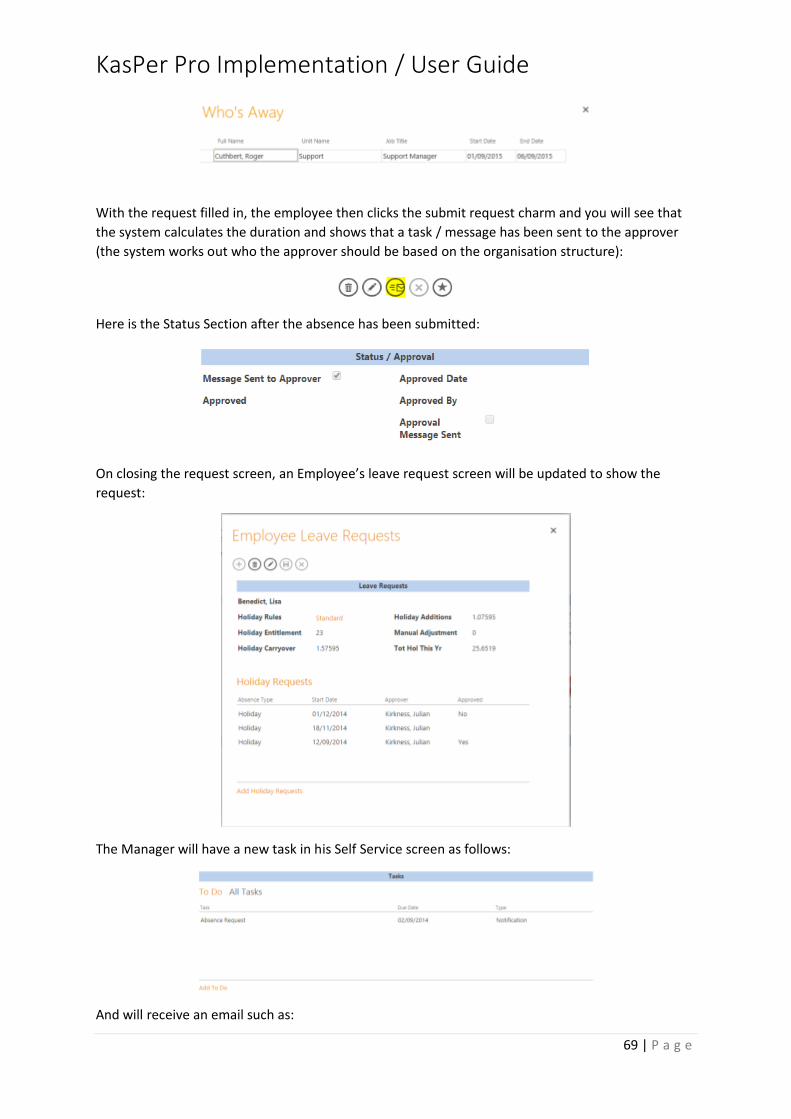
KasPer Pro Implementation / User Guide
69 | P a g e
With the request filled in, the employee then clicks the submit request charm and you will see that
the system calculates the duration and shows that a task / message has been sent to the approver
(the system works out who the approver should be based on the organisation structure):
Here is the Status Section after the absence has been submitted:
On closing the request screen, an Employee’s leave request screen will be updated to show the
request:
The Manager will have a new task in his Self Service screen as follows:
And will receive an email such as:
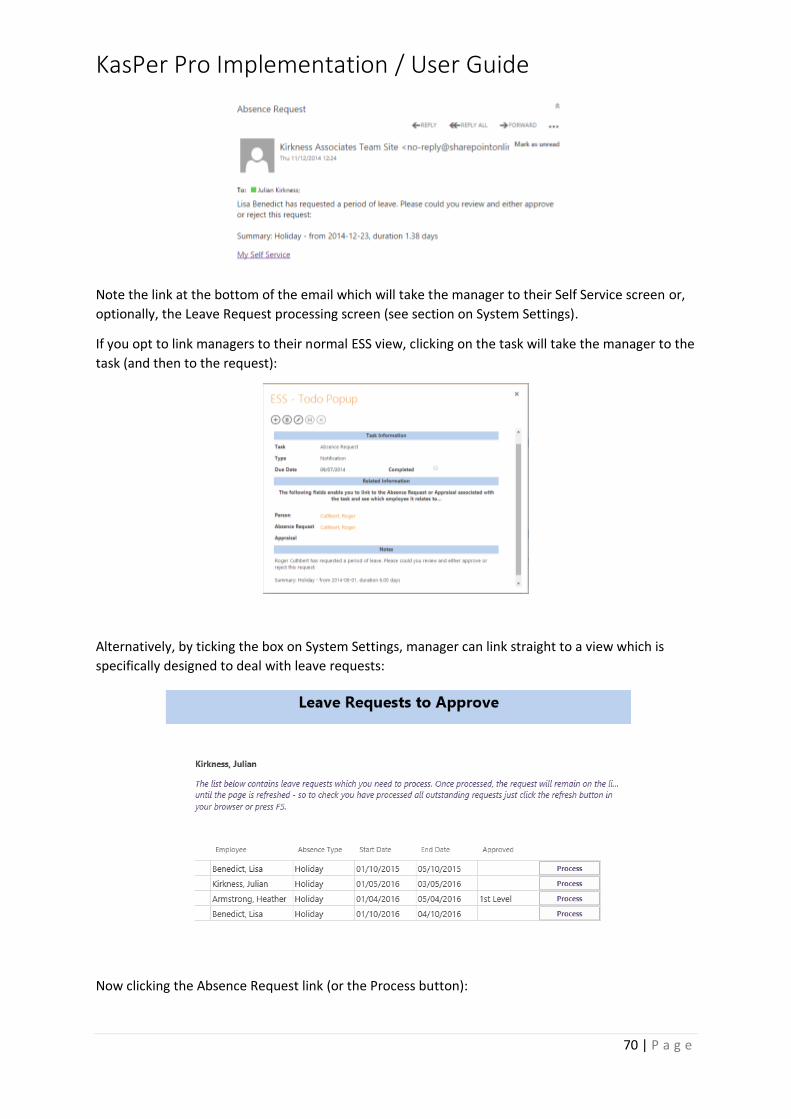
KasPer Pro Implementation / User Guide
70 | P a g e
Note the link at the bottom of the email which will take the manager to their Self Service screen or,
optionally, the Leave Request processing screen (see section on System Settings).
If you opt to link managers to their normal ESS view, clicking on the task will take the manager to the
task (and then to the request):
Alternatively, by ticking the box on System Settings, manager can link straight to a view which is
specifically designed to deal with leave requests:
Now clicking the Absence Request link (or the Process button):

KasPer Pro Implementation / User Guide
71 | P a g e
Note that the manager has the ability to see who else is away in the organisation before deciding
whether to approve or reject the request and also see the multi employee absence calendar. Let’s
assume that this is approved:
For a one level approval, the screen will be updated with the approval information and the Task will
be marked as completed. At the same time a notification (Task and email) is sent to the employee
informing them the request has been approved (or indeed rejected if that were the case) and on the
employee’s Self Service page the request will be shown as approved.
For a two level approval, on first approval the request will be marked ‘1st Level’ in the Approved field
and passed on to the 2nd level approver. At this stage if approved the employee would receive the
confirmation email and the task marked as complete etc.
13.1.2 Requesting Leave Cancellations or Changes
Employees can see their leave on the leave tab of the Self Service page:
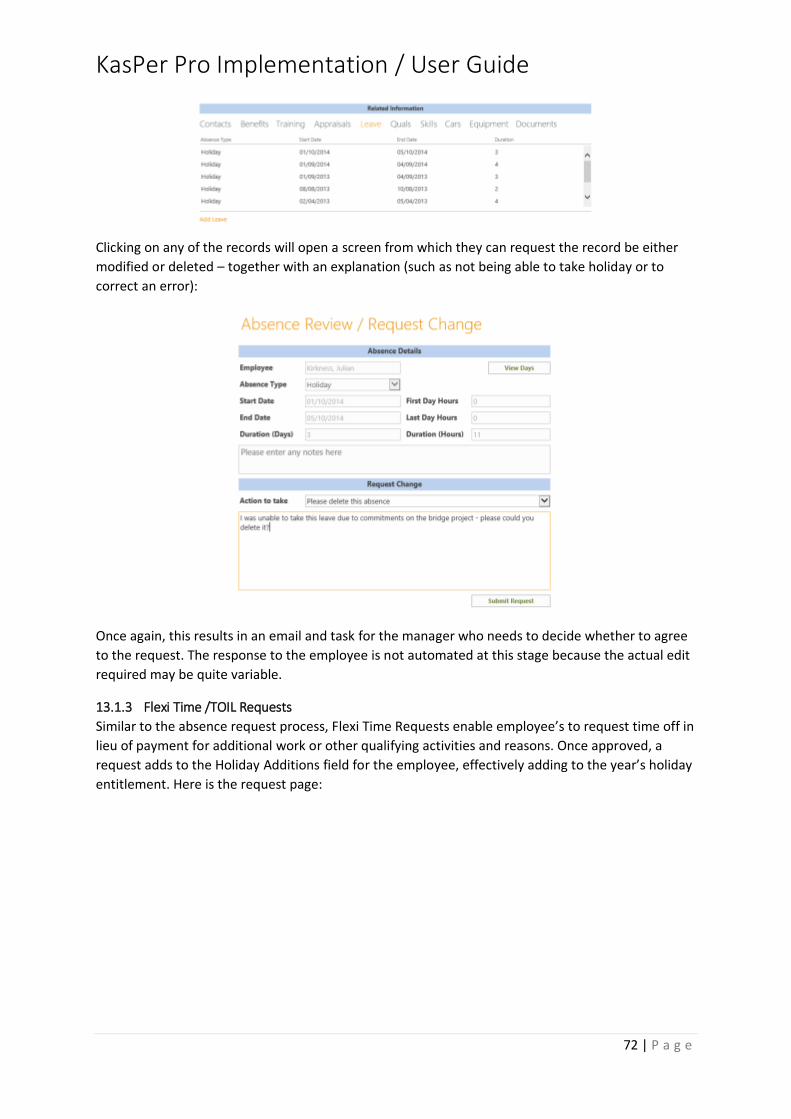
KasPer Pro Implementation / User Guide
72 | P a g e
Clicking on any of the records will open a screen from which they can request the record be either
modified or deleted – together with an explanation (such as not being able to take holiday or to
correct an error):
Once again, this results in an email and task for the manager who needs to decide whether to agree
to the request. The response to the employee is not automated at this stage because the actual edit
required may be quite variable.
13.1.3 Flexi Time /TOIL Requests
Similar to the absence request process, Flexi Time Requests enable employee’s to request time off in
lieu of payment for additional work or other qualifying activities and reasons. Once approved, a
request adds to the Holiday Additions field for the employee, effectively adding to the year’s holiday
entitlement. Here is the request page:

KasPer Pro Implementation / User Guide
73 | P a g e
Once again the process uses notifications via the task system and emails to let managers know there
is a request to approve. Employees are notified of the result by the same mechanism.
A useful feature here is that if the screen is bought up by a manager for a team member or an HR
Admin user for anyone but themselves, then they are able to enter a request for the employee and
approve it straight away – this bypasses the whole request process. No user is allowed to edit their
own requests once they are approved or rejected.
Note that employees will only see a total figure for Holiday Entitlement on their self service page
(including any manual adjustments or holiday additions). If they open either their leave request or
flexi request pages then they will be able to see each item individually. This is simply due to available
screen space.
This process (along with leave requests) is now available to employees via a standalone view which
speeds up the process – more details in section 13.3.2
13.1.4 Appraisals
The other key process in Self Service which involves interaction between managers and employees is
Appraisals. We discussed how different Appraisal Types can be configured as well as how to Manage
Appraisals as a full HR Admin User. In this section we are going to look at how employees and
managers interact through Self Service to complete the process.
Firstly, let’s look at how a manager can review outstanding appraisals and create new ones.
13.1.5 Notes
Employees have a new screen from 1.6.7.0 to look at notes which have been made on their record:
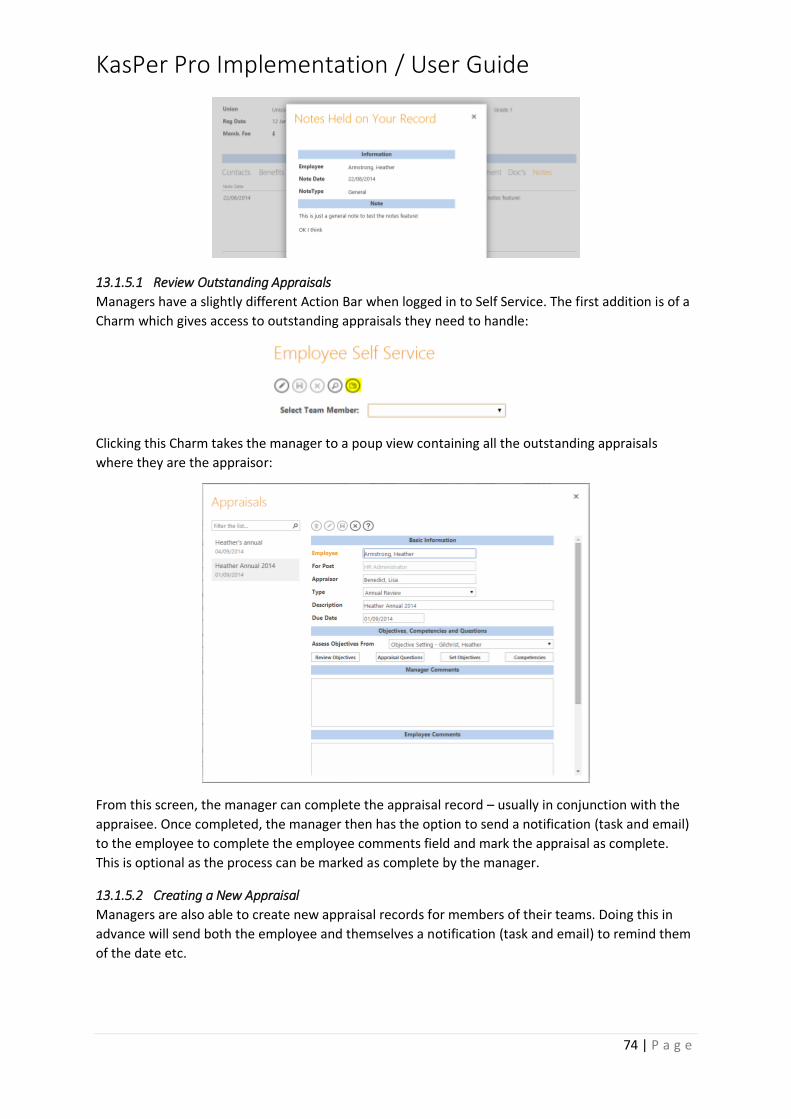
KasPer Pro Implementation / User Guide
74 | P a g e
13.1.5.1 Review Outstanding Appraisals
Managers have a slightly different Action Bar when logged in to Self Service. The first addition is of a
Charm which gives access to outstanding appraisals they need to handle:
Clicking this Charm takes the manager to a poup view containing all the outstanding appraisals
where they are the appraisor:
From this screen, the manager can complete the appraisal record – usually in conjunction with the
appraisee. Once completed, the manager then has the option to send a notification (task and email)
to the employee to complete the employee comments field and mark the appraisal as complete.
This is optional as the process can be marked as complete by the manager.
13.1.5.2 Creating a New Appraisal
Managers are also able to create new appraisal records for members of their teams. Doing this in
advance will send both the employee and themselves a notification (task and email) to remind them
of the date etc.
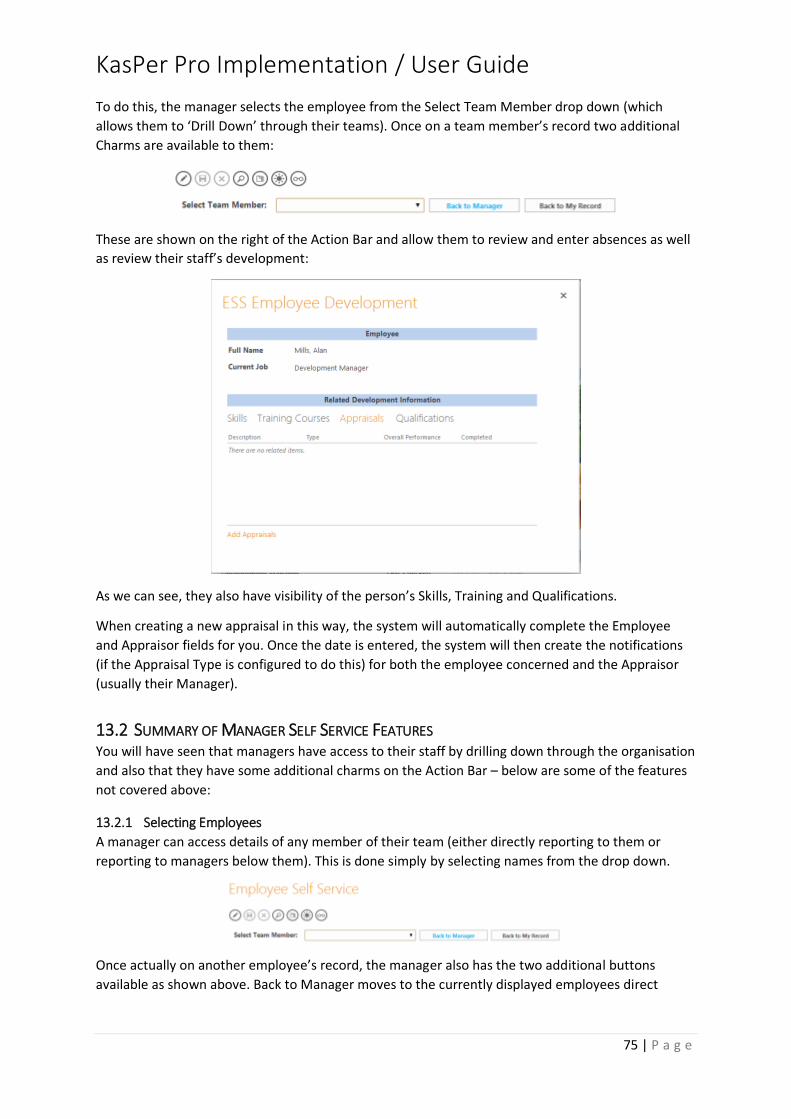
KasPer Pro Implementation / User Guide
75 | P a g e
To do this, the manager selects the employee from the Select Team Member drop down (which
allows them to ‘Drill Down’ through their teams). Once on a team member’s record two additional
Charms are available to them:
These are shown on the right of the Action Bar and allow them to review and enter absences as well
as review their staff’s development:
As we can see, they also have visibility of the person’s Skills, Training and Qualifications.
When creating a new appraisal in this way, the system will automatically complete the Employee
and Appraisor fields for you. Once the date is entered, the system will then create the notifications
(if the Appraisal Type is configured to do this) for both the employee concerned and the Appraisor
(usually their Manager).
13.2 SUMMARY OF MANAGER SELF SERVICE FEATURES You will have seen that managers have access to their staff by drilling down through the organisation
and also that they have some additional charms on the Action Bar – below are some of the features
not covered above:
13.2.1 Selecting Employees
A manager can access details of any member of their team (either directly reporting to them or
reporting to managers below them). This is done simply by selecting names from the drop down.
Once actually on another employee’s record, the manager also has the two additional buttons
available as shown above. Back to Manager moves to the currently displayed employees direct

KasPer Pro Implementation / User Guide
76 | P a g e
manager and Back to My Record moves to your own record (these could be the same). They also
have the additional Action Bar Charms for Absence and Employee Development.
13.2.2 Skill Search
Managers have the capability to search for people with skills (useful for resourcing projects, etc.)
using the following charm:
This provides the following view which allows you to select the skill required and see who is available
and who their manager is:
13.2.3 Multi Employee Absence Calendar
Managers have access to the multi employee absence calendar from their Action Bar as well as from
the Absence Approval screen to assist with managing holidays:
13.2.4 Review Absence
This option provides a manager with the ability to view, add and edit absence and holiday records
for members of their teams.
13.3 CONFIGURING STANDALONE SELF-SERVICE Self Service can be accessed via the normal KasPer PRO configuration (and would probably be
accessed from here by Admin / HR users) – but for employees and managers this isn’t ideal because
they don’t have any access to many of the options presented and this can be confusing.
Version 1.2.1.0 introduced the capability to load the Self Service page separately. Ideally this would
be set up as a link from your Sharepoint Site or Intranet.
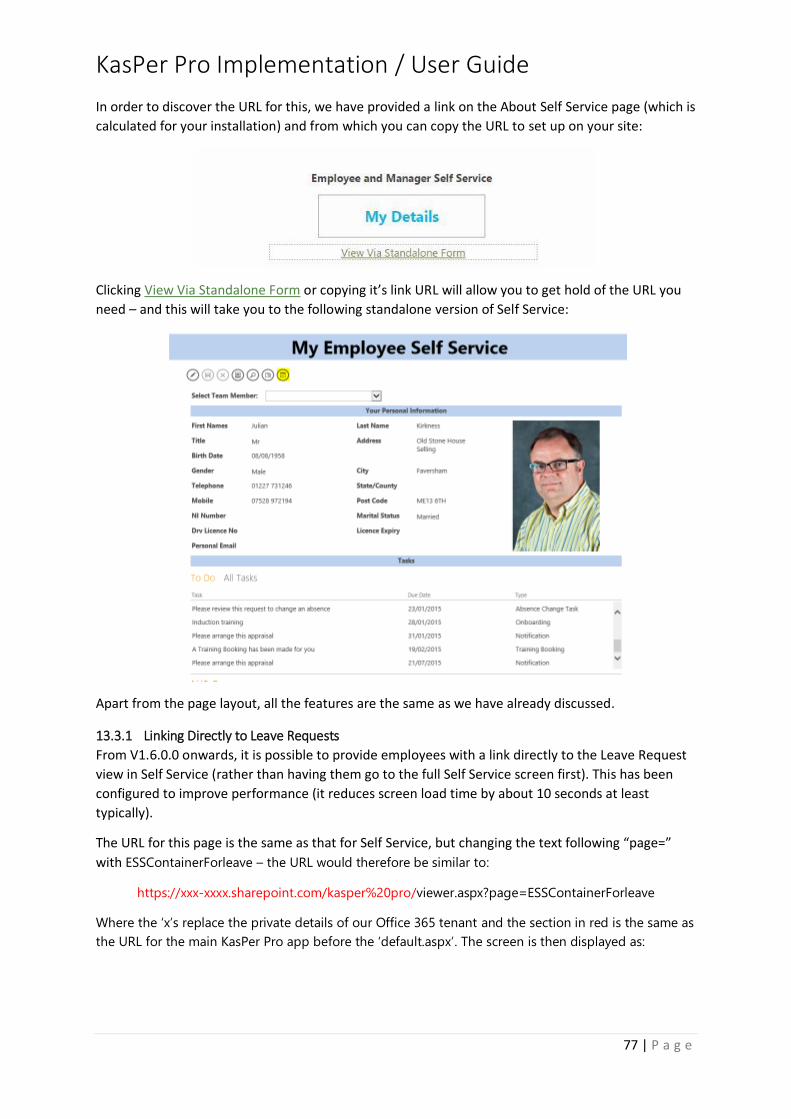
KasPer Pro Implementation / User Guide
77 | P a g e
In order to discover the URL for this, we have provided a link on the About Self Service page (which is
calculated for your installation) and from which you can copy the URL to set up on your site:
Clicking View Via Standalone Form or copying it’s link URL will allow you to get hold of the URL you
need – and this will take you to the following standalone version of Self Service:
Apart from the page layout, all the features are the same as we have already discussed.
13.3.1 Linking Directly to Leave Requests
From V1.6.0.0 onwards, it is possible to provide employees with a link directly to the Leave Request
view in Self Service (rather than having them go to the full Self Service screen first). This has been
configured to improve performance (it reduces screen load time by about 10 seconds at least
typically).
The URL for this page is the same as that for Self Service, but changing the text following “page=”
with ESSContainerForleave – the URL would therefore be similar to:
https://xxx-xxxx.sharepoint.com/kasper%20pro/viewer.aspx?page=ESSContainerForleave
Where the ‘x’s replace the private details of our Office 365 tenant and the section in red is the same as
the URL for the main KasPer Pro app before the ‘default.aspx’. The screen is then displayed as:
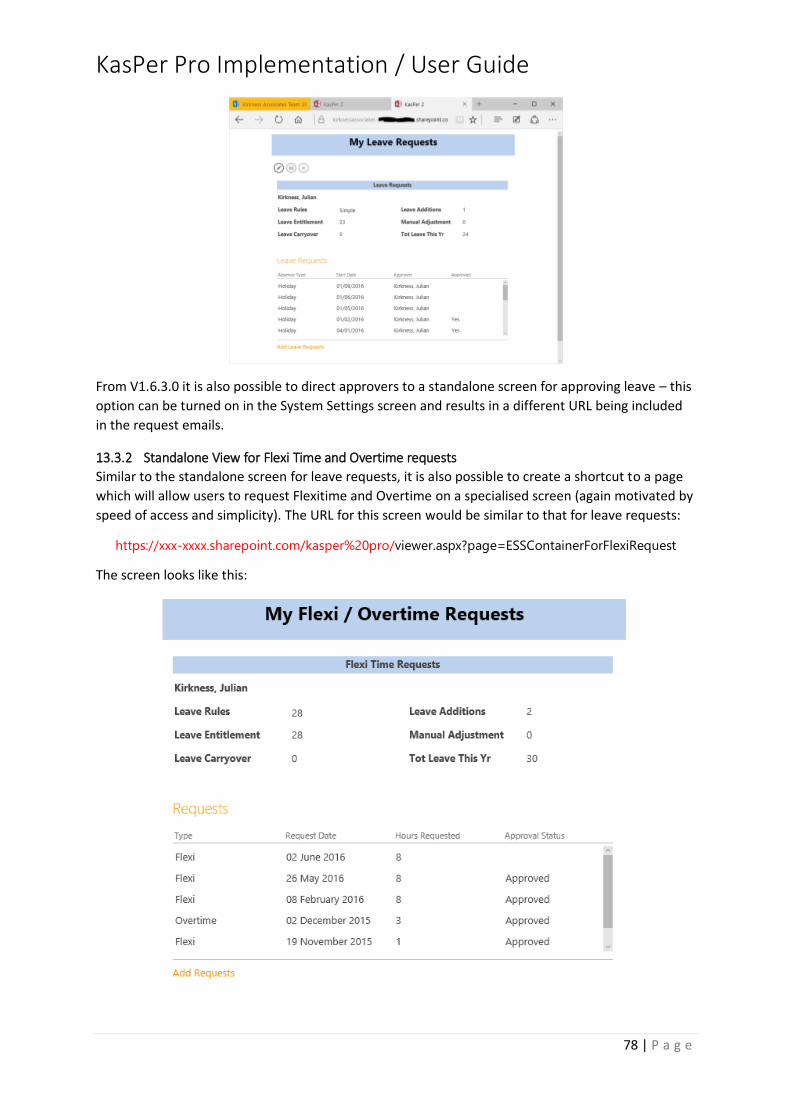
KasPer Pro Implementation / User Guide
78 | P a g e
From V1.6.3.0 it is also possible to direct approvers to a standalone screen for approving leave – this
option can be turned on in the System Settings screen and results in a different URL being included
in the request emails.
13.3.2 Standalone View for Flexi Time and Overtime requests
Similar to the standalone screen for leave requests, it is also possible to create a shortcut to a page
which will allow users to request Flexitime and Overtime on a specialised screen (again motivated by
speed of access and simplicity). The URL for this screen would be similar to that for leave requests:
https://xxx-xxxx.sharepoint.com/kasper%20pro/viewer.aspx?page=ESSContainerForFlexiRequest
The screen looks like this:
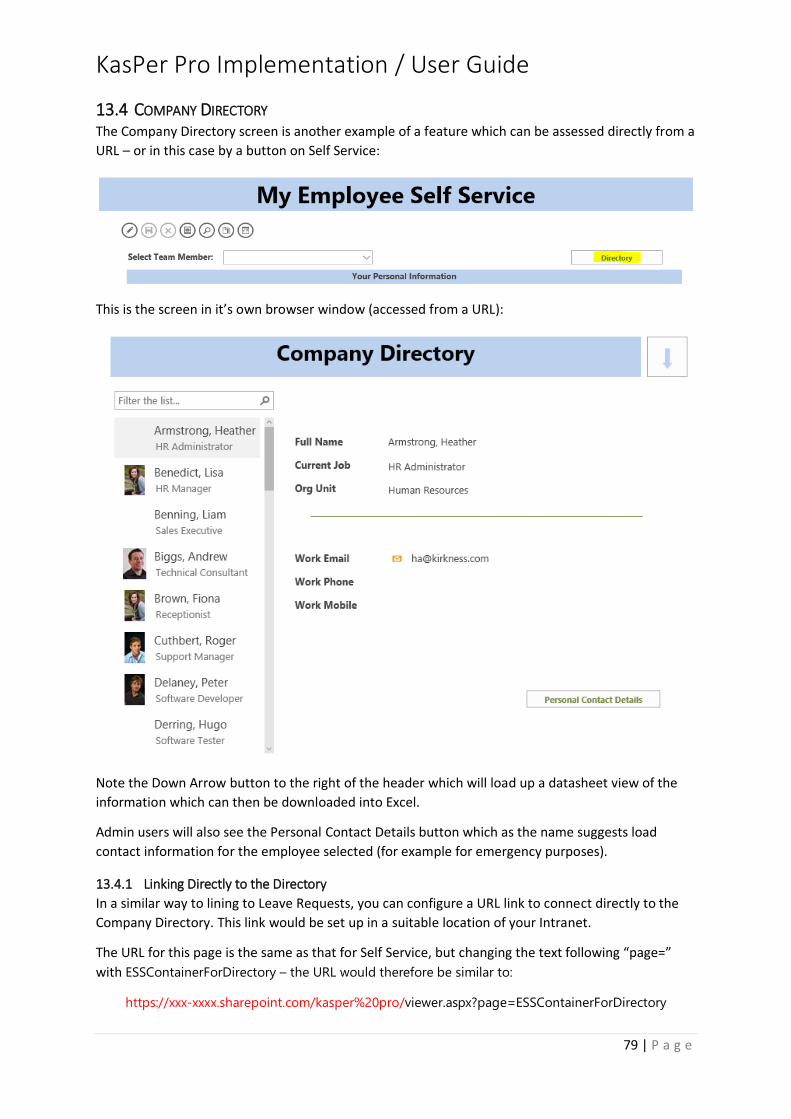
KasPer Pro Implementation / User Guide
79 | P a g e
13.4 COMPANY DIRECTORY The Company Directory screen is another example of a feature which can be assessed directly from a
URL – or in this case by a button on Self Service:
This is the screen in it’s own browser window (accessed from a URL):
Note the Down Arrow button to the right of the header which will load up a datasheet view of the
information which can then be downloaded into Excel.
Admin users will also see the Personal Contact Details button which as the name suggests load
contact information for the employee selected (for example for emergency purposes).
13.4.1 Linking Directly to the Directory
In a similar way to lining to Leave Requests, you can configure a URL link to connect directly to the
Company Directory. This link would be set up in a suitable location of your Intranet.
The URL for this page is the same as that for Self Service, but changing the text following “page=”
with ESSContainerForDirectory – the URL would therefore be similar to:
https://xxx-xxxx.sharepoint.com/kasper%20pro/viewer.aspx?page=ESSContainerForDirectory
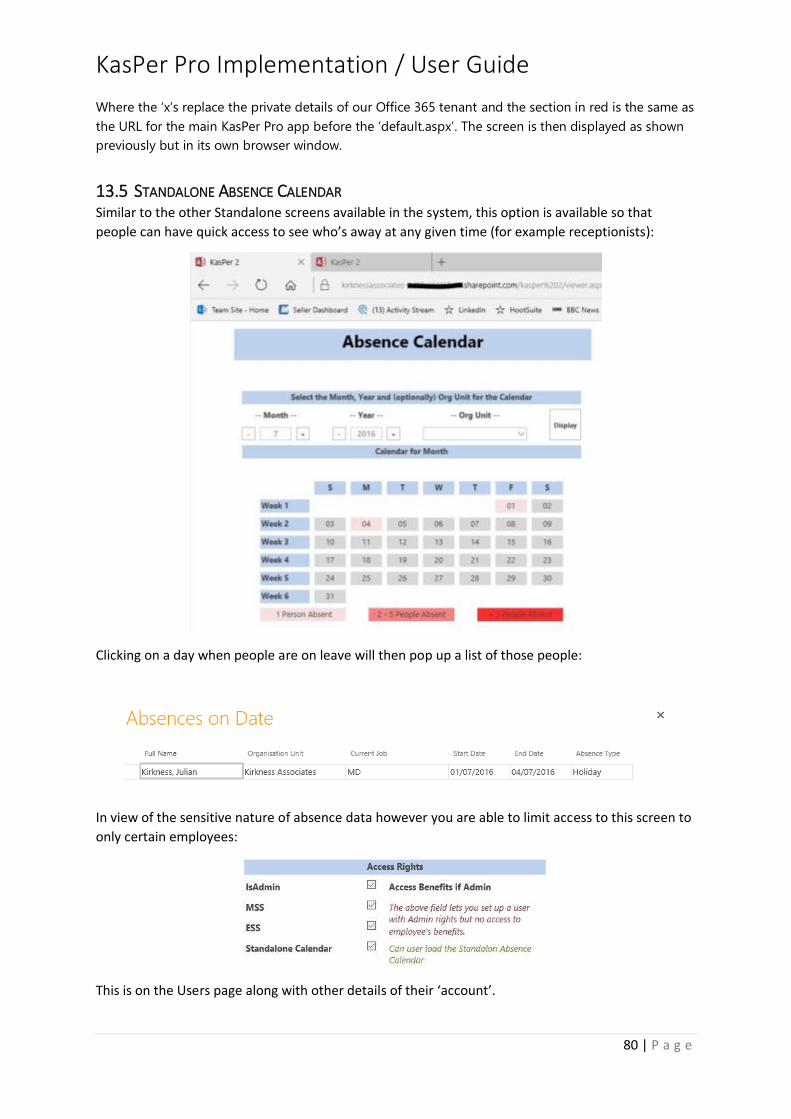
KasPer Pro Implementation / User Guide
80 | P a g e
Where the ‘x’s replace the private details of our Office 365 tenant and the section in red is the same as
the URL for the main KasPer Pro app before the ‘default.aspx’. The screen is then displayed as shown
previously but in its own browser window.
13.5 STANDALONE ABSENCE CALENDAR Similar to the other Standalone screens available in the system, this option is available so that
people can have quick access to see who’s away at any given time (for example receptionists):
Clicking on a day when people are on leave will then pop up a list of those people:
In view of the sensitive nature of absence data however you are able to limit access to this screen to
only certain employees:
This is on the Users page along with other details of their ‘account’.
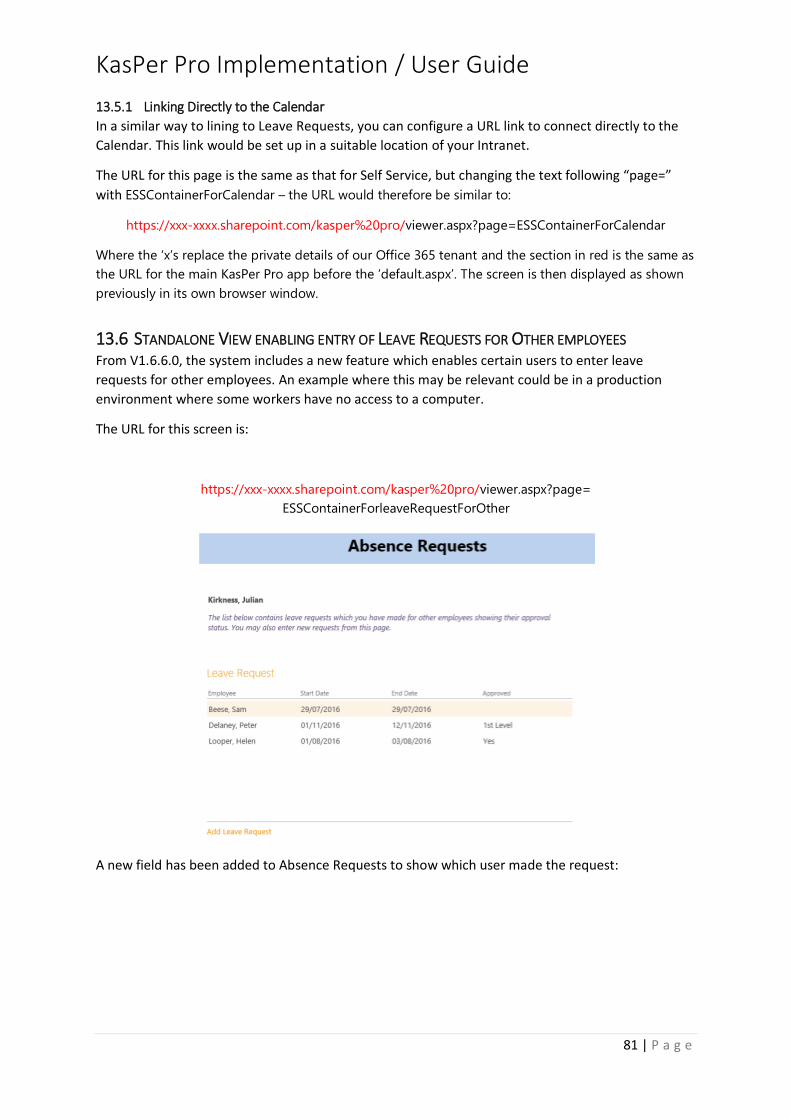
KasPer Pro Implementation / User Guide
81 | P a g e
13.5.1 Linking Directly to the Calendar
In a similar way to lining to Leave Requests, you can configure a URL link to connect directly to the
Calendar. This link would be set up in a suitable location of your Intranet.
The URL for this page is the same as that for Self Service, but changing the text following “page=”
with ESSContainerForCalendar – the URL would therefore be similar to:
https://xxx-xxxx.sharepoint.com/kasper%20pro/viewer.aspx?page=ESSContainerForCalendar
Where the ‘x’s replace the private details of our Office 365 tenant and the section in red is the same as
the URL for the main KasPer Pro app before the ‘default.aspx’. The screen is then displayed as shown
previously in its own browser window.
13.6 STANDALONE VIEW ENABLING ENTRY OF LEAVE REQUESTS FOR OTHER EMPLOYEES From V1.6.6.0, the system includes a new feature which enables certain users to enter leave
requests for other employees. An example where this may be relevant could be in a production
environment where some workers have no access to a computer.
The URL for this screen is:
https://xxx-xxxx.sharepoint.com/kasper%20pro/viewer.aspx?page=
ESSContainerForleaveRequestForOther
A new field has been added to Absence Requests to show which user made the request:
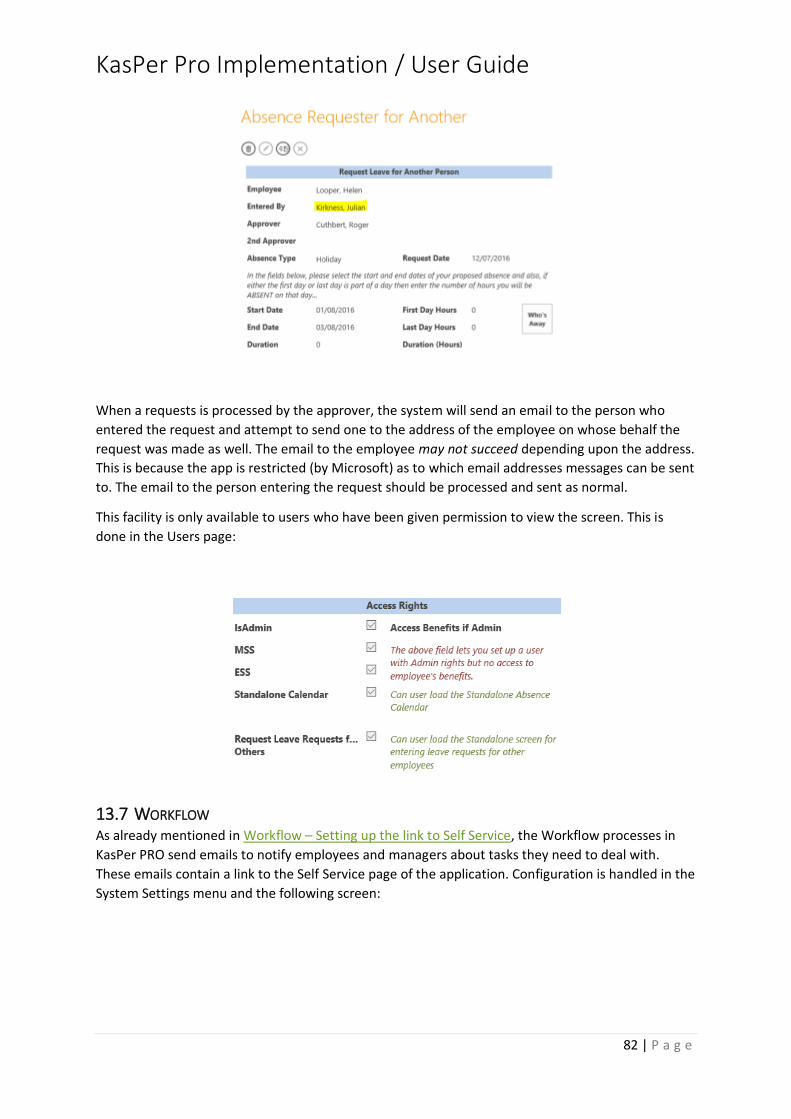
KasPer Pro Implementation / User Guide
82 | P a g e
When a requests is processed by the approver, the system will send an email to the person who
entered the request and attempt to send one to the address of the employee on whose behalf the
request was made as well. The email to the employee may not succeed depending upon the address.
This is because the app is restricted (by Microsoft) as to which email addresses messages can be sent
to. The email to the person entering the request should be processed and sent as normal.
This facility is only available to users who have been given permission to view the screen. This is
done in the Users page:
13.7 WORKFLOW As already mentioned in Workflow – Setting up the link to Self Service, the Workflow processes in
KasPer PRO send emails to notify employees and managers about tasks they need to deal with.
These emails contain a link to the Self Service page of the application. Configuration is handled in the
System Settings menu and the following screen:
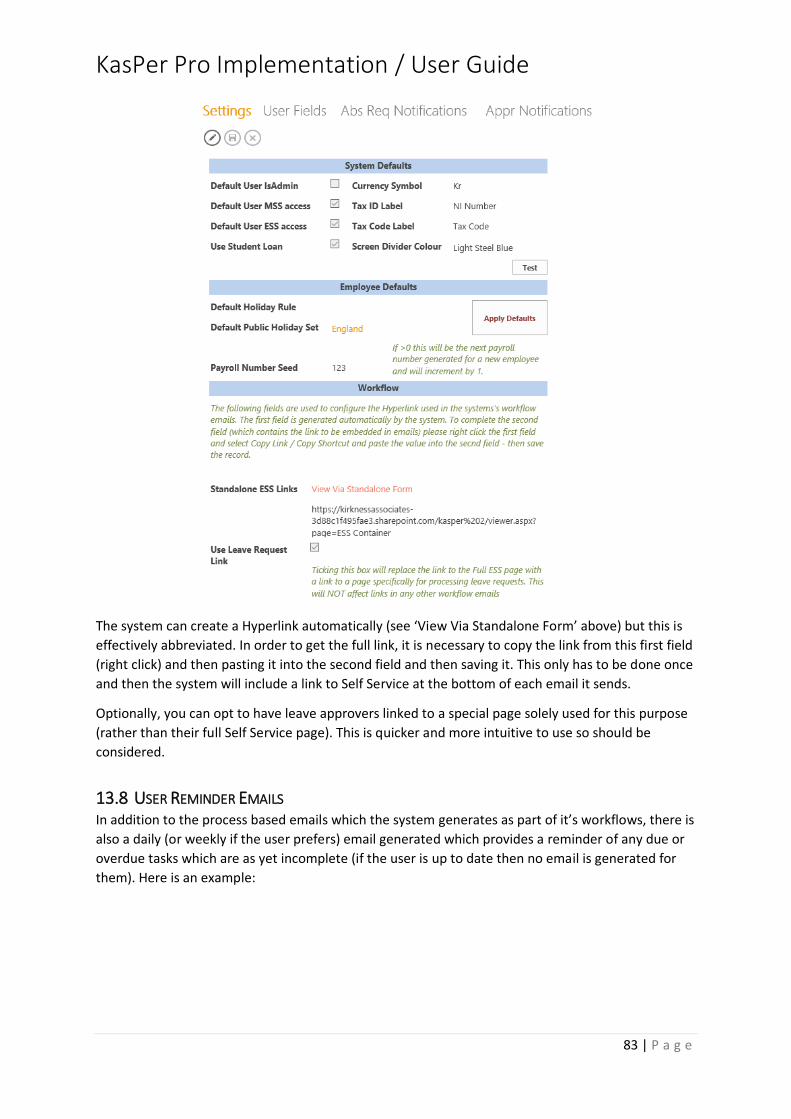
KasPer Pro Implementation / User Guide
83 | P a g e
The system can create a Hyperlink automatically (see ‘View Via Standalone Form’ above) but this is
effectively abbreviated. In order to get the full link, it is necessary to copy the link from this first field
(right click) and then pasting it into the second field and then saving it. This only has to be done once
and then the system will include a link to Self Service at the bottom of each email it sends.
Optionally, you can opt to have leave approvers linked to a special page solely used for this purpose
(rather than their full Self Service page). This is quicker and more intuitive to use so should be
considered.
13.8 USER REMINDER EMAILS In addition to the process based emails which the system generates as part of it’s workflows, there is
also a daily (or weekly if the user prefers) email generated which provides a reminder of any due or
overdue tasks which are as yet incomplete (if the user is up to date then no email is generated for
them). Here is an example:
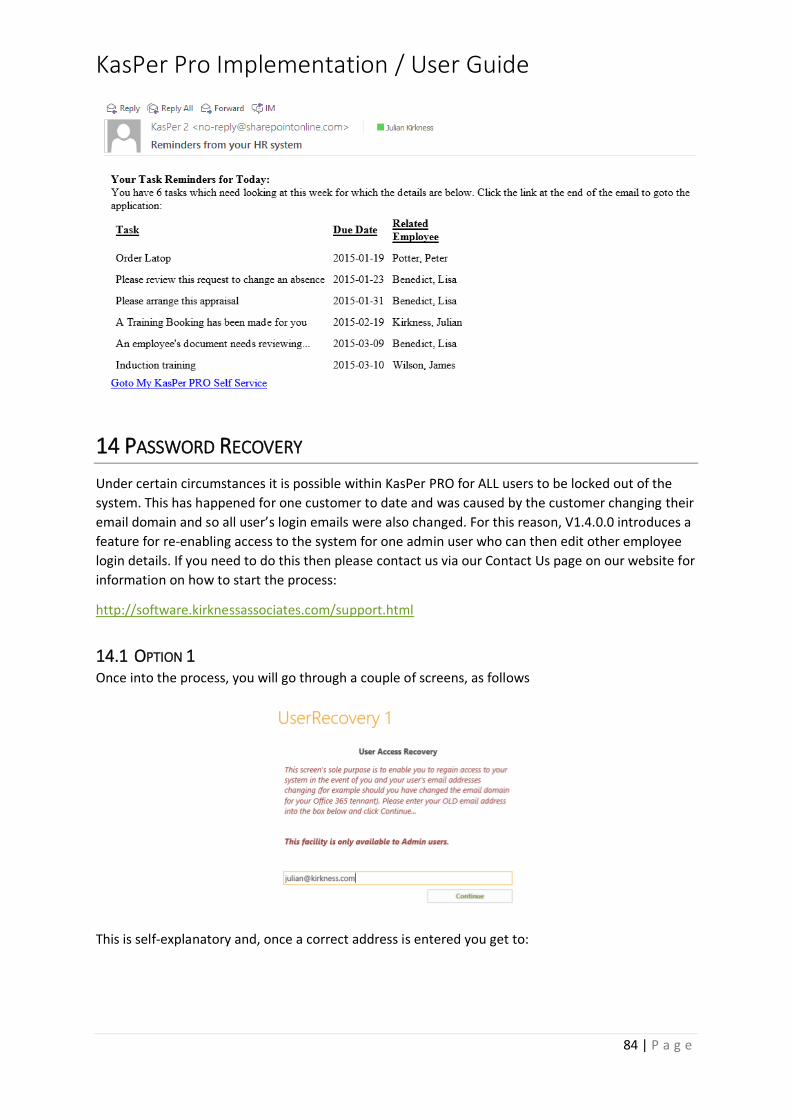
KasPer Pro Implementation / User Guide
84 | P a g e
14 PASSWORD RECOVERY
Under certain circumstances it is possible within KasPer PRO for ALL users to be locked out of the
system. This has happened for one customer to date and was caused by the customer changing their
email domain and so all user’s login emails were also changed. For this reason, V1.4.0.0 introduces a
feature for re-enabling access to the system for one admin user who can then edit other employee
login details. If you need to do this then please contact us via our Contact Us page on our website for
information on how to start the process:
http://software.kirknessassociates.com/support.html
14.1 OPTION 1 Once into the process, you will go through a couple of screens, as follows
This is self-explanatory and, once a correct address is entered you get to:
KasPer Pro Implementation / User Guide
85 | P a g e
Here you need to get the responses to the data items correct – and when they are a tick appears
alongside –in the example above Post Code is incorrect.
When all are filled in correctly you then get the following confirmation:
14.2 OPTION 2 (THE LAST RESORT) If you really can’t remember any of this data then we are still able to assist. Please contact us and we
will be able to talk you through a different process which requires a ‘password of the day’ generated
by us.
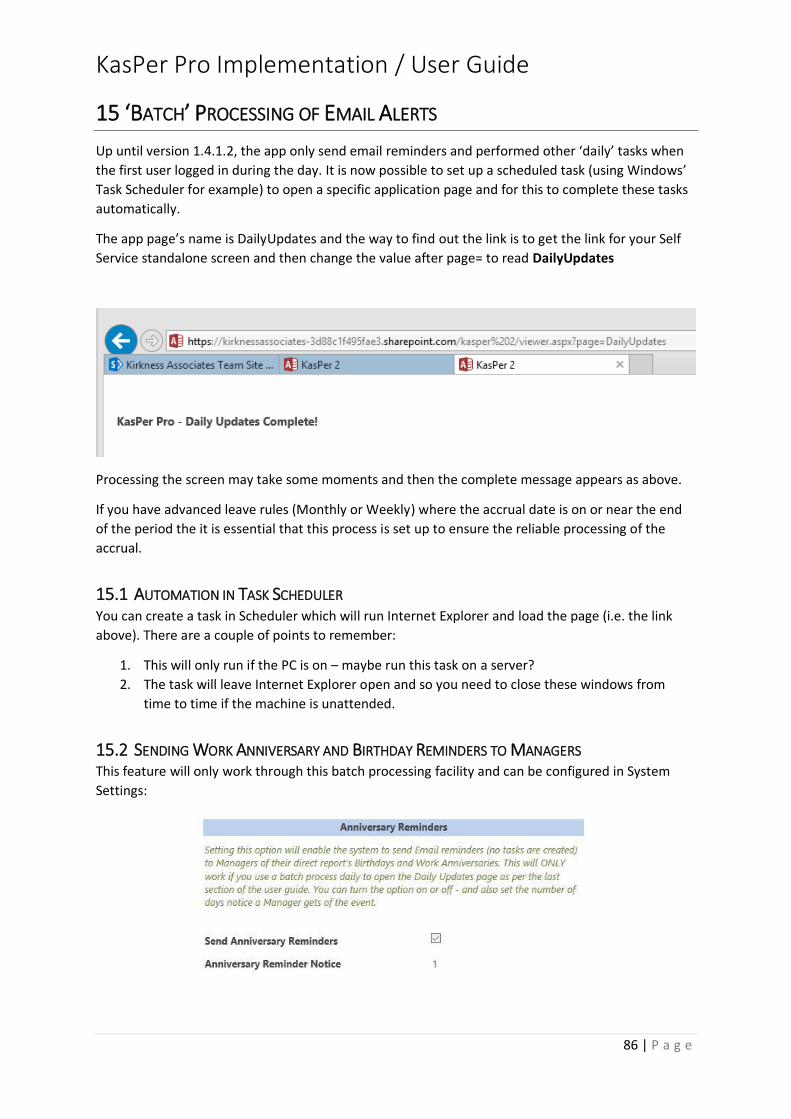
KasPer Pro Implementation / User Guide
86 | P a g e
15 ‘BATCH’ PROCESSING OF EMAIL ALERTS
Up until version 1.4.1.2, the app only send email reminders and performed other ‘daily’ tasks when
the first user logged in during the day. It is now possible to set up a scheduled task (using Windows’
Task Scheduler for example) to open a specific application page and for this to complete these tasks
automatically.
The app page’s name is DailyUpdates and the way to find out the link is to get the link for your Self
Service standalone screen and then change the value after page= to read DailyUpdates
Processing the screen may take some moments and then the complete message appears as above.
If you have advanced leave rules (Monthly or Weekly) where the accrual date is on or near the end
of the period the it is essential that this process is set up to ensure the reliable processing of the
accrual.
15.1 AUTOMATION IN TASK SCHEDULER You can create a task in Scheduler which will run Internet Explorer and load the page (i.e. the link
above). There are a couple of points to remember:
1. This will only run if the PC is on – maybe run this task on a server?
2. The task will leave Internet Explorer open and so you need to close these windows from
time to time if the machine is unattended.
15.2 SENDING WORK ANNIVERSARY AND BIRTHDAY REMINDERS TO MANAGERS This feature will only work through this batch processing facility and can be configured in System
Settings:

KasPer Pro Implementation / User Guide
87 | P a g e
In this case, the system will send a manager an email (no task) a set number of days before the dates
concerned – so it’s important that this process is run every day for this to work reliably. Here is an
example of the email:
There are 3 different possible emails that can be sent:
a. As above, for a work anniversary
b. For a forthcoming birthday, or
c. A version which caters for a Birthday and Work Anniversary on the same day,