FEATURES AND BENEFITS SPECIFICATIONS
6
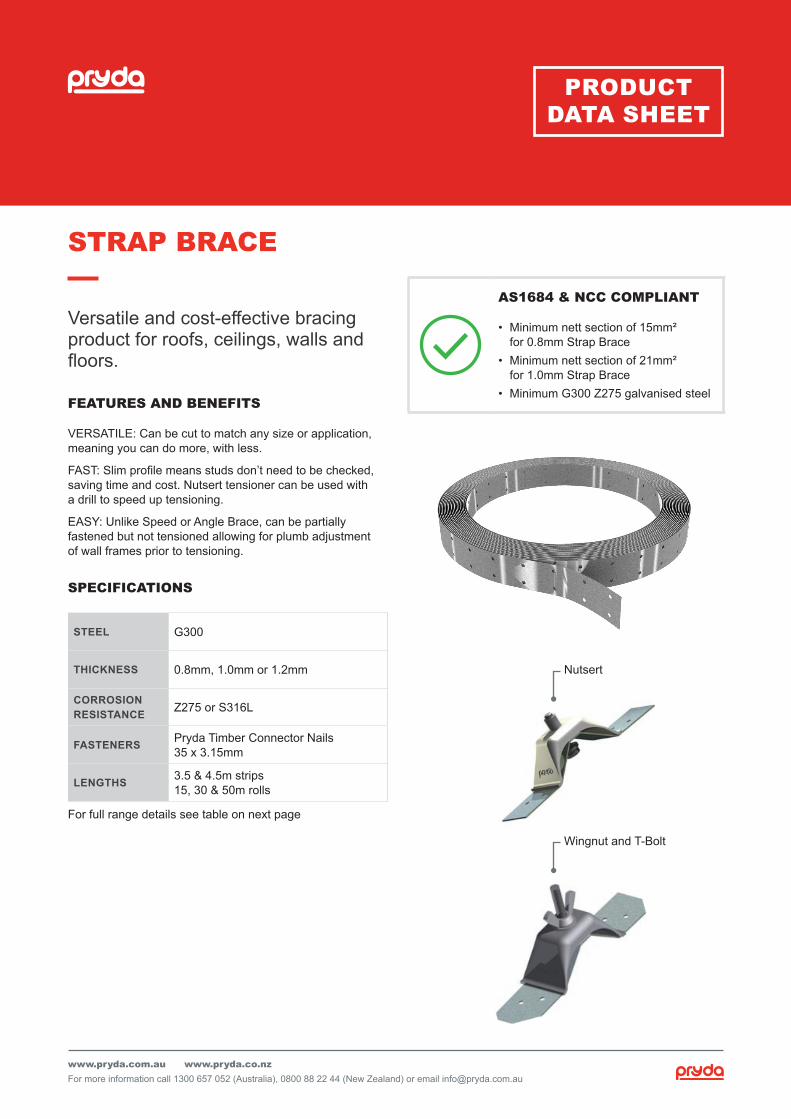
www.pryda.com.au www.pryda.co.nz For more information call 1300 657 052 (Australia), 0800 88 22 44 (New Zealand) or email [email protected] PRODUCT DATA SHEET STRAP BRACE Versatile and cost-effective bracing product for roofs, ceilings, walls and floors. FEATURES AND BENEFITS VERSATILE: Can be cut to match any size or application, meaning you can do more, with less. FAST: Slim profile means studs don’t need to be checked, saving time and cost. Nutsert tensioner can be used with a drill to speed up tensioning. EASY: Unlike Speed or Angle Brace, can be partially fastened but not tensioned allowing for plumb adjustment of wall frames prior to tensioning. SPECIFICATIONS STEEL G300 THICKNESS 0.8mm, 1.0mm or 1.2mm CORROSION RESISTANCE Z275 or S316L FASTENERS Pryda Timber Connector Nails 35 x 3.15mm LENGTHS 3.5 & 4.5m strips 15, 30 & 50m rolls For full range details see table on next page AS1684 & NCC COMPLIANT • Minimum nett section of 15mm² for 0.8mm Strap Brace • Minimum nett section of 21mm² for 1.0mm Strap Brace • Minimum G300 Z275 galvanised steel Nutsert Wingnut and T-Bolt
Transcript of FEATURES AND BENEFITS SPECIFICATIONS
www.pryda.com.au www.pryda.co.nzFor more information call 1300 657 052 (Australia), 0800 88 22 44 (New Zealand) or email [email protected]
PRODUCTDATA SHEET
STRAP BRACE
Versatile and cost-effective bracing product for roofs, ceilings, walls and floors.
FEATURES AND BENEFITS
VERSATILE: Can be cut to match any size or application, meaning you can do more, with less.
FAST: Slim profile means studs don’t need to be checked, saving time and cost. Nutsert tensioner can be used with a drill to speed up tensioning.
EASY: Unlike Speed or Angle Brace, can be partially fastened but not tensioned allowing for plumb adjustment of wall frames prior to tensioning.
SPECIFICATIONS
STEEL G300
THICKNESS 0.8mm, 1.0mm or 1.2mm
CORROSION RESISTANCE Z275 or S316L
FASTENERS Pryda Timber Connector Nails 35 x 3.15mm
LENGTHS 3.5 & 4.5m strips 15, 30 & 50m rolls
For full range details see table on next page
AS1684 & NCC COMPLIANT
• Minimum nett section of 15mm² for 0.8mm Strap Brace
• Minimum nett section of 21mm² for 1.0mm Strap Brace
• Minimum G300 Z275 galvanised steel
Nutsert
Wingnut and T-Bolt
2STRAP BRACE PRODUCT DATA SHEET
www.pryda.com.au www.pryda.co.nzFor more information call 1300 657 052 (Australia), 0800 88 22 44 (New Zealand) or email [email protected]
STRAP BRACE
PRODUCT CODE MATERIAL SIZE LENGTH QUANTITY WALLS ROOFS FLOORS
DESIGN TENSION
CAPACITY (ΦNJ) KN
SB083/15
G300 Z275 Galvanised Steel
(275 g/m2 coating)
30 x 0.8mm
15m 1 Roll
Type A(1.5 kN/m)
&Type B
with 20% reduced capacity
(2.4 kN/m)
Not Suitable
5.2
SB083/30 30m 1 Roll 5.2
SB083/50 50m 1 Roll 5.2
SB083/3.5W-500 3.5m 500 Lengths 5.2
SB083/4.0W-500 4.0m 500 Lengths 5.2
SB102/SS G316L Stainless Steel 25 x 0.9mm 15m 1 Roll 5.8
SB103/30G300 Z275 Galvanised
Steel
(275 g/m² coating)
30 x 1.0mm30m
1 Roll
Type A(1.5 kN/m)
&Type B
(3.0 kN/m)
Not Suitable*
6.8
SB103/50 50m 6.8
SB123/30 32 x 1.2mm 30m
Refer to Pryda Truss Installation
Guide
9.4
For more details on Type A & B Bracing units, refer to Australian Standard AS1684*Can be used for Truss Tie Downs. Refer to AS1684 for permitted use and fixing details.
TENSIONERSPRODUCT CODE MATERIAL SIZE LENGTH QUANTITY
SBT
G300 Z275 Galvanised Steel (275 g/m² coating)
Wing Nut Driven by hand
5 packs of 6 Tensioners 30
SBT100 10 packs of 10 Tensioners 100
SBT30NNutsert
Driven by socket
5 packs of 6 Tensioners 30
SBT100N 10 packs of 10 Tensioners 100
SBT/SS S316L Stainless Steel Wing Nut Driven by hand 1 1
PRYDA TIMBER CONNECTOR NAILSPRODUCT CODE MATERIAL SIZE LENGTH QUANTITY
OSNGB
Galvanised Steel 35 x 3.15mmFlat Head
500g cardboard packs x 10 5kg
OSNGC/S 500g clamshell packs x 5 2.5kg
OSNG 1kg cardboard packs x 10 10kg
TPOSNG 5kg trade pack x 1 5kg
OSNBCI/SS S316L Stainless Steel 500g clamshell pack x 1 500g
3STRAP BRACE PRODUCT DATA SHEET
www.pryda.com.au www.pryda.co.nzFor more information call 1300 657 052 (Australia), 0800 88 22 44 (New Zealand) or email [email protected]
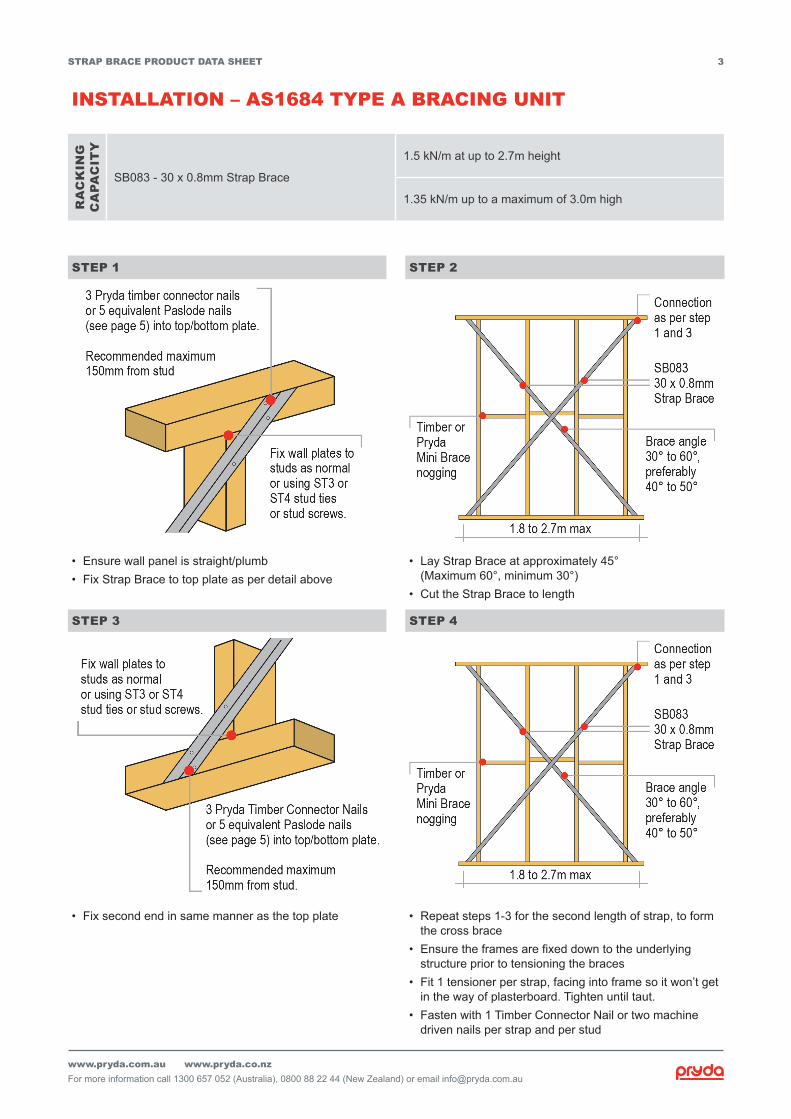
STEP 1 STEP 2
• Ensure wall panel is straight/plumb• Fix Strap Brace to top plate as per detail above
• Lay Strap Brace at approximately 45° (Maximum 60°, minimum 30°)
• Cut the Strap Brace to length
STEP 3 STEP 4
• Fix second end in same manner as the top plate • Repeat steps 1-3 for the second length of strap, to form the cross brace
• Ensure the frames are fixed down to the underlying structure prior to tensioning the braces
• Fit 1 tensioner per strap, facing into frame so it won’t get in the way of plasterboard. Tighten until taut.
• Fasten with 1 Timber Connector Nail or two machine driven nails per strap and per stud
INSTALLATION – AS1684 TYPE A BRACING UNITR
AC
KIN
G
CA
PAC
ITY
SB083 - 30 x 0.8mm Strap Brace
1.5 kN/m at up to 2.7m height
1.35 kN/m up to a maximum of 3.0m high
4STRAP BRACE PRODUCT DATA SHEET
www.pryda.com.au www.pryda.co.nzFor more information call 1300 657 052 (Australia), 0800 88 22 44 (New Zealand) or email [email protected]
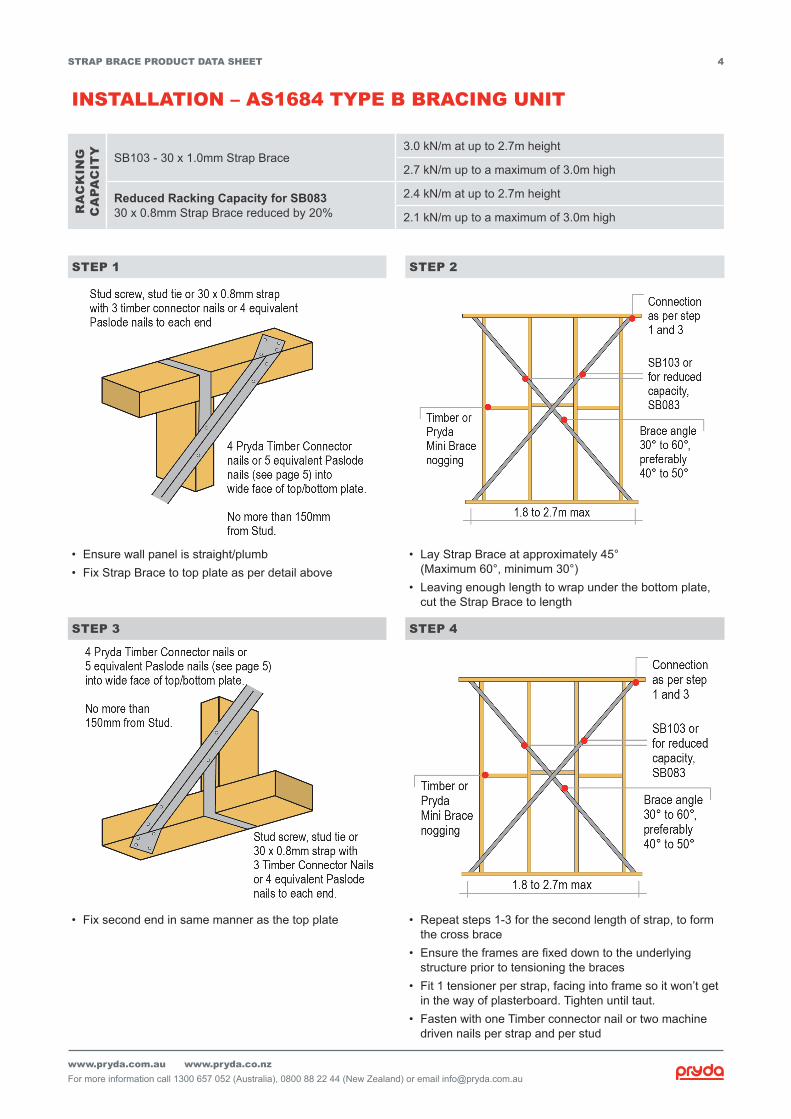
STEP 1 STEP 2
• Ensure wall panel is straight/plumb• Fix Strap Brace to top plate as per detail above
• Lay Strap Brace at approximately 45° (Maximum 60°, minimum 30°)
• Leaving enough length to wrap under the bottom plate, cut the Strap Brace to length
STEP 3 STEP 4
• Fix second end in same manner as the top plate • Repeat steps 1-3 for the second length of strap, to form the cross brace
• Ensure the frames are fixed down to the underlying structure prior to tensioning the braces
• Fit 1 tensioner per strap, facing into frame so it won’t get in the way of plasterboard. Tighten until taut.
• Fasten with one Timber connector nail or two machine driven nails per strap and per stud
INSTALLATION – AS1684 TYPE B BRACING UNITR
AC
KIN
G
CA
PAC
ITY SB103 - 30 x 1.0mm Strap Brace
3.0 kN/m at up to 2.7m height
2.7 kN/m up to a maximum of 3.0m high
Reduced Racking Capacity for SB083 30 x 0.8mm Strap Brace reduced by 20%
2.4 kN/m at up to 2.7m height
2.1 kN/m up to a maximum of 3.0m high
5STRAP BRACE PRODUCT DATA SHEET
www.pryda.com.au www.pryda.co.nzFor more information call 1300 657 052 (Australia), 0800 88 22 44 (New Zealand) or email [email protected]
STRAP BRACE
BUILD WITH CONFIDENCE
Where possible, hand nailing with Pryda Timber Connector nails is always preferred, why?
• Pryda Timber Connector Nails are forged in one piece, unlike clouts that are two pieces soldered together, meaning the head can pop off
• Pryda Nails are the correct diameter, ensuring a tight fit in prepunched holes = a stronger connection
• Design values and testing have all been conducted using Pryda Timber Connector Nails
• Hand hammered nails ensure correct nail positioning and drive depth (not driven to shallow or too deep)
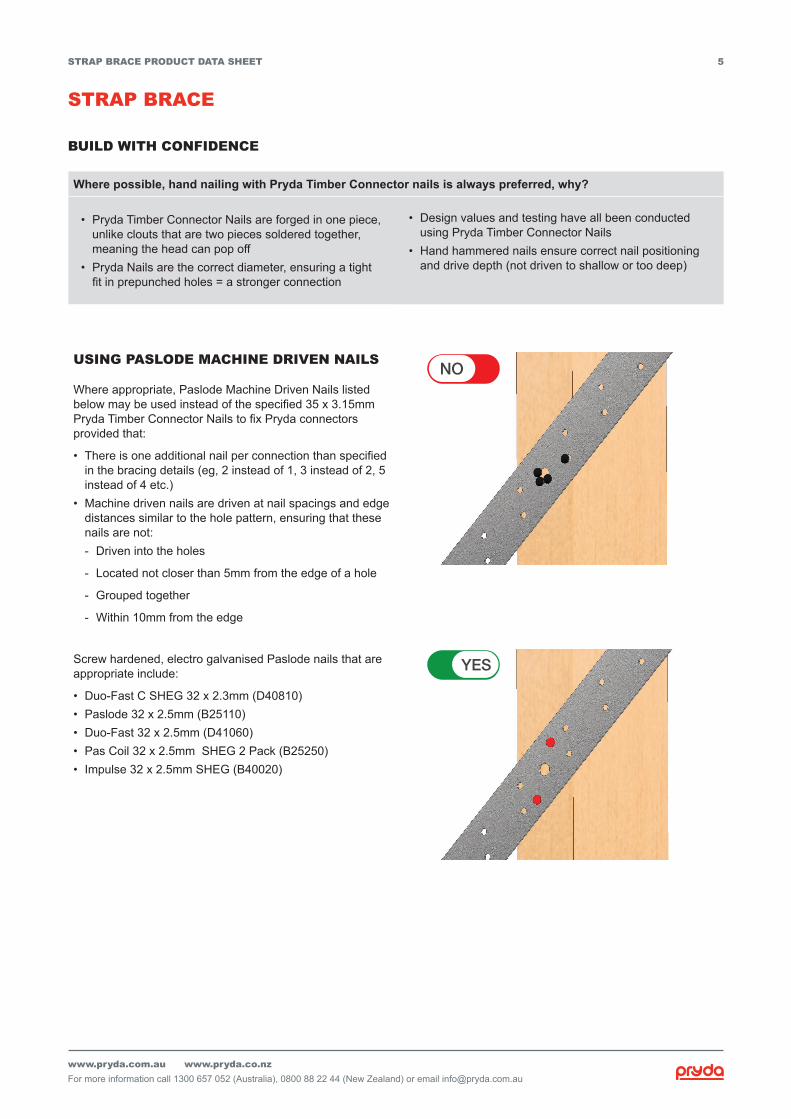
USING PASLODE MACHINE DRIVEN NAILS
Where appropriate, Paslode Machine Driven Nails listed below may be used instead of the specified 35 x 3.15mm Pryda Timber Connector Nails to fix Pryda connectors provided that:
• There is one additional nail per connection than specified in the bracing details (eg, 2 instead of 1, 3 instead of 2, 5 instead of 4 etc.)
• Machine driven nails are driven at nail spacings and edge distances similar to the hole pattern, ensuring that these nails are not: - Driven into the holes
- Located not closer than 5mm from the edge of a hole
- Grouped together
- Within 10mm from the edge
Screw hardened, electro galvanised Paslode nails that are appropriate include:
• Duo-Fast C SHEG 32 x 2.3mm (D40810) • Paslode 32 x 2.5mm (B25110)• Duo-Fast 32 x 2.5mm (D41060)• Pas Coil 32 x 2.5mm SHEG 2 Pack (B25250)• Impulse 32 x 2.5mm SHEG (B40020)
NO
YES

6STRAP BRACE PRODUCT DATA SHEET
www.pryda.com.au www.pryda.co.nzFor more information call 1300 657 052 (Australia), 0800 88 22 44 (New Zealand) or email [email protected]
1 Larger holes are only for tensioners, do not use them for nails
2 Do not overtension Strap Bracing as this can both reduce the capacity of the unit and bring walls out of plumb
3 Ensure nails are at least 10mm away from timber end or edges to prevent splitting
4 Ensure Strap Brace is tensioned prior to nailing to studs/trusses
5 Keep wall bracing angles within 30° to 60° and roof angles between 30° to 45° or the brace will not be compliant
6 Fix Strap Brace to the Bottom Plate before standing wall
7 Avoid having the centre of the opposing brace located over a stud or a nog as this can cause a bump in the plasterboard
STRAP BRACE TIPS
LOOKING FOR MORE DETAILED DESIGN VALUES?See our Bracing Design guide available at www.pryda.com.au