BOVUr That's French For HellO - ディズニーキッズ …...BOVUr That's French For HellO
The 1997 Mitsubishi Galant ...........................................page 1
Director's Page ..................................................................page 3
Van Contest .......................................................................page 4
Servicing the 1997 Buick Park Avenue .........................page 6
Autoparts .........................................................................page 20
Servicing the 1997 Dodge Avenger .............................page 22
Transponder Types and Worldwide Information..........................................page 31
The Official Publication of the
NATIONAL LOCKSMITHAUTOMOBILE ASSOCIATION™
Spring1997
TM
Servicing the 1997Mitsubishi Galant
By Michael Hyde
FEATURE ARTICLE
Photograph 1. This time out we disassemble the new Mitsubishi Galant.This car is a mid-size import that comes in many different levels of luxury.The key is of the double-sided type, with eight spaces and four depths. Thecode series is E5001-7679.
(Continued on page 33)

I know you’re going to hate to hearthis, but card access for cars iscoming to a dealer near you! No, it’snot going to be there tomorrow, butprototypes are in the works. You knowwhat that means don’t you? It meansthose who refuse to learn at leastbasic electronics, are going to go theway of mechanical locks. They willslowly, but surely, be phased out. And,it’s not just the door locks that will becard access controlled. It will be theignition lock — or rather theelectronic Immobilizer — as well.
Auto manufacturers are currentlydeveloping totally keyless entrysystems based on infrared, radiowave, and card access technology.
Card access may prove to be the mostdesirable, with the theory being thatone card will open and start your car,dispense cash from an AutomaticTeller Machine (ATM), be used as adebit card, phone card, credit card,and access card to your home andbusiness. The technology is there, it’sjust a matter of increasing thereliability of the card readers whenexposed to the elements, and makingit affordable when compared tomechanical locks.
With each passing year, thereliability of electronic technologyincreases, and the costs decrease,bringing us closer and closer to suchtechnology. There is no doubt that the
day will come when totally keylesstechnology will be here, not just onour cars, but on everything needingaccess. Code books and key bittingswill be a thing of the past as electronicencryption takes its place.
GM 10-Cut Tumbler Locations
Last issue I gave you a chart listingthe models of car which used V.A.T.S.,P.A.T.S., M.A.T.S. and PASSLOCKignition systems. This month I’ll giveyou a handy little GM 10-cut tumblerlocation chart.
Use the table to reference thetumbler placement on thecorresponding chart.
DIRECTOR’SPAGE
GREG MANGO
National Locksmith Automobile Association Spring 1997 3
Card Access for Cars
CHART A1 2 3 4 5 6 7 8 9 10
Ignition X X X X X X X X XDoors X X X X XTrunk X X X X XGlove Box X X X XCHART B
1 2 3 4 5 6 7 8 9 10Ignition X X X X X X X X XDoors X X X X XTrunk X X X X XGlove Box X X X XCHART C
1 2 3 4 5 6 7 8 9 10Ignition X X X X X X X X XDoors X X X X X X XTrunk X X X X X X XGlove Box X X X XCHART D
1 2 3 4 5 6 7 8 9 10Ignition X X X X X X X X XDoors X X X X XTrunk X X X X XGlove BoxCHART E
1 2 3 4 5 6 7 8 9 10Ignition X X X X X X X X XDoors X X X X XTrunk X X X X XGlove Box X X X X
MODEL YEAR CHART LOCK TYPEBUICKRiviera 1995 E SidebarRiviera 1996 E WaferSkylark 1996 B WaferSkylark 1996-1/2 C WaferCHEVROLETCavalier 1995 A WaferCavalier 1996 B WaferCavalier 1996-1/2 C WaferGMC/CHEVROLET TRUCKSPickup 1995-96 D WaferFull Size Van 1996 D WaferAstro/Safari 1996 D WaferOLDSMOBILEAurora 1995 E SidebarAurora 1996 E WaferAchieva 1996 B WaferAchieva 1996-1/2 C WaferPONTIACSunfire 1995 E WaferSunfire 1996 B WaferSunfire 1996-1/2 C WaferGrand Am 1996 B WaferGrand Am 1996-1/2 C Wafer

Van ContestHow do you have your
service vehicle set up? That's acommon quest ion I thinkeveryone has when it comes tosetting up a service vehicle.And, what bet ter way toanswer it than to show someexamples. So, we’re going tohave a Locksmith van/truckc o n t e s t . P l e a s e s e n d aphotograph of your workvehicle, inside and out, and tellus a little about the way you setit up, and why.
Send the photographs andinformation to:
Van ContestNational Publishing1533 Burgundy ParkwayStreamwood, IL 60107
The winner will get a $100.00gift certificate for products soldby The National Locksmith. Thedeadline by which to have yourphotographs in is, June 10, 1997.All Photographs become thep r o p e r t y o f T h e N a t i o n a lLocksmith.
4 Spring 1997 National Locksmith Automobile Association
Photograph 2. An inside lookat Mike’s service vehicle.
Photograph 3. This GMC Safari is operated by DonAyesh of Don’s Key & Lock, San Francisco, CA. Photograph 4. An inside look at Don’s service vehicle.
Photograph 1. This Ford van is operated by Mike Chapman of AccessEngineering Company, Novato, California.

National Locksmith Automobile Association Spring 1997 5
Photograph 5. This GMC Sierra is operated by ElliottTamony of Lightning Security, San Francisco, CA.
Photograph 9 &10. An inside view of Dave's servicevehicle.
Photograph 6 & 7. An inside view of Elliott’s servicevehicle.
Photograph 8. This Ford van is operated by DaveRiorda of Fast Key Service, San Jose California.

Servicing the 1997Buick Park Avenue
by Michael Hyde
Well, here’s a car with some new twists, the 1997Buick Park Avenue (see Photograph 1). The 1997Park Avenue has locks made by the big Europeanlock manufacturer “HUF.” The only part made by
Strattec is the lock housing mounted on the column.This car is also equipped with a Transponder, but the
good news is that the system is very similar to theFord P.A.T.S. system. General Motors is calling thisnew transponder system “PASSKEY III”. Right now
key blanks are only available from the dealer. Retailcost for the key blanks is about $5.00. That’s right
only five bucks. You can’t beat that. The transponderchip is one of the smallest I have ever seen. It is so
small you won’t believe they put it in the head of thekey, once you see the key.
OPENING TECHNIQUE
Photograph 2. Opening this car is easier than it looks,even though the linkage rods are heavily guarded.
Photograph 3. First spread the window and weather stripping. Iused a horizontal slide linkage tool and inserted itinto the door cavity about 2” from the window edge.
6 Spring 1997 National Locksmith Automobile Association

National Locksmith Automobile Association Spring 1997 7
Photograph 4. There is an opening on thelinkage where it is not guarded.This opening is right before thelinkage connects with the latch. Iused the opening tool andbrought it down along the edge ofthe door and under the latch. Ithen bumped it up against thelatch and the lock button beganto move a little. Bumping it acouple of more times and thedoor was unlocked. The circle inthe photograph is the area whereI engaged the linkage rod.
IGNITION SERVICE
Photograph 5. This car uses a steering column lockthat is usually found on G.M. trucksthat use the new G.M. 10-cut keyway.This type of column is called the CSScolumn. On the CSS columns there is no sec-ondary lock cylinder housing. Thismeans that the cylinder housing is anintegral part of the steering column.The lock cylinder plug is inserteddirectly into that housing. When thesecolumns are built, they are assembledwith the shroud, ignition housing,steering wheel and so on. The ignitionlock cylinder plug is inserted after thecolumn arrives from the columnmanufacturer. Since the wings of thelock cylinder plug are larger than theopening in the shroud, you can notremove the upper section of theshroud.
Photograph 6. To service the ignition lock,you do not need to remove
the steering wheel.Remove the two Torxscrews that hold the
bottom half of the shroudto the column.

8 Spring 1997 National Locksmith Automobile Association
Photograph 7. Adjust the column to its mid-height position. Now remove the tilt-columnlever. The lever pulls right out.
Photograph 8. The next step is to gently,and I mean gently, unsnapthe forward section of the
shroud. The rear section ofthe shroud is hinged and
will not unsnap. The lowersection of the shroud can be
removed by pushing ittowards the front of the car,
to release it from themolded plastic hooks. Youcan also push the shroud
out of your way.You can now see the Delco“PASS-Key III” transponder
receiving unit.
IMPORTANT NOTE: Thecylinder plug only releaseswhen it is in the “Start”position. You can disconnectthe battery to accomplish this.If you disconnect the batteryyou may need a special radio“Code” to reactivate thevehicles radio. You can put thecar into gear, such as “Drive,”and then turn the ignition to“Start” to depress the retainer.When the car is in gear, thetransmission safety switchdoes not allow the starter toengage. Be careful. If you hearthe starter engage, turn theignition switch to the OFFposition immediately.
Photograph 9. Insert the working key androtate the cylinder to the “ON”position. Put the car in “Drive”,and make sure the brake is on.Use a GM 10-cut ignitionrelease tool and rotate the plugto the “Start” position. Depressthe retainer that is located ontop of the housing. The cylinderplug will now slide out.The ignition retainer tool that ispictured was part of a GM 10-cut servicing kit purchased fromA-1 Security. A GM 10-cutignition retainer tool can bepurchased from Tech-TrainProducts as well.

National Locksmith Automobile Association Spring 1997 9
Photograph 10. The ignition housing is pictured.The drop-in hole for the retainer is shown withtool tip protruding through. The plastic buzzerswitch is to the right of the tool.
Photograph 11. With the cylinder removed theside-bar and active retainer can be seen.
Photograph 12. A close-up view of the code that is
stamped on the cylinder plug can beseen on the side of the cylinder. The
code looks as if it was put on in a dot-matrix design, and will interchange
with the Strattec version.This plug contains nine tumblers in
positions 1 through 9. This codeseries is different from the standard
G.M. 10-Cut series.
DOOR LOCK SERVICING
Photograph 13. The door lock is part of theoutside door handle.

10 Spring 1997 National Locksmith Automobile Association
Photograph 14. To service the door
cylinder, it is necessaryto remove the inside
door panel.
Photograph 15. First, remove the trim plate in the bottomof the door pull cavity.
Photograph 16. Under the trim plate are twoscrews that must be removed.
Photograph 17. On the rear edge of the door is a markerlight. Gently pull out the light.
Photograph 18. Behind the marker light you willfind a phillips head screw that must be removed.

National Locksmith Automobile Association Spring 1997 11
Photograph 20. The panel can now be removed. Thisdoor panel does not use the standard push in stylefasteners. The panel uses the new “Hook” fastenersnormally found on cars like Mercedes. Lift up on thepanel to remove it. Be careful to remove the wiringharness attached to the panel.
Photograph 19. The trim cover that sits behind theinside door handle release must be removed. Gentlydetach it at the front section of it.
Photograph 21. A view of the door with thepanel removed.
Photograph 22. To gain easier access to the
inside cavity of the door, youmust remove the bracket
shown.

12 Spring 1997 National Locksmith Automobile Association
Photograph 23. Now you can pull back the thickliner and easily find the door lockcylinder. The lock cylinder is held inplace by a wire clip. The door lockcylinders use plastic pawls. Thesepawls are very easy to break. Beextremely careful not break thepawl as you disconnect the linkagerod from it. There are noreplacements available yet and alock service package from thedealer is around $60.00
Photograph 24.There is no
side-bar in thedoor locks. The
door lock ispictured.
Photograph 25. The facecap is re-usable. Thefacecap and the tailpiece need to be removed toslide the cylinder plug out.
Photograph 26. A view of the plastic tailpiece. Be carefulwhen removing not to break.
Photograph 27.The shutterdoor assemblyis differentthan other GMface caps. Theshutter doorsprings arevery small andcan easily belost.
National Locksmith Automobile Association Spring 1997 13
Photograph 28. If you don’t have a working key
you will need to shim the cylinderplug in order to get the plug out.The plug has a ball bearing and
spring mounted in it.
Photograph 29. A view of the door lock cylinderdisassembled.
Photograph 30. The door lock contains tumblers inpositions 3 through 9.
Photograph 31. The type of tumblers used in the door lock are verydifferent than anything else in the GM family. The widetumbler on the right is the standard GM 10-cut doortumbler. The tumbler on the left is from a 1992 DodgeCaravan. The tumbler in the middle is from the 1997Buick Park Avenue. The Dodge tumblers are almostidentical. This is really strange.
TRUNK LOCK SERVICING
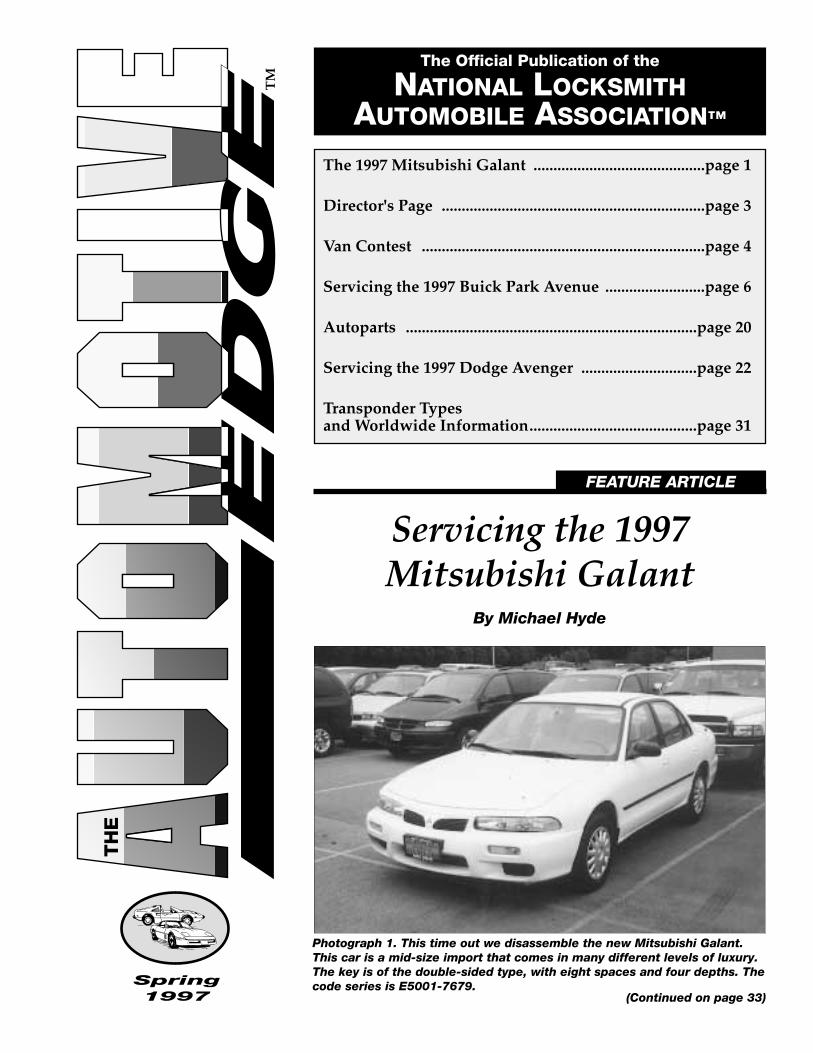
Photograph 32. The trunk lock cylinder islocated to the right of the license plate.
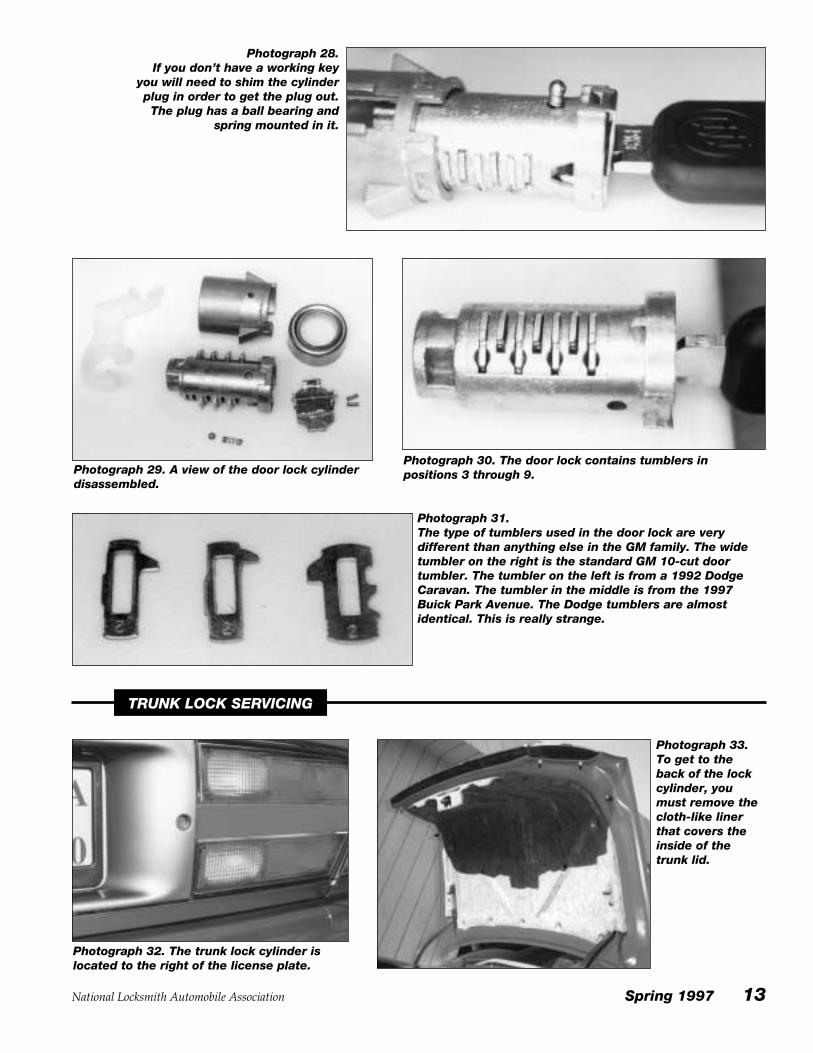
Photograph 33. To get to theback of the lockcylinder, youmust remove thecloth-like linerthat covers theinside of thetrunk lid.

14 Spring 1997 National Locksmith Automobile Association
Photograph 34. The trunk lock is bolted to the trunklid by two 10mm nuts. The cable tailpiece assembly issnapped onto the rear of the lock.
Photograph 35. You will have to remove the 10mmnuts that hold the rear tail-light assembly on. The tail-light assembly can then be removed.
Photograph 36. A view of the trunk lockwith the tail-light assembly removed.
Photograph 37. A view of the trunk
lock removed.
Photograph 38. The facecap is re-usable. The facecapneeds to be removed to slide the cylinder plug out.
Photograph 39.The face cap,dust shutterand springs intheirdisassembledstate.

National Locksmith Automobile Association Spring 1997 15
Photograph 40. The tailpiece return spring as it ismounted to the tailpiece shaft.
Photograph 41. The middle section of the lock assemblyhas a large wire retaining clip.
Photograph 42. The wire retaining clip removed.Photograph 43. The rear housing section can now berotated and removed.
Photograph 44. The rear section of the housing iswarded and can only rest flat in themain housing in one position. There isa spring that sits between the frontand rear sections.

16 Spring 1997 National Locksmith Automobile Association
Photograph 45. The tailpiece shaft is also warded.
Photograph 46.The frontsection cannow slide outof the mainhousing.
Photograph 47. The cylinder plug is also warded andmust be rotated to a certain position for removal. Aworking key is necessary, or you will have to pickthe lock. It is possible to use H.E. Mitchell’s EZZ-Reader, but since the tumblers are of a differentdesign the reader does not read the tumblerscorrectly. The reader tool reads the wafers shallow,such as a number four depth reading as a numberthree depth, and so on.
Photograph 48.The trunk lock cylinder plug
contains tumblers in positions 3through 9.
Photograph 49. The trunk lock assemblycomponents disassembled.

National Locksmith Automobile Association Spring 1997 17
GLOVE BOX/COMPARTMENT LOCK
Photograph 50. The glove box lock.
Photograph 51. The inside liner must be removed toget to the locks latch assembly. There are six phillipshead screws securing the liner.
Photograph 52. Next, remove the two8mm nuts that holdthe latch on, anddisconnect it from thelock unit. You can nowremove the largehorseshoe clip thatholds on the lock unit.
Photograph 53.The glove box lock
unit removed.

18 Spring 1997 National Locksmith Automobile Association
Photograph 55. A view of the wardon the end of the cylinder plug.
Photograph 56. The glove box lock cylinder plugcontains four combination tumblersand one retaining tumbler. Thecombination tumblers are positions7 through 10.
MAKING FIRST KEY
NOTE: Since the codes for this car are different than other G.M. 10-cut codes, calling Buick Roadside wouldn’t do muchgood until someone release’s the codes for this car.
Method 1. Use A-1’s GM 10-cut ignition pick and decoder service set. It will allow you to pick the ignition cylinder and thenremove the cylinder to decode it, without drilling or damaging the lock. This will give you cuts in positions 1 through 9.
(A-1 Security can be reached at 804-359-9003)
Method 2. Use AABLE’S GM 10-Cut tool to pick the lock to the “ON” position and remove to decode the lock. (AABLElocksmiths can be reached at 718-847-1377)
Method 3. Remove door or trunk lock and decode the lock. Progression two cuts needed to turn the ignition “ON”, inpositions 1 & 2. Then progression the last cut in the glove box for position 10.
IMPORTANT NOTE: The cylinder plug only releases when it is in the “Start” position. You can disconnect the battery. If youdisconnect the battery you may need a special radio “Code” to reactivate the vehicles radio. You can put the car into gear,such as “Drive,” and then turn the ignition to “Start” to depress the retainer. When the car is in gear, the transmission safetyswitch does not allow the starter to engage. Be Careful, if you hear the starter engage, turn the ignition switch to the “OFF”position immediately.
Photograph 54.Rotate the
cylinder plug tothe locked
position andthen depress
the wafer in theaccess window
to rotate thecylinder
further. It willthen line up
with the wardon the end of
the plug forremoval.

National Locksmith Automobile Association Spring 1997 19
NOTE: This procedure is used when no other working key for the car is available.
1. Put the newly cut key into the keyway and turn it to the “ON” (RUN) position. A “Security” indicator light on the dashboardwill flash for 10 minutes.
2. Within 3 minutes after the indicator light stops flashing, turn the ignition to “OFF,” then return to the “ON” (RUN) position.The indicator light again will flash for 10 minutes.
3. Again, within 3 minutes after the indicator light stops flashing, turn the ignition to “OFF,” then return to the “ON” (RUN)position. The indicator light again will flash for 10 minutes.
When the light stops flashing for the third time, the new key is programmed into the computer and will start the car. Allpreviously stored codes will be erased. To stop the process at any time, simply remove the key and use an existing key tostart the car.
PROGRAMMING INSTRUCTIONS FOR TRANSPONDER KEY
SPECIFICATIONS
Code Series: N/A
Key Blank: Dealer Item Only (at thistime)
Reed Codes: N/A
HPC 1200CM #: CF215
M.A.C.S.: 2
Center of first cut: 1.034 (from tip)
FRAMON: Lay tip stop clip flatagainst left side of vise, then tip stopkey against clip.
Set first cut @ .216
TRANSPONDER KEYS
Photograph 57. All Buick keys thathave a marking of
“PK3” are trans-ponder keys.
Photograph 58. A view of the tiny transponder andhow it is positioned in the head of the key.
1. Place an already programmed key in the keyway. Cycle the ignition from “OFF” to “ON” (RUN) to “OFF.”
2. Within 15 seconds, insert the new, properly cut Transponder key in the ignition. Turn the key to “ON” (RUN) or “START.”The “Security” indicator light will go on and off. Turn the key “OFF.” The key will now start the car
3. Repeat the second step for each new key to be programmed.
CREATING A SPARE KEY
1.034 .942 .850 .758 .666 .574 .482 .390 .298 .206
Depths:1= .3252= .2973= .2704= .242
Cut to Cut: .092"
Tumbler Locations

20 Spring 1997 National Locksmith Automobile Association
In this issue of the NLAAnewsletter we continue with ournews about the auto industry.
BUYING A NEW TRUCK/VAN
A. Here are some things toconsider when buying a new workvehicle.
Try to buy a 1 ton truck. Sincecabinets and equipment are apermanent fixture for the truck,you need a truck that can handleit. If you buy a 1/2 ton truck, youwill be getting a light weightsuspension and rear-end. You willalso get leaf spring sagging, andrun into wheel bearing problemsand blown seals.
B. How tall is the truck? Inmetro area’s there are parkinggarages and other areas that willkeep you out. There’s nothingworse than having to drag yourtools down four levels of a parkinggarage, let alone have to run backand forth to the truck.
C. Most dealers usually stockbare-bones trucks. If you wantsomething other than White, youwill have to order it from thefactory. If you do order it you canget certain necessities like powerwindows and power door locks.
MERCEDES-BENZ UPDATE
All 1997 models have a rollingcode transponder. There is a veryobvious looking cup ring on theignition.
HYUNDAI LOCKS
In Europe there is a new highsecurity keyway. Yes, even
Hyundai has a 2-track keyway. Ithas eight spaces and 9 depths.
NEW CARS & TRUCKS
Here are a few new vehiclescoming to a showroom near you.
1998 Dodge Durango
1998 Ford Escort ZX2
1998 Lincoln Navigator
1998 Mercedes CLK Coupe
1998 Toyota Sienna
1998 Volvo C70 & V70 T5
1998 Subaru Streega
1998 Honda CR-V
1998 GMC Denali
1998 Olds Intrigue
The 1997 Chevy Corvette willhave a re-designed double sidedGM 10-cut keyway with VATS.Strattec says those other GMdouble sided VATS blanks, madefor the “Aurora” & “Riviera” willnot work on the Vette because of avery slight difference in the lengthof the blade.
HONDA NEWS
The new re-designed 1997Honda Prelude has a Transponderkey system. The customer musth a v e t h e o r i g i n a l “ R e d ”p r o g r a m m i n g k e y t o a d dadditional keys to the system. Ifyou don’t have any keys to the caryou can not make any new onesthat will start the car. This is whatI call a closed system. The car stilluses the standard late modelHonda keyway. Code series is5001-8442.
TRANSPONDER EQUIPMENT
Recently there has been somearticles and advertising ontransponder “Reading/Writing”equipment. The thing they don’ttell you is that none of thesemachines will do you any good ifthere are no keys that can start thecar. Basically they are “Electronic”duplicators. You still have to makethe mechanical portion of the key.
OPEN SYSTEMS
The Ford P.A.T.S. on the FordTaurus LX, Mercury Sable LS,“Ford Expedition, 1997 LincolnMark VIII & 1997 Buick ParkAvenue.
DUPLICATION ONLY SYSTEMS
Acura RL, Audi A4 (some),Audi A6, Audi A8. CadillacCatera, 1997 Honda Prelude, &1997 Porsche Boxster.
CLOSED SYSTEMS
1996 & up BMW’s, 1997 InfinitiQ45, 1996 & up Jaguar (most), 1997Lexus LS400, 1997 Mercedes (all),1996 & up Range Rover.
RECALLS
There were 742, 1997 LincolnTown Cars that are missing boltsfrom driver’s side airbag units.
Dealers will add the missingbolts if you bring the car into theservice dept.
Honda is recalling about all the1995 Accord Sedans & Coupes.There is a faulty sensor that couldcause the Airbag to deploywithout a collision.
by Michael Hyde
Inside Industry News

National Locksmith Automobile Association Spring 1997 21
ROLLS-ROYCE TRIVIA
It takes about 30 days to makeone Rolls-Royce.
GEO, NO MORE
The Geo name is no more afterthe 1997 model year. The three Geomodels: Tracker, Prizm & Metrowill be renamed to the Chevroletname. Almost 2 million Geo’s havebeen sold since the introduction in1989. The goal of G.M. was toconcentrate on small car sales and
now they think they have done that.
SPORT UTILITY POLICE CARS
As you know the Chevy Capricehas been discontinued. Now Fordis the only one making Police cars.Wait, hold the phone, Chevy willrelease a Police version of its“Tahoe” Sport Utility Vehicle.Good luck Chevy.
KIA MOTORS GOING STRONG
Kia Motors has 210 dealers in 22states and is expanding into the East
Coast. Next year Kia will introducethe Kia Sportage Convertible.
MAZDA DOWNSIZES
Mazda has discontinued sales ofthe Navajo, 323, MX3, RX-7, & 929.
DAEWOO
Remember Daewoo? It was thecompany that gave us the lovelyKorean made Pontiac LeMans.Daewoo will be coming to Americain 1998 with a model called the“Lanos”.
NOTES:

Photograph 1. The Dodge Avenger is the
sister to the ChryslerSebring hardtop. This
model only comes in a twodoor model. This car is
made by a subsidiary ofMitsubishi Motors. It usesone master key for all the
locks and can also use avalet key. The key is of the
double-sided type, witheight spaces and four
depths. The code series isE5001-7679.
22 Spring 1997 National Locksmith Automobile Association
Servicing the 1997 Dodge Avenger
by Michael Hyde
OPENING
Photograph 3. Make contact with the linkage rod shown andbind the rod. Move the rod towards the front of the car.
Photograph 2. Opening the Avenger is a pieceof cake. Insert a horizontal slide linkage toolinto the door cavity, about 10 inches from theedge of the door.
National Locksmith Automobile Association Spring 1997 23
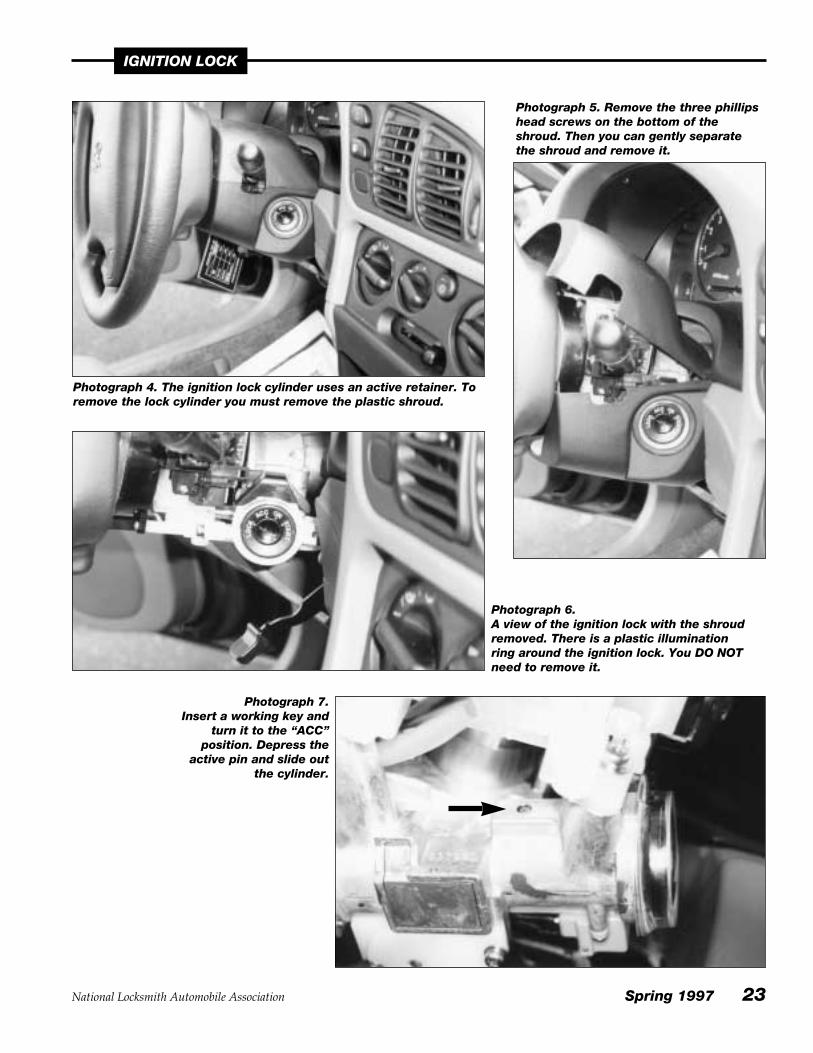
IGNITION LOCK
Photograph 4. The ignition lock cylinder uses an active retainer. Toremove the lock cylinder you must remove the plastic shroud.
Photograph 5. Remove the three phillipshead screws on the bottom of theshroud. Then you can gently separatethe shroud and remove it.
Photograph 6. A view of the ignition lock with the shroudremoved. There is a plastic illuminationring around the ignition lock. You DO NOTneed to remove it.
Photograph 7. Insert a working key and
turn it to the “ACC”position. Depress the
active pin and slide outthe cylinder.

24 Spring 1997 National Locksmith Automobile Association
Photograph 8.The ignition
lock cylinderis shownremoved.
Photograph 9. To disassemblethe ignitionlock cylinderyou must firstremove the“tru-arc” ringon the rear ofthe cylinderhousing.
Photograph 10. The ignition lock cylinder disassembled.
Photograph 11. The ignition cylinder plug containsall eight tumblers.
DOOR LOCK
Photograph 12. The door lock cylinder is part of theoutside door handle.
Photograph 13. To service the door lock cylinder, itis necessary to remove the inside door panel.Remove the window crank which is held on a byhorseshoe style clip.
National Locksmith Automobile Association Spring 1997 25
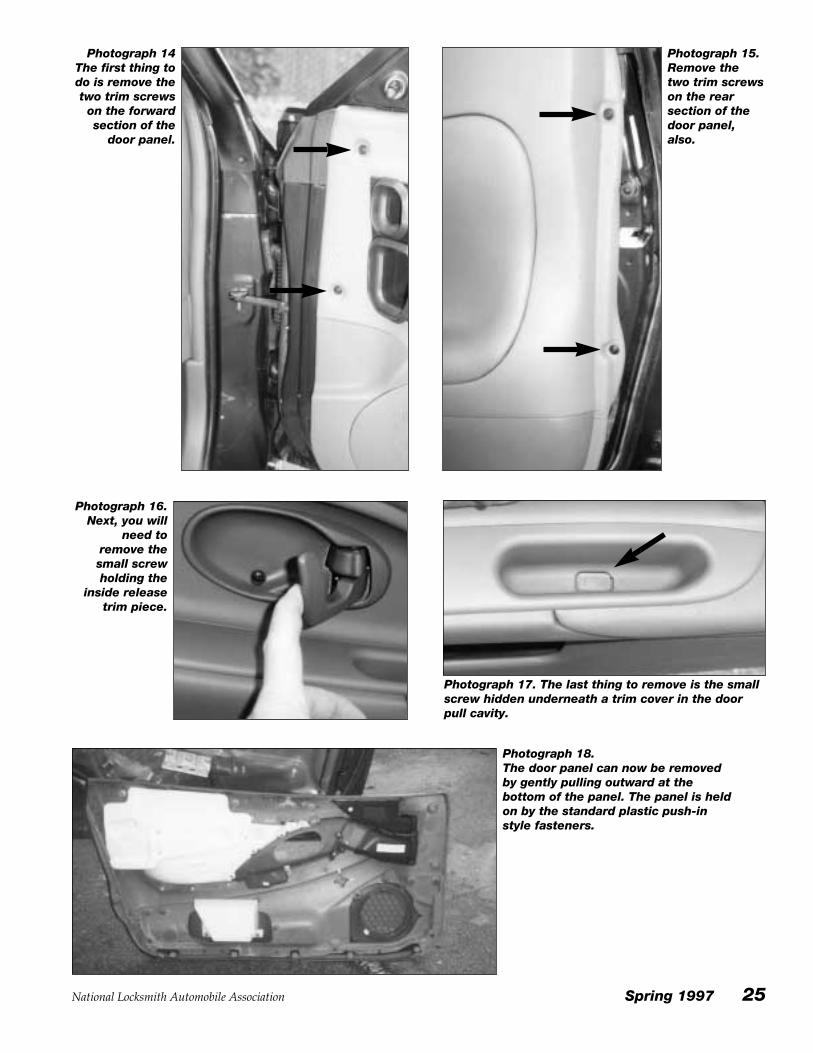
Photograph 14The first thing todo is remove thetwo trim screws
on the forwardsection of the
door panel.
Photograph 15.Remove thetwo trim screwson the rearsection of thedoor panel,also.
Photograph 16.Next, you will
need toremove thesmall screwholding the
inside releasetrim piece.
Photograph 17. The last thing to remove is the smallscrew hidden underneath a trim cover in the doorpull cavity.
Photograph 18. The door panel can now be removedby gently pulling outward at thebottom of the panel. The panel is heldon by the standard plastic push-instyle fasteners.
26 Spring 1997 National Locksmith Automobile Association
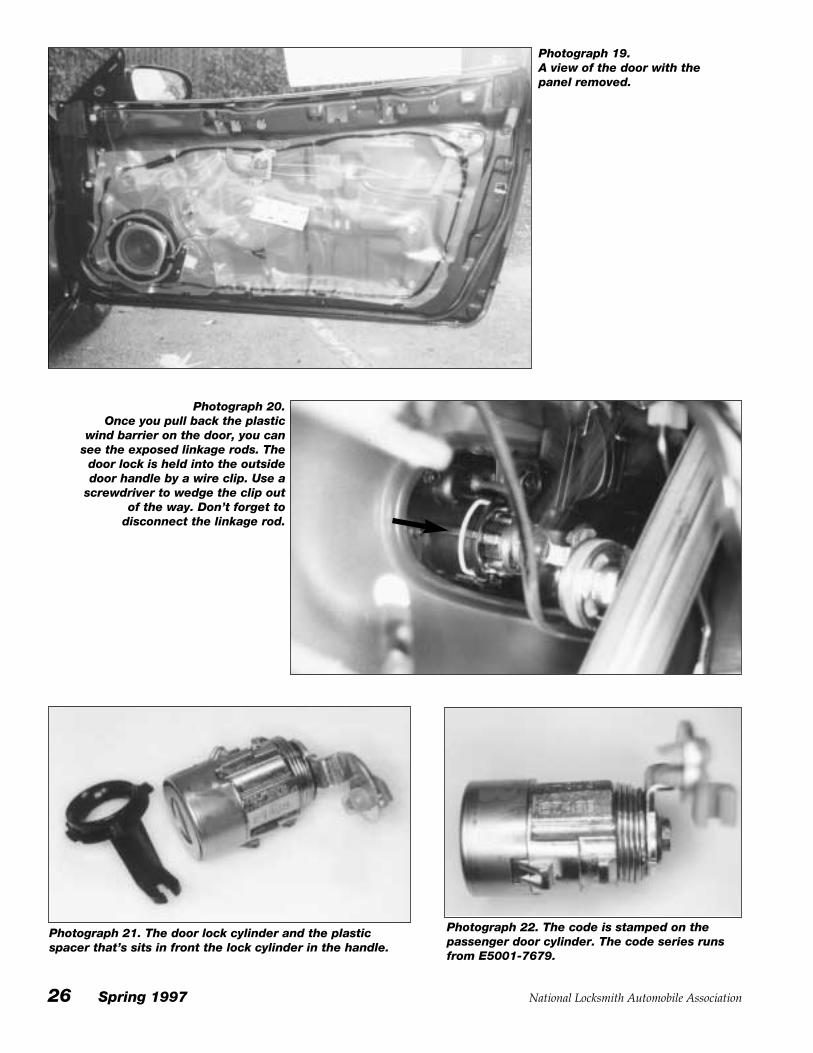
Photograph 19. A view of the door with thepanel removed.
Photograph 20. Once you pull back the plastic
wind barrier on the door, you cansee the exposed linkage rods. The
door lock is held into the outsidedoor handle by a wire clip. Use a
screwdriver to wedge the clip outof the way. Don’t forget to
disconnect the linkage rod.
Photograph 21. The door lock cylinder and the plasticspacer that’s sits in front the lock cylinder in the handle.
Photograph 22. The code is stamped on thepassenger door cylinder. The code series runsfrom E5001-7679.

National Locksmith Automobile Association Spring 1997 27
Photograph 23.To disassemble
the door cylinderyou will first have
to remove the“C” clip thatholds on the
tailpiece.
Photograph 24. The face cap will also have to beremoved. The face cap is reusable. There are noreplacement caps available.
Photograph 25. A view of the door lock cylinderdisassembled.
Photograph 26. The door lock cylinder plug containsall eight master wafers.
TRUNK LOCK
Photograph 27. The trunk lock cylinder sits behind atrim piece on the trunk lid.
Photograph 28. It is necessary to remove the five10mm nuts that hold on the lower section of theoutside trim piece that covers the lock cylinder.

28 Spring 1997 National Locksmith Automobile Association
Photograph 29. There are also three plasticfasteners that hold the trim piece. These fastenersare extremely easy to break. Unsnap the fastenerclosest to the lock cylinder by gently pushing it fromthe inside of the trunk lid. There should now beenough room to lift up on the trim piece to slide outthe lock cylinder. The lock cylinder is held by amental clip. Remember to disconnect the locklinkage rod.
Photograph 30.The trunk lockcylinderremoved fromthe car.
Photograph 31. To disassemble the trunkcylinder you will first have to remove the “C” clipthat holds on the tailpiece.
Photograph 32. The face capwill also haveto be removed.The face cap isreusable. Thereare no replace-ment capsavailable.
Photograph 33. A view of the trunk lockcylinder disassembled.
Photograph 34. The trunk lock cylinder plugcontains all eight master waferstumblers and one valet wafertumbler that the tip of the keyoperates.

National Locksmith Automobile Association Spring 1997 29
Photograph 35. A view of the glove box lock mountedin the glove box door.
GLOVE BOX LOCK
Photograph 36. To remove the lock, you must unfastenthe two small phillips head screws.
Photograph 37. The glove box lock assemblyremoved from the car.
Photograph 38. To get to the cylinder plug, you mustdisassemble the squeeze type button assembly on the front ofthe lock. Bend the four brass tabs the hold the face of the locktogether. The tabs are on the rear section of the assembly.
Photograph 39. A view of the plastic face plateremoved.
Photograph 40. The opposing squeeze buttons will now slideoff. Underneath each squeeze button is a spring.

30 Spring 1997 National Locksmith Automobile Association
Method 1. Check owners manual for code, written in by the dealer.
Method 2. Remove passenger door cylinder and read code stamped on lock.
Method 3. Disassemble door cylinder or trunk cylinder, and decode wafers to make master key.
Method 4. Disassemble the glove box and decode the tumblers. The glove box contains, (if equipped), 4 tumblers inpositions 5 through 8. Use Blackhawk Computer program called “FILL” to progression the remaining cuts.
Method 5. Impression locks.
Photograph 41. It is important that you markthe cylinder plug before you remove it from thelock housing.The glove box cylinder plug contains fourmaster wafer tumblers and a valet tumbler. Themaster tumblers are in positions 5 through 8.The valet tumbler is activated by the tip of thekey.
Photograph 42.A view of the
glove box lockassembly,
disassembled.
Photograph 43. Once the cylinder plug is removedfrom the lock housing there is nothing to hold thetwo opposing locking latches in place. Be carefulwhen handling the lock assembling.
GENERATING FIRST KEY
SPECIFICATIONS
Keyblanks:
Ilco: X176/MIT1
Silca: MIT8
Reed Codes: 09-02-280
HPC 1200CM #: XF88, CX88
M.A.C.S.: 2
Code Series: E5001-7679
Depths:1= .3252= .2973= .2704= .242
Cut to Cut: .083"
Tumbler Locations

National Locksmith Automobile Association Spring 1997 31
Transponder Types andWorldwide Information
There are two basic types oftransponder systems currently inuse today.
SYSTEM A, is a system with amaster key. The master keyenables the addition of extra keysinto the memory of the car.
SYSTEM B, is a system without amaster key. The system requires adedicated electronic tool to addthe extra keys into the memory ofthe car.
The following is a list of themanufacturers of suchtransponder systems, along withthe vehicle application and type ofsystem used.
The following letter is a reprintof a letter sent out to all Silcacustomers:
January 1997
From: Roberto De March & EzioChies
To: All our Customers, Agents,and Dealers
We begin this new year withimportant news in connection withelectronic technology applied toTransponders, which, as used bycar manufacturers on car keys withimmobilizers, requires continuousupdating.
We are, in fact, about to launch27 new keys which will allow us to
offer a fuller range of key blankswith Transponders to meet thedemand relating to most of the carsnow in circulation in the world.
Let’s take a closer look at theinnovations.
Up till now, car manufacturesh a v e u s e d f o u r t y p e s o fTransponders with fixed codes:Texas, Philips, Megamos, andTemic. Recent inside informationhas it that Motorola is also about toenter the market with applicationson American cars. With the soleexceptions of Philips, none of theother types of Transponder wasoriginally designed for duplication.Car manufacturers organized a
by Elliot Tamony
Manufacturer Application SystemTexas Ford-Euro (most models) A(TIRIS) *Ford-USA (Taurus-Sable-Mustang-
and Expedition) AHyundai-(all models 1996 1/2) AMitsubishi-(most models) BProton-(415-416) ASuzuki-(Baleno, Vitara) BToyota-(Carina, Celica, RAV4) B
Philips Alfa Romeo (all models) A(Bosch- BMW (all models-rolling code) BSiemans) Fiat (some models) A
Ford-Euro (Galaxy, Maverick) B*GM Cadillac USA (Catera) BHonda-Euro (Accord, Civic) ALancia A*Mercedes (‘97 Worldwide) BMitsubishi (Carisma) BNISSAN (all models) BOpel-Vauxhall(all models) BRenault (Clio, Twingo, and Megane, Laguna) B
Manufacturer Application SystemRover (620) BSeat (all models) BSkoda (Felicia) BSubaru BToyota (Celica, Carina) AVW (all models) BVolvo (850, 960, 740, Polar, S40) B
Megamos Audi (A4, A6, A8, A3) BDaewoo (Nexia, Espero) BFiat (most models) AHonda (Shuttle, Civic) ALancia (Delta, Dedra) AJaguar (all models) BOpel (Frontera) B
Temic Fiat (Palio, Fiorino, Marea) AFord (Probe) ALancia AMazda (all models) APiaggio (Vespa ‘96) A
Motorola *Lincoln-USA (‘97 Mark 8) A*Models that are available in the U.S. Market.
32 Spring 1997 National Locksmith Automobile Association
spare key service by providingtheir dealers with special electronicmachines reserved for duplicatingthe type of key used on their cars.
F o r k e y s w i t h M e g a m o sTransponders, used by Fiat, Audi,and Honda, at the end of 1995 Silcadeveloped a suitable codingsolution, which became obsoletearound mid 1996 because thecentralized electronic controlsystem on the cars was modified.For example, the Silca HU66AT2key for Audi now operates onlyk e y s s u p p l i e d w i t h c a r smanufactured up to June 1996. Thes a m e a p p l i e s t o S i l c a K e yGT15RAT2 for Fiat Punto. Fiat hasalso adopted a Temic Transponderfor its new Marea and Paliomodels, thereby adding newproblems and variants to Silca’salready difficult task of providingthe market with the best solutions.
Now we have the answer! Thesolution is the innovative SilcaUniversal Transponder T5.
This solution makes it possible topreserve the advantage, especiallyfor the final user, of being able tou s e t h e d u p l i c a t e d k e yimmediately without the need forthe Master key or the dealer forf i n a l c o d i n g . A l l t h e k e y si n c o r p o r a t i n g t h e n e wTransponder are distinguished bya final code T5.
In offering the new car keys withSilca Transponders, there are fivepoints to note:
1. Seven existing keys havechanged their final code from T2 toT5.
2. For these seven types of keysremaining on the shelves of dealersor key cutting service centers, Silcahas brought out a transformationkit which includes the new T5Transponder to replace the existingT2, and relative plug. Therecovered T2 Transponder may beused on any other key whose codedoes not need to be changed. Bear
in mind that keys can be purchasedwithout Transponders; their partnumbers can be found in the guideto Immobilizer Key Code Service.
3. With the introduction of a news e r i e s o f k e y s w i t h T 5Transponders, it will be necessaryto update the TW100, SA1 and TR1decoding machines.
4. A new series of keys has beenadded for the duplication ofo r i g i n a l k e y s w i t h T e m i cTransponders.
5. A new series of keys withTexas plastic Transponders T4(pre-coded, they cannot beduplicated) for use on Japaneseand Korean cars adopting theoriginal memorization procedure(Master Key or dealer).
Work on replacing the referencesfor the seven types of keys, theproduction of twenty new keysand updating of the decodingmachines has already started andwe are counting on showing theresults at the Cologne Fair (2-5March 1997).
We assure you, as this letter is ofample proof, that our commitmentwill be intense in 1997, from boththe organizational and financialpoint of view, and in terms ofcommunication, in order to placeyou in the best condition to satisfyyour customers. For example, weare already working on our newc a t a l o g u e f o r k e y s w i t hTransponders and new advertisingm a t e r i a l f o r p o i n t o f s a l ecommunications to customers.
The subject of car keys withTransponders is certainly complex,because it is new, in continuousevolution, and requires a newapproach on the part of key-cuttingcenters to the problems of carowners. Key-cutting centersworking in close contact with cardealers are usually happy withtheir investment in technology forthe duplication of keys withTransponders. In Europe we are
constantly aware that more keysare sold if there is direct contactwith car dealers, who very oftenare able to offer satisfactory serviceto their customers only if they relyon a specialist key center.
The Transponder revolution isnow worldwide. Silca has alreadysold transponder machines andkeys to every continent, withoutexception. The European market isundoubtedly the driving forcebehind a phenomenon which hasno boundaries. A survey carriedout in the motor car industryshows that up to now 20,000,000motor cars provided withImmobilizers have been releasedonto the western European marketand that a further 10,000,000 willbe sold during 1997. To thesefigures can be added millions ofcars exported throughout theworld.
The latest news is that Silca hasbeen chosen by ALOA, theAmerican Locksmiths’ Association,t o o r g a n i z e a s e m i n a r o nTransponder technology to be heldduring their next annual fair due tobe held on 30th July this year inReno, Nevada. It gives usenormous satisfaction that thebiggest locksmiths’ association inthe world considers us the leadersin this new technology!
All Silca people, in the SalesTeam, Customer Service and After-sales Service are at your completed i s p o s a l f o r a n y f u r t h e rinformation or clarification youmay require.
We feel confident that we haveonce again proved our deter-mination to exploit anotherimportant business opportunityand wish to thank you in advancefor your cooperation.
Yours truly,
Roberto De MarchEzio Chies
Sales DirectorR&D Director

National Locksmith Automobile Association Spring 1997 33
FEATURE ARTICLE
1997 Mitsubishi Galant (Continued from front cover)
OPENING
Photograph 2.Opening the Galant is simple, because all the linkageis exposed. Use a horizontal slide linkage tool and acouple of good wedges.
Photograph 3. Make contact with the linkage rod shownand bind the rod. Move the rod towards the front of thecar to open.
Photograph 4. To remove the lock cylinder youmust remove the two piece plastic shroud. Theignition lock cylinder uses an active retainer.
IGNITION
Photograph 5. Remove the four phillips head screwson the bottom of the shroud. Then you can gentlyseparate the shroud and remove it.

34 Spring 1997 National Locksmith Automobile Association
Photograph 6. A view of the ignition lockwith the shroud separated.
Photograph 7. Insert a working key and turn it tothe “ACC” position. Depress the active pin and slideout the cylinder.
Photograph 8. The ignition lock cylinder is shownremoved.
Photograph 9. To disassemble the ignition lockcylinder you must first remove the “tru-arc”ring on the rear of the cylinder housing. Photograph 10. There is a lever in the cylinder housing that
blocks the cylinder plug from being forcibly pulled out.

National Locksmith Automobile Association Spring 1997 35
Photograph 11. A look at the retaining lever mounted in theupper cavity of the lock housing.
Photograph 12. A view of the ignition lockdisassembled.
Photograph 13. The ignition lock
cylinder plug containsall eight master wafer
tumblers. Be carefulnot to lose the black
buzzer activator whenyou disassemble the
lock cylinder.
DOOR LOCK
Photograph 14. The door lock cylinder is part of theoutside door handle.
Photograph 15. To service the door lock cylinder it isnecessary to remove the door panel.

36 Spring 1997 National Locksmith Automobile Association
Photograph 16. The armrest has two screws that are hiddenbehind the trim caps. Remove the screws.
Photograph 17. There are three screws on the rear of the door that
have to be removed. There are also two screws on thefront section of the panel that need to be removed.
Photograph 18. There is a screw that holds on thetrim piece behind the inside door release handle. Photograph 19. A view of the door with panel removed.
Photograph 20. As you can see the door lock
cylinder is held in by a wire clipand easily accessible.
National Locksmith Automobile Association Spring 1997 37
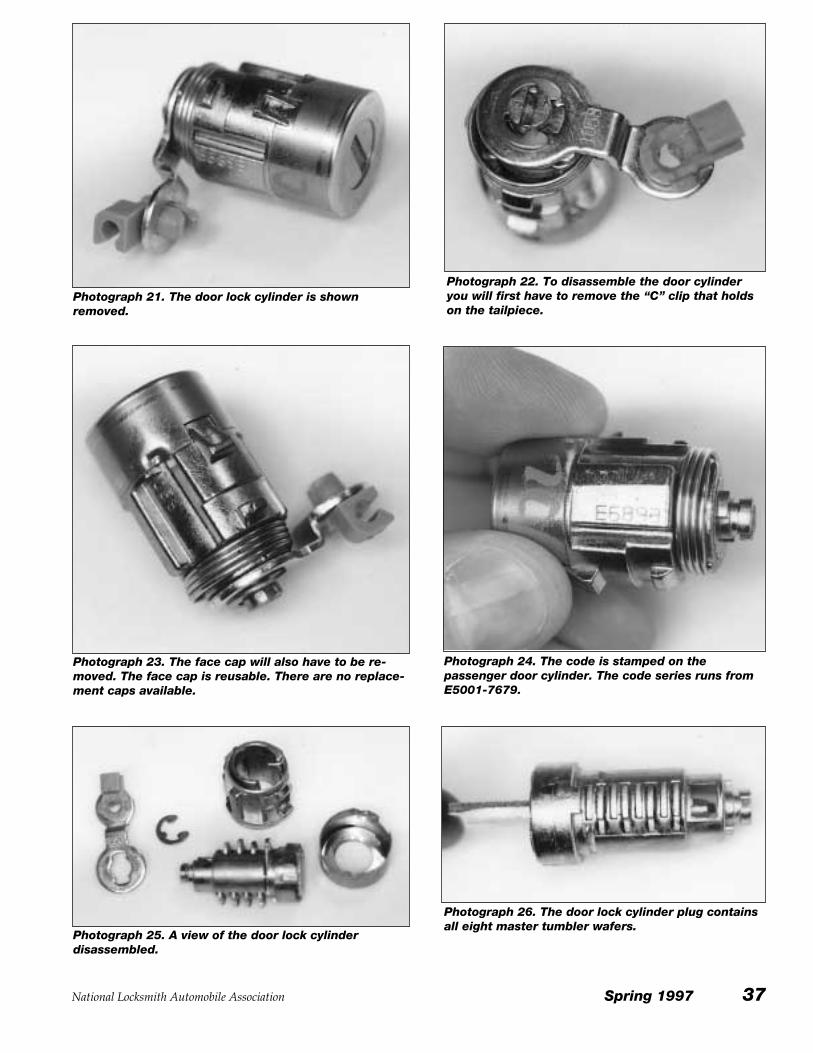
Photograph 21. The door lock cylinder is shownremoved.
Photograph 22. To disassemble the door cylinderyou will first have to remove the “C” clip that holdson the tailpiece.
Photograph 23. The face cap will also have to be re-moved. The face cap is reusable. There are no replace-ment caps available.
Photograph 24. The code is stamped on thepassenger door cylinder. The code series runs fromE5001-7679.
Photograph 25. A view of the door lock cylinderdisassembled.
Photograph 26. The door lock cylinder plug containsall eight master tumbler wafers.

38 Spring 1997 National Locksmith Automobile Association
TRUNK LOCK
Photograph 27. The trunk lock cylinder has achrome face on the lock cylinder housing. The car isequipped with a trunk release lever located downlow by the driver’s seat. The release lever is on allGalant models and does not lock.
Photograph 28. The trunk lock cylinder is held to thetrunk lid by a metal horseshoe clip.
Photograph 29. The trunk lock cylinder removed from the car.Notice the long tailpiece. The very tip of the tailpiece sits in a holein the trunk lid sub-structure to steady lock housing.
Photograph 30. To disassemble the trunkcylinder you will first have to remove the“C” clip that holds on the tailpiece.
Photograph 31. A view of the trunk
lock cylinderdisassembled.
Photograph 32. The trunk lock cylinder plugcontains all eight master wafers tumblers and onevalet wafer tumbler that the tip of the keyoperates.

National Locksmith Automobile Association Spring 1997 39
Photograph 33. A view of the glove box lock mountedin the glove box door.
GLOVE BOX LOCK
Photograph 34. To remove the lock, you must unfastenthe two small phillips head screws.
Photograph 35. The glove box lock assemblyremoved from the car.
Photograph 36. To get to the cylinder plug, you mustdisassemble the squeeze type button assembly on thefront of the lock. Bend the four brass tabs the hold theface of the lock together. The tabs are on the rearsection of the assembly.
Photograph 37. A view of the plastic face plateremoved.
Photograph 38. The opposing squeeze buttons will nowslide off. Underneath each squeeze button is a spring.

40 Spring 1997 National Locksmith Automobile Association
Method 1. Check owners manual for code, written in by the dealer.
Method 2. Use the trunk release lever to pop open the trunk and remove the lock cylinder and decode it, to make a master key.
Method 3. Remove passenger door cylinder and read code stamped on lock.
Method 4. Disassemble the glove box and decode the tumblers. The glove box contains, (if equipped), 4 tumblers inpositions 5 through 8. Use Blackhawk Computer program called “FILL” to progression the remaining cuts.
Method 5. Impression locks.
Photograph 39. It is important that you markthe cylinder plug before you remove it from thelock housing.
Photograph 40. The glove box cylinder plug contains fourmaster wafer tumblers and a valet tumbler. The mastertumblers are in positions 5 through 8. The valet tumbler isactivated by the tip of the key.
Photograph 41. Once the cylinder plug is removed from the lockhousing there is nothing to hold the two opposinglocking latches in place. Be careful when handlingthe lock assembling.
GENERATING FIRST KEY
SPECIFICATIONS
Keyblanks:
Ilco: X176/MIT1
Silca: MIT8
Reed Codes: 09-02-280
HPC 1200CM #: XF88, CX88
M.A.C.S.: 2
Code Series: E5001-7679
Depths:1= .3252= .2973= .2704= .242
Cut to Cut: .083"
Tumbler Locations