FAST Serial Adaptors - Perle · EN 55022: 1998, Class A Note ... 8 port octopus cable with DB25...
129
Page 1 FAST Serial Adaptors User Guide Part number: 5500043-15 Date: 10 September 2008 Navigating around this manual Using this on-line manual. See page 5. Fast Contents. See page 7. Contents. See page 8. Index. See page 127.
Transcript of FAST Serial Adaptors - Perle · EN 55022: 1998, Class A Note ... 8 port octopus cable with DB25...

FAST Serial AdaptorsUser Guide
Part number: 5500043-15Date: 10 September 2008
Navigating around this manual
Using this on-line manual. See page 5.
Fast Contents. See page 7.
Contents. See page 8.
Index. See page 127.
Page 1

Copyright statement
This document must not be reproduced in any way whatsoever, either printed or electronically, without the consent of:
Perle Systems Limited,60 Renfrew DriveMarkham,Ontario,CanadaL3R 0E1
Perle reserves the right to make changes without further notice, to any products to improve reliability, function or design.
JETSTREAM, JETSTREAM4000, JETSTREAM8500 and LANSTREAM2000 are trademarks of Perle Systems Limited.
Microsoft, Windows 95, Windows 98, Windows NT, Windows 2000, Windows XP, Windows Server 2003, Windows Vista, Windows Server 2008, and Internet Explorer are trademarks of Microsoft Corporation.
Netscape is a trademark of Netscape Communications Corporation.
Solaris is a registered trademark of Sun Microsystems, Inc. in the USA and other countries.
Perle Systems Limited, 10 September 2008.
Page 2

Page 3
FCC Note
The products described in this manual have been found to comply with the limits for a Class A digital device, pursuant to Part 15 of the FCC rules. These limits are designed to provide reasonable protection against harmful interference when the equipment is operated in a commercial environment. This equipment generates, uses and can radiate radio frequency energy and, if not installed and used in accordance with the instructions in this Guide, may cause harmful interference to radio communications. Operation of this equipment in a residential area is likely to cause harmful interference, in which case the user will be required to correct the interference at his/her own expense.
EN 55022: 1998, Class A Note
Warning: This is a Class A product. In a domestic environment this product may cause radio interference in which case the user may be required to take adequate measures.
Caution: The products described in this manual are approved for commercial use only.

FAST Serial AdaptorsUser Guide
About this manual
Purpose of this manual
This manual tells you how to install, configure and use the Perle AT-FAST and PCI-FAST serial adaptor cards, distribution hardware, associated drivers and utilities.
Who this manual is for
This manual is aimed at users who want to add extra serial ports to their system using AT-CI-FAST serial adaptor cards. This manual requires a working knowledge of using personal computers and associated operating systems, as well as experience in installing host cards.
Warning
Dangerous voltages exist inside computer systems. Before installing host cards in your system, turn off the power supply and disconnect the mains lead.
FAST Serial Adaptors User Guide Purpose of this manual
Page 4

Using this on-line manual
The following is a brief guide to using this manual on-line.
Document navigation
This manual features document navigation hypertext buttons in the header area as shown in the next picture;
Hypertext jumps
You can also navigate around this manual by clicking on any cross reference or text in blue for example, Hypertext jumps.
(if included)
Jump to Using this on-line manual
Jump to Index
Jump to Quick Reference
Jump to previous location
Jump to front of current chapter
Jump to Contents
Jump to Fast contents
Note
The Fast Contents, Contents and Index entries are all hypertext jumps into this manual.
FAST Serial Adaptors User Guide Using this on-line manual
Page 5

Page 6
Revision history
Date Part number Description
July 2000 5500043-10 First issue of new AT- FAST and PCI-FAST user manual. Includes details of drivers, utilities and installation under the Windows NT and Windows 2000 operating systems.
November 2001 5500043-11 Re-branding update.
December 2001 5500043-12 Update of manual to include installation under the SCO OpenServer, SCO UnixWare, Solaris and Linux operating systems.
October 2005 5500043-13 Added information about SCO OpenServer 6 support.
March 2007 5500043-14 Added instructions for a new Windows 2000/XP/Server 2003/Vista installation process. There are now three Windows drivers to support 32-bit, 64-bit x64, and 64-bit Itanium operating systems/processors.
September 2008 5500043-15 Added support for Windows Server 2008.

FAST Serial Adaptors User Guide
Page 7
FAST Serial AdaptorsUser Guide
Fast Contents
ABOUT THIS MANUAL ........................................................... 4
REVISION HISTORY ............................................................... 6
FAST CONTENTS .................................................................. 7
CONTENTS ........................................................................... 8
CHAPTER 1 INTRODUCTION .................................................. 13
CHAPTER 2 INSTALLING DRIVERS AND HOST CARDS .............. 16
CHAPTER 3 CABLING INFORMATION ...................................... 105
APPENDIX A TROUBLESHOOTING .......................................... 116
APPENDIX B CONTACTING PERLE ......................................... 121
INDEX .................................................................................. 127

FAST Serial AdaptorsUser Guide
Contents
ABOUT THIS MANUAL ............................................................ 4Purpose of this manual ..................................................................................4Who this manual is for ...................................................................................4Using this on-line manual ..............................................................................5
Document navigation ................................................................................5Hypertext jumps ........................................................................................5
REVISION HISTORY ................................................................ 6
FAST CONTENTS................................................................... 7
CONTENTS............................................................................ 8
FAST Serial Adaptors User Guide
Page 8

CHAPTER 1 INTRODUCTION 13About the AT-FAST and PCI-FAST serial adaptor cards .........................14Guide to distribution accessories ................................................................15
FAST Serial Adaptors User Guide
Page 9

CHAPTER 2 INSTALLING DRIVERS AND HOST CARDS 16Before you start ...............................................................................................17Down loading FAST drivers from the Perle web site ...............................18Installing under Windows 95 ........................................................................19
General setup procedure for Windows 95 ................................................20Installing Windows 95 drivers for PCI-FAST cards ...................................21De-installing the driver for PCI-FAST cards ..............................................22Installing Windows 95 drivers for AT-FAST cards .....................................23De-installing the driver for AT-FAST cards ................................................25
Installing under Windows NT .......................................................................26Installing under Windows 2000/XP/Server 2003/Vista/Server 2008 .......27
General setup procedure for Windows 2000/XP/Server 2003/Vista/Server 2008 ..............................................................................................28Installing device drivers and utilities onto your system .............................29Adding additional cards and/or updating drivers .......................................31Adding AT host cards to the system .........................................................31Viewing and changing the resources for a device ....................................35Configuring serial ports .............................................................................39
Installing under SCO OpenServer 5 ............................................................44General setup procedure for SCO OpenServer 5.....................................46Initial configuration under SCO OpenServer 5..........................................47Suggested hardware settings for AT-FAST ...............................................48Installing the driver software .....................................................................49Enabling login access ...............................................................................50Reinstalling or upgrading software............................................................50Removing the driver software ...................................................................50Port naming conventions for SCO OpenServer 5 .....................................51Higher baud rates under SCO OpenServer 5 ...........................................51
Installing under SCO OpenServer 6 ............................................................52General installation procedure for SCO OpenServer 6.............................53Installing device drivers and utilities..........................................................54Serial port naming conventions.................................................................59Configuring serial ports .............................................................................60Removing drivers and utilities from your system ......................................64
FAST Serial Adaptors User Guide
Page 10

Installing under SCO UnixWare ...................................................................65General setup procedure for SCO UnixWare ...........................................66Initial configuration under SCO UnixWare ................................................67Installing SCO UnixWare drivers using command line..............................68Installing SCO UnixWare drivers using the Desktop.................................70Enabling login access ...............................................................................70Reinstalling or upgrading software............................................................70Installing additional cards..........................................................................70Removing cards and software ..................................................................71
To remove a PCI-FAST card, jump to step 5. ................................................ 71To remove an AT-FAST card: ........................................................................ 71Removing the SCO UnixWare driver ............................................................. 72
Port naming conventions for SCO UnixWare............................................73Higher baud rates under SCO UnixWare..................................................73
Installing under Solaris ..................................................................................74General setup procedure for Solaris .........................................................75Installing Solaris drivers ............................................................................76Port naming conventions ..........................................................................77Card Ordering ...........................................................................................77Enabling logins..........................................................................................77
Installing under Linux .....................................................................................78Cards Supported.......................................................................................78Enhanced Features...................................................................................78Known Limitations.....................................................................................78
Installing host cards and distribution accessories ..................................79Distribution accessory guide .....................................................................80Installing 4 port cards................................................................................81
Installing a 4 port PCI host card .................................................................... 81Installing a 4 port AT host card ...................................................................... 83
Installing 8 port cards and distribution accessories ..................................86Installing an 8 port PCI host card .................................................................. 87Installing an 8 port AT host card .................................................................... 89Connecting an 8 port distribution box fitted via hardwired flying lead ........... 92Connecting an 8 port octopus cable .............................................................. 93Connecting an 8 port distribution cable ......................................................... 94
Installing 16 port cards and distribution accessories ................................95Installing a 16 port PCI host card .................................................................. 95Installing a 16 port AT host card .................................................................... 97Connecting a 16 port distribution box ............................................................ 102
Removing host cards .....................................................................................103
FAST Serial Adaptors User Guide
Page 11

CHAPTER 3 CABLING INFORMATION 105AT- AT-FAST4 and PCI-FAST4 RJ45 card edge connectors ...................106Distribution box and cable guide .................................................................107Distribution box and cable pinouts .............................................................108
RJ45 to DB25 male cable .........................................................................1098 port distribution box with DB25 female connectors................................1108 port octopus cable with DB25 female connectors..................................1118 port octopus cable with DB25 male connectors.....................................1128 port distribution cable with RJ45 female connector block ......................11316 port distribution box with DB25 female connectors..............................114
APPENDIX A TROUBLESHOOTING 116Windows NT .....................................................................................................117
Windows NT general troubleshooting .......................................................117Windows 2000/XP/Server 2003/Vista/Server 2008 ....................................118
General troubleshooting under Windows 2000/XP/Server 2003/Vista/Server 2008 ..............................................................................................119Windows 2000/XP/Server 2003/Vista/Server 2008 error messages.........120
APPENDIX B CONTACTING PERLE 121Making a technical Support Query ..............................................................122
Who to contact ..........................................................................................122Information needed when making a query................................................123Making a support query via the Perle web page.......................................124
Repair procedure ............................................................................................125Feedback about this manual ........................................................................125Contacting Perle technical support .............................................................126
INDEX ................................................................................... 127
FAST Serial Adaptors User Guide
Page 12

FAST Serial AdaptorsUser Guide
Chapter 1 Introduction
You need to read this chapter if you want to...
You need to read this chapter if you want an introduction to the Perle AT-FAST and PCI-FAST serial adaptor cards, driver software and utilities.
This chapter provides introductory information about the Perle AT-FAST and PCI-FAST serial adaptor cards, driver software and configuration utilities.
This chapter includes the following sections;
• About the AT-FAST and PCI-FAST serial adaptor cards on page 14
• Guide to distribution accessories on page 15
FAST Serial Adaptors User Guide
Page 13
Chapter 1 Introduction

About the AT-FAST and PCI-FAST serial adaptor cards
The PCI-FAST and AT-FAST are multi-port cards which provide extra serial ports for RS-232 peripherals. These cards plug into your PC servers and provide 4, 8 or 16 high speed ports suitable for remote access, data collection, point of sale or any other RS232 applications.
You use the FAST serial adaptor cards when you want a robust entry level solution for the small office or point of sale applications. Typically you use FASTserial adaptor cards because you want to add extra serial ports to an existing computer system rather than replacing it with the considerable cost that entails. Higher data rates and ESD protection in the FAST serial adaptor cards make it suitable for any modem or ISDN TA application.
Note
To use the FAST serial adaptor cards you must first install the drivers supplied with the card and then configure each card as required prior to mechanical installation. The installation procedure varies for different operating systems. Please read Before you start on page 17 in Chapter 2 Installing drivers and host cards before commencing installation.
FAST Serial Adaptors User Guide About the AT-FAST and PCI-FAST serial adaptor cards
Page 14
Chapter 1 Introduction

Guide to distribution accessories
The distribution box or cable required for the FAST product you are using depends on the number of ports and product type as detailed in the next table;
ProductCable or distribution box options For installation information see...
AT-FAST4PCI-FAST4
RJ45 (8 pin) to DB25 male cable.
See Installing 4 port cards on page 81 in Chapter 2 Installing drivers and host cards.
AT-FAST8PCI-FAST8
8 port distribution box with DB25 female connectors.
See Installing 8 port cards and distribution accessories on page 86 in Chapter 2 Installing drivers and host cards.
8 port octopus cable with DB25 female connectors on flying leads.
8 port octopus cable with DB25 male connectors on flying leads.
8 port distribution cable with RJ45 8 pin female connector block.
AT-FAST16PCI-FAST16
16 port distribution box with DB25 female connectors.
See Installing 16 port cards and distribution accessories on page 95 in Chapter 2 Installing drivers and host cards.
FAST Serial Adaptors User Guide Guide to distribution accessories
Page 15
Chapter 1 Introduction

FAST Serial AdaptorsUser Guide
Chapter 2 Installing drivers and host cards
You need to read this chapter if you want to...
You need to read this chapter if you want to install FAST serial adaptor cards, associated hardware and software.
This chapter provides information about installing and configuring FAST serial adaptor cards.
This chapter includes the following sections;
• Before you start on page 17
• Down loading FAST drivers from the Perle web site on page 18
• Installing under Windows 95 on page 19
• Installing under Windows NT on page 26
• Installing under Windows 2000/XP/Server 2003/Vista/Server 2008 on page 27
• Installing under SCO OpenServer 5 on page 44
• Installing under SCO OpenServer 6 on page 52
• Installing under SCO UnixWare on page 65
• Installing under Solaris on page 74
• Installing under Linux on page 78
• Installing host cards and distribution accessories on page 79
• Removing host cards on page 103.
Note
The procedure for installing and configuring FAST serial adaptor cards varies for different operating systems. Please read Before you start on page 17 before commencing installation.
FAST Serial Adaptors User Guide
Page 16
Chapter 2 Installing drivers and host cards

Before you start
Before you install your FAST host cards and software, note that the procedure for installing and configuring FAST serial adaptor cards varies for different operating systems.
To install under a particular operating system, please refer to one of the operating system specific installation procedures listed below;
• Installing under Windows 95 on page 19
• Installing under Windows NT on page 26
• Installing under Windows 2000/XP/Server 2003/Vista/Server 2008 on page 27
• Installing under SCO OpenServer 5 on page 44
• Installing under SCO OpenServer 5 on page 44
• Installing under SCO UnixWare on page 65
• Installing under Solaris on page 74
• Installing under Linux on page 78
FAST Serial Adaptors User Guide Before you start
Page 17
Chapter 2 Installing drivers and host cards

Down loading FAST drivers from the Perle web site
You can install the FAST driver and utility software from the Perle web site. To do this proceed as follows;
1. On your PC, start the Internet browser you want to use (for example, Netscape).
2. Within your Internet browser window, select the software directory using one the following URL;
http://www.perle.com/downloads
3. Change to the software directory.
The software directory is now displayed.
4. Download the zip files in this directory to a suitable location on your PC for example, /tmp.
5. Uncompress the files using a suitable utility.
6. You can now install the driver software using the correct procedure for your operating system. See Before you start on page 17.
Note
In the event of any problems contact your System Administrator or Internet Service provider for assistance.
FAST Serial Adaptors User Guide Down loading FAST drivers from the Perle web site
Page 18
Chapter 2 Installing drivers and host cards

Installing under Windows 95
This section describes how to install the FAST device driver software under Microsoft Windows 95.
This section includes the following;
• General setup procedure for Windows 95 on page 20
• Installing Windows 95 drivers for PCI-FAST cards on page 21
• De-installing the driver for PCI-FAST cards on page 22
• Installing Windows 95 drivers for AT-FAST cards on page 23
• De-installing the driver for AT-FAST cards on page 25
NoteThe following Port naming conventions are applied for Windows 95;
Port names under Windows 95 take the form: COMx
Where the first port on each card is numbered from the next available port on the PC for COM5 upwards for Windows 95. In the case of PCI-FAST, the ports are numbered according to the system slot number occupied by the card in the PC, starting with slot 0.
Example:After installing a PCI-FAST 4, the ports are labelled:COM1 - COM4 PC systemCOM5 - COM8 PCI-FAST 4If a new PCI-FAST 8 is installed in a preceding slot, the ports will be as follows:COM1 - COM4 PC SystemCOM5 - COM12 PCI-FAST 8COM13 - COM16 PCI- FAST 4That is, the PCI-FAST 4 ports will be moved up.
FAST Serial Adaptors User Guide Installing under Windows 95
Page 19
Chapter 2 Installing drivers and host cards
General setup procedure for Windows 95
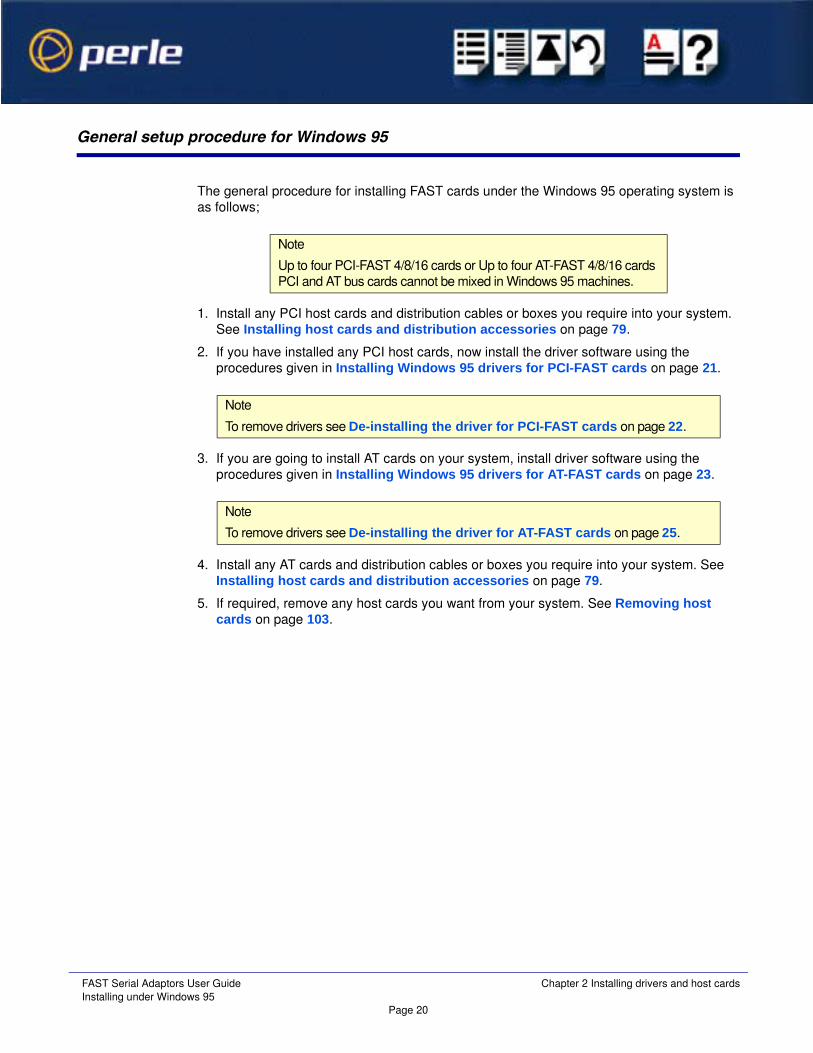
The general procedure for installing FAST cards under the Windows 95 operating system is as follows;
1. Install any PCI host cards and distribution cables or boxes you require into your system. See Installing host cards and distribution accessories on page 79.
2. If you have installed any PCI host cards, now install the driver software using the procedures given in Installing Windows 95 drivers for PCI-FAST cards on page 21.
3. If you are going to install AT cards on your system, install driver software using the procedures given in Installing Windows 95 drivers for AT-FAST cards on page 23.
4. Install any AT cards and distribution cables or boxes you require into your system. See Installing host cards and distribution accessories on page 79.
5. If required, remove any host cards you want from your system. See Removing host cards on page 103.
Note
Up to four PCI-FAST 4/8/16 cards or Up to four AT-FAST 4/8/16 cards PCI and AT bus cards cannot be mixed in Windows 95 machines.
Note
To remove drivers see De-installing the driver for PCI-FAST cards on page 22.
Note
To remove drivers see De-installing the driver for AT-FAST cards on page 25.
FAST Serial Adaptors User Guide Installing under Windows 95
Page 20
Chapter 2 Installing drivers and host cards

Installing Windows 95 drivers for PCI-FAST cards
PCI-FAST cards install as a Plug and Play card under Windows 95.
Once the card is installed, power up your PC and Windows 95 will automatically detect it. On older versions of Windows 95 the New Hardware Found window will appear as shown below:
1. Load the CD, select Driver from disk provided by hardware manufacturer and press OK.
2. When prompted, select the CD drive and enter the path: pci-fast\drivers\win_95 and press OK.
On more recent versions of Windows 95 the Update DeviceDriver Wizard window will appear as follows:
FAST Serial Adaptors User Guide Installing under Windows 95
Page 21
Chapter 2 Installing drivers and host cards

3. Press Next.
4. Enter the drive name for the CD and the path: pci-fast\drivers\win_95 or browse to select the directory.
5. Press Finish.
There will be a delay while the Update Device Driver wizard installs the ports for the PCI-FAST card.
6. Now restart your system.
When port installation is complete, driver software is installed and the card is ready for use.
De-installing the driver for PCI-FAST cards
To remove the PCI-Fast driver and card:
1. Select Control Panel from the Start menu and double click the System applet.
2. Select Device Manager and expand the Multifunction Adapter tree.
3. Select the card which you require to remove and press Remove. When complete press OK.
With the system shutdown and the power turned off the Card may now be physically removed from the system and the machine re-booted.
FAST Serial Adaptors User Guide Installing under Windows 95
Page 22
Chapter 2 Installing drivers and host cards

Installing Windows 95 drivers for AT-FAST cards
For AT-FAST Windows 95 drivers use setup.exe on the CD in the directorydrivers\at-fast\win9x.
After the initial setup program has detected your system, it will start the Add New Hardware Wizard. Then:
1. Select Next .
2. Select No to Do you want Windows to search for your new hardware?
FAST Serial Adaptors User Guide Installing under Windows 95
Page 23
Chapter 2 Installing drivers and host cards

3. Select Multi-function adapters and then Next.
4. Select Have Disk and then Next.
5. Select your AT-FAST card from the list shown and then select Next.
6. Select Next when the card hardware parameters are displayed.
7. Now restart your system.
Note:
Windows 95 already has the ability to select the baud rates 230.4 kbps and 460.8 kbps, but for 16 bit programs running on the system that may not have this ability it is possible to instead map 57.6 kbps and 115.2 kbps to these rates.
The AT-FAST supports auto flow control, this generally works best when linked with a device (such as another 16650) that also supports this. If you find that performance is not as good with auto flow control selected then you can disable it on a per port basis.
The above options can be changed via the advanced tab on the ports properties dialog box located under the device manager tab of the system icon in Control Panel, after the card has been installed.
FAST Serial Adaptors User Guide Installing under Windows 95
Page 24
Chapter 2 Installing drivers and host cards

De-installing the driver for AT-FAST cards
To remove the driver software:
1. From Control Panel select the System icon, and select the Device manager tab.
2. Select Multi-function Adapters to list the options available.
3. Select the AT-FAST option installed earlier.
4. Select Remove, and then OK.
5. Shutdown your system and power off the PC.
6. Remove the AT-FAST card.
FAST Serial Adaptors User Guide Installing under Windows 95
Page 25
Chapter 2 Installing drivers and host cards

Installing under Windows NT
The procedure for installing and configuring host cards, drivers software and associated utilities for the Windows NT operating system is as follows:
1. Install any PCI host cards and distribution cables or boxes you require into your system. See Installing host cards and distribution accessories on page 79.
2. Install any AT cards and distribution cables or boxes you require into your system. See Installing host cards and distribution accessories on page 79
3. If required, remove any host cards you want from your system. See Removing host cards on page 103.
4. Use the PortDirector software to update your system with the revised number and type of host cards. See The PortDirector user guide part number 5500028 for further details.
Your system can now use the serial adaptor cards you have installed.
Note
The Perle PortDirector software contains drivers for the FAST host cards.
You will need to install the PortDirector for WIndows NT on your system in order to use the FAST host cards.
See Chapter 5 Adding and deleting host cards in the PortDirector User guide part number 5500028 for further details.
FAST Serial Adaptors User Guide Installing under Windows NT
Page 26
Chapter 2 Installing drivers and host cards

Installing under Windows 2000/XP/Server 2003/Vista/Server 2008
This section describes how to install the FAST device driver software under Microsoft Windows 2000/XP/Server 2003/Vista/Server 2008.
This section includes the following:
• General setup procedure for Windows 2000/XP/Server 2003/Vista/Server 2008 on page 28
• Installing device drivers and utilities onto your system on page 29
• Adding additional cards and/or updating drivers on page 31
• Adding AT host cards to the system on page 31
• Viewing and changing the resources for a device on page 35
• Configuring serial ports on page 39.
FAST Serial Adaptors User Guide Installing under Windows 2000/XP/Server 2003/Vista/Server 2008
Page 27
Chapter 2 Installing drivers and host cards

General setup procedure for Windows 2000/XP/Server 2003/Vista/Server 2008
The general procedure for installing FAST cards under the Windows 2000/XP/Server 2003/Vista/Server 2008operating system is as follows:
1. Install any PCI host cards and distribution cables or boxes you require into your system. See Installing host cards and distribution accessories on page 79.
2. Install any AT cards and distribution cables or boxes you require into your system. See Installing host cards and distribution accessories on page 79.
3. Install the FAST device driver software. See Installing device drivers and utilities onto your system on page 29.
4. If you add new FAST cards, you should run Update Driver to make sure the new cards have the latest driver. See Adding additional cards and/or updating drivers on page 31.
5. If required, remove any host cards you want from your system. See Removing host cards on page 103.
6. Using the Windows 2000/XP/Server 2003/Vista/Server 2008 Device Manager, configure the serial ports you have added to the system. See Configuring serial ports on page 39.
FAST Serial Adaptors User Guide Installing under Windows 2000/XP/Server 2003/Vista/Server 2008
Page 28
Chapter 2 Installing drivers and host cards

Installing device drivers and utilities onto your system
To install or enable the FAST device drivers on your system proceed as follows;
1. Turn on your PC and if required, log in.
If you have installed any new PCI host cards, a Found New Hardware message is briefly shown followed by the Found New Hardware wizard as shown in the pictures.
2. In the Found New Hardware wizard click on the Cancel button.
3. Download the lastest FAST driver zip file from the Perle website for your operating system:
pserial-x86.zip for 32-bit Windows operating systems.
pserial-amd64.zip for 64-bit Windows operating systems.
pserial-ia64.zip for 64-bit Windows Itanium operating systems.
4. Unzip the driver zip file to a local directory. We recommend that you use the pserial-setup-<arch>.exe file, which will launch the installation wizard, to install the FAST driver.
FAST Serial Adaptors User Guide Installing under Windows 2000/XP/Server 2003/Vista/Server 2008
Page 29
Chapter 2 Installing drivers and host cards

5. Double-click the pserial-setup-<arch>.exe installation executable and follow the installation wizard steps:
6. During the installation, you may get a Windows Logo message. Click Continue Anyway when these appear.
Your FAST driver installation is now finished.
Note
If you are installing an unsigned driver, you may have to click through the Found New Hardware wizard for every FAST port on your system.
FAST Serial Adaptors User Guide Installing under Windows 2000/XP/Server 2003/Vista/Server 2008
Page 30
Chapter 2 Installing drivers and host cards

Adding additional cards and/or updating drivers
Whenever you add any additional FAST hardware to your system, Windows might install the latest digitally signed driver in its database (depending on your Windows operating system and settings). To ensure you have the latest driver installed after you add new hardware, you can either:
• Click Start > All Programs > Perle > Perle-Serial > Update Driver
or
• Reinstall the drivers as described in Installing device drivers and utilities onto your system on page 29.
Adding AT host cards to the system
When you physically install an AT host card in your system you also need to add the card to the list of installed devices in the system.
To add AT host cards to your system proceed as follows:
1. In the Windows desktop, click on the Start button and select Settings > Control Panel
The control panel window is now displayed.
2. In the control panel window, double click on the System icon.
The Add/Remove Hardware Wizard is now displayed.
Note
The addresses used by AT-FAST host cards are normally set by default. This procedure is used when you wish to set non-standard addresses.
FAST Serial Adaptors User Guide Installing under Windows 2000/XP/Server 2003/Vista/Server 2008
Page 31
Chapter 2 Installing drivers and host cards

3. Using the instructions given in the next table, use the Add/Remove Hardware Wizard to assign the host card addresses and IRQ levels you require.
In this Wizard page Do the following...
4. In the Add/Remove Hardware Wizard, select Add/Troubleshoot a device and press the Next > button.
The Choose a Hardware Device page is now displayed.
5. In the Choose a Hardware Device page, scroll up the list of devices and click on Add a new device, then click on the Next > button.
The Find New Hardware page is now displayed.
6. In the Find New Hardware page, select No, I want to select the hardware from a list and click on the Next > button.
The Hardware Type page is now displayed.
7. In the Hardware Type page, select Mutli-port serial adaptors and click on the Next > button.
FAST Serial Adaptors User Guide Installing under Windows 2000/XP/Server 2003/Vista/Server 2008
Page 32
Chapter 2 Installing drivers and host cards

The Select a Device Driver page is now displayed.
8. If your host card type isn’t shown, in the Select a Device Driver page click on the Have Disk button.
A message window is now displayed which prompts you for the driver and location you want to use.
9. In the message window, enter or select the driver you want and click on the OK button to accept settings and close the window.
The Select a Device Driver page is now updated to show the new driver you have selected.
10.In the Select a Device Driver page, select the manufacturer and model you require, then click on the Next > button.
The Start Hardware Installation page is now displayed.
11. In the Start Hardware Installation page, click on the Next > button to accept your choice.
A completion message page is now displayed as shown in the next picture
Note
If resources are not free you will have to change the resource configuration using the procedures described on page 35.
In this Wizard page Do the following...
FAST Serial Adaptors User Guide Installing under Windows 2000/XP/Server 2003/Vista/Server 2008
Page 33
Chapter 2 Installing drivers and host cards

12.In the completion message page click on the Finish button to complete the new configuration.
After the you have finished adding cards to the system all connected port devices will now be detected. You should now install the latest driver for the ports from its database or you will be prompted for one if one cannot be found.
Note
Whenever you add any FAST hardware to your system, the default is to use the latest digitally signed driver, although if you are using a later unsigned driver version, the harware will automatically go through an update process. This ensures that every device currently installed in the system is updated to use the driver on the CDROM.
FAST Serial Adaptors User Guide Installing under Windows 2000/XP/Server 2003/Vista/Server 2008
Page 34
Chapter 2 Installing drivers and host cards

Viewing and changing the resources for a device
To view or change the resources for a device proceed as follows:
1. In the Add/Remove Hardware Wizard go to the last page and click on the Resources button.
The Add New Hardware Wizard properties window is now displayed.
FAST Serial Adaptors User Guide Installing under Windows 2000/XP/Server 2003/Vista/Server 2008
Page 35
Chapter 2 Installing drivers and host cards

2. In the Add New Hardware Wizard properties window, select the Resources page and click on the Set Configuration Manually button.
The resources page is now updated to show the settings for the current installed FAST device.
FAST Serial Adaptors User Guide Installing under Windows 2000/XP/Server 2003/Vista/Server 2008
Page 36
Chapter 2 Installing drivers and host cards

3. In the Add New Hardware Wizard properties window, select the Input/Output Range field and click on the Change Setting button.
The Edit Input/Output Range window is now displayed.
4. In the Edit Input/Output Range window, select the I/O address range for the host card you want and click on the OK button.
FAST Serial Adaptors User Guide Installing under Windows 2000/XP/Server 2003/Vista/Server 2008
Page 37
Chapter 2 Installing drivers and host cards

5. In the Add New Hardware Wizard properties window, select the Interrupt Request field and click on the Change Setting button.
The Edit Interrupt Request window is now displayed as shown in the next picture.
6. Within the Edit Interrupt Request window, select the Interrupt Request level you want and click on the OK button.
If values you have selected are not acceptable to the system, then the Device Manager will display a problem icon as shown in the next picture.
7. If the memory settings you have selected are not acceptable to the system, check your configuration settings and adjust memory address as required (page 79). Otherwise ring Technical support.
Note
Ensure any AT-FAST cards are set to the I/O address and IRQ levels you have set during this procedure. See Installing host cards and distribution accessories on page 79.
FAST Serial Adaptors User Guide Installing under Windows 2000/XP/Server 2003/Vista/Server 2008
Page 38
Chapter 2 Installing drivers and host cards

Configuring serial ports
To configure FAST serial ports under Windows, proceed as follows:
1. In the Windows desktop, click on the Start button and select Settings > Control Panel.
The control panel window is now displayed.
2. In the Control Panel window, click on the System icon.
The System Properties tabbed window is now displayed.
3. In the System Properties window, click on the Hardware tab.
The hardware page is now displayed.
FAST Serial Adaptors User Guide Installing under Windows 2000/XP/Server 2003/Vista/Server 2008
Page 39
Chapter 2 Installing drivers and host cards

4. In the Hardware page, click on the Device Manager Button.
The Device Manager window is now displayed.
5. In the Device Manager window, click on the Multiport serial adapters icon to display the currently installed devices.
6. In the Device Manager window, double click on the device whose properties you want to view or change
The device Properties tabbed window is now displayed.
FAST Serial Adaptors User Guide Installing under Windows 2000/XP/Server 2003/Vista/Server 2008
Page 40
Chapter 2 Installing drivers and host cards

7. In the device Properties window, click on the Port Settings tab to display the Port Settings page.
8. In the Port Settings page, set the Port Number, Baud Rate and other configuration parameters you require.
FAST Serial Adaptors User Guide Installing under Windows 2000/XP/Server 2003/Vista/Server 2008
Page 41
Chapter 2 Installing drivers and host cards
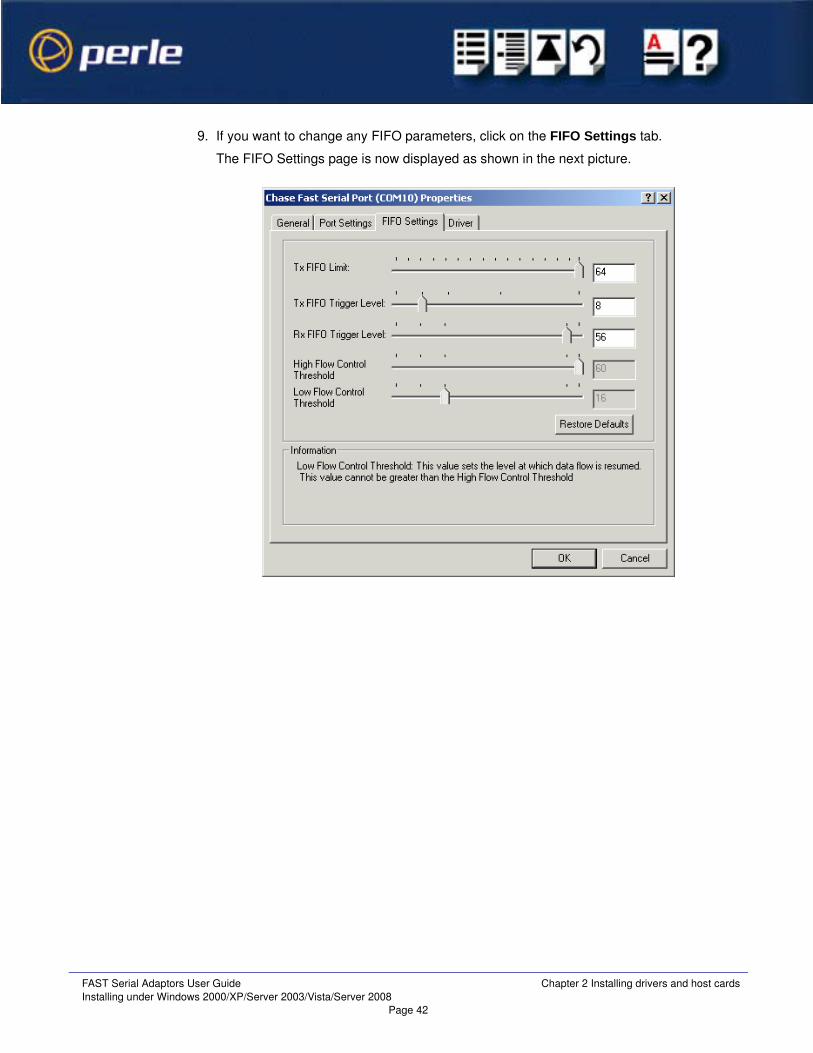
9. If you want to change any FIFO parameters, click on the FIFO Settings tab.
The FIFO Settings page is now displayed as shown in the next picture.
FAST Serial Adaptors User Guide Installing under Windows 2000/XP/Server 2003/Vista/Server 2008
Page 42
Chapter 2 Installing drivers and host cards

10.In the FIFO Settings page, set the FIFO buffer levels using the parameters detailed in the next table.
11.Within the Serial Port properties window, click on the OK button to save changes and close the window.
The configuration process is now complete.
Hint
To restore the default settings, use the Restore Defaults button.
Parameter Description
Tx FIFO Limit Sets the overall size of the Transmit FIFO buffer.You use this when you want to restrict the size of the buffer in order to control the data flow. This is useful when your application requires you to send small amounts of data but needs acknowledgement that the data has been sent.
For example, if your application is designed to receive 4 bytes at a time, a larger value of say 16 would time out.
Permitted values for a FAST card are 1 to 64.
Tx FIFO Trigger Level Sets the level at which the com port Transmit FIFO buffer is filled with data each time a request for more data is made.
For example, if set to 16 bytes you get 16 bytes at a time when driver requests data.
Permitted values for a FAST card are 8, 16, 32 and 56.
Rx FIFO Trigger Level Sets the level at which the com port Receive FIFO buffer is filled before the data is passed on to an application.
For example, if set to 16 bytes, 16 bytes of data are accumulated at a time before data is passed on to an application. The FIFO trigger will also time out if the level is not achieved within two character periods of the last byte received.
Permitted values for a FAST card are 8, 16, 56 and 60.
High Flow Control Threshold
Sets the level at which data flow is suspended.If the limit is exceeded, the driver will stop collecting data.
For FAST, value is read only, set automatically from FIFO trigger level.
Low Flow Control Threshold
Sets the level at which data flow is resumed.
If the low flow threshold is exceeded, the driver requests more data.For FAST, value is read only, set automatically from FIFO trigger level.
FAST Serial Adaptors User Guide Installing under Windows 2000/XP/Server 2003/Vista/Server 2008
Page 43
Chapter 2 Installing drivers and host cards

Installing under SCO OpenServer 5
This section describes how to install the FAST device driver software under SCO OpenServer 5.
The SCO OpenServer 5 drivers support any mix of AT-FAST and PCI-FAST cards up to a maximum of four cards. Each card can contain 4, 8 or 16 high-speed serial ports.
The drivers for Unix are supplied as 'disk images' on the CD, formatted for use with the pkgadd utility. Each package has been given the label comf for com- Fast reflecting the fact that these are fast communications ports.
This section includes the following;
• General setup procedure for SCO OpenServer 5 on page 46
• Initial configuration under SCO OpenServer 5 on page 47
• Suggested hardware settings for AT-FAST on page 48
• Installing the driver software on page 49
• Enabling login access on page 50
• Reinstalling or upgrading software on page 50
• Removing the driver software on page 50
• Port naming conventions for SCO OpenServer 5 on page 51
• Higher baud rates under SCO OpenServer 5 on page 51
NoteWhen installing additional AT or PCI cards the standard software installation creates operating system device and control entries for a single card. When you wish to add extra cards you should run the command mkdev to add new device and control entries.
mkdev comf
This command will prompt you with the possible actions for the addition or removal of cards.
FAST Serial Adaptors User Guide Installing under SCO OpenServer 5
Page 44
Chapter 2 Installing drivers and host cards

Note
A mouse or similar device (a few scanners and non-intelligent FAX modems) can be confused by the extra buffering that the card provides. This buffering can be disabled on a port by port basis using the mkdev comf command. The unbuffered ports use similar names to those above with comf changed to com. e.g. com1a.
mkdev comf
The unbuffered ports will now work with a mouse or similar device but they are not recommended for general use as they will present a higher load on the system and their performance will be limited.
FAST Serial Adaptors User Guide Installing under SCO OpenServer 5
Page 45
Chapter 2 Installing drivers and host cards

General setup procedure for SCO OpenServer 5
The general procedure for installing FAST cards under the SCO OpenServer 5 operating system is as follows;
1. Before commencing the installation process under SCO OpenServer 5, configure your system as described in Initial configuration under SCO OpenServer 5 on page 47.
2. Install any PCI host cards and distribution cables or boxes you require into your system. See Installing host cards and distribution accessories on page 79.
3. Install any AT cards and distribution cables or boxes you require into your system. See Installing host cards and distribution accessories on page 79.
4. Install the driver software onto your system using the procedures given in Installing the driver software on page 49.
5. You can then enable login access using the procedures given in Enabling login access on page 50.
6. If required, remove any host cards you want from your system. See Removing host cards on page 103.
Note
If you are installing AT-FAST hardware you should examine your system configuration and determine non-conflicting I/O addresses and IRQs for use with each ISA card.
See Suggested hardware settings for AT-FASTon page 48.
NoteFor information on upgrading or re-installing drivers, see Reinstalling or upgrading software on page 50.To remove drivers, see Removing the driver software on page 50
FAST Serial Adaptors User Guide Installing under SCO OpenServer 5
Page 46
Chapter 2 Installing drivers and host cards

Initial configuration under SCO OpenServer 5
Before installing any new software on your system it is important that the existing software is correctly installed and configured.
The Perle software supplied comprises various files plus a kernel module called a device driver that has to be linked into the Unix kernel. Before attempting to install the driver software, it is advisable to check that the kernel can be rebuilt. The steps to do this are:
1. Log in as root.
2. Change directory to /etc/conf/cf.d.
cd /etc/conf/cf.d
3. Run link_unix.
./link_unix -y
4. Reboot the machine.
sync
init 6
Any problems that cause the rebuild to fail must be resolved (by your operating system vendor or other third-party product vendor) before installing the driver software.
FAST Serial Adaptors User Guide Installing under SCO OpenServer 5
Page 47
Chapter 2 Installing drivers and host cards

Suggested hardware settings for AT-FAST
If you are installing AT-FAST hardware you should examine your system configuration and determine non-conflicting I/O addresses and IRQs for use with each ISA card. Some suggested locations to try:
As can be seen from the above, I/O space is in short supply especially if installing multiple cards - particularly 16 port units. Using PCI-FAST cards in multiple card configurations is advised. If suitable non-conflicting addresses can be determined then up to four AT-FAST cards can be installed.
The command hwconfig can be used to display resources used by existing hardware.
The parameters base and offset give the start address and size of the I/O space used by a card and vec gives the IRQ number. This list is not exhaustive as some drivers do not declare all the resources they use.
On SMP (multi-processor) systems an additional command displayintr can be used to show the IRQ lines currently in use by the various device drivers.
Card I/O base IRQ Suitable for
1st 0x180 5 4 and 8 port cards. Possibly 16 port if using SCSI hard disk
2nd 0x100 10 All cards
3rd 0x240 11 4 and 8 port cards
4th 0x280 12 4 and 8 port cards. Possibly 16 port if not using COM2
NoteDo not use IRQ12 if a PS/2 mouse is connected.
FAST Serial Adaptors User Guide Installing under SCO OpenServer 5
Page 48
Chapter 2 Installing drivers and host cards

Installing the driver software
Before commencing software installation, you will need to create a diskette using the 'diskette image' supplied on the CD supplied with this product. When you have created the installation diskette, proceed as follows:
1. Login as root.
2. Insert the created installation diskette.
3. Check for the presence of the /install directory. If this does not exist then create it.
mkdir /install
4. Call pkgadd to install the driver software.
pkgadd -n -d /dev/fd0135ds18 comf
5. pkgadd will remind you to insert the floppy in drive A and assuming you have done this you should enter go to continue. Before the kernel is rebuilt you will be asked if the card you are installing is an AT-FAST card.
If you answer yes then you will be asked to supply the I/O address and IRQ you have determined for the card along with the number of serial ports on the card.
If you are installing a PCI-FAST card simply answer no to this question as PCI configuration is automatic.
6. You will then be asked if you wish to add any additional cards with this initial installation.
If installing more than one card you should answer Yes and will then be prompted with a general configuration menu. Otherwise say No. You may add further cards at a later date by issuing the command.
mkdev comf
7. It may take a couple of minutes to rebuild the system kernel. You will now be asked whether you wish to use the new kernel by default and whether you want the new kernel environment to be built. You should answer Yes to both these questions.
8. Finally, to activate your new kernel you must reboot the system by typing:
shutdown -y -g5 (Gives users 5 mins) or reboot (Immediate)
FAST Serial Adaptors User Guide Installing under SCO OpenServer 5
Page 49
Chapter 2 Installing drivers and host cards

Enabling login access
Once installed, operation of the ports is identical with that of standard serial ports with the exception of the differing names described in Port naming conventions for SCO OpenServer 5 on page 51 and higher possible baud rates described in Higher baud rates under SCO OpenServer 5 on page 51.
Thus to enable a login on the first port, you would use the enable command just as you would with the standard serial ports:
enable comf1a
As installed, the ports operate at 9600 bps. To change this you should edit /etc/inittab and /etc/conf/init.d/comf and change the speed letter for the port.
Remember that /etc/inittab is your current configuration but that it is rebuilt from /etc/conf/init.d/comf whenever the kernel is rebuilt, therefore it is important to update both files.
Reinstalling or upgrading software
New versions of the software can be installed over the top of any existing version using the above installation procedure.
The installation software will attempt to preserve as much of the existing configuration as possible.
Removing the driver software
No action is required when removing cards other than the standard operating system actions to disable login processing on the removed ports. Do not use pkgrm to remove the driver. However, if you wish to remove the card device names and control entries then this can be done as follows:
1. Type: mkdev comf and select the required action.
Once all card entries have been removed using the above method, the command will prompt to remove the device driver from the kernel.
2. Select yes to remove all references to the software apart from some package management entries and the mkdev program itself.
Note
Having removed the device driver in this way you would need to reinstall from the distribution disk should you wish to use the cards again in the future.For information on the port labelling conventions and high-speed baud rate mapping please go to Port naming conventions for SCO OpenServer 5 on page 51 and Higher baud rates under SCO OpenServer 5 on page 51.
FAST Serial Adaptors User Guide Installing under SCO OpenServer 5
Page 50
Chapter 2 Installing drivers and host cards

Port naming conventions for SCO OpenServer 5
If the first card has 16 ports, the ports on the first card are named comf1a through to comf1p. Only the first four or eight names will be used on smaller cards. If a second 16 port card is subsequently added, it’s ports are named comf2a to comf2p, etc.
Cards are numbered and named in PCI system slot order, with cards in the lower numbered slot on the lower numbered bus appearing first in the list.
For OpenServer 5, any AT-FAST cards configured will appear in the list in the order they have been configured.
To use modem control for dial in operations the port name should be used with the last letter of the name in uppercase;
e.g. comf1A. Upper case port names assume at least a five-wire connection (RXD, TXD, RTS, CTS, GND) with another serial device. Lower case port names assume a three-wire connection only (RXD, TXD, GND).
Higher baud rates under SCO OpenServer 5
Because the system does not support the selection of baud rates above 38.4 kpbs, we have permanently remapped some of the lower baud rates to support higher card speeds.
Note
Adding a new card in a lower numbered slot than an existing one will cause the ports on the existing board to be renumbered.
Original speed (bps)
Is mapped to (kpps) Getty letter
50 57.6 a
75 76.8 b
110 115.2 c
134 230.4 d
150 460.8 e
FAST Serial Adaptors User Guide Installing under SCO OpenServer 5
Page 51
Chapter 2 Installing drivers and host cards

Installing under SCO OpenServer 6
This section describes how to install the FAST device driver software under SCO OpenServer 6.
The SCO OpenServer 5 drivers support any mix of AT-FAST and PCI-FAST cards up to a maximum of four cards. Each card can contain 4, 8 or 16 high-speed serial ports.
• General installation procedure for SCO OpenServer 6 on page 53
• Installing device drivers and utilities on page 54
• Serial port naming conventions on page 59
• Configuring serial ports on page 60
• Removing drivers and utilities from your system on page 64.
FAST Serial Adaptors User Guide Installing under SCO OpenServer 6
Page 52
Chapter 2 Installing drivers and host cards

General installation procedure for SCO OpenServer 6
The general procedure for installing and configuring host cards, drivers software and associated utilities for the SCO OpenServer 6 operating system is as follows:
1. Install any AT-FAST cards you require into your system. See Installing host cards and distribution accessories on page 79
2. Install the SPEED SCO OpenServer 6 drivers and utilities onto your system using the
procedures described in Installing device drivers and utilities on page 54.
3. If required, remove any host cards you want from your system. See Removing host cards on page 103.
4. Using the Port Configuration tool, configure the serial ports you have added to the system. See Configuring serial ports on page 60.
Your system can now use the serial adaptor cards you have installed. If required, you can reconfigure serial ports following initial installation.
FAST Serial Adaptors User Guide Installing under SCO OpenServer 6
Page 53
Chapter 2 Installing drivers and host cards

Installing device drivers and utilities
To install the PCI-FAST device drivers and utilities for the SCO OpenServer 6 operating
system proceed as follows;
1. Login to your system as super user.
2. Load the CDROM into your system CD drive.
3. At the command prompt, make a directory for your installation by typing:
mkdir /cdrom
4. Mount the CDROM file system using the following commands:
mount -f ISO9660 -r/dev/cd0 /cdrom
5. In the SCO OpenServer desktop, double click on the System Administration folder.
The System Administration window is now displayed.
6. In the System Administration window, double click on the software manager icon.
The Software Manager window is now displayed.
Note
The example above shows the directory name as /cdrom, You can either use this name or use another directory name to suit your requirements. For example, /mnt.
FAST Serial Adaptors User Guide Installing under SCO OpenServer 6
Page 54
Chapter 2 Installing drivers and host cards

7. In the Software Manager menu, click on Software > Install New.
The Begin Installation window is now displayed as shown in the next picture.
8. In the Begin Installation window, select the local host as the machine to install from by clicking on the From localhostname button and then click on Continue.
The Select Media window is now displayed.
9. In the Select Media window, using the Media Device selector choose the Media Images option then click on Continue.
The Enter Image Directory window is now displayed.
Click here to select the local host as the host machine.
FAST Serial Adaptors User Guide Installing under SCO OpenServer 6
Page 55
Chapter 2 Installing drivers and host cards

10.In the Enter Image Directory window, enter the following in the Image directory field;
/cdrom/drivers/pci-fast/openserver6/
11.In the Enter Image Directory window, click on OK.
The Install Selection window is now displayed.
Note
The example and picture above show a directory name including /cdrom, You can either include this name in the path or use another directory name to suit your requirements. For example, /mnt.
FAST Serial Adaptors User Guide Installing under SCO OpenServer 6
Page 56
Chapter 2 Installing drivers and host cards

12.In the Install Selection window, click on the Install button.
The following progress message is now displayed.
The above window will display various progress messages and then the Speed Installation Options window will be displayed.
13.If required, in the Speed Installation Options window, select the Re-Link kernel option.
14.In the Speed Window Installation menu, click on Options > Exit to close the window and continue the installation process.
If you select Re-link kernel, a message window is displayed at the end of the driver installation prompting you to re-boot the system.
Hint
If you are installing more then one driver, you can de-select this option until you have installed all the drivers and utilities you require to save time.
FAST Serial Adaptors User Guide Installing under SCO OpenServer 6
Page 57
Chapter 2 Installing drivers and host cards
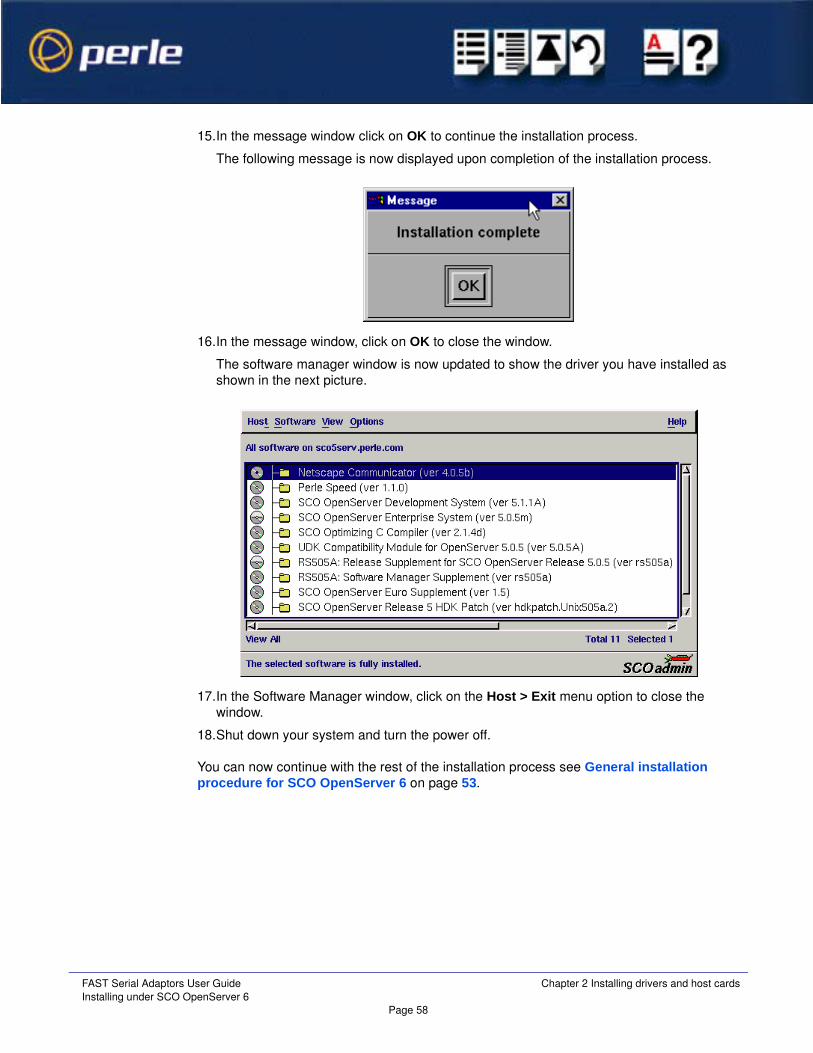
15.In the message window click on OK to continue the installation process.
The following message is now displayed upon completion of the installation process.
16.In the message window, click on OK to close the window.
The software manager window is now updated to show the driver you have installed as shown in the next picture.
17.In the Software Manager window, click on the Host > Exit menu option to close the window.
18.Shut down your system and turn the power off.
You can now continue with the rest of the installation process see General installation procedure for SCO OpenServer 6 on page 53.
FAST Serial Adaptors User Guide Installing under SCO OpenServer 6
Page 58
Chapter 2 Installing drivers and host cards

Serial port naming conventions
Each serial port has three device nodes associated with it. Each node takes the form of a file which you can access from operating system utilities and user applications. Details of these nodes are shown in the next table.
Device name Function Description Location
ttyz1 Normal communications port for local “tty” devices.
Indicates normal communications port behaviour.
/dev
ttyZ1 Modem port Indicates that a port open will not complete unless DCD is present
/dev
ttyz1p Transparent print port. Indicates that device should only be used for transparent print.
/dev
FAST Serial Adaptors User Guide Installing under SCO OpenServer 6
Page 59
Chapter 2 Installing drivers and host cards

Configuring serial ports
The Port Configuration utility allows you to configure the SPEED serial ports you have
installed on your system. To do this proceed as follows;
Starting the Port Configuration utility
1. In the command prompt, type spdpcfg and press the Enter key. Alternatively use the SCO OpenServer desktop as follows;
a. In the SCO OpenServer desktop, open the System Administration folder.
The System Administration window is now displayed.
b. In the System Administration window, click on the Perle-Serial folder to open it.
The Speed window is now displayed.
c. In the Speed window, click on the Speed Port Configuration Icon.
The Port Configuration window is now displayed as shown in the next picture.
Menus see page 61.
Select a getty definition here. See page 61.
Select a terminal type here.See page 62
Select one or more ports from this list.
Enables or disables login.See page 62
FAST Serial Adaptors User Guide Installing under SCO OpenServer 6
Page 60
Chapter 2 Installing drivers and host cards

Menu map The Port Configuration tool menu is as follows;
Selecting ports 2. In the Port Configuration window, select the ports you want you want to configure by clicking on one or more items in the list of ports (example in next picture).
Selecting a getty definition
3. In the Port Configuration window, select the getty definition you want by double clicking on an item in the Available gettydefs list. Alternatively, click on the Set button.
Menu optionDescription
Ports > Quit Quit Port Configuration tool without saving changes.
Logins Display all ports with logins enabled.
Unconfigured Display all ports without logins enabled.
All Display all ports.
Save & Exit Exit the Port Configuration tool and save changes.
Hint
To select multiple items which follow each other in the list, hold down the Shift key and click on all the items you want.
To select multiple items from anywhere in the list, hold down the Ctrl key and click on all the items you want.
FAST Serial Adaptors User Guide Installing under SCO OpenServer 6
Page 61
Chapter 2 Installing drivers and host cards

The list of currently selected ports is now updated to show the new getty definition.
Selecting terminal type
4. In the Terminal type list, double click on the terminal type you want for the currently selected ports. Alternatively, single click on the item you want in the Terminal type list and press the Set button.
The list of ports is now updated to show the new terminal type.
Setting up a port login
5. In the Port Configuration window, click on one of the menu options shown in the next table to display the ports with the login status you want to change. For example, ports without logins enabled.
These options allow you to filter on the type of ports you are looking for. This facility is helpful when you have a large number of ports installed.
6. If required, in the Port Configuration window, select the ports whose logins status you want to change, then click on one of the following to change the login status;
New definition displayed here
New terminal type displayed here
To Display Click menu option
All ports with logins enabled Ports > Logins
All ports without logins enabled Ports > Unconfigured
Display all ports Ports > All
Tc Click on
Enable logins for a port Enable button
Disable logins for a port Disable button
FAST Serial Adaptors User Guide Installing under SCO OpenServer 6
Page 62
Chapter 2 Installing drivers and host cards

The selected ports in the list now are updated show their new login status. For example if you enable the login for a port, a tick is displayed along side the port as shown in the next picture.
7. Repeat steps 2. to 6. until you have configured all the ports you want.
Exiting the Port Configuration tool
8. In the Port Configuration menu, click on Ports > Save & Exit.
The Port Configuration tool now closes and saves any changes you have made.
Note
To quit the Port Configuration tool without saving changes,
• In the Port Configuration menu, click on Ports > Quit.
FAST Serial Adaptors User Guide Installing under SCO OpenServer 6
Page 63
Chapter 2 Installing drivers and host cards

Removing drivers and utilities from your system
To remove the PCI-FAST device drivers and utilities for the SCO OpenServer operating
system proceed as follows;
1. In the SCO OpenServer 6 desktop, double click on the System Administration folder.
The System Administration window is now displayed.
2. In the System Administration window, double click on the software manager icon.
The Software Manager window is now displayed.
3. In the Software Manager window select the driver you want to remove.
4. In the Software Manager menu, click on Software > Remove software.
A confirmation window is now displayed prompting you to confirm removal.
5. In the confirmation window, click on the Remove button.
The software is now removed. The software manager window is now updated to show the remaining software.
FAST Serial Adaptors User Guide Installing under SCO OpenServer 6
Page 64
Chapter 2 Installing drivers and host cards

Installing under SCO UnixWare
This section describes how to install the FAST device driver software under SCO UnixWare.
This section includes the following;
• General setup procedure for SCO UnixWare on page 66
• Initial configuration under SCO UnixWare on page 67
• Installing SCO UnixWare drivers using command line on page 68
• Installing SCO UnixWare drivers using the Desktop on page 70
• Enabling login access on page 70
• Reinstalling or upgrading software on page 70
• Installing additional cards on page 70
• Removing cards and software on page 71
• Port naming conventions for SCO UnixWare on page 73
• Higher baud rates under SCO UnixWare on page 73.
Note
A mouse or similar device may not work correctly on buffered ports, such as those offered with the PCI-FAST / AT-FAST cards. If possible, connect your mouse to one of the existing PC serial ports. To configure the cards for connection to a mouse, disable the buffering option as follows:
1. Run the atfconfig utility:
/etc/comf/atfconfig
2. At the Action? prompt, select M. Add a mouse port. A list of available ports is shown and a prompt follows for the name of the port you wish to unbuffer.
Example: Type comf2c to unbuffer the third port on the second card.
3. Repeat as required for other ports.
4. Quit the utility.
An extra device will now be added to the /dev directory for each unbuffered port configured. In the example above it is called com2c and this name should be specified to the mouse software, etc.
FAST Serial Adaptors User Guide Installing under SCO UnixWare
Page 65
Chapter 2 Installing drivers and host cards

General setup procedure for SCO UnixWare
The general procedure for installing FAST cards under the SCO UnixWare operating system is as follows;
1. Before commencing the installation process under SCO UnixWare, configure your system as described in Initial configuration under SCO UnixWare on page 67.
2. Install any PCI host cards and distribution cables or boxes you require into your system. See Installing host cards and distribution accessories on page 79.
3. Install any AT cards and distribution cables or boxes you require into your system. See Installing host cards and distribution accessories on page 79.
4. Install the driver software ionto your system using the procedures given in Installing SCO UnixWare drivers using command line on page 68 or Installing SCO UnixWare drivers using the Desktop on page 70
5. You can then enable login access using the procedures given in Enabling login access on page 70.
6. If required, remove any host cards you want from your system. See Removing host cards on page 103.
Note
If you are installing AT-FAST hardware you should examine your system configuration and determine non-conflicting I/O addresses and IRQs for use with each ISA card.
NoteFor information on upgrading or re-installing drivers, see Reinstalling or upgrading software on page 70.To remove drivers, see Removing the driver software on page 50
For information on installing additional cards see Installing additional cards on page 70.
FAST Serial Adaptors User Guide Installing under SCO UnixWare
Page 66
Chapter 2 Installing drivers and host cards

Initial configuration under SCO UnixWare
Before installing any new software on your system it is important that the existing software is correctly installed and configured.
The software supplied comprises various files plus a kernel module called a device driver that has to be linked into the Unix kernel.
Before attempting to install the software, it is advisable to check that the kernel can be rebuilt.
The steps to do this are:
1. Log in as root.
2. Change directory to /etc/conf/bin.
cd /etc/conf/bin
3. Run idbuild.
./idbuild
4. Reboot the machine.
sync
init 6
During the reboot, the kernel will be rebuilt. Any problems that cause the rebuild to fail must be resolved (by your operating system vendor or other third party product vendor) before installing the driver.
FAST Serial Adaptors User Guide Installing under SCO UnixWare
Page 67
Chapter 2 Installing drivers and host cards

Installing SCO UnixWare drivers using command line
Before commencing software installation, you will need to create a diskette using the 'diskette image' supplied on the CD supplied with this product. How to use this CD-ROM When you have created the installation diskette, proceed as follows:
1. Log in as root.
2. Insert the created installation diskette.
3. Run pkgadd to install the package.
pkgadd -d diskette1 comf
4. When prompted, give the total number of PCI-FAST and AT-FAST you want to install at this time (cards can be added later).
Example: If you are installing 2 PCI-FAST cards and 1 AT-FAST card, enter 3.
5. You will be prompted to run the Device Configuration Utility (dcu) if you are installing any AT-FAST cards. If you are installing PCI-FAST cards only, go to step 12.
6. Unless you are confident that you know suitable values for the IRQ line and I/O address range to use with AT-FAST cards, it is advisable to run the scansd utility.
/etc/comf/scansd
This produces a report such as:
The following IRQs are free:
2 5 7 12 13 14 15
The following IRQs are shareable (ipl level in () ): 9(5)
The following I/O address ranges are free:
0x63-0x63 0x65-0x6F 0xE0-0x2F7 0x320-0x32F0x334-0x3EF
The following memory address ranges are free
0xC8000-0xCBFFF 0xD0800-0xDBFFF 0xDE000-0xDFFFF
FAST Serial Adaptors User Guide Installing under SCO UnixWare
Page 68
Chapter 2 Installing drivers and host cards

7. Select a unique free IRQ for each AT-FAST card from the subset that is supported by the card. Then select a free I/O range from the subset supported by the card.
The following table shows the address range required for each card type.
From the example above, we could select an IRQ of 15 and an I/O range of 0x100 to 0x17F to install a 16-port card.
8. Run dcu.
dcu
9. When the main menu appears, select software Device Drivers. Then select Communications Cards or All Software Device Drivers.
10.Use the PgDn key and/or tab key to move to the comf entry and press F5. On the New Hardware Configuration form, fill in the fields as follows:
11.Press F10 to leave this form, then <Enter> to return to Software Device Driver Selections menu. Press R then <Enter> to return to the main menu. Finally press A then <Enter> to make the changes.
12.Remove the installation diskette and reboot the machine.syncinit 6
The new devices will be available after a successful rebuild and reboot.
Ports Range
4 base to base+0x1F
8 base to base+0x3F
1 6base to base+0x7F
IPL 5
ITYPE 1
IRQ [chosen value (15 in example above)]
IOStart [chosen value (100 in example)]
IOEnd [chosen value (17F in example)]
MemStart -
MemEnd -
DMA -
Note
The default stty setting for UNIXWARE 2.1.1 is 7 bits even-parity. The default ports are 8 bit no-parity. These usually need to match the connecting device.
FAST Serial Adaptors User Guide Installing under SCO UnixWare
Page 69
Chapter 2 Installing drivers and host cards

Installing SCO UnixWare drivers using the Desktop
The system owner can install the driver from the desktop as follows:
1. Insert the created Installation diskette.
2. Select the Admin_Tools/App_Installer icon.
3. Set the Install From box to Disk_A and wait for the comf icon to appear, then select it.
4. Select the Install button.
5. If you are installing any AT-FAST cards, see steps 4. to 8. of the command line installation on page 68. The Device Configuration Utility may be envoked from the desktop by selecting Admin_Tools/ Hardware_Setup icon.
6. Remove the diskette.
7. Select the Shutdown icon on the main desktop.
Enabling login access
Logins are not enabled by default. For example, to enable a login on the third port of the second card, type:
pmadm -e -p comf2 -s 2c
The -p parameter is comf1 for the first card to comf4 for the fourth card. The -s parameter is the last two characters of the port name (see page 73). See the pmadm man page for more details.
Reinstalling or upgrading software
New versions of the software can be installed over the top of any existing version using the installation procedure listed on page 65.
Installing additional cards
To install extra cards (up to the maximum of four):
1. Run the atfconfig utility.
/etc/comf/atconfig
2. At the Action? prompt, select A. Add a card.
3. On completion of the program, quit and then for AT-FAST cards only, use dcu to configure the cards in the same way as discussed in Command line installation on page 68, or Desktop installation steps on page 70.
4. Finally reboot the system:
syncinit 6
FAST Serial Adaptors User Guide Installing under SCO UnixWare
Page 70
Chapter 2 Installing drivers and host cards

Removing cards and software
To remove a PCI-FAST card, jump to step 5.
1. Run the atfconfig utility.
/etc/comf/atfconfig
2. At the Action? prompt, select D. Delete a card.
3. Reboot the system.
sync
init 6
To remove an AT-FAST card:
1. Run dcu from the command line as root, or Admin_Tools/Hardware_Setup from the desktop as the system owner.
2. Select Hardware Device Configuration. Use the PgDn and/or Down-arrow key to move the cursor to the first column of the entry for the card to be removed.
3. Type N into this column, then press F10.
4. Press A, then <Enter>.
5. Run the atfconfig utility.
/etc/comf/atfconfig
6. At the Action? prompt, select D. Delete a card.
7. Reboot the system.
syncinit 6
FAST Serial Adaptors User Guide Installing under SCO UnixWare
Page 71
Chapter 2 Installing drivers and host cards

Removing the SCO UnixWare driver
To remove the driver, the following steps are required:
1. Remove all ' comf'cards as per the steps in page 71.
2. Log in as root and type:
pkgrm comf
3. Follow the on-screen prompts, or from Admin_Tools/App_Installer (as system owner) select the comf icon and then select Remove.
4. Reboot the system.
syncinit 6
FAST Serial Adaptors User Guide Installing under SCO UnixWare
Page 72
Chapter 2 Installing drivers and host cards

Port naming conventions for SCO UnixWare
If the first card has 16 ports, the ports on the first card are named comf1a through to comf1p. Only the first four or eight names will be used on smaller cards. If a second 16 port card is subsequently added, it’s ports are named comf2a to comf2p, etc.
Cards are numbered and named in PCI system slot order, with cards in the lower numbered slot on the lower numbered bus appearing first in the list.
For OpenServer 5, any AT-FAST cards configured will appear in the list in the order they have been configured. Under UnixWare 2.1.1 cards are numbered in the order that dcu detects them.
To use modem control for dial in operations the port name should be used with the last letter of the name in uppercase;
e.g. comf1A. Upper case port names assume at least a five-wire connection (RXD, TXD, RTS, CTS, GND) with another serial device. Lower case port names assume a three-wire connection only (RXD, TXD, GND).
Higher baud rates under SCO UnixWare
Because the system does not support the selection of baud rates above 38.4 kpbs, we have permanently remapped some of the lower baud rates to support higher card speeds.
Note
Adding a new card in a lower numbered slot than an existing one will cause the ports on the existing board to be renumbered.
Original speed (bps)
Is mapped to (kpps) Getty letter
50 57.6 a
75 76.8 b
110 115.2 c
134 230.4 d
150 460.8 e
FAST Serial Adaptors User Guide Installing under SCO UnixWare
Page 73
Chapter 2 Installing drivers and host cards

Installing under Solaris
This section describes how to install the FAST device driver software under Solaris.
This section includes the following;
• General setup procedure for Solaris on page 75
• Installing Solaris drivers on page 76
• Port naming conventions on page 77
• Card Ordering on page 77
• Enabling logins on page 77.
FAST Serial Adaptors User Guide Installing under Solaris
Page 74
Chapter 2 Installing drivers and host cards

General setup procedure for Solaris
The general procedure for installing FAST cards under the SCO UnixWare operating system is as follows;
1. Install any PCI host cards and distribution cables or boxes you require into your system. See Installing host cards and distribution accessories on page 79.
2. Install any AT cards and distribution cables or boxes you require into your system. See Installing host cards and distribution accessories on page 79.
3. Install the driver software onto your system using the procedures given in Installing Solaris drivers on page 76.
4. You can then enable login access using the procedures given in Enabling logins on page 77.
5. If required, remove any host cards you want from your system. See Removing host cards on page 103.
FAST Serial Adaptors User Guide Installing under Solaris
Page 75
Chapter 2 Installing drivers and host cards

Installing Solaris drivers
This driver is available either from the Perle Systems web site or on the CD supplied with this product.
1. If this package comes on a CD-ROM, the first step is to copy the image on the CD-ROM to a floppy diskette. Use the 'dd' command for this.
For example: # dd if=sol_1_00.dd of=/dev/fd0 bs=18k
2. Insert the diskette in the floppy drive and, as root, type # pkgadd -d diskette1 comf
3. Follow the on-screen prompts until the prompt "How many AT-Fast cards to install?
[0]" appears.
4. If you are installing PCI-Fast and/or PCI-RAS cards only, you can accept the default value of 0 AT-Fast cards. Otherwise, enter the number (1-4) of AT-Fast cards you want to install.
5. For each card you will then be prompted for a base I/O address and interrupt line (IRQ). Note: there no tools to tell you what is already in use and that the following restrictions apply:
A 4-port card requires 32 bytes of I/O space
An 8-port card requires 64 bytes of I/O space
A 16-port card requires 128 bytes of I/O space
Each AT-Fast requires exclusive use of an IRQ
The installation process will continue to the point where pkgadd reports that the package contains scripts which will be run with root permissions, offering the chance to abort the installation. Perle scripts are not intentionally destructive, but you can see for yourself by aborting the installation, mounting the floppy and the inspecting the request and postinstall scripts.
At the end of the installation, pkgadd may report that the driver was added to the kernel but the module failed to attach. This is normal if you haven't yet installed any cards.
After pkgadd completes, a reconfiguration boot is required to make AT/PCI-Fast and/or PCI-RAS ports work.
Note
The jumpers on the AT-FAST card must be adjusted to agree with the above selection
FAST Serial Adaptors User Guide Installing under Solaris
Page 76
Chapter 2 Installing drivers and host cards

Port naming conventions
By default, each port is associated with two entries under the /dev directory. One takes the form /dev/comfxy, where x is the card number (1-4) and y is a lower-case letter in the range a-p. a is port 1, ..., p is port 16. These device names are intended for local devices or call-out modem ports. The other device name takes the form /dev/term/comfxy, where x is the card number as before and y is an upper-case letter in the range A-P. These devices are intended to use with modems. These mappings can be altered by careful modification of the mkdev and start_comf scripts in /usr/lib/i86.
Card Ordering
Cards are numbered by first taking AT-Fast cards in the order that there were entered in the installation procedure, followed by PCI cards in PCI slot order.
Enabling logins
By default, logins on cards are not enabled. Use 'pmadm' to enable logins. For example, to enable login on the fourth port of the third card, you would type #
pmadm -e -p comf3 -s 3d
FAST Serial Adaptors User Guide Installing under Solaris
Page 77
Chapter 2 Installing drivers and host cards

Installing under Linux
Cards Supported
The driver has been rewritten to support the following Perle products only:
• 4-port AT-Fast
• 8-port AT-Fast
• 16-port AT-Fast (restricted modem control)
• 4-port PCI-Fast
• 8-port PCI-Fast
• 16-port PCI-Fast (restricted modem control)
• 16-port PCI-Fast (full modem control)
• 4-port PCI-RAS
• 8-port PCI-RAS
Enhanced Features
The range of baud rates has been extended to 460800 bits/sec. The on-chip hardware and software flow control capabilities of the 16C654 UART are utilised to reduce host load.
Known Limitations
1. The driver cannot be installed as a module on multi-processor systems. It can only be installed as a statically-linked driver. On single-processor systems it can be installed statically linked or as a module.
2. Data can be lost if multiple ports are run simultaneously at 230400 or 460800 bits/sec.
FAST Serial Adaptors User Guide Installing under Linux
Page 78
Chapter 2 Installing drivers and host cards

Installing host cards and distribution accessories
This section describes the mechanical installation of the FAST host cards and associated distribution boxes and cables for 4, 8 and 16 ports and includes the following;
• Distribution accessory guide on page 80
• Installing 4 port cards on page 81
• Installing 8 port cards and distribution accessories on page 86
• Installing 16 port cards and distribution accessories on page 95.
For information on connector pinouts and cabling, see Chapter 3 Cabling information.
FAST Serial Adaptors User Guide Installing host cards and distribution accessories
Page 79
Chapter 2 Installing drivers and host cards

Distribution accessory guide
The distribution box or cable required for the FAST product you are using depends on the number of ports and product type as detailed in the next table;
ProductCard edge connector
Cable or distribution box options For installation information see...
AT-FAST4PCI-FAST4
RJ45 8 pin femaleSee page 106
RJ45 (8 pin) to DB25 male cable.
See page 81.
AT-FAST8PCI-FAST8
Custom D type connector, no wiring information required by user.
8 port distribution box with DB25 female connectors.
See page 86 and page 92.
8 port octopus cable with DB25 female connectors on flying leads.
See page 86 and page 93.
8 port octopus cable with DB25 male connectors on flying leads
8 port distribution cable with RJ45 8 pin female connector block.
See page 86 and page 94.
AT-FAST16PCI-FAST16
Custom D type connector, no wiring information required by user.
16 port distribution box with DB25 female connectors.
See page 95 and page 102.
FAST Serial Adaptors User Guide Installing host cards and distribution accessories
Page 80
Chapter 2 Installing drivers and host cards

Installing 4 port cards
This section describes the mechanical installation of the 4 port FAST host cards and includes the following;
• Installing a 4 port PCI host card on page 81
• Installing a 4 port AT host card on page 83
For information on installing other card types and associated distribution accessories, see Distribution accessory guide on page 80.
Installing a 4 port PCI host card
To install a PCI host card proceed as follows;
1. Turn off the power to your system and disconnect the mains supply.
2. Remove the system cover to expose the inside of the connector panel for host cards.
Note
The exact location of host card slots varies for different systems, for exact mechanical details of your system, refer to your system documentation.
Warning
Dangerous voltages exist inside computer systems. Before installing host cards in your system, turn off the power supply and disconnect the mains lead.
FAST Serial Adaptors User Guide Installing host cards and distribution accessories
Page 81
Chapter 2 Installing drivers and host cards

3. Insert the PCI card you want to install into a vacant host card slot and secure in place as shown in the next picture.
4. Repeat step 3. until you have installed all the PCI cards you want.
5. Replace and secure the system cover.
Installation of PCI host cards is now complete. For further details about installing host cards including other types, see Before you start on page 17.
Caution
Full anti-static precautions should be taken when handling host cards.
FAST Serial Adaptors User Guide Installing host cards and distribution accessories
Page 82
Chapter 2 Installing drivers and host cards

Installing a 4 port AT host card
Setting parameters on an AT host card
Before you install an AT card in your system you need to physically set the I/O address, IRQ level and operating mode for the card using the jumpers provided as follows;
Operating mode 1. On the host card, set the jumper JP4 to the FAST setting.
IRQ level 2. Using jumper JP3 on the host card, set the IRQ level you want from the values listed on the card;
JP4 sets operating mode, set to Fast.Default setting: FastSee page 83.
JP3 sets IRQ level,move jumper to IRQ level required.Default setting: IRQ10See page 83.
JP1 and JP2 set I/O address,JP2 sets high order address value. Default: 02XXJP1 sets low order address value. Default XX40See page 84.
JP2 JP1
Caution
Full anti-static precautions should be taken when handling host cards.
JP3 sets IRQ level,move jumper to IRQ level required.For example to select a value of 12, move jumper to IRQ12 position.
FAST Serial Adaptors User Guide Installing host cards and distribution accessories
Page 83
Chapter 2 Installing drivers and host cards

I/O address 3. Using jumpers JP1 and JP2 on the host card, set the high order and low order I/O address you want in hexidecimal using the one of the settings shown in the next table;
Mechanical installation
You can now install the AT host card in your system. To do this proceed as follows;
4. Turn off the power to your system and disconnect the mains supply.
5. Remove the system cover to expose the inside of the connector panel for host cards.
Address JP2 setting JP1 setting
0100 01XX XX00
0140 XX40
0180 XX80
01c0 XXc0
0200 02XX XX00
0240 XX40
0280 XX80
02c0 XXc0
0300 03XX XX00
0340 XX40
0380 XX80
03c0 XXc0
JP2 JP1
JP1 and JP2 set I/O address,JP2 sets high order address valueJP1 sets low order address value
Note
The exact location of host card slots varies for different systems, for exact mechanical details of your system, refer to your system documentation.
Warning
Dangerous voltages exist inside computer systems. Before installing host cards in your system, turn off the power supply and disconnect the mains lead.
FAST Serial Adaptors User Guide Installing host cards and distribution accessories
Page 84
Chapter 2 Installing drivers and host cards

6. Insert the AT card you want to install into a vacant host card slot and secure in place as shown in the next picture.
7. Repeat steps 1. to 6. until you have installed all the AT cards you want.
8. Replace and secure the system cover.
9. Plug in the mains and turn on the power.
Installation of AT host cards is now complete. For further details about installing host cards including other types, see Before you start on page 17.
Caution
Full anti-static precautions should be taken when handling host cards.
FAST Serial Adaptors User Guide Installing host cards and distribution accessories
Page 85
Chapter 2 Installing drivers and host cards

Installing 8 port cards and distribution accessories
This section describes the mechanical installation of the 8 port FAST host cards and distribution accessories and includes the following;
• Installing an 8 port PCI host card on page 87
• Installing an 8 port AT host card on page 89
• Connecting an 8 port distribution box fitted via hardwired flying lead on page 92
• Connecting an 8 port octopus cable on page 93
• Connecting an 8 port distribution cable on page 94
For information on installing other card types and associated distribution accessories, see Distribution accessory guide on page 80.
FAST Serial Adaptors User Guide Installing host cards and distribution accessories
Page 86
Chapter 2 Installing drivers and host cards

Installing an 8 port PCI host card
To install a PCI host card proceed as follows;
1. Turn off the power to your system and disconnect the mains supply.
2. Remove the system cover to expose the inside of the connector panel for host cards.
3. Insert the PCI card you want to install into a vacant host card slot and secure in place as shown in the next picture.
4. Repeat step 3. until you have installed all the PCI cards you want.
Note
The exact location of host card slots varies for different systems, for exact mechanical details of your system, refer to your system documentation.
Warning
Dangerous voltages exist inside computer systems. Before installing host cards in your system, turn off the power supply and disconnect the mains lead.
Caution
Full anti-static precautions should be taken when handling host cards.
FAST Serial Adaptors User Guide Installing host cards and distribution accessories
Page 87
Chapter 2 Installing drivers and host cards

5. Replace and secure the system cover.
Installation of PCI host cards is now complete. For further details about installing other host cards types and distribution accessories, see Distribution accessory guide on page 80.
Note
Do not turn on the power to your system until you have connected the distribution cable or box you are using with this host card. See the following for details;
• Connecting an 8 port distribution box fitted via hardwired flying lead on page 92
• Connecting an 8 port octopus cable on page 93
• Connecting an 8 port distribution cable on page 94
FAST Serial Adaptors User Guide Installing host cards and distribution accessories
Page 88
Chapter 2 Installing drivers and host cards

Installing an 8 port AT host card
Setting parameters on an AT host card
Before you install an AT card in your system you need to physically set the I/O address, IRQ level and operating mode for the card using the jumpers provided as follows;
Operating mode 1. On the host card, set the jumper JP4 to the FAST setting.
IRQ level 2. Using jumper JP3 on the host card, set the IRQ level you want from the values listed on the card;
JP4 sets operating mode, set to FAST.Default setting: FASTSee page 83.
JP3 sets IRQ level,move jumper to IRQ level required.Default setting: IRQ10See page 83.
JP1 and JP2 set I/O address, Default: 02XXJP2 sets high order address value Default: XX40JP1 sets low order address value. See page 84.
JP2 JP1
Caution
Full anti-static precautions should be taken when handling host cards.
JP3 sets IRQ level,move jumper to IRQ level required.For example to select a value of 12, move jumper to IRQ12 position.
FAST Serial Adaptors User Guide Installing host cards and distribution accessories
Page 89
Chapter 2 Installing drivers and host cards

I/O address 3. Using jumpers JP1 and JP2 on the host card, set the high order and low order I/O address you want in hexidecimal using the one of the settings shown in the next table;
Mechanical installation
You can now install the AT host card in your system. To do this proceed as follows;
4. Turn off the power to your system and disconnect the mains supply.
5. Remove the system cover to expose the inside of the connector panel for host cards.
Address JP2 setting JP1 setting
0100 01XX XX00
0140 XX40
0180 XX80
01c0 XXc0
0200 02XX XX00
0240 XX40
0280 XX80
02c0 XXc0
0300 03XX XX00
0340 XX40
0380 XX80
03c0 XXc0
JP2 JP1
JP1 and JP2 set I/O address,JP2 sets high order address valueJP1 sets low order address value
Note
The exact location of host card slots varies for different systems, for exact mechanical details of your system, refer to your system documentation.
Warning
Dangerous voltages exist inside computer systems. Before installing host cards in your system, turn off the power supply and disconnect the mains lead.
FAST Serial Adaptors User Guide Installing host cards and distribution accessories
Page 90
Chapter 2 Installing drivers and host cards

6. Insert the AT card you want to install into a vacant host card slot and secure in place as shown in the next picture.
7. Repeat steps 1. to 6. until you have installed all the AT cards you want.
8. Replace and secure the system cover.
Installation of AT host cards is now complete. For further details about installing host cards including other types, see Before you start on page 17.
Caution
Full anti-static precautions should be taken when handling host cards.
Note
Do not turn on the power to your system until you have connected the distribution cable or box you are using with this host card. See the following for details;
• Connecting an 8 port distribution box fitted via hardwired flying lead on page 92
• Connecting an 8 port octopus cable on page 93
• Connecting an 8 port distribution cable on page 94
FAST Serial Adaptors User Guide Installing host cards and distribution accessories
Page 91
Chapter 2 Installing drivers and host cards

Connecting an 8 port distribution box fitted via hardwired flying lead
To allow 8 ports to be connected using a distribution box proceed as follows;
1. Install your 8 port AT or PCI FAST card using the procedures given in Installing an 8 port PCI host card on page 87 and Installing an 8 port AT host card on page 89.
2. Turn off the power to your system.
3. Push fit the large connector on the end of the distribution box cable onto the card edge connector.
4. Secure the connector in place in place using the screws provided as shown in the next picture.
5. Connect peripherals to the required ports on the distribution box using DB25 connectors provided.
6. Turn on the power to your system.
Push fit onto card edge connector
Port numbers labelled on unit
Connect peripheral cable here via DB25 connectors
FAST Serial Adaptors User Guide Installing host cards and distribution accessories
Page 92
Chapter 2 Installing drivers and host cards

Connecting an 8 port octopus cable
To allow 8 ports to be connected using an octopus cable proceed as follows;
1. Install your 8 port AT-FAST or PCI-FAST card using the procedures given in Installing an 8 port PCI host card on page 87 and Installing an 8 port AT host card on page 89.
2. Turn off the power to your system.
3. Push fit the large connector on the single end of your octopus cable onto the card edge connector and secure in place using the screws provided as shown in the next picture.
4. Connect peripherals to the required ports on the distribution box using the DB25 flying leads provided.
5. Turn on the power to your system.
Note
Octopus cables are available with both DB35 male and DB25 female connectors for connection to each port.
Push fit onto card edge connector
Port numbers labelled on DB25 flying lead
Connect peripheral cable here via DB25 flying lead
DB25 flying leads connected to card edge connector.
FAST Serial Adaptors User Guide Installing host cards and distribution accessories
Page 93
Chapter 2 Installing drivers and host cards

Connecting an 8 port distribution cable
To allow 8 ports to be connected using a distribution cable proceed as follows;
1. Install your 8 port AT or PCI FAST card using the procedures given in Installing an 8 port PCI host card on page 87 and Installing an 8 port AT host card on page 89.
2. Turn off the power to your system.
3. Push fit the large custom D type connector on the single end of your distribution cable onto the card edge connector and secure in place using the screws provided as shown in the next picture.
4. Connect peripherals to the required ports on the connector block on the end of the distribution cable using the RJ45 sockets provided.
5. Turn on the power to your system.
Connect peripheral cable here via RJ45
Push fit onto card edge connector
Port numbers labelled on unit
RJ45 connector block
View looking into RJ45 connector block
FAST Serial Adaptors User Guide Installing host cards and distribution accessories
Page 94
Chapter 2 Installing drivers and host cards

Installing 16 port cards and distribution accessories
This section describes the mechanical installation of the 8 port FAST host cards and distribution accessories and includes the following;
• Installing a 16 port PCI host card on page 95
• Installing a 16 port AT host card on page 97
• Connecting a 16 port distribution box on page 102
For information on installing other card types and associated distribution accessories, see Distribution accessory guide on page 80.
Installing a 16 port PCI host card
To install a PCI host card proceed as follows;
1. Turn off the power to your system and disconnect the mains supply.
2. Remove the system cover to expose the inside of the connector panel for host cards.
Note
The exact location of host card slots varies for different systems, for exact mechanical details of your system, refer to your system documentation.
Warning
Dangerous voltages exist inside computer systems. Before installing host cards in your system, turn off the power supply and disconnect the mains lead.
FAST Serial Adaptors User Guide Installing host cards and distribution accessories
Page 95
Chapter 2 Installing drivers and host cards

3. Insert the PCI card you want to install into a vacant host card slot and secure in place as shown in the next picture.
4. Repeat step 3. until you have installed all the PCI cards you want.
5. Replace and secure the system cover.
Installation of PCI host cards is now complete. For further details about installing other host cards types and distribution accessories, see Distribution accessory guide on page 80.
Caution
Full anti-static precautions should be taken when handling host cards.
Note
Do not turn on the power to your system until you have connected the distribution cable or box you are using with this host card. See the following for details;
• Connecting an 8 port distribution box fitted via hardwired flying lead on page 92
• Connecting an 8 port octopus cable on page 93
• Connecting an 8 port distribution cable on page 94
FAST Serial Adaptors User Guide Installing host cards and distribution accessories
Page 96
Chapter 2 Installing drivers and host cards

Installing a 16 port AT host card
Setting parameters on an AT host card
Before you install an AT card in your system you need to physically set the I/O address, IRQ level and operating mode for the card using the jumpers provided. On the 16 port cards you can also set an IRQ delay time and choose between DTR and RTS as follows;
JP6 sets operating mode, set to FAST.Default setting: FAST.See page 83.
JP7 sets IRQ level,move jumper to IRQ level required.Default setting: IRQ10See page 83.
JP1,JP2 and JP3 allows you to set I/O address to one of the following values:100, 180, 200, 280, 300, and 380.Default setting: 280See page 84.
JP5 allows you to select flow control to either RTS or DTR modes.Default setting: RTS. See page 83.
JP4 sets IRQ delay time, set to 2MS for larger systems.Default setting: 0MSSee page 83.
Caution
Full anti-static precautions should be taken when handling host cards.
FAST Serial Adaptors User Guide Installing host cards and distribution accessories
Page 97
Chapter 2 Installing drivers and host cards
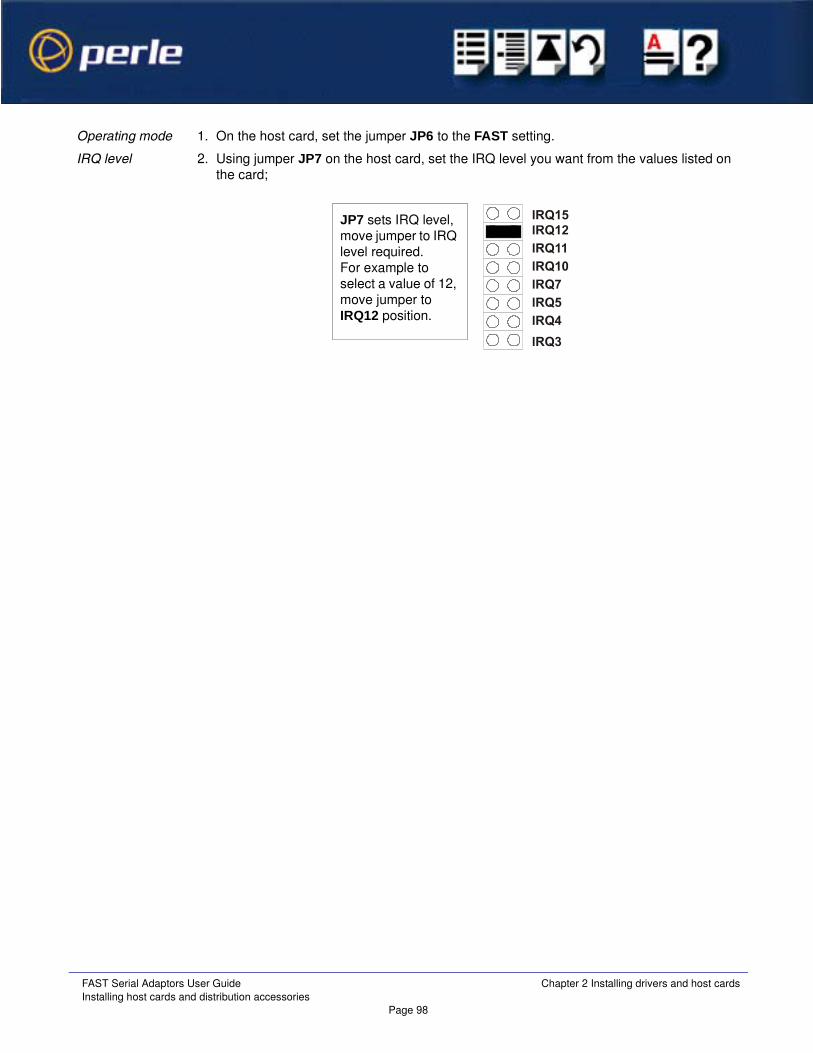
Operating mode 1. On the host card, set the jumper JP6 to the FAST setting.
IRQ level 2. Using jumper JP7 on the host card, set the IRQ level you want from the values listed on the card;
JP7 sets IRQ level,move jumper to IRQ level required.For example to select a value of 12, move jumper to IRQ12 position.
FAST Serial Adaptors User Guide Installing host cards and distribution accessories
Page 98
Chapter 2 Installing drivers and host cards

I/O address 3. Using jumpers JP1, JP2 and JP3 on the host card, set the I/O address you want in hexidecimal using the one of the settings shown in the next table;
IRQ delay time 4. If you are using larger systems with between 12 and 16 ports simultaneously at a baud rate greater than or equal to 9600bps, you can improve system performance by setting jumper JP4 to 2MS setting instead of the default 0MS value.
Address Jumper setting Address Jumper setting
100 280
180 300
200 380
JP4 sets IRQ delay time, set to 2MS for larger systems.
FAST Serial Adaptors User Guide Installing host cards and distribution accessories
Page 99
Chapter 2 Installing drivers and host cards

5. Using jumper JP5 select the flow control type to RTS or DTR as required.
Mechanical installation
You can now install the AT host card in your system. To do this proceed as follows;
6. Turn off the power to your system and disconnect the mains supply.
7. Remove the system cover to expose the inside of the connector panel for host cards.
8. Insert the AT card you want to install into a vacant host card slot and secure in place as shown in the next picture.
9. Repeat steps 1. to 8. until you have installed all the AT cards you want.
Note
The exact location of host card slots varies for different systems, for exact mechanical details of your system, refer to your system documentation.
Warning
Dangerous voltages exist inside computer systems. Before installing host cards in your system, turn off the power supply and disconnect the mains lead.
Caution
Full anti-static precautions should be taken when handling host cards.
FAST Serial Adaptors User Guide Installing host cards and distribution accessories
Page 100
Chapter 2 Installing drivers and host cards

10.Replace and secure the system cover.
Installation of AT host cards is now complete. For further details about installing other host cards types and distribution accessories, see Distribution accessory guide on page 80.
Note
Do not turn on the power to your system until you have connected the distribution cable or box you are using with this host card. See the following for details;
• Connecting an 8 port distribution box fitted via hardwired flying lead on page 92
• Connecting an 8 port octopus cable on page 93
• Connecting an 8 port distribution cable on page 94
FAST Serial Adaptors User Guide Installing host cards and distribution accessories
Page 101
Chapter 2 Installing drivers and host cards

Connecting a 16 port distribution box
To allow 16 ports to be connected using a distribution box proceed as follows
1. Install your 16 port AT or PCI FAST card using the procedures given in Installing a 16 port PCI host card on page 95 and Installing a 16 port AT host card on page 97.
2. Turn off the power to your system.
3. Push fit the large connector on the single end of your octopus cable onto the card edge connector and secure in place using the screws provided as shown in the next picture.
4. Connect peripherals to the required ports on the distribution box using DB25 connectors provided, then turn on the power to your system.
Push fit onto card edge connector
Port numbers labelled on unit
Connect peripheral cable here via DB25 connectors
FAST Serial Adaptors User Guide Installing host cards and distribution accessories
Page 102
Chapter 2 Installing drivers and host cards

Removing host cards
To remove a host card from your system proceed as follows;
1. Turn off the power to your system and disconnect the mains supply.
2. Remove the system cover to expose the inside of the connector panel for host cards.
3. Disconnect any distribution cables or boxes connected to the card you want to remove
4. Undo the securing screw for the host card you want to remove then lift the card out of its slot as shown in the next picture.
5. Repeat step 4. until you have removed all the host cards you want.
6. Replace and secure the system cover.
7. Plug in the mains lead and turn on the power.
Removal of host cards is now complete. For further details about installation of host cards including other types, see Before you start on page 17.
Note
The exact location of host card slots varies for different systems, for exact mechanical details of your system, refer to your system documentation.
Warning
Dangerous voltages exist inside computer systems. Before removing host cards from your system, turn off the power supply and disconnect the mains lead.
Caution
Full anti-static precautions should be taken when handling host cards.
FAST Serial Adaptors User Guide Removing host cards
Page 103
Chapter 2 Installing drivers and host cards

FAST Serial Adaptors User Guide Removing host cards
Page 104
Chapter 2 Installing drivers and host cards

FAST Serial AdaptorsUser Guide
Chapter 3 Cabling information
You need to read this chapter if you want to...
You need to read this chapter if you want cabling information for the Perle FAST serial adaptor cards.
This chapter provides cabling and connector pinout information for the Perle FAST serial adaptor cards. Included are details of standard cables for use with FAST products available from Perle.
This chapter includes the following sections;
• AT- AT-FAST4 and PCI-FAST4 RJ45 card edge connectors on page 106
• Distribution box and cable guide on page 107
• Distribution box and cable pinouts on page 108
FAST Serial Adaptors User Guide
Page 105
Chapter 3 Cabling information

AT- AT-FAST4 and PCI-FAST4 RJ45 card edge connectors
The connector pinout for each RJ45 socket fitted to the AT-FAST and PCI-FAST four port cards is as follows;
PCI host card
Port 1
Pin 1
AT host card
Port 1
Pin 1
RJ45 pin Signal Direction Description
1 DCD In Data Carrier Detect
2 RTS Out Request To Send
3 DSR In Data Set Ready
4 TXD Out Transmit Data
5 RXD In Receive Data
6 GND Ground
7 CTS In Clear to Send
8 DTR Out Data Terminal Ready
FAST Serial Adaptors User Guide AT- AT-FAST4 and PCI-FAST4 RJ45 card edge connectors
Page 106
Chapter 3 Cabling information

Distribution box and cable guide
The connector pinout information for the FAST product you are using depends on the number of ports and type of distribution box or cable used as detailed in the next table;
ProductCard edge connector
Cable or distribution box options For connector pinouts see...
AT-FAST4PCI-FAST4
RJ45 8 pin femaleSee page 106
RJ45 (8 pin) to DB25 male cable.
See page 109.
AT-FAST8PCI-FAST8
Custom D type connector, no wiring information required by user.
8 port distribution box with DB25 female connectors.
See page 110.
8 port octopus cable with DB25 female connectors on flying leads.
See page 111.
8 port octopus cable with DB25 male connectors on flying leads.
See page 112.
8 port distribution cable with RJ45 8 pin female connector block.
See page 113.
AT-FAST16PCI-FAST16
Custom D type connector, no wiring information required by user.
16 port distribution box with DB25 female connectors.
See page 114.
FAST Serial Adaptors User Guide Distribution box and cable guide
Page 107
Chapter 3 Cabling information

Distribution box and cable pinouts
This section contains pinout information for the FAST product range distribution accessories and contains the following;
• RJ45 to DB25 male cable on page 109
• 8 port distribution box with DB25 female connectors on page 110
• 8 port octopus cable with DB25 female connectors on page 111
• 8 port octopus cable with DB25 male connectors on page 112
• 8 port distribution cable with RJ45 female connector block on page 113
• 16 port distribution box with DB25 female connectors on page 114
Note
For details of which cable to use with which product, see Distribution box and cable guide on page 107.
FAST Serial Adaptors User Guide Distribution box and cable pinouts
Page 108
Chapter 3 Cabling information

RJ45 to DB25 male cable
Pin 1(looking into connector)
Pin 1(looking into plug)
RJ45 pin DB25 Pin Signal Direction Description
1 8 DCD In Data Carrier Detect
2 4 RTS Out Request To Send
3 6 DSR In Data Set Ready
4 2 TXD Out Transmit Data
5 3 RXD In Receive Data
6 7 GND Ground
7 5 CTS In Clear to Send
8 20 DTR Out Data Terminal Ready
FAST Serial Adaptors User Guide Distribution box and cable pinouts
Page 109
Chapter 3 Cabling information

8 port distribution box with DB25 female connectors
Push fit onto card edge connector
Port numbers labelled on unit
Connect peripheral cable here via DB25 connectors
Pin Signal Direction Description
1 Chassis Chassis ground
2 TXD Out Transmit Data
3 RXD In Receive Data
4 RTS Out Request To Send
5 CTS In Clear To Send
6 DSR In Data Set Ready
7 GND Ground
8 DCD In Data Carrier Detect
20 DTR Out Data Terminal Ready
22 RI In Ring Indicator
Pin 1 (looking into connector)
FAST Serial Adaptors User Guide Distribution box and cable pinouts
Page 110
Chapter 3 Cabling information
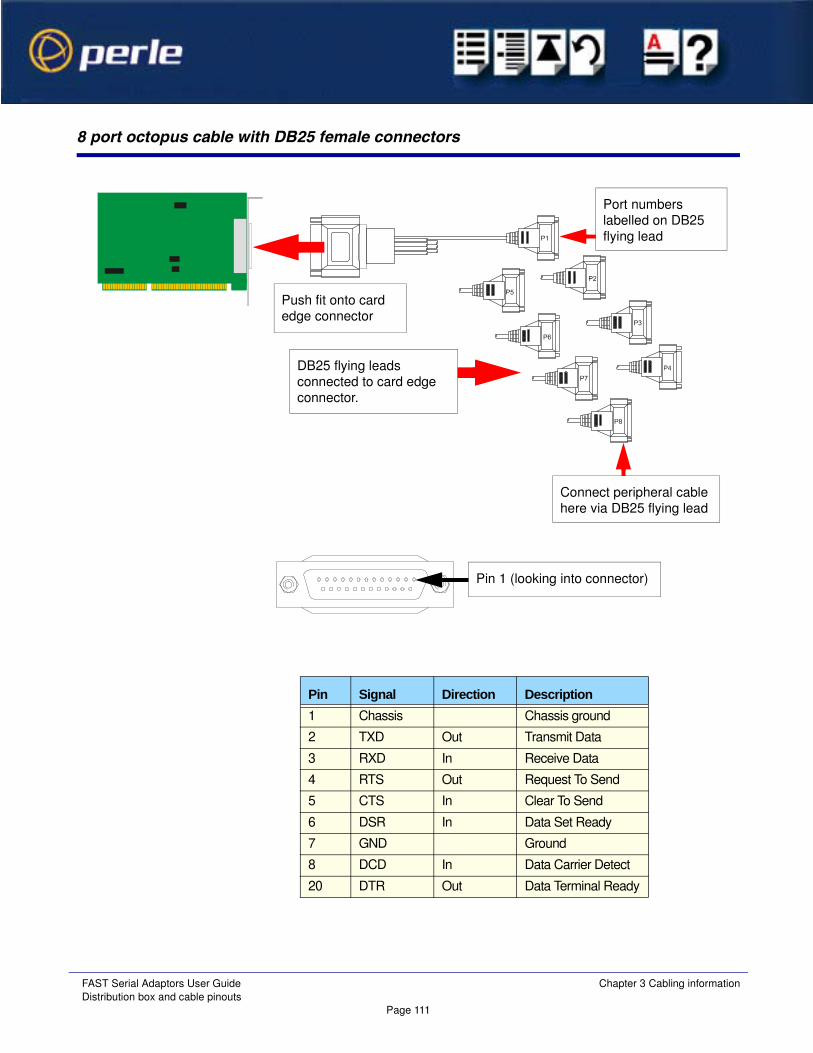
8 port octopus cable with DB25 female connectors
Push fit onto card edge connector
Port numbers labelled on DB25 flying lead
Connect peripheral cable here via DB25 flying lead
DB25 flying leads connected to card edge connector.
Pin Signal Direction Description
1 Chassis Chassis ground
2 TXD Out Transmit Data
3 RXD In Receive Data
4 RTS Out Request To Send
5 CTS In Clear To Send
6 DSR In Data Set Ready
7 GND Ground
8 DCD In Data Carrier Detect
20 DTR Out Data Terminal Ready
Pin 1 (looking into connector)
FAST Serial Adaptors User Guide Distribution box and cable pinouts
Page 111
Chapter 3 Cabling information

8 port octopus cable with DB25 male connectors
Push fit onto card edge connector
Port numbers labelled on DB25 flying lead
Connect peripheral cable here via DB25 flying lead
DB25 flying leads connected to card edge connector.
Pin Signal Direction Description
2 TXD Out Transmit Data
3 RXD In Receive Data
4 RTS Out Request To Send
5 CTS In Clear To Send
6 DSR In Data Set Ready
7 GND Ground
8 DCD In Data Carrier Detect
20 DTR Out Data Terminal Ready
Pin 1 (looking into connector)
FAST Serial Adaptors User Guide Distribution box and cable pinouts
Page 112
Chapter 3 Cabling information

8 port distribution cable with RJ45 female connector block
RJ45 pin Signal Direction Description
1 DCD In Data Carrier Detect
2 RTS Out Request To Send
3 DSR In Data Set Ready
4 TXD Out Transmit Data
5 RXD In Receive Data
6 GND Ground
7 CTS In Clear to Send
8 DTR Out Data Terminal Ready
Connect peripheral cable here via RJ45
Push fit onto card edge connector
Port numbers labelled on unit
RJ45 connector block
View looking into RJ45 connector block
Pin 1 (looking into connector)
FAST Serial Adaptors User Guide Distribution box and cable pinouts
Page 113
Chapter 3 Cabling information

16 port distribution box with DB25 female connectors
Push fit onto card edge connector
Port numbers labelled on unit
Connect peripheral cable here via DB25 connectors
Pin Signal Direction Description
1 Chassis Chassis ground
2 TXD Out Transmit Data
3 RXD In Receive Data
4
When jumper set to RTS See page 97.
RTS Out Request To Send
4
When jumper set to DTRSee page 97.
DTR Out Data Terminal Ready
5 CTS In Clear To Send
7 GND Ground
Pin 1 (looking into connector)
FAST Serial Adaptors User Guide Distribution box and cable pinouts
Page 114
Chapter 3 Cabling information

FAST Serial Adaptors User Guide Distribution box and cable pinouts
Page 115
Chapter 3 Cabling information

FAST Serial AdaptorsUser Guide
Appendix A Troubleshooting
You need to read this appendix if you want to...
You need to read this appendix if you want information on troubleshooting problems with FAST serial adaptor cards.
This appendix provides examples of normal boot up messages and a table of error messages, their meaning and corrective action required for the all the currently supported operating systems.
This appendix includes the following sections;
• Windows NT on page 117
• Windows 2000/XP/Server 2003/Vista/Server 2008 on page 118
FAST Serial Adaptors User Guide
Page 116

Windows NT
Windows NT general troubleshooting
In the event of any problems, open the Devices window to view the status of any installed hardware. For further details of troubleshooting under Windows NT, see your Windows NT user documentation or help system.
FAST Serial Adaptors User Guide Windows NT
Page 117

Windows 2000/XP/Server 2003/Vista/Server 2008
This section describes troubleshooting FAST products under the Windows 2000/XP/Server 2003/Vista/Sever 2008 operating system and includes the following sections:
• General troubleshooting under Windows 2000/XP/Server 2003/Vista/Server 2008 on page 119.
• Windows 2000/XP/Server 2003/Vista/Server 2008 error messages on page 120.
Note
To contact Perle for technical support, see Appendix B Contacting Perle.
FAST Serial Adaptors User Guide Windows 2000/XP/Server 2003/Vista/Server 2008
Page 118

General troubleshooting under Windows 2000/XP/Server 2003/Vista/Server 2008
Problem Action required
Machine fails to boot. 1. Turn off your machine, remove FAST card(s) and reboot. See page 103.
2. Try installing a different host card in case the one currently installed is faulty. See page 79.
Windows operating system fails while loading and the system hangs.
1. Reboot machine and then switch to the last known good configuration.
2. Check for resource conflicts or faulty hardware.
3. Turn off machine, remove any FAST cards fitted (page 103) and then reboot your system.
4. Once the machine boots properly, change the configuration settings of the FAST card to match those in the BIOS setup. See page 79.
Windows operating system fails while loading and displays a blue screen.
1. Note the five hexadecimal numbers at the top line of the screen
2. Reboot your machine and then switch to the last known good configuration.
3. Check for resource conflicts or faulty hardware.
4. Turn off machine, remove any FAST cards fitted (page 103) and then reboot your system.
5. Once the machine boots properly, change the configuration settings of the FAST card to match those in the BIOS setup. See page 79.
Operating system loads OK, but FAST driver or another driver fails to boot
1. Run Windows Device Manager to find available IRQ and memory addresses.
FAST ports do not work after installation. 1. Check the Windows Event Log and follow the suggested actions.
FAST Serial Adaptors User Guide Windows 2000/XP/Server 2003/Vista/Server 2008
Page 119

Windows 2000/XP/Server 2003/Vista/Server 2008 error messages
In the event of any error messages, check the Windows Event Log. Also open the Windows Device Manager and check for warming icons on the installed hardware. See your Windows user documentation or help system for details.
For general problems, see General troubleshooting under Windows 2000/XP/Server 2003/Vista/Server 2008 on page 119.
FAST Windows driver fails during normal operation, symptom: blue screen
1. Note the five hexadecimal numbers displayed at the top line of the screen.
2. Reboot your machine and then switch to the last known good configuration.
3. Check for resource conflicts or faulty hardware.
4. Turn off machine, remove any FAST cards fitted (page 103) and then reboot your system.
5. Once the machine boots properly, change the configuration settings of the FAST card to match those in the BIOS setup. See page 79.
FAST Windows driver fails during normal operation, symptoms either:
black screen, machine reboots or system hangs
1. Contact Technical Support. See Appendix B Contacting Perle.
Problem Action required
FAST Serial Adaptors User Guide Windows 2000/XP/Server 2003/Vista/Server 2008
Page 120

Appendix D Contacting Perle
You need to read this appendix if you want to...
You need to read this appendix if you want to contact Perle for technical support or any other queries about this product.
This appendix includes the following sections;
• Making a technical Support Query on page 109
• Repair procedure on page 112
• Feedback about this manual on page 112
• Contacting Perle technical support on page 113
Internet access
Click here to access the our website at the following URL:
http://www.perle.com
Click here to email Perle at the following address;
Email: [email protected]
Page 108

Making a technical Support Query
This section contains the following information about making a query;
• Who to contact on page 109
• Information needed when making a query on page 110
• Making a support query via the Perle web page on page 111
Who to contact
If you bought your product from a registered Perle supplier, you must contact their Technical Support department; they are qualified to deal with your problem.
If you are a registered Perle supplier, and bought your product from Perle, contact Perle Technical Support using the details given in Contacting Perle technical support on page 113.
Making a technical Support Query
Page 109

Information needed when making a query
When you make a technical support enquiry please have the following information ready;
Hint
Print out this page and fill in the table provided with the basic information you need.
Item Write details here
Product name and version
Problem description
Operating system version
Driver version
Details of any other cards installed in your system
Your name
Company Name
Country
Phone number
Fax number
Email address (if available)
Making a technical Support Query
Page 110

Making a support query via the Perle web page
If you have an internet connection, please send details of your problem to Technical Support using the email links provided on the Perle web site in the ‘Support’ area.
See also Contacting Perle technical support on page 113 for email links and other contact details for the Perle technical support centres.
Click here to access our website at the following URL:
http://www.perle.com
Making a technical Support Query
Page 111

Repair procedure
Before sending a unit for repair, you must contact your Perle supplier. If, however, you bought your product directly from Perle you can contact directly. See Contacting Perle technical support on page 113 for contact information.
Customers who are in Europe, Africa or Middle East can submit repair details via a website form shown in the next picture. This form is on the Perle website, www.perle.com, in the Support area.
In the USA and Asia contact the office shown in the Technical Support section.
Feedback about this manual
If you have any comments or suggestions for improving this manual please email Perle using the following address;
Email: [email protected]
Please include the title, part number and date of the manual (you can find these on the title page at the front of this manual).
Click here to access our web site at the following URL:
http://www.perle.com/support_services/rma_form.asp
Repair procedure
Page 112

Contacting Perle technical support
Note
Perle offers free technical support to Perle Authorised Distributors and Registered Perle Resellers.
To access technical support please visit the Perle website at www.perle.com/support_services/index.shtml.
If you are unable to find the information you require, please feel free to contact our technical support teams by email using the addresses shown in the next table.
Region Address EmailNorth America Perle Systems Ltd.
60 Renfrew DriveMarkhamOntarioCanadaL3R OE1
Email: [email protected]
Europe Perle Systems Europe Ltd. 3 Wintersells Road Byfleet SurreyKT14 7LFUK
Email: [email protected]
Asia Perle Asia Pacific (Pte) Ltd.190 Middle Road#19-05 Fortune CentreSingapore 188979
Email: [email protected]
Worldwide Perle Systems Ltd.60 Renfrew DriveMarkhamOntarioCanadaL3R OE1
Email: [email protected]
Contacting Perle technical support
Page 113

#A B C D E F G H I J K L M N O P Q R S T U V W X Y Z
FAST Serial Adaptors User Guide
Index
Numerics
16 port cardsinstalling 95
4 port cardsinstalling 81
8 port cardsinstalling 86
A
About this manual 4
C
cablesconnector pinouts 107
cabling information 105card edge
connector pinouts 106connector pinouts
cables 107card edge 106distribution boxes 107
contacting Perle Systems 121email 121for technical support 122internet 121
D
device drivers and utilitiesinstalling
SCO OpenServer 6 54removing
SCO OpenServer 6 64distribution boxes
connector pinouts 107drivers and host cards 16
E
email 121
F
FAST serial adaptorsintroduction to 14
H
host cardsinstalling
16 port 954 port 818 port 86
removing 103
I
installation 16device drivers and utilities
Linux 78SCO OpenServer 5 44SCO OpenServer 6 52, 54SCO UnixWare 65Solaris 74Windows 2000 29Windows 95 19Windows NT 26
general procedureSCO OpenServer 6 53
installing16 port cards 954 port cards 818 port cards 86
FAST Serial Adaptors User Guide
Page 127

#A B C D E F G H I J K L M N O P Q R S T U V W X Y Z
L
Linuxinstallation under 78
O
on-line manualguide to using 5hypertext jumps 5navigation 5
P
Port Configuration utilityexiting 63port login, setting up 62starting 60
port loginsetting up under SCO OpenServer 5 62
R
removingdevice drivers and utilities
SCO OpenServer 6 64host cards 103
repair procedure 125resources
viewing and changing, under windows 2000 35
RJ45 socketcard edge views 106pinouts 106
S
SCO OpenServer 5installation under 44
SCO OpenServer 6device drivers and utilities
installing 54removing 64
general installation procedure 53installation under 52installing device drivers and utilities 54Port Configuration utility 60
SCO UnixWareinstallation under 65
serial portsconfiguring
SCO OpenServer 6 60under Windows 2000 39
Solarisinstallation under 74
T
technical support 122centres worldwide 126queries, information needed for 123via the internet 124who to contact 122
troubleshootingWindows 2000 118Windows NT 117
W
Windows 2000 29configuring serial ports 39device drivers and utilities
installing 29installing device drivers and utilities 29troubleshooting 118viewing and changing the resources for a device 35
Windows 95installation under 19
Windows NTdevice drivers and utilities
installing 26installing device drivers and utilities 26troubleshooting 117
FAST Serial Adaptors User Guide
Page 128

FAST Serial Adaptors User Guide
Page 129