FAQ For Android 6 -...
58
FAQ For Android 6.0 i. Basic Setting 1. How can I set up my Alcatel device when I turn it on for the first time? 2. How can I change the language of the device? 3. How can I check the IMEI number of my Alcatel device? 4. How can I check the device’s system version, model number, Android version, Baseboard version, and Kernel version? 5. How can I make a screenshot? 6. How can I change the permissions for my apps? 7. How can I find the nearest repair centers? 8. What is E-warranty card? ii. Home screen 9. How do I interact with the status bar? 10. How do I use the Quick settings? 11. How do I add new apps or widgets to the Home screen? 12. How do I change the wallpaper? 13. How do I set a screen lock? iii. Phone call 14. How can I answer or divert a call? 15. How can I silence the ringer of incoming calls? 16. How can I hold and answer another call? 17. How can I make a three way calling? 18. Where can I check recent call records? 19. How can I switch to mute mode during a call? 20. How can I listen to voicemail? iv. Contact 21. How can I add the number in a message to the contacts? 22. How can I import contacts from the SIM card? 23. How can I back up my phone number and contacts to my Google account? v. Ringtone & Sounds 24. How can I change the default ringtone and volume for incoming calls? 25. How can I change ringtone to vibration? 26. How can I set an MP3 as a ringtone? 27. How can I change the ringtone of the alarm? 28. How can I adjust the volume of media, alarm and ringtone quickly? 29. How can I set priority interruptions? vi. Message 30. How can I add an attachment in an MMS?
-
Upload
vuongkhanh -
Category
Documents
-
view
221 -
download
0
Transcript of FAQ For Android 6 -...

FAQ For Android 6.0 i. Basic Setting
1. How can I set up my Alcatel device when I turn it on for the first time?
2. How can I change the language of the device?
3. How can I check the IMEI number of my Alcatel device?
4. How can I check the device’s system version, model number, Android version, Baseboard
version, and Kernel version?
5. How can I make a screenshot?
6. How can I change the permissions for my apps?
7. How can I find the nearest repair centers?
8. What is E-warranty card?
ii. Home screen
9. How do I interact with the status bar?
10. How do I use the Quick settings?
11. How do I add new apps or widgets to the Home screen?
12. How do I change the wallpaper?
13. How do I set a screen lock?
iii. Phone call
14. How can I answer or divert a call?
15. How can I silence the ringer of incoming calls?
16. How can I hold and answer another call?
17. How can I make a three way calling?
18. Where can I check recent call records?
19. How can I switch to mute mode during a call?
20. How can I listen to voicemail?
iv. Contact
21. How can I add the number in a message to the contacts?
22. How can I import contacts from the SIM card?
23. How can I back up my phone number and contacts to my Google account?
v. Ringtone & Sounds
24. How can I change the default ringtone and volume for incoming calls?
25. How can I change ringtone to vibration?
26. How can I set an MP3 as a ringtone?
27. How can I change the ringtone of the alarm?
28. How can I adjust the volume of media, alarm and ringtone quickly?
29. How can I set priority interruptions?
vi. Message
30. How can I add an attachment in an MMS?

31. How can I forward a message to another contact?
32. How can I delete messages?
33. How can I change the input method?
vii. Internet & Applications
34. How can I switch to recently-used apps?
35. How can I connect to a mobile network?
36. How can I connect to a Wi-Fi network?
37. How do I configure the proxy settings for a Wi-Fi network?
viii. Bluetooth
38. How can I turn on Bluetooth and pair with another Bluetooth device?
39. How can I change the name of my Bluetooth?
40. How can I configure or unpair a Bluetooth device?
ix. Camera
41. How can I take photos with the camera?
42. Where can I check my photos?
x. Music & Video
43. How can I stop the music that is playing?
44. How can I play music?
45. How can I create a new play list?
xi. Email
46. How can I create a POP3/IMAP email account?
xii. Back up & Reset
47. How can I back up my data with phone?
48. How can I perform a factory reset on my phone?
xiii. Storage
49. How can I set up my SD card?
50. How can I Migrate Data from internal storage to SD Card?
xiv. Security
51. What can I do if my phone asks to enter Google account data after Factory reset is done?
xv. Device
52. How can I turn on USB debugging?
53. What should I do when I insert or remove a SIM card?
xvi. VR
54. What is VR?

55. How can I insert handset into the VR BOX?
56. How can I set up the VR launcher?
57. How can I Launching VR desktop APP?
58. What can I do if my handset is too hot in VR display?
59. What can I do if the image on the screen is shaking?
60. What can I do if The Home screen does not appear when putting the handset into the VR
BOX?
61. Where can I save my pictures and videos for VR?
xvii. Xender
62. How can I transfer all files from an old handset to a new one?
63. How can I transfer one or more files from handset A to handset B?
64. How can I backup files from handset to PC?
xviii. Troubleshooting
65. What can I do when my phone pops up a warning saying “high temperature”?
66. What can I do when a warning “the phone stops charging” pops up?
67. Why couldn’t I use three ways calling / multi-conference call function? Why does it say
“Unable to conference calls” when I use conference call function?
68. How can I connect my phone to a PC via USB cable?

i. Basic Setting
1. How can I set up my Alcatel device when I turn it on for the first time?
The first time you turn on the phone, you will see a welcome screen. You can start to set
up your phone by following the instructions.
A series of screens will lead you through the setup process. You also have the option to
skip some steps during the process.
You can set screen lock to prevent others from using this phone without your permission.
2. How can I change the language of the device?
Change language of your phone by accessing into main menu -> “Settings” -> “Language
& input” -> “Language” -> choose the language you want.

3. How can I check the IMEI number of my Alcatel device?
You can check the IMEI information from the IMEI label which was stuck to the battery
jar or battery cover, or by touching *#06# in dial keypad, or by going to main menu ->
“Settings” -> “About phone” -> “Status” -> “IMEI information”.
4. How can I check the device’s system version, model number, Android version, Baseband
version, and Kernel version?
You can check the information by accessing into menu -> “Settings” -> “About phone”.
5. How can I make a screenshot?
Users can share what's on their screens more easily by taking screenshots. Hardware
buttons let them snap a screenshot and store it locally. Afterward, they can view, edit,
and share the screen shot in Gallery or a similar app.
Push power button and Volume down button at the same time for a couple of seconds.

You should then see an animation showing you the screenshot, and view the screenshot
by tapping on the thumbnail in the notification tray or by visiting your Gallery
application.
6. How can I change the permission for my apps?
If an app supports the new permissions model on Android M, you don’t have to grant
any permission when you install or update the app. Instead, the app requests
permissions when needed.
You can change the “app permission” in the Settings > Apps menu>selecting an app and
then clicking Permissions. Use the toggles to switch individual permissions on or off.
7. How can I find the nearest repair centers?
You can check Repair center/Hotline information in “User Care” app or “Alcatel Support”
app on your phone.
Furthermore, you also can contact our repair center via Live Chat.
8. What is E-warranty card and how to activate it?
E-warranty card is kind of registration for Mobile phone warranty information.
Users who purchased handset with E-warranty card, not only need to fill in paper
warranty, but also need to register E-warranty. The register will not being charged. The
only thing to do is to enable the mobile phone access to internet. Via E-warranty card,
user information could be easily and precisely collected by the sales and post-sales
system of the supplier, which leading more convenient for service center. Each handset
has an IMEI which is for registering instead of phone number, so that’s all right to change
your phone number.
Registration process:
1) Touch to open App User Care/ Alcatel Support
2) Open the navigation drawer on the left top of the screen
3) Touch E-Warranty Number and follow the instruction to finish the registration.

ii. Home screen
9. How do I interact with status bar?
Notifications report the arrival of new messages, calendar events, and alarms, as well as
on-going events, For example, when you have configured your phone as a Wi-Fi hotpot.
When you receive a notification, its icon appears in the top left corner of the screen. You
may also hear a sound notice depending on your sound setting. With the notification bar,
you can:
1) See your notifications by swiping your finger down from the top of the screen.
2) Respond to a notification by touching it.
3) Dismiss a notification bar by swipe it sideways.
4) Dismiss all event-based notifications by touching the at the bottom right
corner of screen. Some on-going notifications may remain.
5) Access to quick settings by dragging the Status Bar down again in the Notification
Panel or drag the Status Bar down with two fingers and then you can access more
settings by touching the icon at the top right corner of the screen.
6) Expand or collapse the notifications with a finger gesture to pull the notification
down like a curtain. Then news with photos and headlines can be displayed
completely in the notification. So more new information can be shown in the new
notification.
7) Call or SMS back directly from notification, and even hang up the call.
8) Gmail notifications with new emails display.
9) Calendar notification and email to all attendees with an embedded quick response
to notify them something.

10. How do I use quick settings?
You can access to quick settings by dragging the Status Bar down again in the Notification
Panel or drag the Status Bar down with two fingers.
11. How do I add new apps or widgets on the Home screen?
To add new applications on the Home screen, touch the menu icon , you will see all
the applications. Long-press and drag an application to your desired screen.
To add new widgets to the Home screen, long press the Home screen that’s not occupied,
touch icon “WIDGETS”, you will see all the widgets at the bottom. Touch and drag a
widget to your desired screen.

12. How do I change the wallpaper?
You can set wallpaper by accessing menu-> “Settings” -> “Display” -> “Wallpaper”. Select
a wallpaper source from “Gallery/Live wallpapers/Photos/Wallpaper gallery”, select
wallpaper as you like and touch “Set wallpaper” at the bottom.
13. How do I set screen lock?
In order to protect your personal information, you can adjust your phone’s lock settings
by pressing “Menu” key at Home screen -> “Settings” -> “Lock settings” -> “Screen lock”
->Touch the type of lock you would like to use.
After you set a lock, a lock screen displays whenever your screen is woken up, requesting
pattern, PIN, or other specified key.
Take pattern for example.
Draw a pattern, and then touch “Confirm” to finish the setting.

Notes:
Screen lock options are listed in the approximate order of the strength of their
security, starting with “None” and “Swipe”, which provide no security.
iii. Phone call
14. How can I answer or divert a call?
When you receive a phone call, the incoming call screen opens. It shows caller ID and
any additional information about the caller that you have saved in People app.
If there is any call missed, you will get a notice in notification bar or you can check all
incoming call records in the call log tab of Phone app.
Slide to answer
Slide to reject
Slide to send messages

You can edit text quick response in the “Phone” app-> press the menu key in the top
right corner of screen -> “Settings” ->“Quick responses”.
15. How can I silence the ringer of incoming calls?
There are 3 ways to silence the ringer before answering the call.
Way 1: Press the Volume Up/Down button on the side of your device.
Way 2: Press Power button on the top or side of your device.
Way 3:Enable Gesture function by going to menu-> “Settings”-> “Gestures” -> activate
“Turn over to mute”, then you can mute incoming calls by turning the phone over when
a call is coming.
16. How can I hold and answer another call?
During a call, you can use some buttons near the bottom of the screen
Switch to the dialer.
Control the audio output
Mute your microphone
Put the other party on hold
Switch to another call in process
Add another call
combine two or more calls
How to hold and answer another call?
1) If there is another call coming in, you will get a notice in the screen and ring notice.
2) You can answer it directly, and at the same time the other call will be on hold.

3) You can touch to switch to another call in process.
Note: please make sure you have held the third way calling service with your SIM card.
17. How can I make a three way calling?
During a call, you can use some buttons near the bottom of the screen.
Switch to the dialer.
Control the audio output
Mute your microphone
Put the other party on hold
Switch to another call in process
Add another call
Combine two or more calls
How to make a three way calling/ conference call? You can do like this,
1) Call the first person
2) Touch “Add call” (this function may under menu according to the different
phones), then you can choose the third person you want to call.
3) When you get through the second person or the third person (It depends how many
calls you want to merge), you can touch “Merge calls” to make a conference
call.
*Notes: Three ways calling also need network/simcard support.
18. Where can I check recent call records?
Access into menu, touch “Phone” , and then touch to check recent call
records.
it is call log tab which shows recent calls. There are three different color arrow
icons beside a call to indicate the type of calls.
Means missed incoming call

Means received incoming call
Means outgoing call
19. How can I switch to mute mode during a call?
You can touch to mute your microphone.
During a call, you can use some buttons near the bottom of the screen
Switch to the dialer.
Control the audio output
Mute your microphone
Put the other party on hold
Switch to another call in process
Add another call
Combine two or more calls
20. How can I listen to voicemail?
When you have a new voicemail message, the voicemail icon appears in the
notification bar. Swipe down the status bar and touch it to view your notifications.
You can also change you voicemail settings by accessing into menu->Touch “Phone”
-> press the menu key in the top right corner of screen -> “Settings” -> Call
settings-> Voicemail, then change setting.
iv. Contact
21. How can I add the number in a message to the contacts?
You can follow below steps to add numbers in a message to contacts by opening the
message-> Hold and touch the message for seconds -> Touch -> Touch “Add *** to
Contacts” in the list-> Touch “Create new contact” -> Choose the place you want to store
the contact to (SIM / Phone) ->Enter the name and related information ->Touch icon
to save.
22. How can I import contacts from SIM card?

You can follow below steps to import contacts.
1) Touch “Contacts” app to open contact screen
2) Touch menu key in the top right corner of screen, then a menu appears
3) Touch “Import/Export”
4) Choose the one you want to copy from contacts, then touch “NEXT”. Choose the
one you want to copy contacts to and touch “NEXT”.
5) Select the contacts you want to Import/Export.
6) Touch “ ” in the top to finish the contacts import.
23. How can I back up my phone number and contacts to my Google account?
If you have a Google Account, any contacts associated with that account are
automatically backed up by Google. This means all of your contacts are always available
on the web and can be synced to any Android phone which’s set up with the same
account.
It means your contacts are always available even if you lose your phone, switch to a new
phone or use a desktop computer.
To get your phone numbers and contacts information to your Google Account, you have
several options.
a. Import your contacts directly into your Google Account.
1) Install the SIM card with your contacts on it in your new phone
2) Touch “Contacts” app
3) Touch Menu (Menu key is in the top right corner of screen), then a menu
appears
4) Touch “Accounts”.
5) Touch Google
6) Touch to choose an account
7) Touch “Contacts” in the open window. Then all contact lists will be synchronized to
your account.
b. You can also follow below steps to finish contacts back up
1) Touch “Settings” from Home screen or under main menu.
2) Touch “Accounts”.
3) Touch Google
4) Touch to choose an account
5) Touch “Contacts” in the open window. Then all contact lists will be synchronized to
your account.
v. Ringtone & Sounds
24. How can I change default ringtone and volume for incoming calls?
Your phone uses sounds and vibrations to note you for some news, including ringtones,

notifications, alarms and navigation feedback. You can customize any of these sounds, as
well as control their volumes.
a. Change default ringtone for incoming calls
1) Touch “Settings” icon from Home screen or under main menu.
2) Touch “Sound & notification”.
3) Touch “Phone ringtone”, you will see a list of ringtones
4) Touch a ringtone to select and hear it.
5) Touch “OK” to confirm your final selection.
b. Change volume for incoming calls
1) Touch “Settings” icon from Home screen or under main menu.
2) Touch “Sound & notification”.
3) You will see a Volume Bar. Please drag to adjust the volume.
25. How can I change ringtone to vibration?
To activate Vibrate, press the down volume key until you feel the phone vibrate.
To resume normal ringtone, press the up volume key.
26. How can I set an MP3 as a ringtone?

Follow below steps to set an MP3 as phone ringtone.
1) Open the “Music” app, you will see the music list
2) Touch and hold the music that you want to set as ringtone. Then a list of options
appears
3) Touch “Use as ringtone”. Your ringtone will be changed.
27. How can I change the ringtone of the alarm?
Follow below steps to change the ringtone of alarm.
Touch and open “Time” app.
Touch alarm icon at the top
Touch related alarm to get further setting
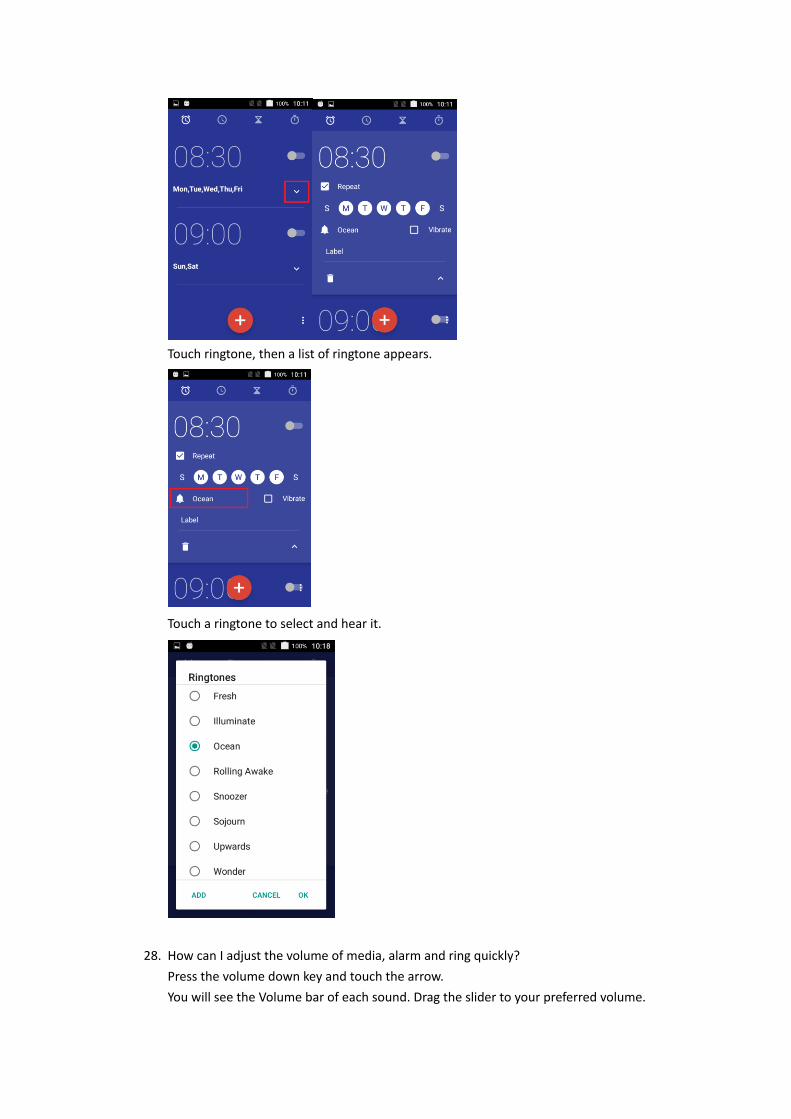
Touch ringtone, then a list of ringtone appears.
Touch a ringtone to select and hear it.
28. How can I adjust the volume of media, alarm and ring quickly?
Press the volume down key and touch the arrow.
You will see the Volume bar of each sound. Drag the slider to your preferred volume.

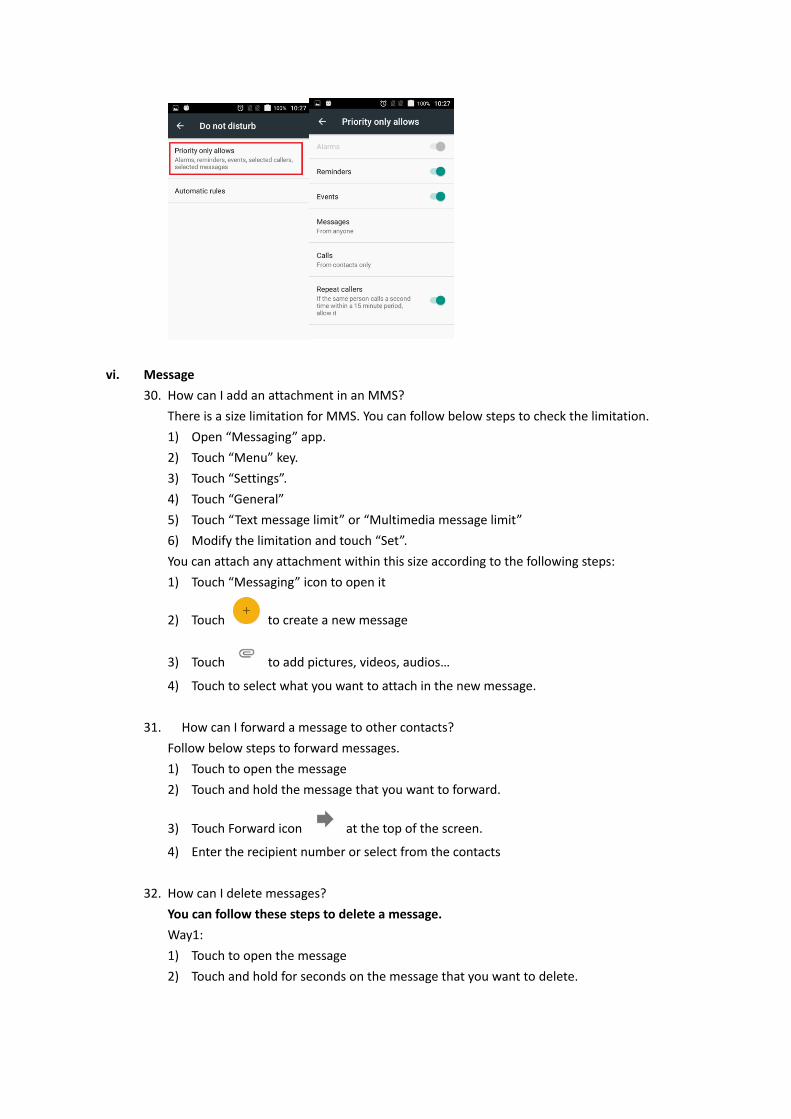
29. How can I set priority interruptions?
1) Touch “Settings” icon from the Home screen or under main menu.
2) Touch “Sound & notification”.
3) Touch “Do not disturb”
You can set priority interruptions by checking Events and
reminders/Calls/Messages.
You can also set interruptions mode when calls and notifications arrive.
vi. Message
30. How can I add an attachment in an MMS?
There is a size limitation for MMS. You can follow below steps to check the limitation.
1) Open “Messaging” app.
2) Touch “Menu” key.
3) Touch “Settings”.
4) Touch “General”
5) Touch “Text message limit” or “Multimedia message limit”
6) Modify the limitation and touch “Set”.
You can attach any attachment within this size according to the following steps:
1) Touch “Messaging” icon to open it
2) Touch to create a new message
3) Touch to add pictures, videos, audios…
4) Touch to select what you want to attach in the new message.
31. How can I forward a message to other contacts?
Follow below steps to forward messages.
1) Touch to open the message
2) Touch and hold the message that you want to forward.
3) Touch Forward icon at the top of the screen.
4) Enter the recipient number or select from the contacts
32. How can I delete messages?
You can follow these steps to delete a message.
Way1:
1) Touch to open the message
2) Touch and hold for seconds on the message that you want to delete.

3) Touch Delete icon at the top of the screen
4) Touch “DELETE” in the warning window
You can follow below steps to delete a conversation.
1) Touch to open the “Messaging” app, you will see all the conversation list
2) Touch and hold a conversation that you want to delete until a trash can icon
appears at the top of screen.
3) If you want to delete more conversations, you can touch them to choose
4) Touch the trash can icon at the top of screen to delete all checked
conversations.
33. How can I change the input method?
There are 2 ways to change the input methods.
Way1:
1) Touch “Settings” icon from Home screen.
2) Touch “Language & input”
3) Touch to choose the input method you want.
Way 2:
In message editing screen, you will see keyboard icon in the indicator icons area.
Drag down the notifications bar, and then touch “Change keyboard” to change input
method.
vii. Internet & Applications
34. How can I switch to recently-used apps?
You can check recently used applications very easily. Just touch the Menu key in
the bottom right corner of screen, recently used applications appear.

1) When you open up the app draw, you can easily switch between the apps that are
running with just a tap of your finger.
2) Also ,you can drag left or right with your finger to kill the task
35. How can I connect to a mobile network?
It depends on your carrier and service plan; your phone may connect automatically to
your carrier’s available data network. Or you may need to insert a SIM card or configure
details for a specific carrier.
Usually, your mobile network settings allow you to adjust several aspects of your phone
uses mobile data.
1) Touch “Settings” icon from Home screen or under main menu
2) Touch “More”
3) Then touch “Mobile Networks”
4) Touch Network operators and select manually to choose an available network
5) After this, user should create/select a correct APN from “Access Point Names”.
Note: Please swipe down the notification bar and touch and activate cellular data
to turn on the data access; you can’t adjust mobile network settings when Airplane
mode is selected.
36. How can I connect to a Wi-Fi networks?
Wi-Fi is a wireless networking technology that can provide internet access at distances of
up to 100 meters, depending on the Wi-Fi router and your surroundings.
To use Wi-Fi, you need to connect to a wireless access point, or “hotspot”. Some
hotspots are open and you can connect to them easily. But others implement security
features which require more steps to set up, like, digital certifications, passwords or
other ways to ensure that only authorized users can connect.
Turn on Wi-Fi by following these steps:
1) Touch “Settings” icon from Home screen or under main menu
2) Touch Wi-Fi

3) Turn the switch to “On” position, the device will scan for available networks and display the
names.
*Secured networks are indicated with a lock icon.
*If the device finds a network that you connected to previously, it connects to it.
4) Touch a network name to see more details or connect to it.
5) Enter a password or other credentials to connect network.
37. How do I configure proxy settings for a Wi-Fi network?
Some network administrators require you to connect to internal or external network
resources via a proxy server. By default, the Wi-Fi networks are not configured to
connect via a proxy, but you can follow below steps to change that for each Wi-Fi
network you’ve added.
1) Touch and hold a network with connected status in the list of Wi-Fi networks
2) Touch “Modify network” in the dialog that opens
3) Select “Advanced options”
4) If the network has no proxy settings, touch “None” under “Proxy Settings”, then
touch “Manual” in the pop-up menu
5) Type the proxy settings supplied by your network administrator.
6) Finally, touch “Save”
Note: all above steps only change the Wi-Fi setting. To change the proxy setting for
others, you should modify them individually.
viii. Bluetooth
38. How can I turn on Bluetooth and pair with another Bluetooth device?
Bluetooth is a short-range wireless communications technology used to communicate
between devices over a distance of about 8 meters.
To connect to a Bluetooth device, you must turn on your phone’s Bluetooth radio. The
first time you use a new Bluetooth device, you must pair it with the one you want to
connect. Then both devices know how to connect securely to each other. After that, they
connect automatically.
1) Touch “Settings”
2) Touch “Bluetooth”
3) Switch to “On” position for searching the device
4) Touch the device that you want to pair with.

You can also turn on Bluetooth from the Quick settings. Touch the indicator icon area
and drag it downwards with two fingers. You can turn Bluetooth on or off.
You can also touch the arrow to view and control pairing of saved Bluetooth devices.
39. How can I change the name of my Bluetooth?
You can follow below steps to rename the Bluetooth.
1) Touch “Settings”
2) Touch “Bluetooth”

*Make sure the Bluetooth is turned on
3) Touch Menu key in the top right corner of screen
4) Touch “Rename this device”
Type the name you want and press “Rename” to save.
40. How can I configure or unpair a Bluetooth device?
Some Bluetooth devices have multiple profiles. Profiles can include the ability to
transmit your conversations, play music in stereo, or transfer files or other data. You can
select which profiles you want to use with your phone. You can also change the name of
the Bluetooth device.
You can follow below steps to unpair a Bluetooth device.
1) Touch “Settings” icon from Home screen or under main menu
2) Touch “Bluetooth”
*Make sure the Bluetooth is turned on
3) Touch the Quick Settings icon beside the connected Bluetooth device you want to
configure
4) A screen opens that allows you to change the device’s name or unpair it.

ix. Camera
41. How can I take photos with camera?
Your Camera app is a combination of camera and camcorder.
You can follow below steps to take pictures and videos.
42. Where can I check my photos?
You can check your photos by visiting the Gallery app.
Touch on the top right of the screen and select photo.
More settings Touch to switch between main camera and
front camera.
Touch to take pictures
Touch to take videos
Touch to turn on/off flash

x. Music & Video
43. How can I stop the music that is playing?
You can stop the playing music by swiping down the notification bar, touch icon to
stop the music.
44. How can I play music?
Touch the “Music” app from home or under main menu. You will find four libraries in
which all songs are classified: Artists, Album, Songs and Playlists. Choose the music you
want to listen to and touch it to play.
45. How can I create a new play list?
Follow these steps to create a new play list.
1) Touch “Music” app from home or under main menu.
2) Long press the music that you want to add to playlist. Then a list of options appears
3) Touch “Add to playlist”
Or you can touch the music you want to add to playlist, touch Menu key on the
right top and touch “Add to playlist” in the open window.

4) You can choose to add in current playlist or to create a new one.
5) If you want to create a new playlist, enter the name in the open window and touch
“Save”.
xi. Email
46. How can I create POP3/IMAP email account?
You can set up external POP3 or IMAP email accounts in your phone. Usually, that is very
useful for work email. It means you can check your work email with your device. You
never have to worry about missing any important emails.
1) Touch “Gmail” App icon to open it.
An email setup wizard will guide you through the steps to set up an email account.
2) Touch ”Add an email address”

3) Enter the email address and touch MANUAL SETUP to choose the type of your
account and then enter your password to sign in.
4) Or you can touch next icon to enter the password of the account you
want to set up.
5) Then an email account settings screen appears, you can set Sync frequency and
download options. Touch Next icon , then the email account is created in
your phone.

6) You can enter the settings by touching the menu icon on the left top of the
screen to change the account name and display name in outgoing emails.
xii. Back up & Reset
47. How can I back up my data with phone?
Please back up data though the following steps.
1) Go “Settings”
2) touch “Backup & reset”
3) activate “Back up my data” in the open window

48. How can I perform a factory reset on my phone?
You can follow below steps to reset your phone in the boot status.
1) Go to “Settings”
2) Touch “Back up & reset”
3) Touch “Factory data reset” to start.
4) Touch “RESET PHONE” in the open window
5) Touch “ERASE EVERYTHING” to start.
Warning: this action will erase all your personal information and downloaded apps.
Way 2: Factory reset with your phone in Shutdown state
1) Press power and volume up button at the same time
2) The device will boot in factory mode
3) Press volume up/ down key to choose “wipe data/factory reset”
4) Press power key to confirm
5) Press volume up/ down key to choose “Yes--delete all user data”
6) Press power key to confirm
7) Choose “reboot system now” and press “Power” key to confirm
Warning: this action will erase all your personal information and downloaded apps.

xiii. Storage
49. How can I set up my SD card?
Android Marshmallow offers a new integration option for external memory cards. They can
now also be used to increase the device’s available internal storage. When you insert a new or
formatted SD card in your device, go to Settings -> Storage & USB. You will be asked to set up
your SD card.
If you choose Use as portable storage, it can only be used for storing media or other files. If
you choose Use as internal storage, the SD card will be formatted for security reasons. After
formatting and moving data to the SD card, it will only work on your device and be used as
internal storage.

When you insert a used SD card in your device, go to Settings -> Storage & USB -> SD
card and touch Format as internal to format the SD card. After formatting, it can only be used on
your device.

50. How can I migrate data from the internal storage to the SD card?
Go to Settings -> Storage and USB ->SD Card, you can choose Format as internal to
format this SD Card. After formatting, it can only be used on your device.

If you choose Move now, the data from the internal storage moves to the SD card
immediately. If you choose Move later, you can move data by going to Settings ->
Storage & USB -> SD card -> Migrate data.
After moving the data to the SD card, it will function as the device’s internal storage.
Data such as downloads, music, pictures, etc. will be stored on the SD card by default.
xiv. Security
51. What can I do if my phone asks to enter Google account data after Factory reset is
done?
You may need to enter the original Google account that was used on this phone
after you execute Factory data reset, otherwise you will not be able to use the phone.
This is FRP (Factory Reset Protection) function.
If you don’t remember your Google account data, please complete Google account
recovery procedure. In case you can’t recovery it, please apply to repair center.
xv. Device

52. How can I turn on USB debugging?
To turn on the USB debugging, you can follow below steps.
1) Go to “Settings” -> “About phone” -> “Build number”
2) Touch the Build number no less than 7 times.
3) When you see a warning that mentioned developer mode already turned on
4) Back to “Settings” again, you will find the “Developer options”
5) Touch “Developer options”
6) Check “USB debugging”.
53. What should I do when I insert or remove SIM card?
1) Power off your device
2) Insert or remove your SIM card
3) Restart your device
Note: Please don’t insert or remove your SIM card while your cell phone is power-on.
Otherwise, you may damage the SIM card.
xvi. VR
54. What is VR?
The VR is a head-mounted, a virtual reality device that provides an immersive experience for
a wide range of users. When you connect an IDOL 4, IDOL 4S or other Alcatel handset which
support this function to the VR, you can enjoy 2D or 3D content and play games by launching
APPs on the handset connected.
55. How can I insert handset into the VR BOX?
1) Put your fingertips into the hole slot and pull the top cover outward to open.
2) Prize the hook firmly and insert the handset into the VR BOX (Picture as below can be a
guidance). Power key should be at the same side with the mark.

Note: Do not prize the hook forcefully; otherwise it may damage the hook. Make
sure the handset is locked by the hooks; or it may separate from the VR and be
damaged accidentally.
3) Press to open the bottom cover.
4) Align two lenses and touch lightly according to your requirement while you are holding
the main body with two hands. Touch the right button to enter the operation interface
and touch the left button to return.
56. How can I set up the VR launcher?

The software VR Launcher has been installed in your handset already. You need to make
sure that the VR Launcher has been set up and received the access before using the VR
for your handset, especially for the first time using.
Step 1: Click in the handset.
Step 2: Start to set the configuration.
1) Open the VR desktop at the first time, a permission(s) will be asked. Select “ALLOW”
to go next step, then it will operating on the handset manually.
2) Click “GOT IT” and insert the handset into the VR Box when it pop up to prompt that
view in full screen.
Note: The VR recognizes your head movements. Move your head in any direction to
move the pointer on the screen. Then touch the right button to confirm or left button to
exit. The pointer is located in the center of the screen. Some apps may not display the
pointer all the time.
3) Health & safety warnings will displayed after the permissions. Read the following
warnings before using: “Not for use by children under the age of 13.” “Stop
immediately if you fell any discomfort and only use under the safe environment.”
Click “GOT IT” to go next.

4) Insert the headset into the handset after closing the top cover. To enjoy the virtual
reality experience, unlock your device and plug the earphones, it will start
automatically. Click “OPEN” to go next.
5) You can short press the button on your headset when using a headset. There’s
the same function when you touch the right button on the VR. Click “NEXT” to go
next.

6) Store your VR content in the VR-media folder located in the device’s internal storage
or external SD card. Other media can be stored in the DCIM or Pictures folder. Click
“FINISH” to go next.
7) Following settings will be only displayed when the Launcher is opened for the first
time. If you would like to change the settings, you can configure in the later Tutorial
section.
Brightness: Move the pointer to coincide with the to darken and with the
to brighten.
Volume: Move the pointer to coincide with icon to volume up and with
icon to volume down.
Look & Wait: Move the pointer to coincide with the icon for 3 seconds to
open (hover function). Then you can look at the icon for 3 seconds to select it. (It’s
only work launcher)
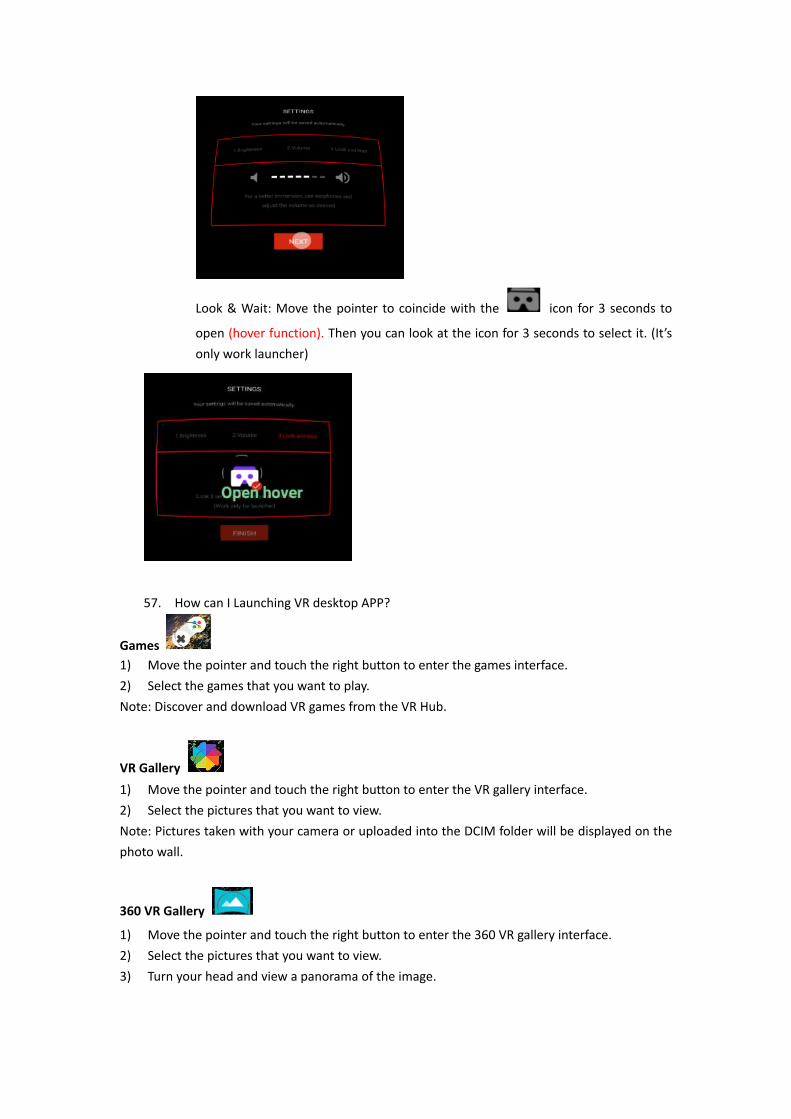
57. How can I Launching VR desktop APP?
Games
1) Move the pointer and touch the right button to enter the games interface.
2) Select the games that you want to play.
Note: Discover and download VR games from the VR Hub.
VR Gallery
1) Move the pointer and touch the right button to enter the VR gallery interface.
2) Select the pictures that you want to view.
Note: Pictures taken with your camera or uploaded into the DCIM folder will be displayed on the
photo wall.
360 VR Gallery
1) Move the pointer and touch the right button to enter the 360 VR gallery interface.
2) Select the pictures that you want to view.
3) Turn your head and view a panorama of the image.

VR Video
1) Move the pointer and touch the right button to enter the VR gallery interface.
2) Select the videos that you want to watch.
While watching videos, you can control the playback. Touch the button to use the following
features:
Pause playback.
Go to the previous or next video.
View a list of videos.
Volume down
Volume up
360 VR Video
1) Move the pointer and touch the right button to enter the VR gallery interface.
2) Select the videos that you want to watch.
While watching videos, you can control the playback. Touch the button to use the following
features:
Pause playback.
Go to the previous or next video.
View a list of videos. 360 VR Video
Volume down
Volume up
58. What can I do if my handset temperature is too hot in VR display?
Usually, it’s requiring a higher amount of power than normal when using APPs.
If you use apps on your VR for an extended period, the handset may feel hot when you touch.
Stop using the VR until the handset cools down, then resume to use it. This’s right thing to do
and should not affect the handset s lifespan or performance.
59. What can I do if the image starts to shake on the screen?
1) Disconnect your handset from the VR and then reconnect it.

2) Restart the handset.
60. What can I do if the Home screen does not appear when putting the handset into the VR
BOX?
1) Ensure your handset’s battery is fully charged.
2) Ensure your handset is turned on.
3) Ensure your handset is properly connected to the VR.
4) Ensure the software VR Launcher is installed for the VR on the handset.
61. Where should I save my pictures and videos so that it can be checked by VR?
VR Gallery
Pictures taken with your camera or uploaded into folders below will be displayed on the photo
wall.
a) \Internal storage\DCIM\
b) \Internal storage\Pictures\
c) \sdcard\DCIM\
d) \sdcard\Pictures\
1) Move the pointer and touch the right button to enter the VR gallery interface.
2) Select the pictures that you want to view.
360 VR Gallery
You can view panoramas pictures taken with your camera or uploaded into folders below in 360
VR Gallery.
a) \Internal storage\Pictures\panoramas
b) \Internal storage\VR-media
c) \sdcard\VR-media (Note:Folder need to be created by users)
1) Move the pointer and touch the right button to enter the 360 VR gallery interface.
2) Select the pictures that you want to view.
3) Turn your head and view a panorama of the image.
VR Video
You can watch videos taken with your camera or uploaded into folders below in VR Video.
a) \Internal storage\DCIM
b) \sdcard\DCIM
1) Move the pointer and touch the right button to enter the VR Video interface.
2) Select the videos that you want to watch.
360 VR Video
You can watch videos taken with your camera or uploaded into folders below in VR Video.
a) \Internal storage\VR-media

b) \sdcard\VR-media (Note:Folder need to be created by users)
1) Move the pointer and touch the right button to enter the 360 VR Video interface.
2) Select the videos that you want to watch.
xvii. Xender
62. How can I transfer all files from an old handset to a new one?
Operation on the new handset:
1) Touch to open Xender, follow the welcome screen and turn on “Allow modify system
settings”. Following setting will be only displayed in the Xender first launching.
2) Touch back to the home screen of Xender.
3) Open the navigation drawer on the left top of the screen.

4) Touch Phone replicate.
5) Select “This phone is New”. If your old phone is an Android phone, touch “Old phone is an
Android phone”.
6) Make sure you have installed APP Xender on your old phone, or you can find it on the Play
Store.
Once it installed, touch “Next”.

7) Follow the instructions which pop-up on the new phone to finish the operation on the old
handset.
Operation on the old handset:
1) Touch to open Xender.
2) Open the navigation drawer on the left top of the screen.
3) Select Phone replicate.
4) Select “This is an old phone”. Then the old phone will start to search for the new phone.

5) When the new phone appears on the search screen, touch it to connect and wait for the
new handset to select items to be imported.
Operation on the new handset:
1) Select items you want to import to the new phone, and touch “IMPORT”.


2) You can find the screen on the old handset after your phone replicate successfully.
You can choose to erase your personal data on it if you intend to dispose of this
device.
63. How can I transfer one or more files from handset A to handset B?
Operation on phone A:
1) Touch to open Xender, follow the welcome screen and turn on “Allow modify

system settings”. Following setting will be only displayed in the Xender first launching.
2) Touch and choose GALLERY. Touch to select device type for “transfer from/to”,
here we select “Android”. Touch “CREATE” to create a group for others to join in.

3) The other device can join in the group by connecting to phone A after a group is created.
If no Xender App on phone B, users can install it from the Play Store, or phone A can send it
directly to phone B. An instruction will be pop up for phone B user to follow.
Operation on Phone B:
1) Follow the pop-up instructions on phone A to install Xender on phone B.

2) Touch to select device type for “transfer from/to”, here we select “Android”. Touch
“JOIN” to join in the group created by phone A.
3) Touch phone A to connect when phone A appears on the search screen.

Phone A appears at the bottom of the screen after the connection is established.
Operation on Phone A:
Select the picture you want, then transfer it to phone B from phone A, touch “SEND”.
Transfer will be processed.

Operation on Phone B:
Phone B users can check the picture immediately or in transfer history and gallery after transfer is
completed.
64. How can I backup files from handset to PC?
Operation on Phone:
1) Touch to open Xender, follow the welcome screen and turn on “Allow modify system
settings”. Following setting will be only displayed in the Xender first launching.

2) Touch and choose GALLERY. Touch to select device type for “transfer from/to”,
here we select “PC/Mac”, here you can connect to PC by either WIFI of Hotspot.

Operation on PC:
Follow the user guide on PC to finish the tour.


You can back up images, videos, music, APPs, files to PC from phone now, and you can also
upload files to a new phone later.
xviii. Troubleshooting
65. What can I do when my phone pops up a warning saying “high temperature”?
The warning is the normal consequence of the CPU handling excessive data, which makes battery
warm. It is a recommendation message and not harmful to battery or phone even if the phone
feels hot.
You can follow below actions to make phone return to normal temperature:
1. It is suggested not to expose your phone in the sunshine for long time;
2. Close large power consumption applications, such as music , chatting applications, GPS
application, 3D gaming, video streaming etc.;
3. Reduce the brightness of screen to lower the temperature
66. What can I do when a warning “the phone stops charging” pops up?
The warning is a normal recommendation message and not harmful to battery or phone,
phone will start recharging once returning to normal temperature.
You can follow below actions to make phone return to normal temperature:
1. It is suggested not to expose your phone in the sunshine for long time;
2. Close large power consumption applications, such as music , chatting applications, GPS
application, 3D gaming, video streaming etc.;
3. Reduce the brightness of screen to lower the temperature
67. Why couldn’t I use three ways calling / multi-conference call function? Why does it say “Unable
to conference calls” when I use conference call function?
Three ways calling / multi-conference call function requires network/SIM card support. If
your SIM card isn’t activated such function by your service provider, the mobile will show a
message “Unable to conference calls” when you try to use it. Please contact your service
provider to enable multi-conference call service for your SIM card.
68. How can I connect my phone to a PC via USB cable?
When your device connects to a PC, the device will ask you which mode you want to use.

To transfer data between the device and computer, select Media Device (MTP) mode. This
mode is used by default.
To transfer data to camera specific software on your PC, or when MTP mode is not supported,
select Camera (PTP) mode.
To disable all data and file transfer connection with computer and put device in charging only
mode, select Charging mode.
Computers that use Windows XP might not connect properly, because they don’t have the proper
drivers installed by default. To fix this, download and install Windows Media Player 11 or higher
which contains the proper drivers.
Computers that use Mac OS X 10.5 or later might not connect properly, because they don’t have
the proper drivers installed by default. To fix this, download and install Android File Transfer
which contains the proper drivers.