Family Nurse Partnership - Ningapi.ning.com/files/OaLCeaCg49gNJ24KXhQb-lKbdBV-DYv9Vfbvork9SS… ·...
35
Family Nurse Partnership REGISTERING, ENROLLING AND TRANSFERRING CLIENTS + INFANTS September 2014
-
Upload
dangnguyet -
Category
Documents
-
view
216 -
download
0
Transcript of Family Nurse Partnership - Ningapi.ning.com/files/OaLCeaCg49gNJ24KXhQb-lKbdBV-DYv9Vfbvork9SS… ·...

Family Nurse Partnership
REGISTERING, ENROLLING AND TRANSFERRING CLIENTS + INFANTS
September 2014

Copyright ©2014 Health and Social Care Information Centre and
FNP National Unit (Tavistock and Portman NHS Foundation Trust)
Uncontrolled when printed
Page 2 of 35 Version 4.4
Family Nurse Partnership Information System
REGISTERING, ENROLLING AND TRANSFERRING CLIENTS + INFANTS
Programme HSCIC, Exeter DOCUMENT RECORD ID KEY:
Project FNP DOC-00162
Programme Director Sean Walsh
Owner FNP 2nd
Line Support and FNP National Unit Version 4.4
Author Kim Hobday
Version Date 16/09/2014 Status FINAL
Contents
The FNP Information System (FNP IS) ................................................................................ 3 Register Client Family Details (Admin and Supervisors Only) .................................. 4
Associated Infants ....................................................................................................... 8 Programme Statuses ................................................................................................... 9
Enrolling a Client ................................................................................................................ 10 Manage Contact Details ..................................................................................................... 13
Associated Infant(s) ........................................................................................................... 21 Registering an Infant ................................................................................................. 21
Recording an Infant Death......................................................................................... 23 Search Client/Infant Contact Information (All Users) ............................................... 25
Printing Clients’ Contact Information (All Users) ........................................................ 27
Transferring Clients (Supervisors and Admins only) .......................................................... 28
Step 1 – Initiating a transfer ....................................................................................... 28 Step 2 – Actioning a transfer ..................................................................................... 29 Step 3 – Accepting a transfer .................................................................................... 30
Step 4 – Rejecting a transfer ..................................................................................... 30 APPENDIX A – DISPOSITION CODES............................................................................. 33 APPENDIX B – WARNING MESSAGES ........................................................................... 34
Published to FNP Online website, in electronic PDF format only.
http://familynursepartnership.ning.com/page/open-exeter-resources
Published to FNP Information System under FNP-Menu, in electronic PDF format only.

Copyright ©2014 Health and Social Care Information Centre and
FNP National Unit (Tavistock and Portman NHS Foundation Trust)
Uncontrolled when printed
Page 3 of 35 Version 4.4
The FNP Information System (FNP IS) In order for clients to be logged on the FNP Information system, they need to first be registered. Before you begin to register clients on the system, please do have a discussion with your FNP Lead in order that the process is agreed. Ideally all clients entitled to FNP should be registered on the system, as this is the way you will be able to monitor your fidelity target of 75% of all entitled clients recruited. However a few sites have not been able to have this agreed and, if this is the case, you will need your own separate database as the FNP National Unit will need this figure during your recruitment phase. A second decision which needs to be made is the process by which data is completed. There are a number of options:
The family nurse completes a paper form with the client and then the administrator inputs the data onto the system.
The family nurse completes a paper form with the client and then inputs the data onto the system themselves.
The family nurse inputs the data onto the system with the client, using a tablet PC.
All data forms are downloaded onto the family nurse’s laptop. Once the nurse is back at base, they can upload the form(s) onto the system and delete from the laptop.
Once you begin receiving information about a client (even before the client is allocated to a family nurse or any recruitment visits have taken place), following the link below will enable the registration of the client:

Copyright ©2014 Health and Social Care Information Centre and
FNP National Unit (Tavistock and Portman NHS Foundation Trust)
Uncontrolled when printed
Page 4 of 35 Version 4.4
Register Client Family Details (Admin and Supervisors Only)
Referred Clients Enter the client’s unique NHS Number and click on the Search button. This will save you time, as the search facility checks Patient Details on Open Exeter for the client’s details and pre-populates the data for you:

Copyright ©2014 Health and Social Care Information Centre and
FNP National Unit (Tavistock and Portman NHS Foundation Trust)
Uncontrolled when printed
Page 5 of 35 Version 4.4
Client Registration Form (UK050)

Copyright ©2014 Health and Social Care Information Centre and
FNP National Unit (Tavistock and Portman NHS Foundation Trust)
Uncontrolled when printed
Page 6 of 35 Version 4.4
If the NHS Number is correct, and the client is registered with a GP in your area, the client’s details will be pulled through automatically:
To save the client, just click on Save. A referred client will be added to the list of clients but will not have an FNP Client ID or a schedule of forms. Note - see ‘FNP Information System – (4) Accessing Forms’ guidance for further information on a client’s visit schedule of forms.

Copyright ©2014 Health and Social Care Information Centre and
FNP National Unit (Tavistock and Portman NHS Foundation Trust)
Uncontrolled when printed
Page 7 of 35 Version 4.4
However, if the NHS Number is correct but the client is NOT registered with a GP in your area, an error message will be displayed:
You can continue to enter the client details manually without clicking on the ‘Search’ option. The minimum fields required to register a client manually are:
Family Name (i.e. Surname)
First Name
Date of Birth
Current Address (via ‘Manage Contact Details’)
When the client does register with a GP in her new area, the details will eventually feed through to the Patient Details screen. When the nurse can see the client details there, she can return to the client registration form, enter the client’s NHS Number (if not already entered) and click on the ‘Search’ option. A message will be displayed to advise that all current (manually added) data will be overwritten. Click on ‘OK’ to now populate the form with the full client and GP details as recorded on the Patient Details screen:

Copyright ©2014 Health and Social Care Information Centre and
FNP National Unit (Tavistock and Portman NHS Foundation Trust)
Uncontrolled when printed
Page 8 of 35 Version 4.4
Whether using the Search option or entering the client details manually, the newly registered client details will be saved under the programme status of AWAITING ENROLMENT (further explanation below) and the Assign Nurse section set to ‘V10000190 - REFERRED UNASSIGNED’ by default: If a registration is saved successfully, the detail confirming this will be shown in green above the Client Details box. If there are any input errors, the detail will be in red advising what needs to be corrected. Associated Infants The Associated Infants section, where the infant’s registration details are entered, does not become active until a client has an FNP Client ID allocated.

Copyright ©2014 Health and Social Care Information Centre and
FNP National Unit (Tavistock and Portman NHS Foundation Trust)
Uncontrolled when printed
Page 9 of 35 Version 4.4
Programme Statuses A client’s Programme Status can be found at the top of their registration page and the various statuses are: AWAITING ENROLMENT - client has been registered but no enrolment details have been entered in the Notification Details section so the client does not have a schedule of forms yet (to make the client’s status active, the Notification Details section should be updated and the first UK001 completed). REFERRED – a client that has been AWAITING ENROLMENT for 40 weeks, but has not been enrolled, will change to a status of REFERRED. Referred clients are removed from the system immediately.
Should you wish to remove a client earlier than 40 weeks, and they are still in a status of AWAITING ENROLMENT, enter a ‘Disposition Code’ on the client’s registration form to indicate that the client won’t now be taking up the programme. The client will revert to REFERRED and also be removed from the system immediately. ACTIVE – client is active within the FNP programme. Notification Details have been entered, the client is now allocated a Client FNP ID, the pregnancy schedule of forms is populated and a UK001 has been completed. INACTIVE – client is marked as inactive by completing the UK004B form. The form can only be completed once the client has had no Family Nurse contact for 6 months (i.e. no UK001 visits have been entered on the schedule of forms for 6 months). LEAVER – ‘Client has moved out of service area’ as indicated by completing the UK004B form. These clients will be removed from the system 4 months from the Date Applicable entered on the UK004B. This will allow the client to return to the programme should they move back within the four month period. All other Leavers, except those that have moved out of service area, will be removed from the system immediately. COMPLETER – client has completed the FNP programme, as indicated by completing the UK004B form. The client’s details will be removed from the system 4 months from the Date Applicable on the UK004B form.
INACTIVE COMPLETER - clients will enter this programme status if 2 years has passed after infant date of birth (if no infant date of birth is present, then EDD + 28 days) and the client is in a programme status of INACTIVE.
The client’s details will be removed from the system 4 months after the client’s status changes to Inactive Completer.
TRANSFER REQUESTED – client is awaiting transfer to another FNP site but the new site has yet to accept the transfer.
These are all read-only fields.

Copyright ©2014 Health and Social Care Information Centre and
FNP National Unit (Tavistock and Portman NHS Foundation Trust)
Uncontrolled when printed
Page 10 of 35 Version 4.4
Enrolling a Client To enrol a client and create a schedule of forms, the Assign Nurse and Notification Details sections must now be completed (the minimum detail required to enrol the client is the EDD field within Notification Details although ideally all fields should be completed):
To save the enrolled client, click on Save.
The system will then automatically enter a ‘Date of Registration’ and ‘Date of Enrolment’ in the Programme Details section, and the client’s schedule of forms will be calculated from these dates and the EDD.
Once the first UK001 has been completed, the ‘Date of Enrolment’ in the Programme Details section will be automatically updated by the system.
The ‘Weeks Gestation at Enrolment’ field is now automatically calculated by the ‘EDD’ and ‘Date of Enrolment’ fields.
The ‘Time to 28 Week Goal’ field is only visible until the first UK001 has been completed on a client’s schedule. After which the field will disappear.
Programme Details

Copyright ©2014 Health and Social Care Information Centre and
FNP National Unit (Tavistock and Portman NHS Foundation Trust)
Uncontrolled when printed
Page 11 of 35 Version 4.4
All of the above dates are read-only and are populated when relevant updates are made (i.e. completing a UK001 form or UK004B). The enrolled client now has an FNP Client ID and an automated schedule of forms, for Pregnancy only (the Infancy and Toddlerhood schedules will only be generated when the infant(s) are born and the details have been entered in the Associated Infants section, or when the client’s EDD has expired by over 28 days).
You will notice the Programme Status remains as AWAITING ENROLMENT, even though the Enrolment Details have been entered and saved.

Copyright ©2014 Health and Social Care Information Centre and
FNP National Unit (Tavistock and Portman NHS Foundation Trust)
Uncontrolled when printed
Page 12 of 35 Version 4.4
It is only when the assigned nurse completes and saves the first UK001 within the client’s schedule of forms, that the status will change to ACTIVE and the Date of Enrolment be updated. Please note the following ‘common’ scenarios with regards to enrolling clients and the most suitable courses of action: Client referred but does not enrol. In this scenario client details are entered on the FNP IS but a UK001 form is not completed. The client’s programme status will remain as AWAITING ENROLMENT. If no Date of Enrolment is ever created, the client’s record will be automatically removed from the system 40 weeks after the record was created. A UK004B form cannot be used on a client with a programme status of AWAITING ENROLMENT to mark them as INACTIVE. To remove the client from the system prior to the 40 weeks, enter a ‘Disposition Code’ on the client’s registration form to indicate that the client won’t now be taking up the programme. The client will then be removed from the system immediately. Please see Appendix A for full details of Disposition Codes.
Client referred and is enrolled. Client details are entered on FNP IS and a UK001 form is completed. The client status will now change to ACTIVE and the client will begin to appear in data reports.
Client enrols but disengages with programme. Client details entered on the FNP IS, Date of Enrolment and schedule of forms created and the first UK001 form has been completed and saved.
If a client begins the programme but then refuses to continue, you must wait 6 months from the last UK001 visit before entering a UK004B form to mark the client as INACTIVE (see ‘FNP Information System - (4A) Form Instructions’ for further information).
Any data forms not completed prior to this inactive date will be displayed as OVERDUE (as the uncompleted visit date passes) in Alerts, unless they are marked as ‘No Longer Required’ (NLR) by a supervisor or administrator.
Any data forms that are expected to occur in the client’s schedule after the UK004B applicable date will automatically no longer appear in Alerts.
Note – the INACTIVE client will remain in the CURRENT list until 2 years + 28 days from the EDD (or 2 years from the infant’s DOB). This keeps opens the possibility that you could still re-engage the client within the remaining term. Once 2 years + 28 days has passed, the client’s programme status becomes INACTIVE COMPLETER.

Copyright ©2014 Health and Social Care Information Centre and
FNP National Unit (Tavistock and Portman NHS Foundation Trust)
Uncontrolled when printed
Page 13 of 35 Version 4.4
Manage Contact Details A number of clients within FNP tend to be quite transitory hence keeping as many details about them as possible will help the nurse maintain regular contact.
Select the button labelled Manage contact details:
You will now be presented with a screen similar to the following example. Here you have up to 7 options (dependent on what data is already held). How these options are accessed is shown on these screens and a description of the options and how to work them through to completion is also given.

Copyright ©2014 Health and Social Care Information Centre and
FNP National Unit (Tavistock and Portman NHS Foundation Trust)
Uncontrolled when printed
Page 14 of 35 Version 4.4
(1) Create a new address In order to create a new address for a client, click on the button labelled New in the Address and Telephone section. This will present you with the following screen:
There are fields which are mandatory when creating an address for a client:
Name – e.g. 'Sister'
Line 1 – e.g. '6'
The options available to you with a new address are:
Create - saves the new address but doesn't make it the client's permanent address.
Create and make permanent - saves the new address and makes it the client's permanent address.
Reset - Clears all fields.
You have the option of assigning a start and/or end date to an address. Assigning a start/end date is not mandatory but this can help you to keep track of when a client lived at a particular address. When you click on Show All (option 3), addresses will be ordered by date (if any dates are assigned). It is worth noting that you cannot input an end date without a start date.
(2) Create a new mobile In order to create a new mobile entry for a client, click on the button labelled New in the Mobile Telephone section. This will present you with the following screen:

Copyright ©2014 Health and Social Care Information Centre and
FNP National Unit (Tavistock and Portman NHS Foundation Trust)
Uncontrolled when printed
Page 15 of 35 Version 4.4
There are fields which are mandatory when creating a mobile for a client:
Name - e.g. 'Boyfriend'
Mobile Phone Number - e.g. '07111 123456' The options available to you with a new address are:
Create - saves the new mobile but doesn't make it the client's permanent address.
Create and make permanent - saves the new mobile and makes it the client's permanent mobile.
Reset - Clears all fields.
You have the option of assigning a start and/or end date to a mobile, as with an address. Assigning a start/end date is not mandatory but this can help you to keep track of when a client had a particular mobile. When you click on Show All (option 6), mobiles will be ordered by date (if any are assigned). It is worth noting that you cannot input an end date without a start date.
(3) Select an existing address to view/amend (if one or more addresses exist for this client)
In order to edit an existing address, select it from the list (the list contains the name you gave the address when you created it, e.g. ‘Mum's Address’). When you select one from the list (shown on the left) you will be presented with the screen on the right:

Copyright ©2014 Health and Social Care Information Centre and
FNP National Unit (Tavistock and Portman NHS Foundation Trust)
Uncontrolled when printed
Page 16 of 35 Version 4.4
Selecting an address from the list will automatically bring up the details of that address as shown in the diagrams above. Notice how the options are now different:
Update - saves the updates that have been made (you will be asked to confirm you want to do this).
Make permanent - saves the updates and makes it the client's permanent address. The same integrity constraints apply as for a new address.
(4) Select an existing mobile to view/amend (if one or more mobiles exist for this client)
In order to edit an existing mobile, select it from the list (the list contains the name you gave the mobile when you created it). When you select one from the list (shown on the left) you will be presented with the screen on the right:
Selecting a mobile from the list will automatically bring up the details of that mobile as shown in the diagrams above. Notice how the options are now different, as with the address:

Copyright ©2014 Health and Social Care Information Centre and
FNP National Unit (Tavistock and Portman NHS Foundation Trust)
Uncontrolled when printed
Page 17 of 35 Version 4.4
Update - saves the updates that have been made (you will be asked to confirm you want to do this).
Make permanent - saves the updates and makes it the client's permanent mobile. The same integrity constraints apply as for a new mobile.
(5) Show all addresses in the system for a client (if one or more addresses exist for this client)
In order to show all addresses that exist for a client, click on the button labelled Show All in the Address and Telephone section. When you click on this you will be shown all of the addresses in the following manner:
(6) Show all mobiles in the system for a client (if one or more mobiles exists for this client)
In order to show all mobiles that exist for a client, click on the button labelled Show All in the Mobile Telephone section. When you click on this you will be shown all of the mobiles in the following manner:

Copyright ©2014 Health and Social Care Information Centre and
FNP National Unit (Tavistock and Portman NHS Foundation Trust)
Uncontrolled when printed
Page 18 of 35 Version 4.4
(7) Close Contact Details
Whilst the Contact Details window is open, you will not be able to edit the rest of the client's details. In order to resume editing of the client you have to close the window. This is done by clicking on the Close button. Address Look Up
Wherever an address can be input within FNP, there is the option to look up an address. When you attempt an address look-up you must at least specify a postcode that is to be searched by. The address look-up will use every field that has been specified. However, it is recommended that you use just postcode and first line of the address for the most reliable results. Here is a step by step guide of how to use the address look-up facility within FNP:
Type in which parameters you want to search by (in this case it is just postcode) and click on the Find Address button:
Select an address from the list.

Copyright ©2014 Health and Social Care Information Centre and
FNP National Unit (Tavistock and Portman NHS Foundation Trust)
Uncontrolled when printed
Page 19 of 35 Version 4.4
The address details are injected into the corresponding fields. You can choose to create an additional address with these details by selecting Create, or make the address the primary residence of the client by selecting Create and Make Permanent:
If your search yields no results you will get the following message:
The process for looking up an address works in the same way wherever you are in the FNP IS. Note – the above explains how to manually amend and view the client contact details on the registration form.
However the client contact details can be automatically updated if the option of ‘Client change of address (within site area)’ is selected on the UK004A form:

Copyright ©2014 Health and Social Care Information Centre and
FNP National Unit (Tavistock and Portman NHS Foundation Trust)
Uncontrolled when printed
Page 20 of 35 Version 4.4
Fill in the required details on the form, select ‘Client change of address (within site area)’ and press Save and Complete. The following screen will then ask for the client’s details. Enter the new address, postcode, telephone number and Start Date. Press Save Address. These new details will be automatically updated onto the registration form:

Copyright ©2014 Health and Social Care Information Centre and
FNP National Unit (Tavistock and Portman NHS Foundation Trust)
Uncontrolled when printed
Page 21 of 35 Version 4.4
Associated Infant(s)
Registering an Infant
On the client’s registration form you can add infants and modify their details. Note – until the infant details have been registered on the client’s registration form, there will be no Infancy (I) or Toddler (T) schedule of forms. You will only be able to add infants to a client if the client is enrolled (i.e. they have a value specified for (a) weeks gestation and (b) date of enrolment). Note - if more than one infant is to be recorded on the system, the Multiple Birth indicator must be ticked and the number of infants specified. The birth dates must be within one day of each other (i.e. twins).
Click on the Add Infant button. Enter the infant’s NHS Number and click on the Search button. This will save you time, as the search facility checks Open Exeter for the infant’s details and pre-populates the data for you:

Copyright ©2014 Health and Social Care Information Centre and
FNP National Unit (Tavistock and Portman NHS Foundation Trust)
Uncontrolled when printed
Page 22 of 35 Version 4.4
Note - on the birth of a child, the New Numbers for Babies (NN4B) Team issues a new NHS Number. The Personal Demographics Service (PDS), Office of National Statistics (ONS), Screening Management System (SMS) and Registrars On-Line (RON) systems are all then updated with the details. For the infant’s details to be viewable on Patient Details on the NHAIS system, the parent(s) must have registered the birth with their GP. The GP confirms the NHS Number with PDS, which then updates the NHAIS system of the birth details.
When you enter an infant’s NHS Number and no details are returned, this is probably because the details have not yet been fed through to NHAIS. If this is the case, and no details are found for the infant, you can enter the details manually instead.
There are several integrity constraints which must be satisfied when completing the infant details manually. The following fields must be specified:
Family Name (Surname) First Name Date of Birth Gender
When you are ready to submit, click on Register Infant.
If the submission is successful (i.e. all validation met), the pop up will close and the Associated Infants area will change to reflect the new infant you have added. You can also select Reset, which clears all the infant fields. The third and final option you have is to close the Add Infant pop up. If you do this you can go back in again and your data will remain (as long as you don't leave the client’s registration form).
Note - the NHS Number search will remain active after the infant has been registered manually so you can go back at a later date and search on the infant’s NHS Number to populate the infant(s) details automatically with the full information.
The Associated Infants area for this client will now be updated to show the infant(s) you have just registered (as shown below). If you wish to amend any details, click on Edit next to the relevant infant. You will be presented with the Add Infant pop up but this time it will be pre-populated with the data for that infant.

Copyright ©2014 Health and Social Care Information Centre and
FNP National Unit (Tavistock and Portman NHS Foundation Trust)
Uncontrolled when printed
Page 23 of 35 Version 4.4
Multiple births will generate additional data forms on the client’s Schedule of Forms relating to the individual infants, where appropriate (such as additional UK012 infant forms). Recording an Infant Death In the unfortunate instance when one of the infants dies (either stillborn or some time later), this can be recorded on the Associated Infants screen:
This will update the associated infant data forms, succeeding the death, to be No Longer Required.
Note – remember only supervisors and administrators will see the ‘editable’ client registration form. Nurses will only see a ‘greyed out’ read-only version but with access to the ‘Manage Contact Details’ and ‘Associated Infants’ sections to ‘view’ full details.

Copyright ©2014 Health and Social Care Information Centre and
FNP National Unit (Tavistock and Portman NHS Foundation Trust)
Uncontrolled when printed
Page 24 of 35 Version 4.4
Copyright ©2014 Health and Social Care Information Centre and
FNP National Unit (Tavistock and Portman NHS Foundation Trust)
Uncontrolled when printed
Page 25 of 35 Version 4.4
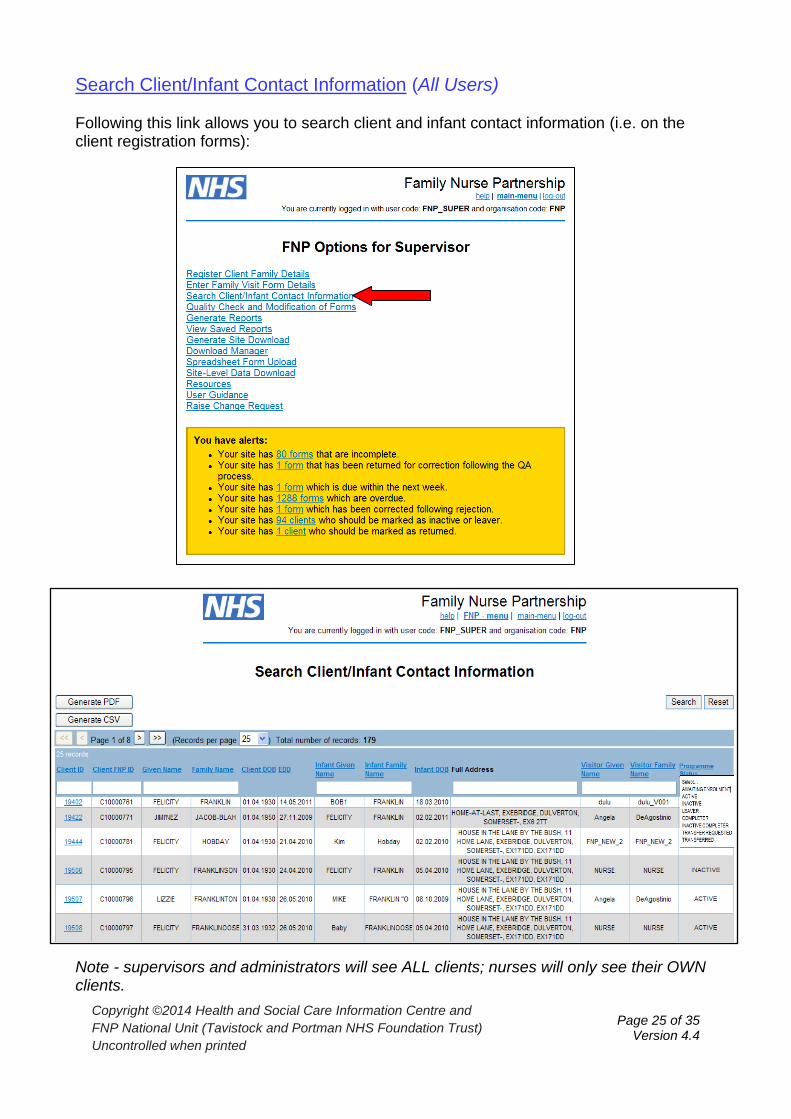
Search Client/Infant Contact Information (All Users) Following this link allows you to search client and infant contact information (i.e. on the client registration forms):
Note - supervisors and administrators will see ALL clients; nurses will only see their OWN clients.
Copyright ©2014 Health and Social Care Information Centre and
FNP National Unit (Tavistock and Portman NHS Foundation Trust)
Uncontrolled when printed
Page 26 of 35 Version 4.4
The above Search Client/Infant Contact Information screen is to search for saved client records. Click on the blue Client ID link on the left, to access the client’s registration form. Users can:
Search records in ascending/descending order by each column heading.
Change the number of records shown on each page (min = 10, max = 100).
Search by individual criteria (i.e. put Smith in the First Name/Family Name box and press Search).
Filter by Programme Status to choose the exact status you require. Press ‘Reset’ to clear filter criteria and return to default setting. A client’s FNP ID will only appear if the client has enrolled with an Assigned Nurse on the registration form. Referred clients (i.e. those without this information) will not have a Client FNP ID present and will therefore not be listed. Please note the following validations when searching on the status of Leaver, Completer, Inactive Completer and Transferred:
LEAVER (moved out of service area) – access to client information removed after 4 months. Note - LEAVER (client has left programme) – access to client information is removed immediately.
COMPLETER (client has completed the programme) – access to client information removed after 4 months.
INACTIVE COMPLETER – access to client information removed after 4 months.
TRANSFERRED – access to client information removed immediately. There is no clinical need for access to client information for completers and leavers, therefore the ability to view details, after the timescales specified above, will be removed.

Copyright ©2014 Health and Social Care Information Centre and
FNP National Unit (Tavistock and Portman NHS Foundation Trust)
Uncontrolled when printed
Page 27 of 35 Version 4.4
Printing Clients’ Contact Information (All Users) The below screenshot shows the supervisor/admin view, with ALL client’s shown, for ALL nurses:
The Generate PDF/CSV options are available to all users, to open on screen or save to local PC:

Copyright ©2014 Health and Social Care Information Centre and
FNP National Unit (Tavistock and Portman NHS Foundation Trust)
Uncontrolled when printed
Page 28 of 35 Version 4.4
Transferring Clients (Supervisors and Admins only) Step 1 – Initiating a transfer The transfer is initiated via the UK004A form. Select the option of ‘Client transferred to new site’ and enter the new site that the client is transferring to from the dropdown list of available sites. The transfer will only occur on Save and Complete. The transfer can also only occur on clients who have a system status of CURRENT. When saved, a client will move into the programme status of TRANSFER REQUESTED at the initiating site.

Copyright ©2014 Health and Social Care Information Centre and
FNP National Unit (Tavistock and Portman NHS Foundation Trust)
Uncontrolled when printed
Page 29 of 35 Version 4.4
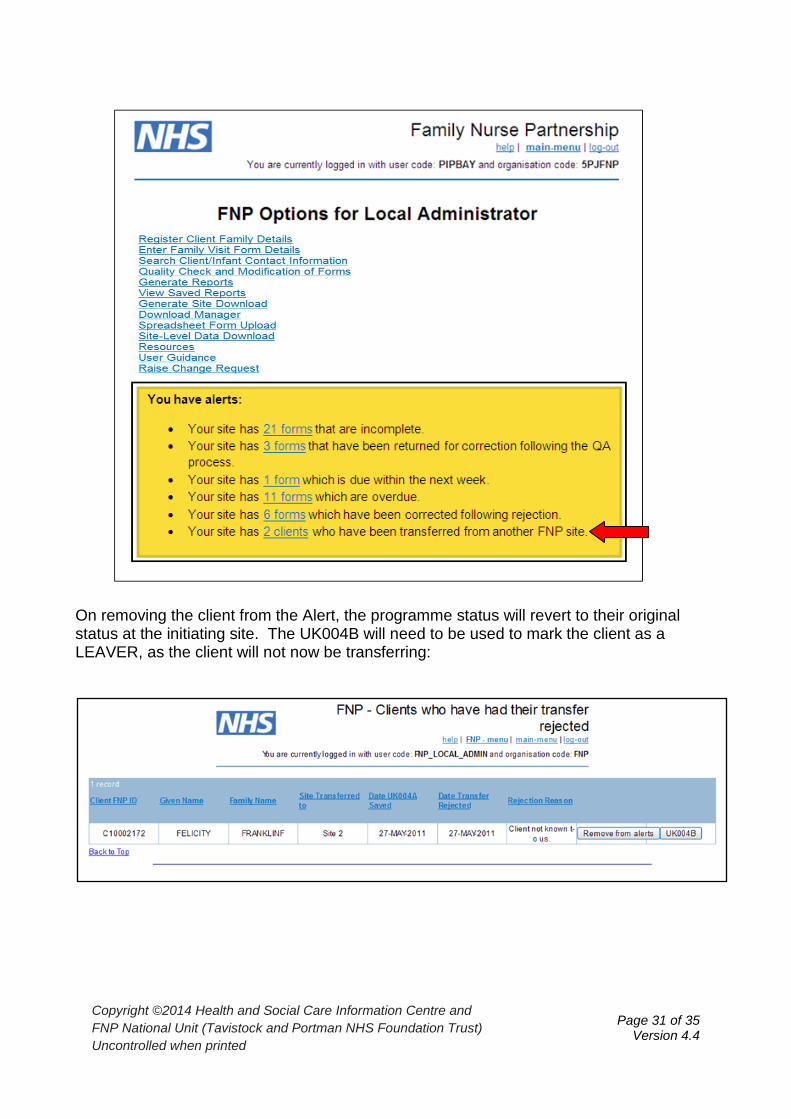
Step 2 – Actioning a transfer A new alert will be presented at the receiving site (available at admin/supervisor level only) marked ‘Your site has X clients who have been transferred from another FNP site’. This alert can be used to Accept or Reject the transfer at the receiving site.

Copyright ©2014 Health and Social Care Information Centre and
FNP National Unit (Tavistock and Portman NHS Foundation Trust)
Uncontrolled when printed
Page 30 of 35 Version 4.4
Step 3 – Accepting a transfer Once accepted, the transferred client will no longer appear at the sending site and will only be visible by the receiving site. The client will receive a new FNP ID and will enter the new site under the programme status of ACTIVE.
The new site will receive all forms associated with the client and completed by the sending site.
Infants will be moved with clients, and they also will no longer be visible to the sending site.
The ‘Transferred In’ date is viewable on the Programme Details screen on the client’s registration form.
A client may be transferred any number of times and the same process will apply on any subsequent transfer.
Step 4 – Rejecting a transfer When choosing to reject a transfer, the reason for rejection is required:
This will then appear as an Alert at the initiating site and can be used for information, or to initiate a UK004B removal instead. The Alert is at the bottom of the screen below:
Copyright ©2014 Health and Social Care Information Centre and
FNP National Unit (Tavistock and Portman NHS Foundation Trust)
Uncontrolled when printed
Page 31 of 35 Version 4.4
On removing the client from the Alert, the programme status will revert to their original status at the initiating site. The UK004B will need to be used to mark the client as a LEAVER, as the client will not now be transferring:

Copyright ©2014 Health and Social Care Information Centre and
FNP National Unit (Tavistock and Portman NHS Foundation Trust)
Uncontrolled when printed
Page 32 of 35 Version 4.4
Other information
The Search/Client Contact Information page will allow filtering on the programme status of TRANSFER REQUESTED. However TRANSFERRED is no longer applicable, as the client’s record is removed upon transfer. A transferred client would only be visible at a receiving site under the status of ACTIVE.
The programme status of TRANSFER REQUESTED will be shown on the Client Registration Screen.
The Client Characteristics Report will only show TRANSFER REQUESTED clients at the sending site.
On Reports, TRANSFERRED clients will count towards the Ever Enrolled amount.
Note – only the details below will be retained at the original site, via the Site Level Download facility:
Client’s Age at Enrolment, in Years and Months Infant Year and Month of Birth
The client will not move into a status of INACTIVE COMPLETER if a client is in
status of TRANSFER REQUESTED. Also in this status, a client may not become a COMPLETER or LEAVER as a result of a UK004B.

Copyright ©2014 Health and Social Care Information Centre and
FNP National Unit (Tavistock and Portman NHS Foundation Trust)
Uncontrolled when printed
Page 33 of 35 Version 4.4
APPENDIX A – DISPOSITION CODES
Mapping of old disposition codes to new disposition codes:
Old Disposition Code New Disposition Code
1 - Enrolled in Programme 1 - Eligible and enrolled
2 - Refused Participation in programme 2 - Eligible but not enrolled (include clients
with no known ineligibility) 3 - Unable to Locate
No precursor 3a - Eligible but insufficient interpreter resources/capacity
6 - Quota full for month 3b - Eligible but quota full for month
4b - DMC:>28 wks pregnant 4a - Not eligible: >28 wks pregnant
No precursor 4b - Not eligible: previous live birth
4d - DMC: miscarried/other medical crisis
4c - Not eligible: miscarried/TOP taken place or planned
7 - Adoption planned 4d - Not eligible: adoption planned
4e - DMC: incorrect geographical area
4e - Not eligible: incorrect geographical area
No precursor 4f - Not eligible: plans to move out of area permanently or for an extended period (3 months or more)
The following codes are not longer available so have been renumbered and archived:
4a - DMC: Employed/Qualifications
4g - Not eligible: Employed/Qualifications
4c - DMC: multiple problems e.g. mental health
4h - Not eligible: multiple problems e.g. mental health
4f - DMC: unknown/other 4i - Not eligible: unknown/other
5 - Language issues 4j - Not eligible: Language issues

Copyright ©2014 Health and Social Care Information Centre and
FNP National Unit (Tavistock and Portman NHS Foundation Trust)
Uncontrolled when printed
Page 34 of 35 Version 4.4
APPENDIX B – WARNING MESSAGES
1. Warning message for clients leaving (completion of UK004B) if some forms are incomplete:
2. Warning message for clients leaving (completion of UK004B) if all forms are complete:

Copyright ©2014 Health and Social Care Information Centre and
FNP National Unit (Tavistock and Portman NHS Foundation Trust)
Uncontrolled when printed
Page 35 of 35 Version 4.4
3. Warning message for clients not enrolled in the programme. Disposition Code entered on the client registration screen (excludes option ‘1 - Enrolled in programme’).
This warning message appears when the ‘Save’ button is pressed:
Clicking on OK will then set the client to REFERRED and will remove them from the system immediately.