
FAMILY HAVEN ALLIANCE MASTER CASE MANAGEMENT USING HMIS AS A TOOL IN CASE MANAGEMENT.
63
FAMILY HAVEN ALLIANCE MASTER CASE MANAGEMENT USING HMIS AS A TOOL IN CASE MANAGEMENT
-
Upload
sydney-owens -
Category
Documents
-
view
214 -
download
0
Transcript of FAMILY HAVEN ALLIANCE MASTER CASE MANAGEMENT USING HMIS AS A TOOL IN CASE MANAGEMENT.

FAMILY HAVEN ALLIANCEMASTER CASE MANAGEMENTUSING HMIS AS A TOOL IN CASE MANAGEMENT
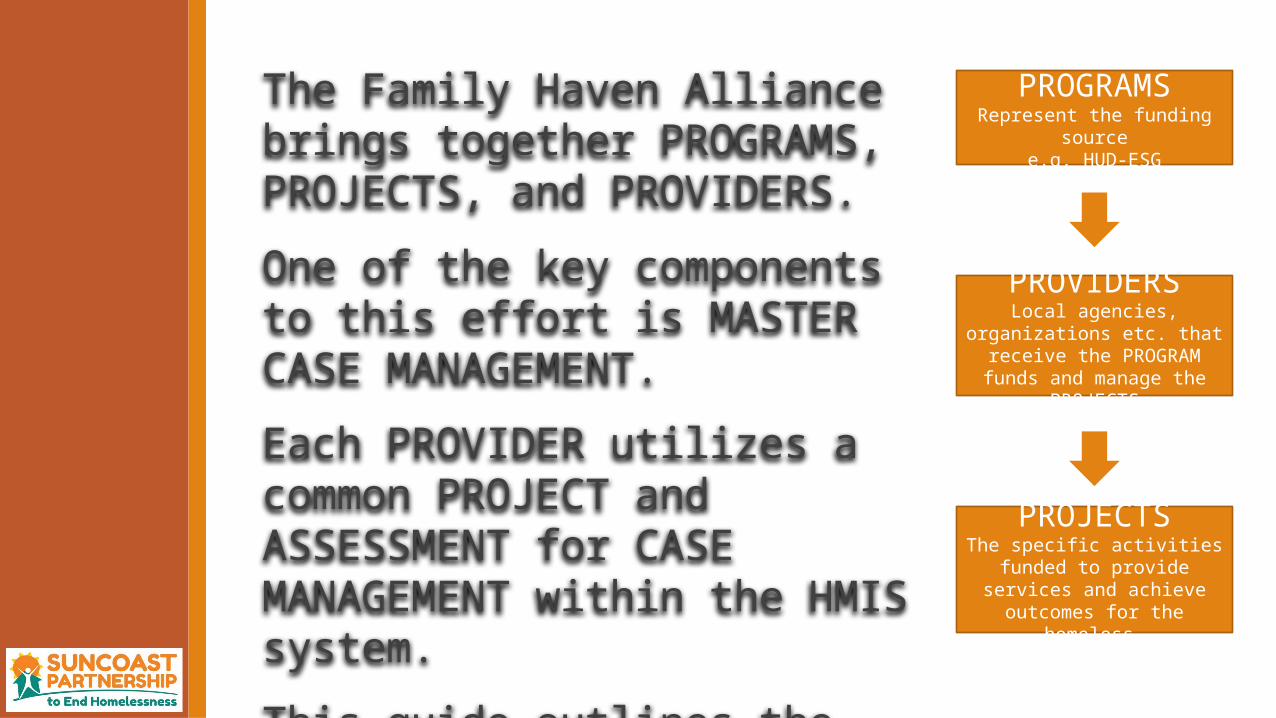
The Family Haven Alliance brings together PROGRAMS, PROJECTS, and PROVIDERS.
One of the key components to this effort is MASTER CASE MANAGEMENT.
Each PROVIDER utilizes a common PROJECT and ASSESSMENT for CASE MANAGEMENT within the HMIS system.
This guide outlines the HMIS tools available for the CASE MANAGER.
PROGRAMSRepresent the funding source
e.g. HUD-ESG
PROVIDERSLocal agencies, organizations etc. that receive the PROGRAM funds
and manage the PROJECTS
PROJECTSThe specific activities funded to
provide services and achieve outcomes for the homeless.

Family Haven Alliance Master Case Management (MCM) is a component of the Family Haven Project. In the Diagram below the Family Haven Alliance Project Client Flow is described as posted on TEAMWORK 10/6/2014. Master Case Management components are designated in green boxes.
1. Intake Location
2. Initial Triage 3. Referral Determination
A) Services only
5. FHA WeeklyMeeting
6. MCM InitialMeeting
4. Referral 7. MCM OngoingMeeting
Notes:•Referral Group B” (VMCM only): This group will be managed by agencies until FHA weekly meeting. 211 will refer this group to School House Link to prioritize and bring to FHA weekly meeting. No MCM will be assigned until FHA weekly meeting.•Referral Group “C” (VMCM + Haven/Motel): All “literally homeless” families will be referred to the Havens according to geographic location. (Until South Haven is ready, motels will be used but MCM will be done by Catholic Charities, starting on October 20 th. •A summary and case narrative will be presented at the FHA weekly meeting.
JFCS
Havens
CC
HH
SHL
SA
211
•VI-SPDAT•HMIS Entry
Housing: Stable or unstable VI-SPDAT: Med (6-11)/High (12+)
Housing: Stable VI-SPDAT: Low (0-5)
Literally homeless
B) VMCM only1
C) VMCM + Haven2 (or Motel)
MCM Assigned3 Dream MapFull F-SPDAT
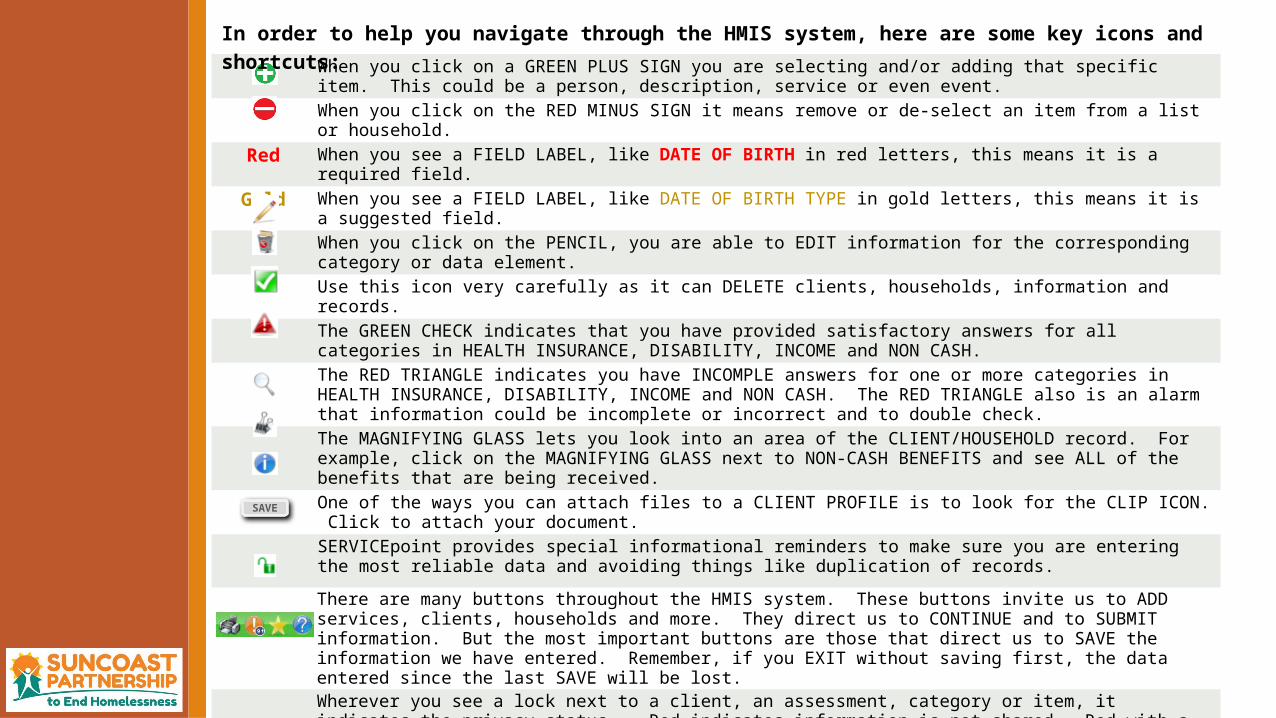
When you click on a GREEN PLUS SIGN you are selecting and/or adding that specific item. This could be a person, description, service or even event.
When you click on the RED MINUS SIGN it means remove or de-select an item from a list or household.
Red When you see a FIELD LABEL, like DATE OF BIRTH in red letters, this means it is a required field.
Gold When you see a FIELD LABEL, like DATE OF BIRTH TYPE in gold letters, this means it is a suggested field.
When you click on the PENCIL, you are able to EDIT information for the corresponding category or data element.
Use this icon very carefully as it can DELETE clients, households, information and records.
The GREEN CHECK indicates that you have provided satisfactory answers for all categories in HEALTH INSURANCE, DISABILITY, INCOME and NON CASH.
The RED TRIANGLE indicates you have INCOMPLE answers for one or more categories in HEALTH INSURANCE, DISABILITY, INCOME and NON CASH. The RED TRIANGLE also is an alarm that information could be incomplete or incorrect and to double check.
The MAGNIFYING GLASS lets you look into an area of the CLIENT/HOUSEHOLD record. For example, click on the MAGNIFYING GLASS next to NON-CASH BENEFITS and see ALL of the benefits that are being received.
One of the ways you can attach files to a CLIENT PROFILE is to look for the CLIP ICON. Click to attach your document.
SERVICEpoint provides special informational reminders to make sure you are entering the most reliable data and avoiding things like duplication of records.
There are many buttons throughout the HMIS system. These buttons invite us to ADD services, clients, households and more. They direct us to CONTINUE and to SUBMIT information. But the most important buttons are those that direct us to SAVE the information we have entered. Remember, if you EXIT without saving first, the data entered since the last SAVE will be lost.
Wherever you see a lock next to a client, an assessment, category or item, it indicates the privacy status. Red indicates information is not shared. Red with a triangle, indicates that information is not shared but there are exceptions. Green indicates an item is shared with all. Green with a triangle indicates it is sharable with exceptions.
At the top right hand on your SERVICEpoint home page there are four icons. The first is a PRINT icon that will print the current page your are working on. In some cases, you will see a print button or icon for a specific work area or report. When given a choice choose the print icon that is attached to your current work area. The second icon provides the user with ALERTS including important news items. The third icon allows you to save clients for easy further reference. You can see these saved FAVORITES from your home page and the FAVORITES tab on the left. The final icon is for SERVICEpoint HELP. Here you can find answers to many common questions.
SAVE
In order to help you navigate through the HMIS system, here are some key icons and shortcuts:

The HMIS System provides tools to assist with the Master Case Management portion of the Family Haven Alliance Project workflow for a CLIENT/HOUSEHOLD. In doing so, Master Case Managers area able to:
1. Make and save notations regarding the CLIENT/ HOUSEHOLD.
2. Attach documents, record and update SPDAT information and maintain other evaluation information.
3. Establish Goals and create Actions Steps for each Goal.
4. Make Referrals and Initiate Service Transactions.
5. Allow Case Managers and Program Evaluators to see the Action Steps Taken and the Goals Achieved or Not Achieved.
Family Haven Master Case
Management utilizes the Case
Management Tools that are
available within the HMIS system.

This workbook will cover the following elements that are integral to HMIS Master Case Management:
Working with ServicePoint and the Client Profile Entry/Exit for the Family Haven Master Case Management
Program Closing the Referral Loop Adding the Master Case Manager Reviewing Client Profile Information Using Case Plans Entering Goal Classifications and Types Adding Case Notes Entering Action Steps Adding Services Entering Service Transactions, including Entry/Exit Setting, Reminding and Recording Project Interims and post
Project Support. Uploading File Attachments, including client notes, VI-F-SPDAT
and/or Full F-SPDAT information. Printing the CASE PLAN for a CLIENT.
The Family Haven Master Case
Management Workbook will provide step by
step information to allow for a more
uniform approach among Master Case
Managers that represent different
PROVIDERS.
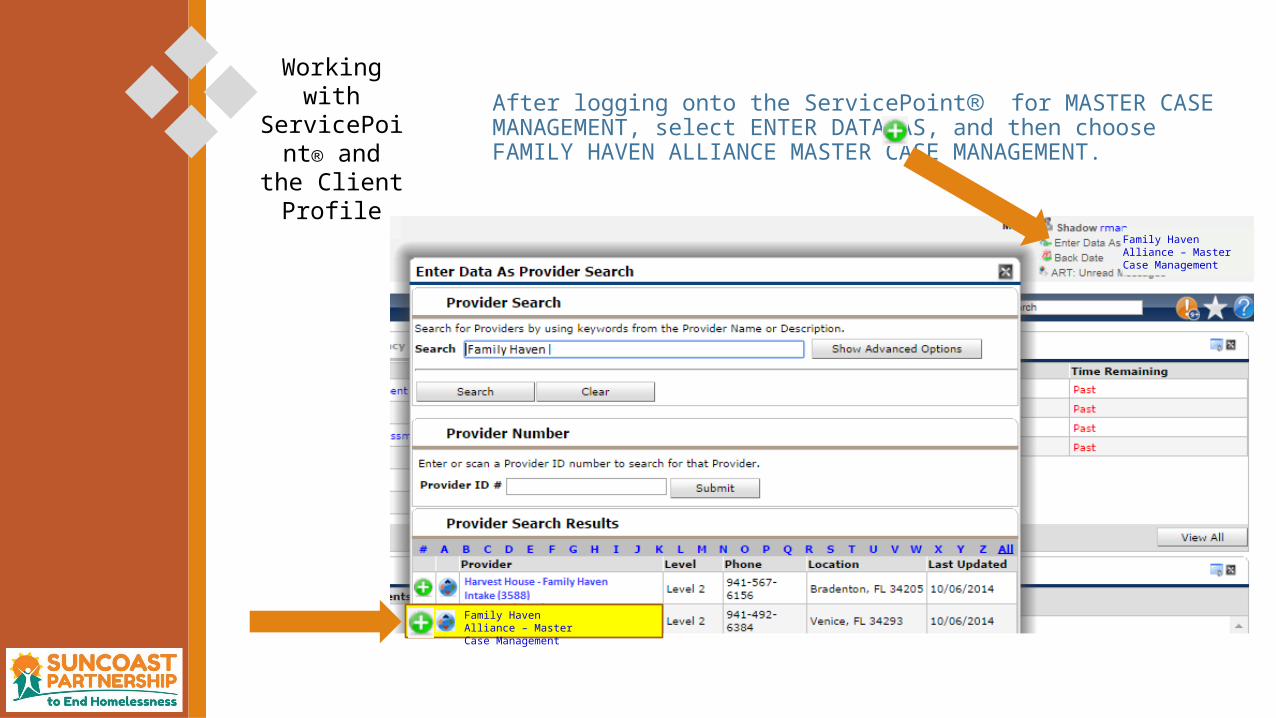
After logging onto the ServicePoint for MASTER CASE MANAGEMENT, select ENTER DATA AS, and then choose FAMILY HAVEN ALLIANCE MASTER CASE MANAGEMENT.
Family Haven Alliance – Master Case Management
Family Haven Alliance – Master Case Management
Working with ServicePoint and the Client
Profile
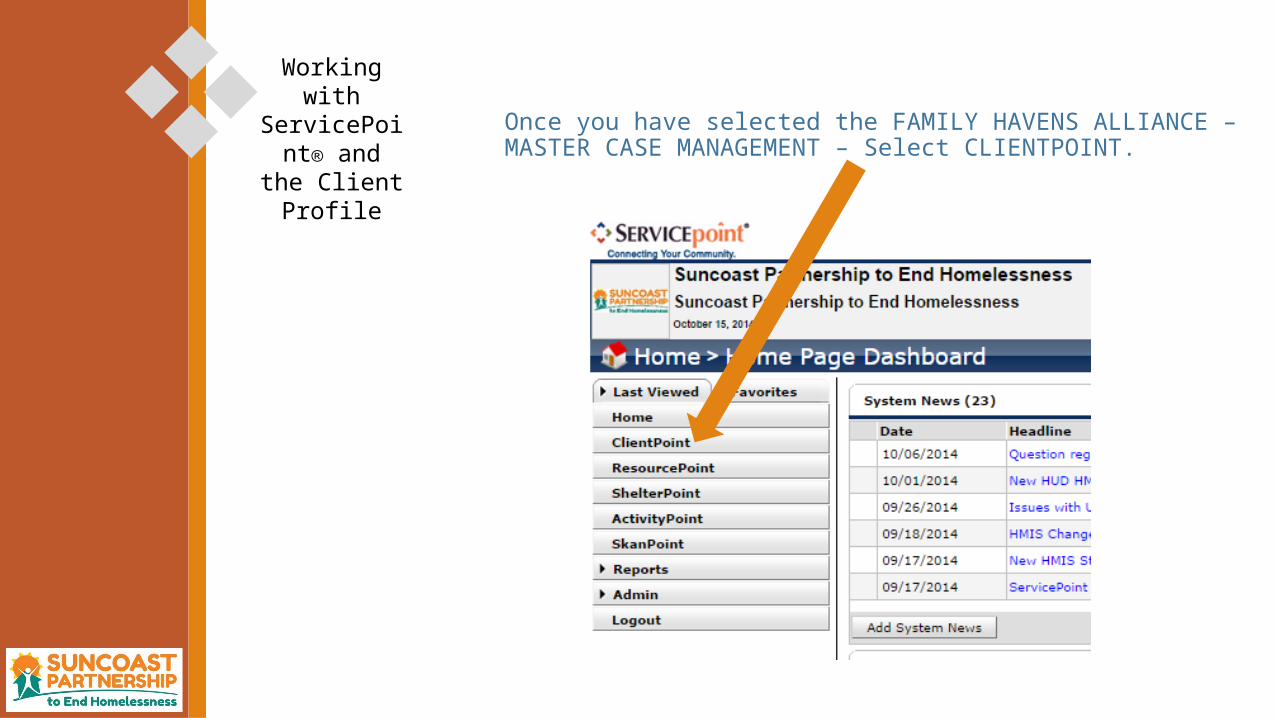
Once you have selected the FAMILY HAVENS ALLIANCE – MASTER CASE MANAGEMENT – Select CLIENTPOINT.
Working with ServicePoint and the Client
Profile

Look in the CLIENTPOINT File Cabinet for existing clients. For the Family Haven
Alliance – Master Case Management, all of the CLIENTS/HOUSEHOLDS should
be pre-existing. Use First Name, Last Name and/or SS#. OR, if you know the
Client ID# enter that number in the space provided.
Working with ServicePoint and the Client
Profile
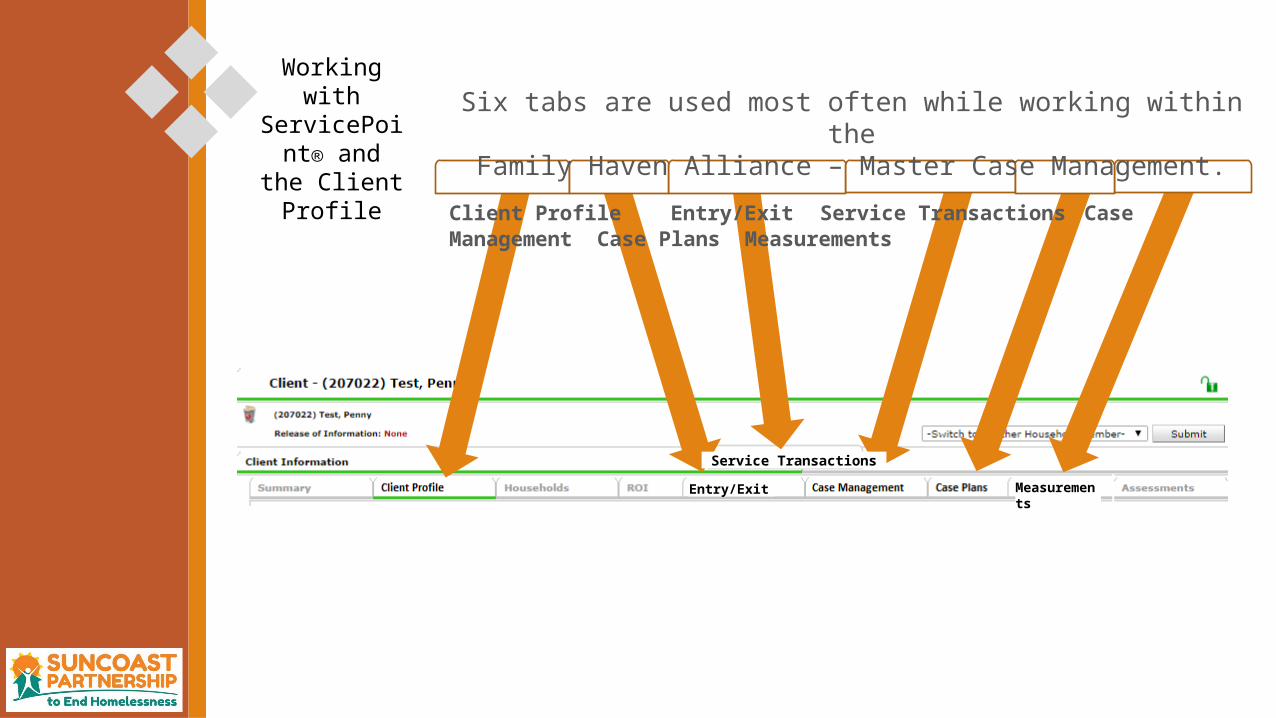
Six tabs are used most often while working within theFamily Haven Alliance – Master Case Management.
Client Profile Entry/Exit Service Transactions Case Management Case Plans Measurements
Working with ServicePoint and the Client
Profile
Service Transactions
Entry/Exit Measurements

For the purposes of the FAMILY HAVEN ALLIANCE – MASTER CASE
MANAGER, once a Case Manager is assigned, that person will need to log
into the HMIS System and click on the CASE MANAGERS tab. Program
Entry/Exit

For the purposes of the FAMILY HAVEN ALLIANCE – MASTER CASE
MANAGER, once a Case Manager is assigned, that person will need to log
into the HMIS System and click on the CASE MANAGERS tab. Program
Entry/Exit
For the purposes of the FAMILY HAVEN ALLIANCE – MASTER CASE
MANAGER, once a Case Manager is assigned, that person will need to log
into the HMIS System and click on the CASE MANAGERS tab.
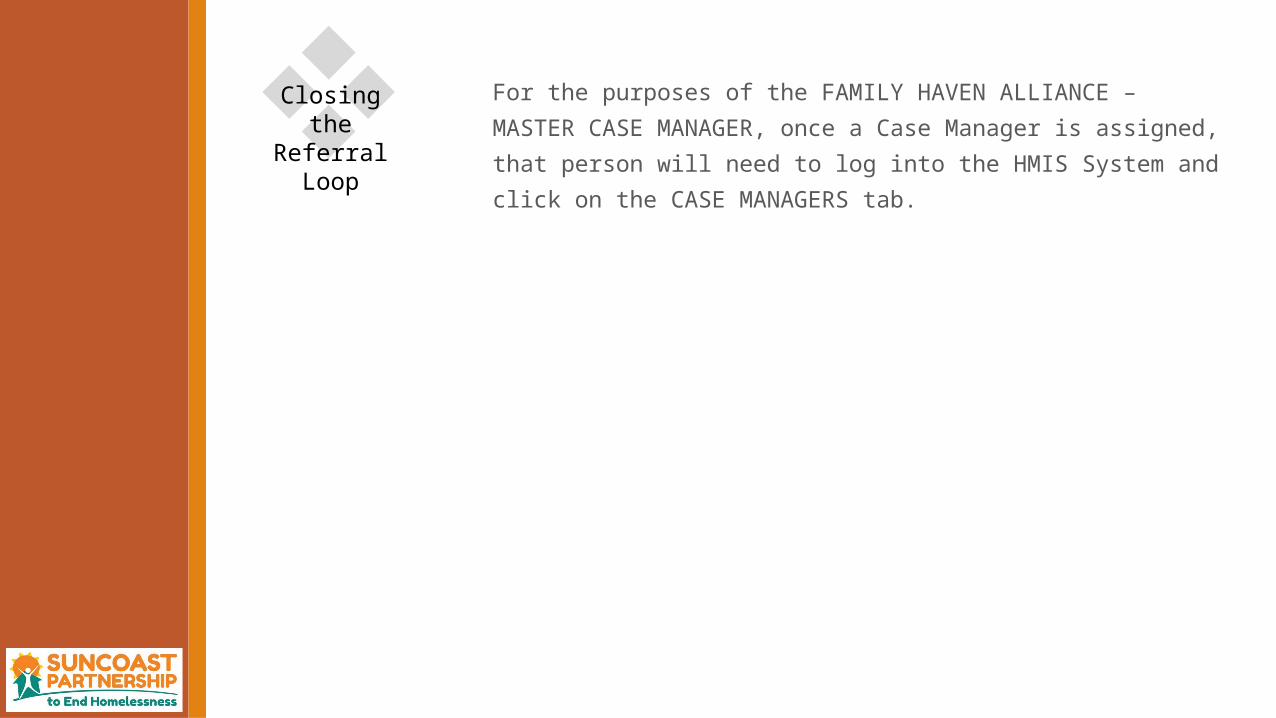
Closing the Referral Loop

For the purposes of the FAMILY HAVEN ALLIANCE – MASTER CASE
MANAGER, once a Case Manager is assigned, that person will need to log
into the HMIS System and click on the CASE MANAGERS tab.
Closing the Referral Loop
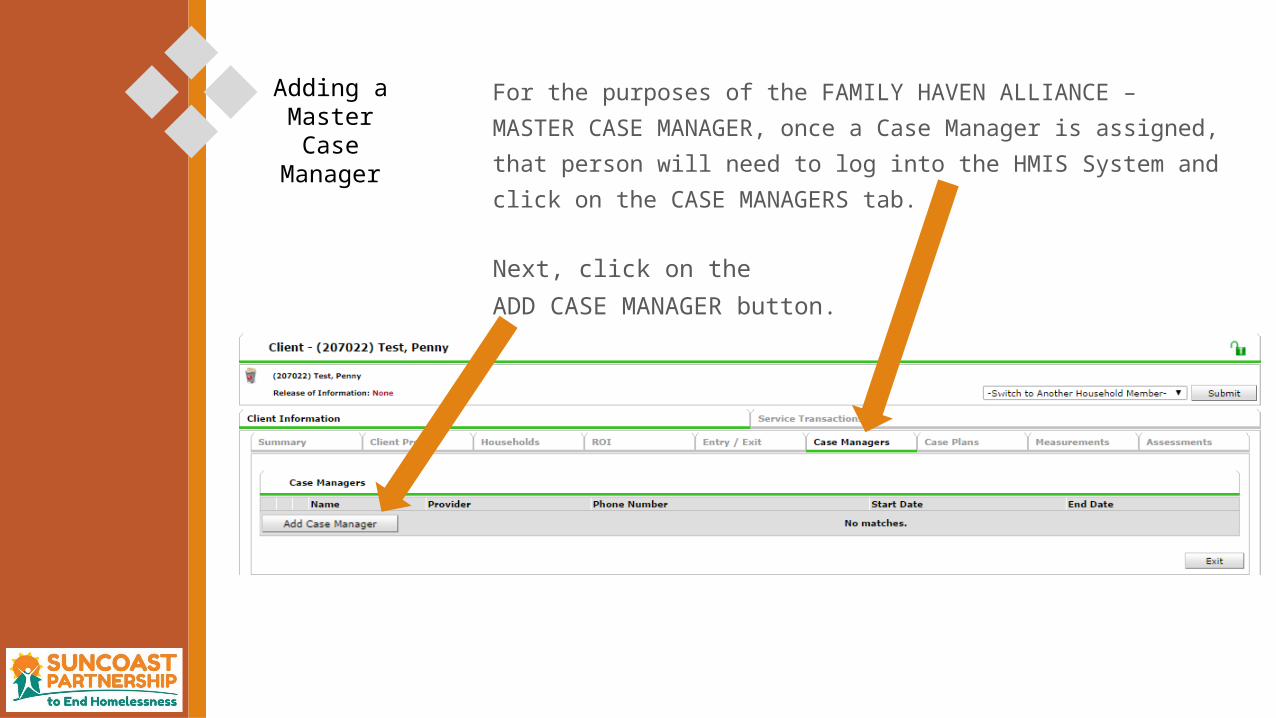
For the purposes of the FAMILY HAVEN ALLIANCE – MASTER CASE
MANAGER, once a Case Manager is assigned, that person will need to log
into the HMIS System and click on the CASE MANAGERS tab.
Next, click on the
ADD CASE MANAGER button.
Adding a Master Case
Manager

When you click on the ADD CASE MANAGER button a CASE MANAGER dialog box appears that asks you for information about the CASE MANAGER you want to add for that CLIENT/HOUSEHOLD.
1. Select the members of the household to be included or select the entire household.
Adding a Master Case
Manager

2. Select ME as your choice for TYPE. This should populate the remaining fields.
Check to make sure the information is correct. The PROVIDER should be FAMILY HAVEN ALLIANCE MASTER CASE MANAGEMENT.
Adding a Master Case
ManagerContinue adding information about the CASE MANAGER.

3. Make sure the START DATE IS correct.
4. Finally, ADD CASE MANAGER.
Adding a Master Case
ManagerContinue adding information about the CASE MANAGER.

Now when you look at the CASE MANAGERS list, your name should be there
along with other information. Adding a
Master Case Manager

For the FAMILY HAVEN ALLIANCE MASTER CASE MANAGEMENT workflow the MASTER CASE MANAGER should briefly review the CLIENT/HOUSEHOLD profile in order to complete, update or make needed changes to the information.
Reviewing Client
Information
The first two sections of the CLIENT PROFILE are:
CLIENT RECORD
CLIENT DEMOGRAPHICS

The next section to review is the specific data elements collected for the FAMILY HAVEN ALLIANCE Assessment. Reviewing
Client Information
This section of the CLIENT PROFILE includes:
PRESENTING PROBLEM
CURRENT LIVING SITUATION.
PRESENTING PROBLEM
CURRENT LIVING SITUATION
Family Haven Alliance – Client Profile

Then you may want to review the MEDICAL INFORMATION, including health insurance and disabilities, MONTHLY INCOME and NON-CASH BENEFITS. Reviewing
Client Information
Medical InformationIncome Information
Non-cash Benefit InformationHealth Insurance
Disabilities
Monthly Income
Non-cash Benefits

Finally, make sure the CLIENT CONTACT INFORMATION, EMERGENCY CONTACT and the score for the VI-F-SPDATare as complete as possible.
Reviewing Client
Information
Contact Information
Emergency Contact
VI-F-SPDAT

Creating a Case Plan The next step in using the HMIS system in MASTER CASE MANAGEMENT is
developing a Case Plan. Click on the CASE PLANS tab.
Here’s a Tip!
The CASE PLANS section enables you to record GOALS, set timelines, set FOLLOW-UP DATES, include CASE NOTES and more. Your first step is to enter your first GOAL for the CLIENT/HOUSEHOLD.

Creating a Case Plan: Entering
a GoalTo enter a GOAL for the CLIENT/HOUSEHOLD Case Plan select ADD A GOAL.

Creating a Case Plan: Entering
a Goal
When you select ADD A GOAL, the GOAL dialog box will appear.
Complete each area requested in order to ADD A GOAL.

Creating a Case Plan: Entering
a Goal Here are the first steps to ADD A GOAL. In the GOAL dialog box:
Because you are Entering Data As FAMILY HAVEN ALLIANCE MASTER CASE MANAGEMENT, the PROVIDER field will populate with that information. There is no need to change that setting.
The CASE MANAGER will be selected from those who have are listed as Case Managers for that CLIENT/HOUSEHOLD. Select your name from the list to be designated CASE MANAGER for this GOAL.

Creating a Case Plan: Entering
a Goal The DATE GOAL WAS SET is the Date that the specific GOAL was established. The HMIS system will default to today’s date, and unless that is specifically incorrect, it can be left as is.

Creating a Case
Plan: Adding Classifications
& TypesThe next two questions are GOAL CLASSIFICATIONS and GOAL TYPE.
First, you must select the GOAL CLASSIFICTON. Below you will find a list of the current GOAL CLASSIFICATIONS.
BudgetingCase ManagementChild CareCommunity InvolvementEconomicEducationEducational Support ServicesEmploymentEnvironment and SafetyFinancial StabilityFood HealthHealth ImprovementHousehold NecessitiesHousing
Interpersonal RelationshipsLegalLife SkillsMedical CareMental Health TreatmentOtherParentingSavingsSelf-SufficiencySocial Development and RelationshipsSubstance Abuse TreatmentsTransportation Utilities
Here’s a Tip!
These GOALS are able to be changed, removed or new GOAL CLASSIFICATIONS entered.
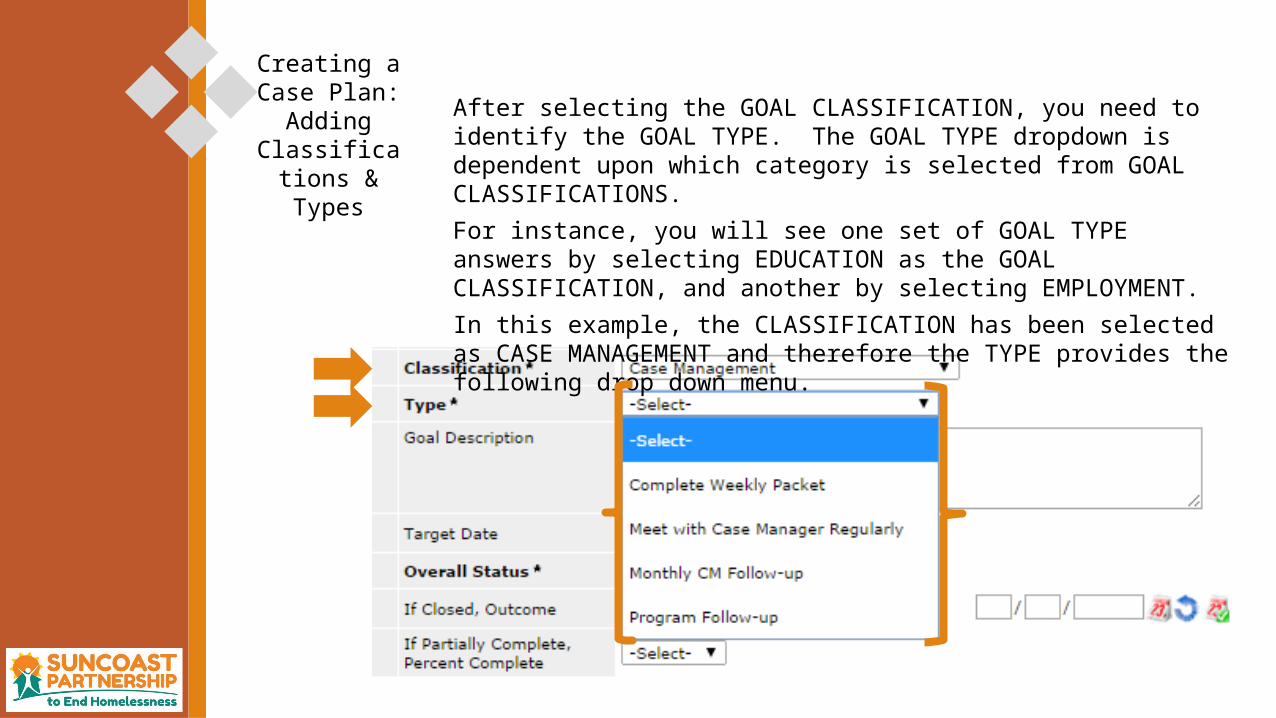
After selecting the GOAL CLASSIFICATION, you need to identify the GOAL TYPE. The GOAL TYPE dropdown is dependent upon which category is selected from GOAL CLASSIFICATIONS.
For instance, you will see one set of GOAL TYPE answers by selecting EDUCATION as the GOAL CLASSIFICATION, and another by selecting EMPLOYMENT.
In this example, the CLASSIFICATION has been selected as CASE MANAGEMENT and therefore the TYPE provides the following drop down menu.
Creating a Case Plan: Adding
Classifications & Types
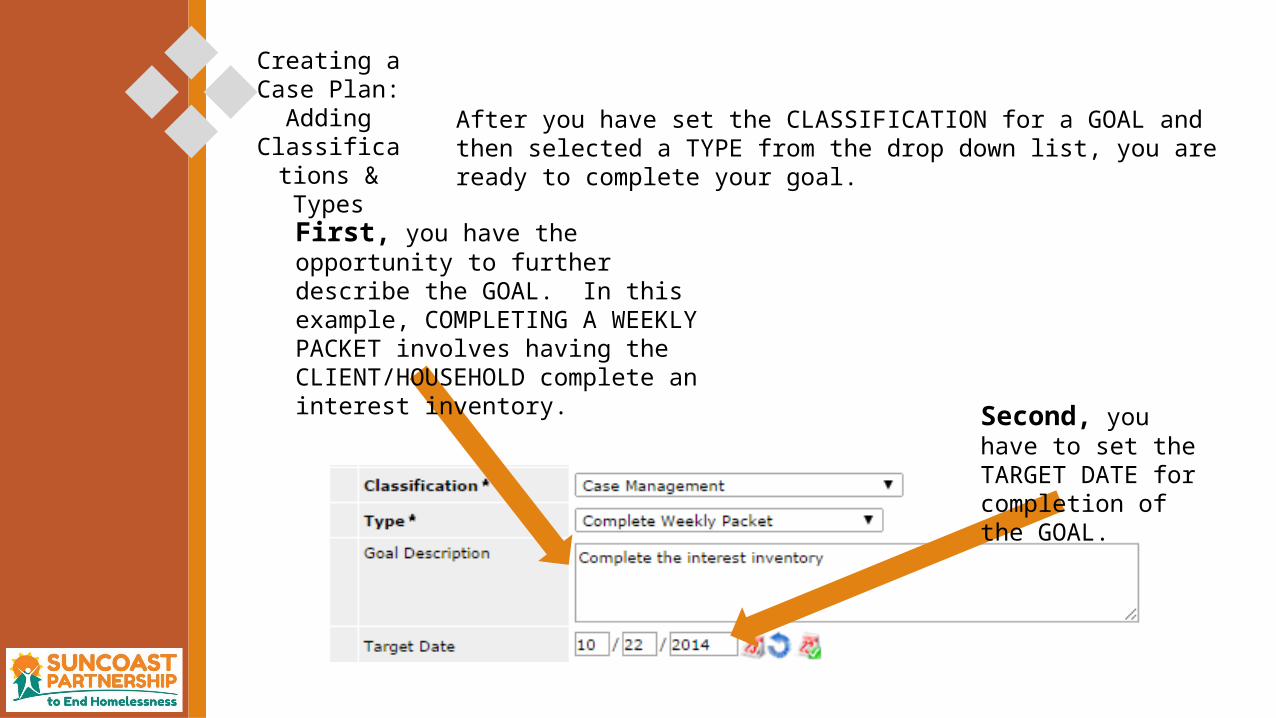
After you have set the CLASSIFICATION for a GOAL and then selected a TYPE from the drop down list, you are ready to complete your goal.
First, you have the opportunity to further describe the GOAL. In this example, COMPLETING A WEEKLY PACKET involves having the CLIENT/HOUSEHOLD complete an interest inventory.
Second, you have to set the TARGET DATE for completion of the GOAL.
Creating a Case Plan: Adding
Classifications & Types

Closed
In order to better track the progress of the overall CASE PLAN, each GOAL has an entry for OVERALL STATUS. There are three choices:
1. Closed – This means that the goal has been completed or the CLIENT/HOUSEHOLD are no longer working toward this GOAL.
2. In Progress – Working toward accomplishment of the GOAL.
3. Identified – The GOAL has been identified, but no progress has been made.
Creating a Case Plan: Tracking the Status of
your Goal
AchievedIf Closed, Outcome
Overall Status
Target Date
If Partial Complete,Percent Complete
-Select- Closed Identified In Progress
Closed

-Select- Abandoned Achieved Goal Revised Not Achieved Partially Achieved
Closed
If the OVERALL STATUS is CLOSED than indicate the OUTCOME for that GOAL.
The choices are ABANDONED, ACHIEVED, GOAL REVISED, NOT ACHIEVED, PARTIALLY ACHIEVED.
For ACHIEVED, make an entry for the date.
Achieved
Achieved
If Closed, Outcome
Overall Status
Target Date
If Partial Complete,Percent Complete
10 25 2014
Creating a Case Plan: Tracking the Status of
your Goal

Closed
If the OUTCOME is other than ACHIEVED, other actions are needed.
1. For PARTIALLY ACHIEVED the Percentage of Completion from 10% through 90% is needed.
2. For PARTIALLY ACHIEVED, ABANDONED, GOAL REVISED and NOT ACHIEVED; add a CASE NOTE to provide more information regarding the GOAL. Entering a CASE NOTE will be reviewed later in this document.
Partially Achieved
50% -Select- Abandoned Achieved Goal Revised Not Achieved Partially AchievedPartially Achieved
If Closed, Outcome
Overall Status
Target Date
If Partial Complete,Percent Complete
Case Notes
Creating a Case Plan: Tracking the Status of
your Goal

Creating a Case Plan: Goal Follow-Up
If needed, a FOLLOW UP DATE can be entered to provide a reminder for the MASTER CASE MANAGER. In order to use this function the information in the FOLLOW UP area needs to be completed, beginning with the PROJECTED FOLLOW UP DATE. The Follow up user should auto-populate with FAMILY HAVEN ALLIANCE MASTER CASE MANAGEMENT and your name.
10 29 2014
Here’s a tip!
For a new GOAL, don’t forget to click on ADD GOAL.

Creating a Case Plan: Entering
a GoalOnce you ADD A GOAL and SAVED the GOAL, this next section is available for the CASE MANAGER. These tools are among the most important within the HMIS CASE PLANS.Here you can:
1. ADD A CASE NOTE2. SPECIFY SPECIFIC STEPS NEEDED TO REACH THE GOAL3. INDICATE THE SERVICES THAT MIGHT BE NEEDED TO REACH THE GOAL.

Creating a Case Plan: Case
Notes
When you click on ADD ACTION STEP, the ACTION STEP dialog box is displayed.
CASE NOTES are an important part of assisting clients in reaching their GOALS.
Because a CASE NOTE is part of the CLIENT RECORD, it should be individualized, objective, factual, supportable and brief.
CASE NOTES help to assure that this important information is available not only for you, but for other PROVIDERS that may be working to provide assistance.
Creating a Case Plan: Case
Notes
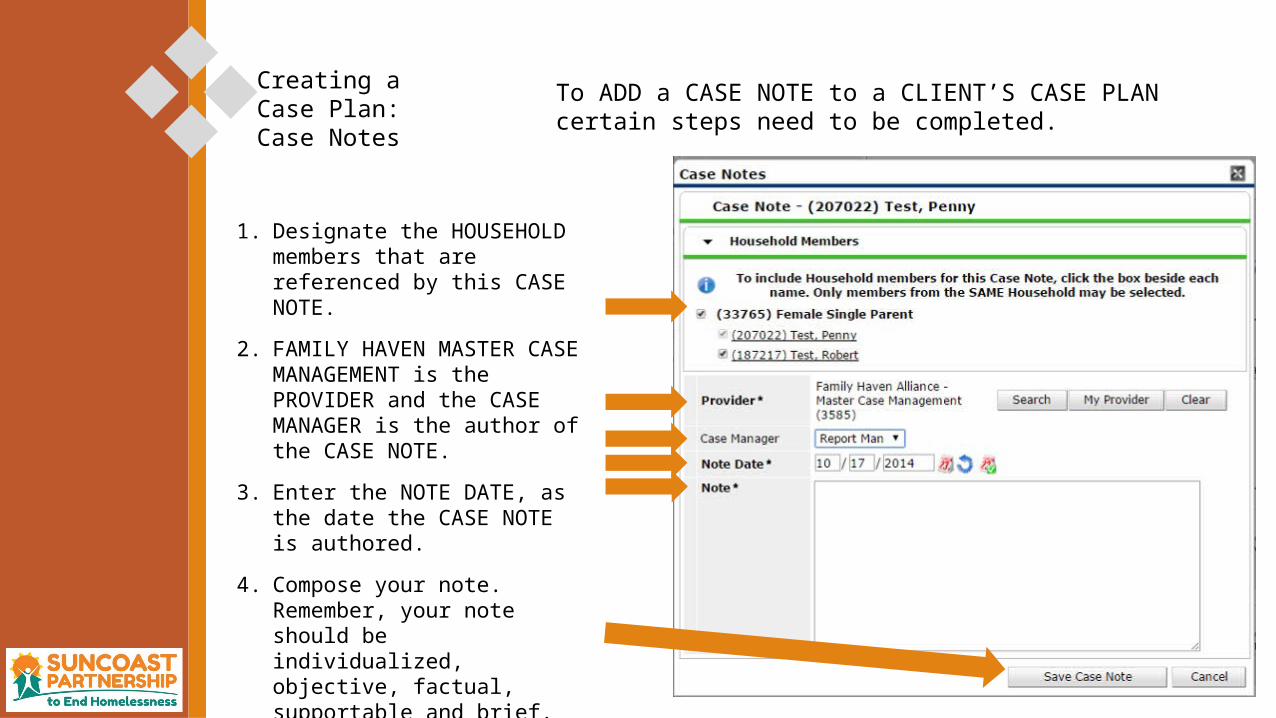
1. Designate the HOUSEHOLD members that are referenced by this CASE NOTE.
2. FAMILY HAVEN MASTER CASE MANAGEMENT is the PROVIDER and the CASE MANAGER is the author of the CASE NOTE.
3. Enter the NOTE DATE, as the date the CASE NOTE is authored.
4. Compose your note. Remember, your note should be individualized, objective, factual, supportable and brief.
5. Make sure you SAVE CASE NOTE.
To ADD a CASE NOTE to a CLIENT’S CASE PLAN certain steps need to be completed.

Creating a Case Plan: Action
Steps
When you click on ADD ACTION STEP, the ACTION STEP dialog box is displayed.
If your stated GOAL CLASSIFICATION is employment and the GOAL TYPE is to gain PART TIME EMPLOYMENT, there are specific ACTION STEPS that willbe needed to reach that GOAL.
When you click on ADD ACTION STEP, the ACTION STEP dialog box displays. Here you can identify, and follow up on each of the ACTION STEPS.

Creating a Case Plan: Action
Steps
1. Designate the HOUSEHOLD members that are referenced by this CASE NOTE.
2. FAMILY HAVEN MASTER CASE MANAGEMENT is the PROVIDER
3. Enter the date the ACTION STEP was set.
4. Describe the ACTION STEP.
5. Set the TARGET DATE for completion of the ACTION STEP.
6. When you first designate an ACTION STEP, the OVERALL STATUS might be either, IDENTIFIED or IN PROGRESS.
7. Don’t forget to SAVE ACTION STEP each time you enter or edit information.
When you designate an ACTION STEP, there are specific steps that needs to be complete.
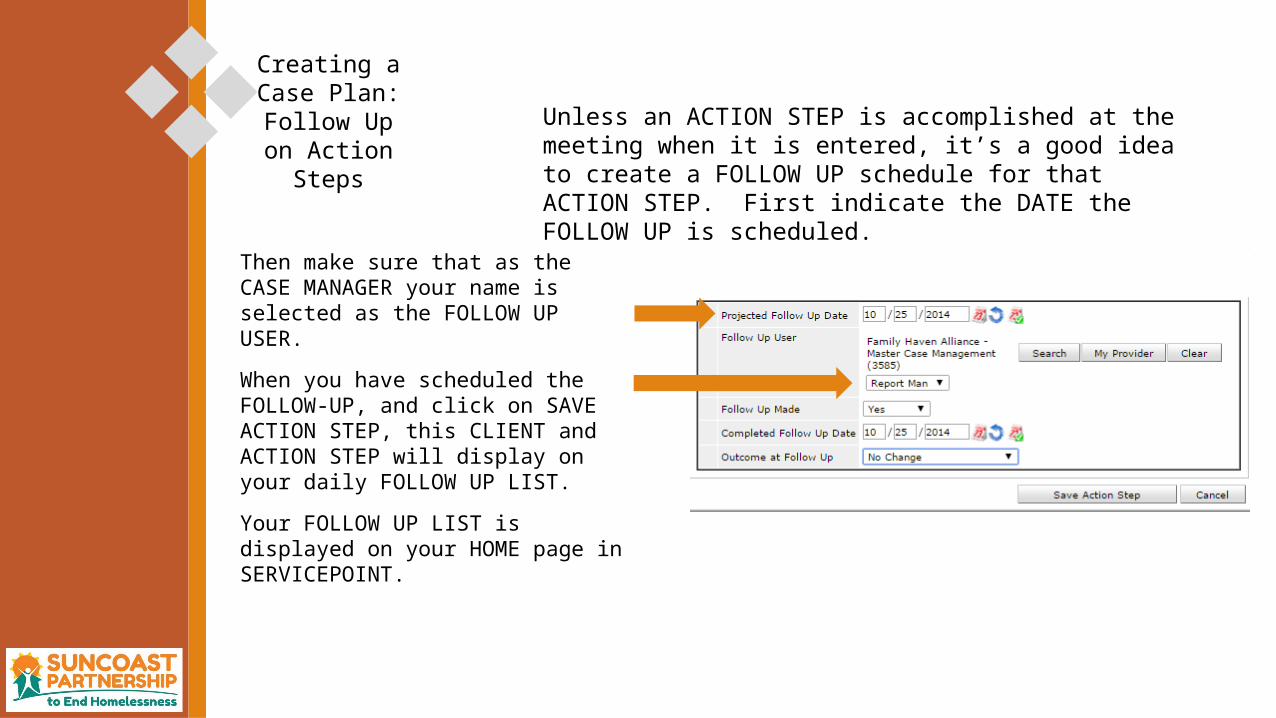
Then make sure that as the CASE MANAGER your name is selected as the FOLLOW UP USER.
When you have scheduled the FOLLOW-UP, and click on SAVE ACTION STEP, this CLIENT and ACTION STEP will display on your daily FOLLOW UP LIST.
Your FOLLOW UP LIST is displayed on your HOME page in SERVICEPOINT.
Unless an ACTION STEP is accomplished at the meeting when it is entered, it’s a good idea to create a FOLLOW UP schedule for that ACTION STEP. First indicate the DATE the FOLLOW UP is scheduled.
Creating a Case Plan: Follow Up on Action Steps

Creating a Case Plan: Follow Up on Action Steps
You have three choices for OUTCOME of FOLLOW UP:• No Change• Was Achieved Now Failed• Was Failed Now Achieved
Don’t forget to SAVE ACTION STEP whenever you enter or edit information.
Finally, as you complete the FOLLOW UP, indicate that the FOLLOW UP was completed, the DATE it was completed and the OUTCOME of the FOLLOW UP.
Creating a Case Plan: Follow Up on Action Steps
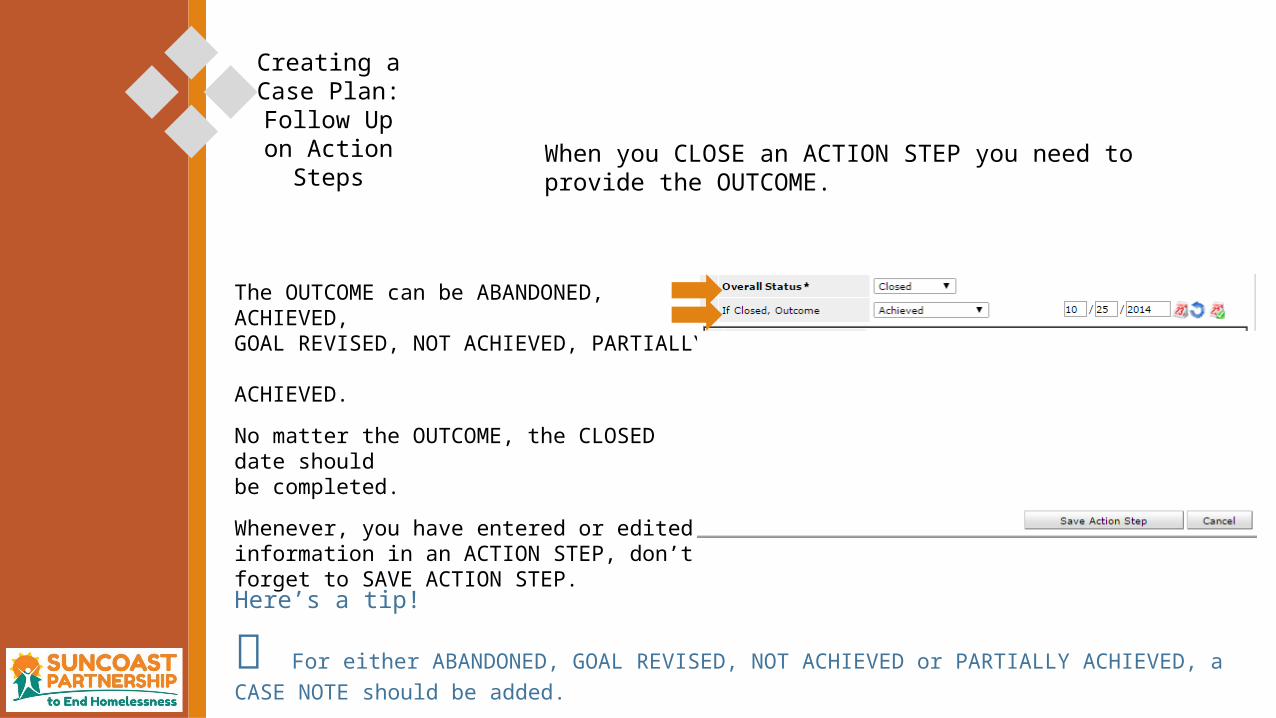
The OUTCOME can be ABANDONED, ACHIEVED, GOAL REVISED, NOT ACHIEVED, PARTIALLY ACHIEVED.
No matter the OUTCOME, the CLOSED date shouldbe completed.
Whenever, you have entered or edited information in an ACTION STEP, don’t forget to SAVE ACTION STEP.
Here’s a tip!
For either ABANDONED, GOAL REVISED, NOT ACHIEVED or PARTIALLY ACHIEVED, a CASE NOTE should be added.
When you CLOSE an ACTION STEP you need to provide the OUTCOME.
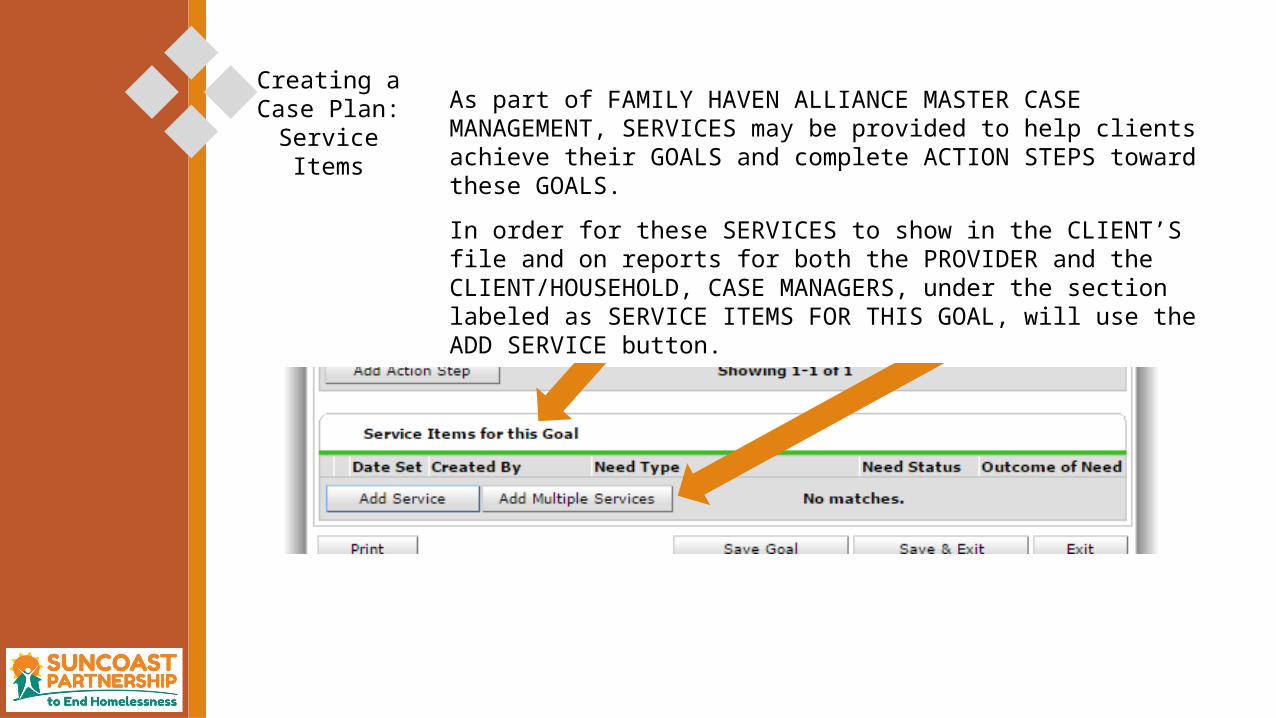
Creating a Case Plan: Service
Items
As part of FAMILY HAVEN ALLIANCE MASTER CASE MANAGEMENT, SERVICES may be provided to help clients achieve their GOALS and complete ACTION STEPS toward these GOALS.
In order for these SERVICES to show in the CLIENT’S file and on reports for both the PROVIDER and the CLIENT/HOUSEHOLD, CASE MANAGERS, under the section labeled as SERVICE ITEMS FOR THIS GOAL, will use the ADD SERVICE button.
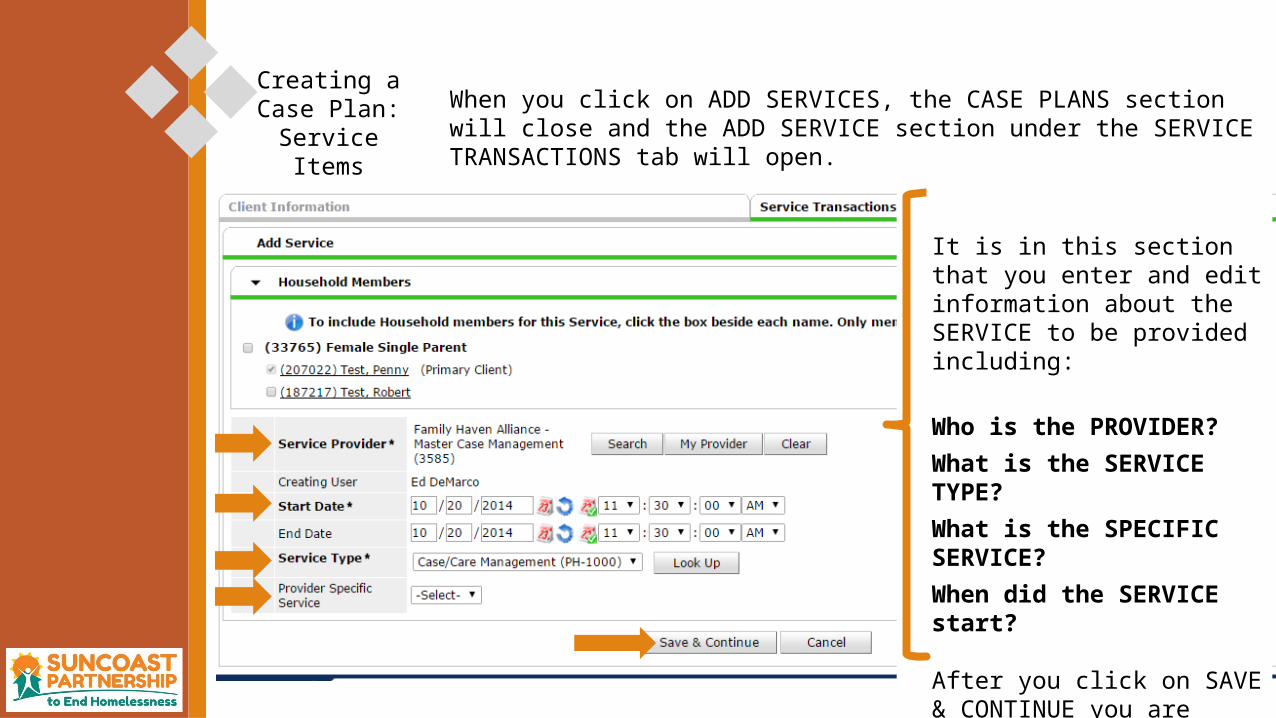
Creating a Case Plan: Service
Items
When you click on ADD SERVICES, the CASE PLANS section will close and the ADD SERVICE section under the SERVICE TRANSACTIONS tab will open.
It is in this section that you enter and edit information about the SERVICE to be provided including:
Who is the PROVIDER?
What is the SERVICE TYPE?
What is the SPECIFIC SERVICE?
When did the SERVICE start?
After you click on SAVE & CONTINUE you are directed to a dialog box for that specific service.

Creating a Case Plan: Service
ItemsAfter you click on SAVE AND CONTINUE, you are directed to the EDIT SERVICE dialog box, where you can add additional information about the service, update and edit service information. Make sure you click save after you are done.
Here’s a tip!
When you describe the SERVICE to be provided you may want to make additional SERVICE NOTES.

Creating a Case Plan: Service
Items
Additionally on the EDIT SERVICE page, you are able to enter SERVICE COSTS, FUNDING SOURCE and any SUPPORT DOCUMENTATION that may be required.
When you ADD FUNDING SOURCE you will see a dialog box that provides a list of FOUNDING SOURCES. You can easily search for your FUNDING SOURCE and then select the appropriate source by clicking on the green plus sign.

Creating a Case Plan: Service
Items
Adding SUPPORT DOCUMENTATION works in much the same way as any attachment to the CLIENT PROFILE or CASE PLAN.
Click on ADD SUPPORT DOCUMENTATION and a dialog box will display.
Click on CHOOSE FILE, select a file from your computer and finally click on UPLOAD.
You can choose to add a DESCRIPTION to the documentation, as well.

Creating a Case Plan: Service
ItemsWhen creating a FOLLOW UP schedule for a SERVICE, indicate the DATE the FOLLOW UP is to be scheduled and who will be managing that FOLLOW-UP. After you have SAVED this information the FOLLOW UP it will appear in your FOLLOW UP LIST.
Here’s a Tip!
Make sure you SAVE each time you enter or edit a SERVICE.
10 25 2014

Creating a Case Plan: Service
Items When a FOLLOW UP is completed, confirm the FOLLOW UP was MADE and then indicate the DATE the FOLLOW UP was completed.

Creating a Case Plan: Service
Items For every SERVICE END DATE, the NEED INFORMATION section must be completed. This information ties into the CASE PLAN and GOALS set. Indicate the OUTCOME OF NEED and IF NEED IS NOT MET provide a reason from the DROP DOWN list. After entering or editing information is the EDIT SERVICE area, SAVE your information.
Here’s a tip!
It is good CASE MANAGEMENT practice to enter a CASE NOTE if the OUTCOME is other than FULLY MET.
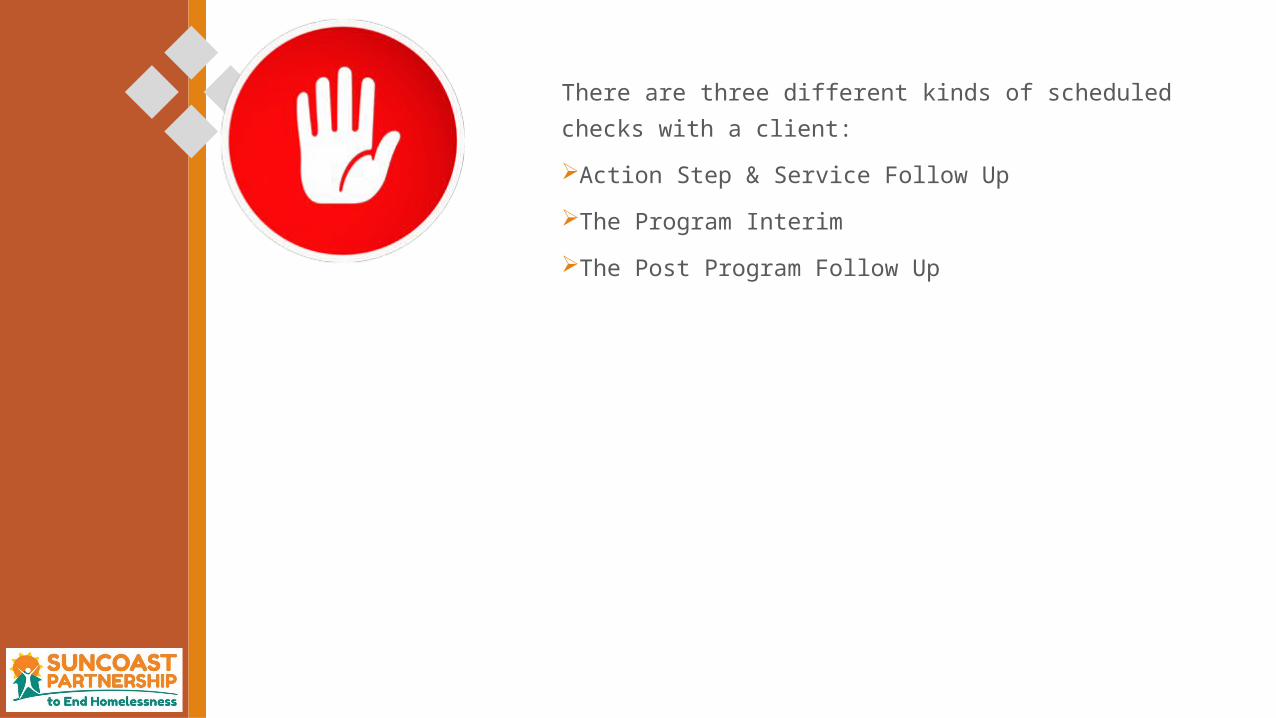
There are three different kinds of scheduled checks with a client:
Action Step & Service Follow Up
The Program Interim
The Post Program Follow Up
Program Entry/Exit
What is the difference between an ACTION STEP or SERVICE follow up and a
PROGRAM exit follow up? Program Entry/Exit

Creating a Case Plan: Case Plan
Attachments
Click on the CASE PLANS tab and you will see CASE PLANS FILE ATTACHMENTS. simply click on ADD NEW FILE ATTACHMENT.
The UPLOAD ATTACHMENT dialog box will be displayed. CHOOSE A FILE from your computer and click on UPLOAD. You can also add a description of the file.
During your CASE MANAGEMENT work with a CLIENT/HOUSEHOLD, You may want to archive, as part of the CASE PLAN, items like completed resumes, sample job applications, VI-F-SPDAT forms, verification information and other written information.

Here’s a tip!
If you are editing or updating information about the GOAL, it is a BEST PRACTICE to save your information after each change, even if you are not ready to leave the GOAL area.
Creating a Case Plan: Savethe Goal When you have added all of the information you need to either create or update
your GOAL, make sure you select SAVE & EXIT.
Creating a Case Plan: Print the
Case Plan
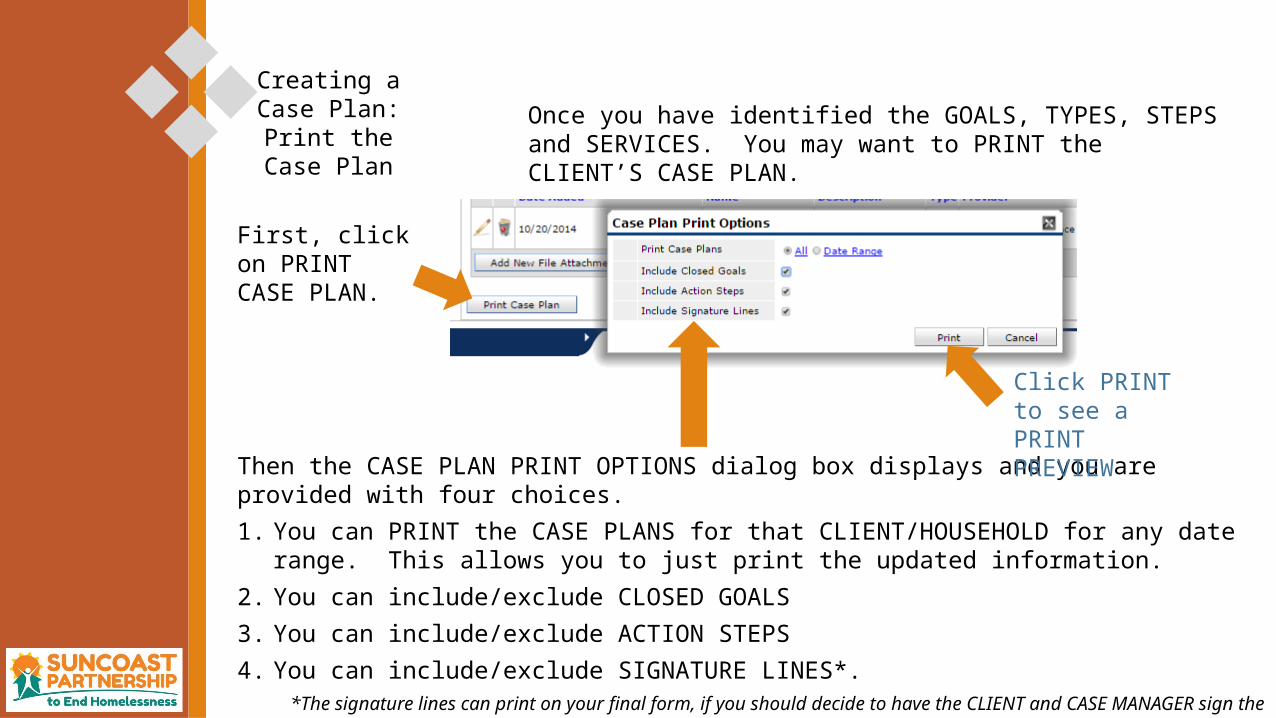
First, click on PRINT CASE PLAN.
Once you have identified the GOALS, TYPES, STEPS and SERVICES. You may want to PRINT the CLIENT’S CASE PLAN.
Then the CASE PLAN PRINT OPTIONS dialog box displays and you are provided with four choices.
1. You can PRINT the CASE PLANS for that CLIENT/HOUSEHOLD for any date range. This allows you to just print the updated information.
2. You can include/exclude CLOSED GOALS
3. You can include/exclude ACTION STEPS
4. You can include/exclude SIGNATURE LINES*. *The signature lines can print on your final form, if you should decide to have the CLIENT and CASE MANAGER sign the document.
Click PRINT to see a PRINT PREVIEW

Creating a Case Plan: Print the
Case Plan
You will first see a preview of the CASE PLAN before you print. The preview will look something like the image below.

Additional Case Management
Tools
However, during CASE MANAGEMENT, additional VI-F-SPDAT measurements may be helpful, you can ADD the other scores.
Toward the bottom of the CLIENT PROFILE page you will see four important areas that may be useful in on-going CASE MANAGEMENT.
The first area is where the original VI-F-SPDAT score is displayed. For the FAMILY HAVEN ALLIANCE project this information should have been completed at INTAKE.
10 / 25 / 2014
15

Additional Case Management
Tools If the CASE MANAGER wants to complete the FULL F-SPDAT on line. This can be done and the information saved through the MEASUREMENTS tab.
Select the MEASUREMENT TOOL.Designate the DATE the measurement was taken.Make sure all of the other information is correct and click CONTINUE.The FULL F-SPDAT is now displayed in a dialog box for you to complete with your CLIENT and score.
Master Case Management

Additional Case Management
Tools
The other three areas that are part of the CLIENT PROFILE that may be important for CASE MANAGEMENT are CLIENT NOTES, FILE ATTACHMENTS and INCIDENTS.
Whereas CASE NOTES may be specific to a GOAL, CLIENT NOTES are more general informational notes. However, it is still important to be factual, objective, individualized and brief.
With FILE ATTACHMENTS, all FILE ATTACHMENTS are visible here and new attachments can be added here. You will notice that the source of the attachment is listed.
Additional Case Management
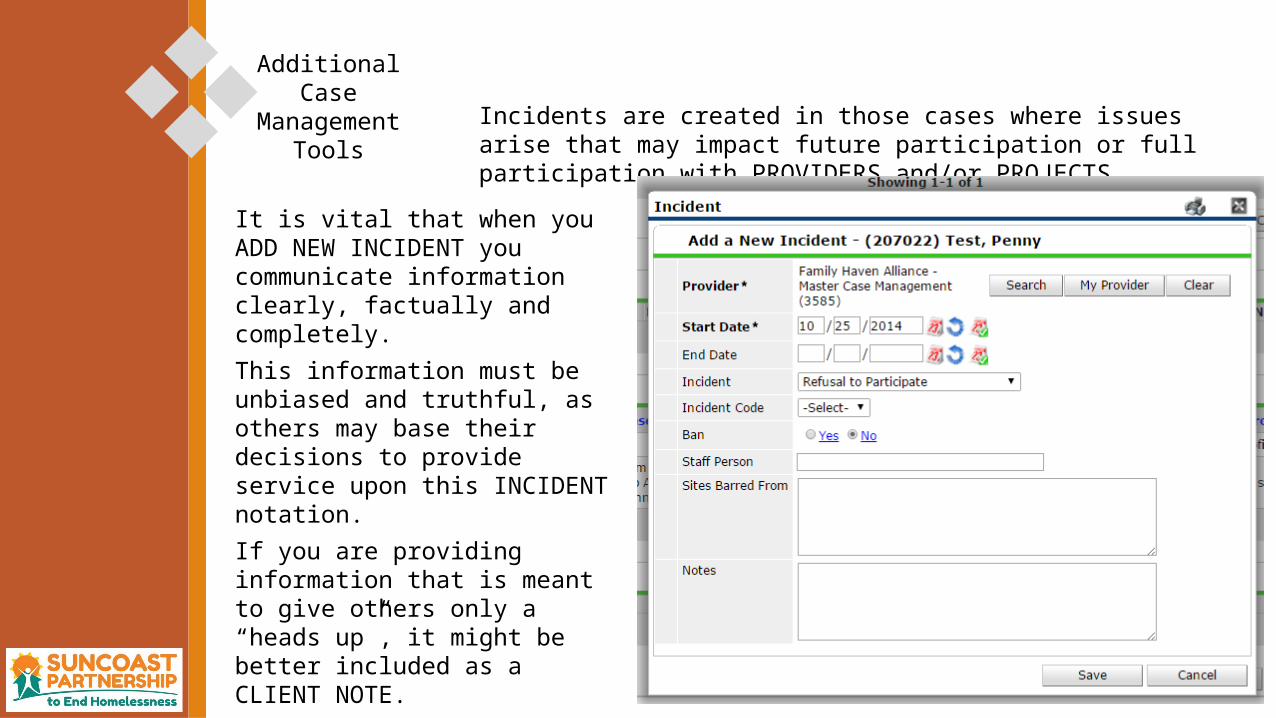
Tools Incidents are created in those cases where issues arise that may impact future participation or full participation with PROVIDERS and/or PROJECTS.
It is vital that when you ADD NEW INCIDENT you communicate information clearly, factually and completely.
This information must be unbiased and truthful, as others may base their decisions to provide service upon this INCIDENT notation.
If you are providing information that is meant to give others only a “heads up”, it might be better included as a CLIENT NOTE.

When a client completes their participation in the Family Haven Alliance
Master Case Management program a PROGRAM exit entry must be made. Program Entry/Exit