Fall 2009 - Bavarian Autosport
7
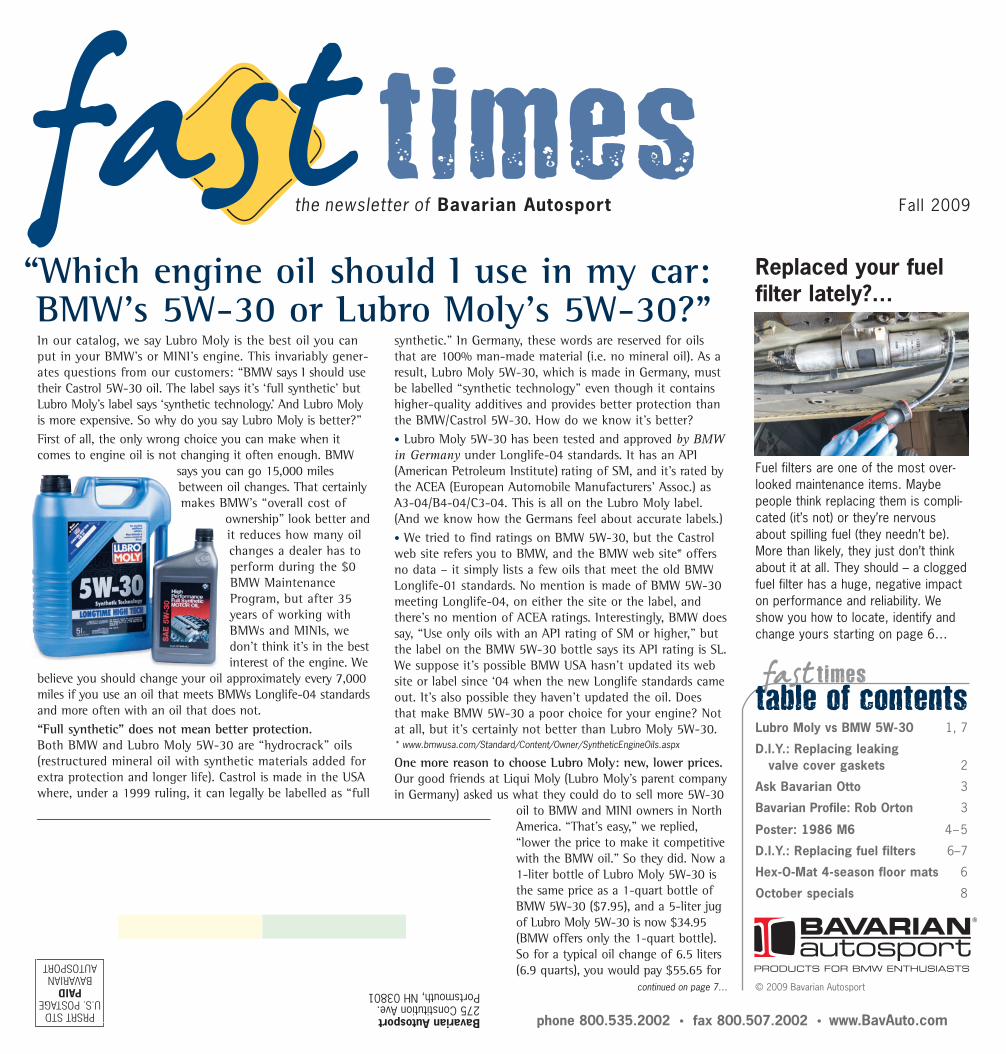
phone 800.535.2002 • fax 800.507.2002 • www.BavAuto.com the newsletter of Bavarian Autosport Fall 2009 Lubro Moly vs BMW 5W-30 1, 7 D.I.Y.: Replacing leaking valve cover gaskets 2 Ask Bavarian Otto 3 Bavarian Profile: Rob Orton 3 Poster: 1986 M6 4–5 D.I.Y.: Replacing fuel filters 6–7 Hex-O-Mat 4-season floor mats 6 October specials 8 times table of contents © 2009 Bavarian Autosport Replaced your fuel filter lately?… Fuel filters are one of the most over- looked maintenance items. Maybe people think replacing them is compli- cated (it’s not) or they’re nervous about spilling fuel (they needn’t be). More than likely, they just don’t think about it at all. They should – a clogged fuel filter has a huge, negative impact on performance and reliability. We show you how to locate, identify and change yours starting on page 6… “Which engine oil should I use in my car: BMW’s 5W-30 or Lubro Moly’s 5W-30?” In our catalog, we say Lubro Moly is the best oil you can put in your BMW’s or MINI’s engine. This invariably gener- ates questions from our customers: “BMW says I should use their Castrol 5W-30 oil. The label says it’s ‘full synthetic’ but Lubro Moly’s label says ‘synthetic technology.’ And Lubro Moly is more expensive. So why do you say Lubro Moly is better?” First of all, the only wrong choice you can make when it comes to engine oil is not changing it often enough. BMW says you can go 15,000 miles between oil changes. That certainly makes BMW’s “overall cost of ownership” look better and it reduces how many oil changes a dealer has to perform during the $0 BMW Maintenance Program, but after 35 years of working with BMWs and MINIs, we don’t think it’s in the best interest of the engine. We believe you should change your oil approximately every 7,000 miles if you use an oil that meets BMWs Longlife-04 standards and more often with an oil that does not. “Full synthetic” does not mean better protection. Both BMW and Lubro Moly 5W-30 are “hydrocrack” oils (restructured mineral oil with synthetic materials added for extra protection and longer life). Castrol is made in the USA where, under a 1999 ruling, it can legally be labelled as “full synthetic." In Germany, these words are reserved for oils that are 100% man-made material (i.e. no mineral oil). As a result, Lubro Moly 5W-30, which is made in Germany, must be labelled “synthetic technology” even though it contains higher-quality additives and provides better protection than the BMW/Castrol 5W-30. How do we know it’s better? • Lubro Moly 5W-30 has been tested and approved by BMW in Germany under Longlife-04 standards. It has an API (American Petroleum Institute) rating of SM, and it’s rated by the ACEA (European Automobile Manufacturers’ Assoc.) as A3-04/B4-04/C3-04. This is all on the Lubro Moly label. (And we know how the Germans feel about accurate labels.) • We tried to find ratings on BMW 5W-30, but the Castrol web site refers you to BMW, and the BMW web site* offers no data – it simply lists a few oils that meet the old BMW Longlife-01 standards. No mention is made of BMW 5W-30 meeting Longlife-04, on either the site or the label, and there’s no mention of ACEA ratings. Interestingly, BMW does say, “Use only oils with an API rating of SM or higher,” but the label on the BMW 5W-30 bottle says its API rating is SL. We suppose it’s possible BMW USA hasn’t updated its web site or label since ‘04 when the new Longlife standards came out. It’s also possible they haven’t updated the oil. Does that make BMW 5W-30 a poor choice for your engine? Not at all, but it’s certainly not better than Lubro Moly 5W-30. * www.bmwusa.com/Standard/Content/Owner/SyntheticEngineOils.aspx One more reason to choose Lubro Moly: new, lower prices. Our good friends at Liqui Moly (Lubro Moly’s parent company in Germany) asked us what they could do to sell more 5W-30 oil to BMW and MINI owners in North America. “That’s easy,” we replied, “lower the price to make it competitive with the BMW oil.” So they did. Now a 1-liter bottle of Lubro Moly 5W-30 is the same price as a 1-quart bottle of BMW 5W-30 ($7.95), and a 5-liter jug of Lubro Moly 5W-30 is now $34.95 (BMW offers only the 1-quart bottle). So for a typical oil change of 6.5 liters (6.9 quarts), you would pay $55.65 for continued on page 7… PRSRT STD U.S. POSTAGE PAID BAVARIAN AUTOSPORT Bavarian Autosport 275 Constitution Ave. Portsmouth, NH 03801
Transcript of Fall 2009 - Bavarian Autosport
phone 800.535.2002 • fax 800.507.2002 • www.BavAuto.com
the newsletter of Bavarian Autosport Fall 2009
Lubro Moly vs BMW 5W-30 1, 7
D.I.Y.: Replacing leakingvalve cover gaskets 2
Ask Bavarian Otto 3
Bavarian Profile: Rob Orton 3
Poster: 1986 M6 4–5
D.I.Y.: Replacing fuel filters 6–7
Hex-O-Mat 4-season floor mats 6
October specials 8
timestable of contents
© 2009 Bavarian Autosport
Replaced your fuelfilter lately?…
Fuel filters are one of the most over-looked maintenance items. Maybepeople think replacing them is compli-cated (it’s not) or they’re nervousabout spilling fuel (they needn’t be).More than likely, they just don’t thinkabout it at all. They should – a cloggedfuel filter has a huge, negative impacton performance and reliability. Weshow you how to locate, identify andchange yours starting on page 6…
“Which engine oil should I use in my car: BMW’s 5W-30 or Lubro Moly’s 5W-30?”In our catalog, we say Lubro Moly is the best oil you canput in your BMW’s or MINI’s engine. This invariably gener-ates questions from our customers: “BMW says I should usetheir Castrol 5W-30 oil. The label says it’s ‘full synthetic’ butLubro Moly’s label says ‘synthetic technology.’ And Lubro Molyis more expensive. So why do you say Lubro Moly is better?” First of all, the only wrong choice you can make when itcomes to engine oil is not changing it often enough. BMW
says you can go 15,000 milesbetween oil changes. That certainlymakes BMW’s “overall cost of
ownership” look better andit reduces how many oilchanges a dealer has toperform during the $0BMW MaintenanceProgram, but after 35years of working withBMWs and MINIs, wedon’t think it’s in the bestinterest of the engine. We
believe you should change your oil approximately every 7,000miles if you use an oil that meets BMWs Longlife-04 standardsand more often with an oil that does not.“Full synthetic” does not mean better protection.Both BMW and Lubro Moly 5W-30 are “hydrocrack” oils(restructured mineral oil with synthetic materials added forextra protection and longer life). Castrol is made in the USAwhere, under a 1999 ruling, it can legally be labelled as “full
synthetic." In Germany, these words are reserved for oils that are 100% man-made material (i.e. no mineral oil). As aresult, Lubro Moly 5W-30, which is made in Germany, mustbe labelled “synthetic technology” even though it containshigher-quality additives and provides better protection thanthe BMW/Castrol 5W-30. How do we know it’s better? • Lubro Moly 5W-30 has been tested and approved by BMWin Germany under Longlife-04 standards. It has an API(American Petroleum Institute) rating of SM, and it’s rated bythe ACEA (European Automobile Manufacturers’ Assoc.) asA3-04/B4-04/C3-04. This is all on the Lubro Moly label.(And we know how the Germans feel about accurate labels.)• We tried to find ratings on BMW 5W-30, but the Castrolweb site refers you to BMW, and the BMW web site* offersno data – it simply lists a few oils that meet the old BMWLonglife-01 standards. No mention is made of BMW 5W-30meeting Longlife-04, on either the site or the label, andthere’s no mention of ACEA ratings. Interestingly, BMW doessay, “Use only oils with an API rating of SM or higher,” butthe label on the BMW 5W-30 bottle says its API rating is SL.We suppose it’s possible BMW USA hasn’t updated its website or label since ‘04 when the new Longlife standards cameout. It’s also possible they haven’t updated the oil. Doesthat make BMW 5W-30 a poor choice for your engine? Notat all, but it’s certainly not better than Lubro Moly 5W-30.* www.bmwusa.com/Standard/Content/Owner/SyntheticEngineOils.aspx
One more reason to choose Lubro Moly: new, lower prices.Our good friends at Liqui Moly (Lubro Moly’s parent companyin Germany) asked us what they could do to sell more 5W-30
oil to BMW and MINI owners in NorthAmerica. “That’s easy,” we replied,“lower the price to make it competitivewith the BMW oil.” So they did. Now a1-liter bottle of Lubro Moly 5W-30 isthe same price as a 1-quart bottle ofBMW 5W-30 ($7.95), and a 5-liter jugof Lubro Moly 5W-30 is now $34.95(BMW offers only the 1-quart bottle).So for a typical oil change of 6.5 liters(6.9 quarts), you would pay $55.65 for
continued on page 7…
PRSRT STD U.S. POSTAGE
PAID BAVARIAN
AUTOSPORT
Bavarian Autosport275 Constitution Ave.Portsmouth, NH 03801
N409FallNwslttr.finalB:N409FallNewsletter 9/4/09 11:24 AM Page 1

2 | shop online www.BavAuto.com Very simple installation. Relatively simple; your BMW may need to be raised.
Replacing a leaking valve cover gasket. or
How easy is this?!do-it-yourself
9. The wiring box sits on top of the fuel injector electrical plugs; the injector harness plugs areassembled as part of the box. In order to remove the box, we must unclip the injector harnessplugs and pull the complete box up andoff of the injectors. Locate the wire clipson each of the injector harness plugs,under the wiring box. Use a pick or smallscrewdriver to pull out (dislocate) oneside of the wire clip on each plug hous-ing (figures 7 & 8). Once all of the clipsare dislodged, we can pull the box upand off of the injectors. Lay the box andwiring over the intake manifold.
Figure 1
Figure 4
Figure 7 Figure 8
Leaking valve cover gaskets are fairly common on BMWs. These leaks can bemore than just a messy inconvenience: a leaking valve cover gasket can cause avacuum leak, which creates problems with the engine management system.Additionally, oil commonly leaks into the spark plug wells causing deterioration ofthe spark plug connector boots and arcing of the ignition spark, which creates ignition miss-fires. (A common cause for a fault code of “random miss-fires” is oil in the spark plug wells.) Replacement of BMW valve cover gaskets can be relativelyquick and easy on most models through the ‘80s and into the early ‘90s. On the 6- and 8-cylinder models from the early ‘90s on, it may require a bit more work but is still not terribly difficult.
The obvious clues to a leaking valve cover gasket are signs of external oil leakageor, in the case of the later 6- and 8-cylinder engines, oil in the spark plug wells,which you may find while performing a spark plug change (see Summer 2007 FastTimes). On the early 4- and 6-cylinder engines (those with distributor caps and reg-ular spark plug ignition wires), you simply remove the nuts securing the valve coverand lift it off. (You may have to first remove the intake air filter or a bracket ortwo.) The later “coil-on-plug” applications (6- and 8-cylinder models from early ‘90s on) require that the coils be removed prior to the valve cover removal. In thisarticle we’re replacing the valve cover gaskets on a V8. (Replacement on the 6-cylinder models is similar, but you have only one valve cover.)
1. If there is a positive jumper terminal on oneof the valve covers, disconnect the negative bat-tery cable at the battery.
2. Remove the center engine trim cover. Pushdown on each of the four button heads and pullup on the cover at each corner (figure 1).
3. Remove the left and right trim covers by pry-ing out the two plugs covering the securing nutson each cover, and then removing the nuts. Pulloff the covers (figure 2).
4. Remove the positive jumper terminal on the driver side valvecover (if installed) and set aside (figure 3).
5. Release the securing clips and pull the harness plugs fromthe ignition coils (figure 4).
6. Remove the two nuts on each coil and pull the coils out. Either mark the coils or lay them out inthe installed order (for reassembly). Note the oil on the connector boots of this engine (figure 5).They should be completely dry. This is why we are replacing the valve cover gaskets.
7. Release the securing clips and remove the cover from the coil and injector wiring box (figure 6).
8. Gently pull the variousharnesses (with the rubbergrommets) out of thecutouts in the wiring box andlet them lie in place. (You willneed to do this for access tothe injector harness plugclips in the next step.) Youdo not need to pull out thecoil plug harnesses.
Figure 5 Figure 6
12. Apply the new gaskets to the valve cover.ONLY use sealant on the cam cutout fillers on the
gasket, as shown (figure 10). We use Permatex UltraRubber Gasket Sealant and
Dressing. (The manuals call for3-Bond 1209 or equivalent.) While
the sealant is curing, remove the sparkplugs and either replace them (if needed) or
clean the oil from them (figure 11). Insert a cleanrag into the spark plug wells (in the cylinder head) and
clean out the accumulated oil. Install the spark plugs.
13. Install the valve cover being careful to properly seat the cam cutout fillers on the cylinderhead cutouts. Once you have the cover seated, feel around the back of the cover and head to verifythat the cutout fillers are seated properly. Install the new rubber seals, bolts and nuts. Torque thefasteners in a spiral or criss-cross pattern, to the value specified in the applicable manual.
14. Finish the installation of all remaining parts. Note that the wire clips on the injector plugs need tobe in the dislodged position in order to fully seat the plugs and the box. Once the plugs and the boxare seated, you can use your pick to re-seat the clips.
10. Remove the nuts/bolts securing the valvecover (here 8 nuts and 3 bolts). Pull the valve coverup and off. It may be necessary to remove the twobolts holding the power steering reservoir and pushit aside. You may also have to gently insert a prytool at the gasket, between the valve cover and thecylinder head, to release the cover (figure 9).
11. Remove old gaskets from the valve cover.Thoroughly clean the cylinder head mating surfacesand valve cover gasket surfaces. (This may requirescraping, especially on the valve cover.) Using aclean rag, finish cleaning with a non-petroleumbased cleaner (e.g. brake parts cleaner).
Figure 11
Figure 10
Sealant
Oil on tip
Figure 2 Figure 3
Sealant
Figure 9
If you have any questions about any part of this procedure, don’t hesitate to give us a call.
Oil on plug
N409FallNwslttr_2-6,8.final:N409FallNewsletter 9/1/09 11:46 PM Page 2
call 800.535.2002 | 3Specific tools needed; repair experience recommended. Experienced technicians only.
I’m shocked! Shocked, I tell you! Dear Bavarian Otto,I have a 2002 530i with 67,000 miles on it. I've noticed that my ride isn't asfirm and controlled as it was when new. My BMW technician doesn't recom-mend changing the shocks unless I have a leak in one of them. I've seen adsin car magazines saying you should change shocks/struts at 50,000 miles.Should I wait until a leak shows up to change them? How do the Sachsshocks you sell compare to the OEM shocks? RayOtto replies:By the time a shock starts leaking, it is well past its service life and haslikely been in a degraded state for quite a while. So even though yourshocks are not leaking, they are undoubtedly softer than when the vehiclewas new. We recommend replacing shocks between 50,000-75,000 miles.Do you “have to” replace them now? Not necessarily, but if you do you willcertainly notice that the sporty side of your 530i has returned with gusto.As for how the Sachs shocks compare to OEM, don’t forget – for 30+ yearsSachs has been an OEM supplier to BMW. As a result, you won’t find anyappreciable difference in the performance – both brands will restore that“like new” handling that you’re missing, and both offer excellent warranties(Sachs’ is a limited lifetime warranty) so both will last for 50,000–75,000miles. But there is one huge difference: Sachs shocks will cost you a lotless – you can buy front and rear Sachs for your 530i for less than theBMW front shocks alone… and still have money left over!
How many BMW owners does it take to change a light bulb? Dear Bavarian Otto,I have a 2002 325i with standard halogen lighting. How do I safely changethe bulb? Are any special tools needed?TomOtto replies:Both the high beam and the low beam bulbs are removed by grasping therear of the bulb socket and twisting counter-clockwise about a quarter turn.Carefully pull the bulb-socket assembly from the light housing. Disconnectthe vehicle wiring harness plug from the bulb socket assembly. You can nowsafely remove and replace the bulb. Note: on the driver's side, removing theair filter box assembly will give you easier access to the bulbs. These proce-dures are outlined in detail in the Bentley repair manual for your 325i(#B305). If you want better illumination, you can upgrade the stock bulb tohigh performance bulbs such as Hella. They are direct swaps for the stockbulbs – no modification is necessary.
I need a break from brake dust. Dear Bavarian Otto,I’m on my second BMW and I’m obsessed with having a clean car. Is thereanything I can do to minimize the brake dust? I have to wipe the rims downevery day, and I don’t have that kind of time. I clean my car once a week,but the wheels need too much maintenance. Can you help me out?KathyOtto replies:We have various options for you in relation to your brake dust woes. KleenWheels are vented discs that mount behind your wheels and effectively keepthe brake dust away from the outer surface of the wheels. They work quitewell and are fine to use in all but high-performance or heavy mountaindriving. Cool Carbon S/T is a premium pad that has been designed andmanufactured specifically for BMWs. It is a long-life pad that generates farless dust that original BMW pads. It also greatly improves your brakingfeel and performance. (See the unsolicited testimonial below.) Finally, youshould be using the BMW-approved P21S wheel cleaner, followed by anapplication of Wheel Wax, which will help keep the brake dust from stick-ing to the wheels. Do all this and you’ll clean your wheels much less often.
May 6, 2009To whom it may concern:Just installed your Cool Carbon S/T pads with new stock rotors on my wife's ‘02 330xi… WOW!! I bedded-in the pads per instructions… simply amazing! Over the years, I've performed over 500+ brake jobs, stock and performance, and tried lots of pads… so far I am very impressed with yours. Now if you only made some for my ‘08 F150 truck, I'd be a happy camper. (After the Bimmer experience with your pads, I really feel like Fred Flintstone in the truck.)… Thanks! Chuck
call 800.535.2002 | 3
from our tech teamask “bavarian otto”
Over 200 years of BMW experience is justa phone call or e–mail away.If you add up all the years the enthusiasts atBavarian Autosport have been working onBMWs and MINIs – and helping people like youwork on theirs – it totals well over 200 years.
That’s a lot of knowledge under one roof. And it’sall yours for the asking. Have a question? Ask that
savvy, BMW and MINI enthusiast, “Bavarian Otto” –just call 800.535.2002 or e-mail [email protected].
Rob OrtonAfter working in our warehouse as a temporaryemployee, Rob joined us full time in 1998, risingquickly through the ranks to become WarehouseManager after 18 months. As the warehouse man-ager, Rob has ultimate responsibility for receiving,stocking, picking, packing and shipping of thou-sands of BMW and MINI parts every week. (Quite a change for a guy who used to “roll” in a late-70s,purple Lincoln.) It is because of Rob’s operational
skills and the kick-asphalt warehouse team he has assembled that we are ableto offer you same-day shipping on most orders, and to ship nearly 90% of allyour orders “complete” with no backordered parts. (To Rob, backorder is afour-letter word.) His day usually starts before 8 AM and often doesn’t end untilafter 6 PM, when the last UPS truck pulls away from our loading docks,(except on Saturdays, when we close the doors at 4 PM). When he’s not mov-ing the merchandise in the Bavarian warehouse, Rob (or Rob-O, or RoBo, or…well, we can’t print any of the others) likes to “relax” by playing goalie in adultice hockey leagues, competing in video games, visiting the casinos in LasVegas or Foxwoods, or cheering intensely (as if he could do it any other way)for the Boston Bruins and New England Patriots. As you might imagine, hedoes partake of a little caffeine from time to time. (“Sleep? What’s that?”)
Bavaria
n P
rofi
le
N409FallNwslttr_2-6,8.final:N409FallNewsletter 9/1/09 11:46 PM Page 3

800.535.2002 • www.BavAuto.com800.535.2002 • www.BavAuto.com
N409FallNwslttr_2-6,8.final:N409FallNewsletter 9/4/09 12:53 PM Page 4
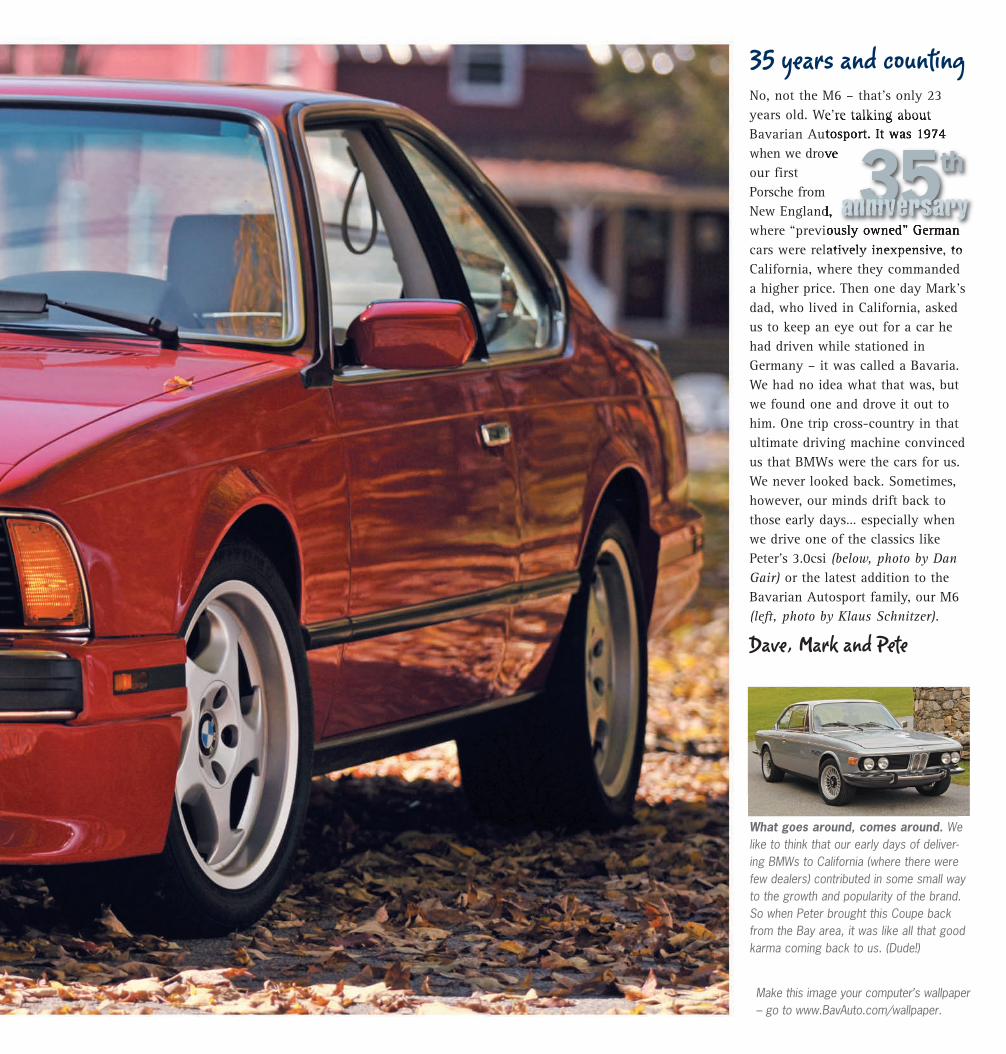
Make this image your computer’s wallpaper– go to www.BavAuto.com/wallpaper.
35 years and countingNo, not the M6 – that’s only 23years old. We’re talking aboutBavarian Autosport. It was 1974when we droveour firstPorsche fromNew England,where “previously owned” Germancars were relatively inexpensive, toCalifornia, where they commandeda higher price. Then one day Mark’sdad, who lived in California, askedus to keep an eye out for a car hehad driven while stationed inGermany – it was called a Bavaria.We had no idea what that was, butwe found one and drove it out tohim. One trip cross-country in thatultimate driving machine convincedus that BMWs were the cars for us.We never looked back. Sometimes,however, our minds drift back tothose early days… especially whenwe drive one of the classics likePeter’s 3.0csi (below, photo by DanGair) or the latest addition to theBavarian Autosport family, our M6(left, photo by Klaus Schnitzer).
anniversary
What goes around, comes around. Welike to think that our early days of deliver-ing BMWs to California (where there werefew dealers) contributed in some small wayto the growth and popularity of the brand.So when Peter brought this Coupe backfrom the Bay area, it was like all that goodkarma coming back to us. (Dude!)
Dave, Mark and Pete
N409FallNwslttr_2-6,8.final:N409FallNewsletter 9/4/09 12:54 PM Page 5
6 | shop online www.BavAuto.com Very simple installation. Relatively simple; your BMW may need to be raised.
How easy is this?!do-it-yourselfReplacing your fuel filter. or
2
3 1
5
6
4
Driver’s side
Engine Transmission
Passenger’s side
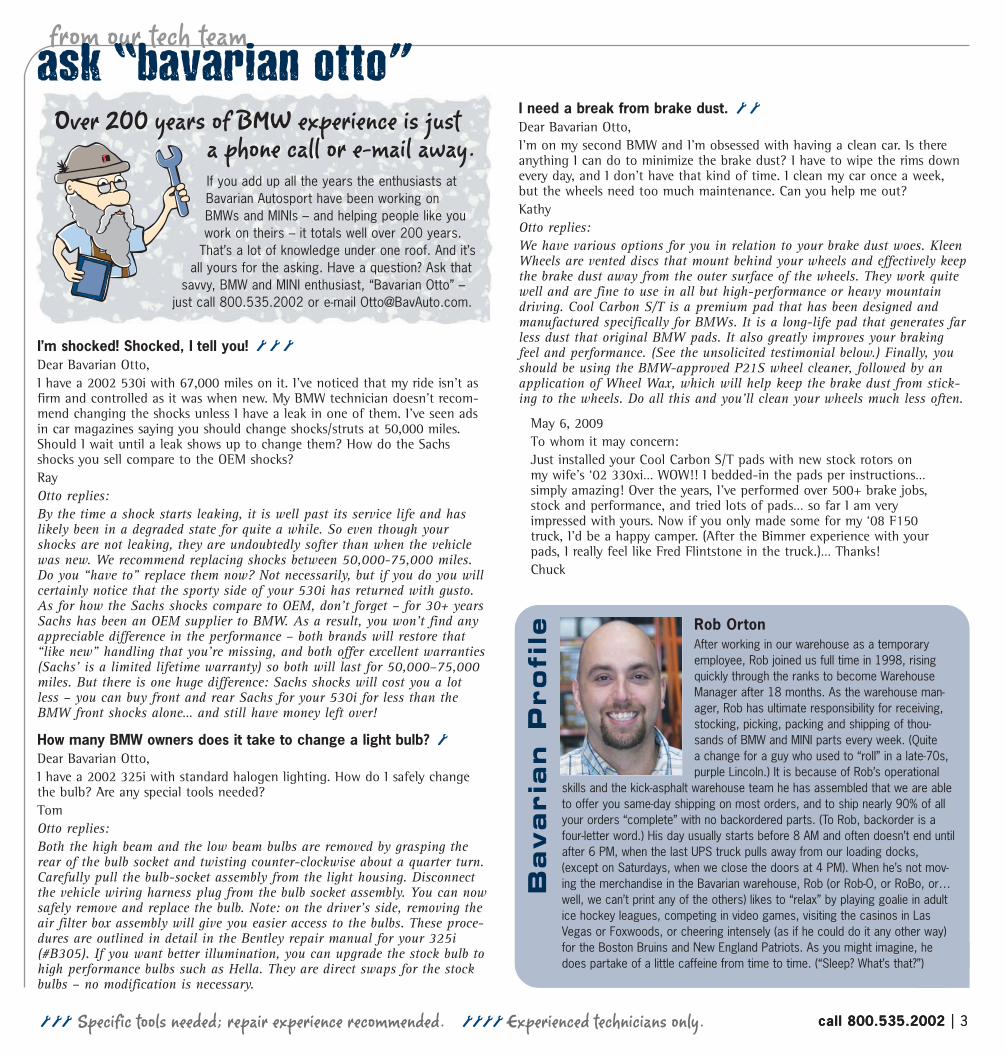
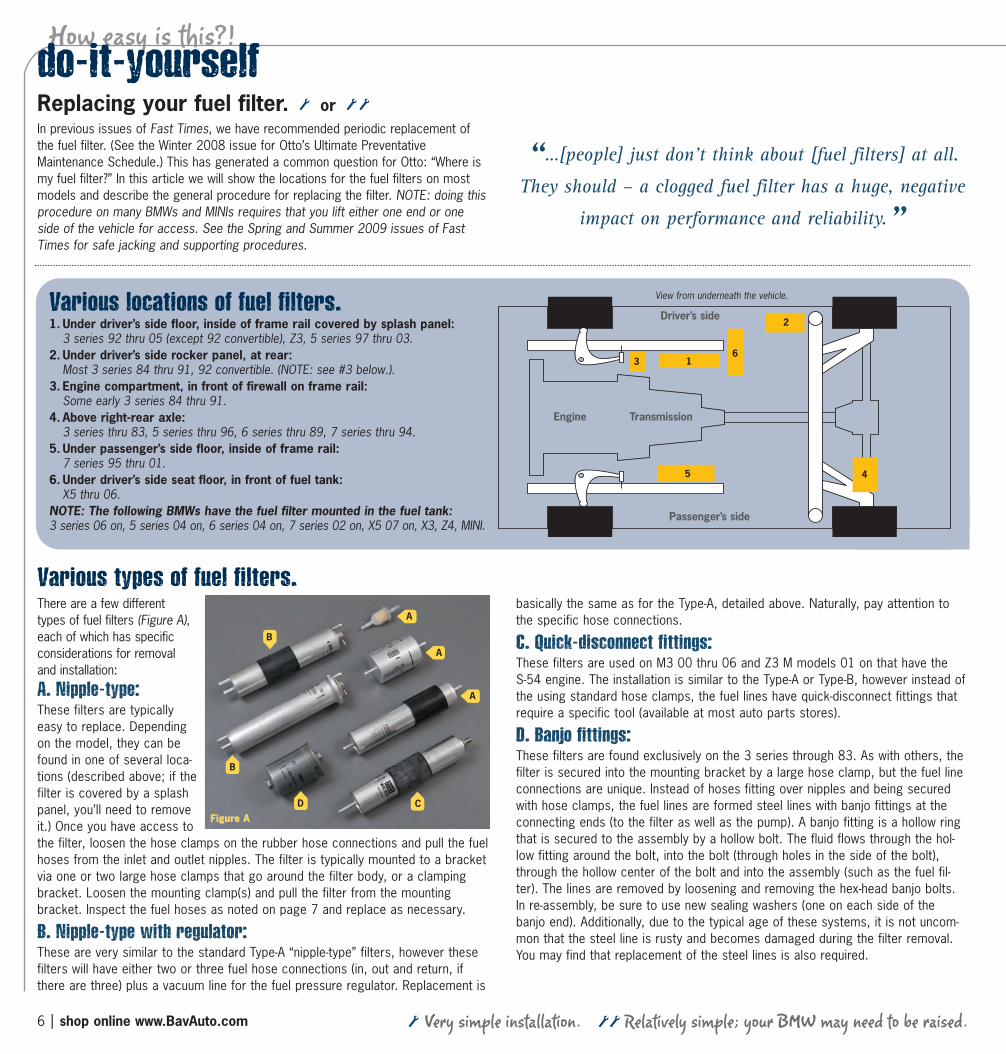
In previous issues of Fast Times, we have recommended periodic replacement ofthe fuel filter. (See the Winter 2008 issue for Otto’s Ultimate PreventativeMaintenance Schedule.) This has generated a common question for Otto: “Where ismy fuel filter?” In this article we will show the locations for the fuel filters on mostmodels and describe the general procedure for replacing the filter. NOTE: doing thisprocedure on many BMWs and MINIs requires that you lift either one end or oneside of the vehicle for access. See the Spring and Summer 2009 issues of FastTimes for safe jacking and supporting procedures.
Various locations of fuel filters.1. Under driver’s side floor, inside of frame rail covered by splash panel:
3 series 92 thru 05 (except 92 convertible), Z3, 5 series 97 thru 03.2. Under driver’s side rocker panel, at rear:
Most 3 series 84 thru 91, 92 convertible. (NOTE: see #3 below.).3. Engine compartment, in front of firewall on frame rail:
Some early 3 series 84 thru 91.4. Above right-rear axle:
3 series thru 83, 5 series thru 96, 6 series thru 89, 7 series thru 94.5. Under passenger’s side floor, inside of frame rail:
7 series 95 thru 01.6. Under driver’s side seat floor, in front of fuel tank:
X5 thru 06.NOTE: The following BMWs have the fuel filter mounted in the fuel tank:3 series 06 on, 5 series 04 on, 6 series 04 on, 7 series 02 on, X5 07 on, X3, Z4, MINI.
There are a few differenttypes of fuel filters (Figure A),each of which has specificconsiderations for removaland installation:
A. Nipple-type:These filters are typicallyeasy to replace. Dependingon the model, they can befound in one of several loca-tions (described above; if thefilter is covered by a splashpanel, you’ll need to removeit.) Once you have access tothe filter, loosen the hose clamps on the rubber hose connections and pull the fuelhoses from the inlet and outlet nipples. The filter is typically mounted to a bracketvia one or two large hose clamps that go around the filter body, or a clampingbracket. Loosen the mounting clamp(s) and pull the filter from the mounting bracket. Inspect the fuel hoses as noted on page 7 and replace as necessary.
B. Nipple-type with regulator:These are very similar to the standard Type-A “nipple-type” filters, however thesefilters will have either two or three fuel hose connections (in, out and return, ifthere are three) plus a vacuum line for the fuel pressure regulator. Replacement is
“…[people] just don’t think about [fuel filters] at all.
They should – a clogged fuel filter has a huge, negative
impact on performance and reliability.”
basically the same as for the Type-A, detailed above. Naturally, pay attention tothe specific hose connections.
C. Quick-disconnect fittings:These filters are used on M3 00 thru 06 and Z3 M models 01 on that have the S-54 engine. The installation is similar to the Type-A or Type-B, however instead ofthe using standard hose clamps, the fuel lines have quick-disconnect fittings thatrequire a specific tool (available at most auto parts stores).
D. Banjo fittings:These filters are found exclusively on the 3 series through 83. As with others, thefilter is secured into the mounting bracket by a large hose clamp, but the fuel lineconnections are unique. Instead of hoses fitting over nipples and being securedwith hose clamps, the fuel lines are formed steel lines with banjo fittings at theconnecting ends (to the filter as well as the pump). A banjo fitting is a hollow ringthat is secured to the assembly by a hollow bolt. The fluid flows through the hol-low fitting around the bolt, into the bolt (through holes in the side of the bolt),through the hollow center of the bolt and into the assembly (such as the fuel fil-ter). The lines are removed by loosening and removing the hex-head banjo bolts.In re-assembly, be sure to use new sealing washers (one on each side of thebanjo end). Additionally, due to the typical age of these systems, it is not uncom-mon that the steel line is rusty and becomes damaged during the filter removal.You may find that replacement of the steel lines is also required.
A
A
CD
B
B
Figure AFigure A
A
Various types of fuel filters.
View from underneath the vehicle.
N409FallNwslttr_2-6,8.final:N409FallNewsletter 9/2/09 12:39 AM Page 6
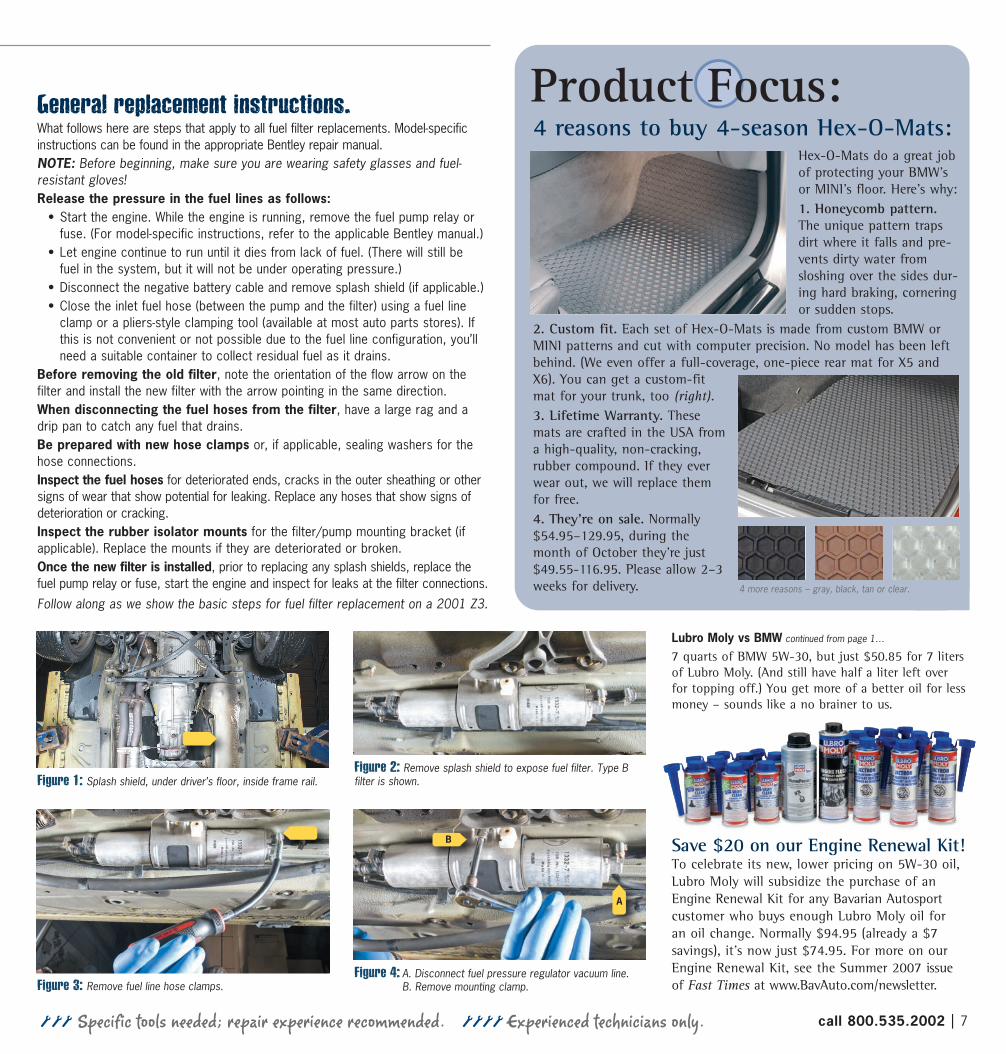
Figure 3: Remove fuel line hose clamps.
Figure 2: Remove splash shield to expose fuel filter. Type B filter is shown.Figure 1: Splash shield, under driver’s floor, inside frame rail.
call 800.535.2002 | 7Specific tools needed; repair experience recommended. Experienced technicians only.
General replacement instructions.What follows here are steps that apply to all fuel filter replacements. Model-specificinstructions can be found in the appropriate Bentley repair manual. NOTE: Before beginning, make sure you are wearing safety glasses and fuel-resistant gloves!Release the pressure in the fuel lines as follows:
• Start the engine. While the engine is running, remove the fuel pump relay or fuse. (For model-specific instructions, refer to the applicable Bentley manual.)
• Let engine continue to run until it dies from lack of fuel. (There will still be fuel in the system, but it will not be under operating pressure.)
• Disconnect the negative battery cable and remove splash shield (if applicable.)• Close the inlet fuel hose (between the pump and the filter) using a fuel line
clamp or a pliers-style clamping tool (available at most auto parts stores). If this is not convenient or not possible due to the fuel line configuration, you’ll need a suitable container to collect residual fuel as it drains.
Before removing the old filter, note the orientation of the flow arrow on the filter and install the new filter with the arrow pointing in the same direction.When disconnecting the fuel hoses from the filter, have a large rag and adrip pan to catch any fuel that drains.Be prepared with new hose clamps or, if applicable, sealing washers for thehose connections.Inspect the fuel hoses for deteriorated ends, cracks in the outer sheathing or othersigns of wear that show potential for leaking. Replace any hoses that show signs ofdeterioration or cracking.Inspect the rubber isolator mounts for the filter/pump mounting bracket (ifapplicable). Replace the mounts if they are deteriorated or broken.Once the new filter is installed, prior to replacing any splash shields, replace thefuel pump relay or fuse, start the engine and inspect for leaks at the filter connections.
Follow along as we show the basic steps for fuel filter replacement on a 2001 Z3.
4 reasons to buy 4-season Hex-O-Mats:Hex-O-Mats do a great jobof protecting your BMW’sor MINI’s floor. Here’s why: 1. Honeycomb pattern.The unique pattern trapsdirt where it falls and pre-vents dirty water fromsloshing over the sides dur-ing hard braking, corneringor sudden stops.
2. Custom fit. Each set of Hex-O-Mats is made from custom BMW orMINI patterns and cut with computer precision. No model has been leftbehind. (We even offer a full-coverage, one-piece rear mat for X5 andX6). You can get a custom-fitmat for your trunk, too (right). 3. Lifetime Warranty. Thesemats are crafted in the USA froma high-quality, non-cracking,rubber compound. If they everwear out, we will replace themfor free. 4. They’re on sale. Normally$54.95–129.95, during themonth of October they’re just$49.55-116.95. Please allow 2–3weeks for delivery. 4 more reasons – gray, black, tan or clear.
Figure 4: A. Disconnect fuel pressure regulator vacuum line. B. Remove mounting clamp.
A
B Save $20 on our Engine Renewal Kit!To celebrate its new, lower pricing on 5W-30 oil,Lubro Moly will subsidize the purchase of anEngine Renewal Kit for any Bavarian Autosportcustomer who buys enough Lubro Moly oil for an oil change. Normally $94.95 (already a $7 savings), it’s now just $74.95. For more on ourEngine Renewal Kit, see the Summer 2007 issueof Fast Times at www.BavAuto.com/newsletter.
Lubro Moly vs BMW continued from page 1…
7 quarts of BMW 5W-30, but just $50.85 for 7 liters of Lubro Moly. (And still have half a liter left over for topping off.) You get more of a better oil for lessmoney – sounds like a no brainer to us.
N409FallNwslttr1,7.final:N409FallNewsletter 9/2/09 1:09 AM Page 7