
FACULTY PROCESS - Cuyahoga Community College...Urgency Breakdown - Displays a comparison of...
9
Transcript of FACULTY PROCESS - Cuyahoga Community College...Urgency Breakdown - Displays a comparison of...

PAGE 1
• An exam must be added to the ProctorU system before an instructor’s test-takers can schedule an exam with ProctorU.
• An administrator or instructor may create an exam using their ProctorU account. Faculty needing an account may contact a ProctorU representative to set up an account.
• After logging into their account, faculty can create an exam using the following process:
• In the top right of the home page, clicking the Add New button (Figure 1) will open a drop down menu.
• Selecting Exam will open the exam details screen (Figure 2).
FIGURE 2
Faculty experience
FIGURE 1

PAGE 1
After completing an exam form, the instructor receives an email notification that the exam has been sent for review.
ProctorU’s assessment services team reviews the exam information and enters it into the system. The instructor is notified via email when the exam has been activated.
Exam details and accuracy can be reviewed within the ProctorU administrative account. Details can be changed until 24 hours before the exam start time. Within this time period, a ProctorU representative must be contacted to change exam parameters.
After activation, test-takers may begin scheduling appointments. The administrative account also provides access to records of proctored exams.
PAGE 2
Adding an exam
An instructor may use the check boxes to specify allowed materials and resources, and a dialogue box is provided for resources not listed.
Exam availability is also be added on this page. Clicking Add Window opens a prompt where the instructor can specify the start and end dates and times that an exam is available on ProctorU. Multiple exam windows may be added for a recurring exam (Figure 3).
FIGURE 3
Instructors can specify the following exam details:
• Exam title
• Department
• Term
• Instructor
• Duration of exam
• Exam URL (location)
• Exam password
• Permitted resources
• Permitted browsers
• Other allowed resources
• Expected no. of test-takers
• Additional exam notes
and accommodations
• Notify on schedule emails
• Point of contact for exam
To help expedite proctoring for test-takers, when detailing the Exam Title field the instructor should also use the course/class code or number in addition to the name of the actual exam (e.g., STA 101 - Statistics Final Exam). This helps the test-taker confirm their class and exam during the appointment start up process.
PAGE 3
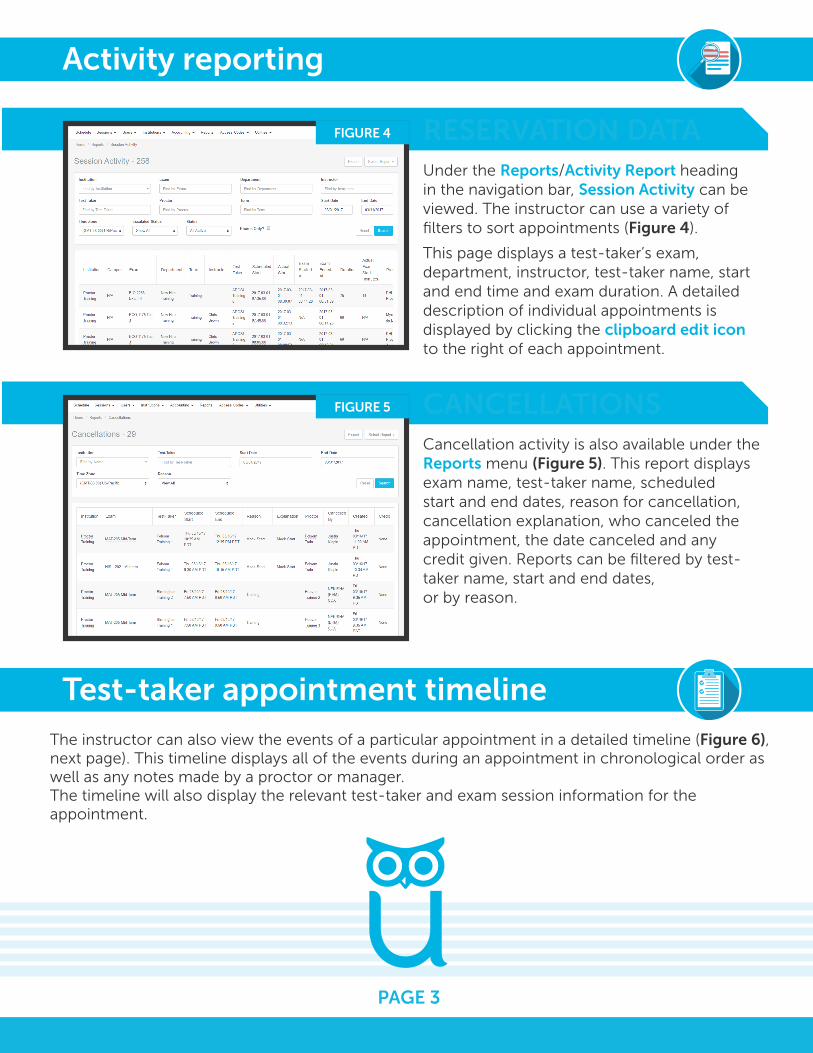
CANCELLATIONSFIGURE 5
Cancellation activity is also available under the Reports menu (Figure 5). This report displays exam name, test-taker name, scheduled start and end dates, reason for cancellation, cancellation explanation, who canceled the appointment, the date canceled and any credit given. Reports can be filtered by test-taker name, start and end dates, or by reason.
RESERVATION DATAFIGURE 4
Under the Reports/Activity Report heading in the navigation bar, Session Activity can be viewed. The instructor can use a variety of filters to sort appointments (Figure 4).
This page displays a test-taker’s exam, department, instructor, test-taker name, start and end time and exam duration. A detailed description of individual appointments is displayed by clicking the clipboard edit icon to the right of each appointment.
Activity reporting
The instructor can also view the events of a particular appointment in a detailed timeline (Figure 6), next page). This timeline displays all of the events during an appointment in chronological order as well as any notes made by a proctor or manager. The timeline will also display the relevant test-taker and exam session information for the appointment.
Test-taker appointment timeline

2
3
4
5
6 7
8
1
PAGE 4
• MEDIA-PLAYBACK - You can watch a live stream of a test-taker if they are still in an exam. If a session is already complete, you can watch a recording of the session. The yellow dots on the playback of the video will pinpoint an alert that was detected by our system.
• ALERT - Under the “Activity” tab, you can see information about a session in more detail.
• NAVIGATION BAR - Shows the institution and exam for the selected appointment.
• USER - Shows the user for the selected appointment including their contact information.
• SESSION - Shows information for the selected appointment including exam start and end times, fulfillment status and contact information.
• AUTHENTICATION METHODS - Displays pass/fail for authentication checks for appointments using Ucard authentication only. Otherwise, this field displays “No authentications for this test-taker.”
• EXAM - Shows exam notes for this appointment. Proctors view these same notes.
• COMMENTS - A counter shows if there are any active comments on timeline events from proctors or management.
• INCIDENTS - All suspicious events flagged by our system will be indicated as “Incidents.
1
2
3
4
5
6
7
8
9
Incident
Test-taker appointment timeline
FIGURE 6
PAGE 3
Activity reporting
Test-taker appointment timeline

PAGE 5
EXAM GENERALUnder the “Exam General” tab, you can see information about a session in more detail. A playback icon will be next to each incident. You can click the icon to go directly to review the event in the video recording.
PRE-CHECKSThe “Pre-checks” tab will show you everything that happened with a test-taker prior to the start of an exam. Each event also has a playback icon to take you to review that specific part of the video recording.
TEST-TAKER BROWSERThe “Browser” section will show each tab a test-taker opened during an exam. It will also show what the test-taker tried to copy and paste during that exam. Lastly, it will show the location of the test-taker based on their IP address.

• Student name
• Session data - Includes the institution, instructor name, exam name, appointment date, incident date and proctor name.
• Incident Type(s) - Displays the urgency level and category of the incident.
• Details - A summary of what happened and actions taken during the incident.
• Chat Log - The chat record between ProctorU and the test-taker. Important sections may be highlighted if the entire chat log is shown.
• Events - A timeline of events during the exam session shown chronologically from newest to oldest. Important sections and incident are highlighted in red, yellow and/or green.
a
b
c
d
e
f
PAGE 6PAGE 5
Incident reporting
Clicking View Incident Report from the email displays the relevant session data collected by ProctorU’s incident report team (Figure 8).
Suspicious activity is collected and sent to the institution in the form of an Incident Report, which documents a potential breach of academic integrity.
A link to the incident report is sent via email to the instructor associated with the course and exam (Figure 7).
FIGURE 7
a
b
c
d
e
f
FIGURE 8
Incident reports can also be viewed in ProctorU’s Incident Report Center (IRC). After logging in, the instructor mouses over Sessions in the navigation bar and selects Incident Center (Figure 9).
FIGURE 9

PAGE 7
Incident reporting
In the IRC, the instructor can view all incidents associated with their exam iterations (Figure 10).
Incidents can also be filtered by department, exam name, test-taker name, start and end dates and urgency level.
Clicking View next to an incident report opens its full details as seen on page two of this document.
FIGURE 10
An instructor can also view a statistical breakdown for the incidents associated with their exams (Figure 11).
Chart Mode displays the following:
Key Stats - Shows percentages for:
• Exams fulfilled vs. sessions
scheduled
• Incidents vs. sessions scheduled
• Processed incidents vs. total
incidents
Urgency Breakdown - Displays a comparison of incidents by amount per urgency level.
Priority Breakdown - Displays a comparison of incidents by amount for each specific incident case.
FIGURE 11
All incidents are flagged with an urgency level and color (Figure 12). An incident report may have multiple flags.
FIGURE 12

PAGE 7 PAGE 8
Incident reporting
FIGURE 13Red is high urgency.
Yellow is medium urgency.
Green is low urgency.
Each level is assigned specific incident events (Figure 13).
When a report is filed, each incident is assigned to one of the urgency levels so the general severity of the incident can be easily assessed.
LiveChat at www.ProctorU.com or email [email protected].