FABRIC ACTIVITY BOOK (Q ) M : G - The Church of Jesus ... ACTIVITY BOOK (Q ) Fabric activity books...
11
FABRIC ACTIVITY BOOK (Quiet book) Fabric activity books are intended to help develop fine motor skills but should still be fun and look very professional. As these may be sent all around the world, they should not contain words. Let's give these children our very best. QUALITY IS MORE IMPORTANT THAN QUANTITY. Materials needed: Various fabric for details, pages should be of a thick durable fabric such as denim, sturdy broadcloth, etc. Thread, yarn, zippers, buttons, embellishments Grommet and metal rings for binding (optional) Guidelines Should include 10 different fabric pages of different activities such as braiding, buttons and zippers, weaving, telling time, counting, textures, lacing, etc. No words or letters No religious symbols, flags or military themes No fabric with raw edges (except fake fur,felt or vinyl), all pages and details should be finished with seams/hems Binding may be done by sewing pages together (shown below) or with Grommet/rings All details should be securely attached Be creative! Above are common dimensions for a finished 8 1/2” x 11” book. Place the activities facing out. Any sewing should be done at this point, so the construc- tion of the activities will go through only one page layer. 18” 23” 18” 11 1/2” Open for turning Sewing pages together These dimensions work well for the patterns given here, but are not required dimensional. fold sewing line for binding Fold the 23” wide side in half to 11 1/2”. The activities are inside. Sew around the outer edge using a 1/4” wide seam allowance. Leave an area open that is large enough to turn the unit right side out. Press the edges so they are straight and well defined. Make two of these four page units Make a two page unit that measures 12”1/2 x 18 1/2”. To make optional handles, cut two 3” x 20” strips and sew them right sides together lengthwise, turning them right side out so they are nicely finished. Baste the handles so they will be in the position as shown above. Cut fabric for the cover that also measures 12 1/2” x 18” 1/2. Sew the two-page unit and cover fabric right sides together. Leave an area open and turn the unit right side out. Press the edges and close the opening. Stack all the units so the centers are aligned and sew the center lines for make the binding. The cover will be slightly larger.
Transcript of FABRIC ACTIVITY BOOK (Q ) M : G - The Church of Jesus ... ACTIVITY BOOK (Q ) Fabric activity books...

FABRIC ACTIVITY BOOK
(Quiet book)
Fabric activity books are intended to help develop fine motor skills but should still be fun and look very
professional. As these may be sent all around the world, they should not contain words. Let's give these
children our very best. QUALITY IS MORE IMPORTANT THAN QUANTITY.
Materials needed: Various fabric for details, pages should be of a thick durable fabric such as denim, sturdy broadcloth, etc.
Thread, yarn, zippers, buttons, embellishments
Grommet and metal rings for binding (optional)
GuidelinesShould include 10 different fabric pages of different activities such as braiding, buttons and zippers, weaving, telling
time, counting, textures, lacing, etc.
No words or letters
No religious symbols, flags or military themes
No fabric with raw edges (except fake fur,felt or vinyl), all pages and details should be finished with seams/hems
Binding may be done by sewing pages together (shown below) or with Grommet/rings
All details should be securely attached
Be creative!
Above are common dimensions for a
finished 8 1/2” x 11” book. Place the
activities facing out. Any sewing should
be done at this point, so the construc-
tion of the activities will go through
only one page layer.
18”
23”
18”
11 1
/2”
Open f
or
turn
ing
Sewing pages togetherThese dimensions work well for
the patterns given here, but are
not required dimensional.
fold sew
ing lin
e f
or
bin
din
g
Fold the 23” wide side in half to 11
1/2”. The activities are inside. Sew
around the outer edge using a 1/4”
wide seam allowance. Leave an area
open that is large enough to turn the
unit right side out. Press the edges so
they are straight and well defined.
Make two of these four page units
Make a two page unit that measures
12”1/2 x 18 1/2”. To make optional handles,
cut two 3” x 20” strips and sew them right
sides together lengthwise, turning them
right side out so they are nicely finished.
Baste the handles so they will be in the
position as shown above. Cut fabric for the
cover that also measures 12 1/2” x 18” 1/2.
Sew the two-page unit and cover fabric right
sides together. Leave an area open and
turn the unit right side out. Press the edges
and close the opening. Stack all the units so
the centers are aligned and sew the center
lines for make the binding. The cover will be
slightly larger.
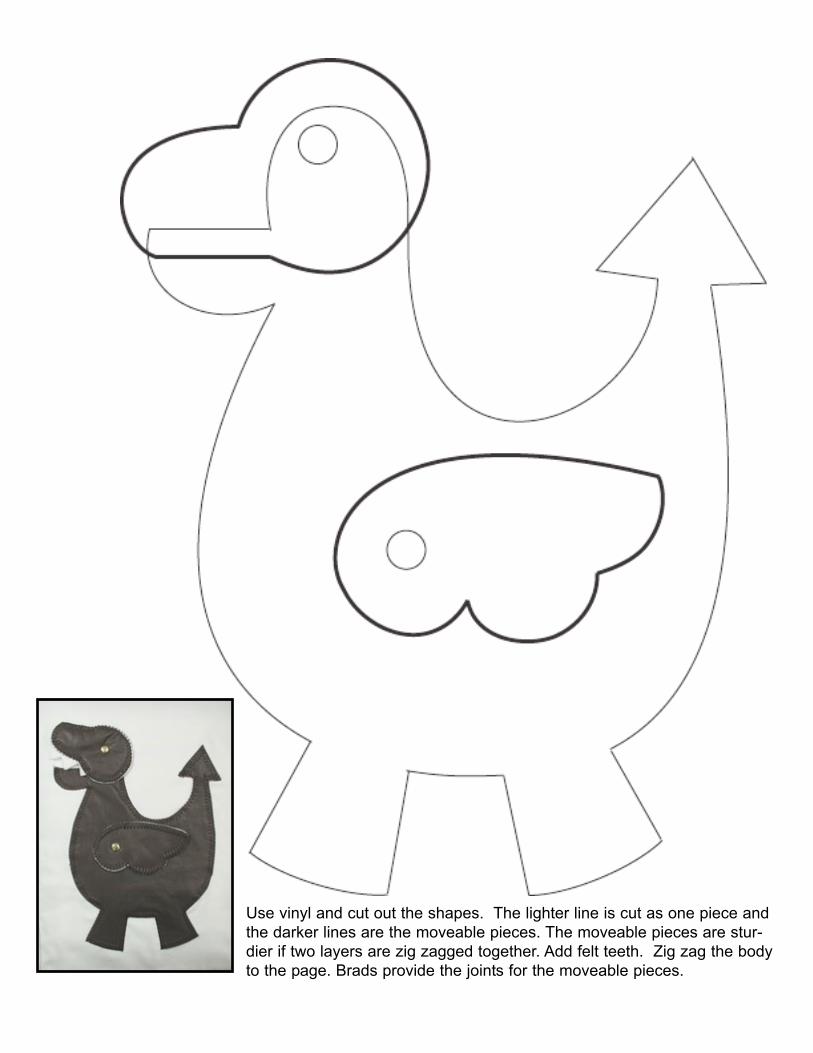
Use vinyl and cut out the shapes. The lighter line is cut as one piece and
the darker lines are the moveable pieces. The moveable pieces are stur-
dier if two layers are zig zagged together. Add felt teeth. Zig zag the body
to the page. Brads provide the joints for the moveable pieces.

The shoe is cut from vinyl. You may use one layer for the sole or two to make a
contrasting color for the rim of the sole. Cut the lacing flaps separate and add
grommets for the holes for the laces. Put them in place and zig zag around the
outside edges to attach to the page. Add a lace and tie.

To make the fish bowl, sew two pieces of fabric together to make the water and
gravel. Cut it to the shape of the fish bowl. Zig zag across the top so it is
attached to the page. Fold a piece of clear vinyl and place the fold across the
top. Zig zag around the bowl, leaving the top open. Trim the vinyl to the round-
ed part of the bowl, leaving the top open and reinforced by the fold. Make the
fish by cutting the main body from two pieces of felt(heavy line). Insert a mag-
net and zig zag around the fish catching the fins and pinchers between the two
layers. Tie a washer to string and a dowel for the fishing pole. Make a pocket to
keep the parts.

Use 1” strips of vinyl stitched on
two basket sides to allow for
weaving. Felt is used for the
flowers. Whip stitch the leaves
to the back of the flowers and
add button holes and buttons to
attach the flowers to the page.

The Tent is cut from vinyl. Cut out the cen-
ter rectangle and add a zipper. Zig zag the
lines of the Tent, leaving the flaps so they
open.Cut the Indian out of felt and glue it
inside the door. Instead of the indian, fab-
ric with interesting pictures may be added
under the tent.
zip
per

The road is black vinyl, cut and zig zagged to the page. Trace the tree and color
them with fabric markers and paints. The car is held by a pocket that is 3 1/2” x 3”.
Fold one 3” side, sew half way down. Spread the lower half and sew three sides to
the page for a garage.

The face(heavy line) works well
in felt or fleece. Zig zag around
the shape of the face, lightly stuff
and close the back of the head.
Use fake fur with long fibers for
the hair and zig zag it into place.
Blush the cheeks and add a but-
ton for the eye. The comb will
need a loop or pocket to hold it
in place.
Comb

The purse is made with a double layer of felt. Cut the center rectangle out and add a zipper.
Zig zag the moveable flap. Zig zag the lower part of the purse to the page. Straight stitch
across the base of the flap. Add a snap for a closure.

The mittens are cut
from a soft fake fur.
Zig zag around the
shaped edge, leav-
ing the straight
edge open.

Each side of the dress was made by placing two pieces
of fabric right sides together. Sew around the outside
shape, leaving a small area for turning right side out.
Once it is turned, press the shape so it is well defined.
Close the opening that was left for turning right side out.
Sew button holes on one side and buttons onto the other
side. Sew the dress sides, sleeve and shoulders to the
page, leaving the center open for button practice.