F700GS - BMW Apparel · PDF fileF700GS BMW Motorrad The Ultimate ... 6 Abbreviationsand...
164
Rider's Manual (US Model) F 700 GS BMW Motorrad The Ultimate Riding Machine
Transcript of F700GS - BMW Apparel · PDF fileF700GS BMW Motorrad The Ultimate ... 6 Abbreviationsand...
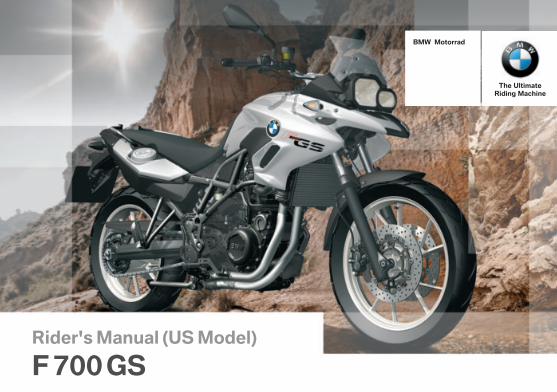
Rider's Manual (US Model)
F 700 GS
BMW Motorrad
The UltimateRiding Machine
Motorcycle/Dealer Data
Motorcycle data
Model
Vehicle identification number
Color number
Initial registration
License plate
Dealer Data
Contact in Service
Ms./Mr
Phone number
Dealer's address/phone number (companystamp)
Welcome to BMW
We congratulate you on yourchoice of a motorcycle fromBMW and welcome you to thecommunity of BMW riders.Familiarize yourself with your newmotorcycle so that you can ride itsafely and confidently in all high-way traffic situations.Please read this Rider's Manualcarefully before starting to useyour new BMW motorcycle. Itcontains important information onhow to operate the controls andhow to make the best possibleuse of all your BMW's technicalfeatures.In addition, it contains informa-tion on maintenance and care tohelp you maintain your vehicle'sreliability and safety, as well as itsvalue.If you have any questions con-cerning your motorcycle, your au-thorized BMW Motorrad retailer
is always happy to provide adviceand assistance.
We wish you many miles of safeand enjoyable riding
BMW Motorrad.
01 41 8 550 297
*01418550297**01418550297**01418550297*
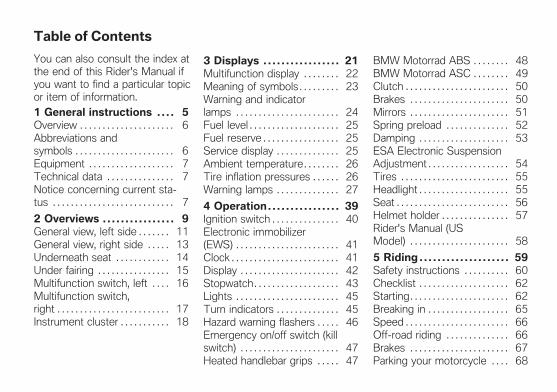
Table of Contents
You can also consult the index atthe end of this Rider's Manual ifyou want to find a particular topicor item of information.
1 General instructions . . . . 5Overview . . . . . . . . . . . . . . . . . . . . . 6Abbreviations andsymbols . . . . . . . . . . . . . . . . . . . . . . 6Equipment . . . . . . . . . . . . . . . . . . . 7Technical data . . . . . . . . . . . . . . . 7Notice concerning current sta-tus . . . . . . . . . . . . . . . . . . . . . . . . . . . 7
2 Overviews . . . . . . . . . . . . . . . . 9General view, left side . . . . . . . 11General view, right side . . . . . 13Underneath seat . . . . . . . . . . . . 14Under fairing . . . . . . . . . . . . . . . . 15Multifunction switch, left . . . . 16Multifunction switch,right . . . . . . . . . . . . . . . . . . . . . . . . . 17Instrument cluster . . . . . . . . . . . 18
3 Displays . . . . . . . . . . . . . . . . . 21Multifunction display . . . . . . . . 22Meaning of symbols . . . . . . . . . 23Warning and indicatorlamps . . . . . . . . . . . . . . . . . . . . . . . 24Fuel level . . . . . . . . . . . . . . . . . . . . 25Fuel reserve . . . . . . . . . . . . . . . . . 25Service display . . . . . . . . . . . . . . 25Ambient temperature. . . . . . . . 26Tire inflation pressures . . . . . . 26Warning lamps . . . . . . . . . . . . . . 27
4 Operation. . . . . . . . . . . . . . . . 39Ignition switch . . . . . . . . . . . . . . . 40Electronic immobilizer(EWS) . . . . . . . . . . . . . . . . . . . . . . . 41Clock . . . . . . . . . . . . . . . . . . . . . . . . 41Display . . . . . . . . . . . . . . . . . . . . . . 42Stopwatch. . . . . . . . . . . . . . . . . . . 43Lights . . . . . . . . . . . . . . . . . . . . . . . 45Turn indicators . . . . . . . . . . . . . . 45Hazard warning flashers . . . . . 46Emergency on/off switch (killswitch) . . . . . . . . . . . . . . . . . . . . . . 47Heated handlebar grips . . . . . 47
BMW Motorrad ABS . . . . . . . . 48BMW Motorrad ASC . . . . . . . . 49Clutch . . . . . . . . . . . . . . . . . . . . . . . 50Brakes . . . . . . . . . . . . . . . . . . . . . . 50Mirrors . . . . . . . . . . . . . . . . . . . . . . 51Spring preload . . . . . . . . . . . . . . 52Damping . . . . . . . . . . . . . . . . . . . . 53ESA Electronic SuspensionAdjustment . . . . . . . . . . . . . . . . . . 54Tires . . . . . . . . . . . . . . . . . . . . . . . . 55Headlight . . . . . . . . . . . . . . . . . . . . 55Seat . . . . . . . . . . . . . . . . . . . . . . . . . 56Helmet holder . . . . . . . . . . . . . . . 57Rider's Manual (USModel) . . . . . . . . . . . . . . . . . . . . . . 58
5 Riding . . . . . . . . . . . . . . . . . . . . 59Safety instructions . . . . . . . . . . 60Checklist . . . . . . . . . . . . . . . . . . . . 62Starting. . . . . . . . . . . . . . . . . . . . . . 62Breaking in . . . . . . . . . . . . . . . . . . 65Speed . . . . . . . . . . . . . . . . . . . . . . . 66Off-road riding . . . . . . . . . . . . . . 66Brakes . . . . . . . . . . . . . . . . . . . . . . 67Parking your motorcycle . . . . 68

Refueling . . . . . . . . . . . . . . . . . . . . 69Securing motorcycle fortransport . . . . . . . . . . . . . . . . . . . . 71
6 Technology indetail . . . . . . . . . . . . . . . . . . . . . 73
Brake system withBMW Motorrad ABS . . . . . . . . 74Engine management withBMW Motorrad ASC . . . . . . . . 75Tire Pressure Control TCP/RDC. . . . . . . . . . . . . . . . . . . . . . . . . 77
7 Accessories . . . . . . . . . . . . . 79General instructions . . . . . . . . . 80Onboard power sockets . . . . . 80Luggage . . . . . . . . . . . . . . . . . . . . 81Case . . . . . . . . . . . . . . . . . . . . . . . . 81Topcase. . . . . . . . . . . . . . . . . . . . . 84
8 Maintenance . . . . . . . . . . . . 89General instructions . . . . . . . . . 90Onboard tool kit . . . . . . . . . . . . . 90Engine oil . . . . . . . . . . . . . . . . . . . 91Brake system . . . . . . . . . . . . . . . 93Coolant . . . . . . . . . . . . . . . . . . . . . . 96Clutch . . . . . . . . . . . . . . . . . . . . . . . 97Wheel rims and tires . . . . . . . . 98
Chain . . . . . . . . . . . . . . . . . . . . . . . . 99Wheels . . . . . . . . . . . . . . . . . . . . 100Front wheel stand . . . . . . . . . 107Lamps. . . . . . . . . . . . . . . . . . . . . 108Fairings and Panels . . . . . . . 114Air cleaner . . . . . . . . . . . . . . . . . 115Jump-starting . . . . . . . . . . . . . 116Battery . . . . . . . . . . . . . . . . . . . . 117
9 Care . . . . . . . . . . . . . . . . . . . . 121Care products . . . . . . . . . . . . . 122Washing your vehicle . . . . . . 122Cleaning sensitive vehicleparts . . . . . . . . . . . . . . . . . . . . . . 122Paint care . . . . . . . . . . . . . . . . . 123Protective wax coating . . . . 124Storing motorcycle . . . . . . . . 124Returning motorcycle touse . . . . . . . . . . . . . . . . . . . . . . . . 124
10 Technical data . . . . . . 125Troubleshooting chart . . . . . 126Threaded fasteners . . . . . . . 127Engine . . . . . . . . . . . . . . . . . . . . 129Fuel . . . . . . . . . . . . . . . . . . . . . . . 130Engine oil . . . . . . . . . . . . . . . . . 131Clutch . . . . . . . . . . . . . . . . . . . . . 131
Transmission . . . . . . . . . . . . . . 132Rear-wheel drive . . . . . . . . . . 132Suspension . . . . . . . . . . . . . . . 133Brakes . . . . . . . . . . . . . . . . . . . . 134Wheels and tires . . . . . . . . . . 134Electrical system . . . . . . . . . . 136Frame . . . . . . . . . . . . . . . . . . . . . 137Dimensions . . . . . . . . . . . . . . . 137Weights . . . . . . . . . . . . . . . . . . . 139Performance data . . . . . . . . . 139
11 Service . . . . . . . . . . . . . . . 141Reporting safetydefects . . . . . . . . . . . . . . . . . . . . 142BMW Motorrad Service . . . 143BMW Motorrad MobilityServices . . . . . . . . . . . . . . . . . . . 143Maintenance proce-dures . . . . . . . . . . . . . . . . . . . . . . 143Confirmation of mainte-nance work . . . . . . . . . . . . . . . . 145Confirmation of service . . . . 150
12 Appendix. . . . . . . . . . . . . 153Certificate . . . . . . . . . . . . . . . . . 154
13 Index . . . . . . . . . . . . . . . . . 155

General instructions
Overview . . . . . . . . . . . . . . . . . . . . . . . . . . . . 6
Abbreviations and symbols . . . . . . . . . . 6
Equipment . . . . . . . . . . . . . . . . . . . . . . . . . . . 7
Technical data . . . . . . . . . . . . . . . . . . . . . . . 7
Notice concerning current status . . . . 7
15
z Ge
ne
ral i
nst
ruc
tio
ns

OverviewChapter 2 of this Rider's Man-ual will provide you with an initialoverview of your motorcycle. Allmaintenance and repair work car-ried out on your motorcycle willbe documented in Chapter 11.Proof of the maintenance workperformed is a prerequisite forgenerous treatment of claims.When the time comes to sellyour BMW, please rememberto hand over this Rider's Manual;it is an important part of the mo-torcycle.
Abbreviations andsymbols
Indicates warnings thatyou must comply with for
reasons of your safety and thesafety of others, and to protectyour product against damage.
Special information on op-erating and inspecting your
motorcycle as well as mainte-nance and adjustment proce-dures.
Indicates the end of anitem of information.
Instruction.
Result of an activity.
Reference to a page withmore detailed informa-tion.
Indicates the end of ac-cessory or equipment-dependent information.
Tightening torque.
Technical data.
OE Optional equipmentBMW Motorrad optionalextras are already com-pletely installed duringmotorcycle production.
OA Optional accessoryBMW optional acces-sories can be purchasedand installed at your au-thorized BMW Motorradretailer.
EWS Electronic immobilizer.
DWA Anti-theft alarm.
ABS Anti-Lock Brake System.
ASC Automatic Stability Con-trol.
ESA Electronic suspensionadjustment.
TPC/RDC
Tire Pressure Control(TPC).
16
z Ge
ne
ral i
nst
ruc
tio
ns

EquipmentWhen you ordered your BMWmotorcycle, you chose variousitems of custom equipment. ThisRider's Manual describes optionalequipment (OE) offered by BMWand selected optional accessories(OA). This explains why the man-ual may also contain descriptionsof equipment which you have notordered. Please note, too, thatyour motorcycle might not be ex-actly as illustrated in this manualon account of country-specificdifferences.If your BMW is equipped withoptions or accessories not de-scribed in this Rider's Manual,then this equipment is describedin a separate set of instructions.
Technical dataAll dimensions, weights and out-puts in the Rider's Manual referto the Deutsches Institut für Nor-mung e. V. (DIN) and comply withits tolerance regulations. Ver-sions for individual countries maydiffer.
Notice concerningcurrent statusThe high safety and quality stan-dards of BMW motorcycles aremaintained by consistent, on-going development efforts em-bracing their design, equipmentand accessories. For this rea-son, aspects of your motorcyclemay vary from the descriptionsin this Operating instructions. Inaddition, BMW Motorrad can-not guarantee the total absenceof errors. We hope you will ap-preciate that no claims can berecognized based on the data, il-
lustrations or descriptions in thismanual. 1
7
z Ge
ne
ral i
nst
ruc
tio
ns

18
z Ge
ne
ral i
nst
ruc
tio
ns

Overviews
General view, left side . . . . . . . . . . . . . . . 11
General view, right side . . . . . . . . . . . . . 13
Underneath seat . . . . . . . . . . . . . . . . . . . . 14
Under fairing . . . . . . . . . . . . . . . . . . . . . . . . 15
Multifunction switch, left . . . . . . . . . . . . 16
Multifunction switch, right . . . . . . . . . . . 17
Instrument cluster . . . . . . . . . . . . . . . . . . 18
29
z Ove
rvie
ws

210
z Ove
rvie
ws
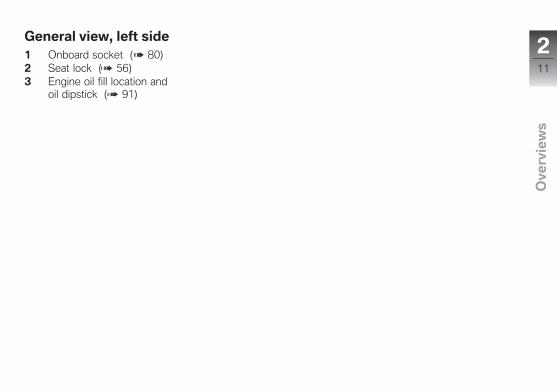
General view, left side1 Onboard socket ( 80)2 Seat lock ( 56)3 Engine oil fill location and
oil dipstick ( 91)
211
z Ove
rvie
ws
212
z Ove
rvie
ws

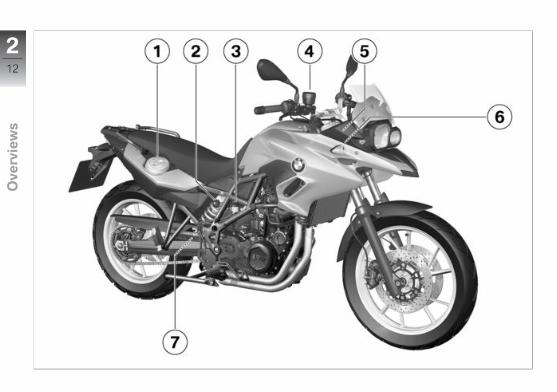
General view, right side1 Fuel filler opening ( 69)2 Adjusting spring preload
( 52)3 Brake-fluid reservoir, rear
( 95)4 Brake-fluid reservoir, front
( 95)5 Vehicle identification
number, type plate (onsteering-head bearing)
6 Coolant level indicator (be-hind side panel) ( 96)
7 Damping adjustment( 53)
213
z Ove
rvie
ws

Underneath seat1 Storage space
with first-aid kit OA
Storing first-aid kit2 Standard tool kit ( 90)3 Payload table4 Tire inflation pressure table5 Helmet holder ( 57)6 Rider's Manual (in vehicle
rear)with anti-theft alarm sys-tem (DWA)OE
Rider's Manual (under thecontrol unit) ( 58)
7 Tools for adjusting springpreload ( 52)
214
z Ove
rvie
ws
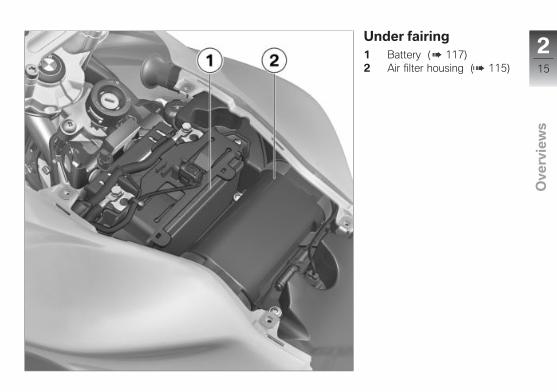
Under fairing1 Battery ( 117)2 Air filter housing ( 115)
215
z Ove
rvie
ws
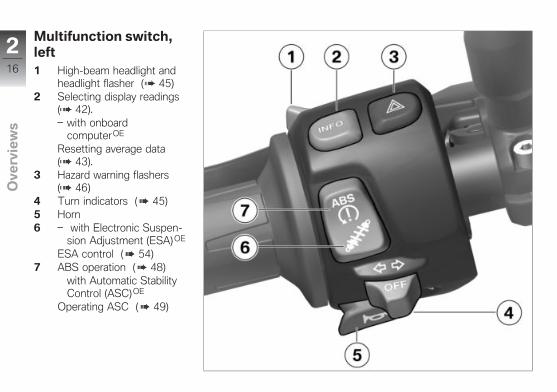
Multifunction switch,left1 High-beam headlight and
headlight flasher ( 45)2 Selecting display readings
( 42).with onboardcomputerOE
Resetting average data( 43).
3 Hazard warning flashers( 46)
4 Turn indicators ( 45)5 Horn6 with Electronic Suspen-
sion Adjustment (ESA)OE
ESA control ( 54)7 ABS operation ( 48)
with Automatic StabilityControl (ASC)OE
Operating ASC ( 49)
216
z Ove
rvie
ws
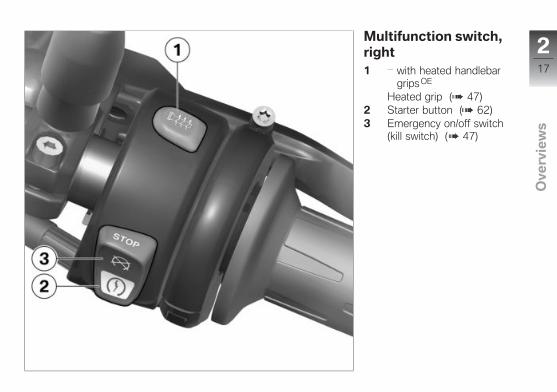
Multifunction switch,right1 with heated handlebar
grips OE
Heated grip ( 47)2 Starter button ( 62)3 Emergency on/off switch
(kill switch) ( 47)
217
z Ove
rvie
ws

Instrument cluster1 Warning and indicator
lamps ( 24)2 Speedometer3 Set the clock ( 41).
with onboardcomputerOE
Operation of stopwatch( 43)
4 Multifunction display( 22)
5 Selecting display readings( 42).Reset tripmeter ( 43).
218
z Ove
rvie
ws
6 Ambient light sensor (forbrightness adjustment ofinstrument lighting)
with anti-theft alarm sys-tem (DWA)OE
Anti-theft alarm system in-dicator lamp (see anti-theftalarm system operating in-structions)
with onboardcomputerOE
Engine speed warning( 66)
7 Tachometer
219
z Ove
rvie
ws

220
z Ove
rvie
ws
Displays
Multifunction display . . . . . . . . . . . . . . . . 22
Meaning of symbols . . . . . . . . . . . . . . . . 23
Warning and indicator lamps . . . . . . . . 24
Fuel level . . . . . . . . . . . . . . . . . . . . . . . . . . . 25
Fuel reserve . . . . . . . . . . . . . . . . . . . . . . . . 25
Service display . . . . . . . . . . . . . . . . . . . . . . 25
Ambient temperature . . . . . . . . . . . . . . . 26
Tire inflation pressures . . . . . . . . . . . . . . 26
Warning lamps . . . . . . . . . . . . . . . . . . . . . . 27
321
z Dis
pla
ys
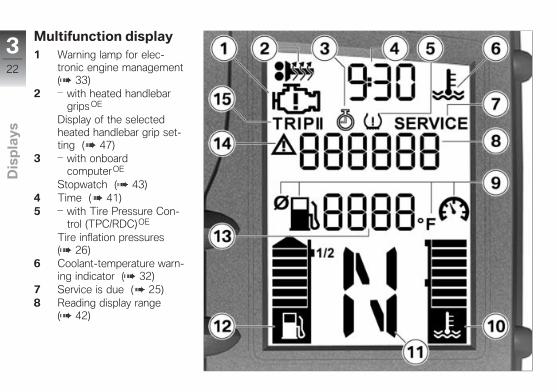
Multifunction display1 Warning lamp for elec-
tronic engine management( 33)
2 with heated handlebargrips OE
Display of the selectedheated handlebar grip set-ting ( 47)
3 with onboardcomputerOE
Stopwatch ( 43)4 Time ( 41)5 with Tire Pressure Con-
trol (TPC/RDC)OE
Tire inflation pressures( 26)
6 Coolant-temperature warn-ing indicator ( 32)
7 Service is due ( 25)8 Reading display range
( 42)
322
z Dis
pla
ys

9 with onboardcomputerOE
Symbols for illustrating dis-play reading ( 23)
10 Coolant temperature dis-play
11 – With onboard computer(OE)Gear indicator, "N" isshown for Neutral
12 Fuel level ( 25)13 – With onboard computer
(OE)Reading display range( 42)
14 A warning appears in thereading display range( 27)
15 Trip odometer ( 42)
Meaning of symbolswith onboard computerOE
Distance covered since thefuel reached the reserve
level ( 25)
Average fuel consumption
Average speed
Current fuel consumption
Ambient temperature( 26)
323
z Dis
pla
ys
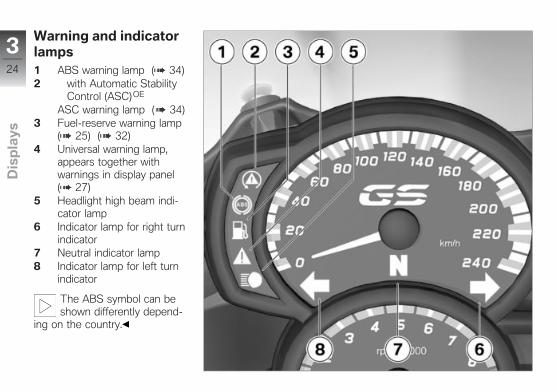
Warning and indicatorlamps1 ABS warning lamp ( 34)2 with Automatic Stability
Control (ASC)OE
ASC warning lamp ( 34)3 Fuel-reserve warning lamp
( 25) ( 32)4 Universal warning lamp,
appears together withwarnings in display panel( 27)
5 Headlight high beam indi-cator lamp
6 Indicator lamp for right turnindicator
7 Neutral indicator lamp8 Indicator lamp for left turn
indicator
The ABS symbol can beshown differently depend-
ing on the country.
324
z Dis
pla
ys
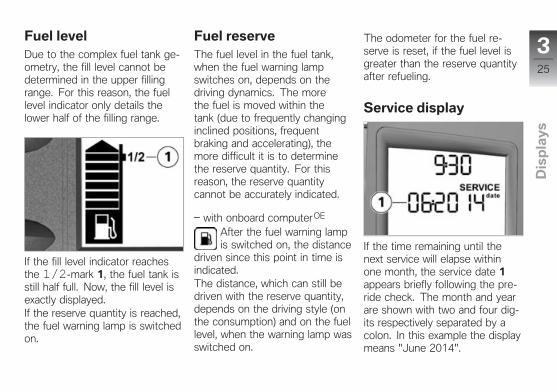
Fuel levelDue to the complex fuel tank ge-ometry, the fill level cannot bedetermined in the upper fillingrange. For this reason, the fuellevel indicator only details thelower half of the filling range.
If the fill level indicator reachesthe 1/2-mark 1, the fuel tank isstill half full. Now, the fill level isexactly displayed.If the reserve quantity is reached,the fuel warning lamp is switchedon.
Fuel reserveThe fuel level in the fuel tank,when the fuel warning lampswitches on, depends on thedriving dynamics. The morethe fuel is moved within thetank (due to frequently changinginclined positions, frequentbraking and accelerating), themore difficult it is to determinethe reserve quantity. For thisreason, the reserve quantitycannot be accurately indicated.
with onboard computerOE
After the fuel warning lampis switched on, the distance
driven since this point in time isindicated.The distance, which can still bedriven with the reserve quantity,depends on the driving style (onthe consumption) and on the fuellevel, when the warning lamp wasswitched on.
The odometer for the fuel re-serve is reset, if the fuel level isgreater than the reserve quantityafter refueling.
Service display
If the time remaining until thenext service will elapse withinone month, the service date 1appears briefly following the pre-ride check. The month and yearare shown with two and four dig-its respectively separated by acolon. In this example the displaymeans "June 2014".
325
z Dis
pla
ys

If the vehicle covers high annualmileages then shorter service in-tervals may be required. Whenthe odometer reading for the re-calculated early service falls towithin 621 miles (1,000 km), theremaining miles (kilometers) 1are counted down in 62-mile(100 km) increments and brieflydisplayed following the pre-ridecheck.
When a service dateelapses without service, the
general warning lamp lights up inyellow, appearing together withthe date and mileage (kilometer)
display. The "Service" messageis displayed continuously.
If the service displayappears more than a month
before the service date, thestored date must be adjustedin the instrument cluster. Thissituation can occur if the batteryhas been disconnected for alonger time.Consult a certified workshop,preferably an authorizedBMW Motorrad retailer, forsetting of the date.
Ambient temperaturewith onboard computerOE
Engine heat can lead tospurious readings of ambi-
ent temperature when the mo-torcycle is stationary. When theeffects of engine heat on themonitored temperature becomeexcessive the display responds
by temporarily reverting to -- asthe display reading.When ambient temperaturesdrop below 37 °F (3 °C) thetemperature display respondsby flashing a warning indicatingpossible ice formation on theroad surface. The display auto-matically switches from any othermode to the temperature read-ing when the temperature dropsbelow this threshold for the firsttime.
Tire inflation pressureswith Tire Pressure Control(TPC/RDC)OE
326
z Dis
pla
ys

The displayed tire inflation pres-sures refer to a tire temperatureof 68 °F (20 °C). The figure onthe left side 1 indicates the fronttire's inflation pressure, whilethe figure on the right 2 showsthe inflation pressure in the reartire. Immediately after switch-ing on the ignition, "-- --" isdisplayed, as the transfer of theinflation pressure values does notbegin until a speed of 19 mph(30 km/h) is exceeded for the firsttime.
If the warning triangle 3 isalso shown, a warning dis-
play is concerned. Critical infla-tion pressure flashes.The universal warning lamp lightsup in yellow when the critical fig-ure is at the limit of the approvedtolerance range. If the monitoredtire inflation pressure is outsidethe specified range the generalwarning lamp will flash in red.
Additional information on theBMW Motorrad Tire PressureMonitor is provided starting onpage ( 77).
Warning lampsDisplayWarnings are displayed with thecorresponding warning lamps.
Warnings for which no separatewarning lamp is available, are in-dicated using the 'General' warn-ing lamp 1 in conjunction witha warning or a warning symbolin the multifunction display. Theuniversal warning lamp shows redor yellow, depending on the ur-gency of the warning.
327
z Dis
pla
ys

If the display in the value area 2shows a warning, then this issymbolized with the warning tri-angle 3. These warnings can bedisplayed in alternation with theodometers ( 42).
The universal warning lamp lightsup for the most urgent warning.
The following page contains a listof potential warnings.
328
z Dis
pla
ys

Overview of warning indicatorsWarning and indicatorlamps
Warning symbols in thedisplay
Meaning
lights up yellow + "EWS" is indi-cated
Electronic immobilizer is active ( 32)
lights up Fuel down to reserve ( 32)
lights up red flashes Coolant temperature too high ( 32)
lights up yellow appears on the dis-play
Engine in emergency-operation mode( 33)
lights up yellow + "LAMP" is indi-cated
Bulb defective ( 33)
"x.x °F" flashes Outside temperature warning ( 33)
lights up yellow + "DWA" is indi-cated
DWA battery drained ( 34)
flashes ABS self-diagnosis not completed( 34)
329
z Dis
pla
ys

Warning and indicatorlamps
Warning symbols in thedisplay
Meaning
lights up ABS deactivated ( 34)
lights up ABS error ( 34)
flashes rapidly ASC intervention ( 34)
flashes slowly ASC self-diagnosis not completed( 35)
lights up ASC deactivated ( 35)
lights up ASC error ( 35)
lights up yellow + "x.x" flashes Tire inflation pressure in limit area ofpermissible tolerance ( 36)
flashes red + "x.x" flashes Tire inflation pressure outside permissi-ble tolerance ( 36)
330
z Dis
pla
ys

Warning and indicatorlamps
Warning symbols in thedisplay
Meaning
+ "--" or "----" is indicated
Transmission error ( 36)
lights up yellow + "--" or "----" is indicated
Sensor defective or system fault ( 37)
lights up yellow + "RdC" is indi-cated.
Battery of tire-inflation pressure sensorweak ( 37)
331
z Dis
pla
ys

Electronic immobilizer isactive
General warning light showsyellow.
+ "EWS" is indicated.
Possible cause:The key being used is not autho-rized for starting, or communica-tion between the key and engineelectronics is disrupted.
Remove other motorcycle keysfrom the ignition key ring.Use the reserve key.Have the defective key re-placed, preferably by an autho-rized BMW Motorrad retailer.
Fuel down to reserveFuel-reserve warning lightlights up.
Fuel shortage can lead toengine misfires. This can
result in unexpected engine de-
activation (accident hazard) anddamage to the catalytic con-verter.Do not drive to the extent thatthe fuel tank is completelyempty.
Possible cause:At the most, the fuel tank stillcontains the reserve fuel quantity.
Reserve fuel quantity
min 2.9 quarts (min 2.7 l)
Refueling procedure ( 69).
Coolant temperature toohigh
General warning light showsred.
The temperature symbolflashes.
Driving with an overheatedengine can result in engine
damage.
Be sure to observe the measureslisted below.
Possible cause:Coolant level is too low.
Checking coolant level ( 96).If coolant level is too low:
Topping up coolant ( 97).
Possible cause:The coolant temperature is toohigh.
If possible, continue drivingin the part-load range to cooldown the engine.In traffic jams, switch off theengine, but keep the ignitionswitched on so that the radia-tor fan continues to operate.Should the coolant temperaturefrequently be too high, havethe fault rectified as quicklyas possible by an authorizedworkshop, preferably an autho-rized BMW Motorrad retailer.
332
z Dis
pla
ys
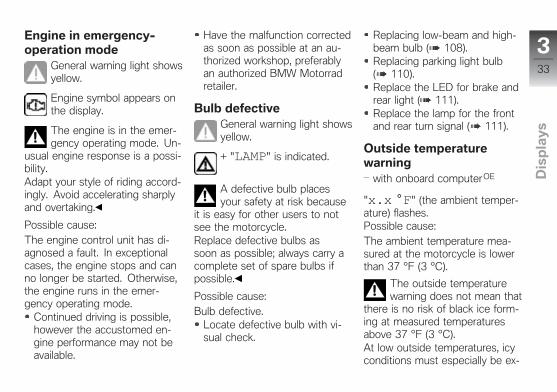
Engine in emergency-operation mode
General warning light showsyellow.
Engine symbol appears onthe display.
The engine is in the emer-gency operating mode. Un-
usual engine response is a possi-bility.Adapt your style of riding accord-ingly. Avoid accelerating sharplyand overtaking.
Possible cause:The engine control unit has di-agnosed a fault. In exceptionalcases, the engine stops and canno longer be started. Otherwise,the engine runs in the emer-gency operating mode.
Continued driving is possible,however the accustomed en-gine performance may not beavailable.
Have the malfunction correctedas soon as possible at an au-thorized workshop, preferablyan authorized BMW Motorradretailer.
Bulb defectiveGeneral warning light showsyellow.
+ "LAMP" is indicated.
A defective bulb placesyour safety at risk because
it is easy for other users to notsee the motorcycle.Replace defective bulbs assoon as possible; always carry acomplete set of spare bulbs ifpossible.
Possible cause:Bulb defective.
Locate defective bulb with vi-sual check.
Replacing low-beam and high-beam bulb ( 108).Replacing parking light bulb( 110).Replace the LED for brake andrear light ( 111).Replace the lamp for the frontand rear turn signal ( 111).
Outside temperaturewarning
with onboard computerOE
"x.x °F" (the ambient temper-ature) flashes.Possible cause:The ambient temperature mea-sured at the motorcycle is lowerthan 37 °F (3 °C).
The outside temperaturewarning does not mean that
there is no risk of black ice form-ing at measured temperaturesabove 37 °F (3 °C).At low outside temperatures, icyconditions must especially be ex-
333
z Dis
pla
ys
pected on bridges and in shadyroad areas.
Think well ahead when driving.
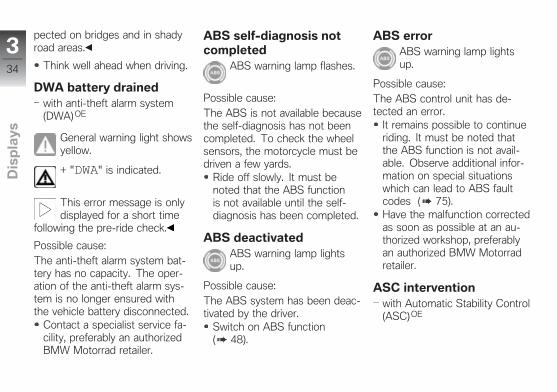
DWA battery drainedwith anti-theft alarm system(DWA)OE
General warning light showsyellow.
+ "DWA" is indicated.
This error message is onlydisplayed for a short time
following the pre-ride check.
Possible cause:The anti-theft alarm system bat-tery has no capacity. The oper-ation of the anti-theft alarm sys-tem is no longer ensured withthe vehicle battery disconnected.
Contact a specialist service fa-cility, preferably an authorizedBMW Motorrad retailer.
ABS self-diagnosis notcompleted
ABS warning lamp flashes.
Possible cause:The ABS is not available becausethe self-diagnosis has not beencompleted. To check the wheelsensors, the motorcycle must bedriven a few yards.
Ride off slowly. It must benoted that the ABS functionis not available until the self-diagnosis has been completed.
ABS deactivatedABS warning lamp lightsup.
Possible cause:The ABS system has been deac-tivated by the driver.
Switch on ABS function( 48).
ABS errorABS warning lamp lightsup.
Possible cause:The ABS control unit has de-tected an error.
It remains possible to continueriding. It must be noted thatthe ABS function is not avail-able. Observe additional infor-mation on special situationswhich can lead to ABS faultcodes ( 75).Have the malfunction correctedas soon as possible at an au-thorized workshop, preferablyan authorized BMW Motorradretailer.
ASC interventionwith Automatic Stability Control(ASC)OE
334
z Dis
pla
ys
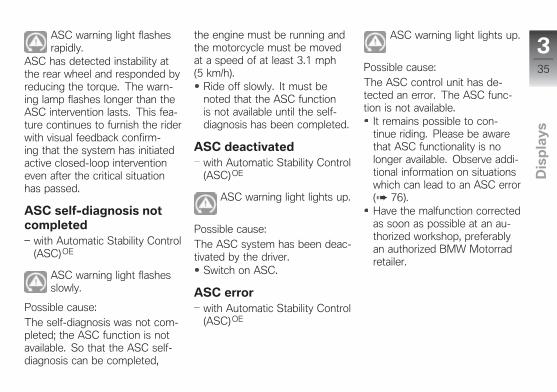
ASC warning light flashesrapidly.
ASC has detected instability atthe rear wheel and responded byreducing the torque. The warn-ing lamp flashes longer than theASC intervention lasts. This fea-ture continues to furnish the riderwith visual feedback confirm-ing that the system has initiatedactive closed-loop interventioneven after the critical situationhas passed.
ASC self-diagnosis notcompleted
with Automatic Stability Control(ASC) OE
ASC warning light flashesslowly.
Possible cause:The self-diagnosis was not com-pleted; the ASC function is notavailable. So that the ASC self-diagnosis can be completed,
the engine must be running andthe motorcycle must be movedat a speed of at least 3.1 mph(5 km/h).
Ride off slowly. It must benoted that the ASC functionis not available until the self-diagnosis has been completed.
ASC deactivatedwith Automatic Stability Control(ASC)OE
ASC warning light lights up.
Possible cause:The ASC system has been deac-tivated by the driver.
Switch on ASC.
ASC errorwith Automatic Stability Control(ASC)OE
ASC warning light lights up.
Possible cause:The ASC control unit has de-tected an error. The ASC func-tion is not available.
It remains possible to con-tinue riding. Please be awarethat ASC functionality is nolonger available. Observe addi-tional information on situationswhich can lead to an ASC error( 76).Have the malfunction correctedas soon as possible at an au-thorized workshop, preferablyan authorized BMW Motorradretailer.
335
z Dis
pla
ys

Tire inflation pressure inlimit area of permissibletolerance
with Tire Pressure Control(TPC/RDC)OE
General warning light showsyellow.
+ "x.x" (the critical infla-tion pressure) flashes.
Possible cause:The measured tire inflation pres-sure is in the limit area of thepermissible tolerance.
Correct tire inflation pressure inaccordance with instructions onback of cover of Rider's Man-ual.
Before adjusting the tire in-flation pressure, observe
the information on temperaturecompensation and on inflationpressure adjustment in the chap-ter "Technology in detail".
Tire inflation pressureoutside permissibletolerance
with Tire Pressure Control(TPC/RDC)OE
General warning lightflashes red.
+ "x.x" (the critical infla-tion pressure) flashes.
Possible cause:The measured tire inflation pres-sure is outside the approved tol-erance range.
Check tire for damage andsuitability for continued use.
If it is still possible to drive withtire:
A tire inflation pressure out-side the permissible toler-
ance result in poorer handling ofthe motorcycle.Adapt your style of ridingaccordingly.
Correct tire inflation pressure atthe next opportunity.Have the tire checked for dam-age at an authorized servicefacility, preferably an authorizedBMW Motorrad dealer.
If you are unsure about the tire'ssuitability for continued riding:
Do not continue riding.Contact roadside service.Have the tire checked for dam-age at an authorized servicefacility, preferably an authorizedBMW Motorrad dealer.
Transmission errorwith Tire Pressure Control(TPC/RDC)OE
+ "--" or "-- --" is indi-cated.
Possible cause:The vehicle's speed has not ex-ceeded the threshold of approx.19 mph (30 km/h). The TPC/RDC sensors do not transmit
336
z Dis
pla
ys
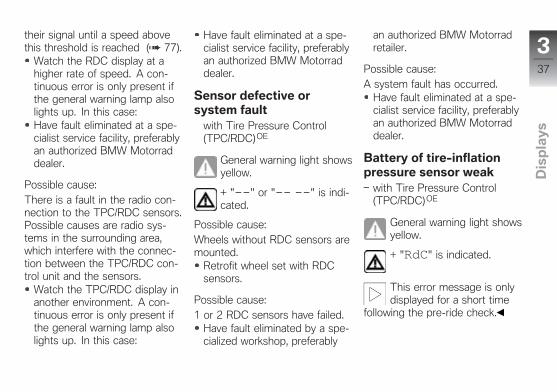
their signal until a speed abovethis threshold is reached ( 77).
Watch the RDC display at ahigher rate of speed. A con-tinuous error is only present ifthe general warning lamp alsolights up. In this case:Have fault eliminated at a spe-cialist service facility, preferablyan authorized BMW Motorraddealer.
Possible cause:There is a fault in the radio con-nection to the TPC/RDC sensors.Possible causes are radio sys-tems in the surrounding area,which interfere with the connec-tion between the TPC/RDC con-trol unit and the sensors.
Watch the TPC/RDC display inanother environment. A con-tinuous error is only present ifthe general warning lamp alsolights up. In this case:
Have fault eliminated at a spe-cialist service facility, preferablyan authorized BMW Motorraddealer.
Sensor defective orsystem fault
with Tire Pressure Control(TPC/RDC)OE
General warning light showsyellow.
+ "--" or "-- --" is indi-cated.
Possible cause:Wheels without RDC sensors aremounted.
Retrofit wheel set with RDCsensors.
Possible cause:1 or 2 RDC sensors have failed.
Have fault eliminated by a spe-cialized workshop, preferably
an authorized BMW Motorradretailer.
Possible cause:A system fault has occurred.
Have fault eliminated at a spe-cialist service facility, preferablyan authorized BMW Motorraddealer.
Battery of tire-inflationpressure sensor weak
with Tire Pressure Control(TPC/RDC)OE
General warning light showsyellow.
+ "RdC" is indicated.
This error message is onlydisplayed for a short time
following the pre-ride check.
337
z Dis
pla
ys

Possible cause:The battery of the tire inflationpressure sensor has almost nocapacity anymore. The operationof the tire inflation pressure con-trol is only ensured for a limitedtime.
Contact a specialist service fa-cility, preferably an authorizedBMW Motorrad retailer.
338
z Dis
pla
ys

Operation
Ignition switch . . . . . . . . . . . . . . . . . . . . . . 40
Electronic immobilizer (EWS) . . . . . . . 41
Clock . . . . . . . . . . . . . . . . . . . . . . . . . . . . . . . 41
Display . . . . . . . . . . . . . . . . . . . . . . . . . . . . . . 42
Stopwatch . . . . . . . . . . . . . . . . . . . . . . . . . . 43
Lights . . . . . . . . . . . . . . . . . . . . . . . . . . . . . . . 45
Turn indicators . . . . . . . . . . . . . . . . . . . . . . 45
Hazard warning flashers . . . . . . . . . . . . . 46
Emergency on/off switch (killswitch) . . . . . . . . . . . . . . . . . . . . . . . . . . . . . . 47
Heated handlebar grips . . . . . . . . . . . . . 47
BMW Motorrad ABS . . . . . . . . . . . . . . . . 48
BMW Motorrad ASC . . . . . . . . . . . . . . . . 49
Clutch . . . . . . . . . . . . . . . . . . . . . . . . . . . . . . 50
Brakes . . . . . . . . . . . . . . . . . . . . . . . . . . . . . . 50
Mirrors . . . . . . . . . . . . . . . . . . . . . . . . . . . . . . 51
Spring preload . . . . . . . . . . . . . . . . . . . . . . 52
Damping . . . . . . . . . . . . . . . . . . . . . . . . . . . . 53
ESA Electronic Suspension Adjust-ment . . . . . . . . . . . . . . . . . . . . . . . . . . . . . . . . 54
Tires . . . . . . . . . . . . . . . . . . . . . . . . . . . . . . . . 55
Headlight . . . . . . . . . . . . . . . . . . . . . . . . . . . 55
Seat . . . . . . . . . . . . . . . . . . . . . . . . . . . . . . . . 56
Helmet holder . . . . . . . . . . . . . . . . . . . . . . 57
Rider's Manual (US Model) . . . . . . . . . 58
439
z Op
era
tio
n

Ignition switchKeysYou are provided with 2 ignitionkeys.Should you lose your keys pleaserefer to the information regardingthe electronic immobilizer (EWS)( 41).The ignition lock, tank lock andseat lock are operated with thesame key.
with case OA
with TopcaseOA
The cases and the topcase canalso be ordered with locks forthe same key on request. Pleasecontact an authorized workshopfor this purpose, preferably anauthorized BMW Motorrad re-tailer.
Switching on ignition
Turn key to position 1.Parking lights and all functioncircuits switched on.Engine can be started.Pre-Ride Check in progress.( 63)ABS self-diagnosis isperformed. ( 64)with Automatic Stability Control(ASC)OE
ASC self-diagnosis in progress.( 64)
Switching off ignition
Turn key to position 2.Light switched off.Handlebars not locked.Key can be removed.Electrically powered acces-sories remain operational fora limited period of time.Battery can be recharged viaonboard socket.
Locking handlebarsTurn handlebars to left.
440
z Op
era
tio
n
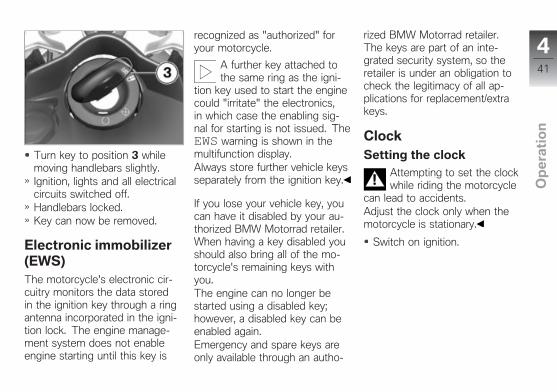
Turn key to position 3 whilemoving handlebars slightly.Ignition, lights and all electricalcircuits switched off.Handlebars locked.Key can now be removed.
Electronic immobilizer(EWS)The motorcycle's electronic cir-cuitry monitors the data storedin the ignition key through a ringantenna incorporated in the igni-tion lock. The engine manage-ment system does not enableengine starting until this key is
recognized as "authorized" foryour motorcycle.
A further key attached tothe same ring as the igni-
tion key used to start the enginecould "irritate" the electronics,in which case the enabling sig-nal for starting is not issued. TheEWS warning is shown in themultifunction display.Always store further vehicle keysseparately from the ignition key.
If you lose your vehicle key, youcan have it disabled by your au-thorized BMW Motorrad retailer.When having a key disabled youshould also bring all of the mo-torcycle's remaining keys withyou.The engine can no longer bestarted using a disabled key;however, a disabled key can beenabled again.Emergency and spare keys areonly available through an autho-
rized BMW Motorrad retailer.The keys are part of an inte-grated security system, so theretailer is under an obligation tocheck the legitimacy of all ap-plications for replacement/extrakeys.
ClockSetting the clock
Attempting to set the clockwhile riding the motorcycle
can lead to accidents.Adjust the clock only when themotorcycle is stationary.
Switch on ignition.
441
z Op
era
tio
n
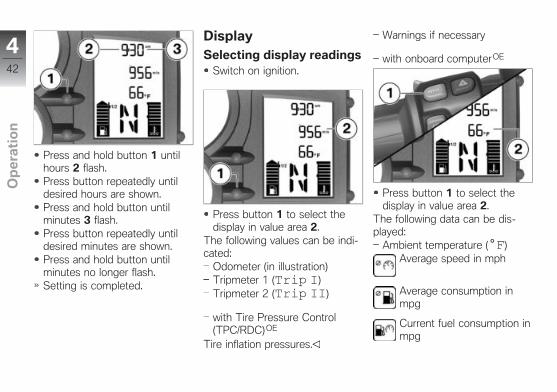
Press and hold button 1 untilhours 2 flash.Press button repeatedly untildesired hours are shown.Press and hold button untilminutes 3 flash.Press button repeatedly untildesired minutes are shown.Press and hold button untilminutes no longer flash.Setting is completed.
DisplaySelecting display readings
Switch on ignition.
Press button 1 to select thedisplay in value area 2.
The following values can be indi-cated:
Odometer (in illustration)Tripmeter 1 (Trip I)Tripmeter 2 (Trip II)
with Tire Pressure Control(TPC/RDC)OE
Tire inflation pressures.
Warnings if necessary
with onboard computerOE
Press button 1 to select thedisplay in value area 2.
The following data can be dis-played:
Ambient temperature (°F)Average speed in mph
Average consumption inmpg
Current fuel consumption inmpg
442
z Op
era
tio
n

Distance driven sincereaching reserve quantity in
mls
Resetting tripmeterSwitch on ignition.Select desired trip odometer.
Press and hold button 1 untiltrip odometer has been reset.
Resetting average datawith onboard computerOE
Switch on ignition.
Select average fuel consump-tion or average speed.
Press and hold button 1 untildisplayed value has been reset.
Stopwatchwith onboard computerOE
Stopwatch
As an alternative to the odome-ter, the stopwatch 2 can be dis-played. The display consists ofhours, minutes, seconds andtenths of a second separated bydots.In enable improved operation ofthe stopwatch while driving (asa lap timer), the functions of thebutton 1 and the functions of theINFO button on the handlebarcan be interchanged. The stop-watch and the odometer are thenoperated with the INFO button;
443
z Op
era
tio
n

the onboard computer must beoperated with the button 1.The stopwatch continues to runin the background when the dis-play is temporarily switched overto the odometer. The stopwatchalso continues to run when theignition is temporarily switchedoff.
Operating stopwatch
If necessary, switch over fromodometer to stopwatch withbutton 1.
With stopwatch stopped, pressbutton 2 to start stopwatch.With stopwatch running, pressbutton 2 to stop stopwatch.Press and hold button 2 to re-set stopwatch.
Interchanging buttonfunctions
Press and hold button 1 andbutton 2 simultaneously untildisplay changes.FLASH (engine speed warn-ing indicator) and ON or OFFare shown.Press button 2.LAP (Lap-Timer) and ON orOFF are shown.Press button 1 repeatedly untildesired state is shown.ON: operation of stopwatchwith INFO button on handlebarfitting.
444
z Op
era
tio
n

OFF: operation of stopwatchwith button 2 in instrumentcluster.To save the setting made,press and hold button 1 andbutton 2 simultaneously untilthe display changes.
LightsParking lightsThe parking lights switch on au-tomatically when the ignition isswitched on.
The parking lights are astrain on the battery. Do
not leave the ignition switchedon longer than absolutelynecessary.
Headlight low beamThe low-beam headlight is auto-matically switched on under thefollowing conditions:
If the engine was started.If the vehicle is pushed whilethe ignition is switched on.
With the engine switchedoff, you can switch on the
lights by switching on the high-beam headlight with the ignitionswitched on or by operating theheadlight flasher.
High-beam headlight andheadlight flasher
Press switch 1 toward front toswitch on high beams.Pull switch 1 rearward to actu-ate headlight flasher.
Parking lampSwitch off ignition.
Immediately after switching offthe ignition push button 1 tothe left and hold until the park-ing lamps come on.Switch ignition on and thenoff again to switch off parkinglamp.
Turn indicatorsOperating turn indicator
Switch on ignition.
445
z Op
era
tio
n

After driving for approx.ten seconds or after cov-
ering a distance of approx. 980 ft(300 m), the turn indicators areautomatically switched off.
Press button 1 toward left toswitch on left-hand turn indica-tor.Press button 1 toward rightto switch on right-hand turnindicator.Press button 1 into center po-sition to switch off turn indica-tors.
Hazard warningflashersOperating hazard warningflashers
Switch on ignition.
The hazard warning flash-ers place a strain on the
battery. Do not use the hazardwarning flashers for longer thanabsolutely necessary.
If a turn indicator button ispressed with the ignition
switched on, the flashing functionreplaces the emergency flashingfunction as long as the button ispressed. If the turn indicator but-ton is released, the emergencyflasher function becomes activeagain.
Press button 1 to switch onhazard warning flashers.Ignition can be switched off.Press button 1 again to switchoff hazard warning flashers.
446
z Op
era
tio
n
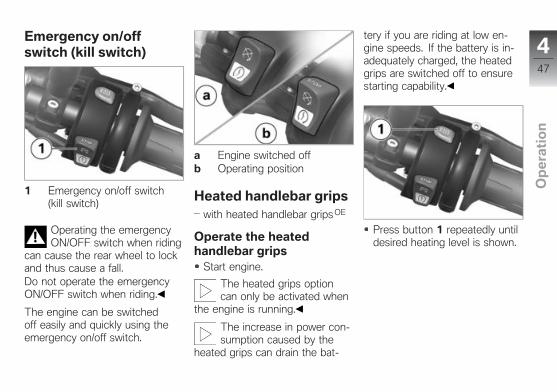
Emergency on/offswitch (kill switch)
1 Emergency on/off switch(kill switch)
Operating the emergencyON/OFF switch when riding
can cause the rear wheel to lockand thus cause a fall.Do not operate the emergencyON/OFF switch when riding.
The engine can be switchedoff easily and quickly using theemergency on/off switch.
a Engine switched offb Operating position
Heated handlebar gripswith heated handlebar grips OE
Operate the heatedhandlebar grips
Start engine.
The heated grips optioncan only be activated when
the engine is running.
The increase in power con-sumption caused by the
heated grips can drain the bat-
tery if you are riding at low en-gine speeds. If the battery is in-adequately charged, the heatedgrips are switched off to ensurestarting capability.
Press button 1 repeatedly untildesired heating level is shown.
447
z Op
era
tio
n
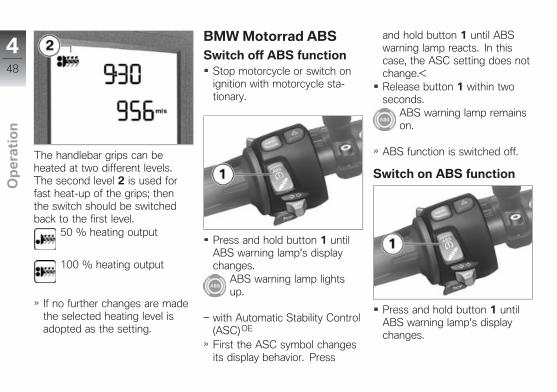
The handlebar grips can beheated at two different levels.The second level 2 is used forfast heat-up of the grips; thenthe switch should be switchedback to the first level.
50 % heating output
100 % heating output
If no further changes are madethe selected heating level isadopted as the setting.
BMW Motorrad ABSSwitch off ABS function
Stop motorcycle or switch onignition with motorcycle sta-tionary.
Press and hold button 1 untilABS warning lamp's displaychanges.
ABS warning lamp lightsup.
with Automatic Stability Control(ASC)OE
First the ASC symbol changesits display behavior. Press
and hold button 1 until ABSwarning lamp reacts. In thiscase, the ASC setting does notchange.Release button 1 within twoseconds.
ABS warning lamp remainson.
ABS function is switched off.
Switch on ABS function
Press and hold button 1 untilABS warning lamp's displaychanges.
448
z Op
era
tio
n

ABS warning light goesout; if self-diagnosis has
not been completed, it begins toflash.
Release button 1 within twoseconds.
ABS warning lamp remainsoff or continues to flash.
ABS function is switched on.As an alternative, the ignitioncan also be switched off andthen on again.
If the ABS warning lightlights up after switching
the ignition off and on and thencontinued driving over 3.1 mph(5 km/h), an ABS error hasoccurred.
BMW Motorrad ASCwith Automatic Stability Control(ASC) OE
Deactivate ASC functionSwitch on ignition.
The ASC function canalso be deactivated while
driving.
Press the 1 button and con-tinue to hold it down until thestatus indicated by the ASCwarning lamp changes.
ASC warning light lights up.
Release button 1 within twoseconds.
ASC warning lamp contin-ues to light up.
ASC function is deactivated.
Activate ASC function
Press the 1 button and con-tinue to hold it down until thestatus indicated by the ASCwarning lamp changes.
ASC warning lamp goesout; if self-diagnosis has
not been completed, it begins toflash.
Release button 1 within twoseconds.
449
z Op
era
tio
n

ASC warning light remainsoff or continues to flash.
ASC function is activated.As an alternative, the ignitioncan also be switched off andthen on again.
If the ASC warning lightlights up after switching
the ignition off and on and thencontinued driving over 3.1 mph(5 km/h), an ASC error hasoccurred.
ClutchAdjusting clutch lever
Adjusting the clutch leverwhile driving can lead to
accidents.Only adjust the clutch lever whenthe motorcycle is stationary.
Turn adjusting screw 1 clock-wise to increase distance be-tween clutch lever and handle-bar grip.Turn adjusting screw 1 coun-terclockwise to decrease dis-tance between clutch lever andhandlebar grip.
The adjusting screw can beturned more easily if you
press the clutch lever forwardwhen doing so.
BrakesAdjusting handbrake lever
Changing the position ofthe brake-fluid reservoir can
allow air to penetrate the brakesystem.Do not reposition the handlebarcontrols on the handlebars or thehandlebars in their mounts.
Adjusting the handbrakelever while driving can lead
to accidents.Only adjust the handbrakelever when the motorcycle isstationary.
450
z Op
era
tio
n

Turn adjusting screw 1 clock-wise to increase distance be-tween brake lever and handle-bar grip.Turn adjusting screw 1 coun-terclockwise to decrease dis-tance between brake lever andhandlebar grip.
The adjusting screw canbe turned more easily if
you press the handbrake leverforward when doing so.
MirrorsAdjusting mirrors
Move mirror into desired posi-tion by twisting.
Adjusting mirror arm
Slide protective cap 1 up overscrew connection on mirrorarm.Loosen the nut 2.Turn mirror arm into desiredposition.Tighten the nut to the spec-ified torque while holding themirror arm to ensure that itdoes not move out of position.
Locknut (mirror) onclamping piece
Locking device: Multi-WaxSpray
451
z Op
era
tio
n

Locknut (mirror) onclamping piece
15 lb/ft (20 Nm)
Slide protective cap overthreaded fastener.
Spring preloadSettingIt is essential to set the springpreload of the rear suspension tosuit the load carried by the mo-torcycle. Increase spring preloadwhen the motorcycle is heavilyloaded and reduce spring preloadaccordingly when the motorcycleis lightly loaded.
Adjusting spring preloadat rear wheel
Remove seat ( 56).
Remove toolkit 1.
Your motorcycle's han-dling will suffer if you do
not match the spring-preload anddamping-characteristic settings.
Adjust damping characteristic tochanged spring preload.
To increase spring preload,turn adjustment wheel 2 clock-wise using toolkit.To decrease spring preload,turn adjustment wheel 2 coun-terclockwise using toolkit.
Basic setting of springpreload, rear
Turn adjustment wheelcounterclockwise as far aspossible (One-up withoutload)
Turn adjustment wheel asfar as possible counterclock-wise, then 12 turns clock-wise (One-up with load)
Turn adjustment wheelclockwise as far as possible(Two-up with load)
with loweringOE
452
z Op
era
tio
n

Basic setting of springpreload, rear
Turn adjustment wheel asfar as possible counter-clockwise, then 5 clicks back(One-up without load)
Remount toolkit.Installing seat ( 57).
DampingSettingDamping must be adjusted to theroad conditions and the springpreload.
A rough road surface requiressofter damping than a smoothroad surface.An increase in spring preloadrequires firmer damping, a re-duction in spring preload re-quires softer damping.
Adjust damping on rearwheel
Make sure ground is level andfirm and park motorcycle.
Adjust damping via adjustingscrew 1.
To increase damping, turn ad-justing screw 1 in arrow direc-tion H.To decrease damping, turn ad-justing screw 1 in arrow direc-tion S.
Basic setting of rearwheel rear-wheel damp-
ing
without Electronic Suspen-sion Adjustment (ESA) OE
Turn adjusting screw as faras possible clockwise, thenturn back 1.5 turns (One-upwithout load)
453
z Op
era
tio
n
Basic setting of rearwheel rear-wheel damp-
ing
Turn adjusting screw as faras possible clockwise, thenturn back 1.5 turns (One-upwith load)
Turn adjusting screw as faras possible clockwise, thenturn back 1 turn (Two-upwith load)
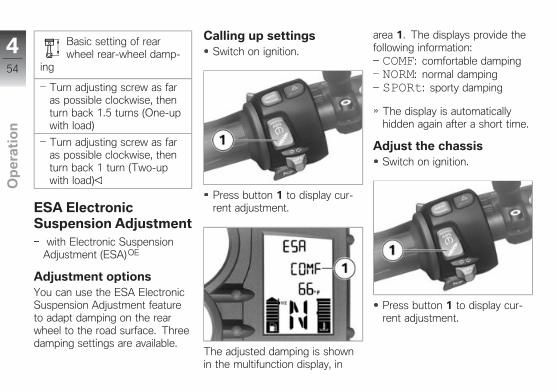
ESA ElectronicSuspension Adjustment
with Electronic SuspensionAdjustment (ESA) OE
Adjustment optionsYou can use the ESA ElectronicSuspension Adjustment featureto adapt damping on the rearwheel to the road surface. Threedamping settings are available.
Calling up settingsSwitch on ignition.
Press button 1 to display cur-rent adjustment.
The adjusted damping is shownin the multifunction display, in
area 1. The displays provide thefollowing information:COMF: comfortable dampingNORM: normal dampingSPORt: sporty damping
The display is automaticallyhidden again after a short time.
Adjust the chassisSwitch on ignition.
Press button 1 to display cur-rent adjustment.
454
z Op
era
tio
n
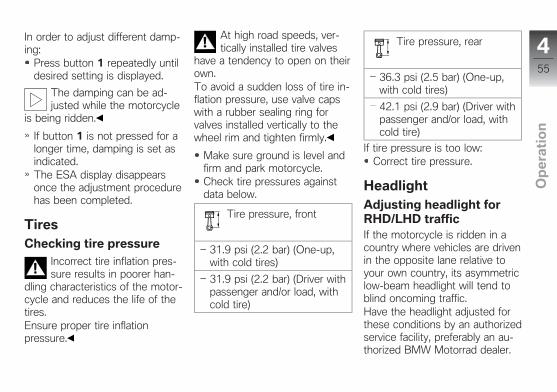
In order to adjust different damp-ing:
Press button 1 repeatedly untildesired setting is displayed.
The damping can be ad-justed while the motorcycle
is being ridden.
If button 1 is not pressed for alonger time, damping is set asindicated.The ESA display disappearsonce the adjustment procedurehas been completed.
TiresChecking tire pressure
Incorrect tire inflation pres-sure results in poorer han-
dling characteristics of the motor-cycle and reduces the life of thetires.Ensure proper tire inflationpressure.
At high road speeds, ver-tically installed tire valves
have a tendency to open on theirown.To avoid a sudden loss of tire in-flation pressure, use valve capswith a rubber sealing ring forvalves installed vertically to thewheel rim and tighten firmly.
Make sure ground is level andfirm and park motorcycle.Check tire pressures againstdata below.
Tire pressure, front
31.9 psi (2.2 bar) (One-up,with cold tires)
31.9 psi (2.2 bar) (Driver withpassenger and/or load, withcold tire)
Tire pressure, rear
36.3 psi (2.5 bar) (One-up,with cold tires)
42.1 psi (2.9 bar) (Driver withpassenger and/or load, withcold tire)
If tire pressure is too low:Correct tire pressure.
HeadlightAdjusting headlight forRHD/LHD trafficIf the motorcycle is ridden in acountry where vehicles are drivenin the opposite lane relative toyour own country, its asymmetriclow-beam headlight will tend toblind oncoming traffic.Have the headlight adjusted forthese conditions by an authorizedservice facility, preferably an au-thorized BMW Motorrad dealer.
455
z Op
era
tio
n
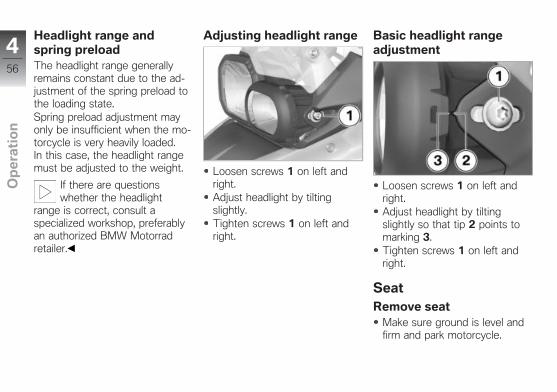
Headlight range andspring preloadThe headlight range generallyremains constant due to the ad-justment of the spring preload tothe loading state.Spring preload adjustment mayonly be insufficient when the mo-torcycle is very heavily loaded.In this case, the headlight rangemust be adjusted to the weight.
If there are questionswhether the headlight
range is correct, consult aspecialized workshop, preferablyan authorized BMW Motorradretailer.
Adjusting headlight range
Loosen screws 1 on left andright.Adjust headlight by tiltingslightly.Tighten screws 1 on left andright.
Basic headlight rangeadjustment
Loosen screws 1 on left andright.Adjust headlight by tiltingslightly so that tip 2 points tomarking 3.Tighten screws 1 on left andright.
SeatRemove seat
Make sure ground is level andfirm and park motorcycle.
456
z Op
era
tio
n
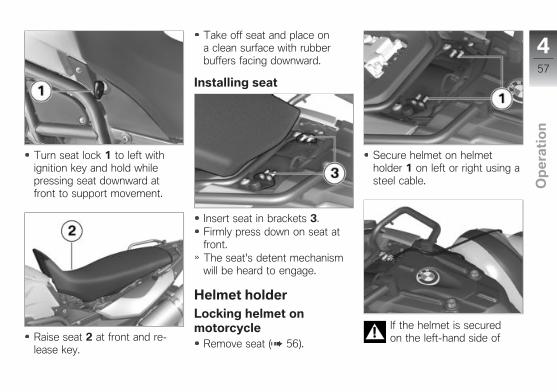
Turn seat lock 1 to left withignition key and hold whilepressing seat downward atfront to support movement.
Raise seat 2 at front and re-lease key.
Take off seat and place ona clean surface with rubberbuffers facing downward.
Installing seat
Insert seat in brackets 3.Firmly press down on seat atfront.The seat's detent mechanismwill be heard to engage.
Helmet holderLocking helmet onmotorcycle
Remove seat ( 56).
Secure helmet on helmetholder 1 on left or right using asteel cable.
If the helmet is securedon the left-hand side of
457
z Op
era
tio
n

the motorcycle, damage can becaused by the hot end muffler.Attach the helmet to the right-hand side of the motorcycle ifpossible.
The helmet catch canscratch the paneling.
When hooking on the helmet,watch the position of the helmetlock.
Guide steel cable through hel-met and bracket and positionas shown.Installing seat ( 57).
Rider's Manual (USModel)Stowing the Owner'sManual
Place Owner's Manual(s) intothe provided bag.
Tightly fold the open side ofthe bag several times andclose subsequently usingVelcro fastener 1.Stow bag in the vehicle rear.
with anti-theft alarm system(DWA)OE
Slightly lift wires 2.Slide bag backwards underthe wires and the rear framestrut 3, until the rolled-up edgeof the bag is under the rearframe strut.Remove protective foil 4 andattach the piece of Velcro toensure that the bag cannot slipfurther to the back.
458
z Op
era
tio
n
Riding
Safety instructions . . . . . . . . . . . . . . . . . . 60
Checklist . . . . . . . . . . . . . . . . . . . . . . . . . . . . 62
Starting . . . . . . . . . . . . . . . . . . . . . . . . . . . . . 62
Breaking in . . . . . . . . . . . . . . . . . . . . . . . . . . 65
Speed . . . . . . . . . . . . . . . . . . . . . . . . . . . . . . 66
Off-road riding . . . . . . . . . . . . . . . . . . . . . . 66
Brakes . . . . . . . . . . . . . . . . . . . . . . . . . . . . . . 67
Parking your motorcycle . . . . . . . . . . . . 68
Refueling . . . . . . . . . . . . . . . . . . . . . . . . . . . 69
Securing motorcycle for trans-port . . . . . . . . . . . . . . . . . . . . . . . . . . . . . . . . . 71
559
z Rid
ing

Safety instructionsRider's equipmentThe following clothing protectsyou while riding:
HelmetRider's suitGlovesBoots
This applies even to shortjourneys, and to every seasonof the year. Your authorizedBMW Motorrad retailer will behappy to advise you and hasthe correct clothing for everypurpose.
Reduced clearance ininclined position
with loweringOE
Motorcycles with lowered runninggear have a reduced clearancein inclined position and to theground compared to motorcycles
with standard running gear (seethe chapter "Technical Data").
Danger of accident due tothe motorcycle contacting
the ground unexpectedly early.Observe the reduced groundclearance of lowered motorcy-cles in all positions.
Test the clearance of your mo-torcycle at an angle in safe sit-uations. Remember to take thelimited ground clearance of yourmotorcycle into account whendriving over curbs and similar ob-stacles.
Lowering the motorcycle reducesthe spring travel. A possible re-duction in the accustomed driv-ing comfort may result. Espe-cially when riding with a passen-ger, the spring preload should beadjusted accordingly.
Correcting loading
Overloading and imbal-anced loads can adversely
affect the motorcycle's handling.Do not exceed the gross weightlimit and observe the loadinginformation.
Adjust spring preload, suspen-sion damping rate settings andtire inflation pressures for thecurrent gross vehicle weight.with case OA
Ensure that case volumes onleft and right are equal.
Make sure that weight is uni-formly distributed betweenright and left.Pack heavy pieces of luggageto bottom and inside of cases.Observe maximum payload andtop speed as indicated on labelin case.
560
z Rid
ing
with TopcaseOA
Observe maximum payload andtop speed as indicated on labelin topcase.
with tank rucksackOA
Observe maximum payload oftank rucksack.
Payload of tank rucksack
max 11 lbs (max 5 kg)
with rear softbagOA
Observe maximum payload ofthe rear bag.
Payload of rear bag
max 3 lbs (max 1.5 kg)
SpeedIf you ride at high speed, alwaysbear in mind that various bound-ary conditions can adversely af-fect the handling of your motor-cycle, e.g.:
Incorrect settings of spring-strut and shock absorber sys-temImbalanced loadLoose clothingInsufficient tire inflation pres-surePoor tire treadInstalled luggage systems, suchas cases, topcases and tankrucksacks.
Risk of poisoningExhaust fumes contain carbonmonoxide, which is colorless andodorless but highly toxic.
Inhaling exhaust fumestherefore represents a
health hazard and can even
cause loss of consciousness withfatal consequences.Do not inhale exhaust fumes.Do not run the engine in closedrooms.
Danger of burns
Engine and exhaust systembecome very hot when the
vehicle is in use. There is a riskof burn injuries by contact withhot surfaces.After parking the motorcycle,make sure that nobody comesinto contact with the engine andexhaust system.
Catalytic converterIf misfiring causes unburned fuelto enter the catalytic converter,there is a danger of overheatingand damage.The following must be observed:
561
z Rid
ing
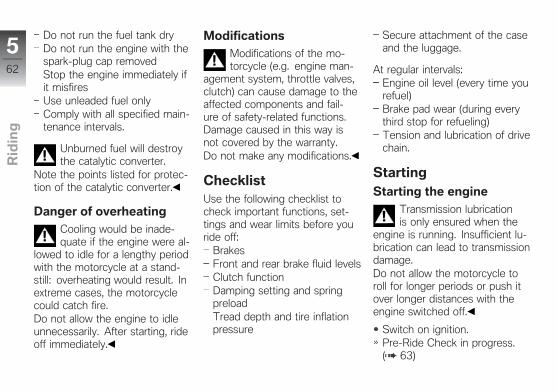
Do not run the fuel tank dryDo not run the engine with thespark-plug cap removedStop the engine immediately ifit misfiresUse unleaded fuel onlyComply with all specified main-tenance intervals.
Unburned fuel will destroythe catalytic converter.
Note the points listed for protec-tion of the catalytic converter.
Danger of overheating
Cooling would be inade-quate if the engine were al-
lowed to idle for a lengthy periodwith the motorcycle at a stand-still: overheating would result. Inextreme cases, the motorcyclecould catch fire.Do not allow the engine to idleunnecessarily. After starting, rideoff immediately.
Modifications
Modifications of the mo-torcycle (e.g. engine man-
agement system, throttle valves,clutch) can cause damage to theaffected components and fail-ure of safety-related functions.Damage caused in this way isnot covered by the warranty.Do not make any modifications.
ChecklistUse the following checklist tocheck important functions, set-tings and wear limits before youride off:
BrakesFront and rear brake fluid levelsClutch functionDamping setting and springpreloadTread depth and tire inflationpressure
Secure attachment of the caseand the luggage.
At regular intervals:Engine oil level (every time yourefuel)Brake pad wear (during everythird stop for refueling)Tension and lubrication of drivechain.
StartingStarting the engine
Transmission lubricationis only ensured when the
engine is running. Insufficient lu-brication can lead to transmissiondamage.Do not allow the motorcycle toroll for longer periods or push itover longer distances with theengine switched off.
Switch on ignition.Pre-Ride Check in progress.( 63)
562
z Rid
ing
ABS self-diagnosis isperformed. ( 64)with Automatic Stability Control(ASC) OE
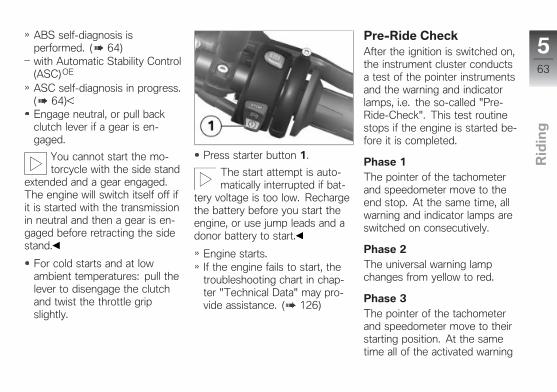
ASC self-diagnosis in progress.( 64)Engage neutral, or pull backclutch lever if a gear is en-gaged.
You cannot start the mo-torcycle with the side stand
extended and a gear engaged.The engine will switch itself off ifit is started with the transmissionin neutral and then a gear is en-gaged before retracting the sidestand.
For cold starts and at lowambient temperatures: pull thelever to disengage the clutchand twist the throttle gripslightly.
Press starter button 1.
The start attempt is auto-matically interrupted if bat-
tery voltage is too low. Rechargethe battery before you start theengine, or use jump leads and adonor battery to start.
Engine starts.If the engine fails to start, thetroubleshooting chart in chap-ter "Technical Data" may pro-vide assistance. ( 126)
Pre-Ride CheckAfter the ignition is switched on,the instrument cluster conductsa test of the pointer instrumentsand the warning and indicatorlamps, i.e. the so-called "Pre-Ride-Check". This test routinestops if the engine is started be-fore it is completed.
Phase 1The pointer of the tachometerand speedometer move to theend stop. At the same time, allwarning and indicator lamps areswitched on consecutively.
Phase 2The universal warning lampchanges from yellow to red.
Phase 3The pointer of the tachometerand speedometer move to theirstarting position. At the sametime all of the activated warning
563
z Rid
ing

and indicator lamps are switchedoff in reverse sequence.
If a pointer has not been moved,or if one of the warning andindicator lamps has not beenswitched on:
Have the malfunction correctedas soon as possible at an au-thorized workshop, preferablyan authorized BMW Motorradretailer.
ABS self-diagnosisThe self-diagnosis routineis determining whetherBMW Motorrad ABS is ready foroperation. The self-diagnosisroutine runs automatically whenyou switch on the ignition. Tocheck the wheel speed sensors,the motorcycle must be driven afew yards.
Phase 1Check on system componentsmonitored by the diagnostic sys-tem while vehicle is parked.
ABS warning lamp flashes.
Phase 2Check wheel sensors while start-ing off.
ABS warning lamp flashes.
ABS self-diagnosiscompletedABS warning lamp goes out.
Watch all warning and indicatorlamps on the display.
An ABS error is indicated follow-ing completion of the ABS self-diagnosis routine.
It remains possible to continueriding. It must be noted that
the ABS function is not avail-able.Have the malfunction correctedas soon as possible at an au-thorized workshop, preferablyan authorized BMW Motorradretailer.
ASC self-diagnosiswith Automatic Stability Control(ASC)OE
The self-diagnosis routineis determining whether theBMW Motorrad Integral ASCis ready for operation. Theself-diagnosis routine runsautomatically when you switch onthe ignition.
Phase 1Check on system componentsmonitored by diagnostic sys-tem while vehicle is parked.
564
z Rid
ing
ASC warning light flashesslowly.
Phase 2Diagnostic system evaluatesstatus of monitored systemcomponents while vehicle isunderway (at least 3.1 mph[5 km/h]).
ASC warning light flashesslowly.
ASC self-diagnosiscompleted
ASC warning lamp goes out.
If an ASC error is indicated fol-lowing completion of the ASCself-diagnosis routine:
It remains possible to continueriding. Please be aware thatASC functionality is no longeravailable.Have the malfunction correctedas soon as possible at an au-thorized workshop, preferably
an authorized BMW Motorradretailer.
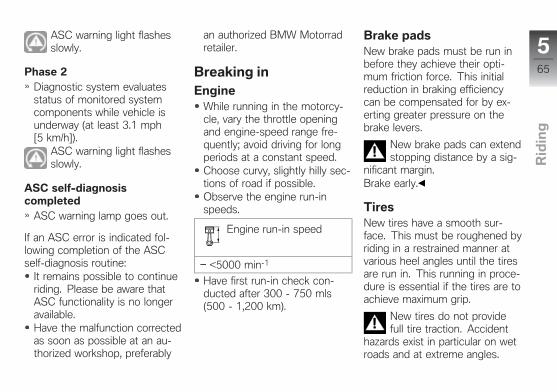
Breaking inEngine
While running in the motorcy-cle, vary the throttle openingand engine-speed range fre-quently; avoid driving for longperiods at a constant speed.Choose curvy, slightly hilly sec-tions of road if possible.Observe the engine run-inspeeds.
Engine run-in speed
<5000 min-1
Have first run-in check con-ducted after 300 - 750 mls(500 - 1,200 km).
Brake padsNew brake pads must be run inbefore they achieve their opti-mum friction force. This initialreduction in braking efficiencycan be compensated for by ex-erting greater pressure on thebrake levers.
New brake pads can extendstopping distance by a sig-
nificant margin.Brake early.
TiresNew tires have a smooth sur-face. This must be roughened byriding in a restrained manner atvarious heel angles until the tiresare run in. This running in proce-dure is essential if the tires are toachieve maximum grip.
New tires do not providefull tire traction. Accident
hazards exist in particular on wetroads and at extreme angles.
565
z Rid
ing

Always think well ahead andavoid extreme angles.
Speedwith onboard computerOE
Engine speed warning
The engine speed warning sig-nals to the driver that the redengine speed range has beenreached. This signal is shown inred by the flashing of the anti-theft alarm indicator light 1.The signal is maintained until thetransmission is upshifted or theengine speed is reduced. It can
be activated or deactivated bythe driver.
Activating engine speedwarning
Press and hold button 1 andbutton 2 simultaneously untildisplay changes.FLASH (engine speed warn-ing indicator) and ON or OFFare shown.Press button 1 until desiredstate is shown.ON: engine speed warning ac-tivated.
OFF: engine speed warningdeactivated.To save the setting made,press and hold button 1 andbutton 2 simultaneously untilthe display changes.
Off-road ridingAfter driving offroadBMW Motorrad recommendsthat the following be observedafter driving offroad:
Tire inflation pressure
A tire inflation pressure re-duced for offroad driving
leads to poorer handling of themotorcycle on paved roads andcan result in accidents.Ensure proper tire inflationpressure.
566
z Rid
ing
Brakes
When the motorcycle isridden on loose surfaces
or muddy roads, the brakes mayfail to take effect immediatelybecause of dirt or moisture onthe disks or brake pads.Brake early until the brakes arebraked clean.
Driving on unpaved or dirtyroads leads to increased
brake pad wear.Check the brake pad thicknessmore often and replace the brakepads sooner.
Spring preload and damping
Spring preload and damp-ing values that have been
changed for offroad use reducehandling characteristics on pavedsurfaces.Before returning to on-road use,reset correct spring preload andcorrect damping.
RimsBMW Motorrad recommendschecking the rims for possibledamage after riding offroad.
Air cleaner insert
Engine damage due tosoiled air filter insert.
When driving in dusty terrain,check air filter insert for soilingat short intervals and clean or re-place if necessary.
Use under very dusty conditions(deserts, savannas, etc.) requiresthe use air cleaner inserts spe-cially developed for these kindsof applications.
BrakesHow do you achievethe shortest stoppingdistances?The dynamic load distribution be-tween the front and rear wheelchanges during braking. Theheavier you brake, the greaterthe weight transfer to the frontwheel. Increases in the load atan individual wheel are accom-panied by a rise in the effectivebraking force that the wheel canprovide.To achieve the shortest possi-ble braking distance, the frontbrake must be applied quicklyand with increasing force. Thisprocedure provides ideal exploita-tion of the extra weight transferto the front wheel. The clutchshould also be disengaged atthe same time. With the "forcedbraking" often practiced in whichthe brake pressure is generated
567
z Rid
ing

as quickly as possible and withgreat force, the dynamic loaddistribution cannot follow theincreased deceleration and thebraking force cannot be com-pletely transferred to the roadsurface. The front wheel can lockup.Locking up of the front wheel isprevented by the BMW MotorradABS.
Descending mountainpasses
There is a danger of thebrakes fading if you use
only the rear brakes whendescending mountain passes.Under extreme conditions, thebrakes could overheat and suffersevere damage.Use both front and rear brakes,and make use of the engine'sbraking effect as well.
Wet, soiled brakesMoisture and dirt on the brakerotors and the brake pads resultin a decrease in the braking ac-tion.Delayed or poorer braking actionmust be expected in the follow-ing situations:
When driving in the rain andthrough puddles.After washing the motorcycle.When driving on roads spreadwith salt.After working on the brakesdue to oil or grease residues.When driving on soiled roadsor offroad.
Poor braking action due tomoisture and dirt.
Brake until brakes are dry orclean; clean if necessary.Brake early until the full brakingaction is available again.
Parking yourmotorcycleSide stand
Switch off engine.
If the ground is soft or un-even, there is no guaran-
tee that the motorcycle will restfirmly on the stand.Always check that the groundunder the stand is level andfirm.
The side stand is designedto support only the weight
of the motorcycle.Do not lean or sit on themotorcycle with the side standextended.
Fold out side stand and parkmotorcycle.If the slope of the road permits,turn the handlebars to the left.On a grade, the motorcycleshould always face uphill; se-lect 1st gear.
568
z Rid
ing

Center standwith center stand OE
Switch off engine.
If the ground is soft or un-even, there is no guaran-
tee that the motorcycle will restfirmly on the stand.Always check that the groundunder the stand is level andfirm.
Excessive movementscould result in the center
stand retracting, and the vehiclecould topple as a result.Do not sit on the motorcyclewhile it is resting on the centerstand.
Fold out center stand and jackup motorcycle.On a grade, the motorcycleshould always face uphill; se-lect 1st gear.
RefuelingFuel specificationsFor optimal fuel economy, thegasoline should be sulfur-free orvery low in sulfur content.
Leaded fuel will destroy thecatalytic converter.
Do not refuel with leaded gaso-line or gasoline with metallicadditives, e. g. manganese orIron.
Ethanol E85 might damagethe engine and fuel supply
system.Do not refuel with E85, i.e. fuelwith an ethanol content of 85 %,or with Flex Fuel.
Fuels with a maximum ethanolcontent of 10 %, i. e., E10,may be used for refueling.
Recommended fuel qual-ity
Super unleaded (max. 10 %ethanol, E10)89 AKI (95 ROZ/RON)89 AKI
with regular unleaded gaso-line (RON 91) OE
Regular unleaded (minorrestrictions with regard topower and fuel consump-tion) (max. 10 % ethanol,E10)87 AKI (91 ROZ/RON)87 AKI
Refueling procedure
Fuel is highly flammable.Fire at the fuel tank can
result in fire and explosion.Do not smoke. Never bring anaked flame near the fuel tank.
569
z Rid
ing
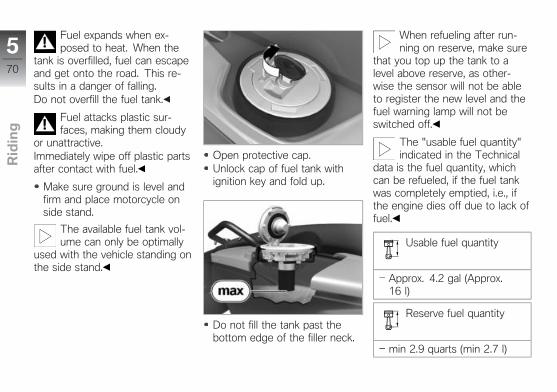
Fuel expands when ex-posed to heat. When the
tank is overfilled, fuel can escapeand get onto the road. This re-sults in a danger of falling.Do not overfill the fuel tank.
Fuel attacks plastic sur-faces, making them cloudy
or unattractive.Immediately wipe off plastic partsafter contact with fuel.
Make sure ground is level andfirm and place motorcycle onside stand.
The available fuel tank vol-ume can only be optimally
used with the vehicle standing onthe side stand.
Open protective cap.Unlock cap of fuel tank withignition key and fold up.
Do not fill the tank past thebottom edge of the filler neck.
When refueling after run-ning on reserve, make sure
that you top up the tank to alevel above reserve, as other-wise the sensor will not be ableto register the new level and thefuel warning lamp will not beswitched off.
The "usable fuel quantity"indicated in the Technical
data is the fuel quantity, whichcan be refueled, if the fuel tankwas completely emptied, i.e., ifthe engine dies off due to lack offuel.
Usable fuel quantity
Approx. 4.2 gal (Approx.16 l)
Reserve fuel quantity
min 2.9 quarts (min 2.7 l)
570
z Rid
ing

Press fuel tank cap down firmlyto close.Remove key and close protec-tive cap.
Securing motorcyclefor transport
Protect all component surfacesagainst which straps are routedagainst scratching. For exam-ple, use adhesive tape or softcloths.
The motorcycle can tipaway to the side and fall
over.
Secure motorcycle against tip-ping away to the side, prefer-ably with the help of a secondperson.
Push motorcycle onto transportsurface, and do not place onside stand or center stand.
Components can be dam-aged.
Do not pinch components, e.g.brake lines or wiring harnesses.
Secure straps at front on bothsides on lower fork bridge andtension.
Secure straps at rear on bothsides on rear frame and ten-sion.Tension all straps evenly; thevehicle should be pulled downagainst its springs with the sus-pension compressed as muchas possible.
571
z Rid
ing

572
z Rid
ing
Technology in detail
Brake system with BMW MotorradABS . . . . . . . . . . . . . . . . . . . . . . . . . . . . . . . . 74
Engine management withBMW Motorrad ASC . . . . . . . . . . . . . . . . 75
Tire Pressure Control TCP/RDC . . . . 77
673
z Te
ch
no
log
y in
de
tail

Brake system withBMW Motorrad ABSHow does ABS work?The maximum braking force thatcan be transferred to the roadsurface is partially dependent onthe friction coefficient of the roadsurface. Gravel, ice, snow andwet roads offer a considerablypoorer friction coefficient than adry, clean asphalt surface. Thepoorer the friction coefficient ofthe road surface is, the longerthe braking distance will be.If the maximum transferable brak-ing force is exceeded when thedriver increases the brake pres-sure, the wheels begin to lockand driving stability is lost, and afall can result. Before this situa-tion occurs, ABS intervenes andadjusts the brake pressure to themaximum transferable brakingforce. This enables the wheelsto continue to turn and maintains
driving stability regardless of theroad surface condition.
What happens whenrough roads areencountered?Bumpy or rough roads can brieflylead to a loss of contact betweenthe tires and the road surface,until the transferable brakingforce is reduced to zero. If brak-ing is carried out in this situa-tion, ABS must reduce the brakepressure to ensure driving sta-bility when restoring contact tothe road. At this point in time,the BMW Motorrad ABS mustassume extremely low friction co-efficients (gravel, ice, snow) sothat the running wheels turn inevery imaginable case and thedriving stability is ensured. Afterdetecting the actual conditions,the system adjusts the optimumbrake pressure.
Lifting off rear wheelHowever, during extremely heavyand rapid decelerations it is pos-sible that the BMW MotorradABS cannot prevent the rearwheel from lifting off the ground.In these cases, the motorcyclecan also flip end over end.
Heavy braking can lead tothe rear wheel lifting off the
ground.When braking, bear in mindthat the ABS control cannotalways be relied on to preventthe rear wheel from lifting off theground.
What are the designcharacteristics of theBMW Motorrad ABS?The BMW Motorrad ABS en-sures driving stability on any sur-face within the limits of drivingphysics. The system is not op-timized for special requirements
674
z Te
ch
no
log
y in
de
tail

resulting under extreme weatherconditions offroad or on the race-track.
Special situationsTo detect the tendency of thewheels to lock up, the speedsof the front and rear wheel arecompared. If implausible valuesare detected over a longer periodof time, the ABS function is de-activated for safety reasons andan ABS error is indicated. Thecondition for a fault code is thecompleted self-diagnosis.In addition to problems on theBMW Motorrad ABS, unusualdriving conditions can also leadto a fault message.Unusual driving conditions:
Driving on the rear wheel(wheelie) for a longer period.Rear wheel spinning in placewith front brake pulled (burnout).
Heating up on the main or aux-iliary stand at idle or with gearengaged.Locked-up rear wheel for alonger period of time, e.g.when riding downhill offroad.
Should a fault code occur due toone of the driving conditions de-scribed above, the ABS functioncan be reactivated by switchingthe ignition off and then on again.
How important is regularmaintenance?
Any technical system is al-ways only as good as its
maintenance condition.To ensure that theBMW Motorrad ABS is in anoptimally maintained condition,it is vital that the specifiedinspection intervals be compliedwith.
Reserves for safetyBut remember: the potentiallyshorter braking distances whichBMW Motorrad ABS permitsmust not be used as an excusefor careless riding. ABS is pri-marily a means of ensuring asafety margin in genuine emer-gencies.Be careful in curves! When youapply the brakes on a corner,the motorcycle's weight andmomentum take over and evenBMW Motorrad ABS is unable tocounteract their effects.
Engine managementwith BMW MotorradASC
with Automatic Stability Control(ASC)OE
675
z Te
ch
no
log
y in
de
tail

How does ASC work?The BMW Motorrad ASC com-pares the wheel speeds of thefront and rear wheels. From thespeed difference the slip, andwith it the stability reserves onthe rear wheel are determined.When a slip limit is exceeded, theengine torque is adapted by theengine management system.
What are the designcharacteristics of theBMW Motorrad ASC?The BMW Motorrad ASC is anassistance system for the riderand is designed for driving onpublic roads. Especially at thelimits of physics, the rider hasa considerable influence on theextent of the control that ASCcan provide (shifting weight incurves, loose loads).The system is not optimized forspecial requirements resultingunder extreme weather condi-
tions offroad or on the racetrack.The BMW Motorrad ASC can bedeactivated for these cases.
Even with ASC, the laws ofphysics cannot be overrid-
den. The rider is always respon-sible for adapting his/her drivingstyle.Do not reduce the additionalsafety provided with riskydriving.
Special situationsAs lean angles increase, accel-eration potential is also progres-sively restricted by the laws ofphysics. This can result in de-layed acceleration when comingout of very tight curves.
To detect spinning or slippingaway of the rear wheel, thespeeds of the front andrear wheel are compared. Ifimplausible values are detectedover a longer period of time, the
ASC function is deactivated forsafety reasons and an ASC faultis indicated. The condition for afault code is the completed self-diagnosis.In the following unusual drivingconditions, the BMW MotorradASC can be automatically deacti-vated.Unusual driving conditions:
Driving on the rear wheel(wheelie) for a longer periodwith ASC deactivatedRear wheel spinning in placewith front brake engaged (burnout)Heating up on the main or aux-iliary stand at idle or with gearengaged
The ASC is reactivated byswitching the ignition on andoff and then driving at a speedabove 3.1 mph (5 km/h).
676
z Te
ch
no
log
y in
de
tail

If the front wheel loses contactwith the ground during extremeacceleration, the ASC reducesthe engine torque until the frontwheel touches the ground again.In this case, BMW Motorrad rec-ommends turning back the throt-tle grip somewhat to achievea stable driving state again asquickly as possible.
On a slippery surface, thethrottle grip should never besuddenly turned back completelywithout pulling the clutch atthe same time. The enginebraking torque can cause therear wheel to block, resulting inan unstable driving state. Thiscase cannot be controlled by theBMW Motorrad ASC.
Tire Pressure ControlTCP/RDC
with Tire Pressure Control(TPC/RDC)OE
FunctionA sensor is located in each tire,which measures the air temper-ature and the inflation pressureinside the tire and sends thesevalues to the control unit.
The sensors are equipped witha centrifugal controller, whichdoes not enable the transmis-sion of the measured values un-til a speed of approx. 19 mph(30 km/h) is reached. Before ini-tial reception of the tire inflationpressure, -- is shown in the dis-play for each tire. The sensorscontinue to transmit the mea-sured values for approx. 15 min-utes after the vehicle comes to astop.
The control unit can manage foursensors, and as a result two setsof wheels with TPC/RDC sen-sors can be driven. If a TPC/RDCcontrol unit is installed withoutthe wheels being equipped withsensors, an error message is out-put.
TemperaturecompensationThe tire inflation pressure is tem-perature dependent, i.e., it in-creases or decreases togetherwith the tire temperature. Thetire temperature is dependent onthe ambient temperature and onthe driving style and duration.
The tire inflation pressures areshown temperature-compen-sated in the multifunction display;they refer to a tire temperatureof 68 °F (20 °C). No tempera-ture compensation takes place inthe inflation pressure testers at
677
z Te
ch
no
log
y in
de
tail

filling stations, meaning that themeasured tire inflation pressurevaries according to tire temper-ature. As a result, the pressurefigures indicated by the gaugesat filling stations will usually varyfrom those appearing in the mul-tifunction display.
Tire inflation pressurerangesThe TPC/RDC control unit distin-guishes between three inflationpressure ranges matched to themotorcycle:
Inflation pressure within thepermissible toleranceInflation pressure at the limitsof the permissible toleranceInflation pressure outside thepermissible tolerance
Adjusting inflationpressureCompare the TPC/RDC value inthe multifunction display with thevalue on the back cover of theRider's Manual. The differencebetween the two values must becompensated with the air pres-sure tester at the filling station.
Example: According to theRider's Manual, the tire inflationpressure is to be 36 psi (2.5 bar),however 33 psi (2.3 bar) isshown in the multifunctiondisplay. The tester at thefilling station indicates 34.8 psi(2.4 bar). This value must beincreased by 3 psi (0.2 bar) to37.8 psi (2.6 bar) in order toproduce the correct tire inflationpressure.
678
z Te
ch
no
log
y in
de
tail

Accessories
General instructions . . . . . . . . . . . . . . . . . 80
Onboard power sockets . . . . . . . . . . . . 80
Luggage . . . . . . . . . . . . . . . . . . . . . . . . . . . . 81
Case . . . . . . . . . . . . . . . . . . . . . . . . . . . . . . . . 81
Topcase . . . . . . . . . . . . . . . . . . . . . . . . . . . . 84
779
z Ac
ce
sso
rie
s

General instructionsBMW Motorrad recommendsthe use of parts and accessoriesfor your motorcycle that are ap-proved by BMW for this purpose.Your authorized BMW Motorradretailer will be happy to providequalified advice on the selectionof genuine BMW parts and ac-cessories as well as other BMW-approved products.These parts and products havebeen tested by BMW for safety,function and suitability. BMWaccepts product liability for theseproducts.BMW is unable to accept any li-ability whatsoever for parts andaccessories which it has not ap-proved.Observe the information onthe importance of wheel sizesfor chassis control systems( 101).
BMW Motorrad cannot ex-amine or test each product
of outside origin to ensure that itcan be used on or in connectionwith BMW motorcycles withoutconstituting a safety hazard. Noris this guarantee provided whenthe official approval of a specificcountry has been granted. Testsconducted by these instancescannot make provision for all op-erating conditions experienced byBMW motorcycles and, conse-quently, they are not sufficient insome circumstances.Use only parts and accessoriesapproved by BMW for yourmotorcycle.
Whenever you are planning mod-ifications, comply with all the le-gal requirements. The vehiclemust not infringe on nationalroad-vehicle construction anduse regulations of your country.
Onboard power socketsInformation on using onboardpower sockets:
Automatic deactivationOnboard sockets are switched offautomatically under the followingconditions:
If the battery's voltage falls be-low the level required to startthe vehicleIf the maximum loadabilityspecified in the technical datais exceededDuring starting.
Operating electrical acces-soriesAdditional devices connected toonboard sockets can only be putinto operation when the ignitionis switched on. The accessoryremains operational if the igni-tion is subsequently switched off.Onboard sockets are switched offapprox. 15 minutes after switch-
780
z Ac
ce
sso
rie
s

ing off the ignition to reduce thestrain on the onboard electricalsystem.Additional devices with lowpower consumption are possiblynot detected by the vehicleelectronics. In these cases,onboard sockets are alreadyswitched off shortly after theignition is switched off.
Cable routingThe cords from the powersockets to the devices must berouted in such a way that they:
do not interfere with thedriver's freedom of movementdo not limit steering angles andhandling characteristicscannot be caught or trapped.
LuggageLashing down luggage
Route luggage belts betweenmotorcycle and along anti-sliplocks 1.
Route luggage belt 2 as shownusing example of a luggage roll.Check piece of luggage for se-cure hold.
Casewith case OA
781
z Ac
ce
sso
rie
s

Open case
Turn key 1 in case lock per-pendicular to direction of travel.Hold down yellow locking de-vice 2 and fold out carryinghandle 3.
Press yellow button 4 down-ward while opening case lid.
Close caseTurn key in case lock perpen-dicular to direction of travel.Close case lid.The lid clicks audibly into place.
If the carrying handle isfolded down when the slot
of the case lock is oriented in thedirection of travel, the lock tabcan be damaged.Before folding down the carryinghandle, make sure that the slot ofthe case lock is perpendicular tothe direction of travel.
Fold carrying handle 3 down.Turn key in case lock in thedirection of travel and remove.
Adjust case volumeOpen and empty case.
782
z Ac
ce
sso
rie
s

Engage pivot lever 1 in upperend position to obtain smallervolume.Engage pivot lever 1 in lowerend position to set larger vol-ume.Close case.
Remove case
Turn key 1 in case lock per-pendicular to direction of travel.Hold down yellow locking de-vice 2 and fold out carryinghandle 3.
Pull up red release lever 4.Locking flap 5 pops up.Fold locking flap all the wayopen.Remove case from mount byits handle.
Mounting caseTurn key in case lock perpen-dicular to direction of travel.
783
z Ac
ce
sso
rie
s
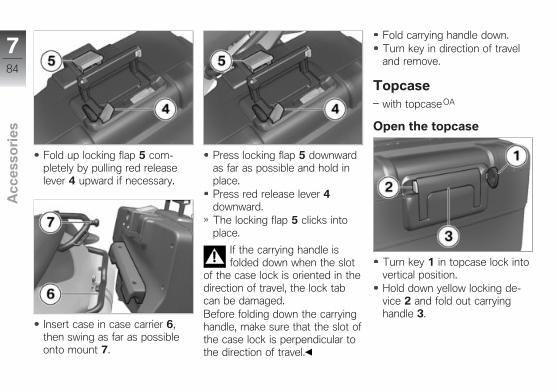
Fold up locking flap 5 com-pletely by pulling red releaselever 4 upward if necessary.
Insert case in case carrier 6,then swing as far as possibleonto mount 7.
Press locking flap 5 downwardas far as possible and hold inplace.Press red release lever 4downward.The locking flap 5 clicks intoplace.
If the carrying handle isfolded down when the slot
of the case lock is oriented in thedirection of travel, the lock tabcan be damaged.Before folding down the carryinghandle, make sure that the slot ofthe case lock is perpendicular tothe direction of travel.
Fold carrying handle down.Turn key in direction of traveland remove.
Topcasewith topcaseOA
Open the topcase
Turn key 1 in topcase lock intovertical position.Hold down yellow locking de-vice 2 and fold out carryinghandle 3.
784
z Ac
ce
sso
rie
s

Press yellow button 4 towardfront while pressing topcase lidupward.
Closing the topcaseTurn key in topcase lock intovertical position.
Close topcase lid with firmpressure.
If the carrying handle isfolded down when the slot
of the topcase lock is horizontal,the lock tab can be damaged.Before folding down the carryinghandle, make sure that the slot ofthe topcase lock is vertical.
Fold carrying handle 3 down.Carrying handle audibly en-gages.Turn key in topcase lock intohorizontal position and remove.
Adjusting topcase volumeOpen and empty topcase.
Engage pivot lever 1 in frontend position to set larger vol-ume.Engage pivot lever 1 in rearend position to set smaller vol-ume.Close topcase.
785
z Ac
ce
sso
rie
s

Removing topcase
Turn key 1 in topcase lock intovertical position.Hold down yellow locking de-vice 2 and fold out carryinghandle 3.
Pull red release lever 4 towardrear.Locking flap 5 pops up.Fold locking flap 5 all the wayopen.Remove topcase from mount-ing by its handle.
Mounting the topcaseTurn key in topcase lock intovertical position.
Fold up locking flap 5 com-pletely by pulling red releaselever 4 toward rear if neces-sary.
Hook topcase into front hold-ers 1 of topcase retaining plate.
786
z Ac
ce
sso
rie
s

Press topcase onto topcaseretaining plate at rear.
Fold locking flap 5 closed asfar as possible and hold inplace.Press red release lever 4 to-ward front.Locking flap clicks into place.
If the carrying handle isfolded down when the slot
of the topcase lock is horizontal,the lock tab can be damaged.Before folding down the carryinghandle, make sure that the slot ofthe topcase lock is vertical.
Fold carrying handle down.Turn key into horizontal posi-tion and remove.
787
z Ac
ce
sso
rie
s

788
z Ac
ce
sso
rie
s

Maintenance
General instructions . . . . . . . . . . . . . . . . . 90
Onboard tool kit . . . . . . . . . . . . . . . . . . . . 90
Engine oil . . . . . . . . . . . . . . . . . . . . . . . . . . . 91
Brake system . . . . . . . . . . . . . . . . . . . . . . . 93
Coolant . . . . . . . . . . . . . . . . . . . . . . . . . . . . . 96
Clutch . . . . . . . . . . . . . . . . . . . . . . . . . . . . . . 97
Wheel rims and tires . . . . . . . . . . . . . . . . 98
Chain . . . . . . . . . . . . . . . . . . . . . . . . . . . . . . . 99
Wheels . . . . . . . . . . . . . . . . . . . . . . . . . . . . 100
Front wheel stand . . . . . . . . . . . . . . . . . 107
Lamps . . . . . . . . . . . . . . . . . . . . . . . . . . . . . 108
Fairings and Panels . . . . . . . . . . . . . . . . 114
Air cleaner . . . . . . . . . . . . . . . . . . . . . . . . . 115
Jump-starting . . . . . . . . . . . . . . . . . . . . . . 116
Battery . . . . . . . . . . . . . . . . . . . . . . . . . . . . . 117
889
z Ma
inte
na
nc
e
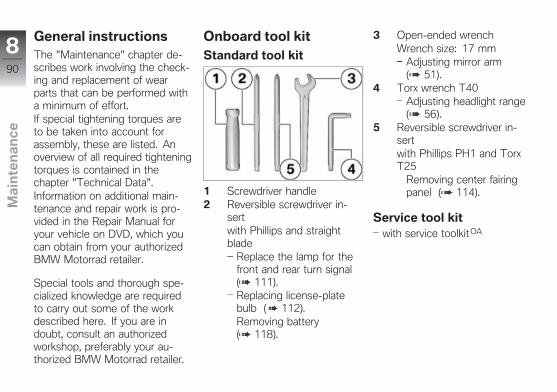
General instructionsThe "Maintenance" chapter de-scribes work involving the check-ing and replacement of wearparts that can be performed witha minimum of effort.If special tightening torques areto be taken into account forassembly, these are listed. Anoverview of all required tighteningtorques is contained in thechapter "Technical Data".Information on additional main-tenance and repair work is pro-vided in the Repair Manual foryour vehicle on DVD, which youcan obtain from your authorizedBMW Motorrad retailer.
Special tools and thorough spe-cialized knowledge are requiredto carry out some of the workdescribed here. If you are indoubt, consult an authorizedworkshop, preferably your au-thorized BMW Motorrad retailer.
Onboard tool kitStandard tool kit
1 Screwdriver handle2 Reversible screwdriver in-
sertwith Phillips and straightblade
Replace the lamp for thefront and rear turn signal( 111).Replacing license-platebulb ( 112).Removing battery( 118).
3 Open-ended wrenchWrench size: 17 mm
Adjusting mirror arm( 51).
4 Torx wrench T40Adjusting headlight range( 56).
5 Reversible screwdriver in-sertwith Phillips PH1 and TorxT25
Removing center fairingpanel ( 114).
Service tool kitwith service toolkitOA
890
z Ma
inte
na
nc
e

For more extensive service op-erations (such as wheel removaland installation), BMW Motorradhas put together a service tool kitmatched to your motorcycle. Youcan purchase this tool kit fromyour authorized BMW Motorradretailer.
Engine oilChecking engine oil level
The oil level varies withthe temperature of the
oil. The higher the temperature,the higher the level of oil in thesump. Checking the oil level with
the engine cold or after a shorttrip leads to misinterpretations ofthe oil fill quantity.To ensure that the display of theengine oil level is correct, onlycheck the oil level with the en-gine at operating temperature.
Wipe area around oil filler loca-tion clean.Allow engine to idle until fanstarts, then let it continue run-ning for an additional minute.Switch off engine.Make sure ground is level andfirm and hold motorcycle at op-erating temperature vertically.with center stand OE
Make sure ground is level andfirm and place motorcycle atoperating temperature on itscenter stand.
The motorcycle can tipaway to the side and fall
over.Secure motorcycle against tip-ping away to the side, prefer-ably with the help of a secondperson.
Remove oil dipstick 1.
891
z Ma
inte
na
nc
e

Wipe off the graduated sec-tion 2 with a dry cloth.Position oil dipstick on oil filleropening, but do not screw in.Remove oil dipstick and readfluid level.
Specified level of engineoil
between MIN and MAXmarking
Engine oil, quantity fortopping up
Products recommended byBMW Motorrad
max 0.4 quarts (max 0.4 l)(Difference between MINand MAX)
If the oil level is below MIN mark:Topping up engine oil ( 92).
If oil level is above MAX mark:Have fluid level corrected by anauthorized workshop, preferablyan authorized BMW Motorradretailer.
Install oil dipstick.
Topping up engine oilMake sure ground is level andfirm and park motorcycle.Clean the area adjacent to theoil filler opening.
892
z Ma
inte
na
nc
e
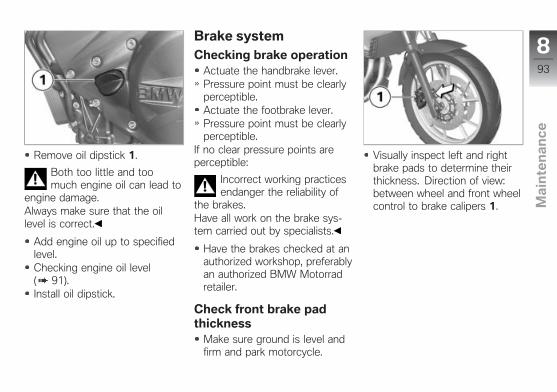
Remove oil dipstick 1.
Both too little and toomuch engine oil can lead to
engine damage.Always make sure that the oillevel is correct.
Add engine oil up to specifiedlevel.Checking engine oil level( 91).Install oil dipstick.
Brake systemChecking brake operation
Actuate the handbrake lever.Pressure point must be clearlyperceptible.Actuate the footbrake lever.Pressure point must be clearlyperceptible.
If no clear pressure points areperceptible:
Incorrect working practicesendanger the reliability of
the brakes.Have all work on the brake sys-tem carried out by specialists.
Have the brakes checked at anauthorized workshop, preferablyan authorized BMW Motorradretailer.
Check front brake padthickness
Make sure ground is level andfirm and park motorcycle.
Visually inspect left and rightbrake pads to determine theirthickness. Direction of view:between wheel and front wheelcontrol to brake calipers 1.
893
z Ma
inte
na
nc
e
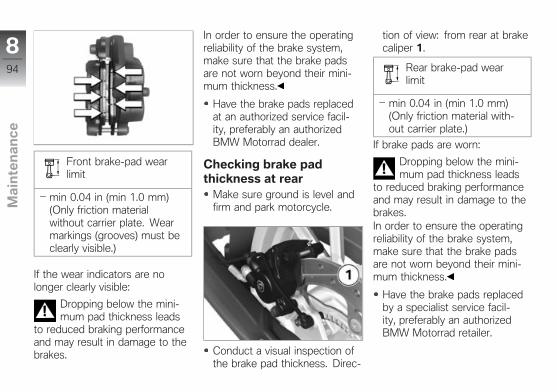
Front brake-pad wearlimit
min 0.04 in (min 1.0 mm)(Only friction materialwithout carrier plate. Wearmarkings (grooves) must beclearly visible.)
If the wear indicators are nolonger clearly visible:
Dropping below the mini-mum pad thickness leads
to reduced braking performanceand may result in damage to thebrakes.
In order to ensure the operatingreliability of the brake system,make sure that the brake padsare not worn beyond their mini-mum thickness.
Have the brake pads replacedat an authorized service facil-ity, preferably an authorizedBMW Motorrad dealer.
Checking brake padthickness at rear
Make sure ground is level andfirm and park motorcycle.
Conduct a visual inspection ofthe brake pad thickness. Direc-
tion of view: from rear at brakecaliper 1.
Rear brake-pad wearlimit
min 0.04 in (min 1.0 mm)(Only friction material with-out carrier plate.)
If brake pads are worn:
Dropping below the mini-mum pad thickness leads
to reduced braking performanceand may result in damage to thebrakes.In order to ensure the operatingreliability of the brake system,make sure that the brake padsare not worn beyond their mini-mum thickness.
Have the brake pads replacedby a specialist service facil-ity, preferably an authorizedBMW Motorrad retailer.
894
z Ma
inte
na
nc
e

Checking front brake fluidlevel
Make sure ground is level andfirm and hold motorcycle verti-cally.with center stand OE
Make sure ground is level andfirm and place motorcycle onits center stand.
Move handlebars into straight-ahead position.
A low fluid level in thebrake reservoir can allow air
to penetrate the brake system.
This significantly reduces brakingefficiency.Check brake fluid levelregularly.
Check brake fluid level in frontbrake-fluid reservoir 1.
The brake fluid level in thebrake-fluid reservoir drops
due to brake pad wear.
Front brake fluid level(visual check)
Brake fluid, DOT4
The brake fluid level mustnot fall below the MIN mark.
If brake fluid level falls below theapproved level:
Have the defect corrected assoon as possible by an autho-rized workshop, preferably anauthorized BMW Motorrad re-tailer.
Checking rear brake fluidlevel
Make sure ground is level andfirm and hold motorcycle verti-cally.with center stand OE
Make sure ground is level andfirm and place motorcycle onits center stand.
895
z Ma
inte
na
nc
e

A low fluid level in thebrake reservoir can allow air
to penetrate the brake system.This significantly reduces brakingefficiency.Check brake fluid levelregularly.
Read brake fluid level at rearbrake-fluid reservoir 1.
The brake fluid level in thebrake-fluid reservoir drops
due to brake pad wear.
Rear brake fluid level (vi-sual check)
Brake fluid, DOT4
The brake fluid level mustnot fall below the MIN mark.
If brake fluid level falls below theapproved level:
Have the defect corrected assoon as possible by an autho-rized workshop, preferably anauthorized BMW Motorrad re-tailer.
CoolantChecking coolant level
Make sure ground is level andfirm and park motorcycle.
Read off coolant level on ex-pansion tank 1. Viewing di-rection: from front throughwindshield and right-hand sidepanel.
896
z Ma
inte
na
nc
e
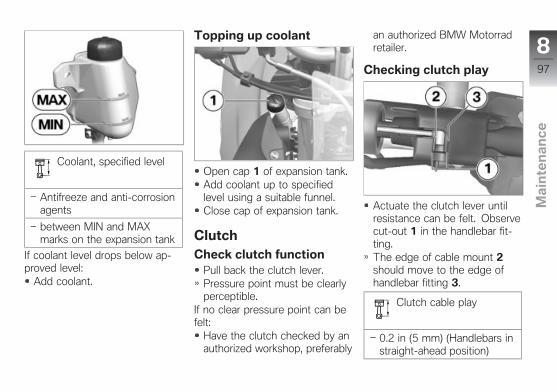
Coolant, specified level
Antifreeze and anti-corrosionagents
between MIN and MAXmarks on the expansion tank
If coolant level drops below ap-proved level:
Add coolant.
Topping up coolant
Open cap 1 of expansion tank.Add coolant up to specifiedlevel using a suitable funnel.Close cap of expansion tank.
ClutchCheck clutch function
Pull back the clutch lever.Pressure point must be clearlyperceptible.
If no clear pressure point can befelt:
Have the clutch checked by anauthorized workshop, preferably
an authorized BMW Motorradretailer.
Checking clutch play
Actuate the clutch lever untilresistance can be felt. Observecut-out 1 in the handlebar fit-ting.The edge of cable mount 2should move to the edge ofhandlebar fitting 3.
Clutch cable play
0.2 in (5 mm) (Handlebars instraight-ahead position)
897
z Ma
inte
na
nc
e

If clutch play is outside tolerance:Adjusting clutch play ( 98).
Adjusting clutch play
Slide rubber grommet 1 to theside.Loosen the nut 2.To increase clutch play: turnadjusting screw 3 into handle-bar fitting.To decrease clutch play: turnadjusting screw 3 out of han-dlebar fitting.Check clutch play ( 97).Tighten nut 2 while holdingadjusting screw 3 to ensure
that it does not move out ofposition.Pull rubber grommet 1 over thenuts.
Wheel rims and tiresCheck wheel rims
Make sure ground is level andfirm and park motorcycle.Subject wheel rims to visualinspection for defects.Have damaged rims checkedand, if necessary, replacedby a specialist service facil-ity, preferably an authorizedBMW Motorrad retailer.
Checking tire tread depth
The handling of your mo-torcycle can already change
for the worse before the legallyprescribed minimum tread depthis reached.Have tires replaced even be-
fore the minimum tread depthis reached.
Make sure ground is level andfirm and park motorcycle.Measure tire tread depth inmain tread grooves with wearindicating marks.
Tread wear marks areintegrated into the main
grooves on every tire. If the tiretread has worn down to thelevel of the marks, the tire iscompletely worn. The locationsof the marks are indicated onthe edge of the tire, e.g. by theletters TI, TWI or by an arrow.
When the minimum tread depthis reached:
Replace tires concerned.
898
z Ma
inte
na
nc
e
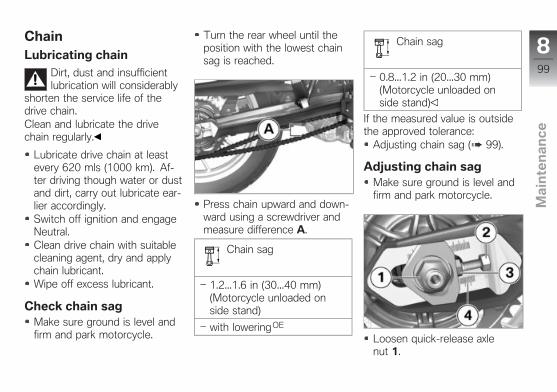
ChainLubricating chain
Dirt, dust and insufficientlubrication will considerably
shorten the service life of thedrive chain.Clean and lubricate the drivechain regularly.
Lubricate drive chain at leastevery 620 mls (1000 km). Af-ter driving though water or dustand dirt, carry out lubricate ear-lier accordingly.Switch off ignition and engageNeutral.Clean drive chain with suitablecleaning agent, dry and applychain lubricant.Wipe off excess lubricant.
Check chain sagMake sure ground is level andfirm and park motorcycle.
Turn the rear wheel until theposition with the lowest chainsag is reached.
Press chain upward and down-ward using a screwdriver andmeasure difference A.
Chain sag
1.2...1.6 in (30...40 mm)(Motorcycle unloaded onside stand)
with loweringOE
Chain sag
0.8...1.2 in (20...30 mm)(Motorcycle unloaded onside stand)
If the measured value is outsidethe approved tolerance:
Adjusting chain sag ( 99).
Adjusting chain sagMake sure ground is level andfirm and park motorcycle.
Loosen quick-release axlenut 1.
899
z Ma
inte
na
nc
e
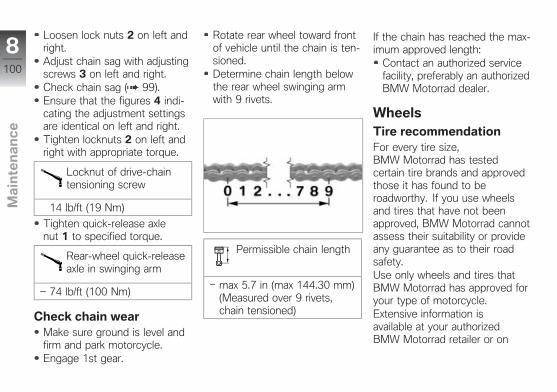
Loosen lock nuts 2 on left andright.Adjust chain sag with adjustingscrews 3 on left and right.Check chain sag ( 99).Ensure that the figures 4 indi-cating the adjustment settingsare identical on left and right.Tighten locknuts 2 on left andright with appropriate torque.
Locknut of drive-chaintensioning screw
14 lb/ft (19 Nm)
Tighten quick-release axlenut 1 to specified torque.
Rear-wheel quick-releaseaxle in swinging arm
74 lb/ft (100 Nm)
Check chain wearMake sure ground is level andfirm and park motorcycle.Engage 1st gear.
Rotate rear wheel toward frontof vehicle until the chain is ten-sioned.Determine chain length belowthe rear wheel swinging armwith 9 rivets.
Permissible chain length
max 5.7 in (max 144.30 mm)(Measured over 9 rivets,chain tensioned)
If the chain has reached the max-imum approved length:
Contact an authorized servicefacility, preferably an authorizedBMW Motorrad dealer.
WheelsTire recommendationFor every tire size,BMW Motorrad has testedcertain tire brands and approvedthose it has found to beroadworthy. If you use wheelsand tires that have not beenapproved, BMW Motorrad cannotassess their suitability or provideany guarantee as to their roadsafety.Use only wheels and tires thatBMW Motorrad has approved foryour type of motorcycle.Extensive information isavailable at your authorizedBMW Motorrad retailer or on
8100
z Ma
inte
na
nc
e

the Internet at www.bmw-motorrad.com.
Affect of wheel sizes onchassis control systemsThe wheel sizes play a major rolein the ABS and ASC chassiscontrol systems. Especially thediameter and width of the wheelsare stored in the control unit asthe basis for all necessary calcu-lations. A change in these sizesdue to conversion to others thanthe wheels installed as standardequipment can seriously affectthe control comfort of these sys-tems.The sensor wheels required forwheel speed detection must alsomatch the control systems in-stalled and may not be replaced.If you want to equip your mo-torcycle with different wheels,please speak to a specialist ser-vice facility, and preferably aBMW Motorrad retailer. In some
cases the data stored in the con-trol units can be adapted to thenew wheel sizes.
RDC stickerwith Tire Pressure Control(TPC/RDC)OE
If tires are inexpertly re-moved, the RDC sensors
may be damaged.Inform the authorizedBMW Motorrad retailer or thespecialist service facility on thefact that the wheel is equippedwith a RDC sensor.
On motorcycles equipped withRDC, a corresponding sticker islocated on the wheel rim in closeproximity to the RDC sensor.
Removing front wheelMake sure ground is level andfirm and park motorcycle.
Remove screw 1 and extractthe ABS sensor from itssocket.
8101
z Ma
inte
na
nc
e
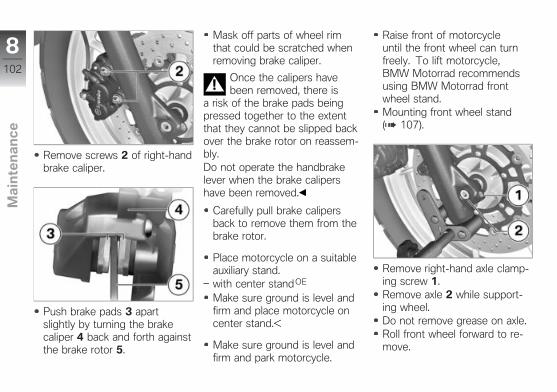
Remove screws 2 of right-handbrake caliper.
Push brake pads 3 apartslightly by turning the brakecaliper 4 back and forth againstthe brake rotor 5.
Mask off parts of wheel rimthat could be scratched whenremoving brake caliper.
Once the calipers havebeen removed, there is
a risk of the brake pads beingpressed together to the extentthat they cannot be slipped backover the brake rotor on reassem-bly.Do not operate the handbrakelever when the brake calipershave been removed.
Carefully pull brake calipersback to remove them from thebrake rotor.
Place motorcycle on a suitableauxiliary stand.with center stand OE
Make sure ground is level andfirm and place motorcycle oncenter stand.
Make sure ground is level andfirm and park motorcycle.
Raise front of motorcycleuntil the front wheel can turnfreely. To lift motorcycle,BMW Motorrad recommendsusing BMW Motorrad frontwheel stand.Mounting front wheel stand( 107).
Remove right-hand axle clamp-ing screw 1.Remove axle 2 while support-ing wheel.Do not remove grease on axle.Roll front wheel forward to re-move.
8102
z Ma
inte
na
nc
e

Remove distance bushings 3on the left and right from thewheel hub.
Installing front wheel
Malfunctions may occurduring control interventions
by ABS or ASC if a wheel otherthan the standard wheel is in-stalled.Please see the information onthe effect of wheel sizes on theABS and ASC chassis controlsystems at the beginning of thischapter.
Threaded fasteners nottightened to the specified
torque can work loose or theirthreads can suffer damage.Always have the tighteningtorques checked by a specializedworkshop, preferably anauthorized BMW Motorradretailer.
Mount distance bushings 3 onthe left and right on the wheelhub.
The front wheel must beinstalled right way round to
rotate in the correct direction.Observe the direction of rota-
tion arrows on the tires or on therim.
Roll front wheel into front sus-pension while guiding brakedisk between brake pads ofleft-hand brake caliper.
Lift front wheel and installaxle 2 with appropriate torque.
Front quick-release axlein axle mount
22 lb/ft (30 Nm)
Remove front wheel stand.
8103
z Ma
inte
na
nc
e
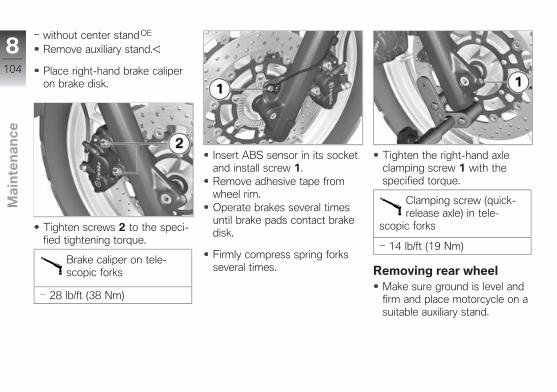
without center standOE
Remove auxiliary stand.
Place right-hand brake caliperon brake disk.
Tighten screws 2 to the speci-fied tightening torque.
Brake caliper on tele-scopic forks
28 lb/ft (38 Nm)
Insert ABS sensor in its socketand install screw 1.Remove adhesive tape fromwheel rim.Operate brakes several timesuntil brake pads contact brakedisk.
Firmly compress spring forksseveral times.
Tighten the right-hand axleclamping screw 1 with thespecified torque.
Clamping screw (quick-release axle) in tele-
scopic forks
14 lb/ft (19 Nm)
Removing rear wheelMake sure ground is level andfirm and place motorcycle on asuitable auxiliary stand.
8104
z Ma
inte
na
nc
e

with center stand OE
Make sure ground is level andfirm and place motorcycle oncenter stand.
Remove screw 1 and takespeed sensor out of hole.
Remove axle nut 2.Loosen lock nuts 3 on left andright by turning counterclock-wise.Loosen adjusting screws 4 onleft and right by turning clock-wise.Remove adjusting plate 5 andslide axle as far as possible to-ward inside.
Remove quick-release axle 6and take out adjusting plate 7.
Roll rear wheel as far forwardas possible and removechain 8 from chain sprocket.
8105
z Ma
inte
na
nc
e
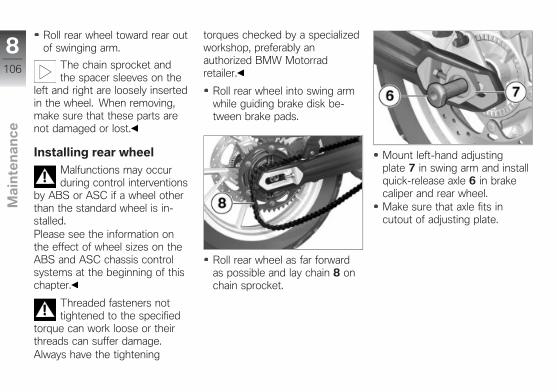
Roll rear wheel toward rear outof swinging arm.
The chain sprocket andthe spacer sleeves on the
left and right are loosely insertedin the wheel. When removing,make sure that these parts arenot damaged or lost.
Installing rear wheel
Malfunctions may occurduring control interventions
by ABS or ASC if a wheel otherthan the standard wheel is in-stalled.Please see the information onthe effect of wheel sizes on theABS and ASC chassis controlsystems at the beginning of thischapter.
Threaded fasteners nottightened to the specified
torque can work loose or theirthreads can suffer damage.Always have the tightening
torques checked by a specializedworkshop, preferably anauthorized BMW Motorradretailer.
Roll rear wheel into swing armwhile guiding brake disk be-tween brake pads.
Roll rear wheel as far forwardas possible and lay chain 8 onchain sprocket.
Mount left-hand adjustingplate 7 in swing arm and installquick-release axle 6 in brakecaliper and rear wheel.Make sure that axle fits incutout of adjusting plate.
8106
z Ma
inte
na
nc
e
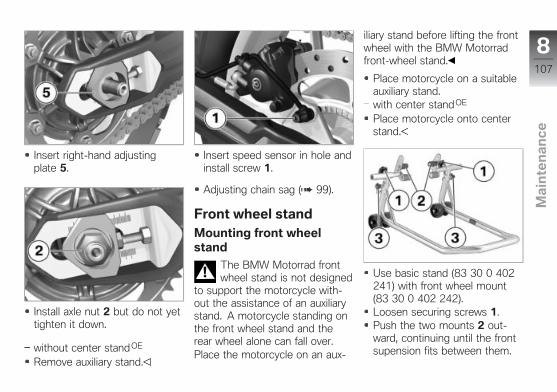
Insert right-hand adjustingplate 5.
Install axle nut 2 but do not yettighten it down.
without center standOE
Remove auxiliary stand.
Insert speed sensor in hole andinstall screw 1.
Adjusting chain sag ( 99).
Front wheel standMounting front wheelstand
The BMW Motorrad frontwheel stand is not designed
to support the motorcycle with-out the assistance of an auxiliarystand. A motorcycle standing onthe front wheel stand and therear wheel alone can fall over.Place the motorcycle on an aux-
iliary stand before lifting the frontwheel with the BMW Motorradfront-wheel stand.
Place motorcycle on a suitableauxiliary stand.with center stand OE
Place motorcycle onto centerstand.
Use basic stand (83 30 0 402241) with front wheel mount(83 30 0 402 242).Loosen securing screws 1.Push the two mounts 2 out-ward, continuing until the frontsupension fits between them.
8107
z Ma
inte
na
nc
e
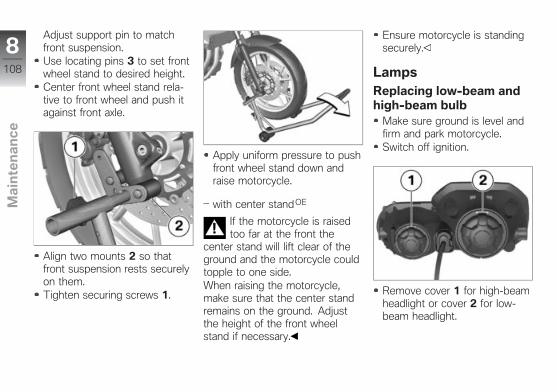
Adjust support pin to matchfront suspension.Use locating pins 3 to set frontwheel stand to desired height.Center front wheel stand rela-tive to front wheel and push itagainst front axle.
Align two mounts 2 so thatfront suspension rests securelyon them.Tighten securing screws 1.
Apply uniform pressure to pushfront wheel stand down andraise motorcycle.
with center stand OE
If the motorcycle is raisedtoo far at the front the
center stand will lift clear of theground and the motorcycle couldtopple to one side.When raising the motorcycle,make sure that the center standremains on the ground. Adjustthe height of the front wheelstand if necessary.
Ensure motorcycle is standingsecurely.
LampsReplacing low-beam andhigh-beam bulb
Make sure ground is level andfirm and park motorcycle.Switch off ignition.
Remove cover 1 for high-beamheadlight or cover 2 for low-beam headlight.
8108
z Ma
inte
na
nc
e
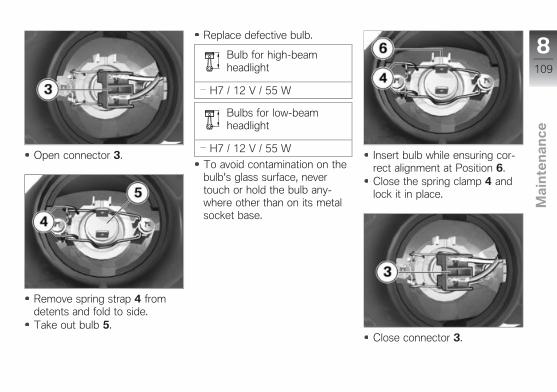
Open connector 3.
Remove spring strap 4 fromdetents and fold to side.Take out bulb 5.
Replace defective bulb.
Bulb for high-beamheadlight
H7 / 12 V / 55 W
Bulbs for low-beamheadlight
H7 / 12 V / 55 W
To avoid contamination on thebulb's glass surface, nevertouch or hold the bulb any-where other than on its metalsocket base.
Insert bulb while ensuring cor-rect alignment at Position 6.Close the spring clamp 4 andlock it in place.
Close connector 3.
8109
z Ma
inte
na
nc
e
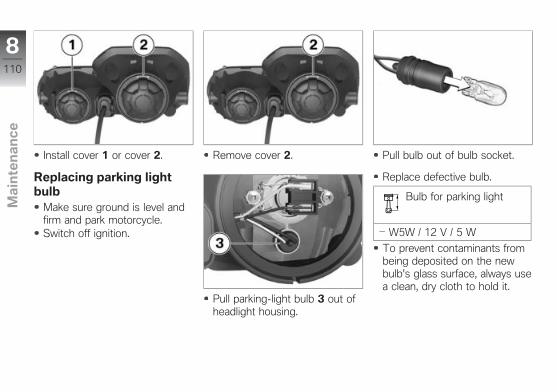
Install cover 1 or cover 2.
Replacing parking lightbulb
Make sure ground is level andfirm and park motorcycle.Switch off ignition.
Remove cover 2.
Pull parking-light bulb 3 out ofheadlight housing.
Pull bulb out of bulb socket.
Replace defective bulb.
Bulb for parking light
W5W / 12 V / 5 W
To prevent contaminants frombeing deposited on the newbulb's glass surface, always usea clean, dry cloth to hold it.
8110
z Ma
inte
na
nc
e
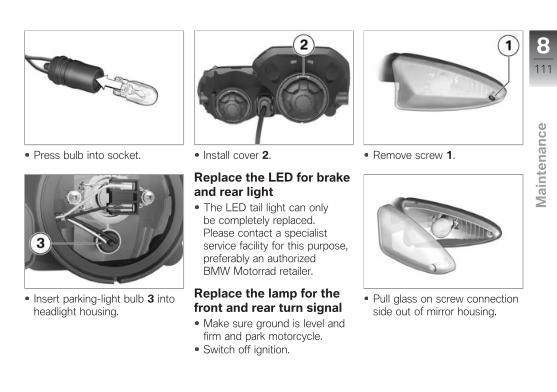
Press bulb into socket.
Insert parking-light bulb 3 intoheadlight housing.
Install cover 2.
Replace the LED for brakeand rear light
The LED tail light can onlybe completely replaced.Please contact a specialistservice facility for this purpose,preferably an authorizedBMW Motorrad retailer.
Replace the lamp for thefront and rear turn signal
Make sure ground is level andfirm and park motorcycle.Switch off ignition.
Remove screw 1.
Pull glass on screw connectionside out of mirror housing.
8111
z Ma
inte
na
nc
e
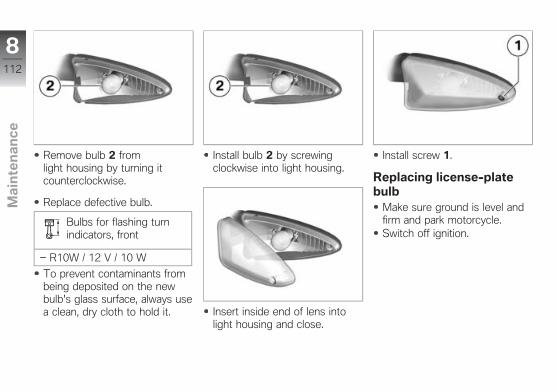
Remove bulb 2 fromlight housing by turning itcounterclockwise.
Replace defective bulb.
Bulbs for flashing turnindicators, front
R10W / 12 V / 10 W
To prevent contaminants frombeing deposited on the newbulb's glass surface, always usea clean, dry cloth to hold it.
Install bulb 2 by screwingclockwise into light housing.
Insert inside end of lens intolight housing and close.
Install screw 1.
Replacing license-platebulb
Make sure ground is level andfirm and park motorcycle.Switch off ignition.
8112
z Ma
inte
na
nc
e
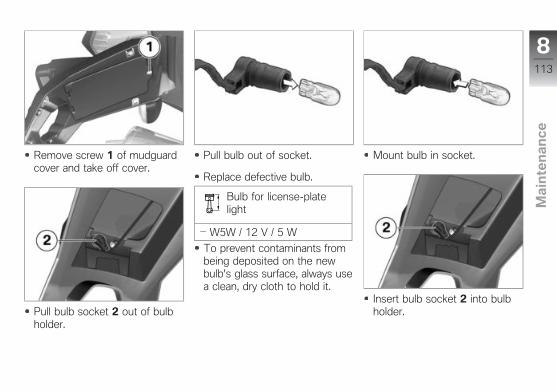
Remove screw 1 of mudguardcover and take off cover.
Pull bulb socket 2 out of bulbholder.
Pull bulb out of socket.
Replace defective bulb.
Bulb for license-platelight
W5W / 12 V / 5 W
To prevent contaminants frombeing deposited on the newbulb's glass surface, always usea clean, dry cloth to hold it.
Mount bulb in socket.
Insert bulb socket 2 into bulbholder.
8113
z Ma
inte
na
nc
e
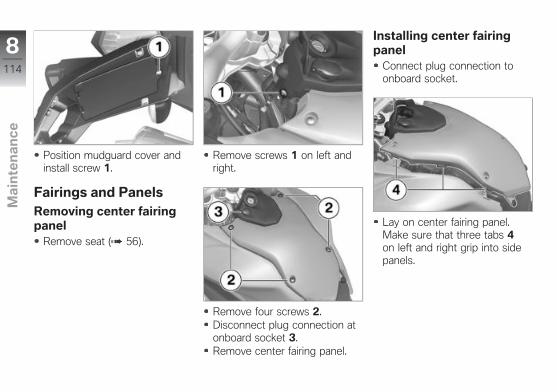
Position mudguard cover andinstall screw 1.
Fairings and PanelsRemoving center fairingpanel
Remove seat ( 56).
Remove screws 1 on left andright.
Remove four screws 2.Disconnect plug connection atonboard socket 3.Remove center fairing panel.
Installing center fairingpanel
Connect plug connection toonboard socket.
Lay on center fairing panel.Make sure that three tabs 4on left and right grip into sidepanels.
8114
z Ma
inte
na
nc
e

Install four screws 2.
Install screws 1 on left andright.Installing seat ( 57).
Air cleanerRemoving air filter
Removing center fairing panel( 114).
Remove four screws 1.Remove air filter cover 2. Forthis purpose, slightly push thefairing side panels outwards.
Take out air filter 3.
Install air cleaner
Install air filter 3.
8115
z Ma
inte
na
nc
e
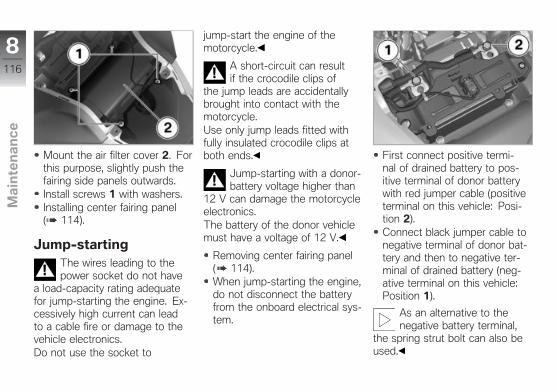
Mount the air filter cover 2. Forthis purpose, slightly push thefairing side panels outwards.Install screws 1 with washers.Installing center fairing panel( 114).
Jump-startingThe wires leading to thepower socket do not have
a load-capacity rating adequatefor jump-starting the engine. Ex-cessively high current can leadto a cable fire or damage to thevehicle electronics.Do not use the socket to
jump-start the engine of themotorcycle.
A short-circuit can resultif the crocodile clips of
the jump leads are accidentallybrought into contact with themotorcycle.Use only jump leads fitted withfully insulated crocodile clips atboth ends.
Jump-starting with a donor-battery voltage higher than
12 V can damage the motorcycleelectronics.The battery of the donor vehiclemust have a voltage of 12 V.
Removing center fairing panel( 114).When jump-starting the engine,do not disconnect the batteryfrom the onboard electrical sys-tem.
First connect positive termi-nal of drained battery to pos-itive terminal of donor batterywith red jumper cable (positiveterminal on this vehicle: Posi-tion 2).Connect black jumper cable tonegative terminal of donor bat-tery and then to negative ter-minal of drained battery (neg-ative terminal on this vehicle:Position 1).
As an alternative to thenegative battery terminal,
the spring strut bolt can also beused.
8116
z Ma
inte
na
nc
e

Allow the engine on the sup-port vehicle to run while jump-starting.Start engine of vehicle with dis-charged battery in usual way; ifengine refuses to start, wait afew minutes before repeatingattempt to protect starter andsupporting battery.Allow both engines to run forseveral minutes before discon-necting jumper cables.Disconnect the jump leadsfrom negative terminal first,then disconnect from positiveterminal.
To start the engine, do notuse start sprays or similar
items.
Installing center fairing panel( 114).
BatteryMaintenance instructionsCorrect battery maintenancecombined with proper chargingand storage procedures extendsthe battery's service life, and isalso required for warranty claims.Compliance with the points be-low is important in order to maxi-mize battery life:
Keep the surface of the batteryclean and dry.Do not open the battery.Do not top up with water.Be sure to read and complywith the instructions for charg-ing the battery on the followingpages.Do not turn the battery upsidedown.
If the battery is not discon-nected, the onboard elec-
tronics (clock etc.) will drain thebattery. This can cause the bat-tery to run flat. If this happens,
warranty claims will not be ac-cepted.During driving breaks of morethan 4 weeks, a trickle-chargershould be connected to thebattery.
BMW Motorrad has devel-oped a trickle-charger spe-
cially designed for compatibilitywith the electronics of your mo-torcycle. Using this charger, youcan keep the battery chargedduring long periods when themotorcycle is not being usedwithout having to disconnect thebattery from the motorcycle'sonboard systems. Additional in-formation is available at your au-thorized BMW Motorrad retailer.
Charging connectedbattery
Remove devices connected toonboard power sockets.
8117
z Ma
inte
na
nc
e
Charging the connectedbattery directly at the bat-
tery terminals can damage themotorcycle electronics.To charge the battery via thebattery terminals, disconnect thebattery first.
Charging the battery viathe onboard socket is only
possible with suitable chargers.Unsuitable chargers can result indamage to the motorcycle elec-tronics.Use suitable BMW chargers.The correct charger is availablethrough your authorizedBMW Motorrad retailer.
If the multifunction displayand indicator lamps fail to
light up when you switch on theignition, the battery is completelydischarged (battery voltage be-low 9 V). Attempts to rechargea completely discharged bat-tery through the onboard power
socket can damage the motorcy-cle's electronic systems.Always charge a completelydrained battery directly at theterminals of the disconnectedbattery.
Charge disconnected batteryvia onboard socket.
The motorcycle's onboardelectronics know when the
battery is fully charged. Theonboard socket is switched offwhen this happens.
Comply with operating instruc-tions of charger.
If you are unable tocharge the battery via
the onboard socket, youmay be using a charger thatis not compatible with yourmotorcycle's electronics. Inthis case, charge the batterydirectly at the terminals of thedisconnected battery.
Charging disconnectedbattery
Charge battery using a suitablecharger.Comply with operating instruc-tions of charger.After charging, remove terminalclamps of the charger from thebattery terminals.
In the case of longer peri-ods when the motorcycle is
not being used, the battery mustbe recharged regularly. See theinstructions for caring for yourbattery. Always fully rechargethe battery before returning it touse.
Removing batteryMake sure ground is level andfirm and park motorcycle.with anti-theft alarm system(DWA)OE
Switch off anti-theft alarm ifnecessary.
8118
z Ma
inte
na
nc
e

Switch off ignition.Removing center fairing panel( 114).
An incorrect disconnectionsequence increase the risk
of short-circuiting.Always observe the propersequence.
Remove negative cable 1 first.Then remove positive cable 2.Remove screws 3 on the leftand right and take off batteryholder forward from the battery.
Lift battery up and out, usingtilting movements if it is difficultto move.
Installing battery
If the motorcycle was dis-connected from the bat-
tery for a longer time, the currentdate must be entered in the in-strument cluster to ensure theproper operation of the servicedisplay.Consult a certified service fa-cility, preferably an authorizedBMW Motorrad retailer, for set-ting of the date.
Switch off ignition.Insert battery into battery com-partment, with positive terminalon right in direction of travel.
Lay on battery holder while en-suring correct routing of cablesto position 4.Install screws 3 on left andright.
An incorrect installation se-quence increases the risk
of short-circuiting.Always observe the propersequence.
Install positive cable 2.Install negative cable 1.
Installing center fairing panel( 114).Set the clock ( 41).
8119
z Ma
inte
na
nc
e

8120
z Ma
inte
na
nc
e
Care
Care products . . . . . . . . . . . . . . . . . . . . . 122
Washing your vehicle . . . . . . . . . . . . . . 122
Cleaning sensitive vehicle parts . . . . 122
Paint care . . . . . . . . . . . . . . . . . . . . . . . . . . 123
Protective wax coating . . . . . . . . . . . . . 124
Storing motorcycle. . . . . . . . . . . . . . . . . 124
Returning motorcycle to use . . . . . . . 124
9121
z Ca
re
Care productsBMW Motorrad recommendsthat you use cleaning andcare products available at yourauthorized BMW Motorradretailer. BMW Care Productshave been materials tested,laboratory tested, and field testedand provide optimum care andprotection for the materials usedin your motorcycle.
The use of unsuitablecleaning and care products
can damage motorcyclecomponents.For cleaning, do not use any sol-vents such as nitro-thinners, coldcleaning agents, fuel or similar,and do not use cleaning agentsthat contain alcohol.
Washing your vehicleBMW Motorrad recommendsthat you use BMW Insect Re-mover to soften and wash offinsects and stubborn dirt frompainted parts before washing thevehicle.To prevent stains, do not washthe vehicle immediately after ithas been exposed to bright sun-light and do not wash it in thesun.Make sure that the vehicle iswashed frequently, especiallyduring the winter months.To remove road salt, clean themotorcycle with cold water im-mediately after completion of ev-ery trip.
After washing the motor-cycle, after driving through
water or in the rain, braking canbe delayed owing to damp brakerotors and brake pads.
Brake early until the brake rotorsand brake pads are dry.
Warm water intensifies theeffect of salt.
Only use cold water to removeroad salt.
The high water pressureof high-pressure cleaners
(steam cleaners) can damageseals, the hydraulic brake sys-tem, the electrical system andthe seat.Do not use a steam jet or high-pressure cleaning equipment.
Cleaning sensitivevehicle partsPlastics
If plastic parts are cleanedusing unsuitable cleaning
agents, the surfaces can be dam-aged.Do not use cleaning agents that
9122
z Ca
re
contain alcohol, solvents or abra-sives to clean plastic parts.'Insect sponges' or sponges withhard surfaces can also lead toscratches.
Fairings and PanelsClean body panels with waterand BMW plastic cleaner.
Windshields and lenses aremanufactured of plasticClean off dirt and insects with asoft sponge and plenty of water.
Soften stubborn dirt anddead insects by covering
the affected areas with a wetcloth.
ChromeEspecially in the case of roadsalt, carefully clean chrome partswith plenty of water and BMWauto shampoo. Use chrome pol-ish for additional treatment.
RadiatorClean the radiator regularly toprevent overheating of the en-gine due to inadequate cooling.For example, use a garden hosewith low water pressure.
Cooling fins can be benteasily.
When cleaning the radiator, en-sure that the fins are not bent.
RubberTreat rubber components withwater or BMW rubber protectioncoating agent.
Using silicone sprays forthe care of rubber seals can
cause damage.Do not use silicone sprays orcare products that containsilicone.
Paint careWashing the vehicle on a regu-lar basis will help prevent long-term damage from harmful sub-stances, and is especially impor-tant when your vehicle is usedin areas with high levels of airpollution or where natural con-taminants such as tree resin andpollen are present.However, remove particularly ag-gressive materials immediately;otherwise changes in the paint ordiscoloration can occur. Theseinclude spilled fuel, oil, greaseand brake fluid as well as birddroppings. BMW Car Polish andBMW Paint Cleaner are recom-mended for this procedure.Contamination on the paint finishis particularly easy to see afterthe vehicle has been washed.Remove this type of soiling withcleaning naphtha or spirit on aclean cloth or cotton ball. BMWMotorrad recommends remov-
9123
z Ca
re

ing tar spots with BMW Tar Re-mover. Then add a protectivewax coating to the paint at theselocations.
Protective wax coatingTo preserve the finish of yourvehicle, BMW Motorrad recom-mends using BMW Car Wax oragents that contain carnauba orsynthetic waxes.When water fails to form beadson the paint surface this indicatesit is time to apply wax.
Storing motorcycleClean the motorcycle.Removing battery ( 118).Spray the brake and clutchlever, the side stand pivot and,if necessary, the main standpivot with a suitable lubricant.Coat bare metal and chrome-plated parts with an acid-freegrease (e.g., Vaseline).
Park motorcycle in a dry room,raising it to remove weightfrom both wheels.
Returning motorcycleto use
Remove the protective waxcoating.Clean the motorcycle.Install a charged battery.Observe checklist before start-ing.
9124
z Ca
re

Technical data
Troubleshooting chart . . . . . . . . . . . . . 126
Threaded fasteners . . . . . . . . . . . . . . . . 127
Engine . . . . . . . . . . . . . . . . . . . . . . . . . . . . . 129
Fuel . . . . . . . . . . . . . . . . . . . . . . . . . . . . . . . . 130
Engine oil . . . . . . . . . . . . . . . . . . . . . . . . . . 131
Clutch . . . . . . . . . . . . . . . . . . . . . . . . . . . . . 131
Transmission . . . . . . . . . . . . . . . . . . . . . . 132
Rear-wheel drive . . . . . . . . . . . . . . . . . . . 132
Suspension . . . . . . . . . . . . . . . . . . . . . . . . 133
Brakes . . . . . . . . . . . . . . . . . . . . . . . . . . . . . 134
Wheels and tires . . . . . . . . . . . . . . . . . . . 134
Electrical system . . . . . . . . . . . . . . . . . . . 136
Frame . . . . . . . . . . . . . . . . . . . . . . . . . . . . . 137
Dimensions . . . . . . . . . . . . . . . . . . . . . . . . 137
Weights . . . . . . . . . . . . . . . . . . . . . . . . . . . . 139
Performance data . . . . . . . . . . . . . . . . . . 13910125
z Te
ch
nic
al d
ata
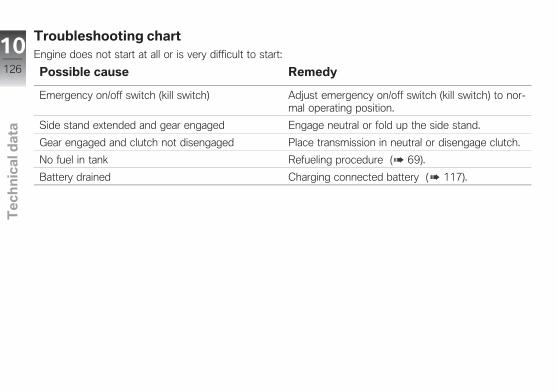
Troubleshooting chartEngine does not start at all or is very difficult to start:
Possible cause Remedy
Emergency on/off switch (kill switch) Adjust emergency on/off switch (kill switch) to nor-mal operating position.
Side stand extended and gear engaged Engage neutral or fold up the side stand.
Gear engaged and clutch not disengaged Place transmission in neutral or disengage clutch.
No fuel in tank Refueling procedure ( 69).
Battery drained Charging connected battery ( 117).
10126
z Te
ch
nic
al d
ata
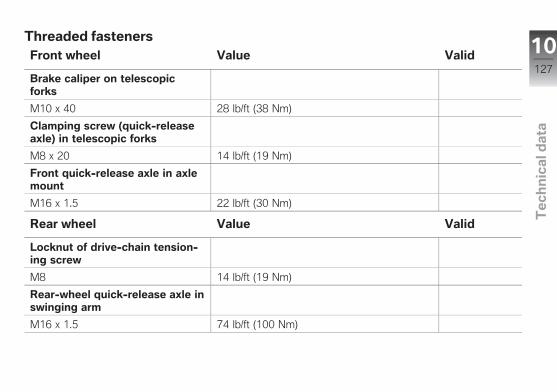
Threaded fastenersFront wheel Value Valid
Brake caliper on telescopicforks
M10 x 40 28 lb/ft (38 Nm)
Clamping screw (quick-releaseaxle) in telescopic forks
M8 x 20 14 lb/ft (19 Nm)
Front quick-release axle in axlemount
M16 x 1.5 22 lb/ft (30 Nm)
Rear wheel Value Valid
Locknut of drive-chain tension-ing screw
M8 14 lb/ft (19 Nm)
Rear-wheel quick-release axle inswinging arm
M16 x 1.5 74 lb/ft (100 Nm)
10127
z Te
ch
nic
al d
ata

Mirror arm Value Valid
Locknut (mirror) on clampingpiece
M14 x 1Multi-Wax Spray
15 lb/ft (20 Nm)
Clamping piece (mirror) onclamping block
M10 22 lb/ft (30 Nm)
10128
z Te
ch
nic
al d
ata

Engine
Engine design Two-cylinder, four-stroke engine, DOHC control,4 valves actuated by trailing valve levers, liquidcooling for cylinders and cylinder head, integratedcoolant pump, 6-speed manual transmission anddry-sump lubrication
Displacement 798 cc (798 cm3)
Cylinder bore 3.2 in (82 mm)
Piston stroke 3 in (75.6 mm)
Compression ratio 12:1
Rated output 75 hp (55 kW), at engine speed: 7000 min-1
with regular unleaded gasoline (RON 91) OE 71 hp (52 kW), at engine speed: 7000 min-1
Torque 57 lb/ft (77 Nm), at engine speed: 5500 min-1
with regular unleaded gasoline (RON 91) OE 55 lb/ft (75 Nm), at engine speed: 4500 min-1
Maximum engine speed max 9000 min-1
Idle speed 1250+50 min-1, with motorcycle stopped
10129
z Te
ch
nic
al d
ata

Fuel
Recommended fuel quality Super unleaded (max. 10 % ethanol, E10)89 AKI (95 ROZ/RON)89 AKI
with regular unleaded gasoline (RON 91) OE Regular unleaded (minor restrictions with regardto power and fuel consumption) (max. 10 %ethanol, E10)87 AKI (91 ROZ/RON)87 AKI
Usable fuel quantity Approx. 4.2 gal (Approx. 16 l)
Reserve fuel quantity min 2.9 quarts (min 2.7 l)
BMW recommends the use of BP fuel
10130
z Te
ch
nic
al d
ata

Engine oil
Engine oil, capacity 3.1 quarts (2.9 l), with filter change
Products recommended by BMW Motorrad
BMW Motorrad High Performance Oil SAE 15W-50, API SJ / JASO MA2
Oil additives BMW Motorrad does not recommend using oiladditives, as these can worsen the operation ofthe clutch. Ask your BMW Motorrad retailer forengine oils suitable for your motorcycle.
BMW recommends
Clutch
Clutch design Multi-disk oil-bath clutch
10131
z Te
ch
nic
al d
ata

Transmission
Transmission design Claw-shifted 6-speed transmission integrated inengine housing
Transmission gear ratios 1.943 (35/68 teeth), Primary gear ratio1:2.462 (13/32 teeth), 1st gear1:1.750 (16/28 teeth), 2nd gear1:1.381 (21/29 teeth), 3rd gear1:1.174 (23/27 teeth), 4th gear1:1.042 (24/25 teeth), 5th gear1:0.960 (25/24 teeth), 6th gear
Rear-wheel drive
Type of final drive Chain drive
Type of rear suspension Two-arm cast aluminum swinging arm
Number of teeth of rear-wheel drive (Pinion/sprocket)
17/42
10132
z Te
ch
nic
al d
ata
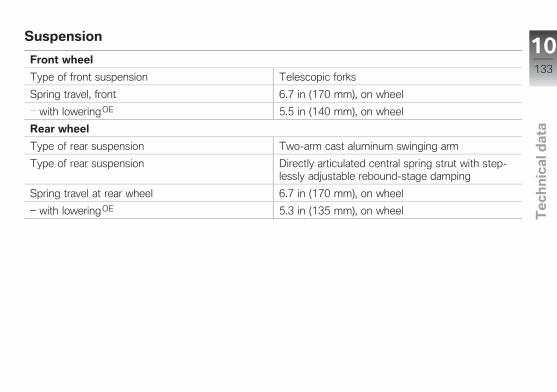
Suspension
Front wheel
Type of front suspension Telescopic forks
Spring travel, front 6.7 in (170 mm), on wheel
with loweringOE 5.5 in (140 mm), on wheel
Rear wheel
Type of rear suspension Two-arm cast aluminum swinging arm
Type of rear suspension Directly articulated central spring strut with step-lessly adjustable rebound-stage damping
Spring travel at rear wheel 6.7 in (170 mm), on wheel
with loweringOE 5.3 in (135 mm), on wheel
10133
z Te
ch
nic
al d
ata
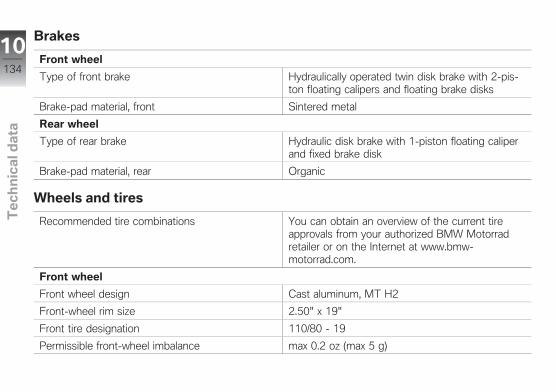
Brakes
Front wheel
Type of front brake Hydraulically operated twin disk brake with 2-pis-ton floating calipers and floating brake disks
Brake-pad material, front Sintered metal
Rear wheel
Type of rear brake Hydraulic disk brake with 1-piston floating caliperand fixed brake disk
Brake-pad material, rear Organic
Wheels and tires
Recommended tire combinations You can obtain an overview of the current tireapprovals from your authorized BMW Motorradretailer or on the Internet at www.bmw-motorrad.com.
Front wheel
Front wheel design Cast aluminum, MT H2
Front-wheel rim size 2.50" x 19"
Front tire designation 110/80 - 19
Permissible front-wheel imbalance max 0.2 oz (max 5 g)
10134
z Te
ch
nic
al d
ata

Rear wheel
Rear wheel design Cast aluminum, MT H2
Rear-wheel rim size 3.50" x 17"
Rear tire designation 140 / 80 - 17
Permissible rear-wheel imbalance max 1.6 oz (max 45 g)
Tire inflation pressure
Tire pressure, front 31.9 psi (2.2 bar), one-up, with cold tires31.9 psi (2.2 bar), driver with passenger and/orload, with cold tire
Tire pressure, rear 36.3 psi (2.5 bar), one-up, with cold tires42.1 psi (2.9 bar), driver with passenger and/orload, with cold tire
10135
z Te
ch
nic
al d
ata
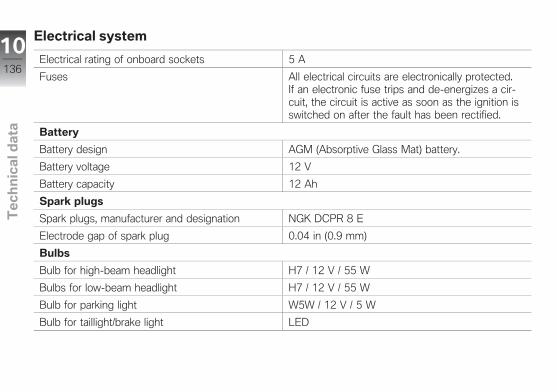
Electrical system
Electrical rating of onboard sockets 5 A
Fuses All electrical circuits are electronically protected.If an electronic fuse trips and de-energizes a cir-cuit, the circuit is active as soon as the ignition isswitched on after the fault has been rectified.
Battery
Battery design AGM (Absorptive Glass Mat) battery.
Battery voltage 12 V
Battery capacity 12 Ah
Spark plugs
Spark plugs, manufacturer and designation NGK DCPR 8 E
Electrode gap of spark plug 0.04 in (0.9 mm)
Bulbs
Bulb for high-beam headlight H7 / 12 V / 55 W
Bulbs for low-beam headlight H7 / 12 V / 55 W
Bulb for parking light W5W / 12 V / 5 W
Bulb for taillight/brake light LED
10136
z Te
ch
nic
al d
ata

Maximum number of defective LEDs in taillight 6, Brake / taillight
Bulb for license-plate light W5W / 12 V / 5 W
Bulbs for flashing turn indicators, front R10W / 12 V / 10 W
Bulbs for flashing turn indicators, rear R10W / 12 V / 10 W
Frame
Frame design Lattice-tube frame
Location of type plate Top front steering head
Location of the vehicle identification number Frame at front right on steering head
Dimensions
Motorcycle length 89.8 in (2280 mm), over front wheel to license-plate carrier
Motorcycle height 52.9 in (1343 mm), across mirrors, without driver,at DIN unladen weight
with loweringOE 51.5 in (1308 mm), across mirrors, without driver,at DIN unladen weight
Motorcycle width 33.7 in (855 mm), without mirrors
34.6 in (880 mm), With mirrors
10137
z Te
ch
nic
al d
ata

Driver's seat height 32.3 in (820 mm), without driver at unladenweight
with low dual seat OE 31.1 in (790 mm), without driver at unladenweight
with low dual seat OE
with loweringOE30.1 in (765 mm), without driver at unladenweight
Rider's inside-leg arc, heel to heel 71.3 in (1810 mm), without driver at unladenweight
with low dual seat OE 69.3 in (1760 mm), without driver at unladenweight
with low dual seat OE
with loweringOE67.3 in (1710 mm), without driver at unladenweight
10138
z Te
ch
nic
al d
ata
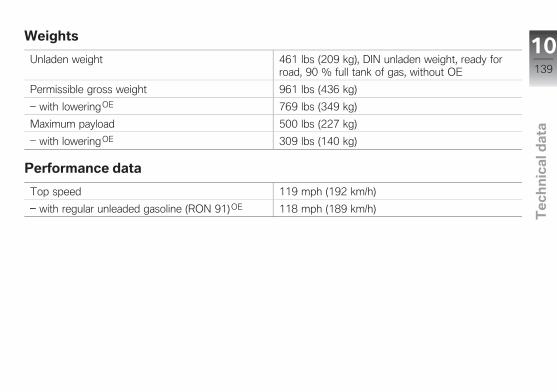
Weights
Unladen weight 461 lbs (209 kg), DIN unladen weight, ready forroad, 90 % full tank of gas, without OE
Permissible gross weight 961 lbs (436 kg)
with loweringOE 769 lbs (349 kg)
Maximum payload 500 lbs (227 kg)
with loweringOE 309 lbs (140 kg)
Performance data
Top speed 119 mph (192 km/h)
with regular unleaded gasoline (RON 91) OE 118 mph (189 km/h)
10139
z Te
ch
nic
al d
ata

10140
z Te
ch
nic
al d
ata
Service
Reporting safety defects . . . . . . . . . . . 142
BMW Motorrad Service . . . . . . . . . . . . 143
BMW Motorrad MobilityServices . . . . . . . . . . . . . . . . . . . . . . . . . . . 143
Maintenance procedures . . . . . . . . . . 143
Confirmation of maintenancework . . . . . . . . . . . . . . . . . . . . . . . . . . . . . . . 145
Confirmation of service . . . . . . . . . . . . 150
11141
z Se
rvic
e

Reporting safety defects
If you believe that your vehicle has a defect which could cause a crash or could causeinjury or death, you should immediately inform the National Highway Traffic Safety Ad-ministration (NHTSA) in addition to notifying BMW of North America, LLC.If NHTSA receives similar complaints, it may open an investigation, and if it finds that asafety defect exists in a group of vehicles, it may order a recall and remedy campaign.However, NHTSA cannot become involved in individual problems between you, yourretailer, or BMW of North America, LLC.To contact NHTSA, you may call the Vehicle Safety Hotline toll-free at 1-888-327-4236 (TTY: 1-800-424-9153); go to http://www.safercar.gov; or write to: Administra-tor, NHTSA, 400 Seventh Street, SW., Washington, DC 20590. You can also obtainother information about motor vehicle safety from http://www.safercar.gov.
11142
z Se
rvic
e

BMW Motorrad ServiceWith its worldwide dealernetwork, BMW Motorradcan attend to you and yourmotorcycle in over 100 countriesaround the globe. AuthorizedBMW Motorrad retailers havethe technical information andexpertise needed to conductreliable service and repairscovering every aspect of yourBMW.You can find the nearest autho-rized BMW Motorrad retailerby visiting our Internet site at"www.bmw-motorrad.com".
If this maintenance and re-pair work is performed inex-
pertly, there is a danger of dam-age and associated safety risks.BMW Motorrad recommendshaving corresponding work onyour motorcycle carried out by aspecialized workshop, preferably
by an authorized BMW Motorradretailer.
To ensure that your BMW con-sistently remains in optimal con-dition BMW Motorrad urges youto observe the recommendedservice intervals.Have all maintenance and repairwork confirmed in the "Service"chapter in this manual. For gen-erous treatment of claims sub-mitted after the warranty periodhas expired (goodwill), evidenceof regular maintenance is essen-tial.
You can obtain information onthe contents of the BMW Ser-vices from your BMW Motorradretailer.
BMW Motorrad MobilityServicesThe BMW Motorrad Mobility Ser-vices furnish you and your newBMW motorcycle with extra se-curity by offering a wide array ofassistance services in the eventof a breakdown (BMW RoadsideAssistance, breakdown assis-tance, vehicle recovery and re-trieval, etc.).Contact your authorized BMWMotorrad retailer for additionalinformation on available mobility-maintenance services.
MaintenanceproceduresBMW Pre-Delivery CheckThe BMW pre-delivery check iscarried out by your authorizedBMW Motorrad retailer before itturns over the vehicle to you.
11143
z Se
rvic
e

BMW Running-in CheckThe BMW running-in checkmust be carried out between300 mls and 750 mls (500 kmand 1200 km).
BMW ServiceBMW Service is carried out oncea year. The scope of the ser-vices performed may be de-pendent on the vehicle ownerand the mileage driven. YourBMW Motorrad retailer confirmsthat the service has been per-formed and enters the date forthe next service.For riders who drive long dis-tances annually, it may be neces-sary to come in for service beforethe entered date. In this case acorresponding maximum odome-ter reading will also be entered inthe confirmation of service. If thisodometer reading is reached be-fore the next service date, servicemust be performed sooner.
The service display in the multi-function display reminds you ofthe next service date approx. onemonth or 620 miles (1000 km)before the entered values.
11144
z Se
rvic
e
Confirmation of maintenance work
BMW Pre-DeliveryCheckConducted
on
Stamp, Signature
BMW Running-inCheckConducted
on
Odometer reading
Next serviceat the latest
onor, if reached sooner,
Odometer reading
Stamp, Signature
11145
z Se
rvic
e
BMW ServiceConducted
on
Odometer reading
Next serviceat the latest
onor, if reached sooner,
Odometer reading
Stamp, Signature
BMW ServiceConducted
on
Odometer reading
Next serviceat the latest
onor, if reached sooner,
Odometer reading
Stamp, Signature
BMW ServiceConducted
on
Odometer reading
Next serviceat the latest
onor, if reached sooner,
Odometer reading
Stamp, Signature
11146
z Se
rvic
e
BMW ServiceConducted
on
Odometer reading
Next serviceat the latest
onor, if reached sooner,
Odometer reading
Stamp, Signature
BMW ServiceConducted
on
Odometer reading
Next serviceat the latest
onor, if reached sooner,
Odometer reading
Stamp, Signature
BMW ServiceConducted
on
Odometer reading
Next serviceat the latest
onor, if reached sooner,
Odometer reading
Stamp, Signature
11147
z Se
rvic
e
BMW ServiceConducted
on
Odometer reading
Next serviceat the latest
onor, if reached sooner,
Odometer reading
Stamp, Signature
BMW ServiceConducted
on
Odometer reading
Next serviceat the latest
onor, if reached sooner,
Odometer reading
Stamp, Signature
BMW ServiceConducted
on
Odometer reading
Next serviceat the latest
onor, if reached sooner,
Odometer reading
Stamp, Signature
11148
z Se
rvic
e

BMW ServiceConducted
on
Odometer reading
Next serviceat the latest
onor, if reached sooner,
Odometer reading
Stamp, Signature
BMW ServiceConducted
on
Odometer reading
Next serviceat the latest
onor, if reached sooner,
Odometer reading
Stamp, Signature
BMW ServiceConducted
on
Odometer reading
Next serviceat the latest
onor, if reached sooner,
Odometer reading
Stamp, Signature
11149
z Se
rvic
e

Confirmation of serviceThe table is intended as proof of maintenance and repair work, the installed optional accessories and anyspecial campaign (recall) work carried out.
Work carried out Odometerreading
Date
11150
z Se
rvic
e
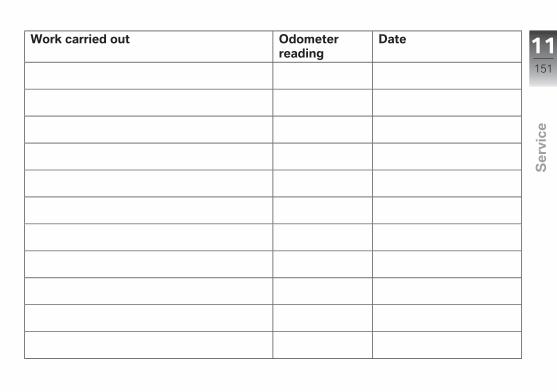
Work carried out Odometerreading
Date 11151
z Se
rvic
e

11152
z Se
rvic
e
Appendix
Certificate . . . . . . . . . . . . . . . . . . . . . . . . . . 15412153
z Ap
pe
nd
ix

Certification Tire Pressure Control (TPC) This device complies with Part 15 of the FCC Rules and with Industry Canada license-exempt RSS standard(s). Operation is subject to the following two conditions: (1) This device may not cause harmful
interference, and (2) This device must accept any interference
received, including interference that may cause undesired operation.
Le présent appareil est conforme aux CNR d'Industrie Canada applicables aux appareils radio exempts de licence. L'exploitation est autorisée aux deux conditions suivantes: (1) l'appareil ne doit pas produire de brouillage,
et (2) l'utilisateur de l'appareil doit accepter tout
brouillage radioélectrique subi, même si le brouillage est susceptible d'en compromettre le fonctionnement.
WARNING: Changes or modifications not expressively approved by the party responsible for compliance could void the user's authority to operate the equipment. The term “IC:” before the radio certification number only signifies that Industry Canada technical specifications were met.
FCC ID: MRXBC5A4 IC: 2546A-BC5A4
FCC ID: MRXBC54MA4 IC: 2546A-BC54MA4
AAbbreviations and symbols, 6ABS
Control, 16Operating, 48Self-diagnosis, 64Technology in detail, 74Warning indicators, 34
AccessoriesGeneral instructions, 80
Air filterInstalling, 115Position on vehicle, 15Removing, 115
Ambient temperatureDisplay, 26Outside temperaturewarning, 33
Anti-theft alarmIndicator lamp, 18Warning indicators, 34
ASCControl, 16Operating, 49Self-diagnosis, 64Technology in detail, 75Warning lamps, 34
Average valuesResetting, 43
BBattery
Charging connectedbattery, 117Charging disconnectedbattery, 118Installing, 119Maintenance instructions, 117Position on vehicle, 15Removing, 118Technical data, 136
Brake fluidChecking fluid level at rear, 95Checking front fluid level, 95Front reservoir, 13Rear reservoir, 13
Brake padsChecking front, 93Checking rear, 94Running in, 65
BrakesAdjusting handlebar lever, 50Checking operation, 93Safety instructions, 67Technical data, 134
BulbsReplacing brake and taillight, 111Replacing high-beam bulb, 108Replacing license-platebulb, 112Replacing low-beam bulb, 108Replacing parking-lightbulb, 110Replacing turn signalbulbs, 111Technical data, 136Warning for bulb failure, 33
13155
z Ind
ex
CCase
Operating, 81Chain
Adjusting sag, 99Checking sag, 99Checking wear, 100Lubricating, 99
Checklist, 62Clock
Adjusting, 41Control, 18
ClutchAdjusting handlebar lever, 50Adjusting play, 98Checking operation, 97Checking play, 97Technical data, 131
Confirmation of maintenancework, 145
CoolantChecking level, 96Fluid level indicator, 13Overtemperature warningindicator, 32Topping up, 97
Currentness of this manual, 7
DDamping
Adjusting, 53Adjustment element, 13
DimensionsTechnical data, 137
EElectrical system
Technical data, 136Emergency ON/OFF switch, 17
Operating, 47Engine
Starting, 62Technical data, 129Warning for engineelectronics, 33
Engine oilChecking level, 91Fill location, 11Oil dipstick, 11Technical data, 131Topping up, 92
Engine speed warningSwitching on, 66Warning lamp, 18
Equipment, 7ESA
Control, 16Operating, 54
FFairing
Installing center section, 114Removing center section, 114
First-aid kitLocation, 14
FrameTechnical data, 137
Front wheel standMounting, 107
13156
z Ind
ex
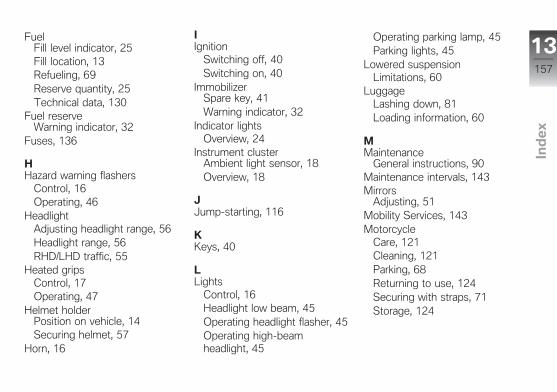
FuelFill level indicator, 25Fill location, 13Refueling, 69Reserve quantity, 25Technical data, 130
Fuel reserveWarning indicator, 32
Fuses, 136
HHazard warning flashers
Control, 16Operating, 46
HeadlightAdjusting headlight range, 56Headlight range, 56RHD/LHD traffic, 55
Heated gripsControl, 17Operating, 47
Helmet holderPosition on vehicle, 14Securing helmet, 57
Horn, 16
IIgnition
Switching off, 40Switching on, 40
ImmobilizerSpare key, 41Warning indicator, 32
Indicator lightsOverview, 24
Instrument clusterAmbient light sensor, 18Overview, 18
JJump-starting, 116
KKeys, 40
LLights
Control, 16Headlight low beam, 45Operating headlight flasher, 45Operating high-beamheadlight, 45
Operating parking lamp, 45Parking lights, 45
Lowered suspensionLimitations, 60
LuggageLashing down, 81Loading information, 60
MMaintenance
General instructions, 90Maintenance intervals, 143Mirrors
Adjusting, 51Mobility Services, 143Motorcycle
Care, 121Cleaning, 121Parking, 68Returning to use, 124Securing with straps, 71Storage, 124
13157
z Ind
ex
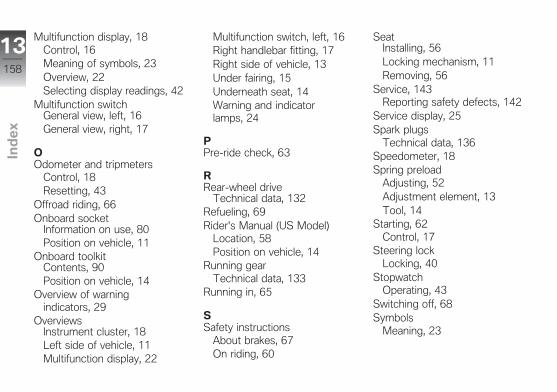
Multifunction display, 18Control, 16Meaning of symbols, 23Overview, 22Selecting display readings, 42
Multifunction switchGeneral view, left, 16General view, right, 17
OOdometer and tripmeters
Control, 18Resetting, 43
Offroad riding, 66Onboard socket
Information on use, 80Position on vehicle, 11
Onboard toolkitContents, 90Position on vehicle, 14
Overview of warningindicators, 29
OverviewsInstrument cluster, 18Left side of vehicle, 11Multifunction display, 22
Multifunction switch, left, 16Right handlebar fitting, 17Right side of vehicle, 13Under fairing, 15Underneath seat, 14Warning and indicatorlamps, 24
PPre-ride check, 63
RRear-wheel drive
Technical data, 132Refueling, 69Rider's Manual (US Model)
Location, 58Position on vehicle, 14
Running gearTechnical data, 133
Running in, 65
SSafety instructions
About brakes, 67On riding, 60
SeatInstalling, 56Locking mechanism, 11Removing, 56
Service, 143Reporting safety defects, 142
Service display, 25Spark plugs
Technical data, 136Speedometer, 18Spring preload
Adjusting, 52Adjustment element, 13Tool, 14
Starting, 62Control, 17
Steering lockLocking, 40
StopwatchOperating, 43
Switching off, 68Symbols
Meaning, 23
13158
z Ind
ex

TTachometer, 18Technical data
Battery, 136Brakes, 134Bulbs, 136Clutch, 131Dimensions, 137Electrical system, 136Engine, 129Engine oil, 131Frame, 137Fuel, 130Rear-wheel drive, 132Spark plugs, 136Standards, 7Suspension, 133Transmission, 132Weights, 139Wheels and tires, 134
Tire Pressure Control TPC/RDCDisplay, 26Rim sticker, 101Technology in detail, 77Warning indicators, 36
TiresChecking tire inflationpressures, 55Checking tread depth, 98Inflation pressure table, 14Inflation pressures, 135Recommendation, 100Running in, 65Technical data, 134
TopcaseOperating, 84
Torques, 127Transmission
Technical data, 132Troubleshooting chart, 126Turn indicators
Control, 16Operating, 45
Type platePosition on vehicle, 13
VVehicle identification number
Position on vehicle, 13
WWarning indicators
ABS, 34Anti-theft alarm system, 34ASC, 34Bulb failure, 33Coolant temperature, 32Display, 27Engine electronics, 33Fuel reserve, 32Immobilizer, 32Outside temperaturewarning, 33TPC/RDC, 36
Warning lampsOverview, 24
WeightsPayload table, 14Technical data, 139
WheelsCheck wheel rims, 98Installing front wheel, 103Installing rear wheel, 106Removing front wheel, 101Removing rear wheel, 104
13159
z Ind
ex

Size change, 101Technical data, 13413
160
z Ind
ex

The descriptions and illustrationsin this manual may vary fromyour own motorcycle's actualequipment, depending upon itsequipment level and accessoriesas well as your specific nationalversion. No claims stemmingfrom these differences can berecognized.Dimensions, weights, fuel con-sumption and performance dataare quoted to the customary tol-erances.The right to modify designs,equipment and accessories isreserved.Errors and omissions excepted.
©2013 Bayerische MotorenWerke Aktiengesellschaft80788 Munich, GermanyReprints and duplication of thiswork, in whole or part, are pro-hibited without the express writ-ten approval of BMW Motorrad,Aftersales.
Original Rider's Manual, printed inGermany.

Important data for refueling:
Fuel
Recommended fuel quality Super unleaded (max. 10 % ethanol, E10)89 AKI (95 ROZ/RON)89 AKI
with regular unleaded gasoline (RON 91) OE Regular unleaded (minor restrictions with regard to powerand fuel consumption) (max. 10 % ethanol, E10)87 AKI (91 ROZ/RON)87 AKI
Usable fuel quantity Approx. 4.2 gal (Approx. 16 l)
Reserve fuel quantity Min 2.9 quarts (min 2.7 l)
Tire inflation pressure
Tire pressure, front 31.9 psi (2.2 bar), one-up, with cold tires31.9 psi (2.2 bar), driver with passenger and/or load, withcold tire
Tire pressure, rear 36.3 psi (2.5 bar), one-up, with cold tires42.1 psi (2.9 bar), driver with passenger and/or load, withcold tire
BMW recommends
Order No.: 01 41 8 550 29708.2013, 2nd edition, 07
*01418550297**01418550297**01418550297*