F-Secure E-mail and Server Security ·...
223
F-Secure E-mail and Server Security Administrator's Guide
Transcript of F-Secure E-mail and Server Security ·...
F-Secure E-mail and Server SecurityAdministrator's Guide
Contents
Preface: Disclaimer................................................................................vi
Chapter 1: About This Guide.................................................................71.1 Introduction...............................................................................................................................8
1.1.1 Product contents.........................................................................................................81.2 How This Guide Is Organized...................................................................................................8
Chapter 2: Getting Started...................................................................102.1 Administering the Product......................................................................................................112.2 Using Web Console................................................................................................................11
2.2.1 Logging in for the First Time.....................................................................................112.2.2 Modifying Settings and Viewing Statistics with Web Console..................................122.2.3 Setting up Web Console for Remote Use.................................................................122.2.4 Setting up Web Console for Remote Use on Windows Server Core Editions..........12
2.3 Using F-Secure Policy Manager Console..............................................................................132.3.1 Settings and Statistics in Centrally Managed Administration Mode.........................13
Chapter 3: Protecting the Server against Malware............................153.1 Overview.................................................................................................................................16
3.1.1 What are Viruses and Other Malware.......................................................................163.2 How to Scan the Server..........................................................................................................17
3.2.1 Scan for Malware......................................................................................................173.2.2 Include Files in Real-Time Virus Scanning...............................................................183.2.3 Exclude Files by Location from Real-Time Virus Scanning......................................183.2.4 Exclude Files by File Type from Real-Time Virus Scanning.....................................183.2.5 Exclude Processes from Real-Time Virus Scanning................................................19
3.3 Scan manually........................................................................................................................193.3.1 How to Select the Type of Manual Scan...................................................................193.3.2 Clean Malware Automatically...................................................................................213.3.3 View the Results of Manual Scan.............................................................................21
3.4 Scan at Set Times..................................................................................................................223.4.1 Schedule a Scan.......................................................................................................223.4.2 View the Results of Scheduled Scan........................................................................22
3.5 Select Files That are Scanned...............................................................................................233.5.1 Include Files..............................................................................................................233.5.2 Exclude Files by Location.........................................................................................233.5.3 Exclude File Types....................................................................................................243.5.4 View Excluded Applications......................................................................................243.5.5 Scan Inside Compressed Files and Folders.............................................................243.5.6 Select the Action When Something is Found...........................................................25
TOC | F-Secure E-mail and Server Security
3.5.7 Actions You Can Take in Real-Time Scanning.........................................................253.5.8 Actions You Can Take in Manual or Scheduled Scanning........................................26
Chapter 4: Centrally Managed Administration...................................284.1 Overview.................................................................................................................................294.2 F-Secure Anti-Virus Settings..................................................................................................29
4.2.1 Settings for Real-Time Protection.............................................................................294.2.2 Settings for Manual Scanning...................................................................................31
4.3 F-Secure DeepGuard Settings...............................................................................................334.4 F-Secure Browsing Protection Settings..................................................................................35
4.4.1 Reputation Based Protection....................................................................................354.5 F-Secure Anti-Virus for Microsoft Exchange Settings............................................................36
4.5.1 General Settings.......................................................................................................364.5.2 Transport Protection.................................................................................................414.5.3 Storage Protection....................................................................................................52
4.6 F-Secure Anti-Virus for Microsoft Exchange Statistics...........................................................734.6.1 Common...................................................................................................................744.6.2 Transport Protection.................................................................................................744.6.3 Storage Protection....................................................................................................754.6.4 Quarantine................................................................................................................77
4.7 F-Secure Anti-Virus for Microsoft SharePoint Settings...........................................................774.7.1 Real-time Protection.................................................................................................774.7.2 Advanced..................................................................................................................79
4.8 F-Secure Anti-Virus for Microsoft SharePoint Statistics.........................................................804.9 F-Secure Software Updater Settings......................................................................................81
4.9.1 Automatic Installation................................................................................................814.9.2 Automatic Scanning..................................................................................................824.9.3 Troubleshooting........................................................................................................834.9.4 Installation Log..........................................................................................................834.9.5 Communications.......................................................................................................83
4.10 F-Secure Software Updater Statistics..................................................................................834.11 F-Secure Content Scanner Server Settings.........................................................................84
4.11.1 Interface..................................................................................................................844.11.2 Virus Scanning........................................................................................................854.11.3 Virus Statistics........................................................................................................874.11.4 Database Updates..................................................................................................874.11.5 Spam Filtering.........................................................................................................884.11.6 Threat Detection Engine.........................................................................................884.11.7 Proxy Configuration................................................................................................894.11.8 Advanced................................................................................................................89
4.12 F-Secure Content Scanner Server Statistics........................................................................904.12.1 Server.....................................................................................................................904.12.2 Scan Engines..........................................................................................................904.12.3 Common.................................................................................................................914.12.4 Spam Control..........................................................................................................914.12.5 Virus Statistics........................................................................................................92
4.13 F-Secure Management Agent Settings................................................................................92
F-Secure E-mail and Server Security | TOC
4.14 F-Secure Automatic Update Agent Settings.........................................................................93
Chapter 5: Administration with Web Console....................................955.1 Home......................................................................................................................................96
5.1.1 Summary..................................................................................................................975.1.2 Services....................................................................................................................985.1.3 Virus Statistics..........................................................................................................99
5.2 Server Protection....................................................................................................................995.2.1 Real-time Scanning................................................................................................1015.2.2 DeepGuard.............................................................................................................1035.2.3 Browsing Protection................................................................................................1065.2.4 Manual Scanning....................................................................................................1105.2.5 Scheduled Scanning...............................................................................................1135.2.6 Managing software updates...................................................................................114
5.3 SharePoint Protection...........................................................................................................1185.3.1 Setting up SharePoint Protection...........................................................................119
5.4 Transport Protection.............................................................................................................1195.4.1 Attachment Filtering................................................................................................1215.4.2 Virus Scanning........................................................................................................1235.4.3 Grayware Scanning................................................................................................1265.4.4 Archive Processing.................................................................................................1285.4.5 Content Filtering.....................................................................................................1305.4.6 Other Options.........................................................................................................132
5.5 Spam Control........................................................................................................................1355.5.1 Settings...................................................................................................................136
5.6 Storage Protection................................................................................................................1385.6.1 Real-Time Scanning...............................................................................................1405.6.2 Manual Scanning....................................................................................................1485.6.3 Scheduled Scanning...............................................................................................158
5.7 Quarantine............................................................................................................................1675.7.1 Query......................................................................................................................1695.7.2 Options...................................................................................................................170
5.8 Automatic Updates...............................................................................................................1765.8.1 Downloads .............................................................................................................1775.8.2 Communications.....................................................................................................178
5.9 General Server Properties....................................................................................................1805.9.1 Administration.........................................................................................................1815.9.2 Engines...................................................................................................................1875.9.3 Lists and Templates................................................................................................1945.9.4 Privacy....................................................................................................................197
Chapter 6: E-mail Quarantine Management......................................1986.1 Introduction...........................................................................................................................199
6.1.1 Quarantine Reasons...............................................................................................1996.2 Configuring E-mail Quarantine Options................................................................................1996.3 Quarantine Status.................................................................................................................2006.4 Searching the Quarantined Content.....................................................................................200
TOC | F-Secure E-mail and Server Security
6.5 Query Results Page.............................................................................................................2036.5.1 Viewing Details of the Quarantined Message.........................................................204
6.6 Quarantine Operations.........................................................................................................2056.6.1 Reprocessing the Quarantined Content.................................................................2056.6.2 Releasing the Quarantined Content.......................................................................2066.6.3 Removing the Quarantined Content.......................................................................2066.6.4 Deleting Old Quarantined Content Automatically...................................................207
6.7 Moving the E-mail Quarantine Storage................................................................................207
Chapter 7: Updating Virus and Spam Definition Databases...........2097.1 Overview...............................................................................................................................2107.2 Automatic Updates...............................................................................................................2107.3 Configuring Automatic Updates............................................................................................210
Chapter 8: Variables in Warning Messages......................................211
Chapter 9: Sending E-mail Alerts And Reports................................2139.1 Overview...............................................................................................................................2149.2 Solution.................................................................................................................................214
9.2.1 Creating a Scoped Receive Connector..................................................................2149.2.2 Grant the Relay Permission on the New Scoped Connector..................................2159.2.3 Specify SMTP Server for Alerts and Reports.........................................................215
Chapter 10: Troubleshooting.............................................................21610.1 Overview.............................................................................................................................21710.2 Viewing the Log File...........................................................................................................21710.3 Common Problems and Solutions......................................................................................217
10.3.1 Registering F-Secure Transport Agent.................................................................21710.3.2 Checking the Web Console..................................................................................21710.3.3 Checking F-Secure Content Scanner Server.......................................................21810.3.4 Securing the E-mail Quarantine...........................................................................21810.3.5 Administration Issues............................................................................................21810.3.6 Turning on EMC CAVA support............................................................................219
10.4 Frequently Asked Questions..............................................................................................219
Chapter 11: Technical Support...........................................................22011.1 F-Secure Online Support Resources..................................................................................22111.2 Software Downloads...........................................................................................................22211.3 Virus Descriptions on the Web............................................................................................222
Chapter 12: About F-Secure Corporation.........................................223
F-Secure E-mail and Server Security | TOC
Disclaimer
"F-Secure" and the triangle symbol are registered trademarks of F-Secure Corporation and F-Secureproduct names and symbols/logos are either trademarks or registered trademarks of F-Secure Corporation.All product names referenced herein are trademarks or registered trademarks of their respective companies.F-Secure Corporation disclaims proprietary interest in the marks and names of others. Although F-SecureCorporation makes every effort to ensure that this information is accurate, F-Secure Corporation will notbe liable for any errors or omission of facts contained herein. F-Secure Corporation reserves the right tomodify specifications cited in this document without prior notice.
Companies, names and data used in examples herein are fictitious unless otherwise noted. No part ofthis document may be reproduced or transmitted in any form or by any means, electronic or mechanical,for any purpose, without the express written permission of F-Secure Corporation.© 1993-2014 F-Secure Corporation. All rights reserved.
Portions Copyright © 2004 BackWeb Technologies Inc.
Portions Copyright © 2003 Commtouch® Software Ltd.
This product includes software developed by the Apache Software Foundation (http://www.apache.org/).
Copyright © 2000-2004 The Apache Software Foundation. All rights reserved.
This product includes PHP, freely available from http://www.php.net/.
Copyright © 1999-2012 The PHP Group. All rights reserved.
This product includes software developed by the OpenSSL Project for use in the OpenSSL Toolkit(http://www.openssl.org/).
Copyright © 1998-2014 The OpenSSL Project. All rights reserved.
This product includes cryptographic software written by Eric Young ([email protected]).
Copyright © 1995-1998 Eric Young ([email protected]). All rights reserved.
This product includes software written by Tim Hudson ([email protected]).
This product includes optional Microsoft SQL Server 2008 R2 SP1 Express Edition.
Copyright © 2010 Microsoft Corporation. All rights reserved.
This product may be covered by one or more F-Secure patents, including the following:
GB2353372, GB2366691, GB2366692, GB2366693, GB2367933, GB2368233, GB2374260
vi | F-Secure E-mail and Server Security | Introduction
About This Guide
Topics:
• Introduction• How This Guide Is Organized

1.1 IntroductionThis guide describes how to administer F-Secure E-mail and Server Security. The solution can be licensedand deployed as F-Secure Server Security, on per-server basis, or F-Secure E-mail and Server Security,on per-user or terminal connection basis. This means that F-Secure Server Security administrators canuse this guide as well.
Depending on the selected license and installed components, some product features may not be available.
Note: For more information on the licensing and the product deployment, consult F-Secure E-mailand Server Security Deployment Guide.
1.1.1 Product contentsThe product can be licensed and deployed as F-Secure Server Security (Standard) or F-Secure ServerSecurity Premium, on per-server basis, or F-Secure E-mail and Server Security (Standard) or F-SecureE-mail and Server Security Premium, on per-user or terminal connection basis.
Features with different product licenses:
F-Secure E-mailand ServerSecurity Premium
F-Secure E-mailand ServerSecurity(Standard)
F-Secure ServerSecurity Premium
F-Secure ServerSecurity(Standard)
Feature
XXXXVirus & spywareprotection
XXXXDeepGuard
XXXXWeb trafficscanning
XXXXBrowsing protection
XXAnti-Virus forMicrosoft Exchange
XXSpam Control
XXXXOffload ScanningAgent
XXSoftware Updater
XAnti-Virus forMicrosoftSharePoint
XEMCCAVA support
1.2 How This Guide Is OrganizedF-Secure E-mail and Server Security Administrator's Guide is divided into the following chapters:
Getting Started. Instructions how to use and administer the product.
Protecting the Server against Malware . Describes malware and how to protect the server against it.
Centrally Managed Administration . Instructions how to remotely administer the product when is installedin centrally managed administration mode.
8 | About This Guide
Administration with Web Console . Instructions how to administer the product with the Web Console.
E-mail Quarantine Management . Instructions how you can manage and search quarantined mails.
Updating Virus and SpamDefinition Databases . Instructions how to update your virus definition database.
Variables in Warning Messages . Describes variables that can be included in virus warning messages.
Sending E-mail Alerts And Reports . Instructions how to configure the product to send alerts to theadministrator by e-mail.
Troubleshooting . Solutions to some common problems.
Technical Support . Contains the contact information for assistance.
About F-Secure Corporation. Describes the company background and products.
F-Secure E-mail and Server Security | 9
Getting Started
Topics:
• Administering the Product• Using Web Console• Using F-Secure Policy Manager
Console
10 | Getting Started
2.1 Administering the ProductThe product can be used either in the stand-alone mode or in the centrally managed administration mode,based on your selections during the installation and the initial setup.
Centrally Managed Administration Mode
In the centrally managed administration mode, you can administer the product with F-Secure PolicyManager.
You still can use the Web Console to monitor the product status, start and stop the product, manage thequarantined content, and to configure settings that are not marked as Final in the F-Secure PolicyManager Console (settings marked as Final are greyed out in Web Console).
See the F-Secure Policy Manager Administrator's Guide for detailed information about installing and usingthe F-Secure Policy Manager components:
• F-Secure Policy Manager Console, the tool for remote administration of the product.• F-Secure Policy Manager Server, which enables communication between F-Secure Policy Manager
Console and the managed systems.
Stand-alone Mode
You can use the Web Console to administer the product; monitor the status, modify settings, manage thequarantine and to start and stop the product if necessary.
2.2 Using Web ConsoleYou can open the Web Console in any of the following ways:
• Go to Windows Start menu > Programs > F-Secure E-mail and Server Security > F-Secure E-mailand Server Security Web Console
• Enter the IP address and the port number of the host where the Web Console is installed in your webbrowser. Note that the protocol used is https. For example: https://127.0.0.1:25023
When the Web Console login page opens, enter your user name and the password and click Log In.Note that you must have administrator rights to the host where the Web Console is installed.
2.2.1 Logging in for the First TimeBefore you log in to the Web Console for the first time, check that javascript and cookies are enabled inthe browser you use.
Note: Microsoft Internet Explorer users: The address of the Web Console, for examplehttps://127.0.0.1:25023/. should be added to the Trusted sites in Internet ExplorerSecurity Options to ensure that it works properly in every environment.
When you log in for the first time, your browser displays a Security Alert dialog window about the securitycertificate for the Web Console. You can create a security certificate for the Web Console before loggingin, and then install the certificate during the login process.
Note: If your company has an established process for creating and storing certificates, follow thatprocess to create and store the security certificate for the Web Console.
Create the security certificate
1. Browse to the Web Console installation directory, for example: C:\Program Files(x86)\F-Secure\Web User Interface\bin\
2. Locate the certificate creation utility, makecert.bat. and double click it to run the utility.3. The utility creates a certificate that will be issued to all local IP addresses, and restarts theWeb Console
service to take the certificate into use.
F-Secure E-mail and Server Security | 11
4. Wait until the utility completes, and the window closes. Now you can proceed to logging in.
Log in and install the security certificate
1. Open the Web Console.2. The Security Alert about the Web Console certificate is displayed. If you install the certificate now, you
will not see the Security Alert window again.
If you are using Internet Explorer 7, click Continue and then Certificate Error.
3. Click View Certificate to view the certificate information.4. The Certificate window opens. Click Install Certificate to install the certificate with the Certificate
Import Wizard.5. The Certificate window opens. Click Install Certificate to proceed to the Certificate Import Wizard.6. Follow the instructions in the Certificate Import Wizard.
If you are using Internet Explorer 7, in the Place all certificates in the following store selection,select the Trusted Root Certification Authorities store.
7. If the Security Alert window is still displayed, click Yes to proceed or log back in to the Web Console.8. When the login page opens, log in to the Web Console with your user name and the password.9. The Web Console displays Getting Started page when you log in for the first time. You can check
and configure the following information in the Getting Started page to complete the installation:
• Internal domains and senders• E-mail alerts and reports• Database updates• Product updates
2.2.2 Modifying Settings and Viewing Statistics with Web ConsoleTo change the product settings, open the Web Console and use the left pane to navigate the settings youwant to change or statistics you want to view. For detailed explanations of all product settings, seeAdministration with Web Console.
2.2.3 Setting up Web Console for Remote UseTo access the Web Console remotely:
1. Log in to the Web Console locally on the server ( https://127.0.0.1:25023 ).2. Go to General > Administration and open the Web Console tab.3. In Allowed hosts section, click Add new hosts and enter the IP address of the remote host where
you want to access the server.4. In the Session section, specify the length of time that a client can be connected to the server. The
Web Console terminates the session and displays a warning when the session expires. The defaultvalue is 60 minutes.
5. On the remote host, open https://<IP address of the server>:25023 to open the Web Console.
2.2.4 Setting up Web Console for Remote Use on Windows Server CoreEditions
To remote access the Web Console that is installed on Microsoft Windows Server Core edition:
1. Log in to Windows Server Core with the local administrator’s account.2. Go to the Web Console installation folder. By default, it is located in:
%ProgramFiles%\F-Secure\Web User Interface\bin3. Open the Web Console configuration file ( webui.cnf ) in Notepad.4. Add the following entry to the Connections section: Allowed2 = <ip_address>
The ip_address is the address of the host that you want to allow to connect to the Web Console.If you want to allow connections from any host, replace the ip address with an asterisk (*).
12 | Getting Started
5. After you have changed the webui.cnf file, enter the following commands in the command line torestart the F-Secure Web Console daemon service:
net stop "F-Secure WebUI daemon"
net start "F-Secure WebUI daemon"
6. On the remote host, open https://<IP address of the server>:25023 to open the Web Console.
2.3 Using F-Secure Policy Manager ConsoleIn the centrally managed administration mode, you can administer the product with F-Secure PolicyManager Console. You can use F-Secure Policy Manager Console to create policies for product installationsthat are running on selected hosts or groups of hosts.
Note: For detailed information on installing and using F-Secure Policy Manager Console, consultF-Secure Policy Manager Administrator's Guide.
2.3.1 Settings and Statistics in Centrally Managed Administration ModeBy default F-Secure Policy Manager Console is in the Anti-Virus mode where you can manage only thebase component settings. To configure components that are not available in the Anti-virus mode, changeF-Secure Policy Manager Console to the Advanced mode user interface.
To change the product settings in the centrally managed administration mode, follow these instructions:
1. Select the product component that you want to configure from the Properties pane.2. Make sure the Policy tab is selected and assign values to variables under the Settings branch.3. Modify settings by assigning new values to the basic leaf node variables (marked by the leaf icons)
shown in the Policy tab of the Properties pane.
Initially, every variable has a default value, which is displayed in gray. Select the variable from theProperties pane and enter the new value in the Editor pane to change it. You can either type thenew value or select it from a list box.
Click Clear to revert to the default value or Undo to cancel the most recent change that has not beendistributed.
Note: Settings that are configured during the installation and the initial setup require that youselect the Final check box from the Product View pane. For more information, see ChangingSettings That Have Been Modified During the Installation or Upgrade.
4. After you have modified settings and created a new policy, it must be distributed to hosts. ChooseDistribute from the File menu.
5. After distributing the policy, you have to wait for the product to poll the new policy file. Alternatively,click Poll the server now in the Server Properties page in the Web Console.
For testing purposes, you may also want to change the polling intervals for incoming and outgoingpackages. For more information see F-Secure Management Agent Settings.
To view statistics, select the Status tab of the Properties pane. Statistics are updated periodically andcan be reset by choosing Reset Statistics on the Policy tab of the Properties pane.
To manage the quarantined content, use the Web Console. For more information, see E-mail QuarantineManagement.
Changing Settings That Have Been Modified During the Installation or UpgradeIf you want to change a setting that has been modified locally during installation or upgrade, you need tomark the setting as Final in the restriction editor. The settings descriptions in this manual indicate thesettings for which you need to use the Final restriction. You can also check in F-Secure Policy ManagerConsole whether you need to use the Final restriction for a setting.
Follow these instructions:
F-Secure E-mail and Server Security | 13
1. Select the Policy tab and then select the setting you want to check.2. Select the Status tab to see if the setting has been modified locally.
• If the setting is shown in grayed font in the Status view, then the product uses the setting from thebase policy and therefore the Final restriction is not needed.
• If the setting is shown in normal black font, then the setting has been modified locally. You mustmark the setting as Final when you change it.
14 | Getting Started
Protecting the Server against Malware
Topics:
• Overview• How to Scan the Server• Scan manually• Scan at Set Times• Select Files That are Scanned

3.1 OverviewBy default, all malware types are immediately handled when they are found, so that they can cause noharm.
Virus and spyware scanning scans your local hard drives, any removable media (such as portable drivesor compact disks) and downloaded content automatically by default.
3.1.1 What are Viruses and Other MalwareMalware are programs specifically designed to damage your computer, use your computer for illegalpurposes without your knowledge, or steal information from your computer.
Malware can:
• take control over your web browser,• redirect your search attempts,• show unwanted advertising,• keep track on the web sites you visit,• steal personal information such as your banking information,• use your computer to send spam, and• use your computer to attack other computers.
Malware can also cause your computer to become slow and unstable. You may suspect that you havesome malware on your computer if it suddenly becomes very slow and crashes often.
VirusesViruses are usually programs that can attach themselves to files and replicate themselves repeatedly;they can alter and replace the contents of other files in a way that may damage your computer.
A virus is a program that is normally installed without your knowledge on your computer. Once there, thevirus tries to replicate itself. The virus:
• uses some of your computer's system resources,• may alter or damage files on your computer,• probably tries to use your computer to infect other computers,• may allow your computer to be used for illegal purposes.
SpywareSpyware are programs that collect your personal information.
Spyware may collect personal information including:
• Internet sites you have browsed,• e-mail addresses from your computer,• passwords, or• credit card numbers.
Spyware almost always installs itself without your explicit permission. Spyware may get installed togetherwith a useful program or by tricking you into clicking an option in a misleading pop-up window.
RootkitsRootkits are programs that make other malware difficult to find.
Rootkits hide files and processes. In general, they do this to hide malicious activity on your computer.When a rootkit is hiding malware, you cannot easily discover that your computer has malware.
This product has a rootkit scanner that scans specifically for rootkits, so malware cannot easily hide itself.
16 | Protecting the Server against Malware
RiskwareRiskware is not designed specifically to harm your computer, but it may harm your computer if it is misused.Riskware is not strictly speaking malware. Riskware programs perform some useful but potentiallydangerous functions.
Examples of riskware programs are:
• programs for instant messaging, such as IRC (Internet Relay Chat),• programs for transferring files over the Internet from one computer to another,• Internet phone programs, such as VoIP (Voice over Internet Protocol),• Remote Access Software, such as VNC,• scareware, which may try to scare or scam individuals into buying fake security software, or• software designed to bypass CD checks or copy protections.
If you have explicitly installed the program and correctly set it up, it is less likely to be harmful.
If the riskware is installed without your knowledge, it is most likely installed with malicious intent andshould be removed.
3.2 How to Scan the ServerYou can scan the server for malware in real time, manually, or you can schedule a scan at set times.
Deciding which method to use depends on how powerful the server is and how high a level of protectionyou want. Turning on all the virus and spyware scanning features can have a noticeable effort on theserver's speed if it is an older server.
Note: The following recommendations will help you to protect the server from malware in filesand do not affect malware in e-mail transmissions throw Microsoft Exchange Server installed onthe same computer. For detailed information about protecting your e-mail traffic and mail serversee Transport Protection and Storage Protection.
3.2.1 Scan for MalwareReal-time scanning protects the server by scanning all files when they are accessed locally or remotely(over network) and by blocking access to those files that contain malware.
Real-time scanning works as follows:
1. A file is accessed locally or remotely over network.2. The file is immediately scanned for malware before access to the file is allowed.3. If malware is found in the file, real-time scanning removes the malware automatically before it can
cause any harm.
Does real-time scanning affect the performance of my computerNormally, you do not notice the scanning process because it takes a small amount of time and systemresources. The amount of time and system resources that real-time scanning takes depends on, forexample, the contents, location and type of the file.
Files that take a longer time to scan:
• Compressed files, such as .zip files.• Files on removable drives such as CDs, DVDs, and portable USB drives.
Turn Real-Time Scanning On or OffWith the product Web Console, you can turn real-time scanning on to stop malware before it can harmyour computer.
To turn real-time scanning on:
1. Go to Server Protection > Real-time Scanning.
F-Secure E-mail and Server Security | 17
2. Select Turn on real-time scanning.3. Click Apply.
3.2.2 Include Files in Real-Time Virus ScanningYou can add file types to be included in Real-time Scanning.
No file that is excluded from scanning by either type or location is scanned even if the file is included inthe list of scanned file types.
To include files:
1. Go to Server Protection > Real-time Scanning.2. Under Scan these files. click Configure and select one of the following:
• Scan all files to scan all files.• Scan defined files to scan only the file types that you define.
3. Define file types to scan.
• To include a file type to be scanned, enter the three-letter file extension in the field and click Add.• To prevent a file type from being scanned, click a file type in the list. Then click Remove.
File types that are defined by F-Secure in database updates are grayed out and cannot be removed.
For example, to include executable files in the scan, type exe in the field next and click Add.
4. Click OK. Edit Scanned File Types dialog closes.5. Click Apply.
3.2.3 Exclude Files by Location from Real-Time Virus ScanningYou can define a list of excluded folders or drives that you do not want to be scanned for viruses in realtime.
Files in folders or drives that are excluded from scanning are not scanned even though they might be ofa type that is included in scanned file types.
To define a list of files, folders, or drives excluded by location:
1. Go to Server Protection > Real-time Scanning.2. In Exclude from scanning. click Configure.3. Add a file, drive, or folder to exclude:
a. Select the Objects tab.b. Select Exclude objects.c. Click Add.d. Select the file, drive, or folder that you want to exclude from virus scanning.e. Click OK.
4. Repeat the previous step to exclude other files, drives, or folders from being scanned for viruses.5. Click OK to close the Exclude from Scanning dialog.6. Click Apply.
3.2.4 Exclude Files by File Type from Real-Time Virus ScanningYou can define a list of excluded file types that you do not want to be scanned for viruses in real time.
File types on this list override the list of scanned file types. For example, if you add a file type to the listof files excluded by file type, files of that type are not scanned even if they are on the list of scanned filetypes.
To define a list of files excluded by file type:
1. Go to Server Protection > Real-time Scanning.2. In Exclude from scanning. click Configure.3. Exclude a file type:
18 | Protecting the Server against Malware

Select the Files tab.a.b. Select Exclude files with these extensions.c. Type a file extension that identifies the type of files that you want to exclude.
To specify files that have no extension, type '.'. You can use the wildcard '?' to represent any singlecharacter, or '*' to represent any number of characters.
For example, to exclude executable files, type ‘ exe ’ in the field.
d. Click Add.
4. Repeat the previous step for any other extension you want to be excluded from being scanned forviruses.
5. Click OK to close the Exclude from scanning dialog.6. Click Apply.
The selected file types are excluded from future real-time scans.
3.2.5 Exclude Processes from Real-Time Virus ScanningWhen you exclude a process from the real-time virus scan, any files it accesses are not scanned forviruses. Excluding processes can speed up the system and ensures compatibility with backup utilitiesand other third-party software.
To define a list of processes excluded from the real-time scanning:
1. Go to Server Protection > Real-time Scanning.2. In Exclude from scanning. click Configure.3. Add a file, drive, or folder to exclude:
a. Select the Processes tab.b. Select Exclude these processes.c. Click Add.d. Select or directly specify the full pathname of the process executable. You cannot use wildcards
in the file or path names, but you can use system environment variables, for example:
%ProgramFiles%\Application\app.exe
On x64 platforms, %ProgramFiles% defaults to the Program Files (x86) directory. Include%ProgramW6432% to add the Program Files directory to the path as an environment variable.
e. Click OK.
4. Repeat the previous step to exclude other processes from being scanned for viruses.5. Click OK to close the Exclude from Scanning dialog.6. Click Apply.
Excluding a process from the scan does not exclude its child processes, so files that are accessed bythem are still scanned for viruses in real time.
3.3 Scan manuallyYou can scan your computer manually, if you suspect that you have malware on your computer.
3.3.1 How to Select the Type of Manual ScanYou can scan your whole computer or scan for a specific type of malware or a specific location.
If you are suspicious of a certain type of malware, you can scan only for this type. If you are suspiciousof a certain location on your computer, you can scan only that section. These scans will finish a lot quickerthan a scan of your whole computer.
To start manually scanning your computer:
1. Go to Server Protection > Manual Scanning.
F-Secure E-mail and Server Security | 19
2. Under New scan. select the type of scan.
If you want to change the scanning settings, click the Settings tab.
3. If you selected Choose what to scan. click Select.
A window opens in which you can select which location to scan.
4. To start scanning, click Start.
If no malware is detected, you will see Finished on the Status line at the upper part of the page. Ifmalware is detected, the Scan Wizard opens.
You can also start scanning the server manually by right-clicking the product icon in the system tray.
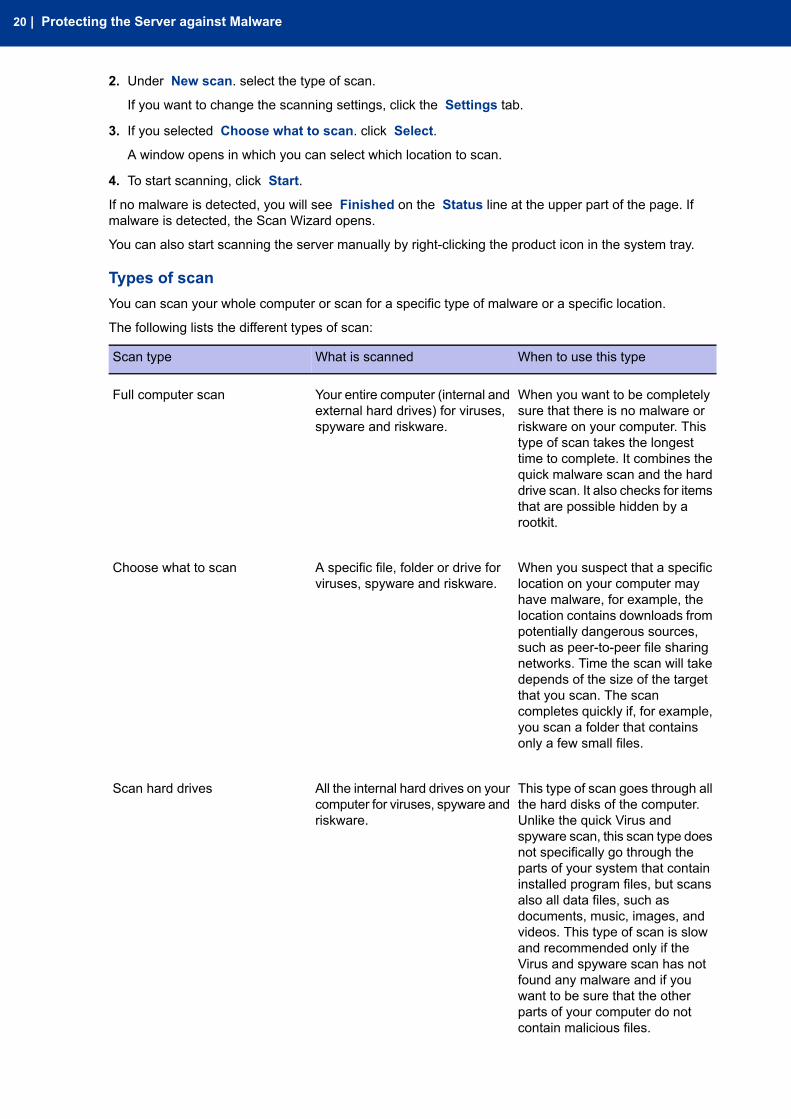
Types of scanYou can scan your whole computer or scan for a specific type of malware or a specific location.
The following lists the different types of scan:
When to use this typeWhat is scannedScan type
When you want to be completelysure that there is no malware or
Your entire computer (internal andexternal hard drives) for viruses,spyware and riskware.
Full computer scan
riskware on your computer. Thistype of scan takes the longesttime to complete. It combines thequick malware scan and the harddrive scan. It also checks for itemsthat are possible hidden by arootkit.
When you suspect that a specificlocation on your computer may
A specific file, folder or drive forviruses, spyware and riskware.
Choose what to scan
have malware, for example, thelocation contains downloads frompotentially dangerous sources,such as peer-to-peer file sharingnetworks. Time the scan will takedepends of the size of the targetthat you scan. The scancompletes quickly if, for example,you scan a folder that containsonly a few small files.
This type of scan goes through allthe hard disks of the computer.
All the internal hard drives on yourcomputer for viruses, spyware andriskware.
Scan hard drives
Unlike the quick Virus andspyware scan, this scan type doesnot specifically go through theparts of your system that containinstalled program files, but scansalso all data files, such asdocuments, music, images, andvideos. This type of scan is slowand recommended only if theVirus and spyware scan has notfound any malware and if youwant to be sure that the otherparts of your computer do notcontain malicious files.
20 | Protecting the Server against Malware
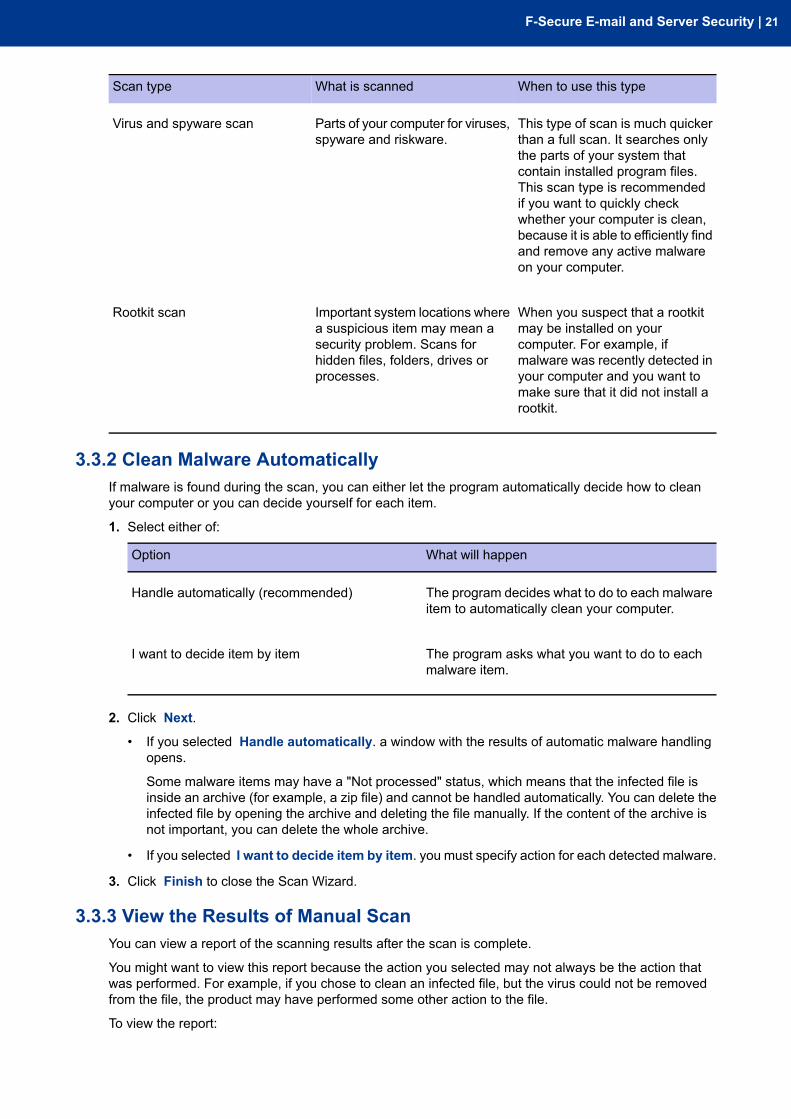
When to use this typeWhat is scannedScan type
This type of scan is much quickerthan a full scan. It searches only
Parts of your computer for viruses,spyware and riskware.
Virus and spyware scan
the parts of your system thatcontain installed program files.This scan type is recommendedif you want to quickly checkwhether your computer is clean,because it is able to efficiently findand remove any active malwareon your computer.
When you suspect that a rootkitmay be installed on your
Important system locations wherea suspicious item may mean a
Rootkit scan
computer. For example, ifsecurity problem. Scans formalware was recently detected inhidden files, folders, drives or
processes. your computer and you want tomake sure that it did not install arootkit.
3.3.2 Clean Malware AutomaticallyIf malware is found during the scan, you can either let the program automatically decide how to cleanyour computer or you can decide yourself for each item.
1. Select either of:
What will happenOption
The program decides what to do to each malwareitem to automatically clean your computer.
Handle automatically (recommended)
The program asks what you want to do to eachmalware item.
I want to decide item by item
2. Click Next.
• If you selected Handle automatically. a window with the results of automatic malware handlingopens.
Some malware items may have a "Not processed" status, which means that the infected file isinside an archive (for example, a zip file) and cannot be handled automatically. You can delete theinfected file by opening the archive and deleting the file manually. If the content of the archive isnot important, you can delete the whole archive.
• If you selected I want to decide item by item. you must specify action for each detected malware.
3. Click Finish to close the Scan Wizard.
3.3.3 View the Results of Manual ScanYou can view a report of the scanning results after the scan is complete.
You might want to view this report because the action you selected may not always be the action thatwas performed. For example, if you chose to clean an infected file, but the virus could not be removedfrom the file, the product may have performed some other action to the file.
To view the report:
F-Secure E-mail and Server Security | 21
1. Go to Server Protection > Manual Scanning and open the Status tab.2. Under Tasks. click View scanning report.
In the centrally managed administration mode, the scan report is sent to F-Secure Policy Manager. Youcan check it also in the F-Secure Policy Manager Console.
3.4 Scan at Set TimesYou can scan your computer for malware at regular intervals, for example daily, weekly or monthly.
Scanning for malware is an intensive process. It requires the full power of your computer and takes sometime to complete. For this reason, you might want to set the program to scan your computer when youare not using it.
3.4.1 Schedule a ScanSet the program to scan your computer at regular times.
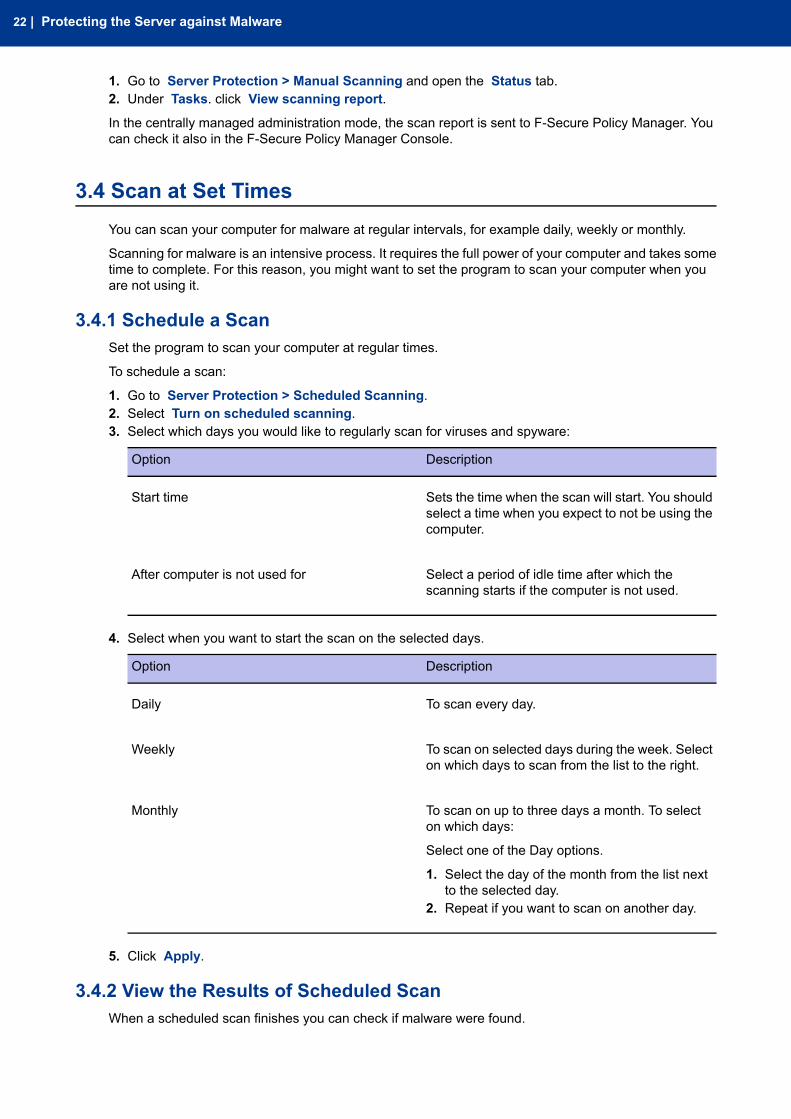
To schedule a scan:
1. Go to Server Protection > Scheduled Scanning.2. Select Turn on scheduled scanning.3. Select which days you would like to regularly scan for viruses and spyware:
DescriptionOption
Sets the time when the scan will start. You shouldselect a time when you expect to not be using thecomputer.
Start time
Select a period of idle time after which thescanning starts if the computer is not used.
After computer is not used for
4. Select when you want to start the scan on the selected days.
DescriptionOption
To scan every day.Daily
To scan on selected days during the week. Selecton which days to scan from the list to the right.
Weekly
To scan on up to three days a month. To selecton which days:
Monthly
Select one of the Day options.
1. Select the day of the month from the list nextto the selected day.
2. Repeat if you want to scan on another day.
5. Click Apply.
3.4.2 View the Results of Scheduled ScanWhen a scheduled scan finishes you can check if malware were found.
22 | Protecting the Server against Malware

To check the results of a scheduled scan:
1. Click the Scheduled scan has finished on the Virus and spyware scanning flyer.2. Click Show Report to see what happened during the scan.
You can view the results of the last scan also by clicking Server Protection > Scheduled Scanning >View scanning report in the product Web console.
In a centrally administered mode, the scan report is sent to F-Secure Policy Manager. You can check italso in the F-Secure Policy Manager Console.
3.5 Select Files That are ScannedYou can select the types of file and parts of your computer to scan in manual and scheduled scans.
Edit manual scanning settings to select files and folders you want to scan during the scheduled scan.
Two types of lists determine which files are scanned for viruses in manual and scheduled scans:
• Scanned file types list contains either all files or a defined list of file types.• Lists of files excluded from scanning define exceptions to the list of scanned file types. File types or
locations that are on the lists of excluded files are not scanned even if they are included in the list ofscanned file types.
The lists of scanned file types and excluded files let you define which parts of your computer will bescanned in different ways:
• You can include all files, and then optionally use the exclude list to exclude drives, directories, or filesthat you know are safe and do not want to be scanned.
• You can define a list of file types that you want to scan, so that only these file types are scanned.
3.5.1 Include FilesYou can select the file types that you want to be scanned for viruses and spyware in manual and scheduledscans.
1. Go to Server Protection > Manual Scanning and click the Settings tab.2. Under Scan these files. click Configure and select one of the following:
• Scan all files to scan all files• Scan defined files to scan only the file types that you define
3. Click Apply.
The options you selected under Scanning options determine which files are included in future manualand scheduled scans.
All file types or locations on the excluded items list will override the settings that you defined here. Filetypes on the excluded items list will not be scanned even if you selected them to be scanned here.
3.5.2 Exclude Files by LocationYou can define a list of excluded folders or drives that you do not want to be scanned for viruses in manualand scheduled scanning.
Files in folders or drives that are excluded from scanning are not scanned even though they might be ofa type that is included in scanned file types.
To define a list of files, folders, or drives excluded by location:
1. Go to Server Protection > Manual Scanning and click the Settings tab.2. In Exclude from scanning. click Configure.3. Add a file, drive, or folder to exclude:
a. Select the Objects tab.b. Select Exclude objects.
F-Secure E-mail and Server Security | 23
c. Click Add.d. Select the file, drive, or folder that you want to exclude from virus scanning.e. Click OK.
4. Repeat the previous step to exclude other files, drives, or folders from being scanned for viruses.5. Click OK to close the Exclude from Scanning dialog.6. Click Apply.
The selected files, drives or folders are excluded from future manual and scheduled scans.
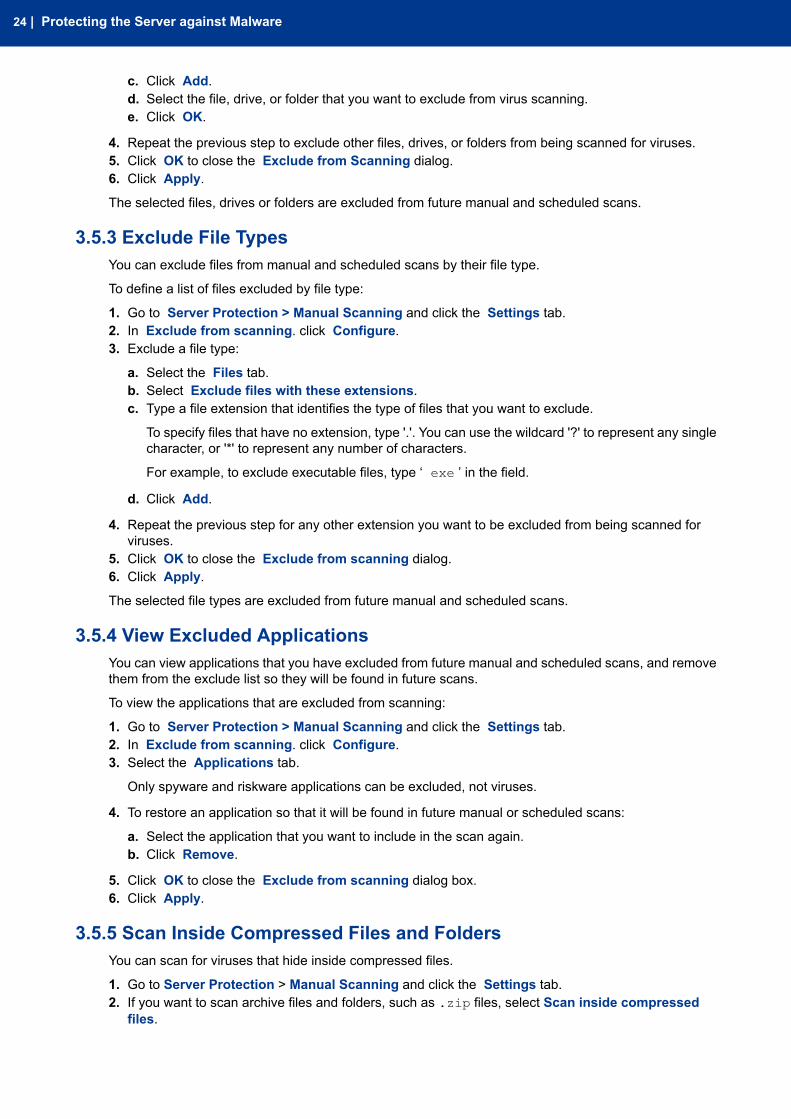
3.5.3 Exclude File TypesYou can exclude files from manual and scheduled scans by their file type.
To define a list of files excluded by file type:
1. Go to Server Protection > Manual Scanning and click the Settings tab.2. In Exclude from scanning. click Configure.3. Exclude a file type:
a. Select the Files tab.b. Select Exclude files with these extensions.c. Type a file extension that identifies the type of files that you want to exclude.
To specify files that have no extension, type '.'. You can use the wildcard '?' to represent any singlecharacter, or '*' to represent any number of characters.
For example, to exclude executable files, type ‘ exe ’ in the field.
d. Click Add.
4. Repeat the previous step for any other extension you want to be excluded from being scanned forviruses.
5. Click OK to close the Exclude from scanning dialog.6. Click Apply.
The selected file types are excluded from future manual and scheduled scans.
3.5.4 View Excluded ApplicationsYou can view applications that you have excluded from future manual and scheduled scans, and removethem from the exclude list so they will be found in future scans.
To view the applications that are excluded from scanning:
1. Go to Server Protection > Manual Scanning and click the Settings tab.2. In Exclude from scanning. click Configure.3. Select the Applications tab.
Only spyware and riskware applications can be excluded, not viruses.
4. To restore an application so that it will be found in future manual or scheduled scans:
a. Select the application that you want to include in the scan again.b. Click Remove.
5. Click OK to close the Exclude from scanning dialog box.6. Click Apply.
3.5.5 Scan Inside Compressed Files and FoldersYou can scan for viruses that hide inside compressed files.
1. Go to Server Protection > Manual Scanning and click the Settings tab.2. If you want to scan archive files and folders, such as .zip files, select Scan inside compressed
files.
24 | Protecting the Server against Malware
Compressed files take slightly longer to scan.
3. Click OK.4. Click Apply.
3.5.6 Select the Action When Something is FoundIf viruses or spyware are found and you have set the program not to automatically handle viruses andspyware, you can now select whether to clean, delete, quarantine or only block the files in which a virusor spyware was found.
This step of the Scan Wizard will be skipped if you have set the program to always handle viruses andspyware automatically during a manual or scheduled scan or if you have set the program to automaticallyprocess malware found during this scan.
When usingWeb Console ScanWizard, you are shown a list of infected files and the viruses and spywarethat were found in these files. To handle these viruses and spyware:
1. Select the infected files that you want to handle.
To view additional details of the infection, click the link in the Infection column.
2. Select the action that you want to take for the selected files.
The files are handled immediately.
3. Repeat step 2 with all the files that you want to handle.4. Click Finish.
If you are using the local Scan Wizard, you will have three separate iterations for handling detectedviruses, spyware and riskware. To handle viruses from your computer:
1. Select the action to take for infected files. If you want to view the additional details of the infection,click the link in the Infection column.
2. Click Next to apply the actions.3. Click Next to finish.
If spyware was found during the manual or scheduled scan, the Scan Wizard continues to the spywarecleaning step.
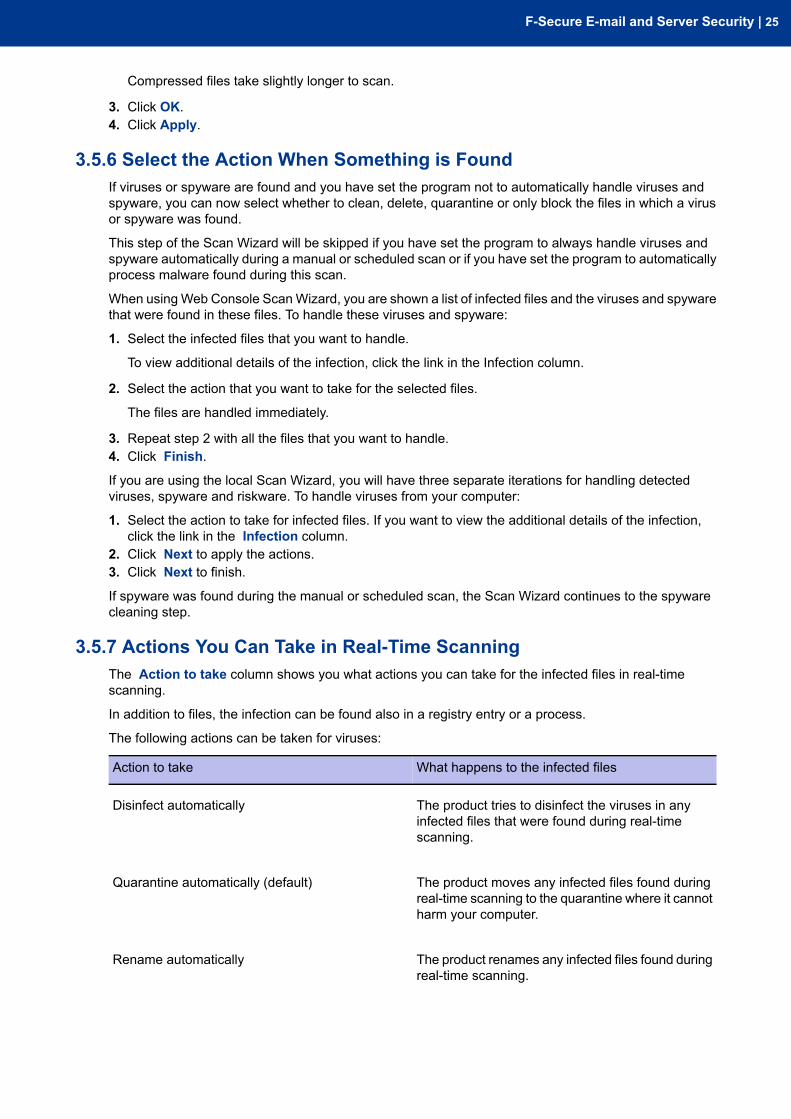
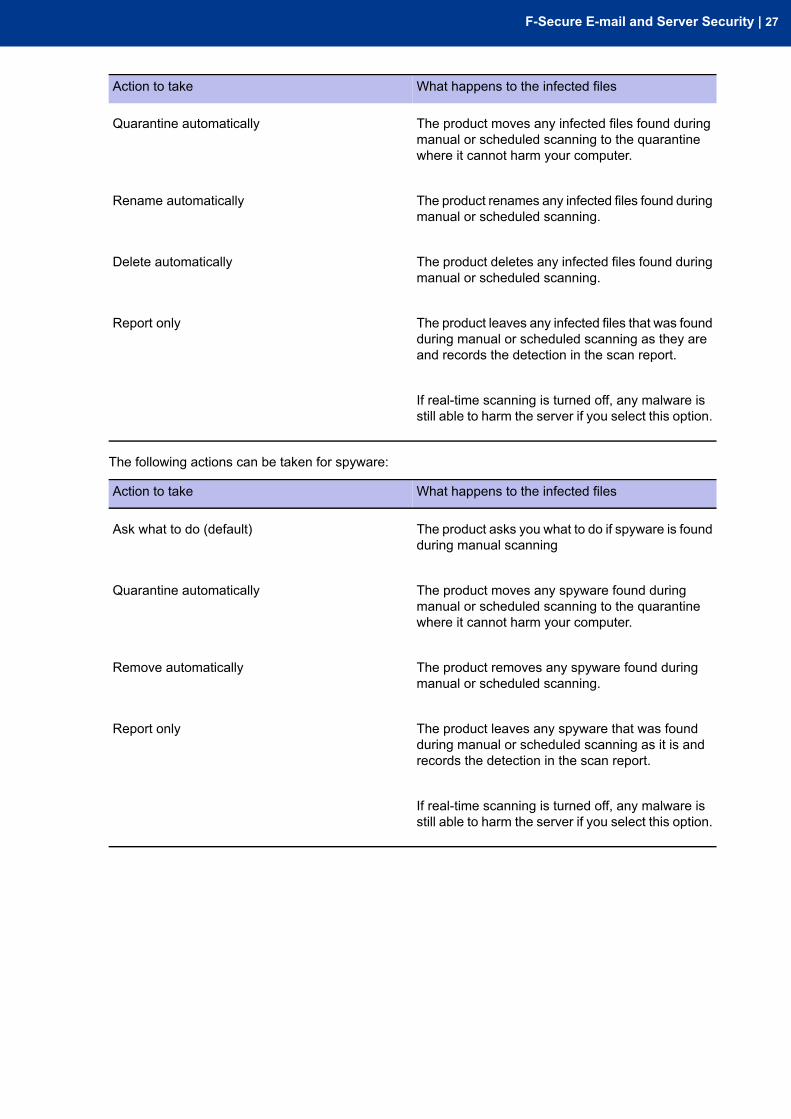
3.5.7 Actions You Can Take in Real-Time ScanningThe Action to take column shows you what actions you can take for the infected files in real-timescanning.
In addition to files, the infection can be found also in a registry entry or a process.
The following actions can be taken for viruses:
What happens to the infected filesAction to take
The product tries to disinfect the viruses in anyinfected files that were found during real-timescanning.
Disinfect automatically
The product moves any infected files found duringreal-time scanning to the quarantine where it cannotharm your computer.
Quarantine automatically (default)
The product renames any infected files found duringreal-time scanning.
Rename automatically
F-Secure E-mail and Server Security | 25
What happens to the infected filesAction to take
The product deletes any infected files found duringreal-time scanning.
Delete automatically
The product records the detected viruses in thelogfile.log file, sends alerts to Policy Manager,
Report only
adds events to Windows Event log, and sendse-mail notifications (according to the settings thatare specified on the Alerts page under General >Administration ).
The following actions can be taken for spyware:
What happens to the infected filesAction to take
The product moves any spyware found duringreal-time scanning to the quarantine where it cannotharm your computer.
Quarantine automatically
The product removes any spyware found duringreal-time scanning.
Remove automatically
The product leaves any spyware that was foundduring real-time scanning as it is and records the
Report only (default)
detection in the logfile.log file, sends alerts to PolicyManager, adds events to Windows Event log, andsends e-mail notifications (according to the settingsthat are specified on the Alerts page under General> Administration ).
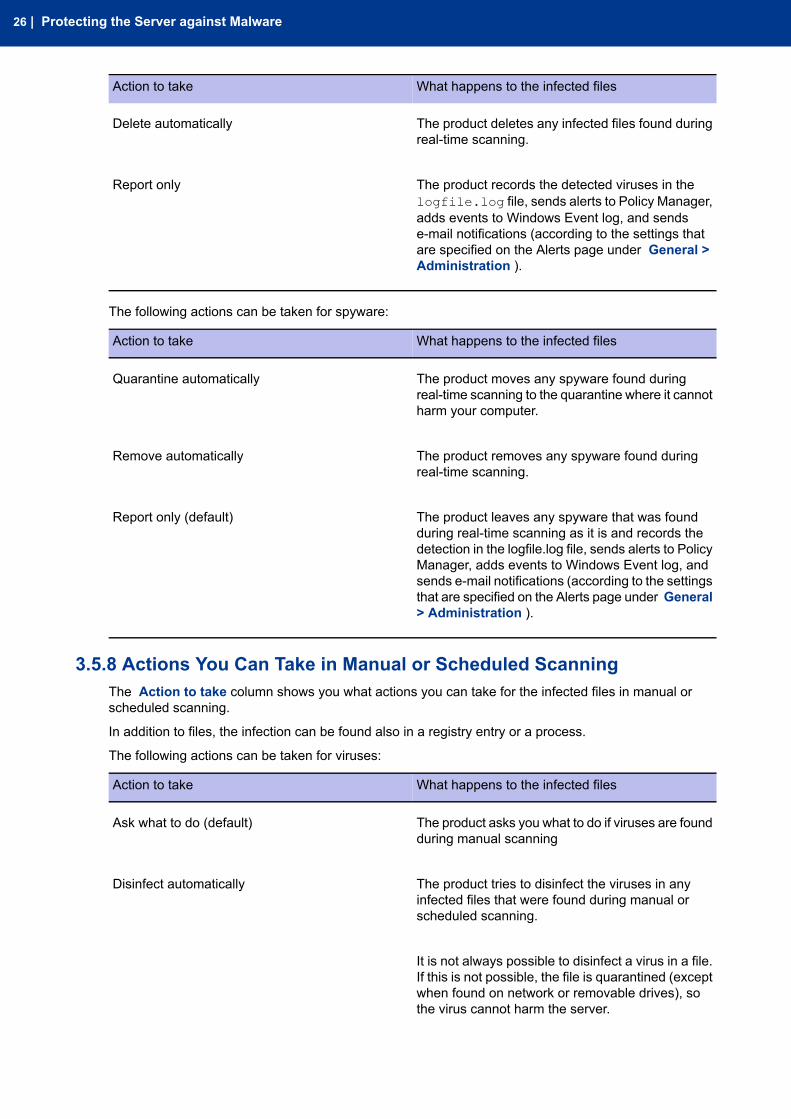
3.5.8 Actions You Can Take in Manual or Scheduled ScanningThe Action to take column shows you what actions you can take for the infected files in manual orscheduled scanning.
In addition to files, the infection can be found also in a registry entry or a process.
The following actions can be taken for viruses:
What happens to the infected filesAction to take
The product asks you what to do if viruses are foundduring manual scanning
Ask what to do (default)
The product tries to disinfect the viruses in anyinfected files that were found during manual orscheduled scanning.
Disinfect automatically
It is not always possible to disinfect a virus in a file.If this is not possible, the file is quarantined (exceptwhen found on network or removable drives), sothe virus cannot harm the server.
26 | Protecting the Server against Malware
What happens to the infected filesAction to take
The product moves any infected files found duringmanual or scheduled scanning to the quarantinewhere it cannot harm your computer.
Quarantine automatically
The product renames any infected files found duringmanual or scheduled scanning.
Rename automatically
The product deletes any infected files found duringmanual or scheduled scanning.
Delete automatically
The product leaves any infected files that was foundduring manual or scheduled scanning as they areand records the detection in the scan report.
Report only
If real-time scanning is turned off, any malware isstill able to harm the server if you select this option.
The following actions can be taken for spyware:
What happens to the infected filesAction to take
The product asks you what to do if spyware is foundduring manual scanning
Ask what to do (default)
The product moves any spyware found duringmanual or scheduled scanning to the quarantinewhere it cannot harm your computer.
Quarantine automatically
The product removes any spyware found duringmanual or scheduled scanning.
Remove automatically
The product leaves any spyware that was foundduring manual or scheduled scanning as it is andrecords the detection in the scan report.
Report only
If real-time scanning is turned off, any malware isstill able to harm the server if you select this option.
F-Secure E-mail and Server Security | 27
Centrally Managed Administration
Topics:
• Overview• F-Secure Anti-Virus Settings• F-Secure DeepGuard Settings• F-Secure Browsing Protection
Settings• F-Secure Anti-Virus for Microsoft
Exchange Settings• F-Secure Anti-Virus for Microsoft
Exchange Statistics• F-Secure Anti-Virus for Microsoft
SharePoint Settings• F-Secure Anti-Virus for Microsoft
SharePoint Statistics• F-Secure Software Updater
Settings• F-Secure Software Updater
Statistics• F-Secure Content Scanner
Server Settings• F-Secure Content Scanner
Server Statistics• F-Secure Management Agent
Settings• F-Secure Automatic Update
Agent Settings
28 | Centrally Managed Administration
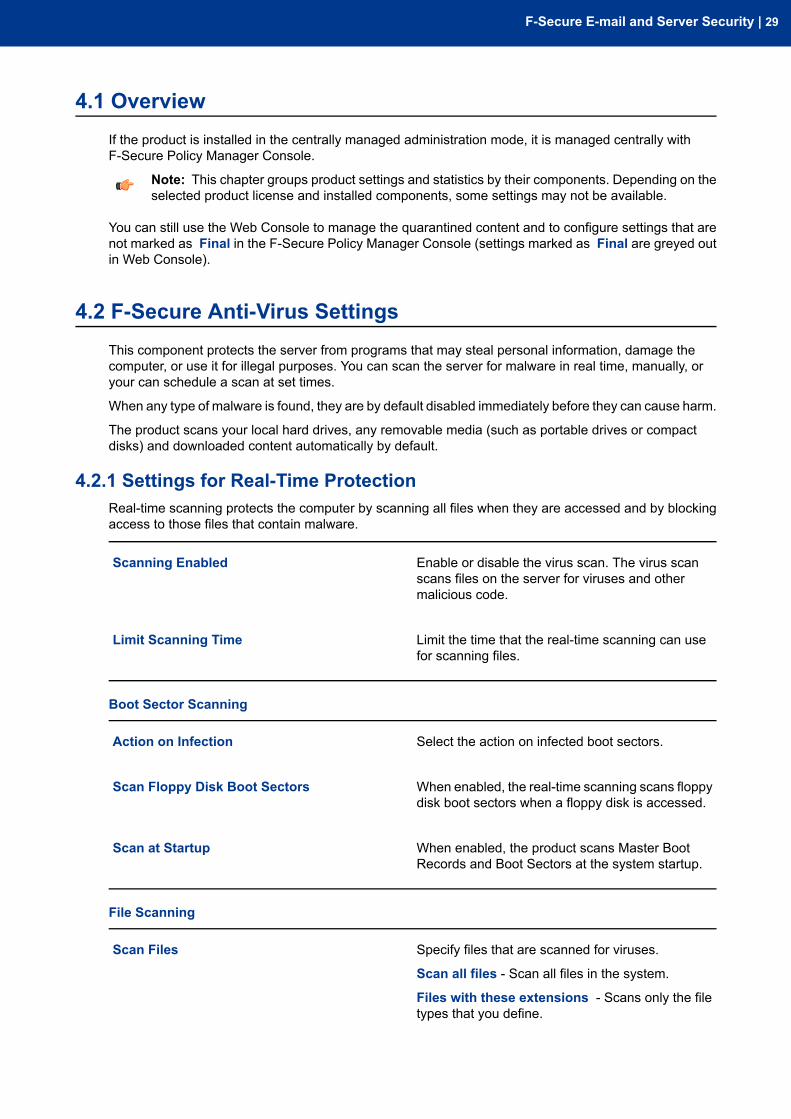
4.1 OverviewIf the product is installed in the centrally managed administration mode, it is managed centrally withF-Secure Policy Manager Console.
Note: This chapter groups product settings and statistics by their components. Depending on theselected product license and installed components, some settings may not be available.
You can still use the Web Console to manage the quarantined content and to configure settings that arenot marked as Final in the F-Secure Policy Manager Console (settings marked as Final are greyed outin Web Console).
4.2 F-Secure Anti-Virus SettingsThis component protects the server from programs that may steal personal information, damage thecomputer, or use it for illegal purposes. You can scan the server for malware in real time, manually, oryour can schedule a scan at set times.
When any type of malware is found, they are by default disabled immediately before they can cause harm.
The product scans your local hard drives, any removable media (such as portable drives or compactdisks) and downloaded content automatically by default.
4.2.1 Settings for Real-Time ProtectionReal-time scanning protects the computer by scanning all files when they are accessed and by blockingaccess to those files that contain malware.
Enable or disable the virus scan. The virus scanscans files on the server for viruses and othermalicious code.
Scanning Enabled
Limit the time that the real-time scanning can usefor scanning files.
Limit Scanning Time
Boot Sector Scanning
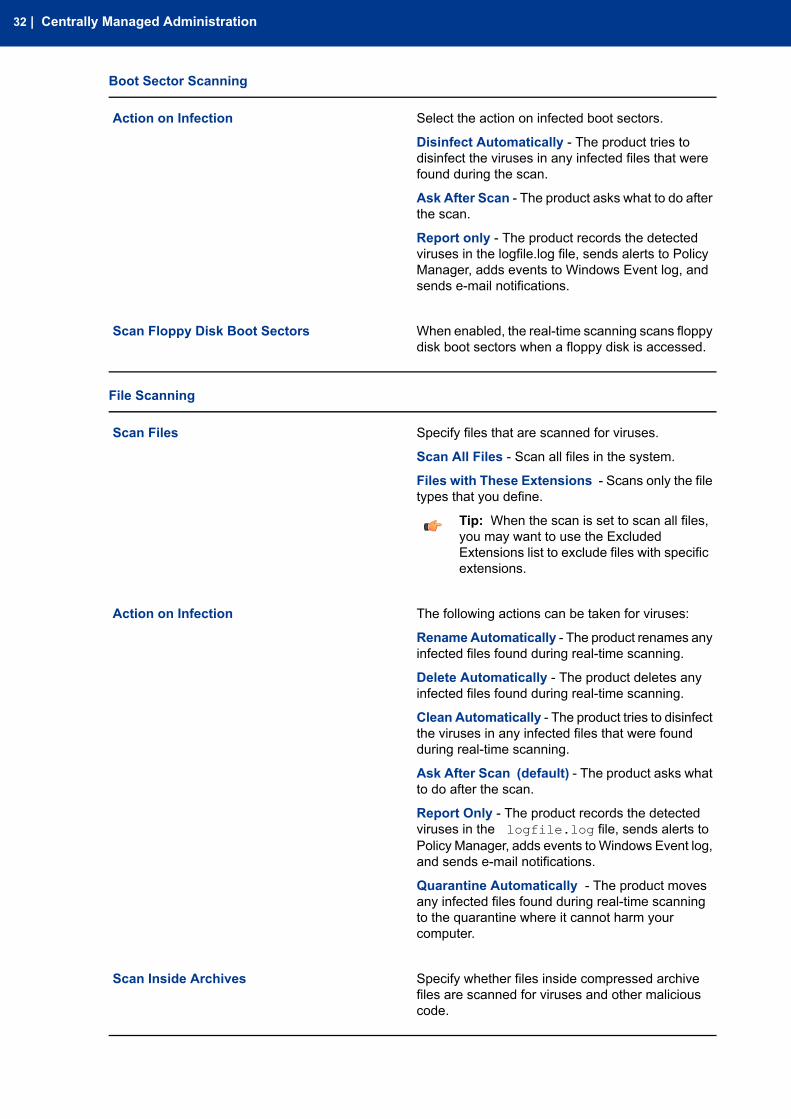
Select the action on infected boot sectors.Action on Infection
When enabled, the real-time scanning scans floppydisk boot sectors when a floppy disk is accessed.
Scan Floppy Disk Boot Sectors
When enabled, the product scans Master BootRecords and Boot Sectors at the system startup.
Scan at Startup
File Scanning
Specify files that are scanned for viruses.Scan Files
Scan all files - Scan all files in the system.
Files with these extensions - Scans only the filetypes that you define.
F-Secure E-mail and Server Security | 29
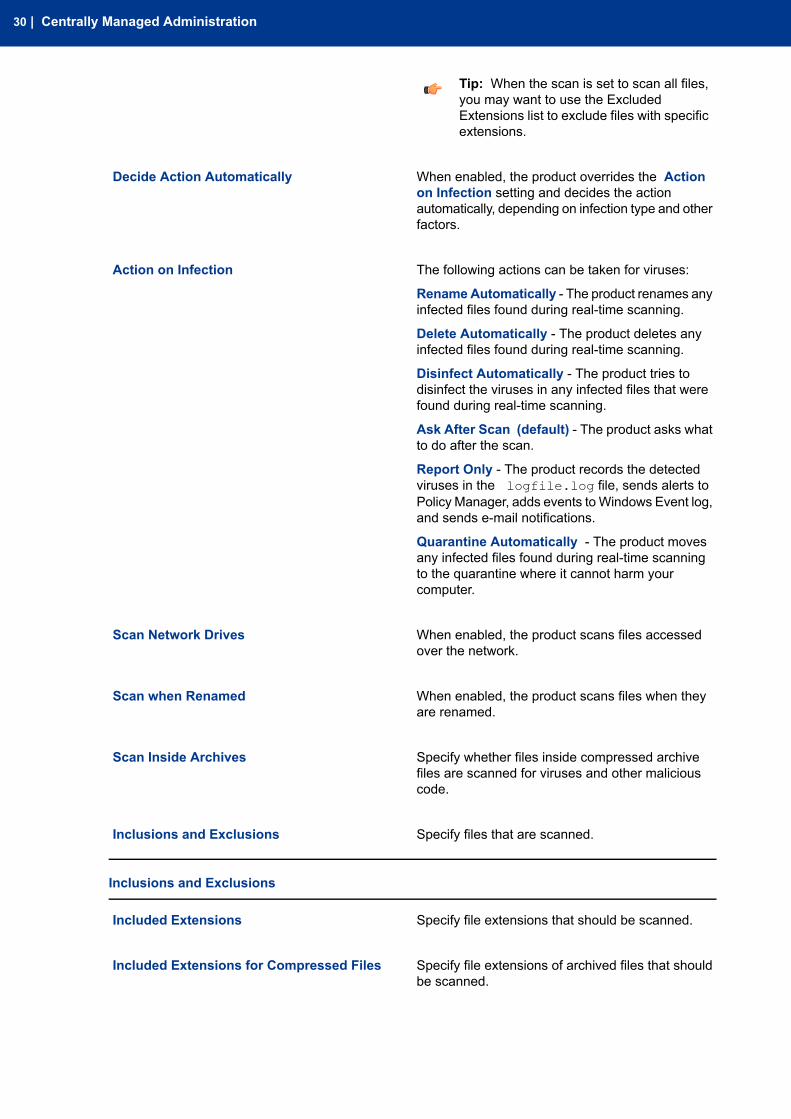
Tip: When the scan is set to scan all files,you may want to use the ExcludedExtensions list to exclude files with specificextensions.
When enabled, the product overrides the Actionon Infection setting and decides the action
Decide Action Automatically
automatically, depending on infection type and otherfactors.
The following actions can be taken for viruses:Action on Infection
RenameAutomatically - The product renames anyinfected files found during real-time scanning.
Delete Automatically - The product deletes anyinfected files found during real-time scanning.
Disinfect Automatically - The product tries todisinfect the viruses in any infected files that werefound during real-time scanning.
Ask After Scan (default) - The product asks whatto do after the scan.
Report Only - The product records the detectedviruses in the logfile.log file, sends alerts toPolicy Manager, adds events toWindows Event log,and sends e-mail notifications.
Quarantine Automatically - The product movesany infected files found during real-time scanningto the quarantine where it cannot harm yourcomputer.
When enabled, the product scans files accessedover the network.
Scan Network Drives
When enabled, the product scans files when theyare renamed.
Scan when Renamed
Specify whether files inside compressed archivefiles are scanned for viruses and other maliciouscode.
Scan Inside Archives
Specify files that are scanned.Inclusions and Exclusions
Inclusions and Exclusions
Specify file extensions that should be scanned.Included Extensions
Specify file extensions of archived files that shouldbe scanned.
Included Extensions for Compressed Files
30 | Centrally Managed Administration

Enable to add the file name extensions defined inthe database update packages published by
Add Extensions Defined in Database Updates
F-Secure Corporation to the list of extensionsdefined in the policy.
Enable to exclude specified file extensions from thescan.
Excluded Extensions Enabled
Specify file extensions that should not be scanned.Excluded Extensions
Enable to exclude specified files or folders from thescan. Specify files and folders that you want toexclude in the Excluded Objects list.
Excluded Objects Enabled
Enable to exclude specified processes from thescan. Specify processes that you want to exclude
Excluded Processes Enabled
in the Excluded Processes list. Any files accessedby the excluded process are automatically excludedfrom the scan.
4.2.2 Settings for Manual ScanningYou can scan the server manually, for example if you suspect that you have malware on the computer.You can scan your whole computer or scan for a specific type of malware or a specific location.
To start the manual scan, follow these instructions:
1. Go to the F-Secure Anti-Virus / Operations / Launch Manual Scanning branch.2. Click Start in the Editor pane.
Specify users who are allowed to run manual scans.Allow Manual Scanning
Not Allowed - Manual scanning is not allowed.
Users with Administrative Rights - Only userswith administrative rights can start the manual scan.
All Users - Anyone can start the manual scan.
Specify the maximum number of simultaneousscanning tasks.
Max Number of Scan Tasks
Limit the time that the real-time scanning can usefor scanning files.
Scanning Time Limit
Memory Scan
Enable to scan the binaries of active processeswhen the task to scan all hard disks for viruses isexecuted.
Scan Binaries of Active Processes
If Scan Binaries of Active Processes setting isEnabled, stops all detected malicious processes.
Stop Active Infected Processes
F-Secure E-mail and Server Security | 31
Boot Sector Scanning
Select the action on infected boot sectors.Action on Infection
Disinfect Automatically - The product tries todisinfect the viruses in any infected files that werefound during the scan.
Ask After Scan - The product asks what to do afterthe scan.
Report only - The product records the detectedviruses in the logfile.log file, sends alerts to PolicyManager, adds events to Windows Event log, andsends e-mail notifications.
When enabled, the real-time scanning scans floppydisk boot sectors when a floppy disk is accessed.
Scan Floppy Disk Boot Sectors
File Scanning
Specify files that are scanned for viruses.Scan Files
Scan All Files - Scan all files in the system.
Files with These Extensions - Scans only the filetypes that you define.
Tip: When the scan is set to scan all files,you may want to use the ExcludedExtensions list to exclude files with specificextensions.
The following actions can be taken for viruses:Action on Infection
RenameAutomatically - The product renames anyinfected files found during real-time scanning.
Delete Automatically - The product deletes anyinfected files found during real-time scanning.
Clean Automatically - The product tries to disinfectthe viruses in any infected files that were foundduring real-time scanning.
Ask After Scan (default) - The product asks whatto do after the scan.
Report Only - The product records the detectedviruses in the logfile.log file, sends alerts toPolicy Manager, adds events toWindows Event log,and sends e-mail notifications.
Quarantine Automatically - The product movesany infected files found during real-time scanningto the quarantine where it cannot harm yourcomputer.
Specify whether files inside compressed archivefiles are scanned for viruses and other maliciouscode.
Scan Inside Archives
32 | Centrally Managed Administration
Inclusions and Exclusions
Specify file extensions that should be scanned.Included Extensions
Specify file extensions of archived files that shouldbe scanned.
Included Extensions for Compressed Files
Enable to add the file name extensions defined inthe database update packages published by
Add Extensions Defined in Database Updates
F-Secure Corporation to the list of extensionsdefined in the policy.
Enable to exclude specified file extensions from thescan.
Excluded Extensions Enabled
Specify file extensions that should not be scanned.Excluded Extensions
Enable to exclude specified files or folders from thescan. Specify files and folders that you want toexclude in the Excluded Objects list.
Excluded Objects Enabled
Heuristic Scanning
Enable or disable the heuristic scan. The heuristicscan analyzes files for suspicious code behavior sothat the product can detect unknown malware.
Heuristic Scanning Enabled
Rootkit Scanning
Enable or disable the rootkit scan.Rootkit Scanning Enabled
Specify whether the full computer check should scanthe computer for rootkits.
Include Rootkit Scanning in Full ComputerCheck
Specify whether the product reports suspicioushidden items that it detects during the full computercheck.
Report Suspicious Hidden Items in a FullComputer Check
If you include the rootkit scanning in the fullcomputer check, suspicious hidden items arereported always.
4.3 F-Secure DeepGuard SettingsDeepGuard analyzes the content of files and behavior of programs, and blocks new and undiscoveredviruses, worms, and other malicious programs that try to make potentially harmful changes to yourcomputer.
System changes that can be dangerous include:
F-Secure E-mail and Server Security | 33
• system setting (Windows registry) changes,• attempts to turn off important system programs, for example, security programs like this product, and• attempts to edit important system files.
DeepGuard continuously watches for these changes and checks each program that attempts to changethe system.
When DeepGuard detects a program attempting to make potentially harmful changes to the system, itallows the program to run in a safe-zone, unless you have specifically allowed or blocked the program.
In the safe-zone, the program cannot harm your computer. DeepGuard analyzes what changes theprogram tried to make, and based on this, decides how likely the program is to be malware.
DeepGuard automatically either allows or blocks the program, or asks you whether to allow or block theprogram, depending on how likely the program is to be malware.
When DeepGuard is enabled, you can preventsuspicious programs frommaking potentially harmfulsystem changes in the computer.
DeepGuard Enabled
Select one of the following default actions ifDeepGuard detects a system modification attempt.
Action on System Modification Attempt
Do Not Ask - DeepGuard blocks unsafeapplications and allows safe applicationsautomatically without asking you any questions.
AskWhenCase is Unclear - Ask whenDeepGuarddetects a program trying to make potentially harmfulsystem changes and it cannot identify whether theprogram is safe or unsafe.
Always Ask Permission - DeepGuard asks youwhether you want to allow or block all monitoredactions, even when it identifies the application assafe.
Specify whether the local administrator can makedecisions on events that on processes that belong
Local Administrator Control
to another user. If Own processes is selected,local administrators can only permit their ownprocesses.
Using Real-time Protection Network improves theDeepGuard detection rate of suspicious programs.
Use Real-time Protection Network
For the full Real-time Protection Network policy,consult our web site:http://www.f-secure.com/en/web/home_global/rtpn-privacy
When enhanced process monitoring is turned on,DeepGuard temporarily modifies running programsfor maximum protection.
Enhanced Process Monitoring Enabled
Note: Enhanced process monitoring maycause problems with programs that makesure that they are not corrupted or modified.
Use the Applications list to select applications thatare commonly used in your company as safe.
Applications
34 | Centrally Managed Administration

To prevent a certain application from running,specify Trusted as No.
4.4 F-Secure Browsing Protection SettingsBrowsing protection helps you evaluate the safety of web sites you visit and prevents you fromunintentionally accessing harmful web sites.
Browsing protection shows you safety ratings for web sites that are listed on search engine results. Byhelping you avoid web sites that contain security threats, such as malware (viruses, worms, trojans) andphishing, you avoid the latest Internet threats that are not yet recognized by traditional antivirus programs.
There are four possible safety ratings for web sites: safe, suspicious, harmful and unknown. These safetyratings are based on information from several sources, such as F-Secure malware analysts and F-Securepartners.
4.4.1 Reputation Based Protection
When Browsing Protection is enabled, you canprotect your browsers from accessing harmful websites.
Browsing Protection Enabled
When Reputation Based Protection is enabled, theproduct obtains safety information on sites and
Reputation Based Protection Enabled
blocks access to sites that have harmful safetyrating.
Features
When enabled, browsing protection ratings will bedisplayed for the sites listed on search engines(Google, Yahoo, etc.).
Show link reputations on search results
If the product blocks access to a page that you trustand want to access, define the site as trusted toallow access to it.
Trusted sites
To block access to a web site completely, define itas a disallowed site.
Disallowed sites
Specify whether users can open blocked pages afterviewing the warning message.
Allow user to continue to blocked pages
F-Secure E-mail and Server Security | 35
4.5 F-Secure Anti-Virus for Microsoft Exchange Settings
4.5.1 General Settings
Notifications
Specify Notification Sender Address that is used for sending warning and informational messages tothe end-users (for example, recipients, senders and mailbox owners).
Note: Make sure that the notification sender address is a valid SMTP address. A public foldercannot be used as the notification sender address.
Network Configuration
The mail direction is based on the Internal Domains and Internal SMTP senders settings and it isdetermined as follows:
1. E-mail messages are considered internal if they come from internal SMTP sender hosts and mailrecipients belong to one of the specified internal domains (internal recipients).
2. E-mail messages are considered outbound if they come from internal SMTP sender hosts and mailrecipients do not belong to the specified internal domains (external recipients).
3. E-mail messages that come from hosts that are not defined as internal SMTP sender hosts areconsidered inbound.
4. E-mail messages submitted via MAPI or Pickup Folder are treated as if they are sent from the internalSMTP sender host.
Note: If e-mail messages come from internal SMTP sender hosts and contain both internaland external recipients, messages are split and processed as internal and outbound respectively.
Note: On Microsoft Exchange Server 2003, internal messages which are submitted via MAPIor Pickup Folder are not delivered via transport level. Therefore, those messages do not passTransport Protection and they are checked on the storage level only.
Note: To scan or filter messages from internal hosts on Microsoft Exchange Server 2003, usecorresponding real-time scanning settings in the storage protection section.
Specify internal domains. Messages coming tointernal domains are considered to be inbound mailunless they come from internal SMTP sender hosts.
Internal Domains
Separate each domain name with a space. You canuse an asterisk (*) as a wildcard. For example,*example.com internal.example.net
Specify the IP addresses of hosts that belong toyour organization. Specify all hosts within the
Internal SMTP Senders
organization that sendmessages to Exchange Edgeor Hub servers via SMTP as Internal SMTPSenders.
Separate each IP address with a space. An IPaddress range can be defined as:
You can use an asterisk (*) to match any numberor dash (-) to define a range of numbers. Forexample,
• a network/netmask pair (for example,10.1.0.0/255.255.0.0), or
36 | Centrally Managed Administration
• a network/nnn CIDR specification (for example,10.1.0.0/16).
You can use an asterisk (*) to match any numberor dash (-) to define a range of numbers. Forexample,
Note: If end-users in the organization useother than Microsoft Outlook e-mail clientto send and receive e-mail, it isrecommended to specify all end-userworkstations as Internal SMTP Senders.
Note: If the organization has ExchangeEdge and Hub servers, the server with theHub role installed should be added to theInternal SMTP Sender on the server wherethe Edge role is installed.
Important:
Do not specify the server where the Edgerole is installed as Internal SMTP Sender.
Lists and Templates
Match Lists
Specify file and match lists that can be used by other settings.
Specify the name for the match list.List name
Specify whether the list contains keywords, filepatterns or e-mail addresses.
Type
Specify file names, extensions, keywords or e-mailaddresses that the match list contains. You can usewildcards.
Filter
Note: To add multiple patterns to the filter,add each list item to a new line.
Specify a short description for the list.Description
Message Templates
Specify message templates for notifications.
Specify the name for the message template.Template name
Specify the subject line of the notification message.Subject line
Specify the notification message text.Message body
For more information about the variables you canuse in notification messages, see Variables inWarning Messages.
F-Secure E-mail and Server Security | 37
Quarantine
When the product places content to the E-mail Quarantine, it saves the content as separate files into theE-mail Quarantine Storage and inserts an entry to the Quarantine Database with information about thequarantined content.
Specify the path to the E-mail Quarantine storagewhere all quarantined mails and attachments areplaced.
Quarantine Storage
Note: If you change the QuarantineStorage setting, select the Final checkboxin the Restriction Editor to override initialsettings.
Note: During the installation, the productadjusts the access rights to the QuarantineStorage so that only the product, operatingsystem and the local administrator canaccess it. If you change the QuarantineStorage setting, make sure that the newlocation has secure access permissions.For more information, see Moving theE-mail Quarantine Storage.
Specify how long quarantined e-mails are stored inthe E-mail Quarantine before they are deletedautomatically.
Retain Items in Quarantine
The setting defines the default retention period forall Quarantine categories. To change the retentionperiod for different categories, configureQuarantine Cleanup Exceptions settings.
Specify how often old items are deleted from theE-mail Quarantine.
Delete Old Items Every
The setting defines the default cleanup interval forall Quarantine categories. To change the cleanupinterval for different categories, configureQuarantine Cleanup Exceptions settings.
Specify separate Quarantine retention periods andcleanup intervals for infected files, suspicious files,
Quarantine Cleanup Exceptions
disallowed attachments, disallowed content, spammessages, scan failures and unsafe files.
Specify the critical size (in megabytes) of the E-mailQuarantine. If the Quarantine size reaches the
Quarantine Size Threshold
specified value, the product sends an alert to theadministrator.
If the threshold is specified as zero (0), the size ofthe Quarantine is not checked.
Specify the critical number of items in the E-mailQuarantine. When the Quarantine holds the critical
Quarantined Items Threshold
38 | Centrally Managed Administration
number of items, the product sends an alert to theadministrator.
If the threshold is specified as zero (0), the amountof items is not checked.
Specify the level of the alert that is sent toadministrator when threshold levels are reached.
Notify When Quarantine Threshold is Reached
Specify the template for the message that is sentto the intended recipients when e-mail content is
Released Quarantine Message Template
released from the quarantine. For more information,see Lists and Templates.
The product generates the message only when theitem is removed from theMicrosoft Exchange Serverstore and sends it automatically when you releasethe item to intended recipients.
Specify how often the product tries to reprocessunsafe messages that are retained in the E-mail
Automatically Process Unsafe Messages
Quarantine. Set the value to Disabled to processunsafe messages manually.
Specify how many times the product tries toreprocess unsafe messages that are retained in theE-mail Quarantine.
Max Attempts to Process Unsafe Messages
Use the Final Action on Unsafe Messages settingto specify the action that takes place if the messageis retained in the Quarantine after the maximumattempts.
Specify the action on unsafe messages after themaximum number of reprocesses have beenattempted.
Final Action on Unsafe Messages
Leave in Quarantine - Leave messages in theQuarantine and process them manually.
Release to IntendedRecipients - Releasemessagesfrom the Quarantine and send them to originalrecipients.
Specify the path to the directory where E-mailQuarantine logfiles are placed.
Quarantine Log Directory
Specify how often the product rotates E-mailQuarantine logfiles. At the end of each rotation timea new log is created.
Rotate Quarantine Logs Every
Specify how many rotated log files are kept.Keep Rotated Quarantine Logs
F-Secure E-mail and Server Security | 39
Sample Submission
You can use the product to send samples of unsafe e-mails and new, yet undefined malware to F-Securefor analysis.
Specify how many times the product attempts tosend the sample if the submission fails.
Max Submission Attempts
Specify the time interval (in minutes) how long theproduct should wait before trying to send the sampleagain if the previous submission failed.
Resend Interval
Specify the time (in seconds) how long the producttries to contact the F-Secure Hospital server.
Connection Timeout
Specify the time (in seconds) how long the productwaits for the sample submission to complete.
Send Timeout
Content Scanner Server
Edit the Content Scanner Server settings to change the general content scanning options.
Specify the maximum size (in kilobytes) of data tobe transferred to the server via shared memory in
Max Size of Data Processed in Memory
the local interaction mode.When the amount of dataexceeds the specified limit, a local temporary filewill be used for data transfer.
If the option is set to zero (0), all data transfers viashared memory are disabled.
The setting is ignored if the local interaction modeis disabled.
Specify the time interval (in seconds) how long theproduct should wait for a response from F-Secure
Connection Timeout
Content Scanner Server before it stops attemptingto send or receive data.
Specify the name and location of the workingdirectory, where temporary files are placed.
Working directory
Important:
This setting must be defined as Final withthe Restriction Editor before the policies aredistributed. Otherwise the setting will not bechanged in the product.
Note: The installation automatically adjuststhe access rights so that only the operatingsystem and the local administrator canaccess files in the Working directory. If youchange this setting after the installation,make sure that the new folder has secureaccess permissions.
40 | Centrally Managed Administration
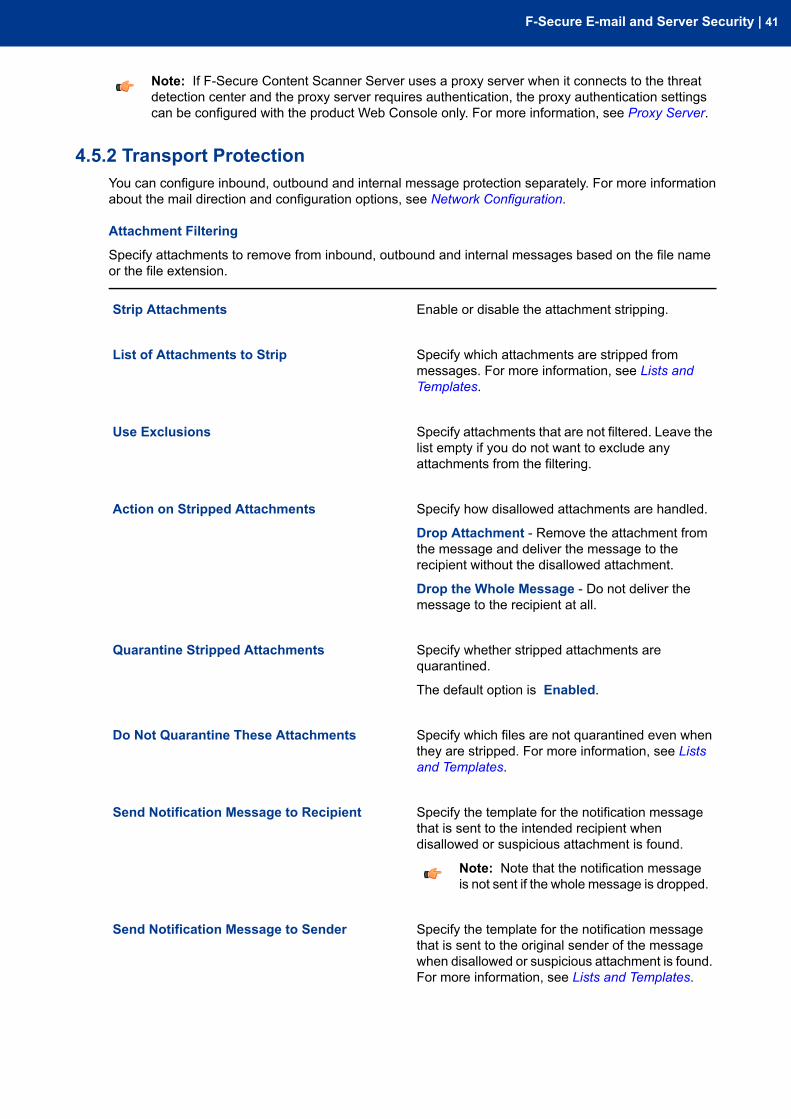
Note: If F-Secure Content Scanner Server uses a proxy server when it connects to the threatdetection center and the proxy server requires authentication, the proxy authentication settingscan be configured with the product Web Console only. For more information, see Proxy Server.
4.5.2 Transport ProtectionYou can configure inbound, outbound and internal message protection separately. For more informationabout the mail direction and configuration options, see Network Configuration.
Attachment Filtering
Specify attachments to remove from inbound, outbound and internal messages based on the file nameor the file extension.
Enable or disable the attachment stripping.Strip Attachments
Specify which attachments are stripped frommessages. For more information, see Lists andTemplates.
List of Attachments to Strip
Specify attachments that are not filtered. Leave thelist empty if you do not want to exclude anyattachments from the filtering.
Use Exclusions
Specify how disallowed attachments are handled.Action on Stripped Attachments
Drop Attachment - Remove the attachment fromthe message and deliver the message to therecipient without the disallowed attachment.
Drop the Whole Message - Do not deliver themessage to the recipient at all.
Specify whether stripped attachments arequarantined.
Quarantine Stripped Attachments
The default option is Enabled.
Specify which files are not quarantined even whenthey are stripped. For more information, see Listsand Templates.
Do Not Quarantine These Attachments
Specify the template for the notification messagethat is sent to the intended recipient whendisallowed or suspicious attachment is found.
Send Notification Message to Recipient
Note: Note that the notification messageis not sent if the whole message is dropped.
Specify the template for the notification messagethat is sent to the original sender of the message
Send Notification Message to Sender
when disallowed or suspicious attachment is found.For more information, see Lists and Templates.
F-Secure E-mail and Server Security | 41
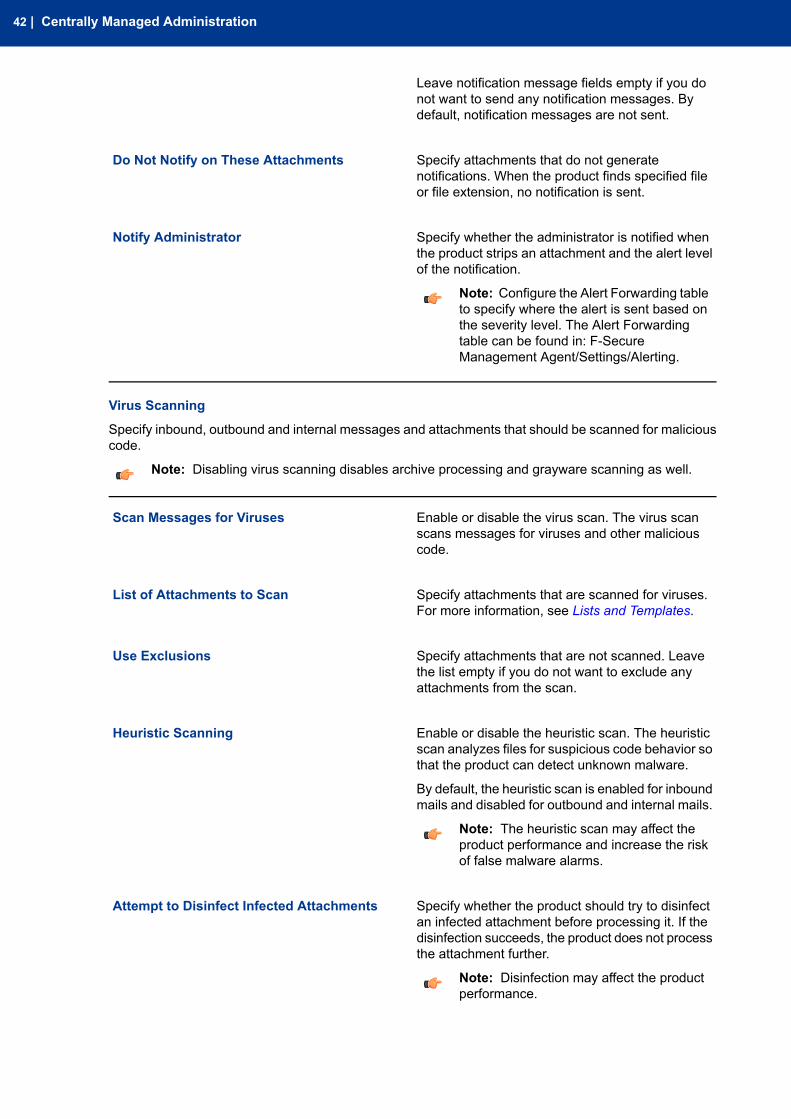
Leave notification message fields empty if you donot want to send any notification messages. Bydefault, notification messages are not sent.
Specify attachments that do not generatenotifications. When the product finds specified fileor file extension, no notification is sent.
Do Not Notify on These Attachments
Specify whether the administrator is notified whenthe product strips an attachment and the alert levelof the notification.
Notify Administrator
Note: Configure the Alert Forwarding tableto specify where the alert is sent based onthe severity level. The Alert Forwardingtable can be found in: F-SecureManagement Agent/Settings/Alerting.
Virus Scanning
Specify inbound, outbound and internal messages and attachments that should be scanned for maliciouscode.
Note: Disabling virus scanning disables archive processing and grayware scanning as well.
Enable or disable the virus scan. The virus scanscans messages for viruses and other maliciouscode.
Scan Messages for Viruses
Specify attachments that are scanned for viruses.For more information, see Lists and Templates.
List of Attachments to Scan
Specify attachments that are not scanned. Leavethe list empty if you do not want to exclude anyattachments from the scan.
Use Exclusions
Enable or disable the heuristic scan. The heuristicscan analyzes files for suspicious code behavior sothat the product can detect unknown malware.
Heuristic Scanning
By default, the heuristic scan is enabled for inboundmails and disabled for outbound and internal mails.
Note: The heuristic scan may affect theproduct performance and increase the riskof false malware alarms.
Specify whether the product should try to disinfectan infected attachment before processing it. If the
Attempt to Disinfect Infected Attachments
disinfection succeeds, the product does not processthe attachment further.
Note: Disinfection may affect the productperformance.
42 | Centrally Managed Administration

Note: Infected files inside archives are notdisinfected even when the setting isenabled.
Specify whether to drop the infected attachment orthe whole message when an infected message isfound.
Action on Infected Messages
Drop Attachment - Remove the infectedattachment from the message and deliver themessage to the recipient without the attachment.
Drop the Whole Message - Do not deliver themessage to the recipient at all.
Specify whether infected or suspicious messagesare quarantined.
Quarantine Infected Messages
Specify infections that are never placed in thequarantine. If a message is infected with a virus or
Do Not Quarantine These Infections
worm which has a name that matches a keywordspecified in this list, the message is not quarantined.For more information, see Lists and Templates.
Specify the template for the notification messagethat is sent to the intended recipient when a virusor other malicious code is found.
Send Virus Notification Message to Recipient
Note: Note that the notification messageis not sent if the whole message is dropped.
Specify the template for the notification messagethat is sent to the original sender of the messagewhen a virus or other malicious code is found.
Send Virus Notification Message to Sender
Leave notification message fields empty if you donot want to send any notification messages. Bydefault, notification messages are not sent.
For more information, see Lists and Templates.
Specify infections that do not generate notifications.When the product finds the specified infection, no
Do Not Notify on These Infections
notification is sent. For more information, see Listsand Templates.
Specify whether the administrator is notified whenthe product finds a virus in a message.
Notify Administrator
Note: Configure the Alert Forwarding tableto specify where the alert is sent based onthe severity level. The Alert Forwardingtable can be found in: F-SecureManagement Agent/Settings/Alerting.
F-Secure E-mail and Server Security | 43
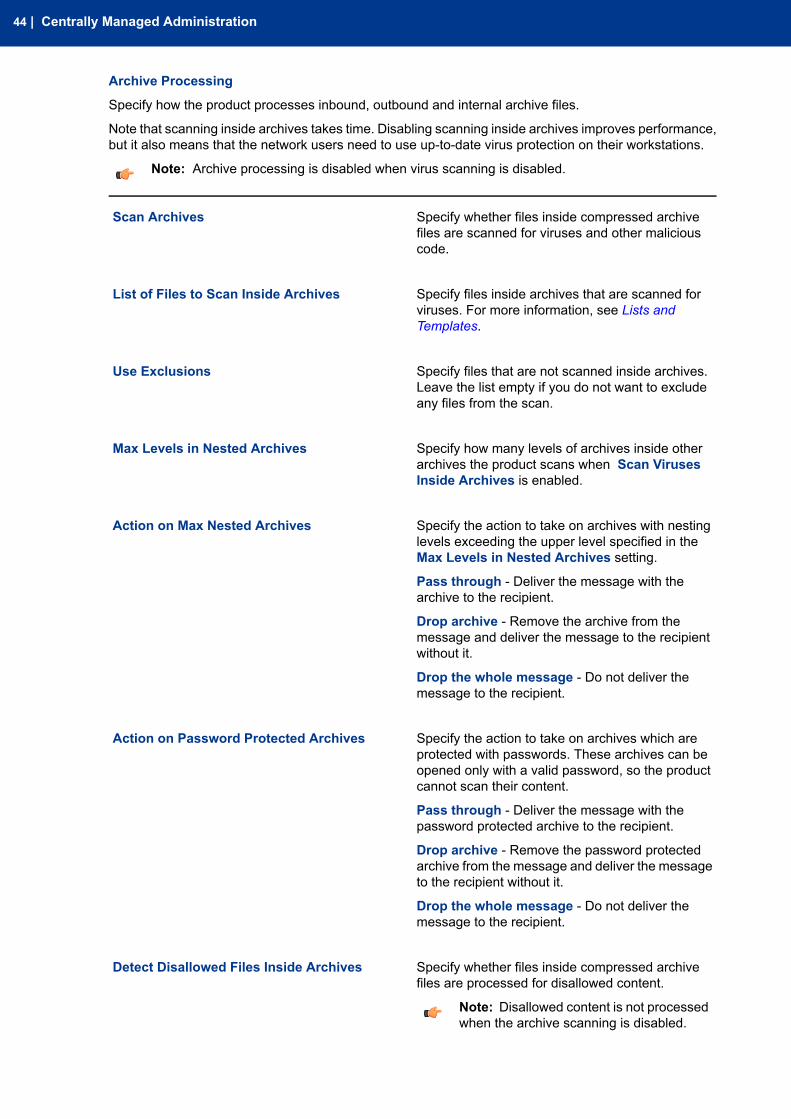
Archive Processing
Specify how the product processes inbound, outbound and internal archive files.
Note that scanning inside archives takes time. Disabling scanning inside archives improves performance,but it also means that the network users need to use up-to-date virus protection on their workstations.
Note: Archive processing is disabled when virus scanning is disabled.
Specify whether files inside compressed archivefiles are scanned for viruses and other maliciouscode.
Scan Archives
Specify files inside archives that are scanned forviruses. For more information, see Lists andTemplates.
List of Files to Scan Inside Archives
Specify files that are not scanned inside archives.Leave the list empty if you do not want to excludeany files from the scan.
Use Exclusions
Specify how many levels of archives inside otherarchives the product scans when Scan VirusesInside Archives is enabled.
Max Levels in Nested Archives
Specify the action to take on archives with nestinglevels exceeding the upper level specified in theMax Levels in Nested Archives setting.
Action on Max Nested Archives
Pass through - Deliver the message with thearchive to the recipient.
Drop archive - Remove the archive from themessage and deliver the message to the recipientwithout it.
Drop the whole message - Do not deliver themessage to the recipient.
Specify the action to take on archives which areprotected with passwords. These archives can be
Action on Password Protected Archives
opened only with a valid password, so the productcannot scan their content.
Pass through - Deliver the message with thepassword protected archive to the recipient.
Drop archive - Remove the password protectedarchive from the message and deliver the messageto the recipient without it.
Drop the whole message - Do not deliver themessage to the recipient.
Specify whether files inside compressed archivefiles are processed for disallowed content.
Detect Disallowed Files Inside Archives
Note: Disallowed content is not processedwhen the archive scanning is disabled.
44 | Centrally Managed Administration
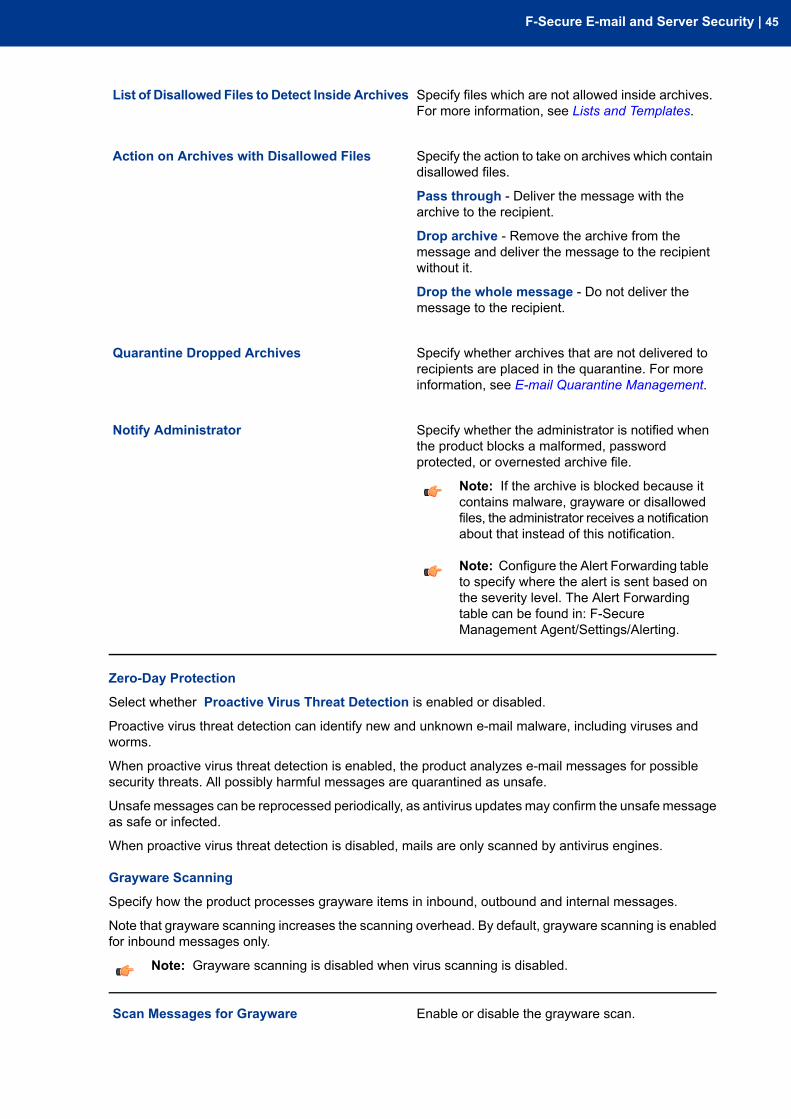
Specify files which are not allowed inside archives.For more information, see Lists and Templates.
List of Disallowed Files to Detect Inside Archives
Specify the action to take on archives which containdisallowed files.
Action on Archives with Disallowed Files
Pass through - Deliver the message with thearchive to the recipient.
Drop archive - Remove the archive from themessage and deliver the message to the recipientwithout it.
Drop the whole message - Do not deliver themessage to the recipient.
Specify whether archives that are not delivered torecipients are placed in the quarantine. For moreinformation, see E-mail Quarantine Management.
Quarantine Dropped Archives
Specify whether the administrator is notified whenthe product blocks a malformed, passwordprotected, or overnested archive file.
Notify Administrator
Note: If the archive is blocked because itcontains malware, grayware or disallowedfiles, the administrator receives a notificationabout that instead of this notification.
Note: Configure the Alert Forwarding tableto specify where the alert is sent based onthe severity level. The Alert Forwardingtable can be found in: F-SecureManagement Agent/Settings/Alerting.
Zero-Day Protection
Select whether Proactive Virus Threat Detection is enabled or disabled.
Proactive virus threat detection can identify new and unknown e-mail malware, including viruses andworms.
When proactive virus threat detection is enabled, the product analyzes e-mail messages for possiblesecurity threats. All possibly harmful messages are quarantined as unsafe.
Unsafe messages can be reprocessed periodically, as antivirus updatesmay confirm the unsafe messageas safe or infected.
When proactive virus threat detection is disabled, mails are only scanned by antivirus engines.
Grayware Scanning
Specify how the product processes grayware items in inbound, outbound and internal messages.
Note that grayware scanning increases the scanning overhead. By default, grayware scanning is enabledfor inbound messages only.
Note: Grayware scanning is disabled when virus scanning is disabled.
Enable or disable the grayware scan.Scan Messages for Grayware
F-Secure E-mail and Server Security | 45
The default value is Enabled for inboundmessagesand Disabled for outbound and internal messages.
Specify the action to take on items which containgrayware.
Action on Grayware
Pass Through - Leave grayware items in themessage.
Drop Attachment - Remove grayware items fromthe message.
Drop the Whole Message - Do not deliver themessage to the recipient.
Specify the list of keywords for grayware types thatare not scanned. Leave the list empty if you do notwant to exclude any grayware types from the scan.
Grayware Exclusion List
Specify whether grayware attachments arequarantined.
Quarantine Dropped Grayware
Specify grayware that are never placed in thequarantine. For more information, see Lists andTemplates.
Do Not Quarantine This Grayware
Specify the template for the notification messagethat is sent to the intended recipient when agrayware item is found in a message.
Send Warning Message to Recipient
Note: Note that the notification messageis not sent if the whole message is dropped.
Specify the template for the notification messagethat is sent to the original sender of the messagewhen a grayware item is found in a message.
Send Warning Message to Sender
Leave notification message fields empty if you donot want to send any notification messages. Bydefault, notification messages are not sent.
For more information, see Lists and Templates.
Specify the list of keywords for grayware types thatare not notified about.
Do Not Notify on This Grayware
If the product finds a grayware item with a namethat matches the keyword, the recipient and thesender are not notified about the grayware itemfound.
Leave the list empty if you do not want to excludeany grayware types from notifications.
Specify whether the administrator is notified whenthe product finds a grayware item in a message.
Notify Administrator
46 | Centrally Managed Administration
Note: Configure the Alert Forwarding tableto specify where the alert is sent based onthe severity level. The Alert Forwardingtable can be found in: F-SecureManagement Agent/Settings/Alerting.
Content Filtering
Specify how the product filters disallowed content in inbound, outbound and internal messages.
Specify whether e-mail messages are scanned fordisallowed content.
Filter Disallowed Content
Specify the list of disallowed keywords to check ine-mail message subjects. For more information, seeUsing Keywords in Content Filtering.
Disallowed Keywords in Message Subject
Specify the list of disallowed keywords to check ine-mail message text. For more information, seeUsing Keywords in Content Filtering.
Disallowed Keywords in Message Text
Specify the action to take on messages whichcontain disallowed keywords.
Action on Disallowed Content
Report only - Deliver the message to the recipientand notify the administrator that the scannedmessage contained disallowed content.
Drop the whole message - Do not deliver themessage to the recipient.
Quarantine - Quarantine the message withdisallowed content.
Specify whether recipients are notified whendisallowed content is found.
Send Notification Message to Recipient
Specify whether the original sender is notified whendisallowed content is found.
Send Notification Message to Sender
To enable the notification, select a template for thenotification message. To disable the notification,leave the notification field empty.
For more information, see Lists and Templates.
Specify whether the administrator is notified whenthe product finds a message with disallowedcontent.
Notify Administrator
Note: Configure the Alert Forwarding tableto specify where the alert is sent based onthe severity level. The Alert Forwardingtable can be found in: F-SecureManagement Agent/Settings/Alerting.
F-Secure E-mail and Server Security | 47
Using Keywords in Content Filtering
When the content filtering is enabled, all messages are checked against every keyword sequence that isspecified in the selected list of keywords.
A keyword may contain any characters, including punctuation symbols, spaces, and other word separators.Keywords are case insensitive.
You can use ‘?’ character in a keyword to match any character in that position in the keyword and ‘*’ tomatch any number of characters.
Keyword examples:
Matches any message text or subject that containsthe word ‘example’.
example
Matches any message text or subject that containsthe ‘another example’ text. Words ‘another’ and
another example
‘example’ have to be separated with exactly onespace character.
Matches any message text or subject that contains- for example - words ‘corporate’ or ‘cooperate’.
co?p?rate
Matches any message text or subject that containswords ‘another’ and ‘example’ separated with any
another*example
number of characters. For example, ‘anotherexample’ or ‘another keyword example’.
To represent ‘?’ or ‘*’ characters themselves in keywords, use ‘\?’ and ‘\*’ sequences correspondingly. Torepresent ‘\’ character, use ‘\\’.
For example, to match the '*** SPAM ***' string, enter '\*\*\* spam \*\*\*'.
Spam Control
Spam Control settings allow you to configure how the product scans incoming mail for spam.
Note: You can configure Spam Control settings for inbound messages, and only if you haveF-Secure Spam Control installed. Otherwise they will be ignored.
The threat detection engine can identify spam and virus patterns from the message envelope, headersand body during the first minutes of the new spam or virus outbreak.
Specify whether inbound mails are scanned forspam.
Spam Filtering
Note: Realtime Blackhole List (RBL) spamfiltering is not enabled by default even if youenable spam filtering. For information onconfiguring Realtime Blackhole Lists,consult F-Secure E-mail and ServerSecurity Deployment Guide.
Specify whether heuristic spam analysis is used tofilter inbound mails for spam.
Heuristic Spam Analysis
If you enable the heuristic spam analysis, allmessages that the threat detection engine does not
48 | Centrally Managed Administration
classify as spam are further analyzed for spam.When the heuristic spam analysis is disabled, onlythe threat detection engine filters messages forspam.
Note: Heuristic spam analysis slows downthe performance but improves the spamdetection rate.
Specify the spam filtering level. All messages withthe spam filtering level lower than the specifiedvalue can pass through.
Spam Filtering Level
Decreasing the level allows less spam to pass, butmore regular mails may be falsely identified asspam. Increasing the level allows more spam topass, but a smaller number of regular e-mailmessages are falsely identified as spam.
For example, if the spam filtering level is set to 3,more spam is filtered, but also more regular mailsmay be falsely identified as spam. If the spamfiltering level is set to 7, more spam may passundetected, but a smaller number of regular mailswill be falsely identified as spam.
Specify actions to take with messages consideredas spam, based on the spam filtering level.
Action on Spam Messages
Quarantine - Place the message into thequarantine folder.
Forward - Forward the message to the e-mailaddress specified in the Forward SpamMessagesTo E-mail Address setting.
Delete - Delete the message.
Specify if a spam flag is added to the mail as theX-Spam-Flag header in the following format:X-Spam-Flag:<flag>
Add X-Header with Spam Flag
where <flag> is YES or NO
Specify if the summary of triggered hits is added tothe mail as X-Spam-Status header in the following
Add X-Header with Summary
format: X-Spam-Status: <flag>,hits=<scr> required=<sfl>tests=<tests>
where
• <flag> is Yes or No.• <scr> is the spam confidence rating returned
by the spam scanner,• <sfl> is the current spam filtering level,• <tests> is the comma-separated list of tests
run against the mail.
F-Secure E-mail and Server Security | 49
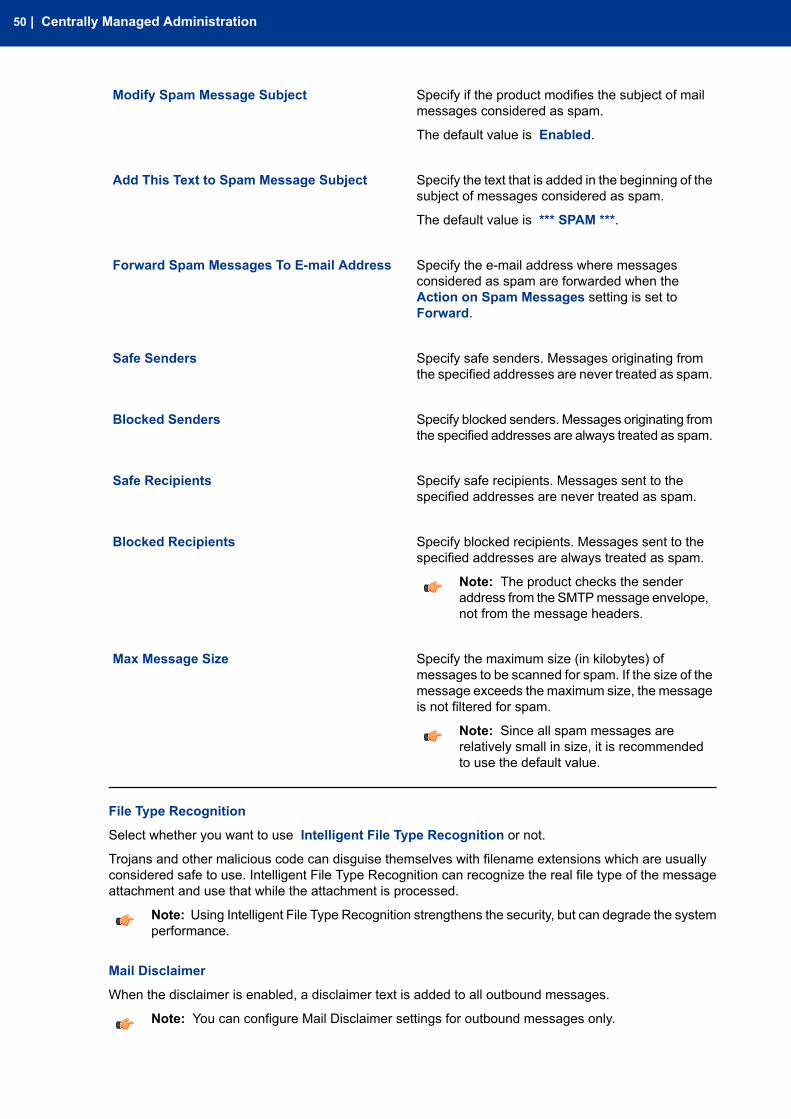
Specify if the product modifies the subject of mailmessages considered as spam.
Modify Spam Message Subject
The default value is Enabled.
Specify the text that is added in the beginning of thesubject of messages considered as spam.
Add This Text to Spam Message Subject
The default value is *** SPAM ***.
Specify the e-mail address where messagesconsidered as spam are forwarded when the
Forward Spam Messages To E-mail Address
Action on Spam Messages setting is set toForward.
Specify safe senders. Messages originating fromthe specified addresses are never treated as spam.
Safe Senders
Specify blocked senders. Messages originating fromthe specified addresses are always treated as spam.
Blocked Senders
Specify safe recipients. Messages sent to thespecified addresses are never treated as spam.
Safe Recipients
Specify blocked recipients. Messages sent to thespecified addresses are always treated as spam.
Blocked Recipients
Note: The product checks the senderaddress from the SMTPmessage envelope,not from the message headers.
Specify the maximum size (in kilobytes) ofmessages to be scanned for spam. If the size of the
Max Message Size
message exceeds the maximum size, the messageis not filtered for spam.
Note: Since all spam messages arerelatively small in size, it is recommendedto use the default value.
File Type Recognition
Select whether you want to use Intelligent File Type Recognition or not.
Trojans and other malicious code can disguise themselves with filename extensions which are usuallyconsidered safe to use. Intelligent File Type Recognition can recognize the real file type of the messageattachment and use that while the attachment is processed.
Note: Using Intelligent File Type Recognition strengthens the security, but can degrade the systemperformance.
Mail Disclaimer
When the disclaimer is enabled, a disclaimer text is added to all outbound messages.
Note: You can configure Mail Disclaimer settings for outbound messages only.
50 | Centrally Managed Administration
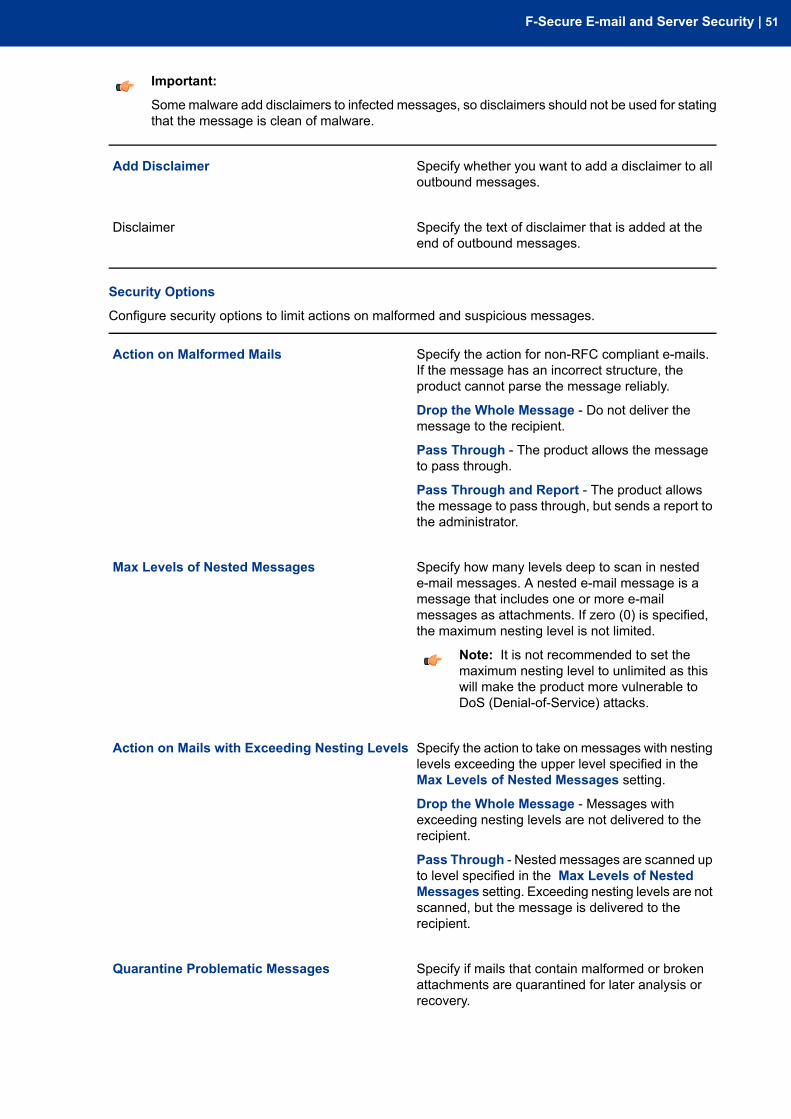
Important:
Somemalware add disclaimers to infected messages, so disclaimers should not be used for statingthat the message is clean of malware.
Specify whether you want to add a disclaimer to alloutbound messages.
Add Disclaimer
Specify the text of disclaimer that is added at theend of outbound messages.
Disclaimer
Security Options
Configure security options to limit actions on malformed and suspicious messages.
Specify the action for non-RFC compliant e-mails.If the message has an incorrect structure, theproduct cannot parse the message reliably.
Action on Malformed Mails
Drop the Whole Message - Do not deliver themessage to the recipient.
Pass Through - The product allows the messageto pass through.
Pass Through and Report - The product allowsthe message to pass through, but sends a report tothe administrator.
Specify how many levels deep to scan in nestede-mail messages. A nested e-mail message is a
Max Levels of Nested Messages
message that includes one or more e-mailmessages as attachments. If zero (0) is specified,the maximum nesting level is not limited.
Note: It is not recommended to set themaximum nesting level to unlimited as thiswill make the product more vulnerable toDoS (Denial-of-Service) attacks.
Specify the action to take on messages with nestinglevels exceeding the upper level specified in theMax Levels of Nested Messages setting.
Action on Mails with Exceeding Nesting Levels
Drop the Whole Message - Messages withexceeding nesting levels are not delivered to therecipient.
Pass Through - Nested messages are scanned upto level specified in the Max Levels of NestedMessages setting. Exceeding nesting levels are notscanned, but the message is delivered to therecipient.
Specify if mails that contain malformed or brokenattachments are quarantined for later analysis orrecovery.
Quarantine Problematic Messages
F-Secure E-mail and Server Security | 51
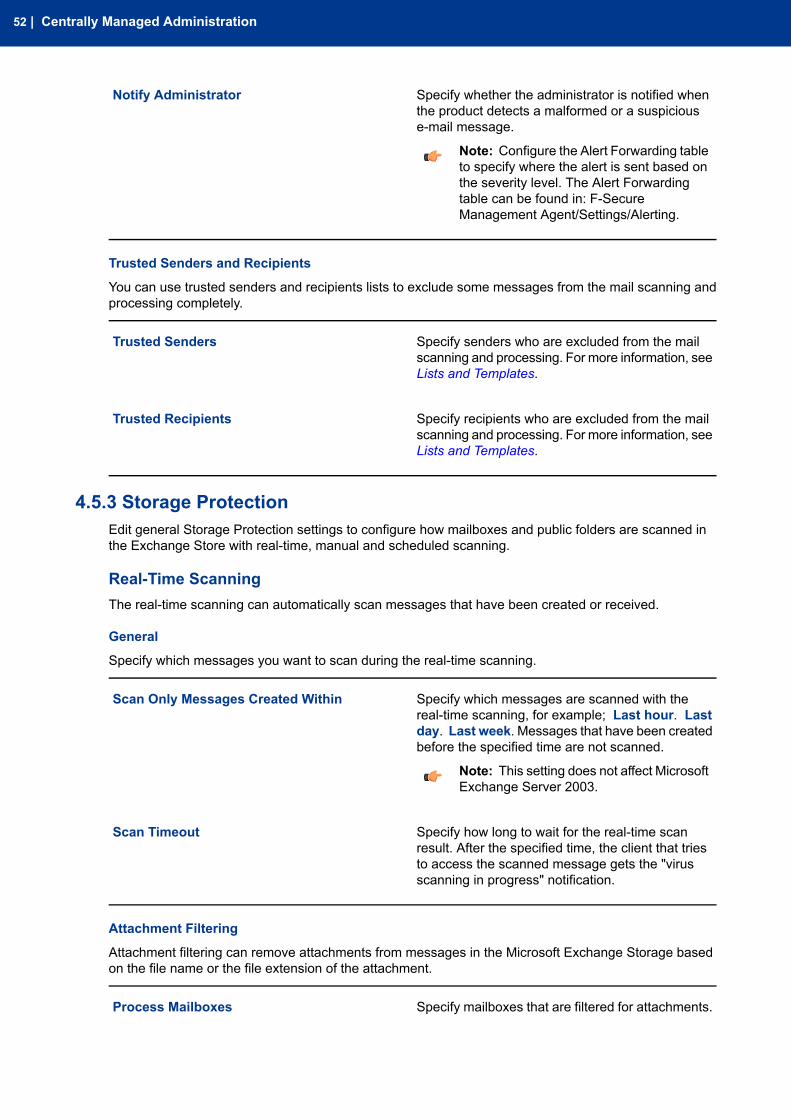
Specify whether the administrator is notified whenthe product detects a malformed or a suspiciouse-mail message.
Notify Administrator
Note: Configure the Alert Forwarding tableto specify where the alert is sent based onthe severity level. The Alert Forwardingtable can be found in: F-SecureManagement Agent/Settings/Alerting.
Trusted Senders and Recipients
You can use trusted senders and recipients lists to exclude some messages from the mail scanning andprocessing completely.
Specify senders who are excluded from the mailscanning and processing. For more information, seeLists and Templates.
Trusted Senders
Specify recipients who are excluded from the mailscanning and processing. For more information, seeLists and Templates.
Trusted Recipients
4.5.3 Storage ProtectionEdit general Storage Protection settings to configure how mailboxes and public folders are scanned inthe Exchange Store with real-time, manual and scheduled scanning.
Real-Time ScanningThe real-time scanning can automatically scan messages that have been created or received.
General
Specify which messages you want to scan during the real-time scanning.
Specify which messages are scanned with thereal-time scanning, for example; Last hour. Last
Scan Only Messages Created Within
day. Last week. Messages that have been createdbefore the specified time are not scanned.
Note: This setting does not affect MicrosoftExchange Server 2003.
Specify how long to wait for the real-time scanresult. After the specified time, the client that tries
Scan Timeout
to access the scanned message gets the "virusscanning in progress" notification.
Attachment Filtering
Attachment filtering can remove attachments from messages in the Microsoft Exchange Storage basedon the file name or the file extension of the attachment.
Specify mailboxes that are filtered for attachments.Process Mailboxes
52 | Centrally Managed Administration
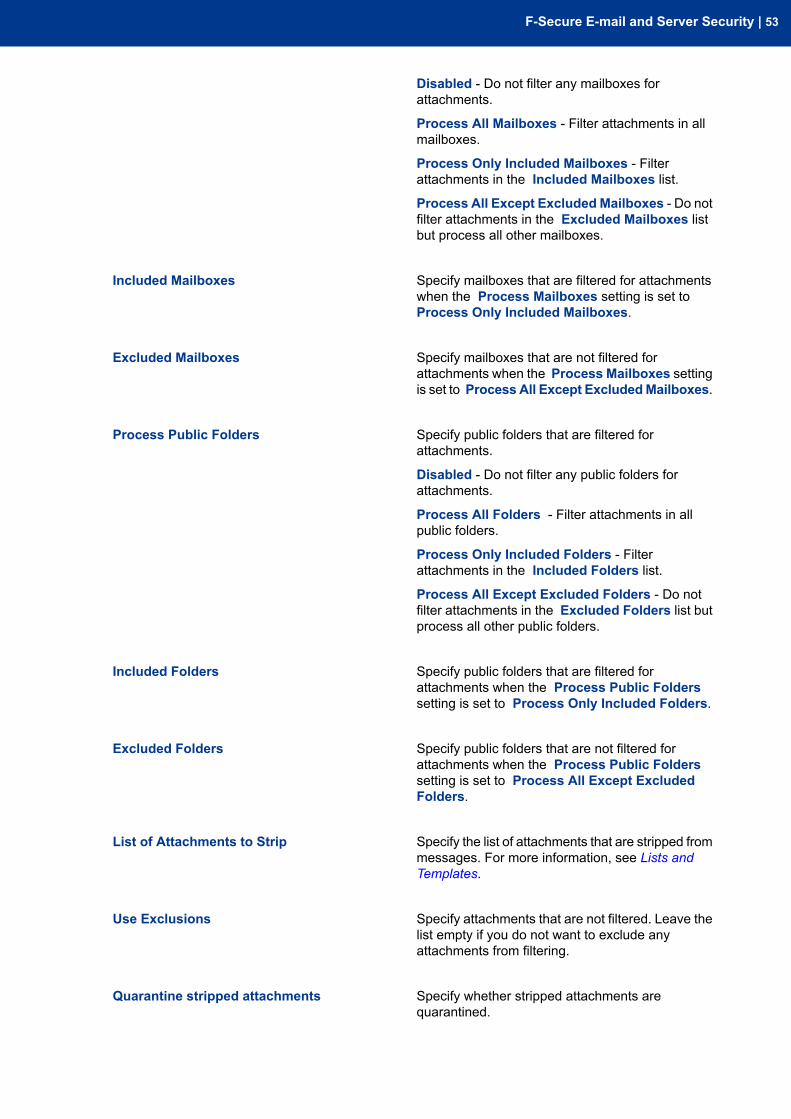
Disabled - Do not filter any mailboxes forattachments.
Process All Mailboxes - Filter attachments in allmailboxes.
Process Only Included Mailboxes - Filterattachments in the Included Mailboxes list.
Process All Except Excluded Mailboxes - Do notfilter attachments in the Excluded Mailboxes listbut process all other mailboxes.
Specify mailboxes that are filtered for attachmentswhen the Process Mailboxes setting is set toProcess Only Included Mailboxes.
Included Mailboxes
Specify mailboxes that are not filtered forattachments when the Process Mailboxes settingis set to Process All Except ExcludedMailboxes.
Excluded Mailboxes
Specify public folders that are filtered forattachments.
Process Public Folders
Disabled - Do not filter any public folders forattachments.
Process All Folders - Filter attachments in allpublic folders.
Process Only Included Folders - Filterattachments in the Included Folders list.
Process All Except Excluded Folders - Do notfilter attachments in the Excluded Folders list butprocess all other public folders.
Specify public folders that are filtered forattachments when the Process Public Folderssetting is set to Process Only Included Folders.
Included Folders
Specify public folders that are not filtered forattachments when the Process Public Folders
Excluded Folders
setting is set to Process All Except ExcludedFolders.
Specify the list of attachments that are stripped frommessages. For more information, see Lists andTemplates.
List of Attachments to Strip
Specify attachments that are not filtered. Leave thelist empty if you do not want to exclude anyattachments from filtering.
Use Exclusions
Specify whether stripped attachments arequarantined.
Quarantine stripped attachments
F-Secure E-mail and Server Security | 53
Specify attachments which are not quarantined evenwhen they are stripped.
Do not quarantine these attachments
For more information, see Lists and Templates.
Specify the template for the text that replaces thesuspicious or disallowed attachment when the
Replacement text template
attachment is removed from themessage. For moreinformation, see Lists and Templates.
Virus Scanning
Specify messages and attachments in the Microsoft Exchange Storage that should be scanned formalicious code.
Note: Disabling virus scanning disables archive processing and grayware scanning as well.
Specify mailboxes that are scanned for viruses.Scan Mailboxes
Disabled - Do not scan any mailboxes.
Scan All Mailboxes - Scan all mailboxes.
Scan Only Included Mailboxes - Scan mailboxesspecified in the Included Mailboxes list.
Scan All Except Excluded Mailboxes - Scan allmailboxes except those specified in the ExcludedMailboxes list.
Specify mailboxes that are scanned for viruses whenthe Scan Mailboxes setting is set to Scan OnlyIncluded Mailboxes.
Included Mailboxes
Specify mailboxes that are not scanned when theScan Mailboxes setting is set to Scan All ExceptExcluded Mailboxes.
Excluded Mailboxes
Specify public folders that are scanned for viruses.Scan Public Folders
Disabled - Do not scan any public folders.
Scan All Folders - Scan all public folders.
Scan Only Included Folders - Scan public foldersspecified in the Included Folders list.
Scan All Except Excluded Folders - Scan allpublic folders except those specified in theExcluded Folders list.
Important:
You need to specify the primary SMTPaddress for the account which is used toscan items in public folders on MicrosoftExchange 2010. The user account musthave permissions to access and modifyitems in the public folders. For moreinformation, see Advanced.
54 | Centrally Managed Administration

Specify public folders that are scanned for viruseswhen the Scan Public Folders setting is set toScan Only Included Folders.
Included Folders
Specify public folders that are not scanned whenthe Scan Public Folders setting is set to ScanAll Except Excluded Folders.
Excluded Folders
Specify attachments that are scanned for viruses.For more information, see Lists and Templates.
List of Attachments to Scan
Specify attachments that are not scanned. Leavethe list empty if you do not want to exclude anyattachments from the scan.
Use Exclusions
Specify whether the product should try to disinfectan infected attachment before processing it. If the
Attempt to Disinfect Infected Attachments
disinfection succeeds, the product does not processthe attachment further.
Note: Disinfection may affect the productperformance.
Note: Infected files inside archives are notdisinfected even when the setting isenabled.
Specify whether infected and suspiciousattachments are quarantined.
Quarantine Infected Attachments
Specify infections that are never placed in thequarantine. For more information, see Lists andTemplates.
Do Not Quarantine This Infections
Specify the template for the text that replaces theinfected attachment when the infected attachment
Replacement Text Template
is removed from themessage. For more information,see Lists and Templates.
Archive Processing
Specify how the product processes archive files in Microsoft Exchange Storage.
Note: Archive processing is disabled when virus scanning is disabled.
Specify if files inside archives are scanned forviruses and other malicious code.
Scan Archives
Specify files that are scanned for viruses insidearchives.
List of Files to Scan Inside Archives
F-Secure E-mail and Server Security | 55
Specify files inside archives that are not scanned.Leave the list empty if you do not want to excludeany files from the scan.
Use Exclusions
Specify how many levels deep to scan in nestedarchives, if Scan Viruses Inside Archives isenabled.
Max Levels in Nested Archives
A nested archive is an archive that contains anotherarchive inside. If zero (0) is specified, the maximumnesting level is not limited.
Specify the number of levels the product goesthrough before the action selected in Action onMax Nested Archives takes place. The defaultsetting is 3.
Specify the action to take on nested archives withnesting levels exceeding the upper level specifiedin the Max Levels in Nested Archives setting.
Action on Max Nested Archives
Pass Through - Nested archives are scanned upto level specified in the Max Levels in NestedArchives setting. Exceeding nesting levels are notscanned, but the archive is not removed.
Drop Archive - Archives with exceeding nestinglevels are removed.
Specify the action to take on archives which areprotected with passwords. These archives can be
Action on Password Protected Archives
opened only with a valid password, so the productcannot scan their content.
Pass through - Leave the password protectedarchive in the message.
Drop archive - Remove the password protectedarchive from the message.
Specify whether archives that are not delivered torecipients are placed in the quarantine. For moreinformation, see E-mail Quarantine Management.
Quarantine Dropped Archives
Grayware Scanning
Specify how the product processes grayware items in Microsoft Exchange Storage.
Note: Grayware scanning is disabled when virus scanning is disabled.
Enable or disable the grayware scan.Scan Messages for Grayware
Specify the action to take on items which containgrayware.
Action on Grayware
Report only - Leave grayware items in themessageand notify the administrator.
56 | Centrally Managed Administration
Drop attachment - Remove grayware items fromthe message.
Specify the list of keywords for grayware types thatare not scanned. Leave the list empty if you do notwant to exclude any grayware types from the scan.
Grayware Exclusion List
Specify whether grayware attachments arequarantined.
Quarantine Dropped Grayware
Specify grayware that are never placed in thequarantine. For more information, see Lists andTemplates.
Do Not Quarantine These Grayware
Specify the template for the text that replaces thegrayware attachment when the grayware attachment
Replacement Text Template
is removed from themessage. For more information,see Lists and Templates.
File Type Recognition
Select whether you want to use Intelligent File Type Recognition or not.
Trojans and other malicious code can disguise themselves with filename extensions which are usuallyconsidered safe to use. Intelligent File Type Recognition can recognize the real file type of the messageattachment and use that while the attachment is processed.
Note: Using Intelligent File Type Recognition strengthens the security, but can degrade the systemperformance.
Manual ScanningYou can scan mailboxes and public folders for viruses and strip attachments manually at any time. Tomanually scan mailboxes and public folders you have specified in the settings, follow these instructions:
1. Browse to the F-Secure Anti-Virus for Microsoft Exchange / Operations / Manual Scanning branch inF-Secure Policy manager Console.
2. Click Start.3. Distribute the policy.
If you want to stop the manual scan in the middle of the scanning process, click Stop and distribute thepolicy.
General
Specify which messages you want to scan during the manual scan.
Specify mailboxes that are scanned for viruses.Scan Mailboxes
Disabled - Do not scan any mailboxes.
Scan All Mailboxes - Scan all mailboxes.
Scan Only Included Mailboxes - Scan mailboxesspecified in the Included Mailboxes list.
Scan All Except Excluded Mailboxes - Scan allmailboxes except those specified in the ExcludedMailboxes list.
F-Secure E-mail and Server Security | 57
Specify mailboxes that are scanned for viruses whenthe Scan Mailboxes setting is set to Scan OnlyIncluded Mailboxes.
Included Mailboxes
Specify mailboxes that are not scanned when theScan Mailboxes setting is set to Scan All ExceptExcluded Mailboxes.
Excluded Mailboxes
Specify public folders that are scanned for viruses.Scan Public Folders
Disabled - Do not scan any public folders.
Scan All Folders - Scan all public folders.
Scan Only Included Folders - Scan public foldersspecified in the Included Folders list.
Scan All Except Excluded Folders - Scan allpublic folders except those specified in theExcluded Folders list.
Important:
You need to specify the primary SMTPaddress for the account which is used toscan items in public folders on MicrosoftExchange 2010. The user account musthave permissions to access and modifyitems in the public folders. For moreinformation, see Advanced.
Specify public folders that are scanned for viruseswhen the Scan Public Folders setting is set toScan Only Included Folders.
Included Folders
Specify public folders that are not scanned whenthe Scan Public Folders setting is set to ScanAll Except Excluded Folders.
Excluded Folders
Specify which messages are scanned for virusesduring the manual scan.
Incremental Scanning
All Messages - Scan all messages.
Only Recent Messages - Scan only messages thathave not been scanned during the previous manualor scheduled scan.
Attachment Filtering
Specify attachments that are removed from messages during the manual scan.
Enable or disable the attachment stripping.Strip Attachments
Specify which attachments are stripped frommessages. For more information, see Lists andTemplates.
List of Attachments to Strip
58 | Centrally Managed Administration
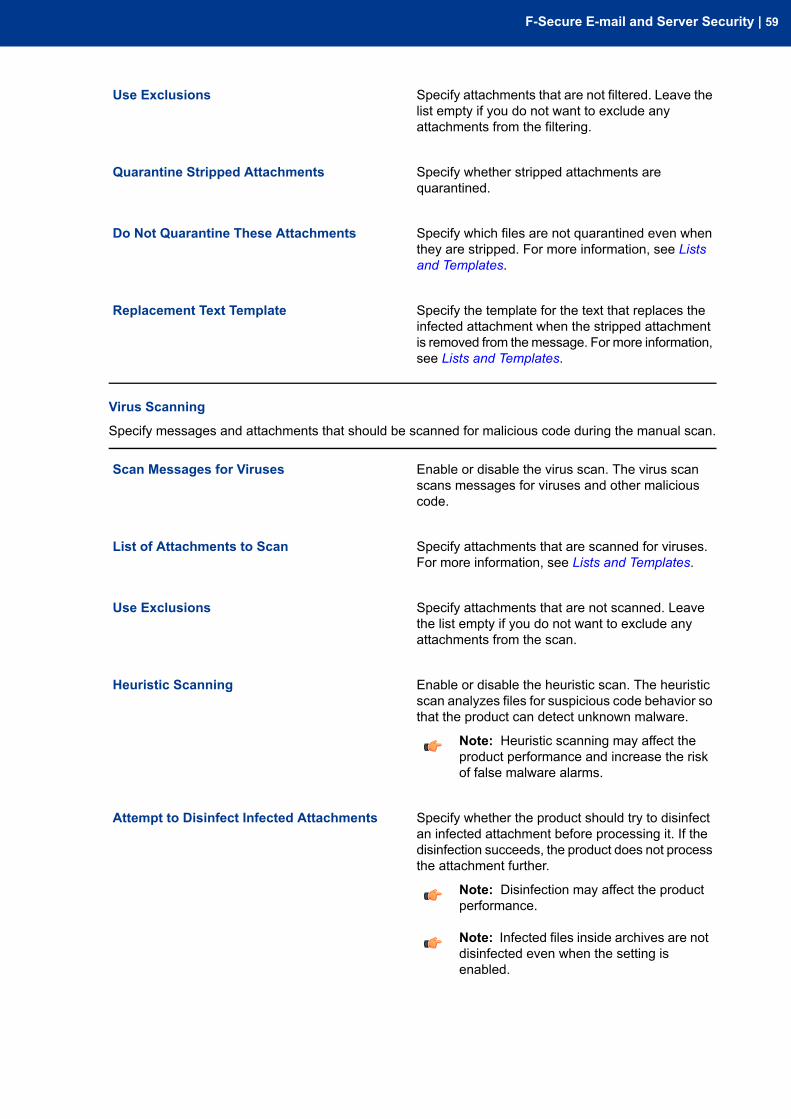
Specify attachments that are not filtered. Leave thelist empty if you do not want to exclude anyattachments from the filtering.
Use Exclusions
Specify whether stripped attachments arequarantined.
Quarantine Stripped Attachments
Specify which files are not quarantined even whenthey are stripped. For more information, see Listsand Templates.
Do Not Quarantine These Attachments
Specify the template for the text that replaces theinfected attachment when the stripped attachment
Replacement Text Template
is removed from themessage. For more information,see Lists and Templates.
Virus Scanning
Specify messages and attachments that should be scanned for malicious code during the manual scan.
Enable or disable the virus scan. The virus scanscans messages for viruses and other maliciouscode.
Scan Messages for Viruses
Specify attachments that are scanned for viruses.For more information, see Lists and Templates.
List of Attachments to Scan
Specify attachments that are not scanned. Leavethe list empty if you do not want to exclude anyattachments from the scan.
Use Exclusions
Enable or disable the heuristic scan. The heuristicscan analyzes files for suspicious code behavior sothat the product can detect unknown malware.
Heuristic Scanning
Note: Heuristic scanning may affect theproduct performance and increase the riskof false malware alarms.
Specify whether the product should try to disinfectan infected attachment before processing it. If the
Attempt to Disinfect Infected Attachments
disinfection succeeds, the product does not processthe attachment further.
Note: Disinfection may affect the productperformance.
Note: Infected files inside archives are notdisinfected even when the setting isenabled.
F-Secure E-mail and Server Security | 59
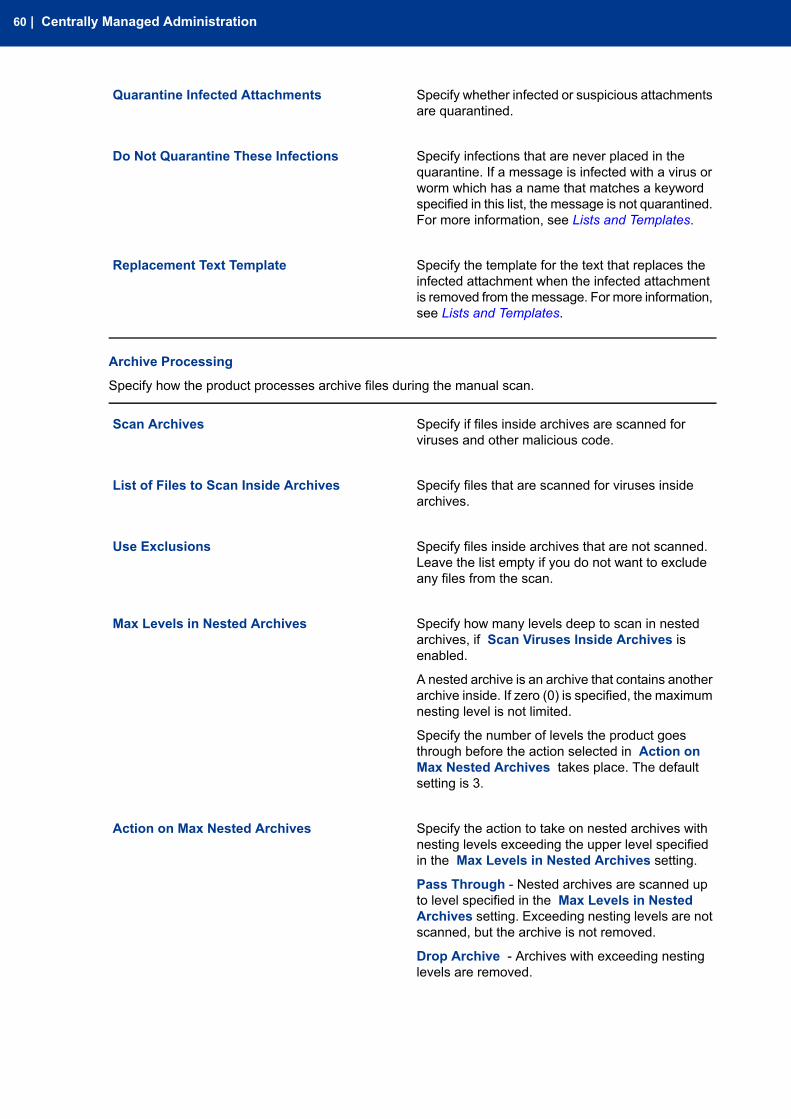
Specify whether infected or suspicious attachmentsare quarantined.
Quarantine Infected Attachments
Specify infections that are never placed in thequarantine. If a message is infected with a virus or
Do Not Quarantine These Infections
worm which has a name that matches a keywordspecified in this list, the message is not quarantined.For more information, see Lists and Templates.
Specify the template for the text that replaces theinfected attachment when the infected attachment
Replacement Text Template
is removed from themessage. For more information,see Lists and Templates.
Archive Processing
Specify how the product processes archive files during the manual scan.
Specify if files inside archives are scanned forviruses and other malicious code.
Scan Archives
Specify files that are scanned for viruses insidearchives.
List of Files to Scan Inside Archives
Specify files inside archives that are not scanned.Leave the list empty if you do not want to excludeany files from the scan.
Use Exclusions
Specify how many levels deep to scan in nestedarchives, if Scan Viruses Inside Archives isenabled.
Max Levels in Nested Archives
A nested archive is an archive that contains anotherarchive inside. If zero (0) is specified, the maximumnesting level is not limited.
Specify the number of levels the product goesthrough before the action selected in Action onMax Nested Archives takes place. The defaultsetting is 3.
Specify the action to take on nested archives withnesting levels exceeding the upper level specifiedin the Max Levels in Nested Archives setting.
Action on Max Nested Archives
Pass Through - Nested archives are scanned upto level specified in the Max Levels in NestedArchives setting. Exceeding nesting levels are notscanned, but the archive is not removed.
Drop Archive - Archives with exceeding nestinglevels are removed.
60 | Centrally Managed Administration
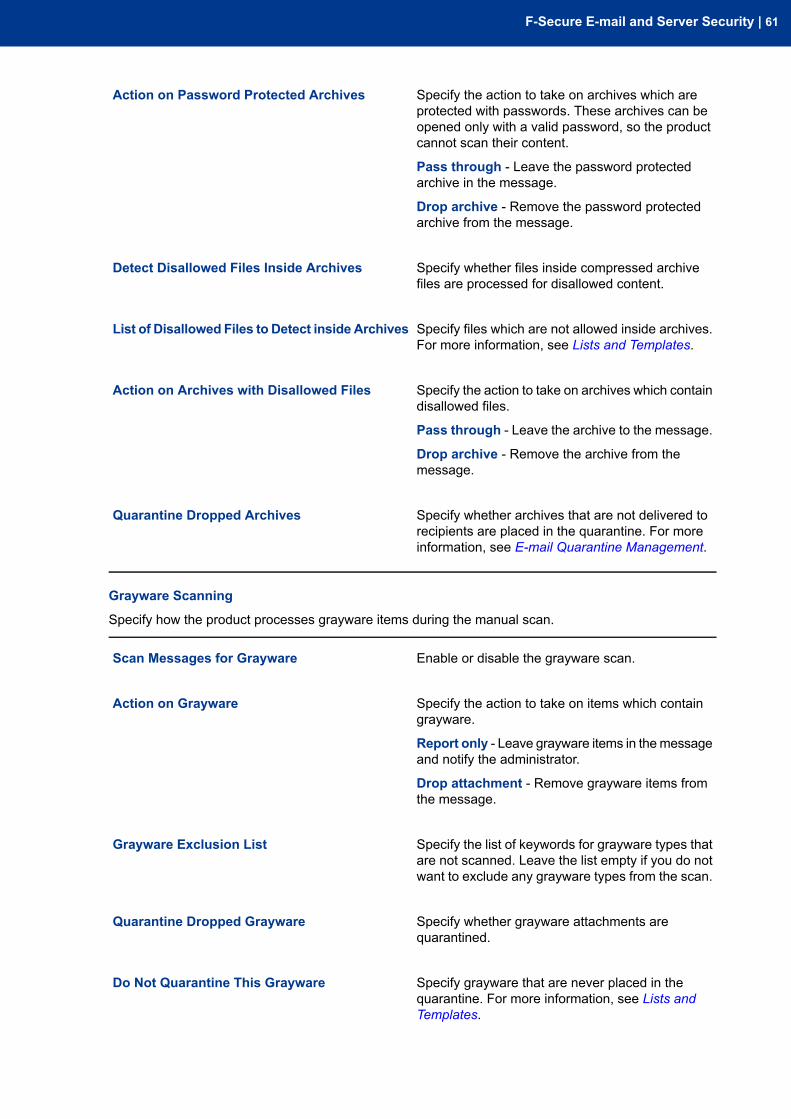
Specify the action to take on archives which areprotected with passwords. These archives can be
Action on Password Protected Archives
opened only with a valid password, so the productcannot scan their content.
Pass through - Leave the password protectedarchive in the message.
Drop archive - Remove the password protectedarchive from the message.
Specify whether files inside compressed archivefiles are processed for disallowed content.
Detect Disallowed Files Inside Archives
Specify files which are not allowed inside archives.For more information, see Lists and Templates.
List of Disallowed Files to Detect inside Archives
Specify the action to take on archives which containdisallowed files.
Action on Archives with Disallowed Files
Pass through - Leave the archive to the message.
Drop archive - Remove the archive from themessage.
Specify whether archives that are not delivered torecipients are placed in the quarantine. For moreinformation, see E-mail Quarantine Management.
Quarantine Dropped Archives
Grayware Scanning
Specify how the product processes grayware items during the manual scan.
Enable or disable the grayware scan.Scan Messages for Grayware
Specify the action to take on items which containgrayware.
Action on Grayware
Report only - Leave grayware items in themessageand notify the administrator.
Drop attachment - Remove grayware items fromthe message.
Specify the list of keywords for grayware types thatare not scanned. Leave the list empty if you do notwant to exclude any grayware types from the scan.
Grayware Exclusion List
Specify whether grayware attachments arequarantined.
Quarantine Dropped Grayware
Specify grayware that are never placed in thequarantine. For more information, see Lists andTemplates.
Do Not Quarantine This Grayware
F-Secure E-mail and Server Security | 61

Specify the template for the text that replaces thegrayware attachment when the grayware attachment
Replacement Text Template
is removed from themessage. For more information,see Lists and Templates.
File Type Recognition
Select whether you want to use Intelligent File Type Recognition or not.
Trojans and other malicious code can disguise themselves with filename extensions which are usuallyconsidered safe to use. Intelligent File Type Recognition can recognize the real file type of the messageattachment and use that while the attachment is processed.
Note: Using Intelligent File Type Recognition strengthens the security, but can degrade the systemperformance.
Advanced
Configure how to handle nested messages and specify the administrator account to scan public folders.
Specify how many levels deep to scan in nestede-mail messages.
Max Levels of Nested Messages
A nested e-mail message is amessage that includesone or more e-mail messages as attachments. Ifzero (0) is specified, the maximum nesting level isnot limited.
Note: It is not recommended to set themaximum nesting level to unlimited as thiswill make the product more vulnerable toDoS (Denial-of-Service) attacks.
Specify the primary SMTP address for the accountwhich is used to scan items in public folders. The
Admin User Credentials
user account must have permissions to access andmodify in the public folders.
Important:
The setting is used on Microsoft Exchange2010 platform only and affects manual,realtime, and scheduled storage scanning.If you do not specify any address, publicfolders in Exchange Store cannot beaccessed or even listed.
Scheduled ScanningYou can schedule scan tasks to scan mailboxes and public folders periodically. The scheduled scanningtable displays all scheduled tasks and date and time when the next scheduled task occurs for the nexttime.
• To deactivate scheduled tasks in the list, clear the Active checkbox in front of the task. Check thecheckbox to make it active again.
• Click Add to add a new scheduled task to the list.• To duplicate a task, select it from the list and click Copy.• To edit a previously created task, click Edit.• To remove the selected task from the list, click Clear Row.• Click Clear Table to remove all tasks from the list.
62 | Centrally Managed Administration
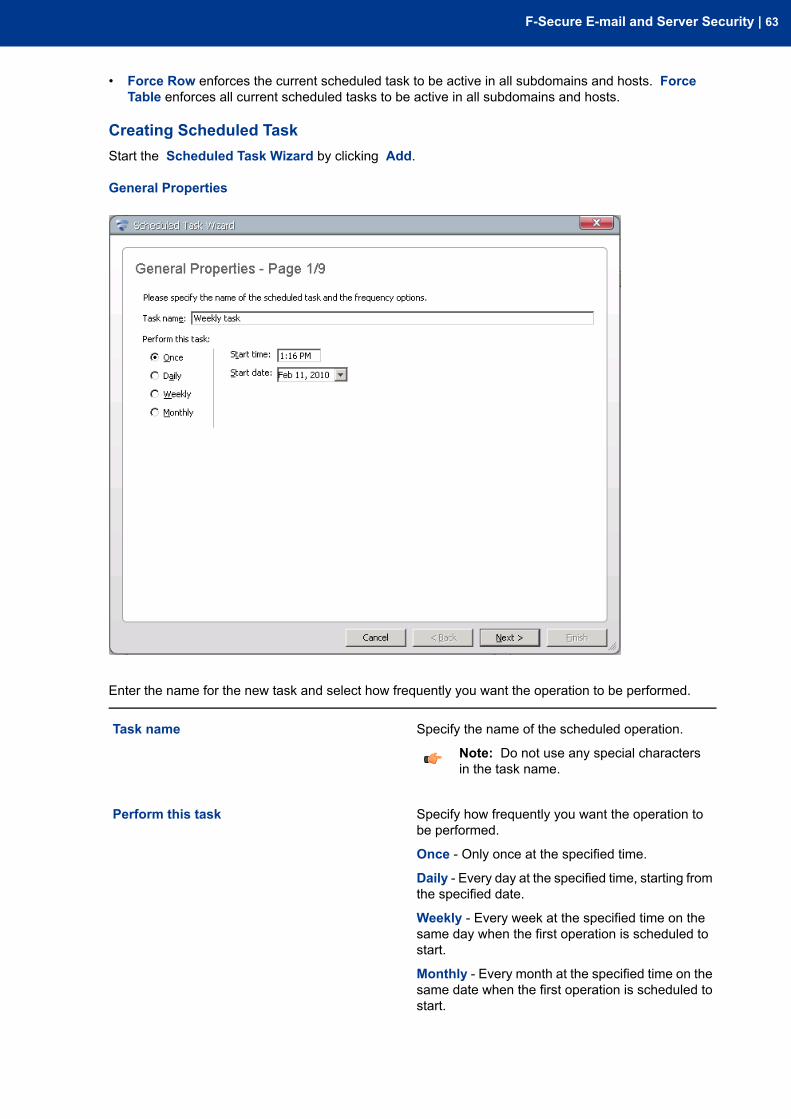
• Force Row enforces the current scheduled task to be active in all subdomains and hosts. ForceTable enforces all current scheduled tasks to be active in all subdomains and hosts.
Creating Scheduled TaskStart the Scheduled Task Wizard by clicking Add.
General Properties
Enter the name for the new task and select how frequently you want the operation to be performed.
Specify the name of the scheduled operation.Task name
Note: Do not use any special charactersin the task name.
Specify how frequently you want the operation tobe performed.
Perform this task
Once - Only once at the specified time.
Daily - Every day at the specified time, starting fromthe specified date.
Weekly - Every week at the specified time on thesame day when the first operation is scheduled tostart.
Monthly - Every month at the specified time on thesame date when the first operation is scheduled tostart.
F-Secure E-mail and Server Security | 63
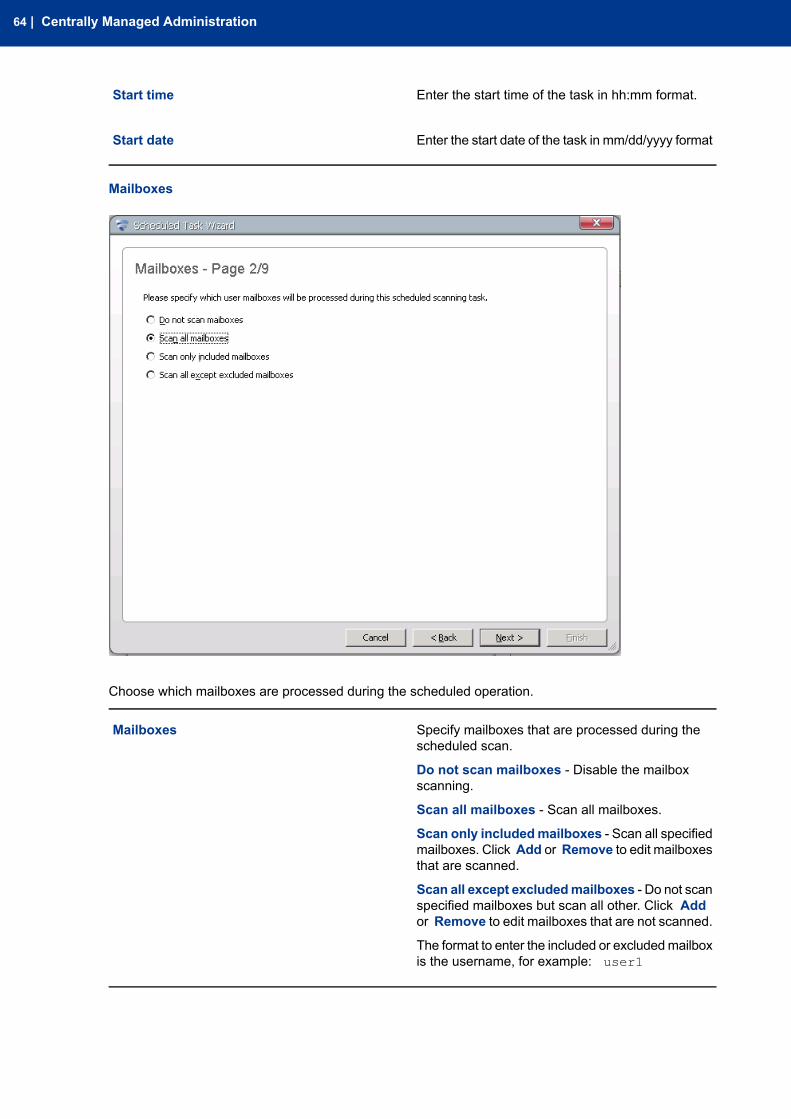
Enter the start time of the task in hh:mm format.Start time
Enter the start date of the task in mm/dd/yyyy formatStart date
Mailboxes
Choose which mailboxes are processed during the scheduled operation.
Specify mailboxes that are processed during thescheduled scan.
Mailboxes
Do not scan mailboxes - Disable the mailboxscanning.
Scan all mailboxes - Scan all mailboxes.
Scan only includedmailboxes - Scan all specifiedmailboxes. Click Add or Remove to edit mailboxesthat are scanned.
Scan all except excludedmailboxes - Do not scanspecified mailboxes but scan all other. Click Addor Remove to edit mailboxes that are not scanned.
The format to enter the included or excludedmailboxis the username, for example: user1
64 | Centrally Managed Administration
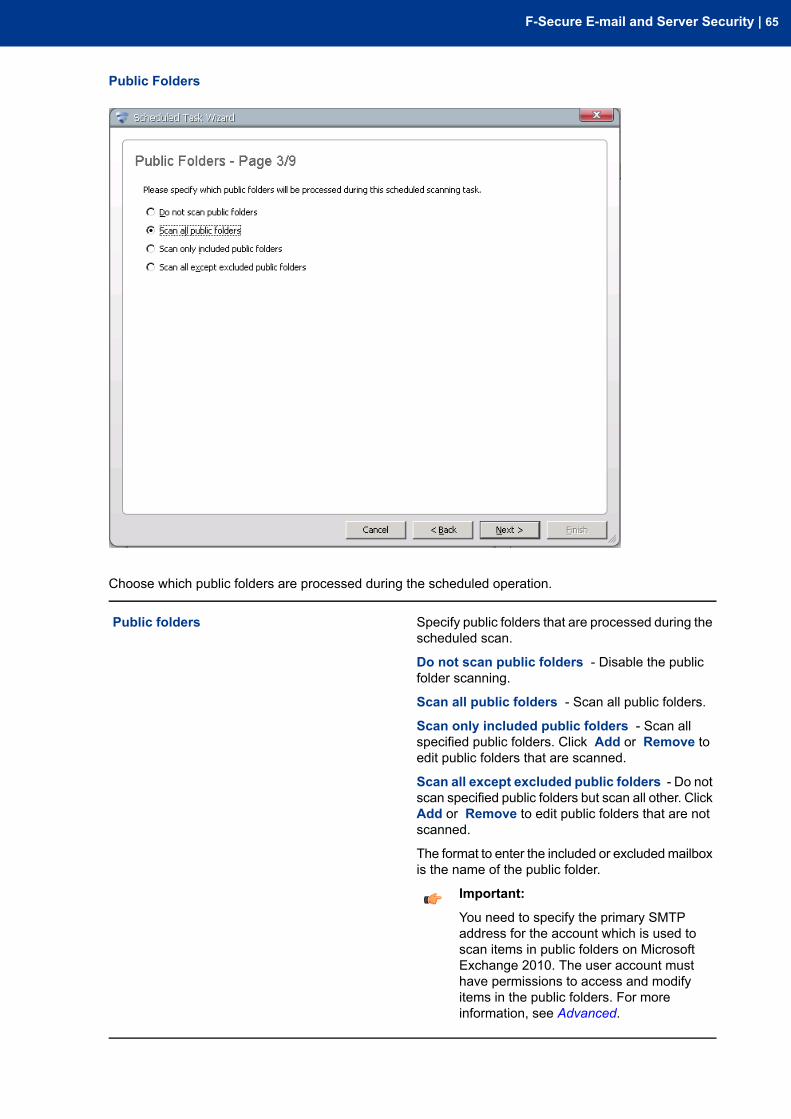
Public Folders
Choose which public folders are processed during the scheduled operation.
Specify public folders that are processed during thescheduled scan.
Public folders
Do not scan public folders - Disable the publicfolder scanning.
Scan all public folders - Scan all public folders.
Scan only included public folders - Scan allspecified public folders. Click Add or Remove toedit public folders that are scanned.
Scan all except excluded public folders - Do notscan specified public folders but scan all other. ClickAdd or Remove to edit public folders that are notscanned.
The format to enter the included or excludedmailboxis the name of the public folder.
Important:
You need to specify the primary SMTPaddress for the account which is used toscan items in public folders on MicrosoftExchange 2010. The user account musthave permissions to access and modifyitems in the public folders. For moreinformation, see Advanced.
F-Secure E-mail and Server Security | 65

Attachment Filtering
Choose settings for stripping attachments during the scheduled operation.
Enable or disable the attachment stripping.Strip attachments from e-mail messages
Targets
Specify which attachments are stripped frommessages. For more information, see Lists andTemplates.
Strip these attachments
Specify attachments that are not filtered. Leave thelist empty if you do not want to exclude anyattachments from the filtering.
Exclude these attachments from stripping
Actions
Specify whether stripped attachments arequarantined.
Quarantine stripped attachments
Specify file names and file extensions which are notquarantined even when they are stripped. For moreinformation, see Lists and Templates.
Do not quarantine these attachments
66 | Centrally Managed Administration

Notifications
Specify the template for the text that replaces theinfected attachment when the stripped attachment
Replacement text template
is removed from themessage. For more information,see Lists and Templates.
Virus Scanning
Choose settings for virus scanning during the scheduled operation.
Enable or disable the virus scan. The virus scanscans messages for viruses and other maliciouscode.
Scan messages for viruses
General Options
Enable or disable the heuristic scanning. Theheuristic scanning analyzes files for suspicious code
Heuristic Scanning
behavior so that the product can detect unknownmalware.
Note: Heuristic scanning may affect theproduct performance and increase the riskof false malware alarms.
F-Secure E-mail and Server Security | 67

Targets
Specify attachments that are scanned for viruses.For more information, see Lists and Templates.
Scan these attachments
Specify attachments that are not scanned. Leavethe list empty if you do not want to exclude anyattachments from the scanning.
Exclude these attachments from scanning
Actions
Specify whether the product should try to disinfectan infected attachment before processing it. If the
Try to disinfect infected attachments
disinfection succeeds, the product does not processthe attachment further.
Note: Disinfection may affect the productperformance.
Note: Infected files inside archives are notdisinfected even when the setting isenabled.
Specify whether infected or suspicious messagesare quarantined.
Quarantine infected attachments
Specify infections that are never placed in thequarantine. For more information, see Lists andTemplates.
Do not quarantine these infections
Notifications
Specify the template for the text that replaces theinfected attachment when the infected attachment
Replacement text template
is removed from themessage. For more information,see Lists and Templates.
68 | Centrally Managed Administration
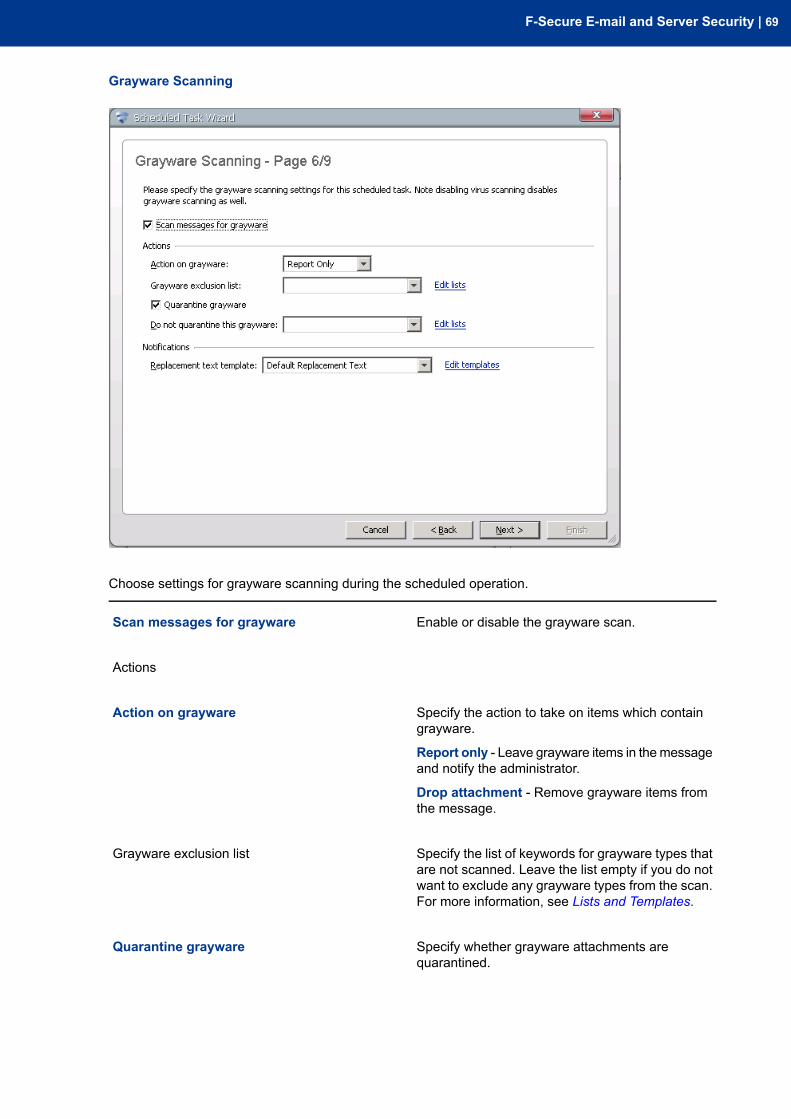
Grayware Scanning
Choose settings for grayware scanning during the scheduled operation.
Enable or disable the grayware scan.Scan messages for grayware
Actions
Specify the action to take on items which containgrayware.
Action on grayware
Report only - Leave grayware items in themessageand notify the administrator.
Drop attachment - Remove grayware items fromthe message.
Specify the list of keywords for grayware types thatare not scanned. Leave the list empty if you do not
Grayware exclusion list
want to exclude any grayware types from the scan.For more information, see Lists and Templates.
Specify whether grayware attachments arequarantined.
Quarantine grayware
F-Secure E-mail and Server Security | 69
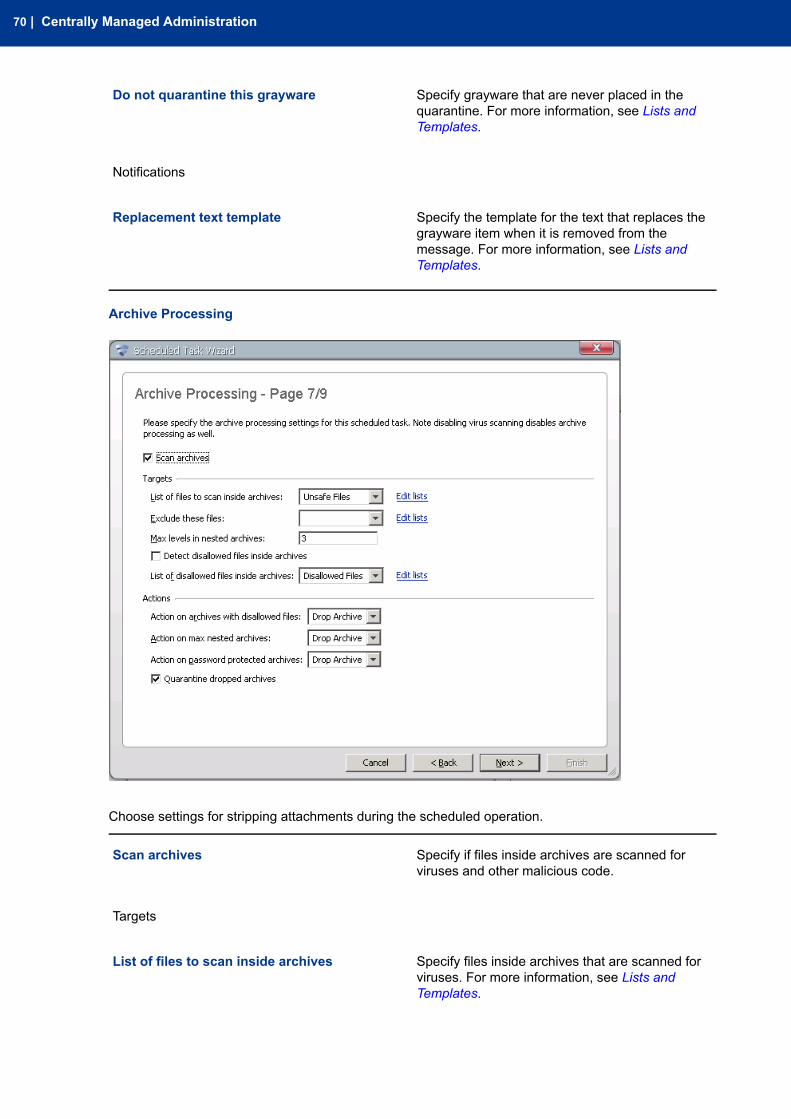
Specify grayware that are never placed in thequarantine. For more information, see Lists andTemplates.
Do not quarantine this grayware
Notifications
Specify the template for the text that replaces thegrayware item when it is removed from the
Replacement text template
message. For more information, see Lists andTemplates.
Archive Processing
Choose settings for stripping attachments during the scheduled operation.
Specify if files inside archives are scanned forviruses and other malicious code.
Scan archives
Targets
Specify files inside archives that are scanned forviruses. For more information, see Lists andTemplates.
List of files to scan inside archives
70 | Centrally Managed Administration

Specify files that are not scanned inside archives.Leave the list empty if you do not want to excludeany files from the scanning.
Exclude these files
Specify how many levels of archives inside otherarchives the product scans when Scan VirusesInside Archives is enabled.
Max levels in nesting archives
Specify whether files inside compressed archivefiles are processed for disallowed content.
Detect disallowed files inside archives
Note: Disallowed content is not processedwhen the archive scanning is disabled.
Actions
Specify the action to take on archives which containdisallowed files.
Action on archives with disallowed files
Pass through - Deliver the message with thearchive to the recipient.
Drop archive - Remove the archive from themessage and deliver the message to the recipientwithout the archive.
Specify the action to take on archives with nestinglevels exceeding the upper level specified in theMax Levels in Nested Archives setting.
Action on max nested archives
Pass through - Deliver the message with thearchive to the recipient.
Drop archive - Remove the archive from themessage and deliver the message to the recipientwithout it.
Specify the action to take on archives which areprotected with passwords. These archives can be
Action on password protected archives
opened only with a valid password, so the productcannot scan their content.
Pass through - Deliver the message with thepassword protected archive to the recipient.
Drop archive - Remove the password protectedarchive from the message and deliver the messageto the recipient without it.
Specify whether archives that are not delivered torecipients are placed in the quarantine. For moreinformation, see E-mail Quarantine Management.
Quarantine dropped archives
F-Secure E-mail and Server Security | 71
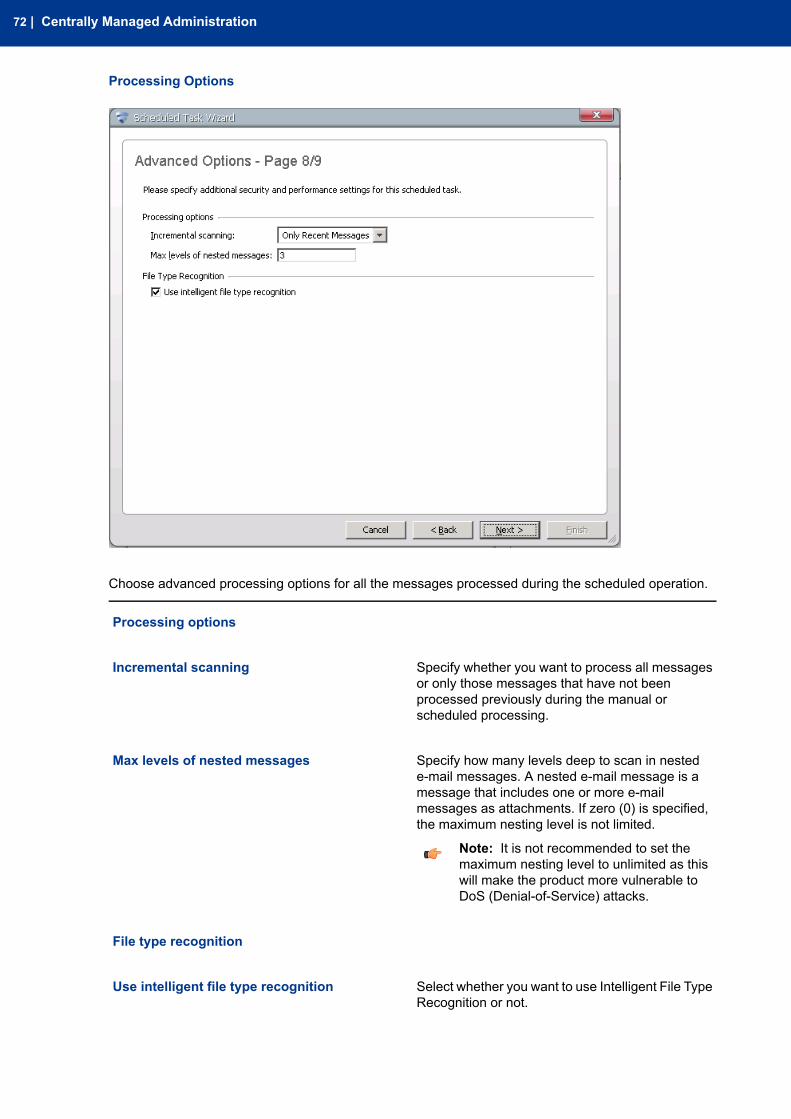
Processing Options
Choose advanced processing options for all the messages processed during the scheduled operation.
Processing options
Specify whether you want to process all messagesor only those messages that have not been
Incremental scanning
processed previously during the manual orscheduled processing.
Specify how many levels deep to scan in nestede-mail messages. A nested e-mail message is a
Max levels of nested messages
message that includes one or more e-mailmessages as attachments. If zero (0) is specified,the maximum nesting level is not limited.
Note: It is not recommended to set themaximum nesting level to unlimited as thiswill make the product more vulnerable toDoS (Denial-of-Service) attacks.
File type recognition
Select whether you want to use Intelligent File TypeRecognition or not.
Use intelligent file type recognition
72 | Centrally Managed Administration
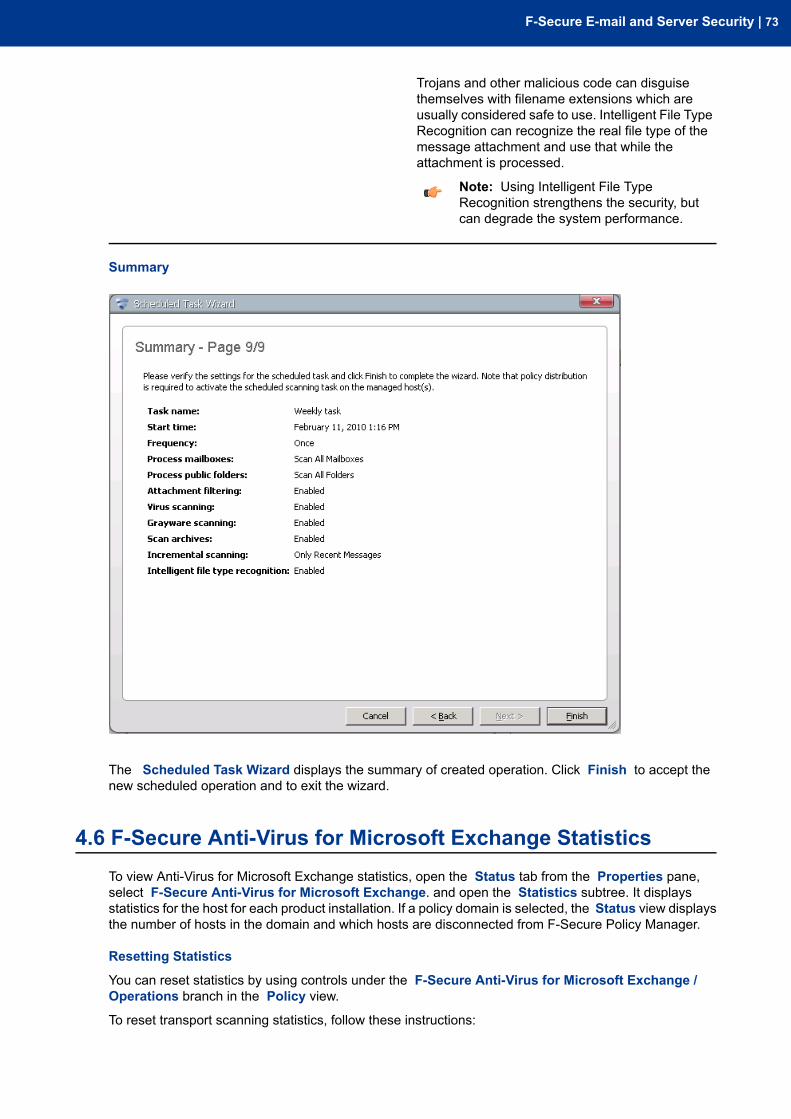
Trojans and other malicious code can disguisethemselves with filename extensions which areusually considered safe to use. Intelligent File TypeRecognition can recognize the real file type of themessage attachment and use that while theattachment is processed.
Note: Using Intelligent File TypeRecognition strengthens the security, butcan degrade the system performance.
Summary
The Scheduled Task Wizard displays the summary of created operation. Click Finish to accept thenew scheduled operation and to exit the wizard.
4.6 F-Secure Anti-Virus for Microsoft Exchange StatisticsTo view Anti-Virus for Microsoft Exchange statistics, open the Status tab from the Properties pane,select F-Secure Anti-Virus for Microsoft Exchange. and open the Statistics subtree. It displaysstatistics for the host for each product installation. If a policy domain is selected, the Status view displaysthe number of hosts in the domain and which hosts are disconnected from F-Secure Policy Manager.
Resetting Statistics
You can reset statistics by using controls under the F-Secure Anti-Virus for Microsoft Exchange /Operations branch in the Policy view.
To reset transport scanning statistics, follow these instructions:
F-Secure E-mail and Server Security | 73

1. Go to the Anti-Virus for Microsoft Exchange / Operations / Reset Transport Statistics / Statisticsto Reset branch.
2. Set statistics you want to reset to Yes.3. Go to the Anti-Virus for Microsoft Exchange / Operations / Reset Transport Statistics / Reset
branch.4. Click Start in the Editor pane and distribute the policy.
To reset storage scanning statistics, follow these instructions:
1. Go to the Anti-Virus for Microsoft Exchange / Operations / Reset Storage Statistics / Statisticsto Reset branch.
2. Set Real-Time Scanning to Yes.3. Go to the Anti-Virus for Microsoft Exchange / Operations / Reset Storage Statistics / Reset
branch.4. Click Start in the Editor pane and distribute the policy.
The Status above the button displays "Operation still in progress" until the program reports that statisticshave been reset.
4.6.1 Common
Displays the version number of the product.Version
Displays the last date and time when the statisticswere reset.
Previous Reset of Statistics
Displays the MIB version number.MIB Version
Displays the complete path where the product isinstalled.
Installation Directory
Displays the installed build number of the product.Build
Displays the product name and lists all installedhotfixes.
Common
Displays whether the product is running (started),stopped, or whether the current status of the agentis unknown.
Status
4.6.2 Transport ProtectionYou can view the inbound, outbound and internal message statistics separately.
Displays the date and time of the last reset ofstatistics.
Previous Reset of Statistics
Displays the total number of processed messagessince the last reset of statistics.
Number of Processed Messages
74 | Centrally Managed Administration
Displays the number of messages with attachmentsthat are infected and cannot be automaticallydisinfected.
Number of Infected Messages
Displays the number of messages that have beenidentified as unsafe; messages that contain patterns
Number of High &MediumVirus Risk Messages
that can be assumed to be a part of a virusoutbreak.
Displays the number of messages that have beenfound to contain grayware.
Number of Grayware Messages
Displays the number of suspicious content found,for example password-protected archives, nestedarchives and malformed messages.
Number of Suspicious Messages
Displays the number of filtered attachments.Number of Stripped Attachments
Displays the number of messages that have beenfound to contain disallowed keywords in themessage subject or text.
Number of Filtered Messages
Displays the number of messages that are classifiedas spam.
Number of Spam Messages
Displays the name of the last infection found.Last Infection Found
Displays the time when the last infection was found.Last Time Infection Found
4.6.3 Storage Protection
Common
Displays the number of currently protected usermailboxes.
Number of Mailboxes
Displays the number of currently protected publicfolders.
Number of Public Folders
Real-time and Background Scanning
Displays the date and time of the last reset ofstatistics.
Previous Reset of Statistics
Displays the total number of processed items sincethe last reset of statistics.
Number of Processed Items
F-Secure E-mail and Server Security | 75
Displays the number of items that are infected andcannot be automatically disinfected.
Number of Infected Items
Displays the number of items that have been foundto contain grayware.
Number of Grayware Items
Displays the number of suspicious content found,for example password-protected archives andnested archives.
Number of Suspicious Items
Displays the number of attachments stripped duringthe real-time scan.
Number of Stripped Attachments
Displays the name of the last infection found.Last Infection Found
Displays the time when the last infection was found.Last Time Infection Found
Manual Scanning
Displays the total number of mailboxes in ExchangeStore that the product processes during the manualscan.
Total Number of Mailboxes
Displays the number of mailboxes that have beenprocessed.
Number of Processed Mailboxes
Displays the total number of Public folders in theExchange Store that the product processes duringthe manual scan.
Total Number of Public Folders
Displays the number of public folders that have beenprocessed.
Number of Processed Public Folders
Displays the estimated time left to finish the currentmanual scan.
Estimated Time Left
Displays the time that has elapsed since the manualscan was started.
Elapsed Time
Displays the total number of processed items duringthe previous manual scan.
Number of Processed Items
Displays the number of items that were infected andcould not be automatically disinfected during theprevious manual scan.
Number of Infected Items
76 | Centrally Managed Administration

Displays the number of items that have been foundto contain grayware.
Number of Grayware Items
Displays the number of suspicious content foundduring the previous manual scan, for examplepassword-protected archives and nested archives.
Number of Suspicious Items
Displays the number of filtered attachments duringthe previous manual scan.
Number of Stripped Attachments
Displays the name of the last infection found.Last Infection Found
Displays the time when the last infection was found.Last Time Infection Found
Displays the date and time of the previous manualscan.
Previous Scanning
4.6.4 QuarantineThe quarantine statistics display the total number of quarantined items, the current size of the mailquarantine storage (in megabytes), and the detailed statistics of quarantined items by category. For moreinformation, see E-mail Quarantine Management.
4.7 F-Secure Anti-Virus for Microsoft SharePoint Settings
4.7.1 Real-time ProtectionYou can configure settings for downloaded (when they are opened from SharePoint) and uploaded (whenthey are saved to SharePoint) documents separetely.
Virus ScanningSpecify how the product processes viruses.
When virus scanning is enabled, the product scansdocuments when they are opened (downloaded)
Enabled
from the SharePoint server or saved (uploaded) tothe SharePoint server.
Enable or disable the heuristic scan. The heuristicscan analyzes files for suspicious code behavior sothat the product can detect unknown malware.
Heuristic scanning
Specify documents that are scanned for viruses.List of documents to scan
Specify the list of documents that should not bescanned for viruses.
List of documents to exclude
F-Secure E-mail and Server Security | 77

Specify whether the administrator is notified whenthe product finds a virus and the alert level of thenotification.
Notify administrator
Note: Configure the Alert Forwarding tableto specify where the alert is sent based onthe severity level. The Alert Forwardingtable can be found in: F-SecureManagement Agent/Settings/Alerting.
Archive ProcessingSpecify how the product processes viruses inside archives.
When archive processing is enabled, the productscans for viruses and other malicious code insidearchives.
Enabled
Specify files that are scanned for viruses insidearchives.
List of files to scan inside archives
Specify files inside archives that are not scanned.Leave the list empty if you do not want to excludeany files from the scan.
List of files to exclude from scan inside archives
Specify how many levels deep to scan in nestedarchives, if archive processing is enabled.
Max levels in nested archives
A nested archive is an archive that contains anotherarchive inside. If zero (0) is specified, the maximumnesting level is not limited.
Specify the number of levels the product goesthrough before the action selected in Action onMax Nested Archives takes place.
Specify the action to take on nested archives withnesting levels exceeding the upper level specifiedin the Max Levels in Nested Archives setting.
Action on max nested archives
Pass Through - Nested archives are scanned upto level specified in the Max Levels in NestedArchives setting. Exceeding nesting levels are notscanned, but the archive is not removed.
Block Archive - Archives with exceeding nestinglevels are removed.
Specify the action to take on archives which areprotected with passwords. These archives can be
Action on password protected archives
opened only with a valid password, so the productcannot scan their content.
Pass through - Leave the password protectedarchive in the message.
78 | Centrally Managed Administration

Block archive - Remove the password protectedarchive from the message.
Specify whether the administrator is notified whenthe product detects a virus in an archive and thealert level of the notification.
Notify administrator
Note: Configure the Alert Forwarding tableto specify where the alert is sent based onthe severity level. The Alert Forwardingtable can be found in: F-SecureManagement Agent/Settings/Alerting.
Grayware ScanningSpecify how the product processes grayware items.
When grayware scanning is enabled, the productscans for grayware (adware, spyware, riskware andsimilar).
Enabled
Note: Grayware scanning is disabled ifvirus scanning is disabled.
Specify the action to take on items which containgrayware.
Action on grayware
Pass through - Let users access grayware items.
Block document - Prevent users from accessinggrayware items.
Specify whether the administrator is notified whenthe product detects grayware and the alert level ofthe notification.
Notify administrator
Note: Configure the Alert Forwarding tableto specify where the alert is sent based onthe severity level. The Alert Forwardingtable can be found in: F-SecureManagement Agent/Settings/Alerting.
4.7.2 Advanced
Content Scanner ServerSpecify how F-Secure Anti-Virus for Microsoft SharePoint communicates with F-Secure Content ScannerServer.
Specify the maximum number of transactions theserver processes simultaneously.
Number of concurrent transactions
Specify (in seconds) how long to wait for a responsefrom F-Secure Content Scanner Server.
Connection timeout
F-Secure E-mail and Server Security | 79
Specify where temporary files are stored. TheWorking directory should be on a local hard disk for
Working directory
the best performance. Make sure that there isenough free disk space for temporary files.
Note: This setting must be defined as Finalwith the Restriction Editor before thepolicies are distributed. Otherwise thesetting will not be changed in the product.
Specify how to handle error when scanningdownloaded documents.
Error handling on download
Allow - treat the document as clean;
Block - return an error to SharePoint.
Specify how to handle error when scanninguploaded documents.
Error handling on upload
Allow - treat the document as clean;
Block - return an error to SharePoint.
SharePointSpecify how SharePoint should handle infected files.
Set Allow download infected file to Warn to display a warning about the infected file, but allow usersto download them. Set it to Block to prevent users from downloading infected files.
Lists and TemplatesSpecify lists and templatest that are used with F-Secure Anti-Virus for Microsoft SharePoint. For moreinformation, see Lists and Templates.
4.8 F-Secure Anti-Virus for Microsoft SharePoint Statistics
Displays the version number of the product.Version
Displays the last date and time when the statisticswere reset.
Previous reset of statistics
Displays the MIB version number.MIB version
Displays the complete path where the product isinstalled.
Installation directory
Displays the installed build number of the product.Build
Common
Displays information on installed hotfixes of the product.
80 | Centrally Managed Administration
Real-time protection
Real-time protection statistics are divided between downloaded and uploaded documents.
Displays the total number of scanned documents.Scanned documents
Displays the number of documents that containviruses.
Infected documents
Displays the number of documents that containgrayware.
Grayware documents
Displays the number of documents with suspiciouscontent.
Suspicious documents
Displays the number of documents that could notbe scanned.
Failed scan requests
Displays the name of the last virus found.Latest infection found
Displays the time when the last virus was found.Latest time infection found
4.9 F-Secure Software Updater SettingsSoftware Updater scans and reports missing updates for third-party software and deploys security updates.
Software Updater scans for Microsoft updates for the operating system and Microsoft applications, inaddition to a comprehensive list of third-party applications, such as Adobe Flash, Java, OpenOffice,archive managers, media players, image viewers and so on.
Software Updater periodically checks information about software updates, compares these to softwarethat you have installed and identifiews missing updates.
It is important to have the latest software updates installed, becausemany updates fix security vulnerabilitiesin installed products.
4.9.1 Automatic InstallationTurn on Enable Software Updater to install security updates automatically.
Specify which security updates are installedautomatically based on their importance.
Install security updates automatically
Note: Service packs are not installedautomatically, only security updates.
Specify the day of the week when to install updatesautomatically, or Every day to install updates everyday.
Install every
Specify the time of day when the automaticinstallation starts.
Install at
F-Secure E-mail and Server Security | 81
Specify how to handle cases where the updaterequires users to restart their computer.
Restart after installation
Ask user - users can choose when to restart thecomputer and they can postpone it for a while.
Force restart - the computer is restartedautomatically if the update requires it.
Specify how long users can postpone the systemrestart before the computer restarts automatically.
Force restart in
Show a flyer to users when updates are installedautomatically.
Notify about installation
Specify the name of any software that you do notwant to update automatically.
Exclude software from automatic installation
Some vendors do not sign their software updates.Specify whether these unsigned updates should beinstalled automatically.
Allow unsigned updates automatic installation
Important: Allowing unsigned updatesmaydecrease the level of protection. This settingapplies to all updates, including any newlydetected products.
4.9.2 Automatic ScanningYou can specify how often to scan for new updates. SetMaximum rescanning period on how often youwant to scan for the latest updates.
Scanning on system startup
Turn on to scan for new updates on the systemstartup.
Scan on system startup
Some delay after the system startup balancescomputer activities and the automatic scan startswhen the other system initialization tasks are ready.
Delay
Specify the delay after the system startup beforestarting the scan.
Specify the time interval when the scan starts afterthe system startup. The scan starts at a randomtime within the interval.
Randomization interval
Randomization interval balances upstream trafficto the server in the environments where many clientcomputers start simulteneously.
Exclude update types from scanning
You can exclude certain applications from the automatic scanning.
82 | Centrally Managed Administration
Exclude security tools from scanning.Exclude security tools
Exclude non-security updates from scanning.Exclude non-security updates
Exclude service packs from scanning.Exclude service packs
4.9.3 Troubleshooting
Specify how long installing an update can take.Cancel hanging installation in
Specify when to try to install the update again if itdid no succeeed.
Retry hanging installation
4.9.4 Installation LogSpecify which entries should be removed from the Installation log table.
4.9.5 CommunicationsSpecify internet connection settings for downloading third-party software and data.
Choose one of the following settings:Use HTTP Proxy
No - use a direct or transparent connection to theInternet.
From AUA configuration - use the AutomaticUpdate Agent settings.
User-defined - specify a proxy URL.
Specify the HTTP proxy address in the followingformat:http://[user[:password]@]host:port.
User-defined proxy
For example:
• http://example.com• http://example.com:8080• http://[email protected]• http://username:[email protected]
4.10 F-Secure Software Updater Statistics
Displays the version number of the product.Version
Displays the MIB version number.MIB version
F-Secure E-mail and Server Security | 83
Displays the complete path where the product isinstalled.
Installation directory
Displays the installed build number of the product.Build
Displays the current status of Software UpdaterSoftware Updater enabled
Common
Displays information on installed hotfixes of the product.
Scanning results
Displays the latest date and time when the computerscanned for missing software updates.
Latest scanning time
Displays the number of critical security updates thatare missing.
Critical security updates count
Displays the number of important security updatesthat are missing.
Important security updates count
Displays the number of other (not critical and notimportant) security updates that are missing.
Other security updates count
Installation
Displays the latest date and time when the computerinstalled software updates.
Latest installation time
Displays whether the computer needs to berestarted to finish the installation.
Restart computer needed
4.11 F-Secure Content Scanner Server SettingsContent Scanner Server hosts all scanning engines that the product uses to scan e-mail content that theF-Secure Anti-Virus for Microsoft Exchange component provides. Use these settings to change the generale-mail scanning options.
Important:
The Content Scanner Server settings do not affect engines that the F-Secure Anti-Virus componentuses when scanning files.
4.11.1 InterfaceSpecify how the server will interact with clients.
84 | Centrally Managed Administration

Specifies the service listen address in case ofmultiple network interface cards or multiple IP
IP Address
addresses. If you do not assign an IP address(0.0.0.0), the server responds to all IP addressesassigned to the host.
Specifies the TCP port that the server listens forincoming requests. The default port number is
TCP Port
18971. If you change this port number, you mustmodify the connection settings of the clientaccordingly, so that the client sends requests to thesame port.
Specifies a comma-separated list of IP addressesthe server accepts incoming requests from. If the
Accept Connections
list is empty, the server accepts connections fromany host.
Specifies the maximum number of simultaneousconnections the server can accept. Value zero (0)means no limit.
Max Connections
Specifies the maximum number of simultaneousconnections the server can accept from a particularhost. Value zero (0) means no limit.
Max Connections Per Host
Specifies how long the server should wait before ittimeouts on sending data to the client.
Send Content Timeout
Specifies how long the server should wait before ittimeouts when receiving data from the client.
Receive Content Timeout
Specifies the length of time before the server closesan inactive/idle connection. This ensures that all
Keep Alive Timeout
connections are closed if the protocol fails to closea connection.
4.11.2 Virus ScanningSpecify scanning engines to be used when F-Secure Content Scanner Server scans files for viruses, andthe files that should be scanned.
Scan engines can be enabled or disabled. If youwant to disable the scan just for certain files, enter
Scan Engines
the appropriate file extensions to Excludedextensions field and separate each extension witha space. The Excluded extensions field supports
Specify how the product reacts if it cannot scan afile.
Action if Engine Malfunctions
F-Secure E-mail and Server Security | 85
Return Scan Error - Drop the file being scannedand send a scan error.
Scan with Other Engines - Scan the file with otheravailable scan engines.
Specify whether files inside compressed archivefiles should be scanned for viruses, if they are notexcluded from scanning.
Scan Inside Archives
Scanning inside archives takes time. Disablingscanning inside archives improves performance,but it also means that the network users need touse up-to-date virus protection on their workstations.
If Scan Inside Archives is enabled, F-SecureContent Scanner Server can scan files inside
Max Levels in Nested Archives
archives that may exist inside of other archives.Furthermore, these nested archives can containother archives.
Specify the number of levels F-Secure ContentScanner Server goes through before the actionselected in Suspect Max Nested Archives takesplace. The default setting is 3.
Increasing the value increases the load on thesystem and thus decreases the overall systemperformance. This means that the system becomesmore vulnerable for DoS (Denial-of-Service) attacks.
If the amount of nested archives exceeds the valuespecified in the Max Levels in Nested Archives.
Suspect Max Nested Archives
the file is stopped if Treat as Unsafe is selected.If Treat as Safe is selected, the archive file is sentto the user.
Compressed archive files can be protected withpasswords. These archives can be opened only
Suspect Password Protected Archives
with a valid password, so F-Secure Content ScannerServer cannot scan their content. Passwordprotected archives can be stopped by selectingTreat as Unsafe. If Treat as Safe is selected,password protected archives are delivered torecipient.
Specify the acceptable unpacked size (in kilobytes)for archive files. If the unpacked size of an archive
Acceptable Unpacked Size Threshold
file exceeds this threshold, the server will considerthe archive suspicious and corresponding actionwill be taken.
Enter all the extensions you want to scan insidearchives.
Scan Extensions Inside Archives
86 | Centrally Managed Administration

Define a space-separated list of the file extensionsallowed in password protected archives. Wildcards(*, ?) can be used. Example: "DO? *ML".
Extensions Allowed in Password ProtectedArchives
Specify the maximum time that one scanning taskcan last. The Max Scan Timeout is 10 minutes bydefault.
Max Scan Timeout
4.11.3 Virus StatisticsSelect the number of most active viruses and the number of days to be displayed on the Top 10 virus list.
Specify the time period for the most active viruseslist. The product shows statistics about most active
Time Period
viruses detected during the specified time period.The possible value range is from 1 hour to 90 days.
Specify the number of most active viruses to bedisplayed for the time period specified in the ' Time
Viruses to Show
Period ' setting. The possible values are Top 5.Top 10 and Top 30.
Specify the IP address of the mail server that is usedto send e-mail.
Mail Server Address
Specify the port number of the mail server that isused to send e-mail.
Mail Server Port
Specify e-mail addresses where you want to sendunencrypted virus statistics reports.
E-mail Addresses for Unencrypted Reports
Separate each address with a comma or space.
4.11.4 Database UpdatesSpecify how you want to keep the virus definition databases up-to-date.
Specify whether the product should verify that thedownloaded virus definition databases are the
Verify Integrity of Downloaded Databases
original databases published by F-SecureCorporation and that they have not been altered orcorrupted in any way before taking them to use.
Specify whether F-Secure Content Scanner Servershould notify the administrator if virus definitiondatabases have not been updated recently.
Notify When Databases Become Old
Specify the time (in days) how old virus definitiondatabases can be before F-Secure Content ScannerServer sends the notification to the administrator.
Notify When Databases Older Than
F-Secure E-mail and Server Security | 87
4.11.5 Spam FilteringSpecify the number of Spam Scanner instances to be created and used for spam analysis.
Specify the number of Spam Scanner instances tobe created and used for spam analysis. As one
Number of spam scanner instances
instance of the spam scanner is capable ofprocessing one mail message at a time, this settingdefines how many messages will undergo spamanalysis simultaneously.
You might need to modify this setting if you enableRealtime Blackhole Lists (DNSBL/RBL) for spamfiltering. For more information, consult F-SecureE-mail and Server Security Deployment Guide.
Note: You have to restart the ContentScanner Server after you change thissetting and distribute the policy to take thenew setting into use.
Important:
Spam analysis is a processor-intensiveoperation and each spam scanner instancetakes approximately 25MB of memory(process fsavsd.exe). Do not increase thenumber of instances unless the product isrunning on a powerful computer.
4.11.6 Threat Detection EngineConfigure the virus outbreak and spam threat detection.
Specify the maximum number of patterns to cachefor the virus outbreak detection service. By default,the cache size is 10000 cached patterns.
VOD Cache Size
Specify the maximum number of patterns to cachefor spam detection service. By default, the cachesize is 10000 cached patterns.
Class Cache Size
Increasing cache sizes may increase the threatdetection performance but it requires more diskspace and may degrade the threat detection rate.Cache sizes can be disabled (set the size to 0) fortroubleshooting purposes.
Specify whether the threat detection engine is usedwhile scanning inbound messages for spam.
Spam Detection
Specify the action for messages when the threatdetection center cannot be contacted and the threatdetection engine cannot classify the message.
Action on Connection Failure
Pass through - The message is passed throughwithout scanning it for spam.
88 | Centrally Managed Administration
Heuristic Scanning - F-Secure Content ScannerServer checks the message using spam heuristics.
Specify networks and hosts in themail relay networkwhich can be trusted not to be operated by
Trusted Networks
spammers and do not have open relays or openproxies.
Define the network as a network/netmask pair(10.1.0.0/255.255.0.0), with the network/nnn CIDRspecification (10.1.0.0/16), or use ‘*’ wildcard tomatch any number and ‘-’ to define a range ofnumbers (172.16.*.1, 172.16.4.10-110).
4.11.7 Proxy ConfigurationSpecify proxy server parameters that Content Scanner Server uses when it connects to the threat detectioncenter.
Specify whether F-Secure Content Scanner Serveruses a proxy server when it connects to the threatdetection center.
Use Proxy Server
Specify the address of the proxy server.Proxy Server Address
Specify the port number of the proxy server.Proxy Server Port
4.11.8 AdvancedSpecify the location and the minimum size of the Working directory.
Specify where temporary files are stored. TheWorking directory should be on a local hard disk for
Working Directory
the best performance. Make sure that there isenough free disk space for temporary files.
Important:
This setting must be defined as Final withthe Restriction Editor before the policies aredistributed. Otherwise the setting will not bechanged in the product.
Note: During the setup, access rights areadjusted so that only the operating systemand the local administrator can access filesin the Working directory. If you makechanges to Working Directory settings,make sure that the new directory has thesame rights.
Specify the time after which the inactive temporaryfiles in the Working directory are deleted. Thedefault clean interval is 30 minutes.
Working Directory Clean Interval
F-Secure E-mail and Server Security | 89
Specify when F-Secure Content Scanner Servershould send a low disk space alert to theadministrator. The default setting is 100 megabytes.
Free Space Threshold
Specify the maximum number of transactions theserver processes simultaneously.
Max Number of Concurrent Transactions
4.12 F-Secure Content Scanner Server StatisticsThe Statistics branch in the F-Secure Content Scanner Server tree displays the version of F-SecureContent Scanner Server that is currently installed on the selected host and the location of F-SecureContent Scanner Server installation directory.
4.12.1 ServerThe Server branch contains the following information:
The version of the F-Secure Content ScannerServer.
Version
The status of F-Secure Content Scanner Server,whether it has been started and it is running or it isstopped.
Status
The date and time when the server was started.Start Time
The date and time of the last reset of statistics.Previous Reset of Statistics
The number of files that have been scanned.Number of Scanned Files
The last date and time when virus definitiondatabase was updated.
Last Database Update
The currently used version of the database update.The version is shown in YYYY-MM-DD_NN format,
Database Update Version
where YYYY-MM-DD is the release date of theupdate and NN is the number of the update for thatday.
The name of the last infection that was encountered.Last Infection Found
The date and time when the last infection was found.Last Time Infection Found
4.12.2 Scan EnginesThe Scan Engines table displays the scan engine statistics and information.
90 | Centrally Managed Administration
Displays the name of the scan engine.Name
Displays the version number of the scan engine.Version
Displays the status of the scan engine. The scanengine can be loaded and enabled or disabled bythe administrator, or not loaded at all.
Status
Displays the last date and time when virus definitiondatabase was taken into use by the scan engine.
Last Database Update
Displays the date the virus signature database forthe scan engine was created.
Database Date
Displays the last infection found by the scan engine.Last Infection Found
Displays the date and time of the last infection foundby the scan engine.
Last Time Infection Found
Displays the number of files processed by the scanengine.
Processed Files
Displays the number of infected files found by thescan engine.
Infected Files
Displays the number of files successfully disinfectedby the scan engine.
Disinfected Files
Displays the current version of database updatesused by the scan engine.
Database Version
4.12.3 CommonThe Common statistics branch displays the list of installed product hotfixes.
4.12.4 Spam ControlThe Spam Control branch displays the following information:
Displays the version and build number of the SpamScanner.
Spam Scanner Version
Displays the status of the Spam Scanner.Status
Displays when the Spam Scanner statistics werereset last time.
Previous Reset of Statistics
F-Secure E-mail and Server Security | 91
Displays the version of the database currently usedby the Spam Scanner.
Database Version
Displays the date and time when the Spam Scannerdatabase was last updated.
Last Database Update
Displays the total number of e-mail messages thathave been analyzed for spam.
Number of Processed Messages
These statistics show how many mail messageshave been identified with each spam confidencelevel rating.
Total Spam Statistics
4.12.5 Virus StatisticsThe Virus Statistics branch displays the following information:
Displays the date and time when the virus statisticswere updated last time.
Last Updated
Displays the list of most active viruses.Most Active Viruses
4.13 F-Secure Management Agent SettingsIf the product is working in centrally managed administration mode, you have to make sure that it sendsand receives data from F-Secure Policy Manager Server. To do this, change communications settingsfrom F-Secure Management Agent.
Note: For detailed information on F-Secure Management Agent, see the F-Secure Policy ManagerAdministrator's Guide.
Communications
Shows whether the host is stand-alone or centrallyadministered.
Host Configuration Mode
The maximum time the host will store theinformation it is unable to transmit.
Spool Time Limit
This setting can be used to disallow F-SecureManagement Agent from downloading large remote
Slow Connection Definition
installation packages over slow networkconnections. F-Secure Management Agentmeasures the speed of the network link to F-SecurePolicy Manager Server and stops the download ifthe minimum speed specified by this setting is notmet.
92 | Centrally Managed Administration
Sets the interval how often the host tries to recoverfrom Last Known Good (LKG) communicationsettings mode.
Last Known Good Settings Recovery
If the communication settings have changed andthe new settings do not work, the host enters theLast Known Good (LKG) communication settingsmode and uses the old settings until the newsettings have been confirmed to work.
If set to allowed, the user can temporarily suspendall network communications.
Allow user to suspend network communications
Note: Select the Final checkbox in theRestriction Editor if the user is not allowedto suspend communications.
Force the host to use a unique identity incommunication or allow the use of DNS name, IPaddresses, or WINS names.
Host identification
Protocols
The branch contains the HTTP protocol settings used for communication between hosts and F-SecurePolicy Manager.
URL of the F-Secure Policy Manager Server. TheURL should not have a slash at the end. Forexample: http://fsms.example.com.
Management Server Address
Defines how often the host tries to fetch incomingpackages (such as Base Policy files or new virus
Incoming Packages Polling Interval
signature databases) from the F-Secure PolicyManager Server.
Defines how often the host tries to transmit to theadministrator information that is periodically updated(such as statistics).
Outgoing Packages Update Interval
4.14 F-Secure Automatic Update Agent SettingsUsing F-Secure Automatic Update Agent is the most convenient way to keep the virus and spam definitiondatabases updated. It connects to F-Secure Policy Manager Server or the F-Secure Update Serverautomatically.
Communications
Enable or disable automatic virus and spamdefinition updates.
Automatic updates
By default, automatic updates are enabled.
F-Secure E-mail and Server Security | 93
Specify whether the product should check theconnection to the Internet before trying to retrieveupdates.
Internet connection checking
Assume always connected - The computer isconnected to the Internet all the time.
Detect connection - The product detects when thecomputer is connected to the Internet.
Detect traffic - The product assumes that thecomputer is connected to the Internet only whenother applications use the network.
Detect connection is the default setting.
Select whether to use an HTTP proxy whenretrieving automatic updates.
HTTP settings
If F-Secure Automatic Update Agent connects tothe Internet through a proxy server, specify theHTTP proxy address in the User-defined proxysettings > Address field.
Enter the HTTP proxy server address.
Specify F-Secure Policy Manager Proxies that youwant to use as sources for automatic updates.
PM Proxies
If no F-Secure Policy Manager Proxies areconfigured, the product retrieves the latest virusdefinition updates from F-Secure Update Serverautomatically.
Specify (in hours) the failover time to connect toF-Secure Policy Manager Server or F-Secure PolicyManager Proxy.
Intermediate server failover time
If the product cannot connect to any user-specifiedupdate server during the failover time, it retrievesthe latest virus definition updates from F-SecureUpdate Server if Allow fetching updates fromF-Secure Update Server is enabled.
Specify (in minutes) how often the product checksone of the update sources for new updates.
Intermediate server polling interval
Specify whether the product should connect toF-Secure Update Server when it cannot connect to
Allow fetching updates from F-Secure UpdateServer
any user-specified update server. Specify PMProxies to configure the update servers.
94 | Centrally Managed Administration
Administration with Web Console
This section describes how to use Web Console to administer theproduct.
Topics:
• HomeIf the product is installed in the stand-alone mode, it can beadministered with the Web Console.• Server Protection
• SharePoint Protection• Transport Protection• Spam Control• Storage Protection• Quarantine• Automatic Updates• General Server Properties
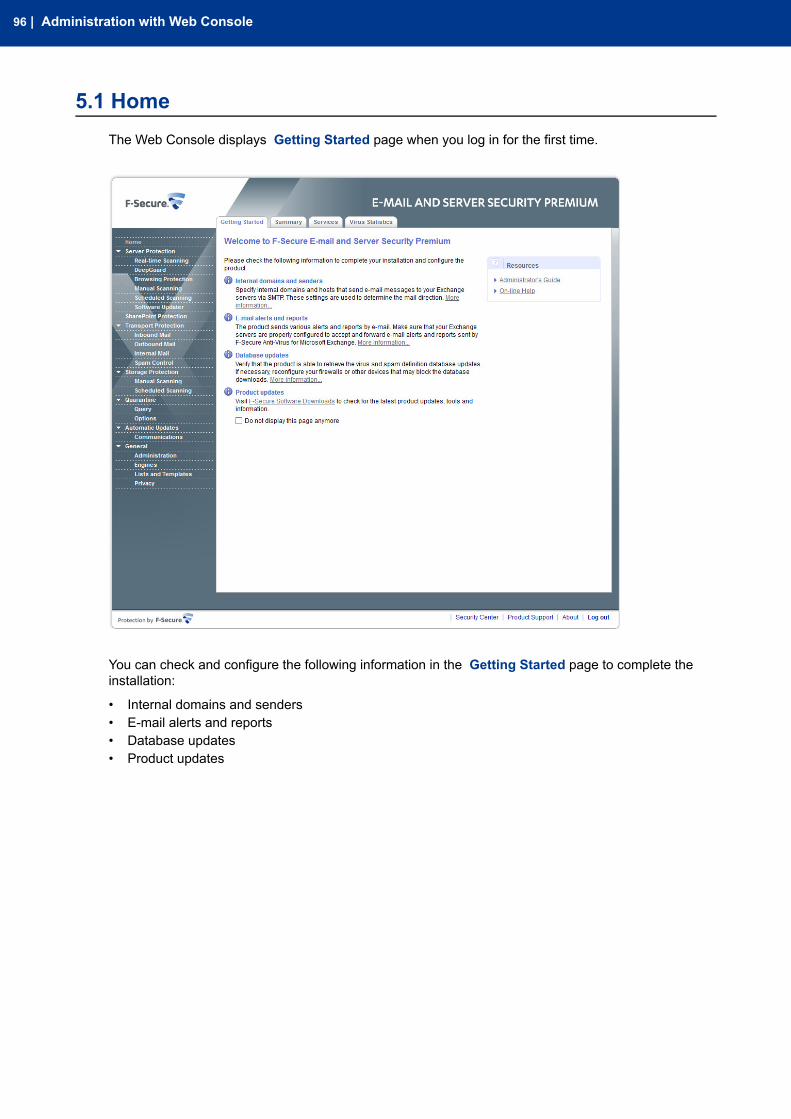
5.1 HomeThe Web Console displays Getting Started page when you log in for the first time.
You can check and configure the following information in the Getting Started page to complete theinstallation:
• Internal domains and senders• E-mail alerts and reports• Database updates• Product updates
96 | Administration with Web Console
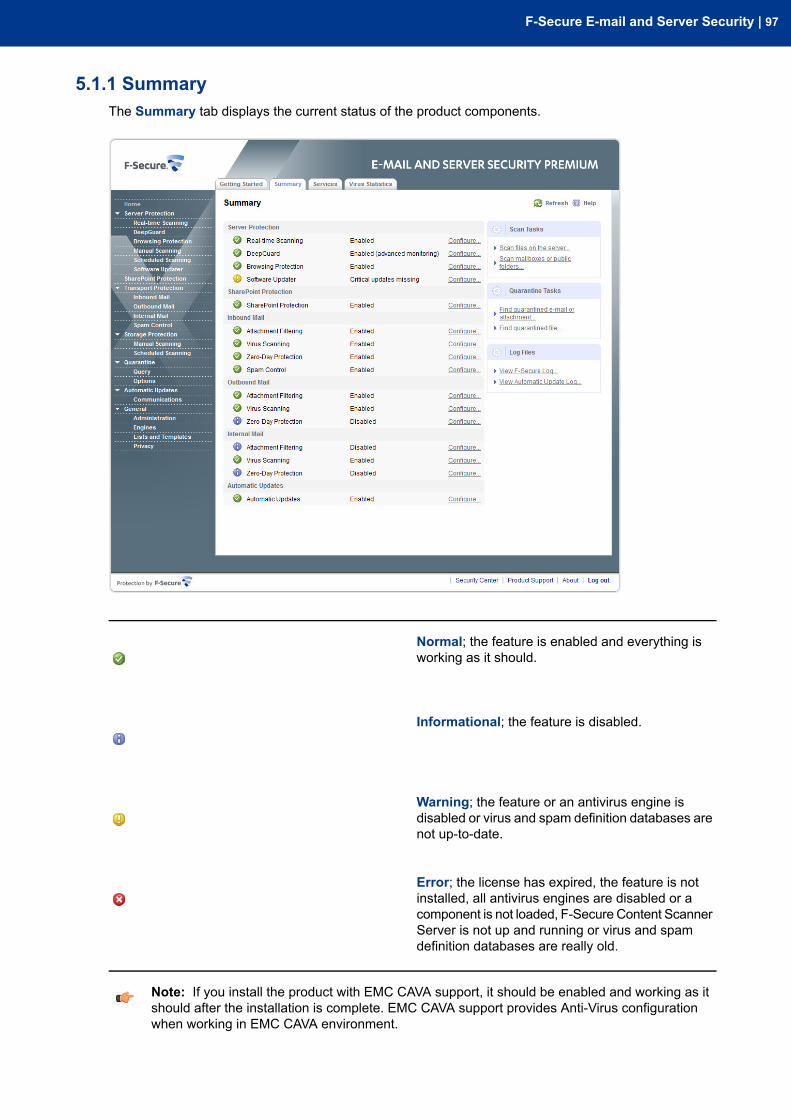
5.1.1 SummaryThe Summary tab displays the current status of the product components.
Normal; the feature is enabled and everything isworking as it should.
Informational; the feature is disabled.
Warning; the feature or an antivirus engine isdisabled or virus and spam definition databases arenot up-to-date.
Error; the license has expired, the feature is notinstalled, all antivirus engines are disabled or acomponent is not loaded, F-Secure Content ScannerServer is not up and running or virus and spamdefinition databases are really old.
Note: If you install the product with EMC CAVA support, it should be enabled and working as itshould after the installation is complete. EMC CAVA support provides Anti-Virus configurationwhen working in EMC CAVA environment.
F-Secure E-mail and Server Security | 97
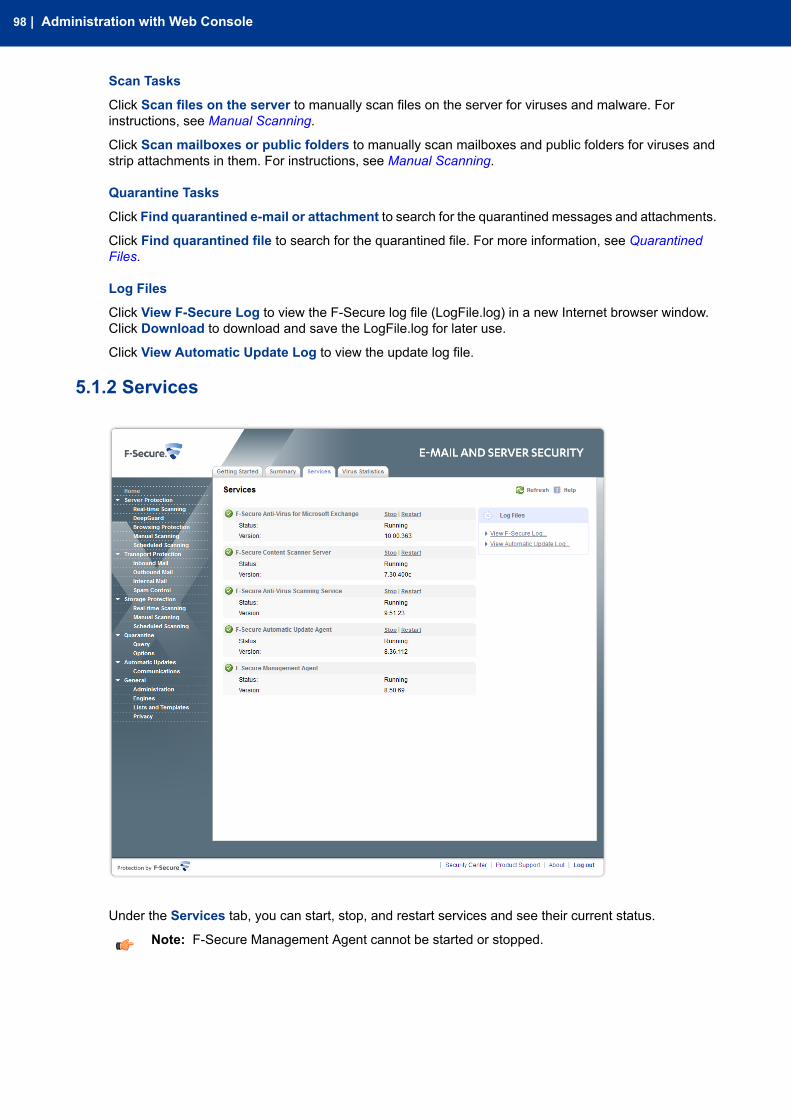
Scan Tasks
Click Scan files on the server to manually scan files on the server for viruses and malware. Forinstructions, see Manual Scanning.
Click Scan mailboxes or public folders to manually scan mailboxes and public folders for viruses andstrip attachments in them. For instructions, see Manual Scanning.
Quarantine Tasks
Click Find quarantined e-mail or attachment to search for the quarantined messages and attachments.
Click Find quarantined file to search for the quarantined file. For more information, see QuarantinedFiles.
Log Files
Click View F-Secure Log to view the F-Secure log file (LogFile.log) in a new Internet browser window.Click Download to download and save the LogFile.log for later use.
Click View Automatic Update Log to view the update log file.
5.1.2 Services
Under the Services tab, you can start, stop, and restart services and see their current status.
Note: F-Secure Management Agent cannot be started or stopped.
98 | Administration with Web Console
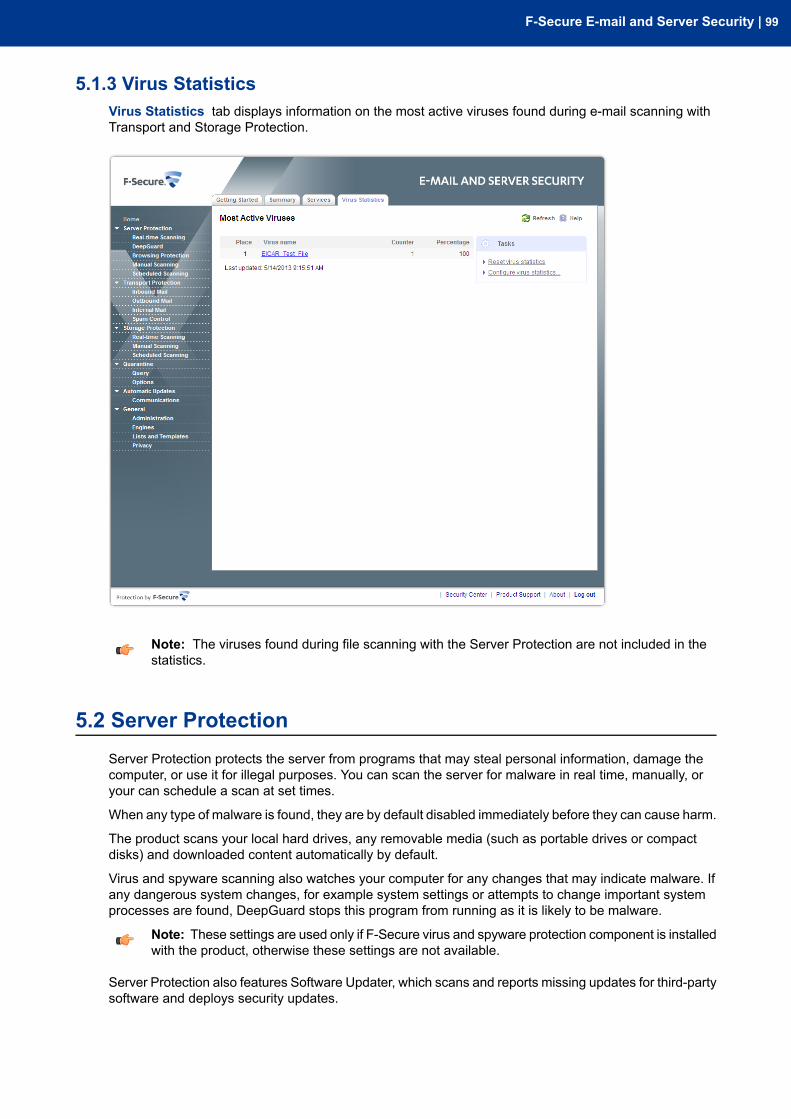
5.1.3 Virus StatisticsVirus Statistics tab displays information on the most active viruses found during e-mail scanning withTransport and Storage Protection.
Note: The viruses found during file scanning with the Server Protection are not included in thestatistics.
5.2 Server ProtectionServer Protection protects the server from programs that may steal personal information, damage thecomputer, or use it for illegal purposes. You can scan the server for malware in real time, manually, oryour can schedule a scan at set times.
When any type of malware is found, they are by default disabled immediately before they can cause harm.
The product scans your local hard drives, any removable media (such as portable drives or compactdisks) and downloaded content automatically by default.
Virus and spyware scanning also watches your computer for any changes that may indicate malware. Ifany dangerous system changes, for example system settings or attempts to change important systemprocesses are found, DeepGuard stops this program from running as it is likely to be malware.
Note: These settings are used only if F-Secure virus and spyware protection component is installedwith the product, otherwise these settings are not available.
Server Protection also features Software Updater, which scans and reports missing updates for third-partysoftware and deploys security updates.
F-Secure E-mail and Server Security | 99
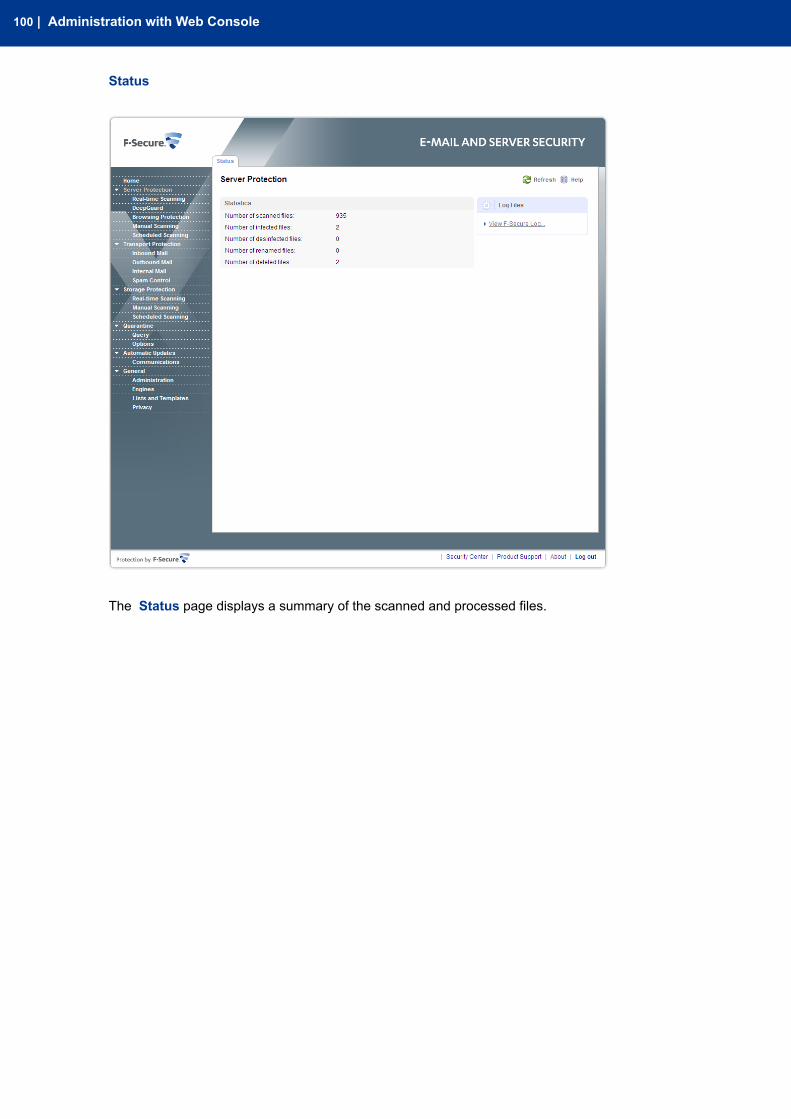
Status
The Status page displays a summary of the scanned and processed files.
100 | Administration with Web Console

5.2.1 Real-time ScanningReal-time scanning protects the computer by scanning all files when they are accessed and by blockingaccess to those files that contain malware.
Enable or disable the virus scan. The virus scanscans files on the server for viruses and othermalicious code.
Turn on real-time scanning
Targets
Specify files that are scanned for viruses.Scan these files
Scan all files - Scan all files in the system.
Scan defined files - Scans only the file types thatyou define.
Specify files that are not scanned.Exclude from scanning
Applications tab lists spyware and riskwareapplications that have been excluded from the scan.To include the application in future scans, select itfrom the list and click Remove.
To exclude a specific file or folder, add it to the listin the Objects tab.
F-Secure E-mail and Server Security | 101

To exclude a file type, enter the three-letter fileextension in the Files tab and click Add.
To exclude processes from scanning, add theprocess executable to the list in the Processes tab.
Note: A file that is excluded from scanningby either type or location is not scannedeven if the file is included in the list ofscanned file types.
Options
You can scan information passing through thebrowser for malware, so that the server is protectedfrom harmful web traffic.
Scan and remove viruses from web traffic
Specify whether files inside compressed archivefiles are scanned for viruses and other maliciouscode.
Scan inside compressed files
Specify whether to scan for programs that collectpersonal information.
Scan for spyware
When you block tracking cookies, web sites cannottrack visited sites.
Block tracking cookies
Actions
Turn on to let the product decide what to do to eachmalware item to automatically clean the computer.
Decide action automatically
The following actions can be taken for viruses:When virus is found
Clean automatically - The product tries to disinfectthe viruses in any infected files that were foundduring real-time scanning.
Quarantine automatically (default) - The productmoves any infected files found during real-timescanning to the quarantine where it cannot harmyour computer.
Rename automatically - The product renames anyinfected files found during real-time scanning.
Delete automatically - The product deletes anyinfected files found during real-time scanning.
Report only - The product records the detectedviruses in the logfile.log file, sends alerts toPolicy Manager, adds events toWindows Event log,and sends e-mail notifications (according to thesettings that are specified on the Alerts page underGeneral > Administration ).
102 | Administration with Web Console
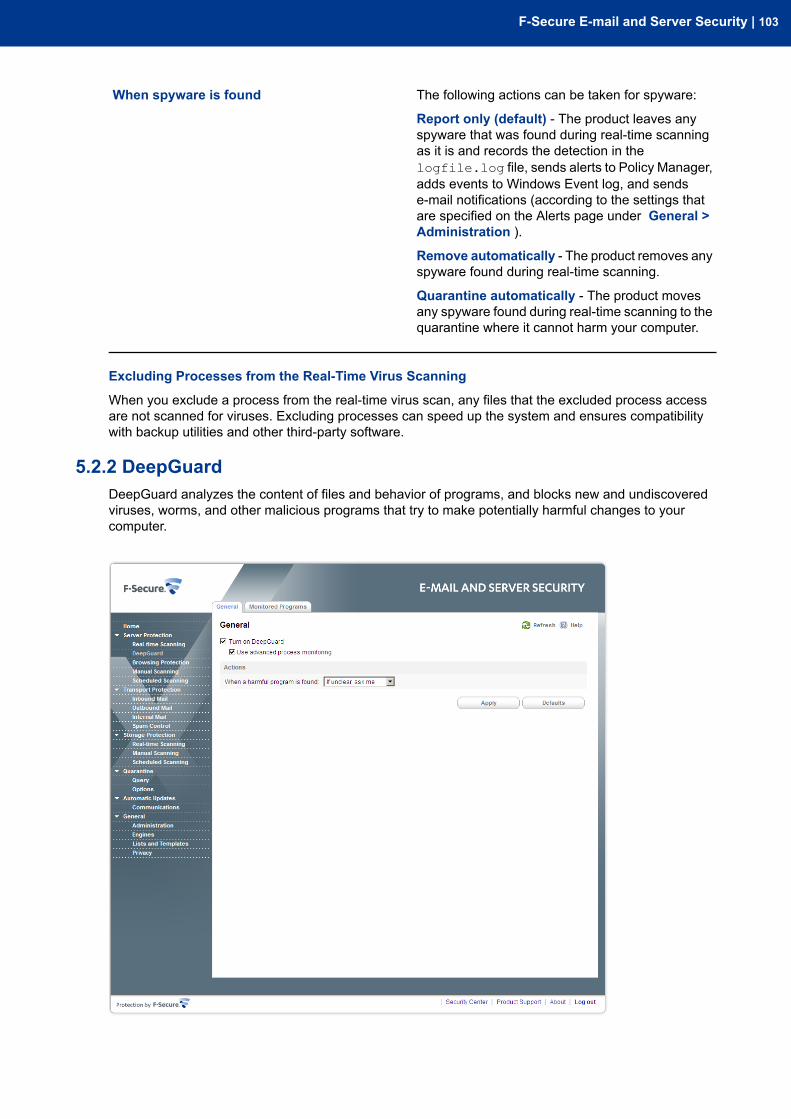
The following actions can be taken for spyware:When spyware is found
Report only (default) - The product leaves anyspyware that was found during real-time scanningas it is and records the detection in thelogfile.log file, sends alerts to Policy Manager,adds events to Windows Event log, and sendse-mail notifications (according to the settings thatare specified on the Alerts page under General >Administration ).
Remove automatically - The product removes anyspyware found during real-time scanning.
Quarantine automatically - The product movesany spyware found during real-time scanning to thequarantine where it cannot harm your computer.
Excluding Processes from the Real-Time Virus Scanning
When you exclude a process from the real-time virus scan, any files that the excluded process accessare not scanned for viruses. Excluding processes can speed up the system and ensures compatibilitywith backup utilities and other third-party software.
5.2.2 DeepGuardDeepGuard analyzes the content of files and behavior of programs, and blocks new and undiscoveredviruses, worms, and other malicious programs that try to make potentially harmful changes to yourcomputer.
F-Secure E-mail and Server Security | 103
System changes that can be dangerous include:
• system setting (Windows registry) changes,• attempts to turn off important system programs, for example, security programs like this product, and• attempts to edit important system files.
DeepGuard continuously watches for these changes and checks each program that attempts to changethe system.
When DeepGuard detects a program attempting to make potentially harmful changes to the system, itallows the program to run in a safe-zone, unless you have specifically allowed or blocked the program.
In the safe-zone, the program cannot harm your computer. DeepGuard analyzes what changes theprogram tried to make, and based on this, decides how likely the program is to be malware.
DeepGuard automatically either allows or blocks the program, or asks you whether to allow or block theprogram, depending on how likely the program is to be malware.
Note: These settings are used only if F-Secure DeepGuard is installed with the product, otherwisethese settings are not available.
By turning DeepGuard on, you can preventsuspicious programs frommaking potentially harmfulsystem changes in the computer.
Turn on DeepGuard
When advanced process monitoring is turned on,DeepGuard temporarily modifies running programsfor maximum protection.
Use advanced process monitoring
Note: Advanced process monitoring maycause problems with programs that makesure that they are not corrupted or modified.
Actions
Select one of the following default actions ifDeepGuard detects a system modification attempt.
When a harmful program is found
Always ask me - DeepGuard asks you whetheryou want to allow or block all monitored actions,even when it identifies the application as safe.
If unclear, ask me - Ask when DeepGuard detectsa program trying to make potentially harmful systemchanges and it cannot identify whether the programis safe or unsafe.
Handle automatically - DeepGuard blocks unsafeapplications and allows safe applicationsautomatically without asking you any questions.
104 | Administration with Web Console
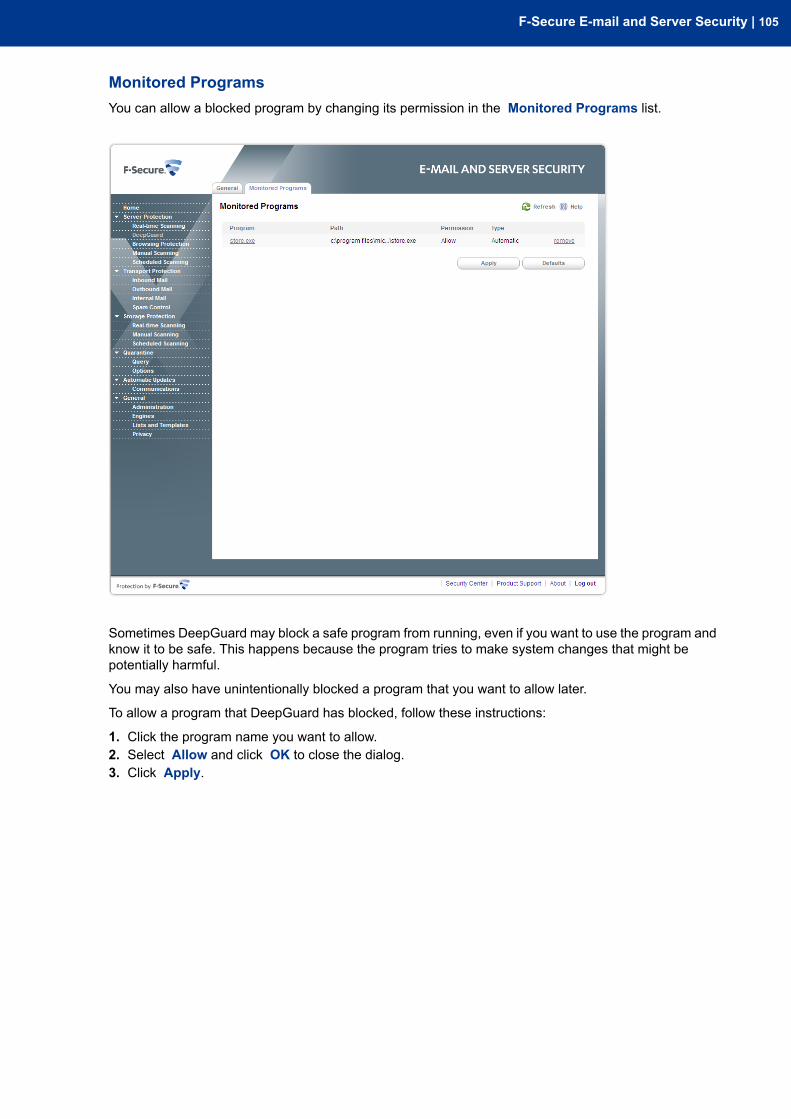
Monitored ProgramsYou can allow a blocked program by changing its permission in the Monitored Programs list.
Sometimes DeepGuard may block a safe program from running, even if you want to use the program andknow it to be safe. This happens because the program tries to make system changes that might bepotentially harmful.
You may also have unintentionally blocked a program that you want to allow later.
To allow a program that DeepGuard has blocked, follow these instructions:
1. Click the program name you want to allow.2. Select Allow and click OK to close the dialog.3. Click Apply.
F-Secure E-mail and Server Security | 105

5.2.3 Browsing ProtectionBrowsing protection helps you evaluate the safety of web sites you visit and prevents you fromunintentionally accessing harmful web sites.
Browsing protection shows you safety ratings for web sites that are listed on search engine results. Byhelping you avoid web sites that contain security threats, such as malware (viruses, worms, trojans) andphishing, you avoid the latest Internet threats that are not yet recognized by traditional antivirus programs.
There are four possible safety ratings for web sites: safe, suspicious, harmful and unknown. These safetyratings are based on information from several sources, such as F-Secure malware analysts and F-Securepartners.
Note: These settings are used only if F-Secure Browsing protection component is installed withthe product, otherwise these settings are not available.
You will be blocked from accessing harmful websiteswhen browsing protection is turned on.
Turn on Browsing protection
Block access when
Block access to web sites that has been ratedharmful.
Web site is rated harmful
Show ratings for
106 | Administration with Web Console
When selected, browsing protection ratings will bedisplayed for the sites listed on search engines(Google, Yahoo, etc.).
Search engine results
Other settings
Specify whether users can open blocked pages afterviewing the warning message.
Allow user to continue to blocked pages
Browsing Protection Ratings
Color-coded icons show the safety rating of the current site (on the toolbar). The safety rating of each linkon search engine results is also shown with the same icons. Four different color-coded icons are used:
The page is safe.Green
The page is suspicious. Security analysis of thepage indicates that it is safe, but many users havegiven it a low safety rating.
Amber
The page is harmful.Red
The page has not been analyzed and no informationis currently available for it.
Gray
F-Secure E-mail and Server Security | 107
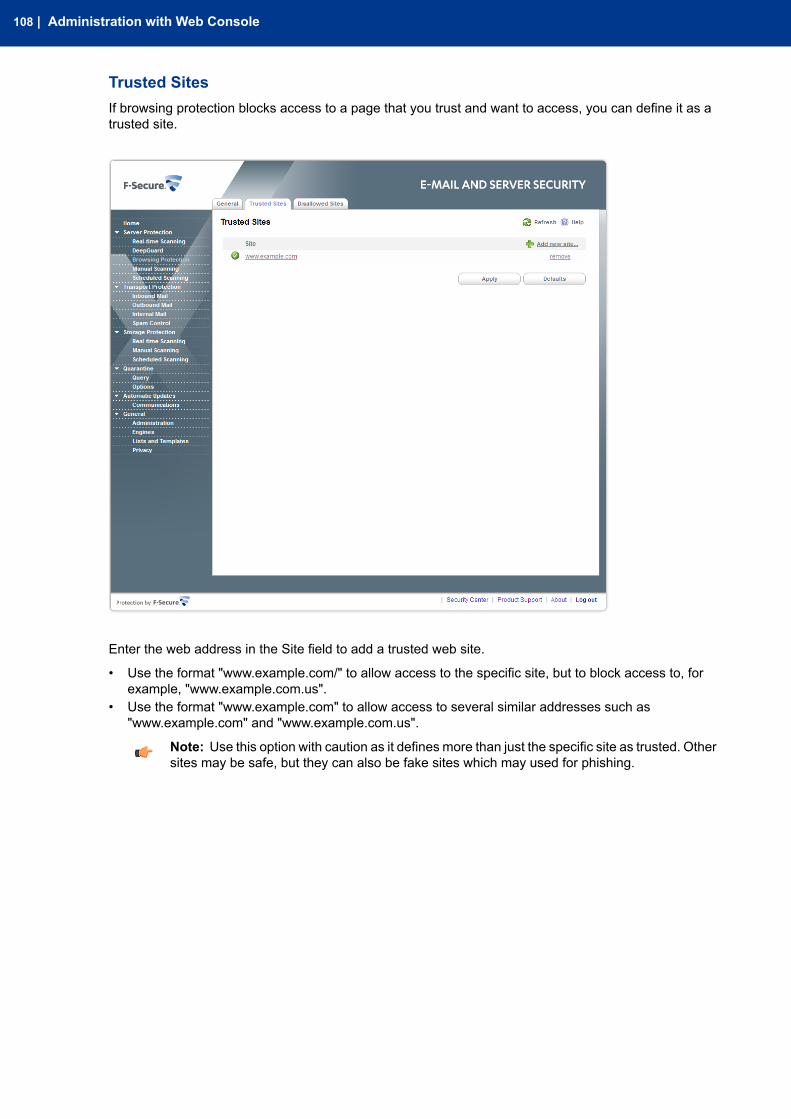
Trusted SitesIf browsing protection blocks access to a page that you trust and want to access, you can define it as atrusted site.
Enter the web address in the Site field to add a trusted web site.
• Use the format "www.example.com/" to allow access to the specific site, but to block access to, forexample, "www.example.com.us".
• Use the format "www.example.com" to allow access to several similar addresses such as"www.example.com" and "www.example.com.us".
Note: Use this option with caution as it defines more than just the specific site as trusted. Othersites may be safe, but they can also be fake sites which may used for phishing.
108 | Administration with Web Console
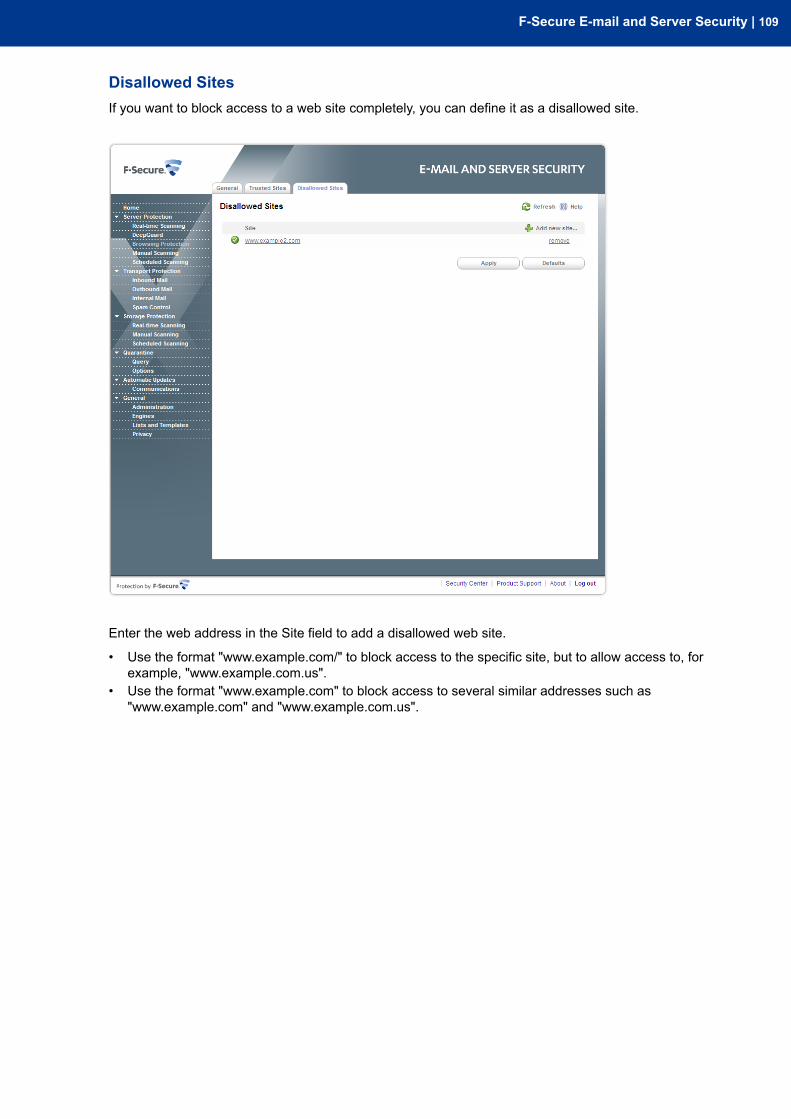
Disallowed SitesIf you want to block access to a web site completely, you can define it as a disallowed site.
Enter the web address in the Site field to add a disallowed web site.
• Use the format "www.example.com/" to block access to the specific site, but to allow access to, forexample, "www.example.com.us".
• Use the format "www.example.com" to block access to several similar addresses such as"www.example.com" and "www.example.com.us".
F-Secure E-mail and Server Security | 109

5.2.4 Manual ScanningYou can scan the server manually, for example if you suspect that you have malware on the computer.You can scan your whole computer or scan for a specific type of malware or a specific location.
If you are suspicious of a certain type of malware, you can scan only for this type. If you are suspiciousof a certain location on your computer, you can scan only that section. These scans will finish a lot quickerthan a scan of your whole computer.
New scan
To start manually scanning the server:
1. Under New scan. select the type of scan.
If you want to change the scanning settings, click the Settings tab.
2. If you selected Choose what to scan. click Select and select which location to scan.3. Click Start to start scanning. If no malware is detected, you will see "Finished" on the Status line at
the upper part of the page.
Click View scanning report in the Tasks list to see the results of the last scan.
110 | Administration with Web Console
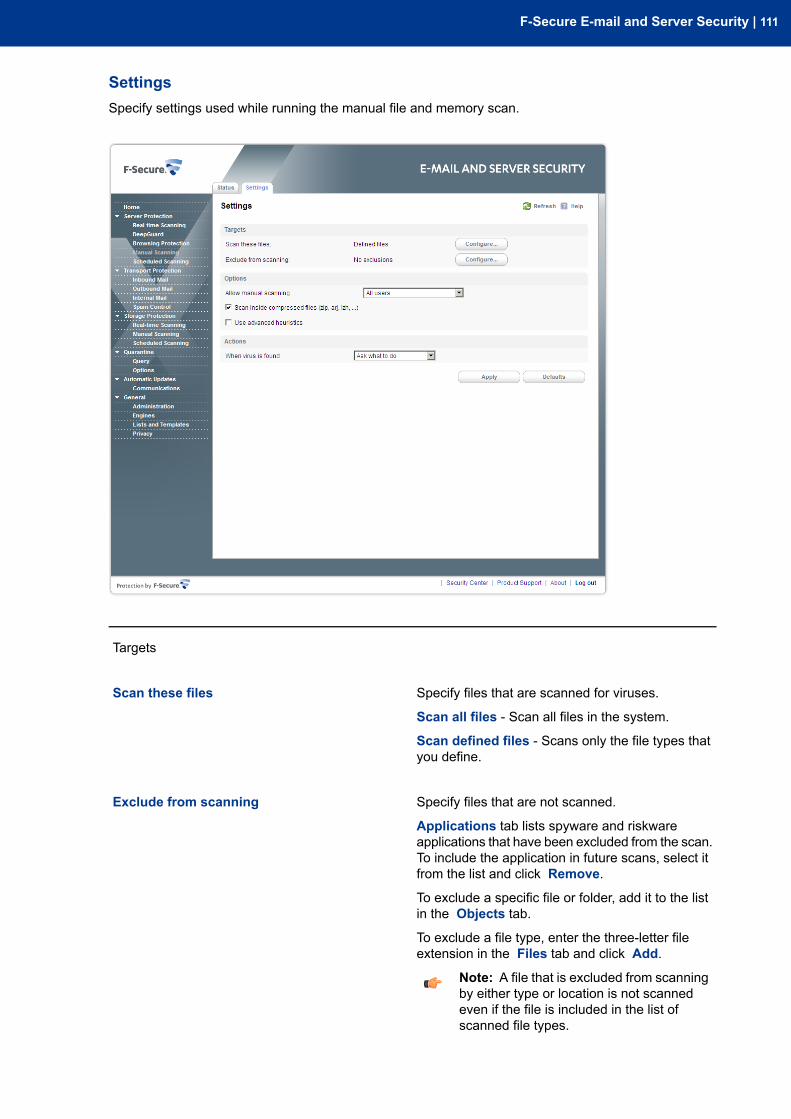
SettingsSpecify settings used while running the manual file and memory scan.
Targets
Specify files that are scanned for viruses.Scan these files
Scan all files - Scan all files in the system.
Scan defined files - Scans only the file types thatyou define.
Specify files that are not scanned.Exclude from scanning
Applications tab lists spyware and riskwareapplications that have been excluded from the scan.To include the application in future scans, select itfrom the list and click Remove.
To exclude a specific file or folder, add it to the listin the Objects tab.
To exclude a file type, enter the three-letter fileextension in the Files tab and click Add.
Note: A file that is excluded from scanningby either type or location is not scannedeven if the file is included in the list ofscanned file types.
F-Secure E-mail and Server Security | 111

Options
Specify users who are allowed to run manual scans.Allow manual scanning
Not allowed - Manual scanning is not allowed.
Users with administrative rights - Only users withadministrative rights can start the manual scan.
All users - Anyone can start the manual scan.
Specify whether files inside compressed archivesshould be scanned for malware.
Scan inside compressed files
Enable or disable the heuristic scan. The heuristicscan analyzes files for suspicious code behavior sothat the product can detect unknown malware.
Use advanced heuristics
Actions
If malware is found during the scan, you can eitherlet the product automatically decide how to cleanthe server or you can decide yourself for each item.
When virus is found
Ask what to do (default) - The product asks youwhat to do if viruses are found during manualscanning.
Clean automatically - The product tries toautomatically disinfect the viruses in any infectedfiles that were found during the scan.
It is not always possible to disinfect a virus in a file.In these cases, the file is quarantined (except whenfound on network or removable drives), so the viruscannot harm the server.
Quarantine automatically - The product moves anyinfected files that were found during the scan to thequarantine where they cannot harm the server.
Rename automatically - The product renames anyinfected files that were found during the scan.
Delete automatically - The product deletes anyinfected files that were found during the scan.
Report only - The product leaves any infected filesthat were found during the scan as they are andrecords the detection in the scan report.
112 | Administration with Web Console
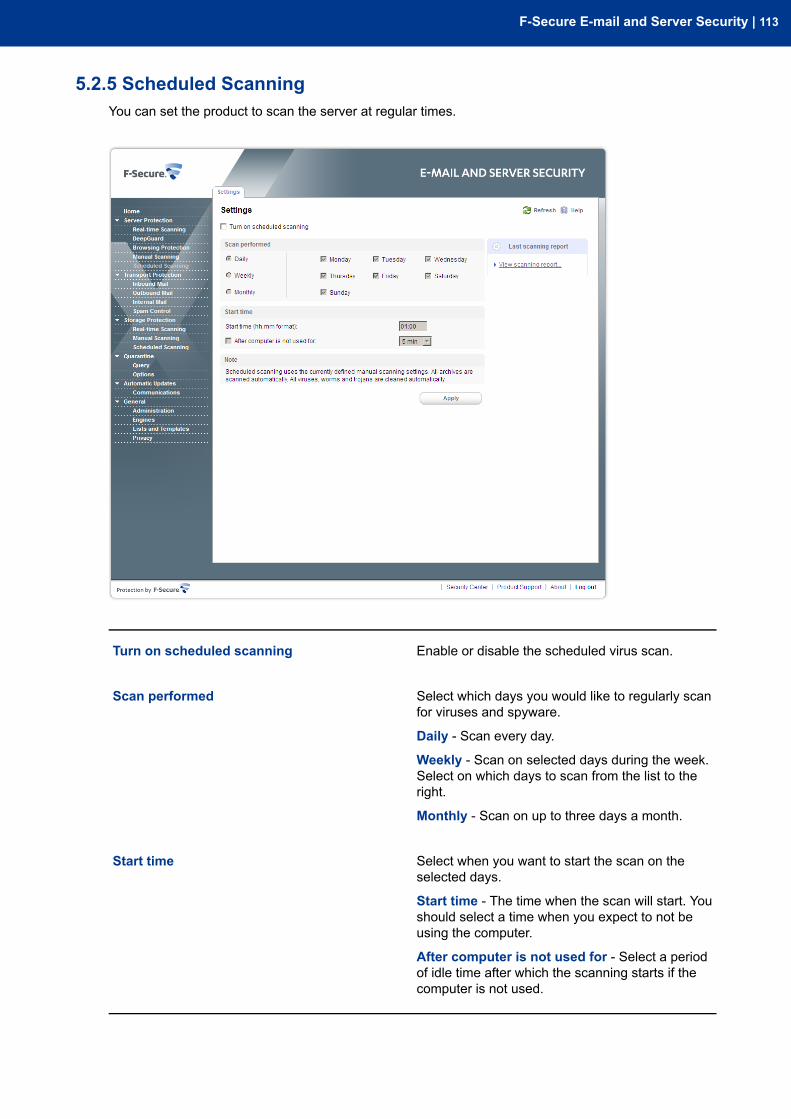
5.2.5 Scheduled ScanningYou can set the product to scan the server at regular times.
Enable or disable the scheduled virus scan.Turn on scheduled scanning
Select which days you would like to regularly scanfor viruses and spyware.
Scan performed
Daily - Scan every day.
Weekly - Scan on selected days during the week.Select on which days to scan from the list to theright.
Monthly - Scan on up to three days a month.
Select when you want to start the scan on theselected days.
Start time
Start time - The time when the scan will start. Youshould select a time when you expect to not beusing the computer.
After computer is not used for - Select a periodof idle time after which the scanning starts if thecomputer is not used.
F-Secure E-mail and Server Security | 113
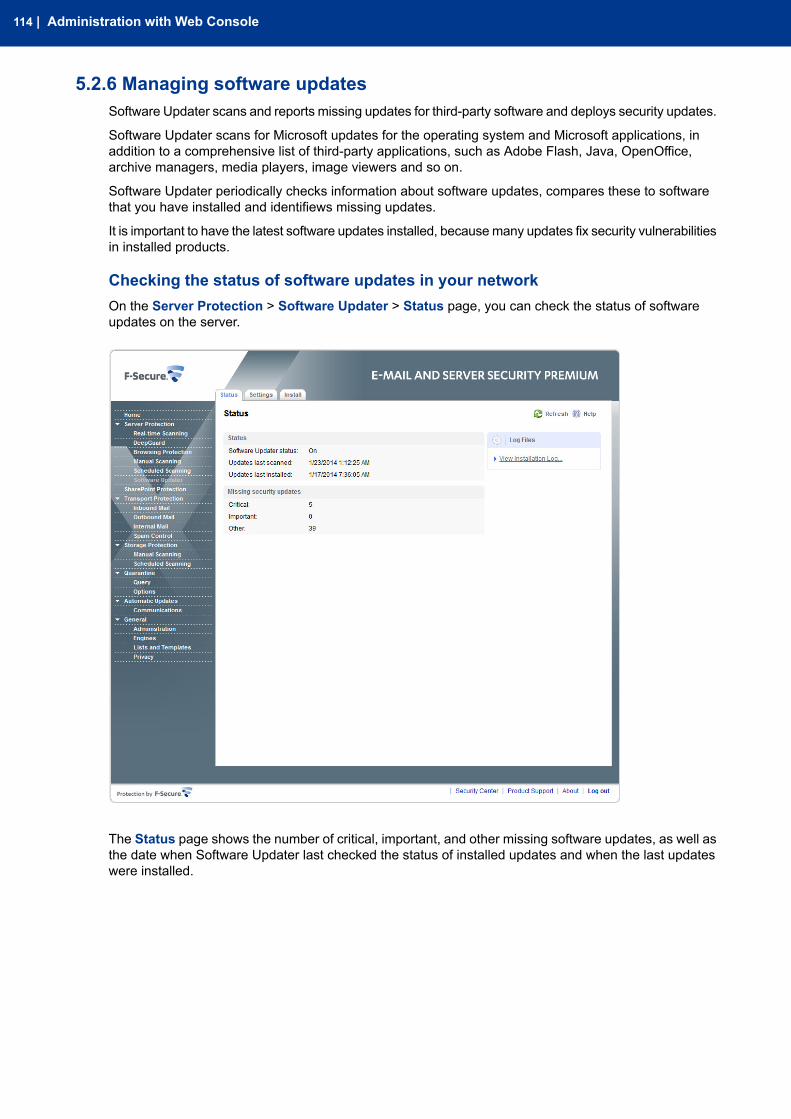
5.2.6 Managing software updatesSoftware Updater scans and reports missing updates for third-party software and deploys security updates.
Software Updater scans for Microsoft updates for the operating system and Microsoft applications, inaddition to a comprehensive list of third-party applications, such as Adobe Flash, Java, OpenOffice,archive managers, media players, image viewers and so on.
Software Updater periodically checks information about software updates, compares these to softwarethat you have installed and identifiews missing updates.
It is important to have the latest software updates installed, becausemany updates fix security vulnerabilitiesin installed products.
Checking the status of software updates in your networkOn the Server Protection > Software Updater > Status page, you can check the status of softwareupdates on the server.
The Status page shows the number of critical, important, and other missing software updates, as well asthe date when Software Updater last checked the status of installed updates and when the last updateswere installed.
114 | Administration with Web Console
View Software Updater logYou can check which software updates have been installed and when in the Software Updater log.
To view the Software Updater log:
1. Go to Server Protection > Software Updater > Status.2. Click View Installation Log.
Software Updates Installation Log shows:
• the date when the update was installed,• installation status,• update ID,• updated software, and• the name of the update file.
3. To remove old entries from the log:a) Go to Server Protection > Software Updater > Settings.b) In Remove entries after field, enter how many days log entries stay in the installation log.
F-Secure E-mail and Server Security | 115
Turning Software Updater on or offWhen Software Updater is on, it scans and reports missing updates for 3rd party software.
To turn Software Updater on:
1. Go to Server Protection > Software Updater > Settings.2. Select Turn on Software Updater.3. Click Apply.
116 | Administration with Web Console
Installing missing software updatesYou can check the status of software updates and install missing updates manually when needed.
To install missing updates:
1. Go to Server Protection > Software Updater > Install.The missing updates list shows Each entry on the list includes the software in question, category, IDand description for the update.
2. Select the updates that you want to install.3. Click Install.
The product starts to download selected updates immediately.4. After updates have been downloaded, the product installs downloaded updates.5. Reboot the computer if the product instructs you to do so.
Some updates require that you reboot the computer to complete the installation. The product doesnot force the computer to reboot, but shows the notification about the reboot when it is needed. Youshould reboot the computer as soon as possible.
F-Secure E-mail and Server Security | 117
5.3 SharePoint ProtectionSharePoint Protection scans the content that is uploaded and downloaded from the SharePoint server.
By default, SharePoint Protection scans all uploaded and downloaded content automatically so thatharmful content is not stored and cannot spread in your Sharepoint repository.
The Status page displays a summary of the scanned and processed files.
118 | Administration with Web Console
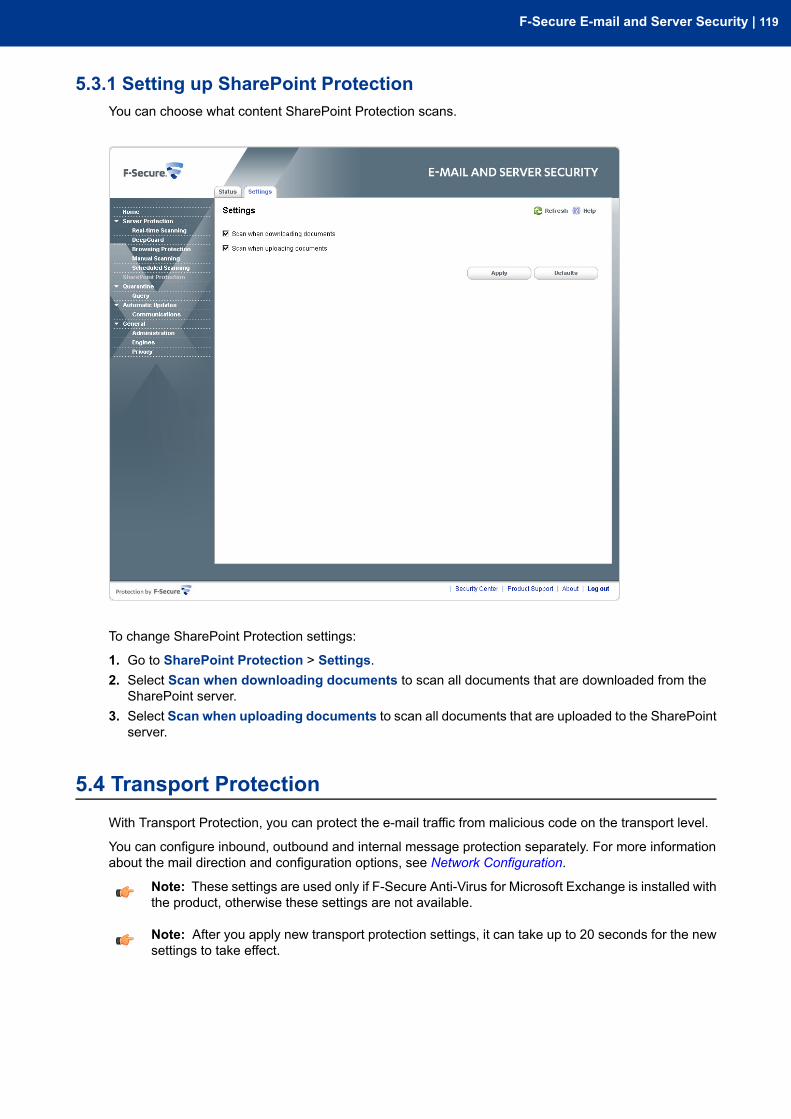
5.3.1 Setting up SharePoint ProtectionYou can choose what content SharePoint Protection scans.
To change SharePoint Protection settings:
1. Go to SharePoint Protection > Settings.2. Select Scan when downloading documents to scan all documents that are downloaded from the
SharePoint server.3. Select Scan when uploading documents to scan all documents that are uploaded to the SharePoint
server.
5.4 Transport ProtectionWith Transport Protection, you can protect the e-mail traffic from malicious code on the transport level.
You can configure inbound, outbound and internal message protection separately. For more informationabout the mail direction and configuration options, see Network Configuration.
Note: These settings are used only if F-Secure Anti-Virus for Microsoft Exchange is installed withthe product, otherwise these settings are not available.
Note: After you apply new transport protection settings, it can take up to 20 seconds for the newsettings to take effect.
F-Secure E-mail and Server Security | 119
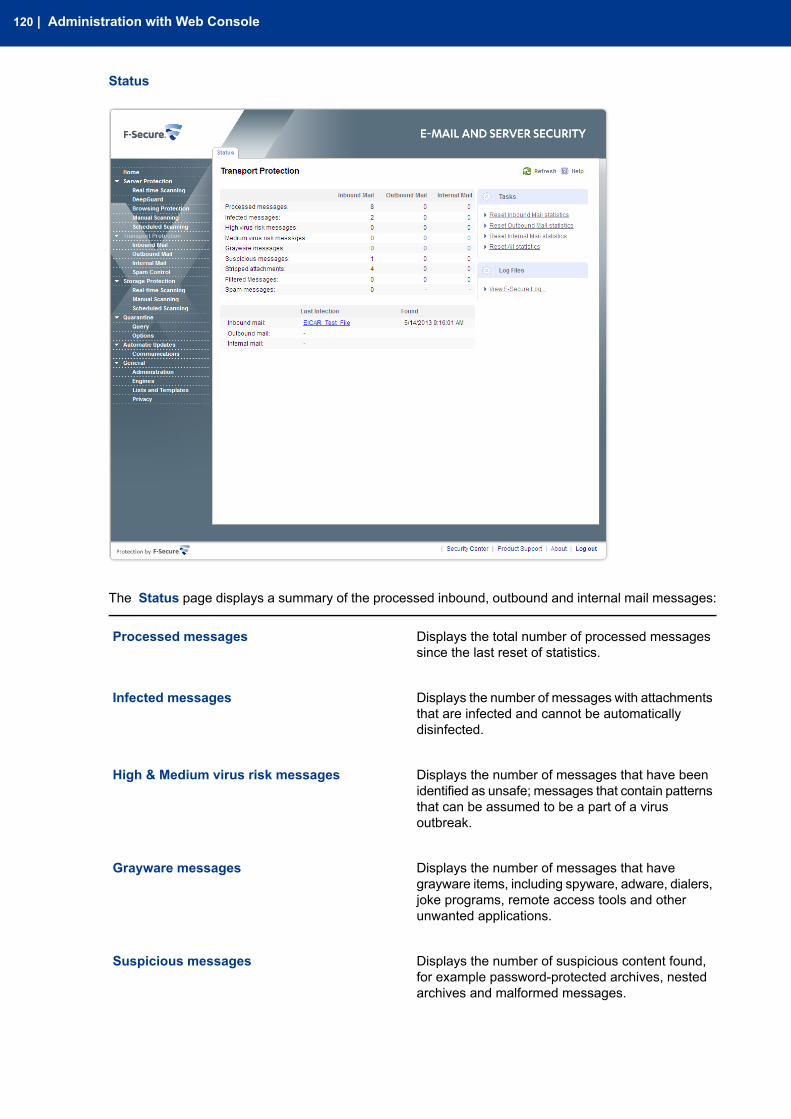
Status
The Status page displays a summary of the processed inbound, outbound and internal mail messages:
Displays the total number of processed messagessince the last reset of statistics.
Processed messages
Displays the number of messages with attachmentsthat are infected and cannot be automaticallydisinfected.
Infected messages
Displays the number of messages that have beenidentified as unsafe; messages that contain patterns
High & Medium virus risk messages
that can be assumed to be a part of a virusoutbreak.
Displays the number of messages that havegrayware items, including spyware, adware, dialers,
Grayware messages
joke programs, remote access tools and otherunwanted applications.
Displays the number of suspicious content found,for example password-protected archives, nestedarchives and malformed messages.
Suspicious messages
120 | Administration with Web Console
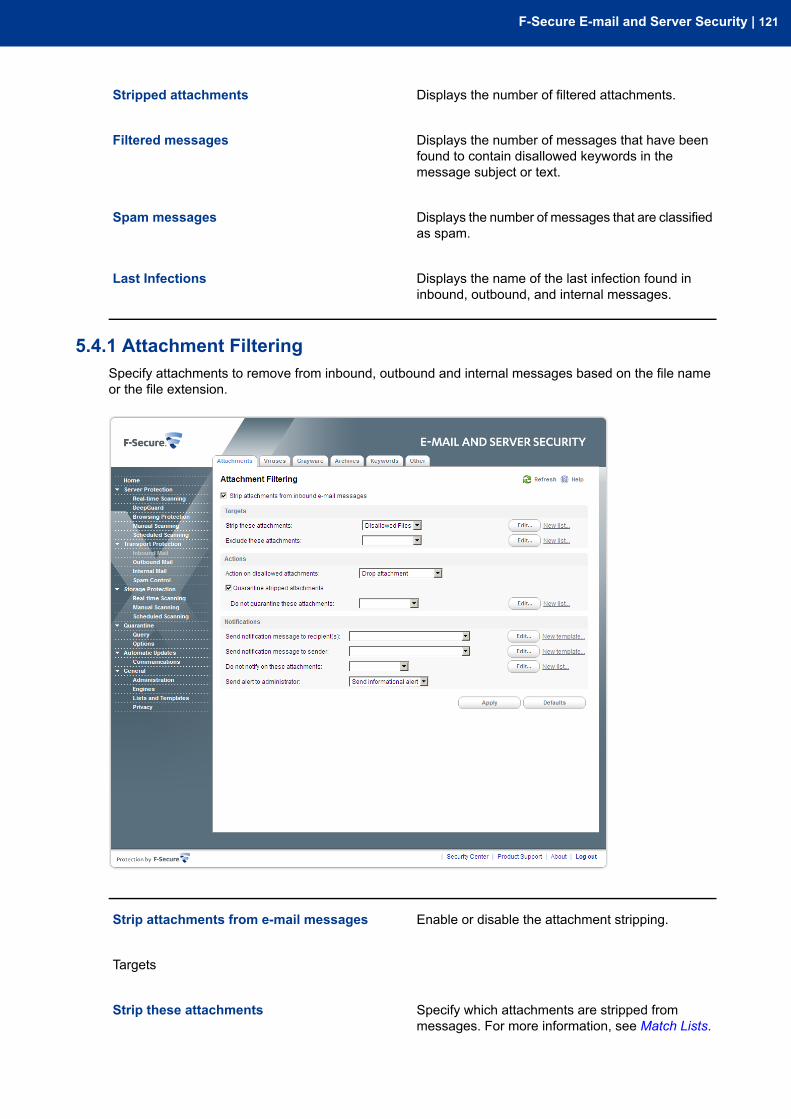
Displays the number of filtered attachments.Stripped attachments
Displays the number of messages that have beenfound to contain disallowed keywords in themessage subject or text.
Filtered messages
Displays the number of messages that are classifiedas spam.
Spam messages
Displays the name of the last infection found ininbound, outbound, and internal messages.
Last Infections
5.4.1 Attachment FilteringSpecify attachments to remove from inbound, outbound and internal messages based on the file nameor the file extension.
Enable or disable the attachment stripping.Strip attachments from e-mail messages
Targets
Specify which attachments are stripped frommessages. For more information, see Match Lists.
Strip these attachments
F-Secure E-mail and Server Security | 121
Specify attachments that are not filtered. Leave thelist empty if you do not want to exclude anyattachments from the filtering.
Exclude these attachments
Actions
Specify how disallowed attachments are handled.Action on disallowed attachments
Drop Attachment - Remove the attachment fromthe message and deliver the message to therecipient without the disallowed attachment.
Drop the Whole Message - Do not deliver themessage to the recipient at all.
Specify whether stripped attachments arequarantined.
Quarantine stripped attachments
Specify files which are not quarantined even whenthey are stripped. For more information, see MatchLists.
Do not quarantine these attachments
Notifications
Specify whether recipients are notified whendisallowed or suspicious attachment is found.
Send notification message to recipient(s)
Note: The notification message is not sentif the whole message is dropped.
Specify whether the original sender is notified whendisallowed or suspicious attachment is found.
Send notification message to sender
To enable the notification, select a template for thenotification message. To disable the notification,leave the notification field empty.
For more information, see Message Templates.
Specify attachments that do not generatenotifications. When the product finds specified fileor file extension, no notification is sent.
Do not notify on these attachments
Specify whether the administrator is notified whenthe product strips an attachment. If you enable thenotification, specify the alert level of the notification.
Send alert to administrator
Note: Configure the Alert Forwarding tableto specify where the alert is sent based onthe severity level. For more information, seeAlerts.
122 | Administration with Web Console

5.4.2 Virus ScanningSpecify inbound, outbound and internal messages and attachments that should be scanned for maliciouscode.
Note: Disabling virus scanning disables grayware scanning and archive processing as well.
Enable or disable the virus scan. The virus scanscans messages for viruses and other maliciouscode.
Scan e-mail messages for viruses
Enable or disable the heuristic scan. The heuristicscan analyzes files for suspicious code behavior sothat the product can detect unknown malware.
Heuristic Scanning
By default, the heuristic scan is enabled for inboundmails and disabled for outbound and internal mails.
Note: The heuristic scan may affect theproduct performance and increase the riskof false malware alarms.
Select whether the proactive virus threat detectionis enabled or disabled.
Proactive virus threat detection
The proactive virus threat detection can identify newand unknown e-mail malware, including viruses andworms.
F-Secure E-mail and Server Security | 123
When the proactive virus threat detection is enabled,the product analyzes e-mail messages for possiblesecurity threats. All possibly harmful messages arequarantined as unsafe.
Unsafe messages can be reprocessed periodically,as antivirus updates may confirm the unsafemessage as safe or infected.
When the proactive virus threat detection isdisabled, mails are only scanned by antivirusengines.
Targets
Specify attachments that are scanned for viruses.For more information, see Match Lists.
Scan these attachments
Specify attachments that are not scanned. Leavethe list empty if you do not want to exclude anyattachments from the scanning.
Exclude these attachments
Actions
Specify whether the product should try to disinfectan infected attachment before processing it. If the
Try to disinfect
disinfection succeeds, the product does not processthe attachment further.
Note: Disinfection may affect the productperformance.
Note: Infected files inside archives are notdisinfected even when the setting isenabled.
Specify whether infected messages are disinfectedor dropped.
Action on infected messages
Drop Attachment - Remove the infectedattachment from the message and deliver themessage to the recipient without the attachment.
Drop the Whole Message - Do not deliver themessage to the recipient at all.
Specify whether infected or suspicious messagesare quarantined.
Quarantine infected messages
Specify infections that are never placed in thequarantine. For more information, see Match Lists.
Do not quarantine these infections
Notifications
124 | Administration with Web Console
Specify whether recipients are notified when a virusor other malicious code is found.
Send notification message to recipient(s)
Note: The notification message is not sentif the whole message is dropped.
Specify whether the original sender is notified whena virus or other malicious code is found.
Send notification message to sender
To enable the notification, select a template for thenotification message. To disable the notification,leave the notification field empty.
For more information, see Message Templates.
Specify infections that do not generate notifications.When the product finds the specified infection, nonotification is sent.
Do not notify on these infections
Specify whether the administrator is notified whenthe product finds a virus in a message.
Send alert to administrator
Note: Configure the Alert Forwarding tableto specify where the alert is sent based onthe severity level. For more information, seeAlerts.
F-Secure E-mail and Server Security | 125
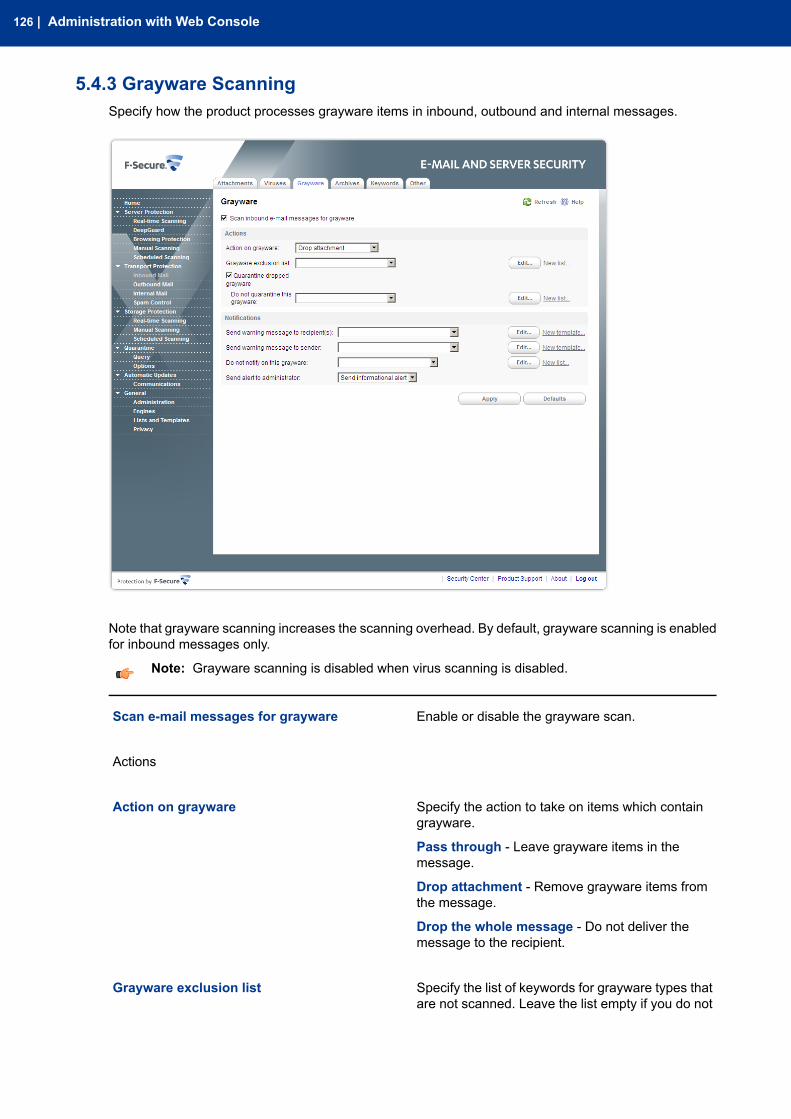
5.4.3 Grayware ScanningSpecify how the product processes grayware items in inbound, outbound and internal messages.
Note that grayware scanning increases the scanning overhead. By default, grayware scanning is enabledfor inbound messages only.
Note: Grayware scanning is disabled when virus scanning is disabled.
Enable or disable the grayware scan.Scan e-mail messages for grayware
Actions
Specify the action to take on items which containgrayware.
Action on grayware
Pass through - Leave grayware items in themessage.
Drop attachment - Remove grayware items fromthe message.
Drop the whole message - Do not deliver themessage to the recipient.
Specify the list of keywords for grayware types thatare not scanned. Leave the list empty if you do not
Grayware exclusion list
126 | Administration with Web Console
want to exclude any grayware types from the scan.For more information, see Match Lists.
Specify whether grayware attachments arequarantined when dropped.
Quarantine dropped grayware
Specify grayware that are never placed in thequarantine. For more information, see Match Lists.
Do not quarantine this grayware
Notifications
Specify the template for the notification messagethat is sent to the intended recipient when agrayware item is found in a message.
Send warning message to recipient(s)
Note: Note that the notification messageis not sent if the whole message is dropped.
Specify the template for the notification messagethat is sent to the original sender of the messagewhen a grayware item is found in a message.
Send warning message to sender
Leave notification message fields empty if you donot want to send any notification messages. Bydefault, notification messages are not sent.
For more information, see Message Templates.
Specify a list of keywords for grayware types onwhich no notifications are sent.
Do not notify on this grayware
If the product finds a grayware item with a namethat matches the keyword, the recipient and thesender are not notified about the grayware itemfound.
Leave the list empty if you do not want to excludeany grayware types from notifications.
Specify whether the administrator is notified whenthe product finds a grayware item in a message.
Send alert to administrator
Note: Configure the Alert Forwarding tableto specify where the alert is sent based onthe severity level. For more information, seeAlerts.
F-Secure E-mail and Server Security | 127

5.4.4 Archive ProcessingSpecify how F-Secure Anti-Virus processes the product processes archived attachments in inbound,outbound, and internal messages.
Note that scanning inside archives takes time. Disabling scanning inside archives improves performance,but it also means that the network users need to use up-to-date virus protection on their workstations.
Note: Archive processing is disabled when the virus scanning is disabled.
Specify whether files inside compressed archivefiles are scanned for viruses.
Scan archives
Targets
Specify files inside archives that are scanned forviruses. For more information, see Match Lists.
List of files to scan inside archives
Specify files that are not scanned inside archives.Leave the list empty if you do not want to excludeany files from the scanning.
Exclude these files
Specify how many levels of archives inside otherarchives the product scans when Scan VirusesInside Archives is enabled.
Limit max levels of nested archives
128 | Administration with Web Console
Specify files which are not allowed inside archives.For more information, see Match Lists.
Detect disallowed files inside archives
Actions
Specify the action to take on archives which containdisallowed files.
Action on archives with disallowed files
Pass through - Deliver the message with thearchive to the recipient.
Drop archive - Remove the archive from themessage and deliver the message to the recipientwithout it.
Drop the whole message - Do not deliver themessage to the recipient.
Specify the action to take on archives with nestinglevels exceeding the upper level specified in theLimit max levels of nested archives setting.
Action on max nested archives
Pass through - Deliver the message with thearchive to the recipient.
Drop archive - Remove the archive from themessage and deliver the message to the recipientwithout it.
Drop the whole message - Do not deliver themessage to the recipient.
Specify the action to take on archives which areprotected with passwords. These archives can be
Action on password protected archives
opened only with a valid password, so the productcannot scan their content.
Pass through - Deliver the message with thepassword protected archive to the recipient.
Drop archive - Remove the password protectedarchive from the message and deliver the messageto the recipient without it.
Drop the whole message - Do not deliver themessage to the recipient.
The default value is Drop archive for inbound andoutboundmail, and Pass through for internal mail.
Specify whether archives that are not delivered torecipients are quarantined.
Quarantine dropped archives
Notifications
Specify whether the administrator is notified whenthe product blocks a suspicious overnested orpassword protected archive file.
Send alert to administrator
F-Secure E-mail and Server Security | 129

Note: If the archive is blocked because itcontains malware, grayware or disallowedfiles, the administrator receives a notificationabout that instead of this notification.
Note: Configure the Alert Forwarding tableto specify where the alert is sent based onthe severity level. For more information, seeAlerts.
5.4.5 Content FilteringSpecify how the product filters disallowed content in inbound, outbound and internal messages.
Specify whether e-mail messages are scanned fordisallowed content.
Filter out e-mail messages withdisallowed/undesirable content
Targets
Specify the list of disallowed keywords to check ine-mail message subjects. For more information, seeUsing Keywords in Content Filtering.
Disallowed keywords in message subject
130 | Administration with Web Console
Specify the list of disallowed keywords to check ine-mail message text. For more information, seeUsing Keywords in Content Filtering.
Disallowed keywords in message text
Actions
Specify the action to take on messages whichcontain disallowed keywords.
Action on disallowed content
Report only - Deliver the message to the recipientand notify the administrator that the scannedmessage contained disallowed content.
Drop the whole message - Do not deliver themessage to the recipient.
Quarantine - Quarantine the message withdisallowed content.
Notifications
Specify whether recipients are notified whendisallowed content is found.
Send notification message to recipient(s)
Specify whether the original sender is notified whendisallowed content is found.
Send notification message to sender
To enable the notification, select a template for thenotification message. To disable the notification,leave the notification field empty.
For more information, see Message Templates.
Specify whether the administrator is notified whenthe product finds a message with disallowedcontent.
Send alert to administrator
Note: Configure the Alert Forwarding tableto specify where the alert is sent based onthe severity level. For more information, seeAlerts.
Using Keywords in Content Filtering
When the content filtering is enabled, all messages are checked against every keyword sequence that isspecified in the selected list of keywords.
A keyword may contain any characters, including punctuation symbols, spaces, and other word separators.Keywords are case insensitive.
You can use ‘?’ character in a keyword to match any character in that position in the keyword and ‘*’ tomatch any number of characters.
Keyword examples:
Matches any message text or subject that containsthe word ‘example’.
example
F-Secure E-mail and Server Security | 131
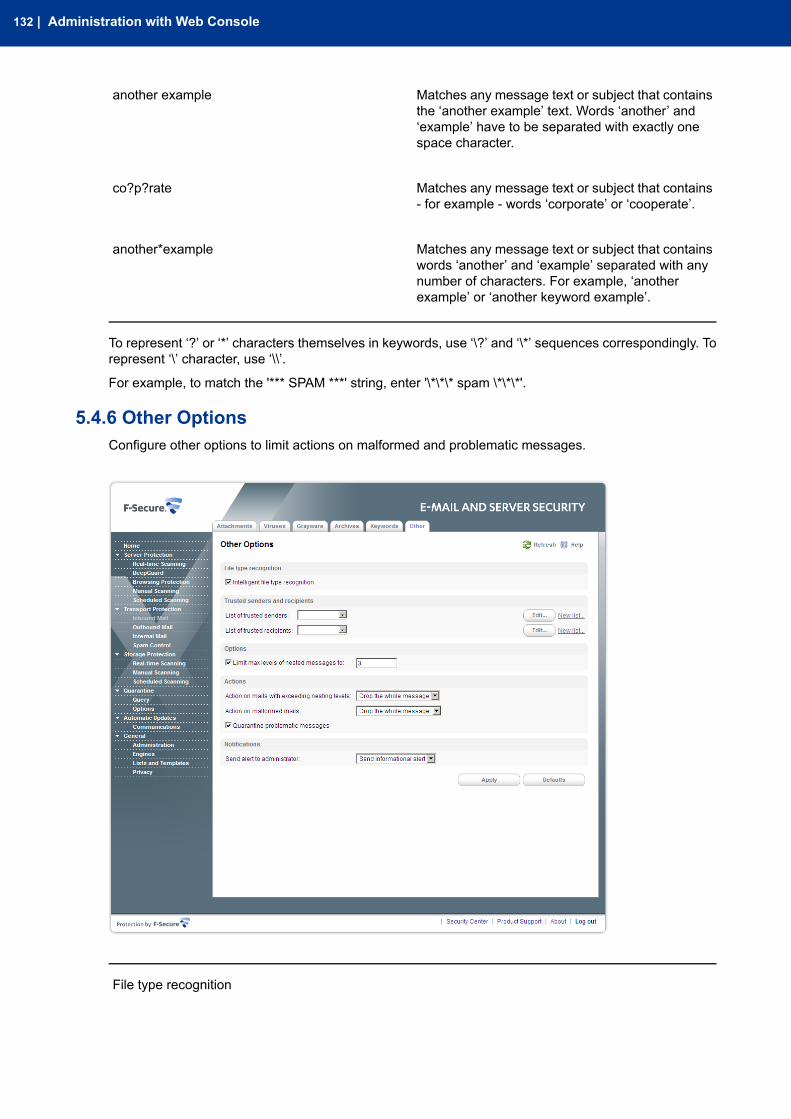
Matches any message text or subject that containsthe ‘another example’ text. Words ‘another’ and
another example
‘example’ have to be separated with exactly onespace character.
Matches any message text or subject that contains- for example - words ‘corporate’ or ‘cooperate’.
co?p?rate
Matches any message text or subject that containswords ‘another’ and ‘example’ separated with any
another*example
number of characters. For example, ‘anotherexample’ or ‘another keyword example’.
To represent ‘?’ or ‘*’ characters themselves in keywords, use ‘\?’ and ‘\*’ sequences correspondingly. Torepresent ‘\’ character, use ‘\\’.
For example, to match the '*** SPAM ***' string, enter '\*\*\* spam \*\*\*'.
5.4.6 Other OptionsConfigure other options to limit actions on malformed and problematic messages.
File type recognition
132 | Administration with Web Console
Select whether you want to use the intelligent filetype recognition or not.
Intelligent file type recognition
Trojans and other malicious code can disguisethemselves with filename extensions which areusually considered safe to use. The intelligent filetype recognition can recognize the real file type ofthe message attachment and use that while theattachment is processed.
Note: Using the intelligent file typerecognition strengthens the security, butcan degrade the system performance.
Trusted senders and recipients
Specify senders who are excluded from the mailscanning and processing.
List of trusted senders
Specify recipients who are excluded from the mailscanning and processing.
List of trusted recipients
For more information, see Match Lists.
Specify whether you want to add a disclaimer to alloutbound messages.
Mail disclaimer
Click Edit disclaimer to edit the disclaimer text.
Note: Mail disclaimer is available only foroutbound messages.
Note: Some malware add disclaimers toinfected messages, so disclaimers shouldnot be used for stating that the message isclean of malware.
Options
Specify how many levels deep to scan in nestede-mail messages. A nested e-mail message is a
Limit max levels of nested messages
message that includes one or more e-mailmessages as attachments. If zero (0) is specified,the maximum nesting level is not limited.
Note: It is not recommended to set themaximum nesting level to unlimited as thiswill make the product more vulnerable toDoS (Denial-of-Service) attacks.
Actions
Specify the action to take on messages with nestinglevels exceeding the upper level specified in theLimit max levels of nested messages setting.
Action on mails with exceeding nesting levels
F-Secure E-mail and Server Security | 133
Drop the Whole Message - Messages withexceeding nesting levels are not delivered to therecipient.
Pass Through - Nested messages are scanned upto level specified in the Limit max levels of nestedmessages setting. Exceeding nesting levels arenot scanned, but the message is delivered to therecipient.
Specify the action for non-RFC compliant e-mails.If the message has an incorrect structure, theproduct cannot parse the message reliably.
Action on malformed mails
Drop the Whole Message - Do not deliver themessage to the recipient.
Pass Through - The product allows the messageto pass through.
Pass Through and Report - The product allowsthe message to pass through, but sends a report tothe administrator.
Specify if mails that contain malformed or brokenattachments are quarantined for later analysis orrecovery.
Quarantine problematic messages
Mail disclaimer
Specify whether you want to add a disclaimer to alloutbound messages. Click Edit Disclaimer to
Add disclaimer to processed messages
specify the text of disclaimer that is added at theend of the messages.
The setting is available for outboundmessages only.
Important:
Some malware add disclaimers to infectedmessages, so disclaimers should not beused for stating that the message is cleanof malware.
Notifications
Specify whether the administrator is notified whenthe product detects a malformed or a suspiciouse-mail message.
Send alert to administrator
Note: Configure the Alert Forwarding tableto specify where the alert is sent based onthe severity level. For more information, seeAlerts.
134 | Administration with Web Console
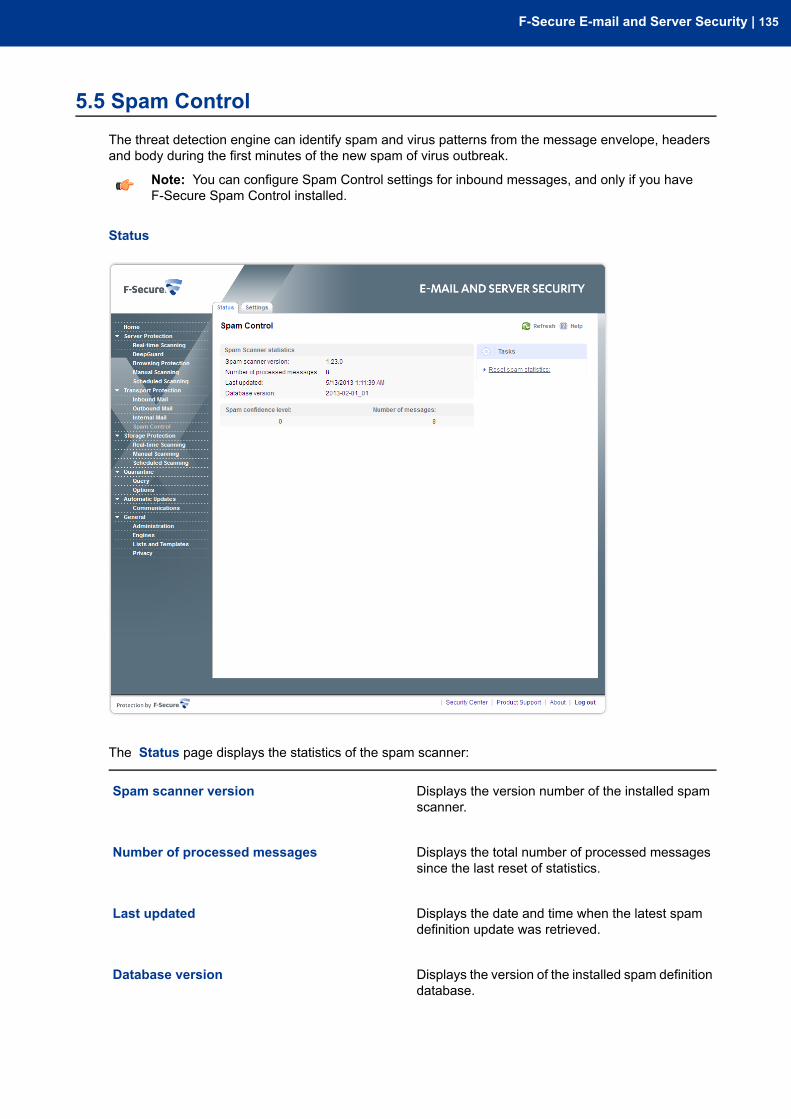
5.5 Spam ControlThe threat detection engine can identify spam and virus patterns from the message envelope, headersand body during the first minutes of the new spam of virus outbreak.
Note: You can configure Spam Control settings for inbound messages, and only if you haveF-Secure Spam Control installed.
Status
The Status page displays the statistics of the spam scanner:
Displays the version number of the installed spamscanner.
Spam scanner version
Displays the total number of processed messagessince the last reset of statistics.
Number of processed messages
Displays the date and time when the latest spamdefinition update was retrieved.
Last updated
Displays the version of the installed spam definitiondatabase.
Database version
F-Secure E-mail and Server Security | 135
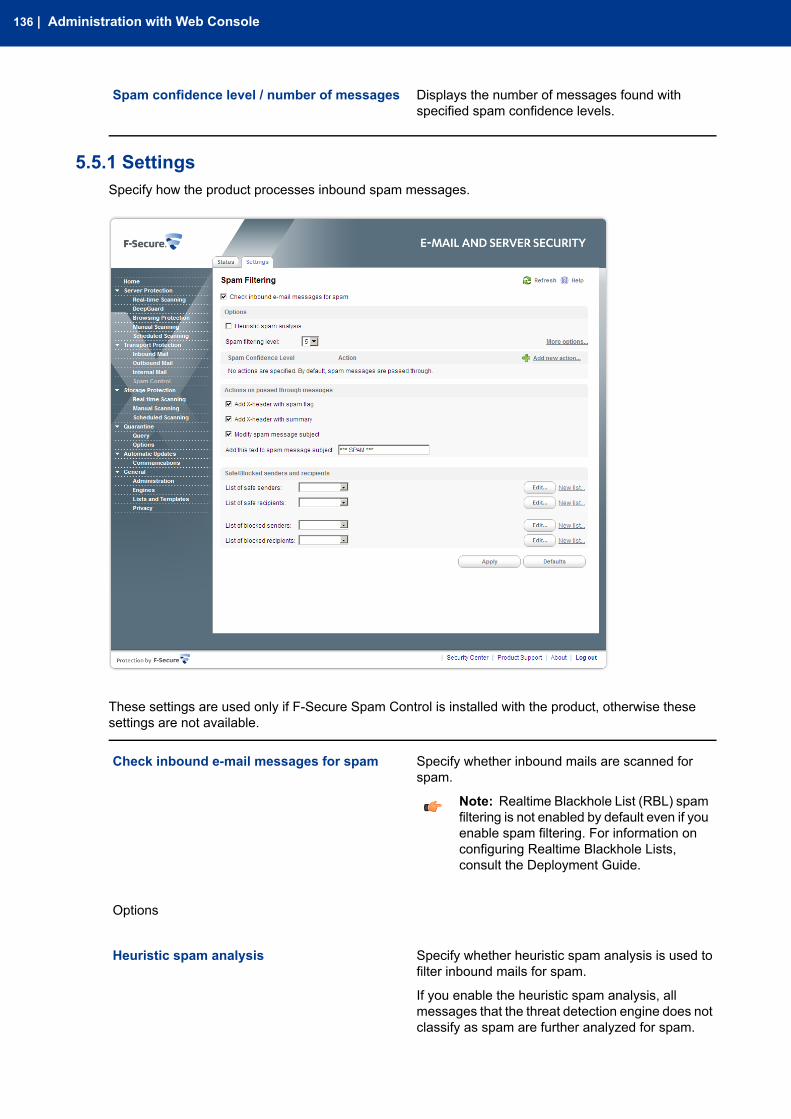
Displays the number of messages found withspecified spam confidence levels.
Spam confidence level / number of messages
5.5.1 SettingsSpecify how the product processes inbound spam messages.
These settings are used only if F-Secure Spam Control is installed with the product, otherwise thesesettings are not available.
Specify whether inbound mails are scanned forspam.
Check inbound e-mail messages for spam
Note: Realtime Blackhole List (RBL) spamfiltering is not enabled by default even if youenable spam filtering. For information onconfiguring Realtime Blackhole Lists,consult the Deployment Guide.
Options
Specify whether heuristic spam analysis is used tofilter inbound mails for spam.
Heuristic spam analysis
If you enable the heuristic spam analysis, allmessages that the threat detection engine does notclassify as spam are further analyzed for spam.
136 | Administration with Web Console
When the heuristic spam analysis is disabled, onlythe threat detection engine filters messages forspam.
Note: Heuristic spam analysis slows downthe performance but improves the spamdetection rate.
Specify the spam filtering level. Decreasing the levelallows less spam to pass, but more regular mails
Spam filtering level
may be falsely identified as spam. Increasing thelevel allows more spam to pass, but a smallernumber of regular e-mail messages are falselyidentified as spam.
For example, if the spam filtering level is set to 3,more spam is filtered, but also more regular mailsmay be falsely identified as spam. If the spamfiltering level is set to 7, more spam may passundetected, but a smaller number of regular mailswill be falsely identified as spam.
The allowed values are from 0 to 9.
Click More options to configure advanced spamfiltering options:
Max message size - Specify the maximum size(in kilobytes) of messages to be scanned for spam.If the size of the message exceeds the maximumsize, the message is not filtered for spam.
Forward spam messages to e-mail address -Specify the e-mail address where messagesconsidered as spam are forwarded when theAction on spam messages setting is set toForward.
Click Add new action to add a new action formessages with the spam level above the specifiedSpam Filtering Level.
Spam confidence level
Specify the spam level and select action to take:
Quarantine - Place the message into thequarantine folder.
Forward - Forward the message to the specifiede-mail address.
Delete - Delete the message.
Actions on passed through messages
Specify if a spam flag is added to the mail as theX-Spam-Flag header in the following format:X-Spam-Flag:<flag>
Add X-header with spam flag
where <flag> is YES or NO.
F-Secure E-mail and Server Security | 137
Specify if the summary of triggered hits is added tothe mail as X-Spam-Status header in the following
Add X-header with summary
format: X-Spam-Status: <flag>,hits=<scr> required=<sfl>tests=<tests>
where
• <flag> is Yes or No.• <scr> is the spam confidence rating returned
by the spam scanner,• <sfl> is the current spam filtering level,• <tests> is the comma-separated list of tests
run against the mail.
Specify if the product modifies the subject of mailmessages considered as spam.
Modify spam message subject
Specify the text that is added in the beginning of thesubject of messages considered as spam.
Add this text to spam message subject
By default, the text is: *** SPAM ***.
Safe/Blocked senders and recipients
Specify safe senders. Messages originating fromthe specified addresses are never treated as spam.
List of safe senders
Specify safe recipients. Messages sent to thespecified addresses are never treated as spam.
List of safe recipients
Specify blocked senders. Messages originating fromthe specified addresses are always treated as spam.
List of blocked senders
Specify blocked recipients. Messages sent to thespecified addresses are always treated as spam.
List of blocked recipients
Note: The product checks the senderaddress from the SMTPmessage envelope,not from the message headers.
5.6 Storage ProtectionConfigure Storage Protection settings to specify how e-mail messages and attachments in selectedmailboxes and public folders should be scanned.
Note: These settings are used only if F-Secure Anti-Virus for Microsoft Exchange is installed withthe product, otherwise these settings are not available.
138 | Administration with Web Console
Status
The Status page displays a summary of the protected mailboxes and public folders and infections found.
Displays the number of currently protected usermailboxes.
Number of mailboxes
Displays the number of currently protected publicfolders.
Number of public folders
Displays the total number of processed items sincethe last reset of statistics.
Processed items
Displays the number of attachments filtered basedof their file name or the file extension.
Stripped attachments
Displays the number of items that are infected andcannot be automatically disinfected.
Infected items
Displays the number of grayware items, includingspyware, adware, dialers, joke programs, remoteaccess tools and other unwanted applications.
Grayware items
F-Secure E-mail and Server Security | 139
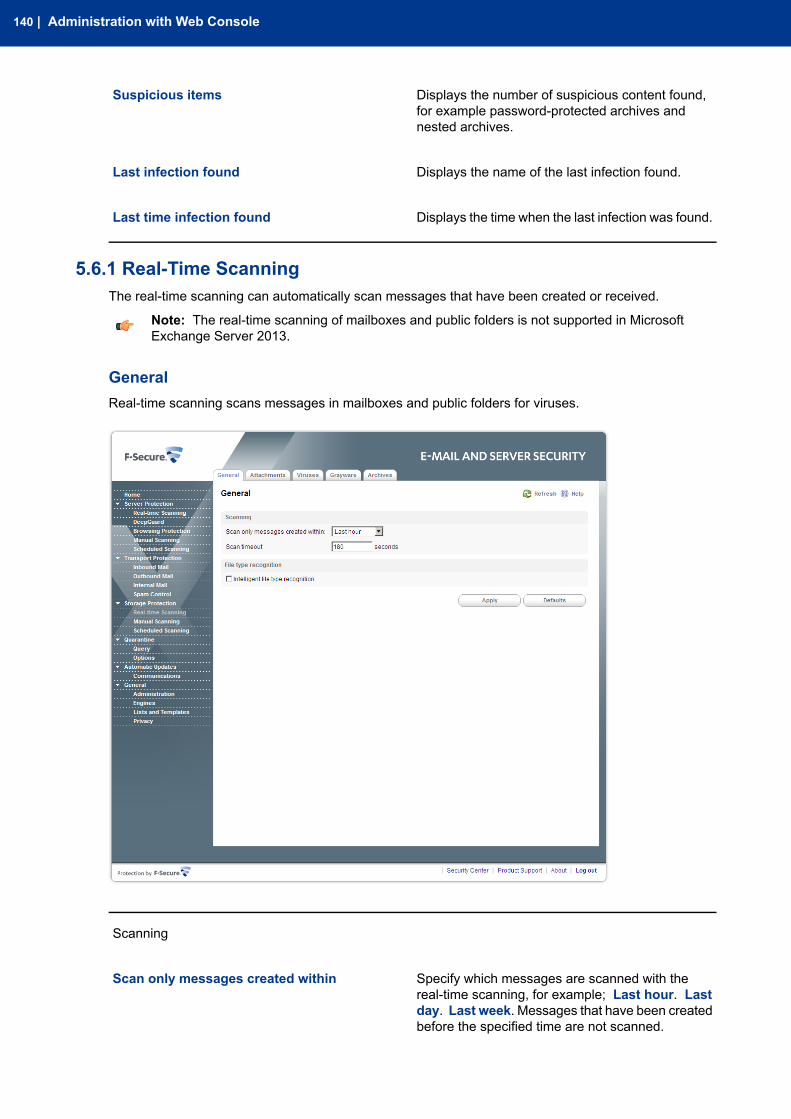
Displays the number of suspicious content found,for example password-protected archives andnested archives.
Suspicious items
Displays the name of the last infection found.Last infection found
Displays the time when the last infection was found.Last time infection found
5.6.1 Real-Time ScanningThe real-time scanning can automatically scan messages that have been created or received.
Note: The real-time scanning of mailboxes and public folders is not supported in MicrosoftExchange Server 2013.
GeneralReal-time scanning scans messages in mailboxes and public folders for viruses.
Scanning
Specify which messages are scanned with thereal-time scanning, for example; Last hour. Last
Scan only messages created within
day. Last week. Messages that have been createdbefore the specified time are not scanned.
140 | Administration with Web Console
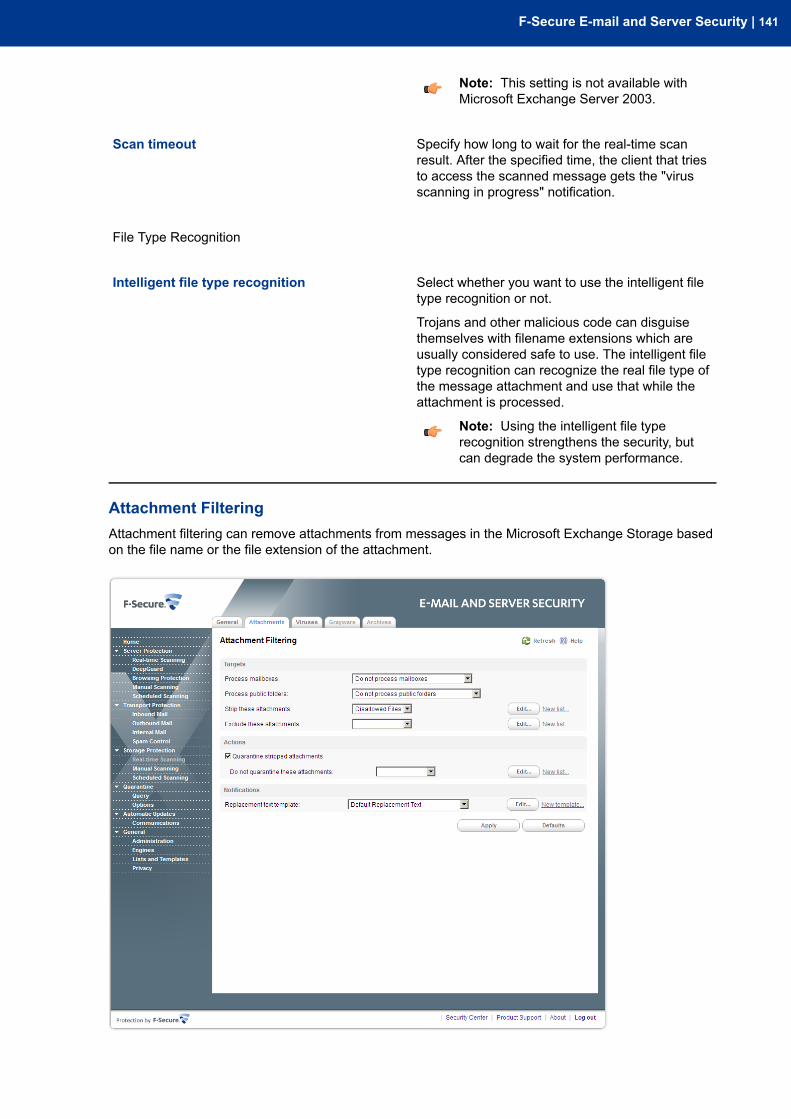
Note: This setting is not available withMicrosoft Exchange Server 2003.
Specify how long to wait for the real-time scanresult. After the specified time, the client that tries
Scan timeout
to access the scanned message gets the "virusscanning in progress" notification.
File Type Recognition
Select whether you want to use the intelligent filetype recognition or not.
Intelligent file type recognition
Trojans and other malicious code can disguisethemselves with filename extensions which areusually considered safe to use. The intelligent filetype recognition can recognize the real file type ofthe message attachment and use that while theattachment is processed.
Note: Using the intelligent file typerecognition strengthens the security, butcan degrade the system performance.
Attachment FilteringAttachment filtering can remove attachments from messages in the Microsoft Exchange Storage basedon the file name or the file extension of the attachment.
F-Secure E-mail and Server Security | 141
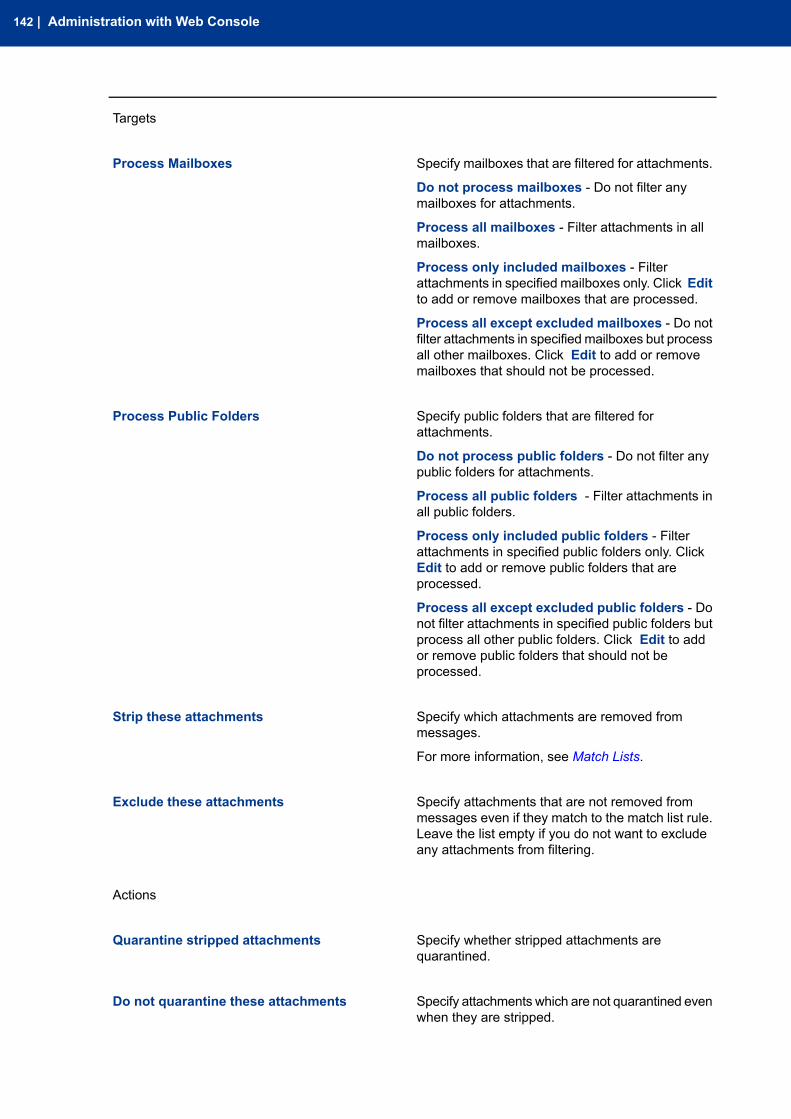
Targets
Specify mailboxes that are filtered for attachments.Process Mailboxes
Do not process mailboxes - Do not filter anymailboxes for attachments.
Process all mailboxes - Filter attachments in allmailboxes.
Process only included mailboxes - Filterattachments in specified mailboxes only. Click Editto add or remove mailboxes that are processed.
Process all except excluded mailboxes - Do notfilter attachments in specified mailboxes but processall other mailboxes. Click Edit to add or removemailboxes that should not be processed.
Specify public folders that are filtered forattachments.
Process Public Folders
Do not process public folders - Do not filter anypublic folders for attachments.
Process all public folders - Filter attachments inall public folders.
Process only included public folders - Filterattachments in specified public folders only. ClickEdit to add or remove public folders that areprocessed.
Process all except excluded public folders - Donot filter attachments in specified public folders butprocess all other public folders. Click Edit to addor remove public folders that should not beprocessed.
Specify which attachments are removed frommessages.
Strip these attachments
For more information, see Match Lists.
Specify attachments that are not removed frommessages even if they match to the match list rule.
Exclude these attachments
Leave the list empty if you do not want to excludeany attachments from filtering.
Actions
Specify whether stripped attachments arequarantined.
Quarantine stripped attachments
Specify attachments which are not quarantined evenwhen they are stripped.
Do not quarantine these attachments
142 | Administration with Web Console
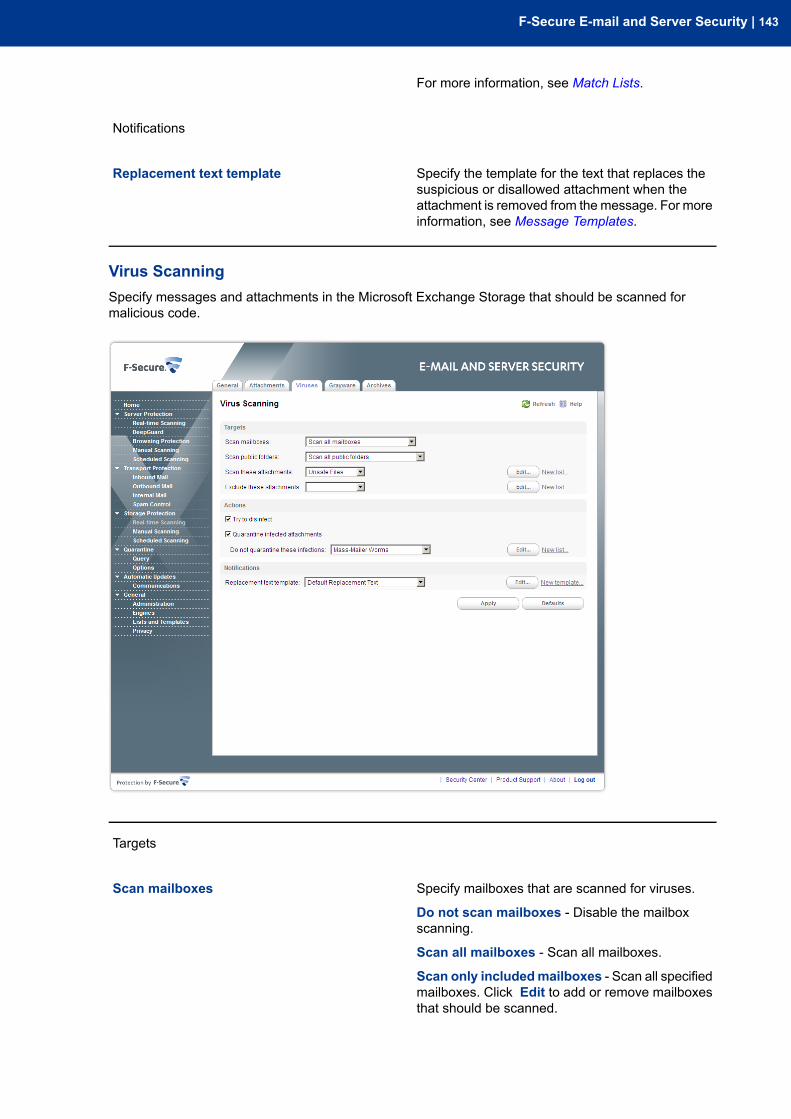
For more information, see Match Lists.
Notifications
Specify the template for the text that replaces thesuspicious or disallowed attachment when the
Replacement text template
attachment is removed from themessage. For moreinformation, see Message Templates.
Virus ScanningSpecify messages and attachments in the Microsoft Exchange Storage that should be scanned formalicious code.
Targets
Specify mailboxes that are scanned for viruses.Scan mailboxes
Do not scan mailboxes - Disable the mailboxscanning.
Scan all mailboxes - Scan all mailboxes.
Scan only includedmailboxes - Scan all specifiedmailboxes. Click Edit to add or remove mailboxesthat should be scanned.
F-Secure E-mail and Server Security | 143
Scan all except excludedmailboxes - Do not scanspecified mailboxes but scan all other. Click Editto add or remove mailboxes that should not bescanned.
Specify public folders that are scanned for viruses.Scan public folders
Do not scan public folders - Disable the publicfolder scanning.
Scan all folders - Scan all public folders.
Scan only included public folders - Scan allspecified public folders. Click Edit to add or removepublic folders that should be scanned.
Scan all except excluded public folders - Do notscan specified public folders but scan all other. ClickEdit to add or remove public folders that should notbe scanned.
Important:
You need to specify Administrator's mailboxsetting to list and scan public folders onMicrosoft Exchange 2010 platform. Formore information, see General.
Specify attachments that are scanned for viruses.For more information, see Match Lists.
Scan these attachments
Specify attachments that are not scanned. Leavethe list empty if you do not want to exclude anyattachments from the scanning.
Exclude these attachments
Actions
Specify whether the product should try to disinfectan infected attachment before processing it. If the
Try to disinfect
disinfection succeeds, the product does not processthe attachment further.
Note: Disinfection may affect the productperformance.
Note: Infected files inside archives are notdisinfected even when the setting isenabled.
Specify whether infected attachments arequarantined.
Quarantine infected attachments
Specify virus and malware infections that are neverplaced in the quarantine. For more information, seeMatch Lists.
Do not quarantine these infections
Notifications
144 | Administration with Web Console
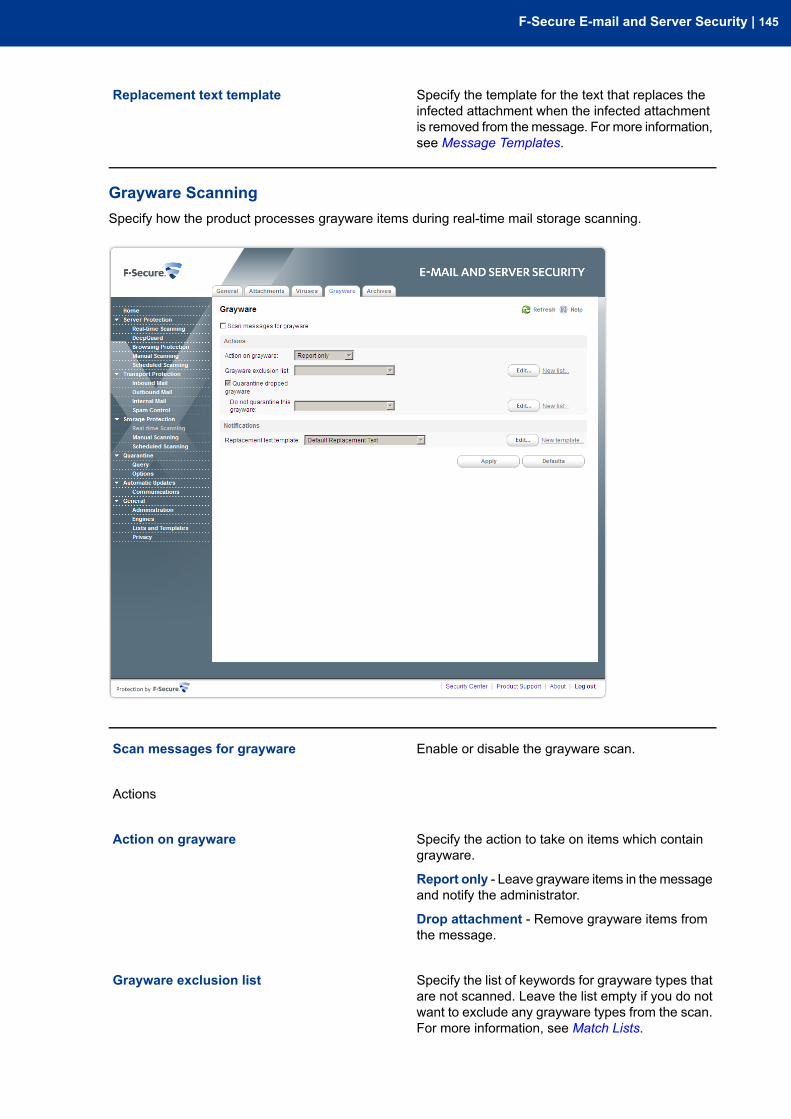
Specify the template for the text that replaces theinfected attachment when the infected attachment
Replacement text template
is removed from themessage. For more information,see Message Templates.
Grayware ScanningSpecify how the product processes grayware items during real-time mail storage scanning.
Enable or disable the grayware scan.Scan messages for grayware
Actions
Specify the action to take on items which containgrayware.
Action on grayware
Report only - Leave grayware items in themessageand notify the administrator.
Drop attachment - Remove grayware items fromthe message.
Specify the list of keywords for grayware types thatare not scanned. Leave the list empty if you do not
Grayware exclusion list
want to exclude any grayware types from the scan.For more information, see Match Lists.
F-Secure E-mail and Server Security | 145
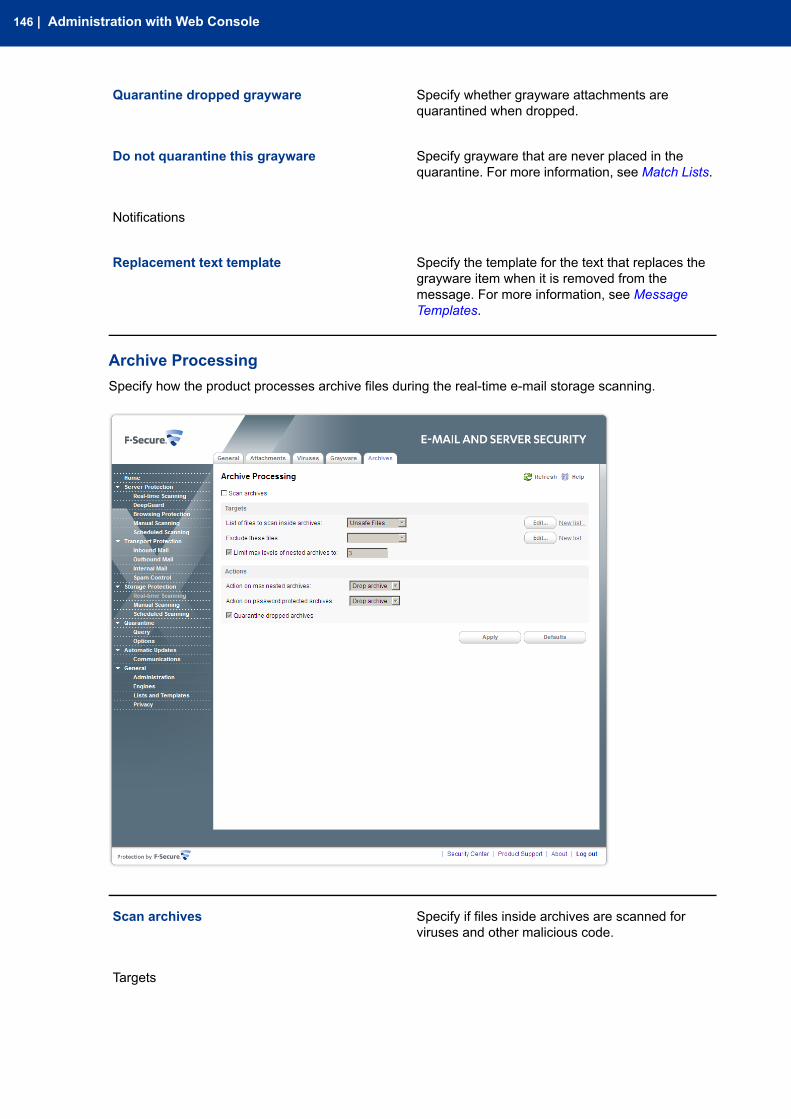
Specify whether grayware attachments arequarantined when dropped.
Quarantine dropped grayware
Specify grayware that are never placed in thequarantine. For more information, see Match Lists.
Do not quarantine this grayware
Notifications
Specify the template for the text that replaces thegrayware item when it is removed from the
Replacement text template
message. For more information, see MessageTemplates.
Archive ProcessingSpecify how the product processes archive files during the real-time e-mail storage scanning.
Specify if files inside archives are scanned forviruses and other malicious code.
Scan archives
Targets
146 | Administration with Web Console
Specify files that are scanned for viruses insidearchives.
List of files to scan inside archives
Specify files inside archives that are not scanned.Leave the list empty if you do not want to excludeany files from the scanning.
Exclude these files
Specify how many levels deep to scan in nestedarchives, if Scan archives is enabled.
Limit max levels of nested archives
A nested archive is an archive that contains anotherarchive inside. If zero (0) is specified, the maximumnesting level is not limited.
Specify the number of archive levels the productgoes through. The default setting is 3.
Actions
Specify the action to take on nested archives withnesting levels exceeding the upper level specifiedin the Limit max levels of nested archives setting.
Action on max nested archives
Pass Through - Nested archives are scanned upto level specified in the Limit max levels of nestedarchives setting. Exceeding nesting levels are notscanned, but the archive is not removed.
Drop archive - Archives with exceeding nestinglevels are removed.
Specify the action to take on archives which areprotected with passwords. These archives can be
Action on password protected archives
opened only with a valid password, so the productcannot scan their content.
Pass through - Leave the password protectedarchive in the message.
Drop archive - Remove the password protectedarchive from the message.
Specify whether archives that are not delivered torecipients are placed in the quarantine.
Quarantine dropped archives
F-Secure E-mail and Server Security | 147
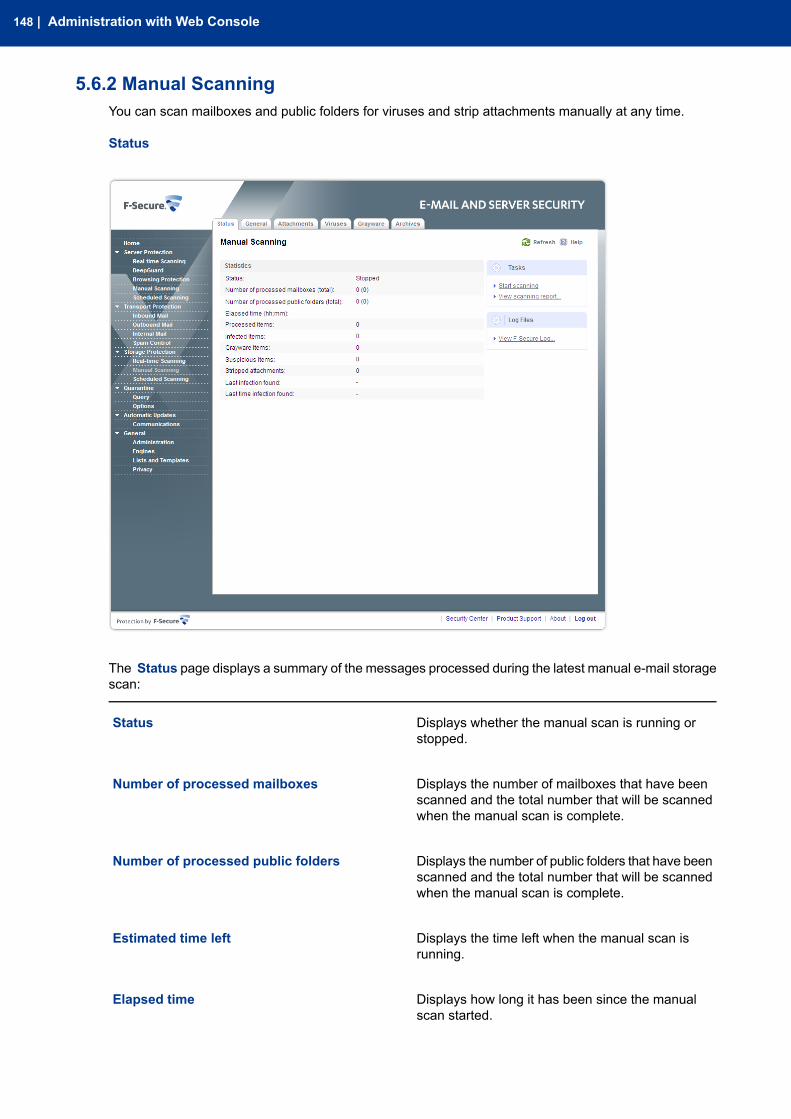
5.6.2 Manual ScanningYou can scan mailboxes and public folders for viruses and strip attachments manually at any time.
Status
The Status page displays a summary of the messages processed during the latest manual e-mail storagescan:
Displays whether the manual scan is running orstopped.
Status
Displays the number of mailboxes that have beenscanned and the total number that will be scannedwhen the manual scan is complete.
Number of processed mailboxes
Displays the number of public folders that have beenscanned and the total number that will be scannedwhen the manual scan is complete.
Number of processed public folders
Displays the time left when the manual scan isrunning.
Estimated time left
Displays how long it has been since the manualscan started.
Elapsed time
148 | Administration with Web Console
Displays the number of items processed during thescan.
Processed items
Displays the number of infected items found.Infected items
Displays the number of grayware items found,including spyware, adware, dialers, joke programs,
Grayware items
remote access tools and other unwantedapplications.
Displays the number of suspicious content found,for example password-protected archives andnested archives.
Suspicious items
Displays the number of filtered attachments.Stripped attachments
Displays the name of the last infection found.Last infection found
Displays the date when the last infection was found.Last time infection found
Note: If the manual scan scans an item that has not been previously scanned for viruses and thereal-time scan is on, the scan result may appear on the real-time scan statistics.
Tasks
Click Start scanning to start the manual scan.
Click Stop scanning to stop the manual scan.
Click View scanning report to view the latest manual scan report.
F-Secure E-mail and Server Security | 149
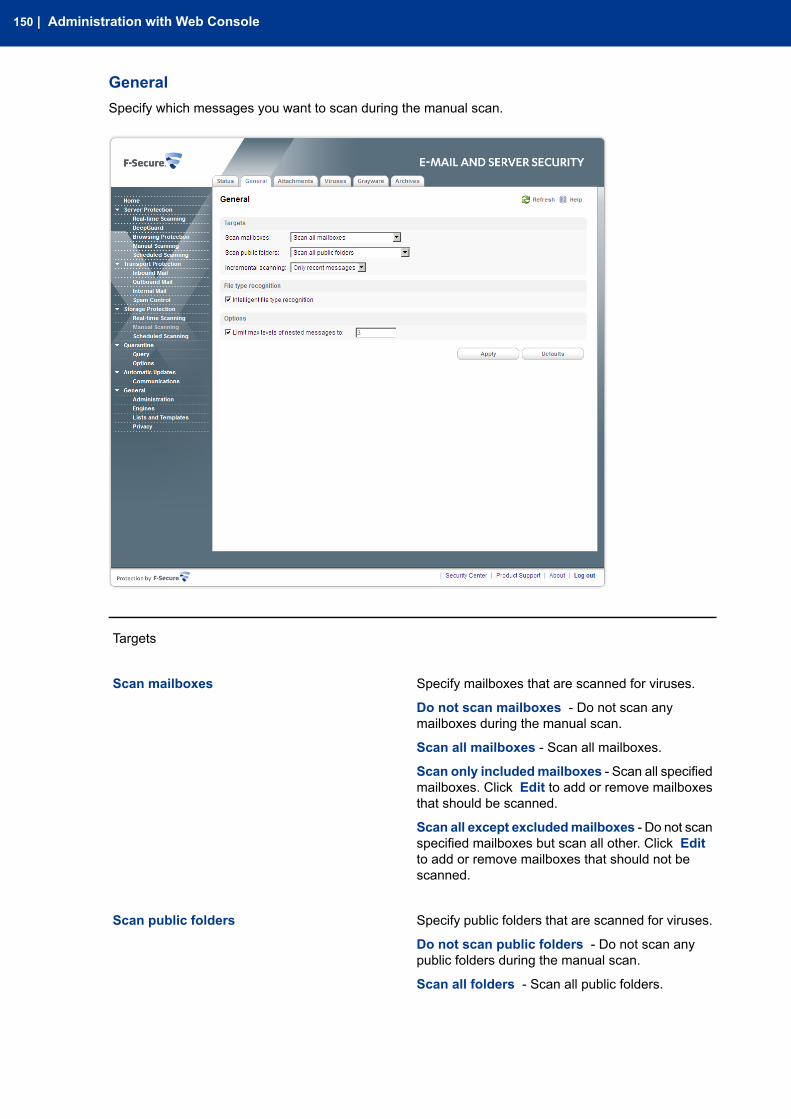
GeneralSpecify which messages you want to scan during the manual scan.
Targets
Specify mailboxes that are scanned for viruses.Scan mailboxes
Do not scan mailboxes - Do not scan anymailboxes during the manual scan.
Scan all mailboxes - Scan all mailboxes.
Scan only includedmailboxes - Scan all specifiedmailboxes. Click Edit to add or remove mailboxesthat should be scanned.
Scan all except excludedmailboxes - Do not scanspecified mailboxes but scan all other. Click Editto add or remove mailboxes that should not bescanned.
Specify public folders that are scanned for viruses.Scan public folders
Do not scan public folders - Do not scan anypublic folders during the manual scan.
Scan all folders - Scan all public folders.
150 | Administration with Web Console

Scan only included public folders - Scan allspecified public folders. Click Edit to add or removepublic folders that should be scanned.
Scan all except excluded public folders - Do notscan specified public folders but scan all other. ClickEdit to add or remove public folders that should notbe scanned.
Important:
You need to specify Administrator's mailboxsetting to list and scan public folders onMicrosoft Exchange 2010 platform. Formore information, see General.
Specify which messages are scanned for virusesduring the manual scan.
Incremental Scanning
All messages - Scan all messages.
Only Recent Messages - Scan only messages thathave not been scanned during the previous manualor scheduled scan.
File Type Recognition
Select whether you want to use the intelligent filetype recognition or not.
Intelligent file type recognition
Trojans and other malicious code can disguisethemselves with filename extensions which areusually considered safe to use. The intelligent filetype recognition can recognize the real file type ofthe message attachment and use that while theattachment is processed.
Note: Using the intelligent file typerecognition strengthens the security, butcan degrade the system performance.
Options
Specify how many levels deep to scan in nestede-mail messages. A nested e-mail message is a
Limit max levels of nested messages
message that includes one or more e-mailmessages as attachments. If zero (0) is specified,the maximum nesting level is not limited.
Advanced
Specify the primary SMTP address for the accountwhich is used to scan items in public folders. The
Administrator's mailbox
user account must have permissions to access andmodify items in the public folders.
Note: The setting is used on MicrosoftExchange 2010 platform only and affects
F-Secure E-mail and Server Security | 151
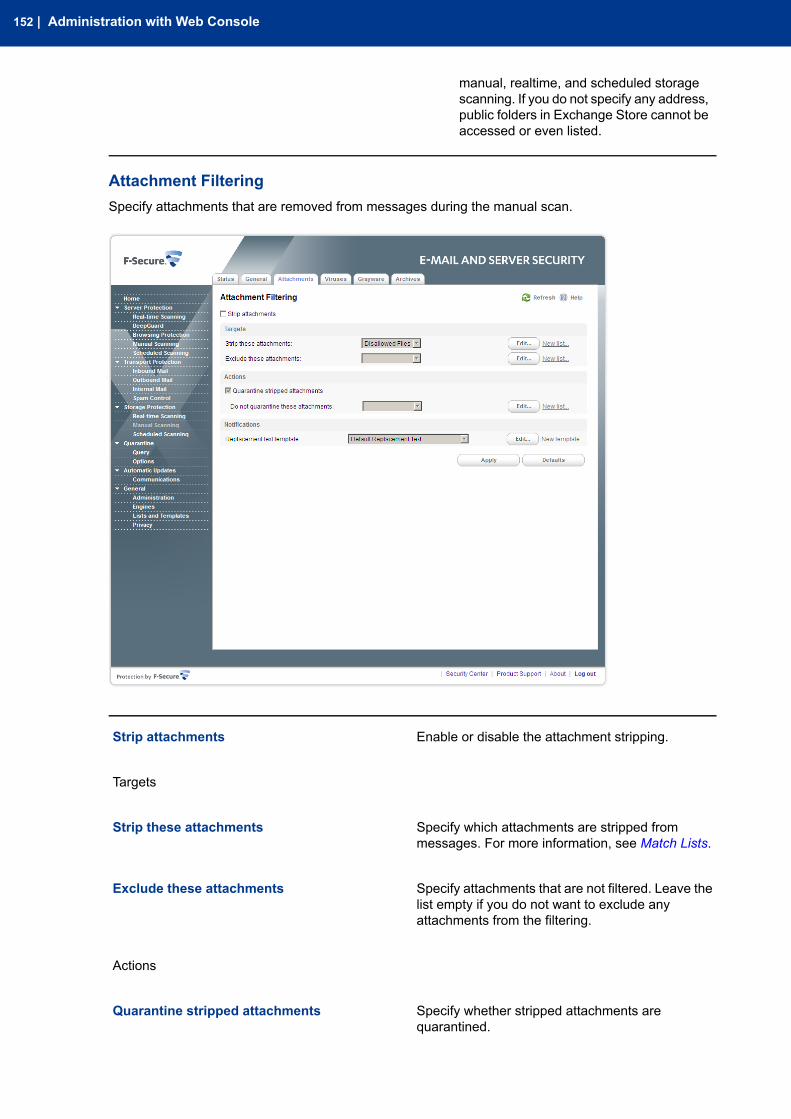
manual, realtime, and scheduled storagescanning. If you do not specify any address,public folders in Exchange Store cannot beaccessed or even listed.
Attachment FilteringSpecify attachments that are removed from messages during the manual scan.
Enable or disable the attachment stripping.Strip attachments
Targets
Specify which attachments are stripped frommessages. For more information, see Match Lists.
Strip these attachments
Specify attachments that are not filtered. Leave thelist empty if you do not want to exclude anyattachments from the filtering.
Exclude these attachments
Actions
Specify whether stripped attachments arequarantined.
Quarantine stripped attachments
152 | Administration with Web Console
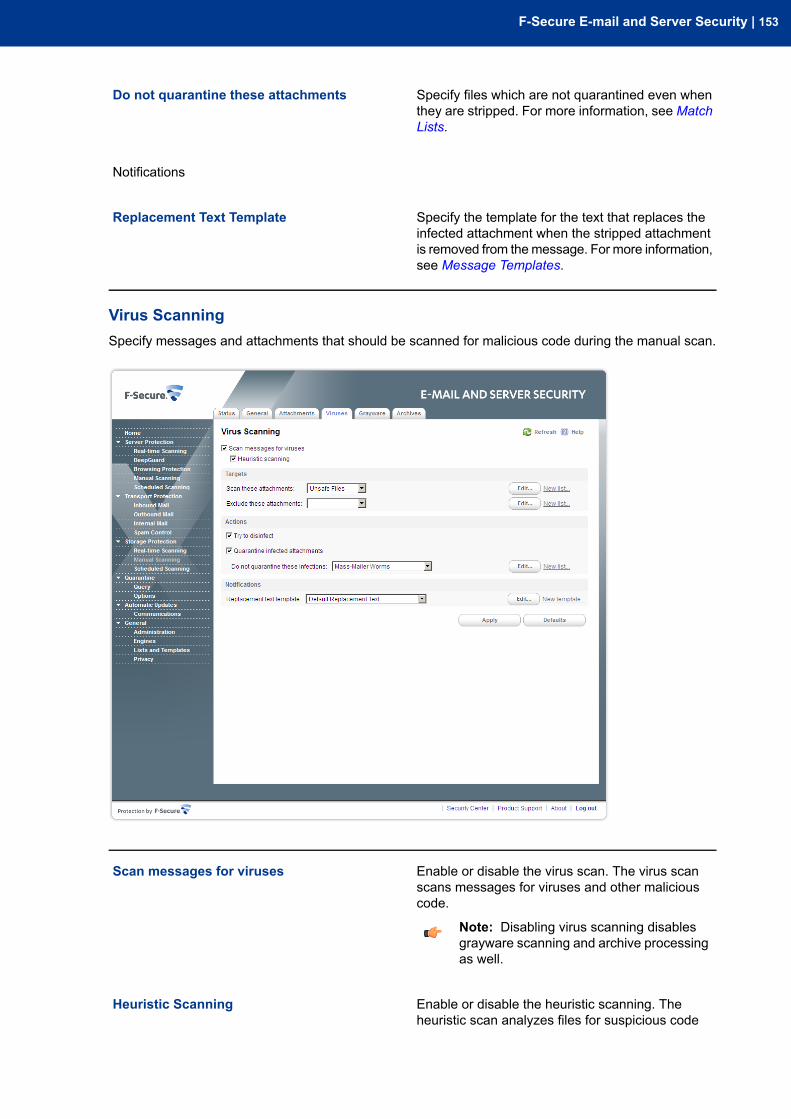
Specify files which are not quarantined even whenthey are stripped. For more information, see MatchLists.
Do not quarantine these attachments
Notifications
Specify the template for the text that replaces theinfected attachment when the stripped attachment
Replacement Text Template
is removed from themessage. For more information,see Message Templates.
Virus ScanningSpecify messages and attachments that should be scanned for malicious code during the manual scan.
Enable or disable the virus scan. The virus scanscans messages for viruses and other maliciouscode.
Scan messages for viruses
Note: Disabling virus scanning disablesgrayware scanning and archive processingas well.
Enable or disable the heuristic scanning. Theheuristic scan analyzes files for suspicious code
Heuristic Scanning
F-Secure E-mail and Server Security | 153
behavior so that the product can detect unknownmalware.
Note: The heuristic scan may affect theproduct performance and increase the riskof false malware alarms.
Targets
Specify attachments that are scanned for viruses.For more information, see Match Lists.
Scan these attachments
Specify attachments that are not scanned. Leavethe list empty if you do not want to exclude anyattachments from the scanning.
Exclude these attachments
Actions
Specify whether the product should try to disinfectan infected attachment before processing it. If the
Try to disinfect
disinfection succeeds, the product does not processthe attachment further.
Note: Disinfection may affect the productperformance.
Note: Infected files inside archives are notdisinfected even when the setting isenabled.
Specify whether infected or suspicious attachmentsare quarantined.
Quarantine infected attachments
Specify virus and malware infections that are neverplaced in the quarantine. For more information, seeMatch Lists.
Do not quarantine these infections
Notifications
Specify the template for the text that replaces theinfected attachment when the infected attachment
Replacement text template
is removed from themessage. For more information,see Message Templates.
154 | Administration with Web Console
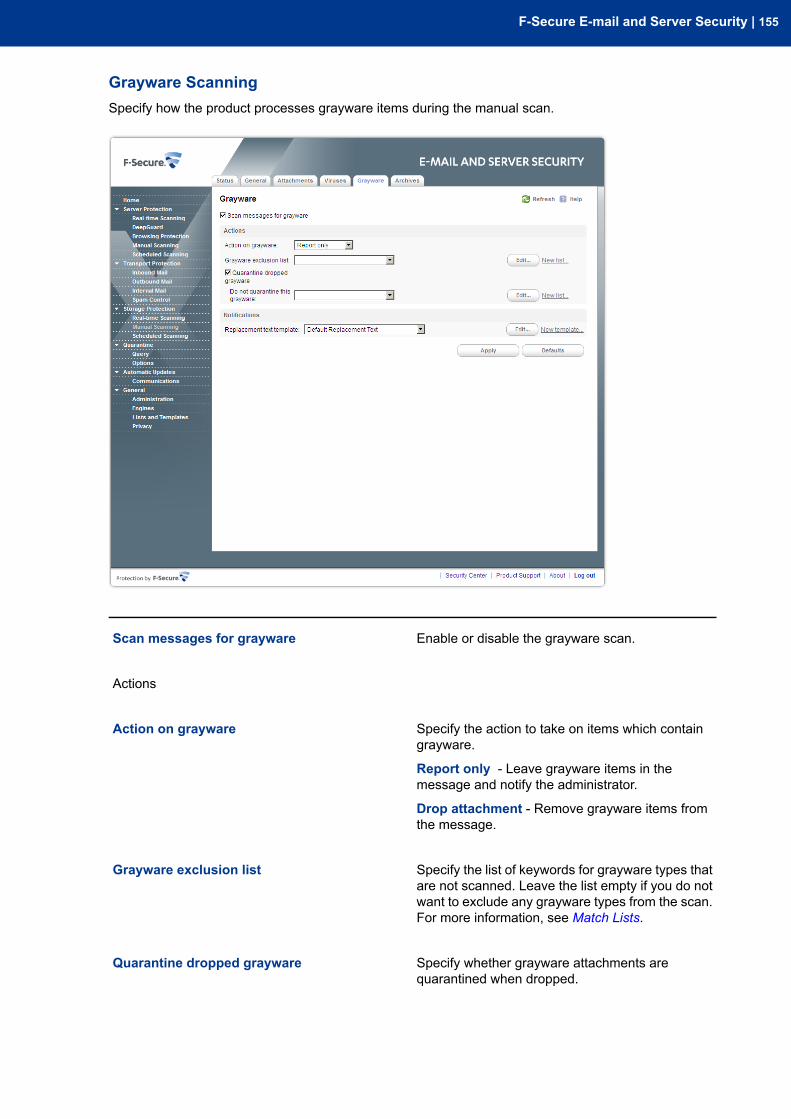
Grayware ScanningSpecify how the product processes grayware items during the manual scan.
Enable or disable the grayware scan.Scan messages for grayware
Actions
Specify the action to take on items which containgrayware.
Action on grayware
Report only - Leave grayware items in themessage and notify the administrator.
Drop attachment - Remove grayware items fromthe message.
Specify the list of keywords for grayware types thatare not scanned. Leave the list empty if you do not
Grayware exclusion list
want to exclude any grayware types from the scan.For more information, see Match Lists.
Specify whether grayware attachments arequarantined when dropped.
Quarantine dropped grayware
F-Secure E-mail and Server Security | 155
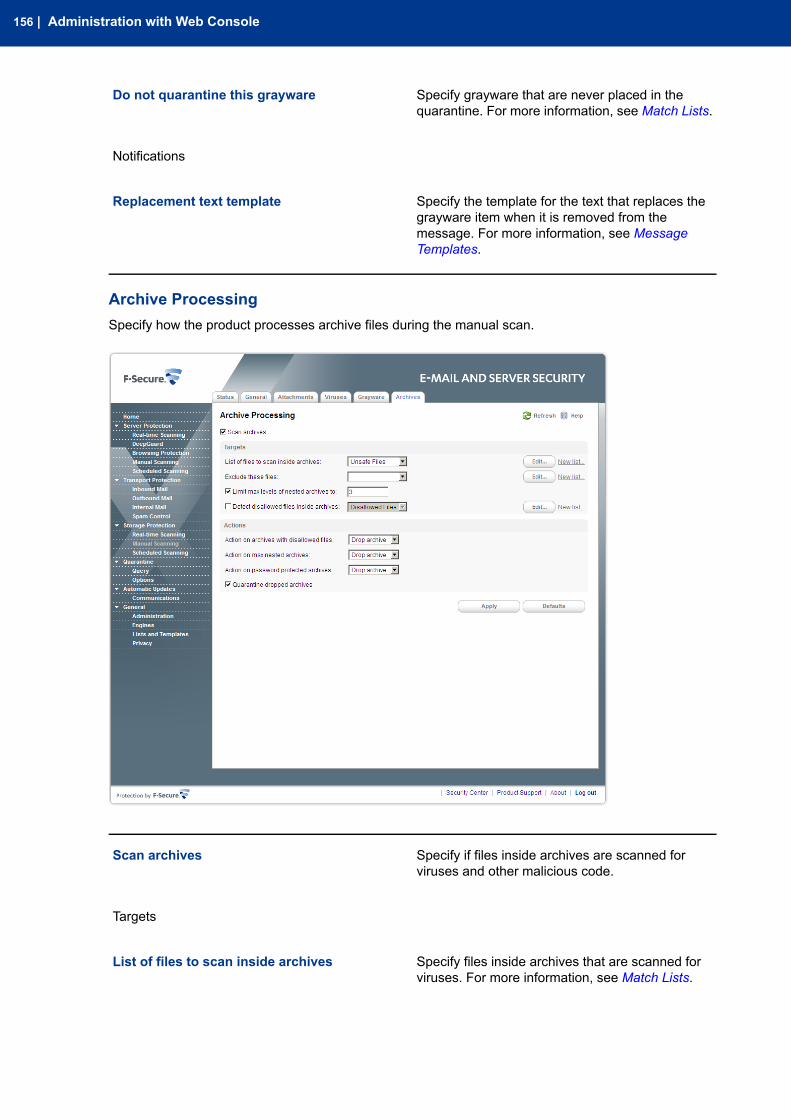
Specify grayware that are never placed in thequarantine. For more information, see Match Lists.
Do not quarantine this grayware
Notifications
Specify the template for the text that replaces thegrayware item when it is removed from the
Replacement text template
message. For more information, see MessageTemplates.
Archive ProcessingSpecify how the product processes archive files during the manual scan.
Specify if files inside archives are scanned forviruses and other malicious code.
Scan archives
Targets
Specify files inside archives that are scanned forviruses. For more information, see Match Lists.
List of files to scan inside archives
156 | Administration with Web Console

Specify files that are not scanned inside archives.Leave the list empty if you do not want to excludeany files from the scanning.
Exclude these files
Specify how many levels of archives inside otherarchives the product scans when Scan archivesis enabled.
Limit max levels of nested archives
Specify whether files inside compressed archivefiles are processed for disallowed content.
Detect disallowed files inside archives
If you want to detect disallowed content, specifyfiles that are not allowed. For more information, seeMatch Lists.
Actions
Specify the action to take on archives that containdisallowed content.
Action on archives with disallowed files
Pass through - Deliver the message with thearchive to the recipient.
Drop archive - Remove the archive from themessage and deliver the message to the recipientwithout it.
Drop the whole message - Do not deliver themessage to the recipient at all.
Specify the action to take on archives with nestinglevels exceeding the upper level specified in theLimit max levels of nested archives setting.
Action on max nested archives
Pass through - Deliver the message with thearchive to the recipient.
Drop archive - Remove the archive from themessage.
Specify the action to take on archives which areprotected with passwords. These archives can be
Action on password protected archives
opened only with a valid password, so the productcannot scan their content.
Pass through - Deliver the message with thearchive to the recipient.
Drop archive - Remove the password protectedarchive from the message.
Specify whether archives that are not delivered torecipients are placed in the quarantine. For moreinformation, see Match Lists.
Quarantine dropped archives
F-Secure E-mail and Server Security | 157

5.6.3 Scheduled ScanningThe Scheduled Tasks list displays the scheduled tasks that scan e-mail storage and date and time whenthey occur for the next time.
Click Add new task to create a new scheduled operation.
Click the scheduled task name to edit it or Remove to completely remove it.
Creating Scheduled TaskHow to create a scheduled scanning task.
To start the Scheduled Operation Wizard, click Add new task in the Scheduled Scanning page.
158 | Administration with Web Console
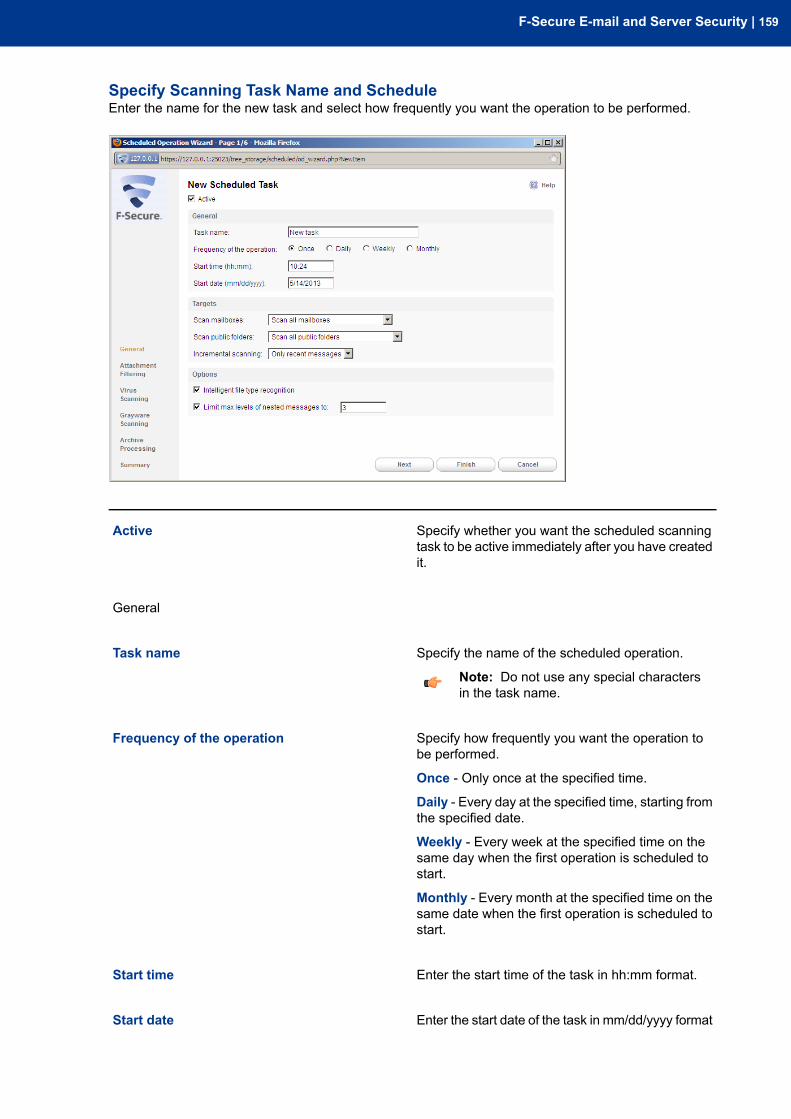
Specify Scanning Task Name and ScheduleEnter the name for the new task and select how frequently you want the operation to be performed.
Specify whether you want the scheduled scanningtask to be active immediately after you have createdit.
Active
General
Specify the name of the scheduled operation.Task name
Note: Do not use any special charactersin the task name.
Specify how frequently you want the operation tobe performed.
Frequency of the operation
Once - Only once at the specified time.
Daily - Every day at the specified time, starting fromthe specified date.
Weekly - Every week at the specified time on thesame day when the first operation is scheduled tostart.
Monthly - Every month at the specified time on thesame date when the first operation is scheduled tostart.
Enter the start time of the task in hh:mm format.Start time
Enter the start date of the task in mm/dd/yyyy formatStart date
F-Secure E-mail and Server Security | 159
Targets
Specify mailboxes that are scanned for viruses.Scan mailboxes
Do not scan mailboxes - Disable the mailboxscanning.
Scan all mailboxes - Scan all mailboxes.
Scan only includedmailboxes - Scan all specifiedmailboxes. Click Edit to add or remove mailboxesthat should be scanned.
Scan all except excludedmailboxes - Do not scanspecified mailboxes but scan all other. Click Editto add or remove mailboxes that should not bescanned.
Specify public folders that are scanned for viruses.Scan public folders
Do not scan public folders - Disable the publicfolder scanning.
Scan all folders - Scan all public folders.
Scan only included public folders - Scan allspecified public folders. Click Edit to add or removepublic folders that should be scanned.
Scan all except excluded public folders - Do notscan specified public folders but scan all other. ClickEdit to add or remove public folders that should notbe scanned.
Important:
You need to specify Administrator's mailboxsetting to list and scan public folders onMicrosoft Exchange 2010 platform. Formore information, see General.
Specify whether you want to process all messagesor only those messages that have not been
Incremental scanning
processed previously during the manual orscheduled processing.
Options
Select whether you want to use the intelligent filetype recognition or not.
Intelligent file type recognition
Trojans and other malicious code can disguisethemselves with filename extensions which areusually considered safe to use. The intelligent filetype recognition can recognize the real file type ofthe message attachment and use that while theattachment is processed.
Note: Using the intelligent file typerecognition strengthens the security, butcan degrade the system performance.
160 | Administration with Web Console
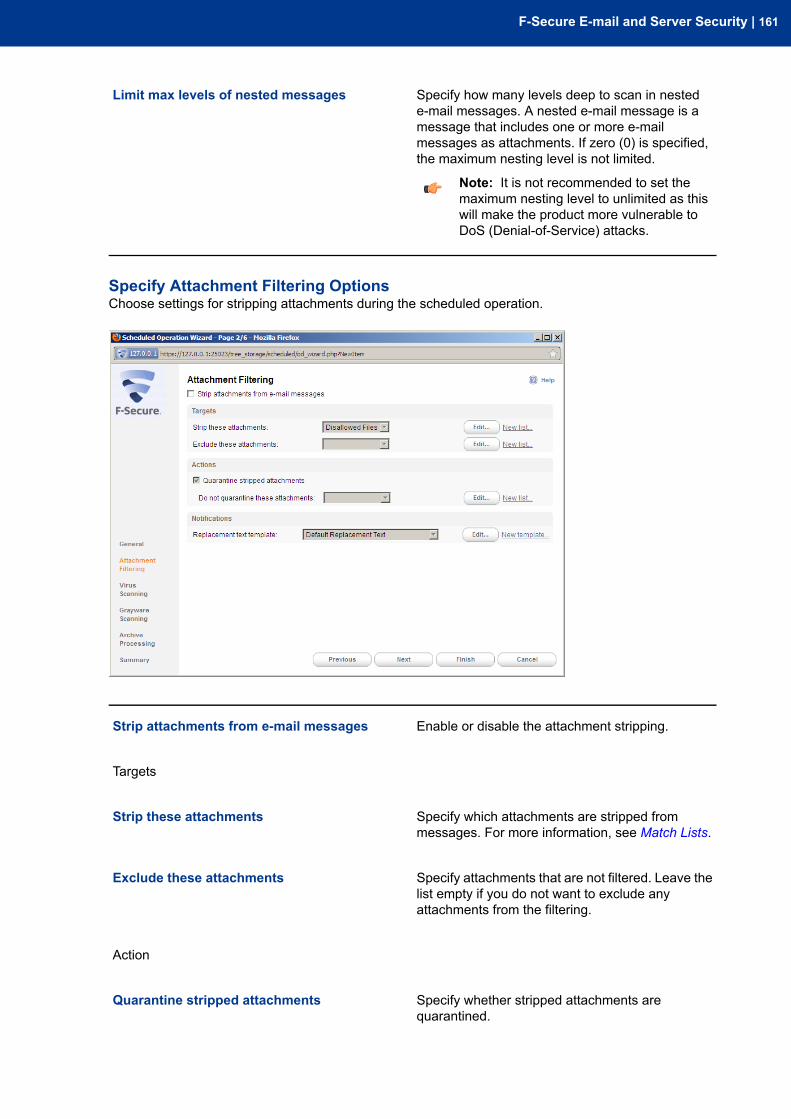
Specify how many levels deep to scan in nestede-mail messages. A nested e-mail message is a
Limit max levels of nested messages
message that includes one or more e-mailmessages as attachments. If zero (0) is specified,the maximum nesting level is not limited.
Note: It is not recommended to set themaximum nesting level to unlimited as thiswill make the product more vulnerable toDoS (Denial-of-Service) attacks.
Specify Attachment Filtering OptionsChoose settings for stripping attachments during the scheduled operation.
Enable or disable the attachment stripping.Strip attachments from e-mail messages
Targets
Specify which attachments are stripped frommessages. For more information, see Match Lists.
Strip these attachments
Specify attachments that are not filtered. Leave thelist empty if you do not want to exclude anyattachments from the filtering.
Exclude these attachments
Action
Specify whether stripped attachments arequarantined.
Quarantine stripped attachments
F-Secure E-mail and Server Security | 161
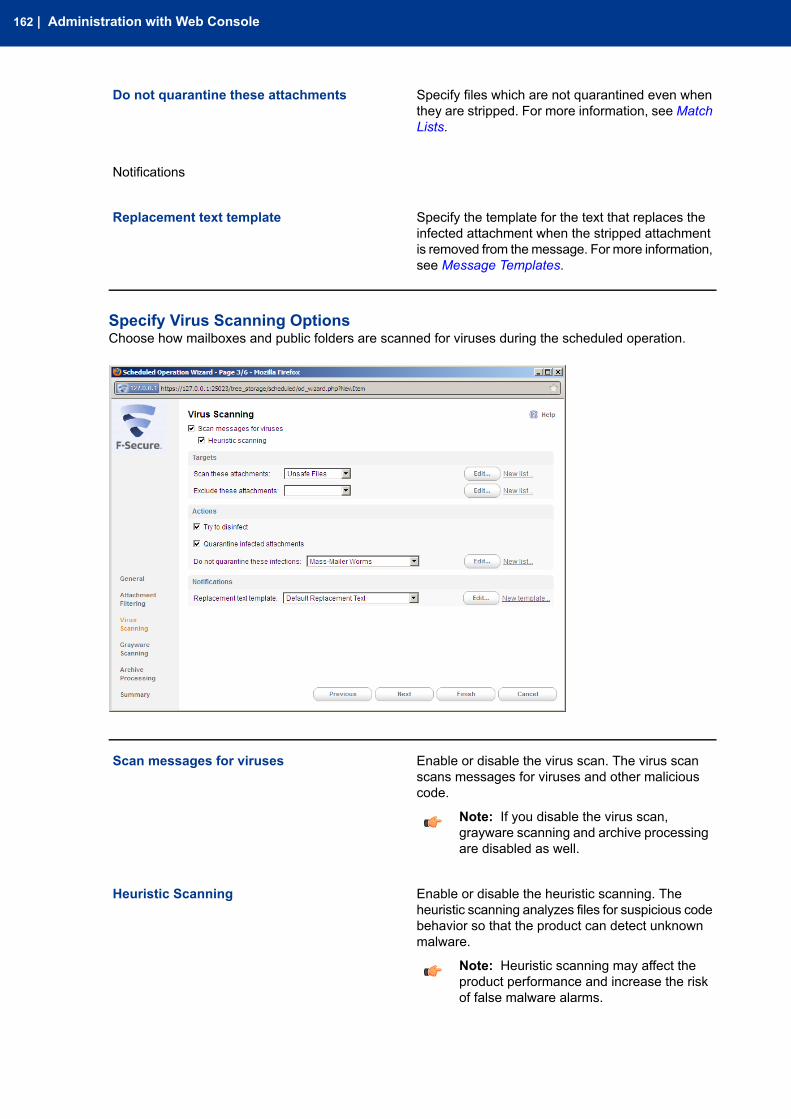
Specify files which are not quarantined even whenthey are stripped. For more information, see MatchLists.
Do not quarantine these attachments
Notifications
Specify the template for the text that replaces theinfected attachment when the stripped attachment
Replacement text template
is removed from themessage. For more information,see Message Templates.
Specify Virus Scanning OptionsChoose how mailboxes and public folders are scanned for viruses during the scheduled operation.
Enable or disable the virus scan. The virus scanscans messages for viruses and other maliciouscode.
Scan messages for viruses
Note: If you disable the virus scan,grayware scanning and archive processingare disabled as well.
Enable or disable the heuristic scanning. Theheuristic scanning analyzes files for suspicious code
Heuristic Scanning
behavior so that the product can detect unknownmalware.
Note: Heuristic scanning may affect theproduct performance and increase the riskof false malware alarms.
162 | Administration with Web Console

Targets
Specify attachments that are scanned for viruses.For more information, see Match Lists.
Scan these attachments
Specify attachments that are not scanned. Leavethe list empty if you do not want to exclude anyattachments from the scanning.
Exclude these attachments
Actions
Specify whether the product should try to disinfectan infected attachment before processing it. If the
Try to disinfect
disinfection succeeds, the product does not processthe attachment further.
Note: Disinfection may affect the productperformance.
Note: Infected files inside archives are notdisinfected even when the setting isenabled.
Specify whether infected or suspicious messagesare quarantined.
Quarantine infected messages
Specify infections that are never placed in thequarantine. For more information, see Match Lists.
Do not quarantine these infections
Notifications
Specify the template for the text that replaces theinfected attachment when the infected attachment
Replacement text template
is removed from themessage. For more information,see Message Templates.
F-Secure E-mail and Server Security | 163
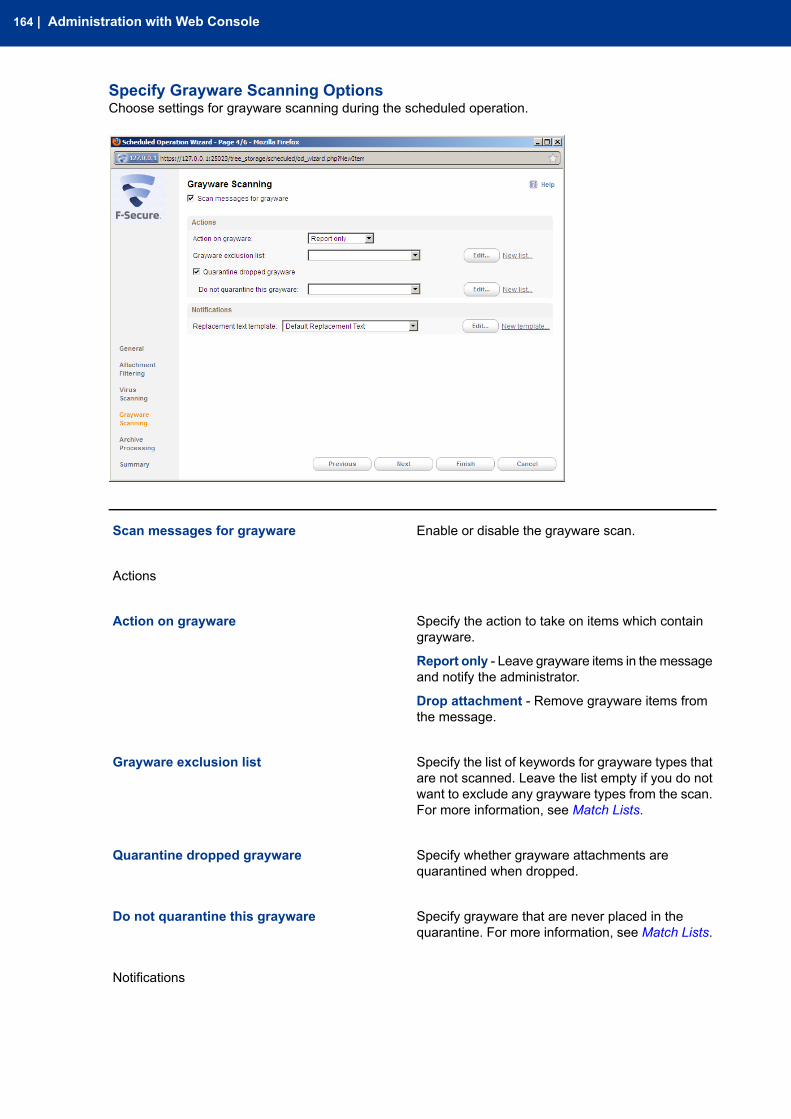
Specify Grayware Scanning OptionsChoose settings for grayware scanning during the scheduled operation.
Enable or disable the grayware scan.Scan messages for grayware
Actions
Specify the action to take on items which containgrayware.
Action on grayware
Report only - Leave grayware items in themessageand notify the administrator.
Drop attachment - Remove grayware items fromthe message.
Specify the list of keywords for grayware types thatare not scanned. Leave the list empty if you do not
Grayware exclusion list
want to exclude any grayware types from the scan.For more information, see Match Lists.
Specify whether grayware attachments arequarantined when dropped.
Quarantine dropped grayware
Specify grayware that are never placed in thequarantine. For more information, see Match Lists.
Do not quarantine this grayware
Notifications
164 | Administration with Web Console
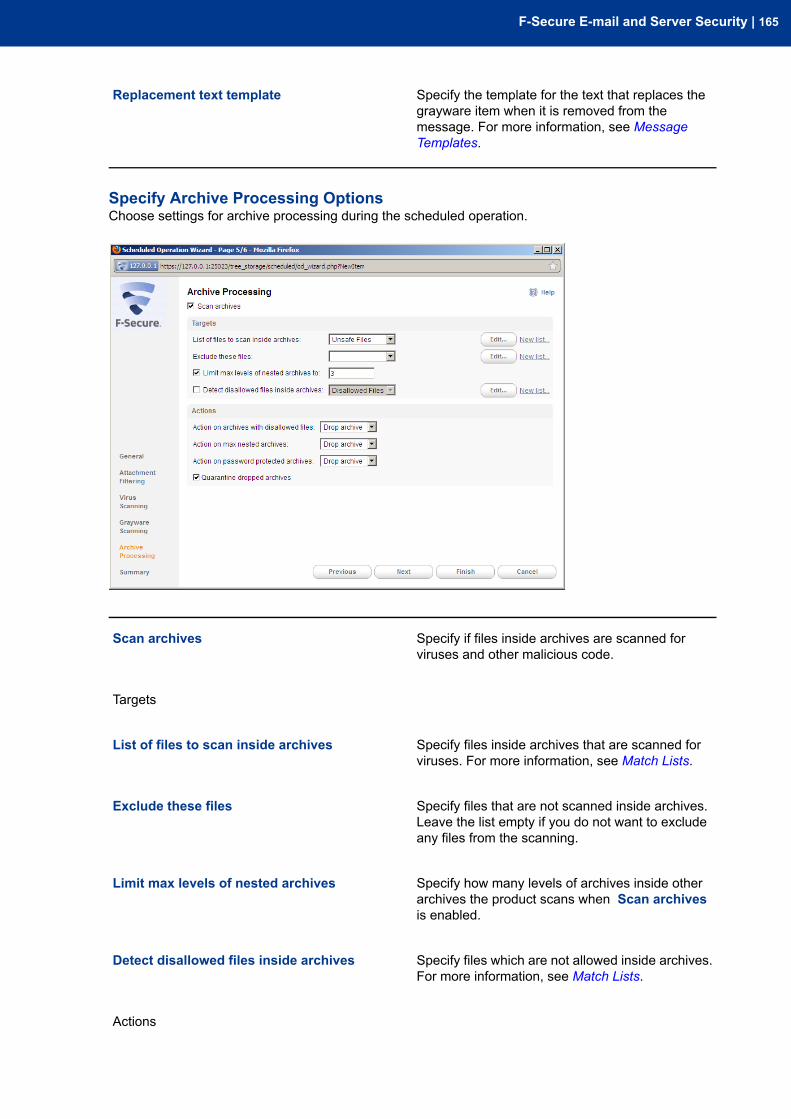
Specify the template for the text that replaces thegrayware item when it is removed from the
Replacement text template
message. For more information, see MessageTemplates.
Specify Archive Processing OptionsChoose settings for archive processing during the scheduled operation.
Specify if files inside archives are scanned forviruses and other malicious code.
Scan archives
Targets
Specify files inside archives that are scanned forviruses. For more information, see Match Lists.
List of files to scan inside archives
Specify files that are not scanned inside archives.Leave the list empty if you do not want to excludeany files from the scanning.
Exclude these files
Specify how many levels of archives inside otherarchives the product scans when Scan archivesis enabled.
Limit max levels of nested archives
Specify files which are not allowed inside archives.For more information, see Match Lists.
Detect disallowed files inside archives
Actions
F-Secure E-mail and Server Security | 165
Specify the action to take on archives which containdisallowed files.
Action on archives with disallowed files
Pass through - Deliver the message with thearchive to the recipient.
Drop archive - Remove the archive from themessage and deliver the message to the recipientwithout it.
Specify the action to take on archives with nestinglevels exceeding the upper level specified in theLimit max levels of nested archives setting.
Action on max nested archives
Pass through - Deliver the message with thearchive to the recipient.
Drop archive - Remove the archive from themessage and deliver the message to the recipientwithout it.
Specify the action to take on archives which areprotected with passwords. These archives can be
Action on password protected archives
opened only with a valid password, so the productcannot scan their content.
Pass through - Deliver the message with thepassword protected archive to the recipient.
Drop archive - Remove the password protectedarchive from the message and deliver the messageto the recipient without it.
Specify whether archives that are not delivered torecipients are placed in the quarantine.
Quarantine dropped archives
166 | Administration with Web Console
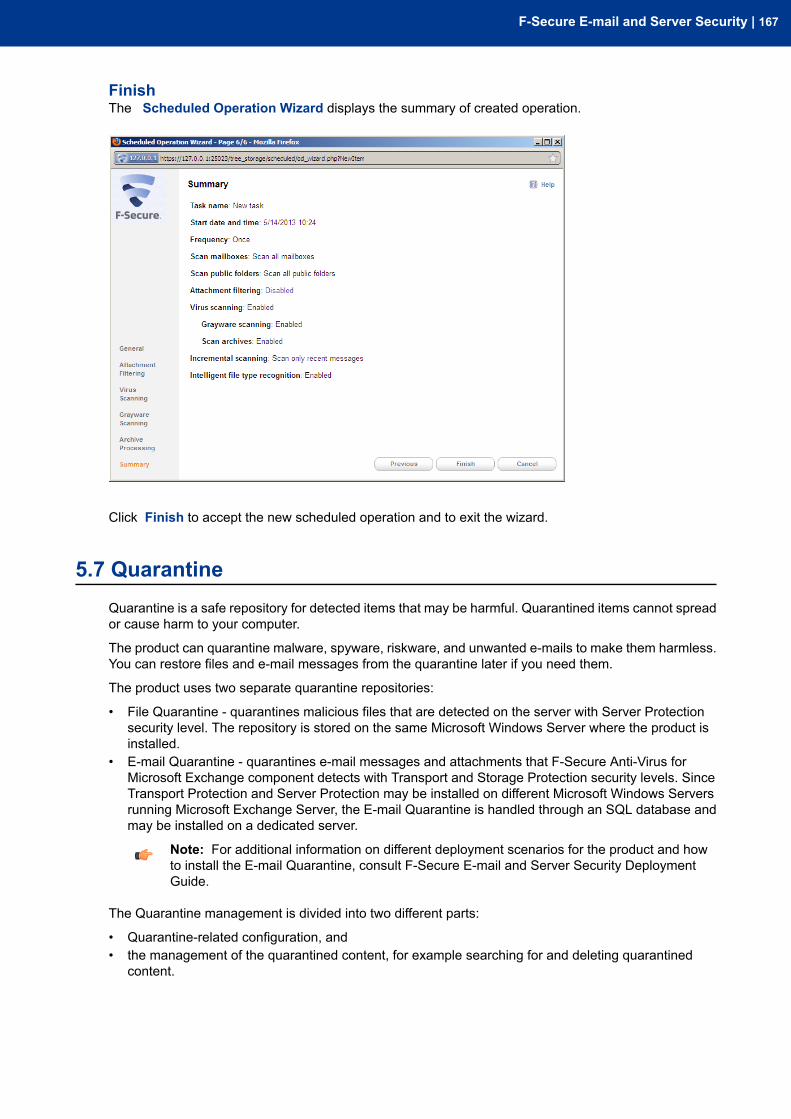
FinishThe Scheduled Operation Wizard displays the summary of created operation.
Click Finish to accept the new scheduled operation and to exit the wizard.
5.7 QuarantineQuarantine is a safe repository for detected items that may be harmful. Quarantined items cannot spreador cause harm to your computer.
The product can quarantine malware, spyware, riskware, and unwanted e-mails to make them harmless.You can restore files and e-mail messages from the quarantine later if you need them.
The product uses two separate quarantine repositories:
• File Quarantine - quarantines malicious files that are detected on the server with Server Protectionsecurity level. The repository is stored on the same Microsoft Windows Server where the product isinstalled.
• E-mail Quarantine - quarantines e-mail messages and attachments that F-Secure Anti-Virus forMicrosoft Exchange component detects with Transport and Storage Protection security levels. SinceTransport Protection and Server Protection may be installed on different Microsoft Windows Serversrunning Microsoft Exchange Server, the E-mail Quarantine is handled through an SQL database andmay be installed on a dedicated server.
Note: For additional information on different deployment scenarios for the product and howto install the E-mail Quarantine, consult F-Secure E-mail and Server Security DeploymentGuide.
The Quarantine management is divided into two different parts:
• Quarantine-related configuration, and• the management of the quarantined content, for example searching for and deleting quarantined
content.
F-Secure E-mail and Server Security | 167
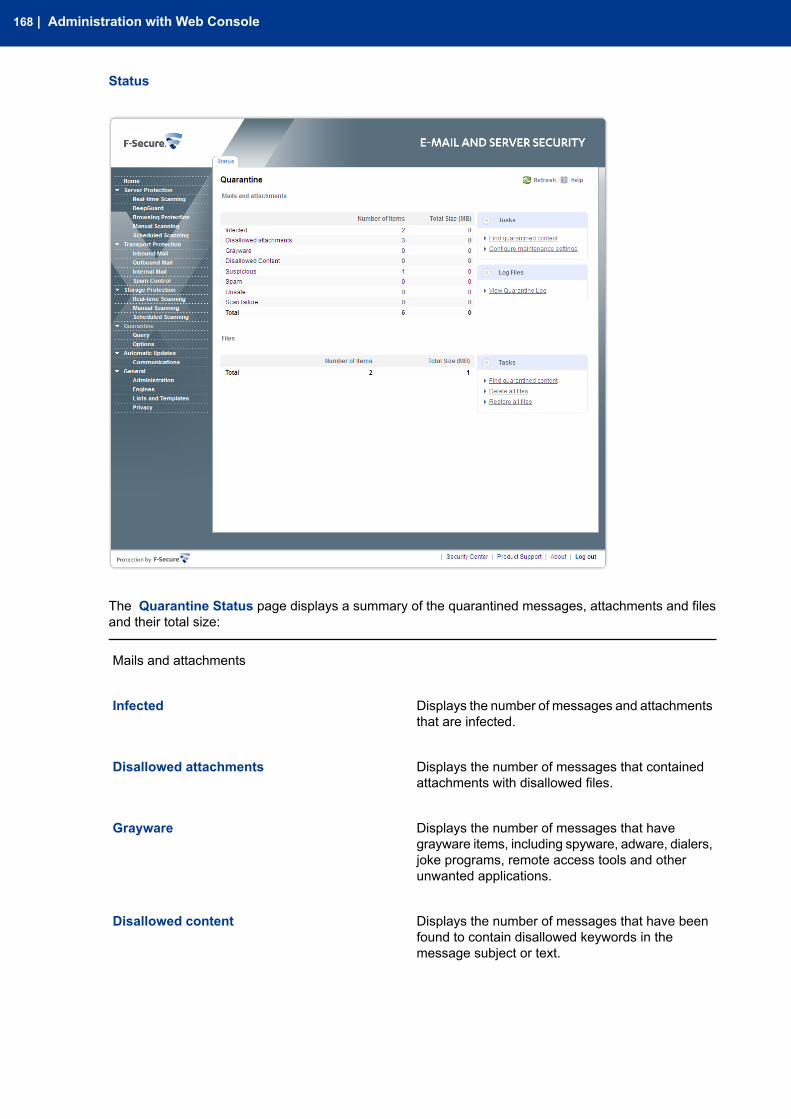
Status
The Quarantine Status page displays a summary of the quarantined messages, attachments and filesand their total size:
Mails and attachments
Displays the number of messages and attachmentsthat are infected.
Infected
Displays the number of messages that containedattachments with disallowed files.
Disallowed attachments
Displays the number of messages that havegrayware items, including spyware, adware, dialers,
Grayware
joke programs, remote access tools and otherunwanted applications.
Displays the number of messages that have beenfound to contain disallowed keywords in themessage subject or text.
Disallowed content
168 | Administration with Web Console
Displays the number of suspicious content found,for example password-protected archives, nestedarchives and malformed messages.
Suspicious
Displays the number of messages that are classifiedas spam.
Spam
Displays the number of messages that have beenidentified as unsafe; messages that contain patterns
Unsafe
that can be assumed to be a part of a spam or virusoutbreak
Displays the number of files that could not bescanned, for example severely corrupted files.
Scan failure
E-mail Quarantine Tasks
Click Find quarantined content to search for the quarantined e-mails and attachments.
Click Configure maintenance settings to configure settings for automatic reprocessing and cleanupitems in E-mail Quarantine.
Click View Quarantine Log to view E-mail Quarantine log file.
Files
Displays the number offiles found on the server
Total
that have beenquarantined.
File Quarantine Tasks
Click Find quarantined content to view general information on quarantined files in the File Quarantine.
Click Delete all files to delete all the quarantined files from the File Quarantine.
Click Restore all files to all the items from the File Quarantine. Restored items are moved back to theiroriginal location in your computer.
Important:
Do not restore any items from the quarantine unless you are sure that the items pose no threat.
5.7.1 QueryYou can use Query pages to search and manually handle the quarantined content.
Quarantined Mails and Attachments
With the Quarantine Query page, you can create different queries to search quarantined e-mails and fileattachments from the E-mail Quarantine database.
Quarantined Files
You can view the general information on the quarantined items in the Quarantined Files page. The pagedisplays a list of the first 100 items with the type of the quarantined items, their name, and the path wherethe files were installed.
F-Secure E-mail and Server Security | 169
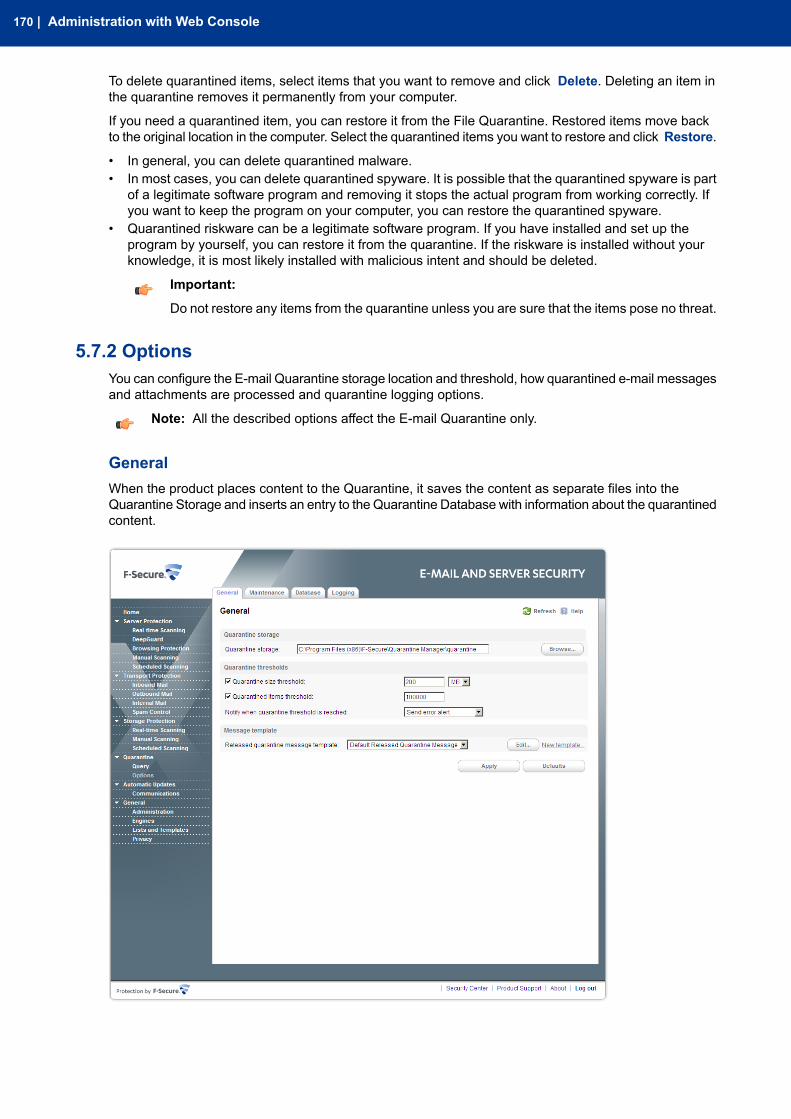
To delete quarantined items, select items that you want to remove and click Delete. Deleting an item inthe quarantine removes it permanently from your computer.
If you need a quarantined item, you can restore it from the File Quarantine. Restored items move backto the original location in the computer. Select the quarantined items you want to restore and click Restore.
• In general, you can delete quarantined malware.• In most cases, you can delete quarantined spyware. It is possible that the quarantined spyware is part
of a legitimate software program and removing it stops the actual program from working correctly. Ifyou want to keep the program on your computer, you can restore the quarantined spyware.
• Quarantined riskware can be a legitimate software program. If you have installed and set up theprogram by yourself, you can restore it from the quarantine. If the riskware is installed without yourknowledge, it is most likely installed with malicious intent and should be deleted.
Important:
Do not restore any items from the quarantine unless you are sure that the items pose no threat.
5.7.2 OptionsYou can configure the E-mail Quarantine storage location and threshold, how quarantined e-mail messagesand attachments are processed and quarantine logging options.
Note: All the described options affect the E-mail Quarantine only.
GeneralWhen the product places content to the Quarantine, it saves the content as separate files into theQuarantine Storage and inserts an entry to the Quarantine Database with information about the quarantinedcontent.
170 | Administration with Web Console
Quarantine storage
Specify the location of the E-mail Quarantinestorage. Before you change the location, seeMovingthe E-mail Quarantine Storage.
Quarantine storage
Note: Make sure that F-Secure Anti-Virusfor Microsoft Exchange service has writeaccess to this directory. Adjust the accessrights to the directory so that only theF-Secure Anti-Virus for Microsoft Exchangeservice and the local administrator canaccess files in the Quarantine.
Quarantine thresholds
Specify the critical size (in megabytes) of the E-mailQuarantine storage. If the specified value is
Quarantine size threshold
reached, the product sends an alert. The defaultvalue is 200. If zero (0) is specified, the size of theQuarantine is not checked. The allowed value rangeis from 0 to 10240.
Specify the critical number of items in theQuarantine storage. If the specified value is reached
Quarantined items threshold
or exceeded, the product sends an alert. If zero (0)is specified, the number of items in the Quarantinestorage is not checked. The default value is 100000items.
Specify how the administrator should be notifiedwhen the Quarantine Size Threshold and/or
Notify when quarantine threshold is reached
Quarantined Items Threshold are reached. No alertis sent if both thresholds are set to zero (0).
Message template
Specify the template for the message that is sentto the intended recipients when e-mail content is
Released quarantine message template
released from the quarantine. For more information,see Message Templates.
F-Secure E-mail and Server Security | 171

Quarantine Maintenance
When quarantined content is reprocessed, it is scanned again, and if it is found clean, it is sent to theintended recipients.
When removing quarantined messages from the quarantine, the product uses the currently configuredquarantine retention and cleanup settings.
Reprocess unsafe messages
Specify how often the product tries to reprocessunsafe messages that are retained in the E-mailQuarantine.
Automatically reprocess unsafe messages
Set the value to Disabled to process unsafemessages manually.
Specify how many times the product tries toreprocess unsafe messages that are retained in theE-mail Quarantine.
Max attempts to process unsafe messages
Specify the action on unsafe messages after themaximum number of reprocesses have beenattempted.
Final action on unsafe messages
Leave in Quarantine - Leave messages in theE-mail Quarantine and process them manually.
172 | Administration with Web Console
Release to Intended Recipients - Releasemessages from the E-mail Quarantine and sendthem to original recipients.
Quarantine retention and cleanup
Specify how long quarantined items should beretained in the E-mail Quarantine before they aredeleted.
Retain items in quarantine
Use the Quarantine Cleanup Exceptions table tochange the retention period for a particularQuarantine category.
Specify how often the storage should be cleaned ofold quarantined items.
Delete old quarantined items
Use the Quarantine Cleanup Exceptions table tochange the cleanup interval for a particularQuarantine category.
Specify separate quarantine retention period andcleanup interval for any Quarantine category. If
Exceptions
retention period and cleanup interval for a categoryare not defined in this table, then the default ones(specified above) are used.
Active - Enable or disable the selected entry in thetable.
Quarantine category - Select a category theretention period or cleanup interval of which youwant to modify. The categories are:
• Infected• Suspicious• Disallowed attachment• Disallowed content• Spam• Scan failure• Unsafe• Grayware
Retention period - Specify an exception to thedefault retention period for the selected Quarantinecategory.
Cleanup interval - Specify an exception to thedefault cleanup interval for the selected Quarantinecategory.
F-Secure E-mail and Server Security | 173
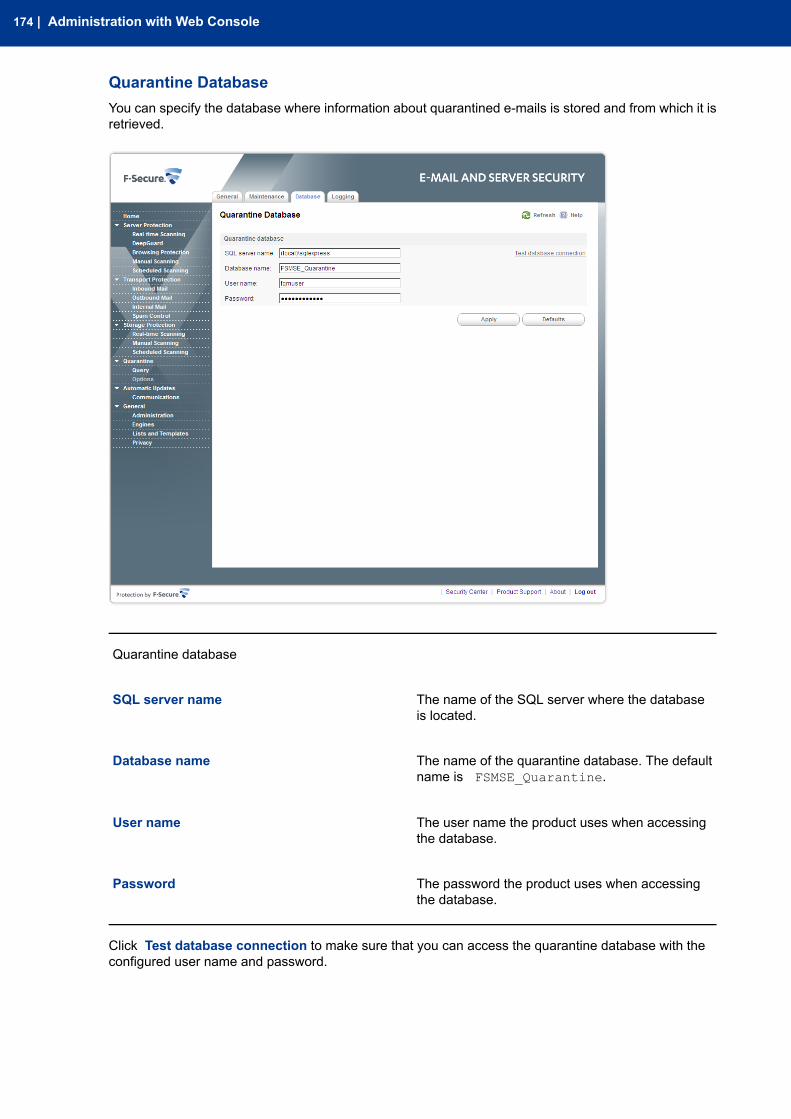
Quarantine DatabaseYou can specify the database where information about quarantined e-mails is stored and from which it isretrieved.
Quarantine database
The name of the SQL server where the databaseis located.
SQL server name
The name of the quarantine database. The defaultname is FSMSE_Quarantine.
Database name
The user name the product uses when accessingthe database.
User name
The password the product uses when accessingthe database.
Password
Click Test database connection to make sure that you can access the quarantine database with theconfigured user name and password.
174 | Administration with Web Console
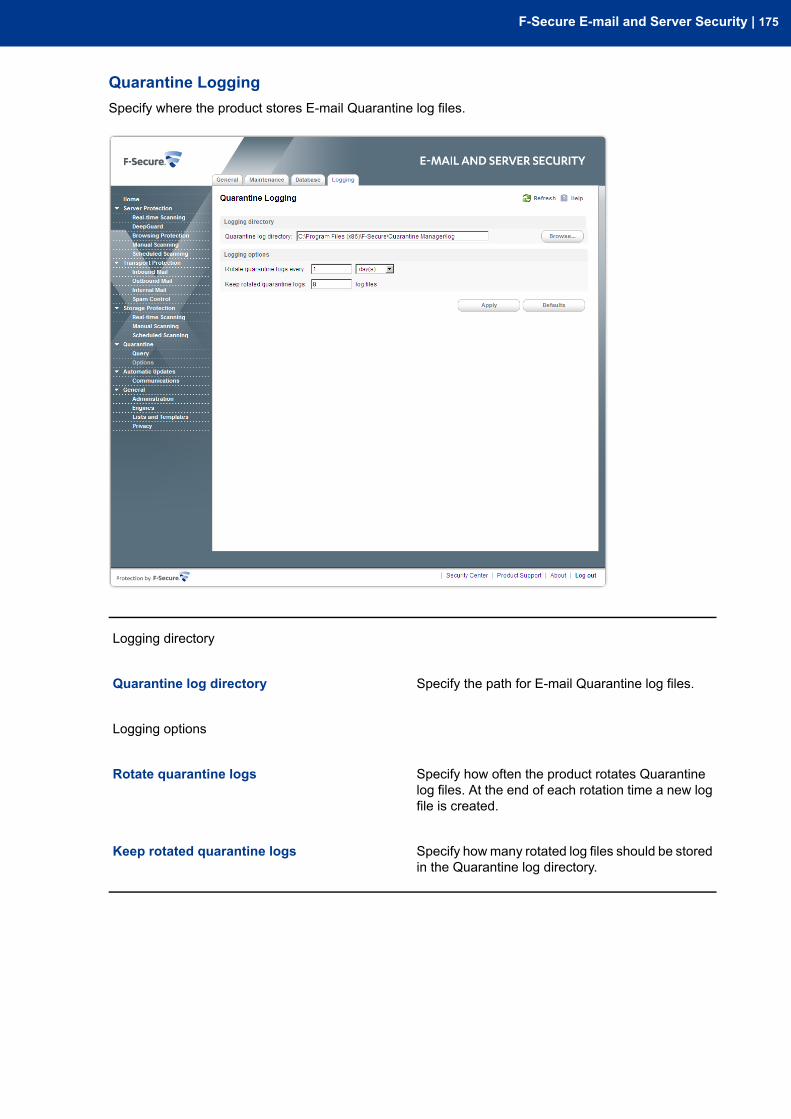
Quarantine LoggingSpecify where the product stores E-mail Quarantine log files.
Logging directory
Specify the path for E-mail Quarantine log files.Quarantine log directory
Logging options
Specify how often the product rotates Quarantinelog files. At the end of each rotation time a new logfile is created.
Rotate quarantine logs
Specify howmany rotated log files should be storedin the Quarantine log directory.
Keep rotated quarantine logs
F-Secure E-mail and Server Security | 175
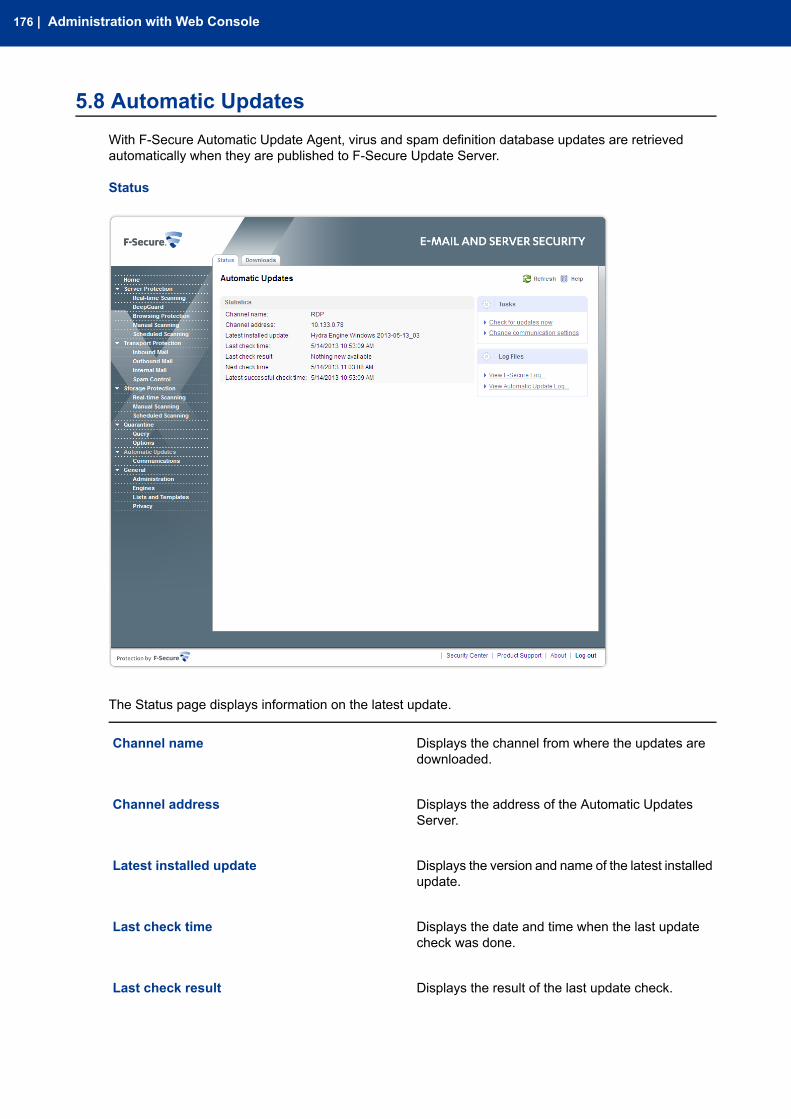
5.8 Automatic UpdatesWith F-Secure Automatic Update Agent, virus and spam definition database updates are retrievedautomatically when they are published to F-Secure Update Server.
Status
The Status page displays information on the latest update.
Displays the channel from where the updates aredownloaded.
Channel name
Displays the address of the Automatic UpdatesServer.
Channel address
Displays the version and name of the latest installedupdate.
Latest installed update
Displays the date and time when the last updatecheck was done.
Last check time
Displays the result of the last update check.Last check result
176 | Administration with Web Console
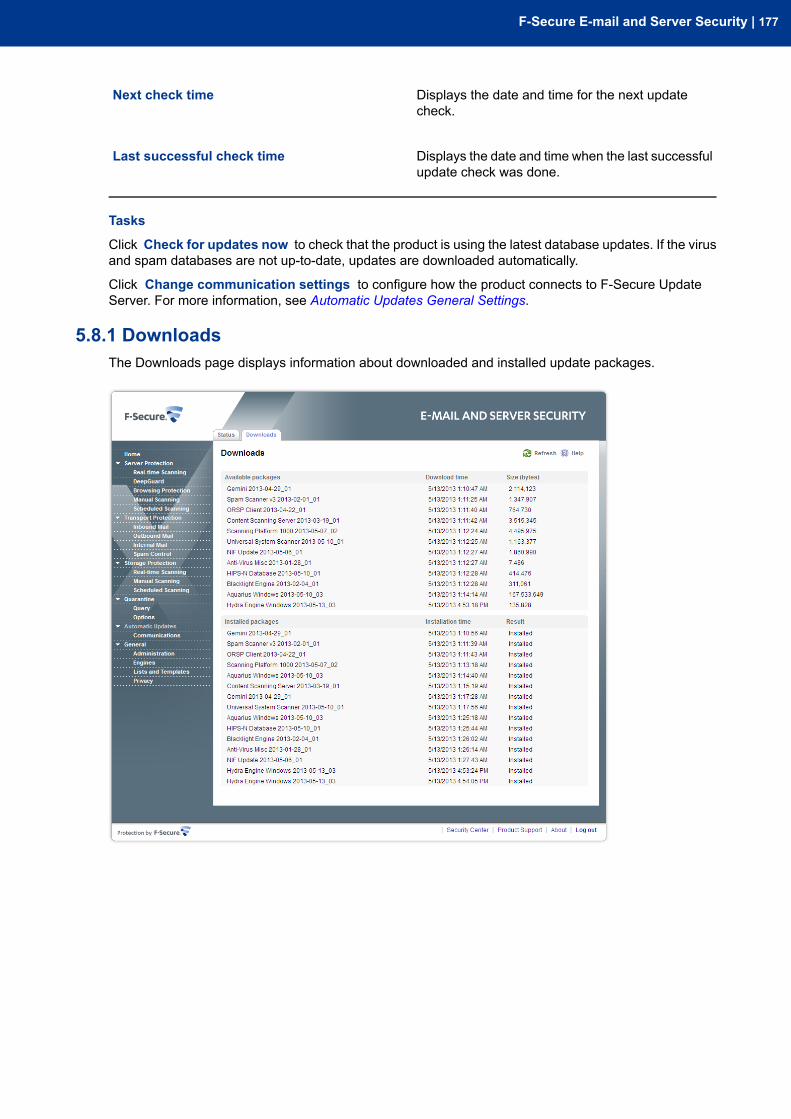
Displays the date and time for the next updatecheck.
Next check time
Displays the date and time when the last successfulupdate check was done.
Last successful check time
Tasks
Click Check for updates now to check that the product is using the latest database updates. If the virusand spam databases are not up-to-date, updates are downloaded automatically.
Click Change communication settings to configure how the product connects to F-Secure UpdateServer. For more information, see Automatic Updates General Settings.
5.8.1 DownloadsThe Downloads page displays information about downloaded and installed update packages.
F-Secure E-mail and Server Security | 177
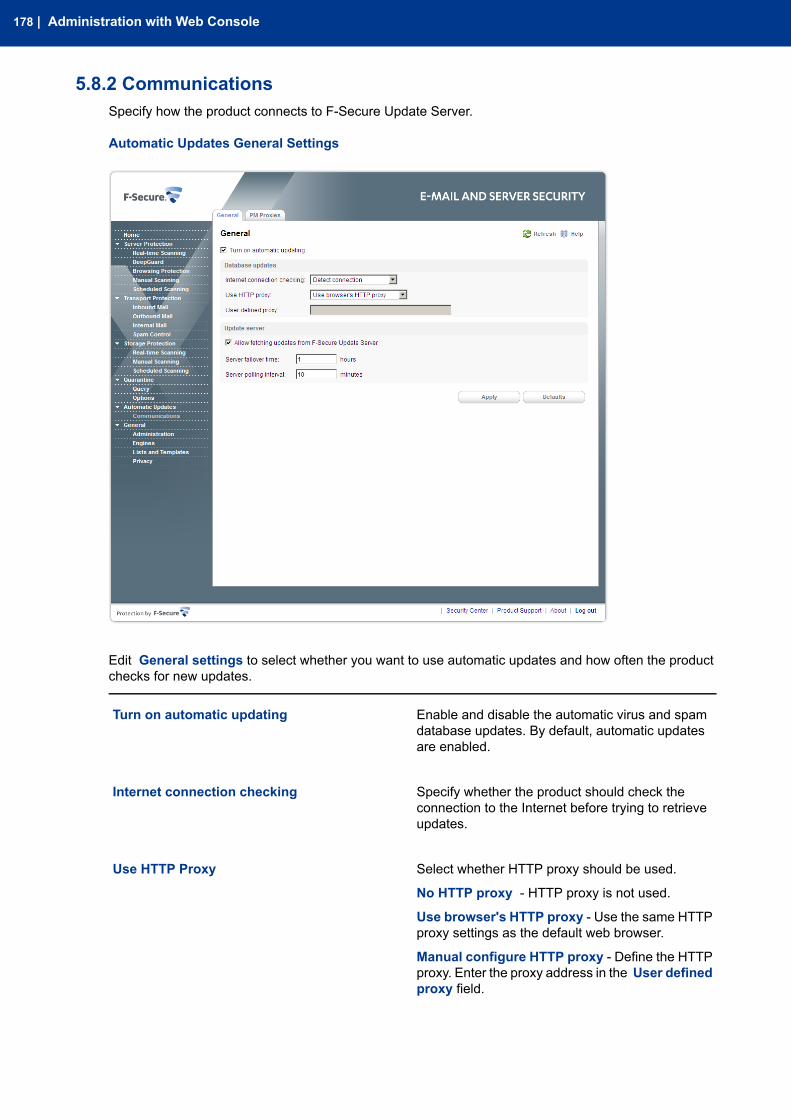
5.8.2 CommunicationsSpecify how the product connects to F-Secure Update Server.
Automatic Updates General Settings
Edit General settings to select whether you want to use automatic updates and how often the productchecks for new updates.
Enable and disable the automatic virus and spamdatabase updates. By default, automatic updatesare enabled.
Turn on automatic updating
Specify whether the product should check theconnection to the Internet before trying to retrieveupdates.
Internet connection checking
Select whether HTTP proxy should be used.Use HTTP Proxy
No HTTP proxy - HTTP proxy is not used.
Use browser's HTTP proxy - Use the same HTTPproxy settings as the default web browser.
Manual configure HTTP proxy - Define the HTTPproxy. Enter the proxy address in the User definedproxy field.
178 | Administration with Web Console
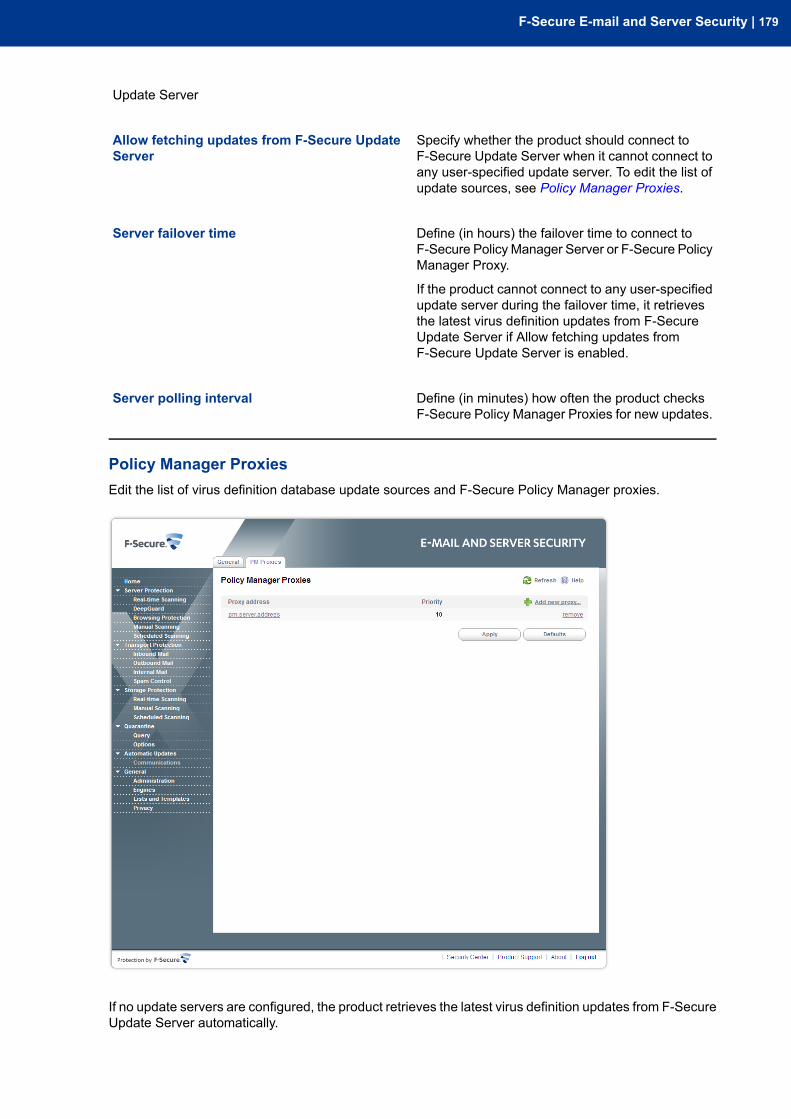
Update Server
Specify whether the product should connect toF-Secure Update Server when it cannot connect to
Allow fetching updates from F-Secure UpdateServer
any user-specified update server. To edit the list ofupdate sources, see Policy Manager Proxies.
Define (in hours) the failover time to connect toF-Secure Policy Manager Server or F-Secure PolicyManager Proxy.
Server failover time
If the product cannot connect to any user-specifiedupdate server during the failover time, it retrievesthe latest virus definition updates from F-SecureUpdate Server if Allow fetching updates fromF-Secure Update Server is enabled.
Define (in minutes) how often the product checksF-Secure Policy Manager Proxies for new updates.
Server polling interval
Policy Manager ProxiesEdit the list of virus definition database update sources and F-Secure Policy Manager proxies.
If no update servers are configured, the product retrieves the latest virus definition updates from F-SecureUpdate Server automatically.
F-Secure E-mail and Server Security | 179

To add a new update source address to the list, follow these instructions:
1. Click Add new proxy to add the new entry to the list.2. Enter the URL of the update source.3. Edit the priority of the update source.
The priority numbers are used to define the order in which the host tries to connect servers. Virusdefinition updates are downloaded from the primary sources first, secondary update sources can beused as a backup.
The product connects to the source with the smallest priority number first (1). If the connection to thatsource fails, it tries to connect to the source with the next smallest number (2) until the connectionsucceeds.
4. Click OK to add the new update source to the list.
5.9 General Server Properties
The Host information displays the following details of the host:
• WINS name• DNS names• IP addresses• Unique ID
In the centralized management mode, the page displays the following details of the F-Secure PolicyManager:
• Management server• Last connection
180 | Administration with Web Console
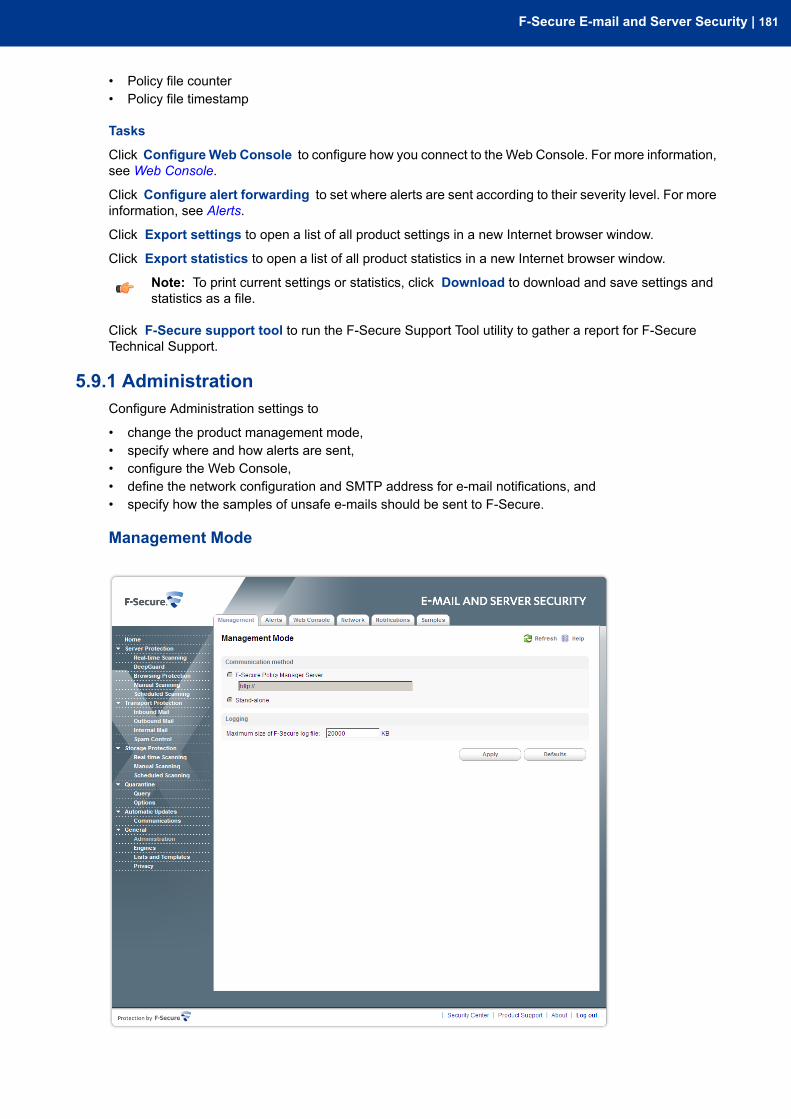
• Policy file counter• Policy file timestamp
Tasks
Click ConfigureWeb Console to configure how you connect to theWeb Console. For more information,see Web Console.
Click Configure alert forwarding to set where alerts are sent according to their severity level. For moreinformation, see Alerts.
Click Export settings to open a list of all product settings in a new Internet browser window.
Click Export statistics to open a list of all product statistics in a new Internet browser window.
Note: To print current settings or statistics, click Download to download and save settings andstatistics as a file.
Click F-Secure support tool to run the F-Secure Support Tool utility to gather a report for F-SecureTechnical Support.
5.9.1 AdministrationConfigure Administration settings to
• change the product management mode,• specify where and how alerts are sent,• configure the Web Console,• define the network configuration and SMTP address for e-mail notifications, and• specify how the samples of unsafe e-mails should be sent to F-Secure.
Management Mode
F-Secure E-mail and Server Security | 181
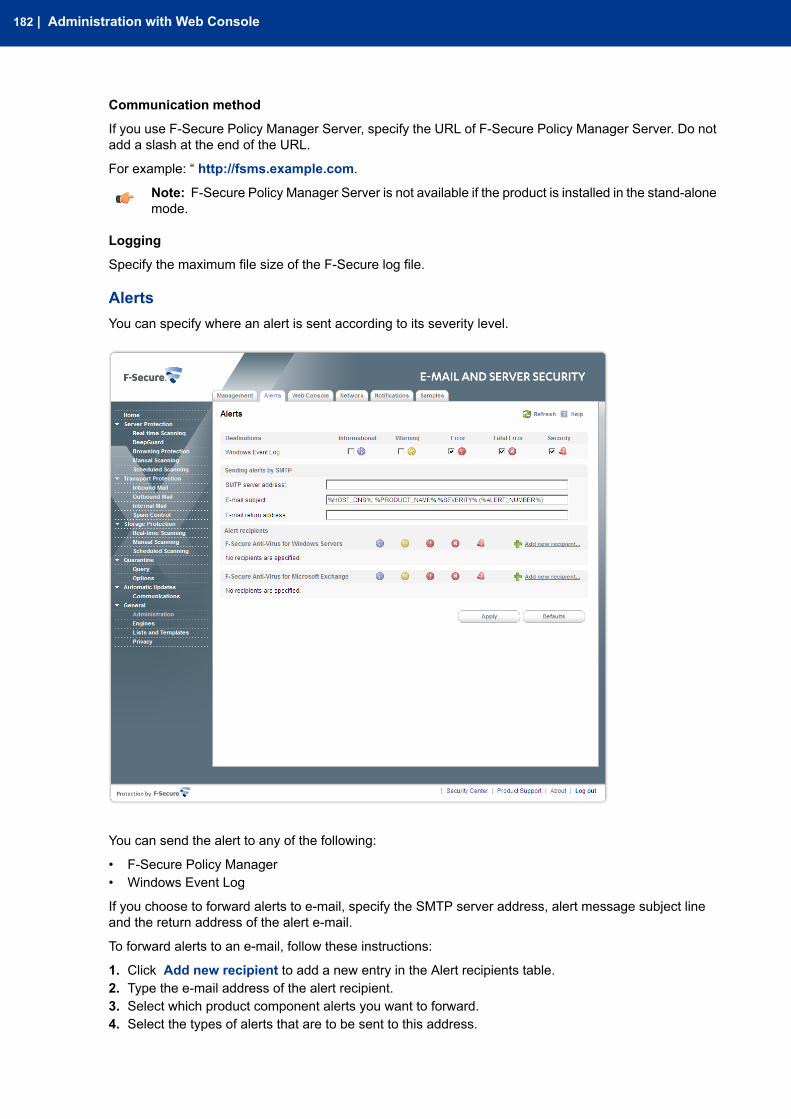
Communication method
If you use F-Secure Policy Manager Server, specify the URL of F-Secure Policy Manager Server. Do notadd a slash at the end of the URL.
For example: “ http://fsms.example.com.
Note: F-Secure Policy Manager Server is not available if the product is installed in the stand-alonemode.
Logging
Specify the maximum file size of the F-Secure log file.
AlertsYou can specify where an alert is sent according to its severity level.
You can send the alert to any of the following:
• F-Secure Policy Manager• Windows Event Log
If you choose to forward alerts to e-mail, specify the SMTP server address, alert message subject lineand the return address of the alert e-mail.
To forward alerts to an e-mail, follow these instructions:
1. Click Add new recipient to add a new entry in the Alert recipients table.2. Type the e-mail address of the alert recipient.3. Select which product component alerts you want to forward.4. Select the types of alerts that are to be sent to this address.
182 | Administration with Web Console
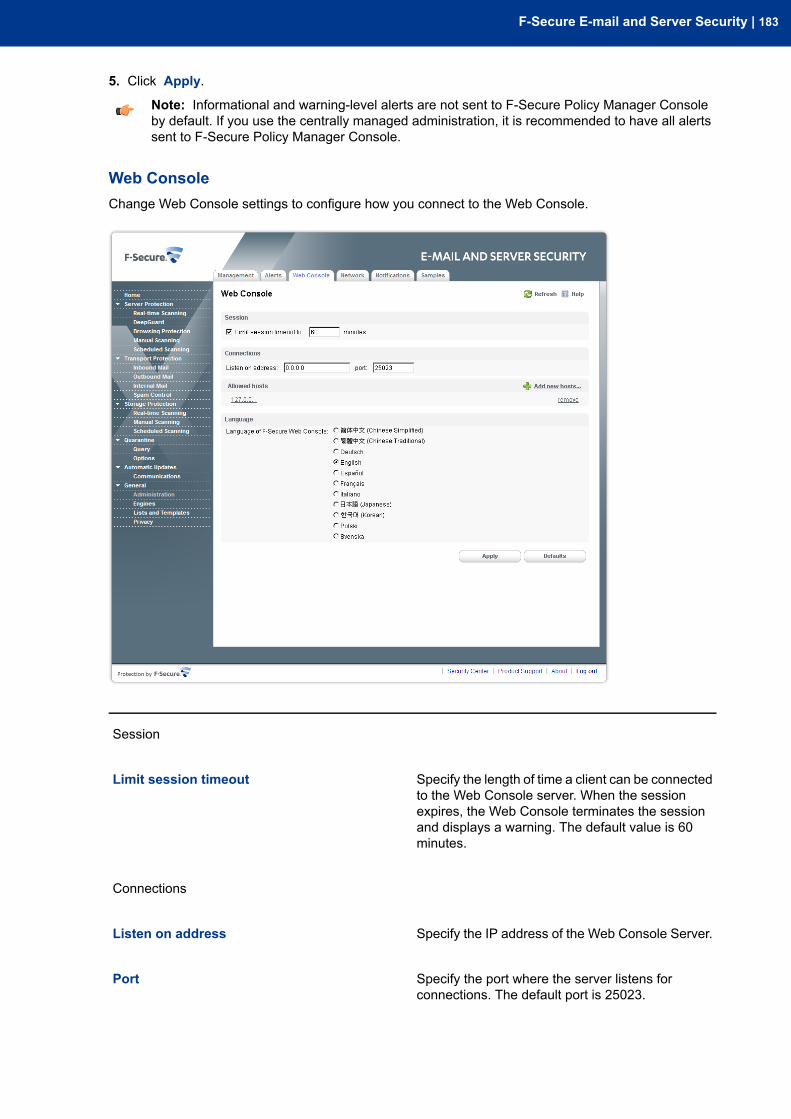
5. Click Apply.
Note: Informational and warning-level alerts are not sent to F-Secure Policy Manager Consoleby default. If you use the centrally managed administration, it is recommended to have all alertssent to F-Secure Policy Manager Console.
Web ConsoleChange Web Console settings to configure how you connect to the Web Console.
Session
Specify the length of time a client can be connectedto the Web Console server. When the session
Limit session timeout
expires, the Web Console terminates the sessionand displays a warning. The default value is 60minutes.
Connections
Specify the IP address of the Web Console Server.Listen on address
Specify the port where the server listens forconnections. The default port is 25023.
Port
F-Secure E-mail and Server Security | 183
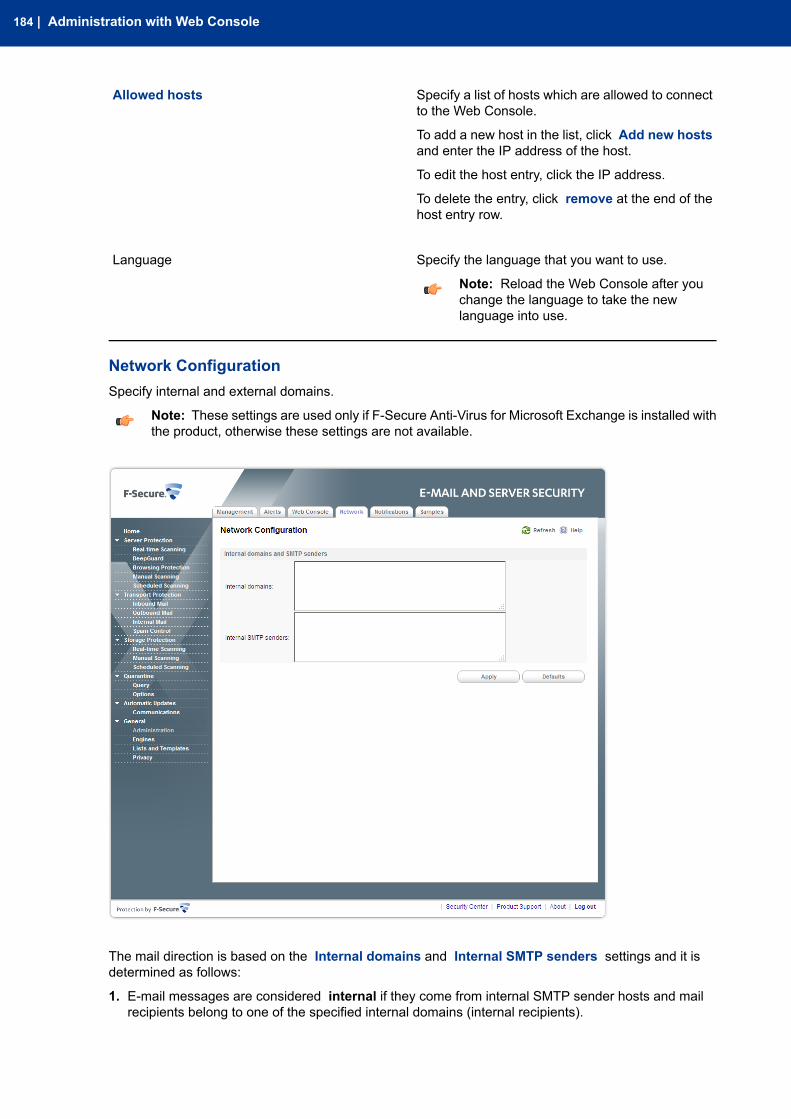
Specify a list of hosts which are allowed to connectto the Web Console.
Allowed hosts
To add a new host in the list, click Add new hostsand enter the IP address of the host.
To edit the host entry, click the IP address.
To delete the entry, click remove at the end of thehost entry row.
Specify the language that you want to use.Language
Note: Reload the Web Console after youchange the language to take the newlanguage into use.
Network ConfigurationSpecify internal and external domains.
Note: These settings are used only if F-Secure Anti-Virus for Microsoft Exchange is installed withthe product, otherwise these settings are not available.
The mail direction is based on the Internal domains and Internal SMTP senders settings and it isdetermined as follows:
1. E-mail messages are considered internal if they come from internal SMTP sender hosts and mailrecipients belong to one of the specified internal domains (internal recipients).
184 | Administration with Web Console
2. E-mail messages are considered outbound if they come from internal SMTP sender hosts and mailrecipients do not belong to the specified internal domains (external recipients).
3. E-mail messages that come from hosts that are not defined as internal SMTP sender hosts areconsidered inbound.
4. E-mail messages submitted via MAPI or Pickup Folder are treated as if they are sent from the internalSMTP sender host.
Note: If e-mail messages come from internal SMTP sender hosts and contain both internaland external recipients, messages are split and processed as internal and outbound respectively.
Note:
On Microsoft Exchange Server 2003, internal messages which are submitted via MAPI orPickup Folder are not delivered via transport level. Therefore, those messages do not passTransport Protection and they are checked on the storage level only.
To scan or filter messages from internal hosts on Microsoft Exchange Server 2003, usecorresponding real-time scanning settings in the storage protection section.
Specify internal domains.Internal Domains
Separate each domain name with a space. You canuse an asterisk (*) as a wildcard. For example,*example.com internal.example.net
Specify the IP addresses of hosts that belong toyour organization. Specify all hosts within the
Internal SMTP senders
organization that sendmessages to Exchange Edgeor Hub servers via SMTP as Internal SMTPSenders.
Separate each IP address with a space. An IPaddress range can be defined as:
• a network/netmask pair (for example,10.1.0.0/255.255.0.0), or
• a network/nnn CIDR specification (for example,10.1.0.0/16).
You can use an asterisk (*) to match any numberor dash (-) to define a range of numbers. Forexample,
Note: If end-users in the organization useother than Microsoft Outlook e-mail clientto send and receive e-mail, it isrecommended to specify all end-userworkstations as Internal SMTP Senders.
Note: If the organization has ExchangeEdge and Hub servers, the server with theHub role installed should be added to theInternal SMTP Sender on the server wherethe Edge role is installed.
Important:
Do not specify the server where the Edgerole is installed as Internal SMTP Sender.
F-Secure E-mail and Server Security | 185
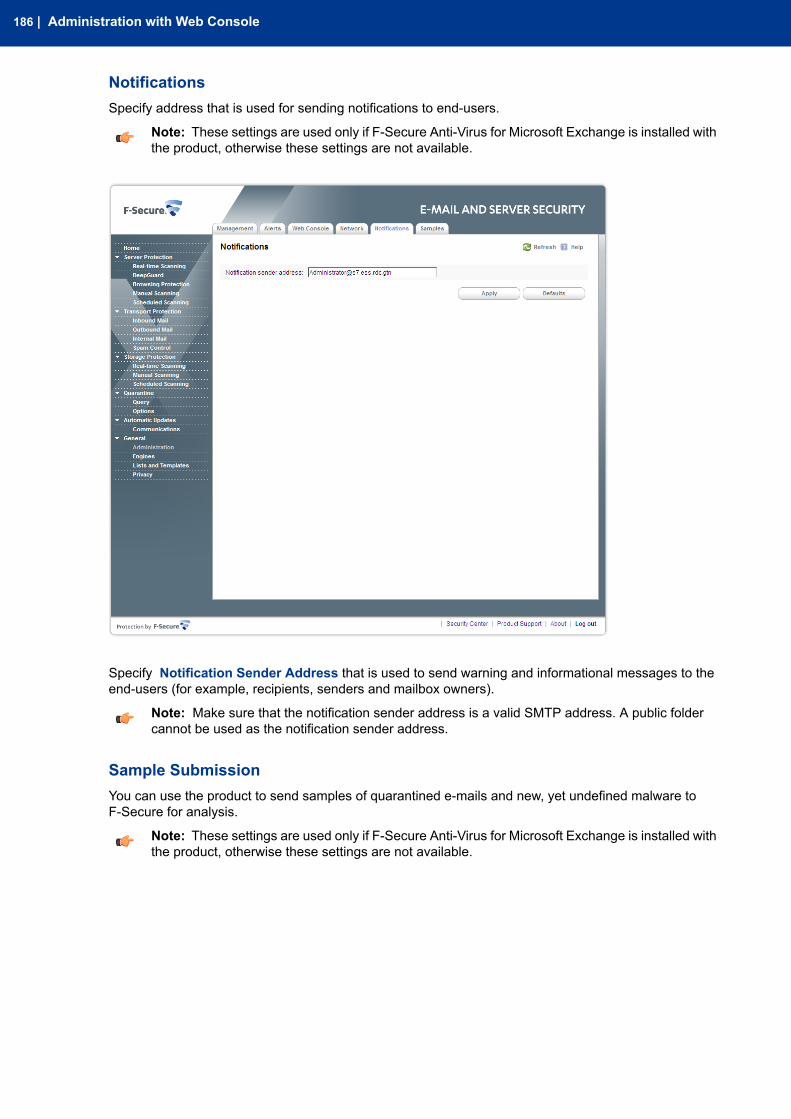
NotificationsSpecify address that is used for sending notifications to end-users.
Note: These settings are used only if F-Secure Anti-Virus for Microsoft Exchange is installed withthe product, otherwise these settings are not available.
Specify Notification Sender Address that is used to send warning and informational messages to theend-users (for example, recipients, senders and mailbox owners).
Note: Make sure that the notification sender address is a valid SMTP address. A public foldercannot be used as the notification sender address.
Sample SubmissionYou can use the product to send samples of quarantined e-mails and new, yet undefined malware toF-Secure for analysis.
Note: These settings are used only if F-Secure Anti-Virus for Microsoft Exchange is installed withthe product, otherwise these settings are not available.
186 | Administration with Web Console
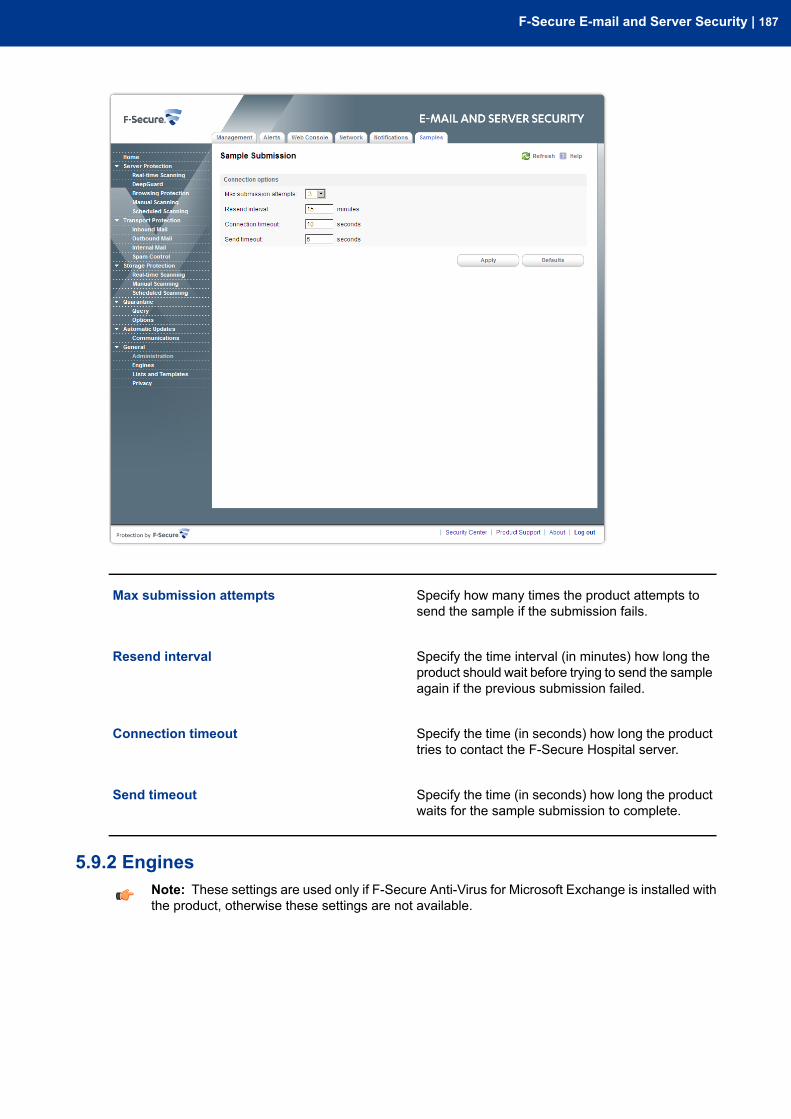
Specify how many times the product attempts tosend the sample if the submission fails.
Max submission attempts
Specify the time interval (in minutes) how long theproduct should wait before trying to send the sampleagain if the previous submission failed.
Resend interval
Specify the time (in seconds) how long the producttries to contact the F-Secure Hospital server.
Connection timeout
Specify the time (in seconds) how long the productwaits for the sample submission to complete.
Send timeout
5.9.2 EnginesNote: These settings are used only if F-Secure Anti-Virus for Microsoft Exchange is installed withthe product, otherwise these settings are not available.
F-Secure E-mail and Server Security | 187
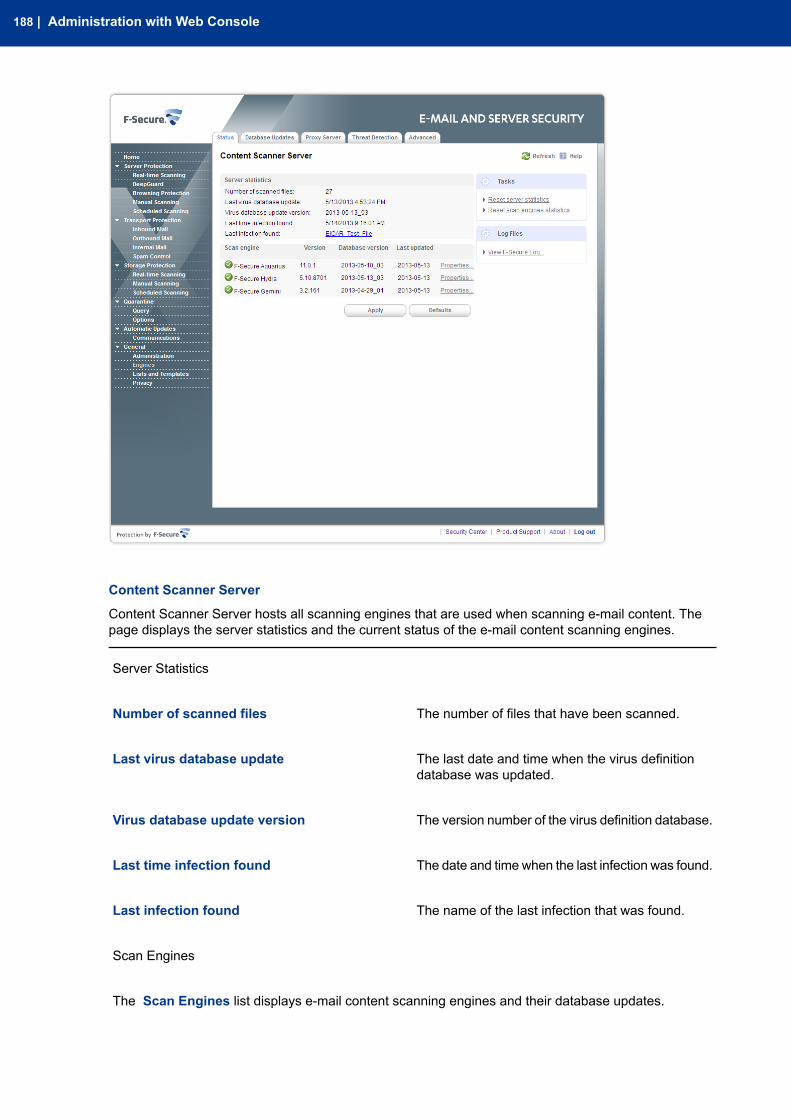
Content Scanner Server
Content Scanner Server hosts all scanning engines that are used when scanning e-mail content. Thepage displays the server statistics and the current status of the e-mail content scanning engines.
Server Statistics
The number of files that have been scanned.Number of scanned files
The last date and time when the virus definitiondatabase was updated.
Last virus database update
The version number of the virus definition database.Virus database update version
The date and time when the last infection was found.Last time infection found
The name of the last infection that was found.Last infection found
Scan Engines
The Scan Engines list displays e-mail content scanning engines and their database updates.
188 | Administration with Web Console
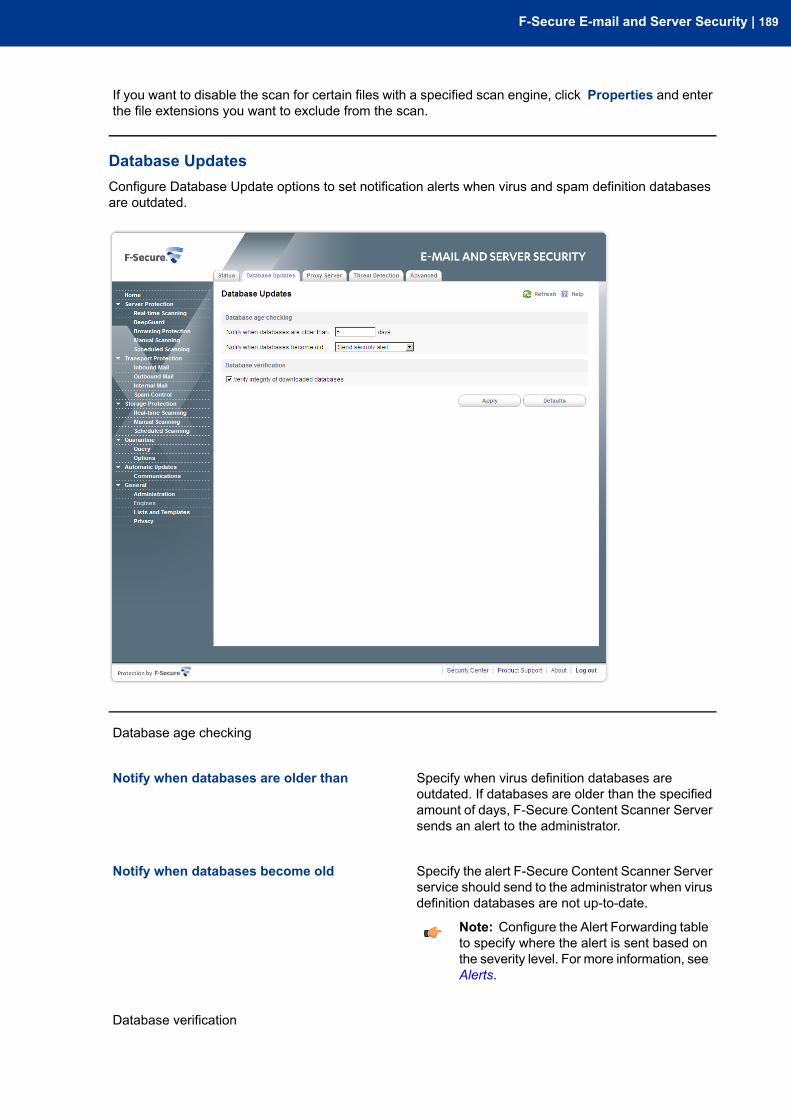
If you want to disable the scan for certain files with a specified scan engine, click Properties and enterthe file extensions you want to exclude from the scan.
Database UpdatesConfigure Database Update options to set notification alerts when virus and spam definition databasesare outdated.
Database age checking
Specify when virus definition databases areoutdated. If databases are older than the specified
Notify when databases are older than
amount of days, F-Secure Content Scanner Serversends an alert to the administrator.
Specify the alert F-Secure Content Scanner Serverservice should send to the administrator when virusdefinition databases are not up-to-date.
Notify when databases become old
Note: Configure the Alert Forwarding tableto specify where the alert is sent based onthe severity level. For more information, seeAlerts.
Database verification
F-Secure E-mail and Server Security | 189
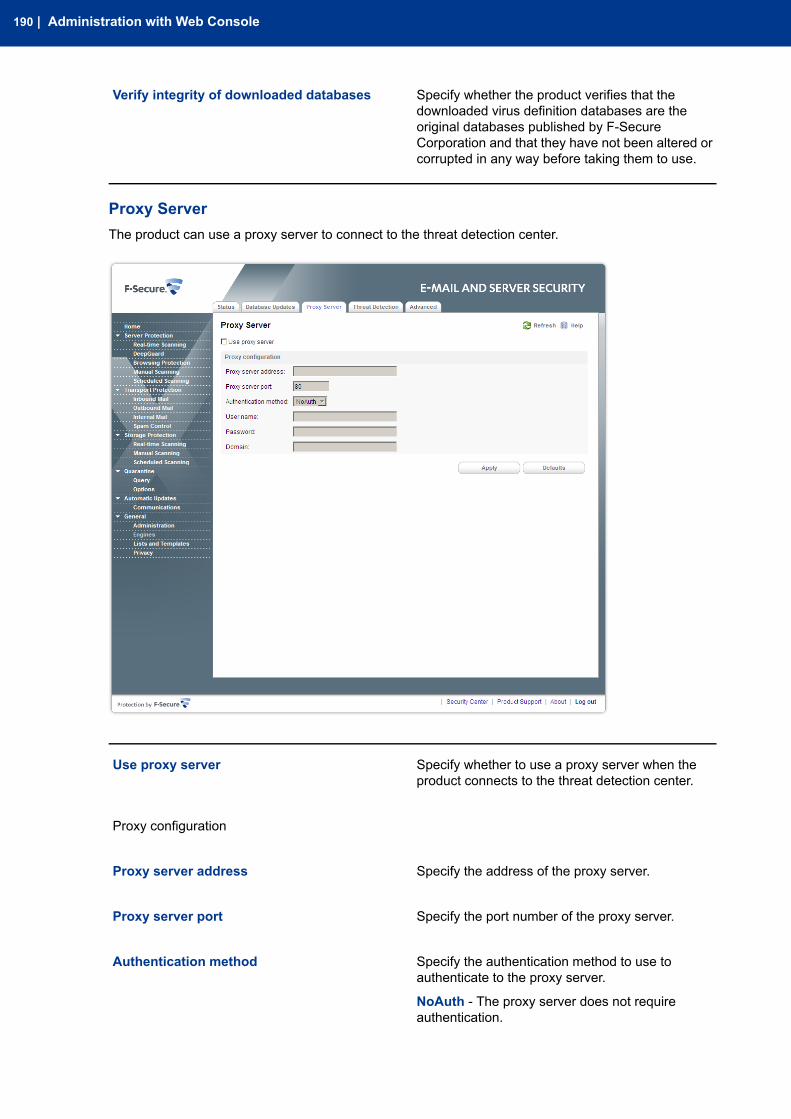
Specify whether the product verifies that thedownloaded virus definition databases are the
Verify integrity of downloaded databases
original databases published by F-SecureCorporation and that they have not been altered orcorrupted in any way before taking them to use.
Proxy ServerThe product can use a proxy server to connect to the threat detection center.
Specify whether to use a proxy server when theproduct connects to the threat detection center.
Use proxy server
Proxy configuration
Specify the address of the proxy server.Proxy server address
Specify the port number of the proxy server.Proxy server port
Specify the authentication method to use toauthenticate to the proxy server.
Authentication method
NoAuth - The proxy server does not requireauthentication.
190 | Administration with Web Console

Basic - The proxy uses the basic authenticationscheme.
NTLM - The proxy uses NTLM authenticationscheme.
Specify the user name for the proxy serverauthentication.
User name
Specify the password for the proxy serverauthentication.
Password
Specify the domain name for the proxy serverauthentication.
Domain
Note: The proxy authentication settings can be configured with the product Web Console only.
Threat DetectionThe product can identify spam and virus outbreak patterns from messages.
Cache
F-Secure E-mail and Server Security | 191

Specify the maximum number of patterns to cachefor the virus outbreak detection service. By default,the cache size is 10000 cached patterns.
VOD cache size
Specify the maximum number of patterns to cachefor spam detection service. By default, the cachesize is 10000 cached patterns.
Class cache size
Increasing cache sizes may increase the threatdetection performance but it requires more diskspace and may degrade the threat detection rate.Cache sizes can be disabled (set the size to 0) fortroubleshooting purposes.
Click Clear cache to clear the detection servicecache.
Spam Scanning
Enable or disable the threat detection service whilescanning inbound messages for spam.
Spam detection
Specify the action for messages when the threatdetection center cannot be contacted and the threatdetection engine cannot classify the message.
Action on connection failure
Pass through - The message is passed throughwithout scanning it for spam.
Heuristic scanning - Check the message usingspam heuristics.
Specify networks and hosts in themail relay networkwhich can be trusted not to be operated by
Trusted networks
spammers and do not have open relays or openproxies.
Define the network as a network/netmask pair(10.1.0.0/255.255.0.0), with the network/nnn CIDRspecification (10.1.0.0/16), or use ‘*’ wildcard tomatch any number and ‘-’ to define a range ofnumbers (172.16.*.1, 172.16.4.10-110).
192 | Administration with Web Console
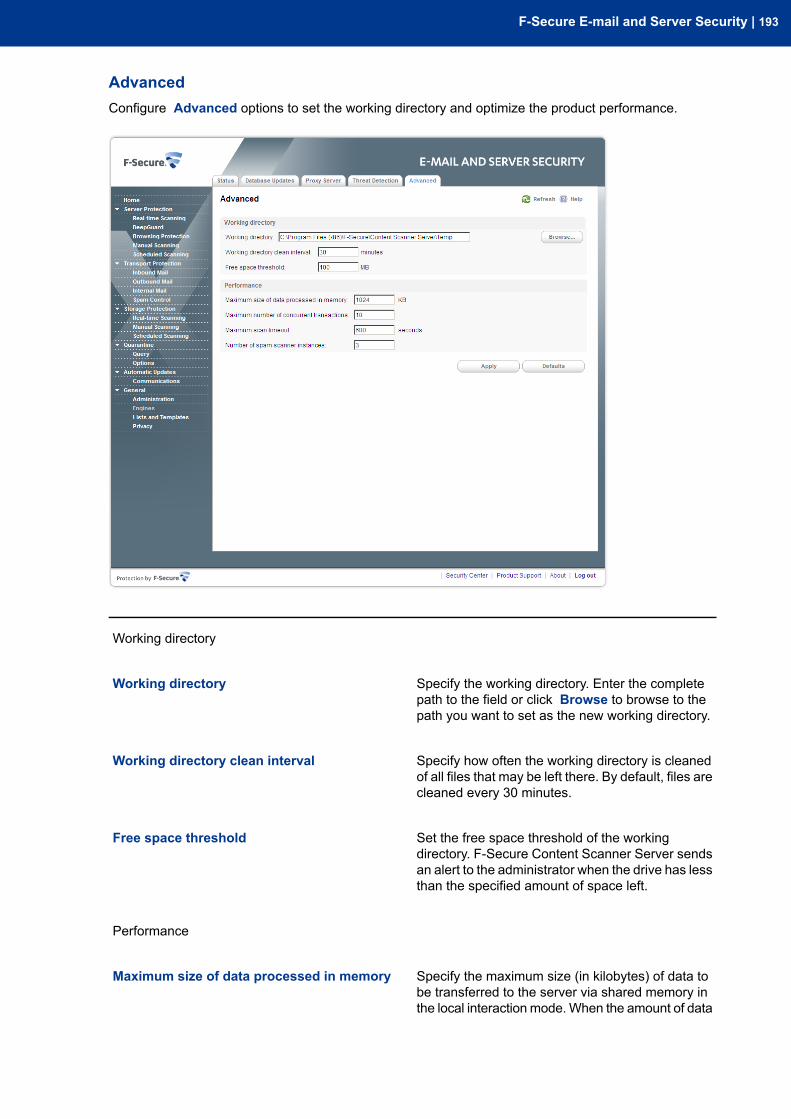
AdvancedConfigure Advanced options to set the working directory and optimize the product performance.
Working directory
Specify the working directory. Enter the completepath to the field or click Browse to browse to thepath you want to set as the new working directory.
Working directory
Specify how often the working directory is cleanedof all files that may be left there. By default, files arecleaned every 30 minutes.
Working directory clean interval
Set the free space threshold of the workingdirectory. F-Secure Content Scanner Server sends
Free space threshold
an alert to the administrator when the drive has lessthan the specified amount of space left.
Performance
Specify the maximum size (in kilobytes) of data tobe transferred to the server via shared memory in
Maximum size of data processed in memory
the local interaction mode.When the amount of data
F-Secure E-mail and Server Security | 193
exceeds the specified limit, a local temporary filewill be used for data transfer.
If the option is set to zero (0), all data transfers viashared memory are disabled.
The setting is ignored if the local interaction modeis disabled.
Specify how many files the product should processsimultaneously.
Maximum number of concurrent transactions
Specify how long a scan task can be carried outbefore it is automatically cancelled.
Maximum scan timeout
Specify the number of Spam Scanner instances tobe created and used for spam analysis. As one
Number of spam scanner instances
instance of the spam scanner is capable ofprocessing one mail message at a time, this settingdefines how many messages undergo the spamanalysis simultaneously.
Note: You have to restart the ContentScanner Server service after you changethis setting to take the new setting into use.
Important:
Spam analysis is a processor-intensiveoperation and each spam scanner instancetakes approximately 25MB of memory(process fsavsd.exe). Do not increase thenumber of instances unless the product isrunning on a powerful computer.
5.9.3 Lists and TemplatesNote: These settings are used only if F-Secure Anti-Virus for Microsoft Exchange is installed withthe product, otherwise these settings are not available.
194 | Administration with Web Console

Match ListsMatch lists are lists of file name patterns, keywords, or e-mail addresses that can be used with certainproduct settings.
Click the name of an existing match list to edit the list or Add new list to create a new match list.
Select the match list you want to edit. If you arecreating a new match list, specify the name for thenew match list.
List name
Specify whether the list contains keywords, filepatterns or e-mail addresses.
Type
Specify file names, extensions, keywords or e-mailaddresses that the match list contains. You can usewildcards.
Filter
Note: To add multiple patterns to the filter,start each item from a new line.
F-Secure E-mail and Server Security | 195
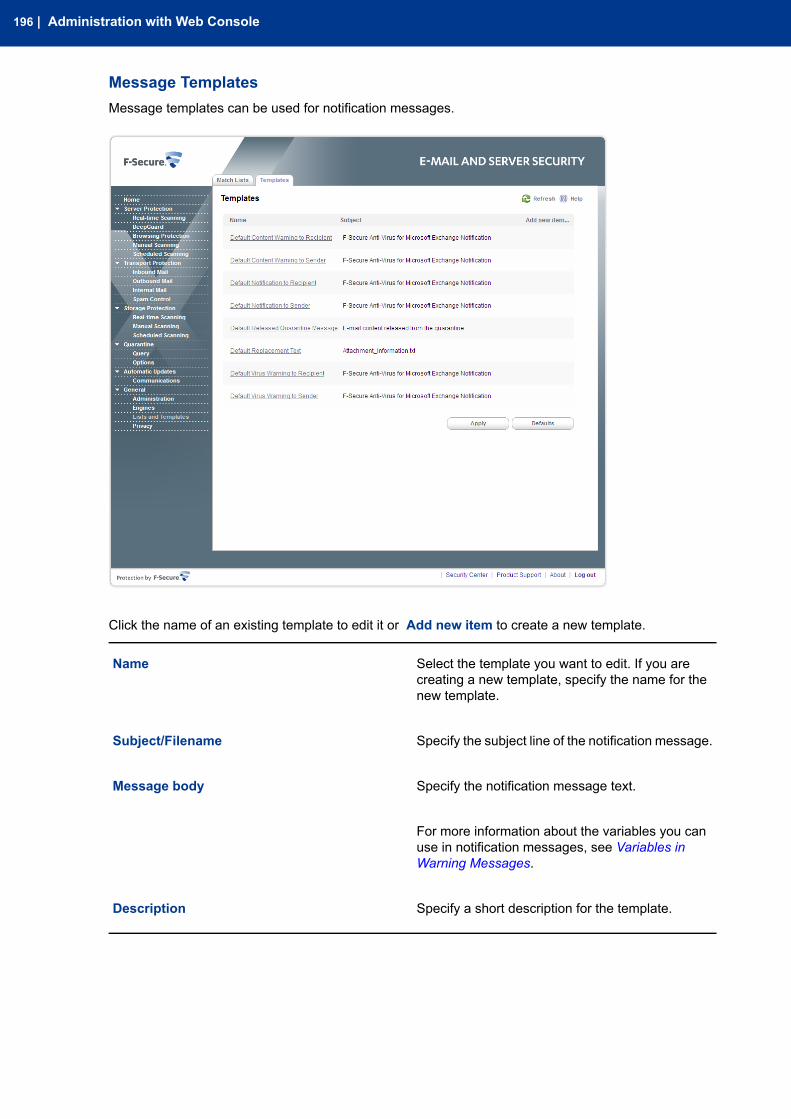
Message TemplatesMessage templates can be used for notification messages.
Click the name of an existing template to edit it or Add new item to create a new template.
Select the template you want to edit. If you arecreating a new template, specify the name for thenew template.
Name
Specify the subject line of the notification message.Subject/Filename
Specify the notification message text.Message body
For more information about the variables you canuse in notification messages, see Variables inWarning Messages.
Specify a short description for the template.Description
196 | Administration with Web Console
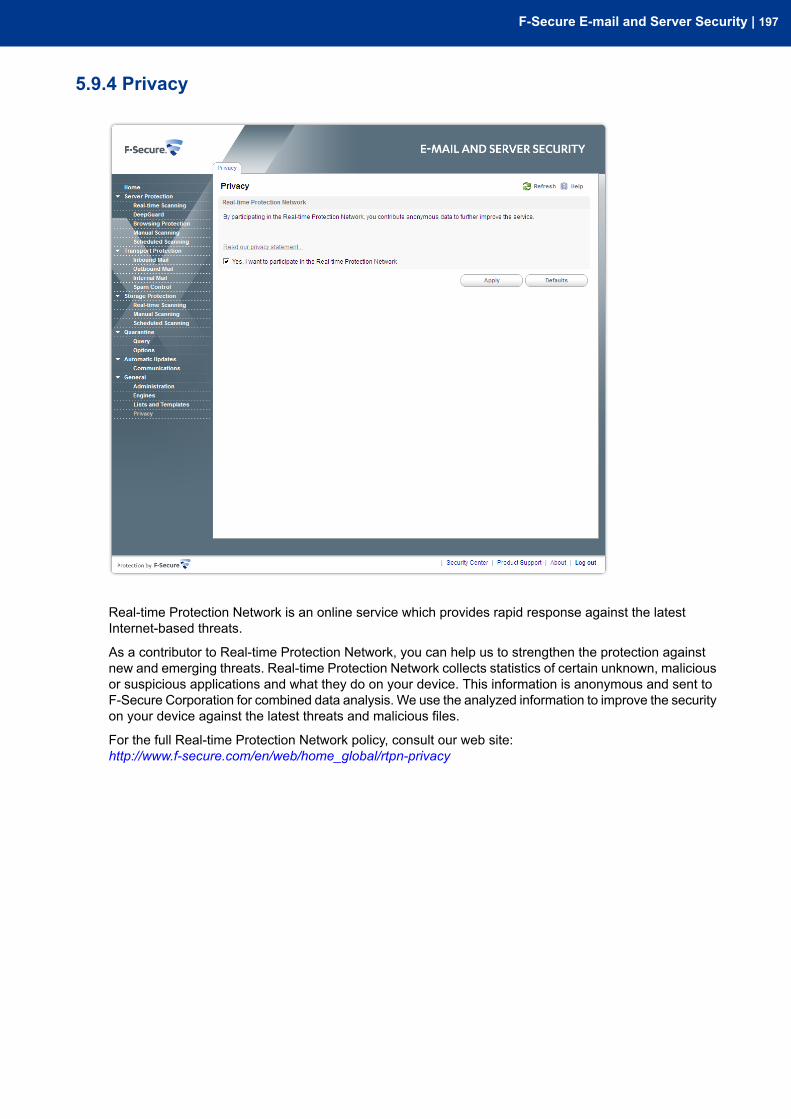
5.9.4 Privacy
Real-time Protection Network is an online service which provides rapid response against the latestInternet-based threats.
As a contributor to Real-time Protection Network, you can help us to strengthen the protection againstnew and emerging threats. Real-time Protection Network collects statistics of certain unknown, maliciousor suspicious applications and what they do on your device. This information is anonymous and sent toF-Secure Corporation for combined data analysis. We use the analyzed information to improve the securityon your device against the latest threats and malicious files.
For the full Real-time Protection Network policy, consult our web site:http://www.f-secure.com/en/web/home_global/rtpn-privacy
F-Secure E-mail and Server Security | 197
E-mail Quarantine Management
Topics:
• Introduction• Configuring E-mail Quarantine
Options• Quarantine Status• Searching the Quarantined
Content• Query Results Page• Quarantine Operations• Moving the E-mail Quarantine
Storage
198 | E-mail Quarantine Management
6.1 IntroductionYou can manage and search quarantined mails with the Web Console. You can search for quarantinedcontent by using different search criteria, including the quarantine ID, recipient and sender address, thetime period during which the message was quarantined, and so on. You can reprocess and deletemessages, and specify storage and automatic deletion times based on the reason for quarantining themessage.
If you have multiple product installations, you can manage the quarantined content on all of them fromone single Web Console.
The E-mail Quarantine consists of:
• Quarantine Database, and• Quarantine Storage.
Quarantine Database
The E-mail Quarantine database contains information about the quarantined messages and attachments.If there are several product installations in the network, they can either have their own quarantinedatabases, or they can use a common quarantine database. An SQL database server is required for thequarantine database.
Note: For more information on the SQL database servers that can be used for deploying thequarantine database, consult the product Deployment Guide.
Quarantine Storage
The E-mail Quarantine storage where the quarantined messages and attachments are stored is locatedon the server where the product is installed. If there are several installations of the product in the network,they all have their own storages. The storages are accessible from a single Web Console.
6.1.1 Quarantine ReasonsThe E-mail Quarantine storage can store:
• Messages and attachments that are infected and cannot be automatically disinfected. (Infected)• Suspicious content, for example password-protected archives, nested archives and malformed
messages. (Suspicious)• Messages and attachments that have been blocked by their filename or filename extension. (Disallowed
attachment)• Messages that contain disallowed words in the subject line or message body. (Disallowed content)• Messages that are considered as spam. (Spam)• Messages that contain grayware. (Grayware)• Files that could not be scanned, for example severely corrupted files. (Scan failure)• Messages that contain patterns that can be assumed to be a part of a spam or virus outbreak. (Unsafe)
6.2 Configuring E-mail Quarantine OptionsIn stand-alone installations, all the quarantine settings can be configured on the Quarantine page inthe Web Console. For more information on the settings, see Quarantine.
In centrally managed installations, the quarantine settings are configured with F-Secure Policy Managerin the F-Secure Anti-Virus for Microsoft Exchange / Settings / Quarantine branch.For more information, see Quarantine.
The actual quarantine management is done through the Web Console.
F-Secure E-mail and Server Security | 199
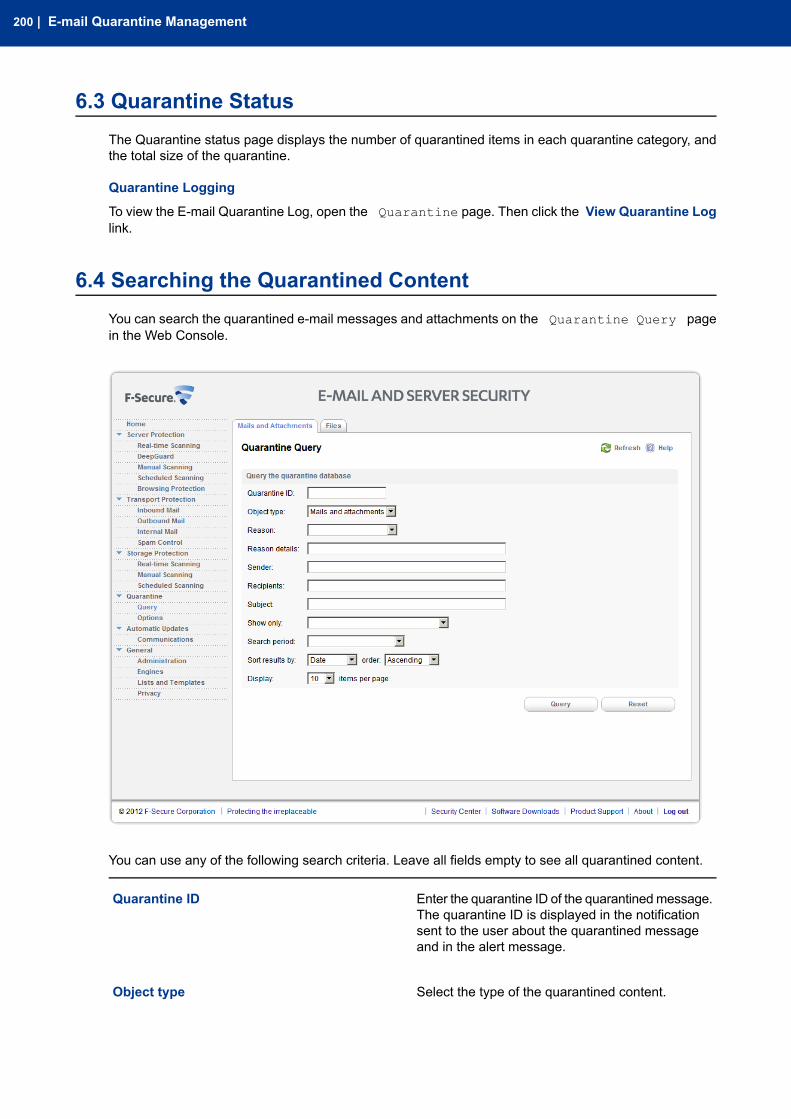
6.3 Quarantine StatusThe Quarantine status page displays the number of quarantined items in each quarantine category, andthe total size of the quarantine.
Quarantine Logging
To view the E-mail Quarantine Log, open the Quarantine page. Then click the View Quarantine Loglink.
6.4 Searching the Quarantined ContentYou can search the quarantined e-mail messages and attachments on the Quarantine Query pagein the Web Console.
You can use any of the following search criteria. Leave all fields empty to see all quarantined content.
Enter the quarantine ID of the quarantinedmessage.The quarantine ID is displayed in the notification
Quarantine ID
sent to the user about the quarantined messageand in the alert message.
Select the type of the quarantined content.Object type
200 | E-mail Quarantine Management
Mails and attachments - Search for bothquarantined mails and attachments.
Attachment - Search for quarantined attachments.
Mail - Search for quarantined mails.
Select the quarantining reason from the drop-downmenu. For more information, see QuarantineReasons.
Reason
Specify details about the scanning or processingresults that caused the message to be quarantined.For example:
Reason details
The message is infected - specify the name of theinfection that was found in an infected message.
Enter the e-mail address of the message sender.You can only search for one address at a time, butyou can widen the search by using the wildcards.
Sender
Enter the e-mail address of the message recipient.Recipients
Enter the message subject to be used as a searchcriteria.
Subject
Enter the Message ID of the quarantined mail.Message ID
Enter the address of the sender mail server or client.Sender Host
Note: You can specify Message ID andSender Host only when you search forquarantined mails.
Enter the file name of the quarantined attachment.Name
Enter the location of the mailbox or public folderwhere the quarantined attachment was found.
Location
Note: You can specify Name and Locationonly when you search for quarantinedattachments.
You can use this option to view the current statusof messages that you have set to be reprocessed,
Show only
released or deleted. Because processing a largenumber of e-mails may take time, you can use thisoption to monitor how the operation is progressing.
The options available are:
Unprocessed e-mails - Displays only e-mailsthat the administrator has not set to be released,reprocessed or deleted.
F-Secure E-mail and Server Security | 201
E-mails to be released - Displays onlye-mails that are currently set to be released, buthave not been released yet.
E-mails to be reprocessed - Displays onlye-mails that are currently set to be reprocessed, buthave not been reprocessed yet.
E-mails to be released or reprocessed - Displayse-mails that are currently set to be reprocessed orreleased, but have not been reprocessed orreleased yet.
Select the time period when the data has beenquarantined. Select Exact start and end dates to
Search period
specify the date and time (year, month, day, hour,minute) when the data has been quarantined.
Specify how the search results are sorted byselecting one of the options in the Sort Results
Sort Results
drop-down listbox: based on Date. Sender.Recipients. Subject or Reason.
Select how many items you want to view per page.Display
1. Click Query to start the search. The Quarantine Query Results page is displayed once thequery is completed.
2. If you want to clear all the fields on the Query page, click Reset.
Using Wildcards
You can use the following SQL wildcards in the quarantine queries:
ExplanationWildcard
Any string of zero or more characters.%
Any single character._ (underscore)
Any single character within the specified range ([a-f])or set ([abcdef]).
[ ]
Any single character not within the specified range([^a-f]) or set ([^abcdef]).
[^]
Note: If you want to search for '%', '_' and '[' as regular symbols in one of the fields, you mustenclose them into square brackets: '[%]', '[_]', '[[]'
202 | E-mail Quarantine Management
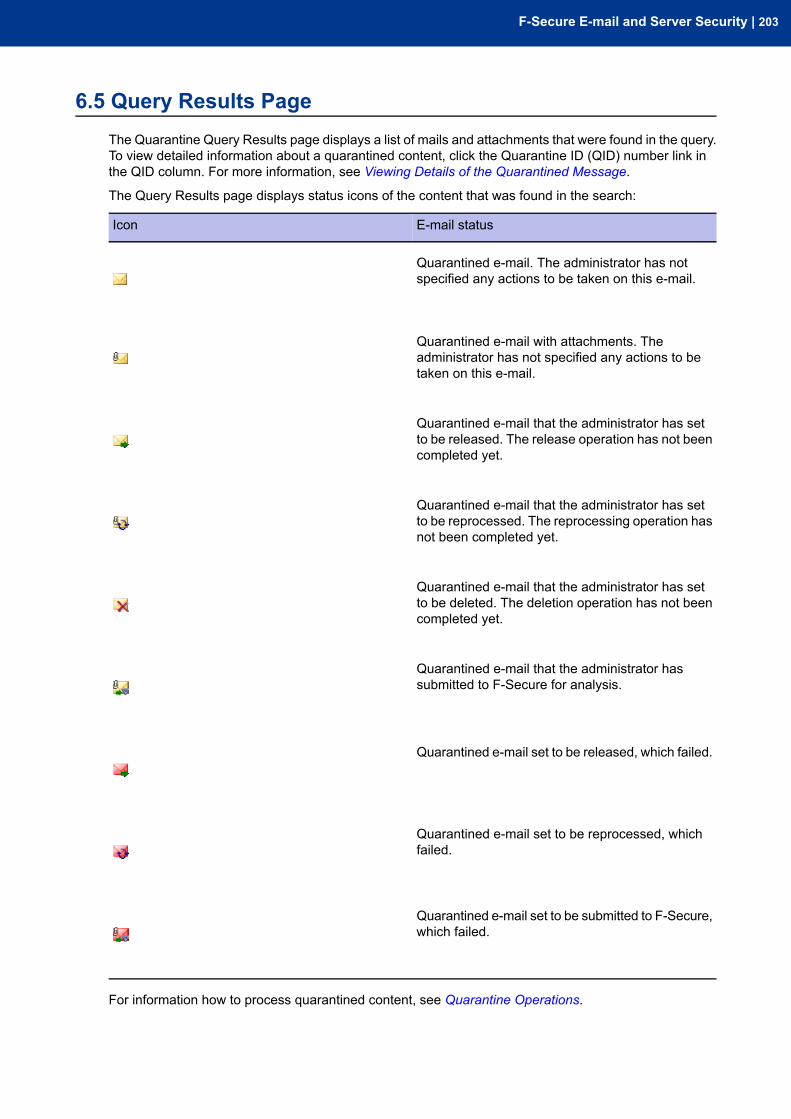
6.5 Query Results PageThe Quarantine Query Results page displays a list of mails and attachments that were found in the query.To view detailed information about a quarantined content, click the Quarantine ID (QID) number link inthe QID column. For more information, see Viewing Details of the Quarantined Message.
The Query Results page displays status icons of the content that was found in the search:
E-mail statusIcon
Quarantined e-mail. The administrator has notspecified any actions to be taken on this e-mail.
Quarantined e-mail with attachments. Theadministrator has not specified any actions to betaken on this e-mail.
Quarantined e-mail that the administrator has setto be released. The release operation has not beencompleted yet.
Quarantined e-mail that the administrator has setto be reprocessed. The reprocessing operation hasnot been completed yet.
Quarantined e-mail that the administrator has setto be deleted. The deletion operation has not beencompleted yet.
Quarantined e-mail that the administrator hassubmitted to F-Secure for analysis.
Quarantined e-mail set to be released, which failed.
Quarantined e-mail set to be reprocessed, whichfailed.
Quarantined e-mail set to be submitted to F-Secure,which failed.
For information how to process quarantined content, see Quarantine Operations.
F-Secure E-mail and Server Security | 203
6.5.1 Viewing Details of the Quarantined MessageTo view the details of a quarantined message or attachment, do the following:
1. On the Query Search Results page, click the Quarantine ID (QID) number link in the QID column.2. The Quarantined Content Details page opens.
The Quarantined Content Details page displays the following information about the quarantined mailsand attachments:
Quarantine ID.QID
The date and time when the item was placed in thequarantine.
Submit time
The server that processed the message.Quarantined messages only.
Processing server
The address of the message senderSender
The addresses of all the message recipients.Recipients
The address of the sender mail server or client.Quarantined messages only.
Sender host
The location of the mailbox or public folder wherethe quarantined attachment was found.Quarantined attachments only.
Location
The message subjectSubject
The size of the quarantinedmessage. Quarantinedmessages only.
Message size
The name of the attachment. Quarantinedattachments only.
Attachment name
The size of the attachment file. Quarantinedattachments only.
Attachment size
The reason why the content was quarantined.Quarantine reason
1. Click the Show link to access the content of the quarantined message.2. Click Download to download the quarantined message or attachment to your computer to check it.
Caution:
In many countries, it is illegal to read other people’s messages.
For information how to process quarantined content, see Quarantine Operations.
204 | E-mail Quarantine Management
6.6 Quarantine OperationsQuarantinedmails and attachments can be reprocessed, released and removed from the E-mail Quarantinestorage after you have searched the quarantined content you want to process.
Quarantined Mail Operations
You can select an operation to perform on the messages that were found in the query:
• Click Reprocess to scan the currently selected e-mail again, or click Reprocess All to scan all e-mailmessages that were found. For more information, see Reprocessing the Quarantined Content.
• Click Release to deliver the currently selected e-mail without further processing, or click Release Allto deliver all e-mail messages that were found. For more information, see Releasing the QuarantinedContent.
Caution:
Releasing quarantined content entails a security risk, because the content is delivered to therecipient without being scanned.
• Click Delete to delete the currently selected e-mail from the quarantine, or click Delete All to deleteall e-mail messages that were found. For more information, see Removing the Quarantined Content.
• Click Send to F-Secure to submit a sample of quarantined content to F-Secure for analysis.
Quarantined Attachment Operations
You can select an operation to perform on the attachments that were found in the query:
• Click Send to deliver the currently selected attachment, or click Send All to deliver all attachmentsthat were found.
Attachments sent from the quarantine go through the transport and storage protection and are scannedagain. For more information, see Releasing the Quarantined Content.
• Click Delete to delete the currently selected e-mail from the quarantine, or click Delete All to deleteall e-mail messages that were found. For more information, see Removing the Quarantined Content.
6.6.1 Reprocessing the Quarantined ContentWhen quarantined content is reprocessed, it is scanned again, and if it is found clean, it is sent to theintended recipients.
Note: if you reprocess a quarantined spam e-mail, the reprocessed content may receive a lowerspam score than it did originally and it may reach the recipient.
For example, if some content was placed in the E-mail Quarantine because of an error situation, you canuse the time period when the error occurred as search criteria, and then reprocess the content. This isdone as follows:
1. Open the Quarantine > Query page in the Web Console.2. Select the start and end dates and times of the quarantining period from the Start time and End
Time drop-down menus.3. If you want to specify how the search results are sorted, select the sorting criteria and order from the
Sort results and order drop-down menus.4. Select the number of items to be displayed on a results page from the Display drop-down menu.5. Click the Query button.6. When the query is finished, the query results page is displayed. Click the Reprocess All button to
reprocess the displayed quarantined content.7. The progress of the reprocessing operation is displayed in the Web Console.
• The e-mails that have been reprocessed and found clean are delivered to the intended recipients.They are also automatically deleted from the quarantine.
F-Secure E-mail and Server Security | 205
• E-mails that have been reprocessed and found infected, suspicious or broken return to thequarantine.
6.6.2 Releasing the Quarantined ContentWhen you release quarantined content, the product sends the content to intended recipients without anyfurther processing on the protection level that blocked the content previously. For example, if you havea password-protected archive in the quarantine that you want to deliver to the recipient, you can releaseit.
Caution:
Releasing quarantined content is a security risk, as the content is delivered to the recipient withoutbeing scanned.
If you release a message that was quarantined on the transport protection level, the released messageis not checked on the transport level again, but the real-time scanning on the storage protection levelprocesses the message before it is delivered to the mailbox of the recipient. If the storage level checkcatches the message, it is not released and remains in the Quarantine.
If you need to release a quarantined message, follow these instructions:
1. Open the Quarantine > Query page in the Web Console.2. Enter the Quarantine ID of the message in the Quarantine ID field. The Quarantine ID is included
in the notification message delivered to the user.3. Click Query to find the quarantined content.4. Quarantine may contain either the original e-mail message or just the attachment that was quarantined.
a. When the quarantined content is an e-mail message, click the Release to release the displayedquarantined content. The Release Quarantined Content dialog opens.
b. When the quarantine contains an attachment, click Send. The quarantined attachment is attachedto the template specified in General Quarantine Options that is sent to the recipient.
5. Specify whether you want to release the content to the original recipient or specify an address wherethe content is to be forwarded.
Note: It may not be legal to forward the e-mail to anybody else than the original recipient.
6. Specify what happens to the quarantined content after it has been released by selecting one of theAction after release options:
• Leave in the quarantine• Delete from the quarantine
7. Click Release or Send. The content is now delivered to the recipient.
6.6.3 Removing the Quarantined ContentQuarantined messages are removed from the quarantine based on the currently configured quarantineretention and cleanup settings. For an example on how to configure those settings, see Deleting OldQuarantined Content Automatically.
If you want to remove a large amount of quarantined messages at once, for example all the messagesthat have been categorized as spam, do the following:
1. Open the Quarantine > Query page in the Web Console.2. Select the quarantining reason, Spam. from the Reason drop-down listbox.3. Click Query.4. When the query is finished, the query results page is displays all quarantined messages that have
been classified as spam. Click the Delete All button to delete all the displayed quarantined content.5. You are prompted to confirm the deletion. Click OK. The content is now removed from the quarantine.
206 | E-mail Quarantine Management
6.6.4 Deleting Old Quarantined Content AutomaticallyQuarantined messages and attachments are deleted automatically, based on the Quarantine Retentionand Cleanup settings in the Maintenance tab on the Quarantine > Options page. By default, all typesof quarantined content are stored in quarantine for one month, and quarantine clean-up task is executedonce an hour.
You can specify exceptions to the default retention and clean-up times in the Exceptions table. Theseexceptions are based on the quarantine category. If you want, for example, to have infected messagesdeleted sooner, you can specify an exception rule for them as follows:
1. Go to the Quarantine > Options page.2. Open the Maintenance tab.3. Click Add new exception at the Exceptions table. A New Quarantine Cleanup Exception dialog
opens.4. Select the Quarantine category for which you want to specify the exception. Specify a Retention
period and a Cleanup interval for the selected category.5. To turn on the exception, make sure that the Active check box is selected. Click Ok.6. Click Apply to apply the new changes.
6.7 Moving the E-mail Quarantine StorageWhen you want to change the E-mail Quarantine storage location either using the F-Secure Policy ManagerConsole or theWeb Console, note that the product does not create the new directory automatically. Beforeyou change the E-mail Quarantine storage directory, make sure that the directory exists and it has propersecurity permissions.
You can use the xcopy command to create and change the E-mail Quarantine storage directory bycopying the existing directory with the current ownership and ACL information. In the following example,the E-mail Quarantine storage is moved from C:\Program Files\F-Secure\QuarantineManager\quarantine to D:\Quarantine :
1. Stop F-Secure Quarantine Manager service to prevent any quarantine operations while you move thelocation of the Quarantine storage. Run the following command from the command prompt: netstop "F-Secure Quarantine Manager"
2. Run the following command from the command prompt to copy the current content to the new location:xcopy "C:\Program Files\F-Secure\Quarantine Manager\quarantine"D:\Quarantine\ /O /X /E
Note the use of backslashes in the source and destination directory paths.
3. Change the path for FSMSEQS$ shared folder. If the product is installed in the local quarantinemanagement mode, you can skip this step.
To change the FSMSEQS$ path, follow these steps:
a. Open Windows Control Panel > Administrative Tools > Computer Management.b. Open System Tools > Shared Folders > Shares and find FSMSEQS$ there.c. Right-click FSMSEQS$ and select Stop Sharing. Confirm that you want to stop sharing FSMSEQS$.d. Right-click FSMSEQS$ again and select New Share.e. Follow Share a Folder Wizard instructions to create FSMSEQS$ shared folder.
• Specify the new directory (in this example, D:\Quarantine ) as the folder path, FSMSEQS$as the share name and F-Secure Quarantine Storage as the description.
• On the Permissions page, select Administrators have full access; other users have read-onlyaccess. Note that the Quarantine storage has file/directory security permissions set only for theSYSTEM and Administrators group.
f. Click Finish.
4. Change the location of the E-mail Quarantine storage from the F-Secure Policy Manager Console(F-Secure Anti-Virus for Exchange/Settings/Quarantine/Quarantine Storage) or
F-Secure E-mail and Server Security | 207
the Web Console (Anti-Virus for Microsoft Exchange > Quarantine > Options > QuarantineStorage).
5. Make sure that the product has received new settings.6. Restart F-Secure Quarantine Manager service. Run the following command from the command prompt:
net start "F-Secure Quarantine Manager"
Note: For more information about the xcopy command and options, refer to MS Windows Helpand Support.
208 | E-mail Quarantine Management

Updating Virus and Spam Definition Databases
Topics:
• Overview• Automatic Updates• Configuring Automatic Updates
7.1 OverviewIt is of the utmost importance that virus definition databases are kept up-to-date. The product takes careof this task automatically.
Information about the latest virus database update can be found at:http://www.f-secure.com/download-purchase/updates.shtml
7.2 Automatic UpdatesUsing F-Secure Automatic Update Agent is the most convenient way to keep the databases updated. Itconnects to F-Secure Policy Manager Server or the F-Secure Update Server automatically. F-SecureAutomatic Update Agent uses incremental technology and network traffic detection to make sure that itworks without disturbing other Internet traffic even over a slow line.
You may install and use F-Secure Automatic Update Agent in conjunction with licensed F-Secure'santivirus and security products. F-Secure Automatic Update Agent shall be used only for receiving updatesand related information on F-Secure's antivirus and security products. F-Secure Automatic Update Agentmay not be used for any other purpose or service.
7.3 Configuring Automatic UpdatesF-Secure Automatic Update Agent user interface provides information about downloaded virus and spamdefinition updates. To access the F-Secure Automatic Update Agent user interface, open theWeb Console,and go to the Automatic Updates page. For more information, see Automatic Updates.
In centrally managed installations, you can use the Web Console only for monitoring the F-SecureAutomatic Update Agent settings. To change these settings, you need to use F-Secure Policy ManagerConsole. For more information, see F-Secure Automatic Update Agent Settings.
If necessary, reconfigure the firewall and other devices that may block the database downloads.
Note: In common deployment scenarios, make sure that the following ports are open:
• DNS (53, UDP and TCP)• HTTP (80)• Port used to connect to F-Secure Policy Manager Server
210 | Updating Virus and Spam Definition Databases

Variables in Warning Messages
The following table lists the variables that can be included in thewarning and informational messages sent by the product if an infectionis found or content is blocked.
If both stripping and scanning are allowed and the Agent found bothtypes of disallowed content (infected and to be stripped) in an e-mailmessage, a warning message will be sent to the end-user instead ofan informational one, if it is required.
These variables will be dynamically replaced by their actual names. Ifan actual name is not present, the corresponding variable will bereplaced with [Unknown].
DescriptionVariable
The DNS/WINS name or IPaddress of F-Secure E-mail andServer Security.
$ANTI-VIRUS-SERVER
The e-mail address where theoriginal content comes from.
$NAME-OF-SENDER
The e-mail addresses where theoriginal content is sent.
$NAME-OF-RECIPIENT
The original e-mail messagesubject.
$SUBJECT
The direction of e-mail message(inbound, outbound or internal).
$DIRECTION
Marks the beginning of the scanreport. This variable does notappear in the warning message.
$REPORT-BEGIN
Marks the end of the scan report.This variable does not appear inthe warning message.
$REPORT-END
Note: $REPORT-BEGIN, $REPORT-END, $DIRECTIONmacrosare not applicable in the replacement text used on real-timescanning in the Exchange storage.
The following table lists variables that can be included in the scanreport, in other words the variables that can be used in the warningmessage between $REPORT-BEGIN and $REPORT-END.
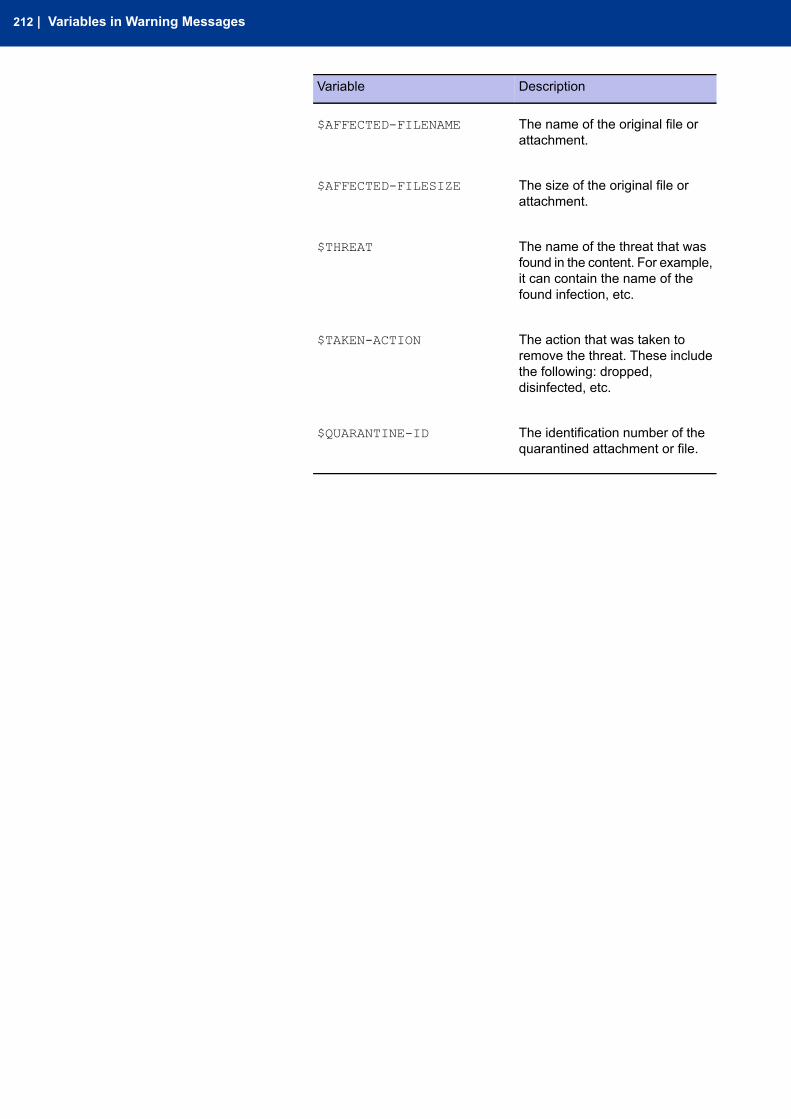
DescriptionVariable
The name of the original file orattachment.
$AFFECTED-FILENAME
The size of the original file orattachment.
$AFFECTED-FILESIZE
The name of the threat that wasfound in the content. For example,
$THREAT
it can contain the name of thefound infection, etc.
The action that was taken toremove the threat. These include
$TAKEN-ACTION
the following: dropped,disinfected, etc.
The identification number of thequarantined attachment or file.
$QUARANTINE-ID
212 | Variables in Warning Messages
Sending E-mail Alerts And Reports
Topics:
• Overview• Solution
9.1 OverviewYou can configure the product to send alerts to the administrator by e-mail. F-Secure Management Agentthat handles the alerting uses a simple SMTP protocol (without authentication and encryption) to sendalerts to the specified e-mail address.
In Microsoft Exchange Server 2007 and 2010, the message relaying is tightly restricted, even on serversthat are not connected to the Internet. By default, only e-mail messages that come from authenticated orallowed sources can be relayed.
This means that the product cannot send SMTP alerts and reports unless some changes are done in theMicrosoft Exchange Server 2007 and 2010 configurations. These changes can be done before or afterthe product has been deployed.
9.2 SolutionIn order to make F-Secure alerts and reports relayed through Microsoft Exchange Server 2007 or 2010,you need to create a special receive connector configure it to allow anonymous, non-authenticatedsubmissions. This connector has to be created on Exchange Edge and/or Hub server(s) that are specifiedas the SMTP server where the product sends alerts and reports to.
9.2.1 Creating a Scoped Receive ConnectorThe connector can be created from the Exchange management shell. Run the following command tocreate a scoped receive connector on the local server: New-ReceiveConnector -Name<connector_name> -Bindings <listen_ip_port> -RemoteIPRanges <accepted_hosts>-AuthMechanism Tls -PermissionGroups "AnonymousUsers" -RequireEHLODomain $false-RequireTLS $false
where:
• <connector_name> is the name for the connector,• <listen_ip_port> is the IP address and port number (separated by a colon) that the receive
connector listens for inbound messages, and• <accepted_hosts> is the IP address or IP address range from which inbound connections are
accepted.
The IP address or IP address range can be entered in one of the following formats:
• IP address: 192.168.1.1• IP address range: 192.168.1.10-192.168.1.20• IP address with subnet 192.168.1.0 (255.255.255.0)• IP address by using Classless Interdomain Routing (CIDR) notation: 192.168.1.0/24
For example, to create a new connector that listens on all configured local IP addresses and acceptsconnections from the local host only, run the following command in the Exchange management shell:New-ReceiveConnector -Name "F-Secure alerts and reports" -Bindings 0.0.0.0:25-RemoteIPRanges 127.0.0.1 -AuthMechanism Tls -PermissionGroups "AnonymousUsers"-RequireEHLODomain $false -RequireTLS $false
To create a new connector that is bound to a single IP addresses and accepts connections from thespecified remote servers, run the following command: New-ReceiveConnector -Name "F-Securealerts and reports" -Bindings 192.168.58.128:25 -RemoteIPRanges 192.168.58.129,192.168.58.131 -AuthMechanism Tls -PermissionGroups "AnonymousUsers"-RequireEHLODomain $false -RequireTLS $false
214 | Sending E-mail Alerts And Reports
9.2.2 Grant the Relay Permission on the New Scoped ConnectorThe receive connector accepts anonymous SMTP submissions but messages are not relayed. To relaymessages, grant ms-Exch-SMTP-Accept-Any-Recipient the permission to the anonymous account. Todo this, run the following command: Get-ReceiveConnector <connector_name> |Add-ADPermission -User "NT AUTHORITY\ANONYMOUS LOGON" -ExtendedRights"ms-Exch-SMTP-Accept-Any-Recipient"
where:
• <connector_name> is the name of the connector you created.
For example: Get-ReceiveConnector "F-Secure alerts and reports" | Add-ADPermission-User "NT AUTHORITY\ANONYMOUS LOGON" -ExtendedRights"ms-Exch-SMTP-Accept-Any-Recipient"
9.2.3 Specify SMTP Server for Alerts and ReportsCheck that the product is properly configured and the address and port of the SMTP server correspondsto the address and port on which the receive connector listens for inbound messages. Remember tospecify the return address for e-mail alerts.
F-Secure E-mail and Server Security | 215
Troubleshooting
Topics:
• Overview• Viewing the Log File• Common Problems and
Solutions• Frequently Asked Questions
216 | Troubleshooting
10.1 OverviewIf you have a problem that is not covered in here, see Technical Support.
10.2 Viewing the Log FileThe product uses the log file Logfile.log that is maintained by F-Secure Management Agent serviceand contains all alerts generated by F-Secure components installed on the host. Logfile.log can befound on all hosts running F-Secure Management Agent. You can view the Logfile.log with any texteditor, for example Windows Notepad. Open the Logfile.log from the common directory under theproduct installation directory or from the Summary page of the Web Console by clicking View F-SecureLog.
Logfile.log contains all the alerts generated by the host, regardless of the severity. To configure theLogfile.log file size in F-Secure Policy Manager, go to F-Secure Management Agent / Settings/ Alerting / Alert Agents / Logfile / Maximum File Size.
E-mail Quarantine Logs
E-mail Quarantine logs are not stored in Logfile.log. By default, they are stored in the quarantinelog directory. You can view E-mail Quarantine logs with any text editor.
To specify the path to the directory where E-mail Quarantine logfiles are placed, change the Quarantine> Quarantine Log Directory setting in F-Secure Policy Manager or Quarantine > Options > Logging> Quarantine log directory setting in the Web Console. For more information, see Quarantine andQuarantine Logging.
10.3 Common Problems and SolutionsIf you think that you have an issue that is not listed here, check that both the product and its componentsare up and running.
10.3.1 Registering F-Secure Transport AgentF-Secure Transport Agent should be registered in the Microsoft Exchange Transport Service automaticallyduring the installation. If Web Console notifies that it is not, follow these instructions:
1. Open Exchange Management Shell.2. Call the Get-TransportAgent command from the command line in Shell.3. If F-Secure Transport Agent is not listed as a transport agent, you need to install it manually:
a. Enter cmd in the Start menu > Run to open the command prompt.b. Type cd “C:\Program Files (x86)\F-Secure\Anti-Virus for Microsoft
Exchange” to go to the product installation directory.
4. Type PowerShell.exe -command ".\fstragnt.ps1 install" to install F-Secure TransportAgent.
10.3.2 Checking the Web ConsoleProblem:
I cannot open or access the Web Console.
Solution:
1. Make sure that F-Secure WebUI Daemon has started and is running. Check the Services in WindowsControl Panel. The following service should be started:
F-Secure E-mail and Server Security | 217

F-Secure WebUI Daemon•
Check the Task Manager. The following process should be running:
• fswebuid.exe
2. If you try to connect to the product Web Console from a remote host, make sure that the connectionis not blocked by a firewall or proxy server.
10.3.3 Checking F-Secure Content Scanner ServerProblem:
When the F-Secure E-mail and Server Security tries to send an attachment to F-Secure Content ScannerServer, the attachment is not scanned and the e-mail does not reach the recipient.
Solution:
F-Secure E-mail and Server Security cannot contact F-Secure Content Scanner Server.
A service or processmay not be running on F-Secure Content Scanner Server. Make sure that all processesand services of F-Secure Content Scanner Server have started. Check the Services in Windows ControlPanel. The following services should be started:
• F-Secure Content Scanner Server• F-Secure Management Agent• F-Secure Network Request Broker
To make sure that F-Secure Content Scanner Server accepts connections, run the following commandfrom the command line on the Microsoft Exchange Server: telnet 127.0.0.1 18971
If you get the cursor blinking in the upper left corner, it means that the connection has been establishedand F-Secure Content Scanner Server can accept incoming connections.
If you get "Connection to the host lost" or other error message or if the cursor does not go to the upperleft corner, it means that the connection attempt was unsuccessful. If the telnet connection attempt wasunsuccessful, make sure that F-Secure Content Scanner Server is up and running and that there is nolocal firewall on the server blocking the access.
10.3.4 Securing the E-mail QuarantineProblem:
I have installed the product and I'm worried about security of the local E-mail Quarantine storage wherestripped attachments are quarantined. What do you recommend me?
Solution:
The product creates and adjusts access rights to the local E-mail Quarantine storage during the installation.Keep in mind the following when setting up the local E-mail Quarantine storage:
• Do not place the E-mail Quarantine storage on a FAT drive. FAT file system does not support accessrights on directories and files for different users. If you place the Quarantine storage on a FAT driveeveryone who has access to that drive will be able to get access to the quarantined content.
• Create and adjust access rights to the E-mail Quarantine storagemanually if you use one on a networkdrive.
• Create and adjust access rights to the E-mail Quarantine storage manually when you change its pathfrom F-Secure Policy Manager Console or the Web Console.
10.3.5 Administration IssuesSome settings are initially configured during the product installation. They can be viewed on the Statustab of F-Secure Policy Manager Console.
When changing such settings in F-Secure Policy Manager Console for the first time, you must enforcethe change by selecting the Final check box.
218 | Troubleshooting
10.3.6 Turning on EMC CAVA supportIf you install the product with EMC CAVA support, it should be on after the installation is complete.
If Web Console notifies that EMC CAVA support has improper policies, follow these instructions:
1. Open F-Secure Policy Manager.2. Go to the F-Secure Anti-Virus >Settings >Settings for Real-Time Protection >Scanning options >
File Scanning branch.3. Set Scan Network Drives to Enabled.4. Go to the F-Secure Anti-Virus > Settings > Security Levels > Server > Settings for Real-Time
Protection > Scanning options > File Scanning branch.5. Set Decide action automatically to Enabled.6. Distribute the policy.
10.4 Frequently Asked QuestionsAll support issues, frequently asked questions and hotfixes can be found under the support pages athttp://support.f-secure.com/. For more information, see Technical Support.
F-Secure E-mail and Server Security | 219
Technical Support
Topics:
• F-Secure Online SupportResources
• Software Downloads• Virus Descriptions on the Web
220 | Technical Support
11.1 F-Secure Online Support ResourcesF-Secure Technical Support is available through F-Secure support web pages, e-mail and by phone.Support requests can be submitted through a form on F-Secure support web pages directly to F-Securesupport.
F-Secure support web pages for any F-Secure product can be accessed at http://support.f-secure.com/.All support issues, frequently asked questions and hotfixes can be found under the support pages.
If you have questions about the product that are not covered in this manual or on the F-Secure supportweb pages, you can contact your local F-Secure distributor or F-Secure Corporation directly.
For technical assistance, please contact your local F-Secure Business Partner. Send your e-mail to:
Anti-Virus-<country>@f-secure.com
Example: [email protected]
If there is no authorized F-Secure Anti-Virus Business Partner in your country, you can submit a supportrequest directly to F-Secure. There is an online "Request Support form" accessible through F-Securesupport web pages under the "Contact Support" page. Fill in all the fields and describe the problem asaccurately as possible. Please include the FSDiag report taken from the problematic server with thesupport request.
F-Secure Support Tool
Before contacting support, please run the F-Secure Support Tool FSDiag.exe on each of the hostsrunning the product. This utility gathers basic information about hardware, operating system, networkconfiguration and installed F-Secure and third-party software. You can run the F-Secure Support Toolfrom the Web Console as follows:
1. Log in to the Web Console.2. Type https://127.0.0.1:25023/fsdiag/ in the browser’s address field or or click F-Secure support tool
on General Server Properties page.3. The F-Secure Support Tool starts and the dialog window displays the progress of the data collection.
Note: Note that in some web browsers, the window may appear behind the main browserwindow.
4. When the tool has finished collecting the data, click Report to download and save the collected data.
You can also find and run the FSDiag.exe utility in the Common directory under the product installationdirectory, or run F-Secure E-mail and Server Security > Support Tool in the Windows Start menu.The tool generates a file called FSDiag.tar.gz.
Please include the following information with your support request:
• Product and component version numbers. Include the build number if available.• Description how F-Secure components are configured.• The name and the version number of the operating system on which F-Secure products and protected
systems are running. For Windows, include the build number and Service Pack number.• The version number and the configuration of your Microsoft Exchange Server, if you use F-Secure
Anti-Virus for Microsoft Exchange component. If possible, describe your network configuration andtopology.
• A detailed description of the problem, including any error messages displayed by the program, andany other details that could help us replicate the problem.
• Logfile.log from the machines running F-Secure products. This file can be found under ProgramFiles\F-Secure\Common. If you are sending the FSDiag report you do not need to send the Logfile.logseparately, because it is already included in the FSDiag report.
• If the whole product or a component crashed, include the drwtsn32.log file from the Windows NTdirectory and the latest records from the Windows Application Log.
F-Secure E-mail and Server Security | 221
11.2 Software DownloadsThe F-Secure web site provides assistance and updated versions of the F-Secure products.
In order to maximize your security level we strongly encourage you to always use the latest versions ofour products. You can find the latest product version, hotfixes and all related downloadable materials in:http://www.f-secure.com/en_EMEA/downloads/product-updates/.
11.3 Virus Descriptions on the WebF-Secure Corporation maintains a comprehensive collection of virus-related information on its Web site.To view the Virus Information Database, connect to: http://www.f-secure.com/security_center/.
222 | Technical Support
About F-Secure Corporation
F-Secure Corporation protects consumers and businesses againstcomputer viruses and other online threats from the Internet and mobilenetworks. We want to be the most reliable provider of internet securityservices in the market. One way to demonstrate this is the speed ofour response.
F-Secure’s award-winning solutions for real-time virus protection areavailable as a service subscription through more than 170 Internetservice providers and mobile operator partners around the world,making F-Secure the global leader in the market of internet andcomputer security. The solutions are also available as licensed productsthrough thousands of resellers globally.
F-Secure aspires to be the most reliable mobile and computer securityprovider, helping make computer and smartphone users' networkedlives safe and easy. This is substantiated by the company’sindependently proven ability to respond faster to new threats than itsmain competitors. Founded in 1988 and headquartered in Finland,F-Secure has been listed on the OMXNordic Exchange Helsinki since1999. The company has consistently been one of the fastest growingpublicly listed companies in the industry.
The latest news on real-time virus threat scenarios is available at thehttp://www.f-secure.com/weblog/