
EZOfficeInventory Mobile App Guide - …...1. Editing or deleting items: Click on the vertical...
24
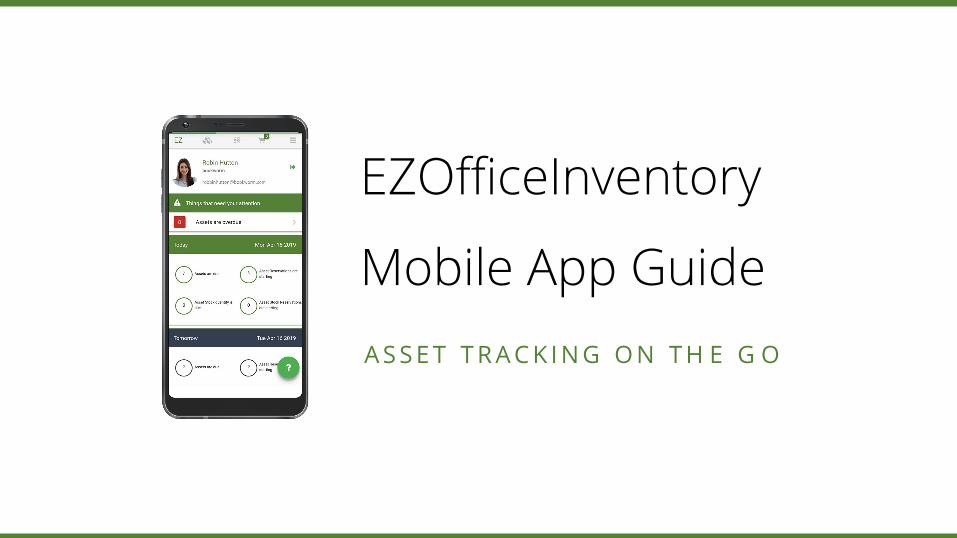
EZOfficeInventory Mobile App Guide A S S E T T R A C K I N G O N T H E G O
Transcript of EZOfficeInventory Mobile App Guide - …...1. Editing or deleting items: Click on the vertical...
EZOfficeInventory
Mobile App Guide A S S E T T R A C K I N G O N T H E G O

C O N T E N T S
Dashboard
Items
2.1 Viewing Item Listings
2.2 Checking Items in and out
2.3 Adding Services & Reservations
Scanning Items
1
2
3
4 Carts
4.1 Taking actions on the Current Cart
4.2 Viewing all Cart Transactions
6.1 Viewing the Bundles Listing
6.2 Taking actions on Bundles
Searching For Items
Bundles
Work Orders
App In Action [Video]
5
6
7
8
7.1 Viewing the Work Order Listing
7.2 Viewing Work Order Details
7.3 Logging Work Order Updates

1. T H E D A S H B O A R D
The Dashboard gets you started on your asset-related activities and enables you to
gain a quick summary of all pressing affairs in minutes!
1. User Profile: View your details here, including name, display picture, company
name and email address.
2. Things that need your attention: Get up to speed with things that require your
immediate attention, like Overdue Assets and Asset Stock.
3. Today: View check-ins and reservations due today.
4. Tomorrow: Prepare for check-ins and reservations due for the next day.
5. Logging out: Click on the left-arrow next to your profile to log out.
6. Help: Use the Help icon (?) to find your way around the app.
Note: Staff Users can only view data for items that are assigned to them.
1
2
3
4
5
6

2. I T E M S
Click on the Items Tab to view, add and edit all your items, and switch between item categories.
Assets InventoryAsset Stock

2.1. V I E W I N G I T E M L I S T I N G S
The Items Tab enables you to view, add and edit all your items, including Assets,
Asset Stock, and Inventory.
1. Filtering items: Click on the funnel ‘🜄’ to apply Asset Filters and customize
your view.
2. Adding new items: Tap the ‘+’ button at the bottom-right to add new items
to your database, right from your phone.
3. Taking mass actions: Click on item displays to select them. A Play ‘⊳’ button
will appear in the place of the funnel. Click it to take an action like reserving
the item for a user.
4. Navigating to the Item Details Page: To head to an Item Details Page, click
on its description.
1
2
3
4

The Item Details Page serves as the source of all data on an item. Scroll down the
page to see a host of different data points like the item’s location, group, and
custom fields.
You can check items in and out, edit their details or delete them from the Item
Details Page.
1. Editing or deleting items: Click on the vertical ellipsis ‘፧’ at the top-right to
edit item details or to delete the concerned item.
2. Checking items in or out: Click on the Play ‘⊳’ button to log data regarding
checkouts, services, reservations, and more from anywhere.
3. Navigating back to the listing: Click on the back arrow ‘←’ to go back to the
listing.
1
2
3
2.2. C H E C K I N G I T E M S I N & O U T

Scroll down the Item Details Page to take the following actions:
1. Logging services: Click on ‘+ Add Service Record’ to log a new service event. View
service history for an item to get a snapshot of its problem areas.
2. Adding comments: Create conversations around items with comments so no
issues are overlooked. Add new comments from ‘+ New Comment’ and view all past
comments.
3. Adding a reservation: View reservation history and add new reservations for the
item by clicking on ‘+ New Reservation’.
4. Downloading/uploading documents: Download supporting documents like item
manuals directly to your phone. To upload new documents, click on ‘+ New Upload’.
1
2
3
4
2.3. A D D I N G S E R V I C E S & R E S E R V A T I O N S

Use the Item Listings to take a variety of mass actions like adding several items to
Cart or checking in multiple tools after a job is over. Click on the display pictures to
select multiple items; a Play ‘⊳’ button will appear once you start selecting items. Click
it to see a list of possible actions you can take.
1. Check items in and out or extend checkouts.
2. Reserve items in advance from wherever you may be.
3. Retire multiple items in one go.
4. Verify possession if you’ve received an assortment of items.
5. Add items to the active or reserved Cart.
6. Record a service event, start a service, or end it for multiple assets.
2.4. T A K I N G M A S S A C T I O N S

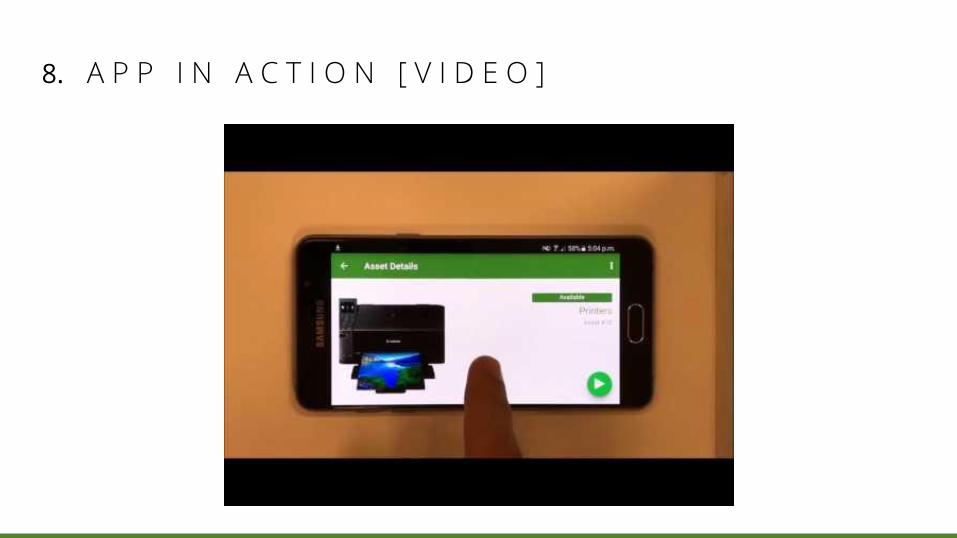
3. S C A N N I N G I T E M S
Scan upto 25 items in quick succession with
EZOfficeInventory’s Barcode Scanner for swift item
processing. Here’s how to do it:
1. Click on the barcode in the top panel.
2. Position the barcode or QR code within the
designated area. Upon detection, the screen will
display the Item #.
3. Once you’ve scanned all items (upto 25), click
‘Completed’.
4. Check out scanned items or add them to the
database if they’re new!

Carts enable you to check out or reserve multiple items together. The Carts Tab also
supports a barcode scanner, so you can add items directly to the Current Cart.
The Carts Add On will have to be enabled from the desktop app in order to show up
on the Mobile App. To do this, head to Settings → Add Ons → Carts from the desktop
app and enable the Add On.
Once enabled, open the Carts Tab from the Mobile App and toggle between Cart
(Current Cart) and Cart Transactions.
- Cart tab lets you view, edit, and take actions on the current Cart.
- Cart Transactions tab provides you an overview of all your transactions.
4. C A R T S

4.1. T A K I N G A C T I O N S O N C U R R E N T C A R T
To access the Current Cart, go to the Cart section under the Carts Tab.
1. Editing the current Cart: Hit ‘Edit Cart’ to add items, change the Checkout or
Due Date, or update cart details. You can also access this by clicking these
options from Play ‘⊳’ → Edit Cart. You can choose to add items from Fuzzy List
suggestions too.
2. Checking out current Cart: Check out Cart from Play ‘⊳’ → Checkout Cart.
3. Reserving the Cart: Reserve Cart from Play ‘⊳’ → Reserve Cart.
4. Printing Cart details: Print Cart details from Play ‘⊳’ → Print Cart.
5. Adding comments: Scroll down through this view and click ‘+ Add
Comments’.
1
5
2 - 4

Get a quick recap on all your Cart Transactions from this section. You can also apply
filters by clicking on the Funnel to view Carts by status. Use these to glean insights
regarding:
- All Carts
- Active Carts
- Active (including drafts) Carts
- Checked out Carts
- Reserved Carts
- Completed Carts
4.2. V I E W I N G A L L C A R T T R A N S A C T I O N S
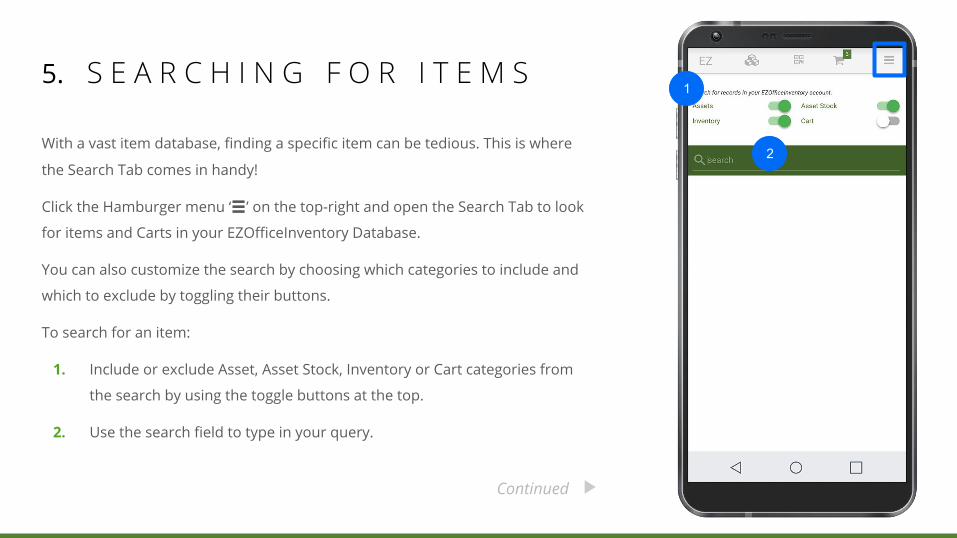
5. S E A R C H I N G F O R I T E M S
With a vast item database, finding a specific item can be tedious. This is where
the Search Tab comes in handy!
Click the Hamburger menu ‘☰’ on the top-right and open the Search Tab to look
for items and Carts in your EZOfficeInventory Database.
You can also customize the search by choosing which categories to include and
which to exclude by toggling their buttons.
To search for an item:
1. Include or exclude Asset, Asset Stock, Inventory or Cart categories from
the search by using the toggle buttons at the top.
2. Use the search field to type in your query.
1
2
Continued
1. 1
2.
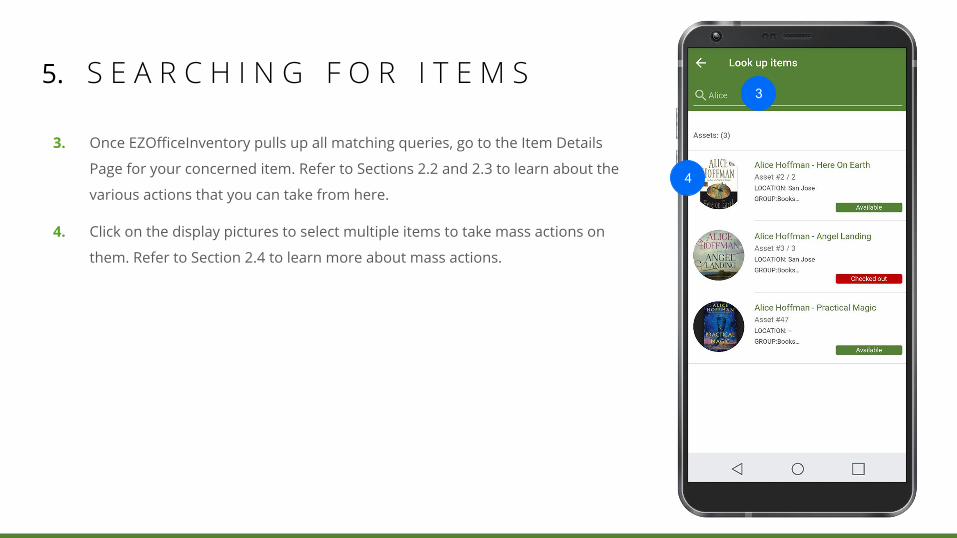
3. Once EZOfficeInventory pulls up all matching queries, go to the Item Details
Page for your concerned item. Refer to Sections 2.2 and 2.3 to learn about the
various actions that you can take from here.
4. Click on the display pictures to select multiple items to take mass actions on
them. Refer to Section 2.4 to learn more about mass actions.
3
4
5. S E A R C H I N G F O R I T E M S
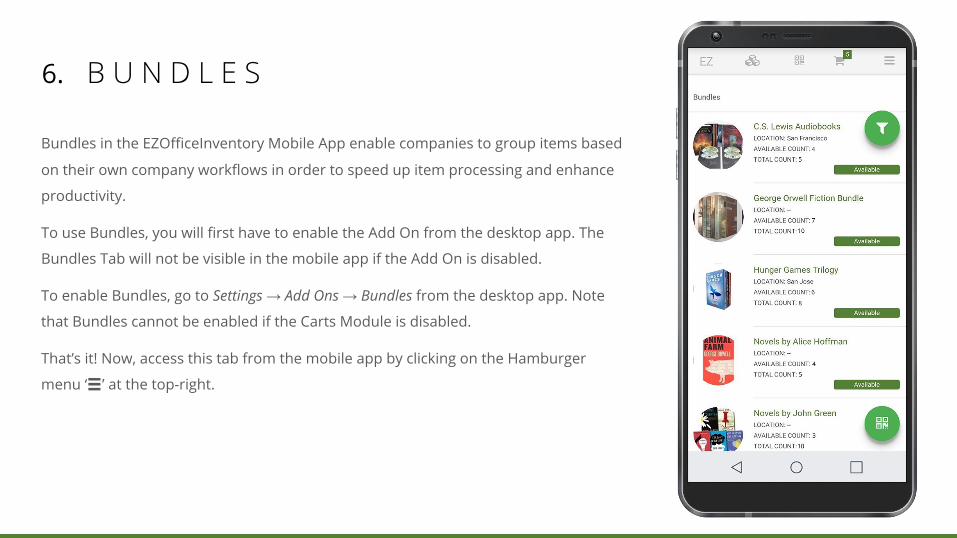
Bundles in the EZOfficeInventory Mobile App enable companies to group items based
on their own company workflows in order to speed up item processing and enhance
productivity.
To use Bundles, you will first have to enable the Add On from the desktop app. The
Bundles Tab will not be visible in the mobile app if the Add On is disabled.
To enable Bundles, go to Settings → Add Ons → Bundles from the desktop app. Note
that Bundles cannot be enabled if the Carts Module is disabled.
That’s it! Now, access this tab from the mobile app by clicking on the Hamburger
menu ‘☰’ at the top-right.
6. B U N D L E S
6.1. B U N D L E S L I S T I N G
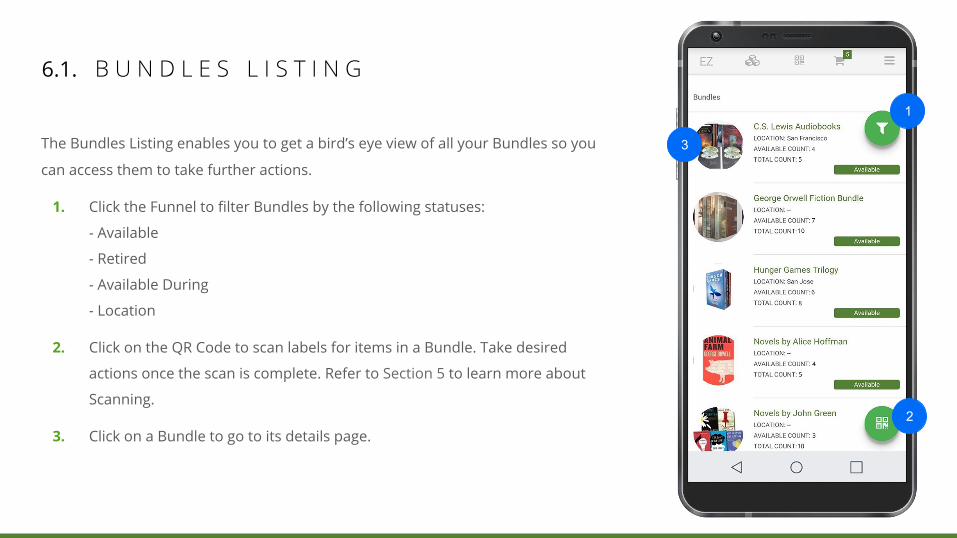
The Bundles Listing enables you to get a bird’s eye view of all your Bundles so you
can access them to take further actions.
1. Click the Funnel to filter Bundles by the following statuses:
- Available
- Retired
- Available During
- Location
2. Click on the QR Code to scan labels for items in a Bundle. Take desired
actions once the scan is complete. Refer to Section 5 to learn more about
Scanning.
3. Click on a Bundle to go to its details page.
1
2
3

You can use the Bundles Tab to add a Bundle to Cart by going to its details page. This
escalates the checkout process and enables users to find everything they need
without a hassle.
1. Click on the ‘+’ button to add the Bundle to Cart. You will be able to select or
deselect Bundle Items before adding them to the Cart that you want to check
out.
2. Read existing comments on the Bundle or add new ones by clicking on ‘+ New
Comment’. This provides a space for users to discuss even the smallest of
concerns regarding the Bundle.
3. Download supporting documents from the Documents section. 1
2
3
6.2. T A K I N G A C T I O N S O N B U N D L E S

Work Orders facilitate companies in tracking maintenance tasks and enable them to
keep their Items in top shape. They are also great for assigning jobs and ensuring that
everyone is aware of the services that have been carried out on an asset.
To use the Work Order Module, head to the desktop app and enable the Add On from
Settings → Add Ons → Work Orders.
Now, access the Work Orders Listing from your mobile by clicking on the Hamburger
menu ‘☰’ at the top-right in the app.
Note that Work Orders will only show up in the app if the Add On is enabled.
7. W O R K O R D E R S
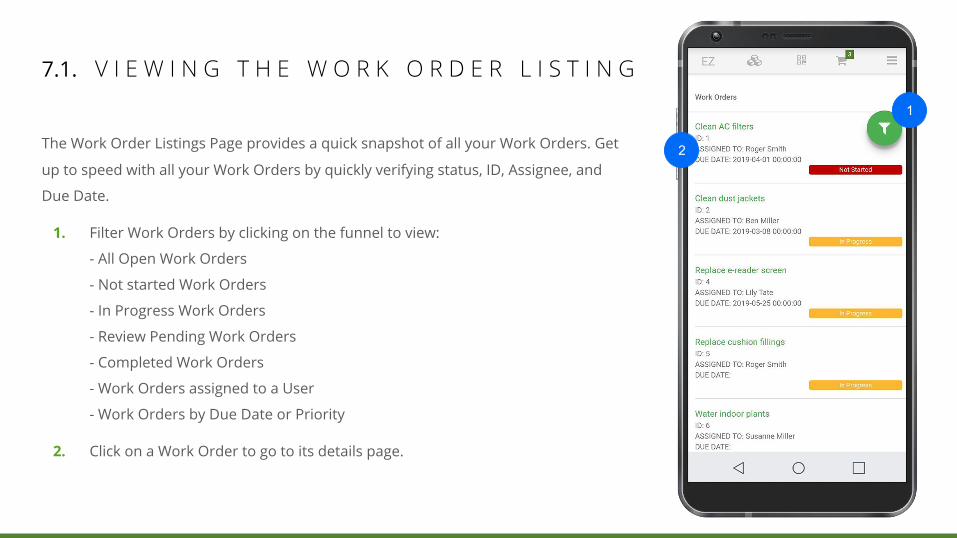
The Work Order Listings Page provides a quick snapshot of all your Work Orders. Get
up to speed with all your Work Orders by quickly verifying status, ID, Assignee, and
Due Date.
1. Filter Work Orders by clicking on the funnel to view:
- All Open Work Orders
- Not started Work Orders
- In Progress Work Orders
- Review Pending Work Orders
- Completed Work Orders
- Work Orders assigned to a User
- Work Orders by Due Date or Priority
2. Click on a Work Order to go to its details page.
2
1
7.1. V I E W I N G T H E W O R K O R D E R L I S T I N G

Use the Work Order Details Page to view the complete log for a Work Order.
1. Check Work Order Status to see if a Work Order is yet to start, is in progress,
or has been completed.
2. Monitor Work Order Progress by checking all relevant dates including Created
On, Started On, and Due Date.
3. Verify Assets linked to the Work Order from the Components section.
4. Follow progress by discerning who was assigned the concerned task and how
long they’ve spent on it from the mobile app.
7.2. V I E W I N G W O R K O R D E R D E T A I L S

In addition to verifying details, the EZOfficeInventory Mobile App enables you to log
Work Order updates from anywhere and at any time.
1. Update Checklists as sub-tasks (Checklist Line Items) are completed to track
progress.
2. View Work Logs and log time spent on a task from ‘+ Add Work Log’ as tasks
are carried out.
3. Add comments from ’+ New Comment’ to bring attention to concerns or
queries related to a Work Order.
4. Download supporting documents like user manuals to your phone.
5. Click on the Play Button ‘⊳’ to end a Work Order, send reminders to concerned
individuals, or un-watch it.
1
2
3
45
7.3. L O G G I N G W O R K O R D E R U P D A T E S

Sign up for a free 15-day trial today, no credit card required
www.ezofficeinventory.com/users/sign_in
We launched EZOfficeInventory in 2011 to help equipment intensive organizations increase efficiency and reduce costs. Together
with thousands of our customers, we’ve developed and refined best practices in Asset management. By removing
technology-related inefficiencies and enhancing employee productivity through the optimal usage of Assets, EZOfficeInventory
enables businesses to focus on core strengths.
Armed with this knowledge, we’ve served all kinds of businesses – from enterprises to SMBs, and from non profits to industry
leaders!
A B O U T E Z O F F I C E I N V E N T O R Y

blog.ezofficeinventory.com
+1 888 623 8654
F O R F U R T H E R A S S I S T A N C E :