EZ Mini Wifi Manual - ezautomation.net Mini Wifi Manual.pdf · Next connect the EZ-Wifi to power...
19
EZ Mini Wifi Manual Version 1.2 Phone: 1-877-774-EASY www.ezautomation.net
Transcript of EZ Mini Wifi Manual - ezautomation.net Mini Wifi Manual.pdf · Next connect the EZ-Wifi to power...

EZ Mini Wifi Manual
Version 1.2
Phone: 1-877-774-EASY
www.ezautomation.net

EZ mini WiFi User Manual Ver 1.2 1 / 19
Contents
EZ Mini WiFi Module......................................................................................................................................... 3
Factory Default Settings ................................................................................................................................... 3
Installation and Wiring ..................................................................................................................................... 4
Using Mini WiFi Module ................................................................................................................................... 5
4.1 Direct Connection (AP Mode) ................................................................................................................... 5
4.2 Connection through a router (STA mode) ................................................................................................ 5
Connecting to Hidden Networks ...................................................................................................................... 6
Module Modes.................................................................................................................................................. 7
6.1 AP Mode (also known as Adhoc mode) .................................................................................................... 7
6.2 STA Mode .................................................................................................................................................. 7
6.3 AP + STA Mode ......................................................................................................................................... 7
View/Manage Module Configurations ............................................................................................................. 8
7.1 Using EZPanel ........................................................................................................................................... 8
7.2 Using PC .................................................................................................................................................. 10
7.2.1 Configuring module for STA (Infrastructure) mode (use existing WiFi router) ......................... 11
7.2.2 Configuring AP or Adhoc mode for direct connection.................................................................... 12
How to use with EZ Products .......................................................................................................................... 13
How to upgrade Firmware .............................................................................................................................. 14
Frequently Asked Questions (FAQs) ........................................................................................................... 15
License ........................................................................................................................................................ 17

EZ mini WiFi User Manual Ver 1.2 2 / 19
Warnings
Programmable control devices such as the EZ7 Series HMI are not fail-safe devices and as such must not be
used for stand-alone protection in any application. Unless proper safeguards are used, unwanted start-ups
could result in equipment damage or personal injury. The operator must be made aware of this hazard and
appropriate precautions must be taken. In addition, consideration must be given to the use of an emergency
stop function that is independent of the EZ7 Series HMI.
The diagrams and examples in this user manual are included for illustrative purposes only. The manufacturer
cannot assume responsibility or liability for actual use based on the diagrams and examples.
Trademarks
This publication may contain references to products produced and/or offered by other companies. The product
and company names may be trademarked and are the sole property of their respective owners. AVG
Automation disclaims any proprietary interest in the marks and names of others.
© Copyright 2019, EZAutomation
All Rights Reserved
No part of this document shall be copied, reproduced, or transmitted in any way without the prior written
consent of AVG Automation. AVG Automation retains the exclusive rights to all information included in this
document.
Designed, Built and Marketed by AVG
4140 Utica Ridge Rd. · Bettendorf, IA 52722-1327
Phone: 1-877-774-EASY · Fax: 1-877-775-EASY · flash.ezautomation.net
EU Information
The EZ7 Series HMI is manufactured in compliance with European Union (EU) Directives and carries the CE
mark. They been tested under CE Test Standard #EN55011, and is submitted for UL Certification. Products with
CE marks perform their required functions safely and adhere to relevant standards as specified by EU directives
provided they are used according to their intended purpose and that the instructions in this manual are
adhered to. The protection provided by the equipment may be impaired if this equipment is not used in
accordance with this manual. Only replacement parts supplied by AVG Automation or its agents should be
used.
Technical Support
Consult Panel Editor Programming Software Help. You may also find answers to your questions in the operator
interface section of our website @ flash.ezautomation.net. If you still need assistance, please call our technical
support at 1-877-774-EASY or FAX us at 1-877-775-EASY.
SELV Circuits All electrical circuits connected to the communications port receptacle are rated as Safety Extra Low Voltage (SELV).

EZ mini WiFi User Manual Ver 1.2 3 / 19
EZ MINI WIFI MODULE
EZ mini WiFi module allows you to connect over Wi-Fi to serial ports of EZ
Automation devices. This allows users to program and monitor EZ panel and other
products over WiFi. The module can be used in AP (Access Point: direct connection
between PC and the module, without need for a router), or in STA (Station mode,
connection through a router). The module requires no setup in AP mode, and is
simple to setup for STA mode. The module requires 24 V DC power.
Features:
Wi-Fi to serial bridge, specifically designed for EZ products,
AP (Adhoc or Access Point: Direct PC to Panel), or STA (Infrastructure: Connection using a router)
modes (AP+STA mode to setup STA connection)
24 V DC power supply.
PC or HMI based Configuration
Factory default mode AP, so nothing to configure to use in AP mode
FACTORY DEFAULT SETTINGS
The module is set to following factory defaults.
These setting can be viewed and changed using panel and/or PC. Panel can do only limited changes (See
section 7.1).
Using PC, all settings can be viewed and changed. (See section 7.1)
Please note that the module’s default settings have changed from firmware revision 1.1 to 1.2. These
differences are listed below. It is highly recommended that user sets their unique password for connection
security and keep passwords safe.
Item Default Values
Firmware Ver 1.1 Firmware Ver 1.2
Mode AP
AP IP Address 192.168.4.1
AP Name AVG_XXXXXX, where XXXXXX are the last 6 characters of the AP MAC-
ID of the module (printed on the module label)
AP Name Broadcast Hidden (No broadcast) Not hidden (Broadcast)
AP Password wiXXXXXXfi, where XXXXXX are the
last 6 characters of the AP MAC-ID
None
AP Authentication WPA2 Open

EZ mini WiFi User Manual Ver 1.2 4 / 19
INSTALLATION AND WIRING
To use the EZ Mini WiFi module with an EZ panel, plug the module’s 9 pin D-sub connector into the 9 pin
connector of the EZ Panel (such as EZTouch, EZ3, EZ12, etc). Thumb tight the two screws. Table below gives the
pins and signals for information.
The module requires 24 VDC power input. Simply connect +24VDC to the red wire, and – to black wire. These
may be conveniently connected to the 24Vpower-input terminals of the same Panel.
The module can be used with other EZ devices, such as EZPLC, EZRack, and EZMarquee. However, if you need
view/change the settings, you would need to use a PC to do so.
Red: +24 V DC
Black: Common

EZ mini WiFi User Manual Ver 1.2 5 / 19
USING MINI WIFI MODULE
PC can be connected to the Mini WiFi module in one of the two ways:
Directly, or
Through an existing router/network.
Direct connection requires WiFi module to be in AP mode (factory default).
4.1 DIRECT CONNECTION (AP MODE) Prerequisite: Wifi Module in AP mode, and knowledge of AP Name and AP password
(These instructions assume factory default settings)
To use an EZTouch Editor to program or monitor an EZPanel over WiFi, follow these steps:
1. Power the module.
2. Use AP Name and AP Password to connect PC WiFi to the module.
(Since, the module with firmware ver 1.1 and default settings does not
broadcast AP Name, it would not show up in the list of available networks on
the pc; the name would have to be typed manually.; Ver 1.2 factory default
setting broadcasts the name and does not require password)
3. Once PC is connected to the WiFi Module, select AVG WiFi (Adhoc) option in
PC to Panel connection in EZTouch Editor (or editors of other EZ devices, such
as EZPLC editor, EZRack Editor, and EZMarquee editor)
4.2 CONNECTION THROUGH A ROUTER (STA MODE) Prerequisite: Wifi Module in STA mode, and knowledge of STA IP address
Note that the module is factory-set to AP mode. To change the mode to STA (or other
items), see section 7.1 below.
To use EZTouch Editor to program or monitor an EZPanel over WiFi, with WiFi in STA
mode, follow these steps:
1. Power the module.
2. If the module mode is already changed to STA, and a router/network connection is defined with proper
credentials, the module would connect to the network automatically.
3. Once PC is connected to the same network, select Ethernet option in PC to Panel connection in
EZTouch Editor, and specify IP address of the module.

EZ mini WiFi User Manual Ver 1.2 6 / 19
CONNECTING TO HIDDEN NETWORKS
Since Module with firmware version 1.1 does not broadcast its ssid name, you will have to connect to it by
selecting Hidden network in Windows 10 as outlined below:
1. Power the module.
2. Then go to your Wifi on your PC. It is the lower right corner icon ( ).
3. Click on Network Settings > Wi-Fi > Hidden Network > Connect.
4. Now enter the SSID of your Wifi module (AVG_XXXXXX, where XXXXXX are the last 6 characters of the
AP MAC-ID of the module).
5. Click Next.
6. Enter your password which is wiXXXXXXfi, where XXXXXX are last six characters of the MAC ID.
7. Now click Next again and your computer connect to your Wifi module.

EZ mini WiFi User Manual Ver 1.2 7 / 19
MODULE MODES
EZ minWiFi module operates in one of the three modes, described below. Each mode has its application:
6.1 AP MODE (ALSO KNOWN AS ADHOC MODE) AP (for Access Point) Mode, also know as Adhoc or Mode is when the module is its own Wifi network. In this mode any Wifi enabled device can connect to the modules network and use IP address 192.168.4.1 to communicate with the module. This mode as default does not broadcast and has a WPA2 password. This can be changed or eliminated. When no STA Mode network is setup this mode is used as default. For configuration direction see Configuring direct connection setup (Adhoc setup – AP mode).
6.2 STA MODE STA Mode or Station Mode is when the module is connected to your already setup Wifi network. This mode has
to be setup by selecting the Wifi network you will connect to and inputting its password. When a configured
network is detected then the module will connect to it and by default go into this mode. This mode will either
have a user setup static IP or use DHCP. For configuration direction see Configuring Infrastructure setup (use
existing WiFi router – STA mode). To figure out the module IP see Module Configuration (IP Address
Information).
6.3 AP + STA MODE This combo mode is when AP and STA mode are running concurrently. The EZ-Wifi module will not remain in
this state indefinitely. If a configured STA Mode network is detected then the module will connect to it and go
to STA Mode. If no network is detected or configured it will go to AP Mode.

EZ mini WiFi User Manual Ver 1.2 8 / 19
VIEW/MANAGE MODULE CONFIGURATIONS
As mentioned before, the module comes with certain factory default configuration. If those settings work for
you, nothing needs to be changed. However, it’s likely that you may need to change the configuration based on
your requirements. You can view and change the settings from Panel and/or PC as described below:
7.1 USING EZPANEL Prerequisites: To view/manage, the module configuration, you would need:
An EZ Panel with firmware revision of L.1.20 or later, and
EZTouch Editor version 2.0.15 or later.
Starting with these revisions, panel firmware and editor supports a new object to get to WiFi Module setup
screen. You would need to add this object to a screen in your HMI project to take advantage of the object. (You
can use the WiFi module in factory default AP Mode with any revision of the firmware).
Follow these steps to program WiFi setup object in your HMI project:
1. In your EZTouch Editor project select menu item the “Objects >
Screen Change > Go to Setup Screen”.
2. In the “Go to Setup Screen” option select the AVG Wifi Module
3. Now place the button object on a screen and download the project to the HMI. (The button can be
included in any HMI Project)
4. Next connect the EZ-Wifi to power and connect it to the 9 pin D-sub port on the HMI.
5. To access the WiFi Setup screen, press the WiFi Setup Button placed on the screen in step 3. You will
get the screen shown below.

EZ mini WiFi User Manual Ver 1.2 9 / 19
On this screen, you can:
see the AP configuration as well as the STA IP address (either Static or DHCP assigned).
reset the module to Factory default as well as switch between all 3 modes (AP, STA, AP+STA)
view module firmware revision (applicable with module firmware version 1.2 onward, and panel
firmware rev L.2.31 or later)
For any changes that cannot be done from panel screen, use of PC is required.
Current Mode
AP Information
STA Information
Press to set
module to
factory defaults
Buttons to switch
to desired mode
Press Refresh Button to
refresh AP and STA info
EZ mini WiFi User Manual Ver 1.2 10 / 19
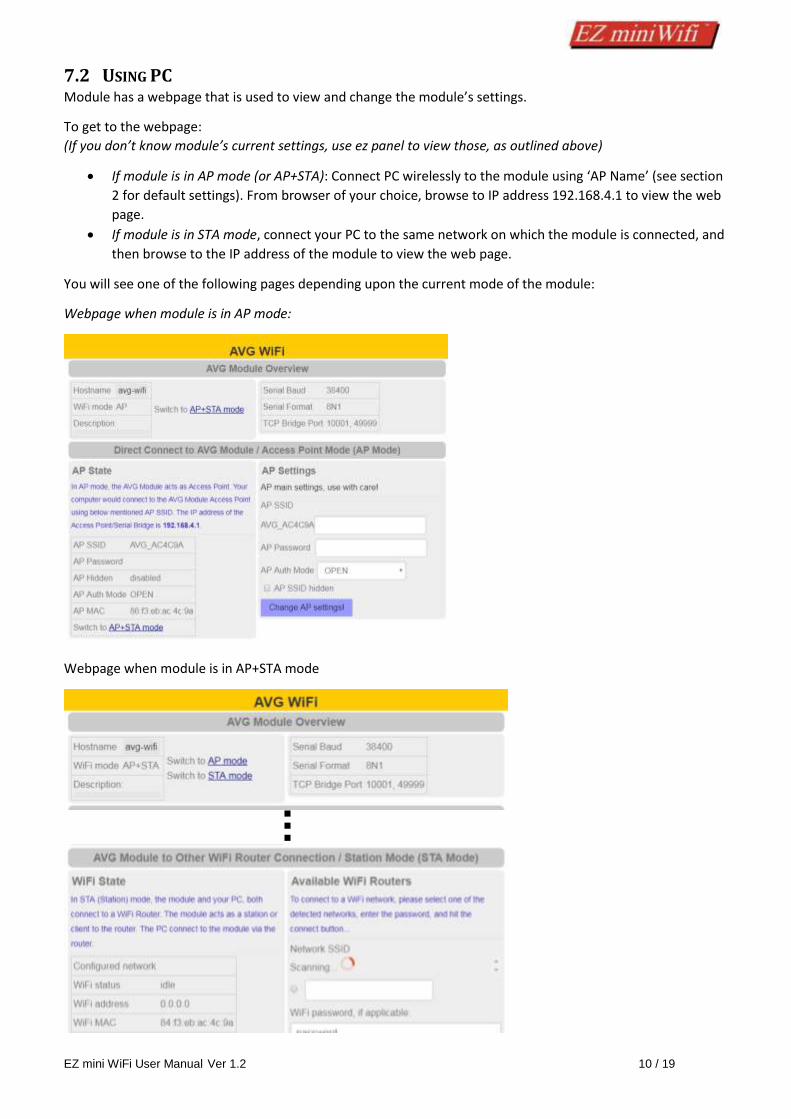
7.2 USING PC Module has a webpage that is used to view and change the module’s settings.
To get to the webpage:
(If you don’t know module’s current settings, use ez panel to view those, as outlined above)
If module is in AP mode (or AP+STA): Connect PC wirelessly to the module using ‘AP Name’ (see section
2 for default settings). From browser of your choice, browse to IP address 192.168.4.1 to view the web
page.
If module is in STA mode, connect your PC to the same network on which the module is connected, and
then browse to the IP address of the module to view the web page.
You will see one of the following pages depending upon the current mode of the module:
Webpage when module is in AP mode:
Webpage when module is in AP+STA mode

EZ mini WiFi User Manual Ver 1.2 11 / 19
Webpage, when module is in STA mode would list available networks along with connection state.
7.2.1 Configuring module for STA (Infrastructure) mode
(use existing WiFi router) If the module is already in STA mode and connected to the desired network, nothing else to be done, otherwise
follow below given steps:
1. While on the webpage, switch to AP+STA mode. You can do this from panel or from the webpage.
2. Wifi module would scan available networks, and show the list of available networks. It may take little
time to scan all available networks.
3. On the webpage:
a. Select desired network,
b. type in the password if applicable, and
c. select how the ip address would be assigned to the module (DHCP vs Static IP). For Static IP,
you would be prompted to enter IP address, netmask and gateway, as shown below in the
image under Special Settings heading
4. Once you connect to desired network (or switch to STA mode with new IP address), you may have to
reconnect your PC to the network, and browse to the new IP address to view the webpage. You will see
the details of connection as shown betow in WiFi State image. You can see these details on ez panel
also.

EZ mini WiFi User Manual Ver 1.2 12 / 19
7.2.2 Configuring AP or Adhoc mode for direct connection If the module is not in AP mode, switch to AP mode ether from EZPanel or from Webpage.
On the webpage, make the necessary changes to the AP settings such as change the name of AP SSID,
Password, etc. Note these values (you can also see these from EZ Panel as mentioned in section 7.1).

EZ mini WiFi User Manual Ver 1.2 13 / 19
HOW TO USE WITH EZ PRODUCTS
To use the EZ-miniWiFi module with an EZ Device, such as EZTouch families, EZPLC, EZRack, or EZMarquee,just
plug the module into the RS-232 port on the HMI. For power the 24 VDC from the EZPanel can be used for the
EZ-WiFi module.
With EZ Panels, you can view module’s configuration using an object as shown in section 7.1. You can use the
module with other headlessdevices in Adhoc or Infrastructure mode, as long as you know these settings.
Now in the Editor Software corresponding to the EZDevice, select the correct communication channel and then
you can download to the device.
If module is connected in Adhoc (AP mode) – Use AVG WiFi (Adhoc) selection in PC to Panel
Connection.
If module is connected to Infrastructure (STA mode) – Use Ethernet and in Specify IP put in the module
IP Address
Adhoc (AP mode)
Infrastructure (STA mode)

EZ mini WiFi User Manual Ver 1.2 14 / 19
HOW TO UPGRADE FIRMWARE
If there is ever a need to upgrade firmware of the EZ-WiFi please power it on. Then follow the direction below.
Using web browser access the EZ-WiFi AP IP address which is 192.168.4.1. Or you can use the Infrastructure
(STA) mode known IP address to go to the same webpage.
Once on the website go to the sidebar on the left and choose Upgrade Firmware.
On the website follow the direction there. In the case below browse to the user2.bin file provide for the
Firmware upgrade using the Choose File option. It will request the user1.bin file the second time or vice versa.
Please make sure to update twice so that both user1 and user2 are the newest version.
Now click Update the firmware. The firmware will be update and it will inform you that it has been successfully
updated.
All settings should usually be retained. If settings are reset then follow direction here to redo settings for
infrastructure mode: Directions.

EZ mini WiFi User Manual Ver 1.2 15 / 19
FREQUENTLY ASKED QUESTIONS (FAQS)
How do I tell what mode the module is in?
The module defaults to STA mode if a Network connection has been configured and the network exists.
Otherwise it will be in AP mode. You can check the EZ-Wifi mode at any time using the HMI utility.
Wifi is not connecting to Wifi Network?
If there are any problems with the module connecting you will need to check HMI Wifi screen for the error
reporting function. The screen will let you know what is causing your connection issue. Depending on the
network the Red message can give an indication of what issue the module has (incorrect password, network
not found, etc.) but otherwise it will be in unknown state with module in AP+STA mode so user can connect to
Access Point. Then user can use the website (192.168.4.1) to find out more information.
How do I switch modes?
The web interface allows for changing to STA+AP mode. From this mode you can then change to AP mode again
or STA mode.
The module is already configured in STA mode. How do I find out its IP address?
Please see the Module Configuration (IP Address Information) Section.
How do I reset the EZ-mini WiFi module?
The HMI utility allow have a reset to Factory Default setting.
How do access the EZ-mini Wifi Webpage?
If the module is in AP mode and you are connected to it then you will use a web browser and go to 192.168.4.1.
If the module is in STA mode and connected to your network then you will go to the module IP address in your
web browser, for example 10.1.200.130.
How do I upgrade my EZ-mini WiFi module?
Please follow directions in the How to upgrade Firmware section.

EZ mini WiFi User Manual Ver 1.2 16 / 19
Can I password protect my EZ-mini WiFi module Access Point (Adhoc) connection?
Yes the EZ-WiFi module Adhoc connection can be password protected. Use the AP settings area to decide on
the Authorization Mode type and the password for the Adhoc connection.
Marquee not displaying message sent to it?
Please make sure that the EZMarquee is using Baud Rate 38400 when communicating.
What to do if you need help or have more questions?
Although most questions can be answered by consulting the EZ-WiFi Help, you may find additional answers on
our web site at www.EZAutomation.net. However, if you still need assistance, please free to call our technical
support, Monday through Friday between 6:00am to 12:00pm CST at 1-877-774-EASY.
Tech Support: 1-877-774-EASY

EZ mini WiFi User Manual Ver 1.2 17 / 19
LICENSE
Copyright (c) Thorsten von Eicken, 2015
All rights reserved.
Redistribution and use in source and binary forms, with or without modification, are permitted provided that
the following conditions are met:
1. Redistributions of source code must retain the above copyright notice, this list of conditions and the
following disclaimer.
2. Redistributions in binary form must reproduce the above copyright notice, this list of conditions and the
following disclaimer in the documentation and/or other materials provided with the distribution.
THIS SOFTWARE IS PROVIDED BY THE COPYRIGHT HOLDERS AND CONTRIBUTORS "AS IS" AND ANY EXPRESS OR
IMPLIED WARRANTIES, INCLUDING, BUT NOT LIMITED TO, THE IMPLIED WARRANTIES OF MERCHANTABILITY
AND FITNESS FOR A PARTICULAR PURPOSE ARE DISCLAIMED. IN NO EVENT SHALL THE COPYRIGHT HOLDER OR
CONTRIBUTORS BE LIABLE FOR ANY DIRECT, INDIRECT, INCIDENTAL, SPECIAL, EXEMPLARY, OR CONSEQUENTIAL
DAMAGES (INCLUDING, BUT NOT LIMITED TO, PROCUREMENT OF SUBSTITUTE GOODS OR SERVICES; LOSS OF
USE, DATA, OR PROFITS; OR BUSINESS INTERRUPTION) HOWEVER CAUSED AND ON ANY THEORY OF LIABILITY,
WHETHER IN CONTRACT, STRICT LIABILITY, OR TORT (INCLUDING NEGLIGENCE OR OTHERWISE) ARISING IN ANY
WAY OUT OF THE USE OF THIS SOFTWARE, EVEN IF ADVISED OF THE POSSIBILITY OF SUCH DAMAGE.
---------------------------------------------------------------------
Portions of this software are derived from esphttpd and have the following license:
"THE BEER-WARE LICENSE" (Revision 42):
Jeroen Domburg <[email protected]> wrote this file. As long as you retain this notice you can do
whatever you want with this stuff. If we meet some day, and you think this stuff is worth it, you can buy me a
beer in return.
---------------------------------------------------------------------
Portions of this software are derived from Espressif's SDK and carry the following copyright notice:
This file is part of Espressif's AT+ command set program. Copyright (C) 2013 - 2016, Espressif Systems
This program is free software: you can redistribute it and/or modify it under the terms of version 3 of the GNU
General Public License as published by the Free Software Foundation.
This program is distributed in the hope that it will be useful, but WITHOUT ANY WARRANTY; without even the
implied warranty of MERCHANTABILITY or FITNESS FOR A PARTICULAR PURPOSE. See the GNU General Public
License for more details.
You should have received a copy of the GNU General Public License along with this program. If not, see
<http://www.gnu.org/licenses/>.
---------------------------------------------------------------------
The Pure CSS portions of this software carry the following license: Copyright 2014 Yahoo! Inc. All rights
reserved.
Redistribution and use in source and binary forms, with or without modification, are permitted provided that
the following conditions are met:

EZ mini WiFi User Manual Ver 1.2 18 / 19
* Redistributions of source code must retain the above copyright notice, this list of conditions and the following
disclaimer.
* Redistributions in binary form must reproduce the above copyright notice, this list of conditions and the
following disclaimer in the documentation and/or other materials provided with the distribution.
* Neither the name of the Yahoo! Inc. nor the names of its contributors may be used to endorse or promote
products derived from this software without specific prior written permission.
THIS SOFTWARE IS PROVIDED BY THE COPYRIGHT HOLDERS AND CONTRIBUTORS "AS IS" AND ANY EXPRESS OR
IMPLIED WARRANTIES, INCLUDING, BUT NOT LIMITED TO, THE IMPLIED WARRANTIES OF MERCHANTABILITY
AND FITNESS FOR A PARTICULAR PURPOSE ARE DISCLAIMED. IN NO EVENT SHALL YAHOO! INC. BE LIABLE FOR
ANY DIRECT, INDIRECT, INCIDENTAL, SPECIAL, EXEMPLARY, OR CONSEQUENTIAL DAMAGES (INCLUDING, BUT
NOT LIMITED TO, PROCUREMENT OF SUBSTITUTE GOODS OR SERVICES; LOSS OF USE, DATA, OR PROFITS; OR
BUSINESS INTERRUPTION) HOWEVER CAUSED AND ON ANY THEORY OF LIABILITY, WHETHER IN CONTRACT,
STRICT LIABILITY, OR TORT (INCLUDING NEGLIGENCE OR OTHERWISE) ARISING IN ANY WAY OUT OF THE USE
OF THIS SOFTWARE, EVEN IF ADVISED OF THE POSSIBILITY OF SUCH DAMAGE.
---------------------------------------------------------------------
Normalize.css used in this firmware carries the following license:
Copyright (c) Nicolas Gallagher and Jonathan Neal
Permission is hereby granted, free of charge, to any person obtaining a copy of this software and associated
documentation files (the "Software"), to deal in the Software without restriction, including without limitation
the rights to use, copy, modify, merge, publish, distribute, sublicense, and/or sell copies of the Software, and to
permit persons to whom the Software is furnished to do so, subject to the following conditions:
The above copyright notice and this permission notice shall be included in all copies or substantial portions of
the Software.
THE SOFTWARE IS PROVIDED "AS IS", WITHOUT WARRANTY OF ANY KIND, EXPRESS OR IMPLIED, INCLUDING
BUT NOT LIMITED TO THE WARRANTIES OF MERCHANTABILITY, FITNESS FOR A PARTICULAR PURPOSE AND
NONINFRINGEMENT. IN NO EVENT SHALL THE AUTHORS OR COPYRIGHT HOLDERS BE LIABLE FOR ANY CLAIM,
DAMAGES OR OTHER LIABILITY, WHETHER IN AN ACTION OF CONTRACT, TORT OR OTHERWISE, ARISING FROM,
OUT OF OR IN CONNECTION WITH THE SOFTWARE OR THE USE OR OTHER DEALINGS IN THE SOFTWARE.