Extrima - INFICONsensistor.com/wp...Manual-Extrima-ENG-201111.pdf · TRIMA Hydrogen Leak Detector...
64
Extrima HYDROGEN LEAK DETECTOR (HW II) User’s manual Publication: INFICON AB -nina61e1-b (1111)- All information can be modified without prior notice
Transcript of Extrima - INFICONsensistor.com/wp...Manual-Extrima-ENG-201111.pdf · TRIMA Hydrogen Leak Detector...

ExtrimaHyd r o g e n Leak Det e c t o r
(HW II)
User’s manual
Publ
icat
ion:
INFI
CO
N A
B -n
ina6
1e1-
b (1
111)
- A
ll in
form
atio
n ca
n be
mod
ified
with
out
prio
r no
tice

2
EN
INFICON - User’s manual Extrima
Contents
1. General ................................................................................................. 3 2. Safety ................................................................................................... 5 Special conditions for safe use Certificate information Safety regulations Hydrogen Tracer Gas for leak detection 3. Working principle ............................................................................... 10 Theory Background compensation Interferences 4. Main parts .......................................................................................... 12 5. To get started ...................................................................................... 13 Basic leak detection 6. Controls and indicators ....................................................................... 15 Display Push buttons LEDs Probe 7. Menu system ...................................................................................... 17 Main menus Change Test Mode Calibration Detection Mode settings Analysis Mode Settings Display settings General settings 8. Operating the Leak Detector ............................................................... 30 To detect leaks To locate leaks To quantify leaks Leak Alarm Level Calibration Password Calibration Coefficient Calibration messages 9. Changing the probe ............................................................................ 3810. Charging ............................................................................................ 3811. Trouble-shooting ................................................................................. 3912. Range and default settings of all parameters ....................................... 4013. Service mode ...................................................................................... 4114. Technical specification ......................................................................... 4415. Accessories and Spare parts ................................................................ 4616. Certificates ......................................................................................... 48
3
EN
INFICON - User’s manual Extrima
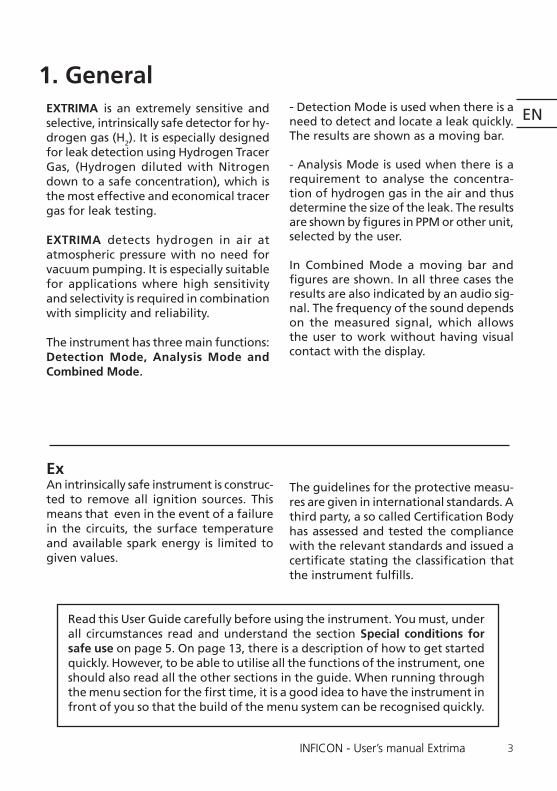
1. GeneralEXTRIMA is an extremely sensitive and selective, intrinsically safe detector for hy-drogen gas (H2). It is especially designed for leak detection using Hydrogen Tracer Gas, (Hydrogen diluted with Nitrogen down to a safe concentration), which is the most effective and economical tracer gas for leak testing.
EXTRIMA detects hydrogen in air at atmospheric pressure with no need for vacuum pumping. It is especially suitable for applications where high sensitivity and selectivity is required in combination with simplicity and reliability.
The instrument has three main functions:Detection Mode, Analysis Mode and Combined Mode.
- Detection Mode is used when there is a need to detect and locate a leak quickly. The results are shown as a moving bar.
- Analysis Mode is used when there is a requirement to analyse the concentra-tion of hydrogen gas in the air and thus determine the size of the leak. The results are shown by figures in PPM or other unit, selected by the user.
In Combined Mode a moving bar and figures are shown. In all three cases the results are also indicated by an audio sig-nal. The frequency of the sound depends on the measured signal, which allows the user to work without having visual contact with the display.
ExAn intrinsically safe instrument is construc-ted to remove all ignition sources. This means that even in the event of a failure in the circuits, the surface temperature and available spark energy is limited to given values.
Read this User Guide carefully before using the instrument. You must, under all circumstances read and understand the section Special conditions for safe use on page 5. On page 13, there is a description of how to get started quickly. However, to be able to utilise all the functions of the instrument, one should also read all the other sections in the guide. When running through the menu section for the first time, it is a good idea to have the instrument in front of you so that the build of the menu system can be recognised quickly.
The guidelines for the protective measu-res are given in international standards. A third party, a so called Certification Body has assessed and tested the compliance with the relevant standards and issued a certificate stating the classification that the instrument fulfills.

4
EN
INFICON - User’s manual Extrima
The major advantages of Hydrogen Tracer Gas* are:
• It is the cheapest of all tracer gases (standard industrial grade mixtures).
• The natural background concentration in air is only 0.5 ppm.
• Hydrogen is very easily vented away from the test area, thereby minimizing background problems.
• Hydrogen is non-toxic, 100% environmentally friendly and non-flammable.
• Hydrogen is a renewable natural resource.
• Hydrogen is a low viscosity gas which spreads very rapidly inside the test object and easily penetrates a leak. After testing it is remarkably easy to eliminate the gas from the test area.
*Whenever the word Hydrogen Tracer Gas is used throughout this manual it implies that the hydrogen gas is safely mixed with Nitrogen in the proportions 5% H2 - 95% N2.

5
EN
INFICON - User’s manual Extrima
The safety terms WARNING, CAUTION and NOTE are used in these instruc-tions to highlight particular dangers and/or to provide additional information on aspects that may not be readily apparent.
WARNING: indicates that death, severe personal injury and/or substantial property damage will occur if proper precautions are not taken.
CAUTION: indicates that minor personal injury and/or property damage can occur if proper precautions are not taken.
NOTE: indicates and provides additional technical information, which may not be very obvious even to qualified personnel.
Compliance with other, not particularly emphasised notes, with regard to transport, assembly, operation and maintenance and with regard to technical documentation (e.g. in the operating instruction, product documentation or on the product itself) is essential, in order to avoid faults, which in themselves might directly or indirectly cause severe personal injury or property damage.
2. Safety
!
The ‘X’ suffix to the certificate number relates to the following special condition for safe use:
As aluminium is used at the accessible surface of this equipment, in the event of rare incidents, ignition sources due to impact and friction sparks could occur. This shall be considered when the EX-TRIMA Hydrogen Leak Detector is used in locations that specifically require group II, category 1G equipment, i.e. Zone 0 or Division 1 applications.
Examples of materials quoted as possibly
able to create sparks on impact with alu-minium are concrete and rust.
Proper care must be taken to avoid impact with aluminium surface when working in Zone 0 areas where impact with such materials can occur. Protecting the instru-ment with a leather or antistatic synthetic protection case is recommended.
Battery Charger for the North American market must be CSA Certified (or equiva-lent), with a maximum charging voltage of 12.6 V and a maximum charging cur-rent of 770 mA.
Special conditions for safe use

6
EN
INFICON - User’s manual Extrima
1. The equipment may be used with flam-mable gases and vapours with apparatus groups IIA, IIB and IIC and with tempera-ture classes T1, T2, and T3.
2. The equipment is only certified for use in ambient temperatures in the range –20oC to +50oC.
3. The certificate number has an ‘X’ suffix which indicates that special conditions of installation and use apply (see above).
4. The equipment is portable and is not intended for fixed installation. Assembly for operation, see page 13.
5. Repair of this equipment may only be carried out by service organisations aut-horised by INFICON, Sweden.
6. If the equipment is likely to come into contact with aggressive substances, then it is the responsibility of the user to take suitable precautions that prevent it from being adversely affected, thus ensuring that the type of protection is not com-promised.
Aggressive substances — e.g. acidic li-quids or gases that may attack metals, or solvents that may affect polymeric materials.
Suitable precautions — e.g. regular checks as part of routine inspections (see also under ”Caution” below).
7. There are no special checking or main-tenance conditions.
Summary of scope of certificate
The following instructions apply to equipment covered by certificate numbers:Sira 07ATEX2117X Issue 3
CSA 1981011 Issue October 25, 2010IECEx SP 07. 0002 X Issue No:2, December 10, 2010 NEPSI GYJ081012, Mod 1, December 8 2010

7
EN
INFICON - User’s manual Extrima
Warning• Pure hydrogen is a flammable gas. Only use ready-made Hydrogen Tracer Gas of 5% Hydrogen in Nitrogen. This is an absolutely safe, standard industrial gas mixture used in various industrial applications. The normal risks associated with all compressed gases must however be considered. As the tracer gas mix contains no oxygen, releasing large amounts of gas in a confined space may lead to asphyxiation.
• Whenever the word Hydrogen tracer gas is used throughout this manual it implies that the hydrogen gas is safely mixed with Nitrogen in the proportions 5% H2 - 95% N2.
• Compressed gases contain a great deal of stored energy. Always carefully secure gas bottles before connecting pressure regulator. Never transport gas bottle with pressure regulator fitted.
• Before connecting tracer gas: confirm that the connectors or test object is designed for working at the test pressure.
• Pressurising objects at too high pressures can result in a burst object. This in turn can result in serious injury or even death. Never pressurise objects that have not previously been burst tested or otherwise approved for the chosen test pressure. INFICON can not take any responsibility for the consequences arising from the inapropriate use of certain test pressures.
• Pressure shocks might cause strong sounds which can cause impairment of hearing.
• Charge battery in safe area only! Read the section Special conditions for safe use on page 5 and Charging on page 38, before using the instrument.
• Check that all relevant legislation and safety standards are complied with before putting EXTRIMA into service.
Safety regulations
8
EN
INFICON - User’s manual Extrima
Caution• Do not open detector! Service of this equipment may only be carried out by service organisations authorised therefore by INFICON, Sweden.
• If the detector gets outer damage it must be controlled and repaired by service organisation authorised by INFICON.
Replacement of Hand Probe and Probe Cable may be carried out by the user.
• Do not expose the probe to a hydrogen concentration higher than 0.1 % when the instrument is not put into operation, this might damage or destroy the probe sensor.
• When the instrument is put into operation the sensor withstands temporary exposure to hydrogen concentration up to 100%. Avoid long exposures to high concentrations.
!

9
EN
INFICON - User’s manual Extrima
NOTE! Whenever the word Hydrogen tracer gas is used throughout this manual it implies that the hydrogen gas is safely mixed with Nitrogen in the proportions 5% H2 - 95% N2.
When a mixture of less than 5.5% hydro-gen in nitrogen mixes with air there is not sufficient energy to support a flame, irrespective of the ratio of air-to-gas.
When a mixture of more than 5.5% hydrogen in nitrogen is released into air there is a region of ratios of air-to-gas where the mixture is flammable. When, for example, a mixture of 10% hydrogen in nitrogen mixes with air there is still very little energy available.
Only in exceptional circumstances can a flame be self-supporting. However, such mixtures cannot detonate.
Hydrogen/nitrogen mixtures containing more than approximately 15% hydrogen can detonate when mixed in certain pro-portions with air.
Never make your own mixtures. Only use ready-made mixtures, or use a certified hydrogen/nitrogen mixer installed by your gas supplier.
Warning!• Never use a gas mixture containing more than 5% hydrogen.• Never make your own gas mixtures.
Hydrogen Tracer Gas for leak detection

10
EN
INFICON - User’s manual Extrima
TheoryThe EXTRIMA detector is based on micro-electronic sensor technology known as GAS-FET technology. The sensor is a field effect transistor in an integrated circuit. The gate electrode of the transistor is made of a hydrogen absorbing metal al-loy (metal hydride). When this device is exposed to hydrogen the gas molecules adsorb on its surface, dissociate into hy-drogen ions (protons), and diffuse rapidly into the gate metal. The absorption of hydrogen ions affects the work function (surface potential) of the metal, which gi-ves the same effect as if the gate voltage of the transistor was changed.
Only hydrogen ions can diffuse into the metal. This excludes cross sensitivity from substances that do not contain hydrogen. Also, the dissociation of hydrogen from other molecules is very inefficient, a fact that makes these sensors practically in-sensitive to other substances. The only, relatively common, substance being de-tected is H2S, hydrogen sulphide. This gas is, however, extremely toxic and has a very strong and distinct smell. It is therefore never present in interfering concentra-tions in normal working environments.
The electrical output signal from these sensors is not at all as stable and repea-table as, for example, sensors for physical parameters such as temperature, pres-sure, etc. Therefore the output signal must undergo signal interpretation in order to give reliable measurements. This is done by a microprocessor in the instrument, which also controls the sensor temperature with high accuracy, and other sensor diagnostics in order to ensure functionality. It also automatically compensates for background gas.
There is always some hydrogen gas in the background. In fresh air this is as low as 0.5 ppm (parts per million).
3. Working principle

11
EN
INFICON - User’s manual Extrima
There is always some hydrogen gas in the background. In fresh air this is as low as 0.5 ppm (parts per million).
EXTRIMA actively adjusts itself to the background. This is done automatically at start-up and thereafter it slowly adapts itself to slow variations in the background concentration. By adjusting slowly (mi-nutes) it avoids taking an actual leak for an increased background, and vice versa. Therefore a sudden rise in background concentration will be detected, but if the concentration remains constant it will be gradually cancelled out over a period of several minutes.
For example, if the background concen-tration, for some reason, should suddenly rise to 10 ppm H2, then the detector will give a corresponding signal which will, very slowly, decline to zero. If you there-after expose the probe to a leak which gives rise to another 10 ppm H2, the detector will give essentially the same signal as if there was no background concentration. Some examples of hydrogen sources which could cause interferences:
Background compensation
- Engine exhaust- Battery charging stations- Welding smoke- Cigarette smoke- Breathing air- Human flatulence- Scratching on aluminium
Hydrogen Leak Detector EXTRIMA is ex-tremely selective. Among naturally occur-ring gases only Hydrogen Sulphide (extre-mely toxic) gives a comparable response to hydrogen. The detector will also react to some synthetic gases, predominantly used within the semiconductor industry, such as Silane, Phosphine, Arsine etc. Exposure to such synthetic gases severely reduces the life of the Hydrogen sensor.
Interferences

12
EN
INFICON - User’s manual Extrima
4. Main parts
EXTRIMA consists of five main parts: • Detector unit with display, controls, and connections • Hand Probe PX50-Flex • Probe cable with connectors • Charger • User’s Manual
Detector Unit
Hand ProbePower switch
EXTRIMA
Charger
Probe Cable

13
EN
INFICON - User’s manual Extrima
EXTRIMA is very easy to setup:
• Connect the Hand Probe to the instru-ment using the probe cable.
• Switch on the power using the right button. The display lights and an indica-tor bar shows that the sensor is stabilising and the detector is booting up. Green LED flashes slowly.
Avoid exposing the probe to hydrogen during the stabilisation period.
• When the stabilisation period is over (typically 90 seconds) the green LED goes out.
• The display will start in Detection Mode, Analysis Mode or Combined Mode, de-pending on which mode was used when the detector was switched off.
• The leak detector is now ready for operation.
Note! The instrument is water-proof, but the sensor has to be protected if there is a risk of contact with water. See page 31.
Shut downIf the display shows a sub menu you first have to press Esc to get to one of the main modes.
To shut down EXTRIMA, press the right button. The display shows: Shut down Extrima? Press YES.
5. To get started
Red Green
!
Extrima ®
Active Mode: Detection
Sensitivity Volume – 8 +
Last serviced 17 Oct 2007
- . -
Battery status indicator
Indicator bar
Menu

14
EN
INFICON - User’s manual Extrima
Basic leak detectionEXTRIMA has three different modes: Detection Mode, Analysis Mode and Combined Mode. The Combined Mode is the default mode.
In Detection Mode you will see a bar and hear a sound with a frequency that increases as the probe approaches the leak, and decreases as the probe is moved away from the leak. No figures are shown on the display, and the frequency is not an accurate measure of the leak rate.
You will soon get used to listening for changes in the frequency rather than to the actual frequency. Move the probe over the surface of the tested object to detect and precisely locate a leak, even when there are other leaks nearby. Keep moving the probe to find out where the signal increases and where it decreases. Let the audio signal guide you to the exact position of the leak.
If you expose the probe to a constant gas concentration you will hear the fre-quency continue to increase slowly until it eventually levels off, and very slowly declines again. This takes 30 - 45 seconds for small leaks and just a few seconds for large leaks. The decline is the automatic background adjustment coming into ac-tion. A gas concentration being constant for several minutes is being taken as an increased background level.
N.B. Do not leave the probe tip in front of a large leak for long times. Remove the tip when the leak has been located.
In Analysis Mode figures are shown on the display. These figures are an accurate measurement of the leak rate.
The detector determines the gas concen-tration from the change as the probe goes from being exposed to background to being position right on the leak.
The detector does not continuously mo-nitor the gas concentration but takes just one reading instead. Another suitable alternative name for this mode could be Sampling Mode. It is important to keep this in mind when using the detector in this mode.
In Combined Mode the bar and the sound in Detection Mode is combined with the figures in Analysis Mode, this means that at the same the signal is displayed as a bar and the measured value is displayed in figures.
When you have located the leak you can measure its size in the following way:
• Remove the probe from the leak into fresh air.
• Wait until 0.0 appears on screen and the put the tip of the probe right on the leak.
Note!• The tip of the hand probe gets warm when the instrument is in use. This is normal.
Important!• Always connect the probe before switching on the instrument.• Never put the probe in water or any other liquid.
!

15
EN
INFICON - User’s manual Extrima
Loudspeaker Display LEDs
Control Push buttons
6. Controls and indicators
DisplayThe display shows:
• The indicator bar in Detection Mode and values in Analysis Mode or both in Combined Mode.
• The six main menus. Their positions are indicated on a horizontal scale. Change from one menu to another using the < and > buttons.
• The main menus have submenus, which are also indicated by horizontal scales and can be selected using the < and > buttons.
• Scales for setting numeric values, langu-ages, etc.
• Messages.
• A battery status indicator in the upper right corner.
Push buttonsThe functions of the push buttons are shown at the lower edge of the display.
• Change from one menu item to another using the < and > buttons.
• Press Enter to move down to the nearest submenu.
• Press Save to save the set value.
• Press Undo to restore the previously set value.
• Press Esc to move up to the nearest higher level(s).
LEDsThe two LEDs on the instrument and the two LEDs on the probe indicate the status of the instrument as follows:
• Green LED flashing slowly during war-ming up phase.
• Steady green LED indicates that instru-ment is ready and hydrogen signal below leak limit.
• Red fixed light together with LEAK on display means the instrument has detec-ted a leak larger than the set alarm limit.
• Red LED flashing. Check message on display. See Trouble-shooting on page 39.
Probe Connector
The display has a ”screen-saver” function. See page 27.

16
EN
INFICON - User’s manual Extrima
Probe
LEDs Button
LEDsThe two LEDs indicate the status of the instrument as described on previous page. During leak location the green LEDs guide the user to the leak by in-creasing flashing. Red LED lits over the Leak Alarm Limit.
Push buttonThe push button is used to switch bet-ween Manual Range, Auto Range and Dynamic Range.
The button can also be used to start calibration when instrument is in Calibra-tion Mode.
Sensor

17
EN
INFICON - User’s manual Extrima
7. Menu system
Change Test Mode
Esc < > Enter
Calibration
The menu system is designed in the form of a tree structure similar to that used in mobile telephones. The display shows all the levels when browsing down through the menus so that you can always see exactly where you are.
Main menusTo enter the menus, press Menu (button on the far right). Press < and > to choose between the six main menus, which are explained in detail on the following pages.
Change Test ModeMove between Detection Mode, Analysis Mode and Combined Mode.See page 19.
CalibrationThe instrument must be calibrated to ensure that the correct values are dis-played in the Analysis Mode. Calibration is described on page 20 and 34.
Esc < > Enter
Calibrated2007-10-31 11:04:59
Active Mode: Detection
Sensitivity Volume – 8 + Menu
- . -

18
EN
INFICON - User’s manual Extrima
General Settings
The following is applicable to the settings described on this page and subsequent pages:
- If no setting is made in a menu or its submenus within 60 seconds, the instrument will revert to the Detection Mode/Analysis Mode.
- All changes in values are valid only when saved using the Save button.
- Use the Undo button to delete a change in value and revert to the previous setting.
Use the Esc button to browse backwards through the menus to the start position Detection Mode/Analysis Mode.
Detection Mode SettingsSelect Sensitivity, Range Setting, Direct Sensitivity Adjustment, Leak Alarm Indi-cation and Lowest Frequency. See page 23 and 24.
Analysis Mode SettingsSelect Leak Alarm Level, Leak Rate Unit, Min. Presentation Time, Leak Alarm Indications, and Lowest Frequency. See page 25 and 26.
Display SettingsSelect Contrast, Brightness and Screen Save Timeout for the display. See page 27.
General SettingsVarious general settings.See page 28.
Esc < > Enter
Display Settings
Esc < > Enter
Detection Mode Settings
Esc < > Enter
Analysis Mode Settings
Esc < > Enter

19
EN
INFICON - User’s manual Extrima
Change Test Mode
Select the main menu Change Test Mode as described on page 17.
1. Press Enter.
2. Select Analysis Mode by pressing Enter again, or select Detection Mode or Com-bined Mode by pressing >.
Tip!To change quickly from Detection Mode to Analysis Mode or vice versa, press the right-hand button three times in succession.
1
2
Explanations
In Detection Mode, the signal is displayed in the form of a bar. The length of the bar varies with the gas concentration.
In Analysis Mode the measured value is displayed in figures, (see page 33). The default unit is in PPM but it is possible to choose other units, see page 26.
In Combined Mode you can see the signal displayed as a bar and the measured value in figures at the same time.
Change Test Mode
Esc < > Enter
Change Test Mode
Analysis Mode
Analysis Mode
0.5 PPM
– Volume + Menu
Esc < > Enter

20
EN
INFICON - User’s manual Extrima
Calibration
Esc < > Enter
3
Calibrated2005-03-31 11:04:59
Last successful calibration
Explanations
Calibration TimeThe number of seconds that measurement is in progress when calibrating in the Analysis Mode. The default value is 8 seconds but values from 5 to 30 seconds can be used.
Calibration CoefficientCalibration parameter. See page 35.
Password Protected CalibrationThe calibration function can be protected using the password so that calibrating cannot be done by unauthorised users. Note! Factory default is no password.
Calibration
Select the Calibration menu as described on page 17.
1. Press Enter.
2. Select: CalibrateCalibration CoefficientCalibration Time orPassword Protected Calibration
3. Press Enter. If Enter Password is display-ed, this means that the setting function is protected by a password, see page 34.
4. Set the desired value using + and –.Use > to move to next character and after the last character.
5. Press Undo to delete the setting and revert to the previous value.
6. Press Save to save the set value. The set-ting scale will flash to confirm the setting.
Revert to Detection Mode/Analysis Mode by pressing Esc twice.
Calibration
2
5
Calibration Coefficient
< + – >
4
1.00E+01
Calibration
Calibration Coefficient
Undo Save2.00E+01
5
6

21
EN
INFICON - User’s manual Extrima
Calibration
Calibration OK
Undo l l Save
5
CalibrateSelect the sub menu Calibrate.
When starting calibration, the sensor must not sense gas, i.e. no measured value should be displayed in Analysis Mode.
1. Press Enter. The display shows Expose to background and press Start.
2. Expose the probe to background air, press Start or the button on the probe, to begin the calibration procedure.
3. An increase in the length of bar can be seen on the display during calibration. While the bar is moving, expose the probe to the calibration gas or reference leak. The display then shows Gas Detected.
The probe does not have to be exposed to calibration gas during the whole Calibra-tion Time (while the bar is moving). The instrument only measures the change as the probe goes from background air to calibration gas.
4. Remove the calibration gas at the latest when the bar reaches its end position.
Note! If the message ”No Gas or Unsta-ble Signal” is displayed repeatedly — go back to Detection Mode and check fun-ctionality.
5. The display will show Calibration OK if the calibration was successful. Press Save. If you do not press Save at this point, the instrument will revert to the previous value after one minute.
Calibration
Expose to backgroundand press start
Esc Start
2
3Esc l l
Calibration
Calibration Coefficient = 1.00E+01Expose to gas
Gas Detected
4
Calibration
Esc l l
Calibration Coefficient = 1.00E+01Expose to gas
Gas Detected

22
EN
INFICON - User’s manual Extrima
If Repeat Calibration is displayed this means that the measured value devia-ted more than 10% from the previous calibration value. Press Recalibrate to repeat steps 2 – 5.
Important! Allow 30 seconds between repeated calibrations for greatest ac-curacy.
Note! Calibration may have to to be repeated several times, especially after probe replacement.
Important! When performing calibra-tion — make sure to follow the above instructions step by step.
ExplanationThe instrument must be calibrated to ensure it displays the correct values in Ana-lysis Mode. Before calibration the Calibration Coefficient must be set correctly as described on page 35.
Regarding the interval between calibration occasions, etc., see Calibration on page 34.
Low sensitivity warningThe Detector will warn if sensitivity of sensor is too low to safely detect a leak equal to the set leak alarm limit. The warning can be ignored and calibration updated.
Irregular reference warningThe Detector will warn if the calibration signal is unreasonably high. This can hap-pen e.g. if 5% tracer gas mix has been used instead of proper reference gas or if the reference leak has an extra non-intentional leak. Warning can be ignored and the calibration updated.
PasswordIf desired, the calibration can be set under the general password to prevent the ope-rator from calibrating by mistake. In this case you will have to enter the password to start the calibration routine. Setting password protection on calibration is done in the General Settings menu. Note that you must also set a password. The instrument is delivered with no password set.
Undo ll Save
Sensor condition indicator.The indicator bar extends in length when the sensor is detecting reference gas. The length of the bar shows the condition of the sensor. The bar will become shorter if the sensor has lost some in sensitivity, but is still useful. The sensitivity is too low when you can´t carry out the calibration or get a Low sensitivity warning.

23
EN
INFICON - User’s manual Extrima
2 3
45 6
1
Detection Mode Settings
Esc < > Enter
Detection Mode Settings
Sensitivity
Esc < > Enter
Detection Mode Settings
Sensitivity
Undo + – Save
Set Sensitivity5
Detection Mode Settings
Note! Detection Mode settings only af-fects Detection Mode. To calibrate the Analysis Mode, see page 21.
If Direct Sensitivity Adjustment is OFF, Sensitivity can be adjusted as described below.
The chosen Sensitivity will only be sto-red in memory if adjusted in the menu system.
Select the main menu Detection Mode Settings as described on page 18.
1. Press Enter.
2. Select: Sensitivity Range SettingsDirect Sensitivity AdjustmentLeak Alarm IndicationLowest Frequency using < and >.
3. Press Enter.
4. Adjust the desired parameter using the + and – buttons.
(5. Press Undo to delete the setting and revert to the previous value.)
6. Press Save to save the set value. The setting scale will flash to confirm the setting.
Revert to Detection Mode by pressing Esc twice.
8

24
EN
INFICON - User’s manual Extrima
Explanations
SensitivityThe sensitivity of the instrument in Detection Mode is adjusted by changing the Sensitivity. The default value is 5, but values from 1 to 13 can be used. Each step doubles the senstivity. In Dynamic Range the sensitivity is Low, Mid or High.
Range Setting Select type of Detection Mode Range: Manual Range, Auto Range or Dynamic Range.
In Manual Range the detection mode sensitivity can be set manually. In Auto Range the sensitivity can be set, but will be changed automatically if necessary. In Dynamic Range sensitivity changes automatically by using an nonlinear presenta-tion on the bar, high sensitivity at the beginning of the bar and low sensitivity at the end of the bar. In this mode both small leaks and gross leaks can be detected in the same range.
Direct Sensitivity Adjustment The detection mode sensitivity can be changed directly from the Detection Mode main screen by pressing Sensitivity + and –. This feature can be turned off by setting Direct Sensitivity Adjustment to OFF. Sensitivity changes made in the main screen are not stored in the memory and the instrument will start with the sensitivity stored in the Detection Mode Settings menu.
Leak Alarm IndicationIf Leak Alarm Indication is set to OFF a leak will not be indicated neither by the word LEAK on the display nor by light or sound signals.
Lowest Frequency (Detection Mode Settings)The lowest frequency of the sound can be adjusted using Lowest Frequency, i.e. when no gas is detected. The default value is 1 Hz but values from 0 to 10 Hz can be used. 0 Hz means that the loudspeaker is silent when the detector has reverted to background level. The setting is not valid in Dynamic Range.

25
EN
INFICON - User’s manual Extrima
Analysis Mode Settings
Select the main menu Analysis Mode Set-tings as described on page 18.
1. Press Enter.
2. Select: Leak Alarm LevelLeak Rate UnitMin. Presentation TimeLeak Alarm Indications or Lowest Frequency using < and >.
3. Press Enter.
4. Adjust the desired parameter using the + and – buttons.
(5. Press Undo to delete the setting and revert to the previous value.)
6. Press Save to save the set value. The set-ting scale will flash to confirm the setting.
Revert to Detection Mode by pressing Esc twice.
2 3
45 6
1
Analysis Mode Settings
Esc < > Enter
Analysis Mode Settings
Leak Alarm Level
Esc < > Enter
Analysis Mode Settings
Leak Alarm Level
Undo + – Save
Set Leak Alarm Level1 .00E+01
1.00E+01

26
EN
INFICON - User’s manual Extrima
Explanations
Leak Alarm LevelThe level at which an indication should be considered as a leak. The default setting is 1.00E+01=10.
Leak Rate UnitSelect unit to be displayed in Analysis mode. See further explanation on page 35.
Min Presentation TimeThe measured value is shown until the sensor has recovered. A longer time can be set by increasing the Min Presentation Time. The default value is 1 second, but values from 0 - 120 seconds can be used. Applies only to Analysis Mode.The Screen Save function will dim the display lamp after a certain time of inactivity.
Leak Alarm IndicationsThere are four choices of leak alarm indication:• LEDs only: This is the default setting. No other indication than red LED on front and probe.• Flashing Backlight: The backlight starts to flash when signal exceeds leak limit.• Chopped audio signal: The audio signal is chopped (silent/loud) when signal exceeds leak limit.• Backlight & Audio: A combination of both backlight flashing and audio chop-ping when signal exceeds leak alarm limit.
Lowest Frequency (Analysis Mode Settings)The lowest frequency of the sound can be adjusted using Lowest Frequency, i.e. when no gas is detected. The default value is 1 Hz but values from 0 to 10 Hz can be used. 0 Hz means that the loudspeaker is silent when the detector has reverted to background level. The setting is not valid in Combined Mode.
27
EN
INFICON - User’s manual Extrima
Set Contrast20
Display settings
Contrast
Display settings
Contrast
Display Settings
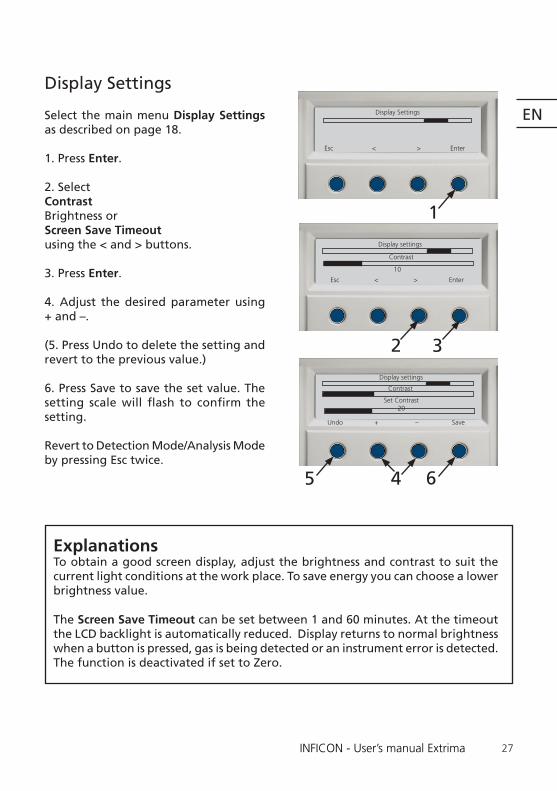
Select the main menu Display Settings as described on page 18.
1. Press Enter.
2. Select Contrast Brightness orScreen Save Timeout using the < and > buttons.
3. Press Enter.
4. Adjust the desired parameter using + and –.
(5. Press Undo to delete the setting and revert to the previous value.)
6. Press Save to save the set value. The setting scale will flash to confirm the setting.
Revert to Detection Mode/Analysis Mode by pressing Esc twice.
2 3
45 6
ExplanationsTo obtain a good screen display, adjust the brightness and contrast to suit the current light conditions at the work place. To save energy you can choose a lower brightness value.
The Screen Save Timeout can be set between 1 and 60 minutes. At the timeout the LCD backlight is automatically reduced. Display returns to normal brightness when a button is pressed, gas is being detected or an instrument error is detected. The function is deactivated if set to Zero.
1
Display Settings
Esc < > Enter
Esc < > Enter
Undo + – Save
10
28
EN
INFICON - User’s manual Extrima
General Settings
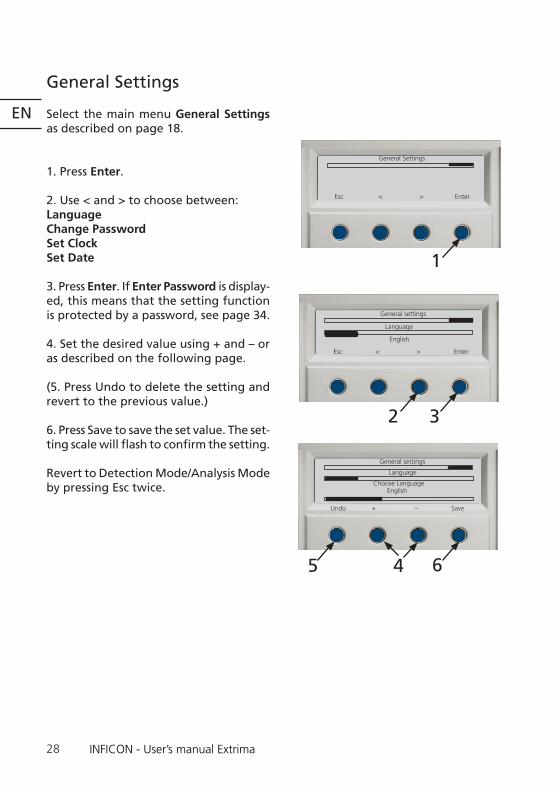
Select the main menu General Settings as described on page 18.
1. Press Enter.
2. Use < and > to choose between:LanguageChange PasswordSet ClockSet Date
3. Press Enter. If Enter Password is display-ed, this means that the setting function is protected by a password, see page 34.
4. Set the desired value using + and – or as described on the following page.
(5. Press Undo to delete the setting and revert to the previous value.)
6. Press Save to save the set value. The set-ting scale will flash to confirm the setting.
Revert to Detection Mode/Analysis Mode by pressing Esc twice.
2 3
45 6
1
General Settings
Esc < > Enter
General settings
Language
Esc < > Enter
General settings
Undo + – Save
English
Language
Choose LanguageEnglish

29
EN
INFICON - User’s manual Extrima
Explanations
LanguageSelect menu language.
Change PasswordThe most critical parameters can be protected using a password so that the instrument settings cannot be changed by unauthorised users. Note! Factory default is no password.
When Enter Password is displayed: Type in the password (alpha/numeric charac-ters) using + and –. Move forward to the next character using >. Press > twice after the last character. The display now shows Confirm New Password. To con-firm, type in the password again and press > twice. The display then shows New Password Accepted.
If no password is required, only press > twice in response to Enter New Password on the display.
Note! When entering characters, go left to come directly to the digits and press right to reach the letters (i.e pressing left arrow at start scrolls around to the last character in the list). This function also works for timer settings.
Set ClockWhen Set Time is displayed: Type in the time using + and –. Move forward to the next character using >. Press > twice after the last character.
Set DateWhen Set Date is displayed: Set year using + and – buttons and press Enter. Select month using < and > and press Enter. Set day using + and – and press >.

30
EN
INFICON - User’s manual Extrima
8. Operating the Leak Detector
The detector operates in three modes.
- The leak detection mode (Detection Mode), mainly used for detecting and locating leaks but not quantifying them.
- The hydrogen analysis mode (Analysis Mode) measures the concentration of hy-drogen.
- The Combined Mode, (default mode) which is a combination of Detection and Analysis mode.
The Detection Mode operates continuously while the Analysis Mode determines the hydrogen concentration (and calculates a corresponding leak rate) in a step measu-rement.
Detection Mode gives no numbers. It therefore needs no actual calibration. The sensitivity of the sound signal and the moving bar on the display is set manually or automatically, see below.
When using the instrument in Analysis Mode, it must be calibrated as described on pages 21 and 34 in order to give correct figures.
To detect leaksIf all you wish to do is to detect the presence of a leak, i.e. find out whether there is a leak or not, then use the De-tection Mode. The definition of Leak/No Leak will then simply be ”A leak is a leak when it can be detected by the detector, set to a specific sensitivity”.
To set up:The operation in Detection Mode is not quantitative. No figures are given but the signal is still increasing and decreasing with gas concentration.
Therefore, there is no actual calibration to be done, but rather a setting of the sensitivity to a desired level.
Detection Mode
Sensitivity Volume – 8 + Menu

31
EN
INFICON - User’s manual Extrima
Antistatic Sensor Cap
Teflon film
A typical set-up procedure for the Detec-tion Mode is:
• Set up a reference leak which cor-responds to the smallest leak you wish to detect.
• Put the probe close to the reference leak and note approximately what reaction you get (no reaction, small, medium, high, full scale) within the first few seconds.
• Set the sensitivity. This can be done permanently under the menu Detection Mode Settings or temporarily as a Direct Sensitivity Adjustment on the display (unless you have set this function to OFF under the Detection Mode Settings menu. See pages 23 and 24).
Note: If the Detection Mode is used and the alarm function is required to be ac-tivated at a particular calibrated level, then the unit must be calibrated in ac-cordance with the instructions on page 21 and 34. The reason for this is that the alarm is based on the Analysis Mode when the Detection Mode is displayed, due to inaccuracies in the Detection Mode signal.
Water protectionThe instrument is water-proof, but the sensor has to be protected if there is a risk of contact with water, which can pierce the filter and prevent the tracer gas from reaching the sensor.
Protect the sensor by placing a piece of teflon film over the filter. Fix it by moun-ting an Antistatic Sensor Cap and remove excessive film.

32
EN
INFICON - User’s manual Extrima
To Locate Leaks
The Detection Mode is used to locate leaks. This mode is semi-quantitative, i.e. it gives an audio and visual signal which increases as a leak is approached (a higher gas concentration) and decreases as you move the probe away from the leak. It does not display figures.
In this mode of operation leaks can easily be detected using a sensitivity which can be pre-set (page 24). Leaks can be loca-ted very accurately, even when there are other leaks nearby.
If, for example, you are trying to locate a leak on a fuel tank and the tank has a major leak, then you will get an audio signal as soon as the probe is placed close to the tank. When the probe is moved around over the tank, the signal will increase as the probe approaches the leak. If the signal goes out of scale, simply reduce the sensitivity setting to bring the signal within the scale. Working with the sensitivity setting this way you will be able to locate multiple leaks that are in close proximity to each other.
N.B. Working inside a confined space such as, for example, a cabinet or a narrow passage on a combustion engine there is a risk that the background concentration accumulates to levels close to the upper detection limit of the detector. In such case it will not be possible to locate leaks as easily as in open spaces.
Hint: Do not expose the probe to more gas than is necessary, because it will slowly saturate with time. It is good practice to detect a leak, locate it, and immediately remove the probe to avoid saturation. The probe is not damaged by the exposure but it will recover more slowly. After excessive exposure it will be less sensitive for a short period of time.

33
EN
INFICON - User’s manual Extrima
To Quantify LeaksThe Analysis Mode is used for measuring the size of a leak (or the concentration of a gas sample).
To be able to do this measurement and obtain correct values, the instrument must first be calibrated using the calibra-tion function. See the following page and page 21.
In the Analysis Mode the detector de-termines the gas concentration from the change, as the probe goes from being exposed to background to being exposed to a certain gas concentration. The detec-tor does not continuously monitor the gas concentration but takes just one reading instead. Another suitable alternative name for this mode could be Sampling Mode. It is important to keep this in mind when using the detector in this mode.
In Analysis Mode the probe should be moved directly from a background situa-tion to the test point. The size of the leak in PPM, or any other selected units*, is shown on the display. The probe can and should be removed from the measuring point as the measured value remains on the display.
Leak Alarm LevelLeak Alarm Level is set in decimal or scientific format. The scientific format is explained by the following example: 2.4 x 10–2 = 0.024 can be written: 2.4E–0.2 or 0.024
If entered incorrectly the previous value will be retained. Always check that the correct value is saved.
The unit used is the current Leak Rate Unit. See page 26.
The EXTRIMA detector operates in the range 0 - 2000 ppm giving reasonable linearity between 0 and 500 ppm. To obtain greatest accuracy over this range, calibrate the detector at a concentration somewhere between 10 and 100 ppm. Generally accuracy is always best near the concentration at which it was calibrated.
*Leak Rate Unit is selected in the Analysis Mode Settings menu, page 25.
The period during which the measured value is displayed can be adjusted in the Analysis Mode Settings menu. See page 25.
– Volume + Menu
Analysis Mode
0.5 PPM
Hint: To switch between Detec-tion Mode and Analysis Mode simply press the right hand but-ton three times.

34
EN
INFICON - User’s manual Extrima
The instrument can be calibrated using the integral calibration function, see page 20. After calibration the instrument will show the correct measured values on the display in Analysis Mode.
(The sensitivity settings made in Detec-tion Mode are described on page 24.)
Calibration is a natural part of leak measurement and an important factor in Quality Assurance. It is easily achieved by using the integral calibration function described on page 21.
It is impossible to specify an exact re-quirement for the interval between calibrations because the applications for which the instrument is used can vary considerably.
If the detector is used, but is not subjec-ted to gas for a lengthy period or exposed to very small gas concentrations (less than 10 ppm) with long intervals between ex-posure, there will be some oxidation of the sensor which reduces the sensitivity.
The oxidation is reduced when the in-strument is subjected to large gas con-centrations.
If the instrument is subjected to a very large gas concentration over a long pe-riod, a certain amount of insensitivity can occur directly afterwards. This saturation effect can make it difficult to detect very small leaks. Therefore, make a habit of removing the probe from the measuring point as soon as the measured value is displayed. This gives the detector an opp-ortunity to recover. The measured value remains on the display for the period selected under Min Presentation Time in the Analysis Mode Settings menu, see page 26.
The calibration is saved in the probe even if it is disconnected. If another probe is connected it must be calibrated if this is not done earlier, if it has not been used for a while or if the reference is changed.
PasswordTo prevent settings for measurements being changed inadvertently or by unaut-horised persons, all critical settings can be protected with a password.
When the display shows Enter Password coupled with a flashing line, type in the desired password using the + and – , and press > twice after the last character.
If the display shows Wrong Password, press Enter and type in the correct pass-word. Menus will be unlocked until you return to Detection Mode/Analysis Mode.
General settings
Change Password
< – + >
Enter Password
Calibration
35
EN
INFICON - User’s manual Extrima
The EXTRIMA detector has no pre-defi-ned leak rate units. The Leak Rate Unit is a text string defined by the user (default: PPM). The relation between the detector signal and the displayed number is set by the Calibration Coefficient.
The Leak Rate Unit is set in the Analysis Mode menu. Select PPM, cc/s, cc/min, SCCM, mbarl/s, mm3/s, mm3/min Pa m3/s or Custom.
Measuring hydrogen concentrationWhen measuring hydrogen concentra-tion the detector should be calibrated against a reference gas with a known concentration. The reference gas should be Hydrogen in Synthetic Air. (Hydrogen in Nitrogen can also be used, but the ac-curacy may be impaired.)
Set the Calibration Coefficient to the value of the known gas concentration. Set the Leak Rate Unit to the same unit as the Calibration Coefficient.
Example:A reference gas contains 10 ppm Hydro-gen in synthetic air. Set Calibration Coef-ficient to 10 and Leak Rate Unit to PPM.
Measuring Leak Flow When measuring leak flow, calibrate the detector against a reference leak.
The reference leak should have a flow close to the chosen leak alarm limit. See also section Selecting the reference, page 36.
Set the Calibration Coefficient to the certified value of the reference leak. Set the Leak Rate Unit to the same unit as the Calibration Coefficient.
Example:A reference leak is certified to 1.5 cc/min. Set Calibration Coefficient to 1.5 and Leak Rate Unit to cc/min.
When you select Custom you can enter any unit as long as it contains a maxi-mum of 12 characters. The unit can also be as a concentration, for example PPM or mg/ml-H2.
Calibration can be performed against:— a known leak flow, or — a known hydrogen concentration.
Note! It is important that the unit for Leak Rate Unit is the same as for the used leak flow/concentration. If not — convert one of the values.
Leak Rate Unit and Calibration Coefficient

36
EN
INFICON - User’s manual Extrima
Selecting the reference
Your reference should have a concentra-tion or flow equal or close to what is to be measured.
Instrument specification is valid for con-centrations ranging from 0.1 to 10 times the leak alarm level.
Example for reference gas:Leak Alarm Level is set at 8 PPM.
A reference gas mix containing 8 ppm hydrogen in synthetic air will give best accuracy.
For greatest accuracy, reference gas should be within 50% of leak alarm level.
In this example it means 4 to 12 ppm Hydrogen.
Concentration of hydrogen should always be within 2 ppm to 400 ppm. Example for reference leak:Leak Alarm Level is set at 2.0E-4 atm.cc/s
A reference leak calibrated to 2.0E-4 cc/s will achieve the greatest degree of ac-curacy.

37
EN
INFICON - User’s manual Extrima
If calibration fails you can still use the instrument. Last valid calibration parameters will be used. You should, however, check that the instrument reacts to the reference.
Calibration messagesBelow is a list of the different messages that can be displayed during calibration.
Message Explanation RemedyExpose tobackground...
Prepare the probe for calibration by holding it in hydrogen free background.
Gas detected Gas signal is detected. Normal operation, gas exposure can be interrupted.
Repeat cali-bration
Calibration was not within 10% of last stored value.
Wait 30 s and calibrate again.
Calibration OK
Calibration was within acceptable limit.
Press save to store calibration inmemory.
No gas or unstablesignal
No gas signal or no stable signal detected during calibration.
Check reference. Gas valve maybe shut. Check that sensor is notclogged.Background is higher than refer-ence gas concentration Improve ventilation.
Sensitivity too lowfor alarm level
Sensitivity of sensor is too lowto guarantee correct responseto a gas flow or concentrationequal to the leak alarm level.The most likely reason is thatsensor is too old.
Check reference. Gas valve may beshut. Check that sensor is not clogged.Check setting of Leak Alarm Level.
High signal! Checkreference!
Reference signal is abnormallyhigh.
Check that reference gas mix is notreplaced with tracer gas mix. Check condition of reference. Check that reference leak connec-tions has no leaks.

38
EN
INFICON - User’s manual Extrima
9. Changing the probe1. Switch off the detector
2. Disconnect the probe
3. Connect the new probe
4. Switch on the detector
5. While waiting for the instrument to stabilise, check that the green LED is flashing. Red LED indicates a fault in the cable or the hydrogen sensor inside the probe.
6. Perform calibration according to in-struction on page 21 or set up as detailed on page 34, depending on whether the Analysis Mode or the Detection Mode is to be used.
7. Repeat calibration after one hour to achieve greatest accuracy.
• Instrument must not be charged inside hazardous area. Charger can cause ignition. Charge battery in safe area only!• Do not use other chargers than the enclosed charger delivered with the EXTRIMA. Use of other charger may in-validate safety of instrument.• When the battery voltage is too low, EXTRIMA is automa-tically switched off. • EXTRIMA is automatically switched off and can not be started when the charger is connected.
On the main screens (Detection, Analysis and Combined Mode) a symbol in the upper right corner shows the battery charge status.
10. Charging
LED indicators on charger- Green LED lights at mains contact- Red LED flashes at short circuit or deep discharging- Red LED lights during charging and is switched of at charge end
Extrima will operate for 7 hours on a fully charged battery.
It takes 8 hours to fully charge a run down battery.
One hour charging will give roughly one hour of operating time. This can be done when considered necessary, but it is important to regularly charge the bat-tery fully.
Battery technology: 12V Litium Ion Rechargeable Cells.

39
EN
INFICON - User’s manual Extrima
11. Trouble-shootingThe instrument contains no parts that can be repaired by the user and may only be dismantled by an authorised service technician. Opening or dismantling an instrument that is powered up can cause serious personal injury or danger to life. If repairs are carried out by a non-authorised person, the Ex-classification will not longer be valid.If the measures described below do not result in a functioning instrument, send or hand in the instrument to an authorised service workshop for repair.
Fault symptom: Action:• No sound in Detection, Analysis or Com-bined Mode.
• Press the + button repeatedly.
• No picture on display, no sound. • Charge battery.
• No picture but sound whenexposed to gas.
• Display setting may be wrong. Watch thedisplay from the side at low angle and aima lamp at the screen. Try to see the text sothat you can enter the Display Settingsmenu and adjust contrast and brightness.If this doesn’t help — send in instrumentfor replacement of display lamp.
• Red LED on charger flashes. • See section 10. Charging. Disconnectcharger and connect again. If the flashingdon´t changes to fixed light within 10 min,send the instrument to authorised serviceworkshop for repair.
• No signal when exposed to gas. • Check sensor against reference leak.Change sensor if necessary.
Error messages:• Check Probe and Cable.Red LED flashes quickly.
• Check that the probe cable is properly connected to the probe and the instru-ment. If the fault persists, replace the probe/cable.
• Check Sensor. Voltage Error. • Sensor defect or missing.
• Check Sensor. Temp Error. • Sensor defect or missing.
• ”Wait” on display. Green LED flashes slowly.
• The instrument is in a stabilization phase.Wait until ”wait” disappears.

40
EN
INFICON - User’s manual Extrima
12. Range and Default Settings of all Parameters
Parameter Range DefaultContrast 0 — 20 10
Brightness 0 — 19 19
Screen Save Timeout 0 — 60 min 2 min
Sensitivity 1 — 13 8
Range Setting Manual Range/Auto Range/Dynamic Range
Manual Range
Direct sensitivity adjustment ON/OFF ON
Leak Alarm Indication ON/OFF ON
Lowest Frequency 0 — 10 Hz 1 Hz
Leak Alarm Level 1.00E-37 – 1.00E+37 1.00E+01 = 10
Leak Rate Unit Several choices “PPM”
Min Presentation Time 1 — 120 s 1 s
Leak Alarm Indications LEDs onlyFlashing backlightChopped audio signalBacklight & Audio
Leds only
Language English, German, French English
Calibration Coefficient 1.00E-37 – 1.00E+37 1.00E+01 = 10
Calibration Time Min Calibration Time – 30 s 8 s
Min Calibration Time 0 — 30 s 5 s
Password Max 12 characters No password
Password protected calibra-tion
ON/OFF OFF
Clock hh:mm:ss -
Date YY-MM-DD -
Menu Mode Several choices Combined Mode

41
EN
INFICON - User’s manual Extrima
13. Service ModeThe detector is equipped with a service mode to help in trouble shooting and diag-nostics.
IMPORTANT! The normal operator should not enter this mode.The service mode menu option is therefore normally not shown in the menu system and most of the functions in the service mode are protected by a special password.
IMPORTANT! We strongly recommend that the service mode log in procedure is kept secret from all personnel not fully trained in the details of all functions of the detector.
Logging inService Mode Log In Procedure1. Switch power OFF.2. Press the left button and hold. Then press start with the right button.
During warm up the display will show software versions and the serial numbers for the EXTRIMA and the Hand Probe PX50. Time and the inside temperature are also shown. All menu items, except showing the service mode display, are locked by a password.
The password can be obtained from INFICON. Simply send your request by FAX or email including the following information:
Subject: Service Mode Password Name: Job Title: Name of Organisation: Name of Division (if applicable): Serial Number of Detector:
FAX number: +46 13 355901e-mail: [email protected]
Menu optionsWhen instrument has been set to service mode there will be an extra menu item, Service Settings, on the display.

42
EN
INFICON - User’s manual Extrima
Choosing Service Settings will display the following options:
Show PasswordIf you have “lost” your user password, you can retrieve it by choosing this menu option.
System ResetChoosing this option will reset all para-meters to factory standard. See page 40 for factory default values.
You will be asked to confirm this choice once before system is reset.
Consider the work of resetting every pa-rameter to suit your application before you perform a system reset.
Service Settings
Show Password
Esc < > Enter
Service Settings
Esc < > Enter
Service Settings
System Reset
Esc < > Enter
43
EN
INFICON - User’s manual Extrima
Min Calibration TimeThis parameter sets the lowest possible Calibration Time that can be set under the Calibration menu. Default is 5 s.
Min calibration time should be set to safeguard that the following two requi-rements are fulfilled:
1. The hydrogen from the reference leak or gas line must reach the sensor before end of calibration time.
2. The sensor must have time to reach its maximum signal before end of calibra-tion time.
Setting Min Calibration Time too low will have the following effects:
• Calibration will fail if Calibration Time is set too low.
• Calibration might pass but be incorrect.
Setting a high Min Calibration Time will have the following effects:
• Calibration takes longer time than necessary.
• Calibration gas consumption is higher than necessary.
It is of course possible to set Min Calibra-tion Time to 0 and anyway set the correct Calibration Time from under the Calibra-tion Menu.
IMPORTANT! Correct calibration is an es-sential parameter in quality testing. We, therefore, recommend that careful consi-deration is paid to setting an appropriate Min Calibration Time. This will inhibit personnel, lacking detailed knowledge about calibration, from jeopardising qua-lity by setting a to short Calibration Time.
Service Settings
Min Caliration Time
Esc < > Enter

44
EN
INFICON - User’s manual Extrima
14. Technical SpecificationPower supplyAC Mains Voltage 100 — 240 V 50/60 Hz
EnvironmentWorking temperature -20°C — +50°C
Start up temperature > 0°C
Humidity 95% RH (non-condensing)
Storage temperature 0°C — +60°C
Chemical Jet-fuel and most common petroleumvapours
IP-Class IP67, 30 min @1 m (IEC529)
DimensionNet Weight 4 kg
Overall Dimensions H x W x D 128 mm x 240 mm x 167 mm
ApplicationEurope Zone 0, 1 and 2 (mines and dust excluded)
US, Canada Zone 0, 1 and 2 (mines and dust excluded)US, Canada Class 1, Div 1, Groups A, B, C, D(Hydrogen, Jet-fuels, and other T3 gases)
SensitivityRange in H2 Analysis Mode 0.5 ppm — 0.2% H2
Sensitivity in Leak Detection
Mode with Hand Probe PX50 1 x 10⁻⁷ cc/s (when using 5% H2 tracer gas)
Repeatability Typical ±10% of reading + 0.3 PPM
Linearity in H2 Analysis Mode (within 0.1 — 10 x calibrationpoint)
Typical ±15% (within 0.5 — 100 ppm)
Battery CapacityOperating time 7h (3h at -20°C)
Charging time 7-8 h, flat to fully charged. Approx. 1h to1h operating time

45
EN
INFICON - User’s manual Extrima
Disposal of product when taken out of serviceAccording to EU legislation, this product must be recovered for separation of materials and may not be disposed of as unsorted municipal waste.
If you wish you can return this INFICON product to the manufacturer for recovery.
The manufacturer has the right to refuse taking back products that are inade-quately packaged and thereby presents safety and/or health risks to the staff.
The manufacturer will not reimburse you for the shipping cost.
Shipping address:INFICON ABWestmansgatan 49582 16 LinköpingSweden

46
EN
INFICON - User’s manual Extrima
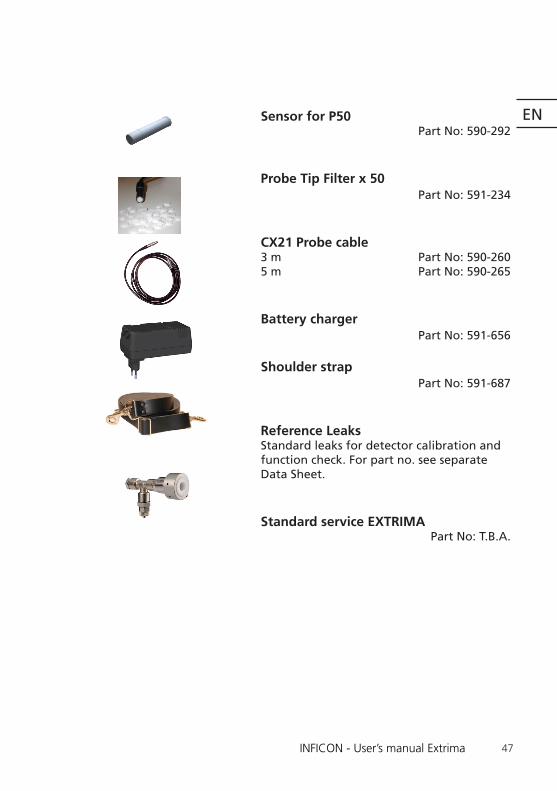
15. Accessories and Spare parts
Complete Gas Injection Kit For easy Tracer Gas injection Part No: 590-621
Injection Pads Easy use throwaway accessories for local injection of Tracer Gas.Small (60 mm) x 10 Part No: 590-615Large (150 mm) x 10 Part No: 590-616
Injection Fix Kit Part No: 590-618
Antistatic Sensor Caps X 50 Part No: 590-270
Water protective tape Part No: 591-038
PX50-FLEX Hand Probe Flex. neck
Part No: 590-609
PX50 Hand Probe Rigid neck
Part No: 590-608
47
EN
INFICON - User’s manual Extrima
Sensor for P50 Part No: 590-292
Probe Tip Filter x 50 Part No: 591-234
CX21 Probe cable 3 m Part No: 590-2605 m Part No: 590-265
Battery charger Part No: 591-656
Shoulder strap Part No: 591-687
Reference Leaks Standard leaks for detector calibration and function check. For part no. see separate Data Sheet.
Standard service EXTRIMA Part No: T.B.A.

48
EN
INFICON - User’s manual Extrima
16. Certificates
INFICON AB
Box 76, SE-581 02 Linköping, SwedenPhone: +46 (0) 13 35 59 00 Fax: +46 (0) 13 35 59 01www.inficon.com E-mail: [email protected]
Declaration of ConformityManufacturer
INFICON ABWestmansgatan 49SE-582 16 LinköpingSweden
Phone: +46 (0)13-355900Fax: +46 (0)13-355901
ProductHydrogen Leak Detector
Brand NameExtrima
The manufacturer declares conformity with the following directives
EMC Electromagnetic Compatibility (89/336/EEC).ATEX Equipment intended for use in potentially Explosive Atmospheres ( 94/9/EC)ROHS Restriction of the use of certain Hazardous Substances in electronic equipment (2002/95/EC).WEEE Waste electrical and electronic equipment (2002/96/EC).LVD Electrical safety - Low Voltage (2006/95/EC) *.
* Relevant only for battery charger (CE marked). Manufacturers declaration provided on request
Harmonized European standards which have been applied
No. Issue SubjectSS-EN 61000-6-1 2 Electromagnetic compatibility (EMC) - Part 6-1: Generic standards - Immunity for
residential, commercial and light-industrial environments.SS-EN 61000-6-3 2 Electromagnetic compatibility (EMC) - Part 6-3: Generic standards - Emission
standard for residential, commercial and light-industrial environments.SS-EN 61000-4-6 1 Electromagnetic compatibility (EMC) - Part 4-6: Testing and measurement techniques
- Immunity to conduct disturbances, induced by radio-frequency fields.EN 60079-0 4 Electrical apparatus for explosive gas atmospheres - Part 0: General requirementsEN 60079-11 5 Explosive atmospheres - Part 11: Equipment protection by intrinsic safety "i".EN 60079-26 2 Explosive atmospheres - Part 26: Equipment with equipment protection level (EPL)
Ga.SS-EN 13980 1 Potentially explosive atmospheres - Application of quality systems.
Test institutes / notified bodies EMC ATEX quality assurance ATEX product certificateBK CE Services ABDatalinjen 5A583 30 LinköpingSwedenPhone: +46 (0)13 21 26 50Fax: +46 (0)13 99 13 025
SP Technical Research Institute of Sweden Box 85750115 Borås, SwedenPhone: +46 (0) 10 516 50 00Fax: +46 (0) 33 13 55 02Notified body number 0402
Sira Certification ServiceRake Lane, Eccleston, Chester, CH4 9JNEnglandPhone: +44 (0) 1244 670900Fax: +44 (0) 1244 681330Notified body number 0518
Report and Certificate reference numbersNo. Issue SubjectSira 07ATEX2117X 3 EC type-examination certificateTR_ADI070827EMC001 - EMC Test Report Extrima
For INFICON AB, September 01, 2011
Fredrik EnquistR&D Manager

49
EN
INFICON - User’s manual Extrima
Sira Certification Service Rake Lane, Eccleston, Chester, CH4 9JN, England
Tel: +44 (0) 1244 670900Fax: +44 (0) 1244 681330Email: [email protected]: www.siracertification.com
C E R T I F I C A T I O N
Project Number 23373 and 23526 C EllabyC. Index 14 Certification Officer
This certificate and its schedules may only bereproduced in its entirety and without change.
Page 1 of 3Form 9400 Issue 1
1 EC TYPE-EXAMINATION CERTIFICATE2 Equipment intended for use in Potentially Explosive Atmospheres Directive 94/9/EC
3 Certificate Number: Sira 07ATEX2117X Issue: 3
4 Equipment: Extrima® Hydrogen Leak Detector
5 Applicant: Adixen Scandinavia AB
6 Address: Westmannsgatan 49SE-582 16 LinköpingSweden
7 This equipment and any acceptable variation thereto is specified in the schedule to this certificate andthe documents therein referred to.
8 Sira Certification Service, notified body number 0518 in accordance with Article 9 of Directive 94/9/ECof 23 March 1994, certifies that this equipment has been found to comply with the Essential Health andSafety Requirements relating to the design and construction of equipment intended for use inpotentially explosive atmospheres given in Annex II to the Directive.
The examination and test results are recorded in the confidential reports listed in Section 14.2.
9 Compliance with the Essential Health and Safety Requirements, with the exception of those listed in theschedule to this certificate, has been assured by compliance with the following documents:
EN 60079-0: 2006 EN 60079-11: 2007 EN 60079-26: 2004
10 If the sign ‘X’ is placed after the certificate number, it indicates that the equipment is subject to specialconditions for safe use specified in the schedule to this certificate.
11 This EC type-examination certificate relates only to the design and construction of the specifiedequipment. If applicable, further requirements of this Directive apply to the manufacture and supply ofthis equipment.
12 The marking of the equipment shall include the following:
II 1GEx ia IIC T3 (Ta = -20°C to +50°C)

50
EN
INFICON - User’s manual Extrima
Sira Certification Service Rake Lane, Eccleston, Chester, CH4 9JN, England
Tel: +44 (0) 1244 670900Fax: +44 (0) 1244 681330Email: [email protected]: www.siracertification.com
C E R T I F I C A T I O N
SCHEDULE
EC TYPE-EXAMINATION CERTIFICATE Sira 07ATEX2117XIssue 3
This certificate and its schedules may only bereproduced in its entirety and without change.
Page 2 of 3Form 9400 Issue1
13 DESCRIPTION OF EQUIPMENT
The Extrima Hydrogen Leak Detector is a portable device used to detect hydrogen leaks and is poweredby a rechargeable Lithium ion battery. The equipment has a main housing (which is referred to as thedetector), interconnected by a pluggable cable to a PX50 series probe unit. The interconnecting cableis fitted with a Lemo connector at each end enabling it to be removed from both the probe anddetector.
The detector housing, is made from extruded aluminium, which is anodized and protected byconductive rubber face seals fitted to the front and rear panels. The side panels and corners of theenclosure are fitted with protective rubber ribs. The front and rear panels are secured to the maindetector housing by four fasteners.
The front panel is fitted with the following; glass LCD, piezo speaker, four rubber pushbuttons, twoLEDs and a Lemo connector for connecting to the probe. On the outside, the back panel has a socketfor connecting to the battery charger/barcode reader and a Gortex seal. The battery charger has thefollowing maximum parameters, 12.6V, 770 mA.
Internally the equipment comprises a potted lithium battery pack fitted to the rear of the back panel,and the following PCBs:
• Main• Keyboard• Backlight• LCD
Externally, the probe comprises a conductive plastic enclosure with a single switch and two LEDs. Thenozzle, which varies in length and type, is fitted into the end of the probe. A hydrogen sensor fitsinside the nozzle and plugs into a connector that is wired back to the probe electronics. The probe isfully encapsulated, however, the switch, two LEDs and the hydrogen sensor are located ouside of theencapsulation.
Internally, the probe comprises a single circuit board. The sensor wires are fitted at one end of theboard and the Lemo connector at the other.
The Extrima® Hydrogen Leak Detector has an Ingress Protection rating of IP67 (1 m, for 30 minutes).
Variation 1 - This variation introduced the following changes:
i. To prolong the battery life, the probe power generation and protection circuit on the MAIN PCB inthe Detector Unit has been redesigned. The circuit contains voltage enhancement and controlledsemiconductor voltage shunts. These changes give increased output parameters to the probe.
ii. PX50x Series Probe Assembly now uses a housing made from an alternative plastic material andmay incorporate a hydrogen sensor that is not component approved. The circuit has been modifiedto provide increased power to the sensor to improve its sensitivity.
iii. The applicant’s name was changed from Adixen Sensistor AB to that currently shown.

51
EN
INFICON - User’s manual Extrima
Sira Certification Service Rake Lane, Eccleston, Chester, CH4 9JN, England
Tel: +44 (0) 1244 670900Fax: +44 (0) 1244 681330Email: [email protected]: www.siracertification.com
C E R T I F I C A T I O N
SCHEDULE
EC TYPE-EXAMINATION CERTIFICATE Sira 07ATEX2117XIssue 3
This certificate and its schedules may only bereproduced in its entirety and without change.
Page 3 of 3Form 9400 Issue1
Variation 2 - This variation introduced the following changes:
i. The LCD module for the Extrima® Hydrogen Leak Detector was modified and now includescomponents with a surface area of less than 20 mm².
i. The bill of material drawings, KK1012-BOM-1H-CERT and KK1018-BOM-R7-CERT, were amended to:• Bring them into line with Sira report number R20666A/01.• Remove the manufacturer’s name from the specification of various safety resistors.
14 DESCRIPTIVE DOCUMENTS
14.1 Drawings
Refer to Certificate Annexe.
14.2 Associated Sira Reports and Certificate History
Issue Date Report no. Comment0 10 October 2007 R52A16411B The release of the prime certificate.1 18 December 2009 R20666A/00 The introduction of Variation 1 (Note: the date was revised
by Issue 3 to correct a typographical error).2 30 April 2010 R20666A/01 Issued to allow report R20666A/01 to replace report
R20666A/003 20 October 2010 R23373A/00
R23526A/00The introduction of Variation 2.
15 SPECIAL CONDITIONS FOR SAFE USE (denoted by X after the certificate number)
15.1 As aluminium is used at the accessible surface of this equipment, in the event of rare incidents, ignitionsources due to impact and friction sparks could occur. This shall be considered when the Extrima®Hydrogen Leak Detector is being used in locations that specifically require group II, category 1equipment.
16 ESSENTIAL HEALTH AND SAFETY REQUIREMENTS OF ANNEX II (EHSRs)
The relevant EHSRs that are not addressed by the standards listed in this certificate have beenidentified and individually assessed in the reports listed in Section 14.2.
17 CONDITIONS OF CERTIFICATION
17.1 The use of this certificate is subject to the Regulations Applicable to Holders of Sira Certificates.
17.2 Holders of EC type-examination certificates are required to comply with the production controlrequirements defined in Article 8 of directive 94/9/EC.
17.3 The battery pack shall be constructed from three, series connected SAFT type MP174865IS or typeMP174865 Lithium ion rechargeable cells all encapsulated in Wacker Elastosil RT675.
17.4 The products covered by this certificate incorporate previously certified devices, it is therefore theresponsibility of the manufacturer to continually monitor the status of the certification associated withthese devices, and the manufacturer shall inform Sira of any modifications of the devices that mayimpinge upon the explosion safety design of their products.

52
EN
INFICON - User’s manual Extrima
IECEx Certificate
of Conformity
INTERNATIONAL ELECTROTECHNICAL COMMISSION IEC Certification Scheme for Explosive Atmospheres
for rules and details of the IECEx Scheme visit www.iecex.com
Certificate No.: IECEx SP 07.0002X issue No.:2
Status: Current
Date of Issue: 2010-12-10 Page 1 of 4
Applicant:
Electrical Apparatus: Hydrogen Leak Detector type Extrima
Optional accessory:
Type of Protection: Intrinsic safety "ia"
Marking: Ex ia IIC T3 Ta: -20 ºC to +50 ºC
Approved for issue on behalf of the IECEx Certification Body:
Peter Bremer
Position: Certification Officer
Signature: (for printed version)
Date:
1. This certificate and schedule may only be reproduced in full. 2. This certificate is not transferable and remains the property of the issuing body. 3. The Status and authenticity of this certificate may be verified by visiting the Official IECEx Website.
Certificate issued by:
SP Technical Research Institute of Sweden Box 857
SE-501 15 Boras Sweden
Certificate history:
Issue No. 2 (2010-12-10)
Issue No. 1 (2010-6-7) Issue No. 0 (2007-9-21)
Adixen Scandinavia AB Westmansgatan 49 Box 76 SE-581 02 Linköping Sweden
Page 1 of 5Certificate of Conformity: IECEx SP 07.0002X
2010-12-29http://iecex.iec.ch/iecex/iecexweb.nsf/CoCHistory/IECEx%20SP%2007.00022

53
EN
INFICON - User’s manual Extrima
IECEx Certificate
of Conformity Certificate No.: IECEx SP 07.0002X Date of Issue: 2010-12-10 Issue No.: 2
Page 2 of 4 Manufacturer:
Manufacturing location(s): This certificate is issued as verification that a sample(s), representative of production, was assessed and tested and found to comply with the IEC Standard list below and that the manufacturer's quality system, relating to the Ex products covered by this certificate, was assessed and found to comply with the IECEx Quality system requirements. This certificate is granted subject to the conditions as set out in IECEx Scheme Rules, IECEx 02 and Operational Documents as amended. STANDARDS: The electrical apparatus and any acceptable variations to it specified in the schedule of this certificate and the identified documents, was found to comply with the following standards:
IEC 60079-0 : 2004 Edition: 4.0
Electrical apparatus for explosive gas atmospheres - Part 0: General requirements
IEC 60079-11 : 2006 Edition: 5
Explosive atmospheres - Part 11: Equipment protection by intrinsic safety "i"
IEC 60079-26 : 2006 Edition: 2
Explosive atmospheres - Part 26: Equipment with equipment protection level (EPL) Ga
This Certificate does not indicate compliance with electrical safety and performance requirements other than those
expressly included in the Standards listed above.
TEST & ASSESSMENT REPORTS:A sample(s) of the equipment listed has successfully met the examination and test requirements as recorded in
Test Report:
GB/SIR/ExTR07.0085/00 GB/SIR/ExTR09.0206/01 GB/SIR/ExTR10.0252/00 SE/SP/ExTR07.0001/00 Quality Assessment Report:
SE/SP/QAR07.0002/00
Adixen Scandinavia AB Westmansgatan 49 Box 76 SE-581 02 Linköping Sweden
Page 2 of 5Certificate of Conformity: IECEx SP 07.0002X
2010-12-29http://iecex.iec.ch/iecex/iecexweb.nsf/CoCHistory/IECEx%20SP%2007.00022

54
EN
INFICON - User’s manual Extrima
IECEx Certificate
of Conformity Certificate No.: IECEx SP 07.0002X Date of Issue: 2010-12-10 Issue No.: 2
Page 3 of 4
Schedule
EQUIPMENT:Equipment and systems covered by this certificate are as follows:
The detector is a hand held device used to detect hydrogen leaks and is powered by a rechargeable Lithium ion battery. The device consists of a main unit interconnected by a pluggable cable to a PX50 series probe unit. The housing of the main unit is made from aluminium which is anodized and protected by conductive rubber face seals fitted to the front and rear panels. The side panels and corners of the enclosure are fitted with protective rubber ribs. The back panel has a Gortex seal and a socket intended to be used outside hazardous areas, for connecting to the battery charger/barcode reader. The battery charger has the following maximum parameters, 12.6 V, 770 mA. The probe has a conductive plastic enclosure and a nozzle which varies in length and type. Inside the nozzle fits a hydrogen sensor (Ex component according to ExTR SE/SP/ExTR07.0001/00 and ATEX certificate SP07ATEX3636U). The probe is fully encapsulated, however, a switch, two LEDs and the hydrogen sensor are located outside the encapsulation. The detector has an ingress protection rating of IP67.
CONDITIONS OF CERTIFICATION: YES as shown below:
Conditions of Certificate and Manufacture The applicant (manufacturer) shall note the following: 1. The permitted battery pack is constructed from 3 series connected SAFT type MP174865IS or type MP174865 Lithium ion rechargeable cells all encapsulated in Wacker Elastosil RT675. 2. The products covered by this certificate incorporate previously certified devices, it is therefore the responsibility of the manufacturer to continually monitor the status of the certification associated with these devices, and the manufacturer shall inform SP of any modifications of the devices that may impinge upon the explosion safety design of their products. 3. The IECEx certificate number referred to in the Manufacturer´s Documents and in the Marking Plate, according to ExTR GB/SIR/ExTR07.0085/00, shall be "IECEx SP 07.0002X". . Conditions for Safe Use As aluminium is used at the accessible surface of this equipment, in the event of rare incidents, ignition sources due to impact and friction sparks could occur. This shall be considered when the detector is being installed or used in locations that specifically require level of protection Ga (see IEC 60079-26).
Page 3 of 5Certificate of Conformity: IECEx SP 07.0002X
2010-12-29http://iecex.iec.ch/iecex/iecexweb.nsf/CoCHistory/IECEx%20SP%2007.00022

55
EN
INFICON - User’s manual Extrima
IECEx Certificate
of Conformity Certificate No.: IECEx SP 07.0002X Date of Issue: 2010-12-10 Issue No.: 2
Page 4 of 4
DETAILS OF CERTIFICATE CHANGES (for issues 1 and above):
Issue 1 of the certificate This issue of the certificate, introduces variation 1 of the Detector Unit and the Probe. The following modifications are introduced by this variation: To prolong the battery life, the probe power generation and protection circuit on the MAIN PCB in the Detector Unit has been redesigned. The circuit contains voltage enhancement and controlled semiconductor voltage shunts. These changes give increased output parameters to the probe. PX50x Series Probe Assembly now uses a housing made from an alternative plastic material. The circuit has been modified to provide increased power to the sensor to improve its sensitivity. The name of the applicant and manufacturer, has been changed from Adixen Sensistor AB to Adixen Scandinavia AB. The introduced modifications have been assessed and tested according to ExTR GB/SIR/ExTR09.0206/01, which also include assessment and test of the HS85 sensor. Issue 2 of the certificate This variation - variation 2 - introduces the following modifications: The LCD module has been modified and the bill of material drawings has been amended. New components on the LCD module, have affected the original thermal assessment. The modifications have been assessed according to ExTR GB/SIR/ExTR10.0252/00, which also introduces and confirm compliance with IEC 60079-26:2006 (ed 2).
Page 4 of 5Certificate of Conformity: IECEx SP 07.0002X
2010-12-29http://iecex.iec.ch/iecex/iecexweb.nsf/CoCHistory/IECEx%20SP%2007.00022

56
EN
INFICON - User’s manual Extrima

57
EN
INFICON - User’s manual Extrima

58
EN
INFICON - User’s manual Extrima

59
EN
INFICON - User’s manual Extrima

60
EN
INFICON - User’s manual Extrima

61
EN
INFICON - User’s manual Extrima

62
EN
INFICON - User’s manual Extrima

63
EN
INFICON - User’s manual Extrima
INFICON AB, Box 76, SE-581 02 Linköping, SwedenPhone: +46 (0) 13 35 59 00 Fax: +46 (0) 13 35 59 01 www.inficon.com E-mail: [email protected]